Upgrade to Pro — share decks privately, control downloads, hide ads and more …

Mastering Mobile App Development with WordPress...

Mastering Mobile App Development with WordPress Backend: A Complete REST API Integration Guide

This mobile app development eBook is a complete, step-by-step resource for developers and technical teams aiming to build a mobile app with a WordPress backend. Designed to simplify WordPress mobile app development, the book walks you through using WordPress as a backend system by harnessing the WordPress REST API.

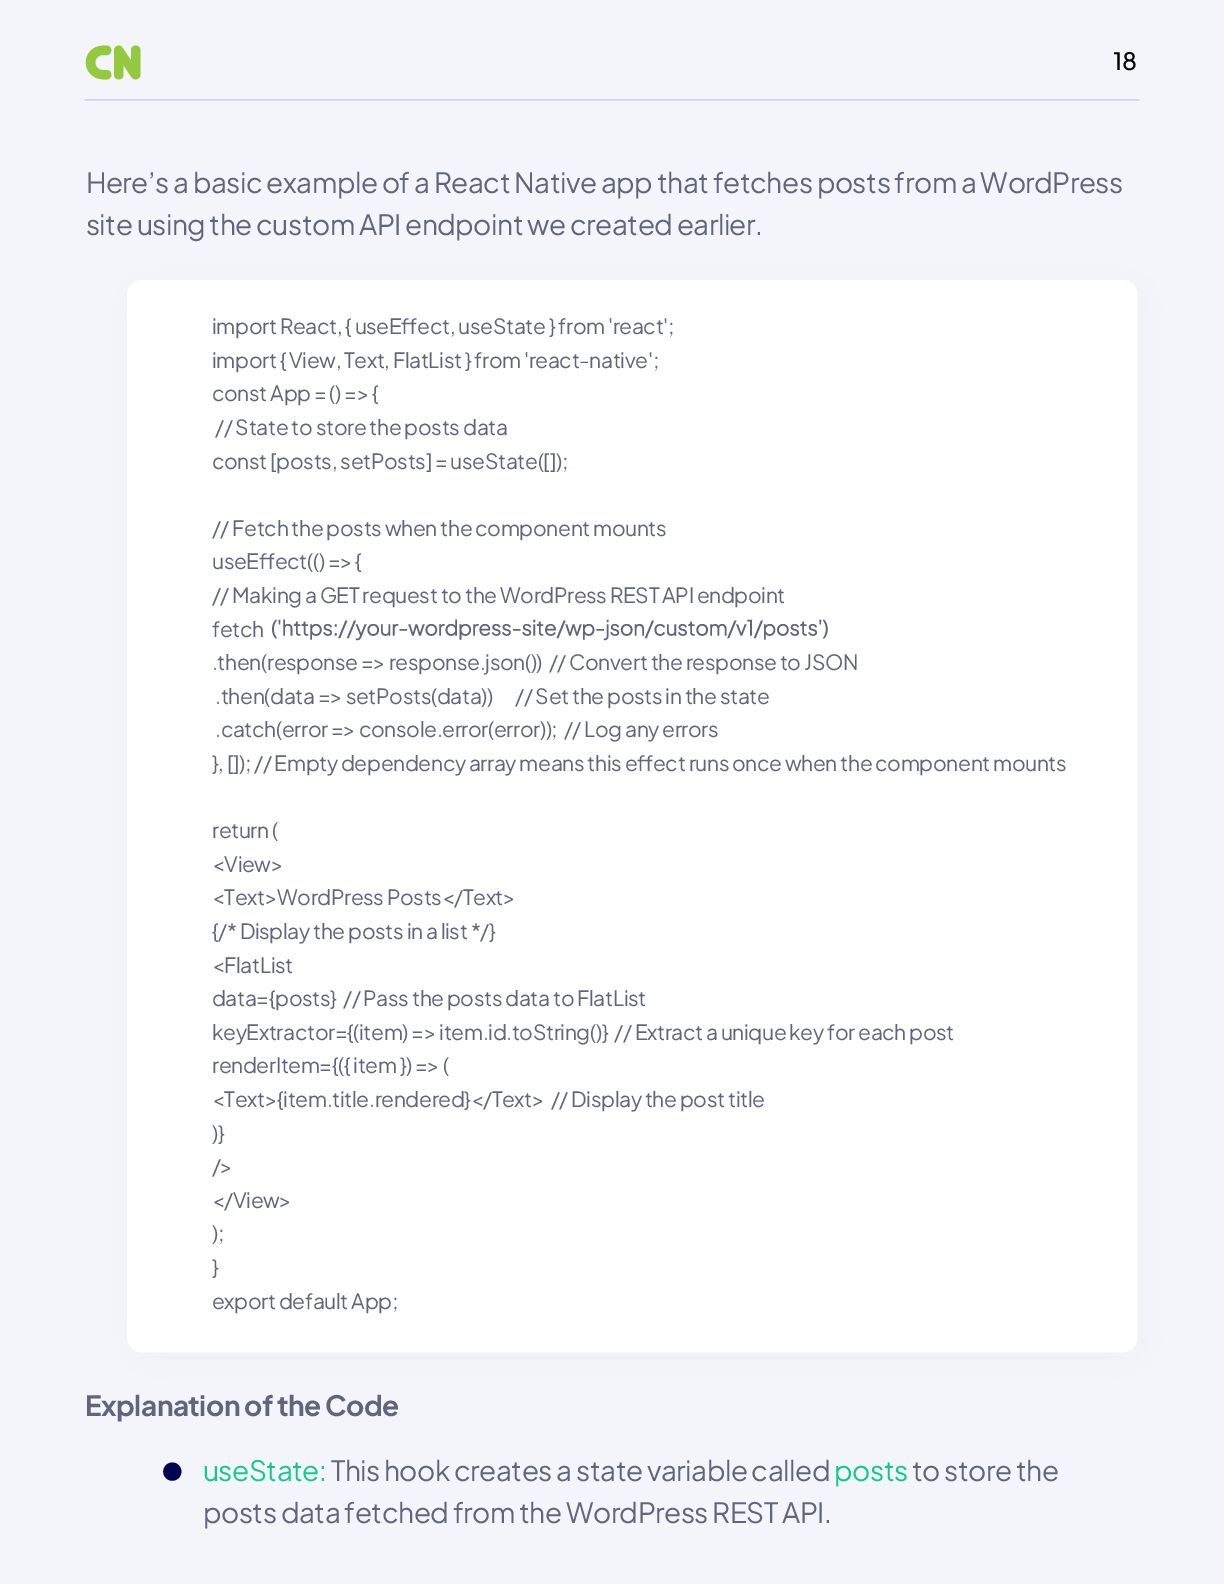
Readers will learn how to enable REST API access, implement secure authentication using JWT or OAuth, and create custom endpoints tailored to mobile app needs. It also explains how to perform CRUD operations and connect WordPress with popular mobile frameworks like React Native and Flutter.

Serving as a practical WordPress REST API tutorial, the guide dives into performance optimization, API security best practices, and common troubleshooting tips. Whether you're building a new mobile app with WordPress or improving your backend architecture, this book is ideal for anyone involved in mobile app backend development looking for a scalable, cost-effective, and familiar solution.

Avatar for Capital Numbers Infotech

Capital Numbers Infotech

August 26, 2025
Tweet

Other Decks in Technology

Transcript

  1. 01 Traditionally, WordPress is seen as a platform to build

    websites and blogs, but with the REST API, it can also be used as a backend for mobile applications. This means WordPress can store and manage all kinds of data (not just blog posts) and serve it to your mobile app. For example, your mobile app might need to display user data, product information, or even handle user authentication. By using WordPress REST API, you can leverage all the built-in features of WordPress, such as user management, content creation, and media handling, to power your mobile app without needing a separate server-side system. In this article, We will walk you through the process of building a backend for a mobile app using the WordPress REST API. Introduction
  2. 02 01 Prerequisites Before diving into building a mobile app

    backend with the WordPress REST API, there are a few essential skills, tools, and technologies you should be familiar with. Here's a breakdown of the prerequisites: Basic Understanding of WordPress and REST APIs 1 You need to have a basic understanding of how WordPress works, especially its ability to manage content like posts, pages, and users. Knowing how to interact with WordPress and understanding how REST APIs work will help you use the WordPress REST API effectively to retrieve and manage data. Mobile App Development Environment 2 To develop a mobile app that will interact with your WordPress backend, you’ll need a mobile development environment. Popular frameworks are: Flutter: Building a mobile app using Flutter and WordPress combines the power of Google’s UI toolkit with the flexibility of WordPress as a backend. Flutter's extensive widget library make it ideal for building customized, responsive apps that connect seamlessly with WordPress via REST APIs or GraphQL. React Native: React Native enables developers to build mobile apps using JavaScript and React, allowing for fast development and a near-native user experience. It’s widely supported, with a large community and plenty of plugins that make integration with WordPress APIs straightforward.
  3. 03 PHP and MySQL Basics for WordPress Backend Setup 3

    WordPress is built using PHP and uses MySQL as its database management system. Having a basic understanding of both will help you set up and manage your WordPress instance. You'll need to know how to: Knowing these will help you implement secure authentication for your app to communicate with WordPress. Choose the framework that best fits your project needs and set up the environment to start building your app. Install WordPress (either locally or on a server). Understand how to interact with the MySQL database for storing and retrieving data like posts and user information. Knowledge of Authentication Mechanisms (OAuth, JWT) 4 Since your mobile app will interact with your WordPress backend, it’s important to secure the data exchange. You'll need to understand authentication mechanisms like: OAuth: A protocol for authorization that allows third-party apps to access resources without exposing user credentials. JWT (JSON Web Tokens): A compact, URL-safe token format used to securely transmit information between your mobile app and WordPress.
  4. 04 Tools and Software Required 5 Here are the essential

    tools and software you’ll need to get started: Knowing these will help you implement secure authentication for your app to communicate with WordPress. WordPress (self-hosted or local installation): You need a running WordPress site. You can set it up locally on your machine using tools like XAMPP or WAMP, or you can use a live server. Mobile App Development IDE: To build the mobile app, you’ll need an IDE (Integrated Development Environment). Some common ones are: Android Studio for Android development. VS Code for cross-platform development using React Native, Flutter, or other frameworks. Postman or Similar API Testing Tool: Postman is a popular tool for testing APIs. It allows you to make HTTP requests to your WordPress REST API endpoints, see the responses, and debug any issues. It’s especially useful when developing your API endpoints and verifying that they return the expected data.
  5. 05 02 Setting Up WordPress for API Access Installing and

    Configuring WordPress Locally 1 To begin, you need a local instance of WordPress running on your computer. This allows you to develop and test your mobile app backend without needing a live server. You can set up WordPress locally using one of the following tools: XAMPP/WAMP: These are software packages that include everything you need to run WordPress on your local machine, including PHP, MySQL, and Apache. Here’s a basic process: Install XAMPP/WAMP on your computer. In this section, We will guide you through the steps to set up WordPress locally and enable API access so that you can connect your mobile app to it. Follow these steps to get started: Set up a new WordPress site by downloading the latest version from WordPress.org and placing it in the htdocs folder (for XAMPP) or www folder (for WAMP).
  6. 06 Enabling the WordPress REST API 2 The WordPress REST

    API is enabled by default in WordPress version 4.7 and higher. This means you don’t need to install any plugins or perform any extra configurations to get started with the API. However, if you're using an older version of WordPress, you may need to update to the latest version to access the REST API. Verifying REST API Endpoint 3 To test whether the REST API is working correctly, you can access the default WordPress REST API endpoint in your browser or using an API testing tool like Postman. Accessing the REST API: Open a browser or Postman and enter the following URL: Once you’ve set up WordPress locally, the REST API is automatically available, and you can start using it to interact with your site’s content. Docker: Docker is a platform that allows you to run applications inside containers. You can use Docker to set up a WordPress environment quickly. Here’s a basic process: Configure the database by creating a new MySQL database via phpMyAdmin. Complete the WordPress installation by following the on-screen prompts Install Docker on your computer. Use a pre-configured Docker Compose file that includes WordPress and MySQL containers. Run the docker-compose up command, and your local WordPress site will be up and running.
  7. 07 will give you a JSON response with a list

    of posts from your WordPress site. With these steps, you’ve set up WordPress for API access and verified that it’s working. Now you can begin integrating it with your mobile app to manage and retrieve data. Replace your-wordpress-site with the actual URL of your local or live WordPress site. For example, accessing: This will give you a response that lists the available API endpoints. If the API is set up correctly, you'll see a JSON response with a list of routes, like /wp/v2/posts for accessing posts, /wp/v2/users for user data, and more.
  8. 08 03 Authentication Mechanisms OAuth Authentication: Overview and How it

    Works with WordPress 1 OAuth is a widely-used protocol that allows users to grant third-party applications limited access to their resources without sharing their password. It’s commonly used to allow users to sign in using their Google or Facebook account. In the context of WordPress: OAuth allows your mobile app to access WordPress data (like posts, user profiles, etc.) on behalf of the user without requiring them to log in directly through the app. WordPress can use plugins to enable OAuth-based authentication for the REST API. A popular plugin for this is the OAuth 2.0 Server plugin. When your mobile app communicates with the WordPress backend using the REST API, it’s important to ensure that only authorized users can access certain data. Authentication is the process of verifying the identity of users, and there are different ways to handle it in WordPress. In this section, we will look at two popular methods for authentication: OAuth and JWT (JSON Web Tokens).
  9. 09 JWT (JSON Web Tokens): Overview and Setup in WordPress

    2 JWT (JSON Web Tokens) is another method for securing API requests. It’s a compact, URL-safe token that represents claims between two parties. Unlike OAuth, JWT is simpler to set up and is commonly used in mobile app development because it’s lightweight and doesn’t require user redirection. With JWT, the WordPress backend generates a token for the user, which the mobile app can use to make secure API requests. The token is typically short-lived and contains user information, like their ID and role, to authenticate the user on subsequent API calls. Setting Up the JWT Authentication Plugin in WordPress 3 To enable JWT authentication in WordPress, you need to install and configure a JWT Authentication plugin. Here’s how to do it: With OAuth, there are typically two main steps: Install the Plugin: The user is redirected to WordPress to grant permission. 1. 1. Once permission is granted, WordPress issues a token that can be used to make API requests on behalf of the user. While OAuth is powerful, it can be more complex to set up compared to simpler authentication methods like JWT. 2. Go to the WordPress admin dashboard. Navigate to Plugins > Add New. Search for the JWT Authentication for WP REST API plugin. Install and activate the plugin.
  10. 10 Code Example to Handle Token Generation and Validation: 4

    Once the plugin is set up, you can use it to generate and validate JWT tokens. Generating the Token: To authenticate a user, you’ll need to send a POST request to the WordPress REST API endpoint /wp-json/jwt-auth/v1/token. This request includes the user’s credentials (username and password). If the credentials are correct, WordPress will return a JWT token. Configure the Plugin: 2. After activation, you need to configure the plugin by adding a secret key in your wp-config.php file. This key is used to sign the JWTs. Open the wp-config.php file in your WordPress installation. Add the following line before the “/* That’s all, stop editing! Happy blogging. */” line: define('JWT_AUTH_SECRET_KEY', 'your-secret-key-here'); Replace 'your-secret-key-here' with a strong, unique key. You can generate a key using online tools like randomkeygen.com. Enable CORS (Optional): 3. If you’re accessing the WordPress API from a different domain (such as a mobile app), you may need to enable Cross-Origin Resource Sharing (CORS) to allow the app to communicate with the WordPress backend. You can do this by adding the following to your .htaccess file or your WordPress theme's functions.php: header("Access-Control-Allow-Origin: *");
  11. 11 Here’s an example of how to send a request

    from your mobile app to get the token: Once the token is generated, your mobile app can include the token in the Authorization header when making subsequent API requests to access protected resources (e.g., posts or user data). WordPress will validate the token and allow access if the token is valid. Here’s an example of how to make an authenticated API request using the token: Validating the Token: method: 'POST', headers: { 'Content-Type': 'application/json', }, body: JSON.stringify({ username: 'your-username', password: 'your-password', }), }) .then(response => response.json()) .then(data => { if (data.token) { // Store the token for later use console.log('JWT Token:', data.token); } else { console.log('Authentication failed'); } }) .catch(error => console.error('Error:', error));
  12. 12 In this example: method: 'GET', headers: { 'Authorization': `Bearer

    ${token}`, // Include the JWT token }, }) .then(response => response.json()) .then(data => { console.log('Posts:', data); }) .catch(error => console.error('Error:', error)); Bearer ${token} is how you send the JWT token with the API request. If the token is valid, WordPress will respond with the requested data (e.g., posts).
  13. 13 04 Creating Custom REST API Endpoints Fetch data in

    a format that the default endpoints don’t support. Perform specific actions (e.g., updating user information or processing custom data). Handle specific business logic or validation before data is returned or processed. Secure access to sensitive data by controlling which endpoints are available to certain users. When you build a mobile app that interacts with WordPress, you may need more than just the default WordPress API endpoints. For example, you might want to create custom endpoints to fetch specific data, perform certain actions, or handle data in a unique way. This is where custom REST API endpoints come in. They allow you to define your own routes and handle requests the way you need. The default WordPress REST API provides standard endpoints for common tasks, such as retrieving posts, users, or media. However, there are many situations where you might need to: Why You Might Need Custom Endpoints
  14. 14 Hook into the rest_api_init Action: WordPress has an action

    hook called rest_api_init that runs when the REST API is initialized. You will use this hook to register your custom endpoints. Register the Endpoint Using register_rest_route: The register_rest_rout function allows you to define a new endpoint and specify the route, HTTP methods (GET, POST, etc.), and callback function that will handle the request. By creating custom endpoints, you can ensure that your mobile app interacts with WordPress exactly the way you need it to. To create a custom REST API endpoint, follow these steps: Hooking into rest_api_init to Register a Custom Endpoint Example Code for Registering a Basic API Endpoint that Fetches Posts To register a custom endpoint, you need to write a function that hooks into rest_api_init and calls register_rest_route to create the endpoint. Below is an example of how to do this. Steps to Create a Custom API Endpoint for Your Mobile App 1. 2. Define the Callback Function: The callback function is where you’ll handle the logic for the custom endpoint. For example, you could query the WordPress database, process data, or return a custom response. 3.
  15. 15 Here’s an example of how to send a request

    from your mobile app to get the token: Explanation of the Code function custom_api_get_posts() { register_rest_route( 'custom/v1', '/posts/', array( 'methods' => 'GET', // Define the HTTP method (GET in this case) 'callback' => 'get_posts_data', // Define the callback function that will handle the request ) ); } function get_posts_data() { // Query WordPress for posts $posts = get_posts(); // Return the posts as a JSON response return new WP_REST_Response($posts, 200); // 200 is the HTTP status code for success } // Hook into the REST API initialization to register the endpoint add_action( 'rest_api_init', 'custom_api_get_posts' ); register_rest_route( 'custom/v1', '/posts/', ... ): This line registers a new route under the namespace custom/v1. The route /posts/ will handle the GET requests for fetching posts. 'methods' => 'GET': This specifies that the endpoint will only accept GET requests, meaning it will fetch data (not modify it). 'callback' => 'get_posts_data': The callback function get_posts_data is defined below, and it will be called when the /posts/ endpoint is accessed. get_posts_data(): This function queries the WordPress database for posts using the get_posts() function, and then returns the posts as a JSON response using WP_REST_Response. The HTTP status code 200 means the request was successful.
  16. 16 Once the code is added to your WordPress site,

    you can access this custom endpoint by visiting: This will return a JSON response with a list of posts from your WordPress site. You can now use this endpoint in your mobile app to fetch data dynamically. How to Use This Endpoint add_action( 'rest_api_init', 'custom_api_get_posts' ): This tells WordPress to run the custom_api_get_posts function when the REST API is initialized, which registers the new route.
  17. 17 05 Consuming the REST API in the Mobile App

    Make an HTTP request from the mobile app to the WordPress endpoint. Once your WordPress REST API is set up, you’ll want your mobile app to be able to make requests to the API and retrieve data like posts, user profiles, or any other custom content. In this section, I’ll explain how to set up your mobile app to interact with the WordPress REST API and provide a simple example using React Native, a popular framework for building cross-platform mobile apps. Setting Up the Mobile App to Make Requests to the WordPress REST API Example for React Native App to Fetch Posts from WordPress To consume the WordPress REST API from your mobile app, you need to: React Native provides built-in tools like fetch() to make HTTP requests and handle responses. 1. Handle the response that WordPress sends back, which will usually be in JSON format. 2. Display the data in your app's user interface (UI). 3.
  18. 18 Here’s a basic example of a React Native app

    that fetches posts from a WordPress site using the custom API endpoint we created earlier. import React, { useEffect, useState } from 'react'; import { View, Text, FlatList } from 'react-native'; const App = () => { // State to store the posts data const [posts, setPosts] = useState([]); // Fetch the posts when the component mounts useEffect(() => { // Making a GET request to the WordPress REST API endpoint fetch .then(response => response.json()) // Convert the response to JSON .then(data => setPosts(data)) // Set the posts in the state .catch(error => console.error(error)); // Log any errors }, []); // Empty dependency array means this effect runs once when the component mounts return ( <View> <Text>WordPress Posts</Text> {/* Display the posts in a list */} <FlatList data={posts} // Pass the posts data to FlatList keyExtractor={(item) => item.id.toString()} // Extract a unique key for each post renderItem={({ item }) => ( <Text>{item.title.rendered}</Text> // Display the post title )} /> </View> ); } export default App; Explanation of the Code useState: This hook creates a state variable called posts to store the posts data fetched from the WordPress REST API.
  19. 19 useEffect: This hook is used to perform side effects

    in functional components. In this case, it runs once when the component first mounts (like componentDidMount in class components). It fetches the posts data from the WordPress API. fetch(): This is a built-in JavaScript function that allows you to make HTTP requests. We use it to make a GET request to the custom endpoint /wp-json/custom/v1/posts that we set up in WordPress. response.json(): After receiving the response from WordPress, we convert it into a JSON format using .json(). This is because the API will return the data in JSON format, and we need to convert it into something we can work with in JavaScript. setPosts(data): This updates the posts state with the data received from the API. This triggers a re-render of the component with the new data. When the app loads, the useEffect hook triggers and makes a request to the WordPress REST API. FlatList: This is a React Native component used to efficiently render large lists of data. It takes the posts array and displays each post’s title. keyExtractor: React Native requires a unique key for each item in a list, so we use the post’s ID to extract a key for each post. renderItem: This function defines how each item in the list should be rendered. In this case, it simply displays the title of each post. How It Works 1. The data is then stored in the posts state. 3. The FlatList component renders the posts in a scrollable list, displaying the title of each post. 4. The fetch() function sends a GET request to the endpoint 2.
  20. 20 06 Handling CRUD Operations In web development, CRUD stands

    for Create, Read, Update, and Delete. These are the basic operations you perform on data in a database, and the WordPress REST API allows you to perform all of these actions programmatically. Here, we'll cover how to handle each of these operations in your mobile app using the WordPress REST API. 1. Creating: POST Request to Create New Data A POST request is used when you want to send new data to the server (e.g., creating a new post, user, or comment). This is the "Create" operation in CRUD. To create new data in WordPress using the REST API, you typically send a POST request to the appropriate endpoint. Example: Creating a new post Here’s how to send a POST request to create a new post:
  21. 21 fetch method: 'POST', headers: { 'Content-Type': 'application/json', 'Authorization': `Bearer

    ${token}`, // Include JWT token for authentication }, body: JSON.stringify({ title: 'New Post Title', content: 'This is the content of the new post.', status: 'publish', // Set the post status (publish, draft, etc.) }) }) .then(response => response.json()) .then(data => console.log('Post created:', data)) .catch(error => console.error('Error:', error)); In this example: A GET request is used to read or fetch data from the server. We’ve already demonstrated how to use the GET request in a previous section to fetch posts from WordPress. Here’s a quick refresher on how you can use a GET request to retrieve data: We send a POST request to the /wp-json/wp/v2/posts endpoint, which is where posts are created. The Authorization header includes the JWT token to authenticate the request. The request body contains the post data, including the title, content, and status. 2. Reading: GET Request to Fetch Data
  22. 22 fetch .then(response => response.json()) .then(data => console.log('Posts:', data)) .catch(error

    => console.error('Error:', error)); fetch method: 'PUT', headers: { 'Content-Type': 'application/json', 'Authorization': `Bearer ${token}`, // Include JWT token for authentication }, body: JSON.stringify({ title: 'Updated Post Title', // New title for the post content: 'Updated content of the post.', // New content for the post }) }) .then(response => response.json()) .then(data => console.log('Post updated:', data)) .catch(error => console.error('Error:', error)); This example fetches the posts data from the custom /posts/ endpoint. A PUT or PATCH request is used to update existing data. The difference between the two is: PUT requests are more common for fully replacing data, while PATCH is used for partial updates. PUT replaces the entire resource (e.g., updating all fields of a post). PATCH only updates the specified fields (e.g., updating just the post title or content). Example: Updating a Post Here’s how you can send a PUT request to update a post: 3. Updating: PUT or PATCH Request to Modify Existing Data
  23. 23 In this example: You can also use a PATCH

    request if you only want to update specific fields of the post (e.g., just the title or content). A DELETE request is used to remove data from the server (e.g., deleting a post or a user). In WordPress, you can send a DELETE request to the appropriate endpoint to remove data. The PUT request is sent to the /wp-json/wp/v2/posts/1 endpoint, where 1 is the ID of the post you want to update. The body contains the updated data (the new title and content). The post with ID 1 will be completely updated with the new data. Example: Deleting a Post Here’s how you can send a DELETE request to delete a post: 4. Deleting: DELETE Request to Remove Data fetch method: 'DELETE', headers: { 'Authorization': `Bearer ${token}`, // Include JWT token for authentication }, }) .then(response => response.json()) .then(data => console.log('Post deleted:', data)) .catch(error => console.error('Error:', error));
  24. 24 By using these HTTP methods, you can easily manage

    data in your WordPress site through the REST API, allowing your mobile app to create, read, update, and delete content as needed. In this example: Create: Use the POST request to send new data (e.g., creating a new post). Read: Use the GET request to retrieve data (e.g., fetching posts). Update: Use the PUT or PATCH request to modify existing data (e.g., updating a post's title or content). Delete: Use the DELETE request to remove data (e.g., deleting a post). The DELETE request is sent to the /wp-json/wp/v2/posts/1 endpoint to delete the post with ID 1. The Authorization header includes the JWT token to authenticate the request. Summary of CRUD Operations
  25. 25 06 Handling API Responses and Error Handling When your

    mobile app makes requests to the WordPress REST API, it receives responses from the server. These responses come with important information about the status of the request, the data returned, or any errors that occurred. In this section, we’ll discuss how to handle these responses properly, including successful responses and errors. Structure of a Typical API Response An API response typically consists of: For example, a successful request to fetch posts might return: Status Code: A number that indicates whether the request was successful or if there was an error. This is the most important part of the response. Response Body: The actual data sent back by the API, usually in JSON format. This could be the requested data (like posts) or an error message. { "id": 1, "title": "Post Title", "content": "Post content here", "status": "publish" }
  26. 26 This is the response body, containing the data that

    your mobile app can display to the user. When an API request is successful, the server will return a status code to let your app know everything went as expected. Some common success codes include: When handling these responses, your mobile app should check the status code and handle the data appropriately. For example, here’s how you might handle a successful GET request (fetching posts) in a React Native app: Handling Successful Responses with Proper Status Codes 200 OK: The request was successful, and the server is returning the requested data. 201 Created: The request was successful, and new data was created (e.g., a new post or user). fetch .then(response => { if (response.status === 200) { return response.json(); // Parse the JSON data } else { throw new Error('Failed to load data'); } }) .then(data => { console.log('Posts fetched successfully:', data); }) .catch(error => { console.error('Error:', error); });
  27. 27 In this example: Not all API requests will be

    successful. When something goes wrong, the server will return an error with an appropriate status code. These are typically 4xx or 5xx status codes. Error Handling for Bad Requests, Unauthorized Access, and Server Errors If the status code is 200 OK, the app proceeds to parse and use the response data. If it’s anything else, an error is thrown, and the app can handle it accordingly. 4xx Errors (Client Errors): These errors occur when something is wrong with the request made by the client (your mobile app). 400 Bad Request: The request was malformed or missing required data. 5xx Errors (Server Errors): These errors happen when the server fails to fulfill a valid request. 500 Internal Server Error: Something went wrong on the server side, but it’s not clear what. 502 Bad Gateway: The server is acting as a gateway or proxy and received an invalid response from the upstream server. 503 Service Unavailable: The server is temporarily unavailable, often due to maintenance or overload. 401 Unauthorized: The request is missing valid authentication (e.g., the user needs to log in or provide a valid token). 403 Forbidden: The request is valid, but the server is refusing to fulfill it (e.g., the user doesn’t have permission to access the resource). 404 Not Found: The requested resource (like a post or page) could not be found on the server.
  28. 28 To handle these errors, you can check the status

    code in your response and provide appropriate feedback to the user. Here’s an example of how to handle errors: In this example: fetch .then(response => { if (response.ok) { return response.json(); // If status code is 200-299, parse the data } else { throw new Error(`Error: ${response.status} ${response.statusText}`); } }) .then(data => { console.log('Posts fetched successfully:', data); }) .catch(error => { console.error('API request failed:', error.message); // Handle different error cases here if (error.message.includes('400')) { alert('Bad request! Please check the request and try again.'); } else if (error.message.includes('401')) { alert('Unauthorized! Please log in to access this data.'); } else if (error.message.includes('500')) { alert('Server error! Please try again later.'); } else { alert('An unknown error occurred.'); } }); response.ok: This checks if the status code is in the range of 200-299, which means the request was successful. Error Handling: If the status code is outside this range (e.g., 400, 404, 500), an error is thrown. The catch block then handles the error, and you can provide feedback like an alert to the user, depending on the error code.
  29. 29 07 Securing the API When your mobile app communicates

    with the WordPress REST API, it's essential to make sure the data exchange is secure. Without proper security, sensitive data can be exposed to unauthorized access. In this section, we’ll discuss best practices for securing the communication between your mobile app and the WordPress backend. Best Practices to Ensure Secure Communication Between the Mobile App and the WordPress Backend 1. Using HTTPS for Secure Data Transmission HTTPS (Hypertext Transfer Protocol Secure) ensures that the data sent between the mobile app and the WordPress backend is encrypted, protecting it from being intercepted or tampered with by unauthorized parties. Securing the API ensures that only authorized users and apps can access and manipulate data. Here are some common practices to follow: Why HTTPS? Encryption: HTTPS encrypts data, ensuring it cannot be read by attackers (e.g., hackers). Authentication: HTTPS verifies that the server you're communicating with is the right one, helping to prevent "man-in-the-middle" attacks.
  30. 31 Example: 2. Handling Permissions and Roles to Restrict Access

    to API Endpoints WordPress has a built-in user role system that controls who can access certain parts of the website. You should use this system to restrict access to your API endpoints based on the user’s role (e.g., admin, editor, subscriber). How to Implement HTTPS: Ensure your WordPress site is served over HTTPS. You can do this by installing an SSL certificate on your server. The URL of your API requests should start with https:// instead of http:// to ensure that all communications are secure. Why Restrict API Access? You don’t want unauthorized users to perform sensitive actions like creating, updating, or deleting posts. Ensuring that only users with proper roles can access certain endpoints helps protect your site’s data. How to Control Access: You can enforce these permissions when creating custom REST API endpoints. Here’s an example: WordPress allows you to define permissions for each user role. For example, only administrators should have the permission to delete posts, while contributors should only be able to read posts.
  31. 32 In this example: API keys and authentication tokens (like

    JWT tokens) are used to verify the identity of users and apps accessing the API. Securing these tokens is crucial because anyone with access to the token could potentially make requests on behalf of the user or app. Why Secure Tokens and API Keys? Prevent misuse: If someone else gets access to the token or key, they could perform malicious actions. Ensure privacy: Protect sensitive data from unauthorized access. How to Secure Tokens and API Keys: Never hard-code tokens: Don’t hard-code your API keys or tokens directly in your mobile app or public repositories. Instead, store them securely (e.g., using environment variables or secure storage in the app). function custom_api_get_posts() { register_rest_route( 'custom/v1', '/posts/', array( 'methods' => 'GET', 'callback' => 'get_posts_data', 'permission_callback' => function() { return current_user_can( 'read' ); // Only logged-in users with the 'read' capability can access }, ) ); } The permission_callback function checks if the user has the necessary capability (in this case, the read capability). You can customize the permission callback to restrict access based on roles like administrator, editor, etc. 3. Securing API Keys and Tokens
  32. 33 In this example: Example of securely storing a token

    in React Native using a package like react-native-keychain: Use Secure Authentication Methods: OAuth and JWT are two commonly used methods for securing API access. Use environment variables: Store sensitive information like API keys and JWT secret keys in environment variables, and make sure they are not exposed in your code. Use Secure Storage in Mobile Apps: Use the platform’s secure storage options to store tokens safely: iOS: Keychain services. import * as Keychain from 'react-native-keychain'; // Storing the token securely Keychain.setGenericPassword('username', 'your-jwt-token'); // Retrieving the token securely Keychain.getGenericPassword() .then(credentials => { if (credentials) { console.log('JWT Token:', credentials.password); } }) .catch(error => console.error('Keychain error:', error)); Keychain is used to securely store and retrieve sensitive data, like authentication tokens, on the mobile device. Android: Keystore system.
  33. 35 Always make sure the JWT token is sent over

    HTTPS and has a short expiration time to limit its exposure. Use the Refresh Token method to issue new tokens without requiring the user to log in every time the token expires.
  34. 36 08 Testing the API Before you integrate your WordPress

    REST API with your mobile app, it’s essential to test the API endpoints to make sure they work as expected. This will help you identify any issues and ensure that your app will be able to interact with the backend correctly. In this section, we’ll cover how to use Postman to test the API and how to debug some common issues. Using Postman to Test the REST API Endpoints Here’s how you can use Postman to test your WordPress REST API endpoints: Postman is a popular tool for testing and interacting with APIs. It allows you to send requests to your API, check the responses, and make sure everything is working before you start coding the mobile app. Install Postman: Download and install Postman from Postman’s official website. 1. Testing GET Requests: Open Postman and create a new GET request by selecting GE from the dropdown menu. 2.
  35. 37 Testing POST Requests: Select POST from the dropdown menu

    in Postman. Enter the API endpoint for creating new data (e.g., -wordpress-site/wp-json/wp/v2/posts). Under the Body tab, select raw and choose JSON as the format. In the body, enter the data you want to send (e.g., the title and content for a new post): Click Send to submit the request. If successful, you should see a 201 Created response, and the new post details will appear in the response body. If your API requires authentication (e.g., using JWT tokens or OAuth), you can add the token to the request header. In Postman, go to the Headers tab and add a new key-value pair: 3. Testing Authentication (JWT or OAuth): Click Send. If the API is working correctly, you should see the response data in the Body section (usually in JSON format). 4. { "title": "New Post", "content": "This is the content of the new post", "status": "publish" } Key: Authorization Value: Bearer <your-jwt-token>
  36. 38 Debugging Common Issues What is CORS? CORS is a

    security feature implemented by web browsers that restricts web pages from making requests to a different domain than the one that served the web page. CORS (Cross-Origin Resource Sharing) Issues: Problem: If you’re testing your API from a different domain (e.g., your mobile app or Postman), you might encounter a CORS error, such as: Solution: To fix this, you need to allow CORS on the server (WordPress). You can do this by adding the following lines to your .htaccess file or functions.php in your WordPress theme: header("Access-Control-Allow-Origin: *"); header("Access-Control-Allow-Methods: GET, POST, PUT, DELETE"); header("Access-Control-Allow-Headers: Content-Type, Authorization"); This will allow your API to be accessed from different origins (domains). Access to XMLHttpRequest at ' from origin Replace <your-jwt-token> with the actual token you are using for authentication. Now, click Send again and verify that the request is authenticated and returns the expected results. 1. Token Expiry Issues (JWT Authentication): 2. While testing the API, you might run into some common issues. Here are a few problems and how to troubleshoot them:
  37. 39 Error: Unauthorized - Invalid token Problem: If you receive

    a 404 Not Found error, it means the API endpoint you’re trying to access doesn’t exist. Solution: Double-check the endpoint URL. Ensure that the route is correct and that it’s properly registered in your WordPress site. 404 Not Found Error: 3. 500 Internal Server Error: 4. Problem: If you are using JWT tokens for authentication, the token may expire after a certain period, causing the API requests to fail. You might get an error like: Solution: Tokens typically expire after a set time (e.g., 1 hour). If the token is expired, you will need to re-authenticate and obtain a new token. If your app requires long-lived sessions, you can implement a Refresh Token mechanism, where the app can automatically request a new JWT token when the current one expires. For example, if you are trying to access /wp-json/custom/v1/ posts, make sure that you have correctly registered this custom endpoint in WordPress. Problem: A 500 Internal Server Error indicates a problem on the server-side (your WordPress site). Solution: Check your server logs for any errors, or try disabling any recently installed plugins or themes that might be causing issues. Also, check for any errors in your functions.php or custom plugin code that might be affecting the API.
  38. 40 To set up a WordPress-based mobile app backend, you

    need to install WordPress, enable the REST API, create custom endpoints, handle authentication, and implement CRUD operations. The WordPress REST API offers benefits like ease of use, cost-effectiveness, and scalability for mobile app development. To ensure optimal performance, consider strategies like caching, pagination, database optimization, rate limiting, and asynchronous requests. Future enhancements can include integrating third-party APIs, improving backend performance, and adding mobile app features like push notifications and offline capabilities. Conclusion