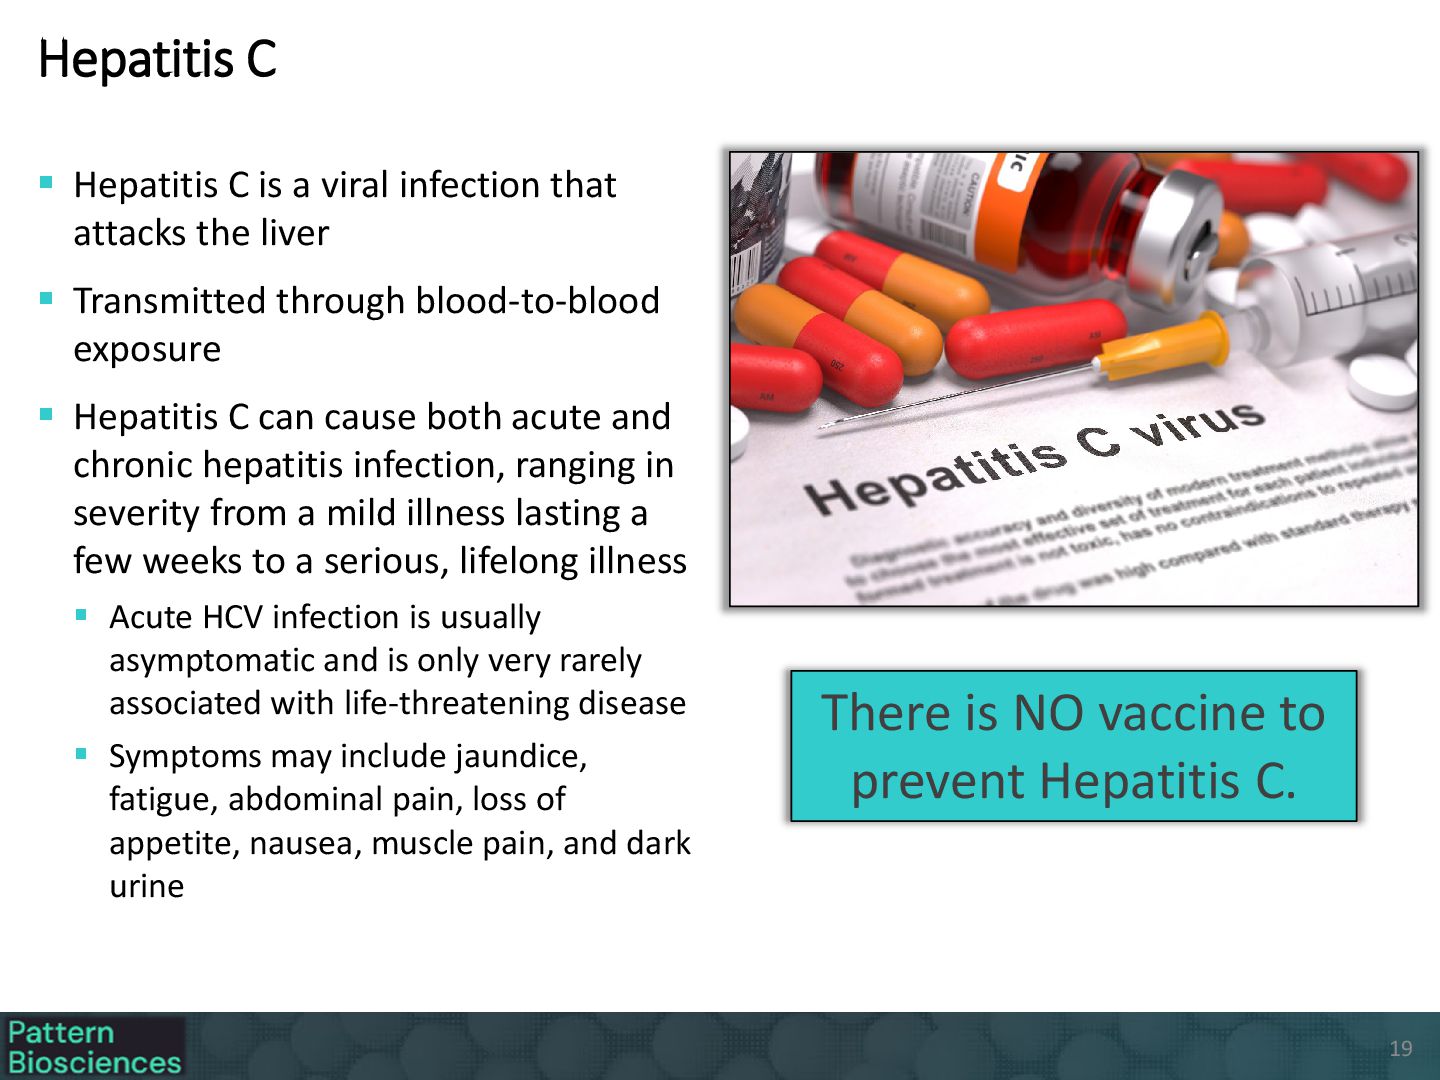
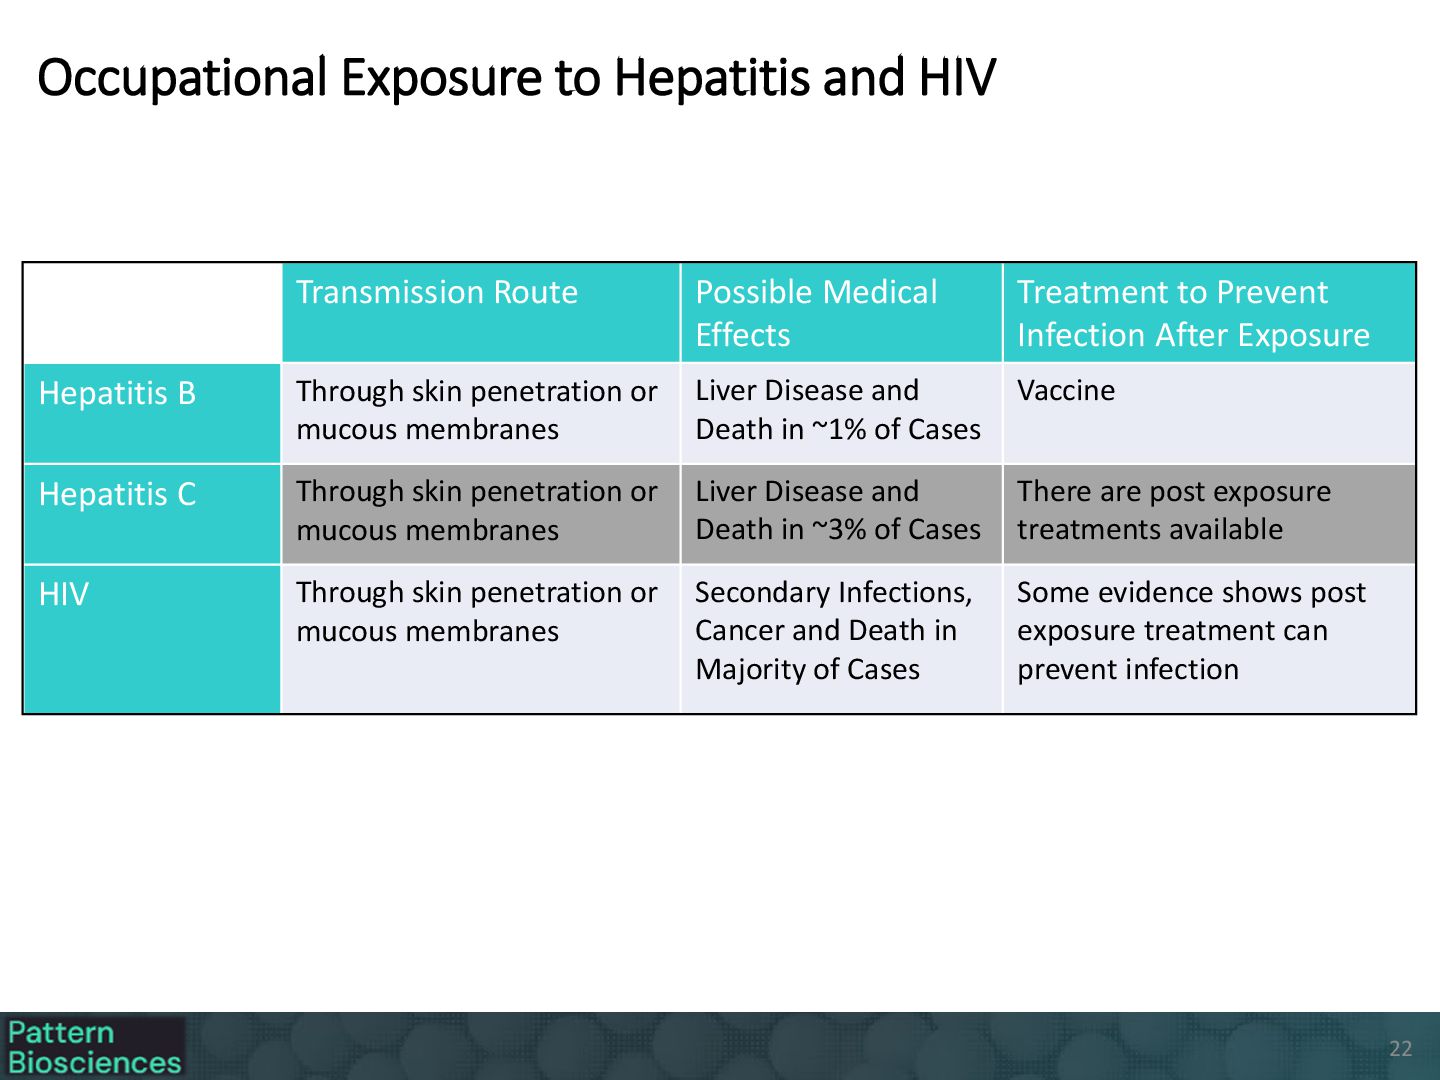
Upgrade to Pro — share decks privately, control downloads, hide ads and more …

Pattern Biosciences Biological Safety Program

Sponsored · Your Podcast. Everywhere. Effortlessly. Share. Educate. Inspire. Entertain. You do you. We'll handle the rest.

Pattern Biosciences Biological Safety Program

Avatar for Occupational Services, Inc.

Occupational Services, Inc. PRO

February 12, 2026

Transcript

  1. Biological Safety & Bloodborne Pathogens South San Francisco, CA Prepared

    by: Lik-See Chung Occupational Services, Inc. [email protected] 650-737-2712 Training Course
  2. Objective The objective of this course is to help you

    to avoid workplace infection from a human bloodborne pathogen by helping you to: • Be aware of human bloodborne pathogens potentially in use • Understand control measures for infectious agents • Know how to respond to exposures and spills • Know how to manage biohazardous waste 2 Please read all the slides in this presentation. After the presentation, scroll down to take a short test. A score of 90% or higher is required to pass.
  3. Bloodborne Pathogens Standard & Exposure Control Plan California Code of

    Regulations (CCR) Title 8 Section 5193 • This purpose of Cal/OSHA’s Bloodborne Pathogen standard is to minimize occupational exposure of human disease caused by bloodborne pathogens or other potentially infectious materials (OPIMs) • To meet the requirements of the standard, Pattern Biosciences has implemented a written Exposure Control Plan. Pattern Biosciences’ written Exposure Control Plan (Bloodborne Pathogen Program) is located in the IIPP Manual. 3
  4. Please contact the biosafety officer: • Before you start a

    new or unfamiliar task that may involve biohazardous materials • If you have any questions about biological safety Biological Safety Officer 1. Assisting in implementation of the Exposure Control Plan and protection measures 2. Bringing biological safety concerns to your Direct Leaders, Safety Ambassador, safety committee 3. Assisting employees with proper disposal of biohazardous waste Duties of the BSO include: 4 Pattern Biosciences’ Biological Safety Officer is Kaelin Napier.
  5. Routes of Exposure There are multiple potential routes of exposure

    including: Cover open sores, cuts or abrasions before entering the laboratory. Oral (Ingestion) Usually Accidental Skin Penetration Cuts, puncture wounds, needle sticks, etc. Mucous Membrane Exposure Contact with eyes, nose or mouth Inhalation Of Aerosolized Droplets 5
  6. Biological Safety Levels (BSL) 6 What is Biosafety? Biosafety is

    the application of safety precautions that reduce a laboratorian’s risk of exposure to a potentially infectious microbe (e.g., virus) and limit contamination of the work environment and, ultimately, the community. What are Biosafety Levels (BSLs)? There are four biosafety levels. The primary risks that determine levels of containment are infectivity, severity of disease, transmissibility, and the nature of the work conducted.
  7. Biological Safety Levels (BSL) Pattern Biosciences works with both BSL-1

    & BSL-2 materials BSL-1 Work with defined and characterized strains of viable micro- organisms not known to consistently cause disease in healthy adult humans, and are of minimal potential hazard to the environment BSL-2 Work with broad spectrum of indigenous moderate-risk agents present in the community that are associated with human or environmental disease of varying severity 7
  8. Biological Safety Level 1 (BSL-1) Work can be conducted on

    open bench tops using standard microbiological practices Special containment equipment is not required (such as a biosafety cabinet) Personnel have general microbiological training and supervision and follow general laboratory rules with regards to exposure control measures 8
  9. Biological Safety Level 2 (BSL-2) BSL-2 differs from BSL-1 in

    that the following is required in addition to the procedures listed for BSL-1: Laboratory personnel be trained in how to handle pathogenic agents and be supervised by competent scientists. Access to the laboratory is limited when work with BSL-2 agents is conducted. Extra precautions are to be taken with contaminated sharps. Procedures with the possibility of creating infectious aerosols or splashes are to be conducted in a biological safety cabinets. 9
  10. Biological Materials Handled at Pattern Biosciences These are biological materials

    that could be handled at Pattern Biosciences: • Human cells (BSL-2) • Human tissues (BSL-2) • Tumor cells (BSL-2) • Adeno-associated viruses (BSL-1 & BSL-2) • E.coli DH10B, DH5α (BSL-1 or BSL-2 ) • Lentiviral vectors (BSL-2) 10
  11. • The laboratory area is classified as BSL-2. • Limit

    frequent and sudden movements when BSL-2 work is being conducted. • Conduct work with BSL-2 materials in biosafety cabinets. • Keep doors to BSL-2 areas and rooms closed when work with BSL-2 materials is being conducted. BSL-2 Practices – Protect Yourself and Others 11 BSL-2 sign posted at the front entrance to the laboratory from the office area Make sure you know the materials you are working with is classified as BSL-2. Follow additional safety procedures for the infectious agents, when required.
  12. Needle stick (do not recap needles) Punctures from compacting biohazardous

    waste Excessive force on laboratory glassware Mismanagement of infected cells as non- hazardous Splashes into the eyes or open mouth Cuts from contaminated razor blades, metal items or glass Infectious materials entering through skin (sores, cuts, abrasions, etc.) Inhalation resulting from pipetting outside of a biological safety cabinet Common Causes of Infectious Transmission Use safety needles 12
  13. • Bloodborne pathogens are disease causing microorganisms that may be

    present in human blood or other human bodily fluid • Bloodborne pathogens may be transmitted by blood-to-blood exposure to blood or items contaminated by blood or other potentially infectious materials • Three pathogens of significance are Hepatitis B, Hepatitis C and Human Immunodeficiency Virus (HIV), which leads to Acquired Immunodeficiency Syndrome (AIDS) Occupationally Transmitted Bloodborne Diseases 13 There are more diseases to be concerned with than these three, however the transmission of other bloodborne pathogens is similar
  14. Screened Human Materials Most commercial vendors of human materials state

    that their products have been screened and are negative for the presence of: HIV Hepatitis B Hepatitis C Syphilis Epstein-Barr Virus Cytomegalovirus Tests may be up to 99.9% accurate, but are not perfect 14
  15. Even Screened Material Could be Pathogenic • Screening lowers the

    risk, but does not eliminate it • Handle all screened blood products with universal precautions, as if they are infectious • Even if you only work with screened human materials, you still fall under the scope of the bloodborne pathogens standard 15
  16. Hepatitis B • Hepatitis B is a viral infection, caused

    by the Hepatitis B virus, that attacks the liver and can cause both acute and chronic disease. • Transmitted through exposure to blood or other body fluids that contains active Hepatitis B virus • Symptoms: • Jaundice (yellowing of skin), fatigue, abdominal pain, loss of appetite, nausea, joint pain, dark urine and clay-colored bowel movements. • 5-10% of individuals develop chronic liver infection. Eyes affected by Jaundice Liver affected by Hepatitis B 16
  17. Pattern Biosciences offers the Hepatitis B vaccination and titer assessment

    free of charge to employees with a risk of exposure through your health care provider • Contact Human Resources for more information Three injected (upper arm) doses of Hepatitis B vaccine at intervals of 0, 1 and 6 months, plus a titer assessment (blood test) 1-2 months later It can be administered to pregnant or nursing employees and can be administered with other vaccinations Immunity develops in 90-95% of vaccinated individuals • A titer is can be performed to check your Hepatitis Antibody levels. Hepatitis B Vaccination 17
  18.  The vaccine may be declined; however, it can be

    requested at a later date.  If an un-vaccinated individual is exposed, recommended treatment is to receive the Hepatitis B vaccination within 7 days.  A blood test is offered 4 weeks after exposure incident to check for Hepatitis B infection. Hepatitis B Vaccination 18
  19.  Hepatitis C is a viral infection that attacks the

    liver  Transmitted through blood-to-blood exposure  Hepatitis C can cause both acute and chronic hepatitis infection, ranging in severity from a mild illness lasting a few weeks to a serious, lifelong illness  Acute HCV infection is usually asymptomatic and is only very rarely associated with life-threatening disease  Symptoms may include jaundice, fatigue, abdominal pain, loss of appetite, nausea, muscle pain, and dark urine Hepatitis C There is NO vaccine to prevent Hepatitis C. 19
  20. Human Immunodeficiency Virus (HIV) HIV attacks the immune system and

    causes it to break down, making the person more susceptible to other diseases/viruses Stages of Infection  Category A = asymptomatic, virus is inactive, but present  Category B = shingles, thrush, fever  Category C = AIDS, pneumonia, TB infection, toxoplasmosis of the brain 20
  21. Pattern Biosciences is required to provide a post-exposure evaluation and

    follow-up for any bloodborne pathogen exposure event HIV Exposure Response • Immediately wash the exposed area with soap and water and then report the incident to your supervisor who should summon medical attention • PEP (post-exposure prophylaxis) means taking medicine to prevent HIV after a possible exposure. PEP should be used only in emergency situations and must be started within 72 hours after a recent possible exposure to HIV. • Three-drug PEP regimens are now the recommended regimens for all exposures • If you think you’ve been exposed to HIV at work, Report your exposure to the appropriate person at work and seek medical attention immediately. Exposure to HIV is a Medical Emergency • PEP must be started within 72 hours after an exposure. The sooner you start PEP, the better. Every hour counts. • If you’re prescribed PEP, you’ll need to take it daily for 28 days.
  22. Occupational Exposure to Hepatitis and HIV Transmission Route Possible Medical

    Effects Treatment to Prevent Infection After Exposure Hepatitis B Through skin penetration or mucous membranes Liver Disease and Death in ~1% of Cases Vaccine Hepatitis C Through skin penetration or mucous membranes Liver Disease and Death in ~3% of Cases There are post exposure treatments available HIV Through skin penetration or mucous membranes Secondary Infections, Cancer and Death in Majority of Cases Some evidence shows post exposure treatment can prevent infection 22
  23. Other Potentially Infectious Materials (OPIM) Other potentially infectious materials include:

    • Semen • Vaginal secretions • Saliva in dental procedures • Bodily fluid that is contaminated with blood such as saliva or vomitus • Bodily fluids in situations where it is difficult or impossible to differentiate between bodily fluids (such as emergency response) • Unfixed tissue or organs (other than intact skin) from a human, living or dead 23
  24. Human blood and human body fluids are treated as if

    known to be infectious for HIV, HBV, HCV and other bloodborne pathogens • Wear clean lab coats and gloves, to protect skin and clothes • Wear safety glasses to protect eyes • Discard single-use equipment or decontaminate fully prior to re-use • Decontaminate surfaces, i.e., with 70% IPA or 10% bleach • Wash hands with water and soap • Respond to spills immediately Universal Precautions 24
  25. Accidental Exposure Response Irrigate for 15 minutes and seek professional

    medical attention. If infectious or potentially infectious material enters your eyes, go to and quickly use an eyewash station 25
  26. Accidental Exposure Response Irrigate for 15 minutes and seek professional

    medical attention. If infectious or potentially infectious material comes into contact with your skin, quickly wash the area with soap and water. 26
  27. Signs and Labeling If a biohazardous package arrives that appears

    damaged or is leaking, notify the biological safety officer as soon as possible. Place biohazard labels on refrigerators, freezers, water-baths and containers used to store, transport or ship potentially infectious materials or waste. Bio label placed on top & sides of waste cans Label collection containers Label equipment 27
  28. • No eating, drinking (or food storage) in the laboratory

    • Avoid touching face, hair, clothes, cell phone • Replace lab coat if soiled • Avoid taking un-necessary items into the BSL-2 laboratory • Decontaminate non-disposable items prior to bringing out of the laboratory that may have contacted BSL-2 materials • Limit absorbent materials in the BSL-2 lab Prevent Accidental Contact, Exposure, Contamination 28
  29. Personal Protective Equipment (PPE) Safety glasses must be worn when

    working in the laboratory. • Eye protection provided by Pattern Biosciences must be worn. Eye Protection should meet ANSI Z87.1 standards • Eye protection may become contaminated and should be regularly cleaned with detergent and water • Eye protection is available in corrective prescription and in protection that fits over corrective glasses. RX prescription glasses are available for employees, when requested. See CHO for more information. 29
  30. Laboratory Coat • Button the lab coat completely Gloves •

    If gloves are torn or punctured, remove them immediately, wash hands and replace with a new pair • Never wash or re-use disposable gloves • Consider wearing double gloves when appropriate Personal Protective Equipment (PPE) 30
  31. Wash your Hands Wash hands with soap and water: •

    After removal of gloves or other PPE • Frequently when working with BSL-2 materials • Before leaving the laboratory 31
  32. Generating Biohazardous Aerosols • Pipetting – Drain a pipette with

    tip against the inner wall of the receiving vessel – Do not forcibly expel any hazardous material from a pipette – Carefully eject the disposable pipette tips to minimize aerosol formation • Opening plates, tubes or bottles, particularly after shaking or centrifuging • Opening sealed ampoules • Conduct these processes inside a biological safety cabinet (BSC), wearing gloves and long-sleeved lab coats • Open glass ampoules with a disinfectant, such as an alcohol swab 32
  33. Biological safety cabinets use High Efficiency Particulate Air (HEPA) filters

    to trap particulate matter. Most HEPA filters are at least 99.97 percent efficient in removing mono-dispersed particles of 0.3 micrometers in diameter. https://www.dir.ca.gov/title8/1532_3.html Most viruses are smaller than 0.3 microns in diameter. However; a study showed 99% retention through a HEPA filter from a challenge of a T7 virus (size 0.04 microns) at concentrations of 5x10⁸. HEPA filters effectively trap particles including viruses at sizes much smaller than 0.3 microns. https://www.americanpharmaceuticalreview.com Biological Safety Cabinets Beware: Organic solvents and gases are not effectively trapped by HEPA filters. Do not use these materials in a Biological Safety Cabinet. Illustration courtesy of the Baker Company 33
  34. Work at least 10 cm inside of the BSC Do

    not block front or rear grills Too many objects in the BSC can disrupt the airflow Set up workflow to go from clean to dirty Use slow direct movements • Enter straight into the cabinet • Minimize sweeping motions Place only the items required for the process in the BSC; unnecessary items could impact air flow Minimize foot traffic within 3 feet of the BSC Working in a Biosafety Cabinet 34
  35. Assess your biosafety cabinet: • Do not block front and

    rear grills • Reduce items in biosafety cabinet; avoid clutter • Check that biosafety cabinet has been decontaminated after use Working in a Biosafety Cabinet 35 CORRECT Front grill is not blocked.
  36. Shutting Down a Biological Safety Cabinet Decontaminate items from the

    work area before removing them  Use a decontamination agent of 70% ethanol. Allow the decontamination agent sufficient time to work (5-10 minutes). Wipe and do not spray surfaces being decontaminated.  Be aware of the risks of your decontamination agent, consult your safety data sheets (SDS) concerning ethanol flammability and corrosion caused by bleach Decontaminate work surfaces in the same manner Turn on UV lamp (if available) for 15 minutes  Leave the work area during this period to avoid skin or eye exposure from the UV light  To preserve UV lamp, turn it off after the 15-minute disinfection period Place the date on the 10% bleach solution when first made. Discard the solution after: 7 days for BSL-2 work 36
  37. Liquid Biohazardous Waste (and waste that will decay and create

    odors) • Dilute to a concentration of 10%, swill and allow to sit for 20 minutes, or add 1” of undiluted household bleach to the empty container, so it is treated on contact • Place flasks in a secondary containment spill tray that is 110% capacity of the contents • Empty biohazard collection containers once a week at minimum • Ensure that no flammable or extreme pH liquids enter the sewer Bleach & Sewer 37
  38. Decontaminating a Biological Safety Cabinet Decontaminate items from the work

    area before removing them  Use a decontamination agent of 70% ethanol. Allow the decontamination agent sufficient time to work (5-10 minutes). Wipe and do not spray surfaces being decontaminated.  Be aware of the risks of your decontamination agent, consult your safety data sheets (SDS) concerning ethanol flammability and corrosion caused by bleach Decontaminate work surfaces in the same manner Turn on UV lamp (if available) for 15 minutes  Leave the work area during this period to avoid skin or eye exposure from the UV light  To preserve UV lamp, turn it off after the 15-minute disinfection period 38
  39. Container • Add biohazardous label on top and sides of

    rigid leak-proof container. Make sure the red biohazard bag does not cover or obscure the labels on the side of the container. Red Bag • Immediately place waste material in the bag • Consider the container “full” when at ¾ capacity • Keep lid closed unless you are adding waste • No biohazardous solids in regular trash Non-Sharp Solid Biohazardous Waste 39
  40. • No protruding sharps • Do not shake down contents

    to compact them • Keep lid secured onto the sharps container. • No non-sharp waste • Needles should be discarded into sharps containers immediately after use Do not bend, crimp or re- sheath, recap needles. Sharp Solid Biohazardous Waste 40 INCORRECT Sharps are protruding from the container.
  41. Solid (Non-Sharp) Biohazardous Waste Step 1 Remove the biohazardous waste

    bag from the biohazardous waste container when it is 3/4 full or less. Do not fill the bag completely. Step 2 Gently squeeze excess air from the inner bag. Do not compact the waste. Step 3 Twist the top of the inner bag, "gooseneck" the bag and tape the "gooseneck" with tape (See diagram). Do not use radiation warning tape. Step 4 Place the bag in the waste hauler's biohazardous waste receptacle. Step 5 Place a clean new bag in the biohazardous waste container. Close the biohazardous waste container. Ok to double-bag. Packaging Biohazardous Waste When a biohazardous waste container is 3/4 full, the waste should be packaged using the following method: 41
  42. Improper Biohazardous Waste Handling 42 Red step can is missing

    a biohazard sticker on lid. Biohazardous red bag waste must be collected in a ridged container with a lid. Container is overfilled and the lid has been left open.
  43. Promptly report exposures involving blood or other potentially infectious materials

    (OPIM) to the Biosafety Officer Sharps injury log must be completed within 14 days Reporting Exposures and Sharps Injuries Related medical evaluation and follow-up, such as tests or vaccinations, will made available at no cost to the employee. A confidential written report of the circumstances surrounding the exposure, the source test results, and your test results will be retained by the Workers’ Comp Coordinator. 43
  44. Warn others of the spill and clear the area for

    at least 20 minutes. Put on Personal Protective Equipment (PPE) such as gloves, eye protection, apron or lab coat Pick up broken contaminated glass with a mechanical device Dispose of broken contaminated glass as biohazardous sharps waste Pour 10% solution of household bleach or 70% Ethanol on stainless steel surfaces (biosafety cabinet) around the spill to disinfect the area. Allow to stand for 20-30 minutes, then clean up the area with absorbent paper or pads. Dispose of all items and PPE used to clean up spill, as biohazardous waste. Biological Spill Response 44
  45. Ergonomic Practices When Performing Biosafety Work 45 If you would

    like to request an ergonomic assessment Contact the Biological Safety Officer. • Ergonomics is the science of designing machines, tools, and systems to maximize the safety, comfort, and efficiency of the people who use them. • There are ergonomic risk factors when performing work in the laboratory. Review and follow ergonomic safe practices described in the following slides.
  46.  Use a chair to elevate the body so that

    shoulder extension is minimized and the elbows rest at 90-110 degrees above the work surface of the biosafety cabinet  Sit into the lab chair and use the backrest to support the lumbar.  Sit closer to the biosafety cabinet to minimize shoulder extension.  Use a biosafety cabinet arm rest or vent bridge to support the arms and reduce contact stress.  Use a lab-appropriate footrest to support the weight of the legs and help sit further back into the chair to support the lumbar. Rest the hips and legs at 90-110 degrees. Ergonomic Practices for Working in Biosafety Cabinet 46 Biological safety cabinet ergonomic position
  47. (Continued)  Relocate the waste bin underneath the biosafety cabinet

    to minimize twisting of the body.  Position work supplies in their order of use, with those most frequently used near the front, but not closer than 6 inches from the face of the biosafety cabinet.  Increase the instance of micro-breaks; a micro-break is a 1-minute break for every 20 minutes of continuous work. Use most micro- breaks for stretching.  Take 5-10 minutes activity breaks every hour. Work no more than two hours continuously at the biosafety cabinet. Ergonomic Practices for Working in Biosafety Cabinet 47 Biological safety cabinet ergonomic position
  48. 1. Take micro-breaks of 3–5 minutes, for every 12–30 minutes

    of pipetting 2. Adjust the workstation so the work can be done with arms close to the body 3. Use shorter pipettes 4. Use pipettes that fit comfortably in the user's hand 5. Keep samples and instruments within easy reach 6. Use low profile waste receptacles for used tips 7. Use anti-fatigue mats when standing for long periods of time 8. Use an adjustable stool or chair when sitting Ergonomic Practices for Pipetting Source: ThermoFisher Scientific
  49. 49 • After you complete the post training quiz, press

    Submit Test • Retake the quiz if you receive a failing score • You will receive an email message showing your score (90% or higher needed to pass) • Forward your results email stating you passed to the person(s) in the training instructions email you received. Please scroll down and begin taking your post training quiz Biological Safety & Bloodborne Pathogens
  50. You Have Completed this Training Course 50 If you have

    any questions or comments regarding the content of this training, please contact your Manager or the Safety Coordinator.