This is a manual for Python using Katana, Foundry's dedicated Lighting & LookDev software.
Foundry社製のLighting & LookDev専用ソフトウェア「Katana」を使用したPythonのマニュアルです。
Root Node Graphの取得 Get the node graph at the top level. It is recommended to assign the acquired node graph to a variable because it is used to create the node described below. 一番上位階層にあるノードグラフを取得します。 取得したノードグラフは後述のノード作成に使用しますので、変数に 代入しておく事を推奨します。 NodegraphAPI.GetRootNode() rootNodeGraph = NodegraphAPI.GetRootNode() Exsample - 例
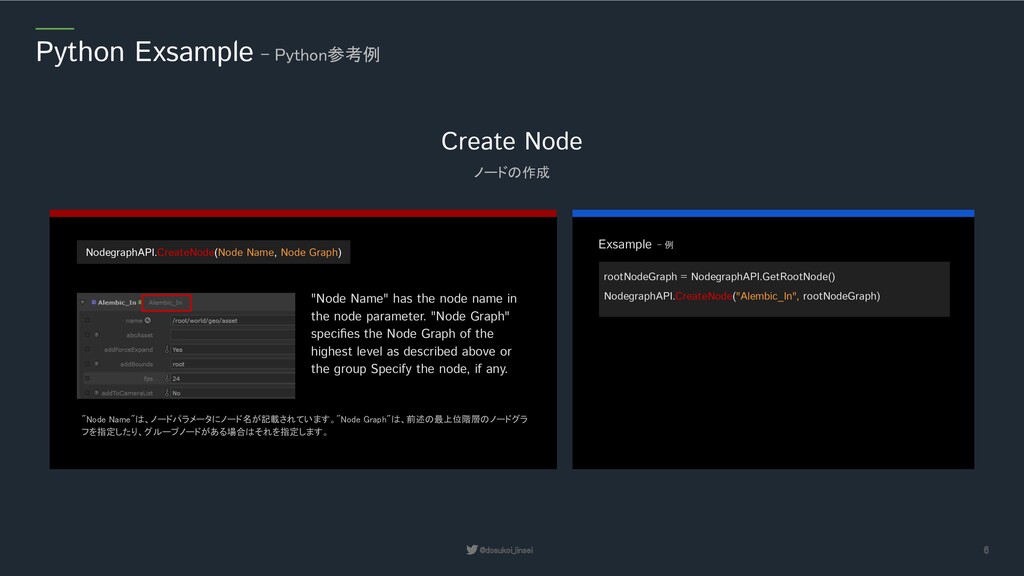
Name, Node Graph) "Node Name" has the node name in the node parameter. "Node Graph" specifies the Node Graph of the highest level as described above or the group Specify the node, if any. "Node Name"は、ノードパラメータにノード名が記載されています。"Node Graph"は、前述の最上位階層のノードグラ フを指定したり、グループノードがある場合はそれを指定します。 Exsample - 例 rootNodeGraph = NodegraphAPI.GetRootNode() NodegraphAPI.CreateNode("Alembic_In", rootNodeGraph)
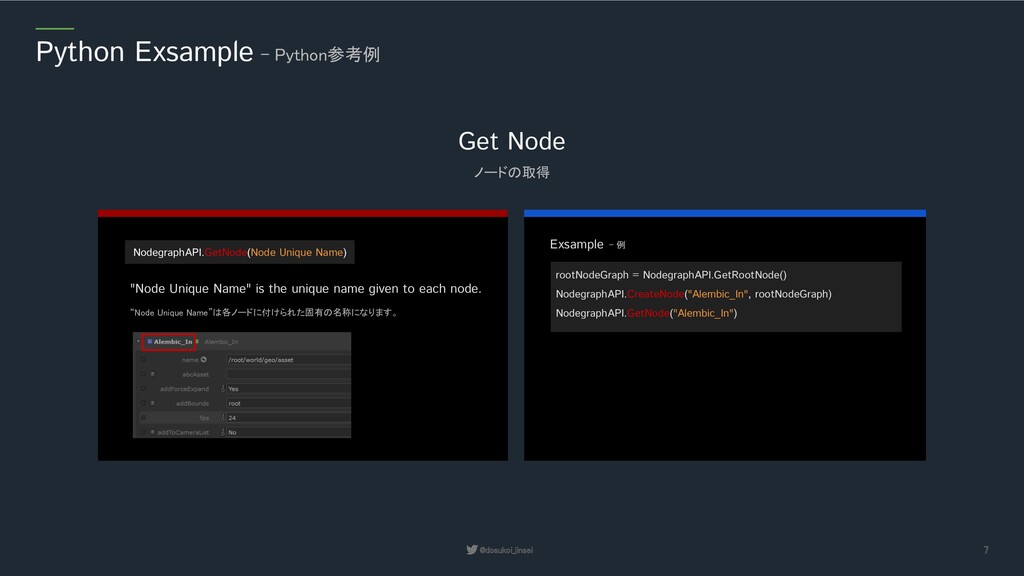
Unique Name) "Node Unique Name" is the unique name given to each node. “Node Unique Name”は各ノードに付けられた固有の名称になります。 Exsample - 例 rootNodeGraph = NodegraphAPI.GetRootNode() NodegraphAPI.CreateNode("Alembic_In", rootNodeGraph) NodegraphAPI.GetNode("Alembic_In")
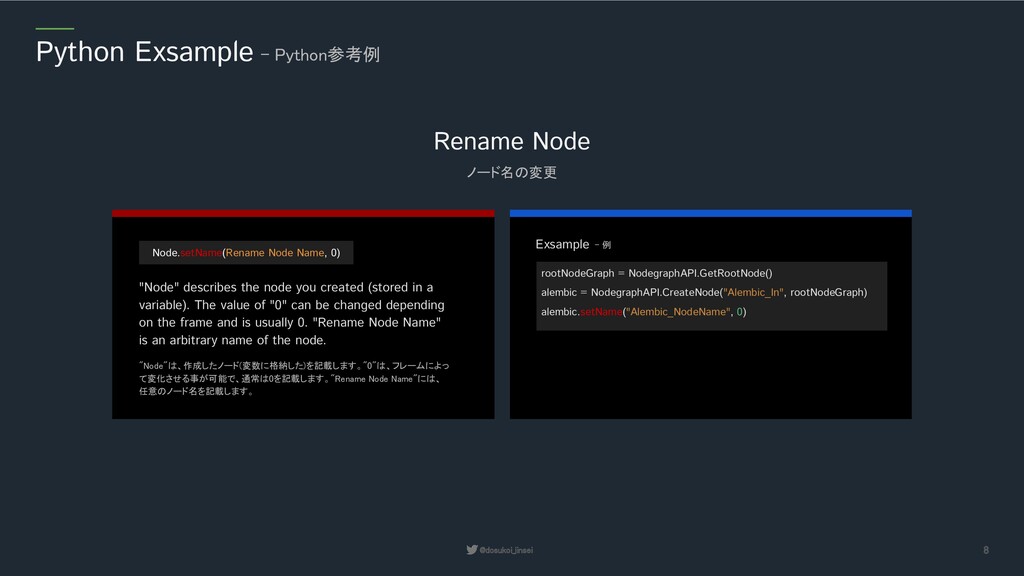
Node Name, 0) "Node" describes the node you created (stored in a variable). The value of "0" can be changed depending on the frame and is usually 0. "Rename Node Name" is an arbitrary name of the node. "Node"は、作成したノード(変数に格納した)を記載します。"0"は、フレームによっ て変化させる事が可能で、通常は0を記載します。"Rename Node Name"には、 任意のノード名を記載します。 Exsample - 例 rootNodeGraph = NodegraphAPI.GetRootNode() alembic = NodegraphAPI.CreateNode("Alembic_In", rootNodeGraph) alembic.setName("Alembic_NodeName", 0)
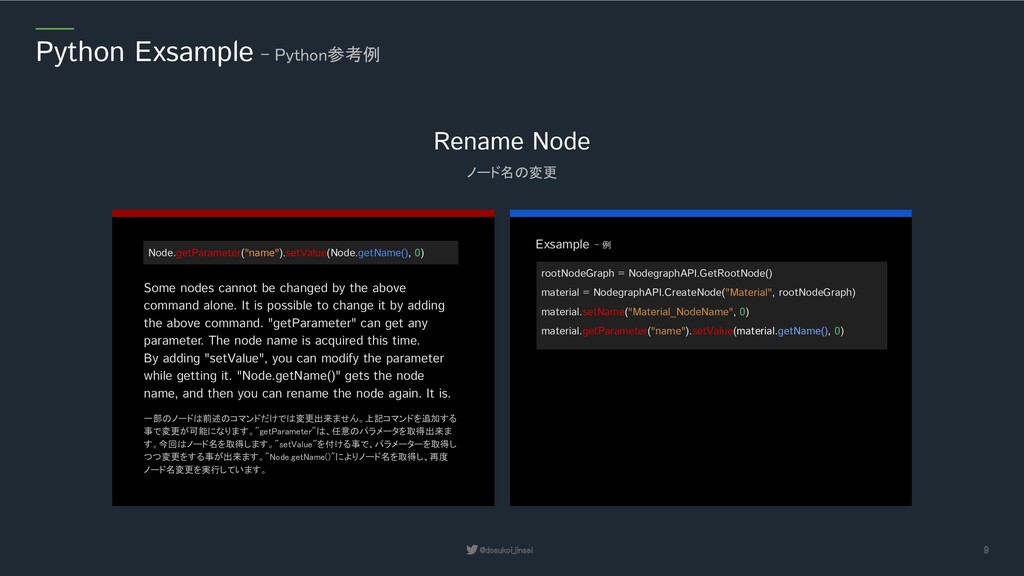
0) Some nodes cannot be changed by the above command alone. It is possible to change it by adding the above command. "getParameter" can get any parameter. The node name is acquired this time. By adding "setValue", you can modify the parameter while getting it. "Node.getName()" gets the node name, and then you can rename the node again. It is. 一部のノードは前述のコマンドだけでは変更出来ません。上記コマンドを追加する 事で変更が可能になります。"getParameter"は、任意のパラメータを取得出来ま す。今回はノード名を取得します。"setValue"を付ける事で、パラメーターを取得し つつ変更をする事が出来ます。"Node.getName()"によりノード名を取得し、再度 ノード名変更を実行しています。 Exsample - 例 rootNodeGraph = NodegraphAPI.GetRootNode() material = NodegraphAPI.CreateNode("Material", rootNodeGraph) material.setName("Material_NodeName", 0) material.getParameter("name").setValue(material.getName(), 0)
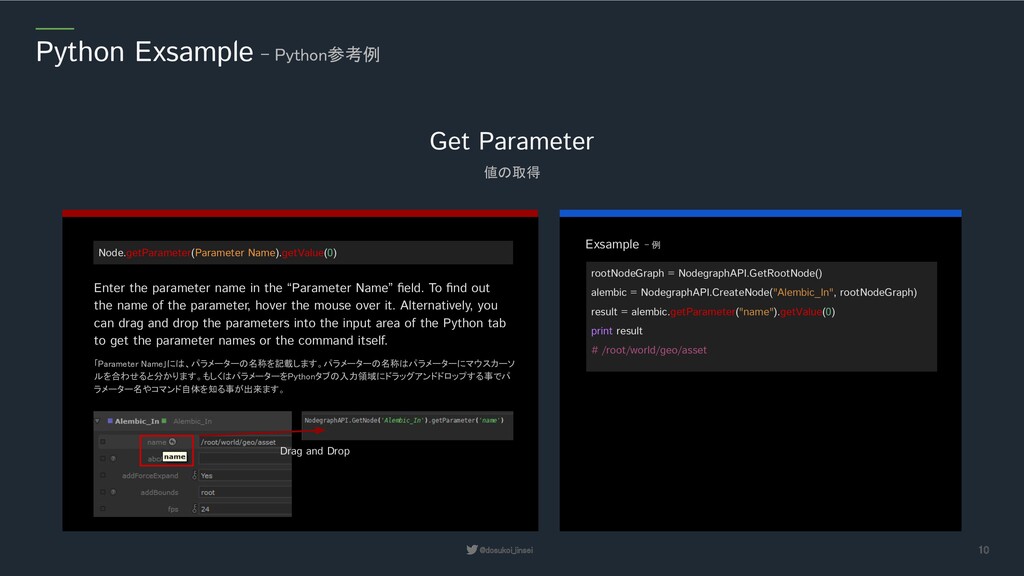
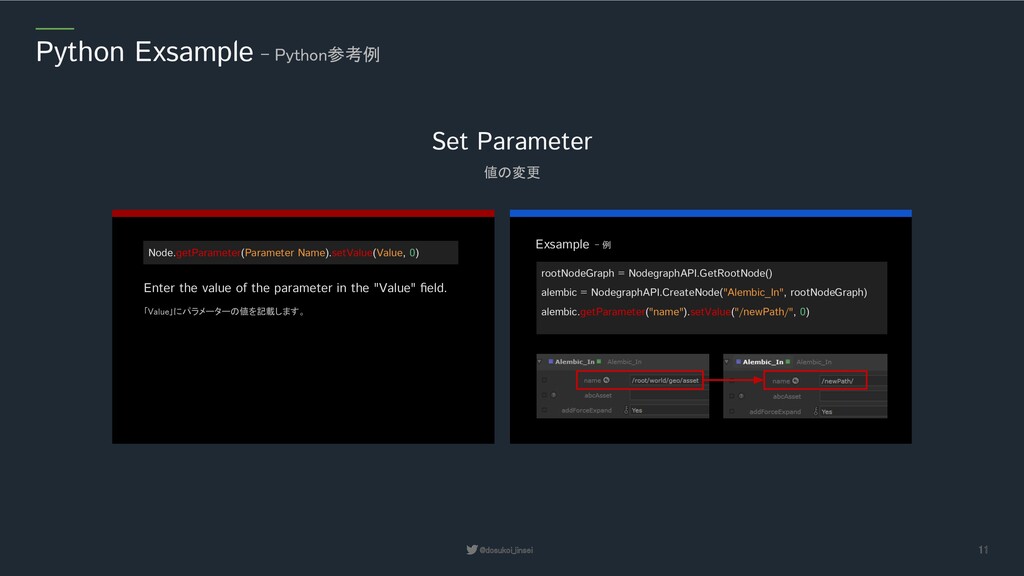
Name).getValue(0) Enter the parameter name in the “Parameter Name” field. To find out the name of the parameter, hover the mouse over it. Alternatively, you can drag and drop the parameters into the input area of the Python tab to get the parameter names or the command itself. 「Parameter Name」には、パラメーターの名称を記載します。パラメーターの名称はパラメーターにマウスカーソ ルを合わせると分かります。もしくはパラメーターをPythonタブの入力領域にドラッグアンドドロップする事でパ ラメーター名やコマンド自体を知る事が出来ます。 Exsample - 例 rootNodeGraph = NodegraphAPI.GetRootNode() alembic = NodegraphAPI.CreateNode("Alembic_In", rootNodeGraph) result = alembic.getParameter("name").getValue(0) print result # /root/world/geo/asset Drag and Drop
Name).setValue(Value, 0) Enter the value of the parameter in the "Value" field. 「Value」にパラメーターの値を記載します。 Exsample - 例 rootNodeGraph = NodegraphAPI.GetRootNode() alembic = NodegraphAPI.CreateNode("Alembic_In", rootNodeGraph) alembic.getParameter("name").setValue("/newPath/", 0)
CoordinateX, CoordinateY) "CoordinateX" and "CoordinateY" have the "X coordinate" and The "Y-coordinate" is described by an integer or a floating point. "CoordinateX"と"CoordinateY"にはそれぞれノードの「X座標」と「Y座標」を整数、もし くは浮動小数点で記載します。 Exsample - 例 rootNodeGraph = NodegraphAPI.GetRootNode() alembic = NodegraphAPI.CreateNode("Alembic_In", rootNodeGraph) NodegraphAPI.SetNodePosition(alembic, (100, 200.5))
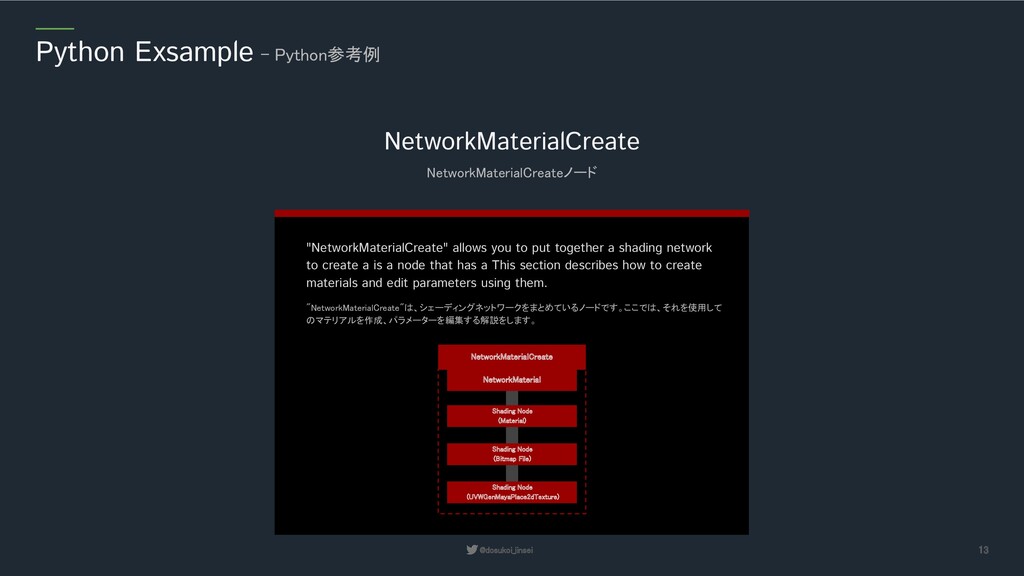
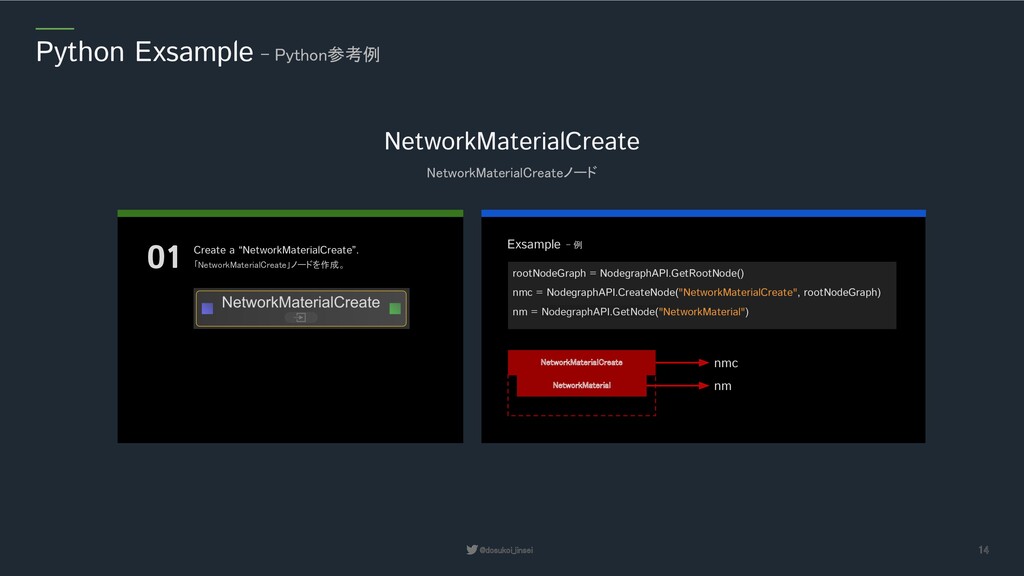
you to put together a shading network to create a is a node that has a This section describes how to create materials and edit parameters using them. "NetworkMaterialCreate"は、シェーディングネットワークをまとめているノードです。ここでは、それを使用して のマテリアルを作成、パラメーターを編集する解説をします。 Shading Node (Material) Shading Node (Bitmap File) Shading Node (UVWGenMayaPlace2dTexture) NetworkMaterialCreate NetworkMaterial
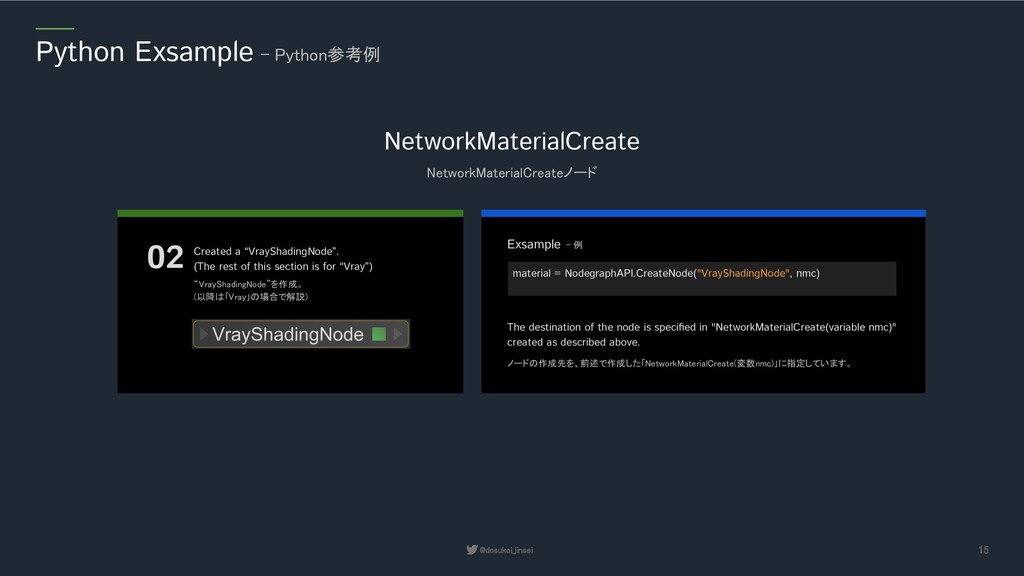
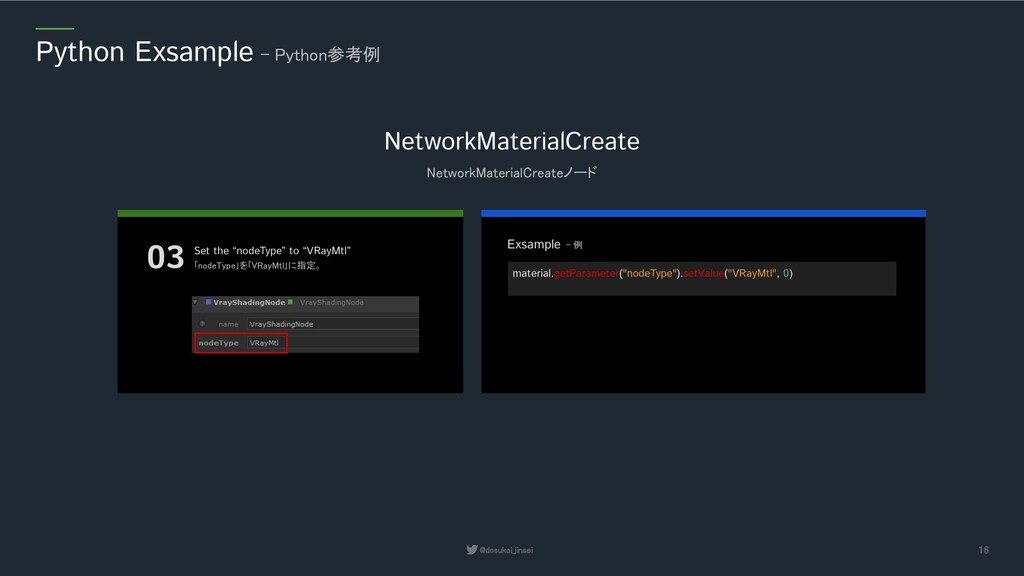
a “VrayShadingNode”. (The rest of this section is for “Vray”) “VrayShadingNode”を作成。 (以降は「Vray」の場合で解説) Exsample - 例 material = NodegraphAPI.CreateNode("VrayShadingNode", nmc) The destination of the node is specified in "NetworkMaterialCreate(variable nmc)" created as described above. ノードの作成先を、前述で作成した「NetworkMaterialCreate(変数nmc)」に指定しています。
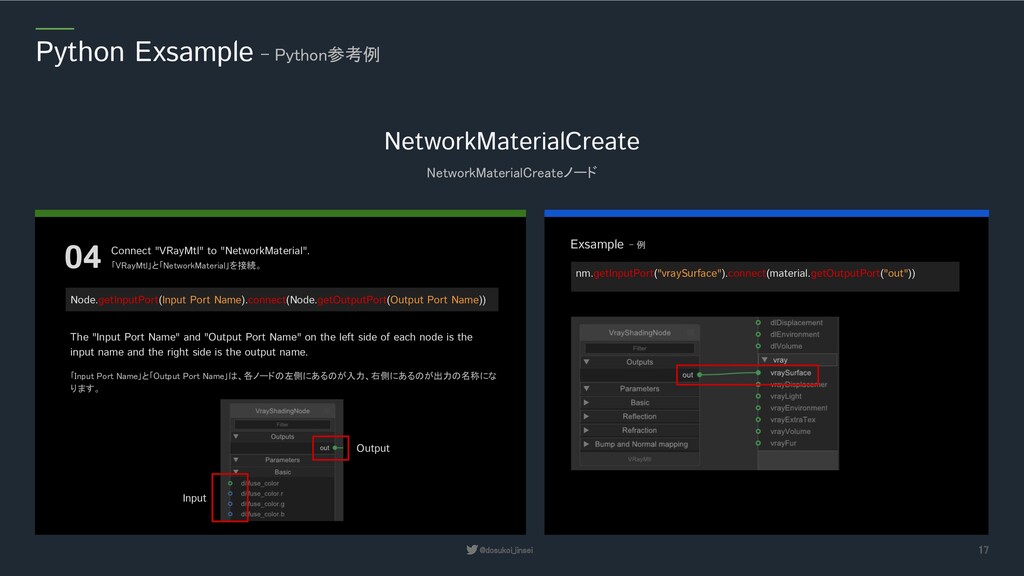
"VRayMtl" to "NetworkMaterial". 「VRayMtl」と「NetworkMaterial」を接続。 Exsample - 例 nm.getInputPort("vraySurface").connect(material.getOutputPort("out")) Node.getInputPort(Input Port Name).connect(Node.getOutputPort(Output Port Name)) The "Input Port Name" and "Output Port Name" on the left side of each node is the input name and the right side is the output name. 「Input Port Name」と「Output Port Name」は、各ノードの左側にあるのが入力、右側にあるのが出力の名称にな ります。 Input Output
the parameters of the material. マテリアルのパラメーターを変更。 There are commands to be run before changing the parameters of a material. This is mainly for the following reasons (taken from the Katana Developer Guide). マテリアルのパラメータを変更する前に実行しておくコマンドがあります。 これは主に以下の理由です( Katana Developer Guideから抜粋)。 A sub-set of nodes in Katana feature “dynamic” parameters; dynamic in that their existence on a node is not fixed at node creation time, but rather is on attributes from the incoming scene or some other asynchronous process. For example, upon adding a shader to a Material node, Katana must query the renderer for the set of parameters the shader exposes, as well as their default values. Until these queries complete and the Parameters tab is updated, the parameters representing the various shader configuration options do not yet exist. Katanaのノードのサブセットには、「ダイナミック」なパラメータがあります。ダイナミックとは、ノード上のパラメータがノード作成時に固定されている のではなく、入力されるシーンやその他の非同期プロセスからのアトリビュートに基づいているという意味です。 例えば、マテリアルノードにシェーダを追加すると、Katanaはシェーダが公開しているパラメータのセットとデフォルト値をレンダラーに問い合わせな ければなりません。これらのクエリが完了して[パラメータ]タブが更新されるまでは、さまざまなシェーダ設定オプションを表すパラメータはまだ存在 しません。 Shading Node VRayMtl Vray (Renderer) VRayMtl Parameter To summarize, this is because after creating a node, we query external programs such as Renderer and can't change it right away because of the time it takes to reflect it in the node. 要約すると、ノード作成後にRenderer等の外部プログラムに問い合わせし、ノードに反映するまでの時間がある ので、すぐには変更出来ないためです。
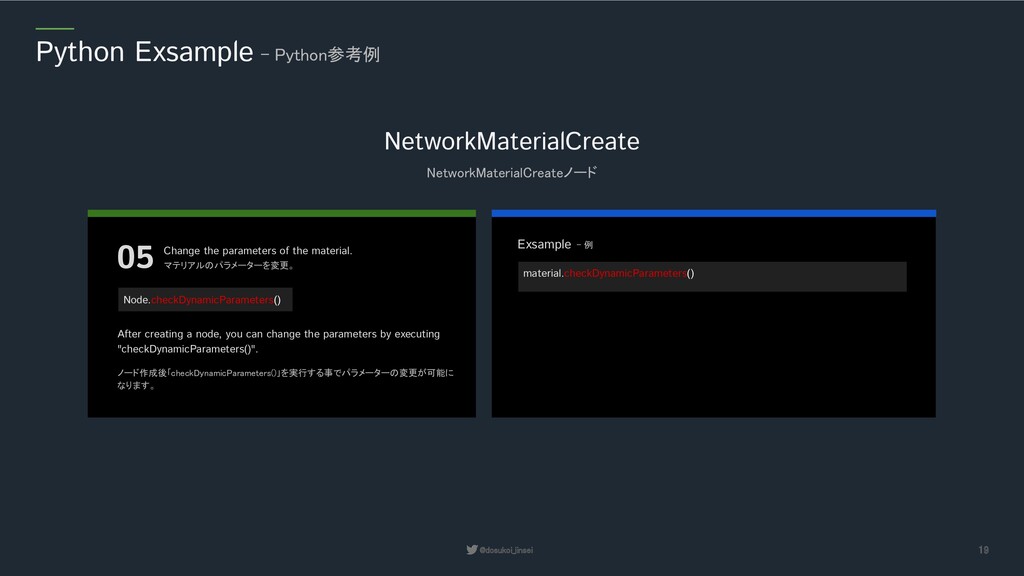
the parameters of the material. マテリアルのパラメーターを変更。 After creating a node, you can change the parameters by executing "checkDynamicParameters()". ノード作成後「checkDynamicParameters()」を実行する事でパラメーターの変更が可能に なります。 Node.checkDynamicParameters() Exsample - 例 material.checkDynamicParameters()
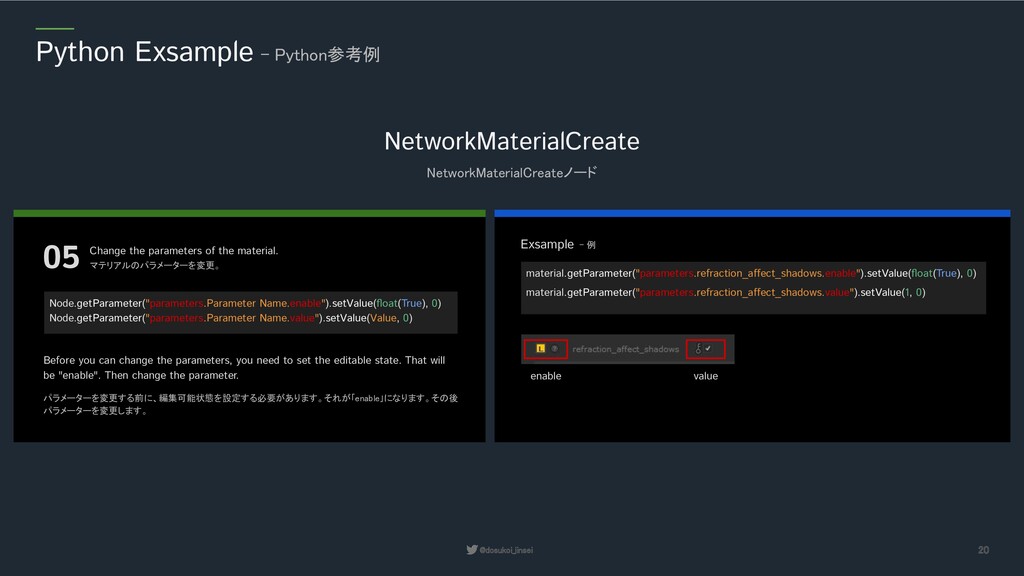
the parameters of the material. マテリアルのパラメーターを変更。 Before you can change the parameters, you need to set the editable state. That will be "enable". Then change the parameter. パラメーターを変更する前に、編集可能状態を設定する必要があります。それが「enable」になります。その後 パラメーターを変更します。 Exsample - 例 material.getParameter("parameters.refraction_affect_shadows.enable").setValue(float(True), 0) material.getParameter("parameters.refraction_affect_shadows.value").setValue(1, 0) Node.getParameter("parameters.Parameter Name.enable").setValue(float(True), 0) Node.getParameter("parameters.Parameter Name.value").setValue(Value, 0) enable value
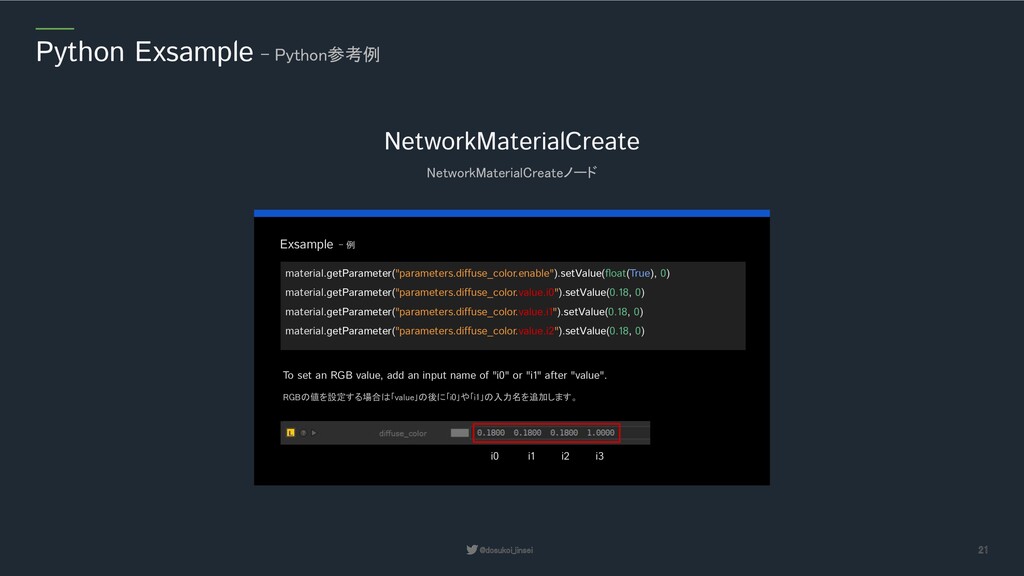
例 material.getParameter("parameters.diffuse_color.enable").setValue(float(True), 0) material.getParameter("parameters.diffuse_color.value.i0").setValue(0.18, 0) material.getParameter("parameters.diffuse_color.value.i1").setValue(0.18, 0) material.getParameter("parameters.diffuse_color.value.i2").setValue(0.18, 0) To set an RGB value, add an input name of "i0" or "i1" after "value". RGBの値を設定する場合は「value」の後に「i0」や「i1」の入力名を追加します。 i0 i1 i2 i3
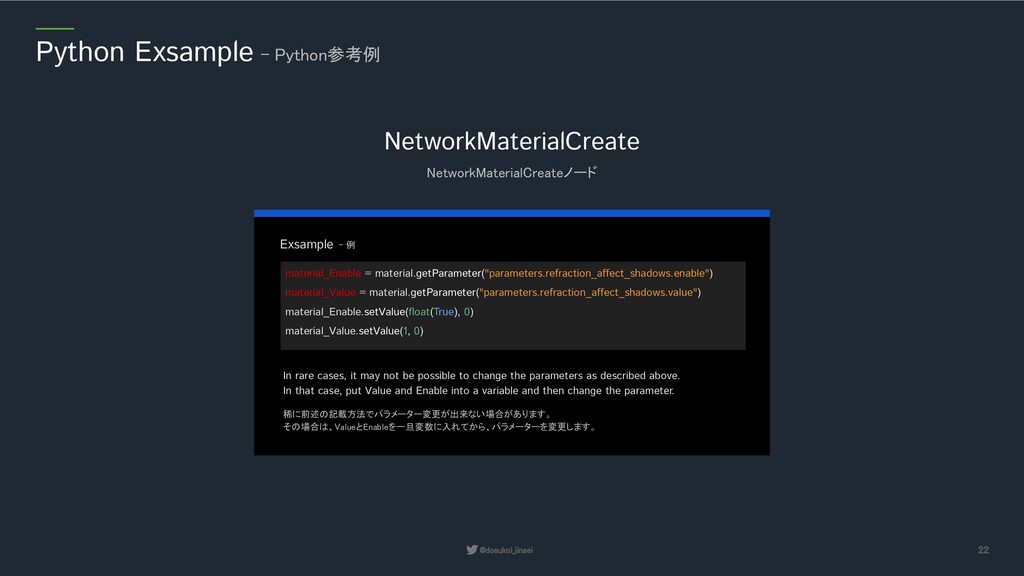
例 material_Enable = material.getParameter("parameters.refraction_affect_shadows.enable") material_Value = material.getParameter("parameters.refraction_affect_shadows.value") material_Enable.setValue(float(True), 0) material_Value.setValue(1, 0) In rare cases, it may not be possible to change the parameters as described above. In that case, put Value and Enable into a variable and then change the parameter. 稀に前述の記載方法でパラメーター変更が出来ない場合があります。 その場合は、ValueとEnableを一旦変数に入れてから、パラメーターを変更します。
Node.addInputPort("i0") Some nodes do not have an input port by default, such as the "Merge" node. In that case, you can add an input port and connect the node. 「Merge」ノード等、デフォルトで入力ポートが付いていないノードがあります。その場合 は、入力ポートを追加し、ノードを接続します。 Exsample - 例 rootNodeGraph = NodegraphAPI.GetRootNode() merge = NodegraphAPI.CreateNode("Merge", rootNodeGraph) merge.addInputPort("i0") merge.addInputPort("i1") Add Input Port
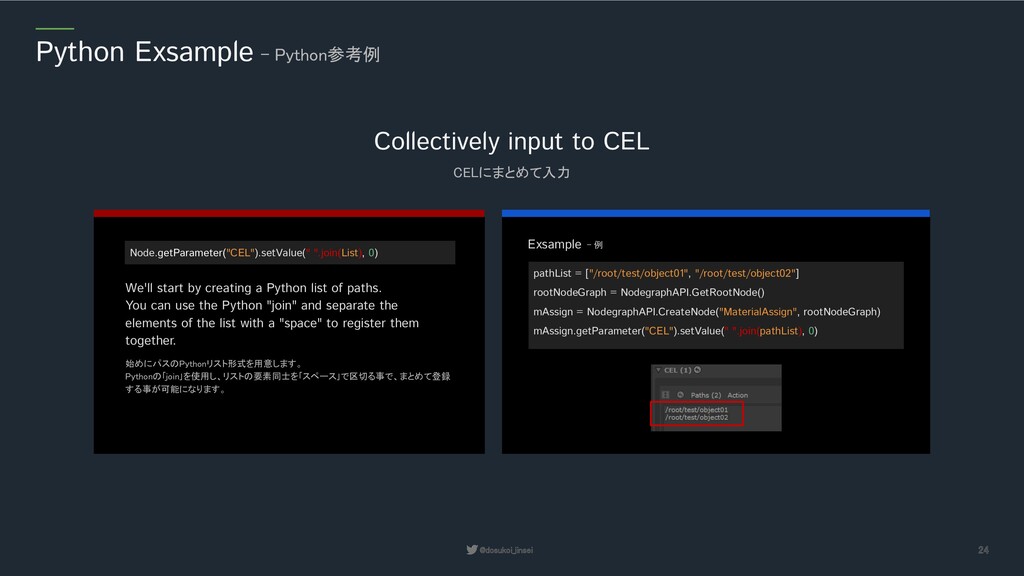
CELにまとめて入力 Node.getParameter("CEL").setValue(" ".join(List), 0) We'll start by creating a Python list of paths. You can use the Python "join" and separate the elements of the list with a "space" to register them together. 始めにパスのPythonリスト形式を用意します。 Pythonの「join」を使用し、リストの要素同士を「スペース」で区切る事で、まとめて登録 する事が可能になります。 Exsample - 例 pathList = ["/root/test/object01", "/root/test/object02"] rootNodeGraph = NodegraphAPI.GetRootNode() mAssign = NodegraphAPI.CreateNode("MaterialAssign", rootNodeGraph) mAssign.getParameter("CEL").setValue(" ".join(pathList), 0)
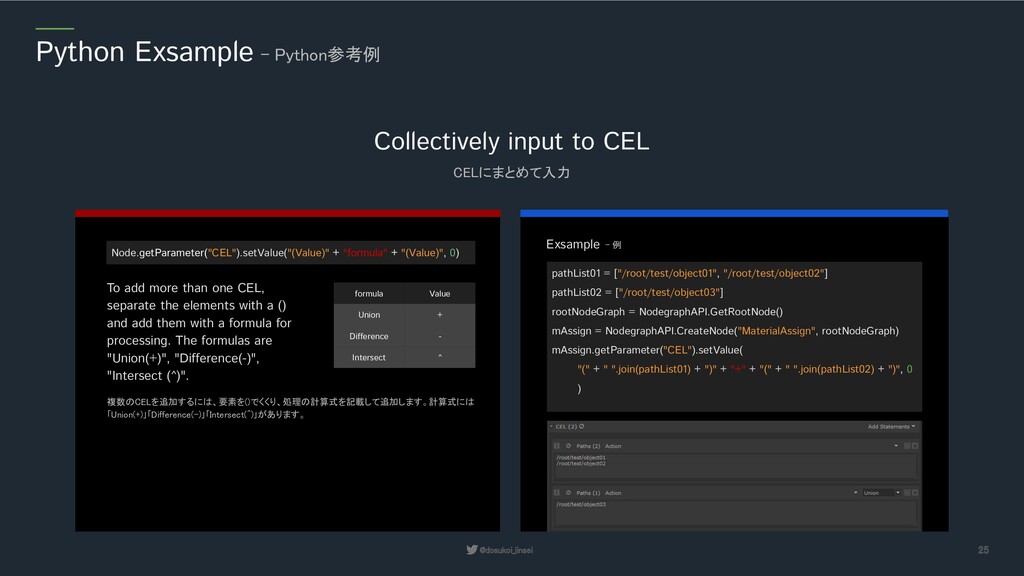
CELにまとめて入力 To add more than one CEL, separate the elements with a () and add them with a formula for processing. The formulas are "Union(+)", "Difference(-)", "Intersect (^)". 複数のCELを追加するには、要素を()でくくり、処理の計算式を記載して追加します。計算式には 「Union(+)」「Difference(-)」「Intersect(^)」があります。 Exsample - 例 pathList01 = ["/root/test/object01", "/root/test/object02"] pathList02 = ["/root/test/object03"] rootNodeGraph = NodegraphAPI.GetRootNode() mAssign = NodegraphAPI.CreateNode("MaterialAssign", rootNodeGraph) mAssign.getParameter("CEL").setValue( "(" + " ".join(pathList01) + ")" + "+" + "(" + " ".join(pathList02) + ")", 0 ) Node.getParameter("CEL").setValue("(Value)" + "formula" + "(Value)", 0) formula Value Union + Difference - Intersect ^
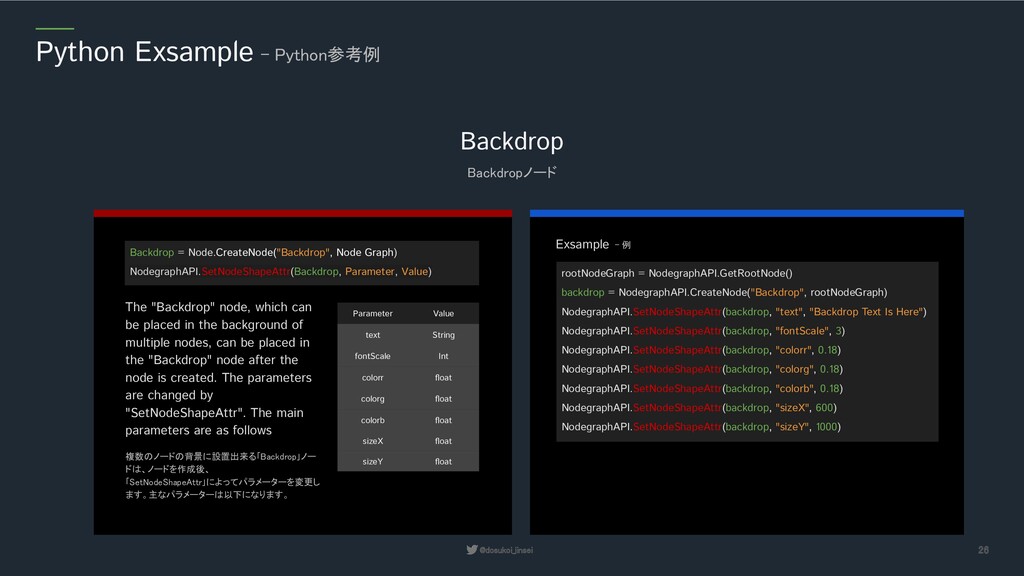
Node.CreateNode("Backdrop", Node Graph) NodegraphAPI.SetNodeShapeAttr(Backdrop, Parameter, Value) The "Backdrop" node, which can be placed in the background of multiple nodes, can be placed in the "Backdrop" node after the node is created. The parameters are changed by "SetNodeShapeAttr". The main parameters are as follows 複数のノードの背景に設置出来る「Backdrop」ノー ドは、ノードを作成後、 「SetNodeShapeAttr」によってパラメーターを変更し ます。主なパラメーターは以下になります。 Exsample - 例 rootNodeGraph = NodegraphAPI.GetRootNode() backdrop = NodegraphAPI.CreateNode("Backdrop", rootNodeGraph) NodegraphAPI.SetNodeShapeAttr(backdrop, "text", "Backdrop Text Is Here") NodegraphAPI.SetNodeShapeAttr(backdrop, "fontScale", 3) NodegraphAPI.SetNodeShapeAttr(backdrop, "colorr", 0.18) NodegraphAPI.SetNodeShapeAttr(backdrop, "colorg", 0.18) NodegraphAPI.SetNodeShapeAttr(backdrop, "colorb", 0.18) NodegraphAPI.SetNodeShapeAttr(backdrop, "sizeX", 600) NodegraphAPI.SetNodeShapeAttr(backdrop, "sizeY", 1000) Parameter Value text String fontScale Int colorr float colorg float colorb float sizeX float sizeY float