Upgrade to Pro — share decks privately, control downloads, hide ads and more …

Planes de pérgolas

Sponsored · Ship Features Fearlessly Turn features on and off without deploys. Used by thousands of Ruby developers. →

Planes de pérgolas

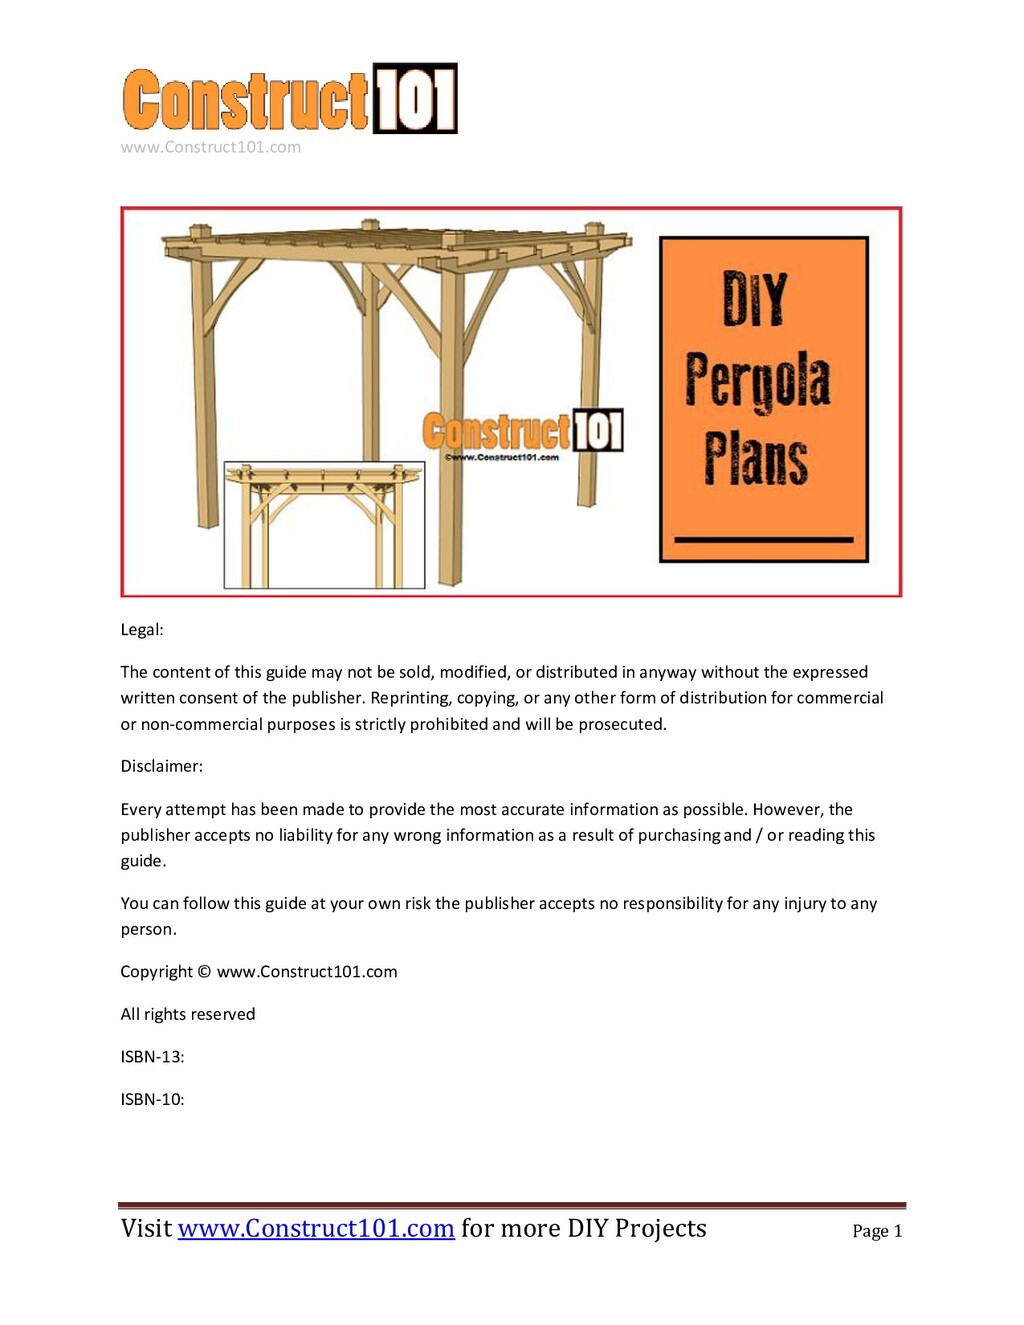
Pérgolas de aluminio con techo de policarbonato

Los techos de policarbonato están hechos por unas planchas de un material de plástico sólido, duradero, consistente, liviano y fácil de moldear.

Se pueden teñir de varios colores. Pueden instalarse en distintos tipos de estructuras, cómo metálicas, madera y aluminio, entre otras.

Le da un paso a la luz natural ya que es un material traslúcido y es muy resistente a aguantar fuertes golpes, este techo nos permite un aislamiento térmico por lo que es ideal colocarlo en el patio cerca de la piscina.

Sus dimensiones pueden ser de 300x300x260 cm con una superficie de 3x3m con una altura de 2m.

Avatar for Daniel Blanco

Daniel Blanco

March 28, 2020

Other Decks in Technology

Transcript

  1. www.Construct101.com Visit www.Construct101.com for more DIY Projects Page 1 Legal:

    The content of this guide may not be sold, modified, or distributed in anyway without the expressed written consent of the publisher. Reprinting, copying, or any other form of distribution for commercial or non-commercial purposes is strictly prohibited and will be prosecuted. Disclaimer: Every attempt has been made to provide the most accurate information as possible. However, the publisher accepts no liability for any wrong information as a result of purchasing and / or reading this guide. You can follow this guide at your own risk the publisher accepts no responsibility for any injury to any person. Copyright © www.Construct101.com All rights reserved ISBN-13: ISBN-10:
  2. www.Construct101.com Visit www.Construct101.com for more DIY Projects Page 2 DIY

    Pergola Plans – Material List Shopping List 4 – 6×6 – 12′ 11 – 2×6 – 12′ 4 – 2×6 – 10′ 11 – 2×2 – 12′ 3 1/2″ deck screws Cutting List 4 – 6×6 -12′ 11 – 2×6 – 12′ 8 – 2×6 – 4′ 4 3/4″ 11 – 2×2 – 12′
  3. www.Construct101.com Visit www.Construct101.com for more DIY Projects Page 3 DIY

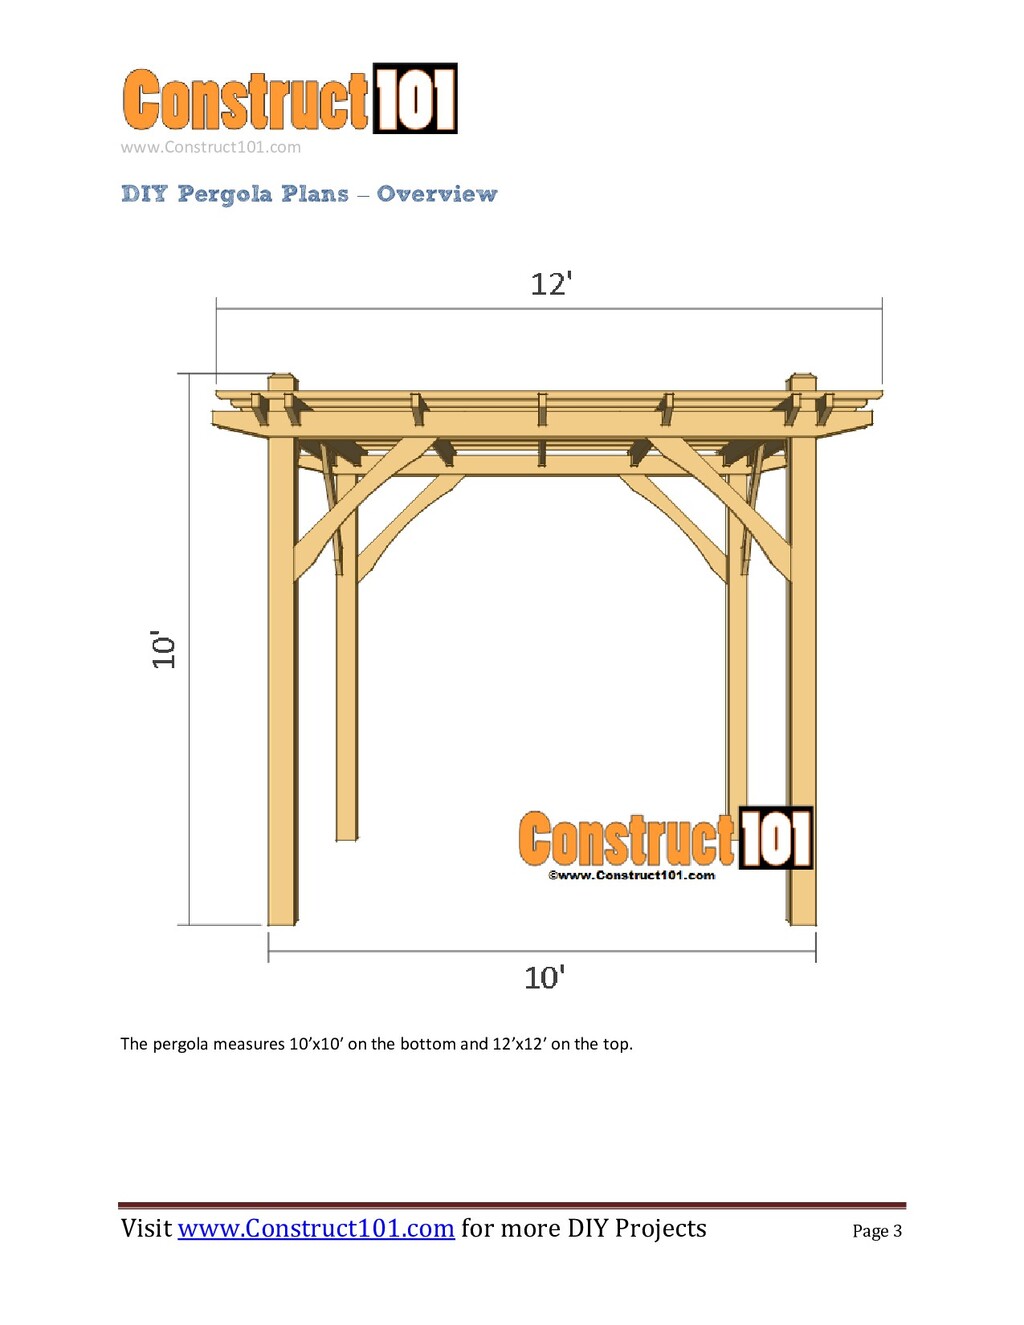
    Pergola Plans – Overview The pergola measures 10’x10′ on the bottom and 12’x12′ on the top.
  4. www.Construct101.com Visit www.Construct101.com for more DIY Projects Page 5 DIY

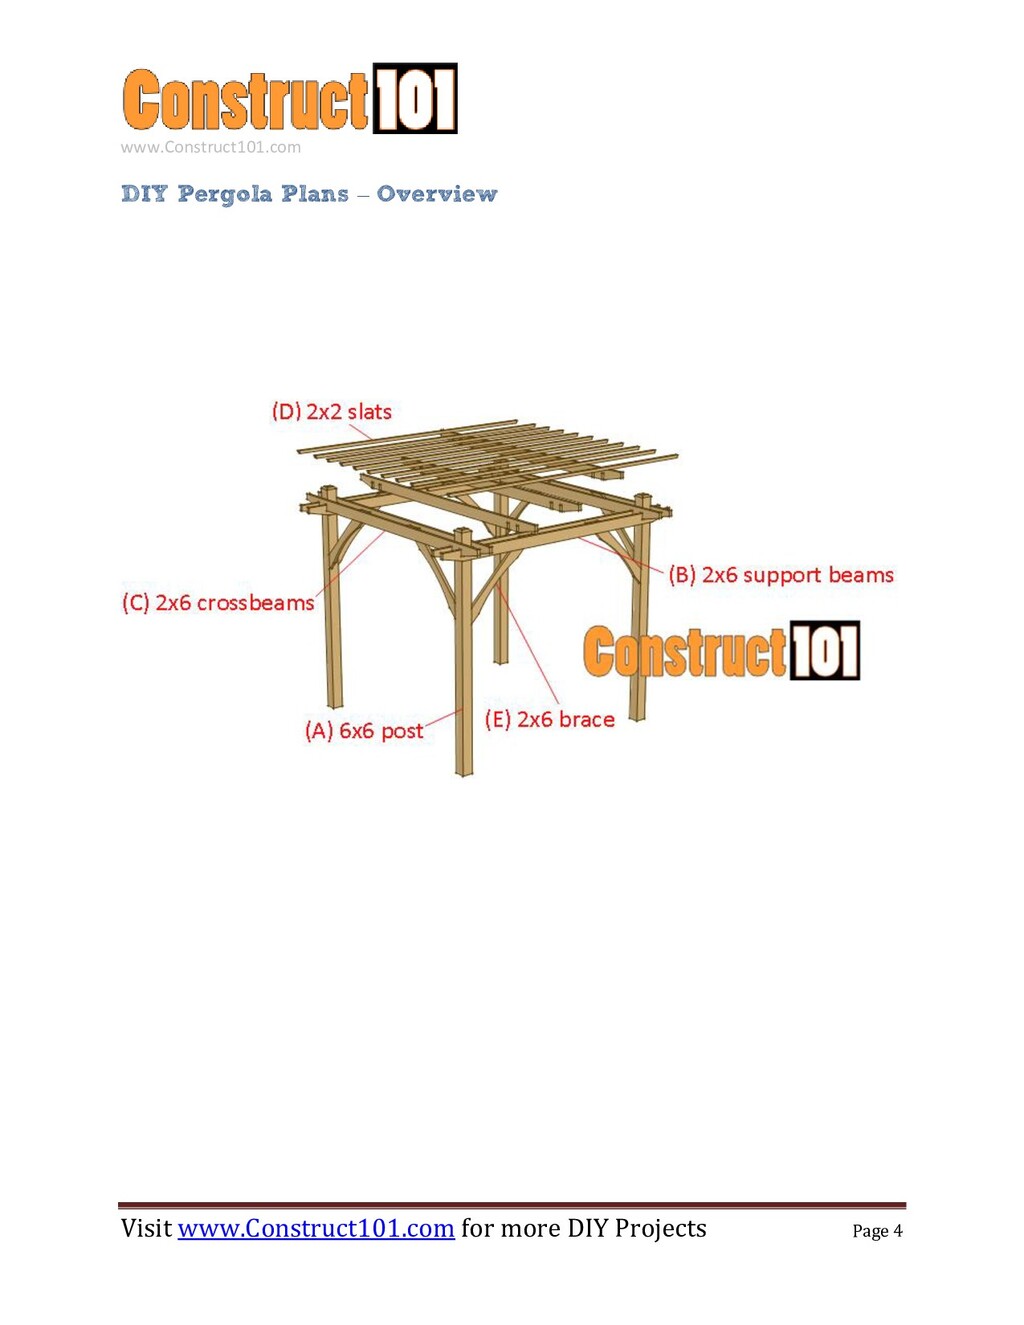
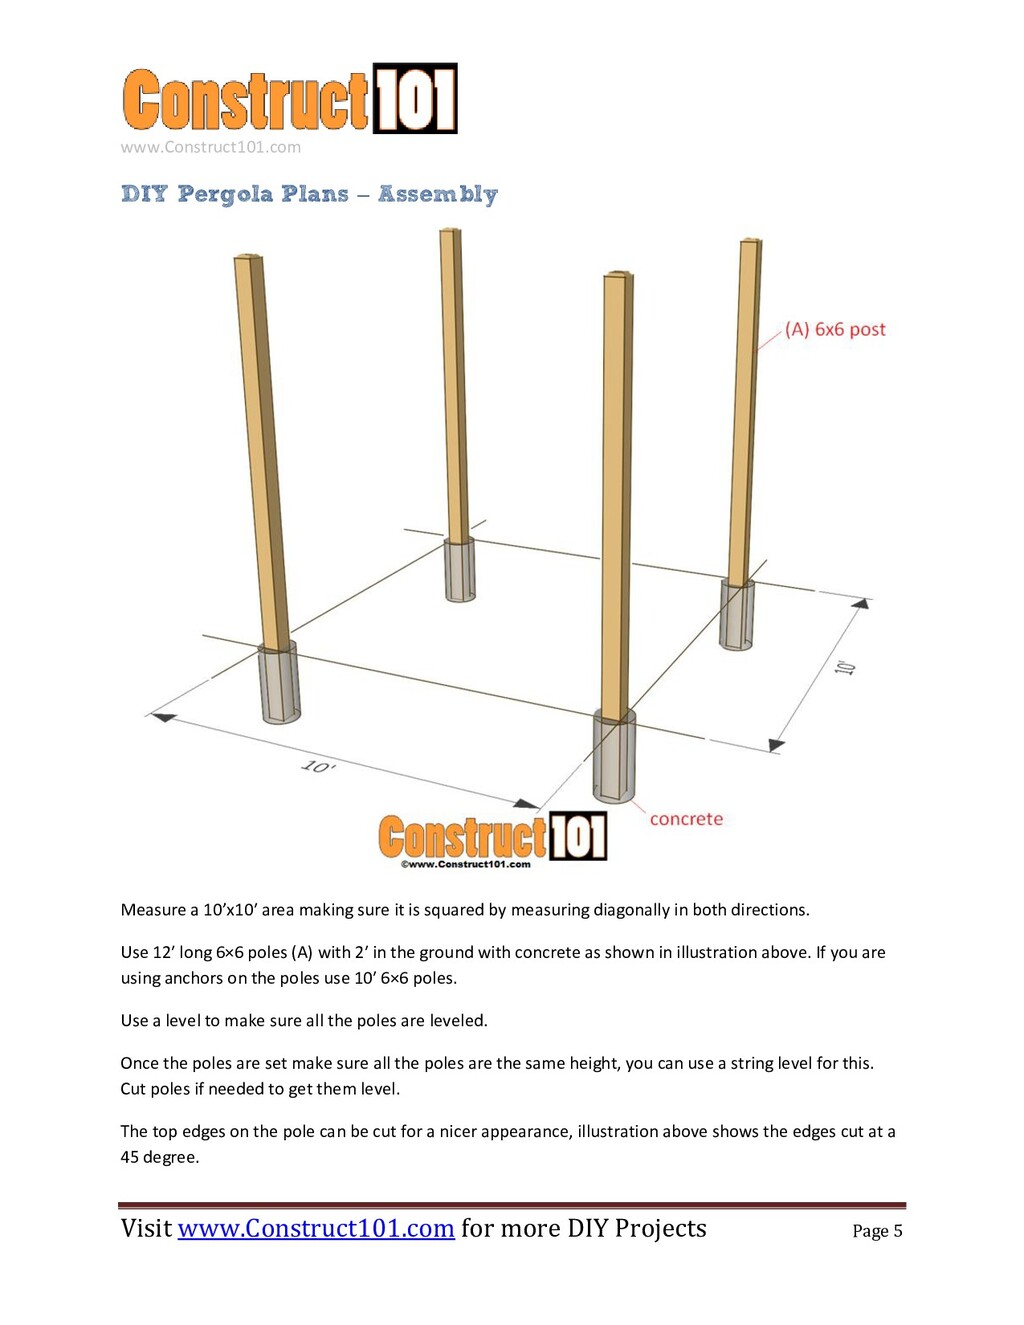
    Pergola Plans – Assembly Measure a 10’x10′ area making sure it is squared by measuring diagonally in both directions. Use 12′ long 6×6 poles (A) with 2′ in the ground with concrete as shown in illustration above. If you are using anchors on the poles use 10′ 6×6 poles. Use a level to make sure all the poles are leveled. Once the poles are set make sure all the poles are the same height, you can use a string level for this. Cut poles if needed to get them level. The top edges on the pole can be cut for a nicer appearance, illustration above shows the edges cut at a 45 degree.
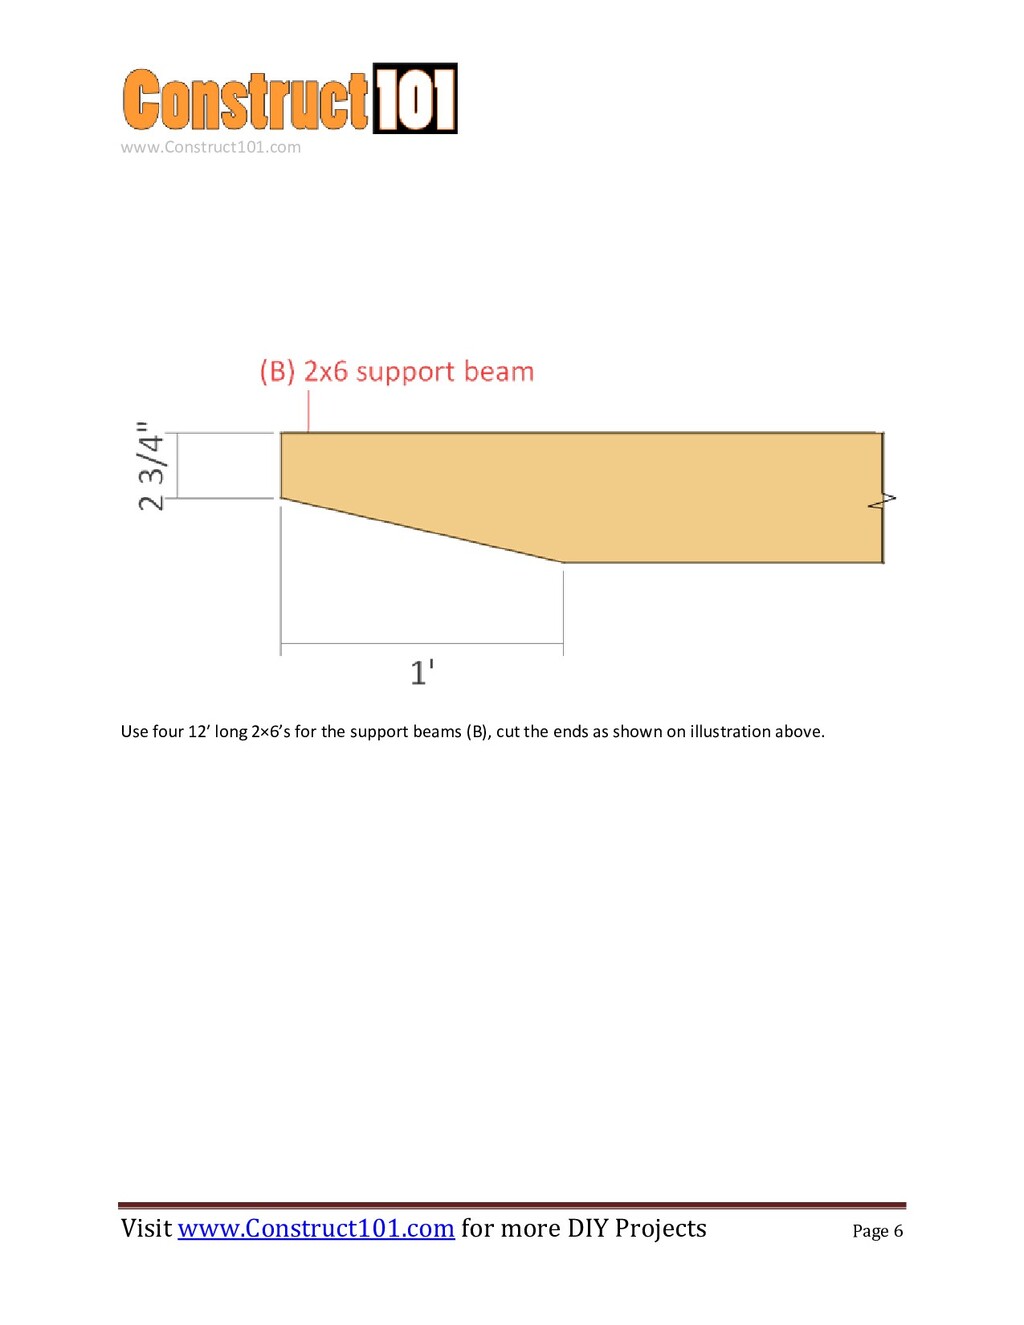
  5. www.Construct101.com Visit www.Construct101.com for more DIY Projects Page 6 Use

    four 12′ long 2×6’s for the support beams (B), cut the ends as shown on illustration above.
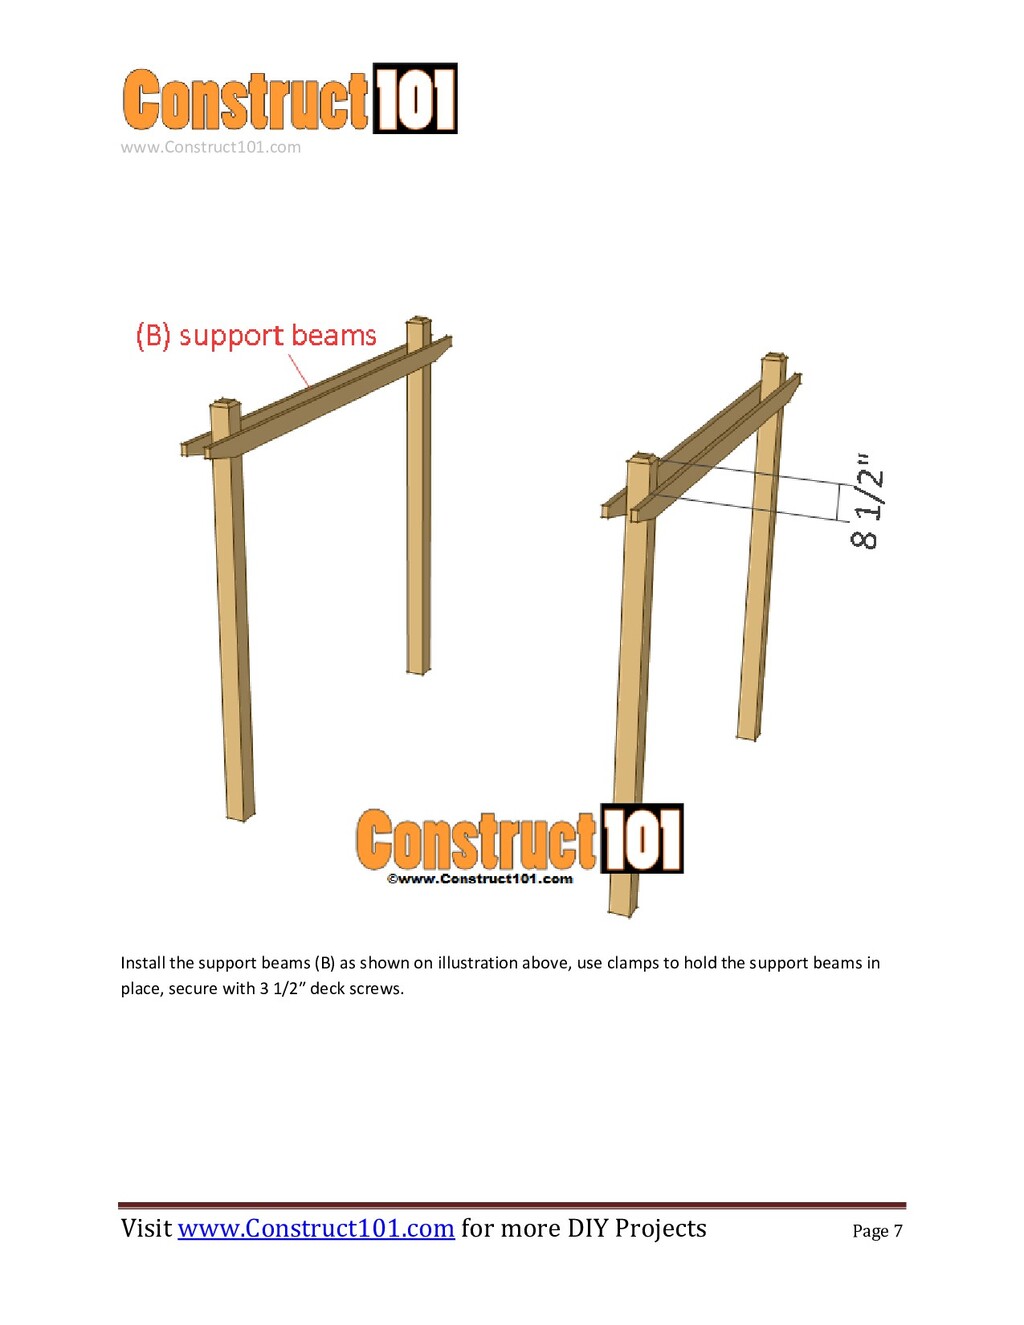
  6. www.Construct101.com Visit www.Construct101.com for more DIY Projects Page 7 Install

    the support beams (B) as shown on illustration above, use clamps to hold the support beams in place, secure with 3 1/2″ deck screws.
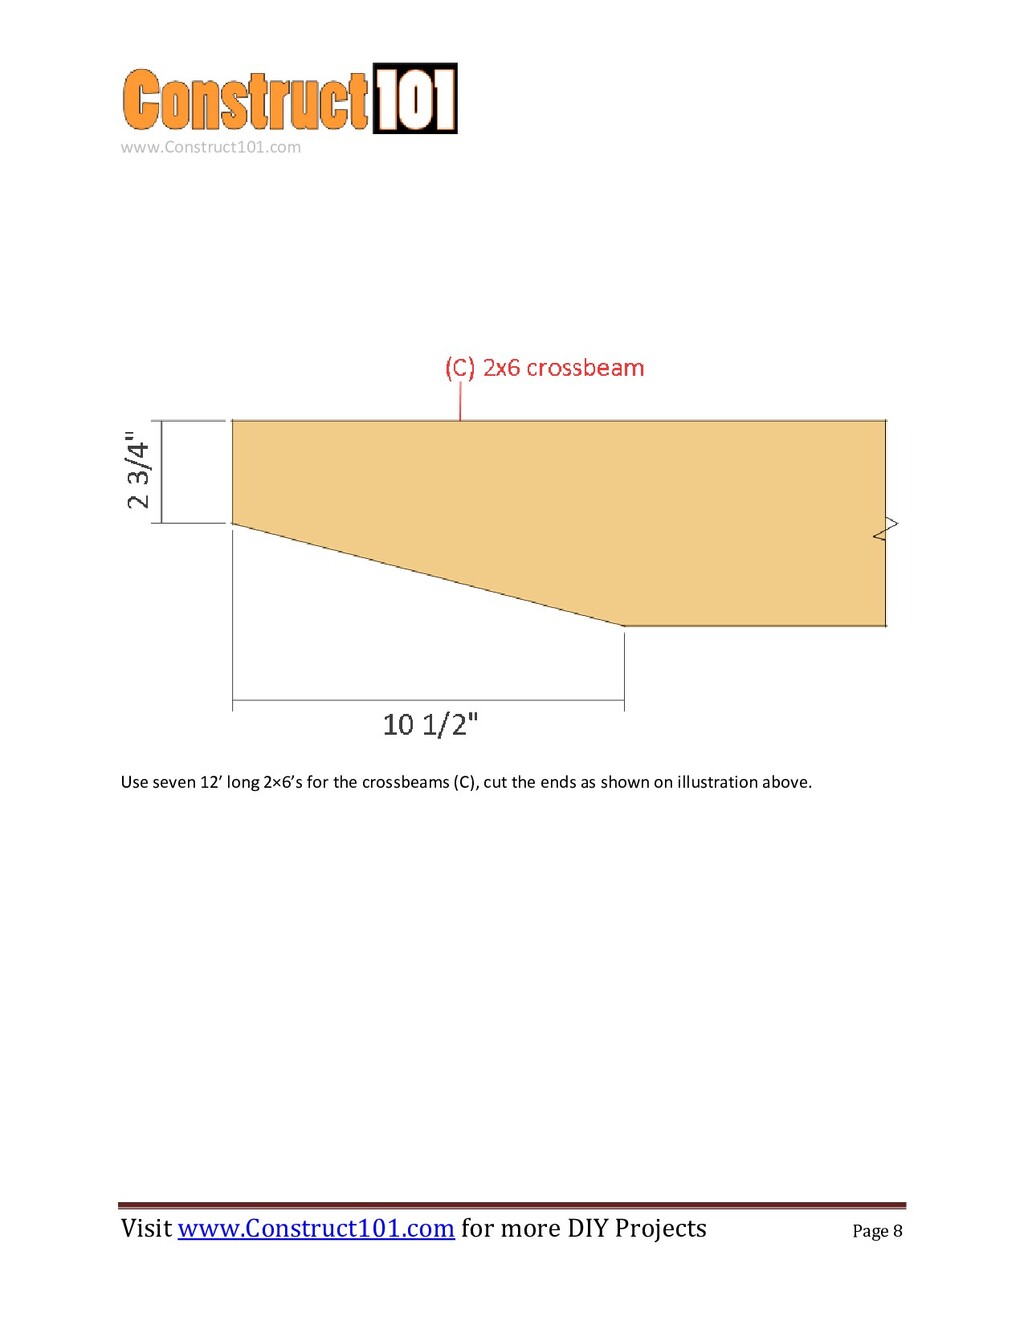
  7. www.Construct101.com Visit www.Construct101.com for more DIY Projects Page 8 Use

    seven 12′ long 2×6’s for the crossbeams (C), cut the ends as shown on illustration above.
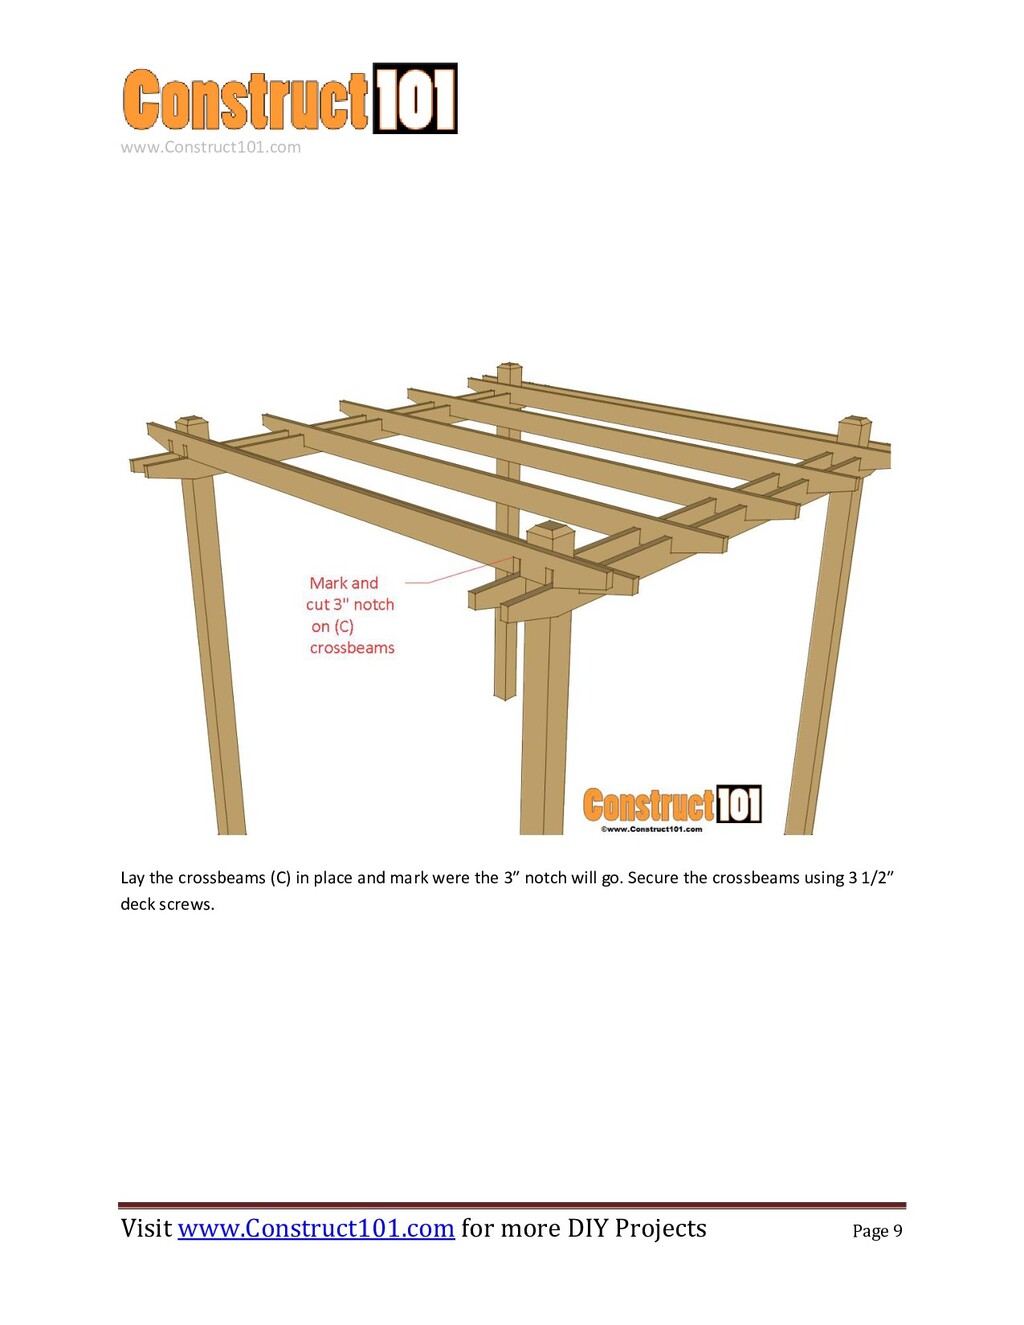
  8. www.Construct101.com Visit www.Construct101.com for more DIY Projects Page 9 Lay

    the crossbeams (C) in place and mark were the 3″ notch will go. Secure the crossbeams using 3 1/2″ deck screws.
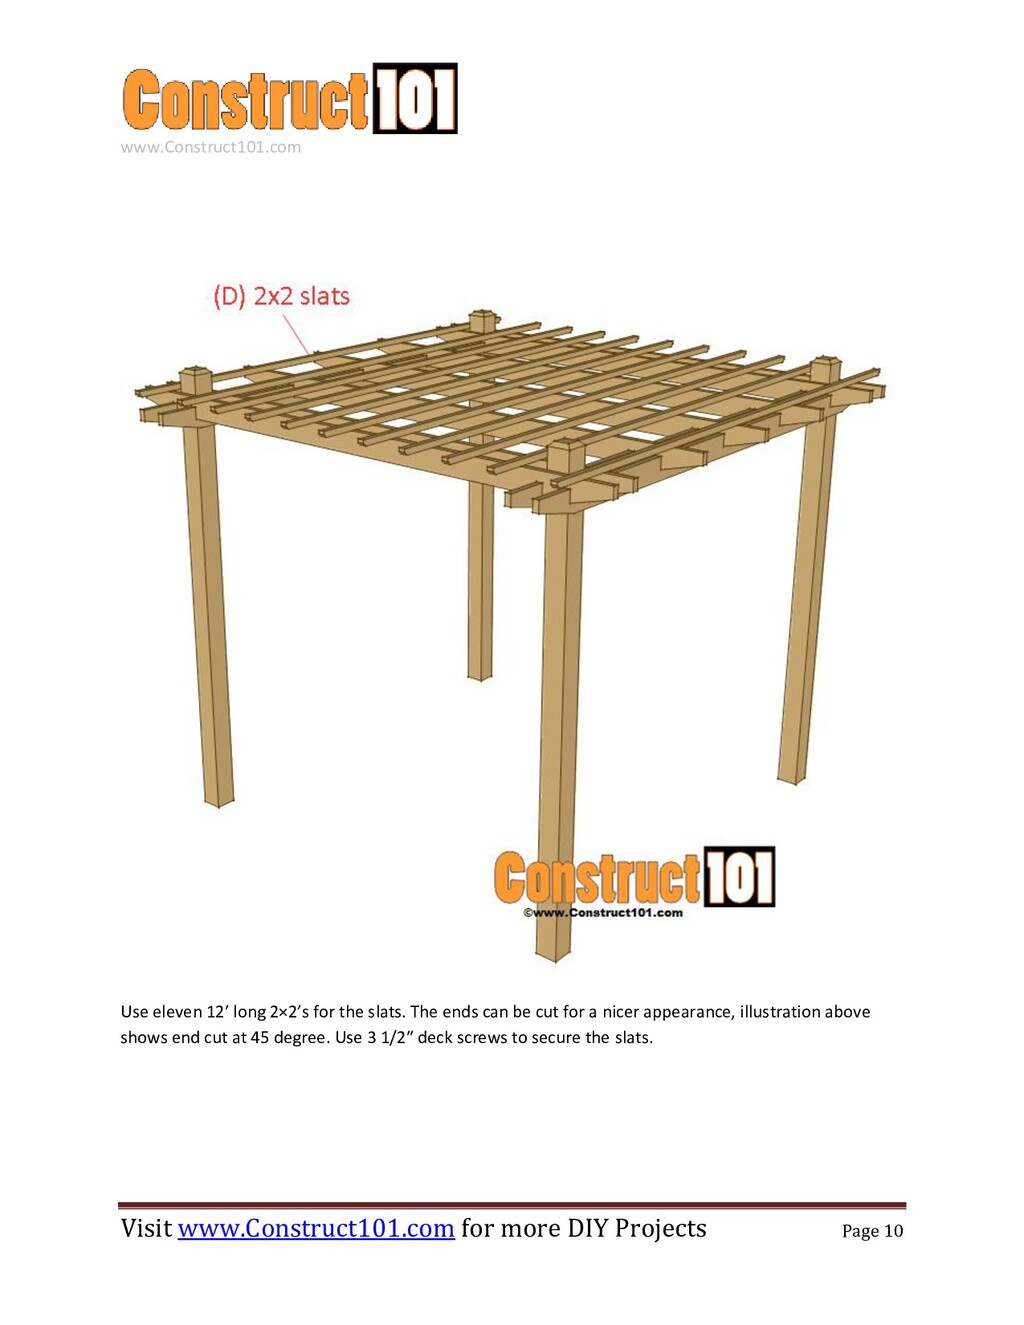
  9. www.Construct101.com Visit www.Construct101.com for more DIY Projects Page 10 Use

    eleven 12′ long 2×2’s for the slats. The ends can be cut for a nicer appearance, illustration above shows end cut at 45 degree. Use 3 1/2″ deck screws to secure the slats.
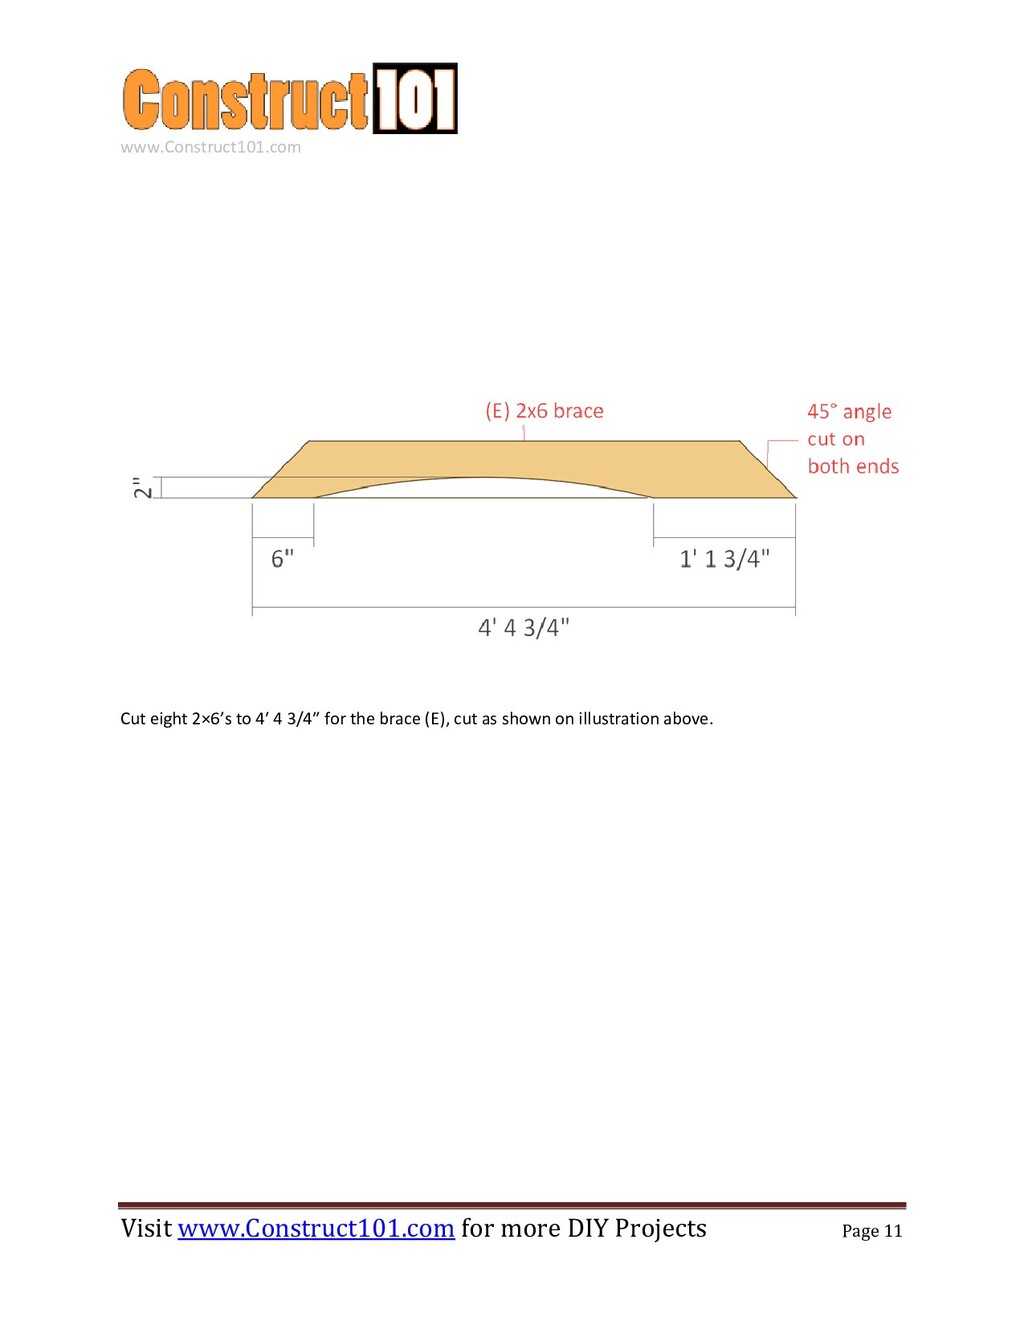
  10. www.Construct101.com Visit www.Construct101.com for more DIY Projects Page 11 Cut

    eight 2×6’s to 4′ 4 3/4″ for the brace (E), cut as shown on illustration above.
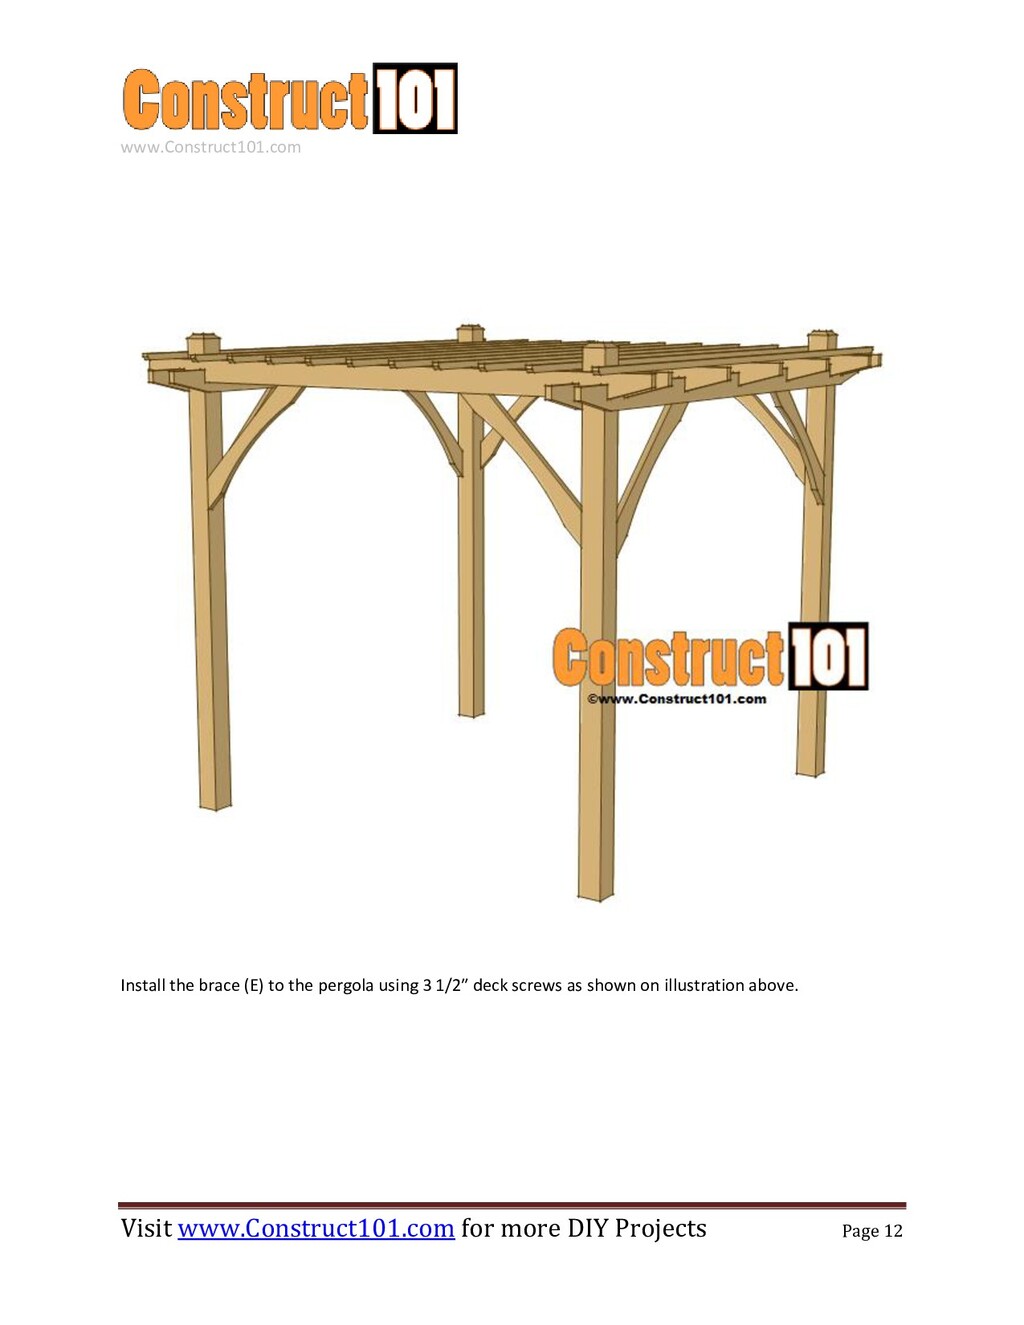
  11. www.Construct101.com Visit www.Construct101.com for more DIY Projects Page 12 Install

    the brace (E) to the pergola using 3 1/2″ deck screws as shown on illustration above.