$30 off During Our Annual Pro Sale. View Details »

Computer Vision with TensorFlow, Getting Started

Computer Vision with TensorFlow, Getting Started

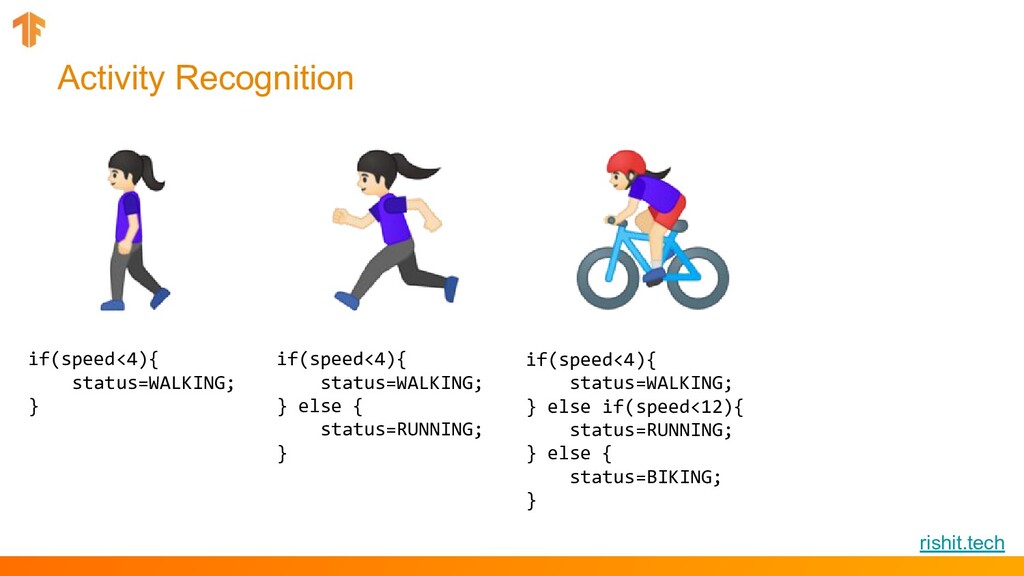
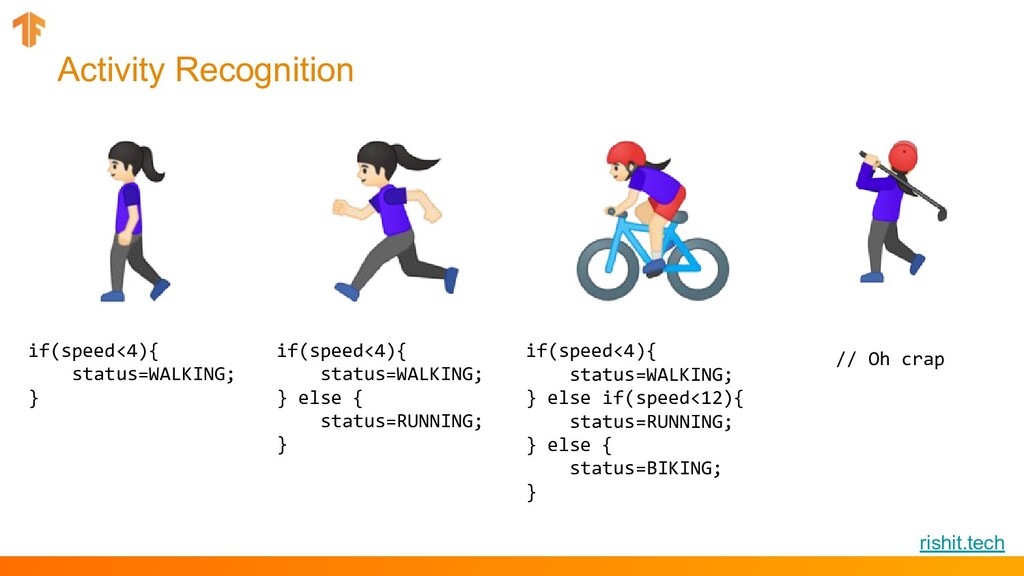
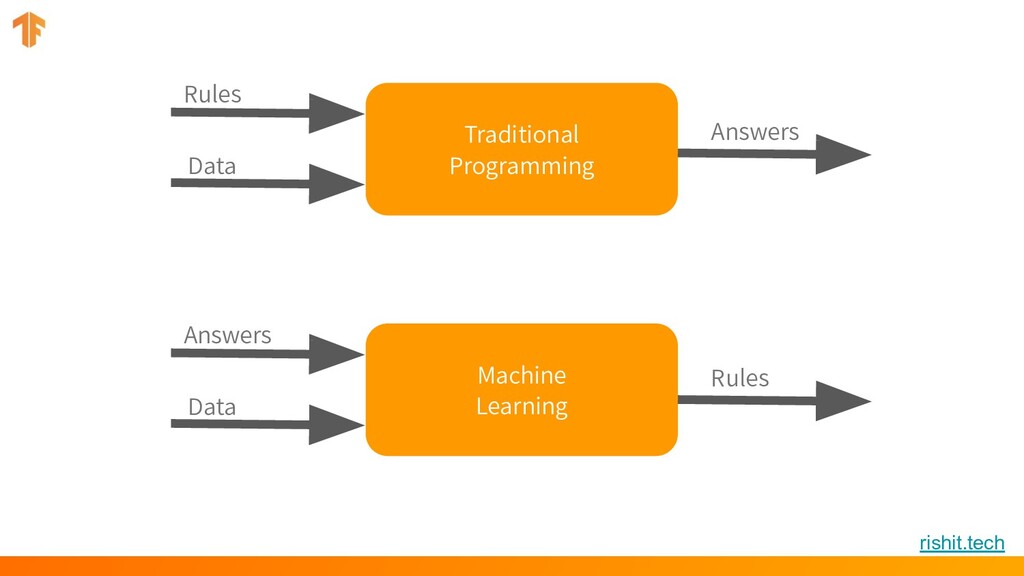
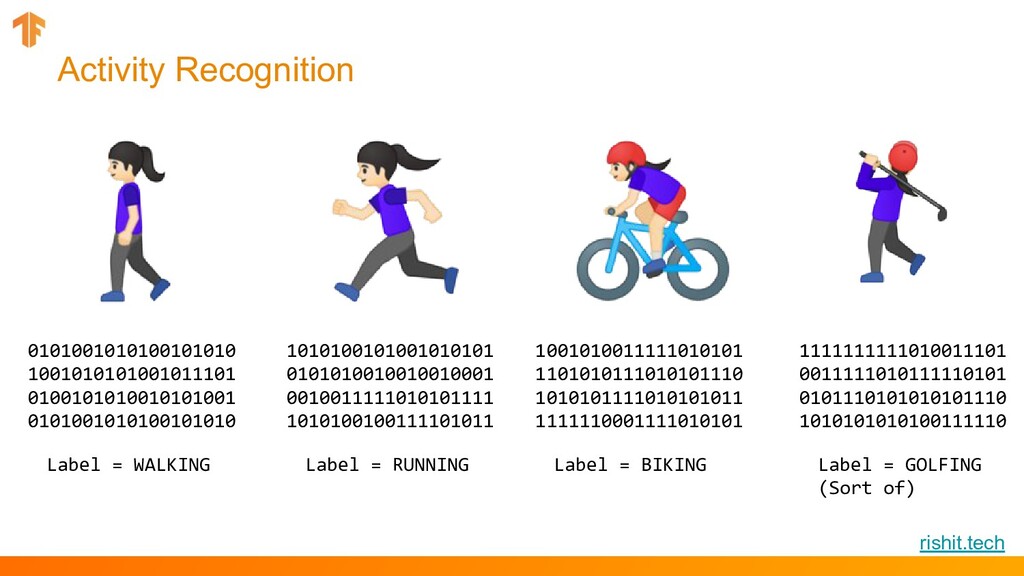
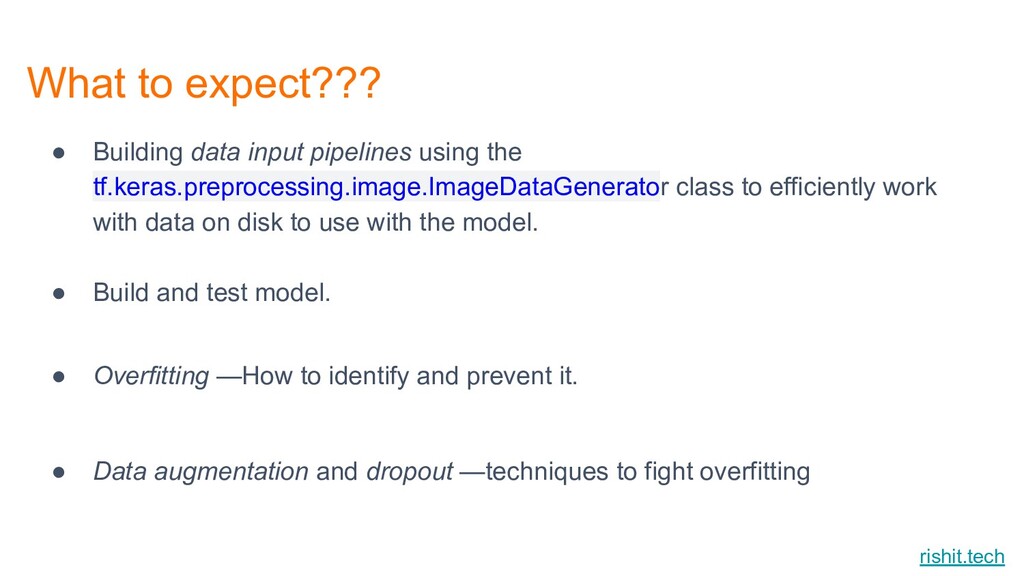
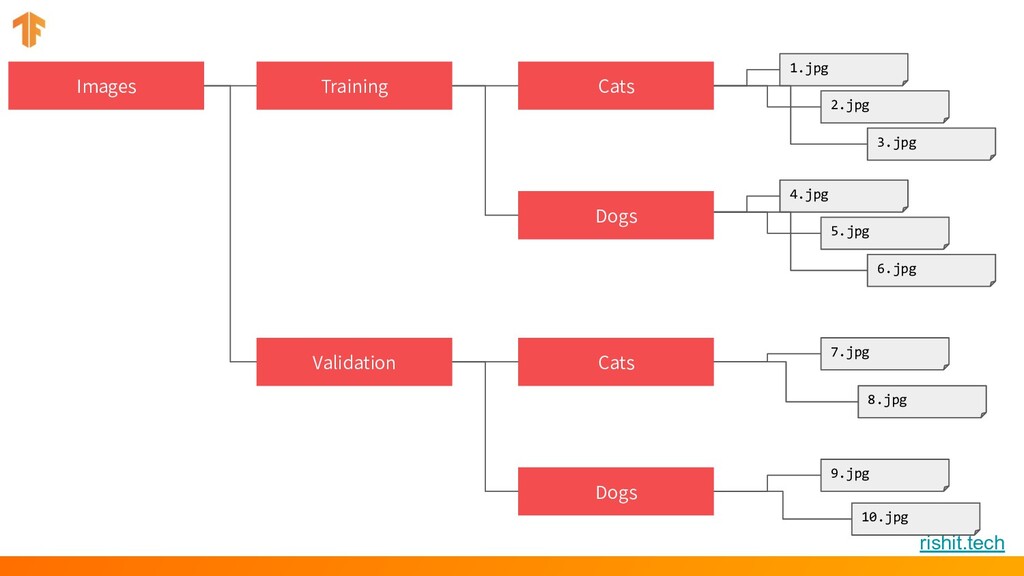
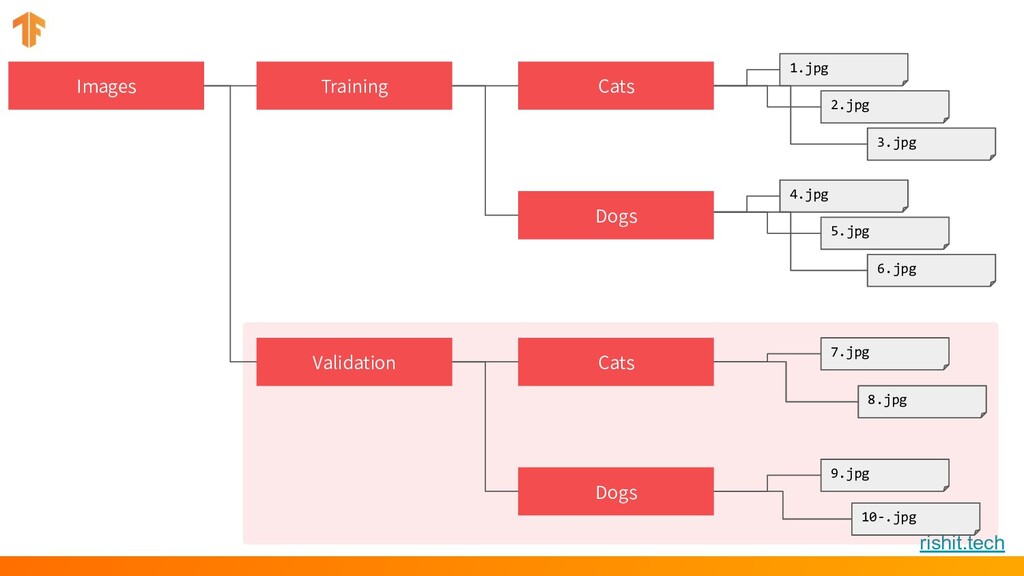
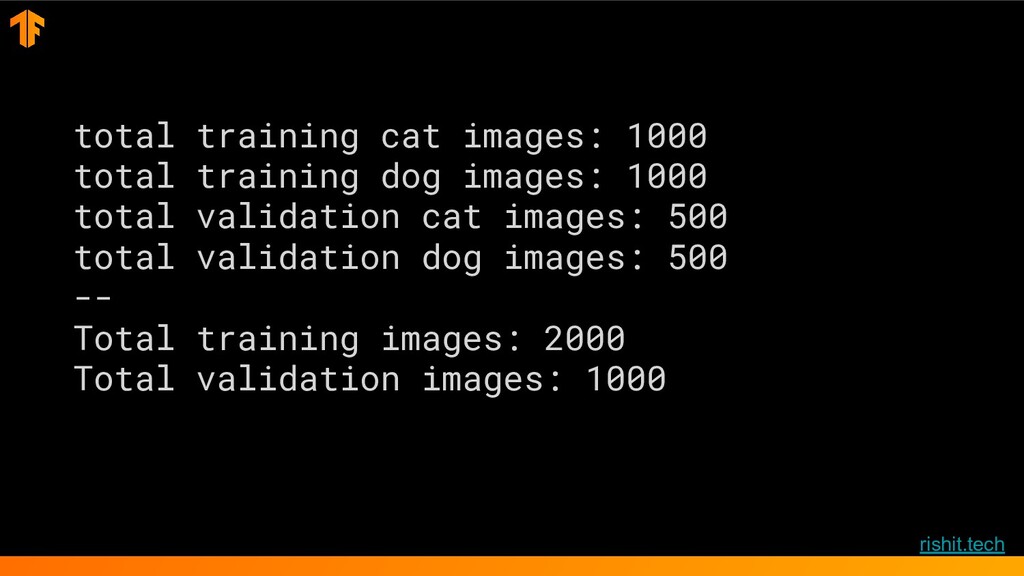
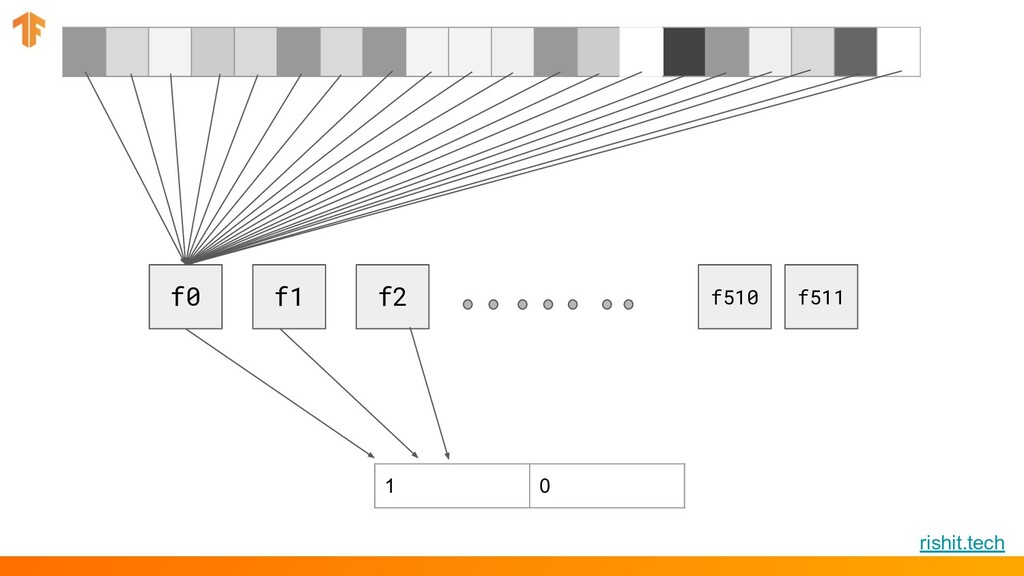
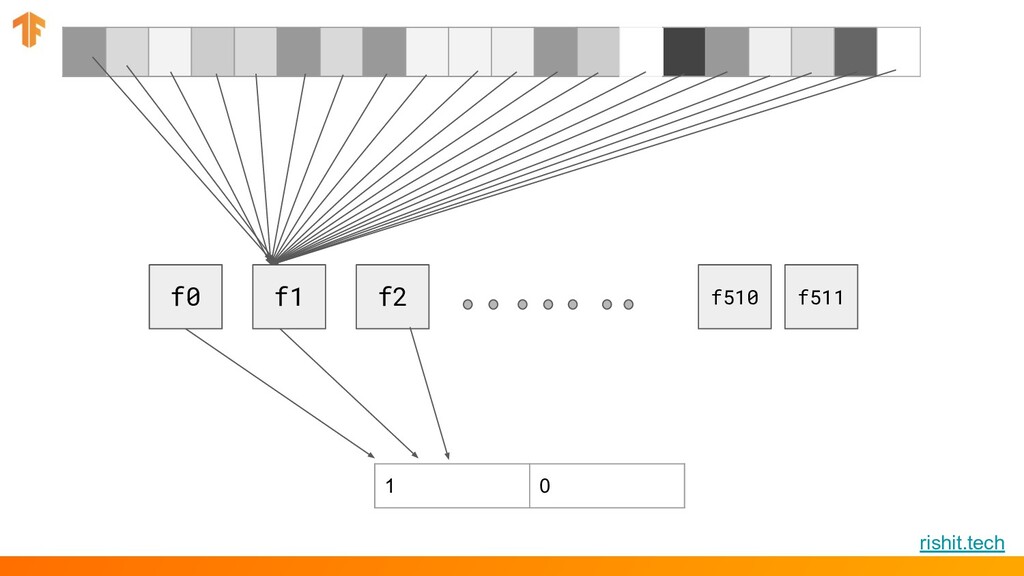
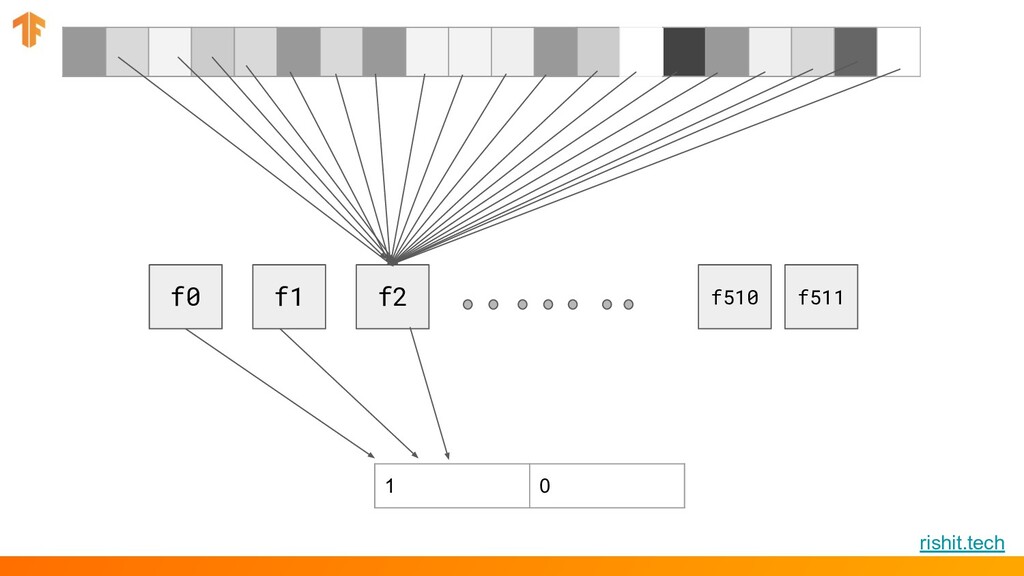
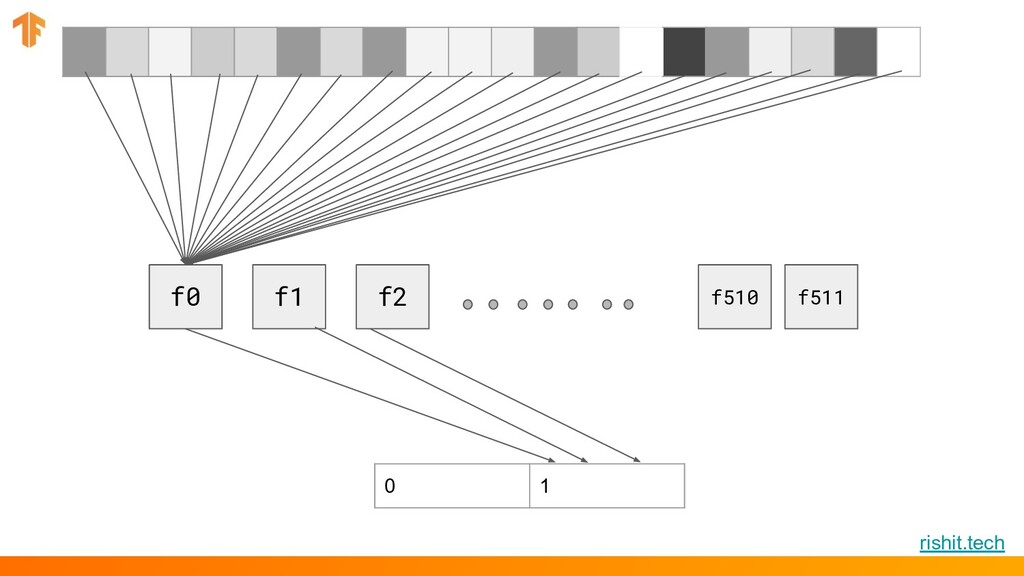
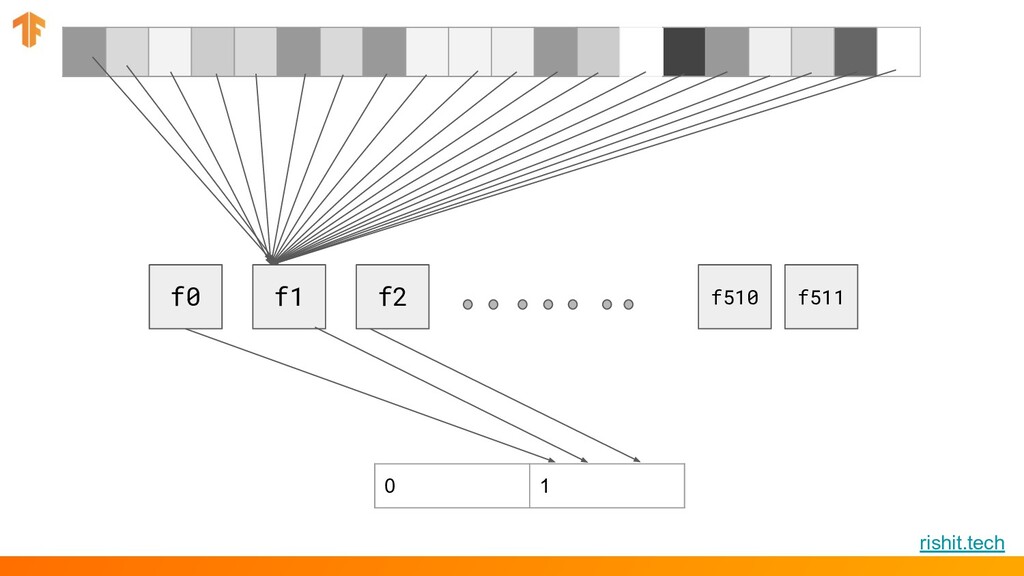
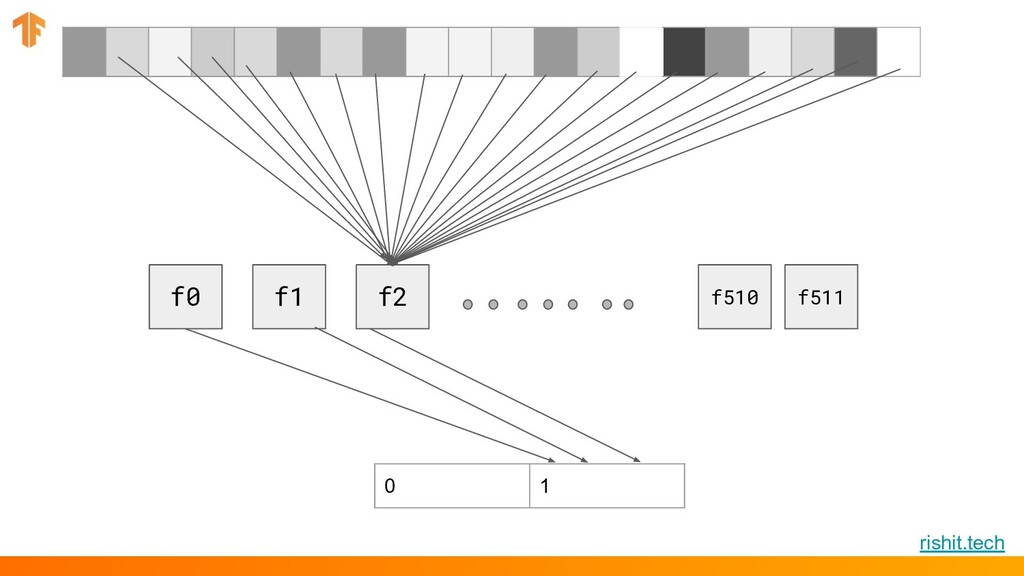
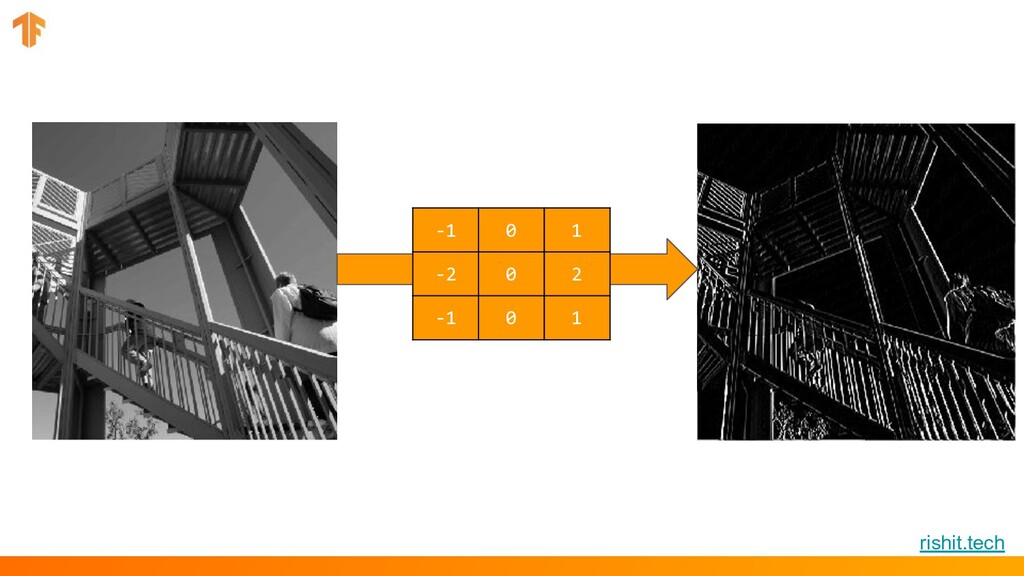
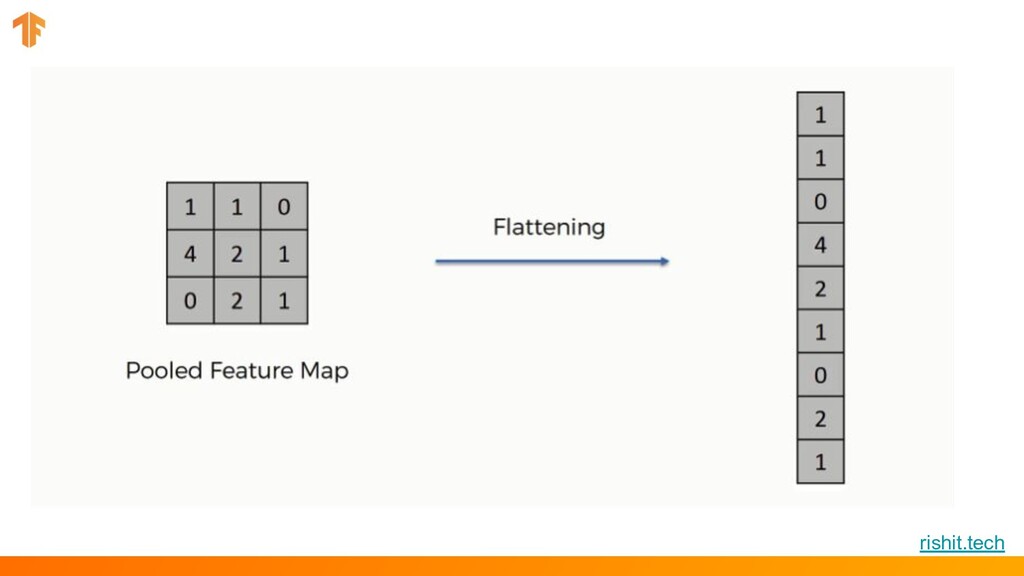
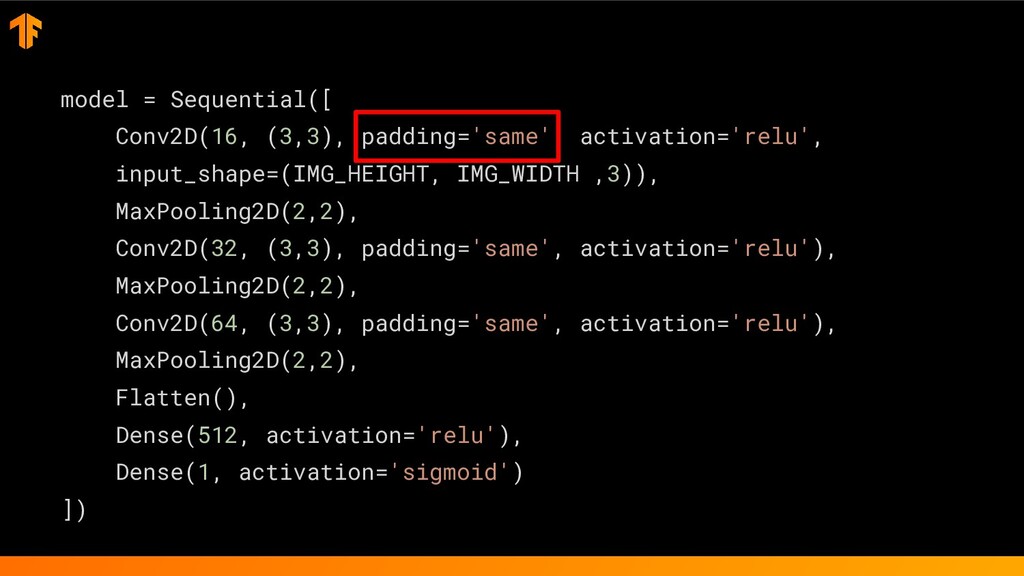
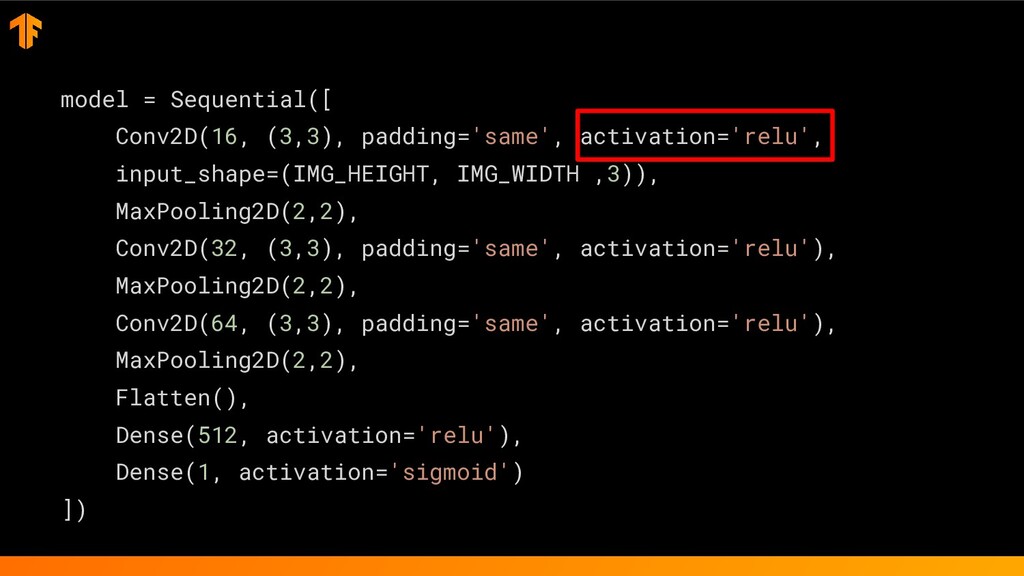
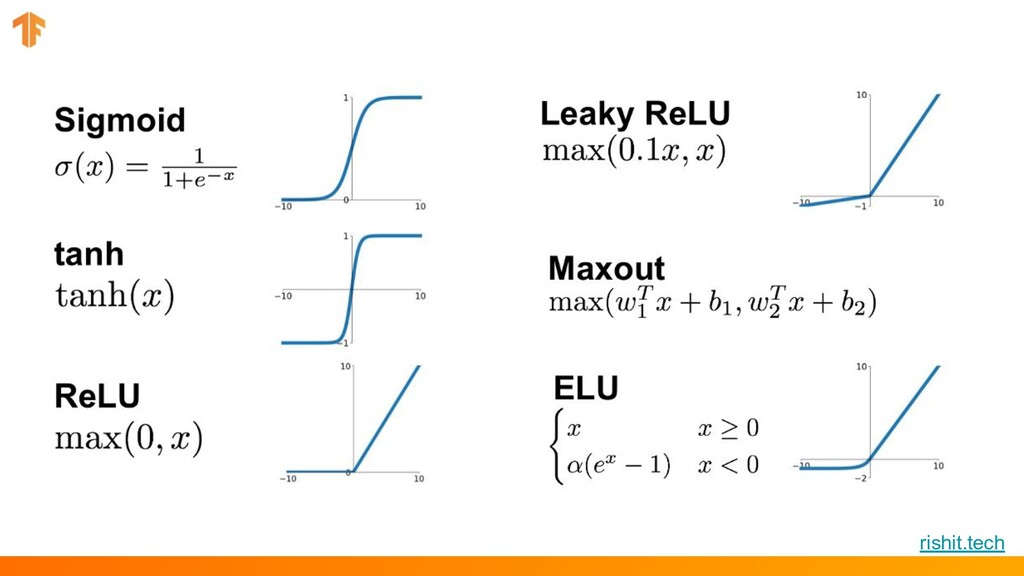
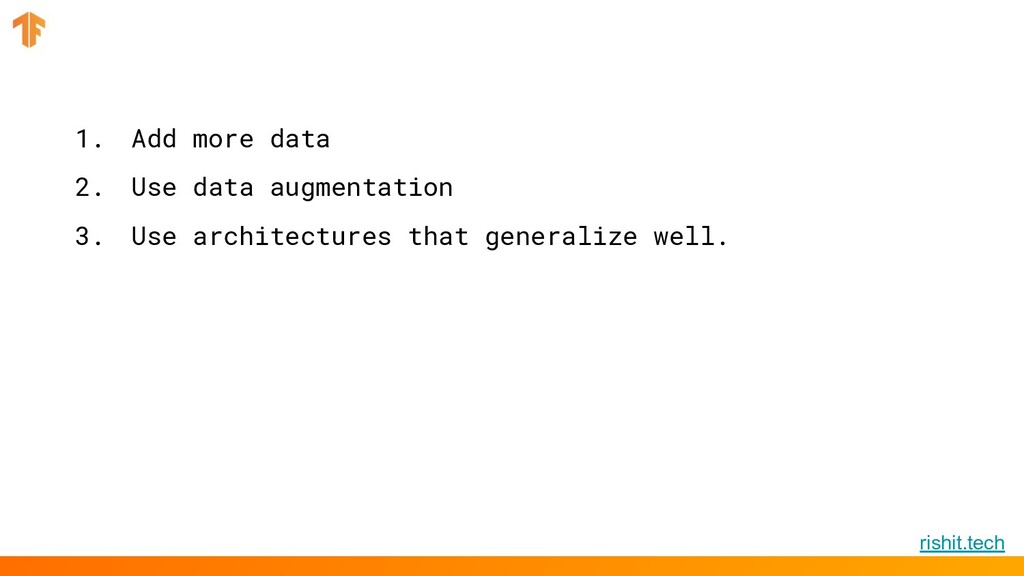
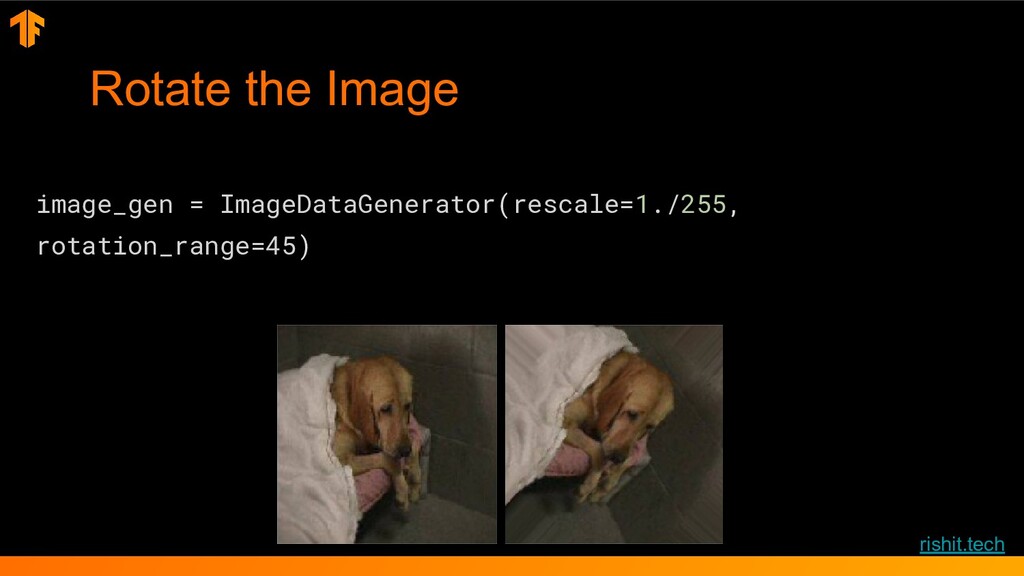
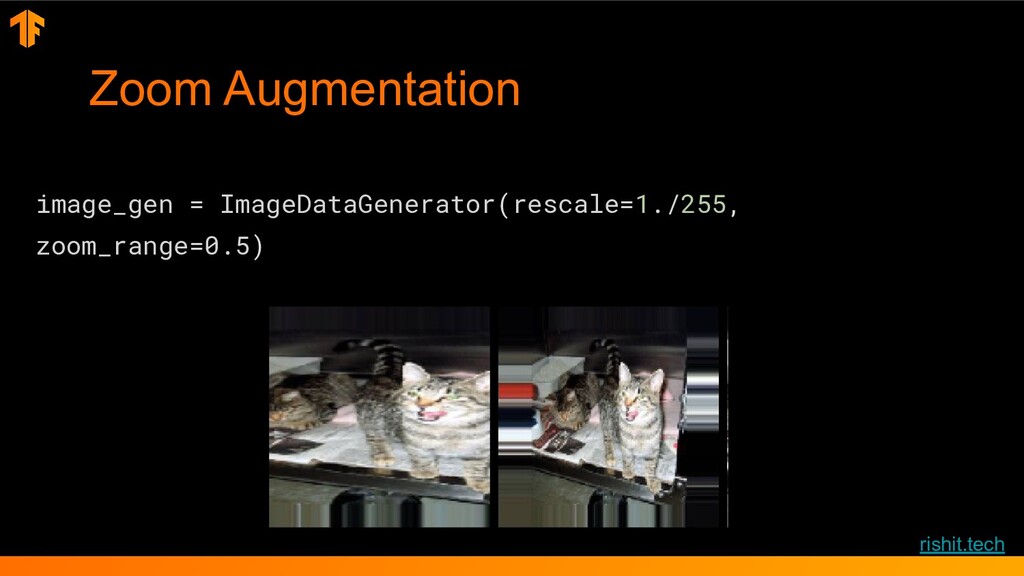
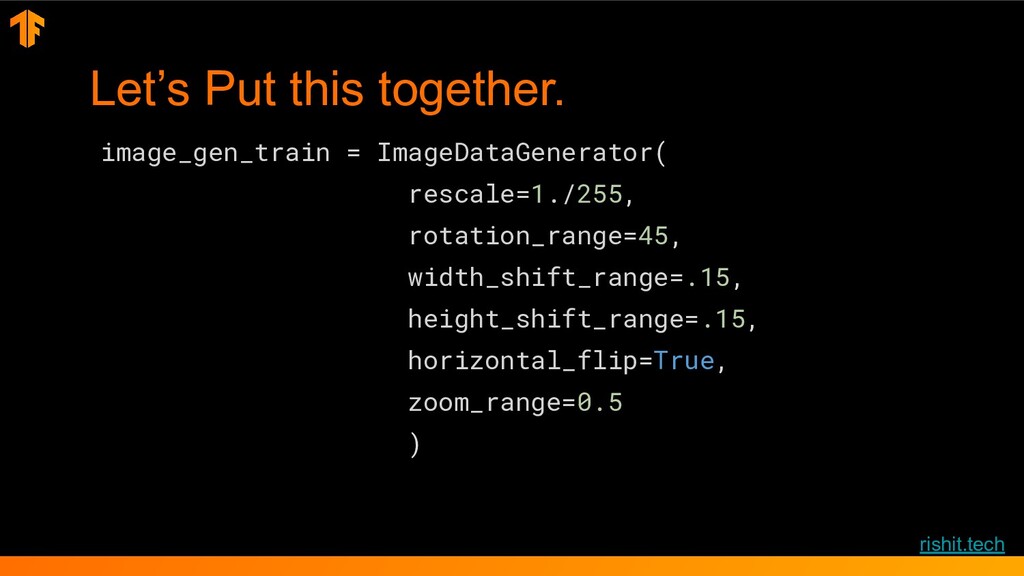
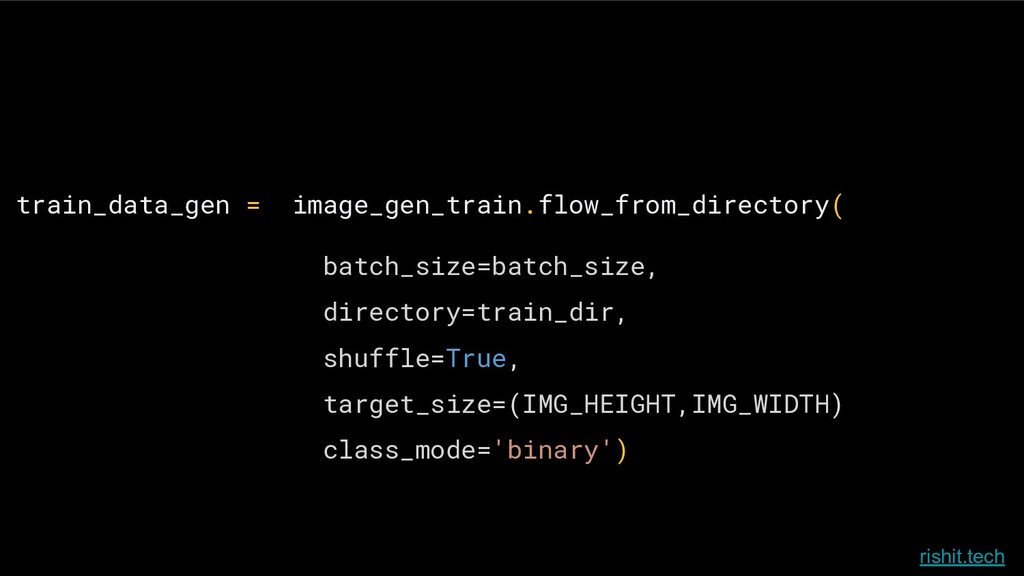
I plan to first start with the idea of CNNs and why they should be used when we already have common or dense NNs. I would then move on to show the clear win which CNN creates for image classification as it is all about picking out features. I then plan to show attendees how an image journeys through convolutional layers and how it extracts features, I would also show them a visualization of the same. Having done this I plan to show the attendees how TensorFlow makes it easy to load and label images in the runtime, I would also show them the use of image augmentation with TF and how it works in TF to save resources in the disk space and also dropouts to reduce potential overfitting. Then, I plan to show them how to use the indispensable Transfer Learning so we can efficiently utilize the work done by other people. At the last I also plan to show the different output layers one should use for binary classification and categorical.
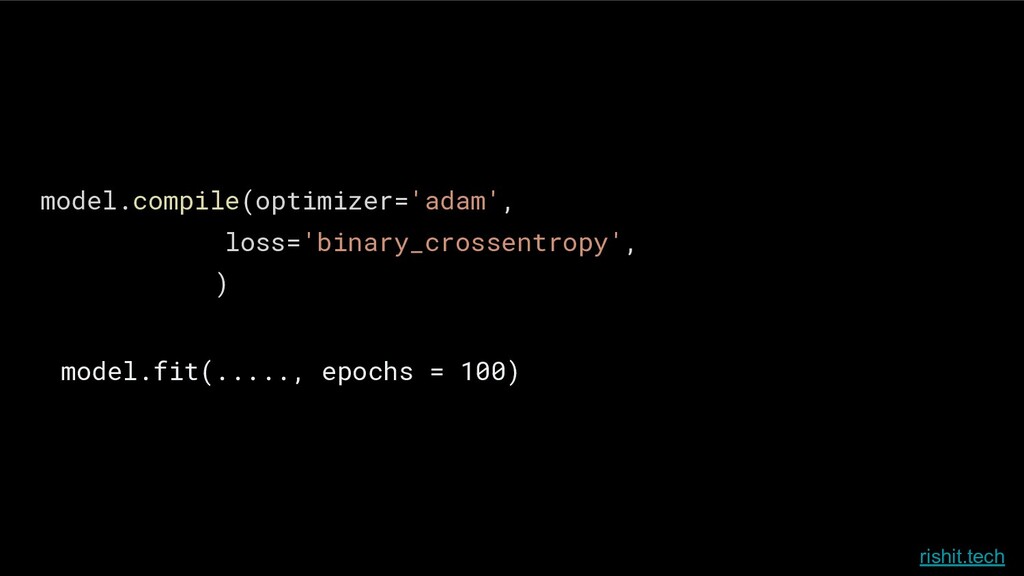
Rishit Dagli

January 04, 2021
Tweet

More Decks by Rishit Dagli

Other Decks in Programming

Transcript

  1. Computer Vision with TF
    Rishit Dagli
    High School, TEDx, Ted-Ed speaker
    rishit.tech
    @rishit_dagli
    Rishit-dagli

    View Slide

  2. ● High School Student
    ● TEDx and Ted-Ed Speaker
    ● ♡ Hackathons and competitions
    ● ♡ Research
    ● My coordinates - www.rishit.tech
    $whoami
    rishit_dagli Rishit-dagli

    View Slide

  3. rishit.tech
    Idea behind Machine Learning

    View Slide

  4. rishit.tech
    Rules
    Data
    Traditional
    Programming
    Answers

    View Slide

  5. rishit.tech
    Rules
    Data
    Traditional
    Programming
    Answers
    Answers
    Data
    Rules
    Machine
    Learning

    View Slide

  6. rishit.tech
    if(speed<4){
    status=WALKING;
    }
    Activity Recognition

    View Slide

  7. rishit.tech
    Activity Recognition
    if(speed<4){
    status=WALKING;
    }
    if(speed<4){
    status=WALKING;
    } else {
    status=RUNNING;
    }

    View Slide

  8. rishit.tech
    Activity Recognition
    if(speed<4){
    status=WALKING;
    }
    if(speed<4){
    status=WALKING;
    } else {
    status=RUNNING;
    }
    if(speed<4){
    status=WALKING;
    } else if(speed<12){
    status=RUNNING;
    } else {
    status=BIKING;
    }

    View Slide

  9. rishit.tech
    Activity Recognition
    if(speed<4){
    status=WALKING;
    }
    if(speed<4){
    status=WALKING;
    } else {
    status=RUNNING;
    }
    if(speed<4){
    status=WALKING;
    } else if(speed<12){
    status=RUNNING;
    } else {
    status=BIKING;
    }
    // Oh crap

    View Slide

  10. rishit.tech
    Rules
    Data
    Traditional
    Programming
    Answers
    Answers
    Data
    Rules
    Machine
    Learning

    View Slide

  11. rishit.tech
    Activity Recognition
    0101001010100101010
    1001010101001011101
    0100101010010101001
    0101001010100101010
    Label = WALKING
    1010100101001010101
    0101010010010010001
    0010011111010101111
    1010100100111101011
    Label = RUNNING
    1001010011111010101
    1101010111010101110
    1010101111010101011
    1111110001111010101
    Label = BIKING
    1111111111010011101
    0011111010111110101
    0101110101010101110
    1010101010100111110
    Label = GOLFING
    (Sort of)

    View Slide

  12. rishit.tech
    What to expect???
    ● Building data input pipelines using the
    tf.keras.preprocessing.image.ImageDataGenerator class to efficiently work
    with data on disk to use with the model.
    ● Build and test model.
    ● Overfitting —How to identify and prevent it.
    ● Data augmentation and dropout —techniques to fight overfitting

    View Slide

  13. rishit.tech
    Understanding the Data

    View Slide

  14. rishit.tech
    Images Training Cats
    Dogs
    Validation Cats
    Dogs
    1.jpg
    2.jpg
    3.jpg
    4.jpg
    5.jpg
    6.jpg
    7.jpg
    9.jpg
    8.jpg
    10.jpg

    View Slide

  15. rishit.tech
    Images Training Cats
    Dogs
    1.jpg
    2.jpg
    3.jpg
    4.jpg
    5.jpg
    6.jpg
    7.jpg
    9.jpg
    8.jpg
    10.jpg
    Validation Cats
    Dogs

    View Slide

  16. rishit.tech
    Images Training Cats
    Dogs
    Validation Cats
    Dogs
    1.jpg
    2.jpg
    3.jpg
    4.jpg
    5.jpg
    6.jpg
    7.jpg
    9.jpg
    8.jpg
    10-.jpg

    View Slide

  17. rishit.tech
    total training cat images: 1000
    total training dog images: 1000
    total validation cat images: 500
    total validation dog images: 500
    --
    Total training images: 2000
    Total validation images: 1000

    View Slide

  18. rishit.tech
    Imports

    View Slide

  19. rishit.tech
    import tensorflow as tf
    from tensorflow.keras.models import Sequential
    from tensorflow.keras.layers
    import Dense, Conv2D, Flatten, Dropout, MaxPooling2D
    from tensorflow.keras.preprocessing.image
    import ImageDataGenerator
    import os
    import numpy as np
    import matplotlib.pyplot as plt

    View Slide

  20. rishit.tech
    Parameters
    batch_size = 128
    epochs = 15
    IMG_HEIGHT = 150
    IMG_WIDTH = 150

    View Slide

  21. rishit.tech
    Data Preparation
    1. Read images from the disk.
    2. Decode contents of these images and convert it into proper grid format as
    per their RGB content.
    3. Convert them into floating point tensors.
    4. Rescale the tensors from values between 0 and 255 to values between 0
    and 1, as neural networks prefer to deal with small input values.

    View Slide

  22. from tensorflow.keras.preprocessing.image
    import ImageDataGenerator

    View Slide

  23. rishit.tech
    # Generator for our training data
    train_image_generator = ImageDataGenerator(rescale=1./255)
    train_data_gen = train_iamge_generator.flow_from_directory(
    batch_size=batch_size,
    directory=train_dir,
    shuffle=True,
    target_size=(IMG_HEIGHT,IMG_WIDTH)
    class_mode='binary')

    View Slide

  24. rishit.tech
    # Generator for our training data
    train_image_generator = ImageDataGenerator(rescale=1./255)
    train_data_gen = train_image_generator.flow_from_directory(
    batch_size=batch_size,
    directory=train_dir,
    shuffle=True,
    target_size=(IMG_HEIGHT,IMG_WIDTH)
    class_mode='binary')

    View Slide

  25. rishit.tech
    # Generator for our training data
    train_image_generator = ImageDataGenerator(rescale=1./255)
    train_data_gen = train_image_generator.flow_from_directory(
    batch_size=batch_size,
    directory= train_dir,
    shuffle=True,
    target_size=(IMG_HEIGHT,IMG_WIDTH)
    class_mode='binary')

    View Slide

  26. rishit.tech
    # Generator for our training data
    train_image_generator = ImageDataGenerator(rescale=1./255)
    train_data_gen = train_image_generator.flow_from_directory(
    batch_size=batch_size,
    directory= train_dir,
    shuffle=True,
    target_size=(IMG_HEIGHT,IMG_WIDTH)
    class_mode='binary')

    View Slide

  27. rishit.tech
    # Generator for our training data
    train_image_generator = ImageDataGenerator(rescale=1./255)
    train_data_gen = train_image_generator.flow_from_directory(
    batch_size=batch_size,
    directory= train_dir,
    shuffle=True,
    target_size=(IMG_HEIGHT,IMG_WIDTH)
    class_mode='binary')

    View Slide

  28. rishit.tech
    # Generator for our training data
    train_image_generator = ImageDataGenerator(rescale=1./255)
    train_data_gen = train_image_generator.flow_from_directory(
    batch_size=batch_size,
    directory= train_dir,
    shuffle=True,
    target_size=(IMG_HEIGHT,IMG_WIDTH)
    class_mode='binary')

    View Slide

  29. rishit.tech
    # Generator for our validation data
    validation_image_generator = ImageDataGenerator(rescale=1./255)
    val_data_gen = validation_imadata_generator.flow_from_directory
    (
    batch_size=batch_size,
    directory= validation_dir,
    shuffle=True,
    target_size=(IMG_HEIGHT,IMG_WIDTH)
    class_mode='binary')

    View Slide

  30. rishit.tech
    Model
    Let’s understand and Build a Convolutional Neural
    Network

    View Slide

  31. model = Sequential([
    Flatten( input_shape = (150,150,3),
    Dense(512 , activation = ‘relu’,
    Dense(2, activation=’softmax’)
    ])

    View Slide

  32. model = Sequential([
    Flatten( input_shape = (150,150,3),
    Dense(512 , activation = ‘relu’,
    Dense( 2 , activation=’softmax’)
    ])

    View Slide

  33. model = Sequential([
    Flatten( input_shape = (150,150,3),
    Dense( 512 , activation = ‘relu’,
    Dense(2, activation=’softmax’)
    ])

    View Slide

  34. rishit.tech
    f0
    1 0
    f1 f2 f510 f511

    View Slide

  35. rishit.tech
    f0
    1 0
    f1 f2 f510 f511

    View Slide

  36. rishit.tech
    f0
    1 0
    f1 f2 f510 f511

    View Slide

  37. rishit.tech
    f0
    0 1
    f1 f2 f510 f511

    View Slide

  38. rishit.tech
    f0
    0 1
    f1 f2 f510 f511

    View Slide

  39. rishit.tech
    f0
    0 1
    f1 f2 f510 f511

    View Slide

  40. rishit.tech
    model.compile(optimizer='adam',
    loss='binary_crossentropy',
    )
    model.fit(....., epochs = 100)

    View Slide

  41. rishit.tech
    0 64 128
    48 192 144
    142 226 168
    -1 0 -2
    .5 4.5 -1.5
    1.5 2 -3
    Current Pixel Value is 192
    Consider neighbor Values
    Filter Definition
    CURRENT_PIXEL_VALUE = 192
    NEW_PIXEL_VALUE = (-1 * 0) + (0 * 64) + (-2 * 128) +
    (.5 * 48) + (4.5 * 192) + (-1.5 * 144) +
    (1.5 * 42) + (2 * 226) + (-3 * 168)

    View Slide

  42. rishit.tech
    -1 0 1
    -2 0 2
    -1 0 1

    View Slide

  43. rishit.tech
    -1 -2 -1
    0 0 0
    1 2 1

    View Slide

  44. model = Sequential([
    Conv2D(16, (3,3), padding='same', activation='relu',
    input_shape=(IMG_HEIGHT, IMG_WIDTH ,3)),
    MaxPooling2D(2,2),
    Conv2D(32, (3,3), padding='same', activation='relu'),
    MaxPooling2D(2,2),
    Conv2D(64, (3,3), padding='same', activation='relu'),
    MaxPooling2D(2,2),
    Flatten(),
    Dense(512, activation='relu'),
    Dense(1, activation='sigmoid')
    ])

    View Slide

  45. model = Sequential([
    Conv2D(16, (3,3), padding='same', activation='relu',
    input_shape=(IMG_HEIGHT, IMG_WIDTH ,3)),
    MaxPooling2D(2,2),
    Conv2D(32, (3,3), padding='same', activation='relu'),
    MaxPooling2D(2,2),
    Conv2D(64, (3,3), padding='same', activation='relu'),
    MaxPooling2D(2,2),
    Flatten(),
    Dense(512, activation='relu'),
    Dense(1, activation='sigmoid')
    ])

    View Slide

  46. rishit.tech
    0 64 128 128
    48 192 144 144
    142 226 168 0
    255 0 0 64
    0 64
    48 192
    192
    128 128
    144 144
    144
    142 226
    255 0
    255
    168 0
    0 64
    168
    192 144
    255 168

    View Slide

  47. rishit.tech
    Max Pooling Example
    Max Pooling 2X2

    View Slide

  48. model = Sequential([
    Conv2D(16, (3,3), padding='same', activation='relu',
    input_shape=(IMG_HEIGHT, IMG_WIDTH ,3)),
    MaxPooling2D(2,2),
    Conv2D(32, (3,3), padding='same', activation='relu'),
    MaxPooling2D(2,2),
    Conv2D(64, (3,3), padding='same', activation='relu'),
    MaxPooling2D(2,2),
    Flatten(),
    Dense(512, activation='relu'),
    Dense(1, activation='sigmoid')
    ])

    View Slide

  49. rishit.tech

    View Slide

  50. model = Sequential([
    Conv2D(16, (3,3), padding='same', activation='relu',
    input_shape=(IMG_HEIGHT, IMG_WIDTH ,3)),
    MaxPooling2D(2,2),
    Conv2D(32, (3,3), padding='same', activation='relu'),
    MaxPooling2D(2,2),
    Conv2D(64, (3,3), padding='same', activation='relu'),
    MaxPooling2D(2,2),
    Flatten(),
    Dense(512, activation='relu'),
    Dense(1, activation='sigmoid')
    ])

    View Slide

  51. rishit.tech

    View Slide

  52. model = Sequential([
    Conv2D(16, (3,3), padding='same', activation='relu',
    input_shape=(IMG_HEIGHT, IMG_WIDTH ,3)),
    MaxPooling2D(2,2),
    Conv2D(32, (3,3), padding='same', activation='relu'),
    MaxPooling2D(2,2),
    Conv2D(64, (3,3), padding='same', activation='relu'),
    MaxPooling2D(2,2),
    Flatten(),
    Dense(512, activation='relu'),
    Dense(1, activation='sigmoid')
    ])

    View Slide

  53. rishit.tech

    View Slide

  54. rishit.tech
    model.compile(optimizer='adam',
    loss='binary_crossentropy',
    metrics=['accuracy'])

    View Slide

  55. Layer (type) Output Shape Param #
    =================================================================
    conv2d_3 (Conv2D) (None, 150, 150, 16) 448
    _________________________________________________________________
    max_pooling2d_3 (MaxPooling2 (None, 75, 75, 16) 0
    _________________________________________________________________
    conv2d_4 (Conv2D) (None, 75, 75, 32) 4640
    _________________________________________________________________
    max_pooling2d_4 (MaxPooling2 (None, 37, 37, 32) 0
    _________________________________________________________________
    conv2d_5 (Conv2D) (None, 37, 37, 64) 18496
    _________________________________________________________________
    max_pooling2d_5 (MaxPooling2 (None, 18, 18, 64) 0
    _________________________________________________________________
    flatten_1 (Flatten) (None, 20736) 0
    _________________________________________________________________
    dense_2 (Dense) (None, 512) 10617344
    _________________________________________________________________
    dense_3 (Dense) (None, 1) 513
    =================================================================
    Total params: 10,641,441
    Trainable params: 10,641,441
    Non-trainable params: 0

    View Slide

  56. history = model.fit(
    train_data_gen,
    steps_per_epoch=total_train // batch_size,
    epochs=epochs,
    validation_data=val_data_gen,
    validation_steps=total_val // batch_size
    )

    View Slide

  57. rishit.tech

    View Slide

  58. rishit.tech
    Overfitting

    View Slide

  59. rishit.tech
    1. Add more data
    2. Use data augmentation
    3. Use architectures that generalize well.

    View Slide

  60. rishit.tech
    Data Augmentation
    Apply some random transformation.
    The Goal is the model never sees the exact same picture twice.
    Use ImageDataGenerator to perform transformation

    View Slide

  61. rishit.tech
    Horizontal Flip
    image_gen = ImageDataGenerator(rescale=1./255,
    horizontal_flip=True)

    View Slide

  62. rishit.tech
    Rotate the Image
    image_gen = ImageDataGenerator(rescale=1./255,
    rotation_range=45)

    View Slide

  63. rishit.tech
    Zoom Augmentation
    image_gen = ImageDataGenerator(rescale=1./255,
    zoom_range=0.5)

    View Slide

  64. rishit.tech
    Let’s Put this together.
    image_gen_train = ImageDataGenerator(
    rescale=1./255,
    rotation_range=45,
    width_shift_range=.15,
    height_shift_range=.15,
    horizontal_flip=True,
    zoom_range=0.5
    )

    View Slide

  65. rishit.tech
    train_data_gen = image_gen_train.flow_from_directory(
    batch_size=batch_size,
    directory=train_dir,
    shuffle=True,
    target_size=(IMG_HEIGHT,IMG_WIDTH)
    class_mode='binary')

    View Slide

  66. rishit.tech
    DropOut
    Another technique to overcome overfitting.
    It drops some of the output units from the applied layer during the training
    process
    It takes values such as 0.1, 0.2, 0.3, etc. which means 10%, 20%, 30% of
    the output dropping off.

    View Slide

  67. rishit.tech
    Creating a network with Dropouts
    model = Sequential([
    Conv2D(16, (3,3), padding='same', activation='relu',
    input_shape=(IMG_HEIGHT, IMG_WIDTH ,3)),
    MaxPooling2D(2,2),
    Dropout(0.2),
    Conv2D(32, (3,3), padding='same', activation='relu'),
    MaxPooling2D(2,2),
    Conv2D(64, (3,3), padding='same', activation='relu'),
    MaxPooling2D(2,2),
    Dropout(0.2),
    Flatten(),
    Dense(512, activation='relu'),
    Dense(1, activation='sigmoid')
    ])

    View Slide

  68. rishit.tech
    Testing
    import numpy as np
    from google.colab import files
    from keras.preprocessing import image
    uploaded = files.upload()
    for fn in uploaded.keys():
    path = '/content/' + fn
    img = image.load_img(path, target_size=(150, 150))
    x = image.img_to_array(img)
    x = np.expand_dims(x, axis=0)
    images = np.vstack([x])
    classes = model.predict(images, batch_size=10)
    print(classes[0])
    if classes[0]>0.5:
    print(fn + " is a dog")
    else:
    print(fn + " is a cat")

    View Slide

  69. bit.ly/cv-demo
    Demos!

    View Slide

  70. Q & A

    View Slide

  71. Thank You
    @rishit_dagli Rishit-dagli

    View Slide