Upgrade to Pro — share decks privately, control downloads, hide ads and more …

Bring Your App To Life with CALayers

Bring Your App To Life with CALayers

Bring Your App To Life with CALayers
CALayers, Paintcode, and **Animations**

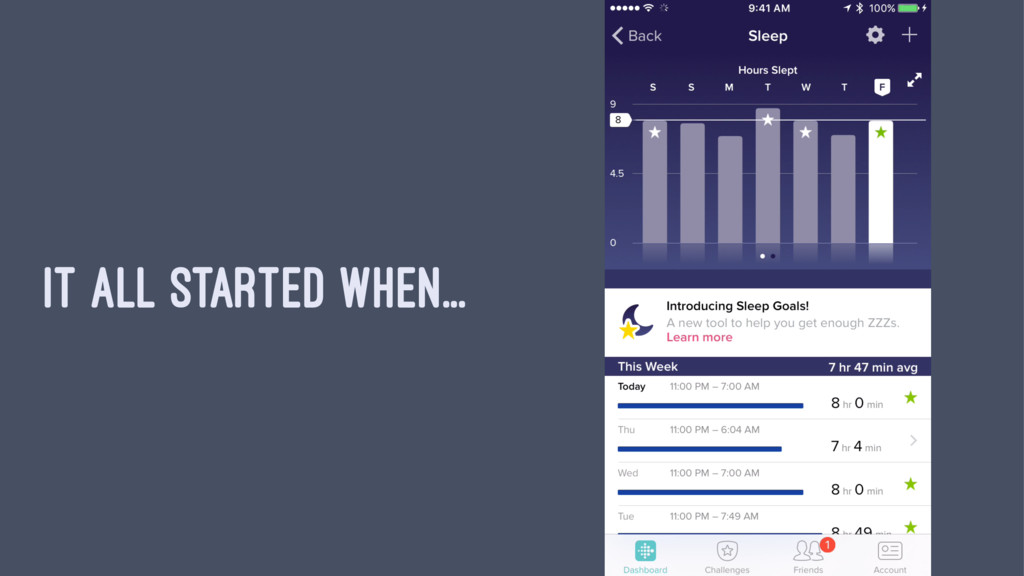
Many times, the most memorable part of an app's experience is an intricate, animated experience. iOS provides a number of tools to create these experiences, but it can take some work to get the most out of them.

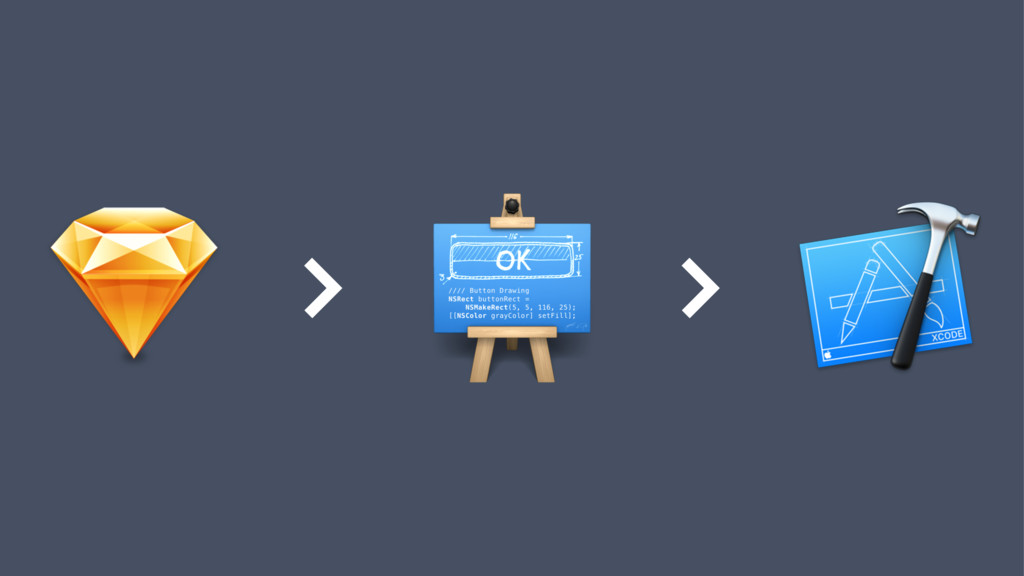
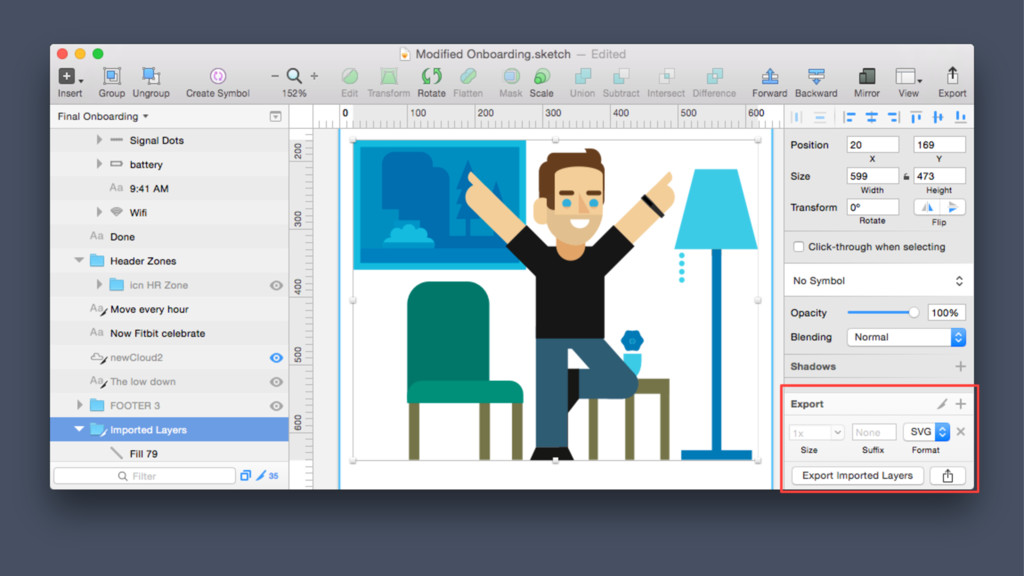
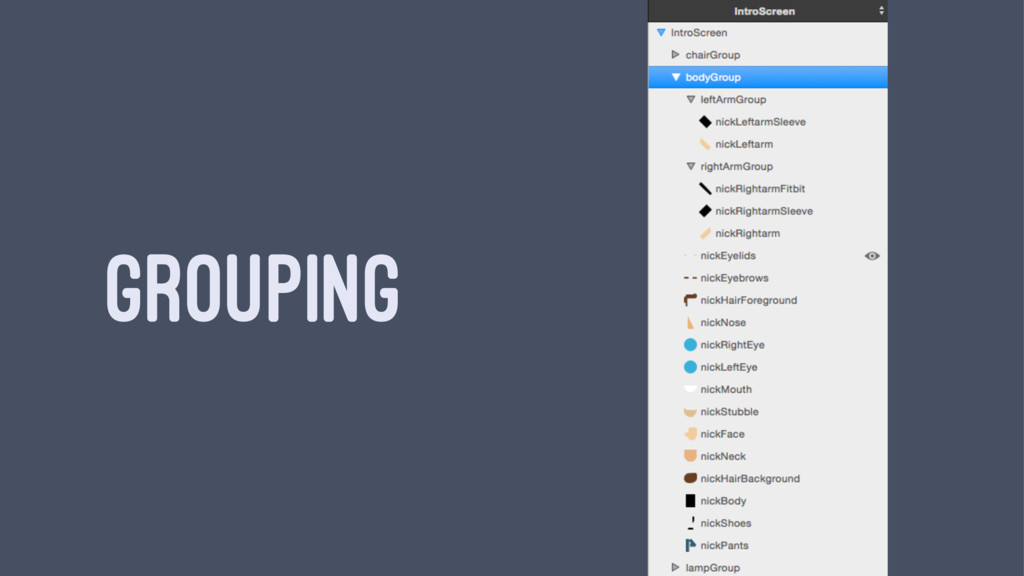
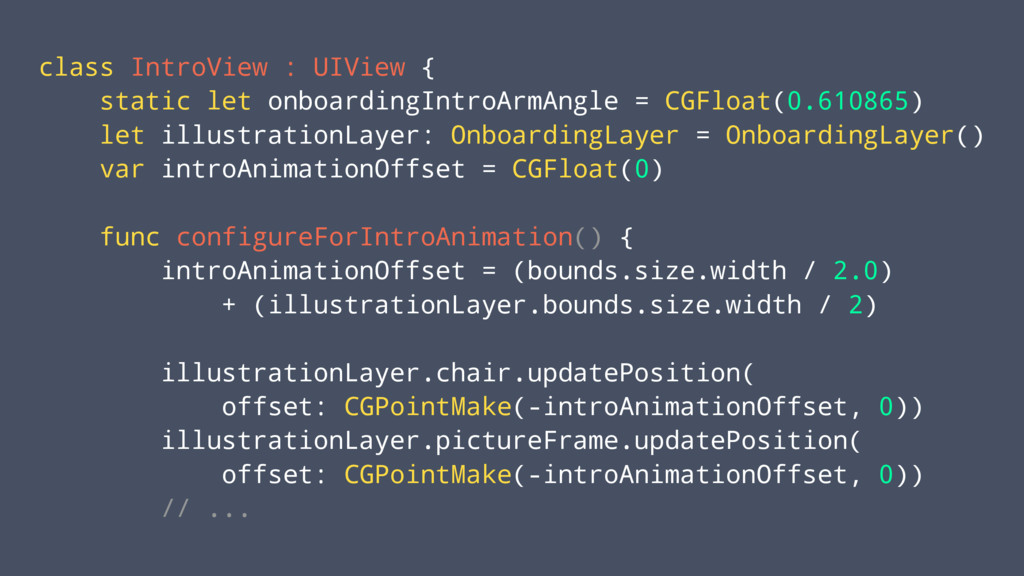
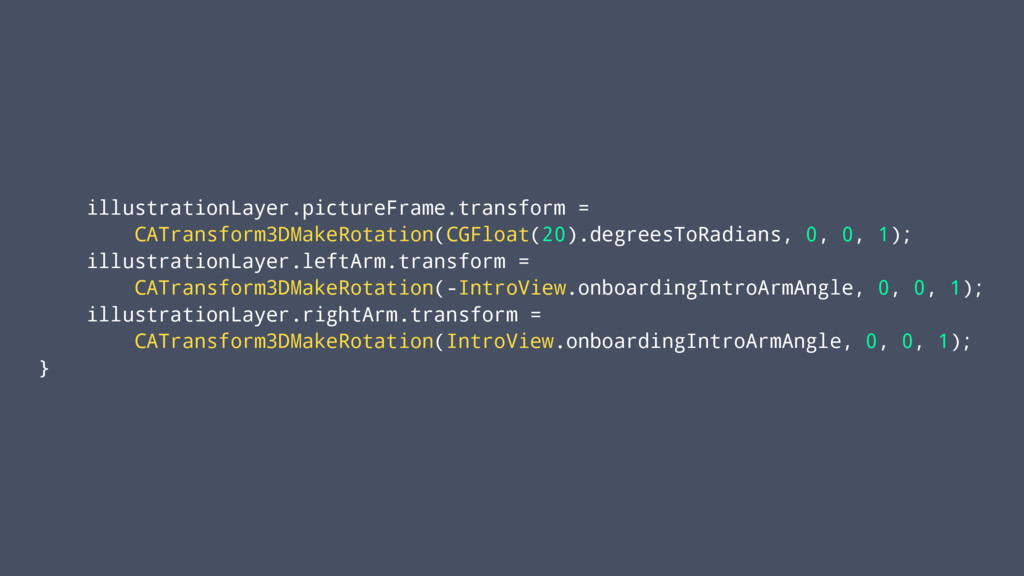
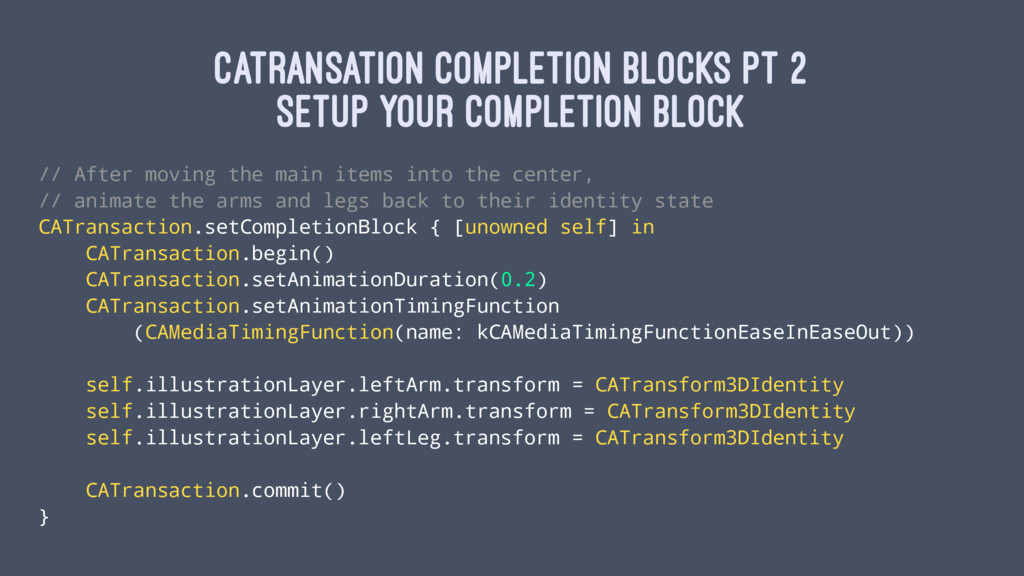
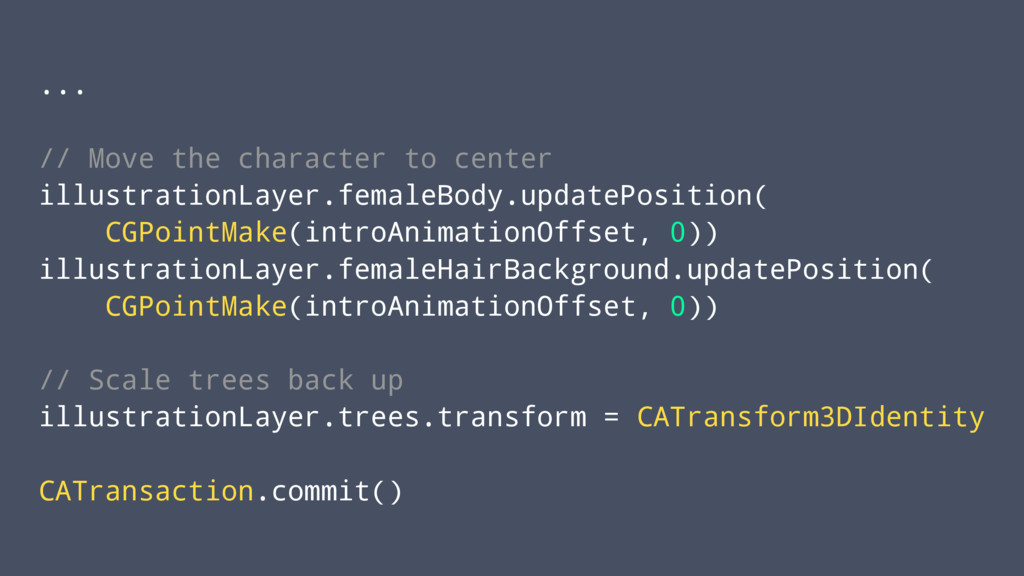
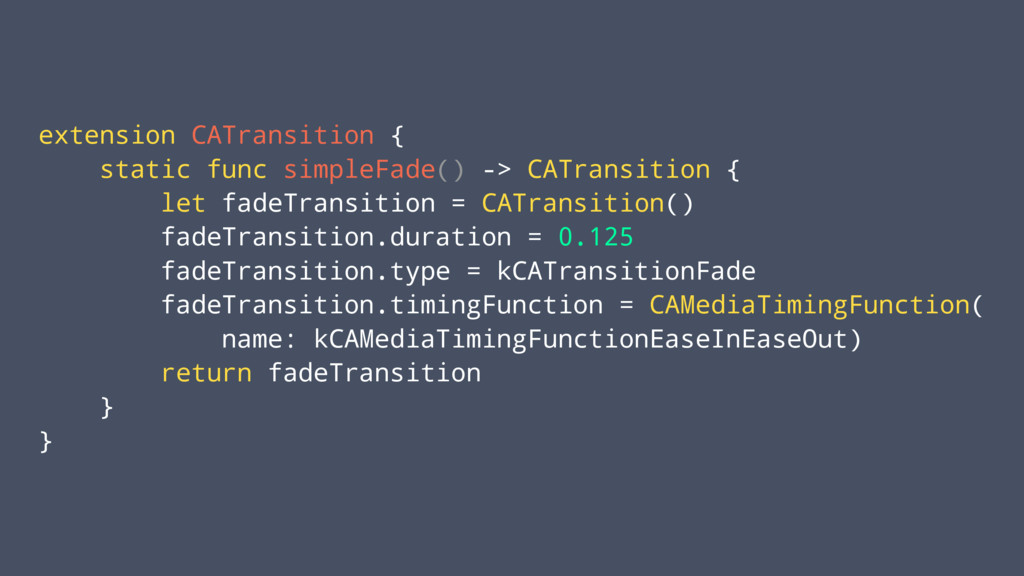
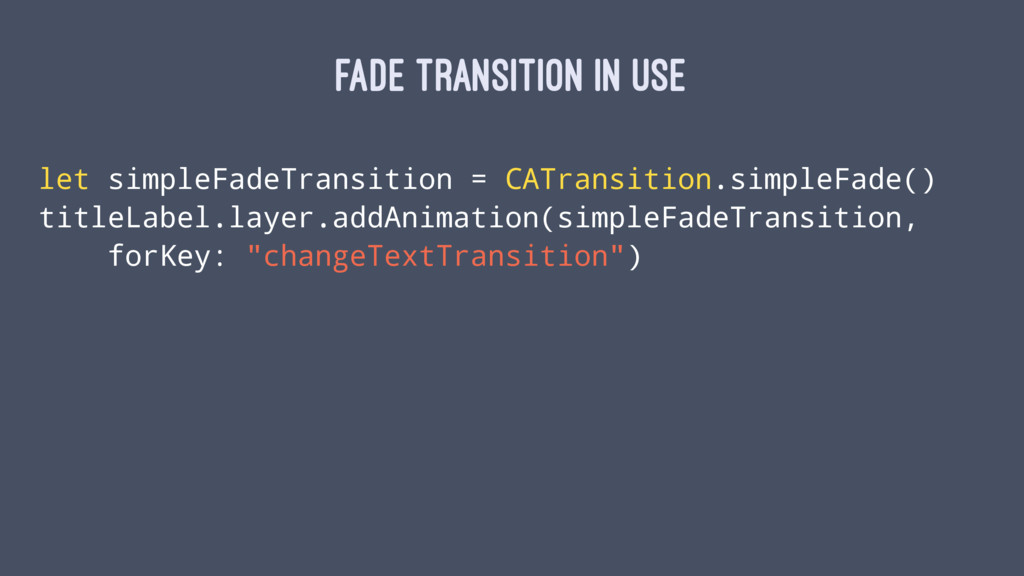
The basis for many great experiences lies in Core Animation. Using tools such as CALayer and CATransaction we can create a high resolution, vector-based, animated sequence that delights users. We'll use code samples to go through different animations and discuss how you can use these techniques in your app.

Let's use the power of CALayers to make your app memorable.

Stephen Barnes

June 14, 2016
Tweet

More Decks by Stephen Barnes

Other Decks in Programming

Transcript

  1. BRING YOUR APP TO LIFE WITH CALAYERS CALAYERS, PAINTCODE, AND

    ANIMATIONS STEPHEN BARNES - @SMBARNE - FITBIT
  2. PROS > Vector output > Performant > Easily adjustable via

    WYSIWYG Editor > Anchor Points, Relative Location, Transforms > Outputs standard iOS code
  3. CONS > Great for controls, requires alterations for sequential animation

    > Relies on drawRect > Imposes a third party tool for UI configuration > Possible compile time increases
  4. GENERATED CODE - (void)drawIntroScreenWithFrame: (CGRect)frame rightArmAngle: (CGFloat)rightArmAngle { //// General

    Declarations CGContextRef context = UIGraphicsGetCurrentContext(); ... //// pictureFrameGroup { //// pictureBackground Drawing UIBezierPath* pictureBackgroundPath = [UIBezierPath bezierPathWithRect:CGRectMake( CGRectGetMinX(pictureFrameGroup) + 3.27, CGRectGetMinY(pictureFrameGroup) + 1.48, 122.75, 94.65)]; [pictureBackgroundBlue setFill]; [pictureBackgroundPath fill]; ...
  5. VECTOR CLEANUP > Delete unused shapes > Merge contiguous shapes

    with same color > Name colors > Name layers
  6. BREAKDOWN AND TRANSFORM GENERATED CODE > Custom View with custom

    CALayer > Custom CALayer exposes animatable groups > Manipulate Paintcode output
  7. class OnboardingLayer : CALayer { let pictureFrame: CAShapeLayer let chair:

    CAShapeLayer let body: CAShapeLayer let leftArm: CAShapeLayer let rightArm: CAShapeLayer let table: CAShapeLayer let lamp: CAShapeLayer }
  8. BOUNDS, ANCHORS, AND POSITIONS > Use paintcode to give bounds

    for a group > Use anchorPoint and bounds to calculate position
  9. BOUNDS, ANCHORS, AND POSITIONS > Default AnchorPoint is (0.5, 0.5)

    > Use transform offset in paintcode to determine anchorpoint > Update position if you update anchorpoint!
  10. TAKE PAINTCODE OUTPUT AND... > Create a CALayer for each

    shape > Set the path of the CALayer to the vector output > Replace fill with fillColor > Add the CALayer to the parent layer
  11. override init() { pictureFrame = OnboardingLayer.createPictureFrame() pictureFrame.anchorPoint = CGPointMake(0.5, 0);

    pictureFrame.bounds = CGRectMake(0, 0, 127, 98); pictureFrame.position = CGPointMake(64, 0); ... super.init() bounds = CGRectMake(0, 0, 296, 241); addSublayer(pictureFrame) addSublayer(chair) addSublayer(table) addSublayer(lamp) ... }
  12. static func createPictureFrame() -> CAShapeLayer { let pictureFrameLayer = CAShapeLayer()

    // Color Declarations taken from paintcode let pictureBackgroundBlue = UIColor( red: 0.066, green: 0.485, blue: 0.695, alpha: 1.000) ... // pictureBackground Layer Shape let pictureBackgroundLayer = CAShapeLayer() pictureBackgroundLayer.path = UIBezierPath(rect: CGRect(x: 3.27, y: 1.48, width: 122.75, height: 94.65)).CGPath pictureBackgroundLayer.fillColor = pictureBackgroundBlue.CGColor pictureFrameLayer.addSublayer(pictureBackgroundLayer) ... return pictureFrameLayer }
  13. If you don't break up your groups... //// rightArmGroup CGContextSaveGState(context)

    CGContextTranslateCTM(context, 186.17, 82.7) CGContextRotateCTM(context, -60.12 * CGFloat(M_PI) / 180) //// rightarm Drawing let rightarmPath = UIBezierPath() rightarmPath.moveToPoint(CGPoint(x: 44.94, y: -59.59))
  14. RETROSPECTIVE > SpriteKit > QuartzCode (WYSIWYG For Core Animation +

    CALayers) > Squall (After Effects to iOS Code)
  15. class IntroView : UIView { static let onboardingIntroArmAngle = CGFloat(0.610865)

    let illustrationLayer: OnboardingLayer = OnboardingLayer() var introAnimationOffset = CGFloat(0) func configureForIntroAnimation() { introAnimationOffset = (bounds.size.width / 2.0) + (illustrationLayer.bounds.size.width / 2) illustrationLayer.chair.updatePosition( offset: CGPointMake(-introAnimationOffset, 0)) illustrationLayer.pictureFrame.updatePosition( offset: CGPointMake(-introAnimationOffset, 0)) // ...
  16. Picture frame angle tranform animation with wobble lazy var pictureFrameAnimation:

    CAAnimation = { let pictureAnimation = CAKeyframeAnimation() pictureAnimation.beginTime = CACurrentMediaTime() + 0.25 pictureAnimation.keyPath = "transform.rotation" pictureAnimation.values = [0, -30.degreesToRadians, -10.degreesToRadians, -20.degreesToRadians] pictureAnimation.duration = 0.75 pictureAnimation.keyTimes = [0, 0.33, 0.66, 1] pictureAnimation.timingFunctions = [ CAMediaTimingFunction(name: kCAMediaTimingFunctionEaseInEaseOut), CAMediaTimingFunction(name: kCAMediaTimingFunctionEaseOut), CAMediaTimingFunction(name: kCAMediaTimingFunctionEaseIn), ] return pictureAnimation }()
  17. Add the animations illustrationLayer.leftArm.addAnimation( leftArmAnimation, forKey: "leftArmIntroAnimation") illustrationLayer.rightArm.addAnimation( rightArmAnimation, forKey:

    "rightArmIntroAnimation") illustrationLayer.pictureFrame.addAnimation( pictureFrameAnimation, forKey: "pictureFrameIntroAnimation")
  18. Keyframe animation static func armAnimation() -> CAKeyframeAnimation { let armAnimation

    = CAKeyframeAnimation() armAnimation.beginTime = CACurrentMediaTime() + 0.25 armAnimation.keyPath = "transform.rotation" // Note we animate rotation armAnimation.duration = 0.4 armAnimation.timingFunctions = [ CAMediaTimingFunction(name: kCAMediaTimingFunctionEaseInEaseOut), CAMediaTimingFunction(name: kCAMediaTimingFunctionEaseIn), ] return armAnimation }
  19. Use the base animation and modify it per arm static

    func armAnimation() -> CAKeyframeAnimation { ... } lazy var leftArmAnimation: CAAnimation = { let leftAnimation = IntroView.armAnimation() leftAnimation.values = [0, 47.degreesToRadians, IntroView.onboardingIntroArmAngle] leftAnimation.keyTimes = [0, 0.5, 1] return leftAnimation }()
  20. static func identityTransformAnimation() -> CAAnimation { ... } static func

    fadeAnimation() -> CAAnimation { ... } static func largeFireworkAnimationGroup() -> CAAnimationGroup { let animationGroup = CAAnimationGroup() animationGroup.repeatCount = HUGE animationGroup.animations = [identityTransformAnimation(), fadeAnimation()] return animationGroup } func configureFireworkAnimation() { let fireworkAnimationGroup = IntroView.largeFireworkAnimationGroup() fireworkAnimationGroup.duration = 3.5 illustrationLayer.topLeftFireworkMaskLayer.addAnimation( fireworkAnimationGroup, forKey: "fireworkGroupAnimation") }
  21. CATransation Completion Blocks pt 1 Start your first transaction CATransaction.begin()

    CATransaction.setAnimationDuration(0.45) CATransaction.setAnimationTimingFunction( CAMediaTimingFunction(name: kCAMediaTimingFunctionEaseIn)) ...
  22. CATransation Completion Blocks pt 2 Setup your completion block //

    After moving the main items into the center, // animate the arms and legs back to their identity state CATransaction.setCompletionBlock { [unowned self] in CATransaction.begin() CATransaction.setAnimationDuration(0.2) CATransaction.setAnimationTimingFunction (CAMediaTimingFunction(name: kCAMediaTimingFunctionEaseInEaseOut)) self.illustrationLayer.leftArm.transform = CATransform3DIdentity self.illustrationLayer.rightArm.transform = CATransform3DIdentity self.illustrationLayer.leftLeg.transform = CATransform3DIdentity CATransaction.commit() }
  23. ... // Move the character to center illustrationLayer.femaleBody.updatePosition( CGPointMake(introAnimationOffset, 0))

    illustrationLayer.femaleHairBackground.updatePosition( CGPointMake(introAnimationOffset, 0)) // Scale trees back up illustrationLayer.trees.transform = CATransform3DIdentity CATransaction.commit()
  24. extension CATransition { static func simpleFade() -> CATransition { let

    fadeTransition = CATransition() fadeTransition.duration = 0.125 fadeTransition.type = kCATransitionFade fadeTransition.timingFunction = CAMediaTimingFunction( name: kCAMediaTimingFunctionEaseInEaseOut) return fadeTransition } }
  25. WRAPPING UP > Use an asset pipeline that works for

    what you're building > Combine CAAnimations using CAAnimationGroups and by chaining CATransactions > CATransitions are simple and effective