Upgrade to Pro — share decks privately, control downloads, hide ads and more …

Intro to SwiftUI

Intro to SwiftUI

brief introduction to SwiftUI
https://github.com/vinhnx/try-SwiftUI

Vinh Nguyen

October 26, 2021
Tweet

More Decks by Vinh Nguyen

Other Decks in Programming

Transcript

  1. SwiftUI SwiftUI helps you build great-looking apps across all Apple

    platforms with the power of Swift — and as little code as possible https://developer.apple.com/xcode/swiftui/
  2. SwiftUI SwiftUI is the most exciting news since Apple announce

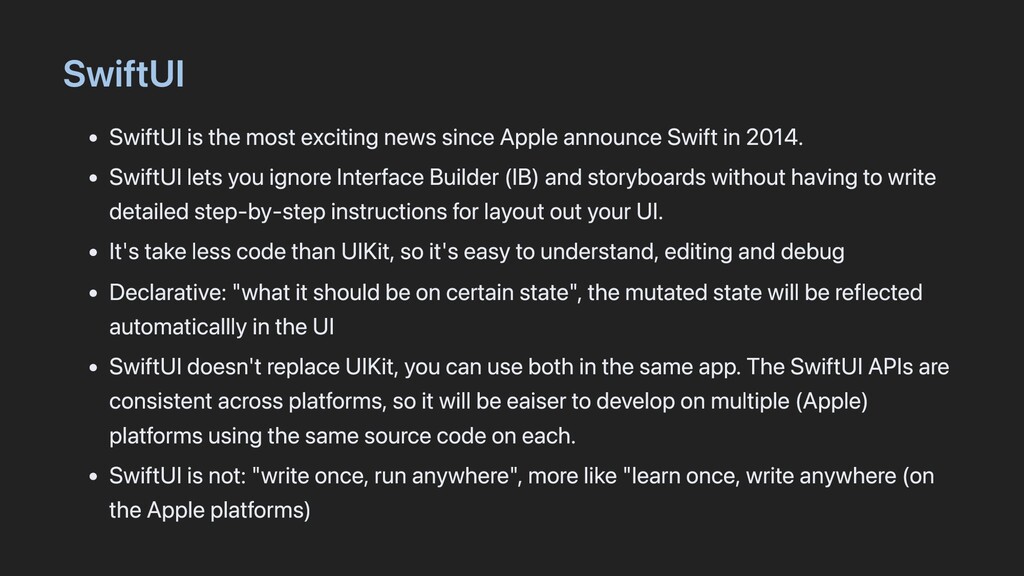
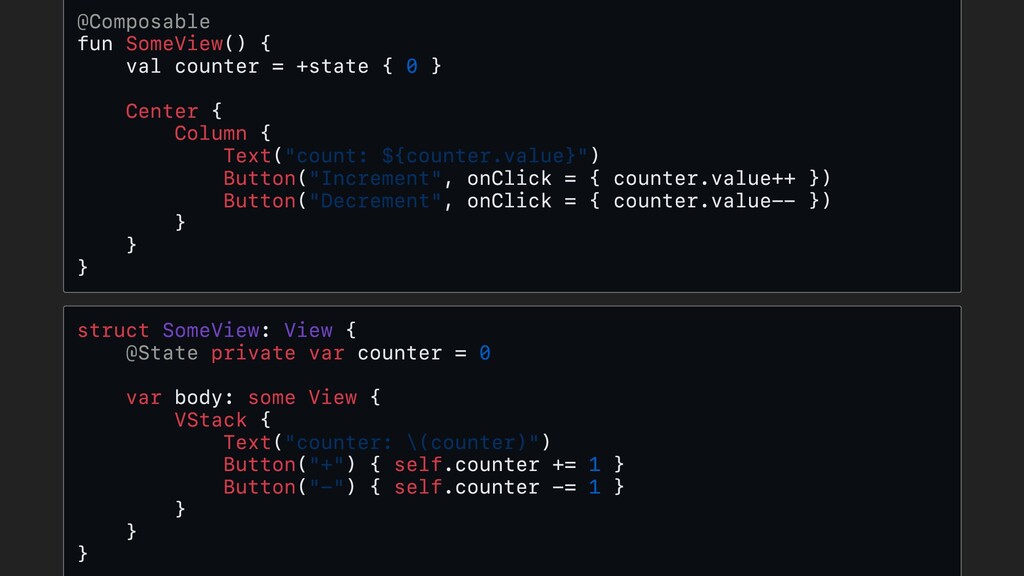
    Swift in 2014. SwiftUI lets you ignore Interface Builder (IB) and storyboards without having to write detailed step-by-step instructions for layout out your UI. It's take less code than UIKit, so it's easy to understand, editing and debug Declarative: "what it should be on certain state", the mutated state will be reflected automaticallly in the UI SwiftUI doesn't replace UIKit, you can use both in the same app. The SwiftUI APIs are consistent across platforms, so it will be eaiser to develop on multiple (Apple) platforms using the same source code on each. SwiftUI is not: "write once, run anywhere", more like "learn once, write anywhere (on the Apple platforms)
  3. SwiftUI SwiftUI is all about Value type and Protocol light-weight

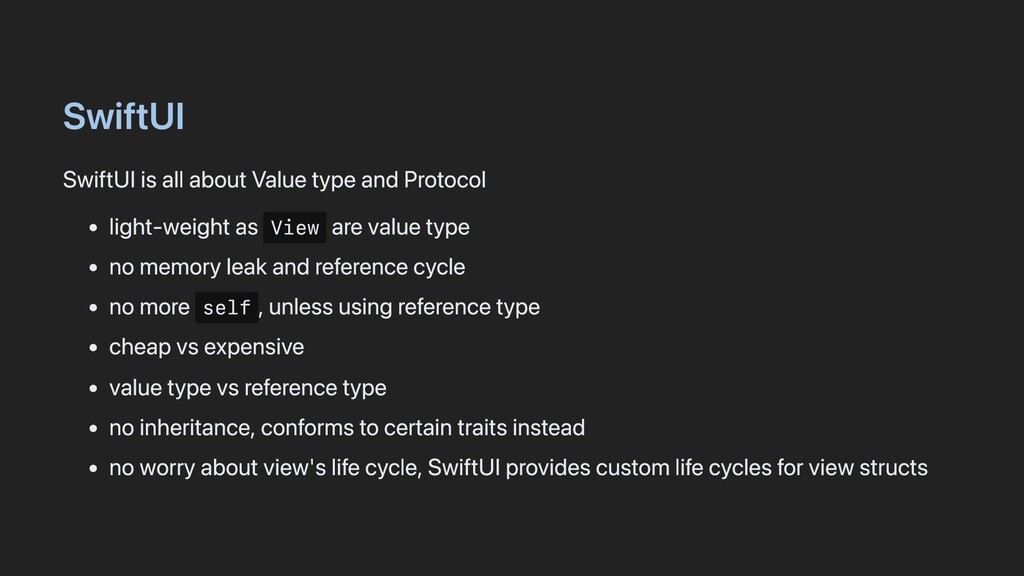
    as View are value type no memory leak and reference cycle no more self , unless using reference type cheap vs expensive value type vs reference type no inheritance, conforms to certain traits instead no worry about view's life cycle, SwiftUI provides custom life cycles for view structs
  4. Delcarative syntax SwiftUI uses a declarative syntax, so you can

    simply state what your user interface should do. import SwiftUI struct ContentView: View { @State private var query: String = "" var body: some View { VStack(alignment: .leading) { TextField("name...", text: $query) Text("Hello: " + query) .foregroundColor(.secondary) } .padding() } }
  5. A list of items UIKit let tableView = UITableView() ...

    tableView.delegate = self tableView.datasource = self ... tableView.reloadData() ... numberOfRows... ... cellForRow(at indexPath:...) SwiftUI List(items, id: \.self) { item in Text(item.title) }
  6. A button struct ContentView: View { @State private var buttonTap:

    Bool = false var body: some View { Button(action: { buttonTap.toggle() }, label: { Label("Hello", systemImage: "hand.wave") }) .buttonStyle(.borderedProminent) .buttonBorderShape(.capsule) } }s
  7. App A type that represents the structure and behavior of

    an app. https://developer.apple.com/documentation/swiftui/app Create an app by declaring a structure that confirms to the App protocol.
  8. App @main struct MyApp: App { @Environment(\.scenePhase) private var scenePhase

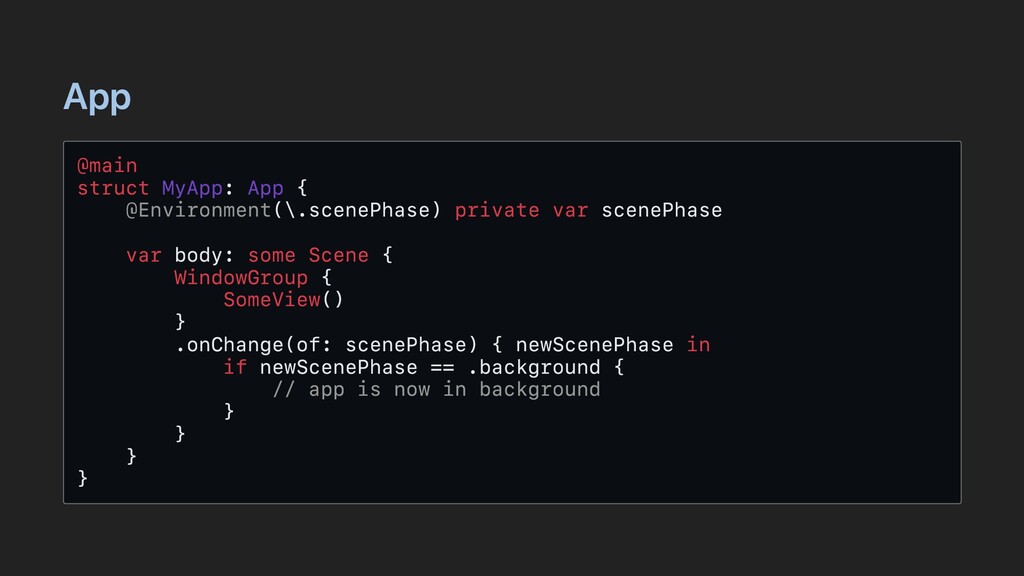
    var body: some Scene { WindowGroup { SomeView() } .onChange(of: scenePhase) { newScenePhase in if newScenePhase == .background { // app is now in background } } } }
  9. @main : annotate the to indicate that MyApp struct conforms

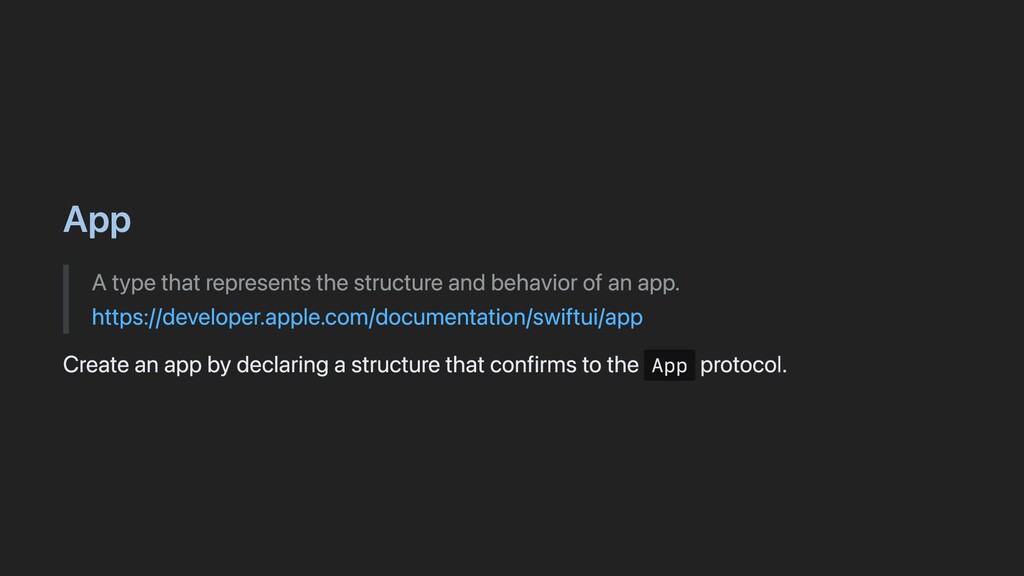
    to the App protocol and provides the entry point of the app. Provides a default implementation of the main() method that the system calls to launch the app. Scene : life cycle of the app Read more about Scene protocol: https://developer.apple.com/documentation/swiftui/scene
  10. View "A type that represents part of your app’s user

    interface and provides modifiers that you use to configure views." https://developer.apple.com/documentation/swiftui/view Declaration protocol View
  11. View View protocol provides a blueprint for functionality. The View

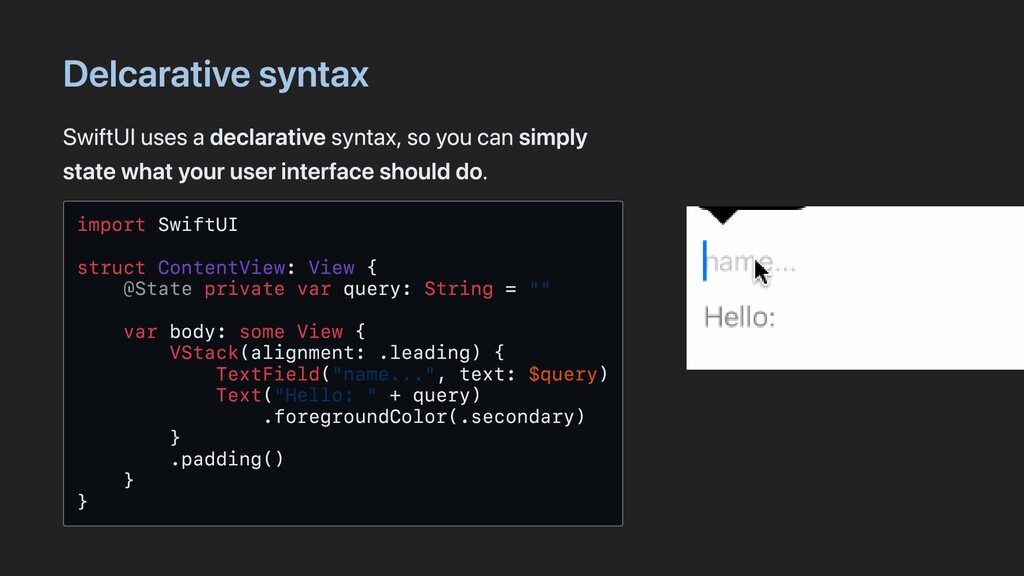
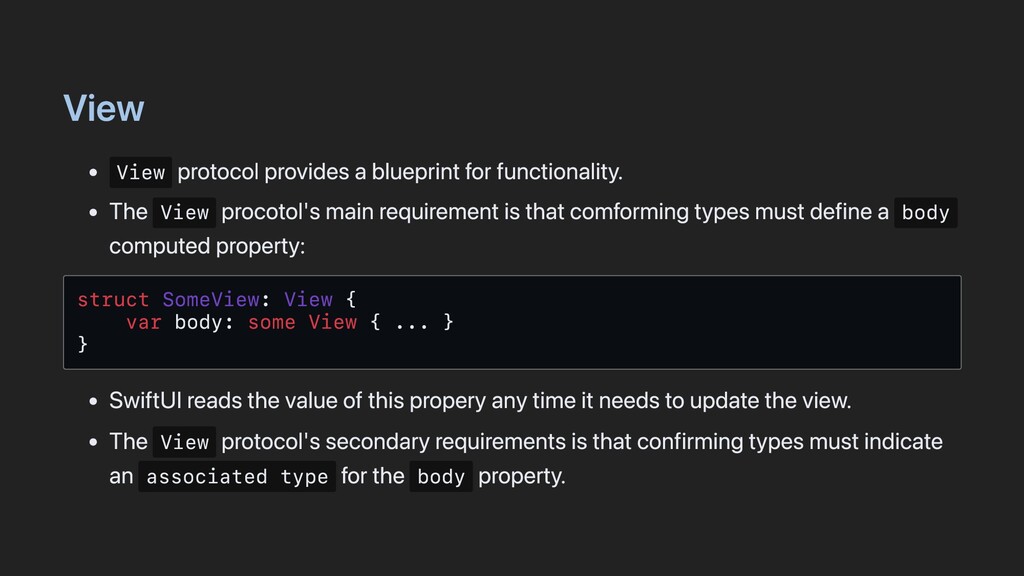
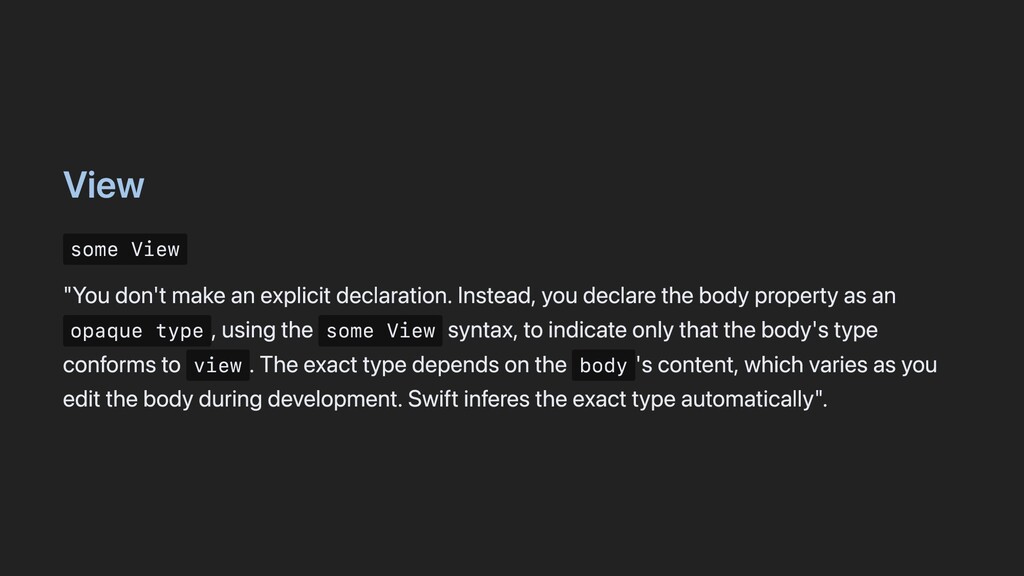
    procotol's main requirement is that comforming types must define a body computed property: struct SomeView: View { var body: some View { ... } } SwiftUI reads the value of this propery any time it needs to update the view. The View protocol's secondary requirements is that confirming types must indicate an associated type for the body property.
  12. View some View "You don't make an explicit declaration. Instead,

    you declare the body property as an opaque type , using the some View syntax, to indicate only that the body's type conforms to view . The exact type depends on the body 's content, which varies as you edit the body during development. Swift inferes the exact type automatically".
  13. this is wrong: var body: some Text {} // WRONG:

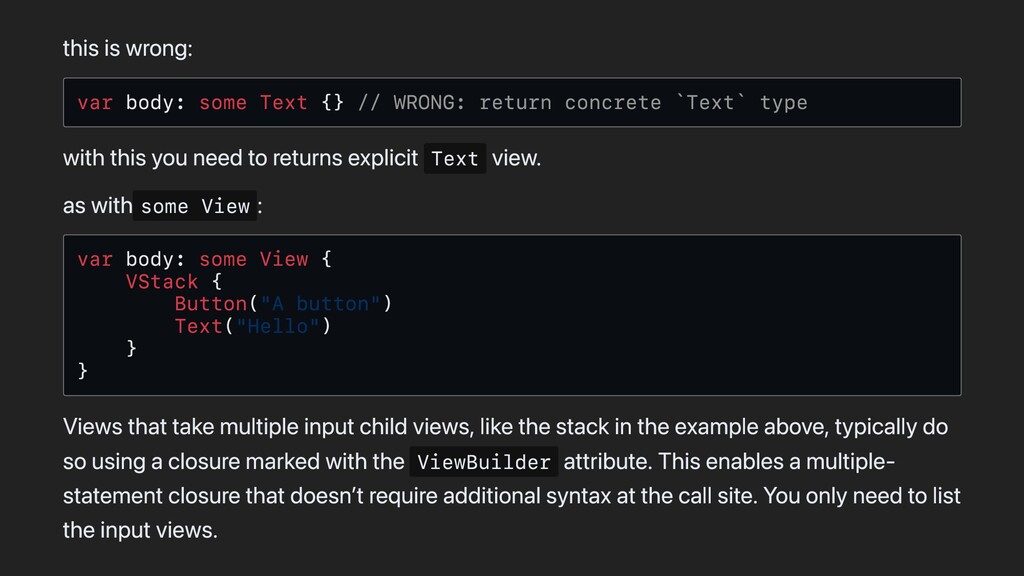
    return concrete `Text` type with this you need to returns explicit Text view. as with some View : var body: some View { VStack { Button("A button") Text("Hello") } } Views that take multiple input child views, like the stack in the example above, typically do so using a closure marked with the ViewBuilder attribute. This enables a multiple- statement closure that doesn’t require additional syntax at the call site. You only need to list the input views.
  14. View Modifiers Use view modifier to customze the appearance and

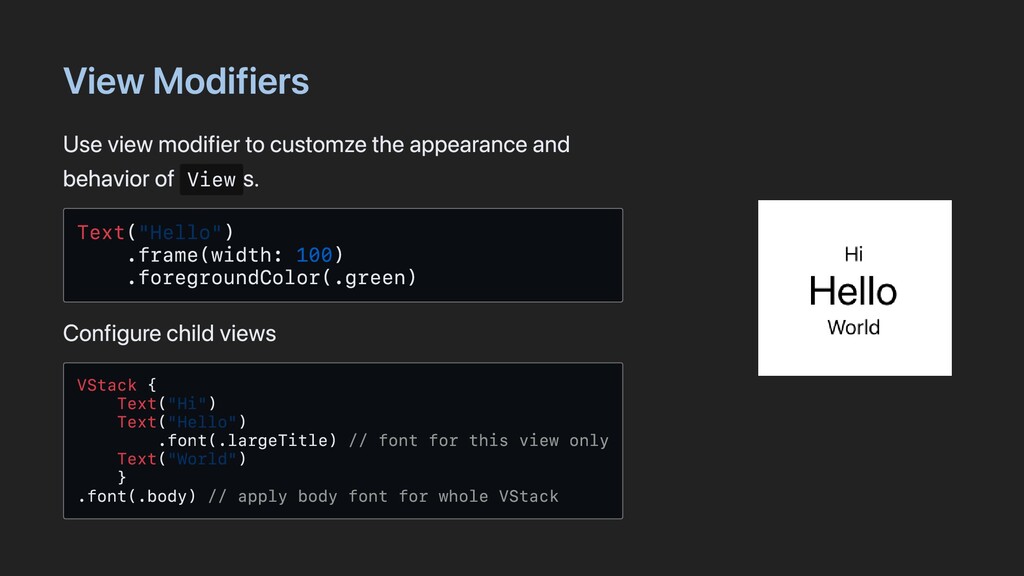
    behavior of View s. Text("Hello") .frame(width: 100) .foregroundColor(.green) Configure child views VStack { Text("Hi") Text("Hello") .font(.largeTitle) // font for this view only Text("World") } .font(.body) // apply body font for whole VStack
  15. Navigation in SwiftUI NavigationView NavgationView { NavigationLink( destination: MyOtherView() )

    { MyView() ) } NavigationLink NavigationLink( destination: MyOtherView(), label: { Text("Click me") } )
  16. Navigation in SwiftUI struct ContentView: View { var body: some

    View { NavigationView { List(0...100, id: \.self) { index in NavigationLink { DetailView(value: "\(index)") } label: { Text("\(index)") } } .navigationTitle("Try Swiftui") } } } struct DetailView: View { var value: String var body: some View { Text(value) .font(.largeTitle) } }
  17. Passing data between views @State for simple properties that belong

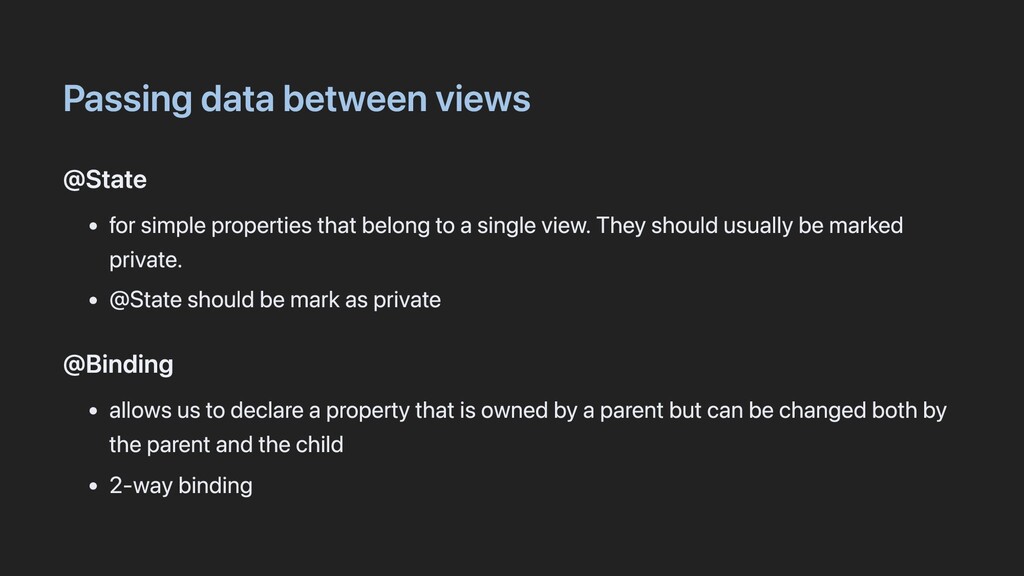
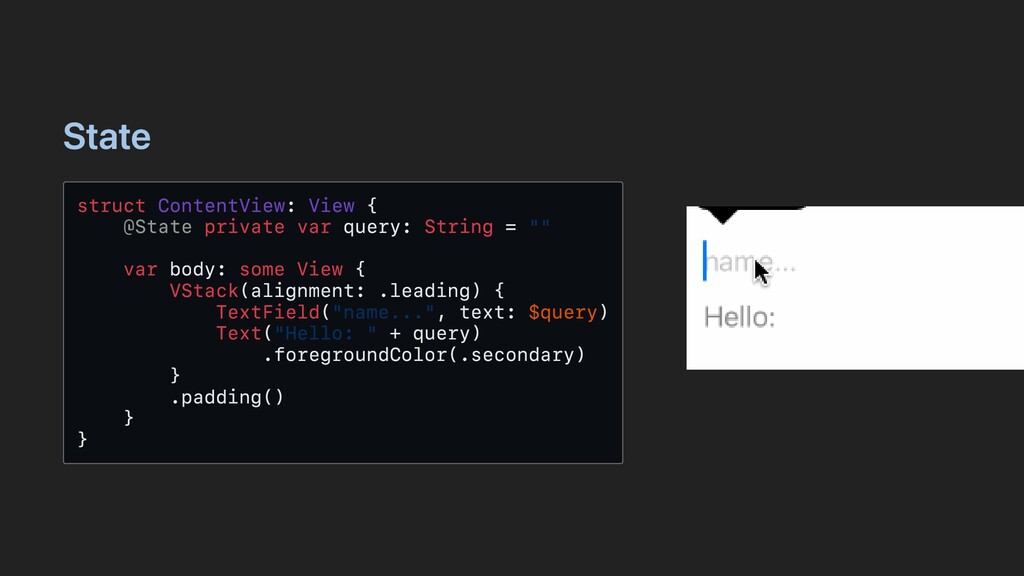
    to a single view. They should usually be marked private. @State should be mark as private @Binding allows us to declare a property that is owned by a parent but can be changed both by the parent and the child 2-way binding
  18. Passing data between views @Published Publisher with @Published Publishing a

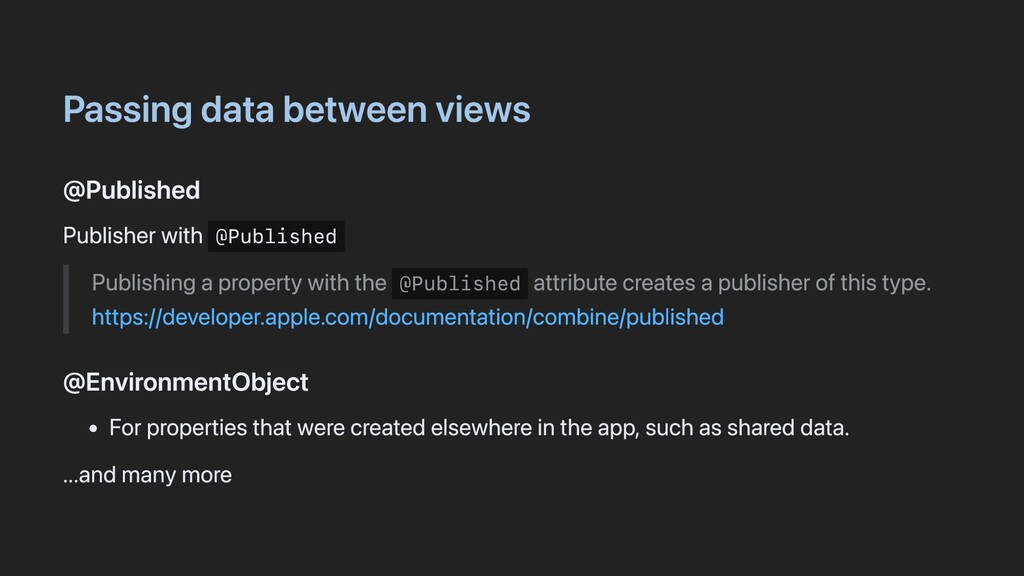
    property with the @Published attribute creates a publisher of this type. https://developer.apple.com/documentation/combine/published @EnvironmentObject For properties that were created elsewhere in the app, such as shared data. ...and many more
  19. State struct ContentView: View { @State private var query: String

    = "" var body: some View { VStack(alignment: .leading) { TextField("name...", text: $query) Text("Hello: " + query) .foregroundColor(.secondary) } .padding() } }
  20. Publiser Publishers send values that can change over time to

    Subscribers (one or many instances) or fail with an error. Subscriber Subscribers receive values from a Publisher (one instance) until the subscription is canceled.
  21. Combine SwiftUI is powered by Combine "The Combine framework provides

    a declarative Swift API for processing values over time. These values can represent many kinds of asynchronous events. Combine declares publishers to expose values that can change over time, and subscribers to receive those values from the publishers." https://developer.apple.com/documentation/combine Combine is Apple's takes on Functional Ractive Programming
  22. ObservableObject A type of object with a publisher that emits

    before the object has changed. https://developer.apple.com/documentation/combine/observableobject By default an ObservableObject synthesizes an objectWillChange publisher that emits the changed value before any of its @Published properties changes. Note that: ObservableObject is part of Combine framework.
  23. ObservableObject class MyViewModel: ObservableObject { @Published var output: String =

    "" } struct ContentView: View { @StateObject var viewModel = MyViewModel() var body: some View { VStack(alignment: .leading) { TextField("name...", text: $viewModel.output) Text("Hello: " + viewModel.output) .foregroundColor(.secondary) } .padding() } }
  24. Property Wrapper When dealing with properties that represent some form

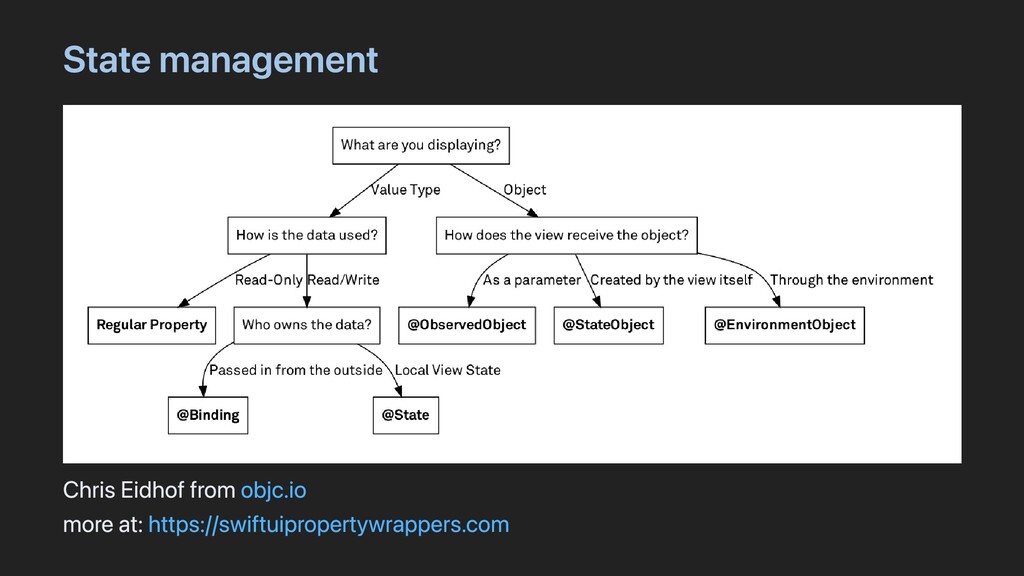
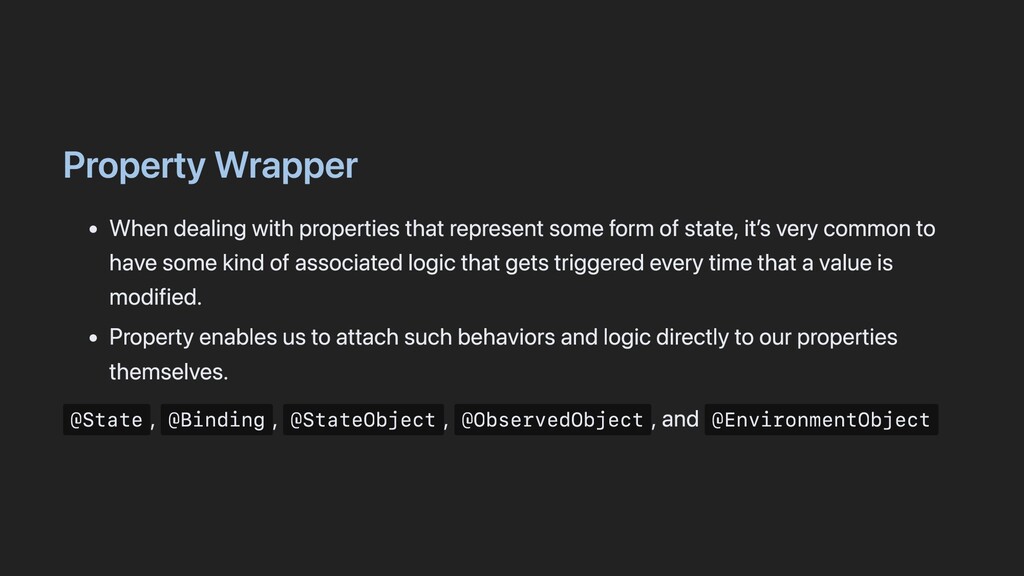
    of state, it’s very common to have some kind of associated logic that gets triggered every time that a value is modified. Property enables us to attach such behaviors and logic directly to our properties themselves. @State , @Binding , @StateObject , @ObservedObject , and @EnvironmentObject
  25. SwiftUI <-> UIKit SwiftUI can work together with UIKit by

    making it easier to add SwiftUI views to UIKit and vise versa.
  26. Using SwiftUI in UIKit Wrapping a SwiftUI view in a

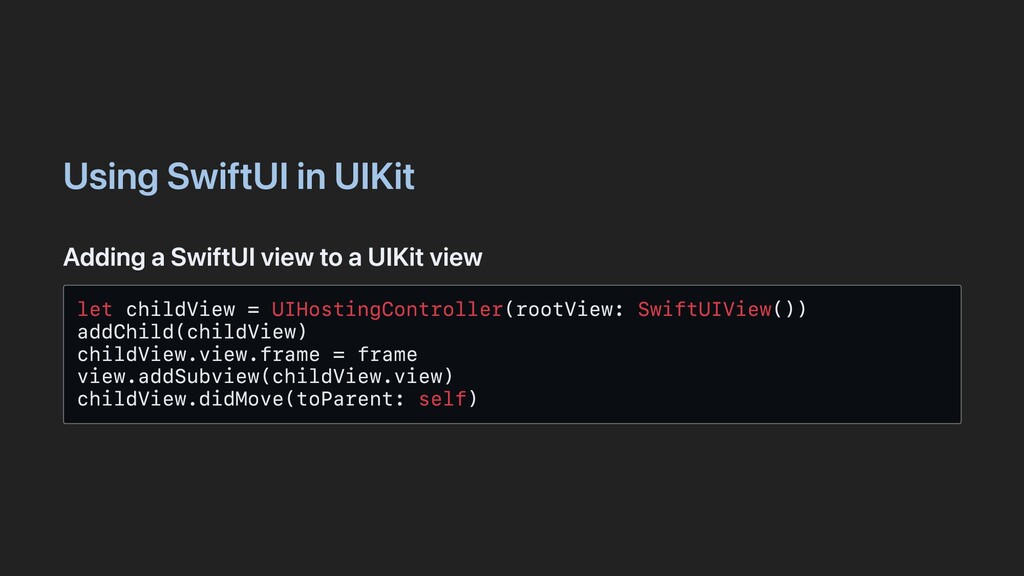
    UIKit view controller UIHostingController(rootView: SwiftUIView()) Document UIHostingController A UIKit view controller that manages a SwiftUI view hierarchy. class UIHostingController<Content> where Content : View
  27. Using SwiftUI in UIKit Adding a SwiftUI view to a

    UIKit view let childView = UIHostingController(rootView: SwiftUIView()) addChild(childView) childView.view.frame = frame view.addSubview(childView.view) childView.didMove(toParent: self)
  28. Using UIKit/AppKit/WatchKit in SwiftUI Apple provided you with five representable

    protocol to wrap UIKit / AppKit / WatchKit into SwiftUI . UIKit/AppKit/WatchKit Protocol UIView UIViewRepresentable NSView NSViewRepresentable WKInterfaceObject WKInterfaceObjectRepresentable UIViewController UIViewControllerRepresentable NSViewController NSViewControllerRepresentable
  29. UIView struct ActivityIndicator: UIViewRepresentable { func makeUIView(context: Context) -> UIActivityIndicatorView

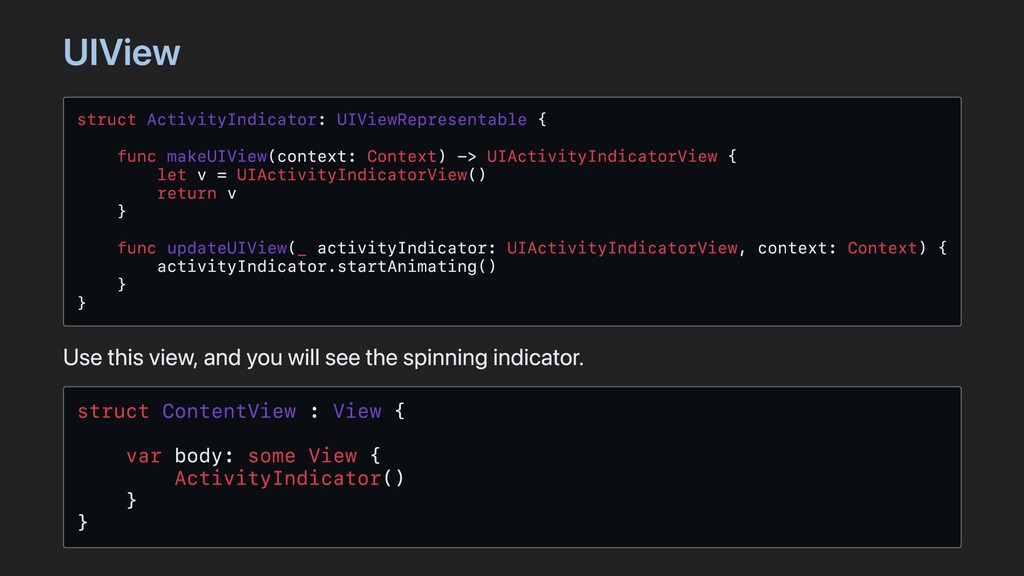
    { let v = UIActivityIndicatorView() return v } func updateUIView(_ activityIndicator: UIActivityIndicatorView, context: Context) { activityIndicator.startAnimating() } } Use this view, and you will see the spinning indicator. struct ContentView : View { var body: some View { ActivityIndicator() } }
  30. Wrapping UIViewController to use in SwiftUI import UIKit import SwiftUI

    import EventKitUI struct MyUIControllerWrapperView: UIViewControllerRepresentable { func makeCoordinator() -> Coordinator { Coordinator(self) } @Environment(\.presentationMode) var presentationMode func makeUIViewController(context: UIViewControllerRepresentableContext<MyUIControllerWrapperView>) -> MyUIController { let viewController = MyUIController() viewController.editViewDelegate = context.coordinator return viewController } func updateUIViewController(_ uiViewController: EKEventEditViewController, context: UIViewControllerRepresentableContext<NewEventView>) { // .. on update } class Coordinator: NSObject, EKEventEditViewDelegate { let parent: MyUIControllerWrapperView init(_ parent: MyUIControllerWrapperView) { self.parent = parent } func eventEditViewController(_ controller: EKEventEditViewController, didCompleteWith action: EKEventEditViewAction) { parent.presentationMode.wrappedValue.dismiss() controller.dismiss(animated: true) { switch action { case .canceled, .deleted: break case .saved: guard let event = controller.event else { return } NotificationCenter.default.post(name: .didSaveEvent, object: event.startDate) @unknown default: break } } } } }
  31. Lifecycle of UIKit in SwiftUI Initialization phase: makeCoordinator() make[UIView|UIViewController|NSView|NSViewController|WKInterfaceObject](./resources/context:) update[UIView|UIViewController|NSView|NSViewController|WKInterfaceObject](./resources/_:context:)

    Update phase: update[UIView|UIViewController|NSView|NSViewController|WKInterfaceObject](./resources/_:context:) Deinitialization phase: dismantle[UIView|UIViewController|NSView|NSViewController|WKInterfaceObject](./resources/_:coordinator:)
  32. Using UIKit/AppKit/WatchKit in SwiftUI These protocols have a very same

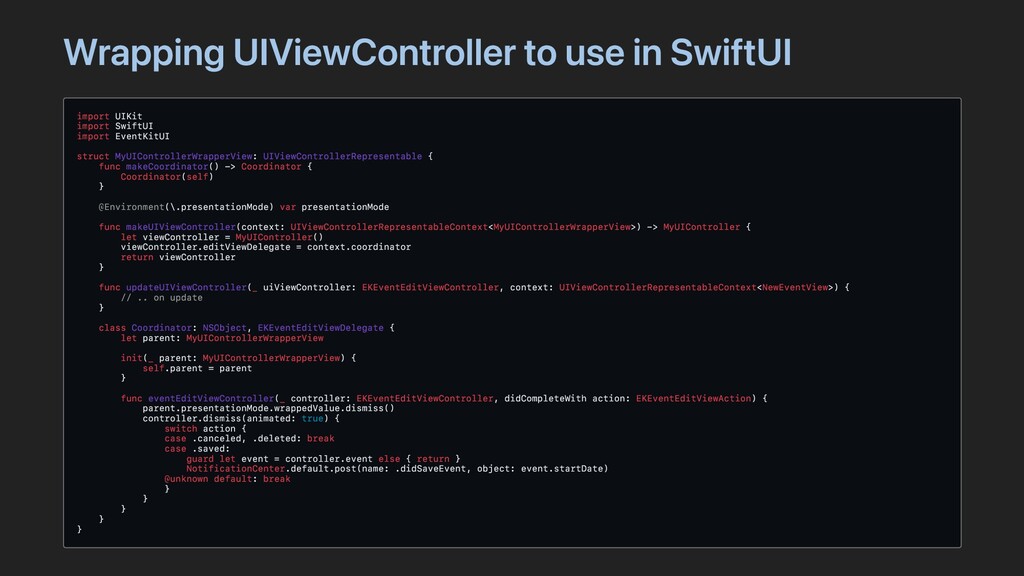
    life cycle and methods, with a purpose to bring the reactive capability to UIKit / AppKit / WatchKit (I will use just UIKit in the rest of the post, but everything applies to all three).
  33. SwiftUI <-> UIKit Things to consider when adopting SwiftUI in

    a UIKit apps It's important to know that you can only use SwiftUI on iOS 13 and up. SwiftUI is constantly improving (Swift Evolution). New thing, new challenges but it will be rewarding the more you figuring things out. Remember: Objective-C to Swift, or Swift 2 to Swift 3 transtions? But this is more fun. if #available(iOS 13.0, *) { // SwiftUI things } else { // fallback to UIKit }
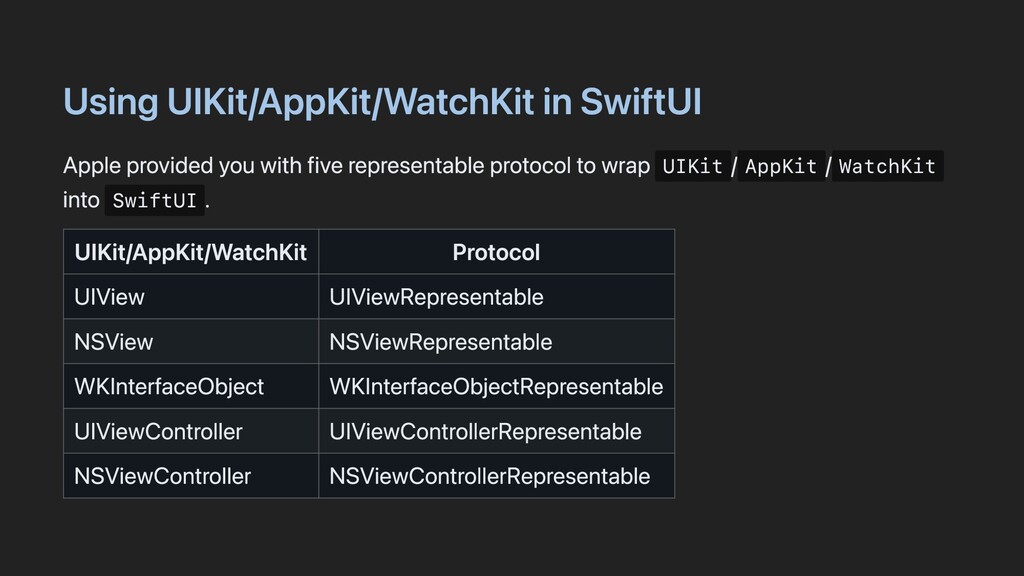
  34. @Composable fun SomeView() { val counter = +state { 0

    } Center { Column { Text("count: ${counter.value}") Button("Increment", onClick = { counter.value++ }) Button("Decrement", onClick = { counter.value-- }) } } } struct SomeView: View { @State private var counter = 0 var body: some View { VStack { Text("counter: \(counter)") Button("+") { self.counter += 1 } Button("-") { self.counter -= 1 } } } }
  35. Q&A

  36. Thank you for your time! Repo for this presentation, including

    slides and sample project: https://github.com/vinhnx/try-SwiftUI