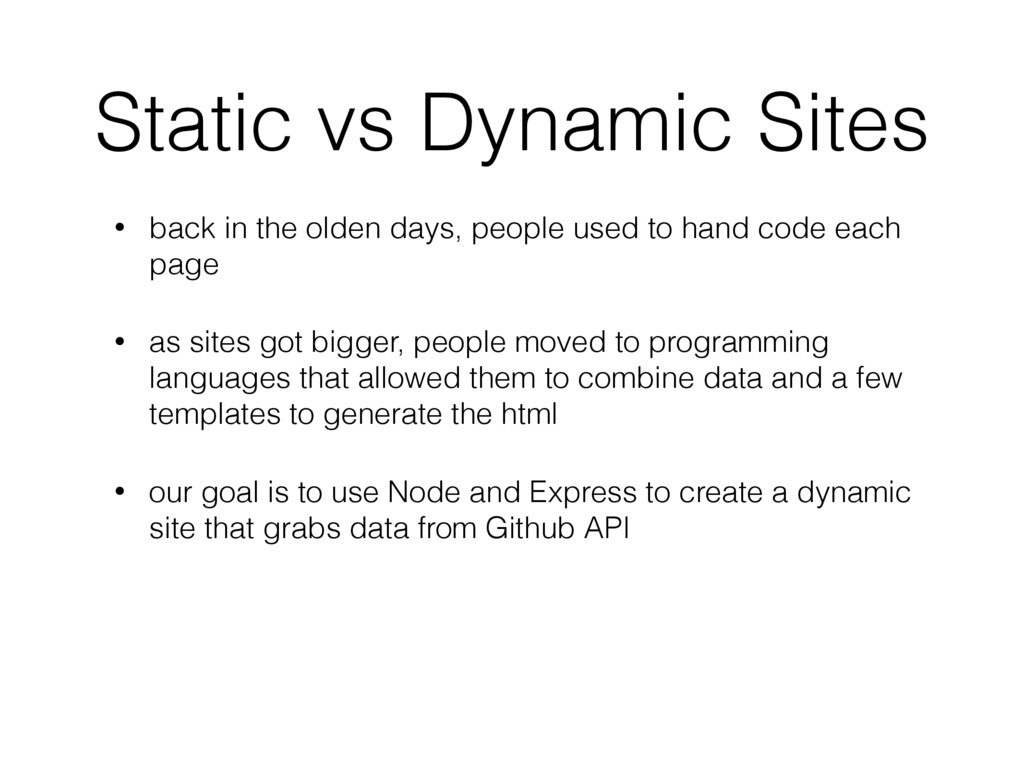
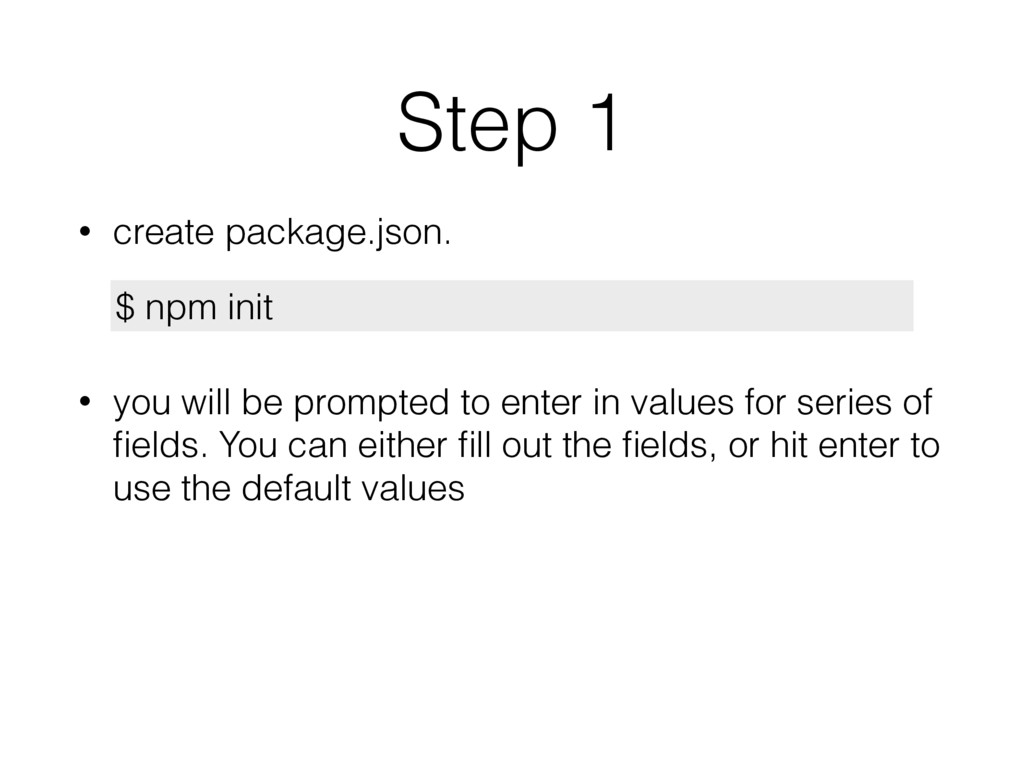
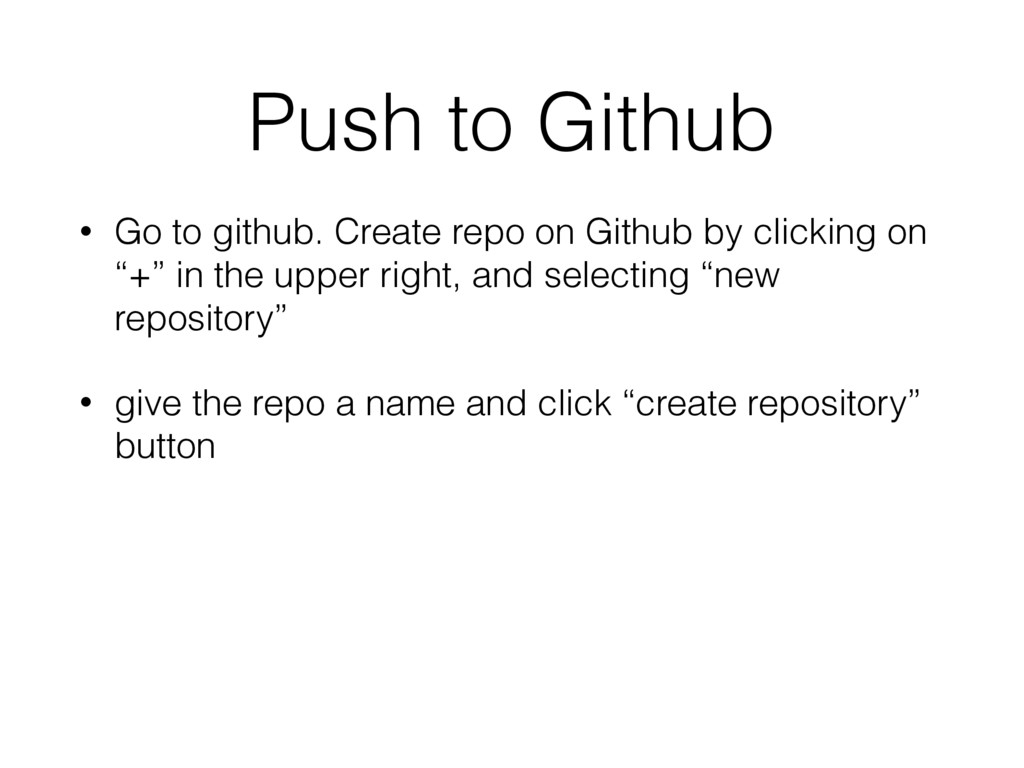
people used to hand code each page • as sites got bigger, people moved to programming languages that allowed them to combine data and a few templates to generate the html • our goal is to use Node and Express to create a dynamic site that grabs data from Github API
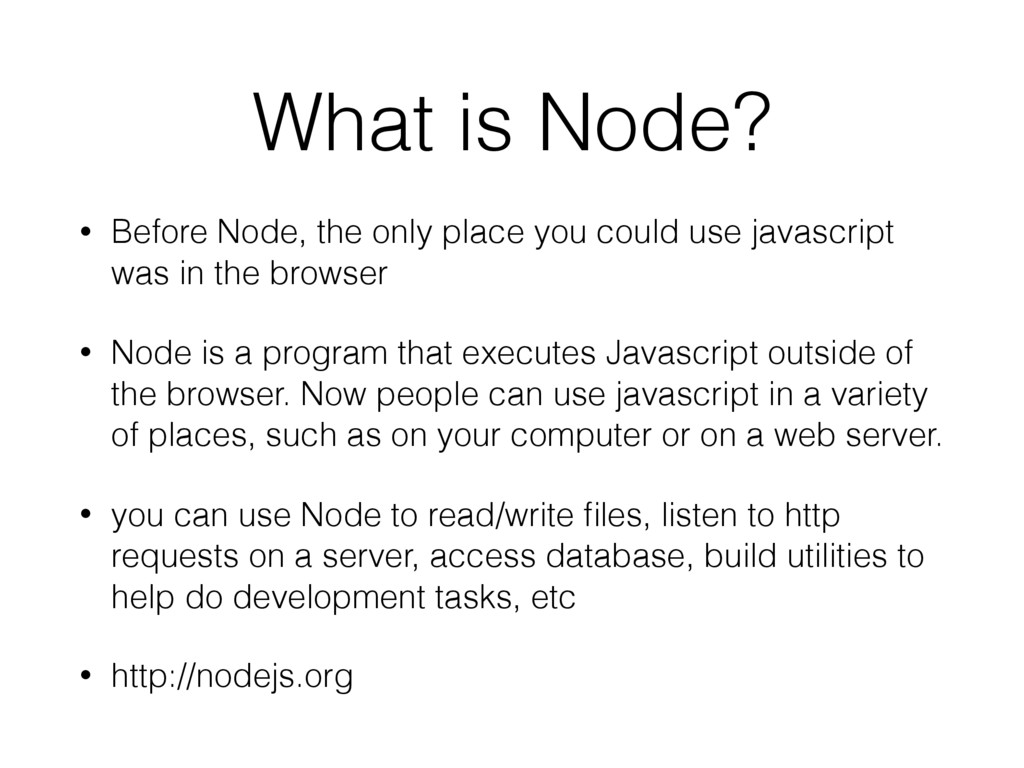
could use javascript was in the browser • Node is a program that executes Javascript outside of the browser. Now people can use javascript in a variety of places, such as on your computer or on a web server. • you can use Node to read/write files, listen to http requests on a server, access database, build utilities to help do development tasks, etc • http://nodejs.org
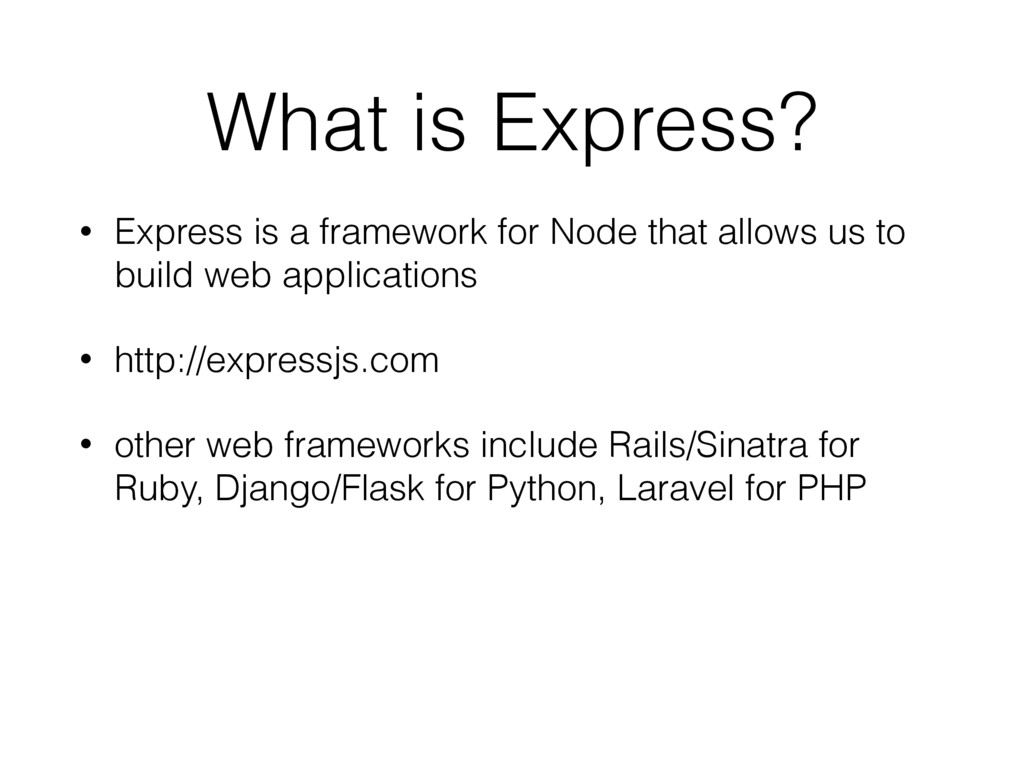
that allows us to build web applications • http://expressjs.com • other web frameworks include Rails/Sinatra for Ruby, Django/Flask for Python, Laravel for PHP
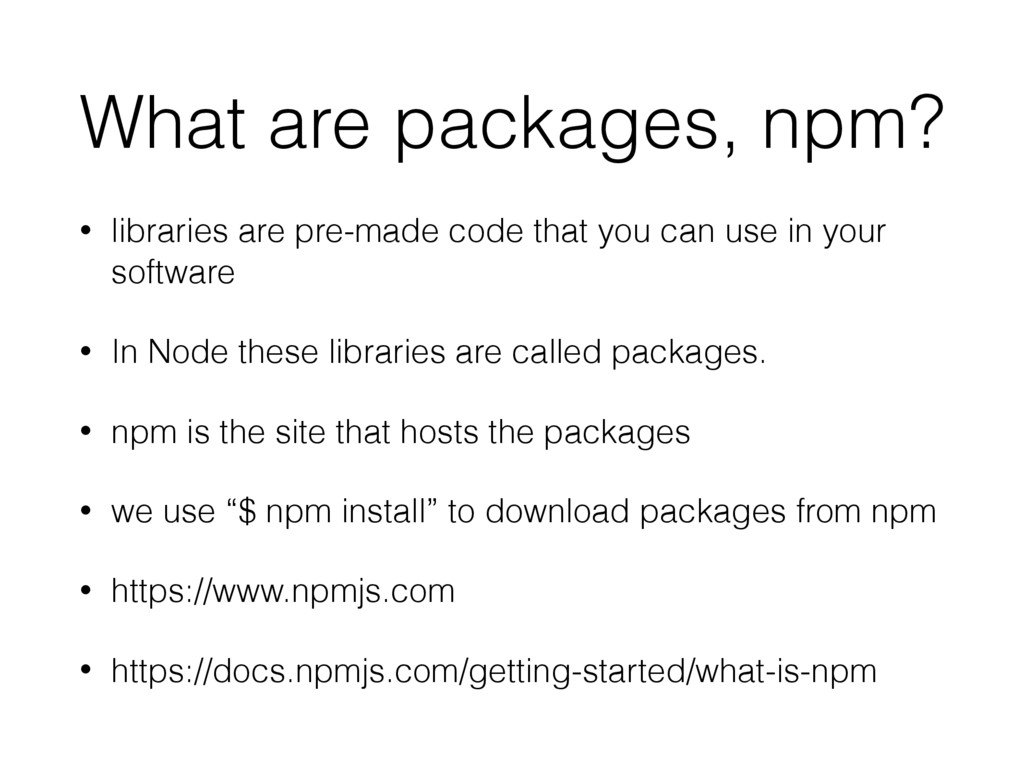
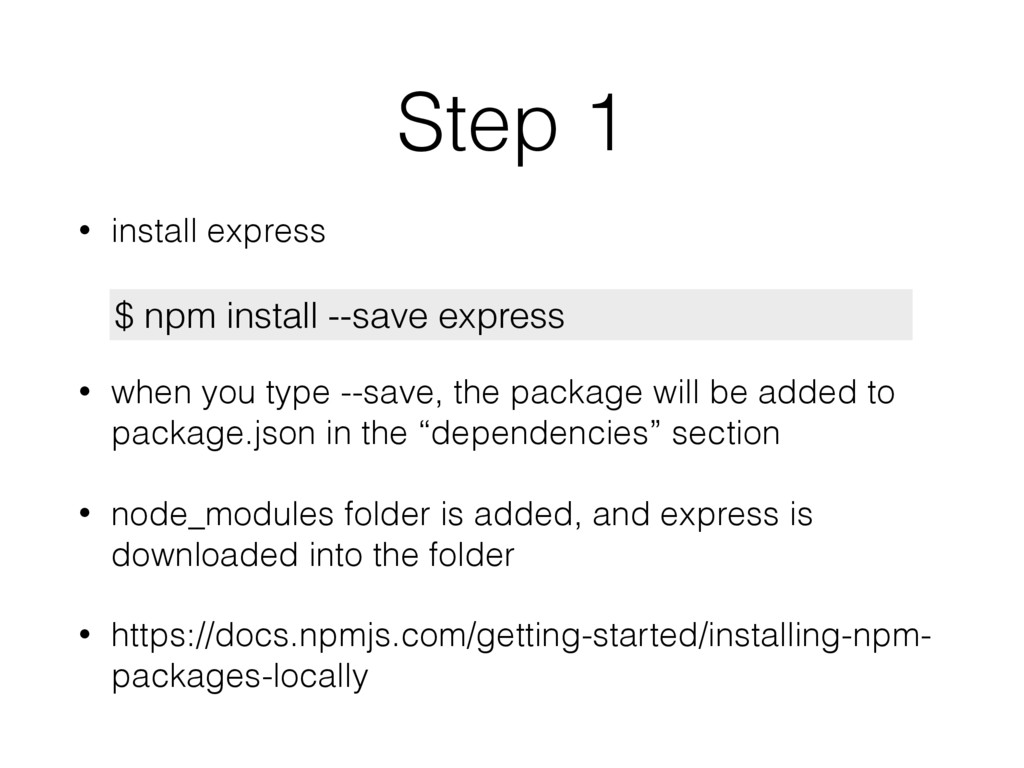
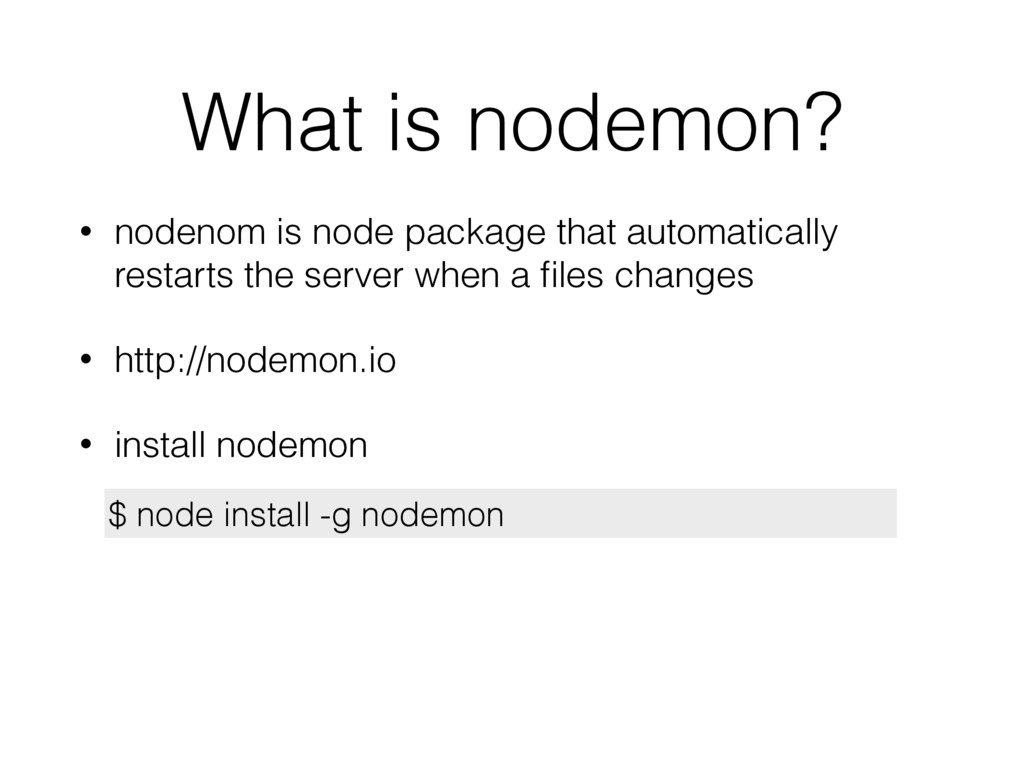
you can use in your software • In Node these libraries are called packages. • npm is the site that hosts the packages • we use “$ npm install” to download packages from npm • https://www.npmjs.com • https://docs.npmjs.com/getting-started/what-is-npm
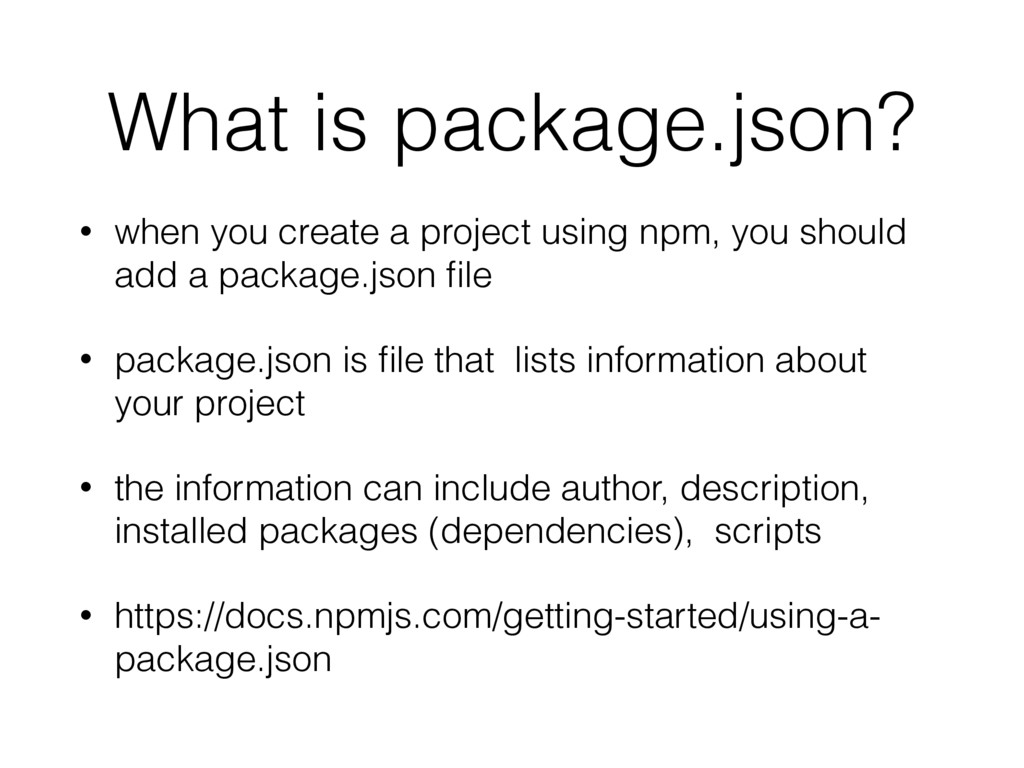
npm, you should add a package.json file • package.json is file that lists information about your project • the information can include author, description, installed packages (dependencies), scripts • https://docs.npmjs.com/getting-started/using-a- package.json
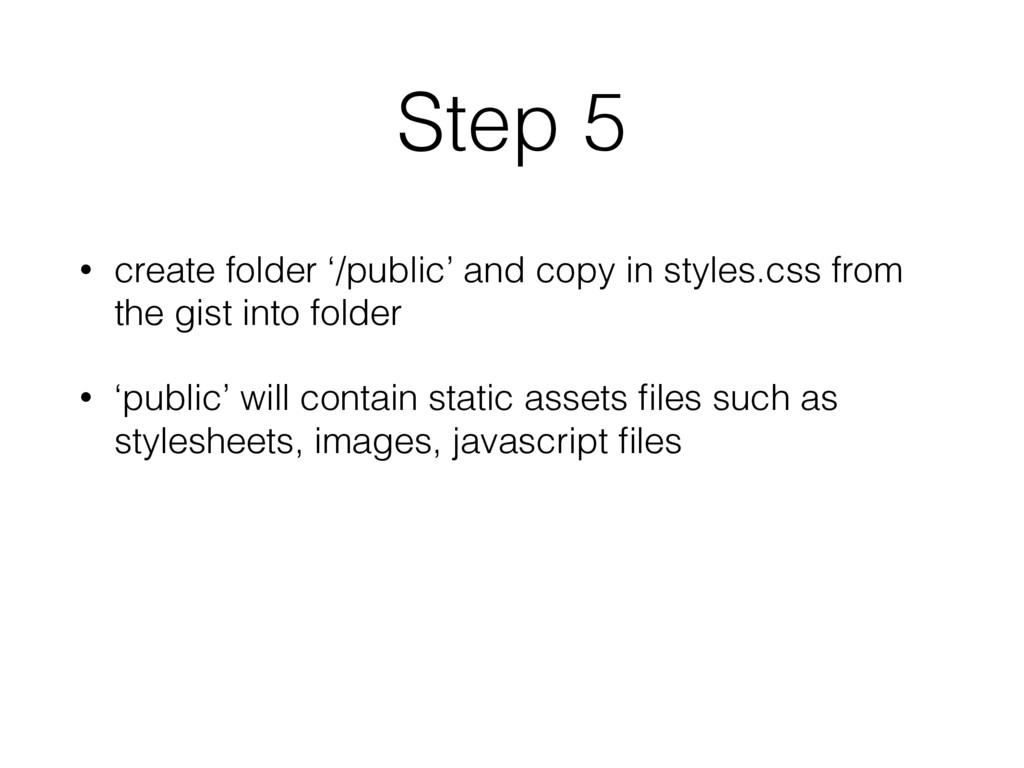
the package will be added to package.json in the “dependencies” section • node_modules folder is added, and express is downloaded into the folder • https://docs.npmjs.com/getting-started/installing-npm- packages-locally $ npm install --save express
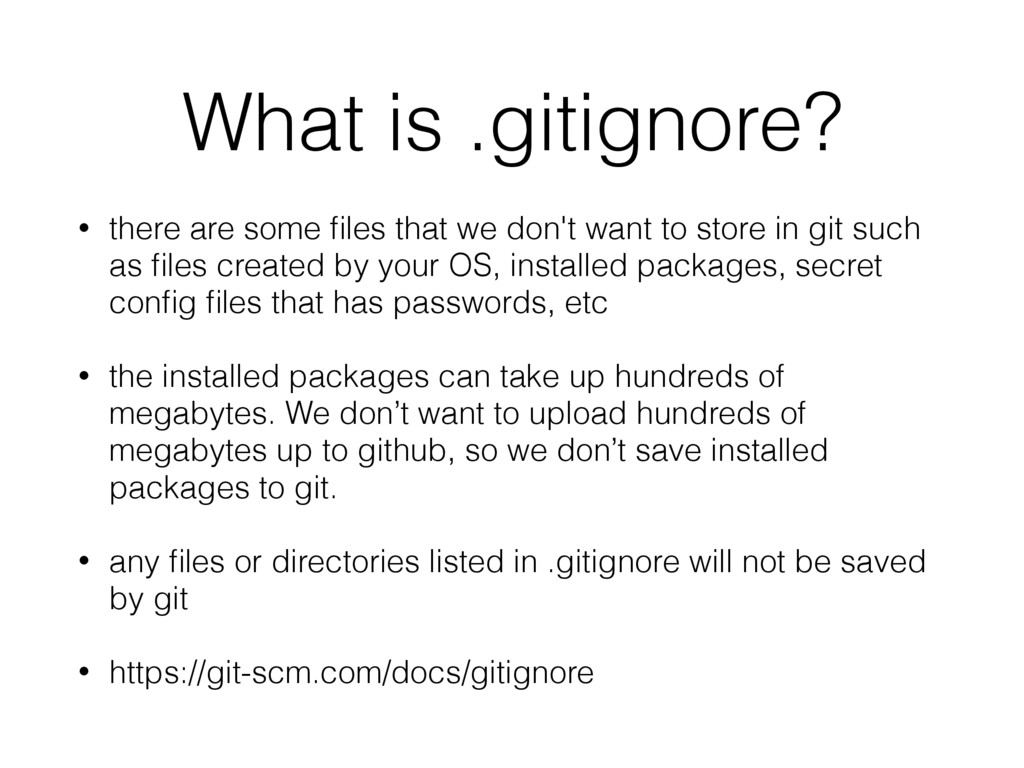
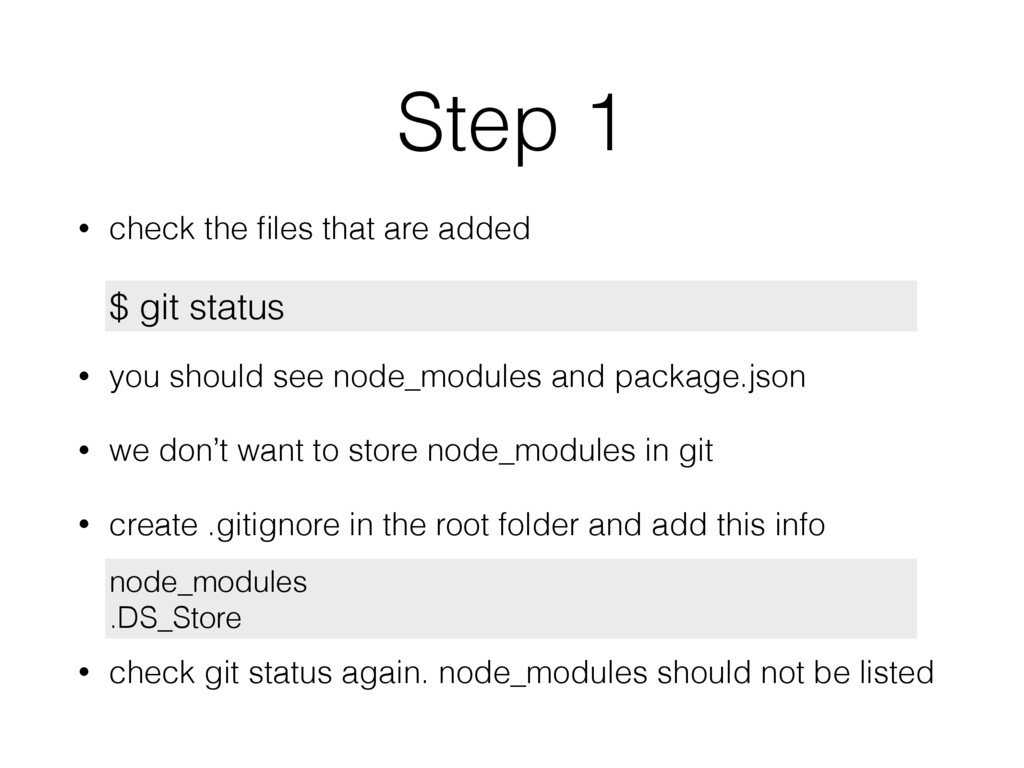
don't want to store in git such as files created by your OS, installed packages, secret config files that has passwords, etc • the installed packages can take up hundreds of megabytes. We don’t want to upload hundreds of megabytes up to github, so we don’t save installed packages to git. • any files or directories listed in .gitignore will not be saved by git • https://git-scm.com/docs/gitignore
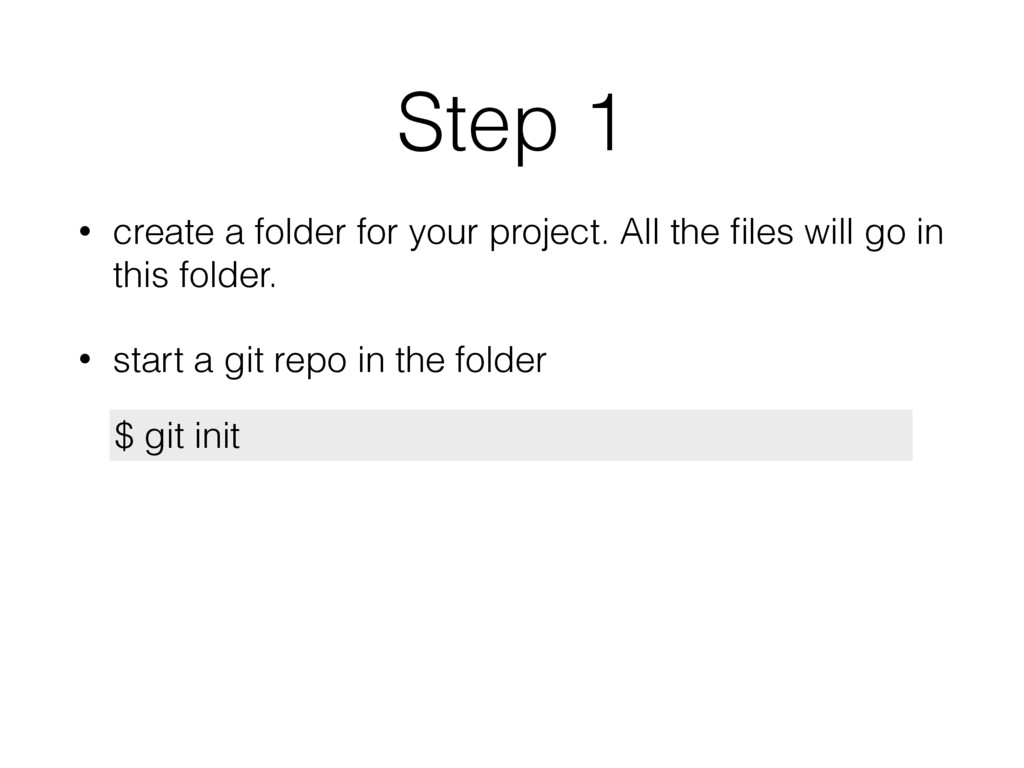
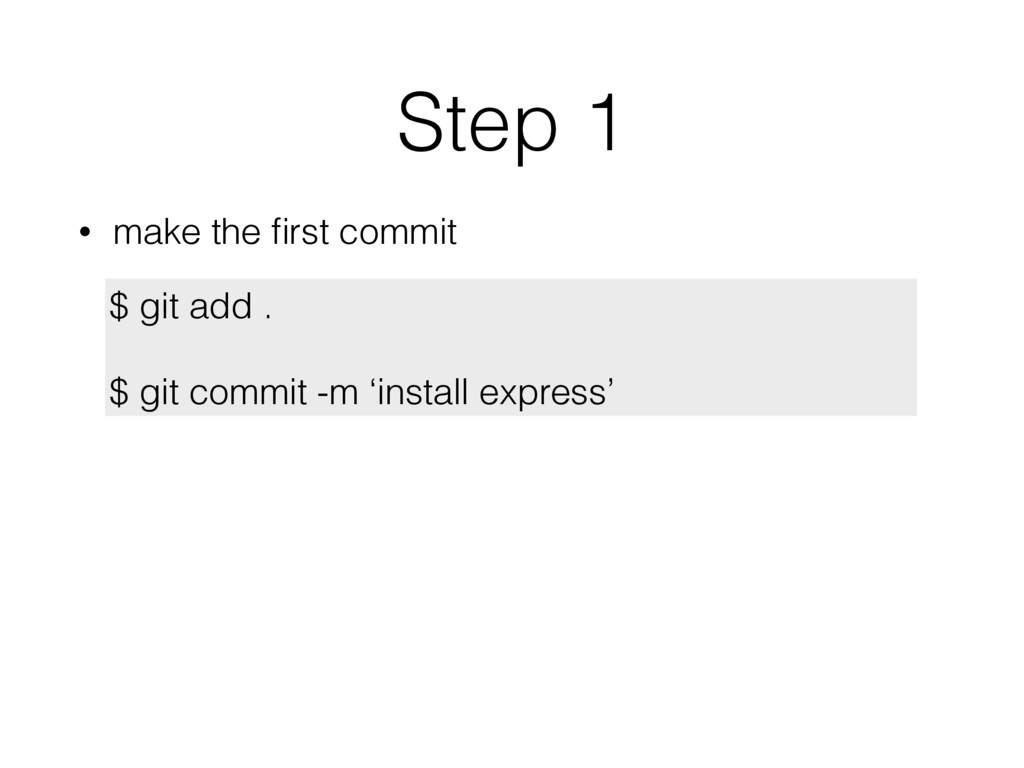
you should see node_modules and package.json • we don’t want to store node_modules in git • create .gitignore in the root folder and add this info • check git status again. node_modules should not be listed $ git status node_modules .DS_Store
express = require('express'); var app = express(); var port = process.env.PORT || 3000; // ======================= // server // ======================= app.listen(port, function(){ console.log('Server is running on port: ' + port) })
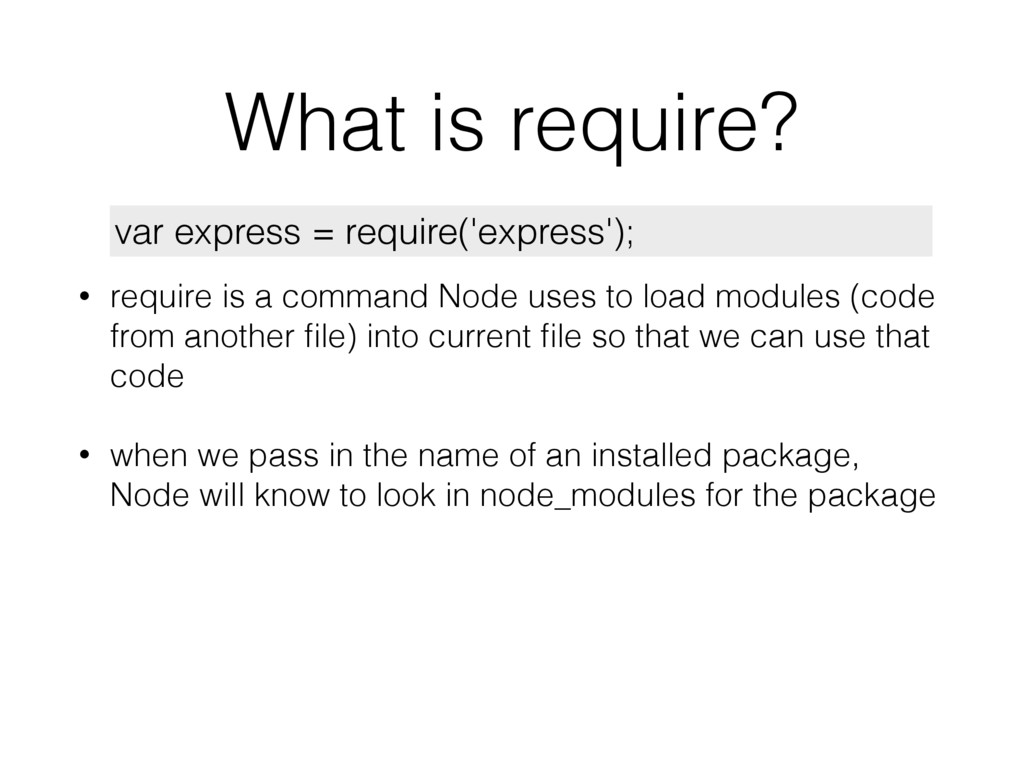
to load modules (code from another file) into current file so that we can use that code • when we pass in the name of an installed package, Node will know to look in node_modules for the package var express = require('express');
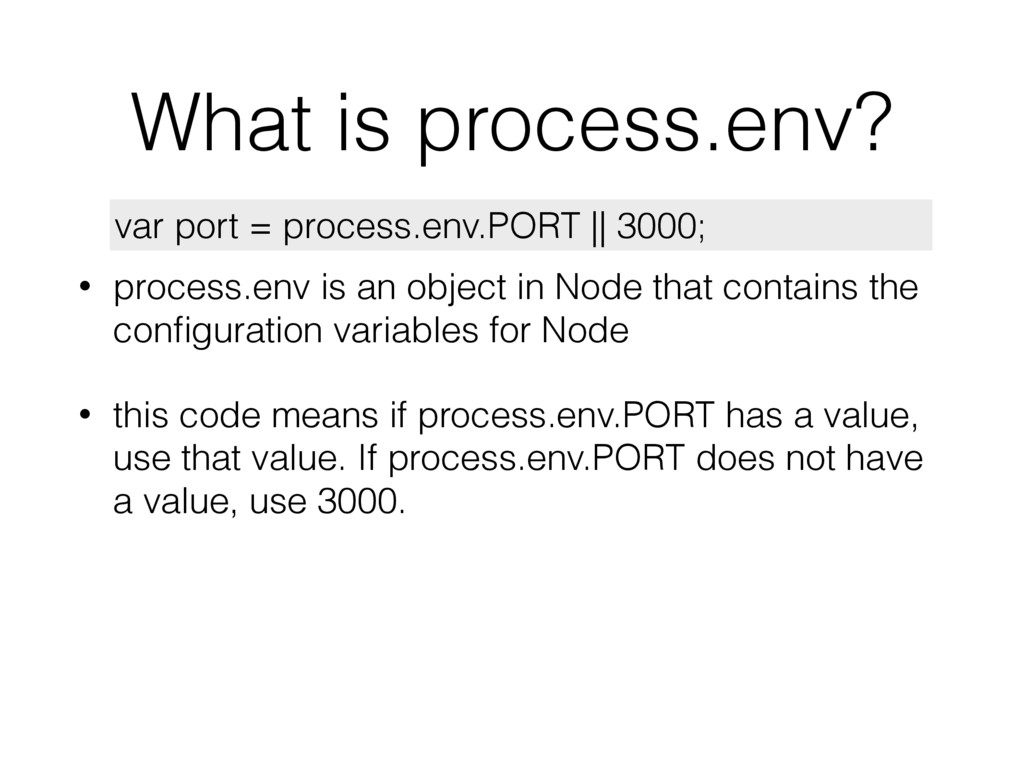
that contains the configuration variables for Node • this code means if process.env.PORT has a value, use that value. If process.env.PORT does not have a value, use 3000. var port = process.env.PORT || 3000;
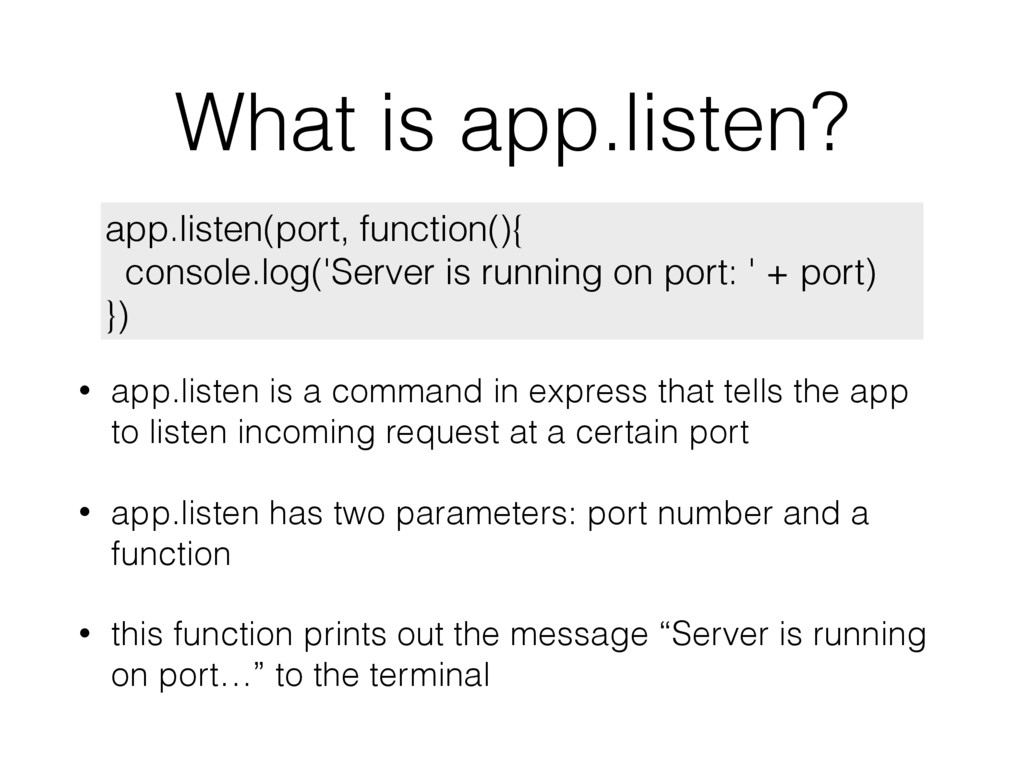
that tells the app to listen incoming request at a certain port • app.listen has two parameters: port number and a function • this function prints out the message “Server is running on port…” to the terminal app.listen(port, function(){ console.log('Server is running on port: ' + port) })
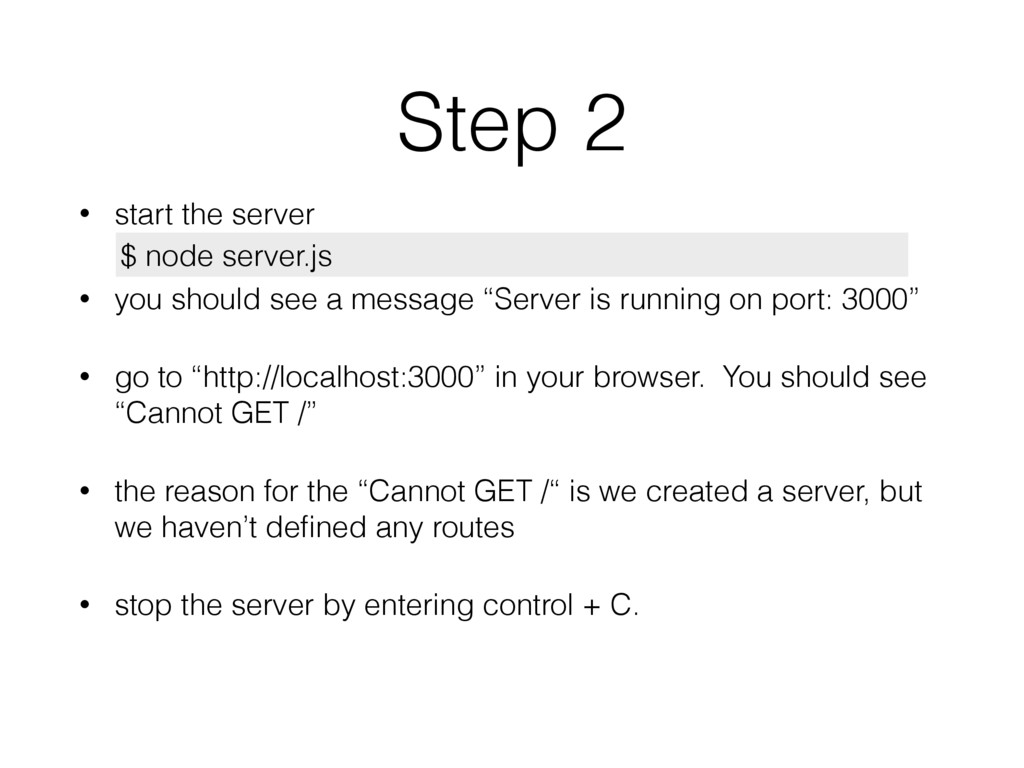
a message “Server is running on port: 3000” • go to “http://localhost:3000” in your browser. You should see “Cannot GET /” • the reason for the “Cannot GET /“ is we created a server, but we haven’t defined any routes • stop the server by entering control + C. $ node server.js
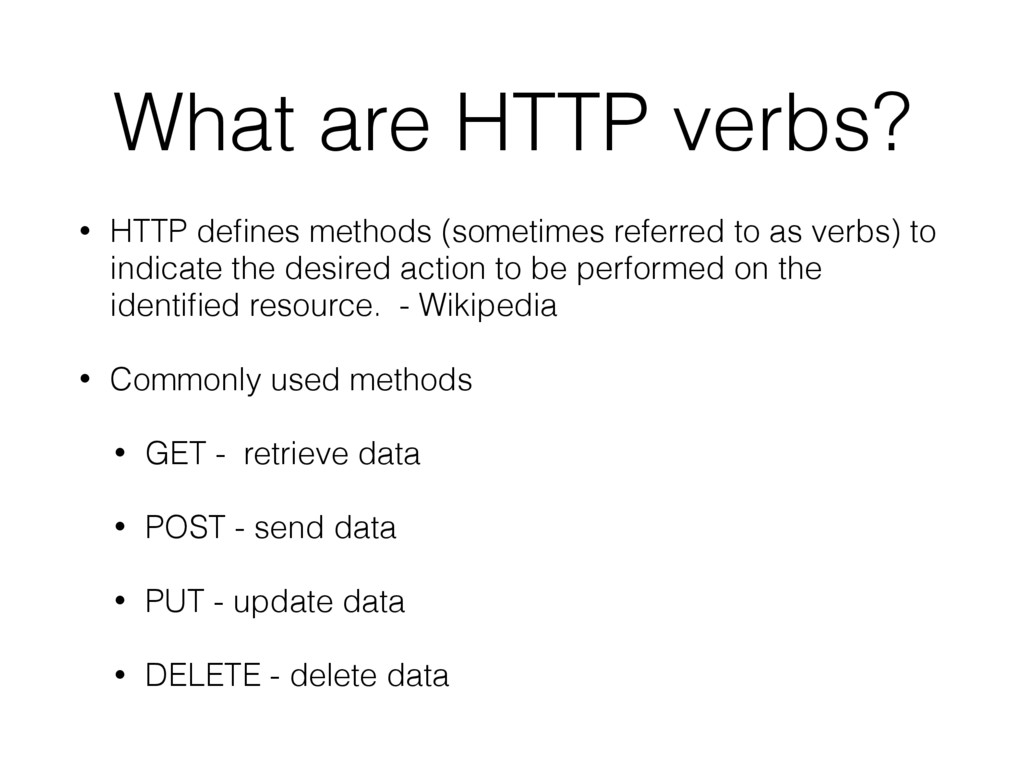
to as verbs) to indicate the desired action to be performed on the identified resource. - Wikipedia • Commonly used methods • GET - retrieve data • POST - send data • PUT - update data • DELETE - delete data
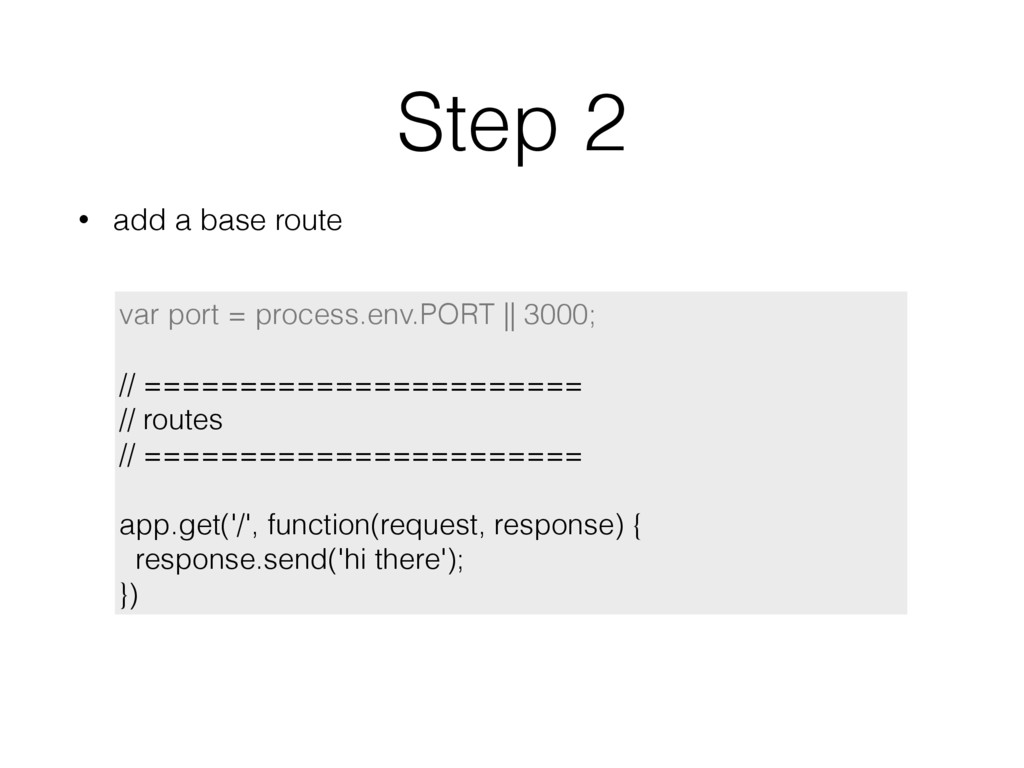
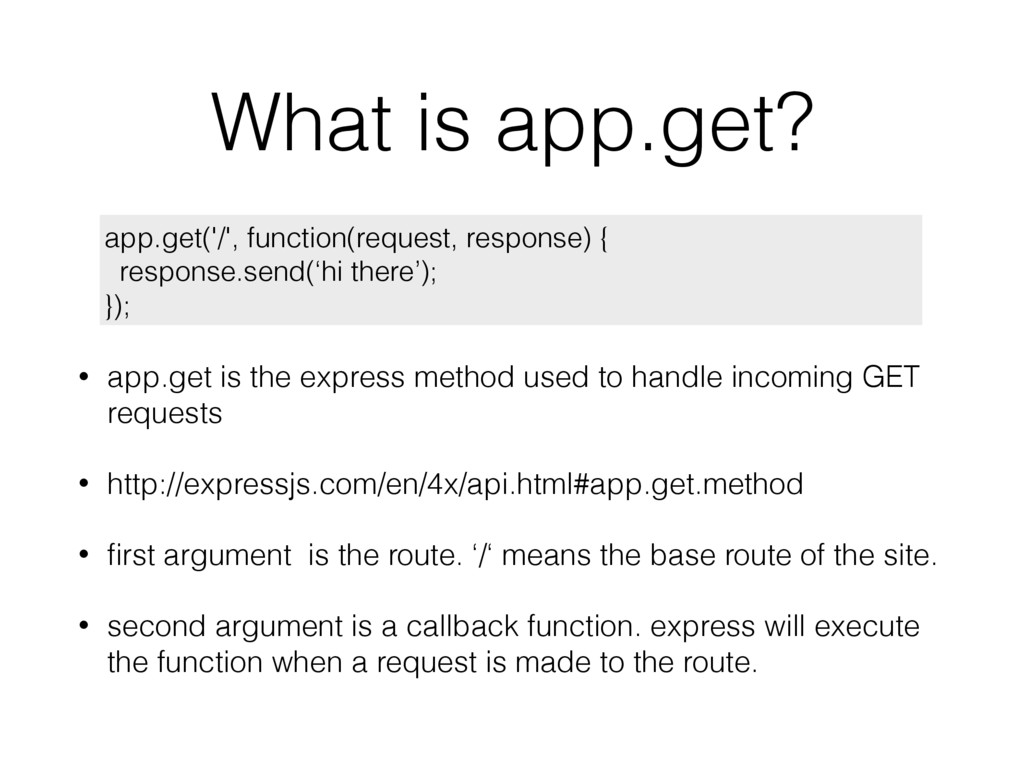
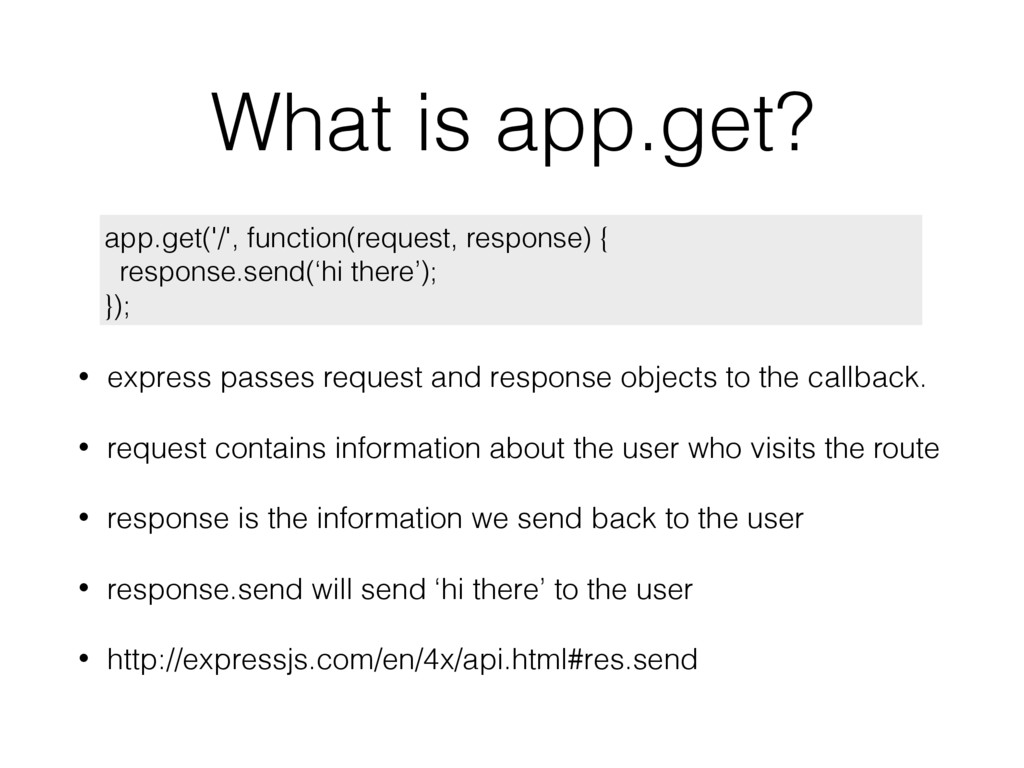
to handle incoming GET requests • http://expressjs.com/en/4x/api.html#app.get.method • first argument is the route. ‘/‘ means the base route of the site. • second argument is a callback function. express will execute the function when a request is made to the route. app.get('/', function(request, response) { response.send(‘hi there’); });
to the callback. • request contains information about the user who visits the route • response is the information we send back to the user • response.send will send ‘hi there’ to the user • http://expressjs.com/en/4x/api.html#res.send app.get('/', function(request, response) { response.send(‘hi there’); });
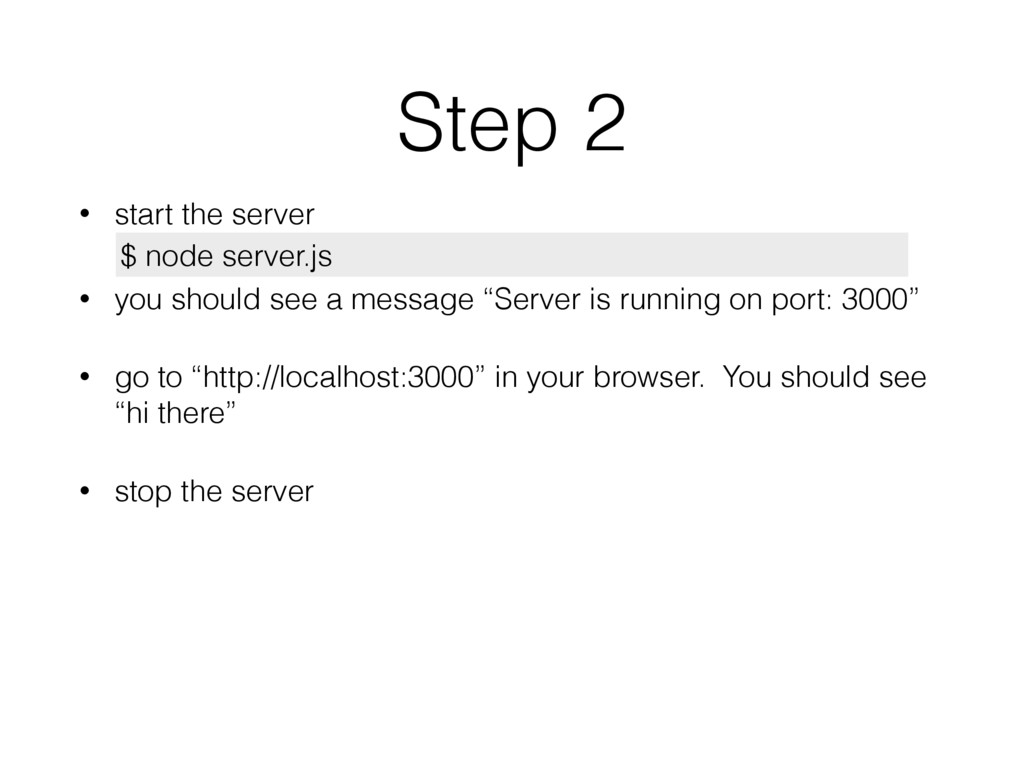
a message “Server is running on port: 3000” • go to “http://localhost:3000” in your browser. You should see “hi there” • stop the server $ node server.js
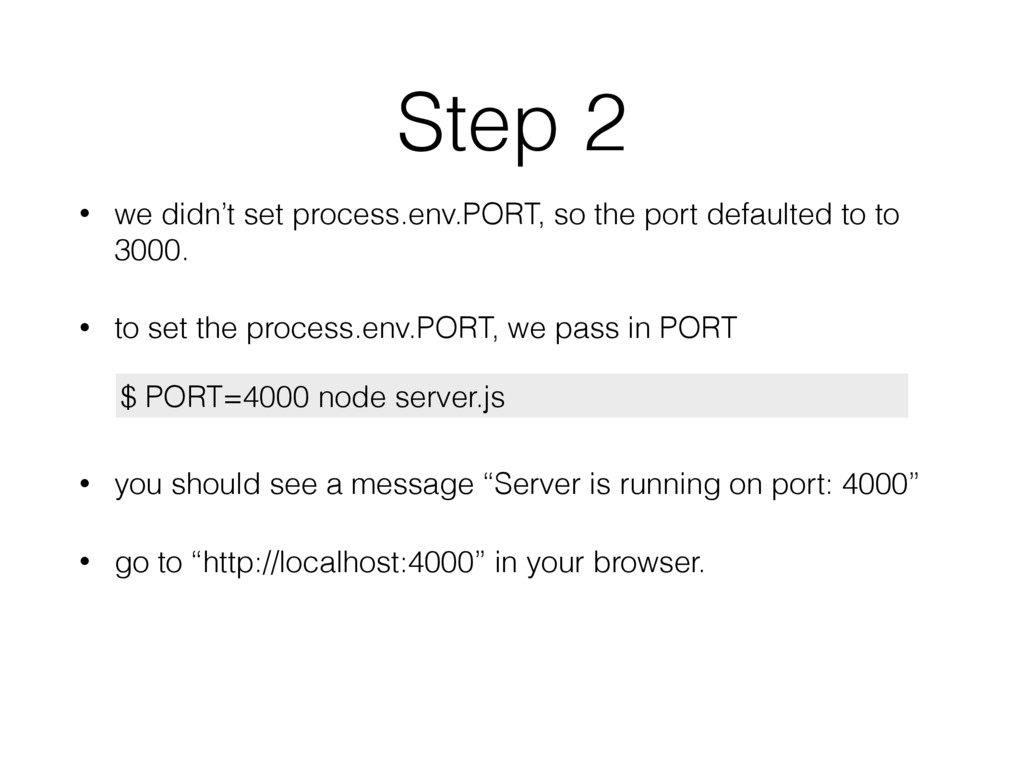
defaulted to to 3000. • to set the process.env.PORT, we pass in PORT • you should see a message “Server is running on port: 4000” • go to “http://localhost:4000” in your browser. $ PORT=4000 node server.js
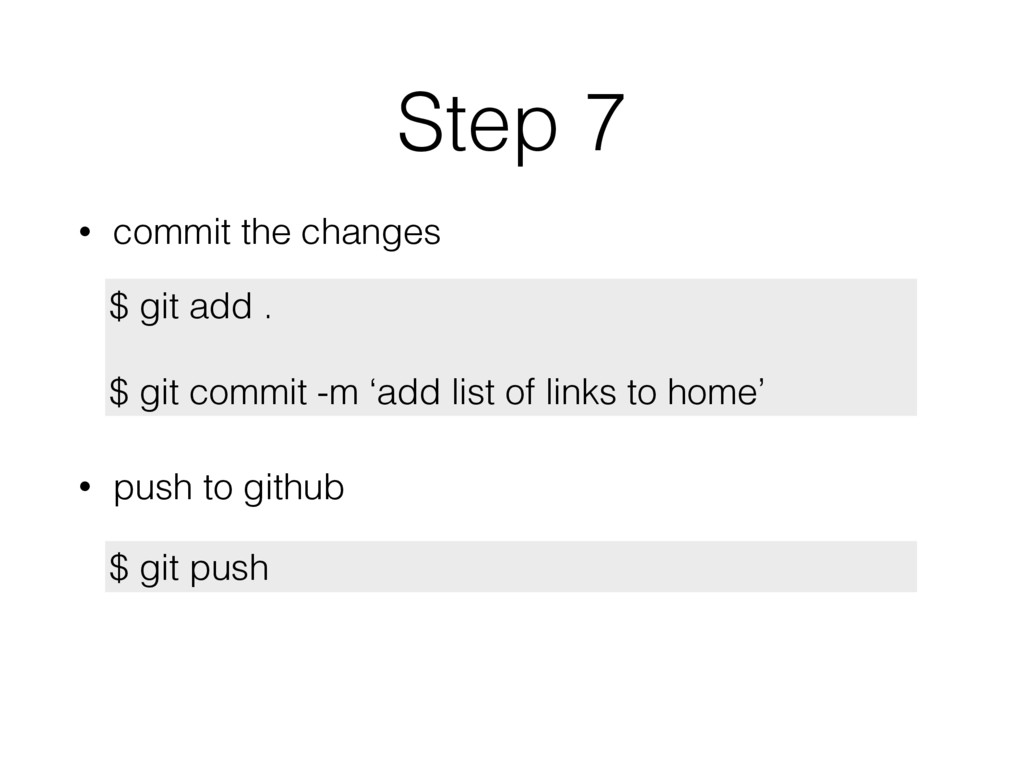
push an existing repository from the command line” • connect your local repo to github by copying & pasting the 1st line • this adds a remote called ‘origin’ that points to the url of the repo ‘[email protected]:<username>/<repo>.git’ • https://git-scm.com/docs/git-remote $ git remote add origin [email protected]:<username>/<repo>.git
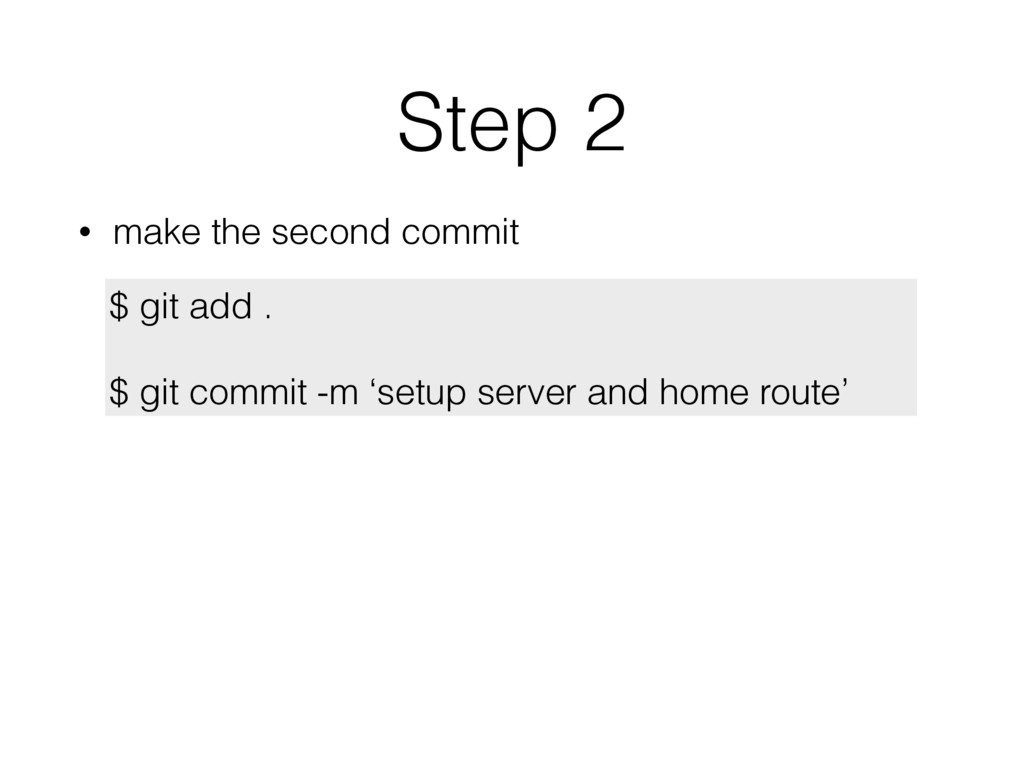
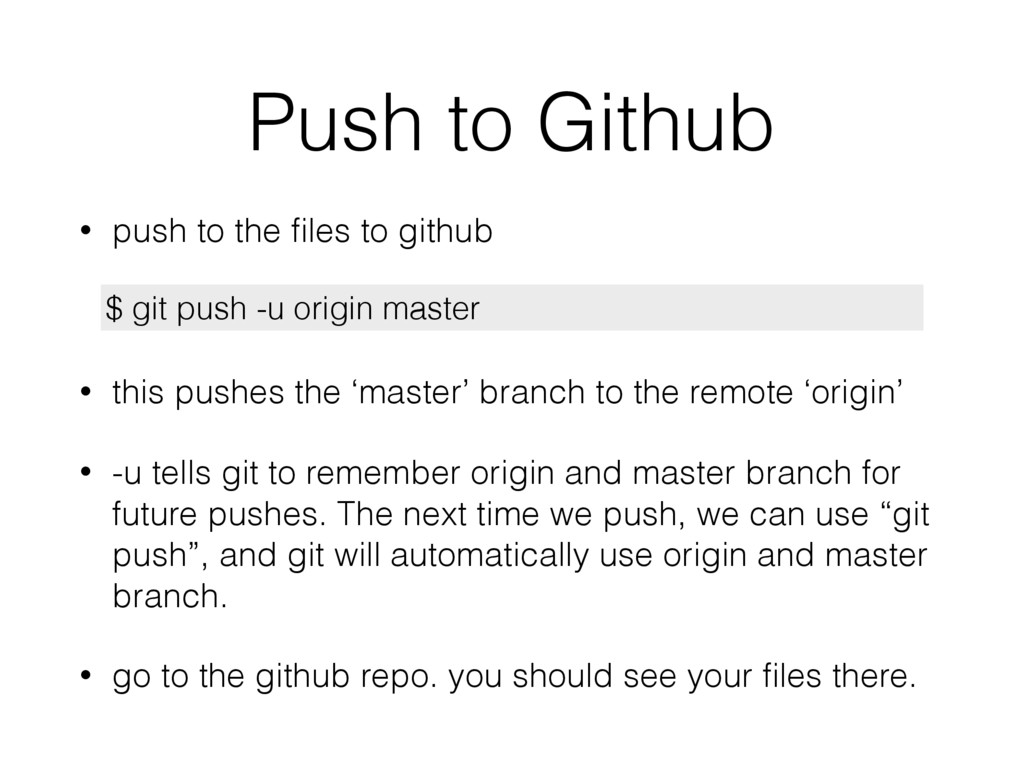
• this pushes the ‘master’ branch to the remote ‘origin’ • -u tells git to remember origin and master branch for future pushes. The next time we push, we can use “git push”, and git will automatically use origin and master branch. • go to the github repo. you should see your files there. $ git push -u origin master
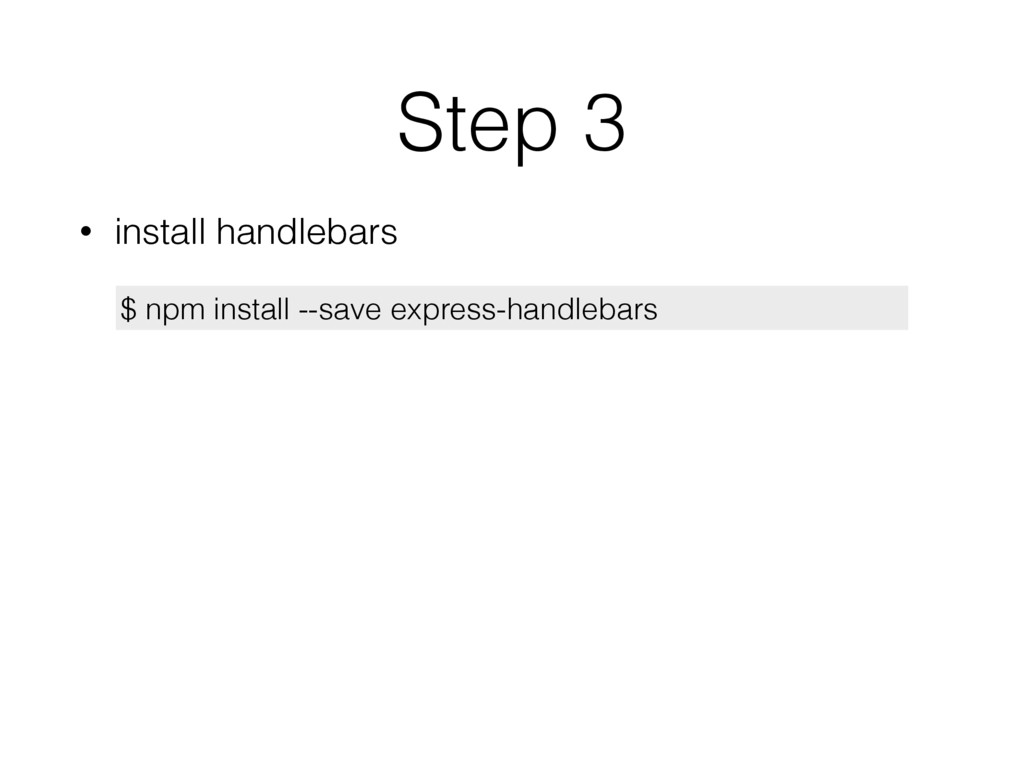
html for the browser, it needs a templating engine • templating engine will take data, inject it into a template, and create the html • popular templating engines include jade, ejs, handlebars • we will use handlebars. • https://www.npmjs.com/package/express-handlebars
contain html elements that you want to appear on every page, such as <head>, site navigation menus, etc • inside the layout file, there is {{{body}}} • {{{body}}} is where the other templates will be injected
folder ‘layouts’ inside of ‘views’ • create a file main.hbs and put it in ‘views/layouts’ • go the gist, and copy the contents of main.hbs into your local main.hbs
has links to Bootstrap (css framework) and Font Awesome (icon library), <head>, and the site navigate menu. • http://getbootstrap.com • http://fontawesome.io
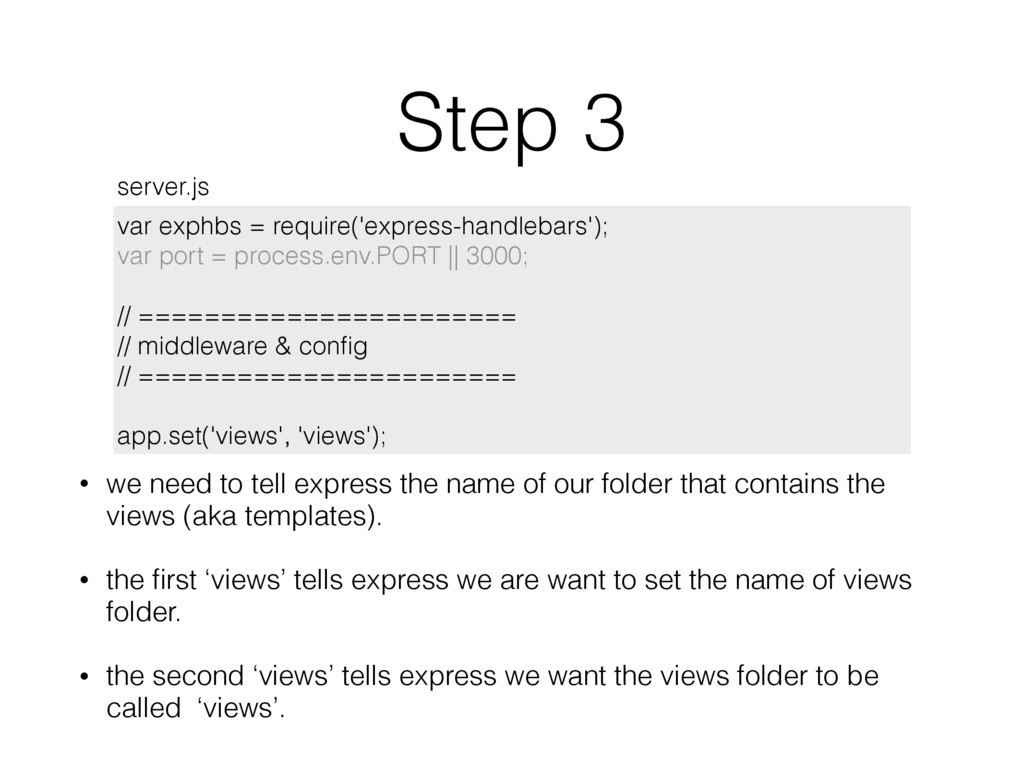
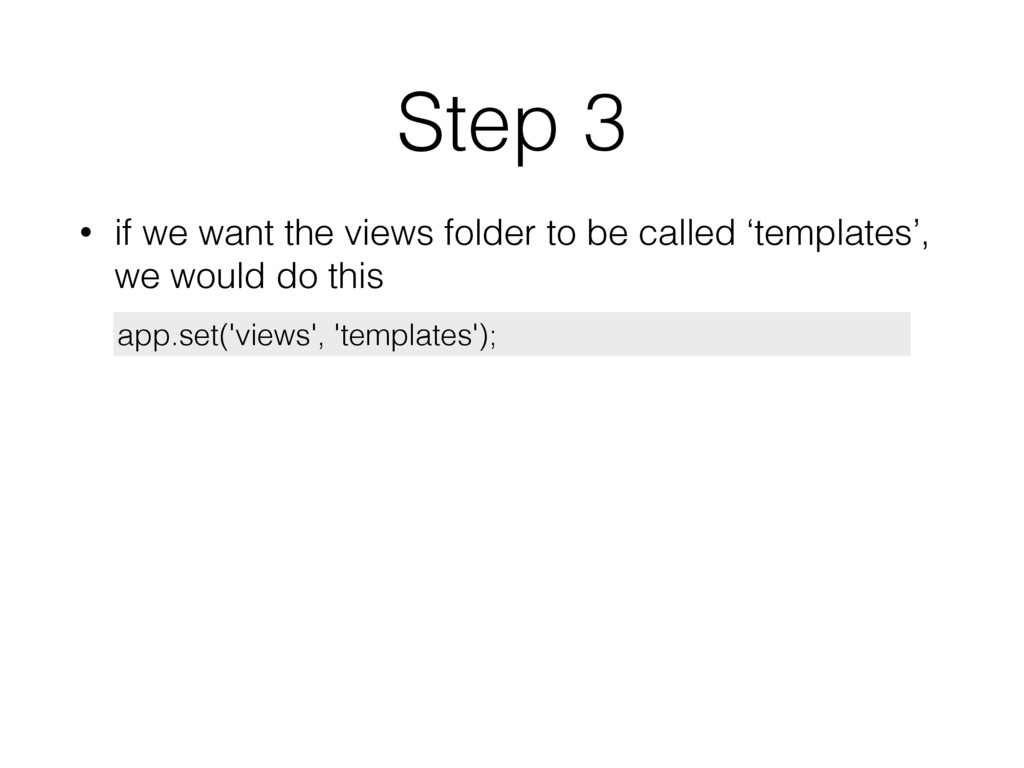
of our folder that contains the views (aka templates). • the first ‘views’ tells express we are want to set the name of views folder. • the second ‘views’ tells express we want the views folder to be called ‘views’. var exphbs = require('express-handlebars'); var port = process.env.PORT || 3000; // ======================= // middleware & config // ======================= app.set('views', 'views'); server.js
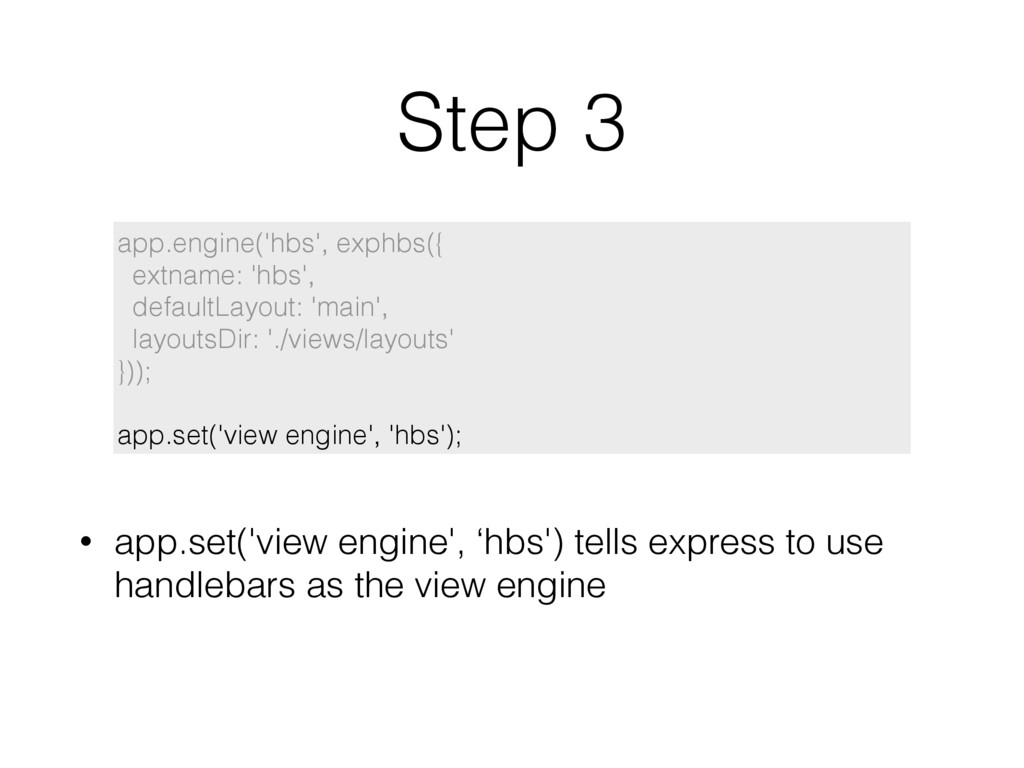
as the extension, set the extname to ‘hbs' • to main.hbs as the default layout, set defaultLayout to ‘main’ • to specify the folder for the layouts, set layoutsDir to ‘./views/ layouts’ app.set('views', 'views'); app.engine('hbs', exphbs({ extname: 'hbs', defaultLayout: 'main', layoutsDir: './views/layouts' }));
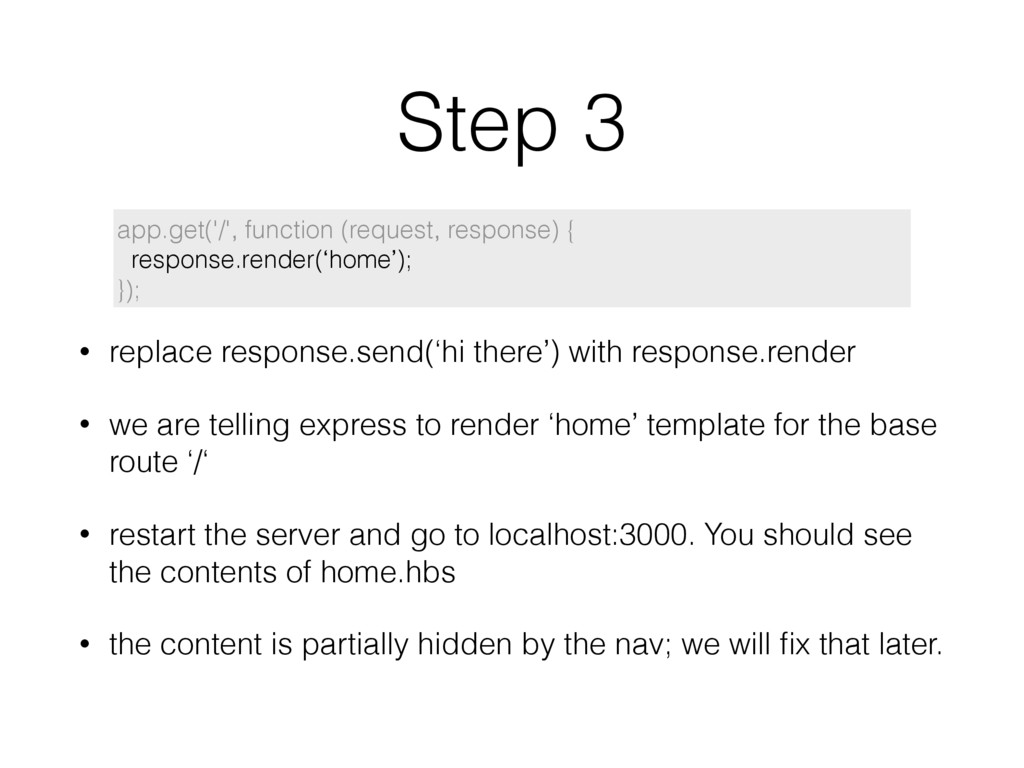
are telling express to render ‘home’ template for the base route ‘/‘ • restart the server and go to localhost:3000. You should see the contents of home.hbs • the content is partially hidden by the nav; we will fix that later. app.get('/', function (request, response) { response.render(‘home’); });
object. the object keys are the name of variables to use in the template • {title: ‘My Site’} sets the {{title}} in main.hbs to ‘My Site’ • Restart the server. You should see ‘My Site’ in the tab of your browser. app.get('/', function (request, response) { response.render(‘home’, { title: 'My Site' }); });
projects.hbs template. • add some html content to projects.hbs • pass in a title to the template. • when you visit http://localhost:3000/projects, you should see the contents of the projects template
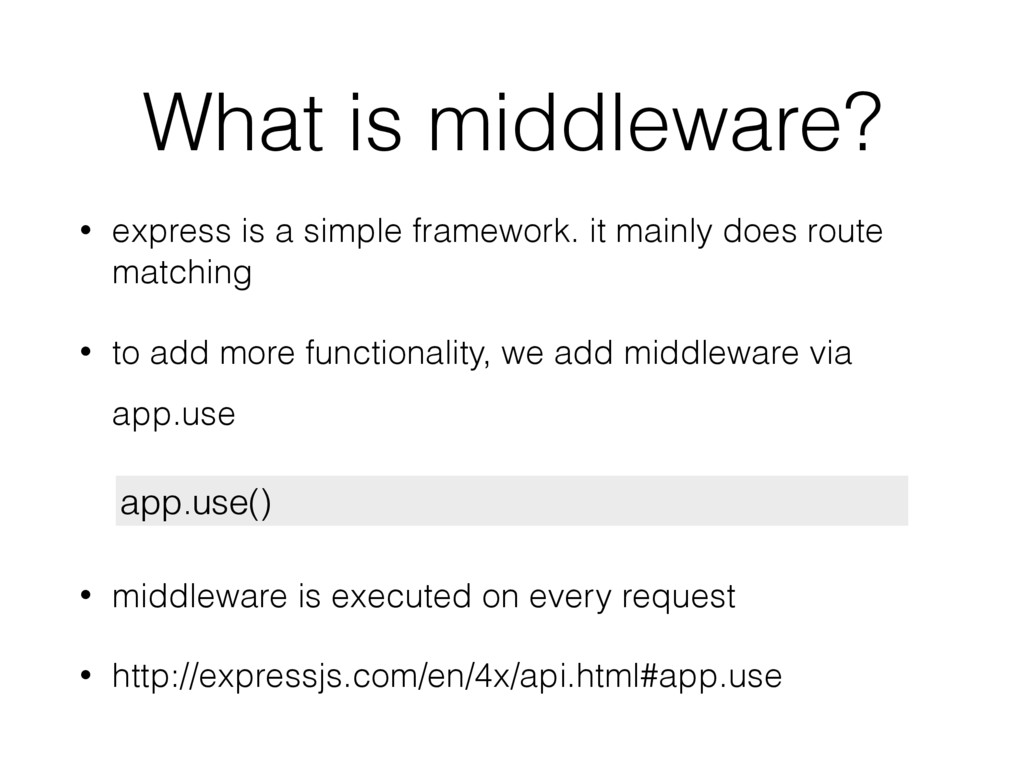
mainly does route matching • to add more functionality, we add middleware via app.use • middleware is executed on every request • http://expressjs.com/en/4x/api.html#app.use app.use()
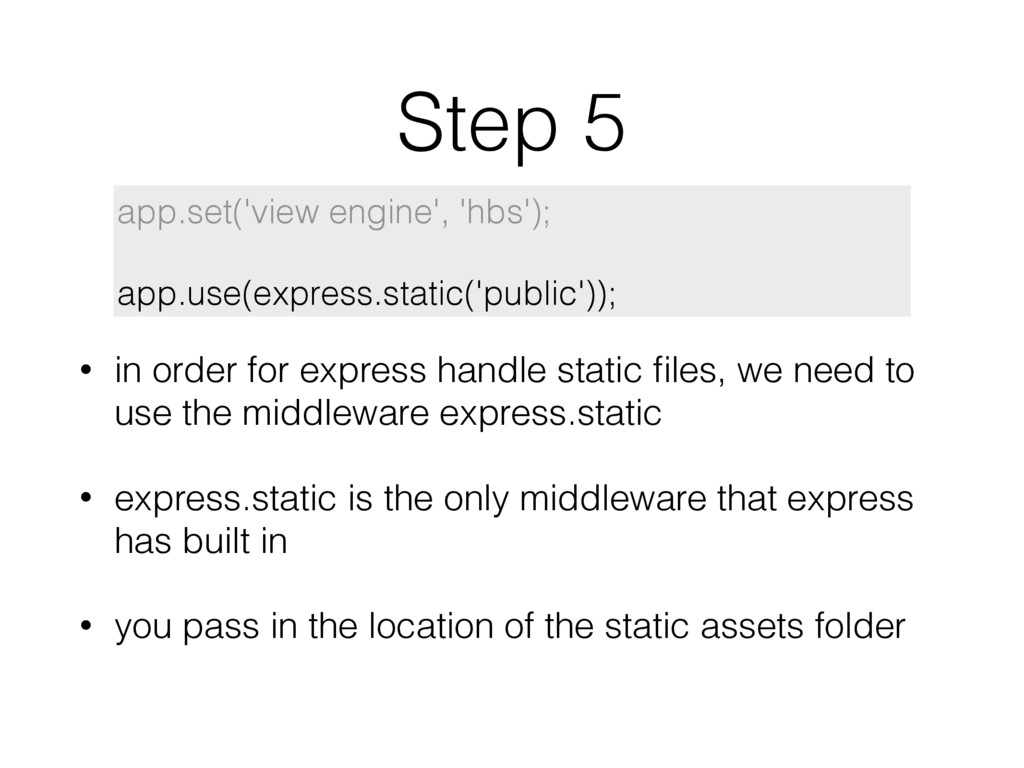
we need to use the middleware express.static • express.static is the only middleware that express has built in • you pass in the location of the static assets folder app.set('view engine', 'hbs'); app.use(express.static('public'));
install packages globally on your machine • globally installed packages can be accessed through command line • https://docs.npmjs.com/getting-started/installing- npm-packages-globally $ node install -g
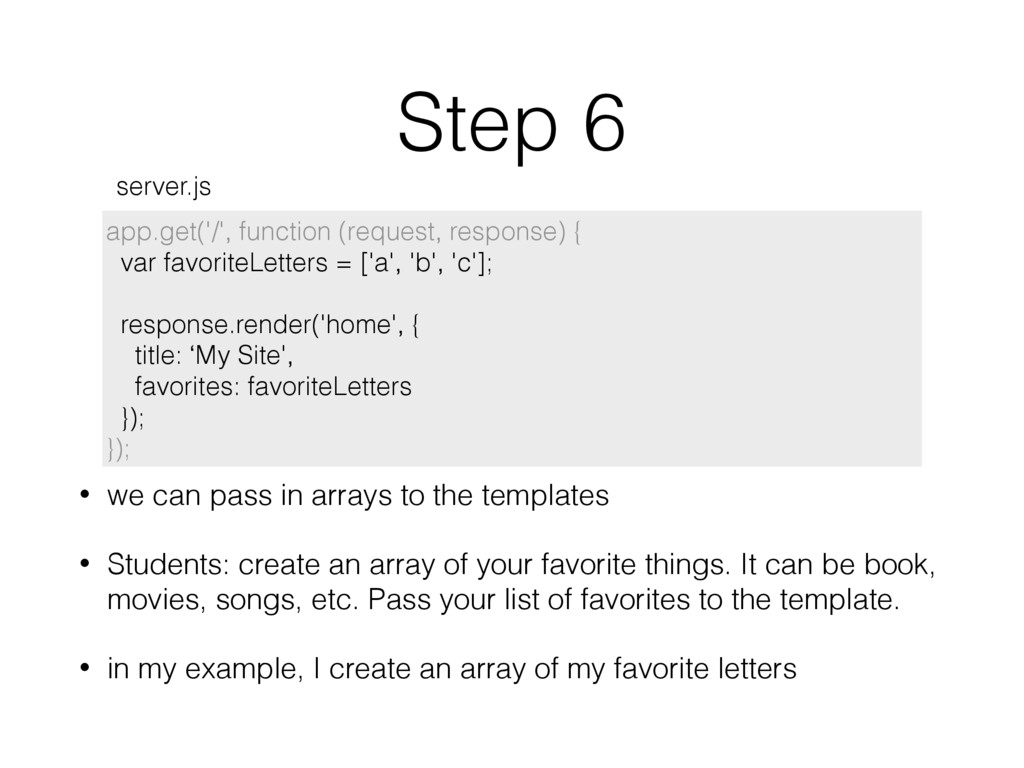
templates • Students: create an array of your favorite things. It can be book, movies, songs, etc. Pass your list of favorites to the template. • in my example, I create an array of my favorite letters app.get('/', function (request, response) { var favoriteLetters = ['a', 'b', 'c']; response.render('home', { title: ‘My Site', favorites: favoriteLetters }); }); server.js
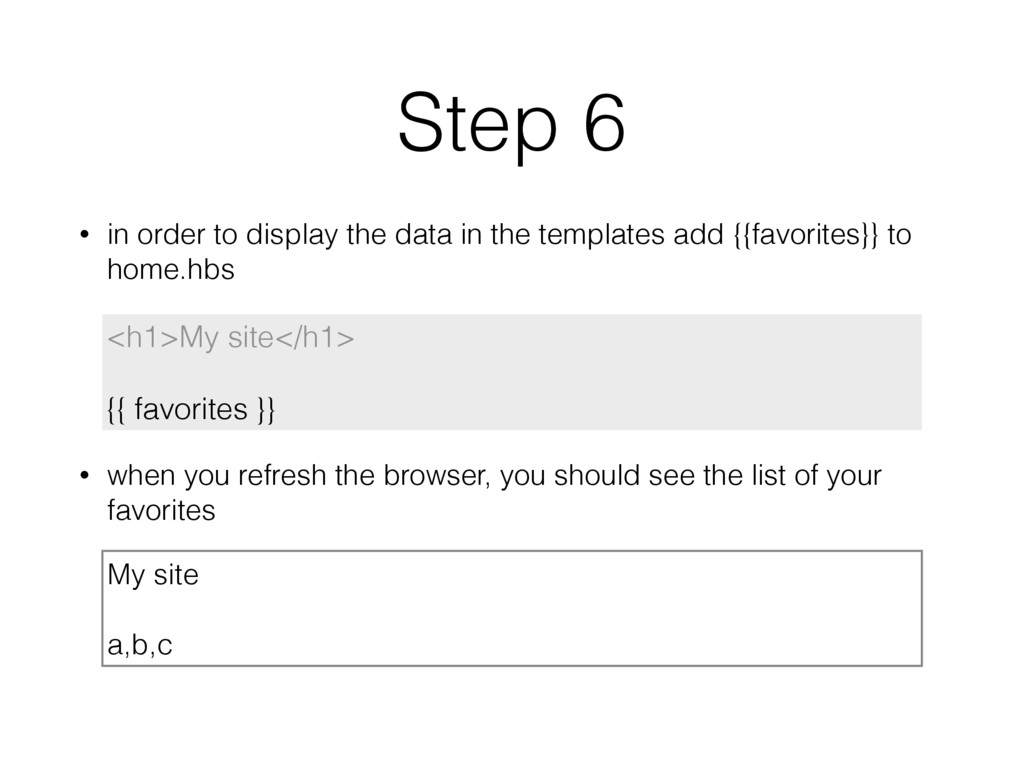
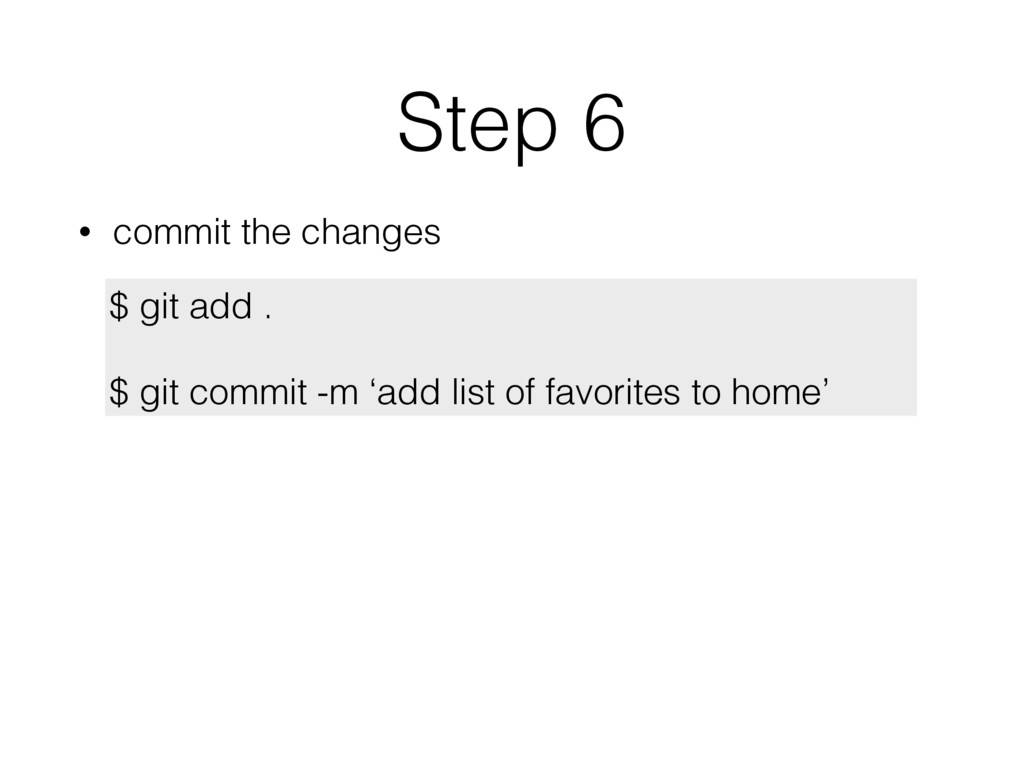
the templates add {{favorites}} to home.hbs • when you refresh the browser, you should see the list of your favorites <h1>My site</h1> {{ favorites }} My site a,b,c
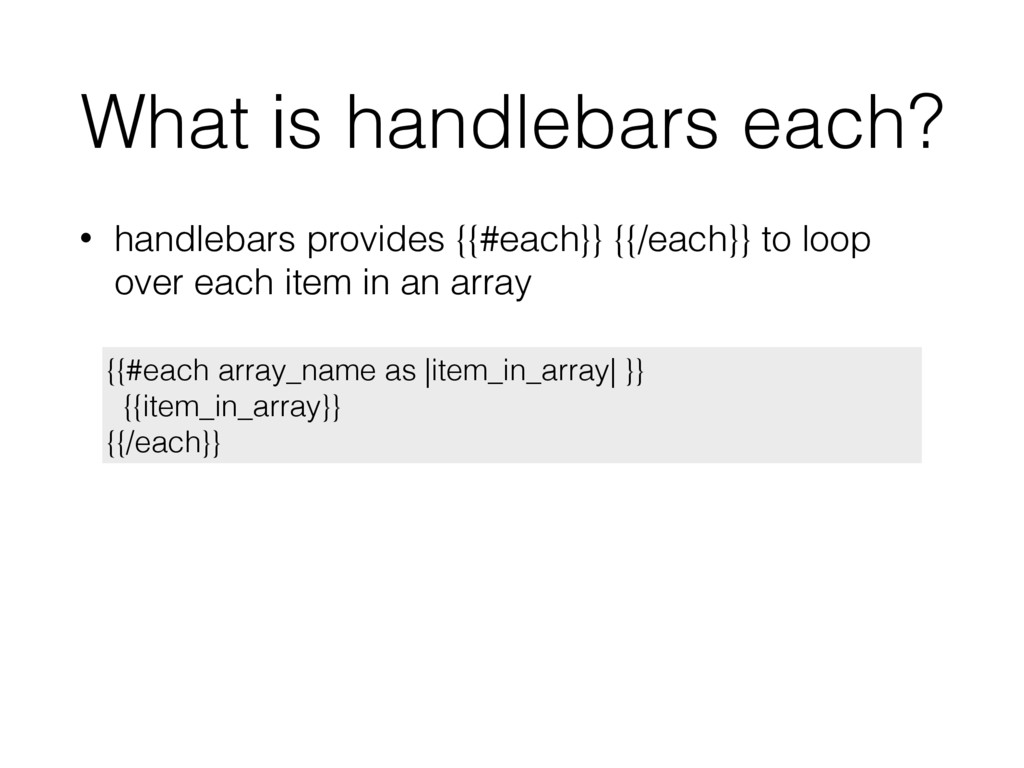
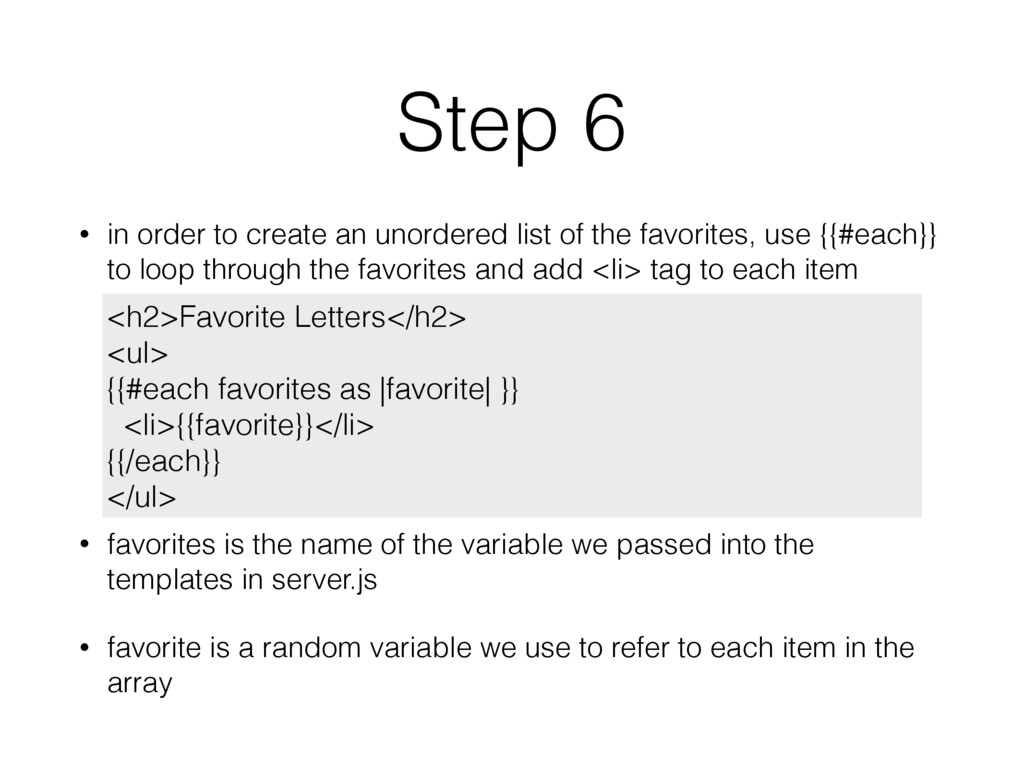
of the favorites, use {{#each}} to loop through the favorites and add <li> tag to each item • favorites is the name of the variable we passed into the templates in server.js • favorite is a random variable we use to refer to each item in the array <h2>Favorite Letters</h2> <ul> {{#each favorites as |favorite| }} <li>{{favorite}}</li> {{/each}} </ul>
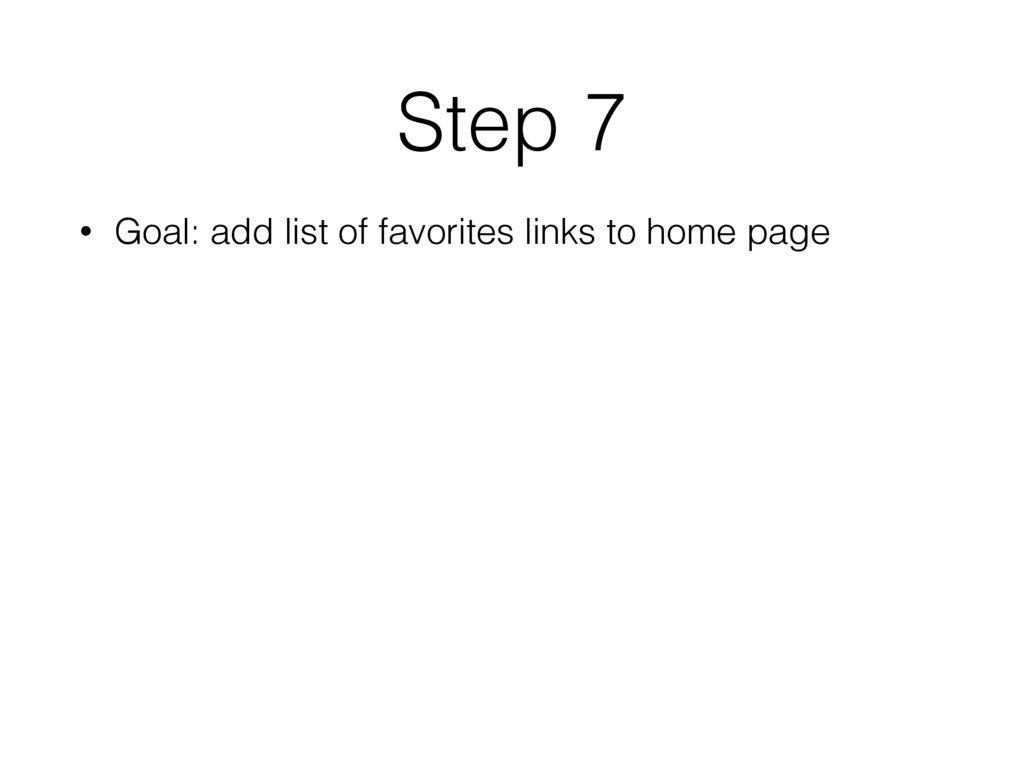
would pass an array of objects • each object has text and the url var favoriteLinks = [ { text: 'Apple', url: 'http://apple.com' }, { text: 'Facebook', url: 'http://facebook.com' } ]; response.render('home', { title: 'home page', favorites: favoriteLetters, links: favoriteLinks });
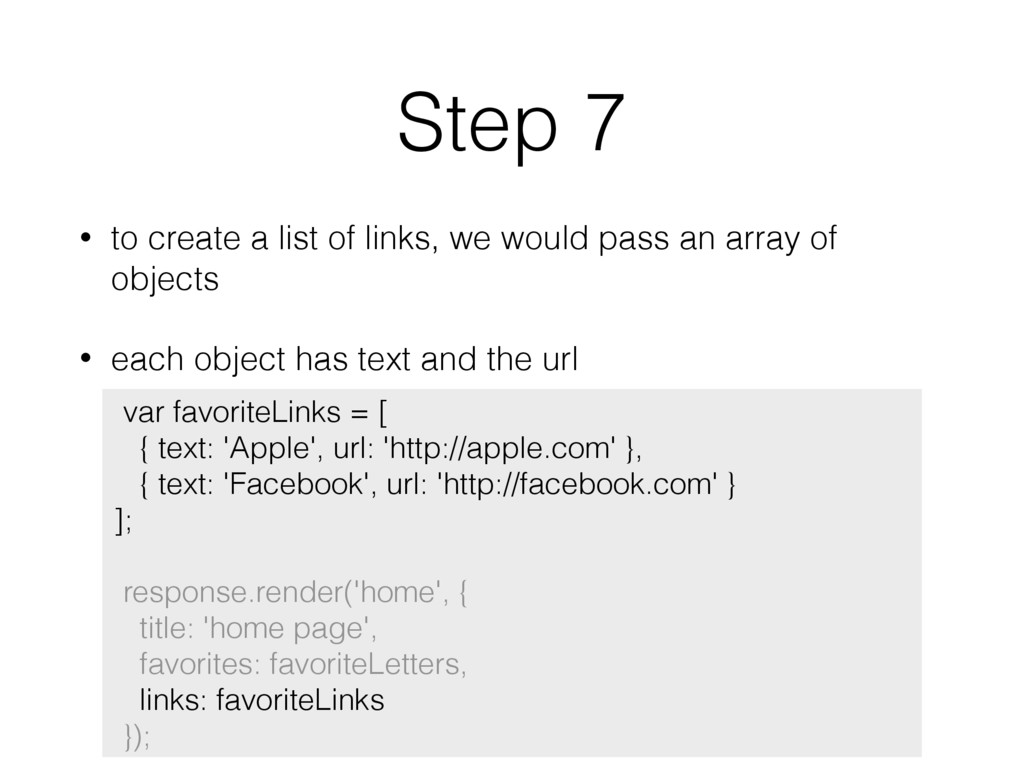
the templates add {{links}} to home.hbs {{#each links as |link| }} {{link}} {{/each}} [object Object] [object Object] • when you refresh the browser, you will see • • since each item is an object, handlebars renders the item as [object Object]
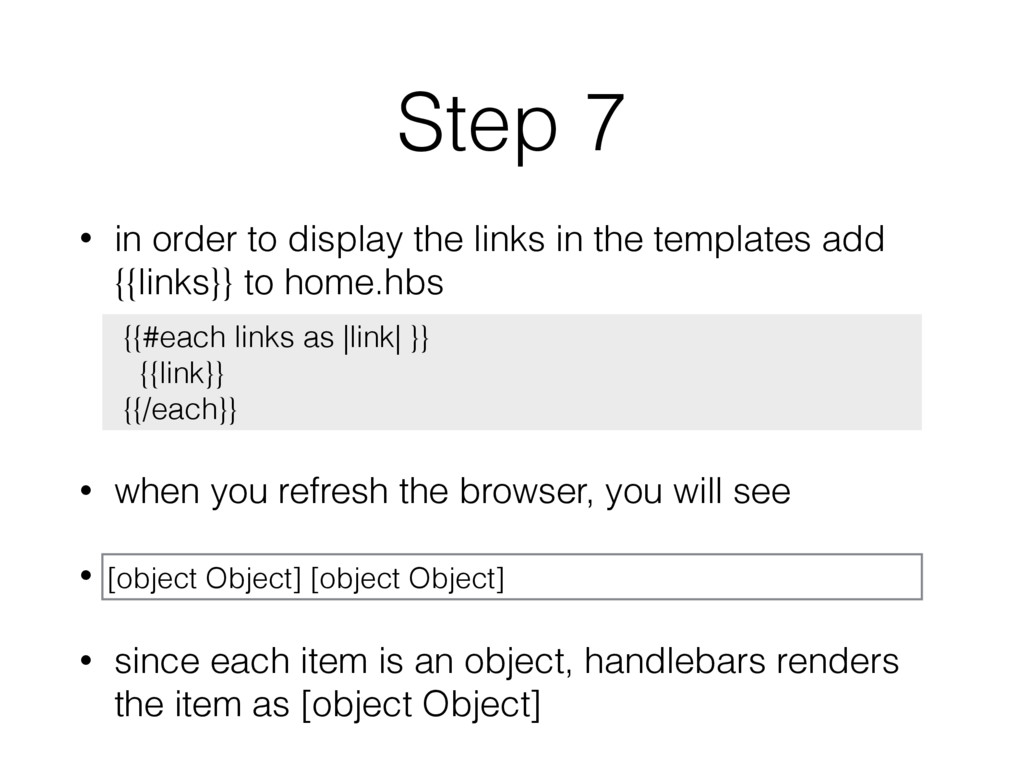
need to access the url and text properties in the object <ul> {{#each links as |link| }} <li>{{link.url}} {{link.text}}</li> {{/each}} <ul> • when you refresh the browser, you should see the url and text for each link
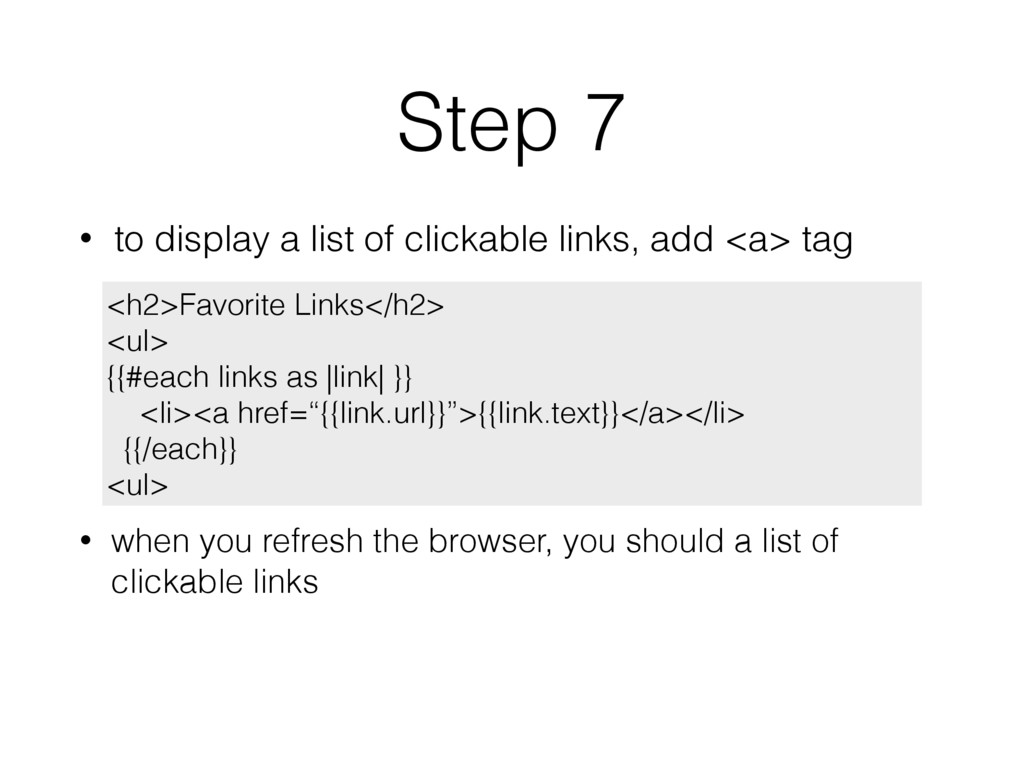
add <a> tag <h2>Favorite Links</h2> <ul> {{#each links as |link| }} <li><a href=“{{link.url}}”>{{link.text}}</a></li> {{/each}} <ul> • when you refresh the browser, you should a list of clickable links
![What is response.render? • response.render(‘template_name’, [data], [callback]) • response.render tells](https://files.speakerdeck.com/presentations/977fe58bac9a4ddcb887a9fe03a8ee9d/slide_42.jpg)