Upgrade to Pro — share decks privately, control downloads, hide ads and more …

WWDC19 新技術分享: Xcode 11,iOS_13,SwiftUI

WWDC19 新技術分享: Xcode 11,iOS_13,SwiftUI

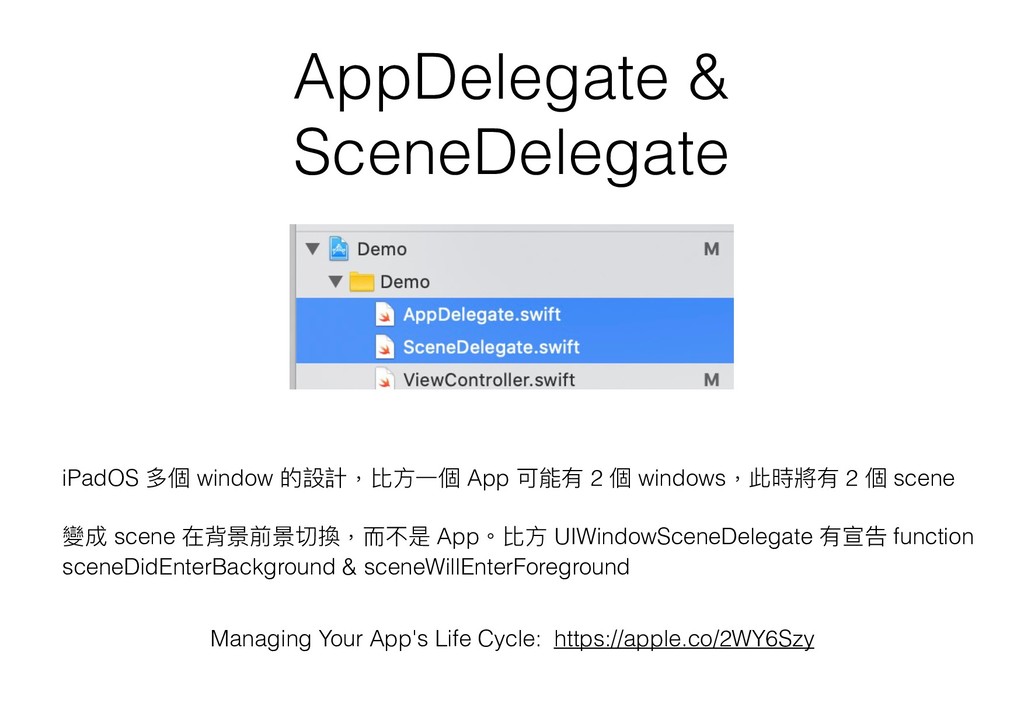
Xcode 11,iOS 13,present modally,LinkPresentation,dark mode,SF Symbols,SPM,Device Conditions,Environment Overrides,RelativeDateTimeFormatter,SceneDelegate,Mac App,Sign In with Apple,OCR,CryptoKit,Collection View Compositional Layout,Context Menu,Swift UI,Xcode Preview
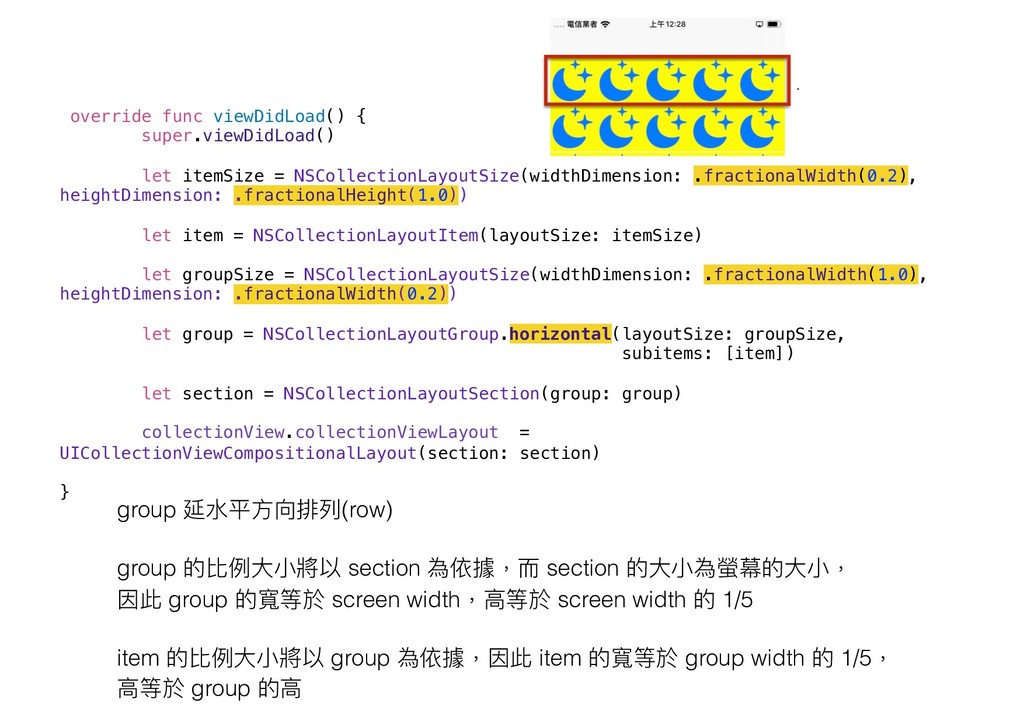
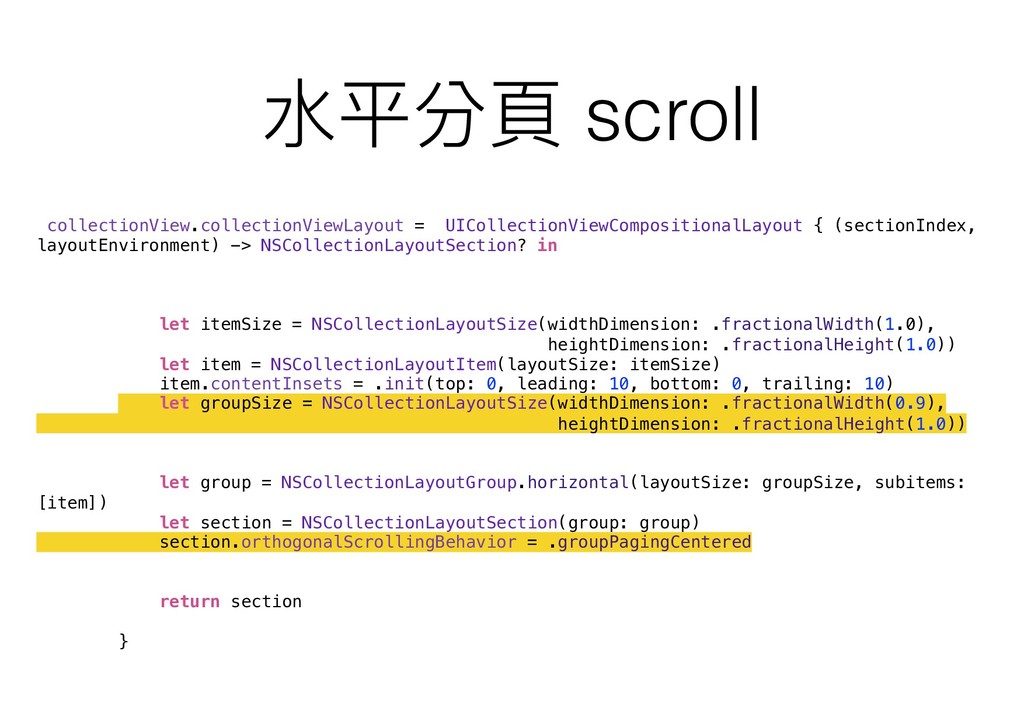
More Decks by 愛瘋一切為蘋果的彼得潘

Other Decks in Programming

Transcript

  1. ⼤大綱 • Xcode 11 • iOS 13 • present modally

    • LinkPresentation • dark mode • SF Symbols • SPM • Device Conditions • Environment Overrides • RelativeDateTimeFormatter • SceneDelegate • Mac App • Sign In with Apple • OCR • CryptoKit • Collection View Compositional Layout • Context Menu • Swift UI • Xcode Preview
  2. import LinkPresentation class ViewController: UIViewController { override func viewDidLoad() {

    super.viewDidLoad() let provider = LPMetadataProvider() let url = URL(string: "https://www.youtube.com/watch? v=DsUmmudjkfQ")! provider.startFetchingMetadata(for: url) { (metadata, error) in if let metadata = metadata { DispatchQueue.main.async { let linkView = LPLinkView(metadata: metadata) self.view.addSubview(linkView) var size = linkView.sizeThatFits(CGSize(width: 1000, height: 1000)) size = CGSize(width: self.view.frame.width, height: size.height * self.view.frame.width / size.width) linkView.frame = CGRect(origin: CGPoint(x: 0, y: 50), size: size) } } } } }
  3. ⾃自動隨 light / dark mode & contrast 改 變顏⾊色的 system

    color (Standard Color) https://developer.apple.com/design/human-interface-guidelines/ios/visual-design/color/ https://developer.apple.com/documentation/uikit/uicolor/standard_colors
  4. semantic(語意) color (UI Element color) • for use in background

    areas and for foreground content, such as labels, separators, and fill. • primary(主要),secondary(第⼆二),tertiary(第三), quaternary(第四) • UIColor.systemBackground, UIColor.secondarySystemBackground • UIColor.systemGroupedBackground, UIColor.secondarySystemGroupedBackground https://developer.apple.com/documentation/uikit/uicolor/ui_element_colors
  5. SF Symbols • 超過 1500 個 • https://developer.apple.com/design/human-interface-guidelines/sf-symbols/overview/ • https://developer.apple.com/design/

    • https://sfsymbols.com • 可以另外⾃自⼰己設計 • 圖片可調整樣式和搭配⽂文字字型
  6. 調整圖片樣式 Symbol Configuration: Scale,Weight,Font let configuration = UIImage.SymbolConfiguration(pointSize: 25, weight:

    .black, scale: .large) let image = UIImage(systemName: "moon.stars", withConfiguration: configuration)
  7. Asset 設定 dark mode 圖片 & 其它有趣的新功能 http://bit.ly/2J29G9M http://bit.ly/2LdSLUl Asset

    有趣的新功能 顯⽰示縮圖的 image 欄欄位 & ⽅方便便加入 image view 的 Image library
  8. Reference https://developer.apple.com/documentation/uikit/uiimage/configuring_and_displaying_symbol_images_in_your_ui/ Configuring and Displaying Symbol Images in Your UI

    Supporting Dark Mode in Your Interface https://developer.apple.com/documentation/appkit/supporting_dark_mode_in_your_interface
  9. RelativeDateTimeFormatter import Foundation let formatter = RelativeDateTimeFormatter() let someday =

    Date(timeIntervalSinceNow: -60*3) formatter.localizedString(for: someday, relativeTo: Date())
  10. AppDelegate & SceneDelegate iPadOS 多個 window 的設計,比⽅方⼀一個 App 可能有 2

    個 windows,此時將有 2 個 scene 變成 scene 在背景前景切換,⽽而不是 App。比⽅方 UIWindowSceneDelegate 有宣告 function sceneDidEnterBackground & sceneWillEnterForeground Managing Your App's Life Cycle: https://apple.co/2WY6Szy
  11. Sign In with Apple • https://developer.apple.com/sign-in-with-apple/ • ⽅方便便使⽤用者⽤用 Face ID

    或 Touch ID 登入 • Apple 可以幫使⽤用者產⽣生⼀一個隨機的 email,讓 App 無法知道使⽤用者真實的 email,帶給使⽤用者更更好的隱 私保護。 • 若若 App 使⽤用到第三⽅方登入(比⽅方 FB,Google),那麼 App 裡⼀一定要同時提供 Sign In with Apple 的選項。
  12. ⽂文字辨識 OCR (optical character recognition) let request = VNRecognizeTextRequest {

    (request, error) in guard let results = request.results as? [VNRecognizedTextObservation] else { return } for visionResult in results { guard let candidate = visionResult.topCandidates(1).first else { return } print(candidate.string) } } if let image = UIImage(named: "book"), let cgImage = image.cgImage { let handler = VNImageRequestHandler(cgImage: cgImage, options: [:]) try? handler.perform([request]) } 記得 import Vision
  13. CryptoKit framework • 加密(encryption),比⽅方 AES • Hash,比⽅方 SHA256 • 儲存密碼

    import CryptoKit import Foundation let password = "deeplove" let data = Data(password.utf8) let shaData = SHA256.hash(data: data) print(shaData.description) https://developer.apple.com/documentation/cryptokit/performing_common_cryptographic_operations
  14. 格⼦子狀狀(grid)照片牆 • iPhone 轉向時⾃自動計算 cell 的⼤大⼩小,維持⼀一個 row 5 個 cell

    • flow layout 的做法: 寫程式⼿手動計算 cell ⼤大⼩小,⽽而且轉向時要再重新計算 • 更更簡單的新做法: Compositional Layout
  15. App Store 畫⾯面 整個⾴頁⾯面垂直捲動,⾴頁⾯面裡有⽔水平捲動的 分⾴頁區塊,⽽而且還能看到前⼀一個和下⼀一個 的部分內容 flow layout 的做法: collection

    view 的 cell 裡塞 collection view (其它做法:
 (1) table view 的 cell 裡塞 collection view (2) cell 裡塞 scroll view 更更簡單的新做法: Compositional Layout
  16. collection view 由 layout 決定排版 item > group > section

    > layout group 可以延⽔水平⽅方向排列列(row), 也可以延垂直⽅方向排列列(column) ⽔水平排列列
  17. collection view 由 layout 決定排版 item > group > section

    > layout 1 個 section group section 裡每個 row 代表⼀一個 group group 裡有 5 個 item item 是正⽅方形,寬度是螢幕寬度的 1/5
  18. override func numberOfSections(in collectionView: UICollectionView) -> Int { return 1

    } override func collectionView(_ collectionView: UICollectionView, numberOfItemsInSection section: Int) -> Int { return 60 } override func collectionView(_ collectionView: UICollectionView, cellForItemAt indexPath: IndexPath) -> UICollectionViewCell { let cell = collectionView.dequeueReusableCell(withReuseIdentifier: "Cell", for: indexPath) return cell }
  19. override func viewDidLoad() { super.viewDidLoad() let itemSize = NSCollectionLayoutSize(widthDimension: .fractionalWidth(0.2),

    heightDimension: .fractionalHeight(1.0)) let item = NSCollectionLayoutItem(layoutSize: itemSize) let groupSize = NSCollectionLayoutSize(widthDimension: .fractionalWidth(1.0), heightDimension: .fractionalWidth(0.2)) let group = NSCollectionLayoutGroup.horizontal(layoutSize: groupSize, subitems: [item]) let section = NSCollectionLayoutSection(group: group) collectionView.collectionViewLayout = UICollectionViewCompositionalLayout(section: section) } group 延⽔水平⽅方向排列列(row) group 的比例例⼤大⼩小將以 section 為依據,⽽而 section 的⼤大⼩小為螢幕的⼤大⼩小, 因此 group 的寬等於 screen width,⾼高等於 screen width 的 1/5 item 的比例例⼤大⼩小將以 group 為依據,因此 item 的寬等於 group width 的 1/5, ⾼高等於 group 的⾼高
  20. NSCollectionLayoutDimension open class NSCollectionLayoutDimension : NSObject, NSCopying { // dimension

    is computed as a fraction of the width of the containing group open class func fractionalWidth(_ fractionalWidth: CGFloat) -> Self // dimension is computed as a fraction of the height of the containing group open class func fractionalHeight(_ fractionalHeight: CGFloat) -> Self // dimension with an absolute point value open class func absolute(_ absoluteDimension: CGFloat) -> Self // dimension is estimated with a point value. Actual size will be determined when the content is rendered. open class func estimated(_ estimatedDimension: CGFloat) -> Self -> Self: 回傳東⻄西的型別是 NSCollectionLayoutDimension 或繼承 NSCollectionLayoutDimension
  21. 多個 section override func numberOfSections(in collectionView: UICollectionView) -> Int {

    return 2 } override func collectionView(_ collectionView: UICollectionView, numberOfItemsInSection section: Int) -> Int { if section == 0 { return 10 } else { return 20 } }
  22. 多個 section override func viewDidLoad() { super.viewDidLoad() collectionView.collectionViewLayout = UICollectionViewCompositionalLayout

    { (sectionIndex, layoutEnvironment) -> NSCollectionLayoutSection? in let columns: Int if sectionIndex == 0 { columns = 5 } else { columns = 1 } let groupHeight = columns == 1 ? NSCollectionLayoutDimension.absolute(44) : NSCollectionLayoutDimension.fractionalWidth(0.2) let itemSize = NSCollectionLayoutSize(widthDimension: .fractionalWidth(1.0), heightDimension: .fractionalHeight(1.0)) let item = NSCollectionLayoutItem(layoutSize: itemSize) let groupSize = NSCollectionLayoutSize(widthDimension: .fractionalWidth(1.0), heightDimension: groupHeight) let group = NSCollectionLayoutGroup.horizontal(layoutSize: groupSize, subitem: item, count: columns) return NSCollectionLayoutSection(group: group) } }
  23. 在 closure 裡回傳每個 section 的 NSCollectionLayoutSection 物件 public typealias UICollectionViewCompositionalLayoutSectionProvider

    = (Int, NSCollectionLayoutEnvironment) -> NSCollectionLayoutSection? public init(sectionProvider: @escaping UICollectionViewCompositionalLayoutSectionProvider)
  24. 利利⽤用 count 指定 group 裡 item 的數量量 let itemSize =

    NSCollectionLayoutSize(widthDimension: .fractionalWidth(1.0), heightDimension: .fractionalHeight(1.0)) let item = NSCollectionLayoutItem(layoutSize: itemSize) let groupSize = NSCollectionLayoutSize(widthDimension: .fractionalWidth(1.0), heightDimension: groupHeight) let group = NSCollectionLayoutGroup.horizontal(layoutSize: groupSize, subitem: item, count: columns) group 延⽔水平⽅方向排列列(row), 比⽅方指定 count 5 表⽰示⼀一個 row 放 5 個 item, 此時會⾃自動計算 item 的寬度, 因此 itemSize 的 widthDimension 不會發揮作⽤用
  25. collectionView.collectionViewLayout = UICollectionViewCompositionalLayout { (sectionIndex, layoutEnvironment) -> NSCollectionLayoutSection? in let

    groupHeight: NSCollectionLayoutDimension if sectionIndex == 0 { groupHeight = .absolute(200) } else { groupHeight = .absolute(44) } let itemSize = NSCollectionLayoutSize(widthDimension: .fractionalWidth(1), heightDimension: .fractionalHeight(1.0)) let item = NSCollectionLayoutItem(layoutSize: itemSize) item.contentInsets = .init(top: 0, leading: 10, bottom: 0, trailing: 10) let groupSize = NSCollectionLayoutSize(widthDimension: .fractionalWidth(0.9), heightDimension: groupHeight) let group = NSCollectionLayoutGroup.horizontal(layoutSize: groupSize, subitems: [item]) let section = NSCollectionLayoutSection(group: group) if sectionIndex == 0 { section.orthogonalScrollingBehavior = .continuous } return section } contentInsets: 設定 item 上下左右的留留⽩白空間 orthogonalScrollingBehavior: 設定⽔水平 scroll orthogonal: 正交,相互垂直
  26. ⽔水平分⾴頁 scroll override func numberOfSections(in collectionView: UICollectionView) -> Int {

    return 1 } override func collectionView(_ collectionView: UICollectionView, numberOfItemsInSection section: Int) -> Int { return 10 }
  27. ⽔水平分⾴頁 scroll collectionView.collectionViewLayout = UICollectionViewCompositionalLayout { (sectionIndex, layoutEnvironment) -> NSCollectionLayoutSection?

    in let itemSize = NSCollectionLayoutSize(widthDimension: .fractionalWidth(1.0), heightDimension: .fractionalHeight(1.0)) let item = NSCollectionLayoutItem(layoutSize: itemSize) item.contentInsets = .init(top: 0, leading: 10, bottom: 0, trailing: 10) let groupSize = NSCollectionLayoutSize(widthDimension: .fractionalWidth(0.9), heightDimension: .fractionalHeight(1.0)) let group = NSCollectionLayoutGroup.horizontal(layoutSize: groupSize, subitems: [item]) let section = NSCollectionLayoutSection(group: group) section.orthogonalScrollingBehavior = .groupPagingCentered return section }
  28. class ViewController: UIViewController, UIContextMenuInteractionDelegate { @IBOutlet weak var button: UIButton!

    func contextMenuInteraction(_ interaction: UIContextMenuInteraction, configurationForMenuAtLocation location: CGPoint) -> UIContextMenuConfiguration? { let action1 = UIAction(__title: "Edit1", image: nil, options: []) { (action) in } let action2 = UIAction(__title: "Edit2", image: nil, options: []) { (action) in } let menu = UIMenu(__title: "Main Menu", image: nil, identifier: nil, children: [action1, action2]) return UIContextMenuConfiguration(identifier: nil, previewProvider: nil) { (menuElements) -> UIMenu? in return menu } } override func viewDidLoad() { super.viewDidLoad() let interaction = UIContextMenuInteraction(delegate: self) button.addInteraction(interaction) }
  29. 無 menu 標題 let menu = UIMenu(__title: "", image: nil,

    identifier: nil, children: [action1, action2])
  30. menu + icon let action1 = UIAction(__title: "Edit1", image: UIImage(systemName:

    "music.house.fill"), options: []) { (action) in } let action2 = UIAction(__title: "Edit2", image: UIImage(systemName: "music.mic"), options: []) { (action) in }
  31. 多層 menu (比⽅方 3 層) func contextMenuInteraction(_ interaction: UIContextMenuInteraction, configurationForMenuAtLocation

    location: CGPoint) -> UIContextMenuConfiguration? { let action1 = UIAction(__title: "Edit1", image: nil, options: []) { (action) in } let action2 = UIAction(__title: "Edit2", image: nil, options: []) { (action) in } let action3 = UIAction(__title: "Edit3", image: nil, options: []) { (action) in } let menu3 = UIMenu(__title: "menu3", image: nil, identifier: nil, children: [action3]) let menu2 = UIMenu(__title: "menu2", image: nil, identifier: nil, children: [action2, menu3]) let menu = UIMenu(__title: "", image: nil, identifier: nil, children: [action1, menu2]) return UIContextMenuConfiguration(identifier: nil, previewProvider: nil) { (menuElements) -> UIMenu? in return menu } }
  32. collection view delegate 的 method override func collectionView(_ collectionView: UICollectionView,

    contextMenuConfigurationForItemAt indexPath: IndexPath, point: CGPoint) -> UIContextMenuConfiguration? { let action1 = UIAction(__title: "Edit1", image: nil, options: []) { (action) in } let action2 = UIAction(__title: "Edit2", image: nil, options: []) { (action) in } let menu = UIMenu(__title: "", image: nil, identifier: nil, children: [action1, action2]) return UIContextMenuConfiguration(identifier: nil, previewProvider: nil) { (menuElements) -> UIMenu? in return menu } }
  33. SwiftUI 的優點 • 同時具有從 storyboard (xib) & 程式設計畫⾯面的優點 • 從

    preview (預覽)畫⾯面可以像 storyboard (xib) ⼀一樣拖曳設計畫⾯面 • 可以從程式設計畫⾯面 • 從 preview 畫⾯面設計也會產⽣生對應的 Swift 程式。(不像 storyboard (xib) 是產 ⽣生 XML) • declarative(陳述): 直接描述想要的畫⾯面樣⼦子,更更直覺易易懂 • 不會再像 storyboard 產⽣生看不懂的 git 衝突 • 開發 iOS,watchOS,macOS App 採⽤用同⼀一種技術 • 可以跟 UIKit 的元件結合 • data binding: 資料改變時,UI 也會⾃自動更更新
  34. SwiftUI 的限制 • Xcode 11 以上的版本才能開發 • ⾄至少要 iOS 13,因為它是

    iOS 13 的 framework • 預覽畫⾯面要搭配 macOS 10.15 • Objective-C 不能使⽤用 SwiftUI
  35. 在 function & computed property 裡省略略 return - Swift 5.1 http://bit.ly/2FuvcTA struct

    ContentView : View { var body: some View { Text("Hello World") } } struct ContentView : View { var body: some View { return Text("Hello World") } } 補充: some View Opaque Types http://bit.ly/2J3ruRY
  36. struct ContentView : View { var body: some View {

    print("hello") return Text("Hello World") } }
  37. @ViewBuilder https://developer.apple.com/documentation/swiftui/vstack/3278367-init init(alignment: HorizontalAlignment = .center, spacing: Length? = nil,

    @ViewBuilder content: () -> Content) VStack https://developer.apple.com/documentation/swiftui/viewbuilder struct ContentView : View { var body: some View { VStack { Text("Hello World") Text("SwiftUI") } } } 將 closure 裡的多個 view 組合成⼀一個新的 view https://swiftrocks.com/inside-swiftui-compiler-magic.html
  38. closure {} 裡只能使⽤用 @ViewBuilder 理理解的語法 struct ContentView : View {

    var number = 1 var body: some View { VStack { if number == 1 { Text("Hello World") } Text("SwiftUI") } } } if 可以
  39. 利利⽤用 ForEach 型別 建立多個 view var body: some View {

    VStack { ForEach(1...3) { number in Text("\(number)") } Text("SwiftUI") } } https://developer.apple.com/documentation/swiftui/foreach
  40. button 點選執⾏行行程式 struct ContentView : View { var body: some

    View { Button(action: { print("tap") }) { Text("Button") } } } Debug Preview 可以顯⽰示 print 印的東⻄西, 多了了⼀一些 debug 的選項,比⽅方 Environment Overrides
  41. public struct Button<Label> where Label : View { public var

    label: Label init(action: @escaping () -> Void, @ViewBuilder label: () -> Label) action: button 點選執⾏行行的程式 label: button 的內容
  42. 利利⽤用 PresentationButton 切換⾴頁⾯面 https://developer.apple.com/documentation/swiftui/presentationbutton struct ContentView : View { var

    body: some View { PresentationButton(destination: PhotoView()) { Text("Show Cute Peter") } } } public init(destination: Destination, label: () -> Label)
  43. PresentationButton public struct PresentationButton<Label, Destination> where Label : View, Destination

    : View Label & Destination 是 generic 宣告的型別代號,我們⽣生成 PresentationButton 時傳入的 參參數決定 Label & Destination 的真正型別 public init(destination: Destination, label: () -> Label) PresentationButton(destination: PhotoView()) { Text("Show Cute Peter") } Label 是 Text,Destination 是 PhotoView
  44. 圖片當 PresentationButton var body: some View { PresentationButton(destination: PhotoView()) {

    Image(systemName: "sun.max.fill") .foregroundColor(.orange) } }
  45. Preview struct ContentView : View { var body: some View

    { Text("Hello World") } } #if DEBUG struct ContentView_Previews : PreviewProvider { static var previews: some View { ContentView() } } #endif 遵從 protocol PreviewProvider 定義 computed property previews,回傳要顯⽰示的 view #if DEBUG: 只有 debug 時會執⾏行行 preview 的程式
  46. 設定 preview 的機型 static var previews: some View { ContentView()

    .previewDevice(PreviewDevice(rawValue: "iPhone SE")) }
  47. 顯⽰示多個 preview static var previews: some View { Group {

    ContentView() .previewDevice(PreviewDevice(rawValue: "iPhone SE")) .previewDisplayName("iPhone SE") ContentView() .previewDevice(PreviewDevice(rawValue: "iPhone XS")) .previewDisplayName("iPhone XS") } } 利利⽤用 group 將多個 view 合併成⼀一個 view 回傳
  48. 顯⽰示 dark mode 的 preview static var previews: some View

    { Group { ContentView() .previewDisplayName("light") ContentView() .environment(\.colorScheme, .dark) .previewDisplayName("dark") } } ⽬目前 Xcode 11 beta 2 有 bug, preview 顯⽰示有問題