Upgrade to Pro — share decks privately, control downloads, hide ads and more …

React Native Begineer Tutorial

Avatar for Avon Avon
August 18, 2018

React Native Begineer Tutorial

React Native 入門實作課程 ppt

Avatar for Avon

Avon

August 18, 2018
Tweet

Other Decks in Programming

Transcript

  1. 成功⼤大學資源⼯工程學系 清華⼤大學動⼒力力機械研究所 ⾃自學程式 女⼈人迷 Hackathon冠軍-智慧法律律APP 台科X政⼤大 Hackathon亞軍-物聯聯網鋼琴 台⼤大 Hackathon企業獎及⼈人氣獎-fb尋找⼿手機/⼈人臉辨識 APP

    Girls 創辦⼈人 印氪股份有限公司接案iOS軟體⼯工程師 達暉資訊科技有限公司iOS軟體⼯工程師 Uitox象網智慧科技有限公司APP軟體⼯工程師 天堂遊戲有限公司APP軟體⼯工程師 雅⽅方 Avon
  2. APP Girls APP Girls aims to give tools for girls

    and women to build their ideas. 希望不斷推廣⽽而有更更多女⽣生⼀一同透過交流學習,⼀一起 了了解程式開發並能互相切磋,歡迎對程式語⾔言有興趣 的⼀一起加入!
  3. ⼤大綱 react native 介紹 react native 基本使⽤用範例例 利利⽤用react-native 快速建立react native專案

    執⾏行行APP到iOS&Android雙平台上 VSCode常⽤用功能介紹 專案架構講解 元件基本架構規則 必須熟悉語法寶典 state介紹 專案時間: 利利⽤用react native做出⼀一個密碼判斷 State v.s. Props ⾃自製元件 react-navigation教學 專案時間: 套⽤用react-navigation做各種換⾴頁 專案時間: 套⽤用react-navigation並⾃自製data列列表 做Notice Cart Storage儲存⼯工具 redux數據流框架 Storage v.s. redux ⼩小練習時間 API介紹 PostMan⼯工具 串串接API教學 專案時間: Notice Cart + API 專案實作:我的收藏 Part1 初探react native 熟悉語法架構 Part2 加強必備戰⼒力力 熟悉套件&數據流 Part3 串串接後台不可或缺 熟悉串串接API與實作
  4. 2015 年年 3 ⽉月份, Facebook 開放了了 React Native 的原始碼,這是 ⼀一個能夠讓你利利⽤用

    JavaScript 建立原⽣生 iOS 及 Android App 的框 架,它已經在世界各地流⾏行行的移動App中廣泛應⽤用,例例如Facebook, Bloomberg, Skype, Instagram和Uber eat。 React Native 「只需學習⼀一次,到處皆可實作」( Learn Once, Write Anywhere ) 學好⼀一套技能,然後運⽤用這套技能來來建構多種平台的 App
  5. React Native 特點 PhoneGap 之類的框架 將網⾴頁內容包裝成 WebView ,形成 UI 元素,看起來來其實跟原⽣生的

    有些不⼀一樣 —>基於HTML, CSS,直接使⽤用HTML渲染,⼤大量量使⽤用DOM,很耗性能 React Native 使⽤用 iOS 或 Android 原⽣生⽀支援的 JavaScript 元件,因此打造出來來的 App 就跟原⽣生的沒有兩兩樣。 ex: 代替web組件’div’和’span' —> 基本上就是⽤用原⽣生組件’View’和’Text' —>基於javascript 即時編譯,運⾏行行效率比較⾼高,⽽而且此框架⽤用 Virtual DOM渲染
  6. 利利⽤用 react-native 快速建立 react native 專案 npm install -g react-native-cli

    (cli = command line interface) 開專案: react-native init AwesomeProject cd AwesomeProject For iOS: react-native run-ios (或是打開資料夾內ios/AwesomeProject.xcodeproj,並點擊Run按鈕。) Tips: 每次修改好程式碼,只要 Cmd+R 就可以reload 除錯⼯工具:’Cmd+D' or shake for dev menu,就會有menu選單跑出來來
  7. 利利⽤用 react-native 快速建立 react native 專案 For Android: A. 環境參參數設置

    (~/ =>就是路路徑 /Users/使⽤用者名稱/) 在終端下使⽤用vi ~/.bash_profile (命令創建或編輯 (按o 代表換⾏行行模式 打好第⼆二⾏行行後 esc 跳出後 再:wq 儲存離開)) export ANDROID_HOME=~/Library/Android/sdk export PATH=$PATH:$ANDROID_HOME/tools:$ANDROID_HOME/platform-tools 執⾏行行source ~/.bash_profile B. 要執⾏行行以前 1. 先開啟android studio 2. 點選“Open an existing Android Studio project”,打開專案內的android資料夾 3. 法⼀一:先打開模擬器,然後終端機react-native run-android 法⼆二: 1. npm start 2. 打開android studio內的斧頭 3. 按⼀一下三⾓角形run (會⾃自動請你打開模擬器) Tips: 按兩兩下R鍵,就可以重新整理理模擬器 command+m,就可以跑出選單(和iOS是 command + d 是⼀一樣的意思) 就可以選擇 Debug JS Remotely http://localhost:8081/debugger-ui/
  8. android 原⽣生程式碼 ios 原⽣生程式碼 此App的進入點,也就是開始執⾏行行的地⽅方 整個專案的路路由在這裏匯入 專案依賴管理理檔案 安裝⽬目錄,套件放置區 專案說明,主要給原⽣生 app

    打包⽤用,包括專案名稱和⼿手機桌⾯面展⽰示名稱 babel的配置檔案,React Native預設使⽤用babel編譯JavaScript程式碼 以前舊版建立專案時,會⾃自動⽣生成 index.ios.js & index.android.js 但新版只有index.js,並把App.js匯入 到index.js
  9. import 可以使物件屬性在整個檔案的範圍內都可以被參參照到 export 匯出,讓別個檔案使⽤用 stylesheet ⽤用於視圖內容的樣式,主要使⽤用 CSS(Cascading Style Sheets,串串接樣式表)來來設定 App

    的 UI 樣式 src: source code 通常會⾃自⾏行行建立 src ⼤大資料夾 (作為App應⽤用Javascript部分所有程式碼和資源的根⽬目錄,放置所有原始的 react native 程式碼) 補充
  10. 建構component組件基本三步驟 1. import 模組, 套件 2. 建立樣式表(StyleSheet) 3. class建構版⾯面樣式 import

    React, { Component } from 'react'; export default class App extends Component { state = { name: '', validCode: '', clickButton: false } changeName = () => { // this.setState({ name: 'avon' }) this.state.name === 'avon' ? this.setState({ name: '歡迎回來來' }) : this.setState({ name: 'avon' }) } render() { return ( <View style={styles.container}> <Text style={styles.welcome}>Welcome to React Native!</Text> <Text style={styles.instructions}>Hello! {this.state.name}</Text> </View> ); } } const styles = StyleSheet.create({ container: { flex: 1, justifyContent: 'center', alignItems: 'center', backgroundColor: '#F5FCFF', } }); 初始化state function執⾏行行 渲染
  11. import { StyleSheet, } from 'react-native'; var styles = StyleSheet.create({

    container: { paddingTop: 10, backgroundColor: '#b5b5b5', justifyContent: 'center', alignItems: 'center', height: 100 }, red: { color: 'red', }, blue: { fontWeight: 'bold', fontSize: 60, color: ‘blue' }, }); … <View style={styles.container}> <Text style={styles.blue} > hello </Text> <Text style={[styles.blue, styles.red]}> Good Luck </Text> </View > // StyleSheet.create來來集中定義組件的樣式 // CSS中的“層疊”做法 樣式(StyleSheet),多個樣式管理理
  12. ✦ 新增⼀一個state 在渲染的JSX內使⽤用{this.state.xxx}來來讀取 ✦ 新增⼀一個funtion 把剛才按鈕內使⽤用的this.setState({xxx}) ⽤用此function包起來來 ✦ 新增⼀一個按鈕來來觸發動作 裡⾯面使⽤用this.setState({xxx})來來改變值

    p.s. 補充: 三元運算判斷 <Button title='Click Me' onPress={( ) => this.setState({ name: 'baby' })}/> changeName = ( ) => { } <Button title='Click Me' onPress={( ) => this.changeName( )}/> state初成熟...
  13. ✓ state語法 初始化: state = { name:' ', age:18} 讀取:

    {this.state.name} 存入: this.setState({ name: ‘avon' }) ✓ function 不帶變數: aaa = ( ) => { } 套⽤用: ( )=>this.aaa( ) 帶變數: aaa = (xxx) => { } 套⽤用: (arg) => this.aaa(arg) ✓ tag內加入參參數 駝峰式⼩小寫 ex: ✓ style寫法 在直接寫在tag內 寫在styleSheet內再引⽤用到tag內 ✓ command標註 // or /* */ or 在render內{/* */} ✓ 元件⼀一定要⼤大寫(⾃自製元件也⼀一樣) <Text style={styles.welcome}>成功</Text> <Text style={{ color: 'green' }}>成功</Text> const styles = StyleSheet.create({ welcome: { flex: 1, justifyContent: 'center', alignItems: 'center', backgroundColor: '#F5FCFF', } }); <Button title='Click Me' onPress={( ) => this.setState({ name: 'baby' })}/> 必須熟悉的常⽤用⽤用法寶典
  14. export default class App extends Component { state = {

    validCode: '', clickButton: false } getNumber = () => { if (this.state.validCode === '1234') { return ( <Text style={{ color: 'green' }}>輸入成功</Text>) } else { return (<Text style={{ color: 'orange' }}>請輸入密碼</Text>) } } render() { return ( <View style={styles.container}> {/* 輸入⽂文字 */} <TextInput maxLength={4} style={{ height: 50, width: 300, borderRadius: 0, borderColor: 'darkgray', backgroundColor: 'white', fontSize: 28, textAlign: 'center' }} onChangeText={(text) => this.setState({ validCode: text })} keyboardType={"numeric"} value={this.state.validCode} /> {/* 法⼀一:輸入⽂文字,即時判斷 */} {this.state.validCode === '1234' ? <Text style={{ color: 'blue' }}>輸入成功</Text> : <Text style={{ color: 'red' }}>請輸入密碼</Text>} {/* 法⼆二:輸入⽂文字,即時判斷,⽤用function包起來來 */} {this.getNumber()} </View > ); } } 專案實作:密碼判斷 practice project
  15. 新增元件 MyButton.js (⼦子) Import 需要的元件 render ⾃自製button export ⾃自製button import

    { TouchableOpacity, Text,} from 'react-native'; class MyButton extends Component { render() { return ( <TouchableOpacity onPress={this.props.onPress} > <Text>{this.props.title}</Text> </TouchableOpacity> ) } } <MyButton title={'Click'} onPress={()=>this.changeName()} /> App.js(⽗父) export default MyButton import MyButton from ‘./MyButton'
  16. 補充:⾃自製元件-屬性 Prop types import PropTypes from 'prop-types'; MyButton.propTypes = {

    title: PropTypes.string.isRequired, color: PropTypes.string, backgroundColor: PropTypes.string, borderRadius: PropTypes.number, onPress: PropTypes.func, }; MyButton.defaultProps = { color: 'white', backgroundColor: 'black', onPress: null, borderRadius: 5, };
  17. 專案實作:元件套件換⾴頁 practice project tab換⾴頁: 參參考https://reactnavigation.org/docs/en/tab-based-navigation.html 在程式碼最上⽅方“引入套件” import { createBottomTabNavigator, }

    from 'react-navigation'; nav bar換⾴頁: 參參考https://reactnavigation.org/docs/en/stack-navigator.html#docsNav 在程式碼最上⽅方“引入套件” import { createStackNavigator, } from 'react-navigation'; 學習換⾴頁-套⽤用套件React-navigation 安裝:npm install --save react-navigation
  18. Tab換⾴頁 const App = createBottomTabNavigator( { Home: { screen: HomeScreen

    }, Profile: { screen: ProfileScreen }, }, // add custom bottom tabs { navigationOptions: ({ navigation }) => ({ tabBarIcon: ({ tintColor }) => { const { routeName } = navigation.state; let iconName; if (routeName === 'Home') { iconName = 'ios-trophy' } else if (routeName === 'Profile') { iconName = 'ios-options' } return <Ionicons name={iconName} size={25} color={tintColor} /> }, }), tabBarOptions: { activeTintColor: 'tomato', inactiveTintColor: 'gray', }, } ); export default App 設定客製化參參數 import HomeScreen from './src/screens/HomeScreen' import ProfileScreen from './src/screens/ProfileScreen' import需要有Tab的⾴頁⾯面 ⽤用createBottomTabNavigator包起來來
  19. Nav bar換⾴頁 ⽤用createStackNavigator包起來來 設定客製化參參數 import HomeMainScreen from './HomeMainScreen' import HomeDetailScreen

    from './HomeDetailScreen' const HomeScreen = createStackNavigator( { HomeMain: { screen: HomeMainScreen, navigationOptions: () => ({ title: '這是上⽅方title', headerBackTitle: '返回', }), }, HomeDetail: { screen: HomeDetailScreen }, } ); import需要有Tab的⾴頁⾯面 export default HomeScreen
  20. const HomeStack = createStackNavigator({ Home: { screen: HomeScreen, navigationOptions: ()

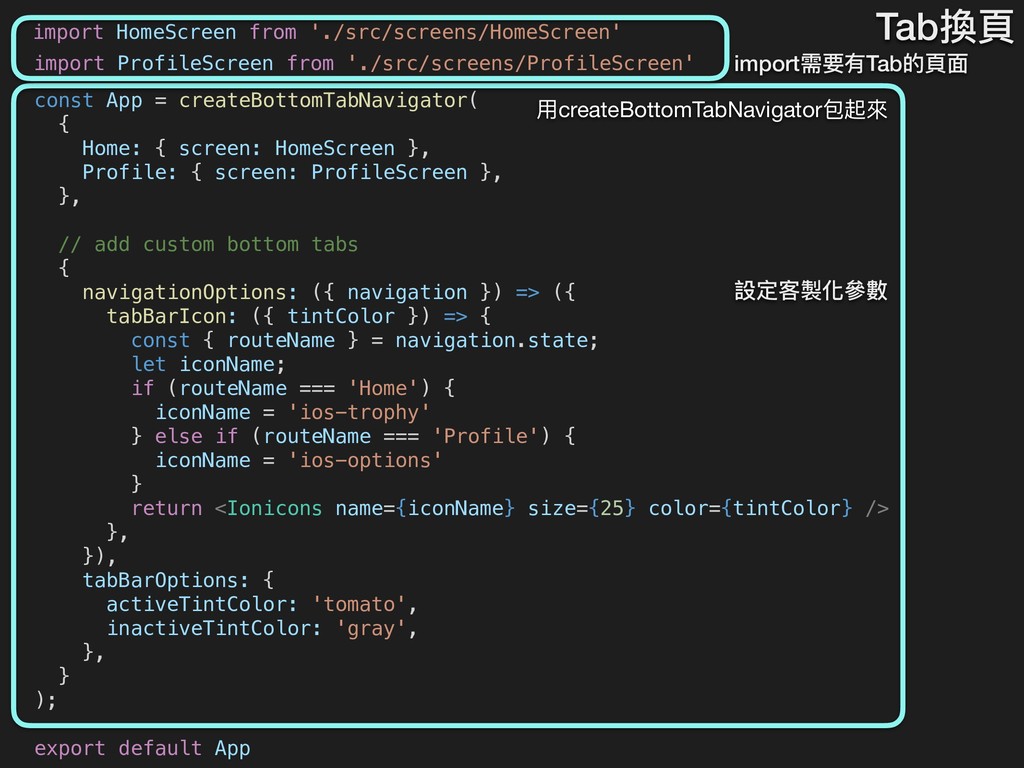
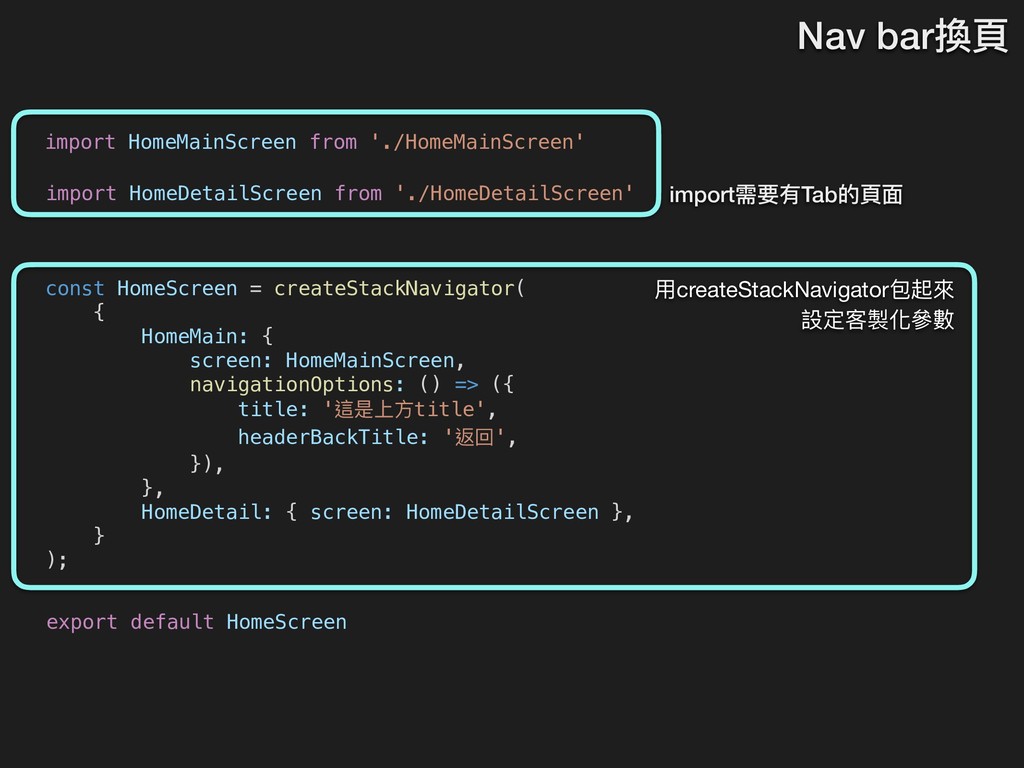
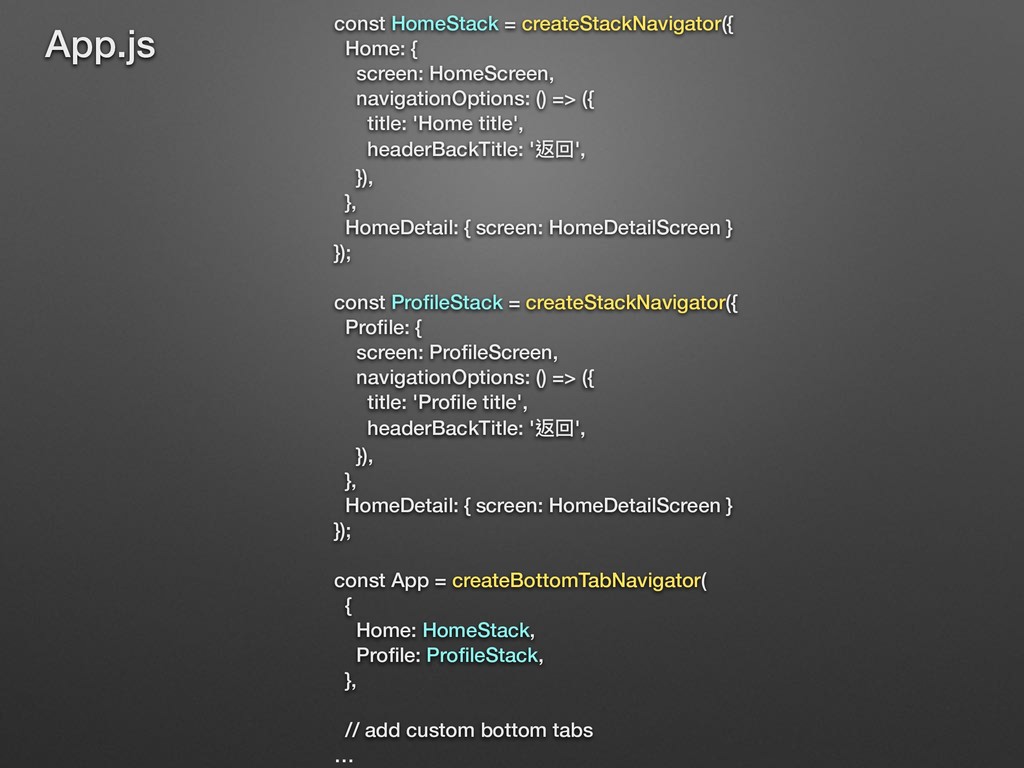
    => ({ title: 'Home title', headerBackTitle: '返回', }), }, HomeDetail: { screen: HomeDetailScreen } }); const ProfileStack = createStackNavigator({ Profile: { screen: ProfileScreen, navigationOptions: () => ({ title: 'Profile title', headerBackTitle: '返回', }), }, HomeDetail: { screen: HomeDetailScreen } }); const App = createBottomTabNavigator( { Home: HomeStack, Profile: ProfileStack, }, // add custom bottom tabs … App.js
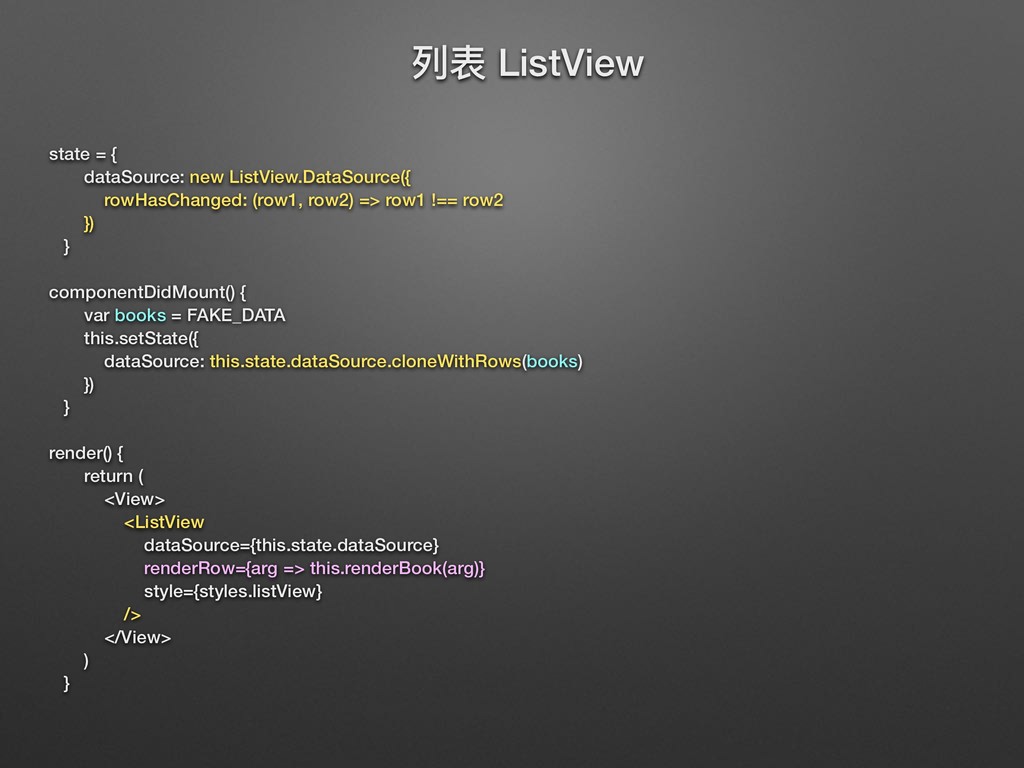
  21. this.props.navigation.navigate('HomeDetail', { name: ‘avon' }) render() { const name =

    this.props.navigation.getParam('name', 'default value'); return ( … <Text>{name}</Text> … ); } HomeScreen.js HomeDetailScreen.js 換⾴頁+傳變數給內⾴頁 內⾴頁拿到變數呈現
  22. this.props.navigation.navigate('HomeDetail', { name: ‘avon’, function: arg=> this.changeFood(arg) }) render() {

    return ( … <Button title="Get Food" onPress={() => this.props.navigation.getParam(‘function')('apple')} /> … ); } HomeScreen.js HomeDetailScreen.js 傳function給內⾴頁,等內⾴頁拿變數傳回來來 內⾴頁拿到function並且回傳參參數 changeFood = (foodGet) => { this.setState({ food: foodGet }) }
  23. Data var FAKE_DATA = [ { notice: '恭喜您!達成環島100次', date: '2018/08/01

    14:00', }, { notice: '您的會員⾝身份認證,已審核通過!', date: '2018/08/02 12:00', }, { notice: '撥款通知:本公司已將款項$123456撥入您的指定銀⾏行行帳⼾戶.', date: '2018/08/05 12:30', } … ]
  24. 列列表 ListView state = { dataSource: new ListView.DataSource({ rowHasChanged: (row1,

    row2) => row1 !== row2 }) } componentDidMount() { var books = FAKE_DATA this.setState({ dataSource: this.state.dataSource.cloneWithRows(books) }) } render() { return ( <View> <ListView dataSource={this.state.dataSource} renderRow={arg => this.renderBook(arg)} style={styles.listView} /> </View> ) }
  25. renderBook = (cases) => { return ( <TouchableHighlight onPress={() =>

    this.showNoticeDetail(cases)}> <View> <View style={styles.MainView}> <Image source={{ uri: 'https://pic.pimg.tw/cc1895/1431185098-1614666523.jpg' }} style={styles.thumbnail} /> <View style={{ flex: 1 }}> <Text ellipsizeMode='tail' numberOfLines={3} style={{ color: 'black', fontSize: 15, marginTop: 8 }} >{cases.notice}</Text> <Text ellipsizeMode='tail' numberOfLines={3} style={{ marginTop: 8, fontSize: 13, marginBottom: 8 }} >{cases.date}</Text> </View> <Image style={styles.image} source={require('../img/ic_arrow_right.png')} /> </View> <View style={styles.separator} /> </View> </TouchableHighlight> ) } 列列表 ListView
  26. showNoticeDetail(cases) { this.props.navigation.navigate('HomeDetail', { passProps: cases, }) } 傳遞資料 const

    passProps = this.props.navigation.getParam('passProps', 'some default value'); … <Text>{passProps.notice}</Text> …
  27. AsyncStorage 結合 async await AsyncStorage: 簡單的、異異步的、持久化的Key-Value存儲系統 —> 處理理異異步(非同步)的救星: async(非同步) await(等待)

    等待這段函式完成後,在往下繼續執⾏行行 備註:async await 也常⽤用來來解決callback hell的問題,讓程式碼易易讀性更更⾼高,更更簡潔
  28. AsyncStorage 結合 try catch 需要Error handling 錯誤處理理(捕獲錯誤): 錯誤的接收執⾏行行動作—> catch( )

    Await 如果有錯誤發⽣生,只會默默地拋出錯誤 ... 後⾯面的程式碼就無法執⾏行行!
  29. react-redux數據流框架 加入redux 安裝: npm install --save redux npm install --save

    react-redux 新增檔案: 在src內新增資料夾redux, 裡⾯面再新增三個檔案: action.js, reducer.js, store.js
  30. react-redux數據流框架 設置redux action.js export const ADD_TO_COUNTER = 'ADD_TO_COUNTER' export function

    addToCounter(newName) { return { type: ADD_TO_COUNTER, payload: { newName: newName }, } } import { ADD_TO_COUNTER } from './action' const initialState = { newName: 'Avon' } export default function reducer(state = initialState, action) { switch (action.type) { case ADD_TO_COUNTER: return { ...state, newName: action.payload.newName } default: return state } reducer.js 定義action名稱&動作 (action creator) 是否要傳入參參數 action名稱規則:以全⼤大寫表⽰示 監聽action,並依照不同動 作來來更更新狀狀態
 listens to actions and modifies the state 引入action 定義初始狀狀態 傳入初始狀狀態&action 會依據不同的action來來更更新狀狀態 標⽰示動作類型
  31. react-redux數據流框架 設置redux store.js import reducer from './reducer' import { createStore

    } from 'redux' export default function configureStore() { let store = createStore( reducer ) return store } import { Provider } from 'react-redux' import configureStore from './src/redux/store' const store = configureStore() const MyApp = () => ( <Provider store={store}> <App /> </Provider> ) // AppRegistry.registerComponent(appName, () => App); AppRegistry.registerComponent(appName, () => MyApp) index.js 引入reducer 利利⽤用creactStore創建store 引入reducer到store,並讓之後 app進入點可以引入這個store
 connects the reducer to the store 新增兩兩⾏行行 引入store和Provider組件 利利⽤用Provider引入store (Provider把store當成參參數往下傳) 改成下⾯面這⾏行行
  32. react-redux數據流框架 存入&讀取 ProfileScreen.js import { connect } from 'react-redux' import

    { addToCounter } from ‘../redux/action' … <Text>{this.props.newName}</Text> <Button onPress={() => this.props.addToCounter(this.state.name)} title='設定名字2' /> … const mapStateToProps = (state) => { return { newName: state.newName } } const mapDispatchToProps = (dispatch) => { return { // 法⼀一 // addToCounter: (name) => { // dispatch({ type: 'ADD_TO_COUNTER', payload: { newName: name } }) // } // 法⼆二 addToCounter: (name) => dispatch(addToCounter(name)) } } export default connect(mapStateToProps, mapDispatchToProps)(ProfileScreen) 新增兩兩⾏行行 引入connect和動作 讀取:⽤用this.props讀取變數 讀取: 把全域的state “state.newName” 轉變成props, 讓這⾴頁ProfileScreen⽤用this.props.newName來來讀取 觸發動作: 利利⽤用dispatch來來呼叫執⾏行行動作(action),就會觸發 reducer來來返回新的state,connect即會監聽到state 的變化,合併回props action export default 改成此⾏行行 利利⽤用connect來來接收Provider傳入的store, 並把全域參參數state變成props拿來來給此component使⽤用
  33. 備註:⼀一定要放到 componentDidMount const host = 'https://njapp.uitoxbeta.com/app'; const url = `${host}${route}`;

    var params = { "articleId": this._deckSwiper._root.state.selectedItem._id, "userId": this.state.userId, } const options = { method: 'POST', headers: { Accept: 'application/json', authorization: token, 'Content-Type': 'application/json', }, body: (params ? JSON.stringify(params) : null), }; 簡單⽤用法:fetch('Put API Request URL Here', { method: 'get'}) 常⽤用⽅方法:fetch(url, options) Fetch API 常⽤用基本⽅方法
  34. const REQUEST_URL = 'https://www.googleapis.com/books/v1/volumes?q=subject:fiction' fetch(REQUEST_URL) .then((response) => response.json()) .then((responseData) =>

    { this.setState({ dataSource: this.state.dataSource.cloneWithRows(responseData.items) }); }) .catch((err) => { console.log('error') }) Fetch API 常⽤用基本⽅方法
  35. state ={ … ds:[ ] } fetch … this.setState({ dataSource:

    this.state.dataSource.cloneWithRows(responseData.items), ds:responseData.items }); … <TouchableHighlight onPress={() => this.pressRow(cases)}> {cases.addToMyLists === true ? <Image style={styles.imageCheck} source={require('../img/square_check.png')} /> : <Image style={styles.imageCheck} source={require('../img/square_non_check.png')} />} </TouchableHighlight> … 讀取data+新增勾選按鈕
  36. pressRow = (cases) => { const newDatas = this.state.ds.map(a =>

    { let copyA = { ...a }; if (copyA.id === cases.id) { copyA.addToMyLists = !copyA.addToMyLists } return copyA; }); this.setState({ ds: newDatas, dataSource: this.state.dataSource.cloneWithRows(newDatas), }); } 複製data, 並依照勾選新增tag
  37. componentDidUpdate() { let chooseCountNum = 0 let getALL = [

    ] this.state.ds.map(a => { if (a.addToMyLists === true) { getALL.push(a) return chooseCountNum += 1 } }) // 儲存&統計所有⾃自選品 this.saveToStorage(getALL) } saveToStorage = async (getMyBooks) => { try { await StorageHelper.setMySetting('code', JSON.stringify(getMyBooks)); } catch (err) { console.error(err); } }; 新增array放入被勾選到的書,並存起來來
  38. state = { myBookCount: 0, myBookListName: [] } loadStorage =

    async () => { this.setState({ myBookListName: [] }) let bookGet = await StorageHelper.getMySetting('code') let a = JSON.parse(bookGet) let newArray = [ ] a.forEach((thing) => { newArray.push(thing.volumeInfo.title) }) this.setState({ myBookCount: a.length, myBookListName: newArray }) }; <Text style={styles.instructions}>我收藏了了{this.state.myBookCount}本書</Text> { this.state.myBookListName.map((bookName, index) => { return (<Text key={index}>書名為:{bookName}</Text>) }) } componentDidMount() { this.props.navigation.addListener('didFocus', () => this.loadStorage()) } 讀取storage內的資料