Complete Denture Fabrication 4 Presenter: M. Leif Stromberg, DDS, MAGD Module 2 — Simpli fi ed Final Impression Techniques for Complete Denture Success and Lab Preparation for the Records Appointment
presenter declares that neither he nor his immediate family have a financial interest that would create a conflict of interest that would influence or restrict his independent judgment with regard to the content of this course.
MODULE 2 — PARTICIPANTS WILL BE ABLE TO: 1. Identify intra-oral anatomic landmarks to record when making fi nal impressions for tissue-supported edentulous restoration. 2. Make very good edentulous fi nal impressions using simpli ed techniques. 3. Describe the anatomy of the posterior palatal seal area and the 360° peripheral seal for retention of a maxillary complete denture. 4. Discuss making the important preliminary centric relation/ vertical dimension of occlusion record for the laboratory to use when fabricating the setup for the records appointment. 5. Create guidance information for the laboratory regarding the dimensions and contours of the upper esthetic wax rim.
purpose of this course is to help dental teams fabricate adequate complete denture restorations. Adequate- it is within acceptable limits. An adequate denture 1. has good esthetics (relative to the patient’s anatomic features), 2. has a good vertical dimension of occlusion (not pathologic and works well for the patient), 3. has good retention (relative to the patient’s anatomic features), and 4. has good stability (relative to the patient’s anatomic features). 5. All posterior teeth contact evenly in maximum intercuspation in centric relation. • An adequate edentulous impression has all the details for fabricating an adequate complete denture. 7
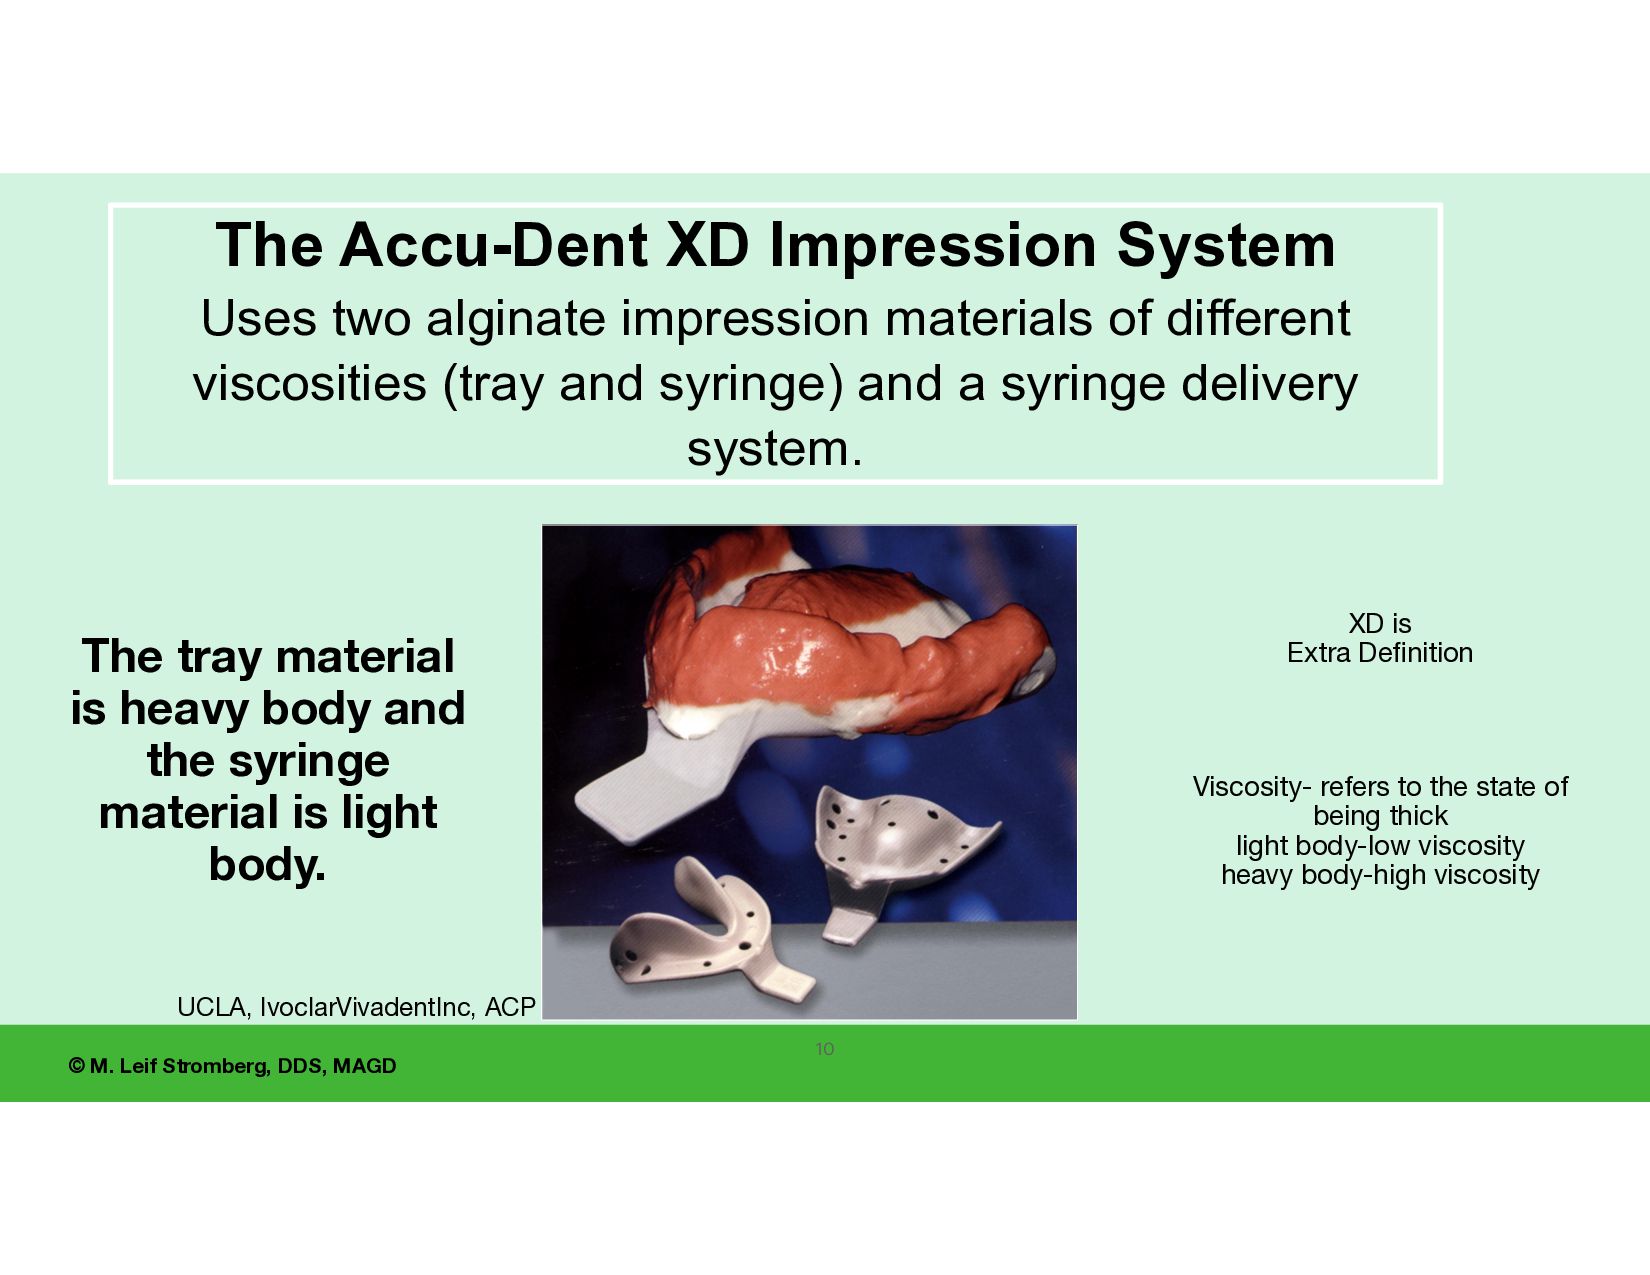
for edentulous nal impressions UCLA, IvoclarVivadentInc, ACP AccuDent XD Syringe Colloid and Tray Colloid by Ivoclar, Inc. For accurate impressions with detail of the tissues. 9
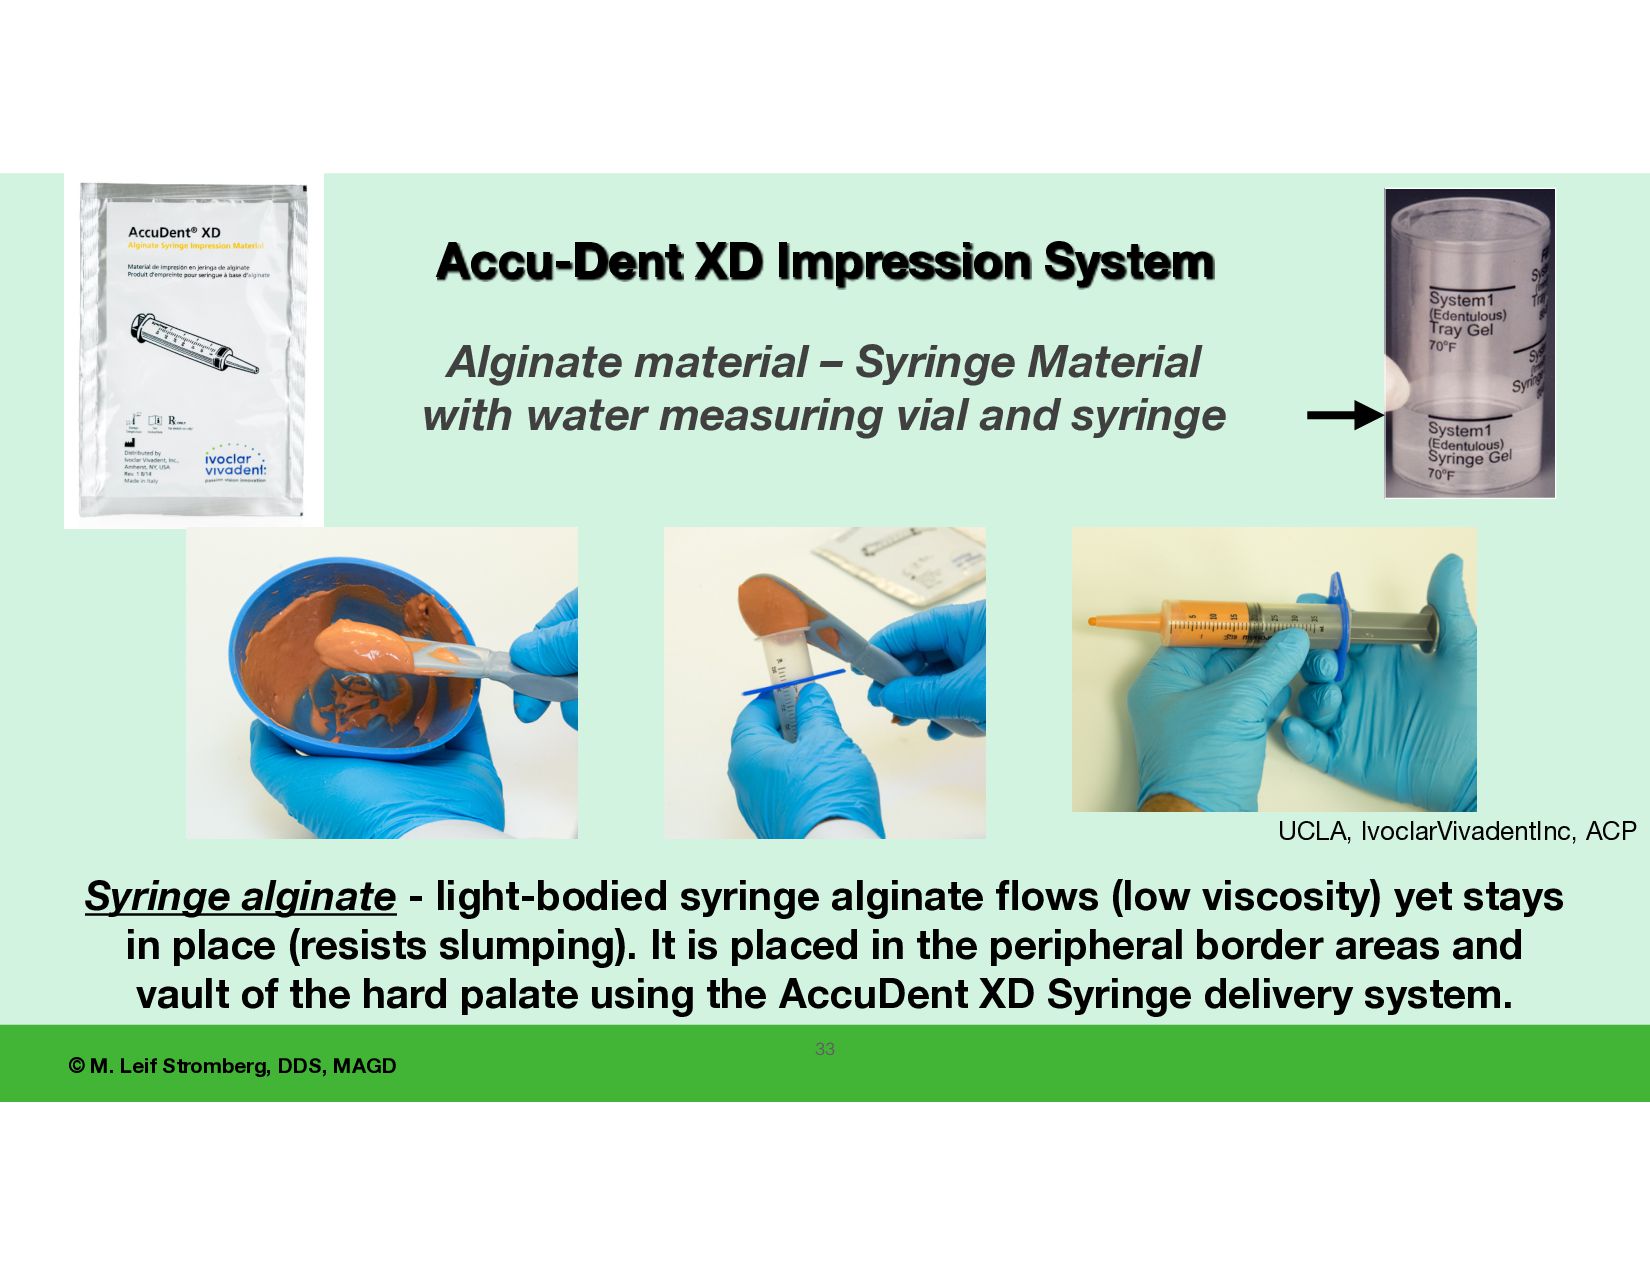
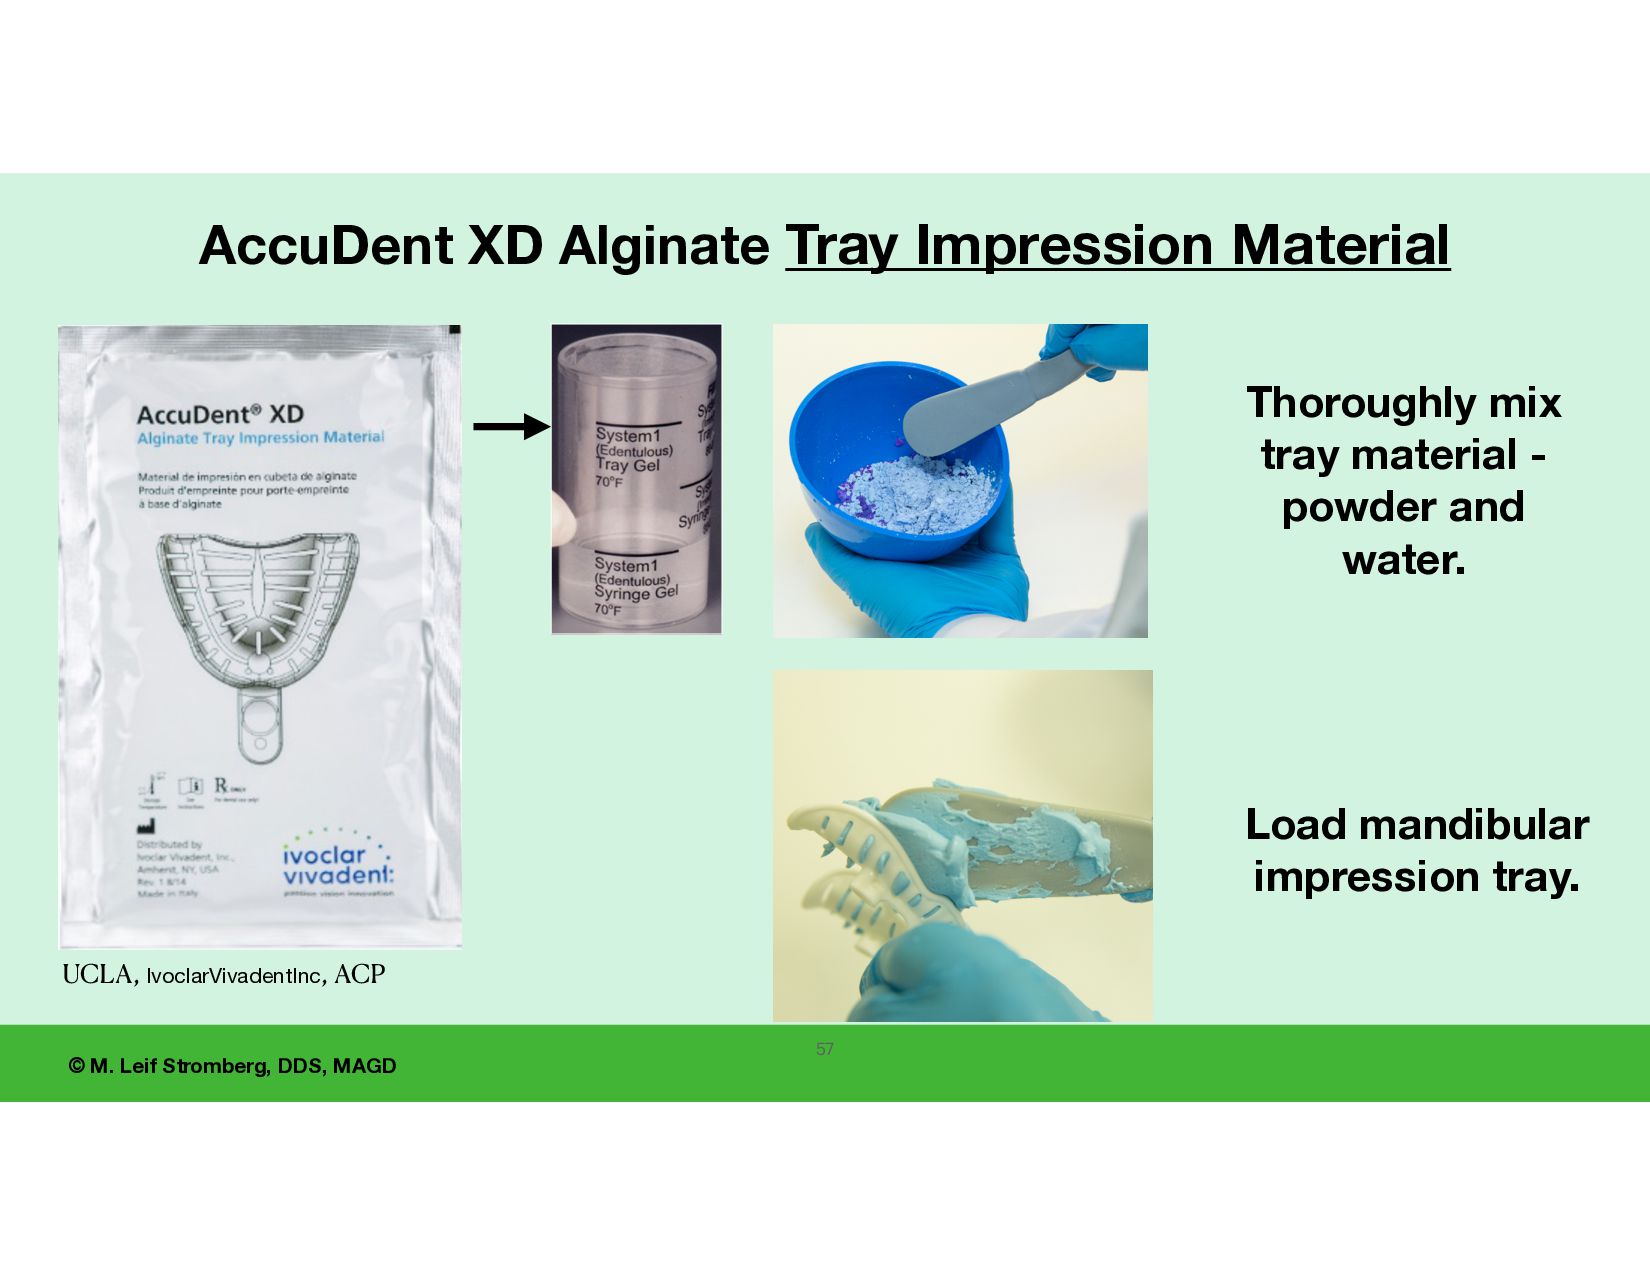
is heavy body and the syringe material is light body. UCLA, IvoclarVivadentInc, ACP XD is Extra De fi nition The Accu-Dent XD Impression System Uses two alginate impression materials of different viscosities (tray and syringe) and a syringe delivery system. Viscosity- refers to the state of being thick light body-low viscosity heavy body-high viscosity
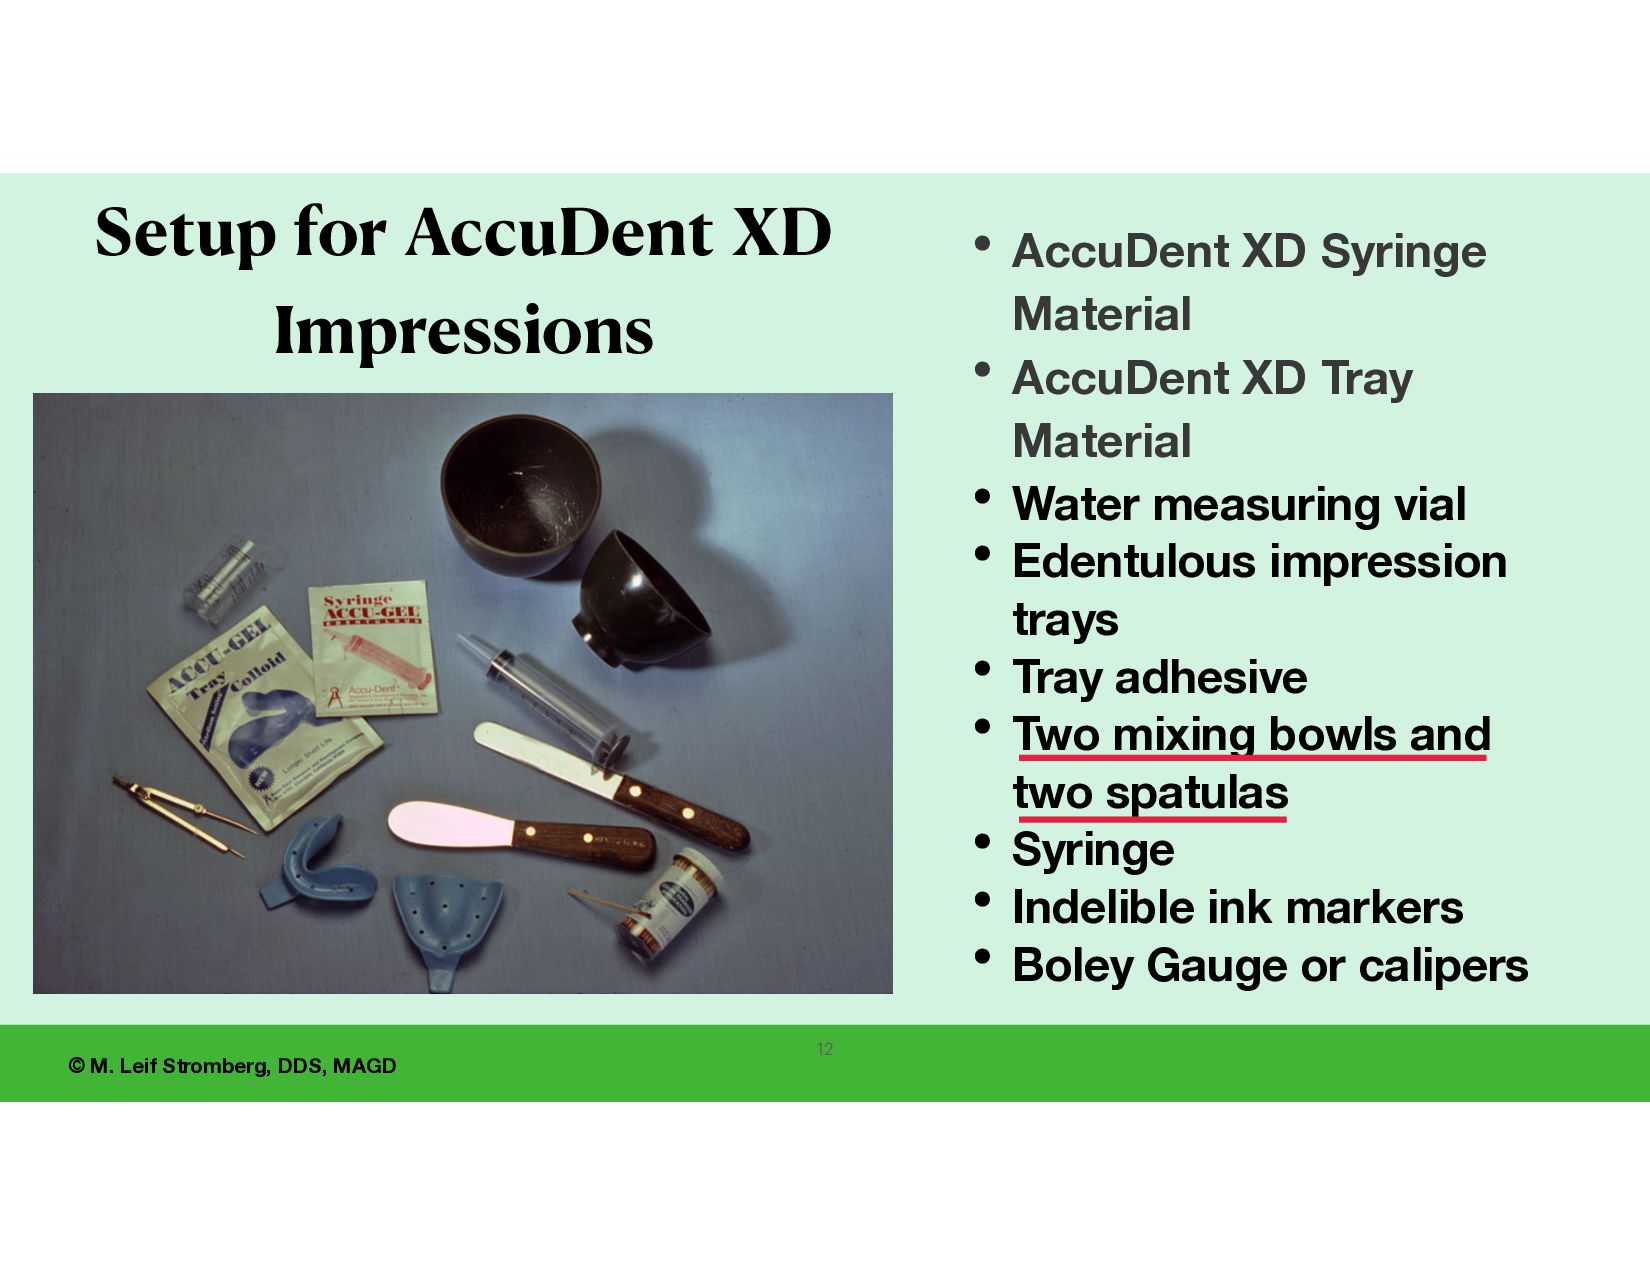
and Tray Materials Advantages of AccuDent XD Impression System 11 • Pre-measured sealed packaging of the alginate powder • Water measuring vial • Syringe delivery into the buccal, labial, and lingual vestibules • Non-slumping of syringe material • Tray material does not run down the patient’s throat
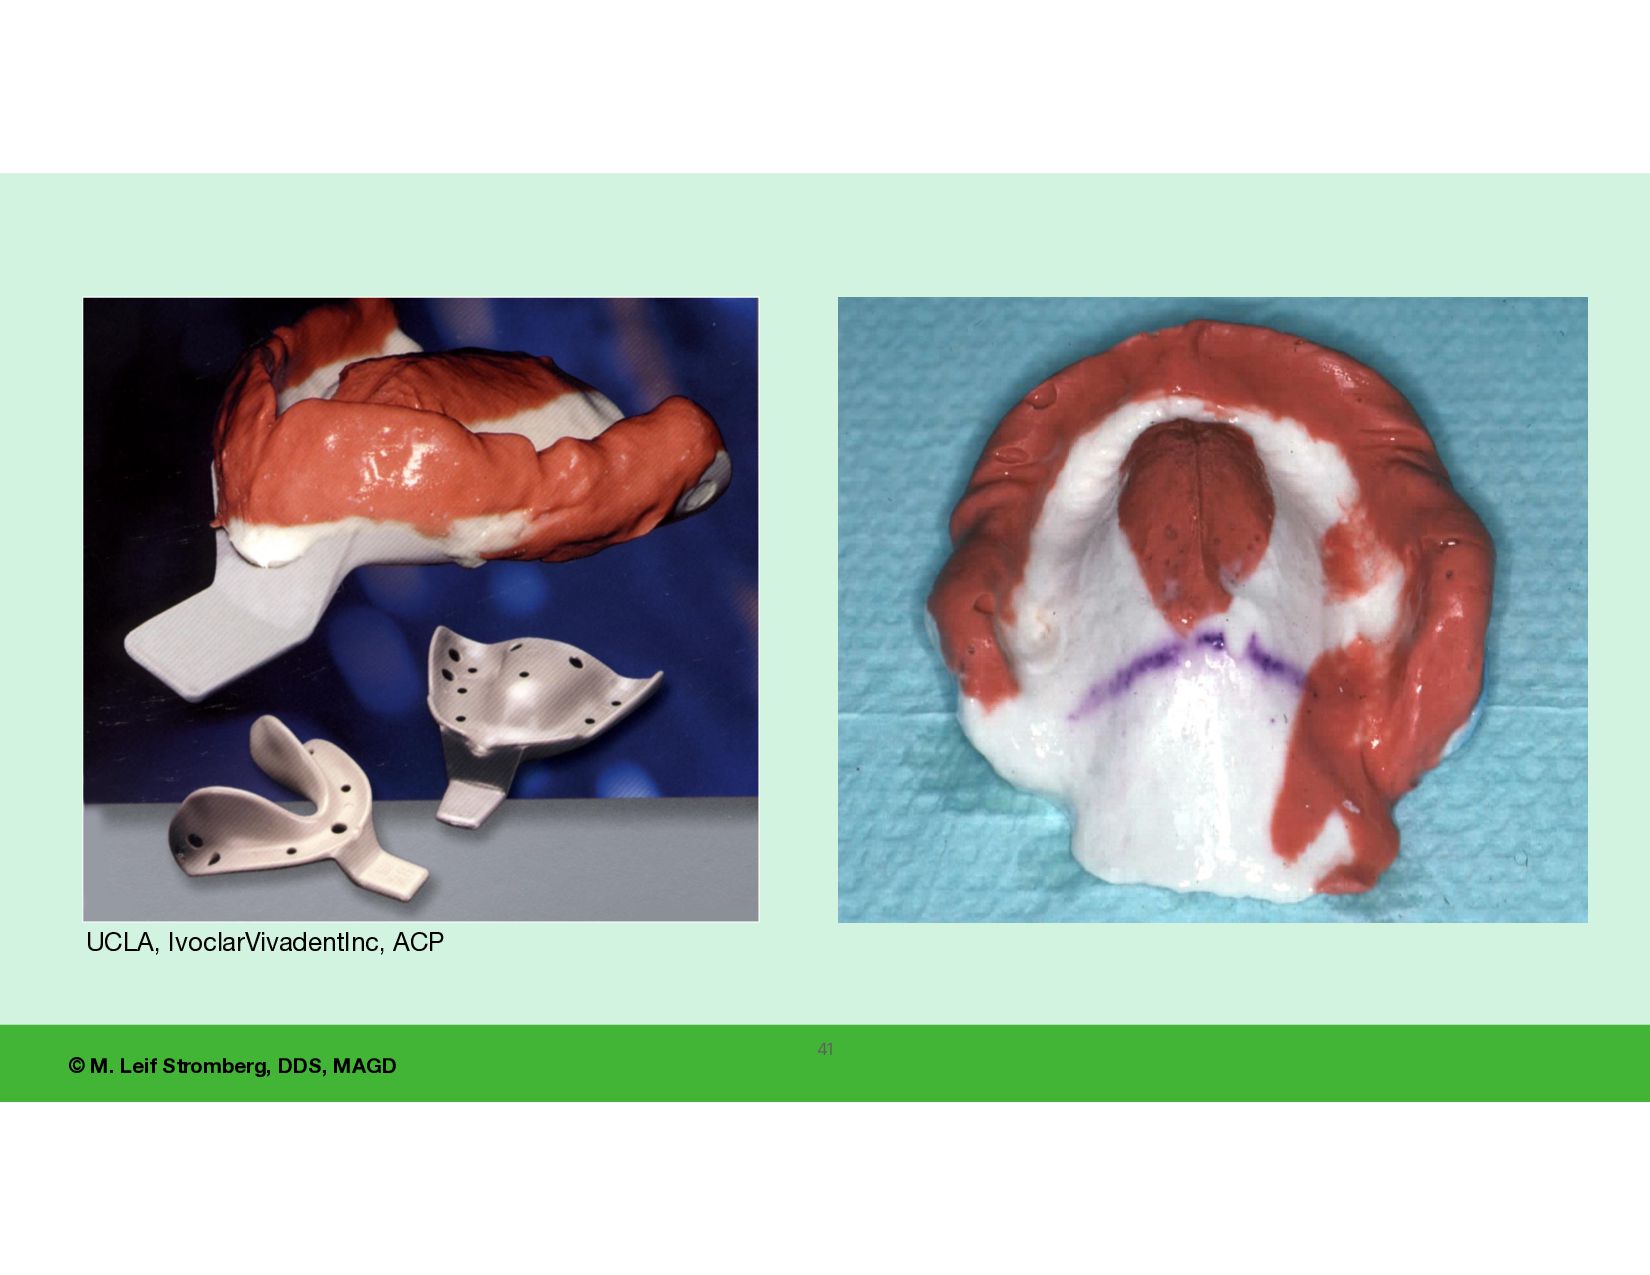
a tray that is slightly wider than the residual ridge on each side… and try it in the mouth to evaluate size and coverage. 15 UCLA, IvoclarVivadentInc, ACP
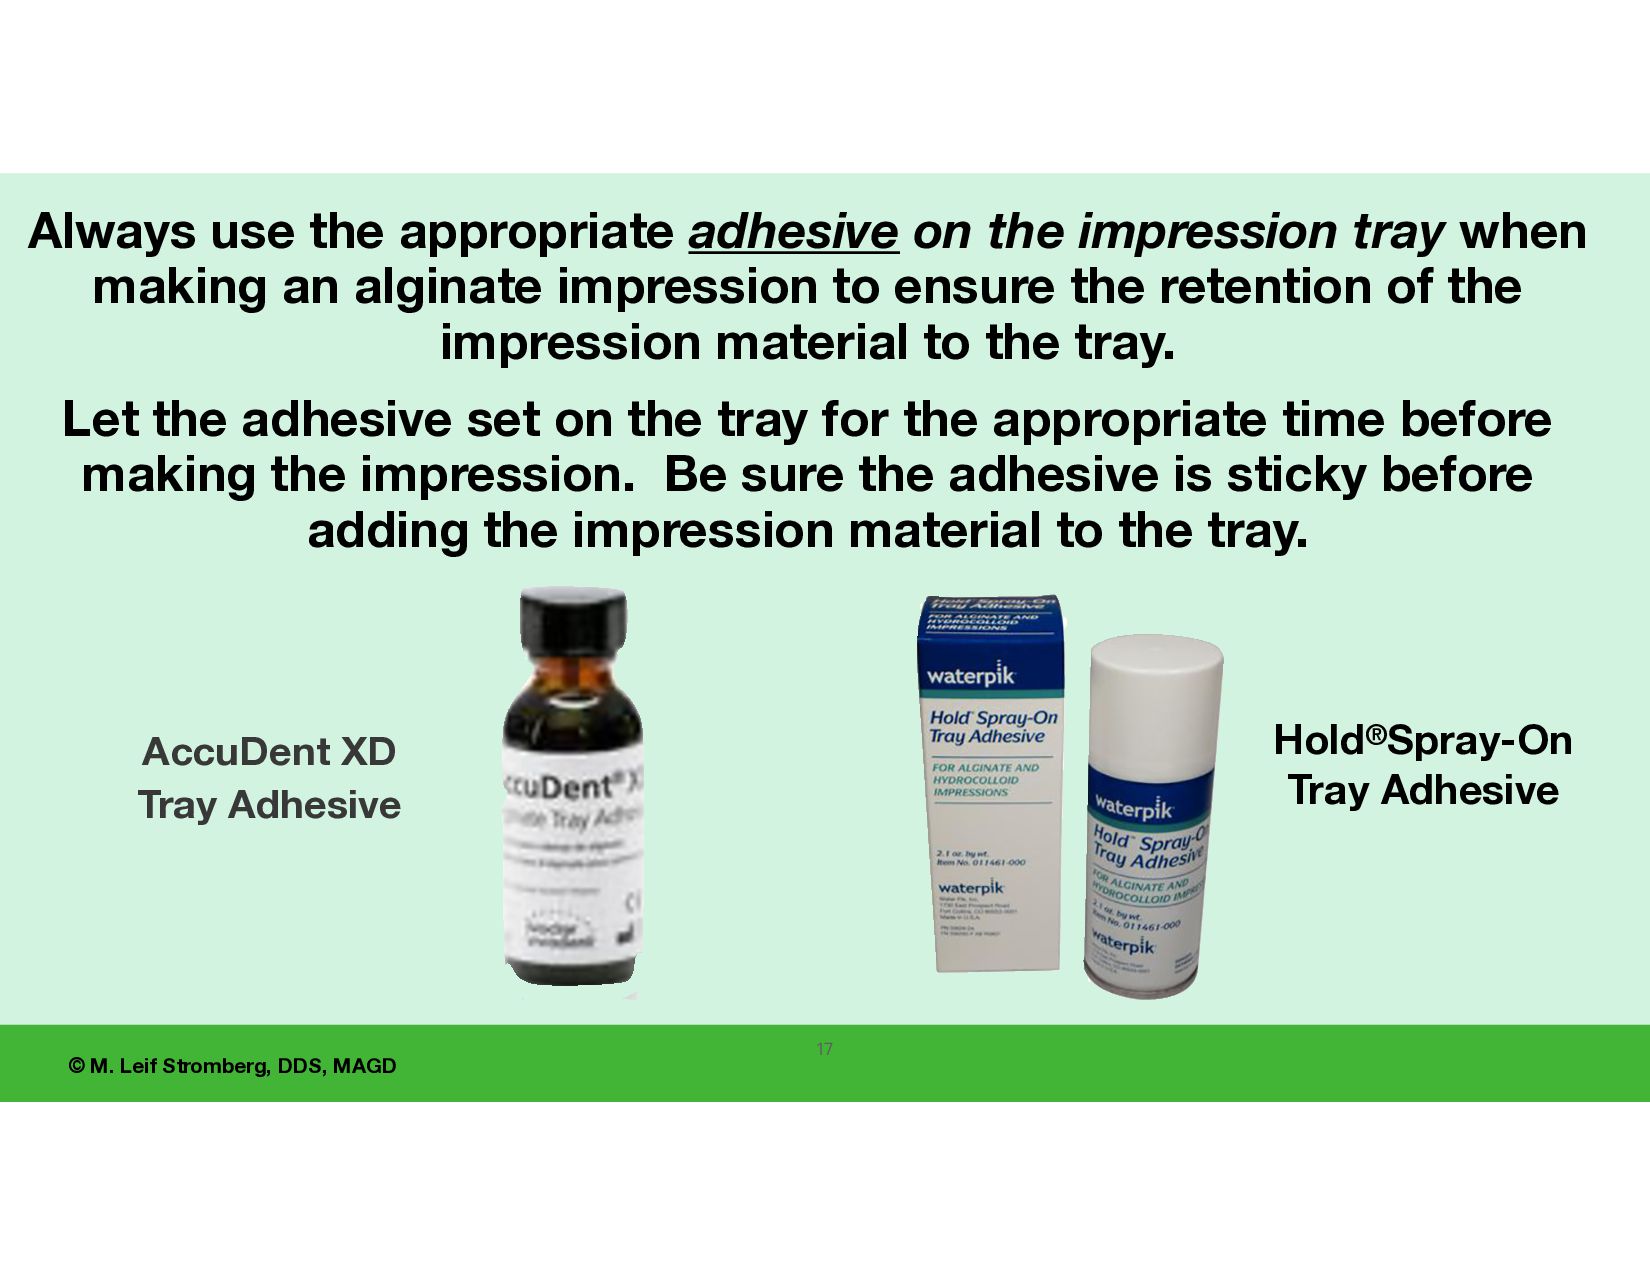
use the appropriate adhesive on the impression tray when making an alginate impression to ensure the retention of the impression material to the tray. Let the adhesive set on the tray for the appropriate time before making the impression. Be sure the adhesive is sticky before adding the impression material to the tray. 17 AccuDent XD Tray Adhesive
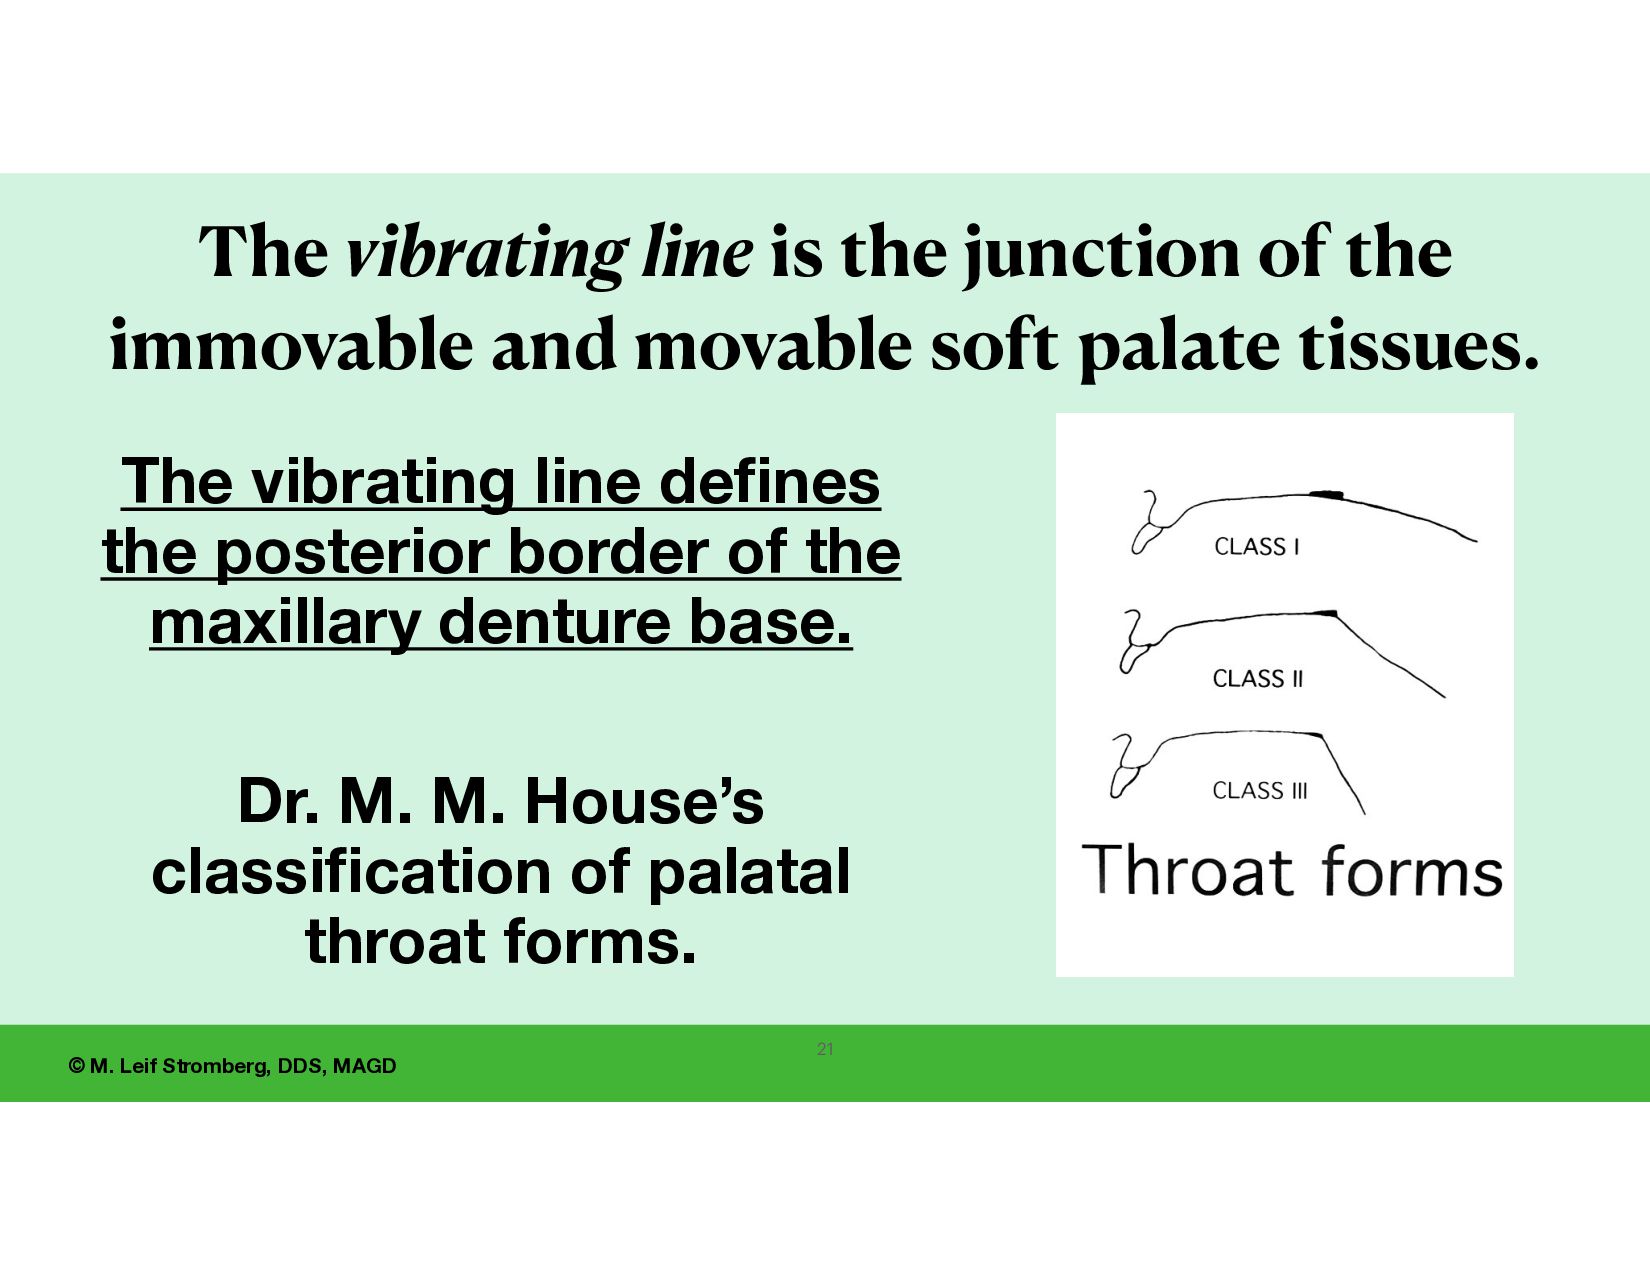
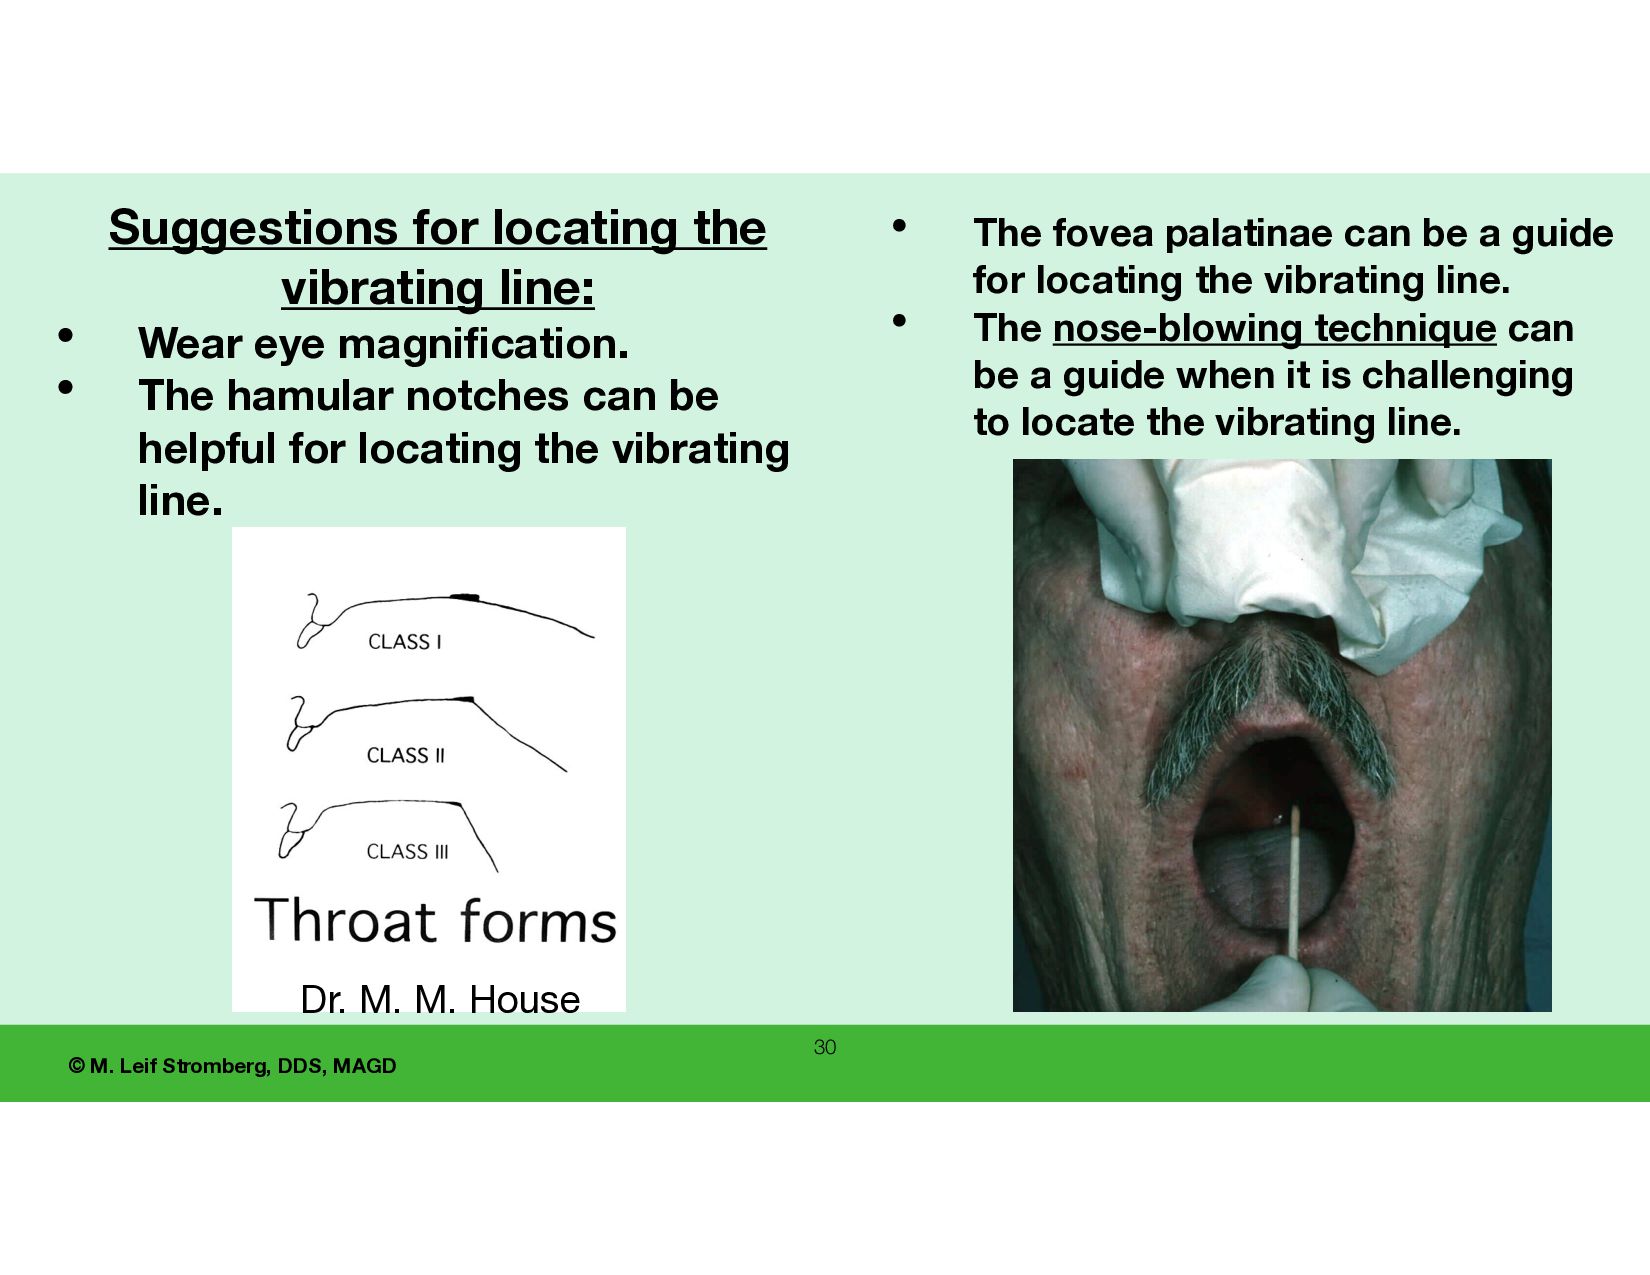
fi nes the posterior border of the maxillary denture base. Dr. M. M. House’s classi fi cation of palatal throat forms. The vibrating line is the junction of the immovable and movable soft palate tissues. 21
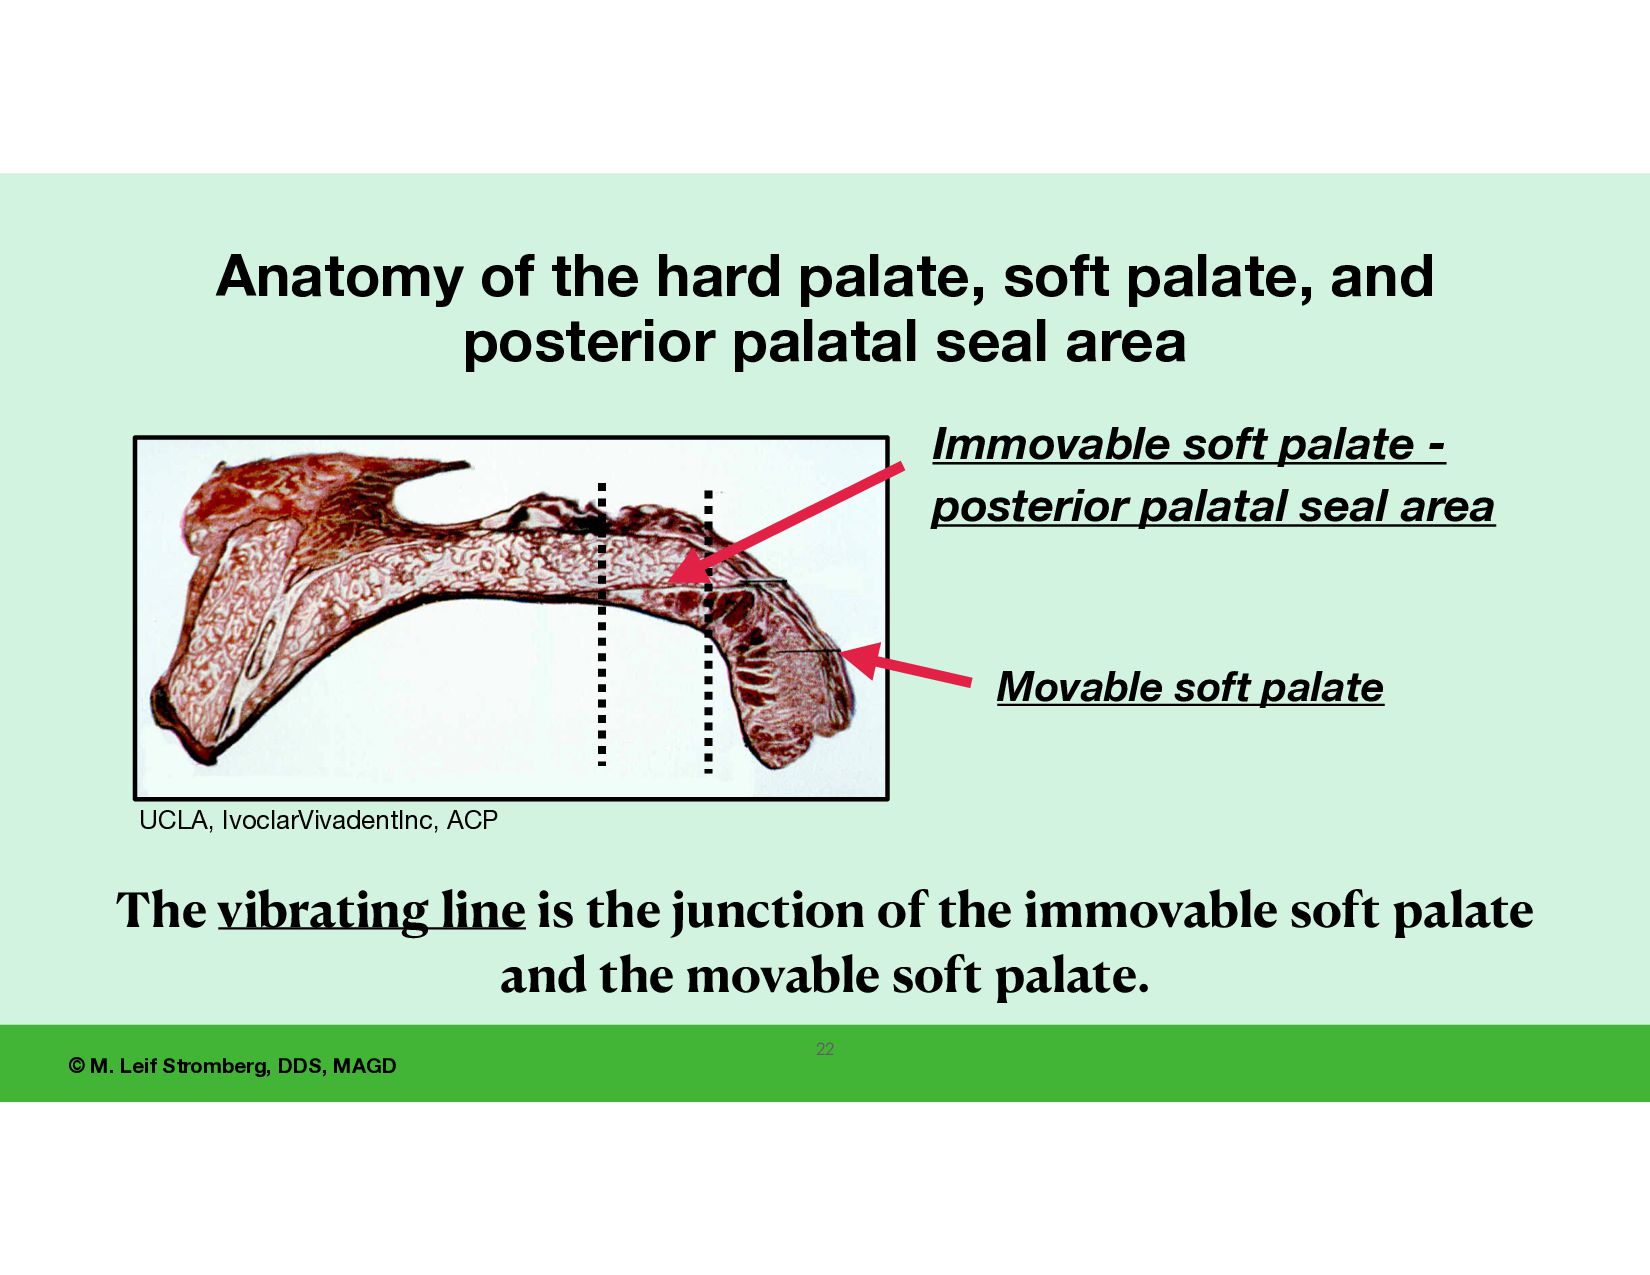
Anatomy of the hard palate, soft palate, and posterior palatal seal area The vibrating line is the junction of the immovable soft palate and the movable soft palate. Movable soft palate Immovable soft palate - posterior palatal seal area
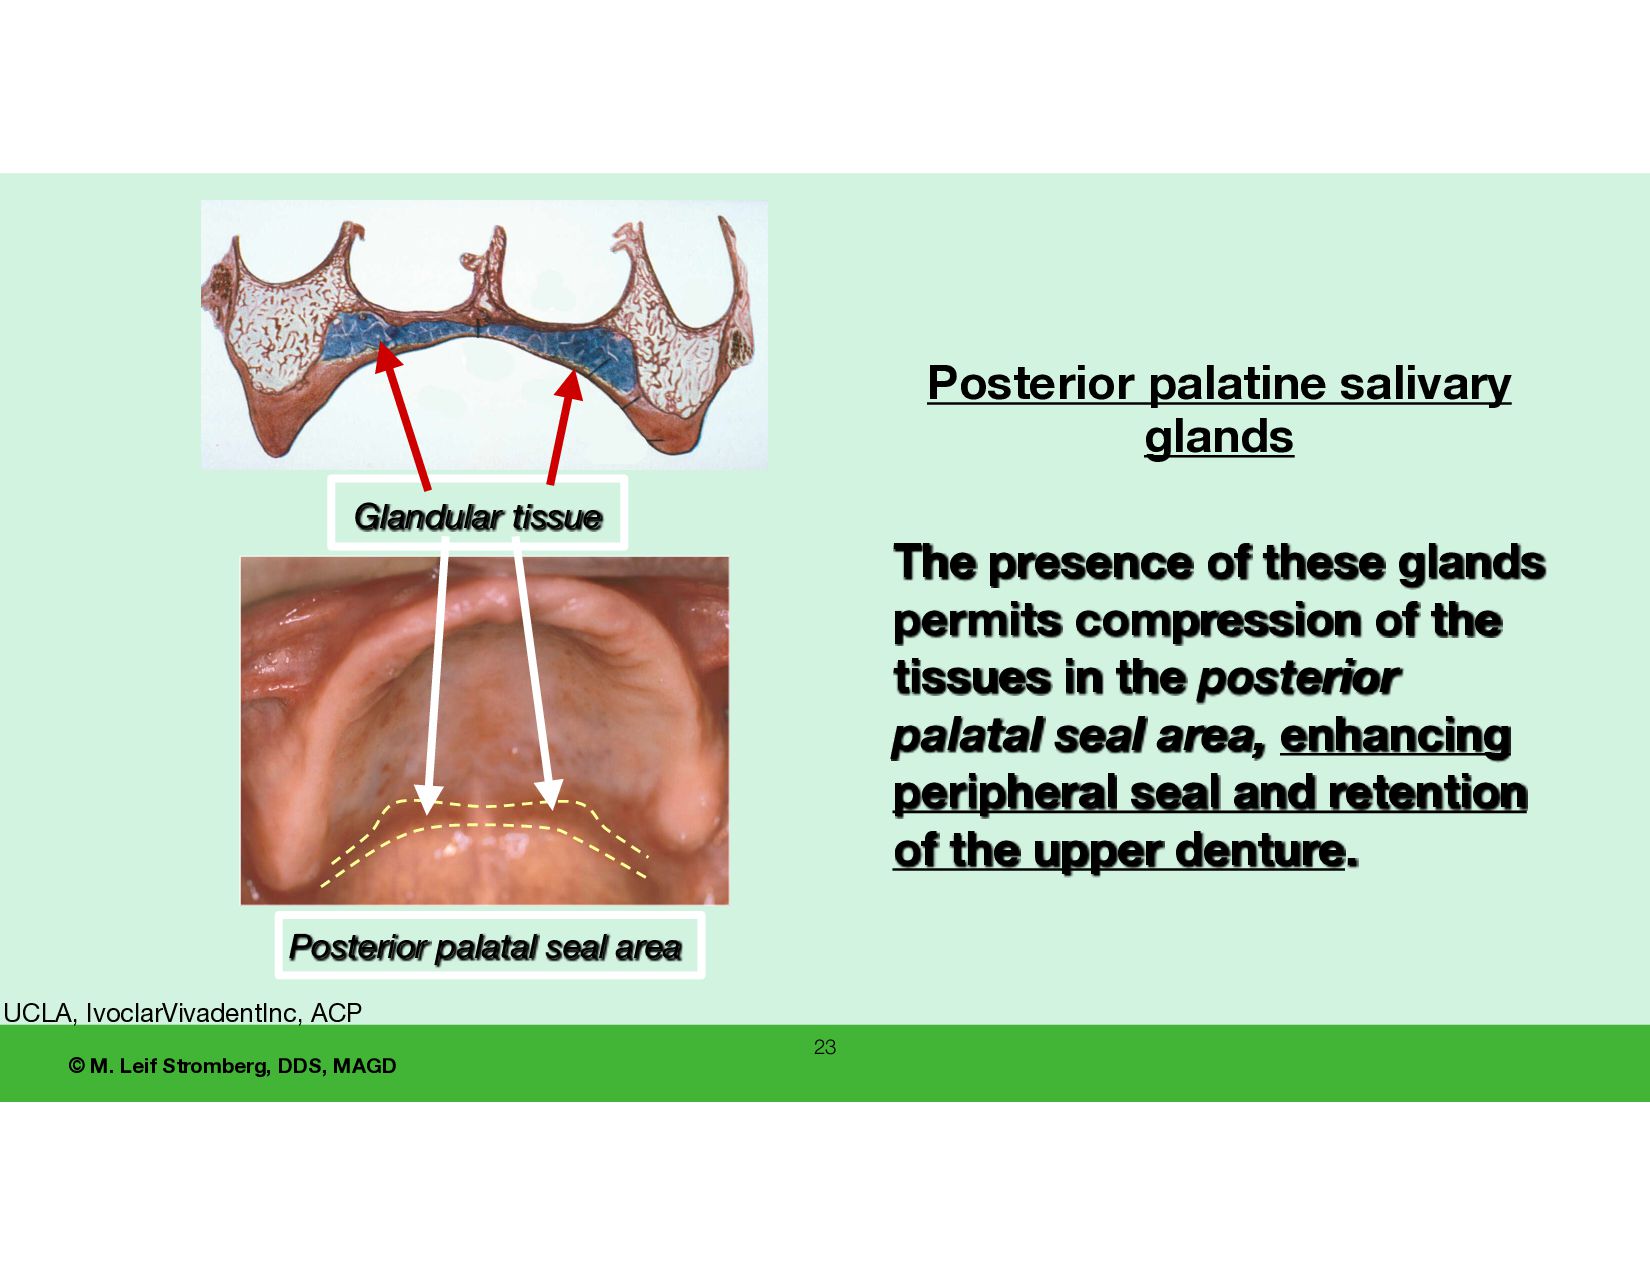
glands The presence of these glands permits compression of the tissues in the posterior palatal seal area, enhancing peripheral seal and retention of the upper denture. Glandular tissue Posterior palatal seal area UCLA, IvoclarVivadentInc, ACP
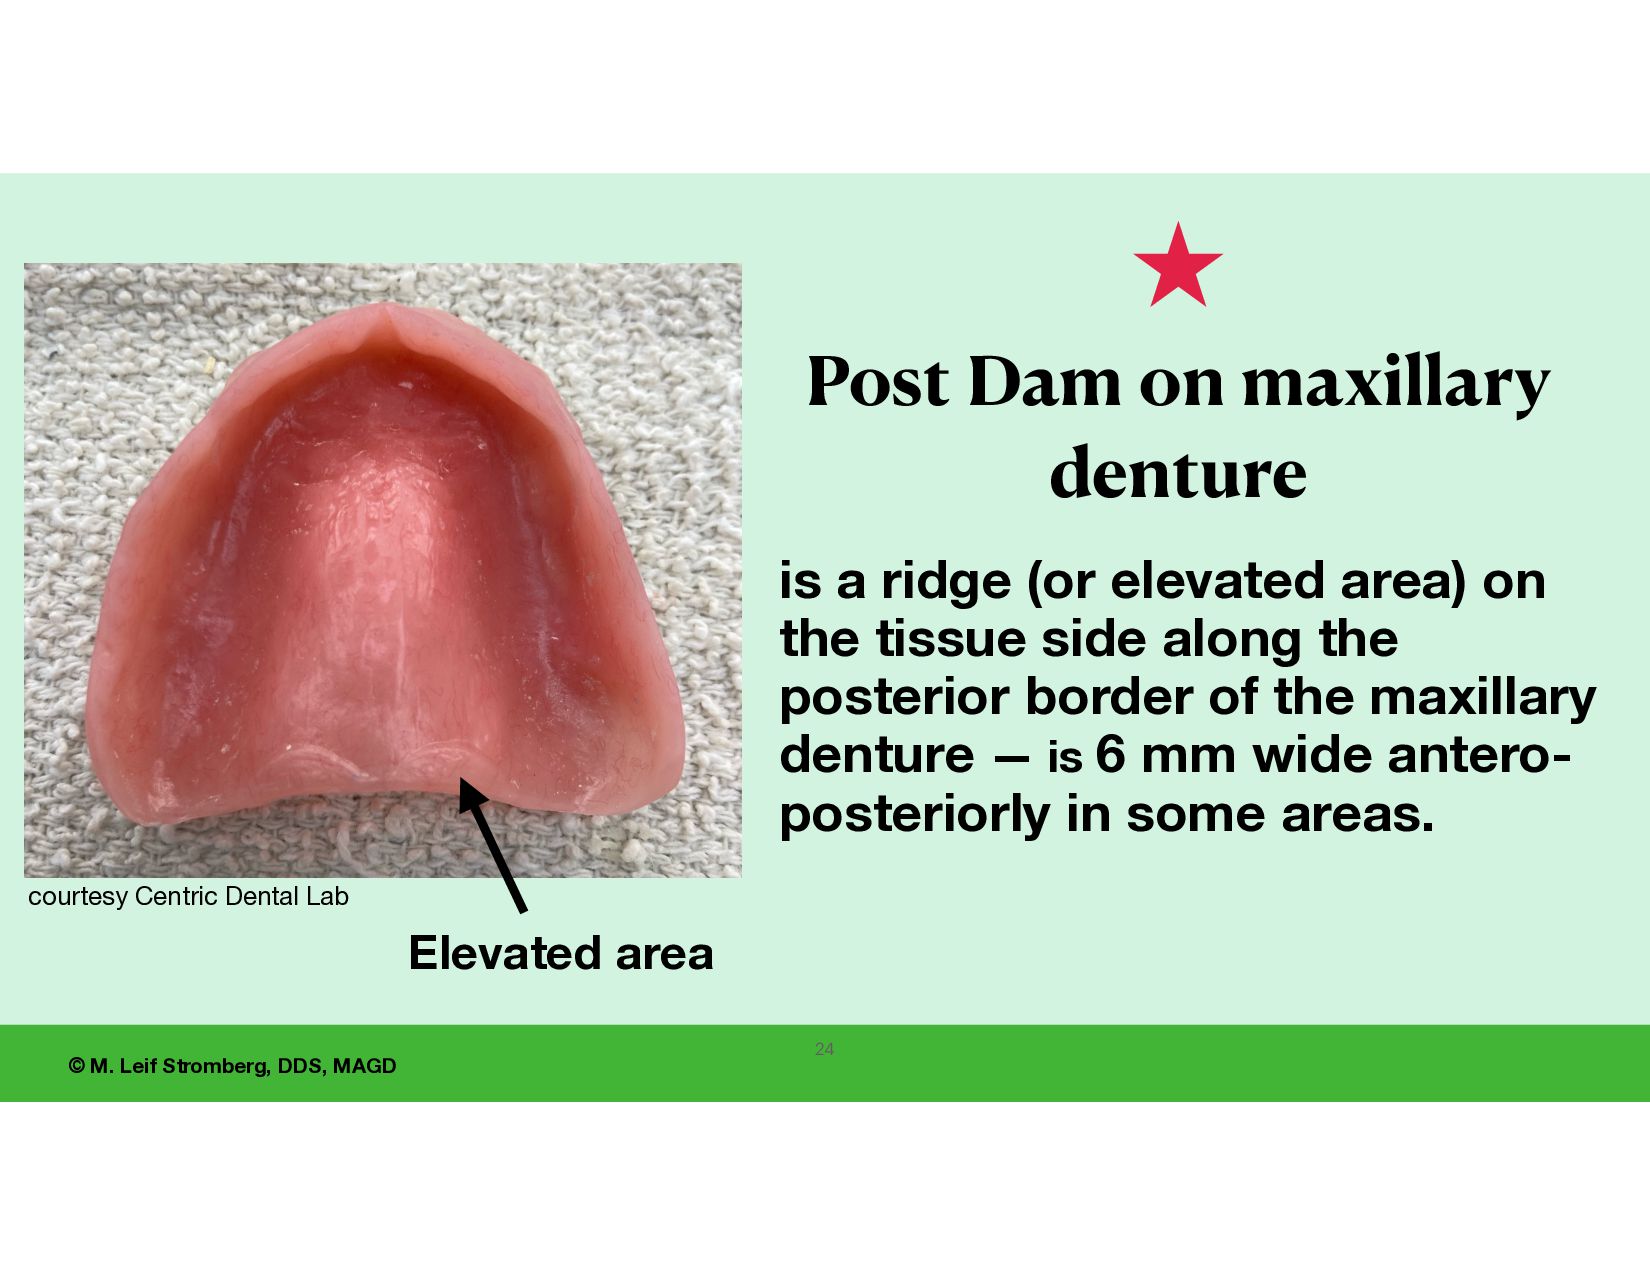
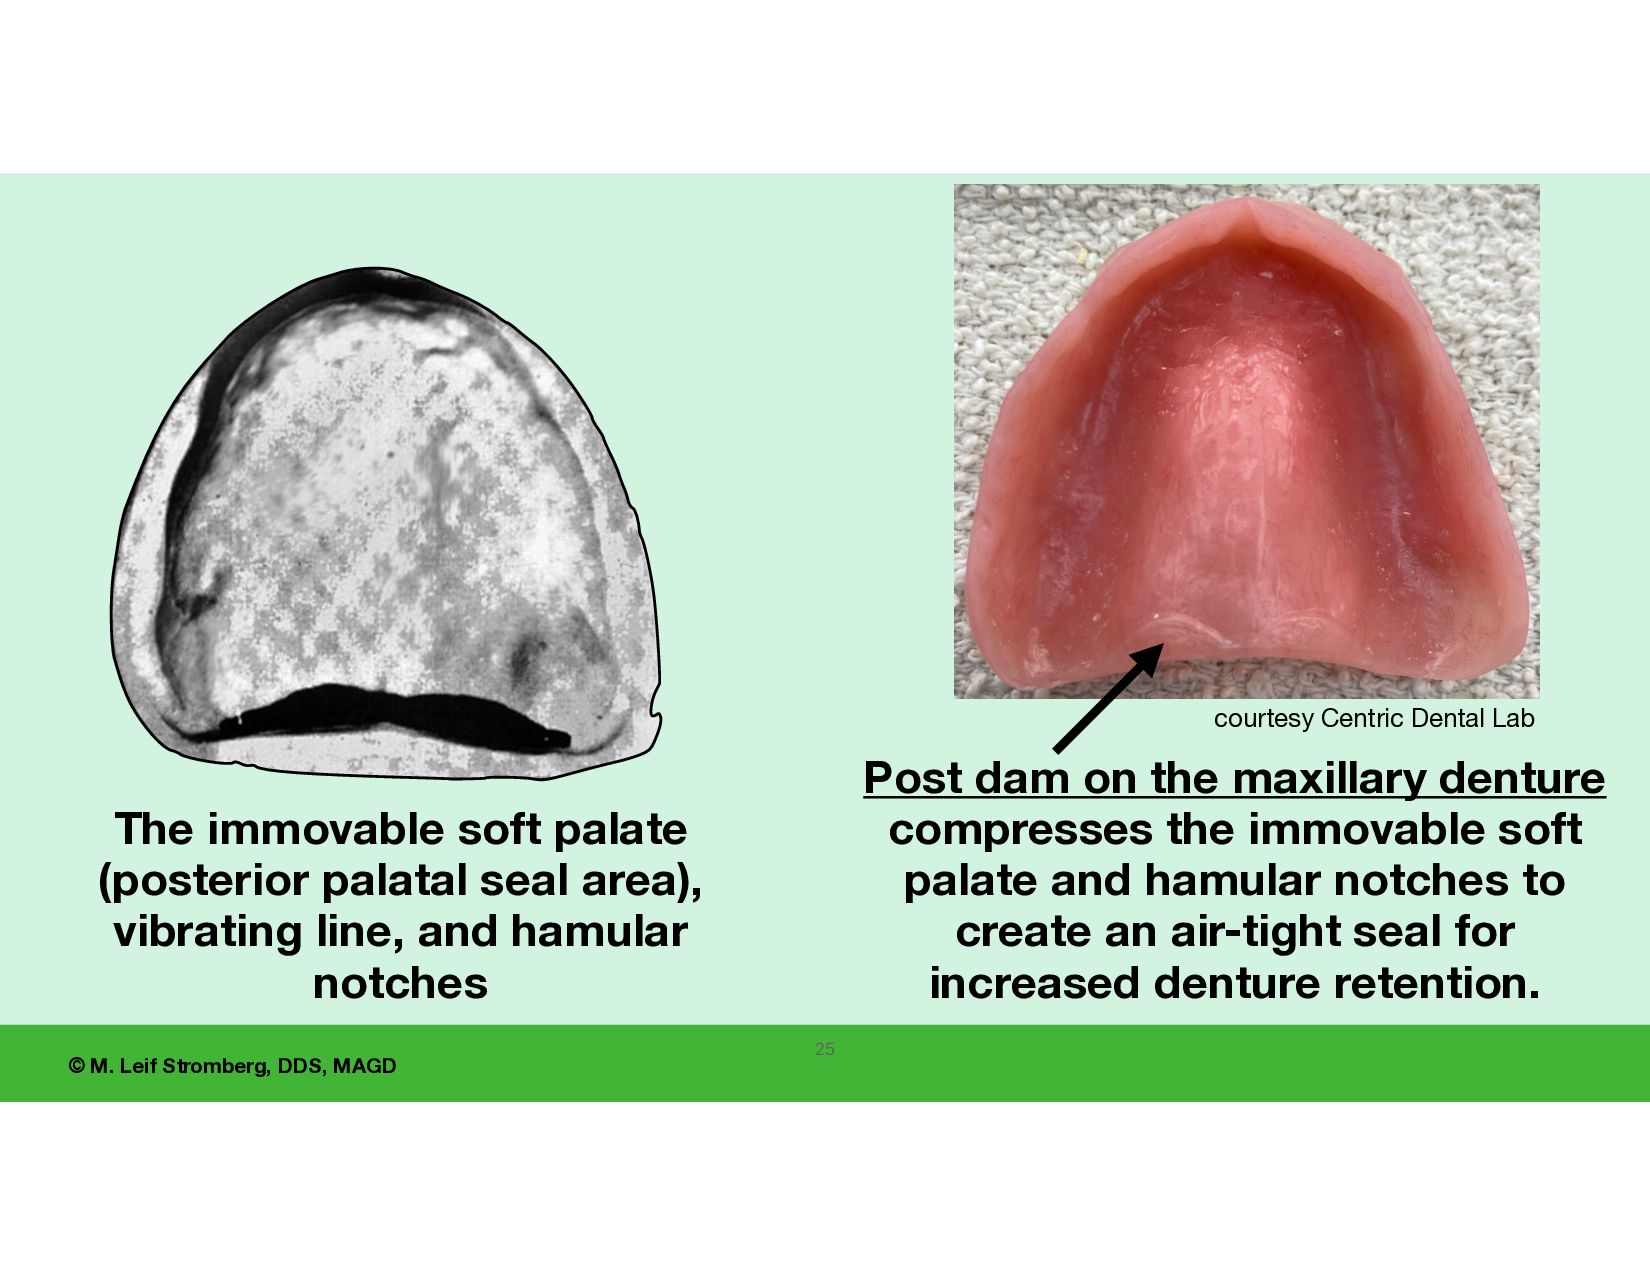
Post Dam on maxillary denture is a ridge (or elevated area) on the tissue side along the posterior border of the maxillary denture — is 6 mm wide antero- posteriorly in some areas. Elevated area 24
maxillary denture compresses the immovable soft palate and hamular notches to create an air-tight seal for increased denture retention. courtesy Centric Dental Lab 25 The immovable soft palate (posterior palatal seal area), vibrating line, and hamular notches
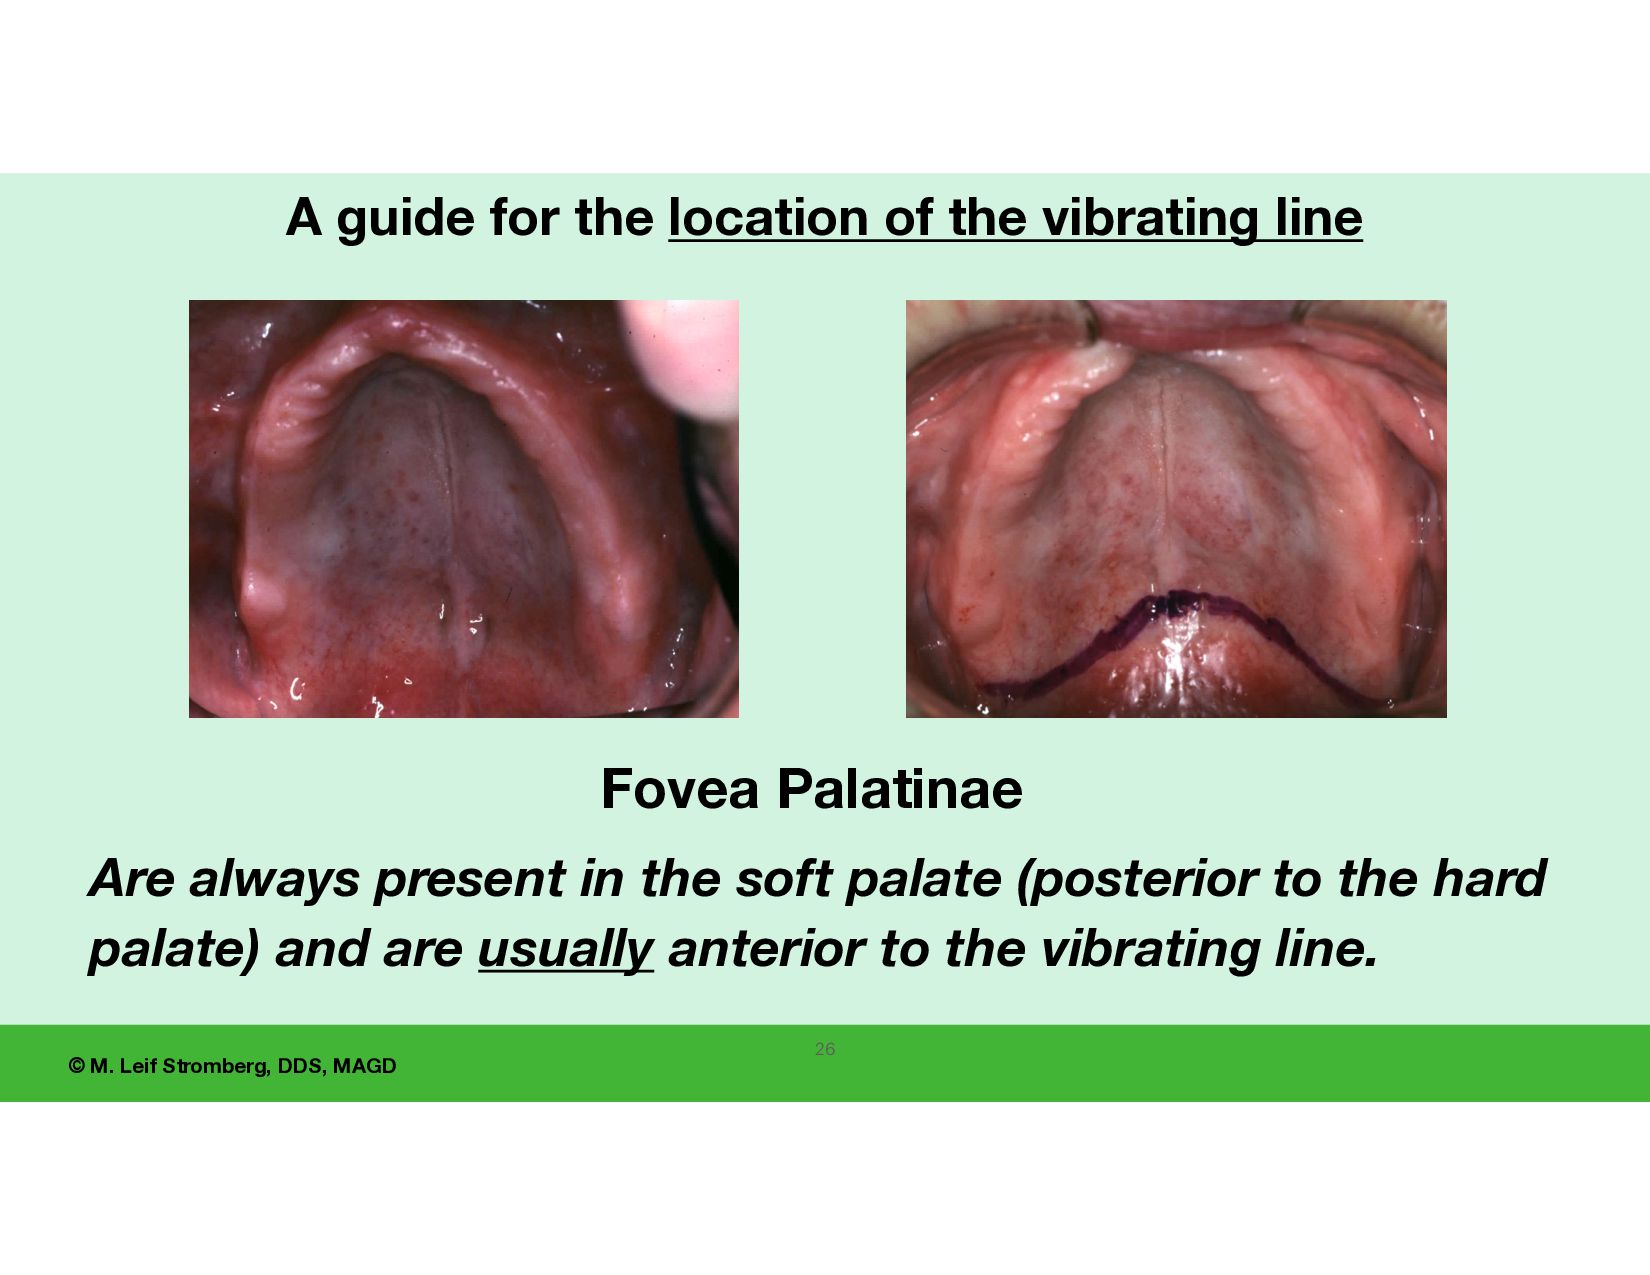
the soft palate (posterior to the hard palate) and are usually anterior to the vibrating line. Fovea Palatinae 26 A guide for the location of the vibrating line
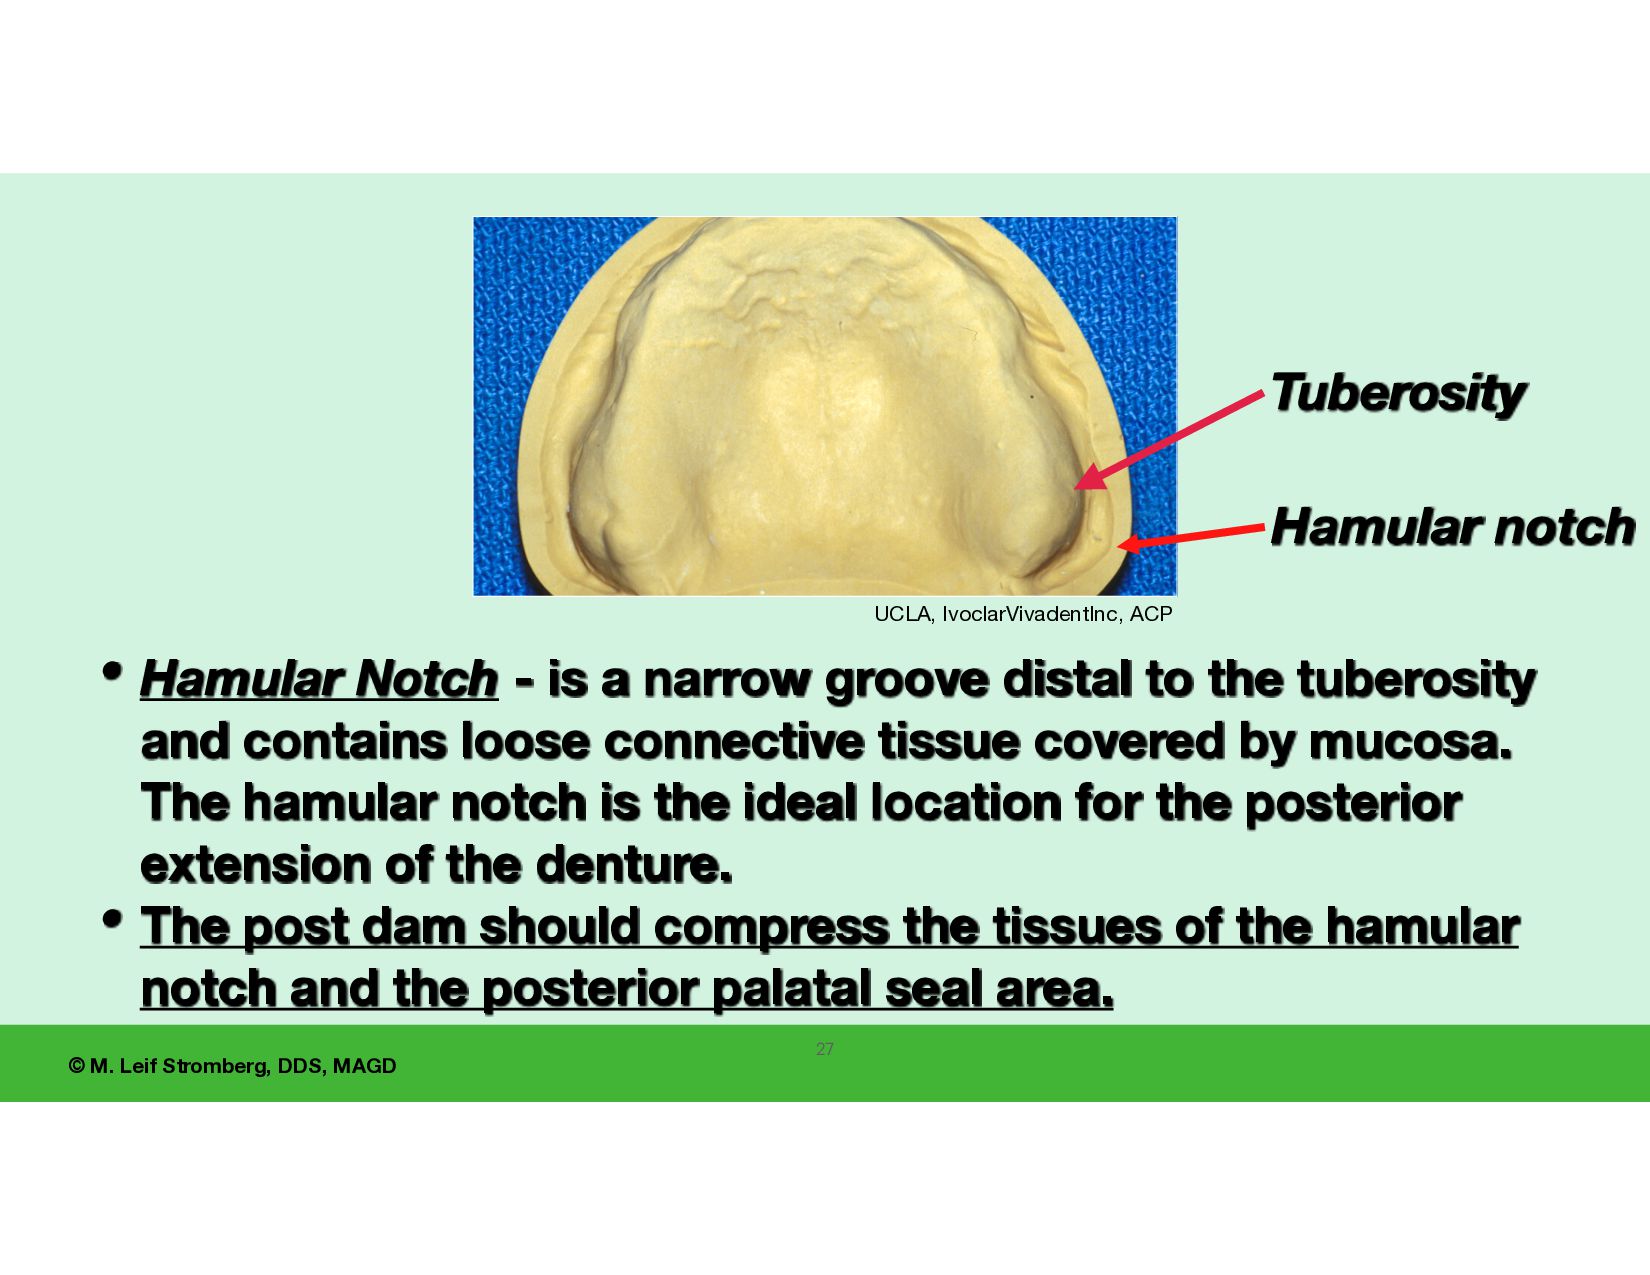
Notch - is a narrow groove distal to the tuberosity and contains loose connective tissue covered by mucosa. The hamular notch is the ideal location for the posterior extension of the denture. • The post dam should compress the tissues of the hamular notch and the posterior palatal seal area. UCLA, IvoclarVivadentInc, ACP Tuberosity 27
function Gravity Want the post dam of the denture to compress the posterior palatal seal area and hamular notches for retention. UCLA, IvoclarVivadentInc, ACP For Suction and Retention • Want extension of the denture base into vestibules to cheek and labial muscle function. 28
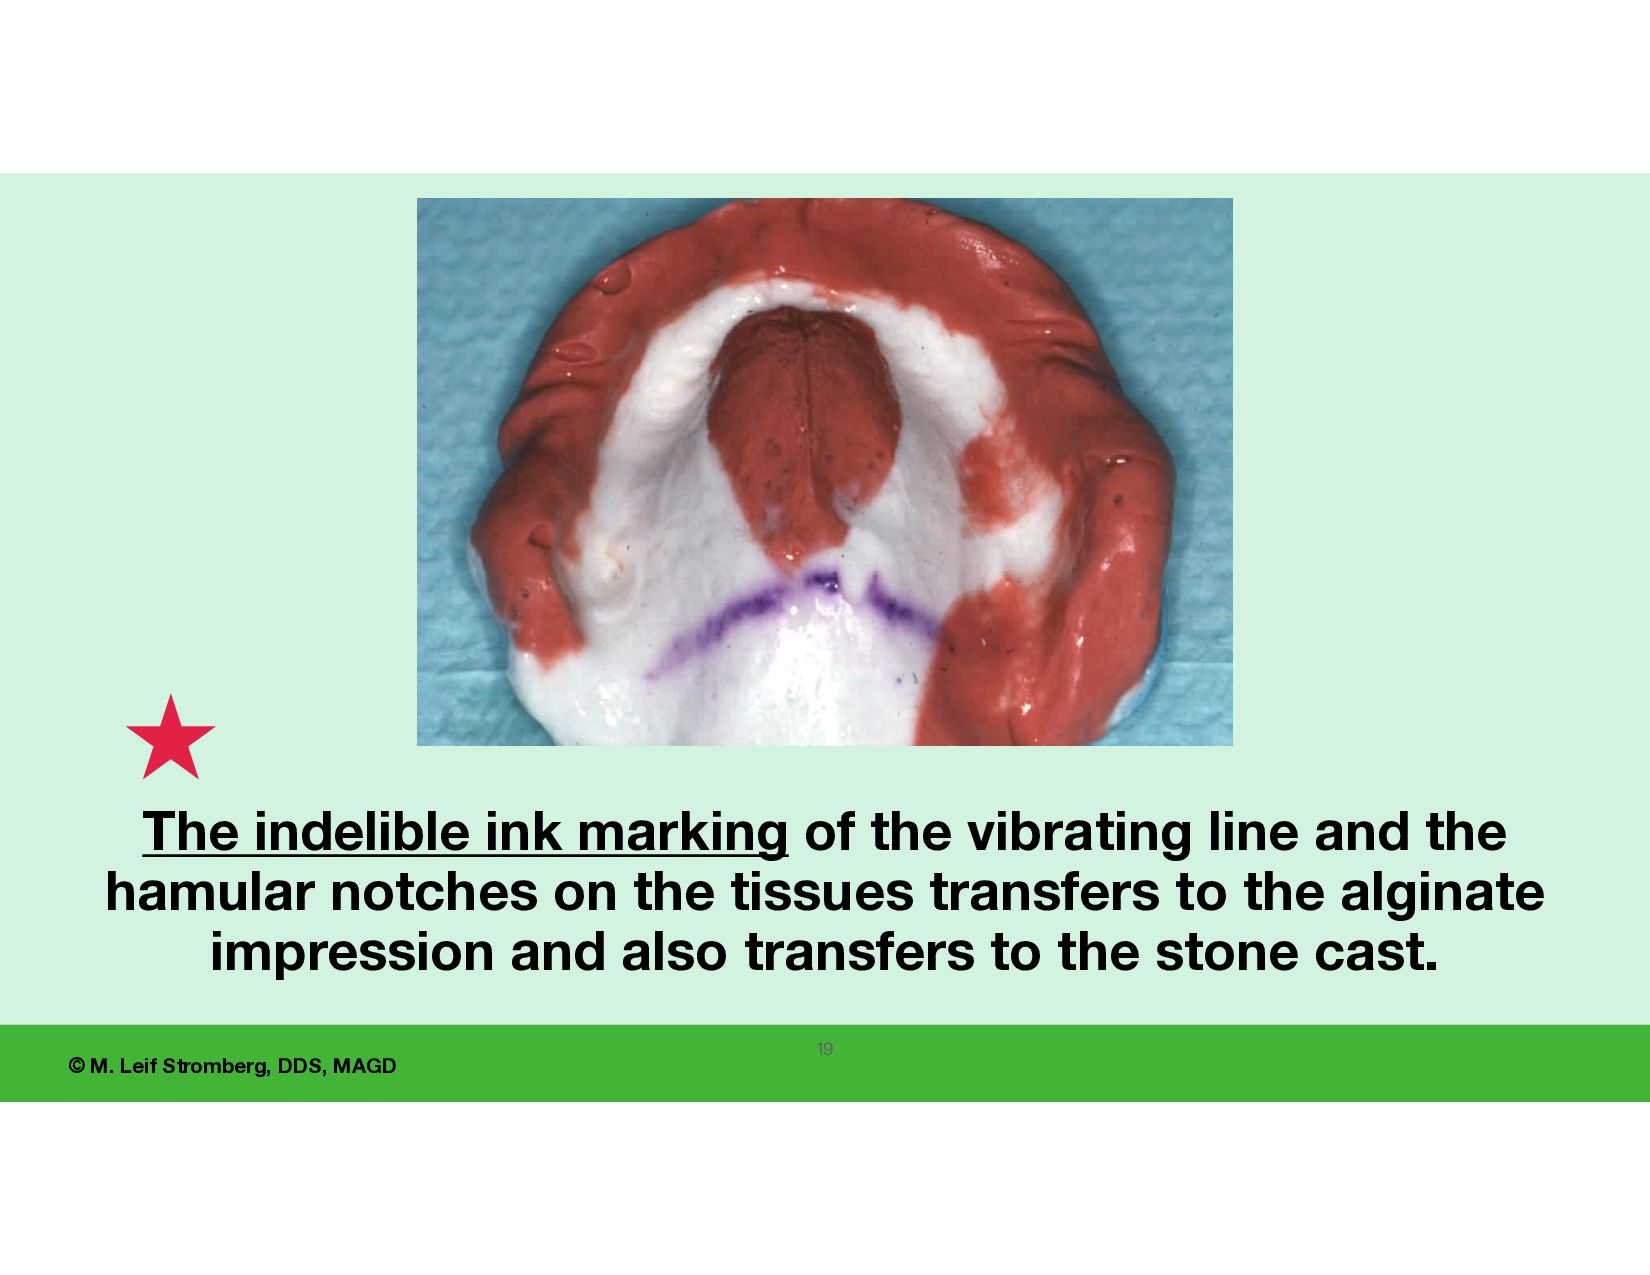
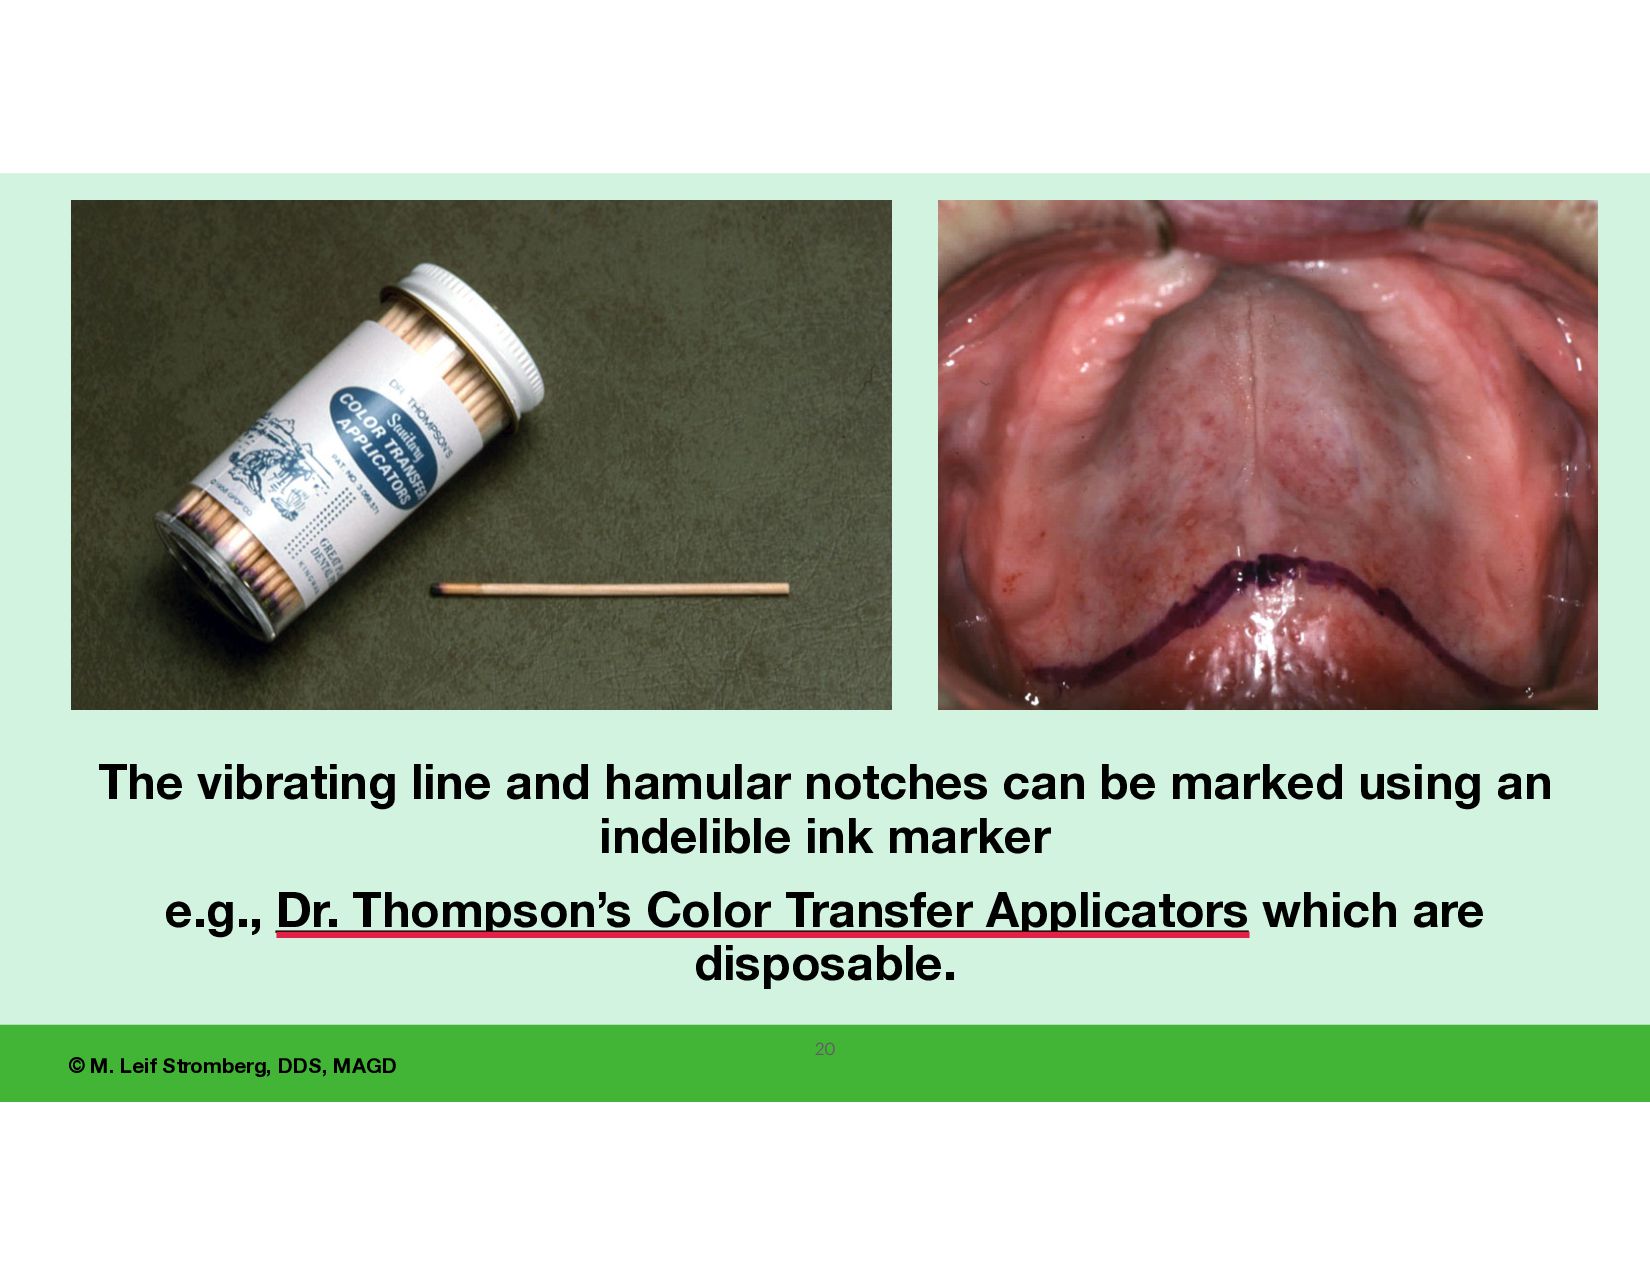
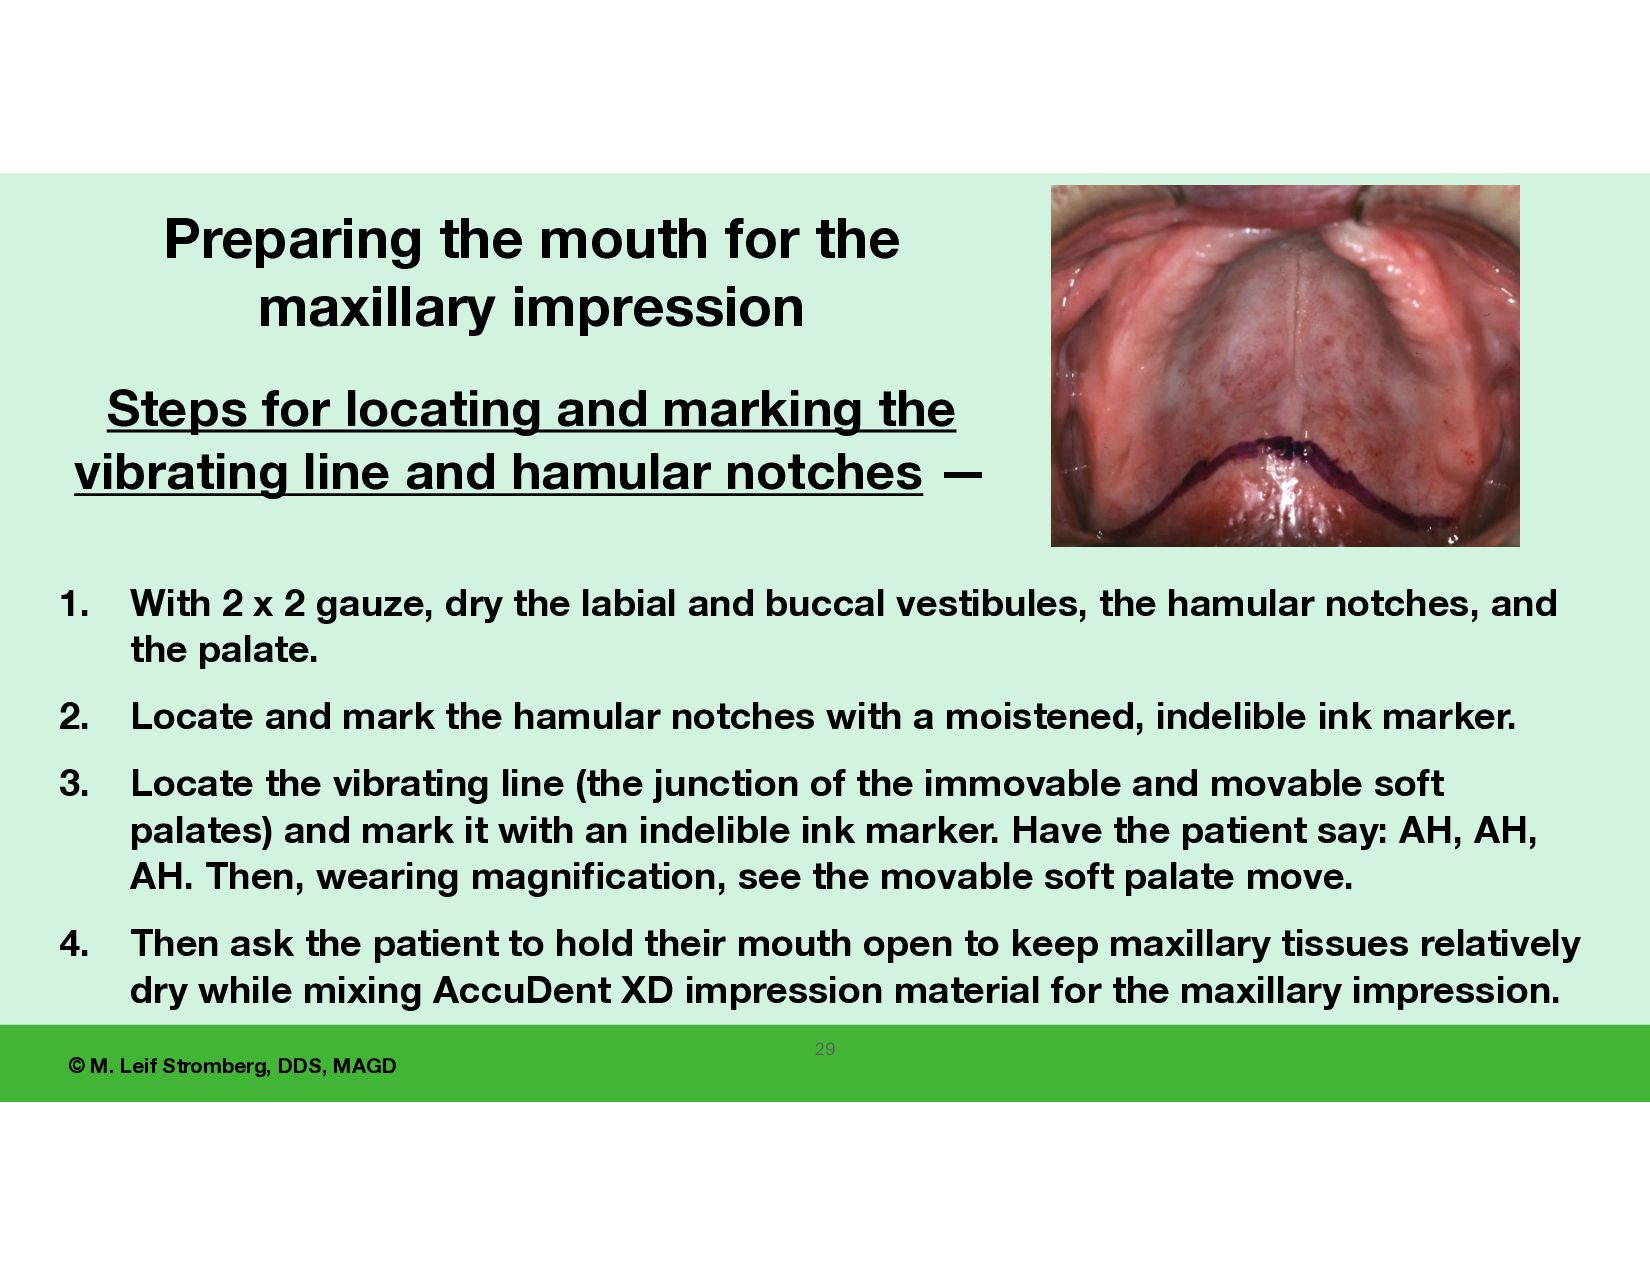
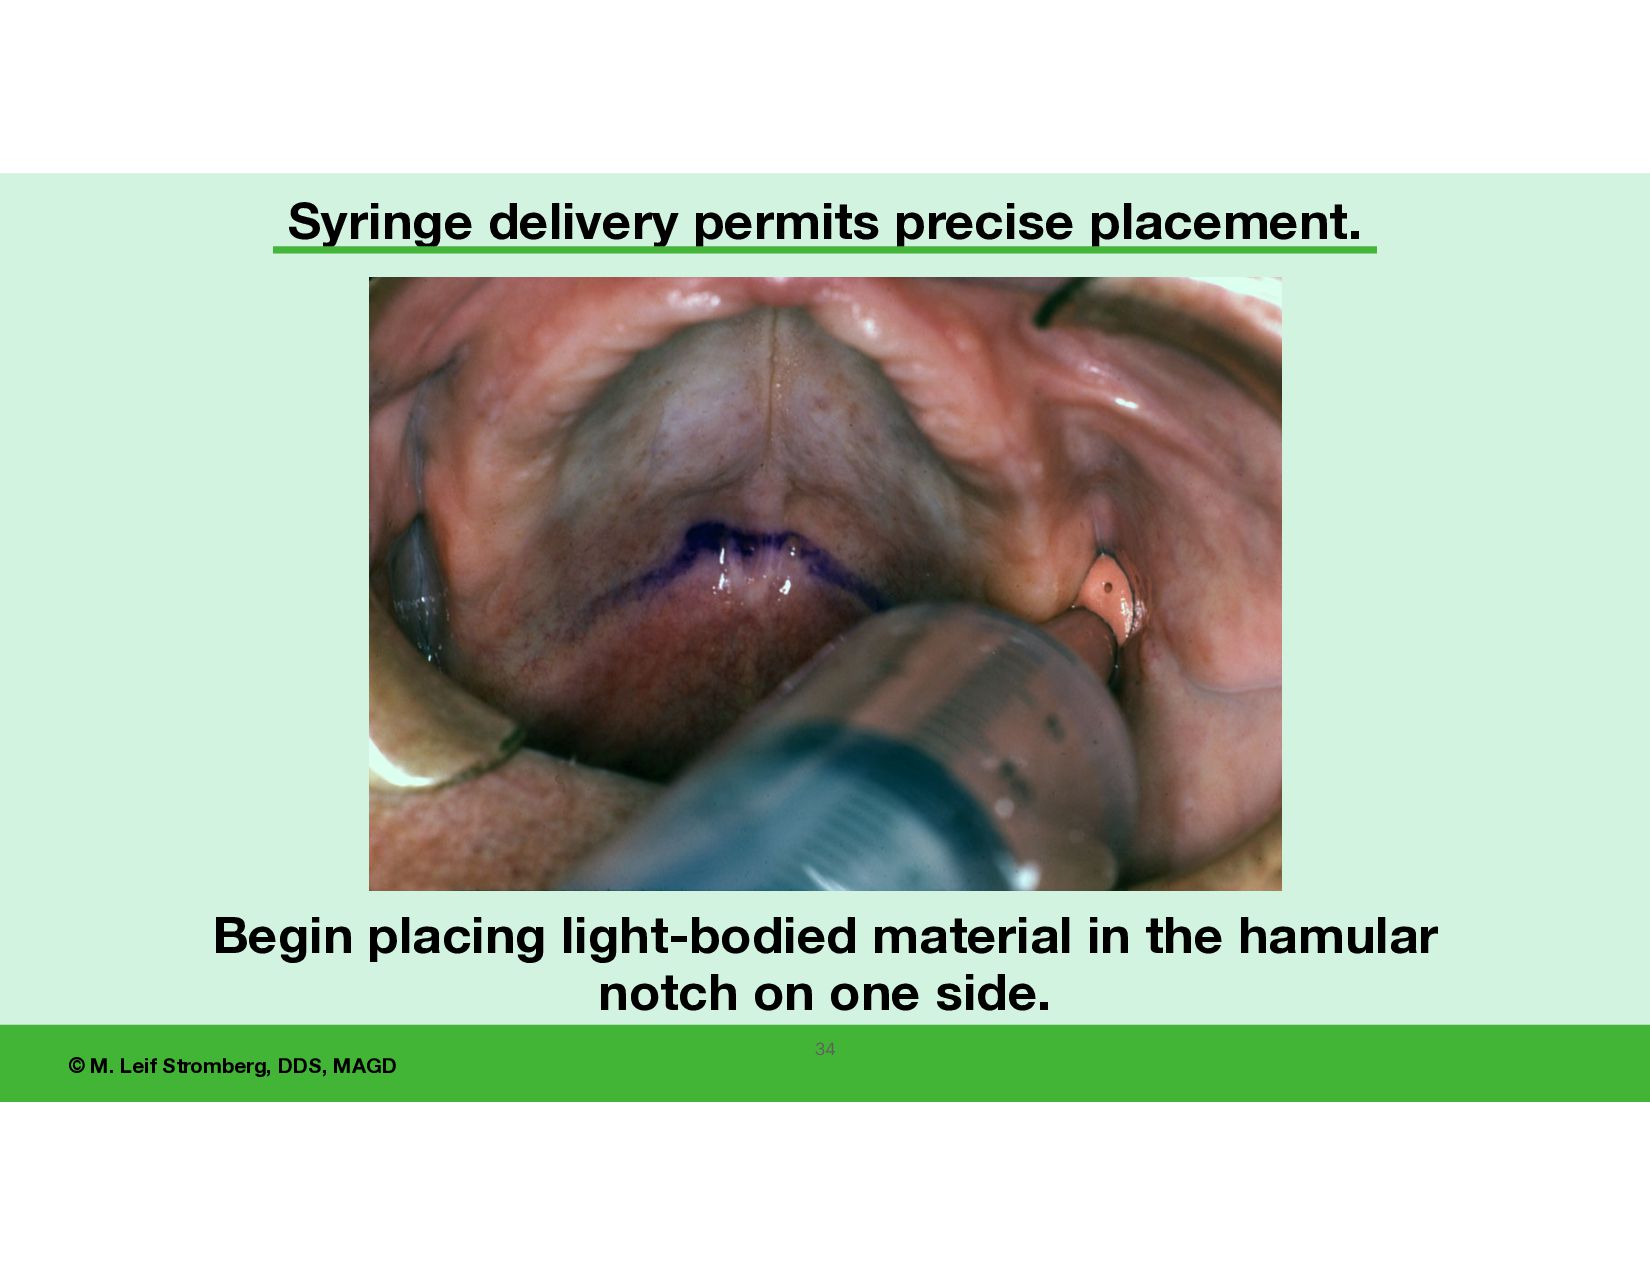
2 gauze, dry the labial and buccal vestibules, the hamular notches, and the palate. 2. Locate and mark the hamular notches with a moistened, indelible ink marker. 3. Locate the vibrating line (the junction of the immovable and movable soft palates) and mark it with an indelible ink marker. Have the patient say: AH, AH, AH. Then, wearing magni fi cation, see the movable soft palate move. 4. Then ask the patient to hold their mouth open to keep maxillary tissues relatively dry while mixing AccuDent XD impression material for the maxillary impression. Preparing the mouth for the maxillary impression Steps for locating and marking the vibrating line and hamular notches — 29
palatinae can be a guide for locating the vibrating line. • The nose-blowing technique can be a guide when it is challenging to locate the vibrating line. Suggestions for locating the vibrating line: • Wear eye magnification. • The hamular notches can be helpful for locating the vibrating line. Dr. M. M. House
nal impression for an edentulous patient Treatment sequence 1. place adhesive on the tray, 2. mark the vibrating line and hamular notches, 3. make impression. 31
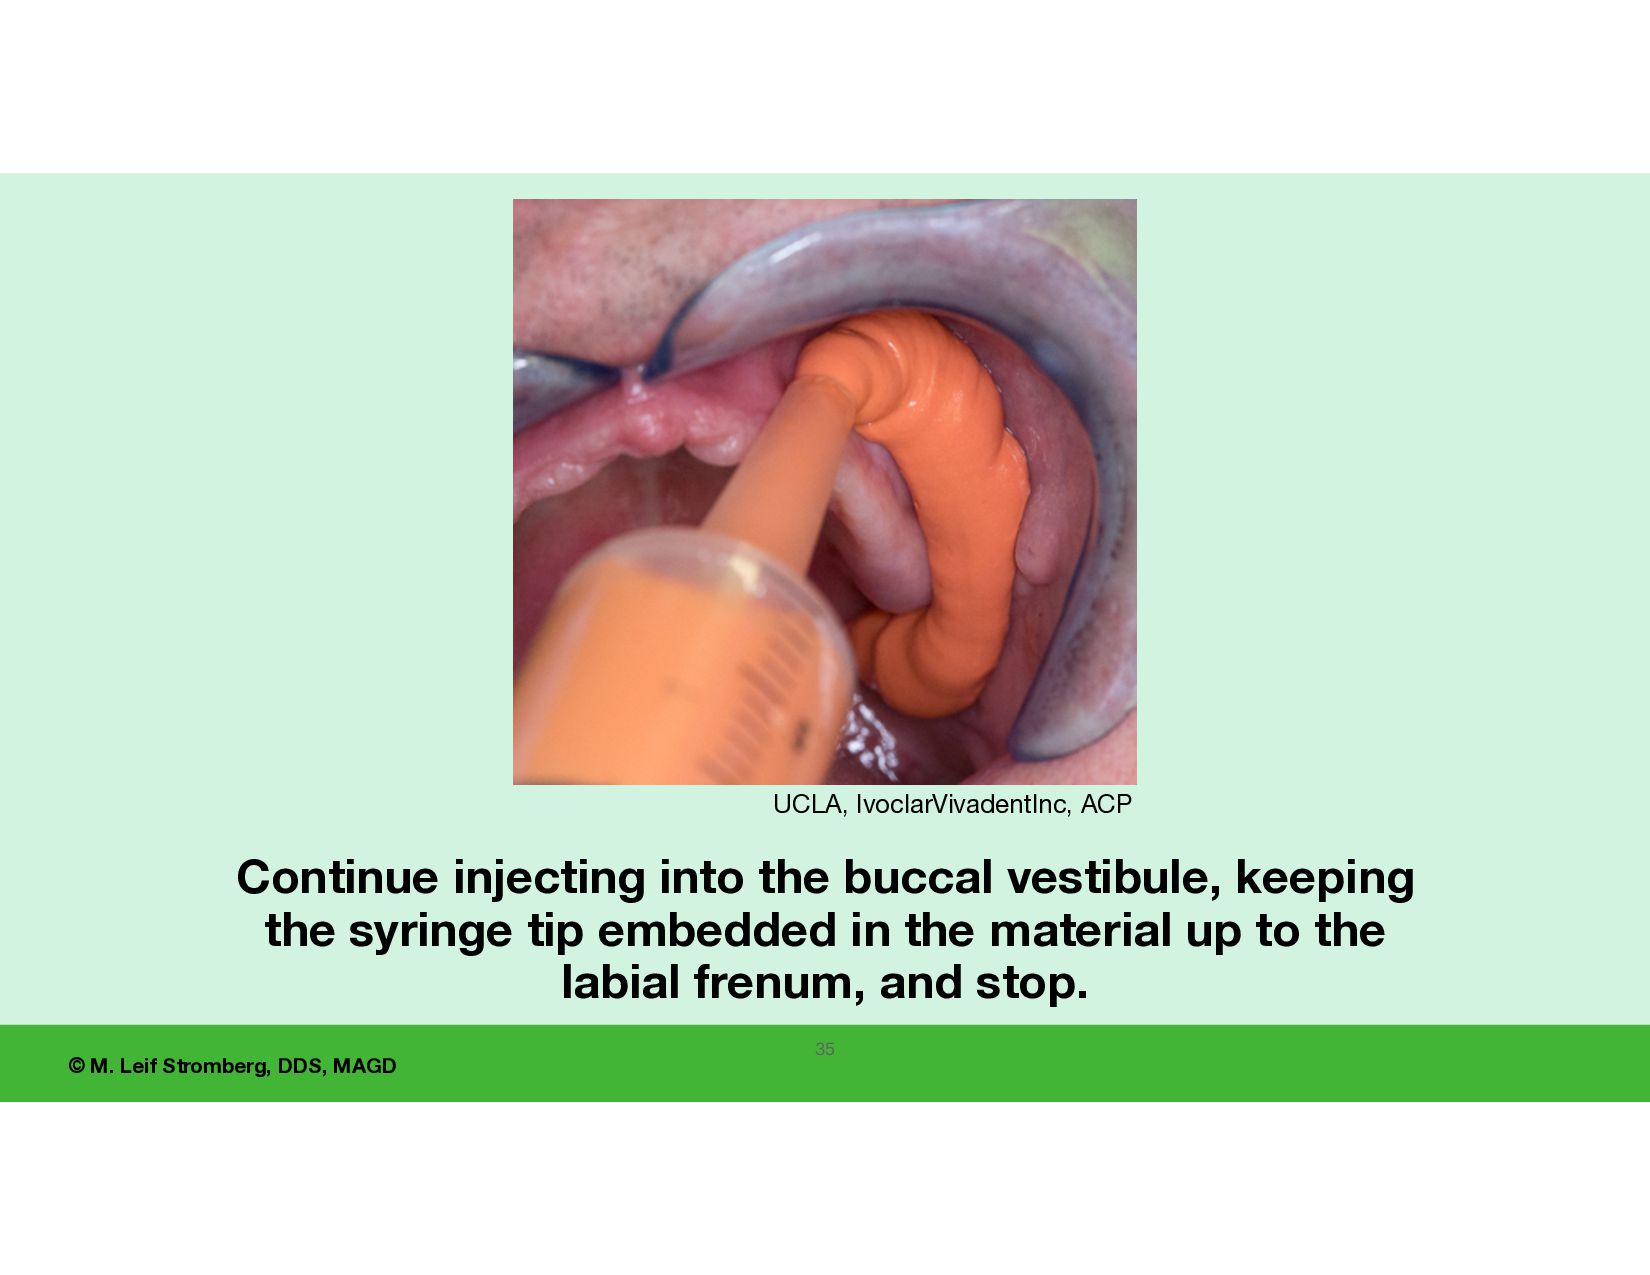
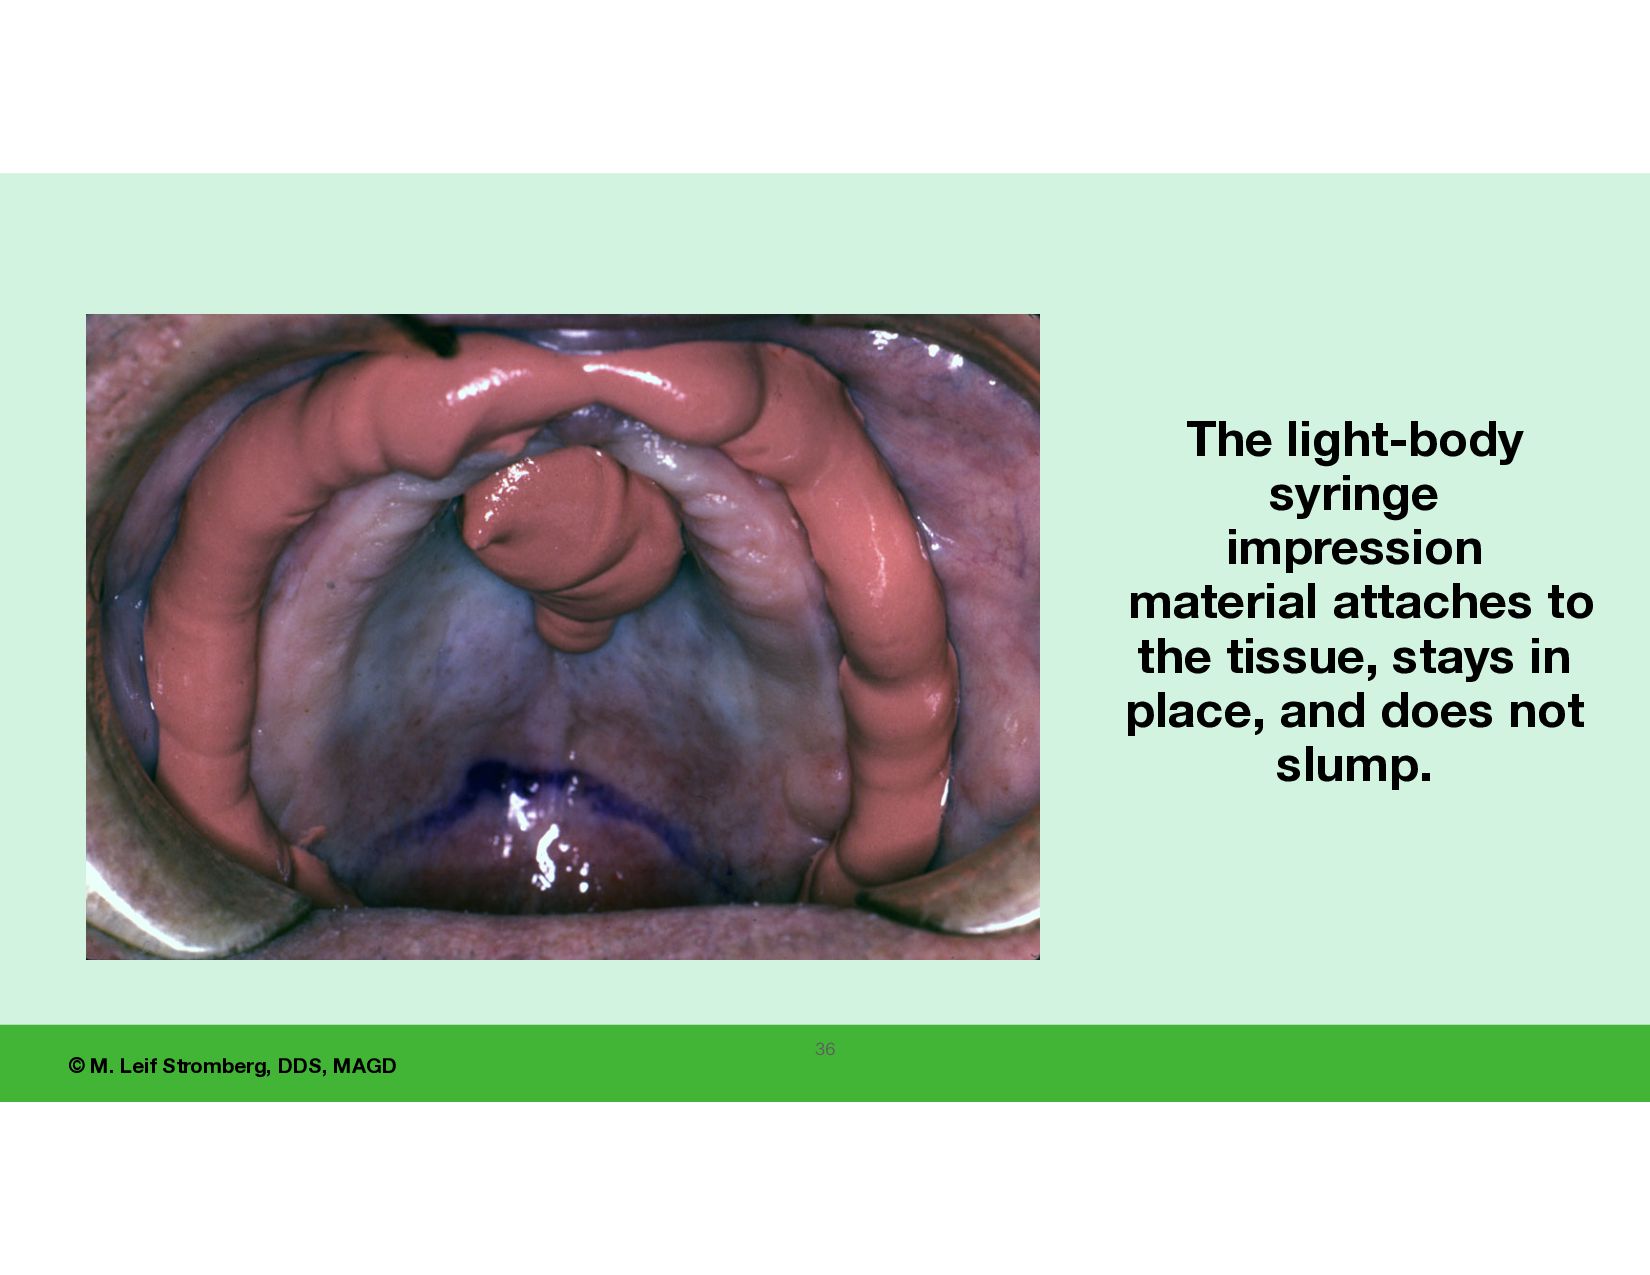
System Alginate material – Syringe Material with water measuring vial and syringe Syringe alginate - light-bodied syringe alginate ows (low viscosity) yet stays in place (resists slumping). It is placed in the peripheral border areas and vault of the hard palate using the AccuDent XD Syringe delivery system. UCLA, IvoclarVivadentInc, ACP
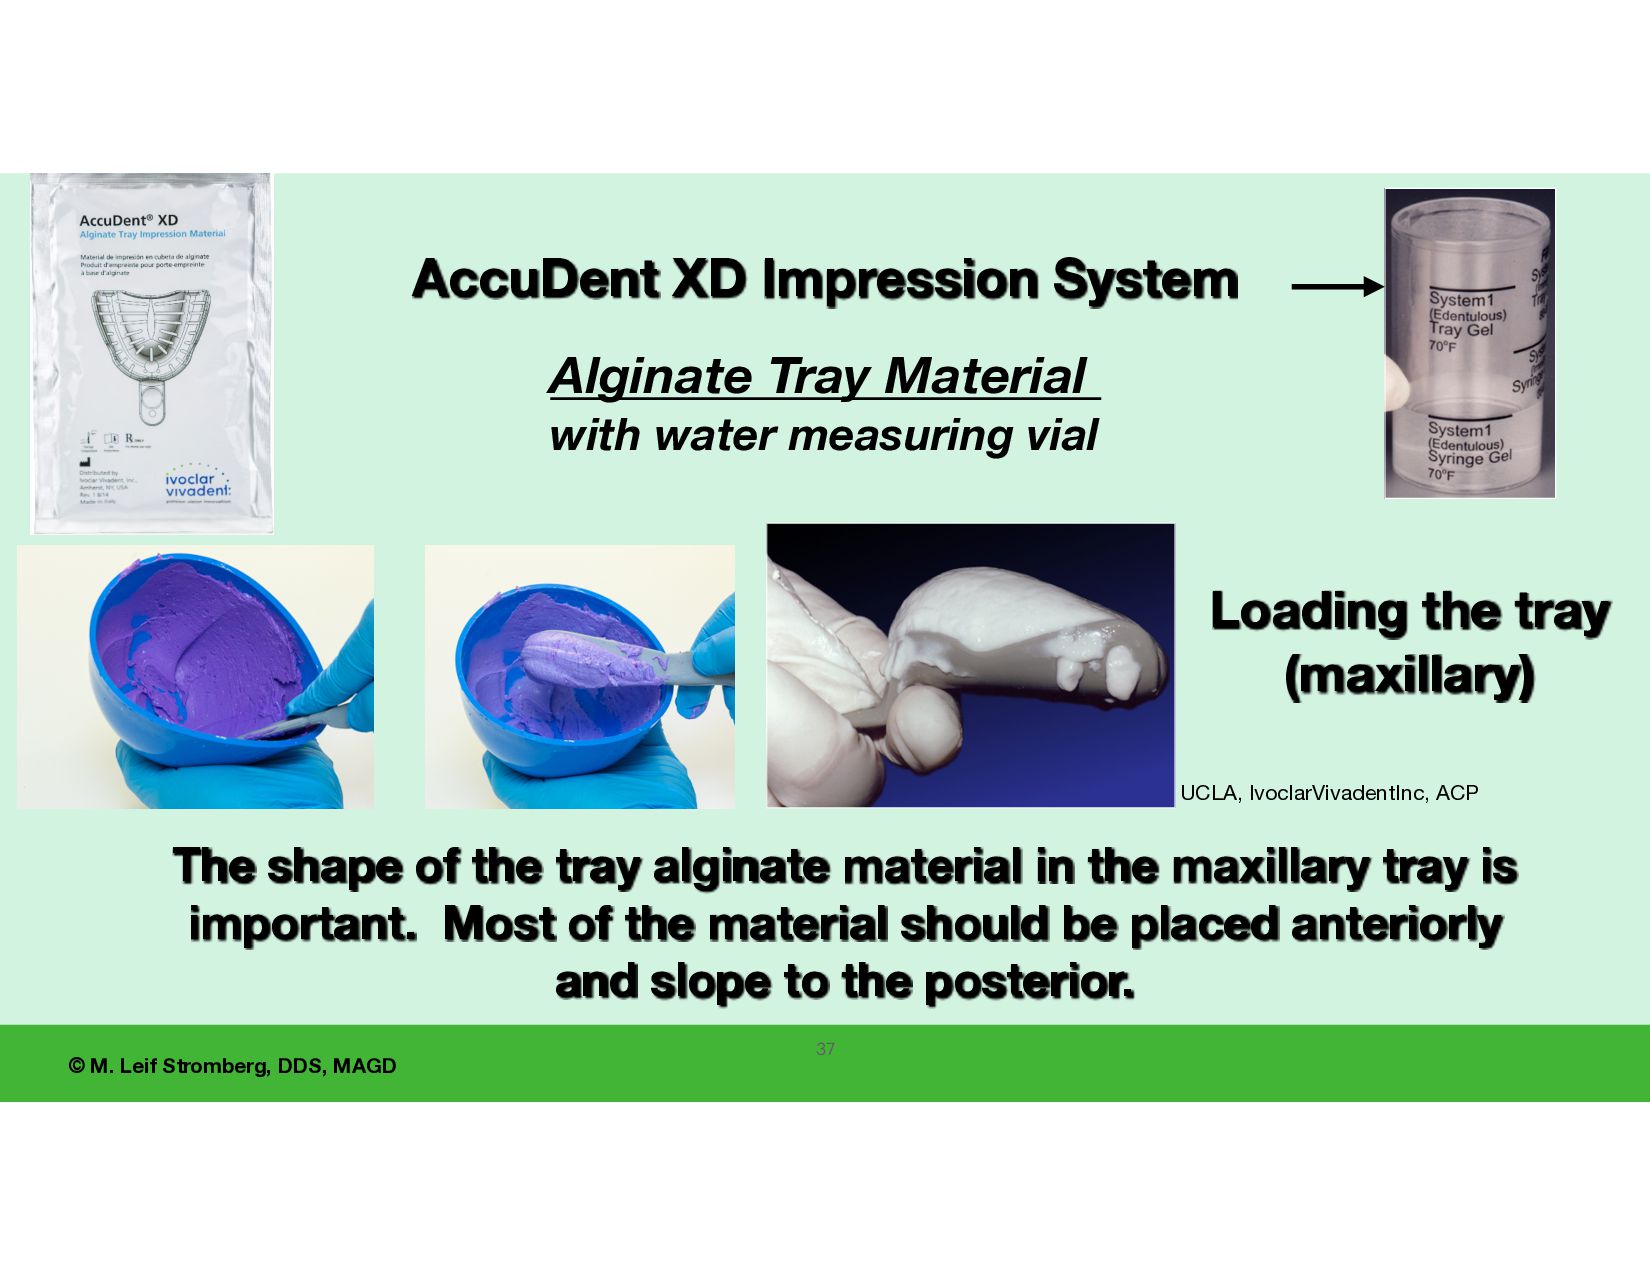
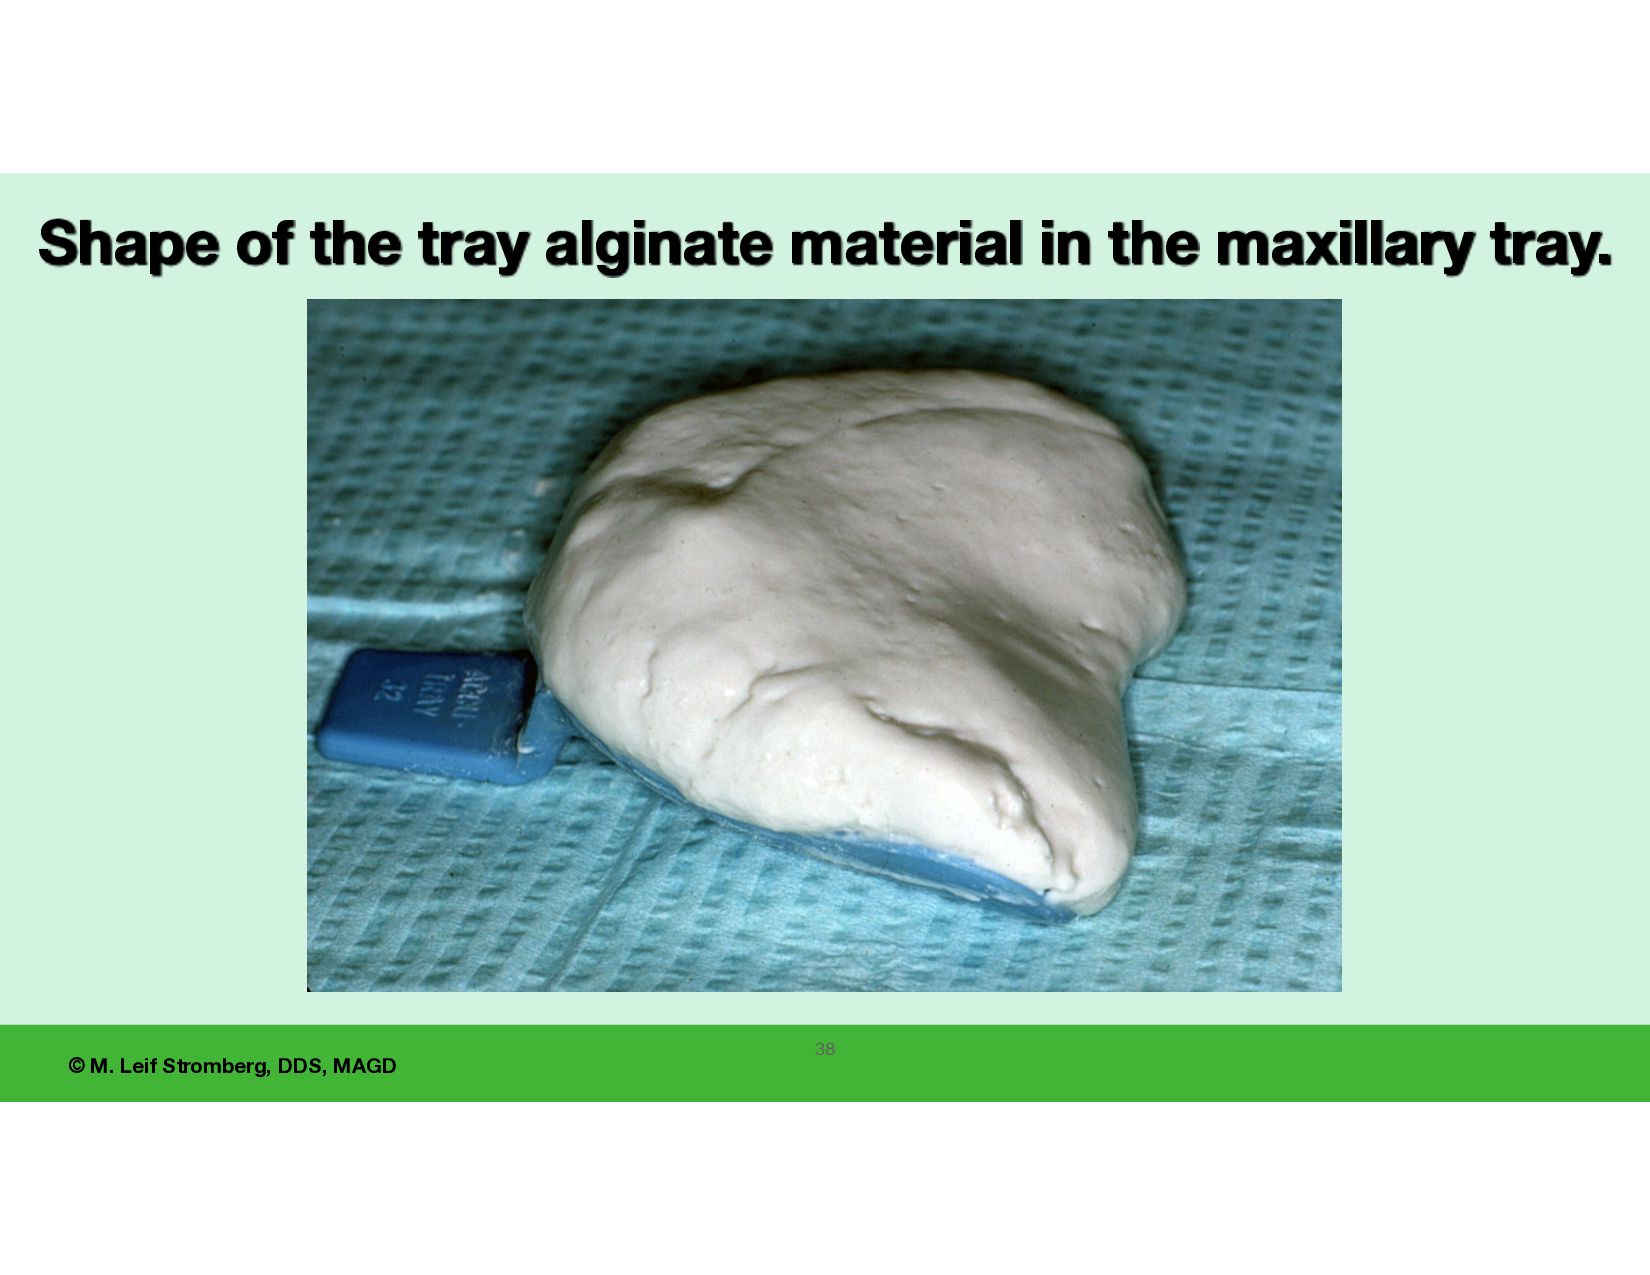
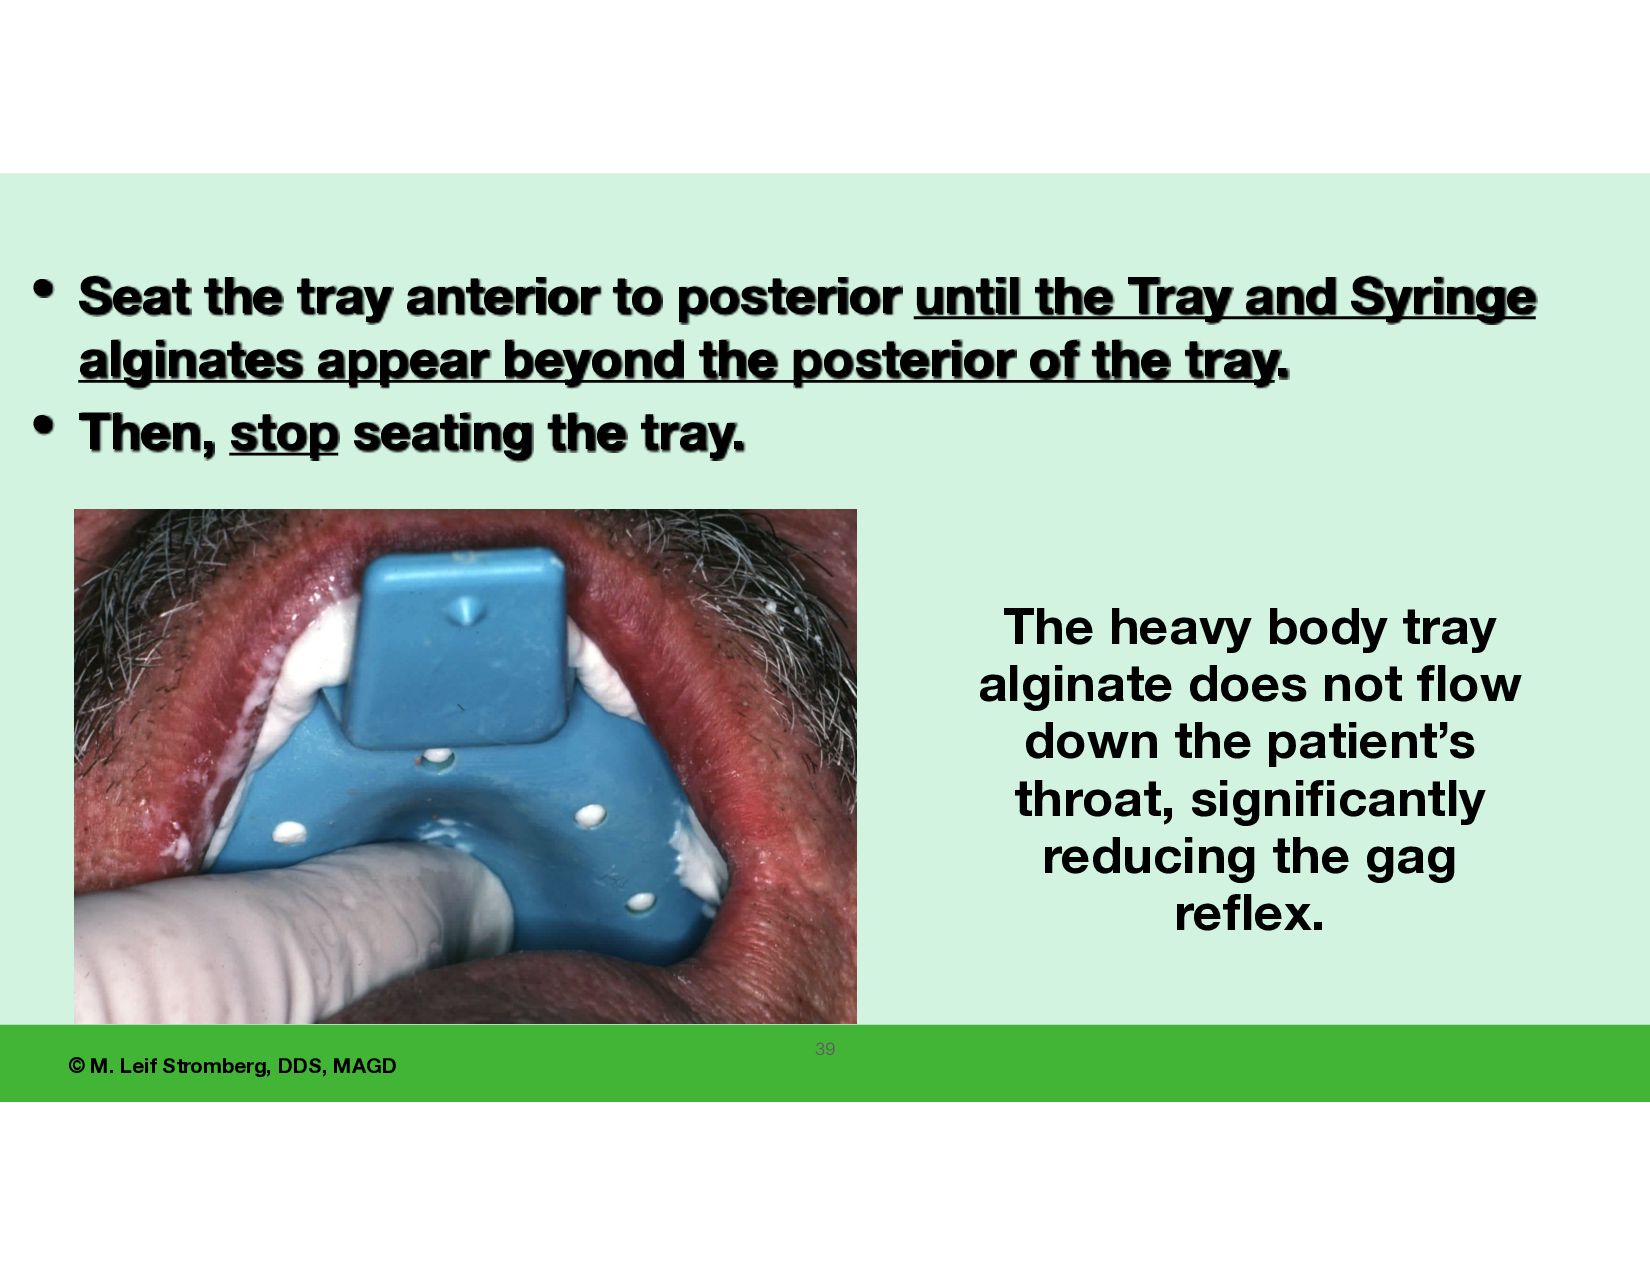
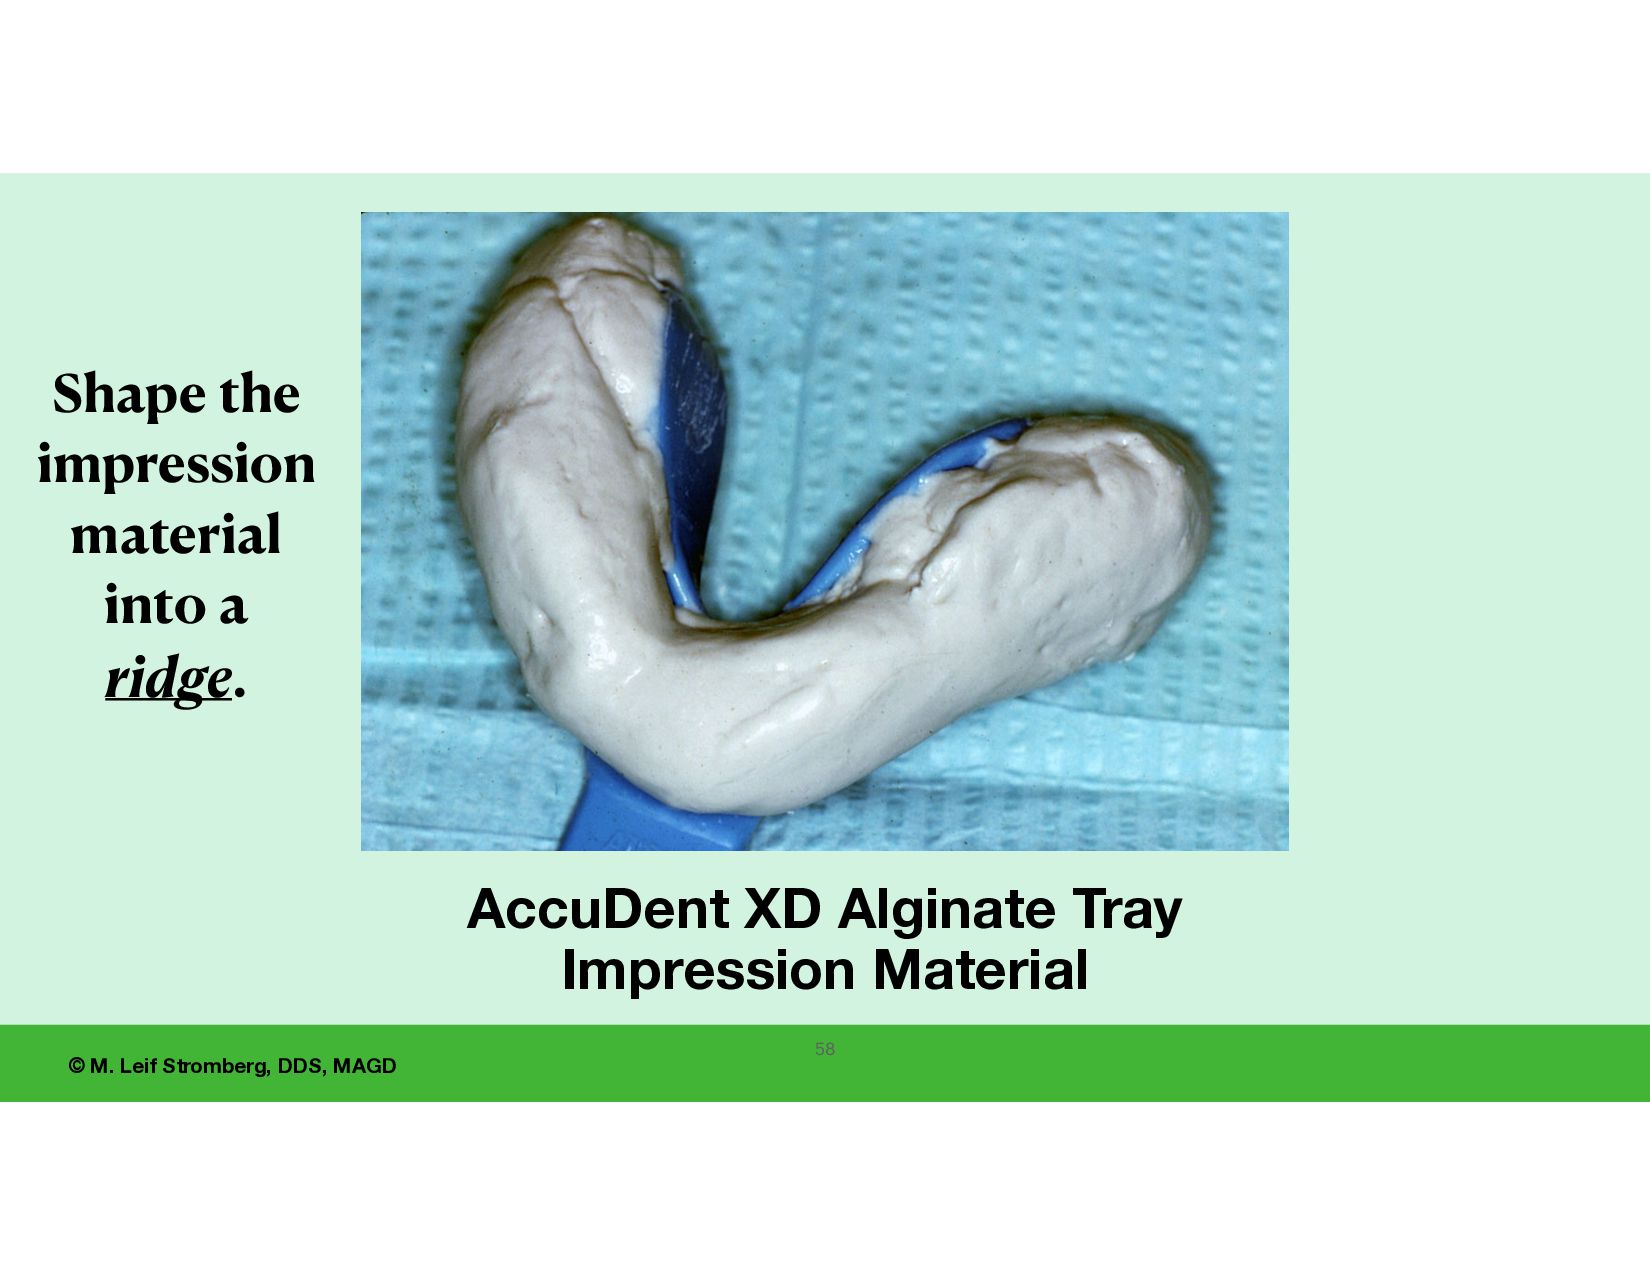
Alginate Tray Material with water measuring vial Loading the tray (maxillary) The shape of the tray alginate material in the maxillary tray is important. Most of the material should be placed anteriorly and slope to the posterior. UCLA, IvoclarVivadentInc, ACP 37
tray alginate does not fl ow down the patient’s throat, signi fi cantly reducing the gag re fl ex. • Seat the tray anterior to posterior until the Tray and Syringe alginates appear beyond the posterior of the tray. • Then, stop seating the tray.
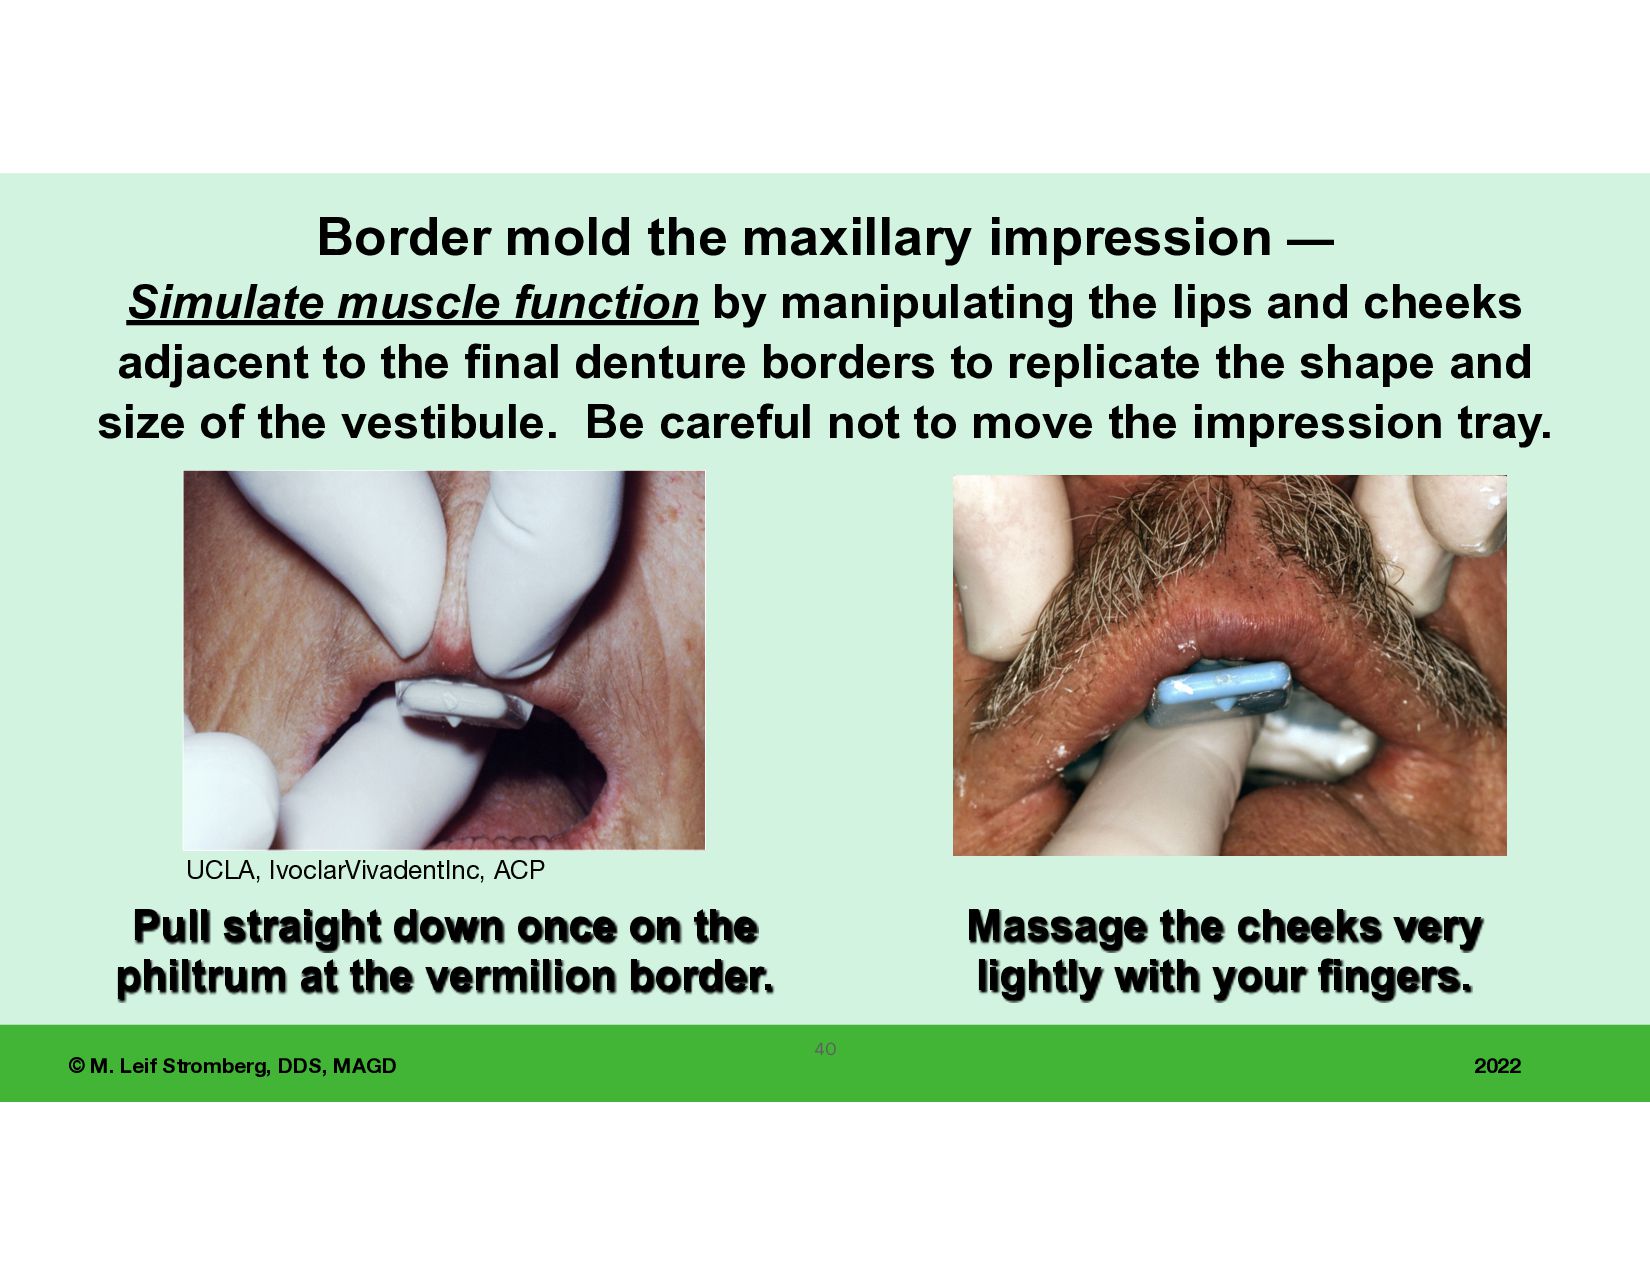
maxillary impression — Simulate muscle function by manipulating the lips and cheeks adjacent to the final denture borders to replicate the shape and size of the vestibule. Be careful not to move the impression tray. Massage the cheeks very lightly with your fingers. UCLA, IvoclarVivadentInc, ACP Pull straight down once on the philtrum at the vermilion border. 40
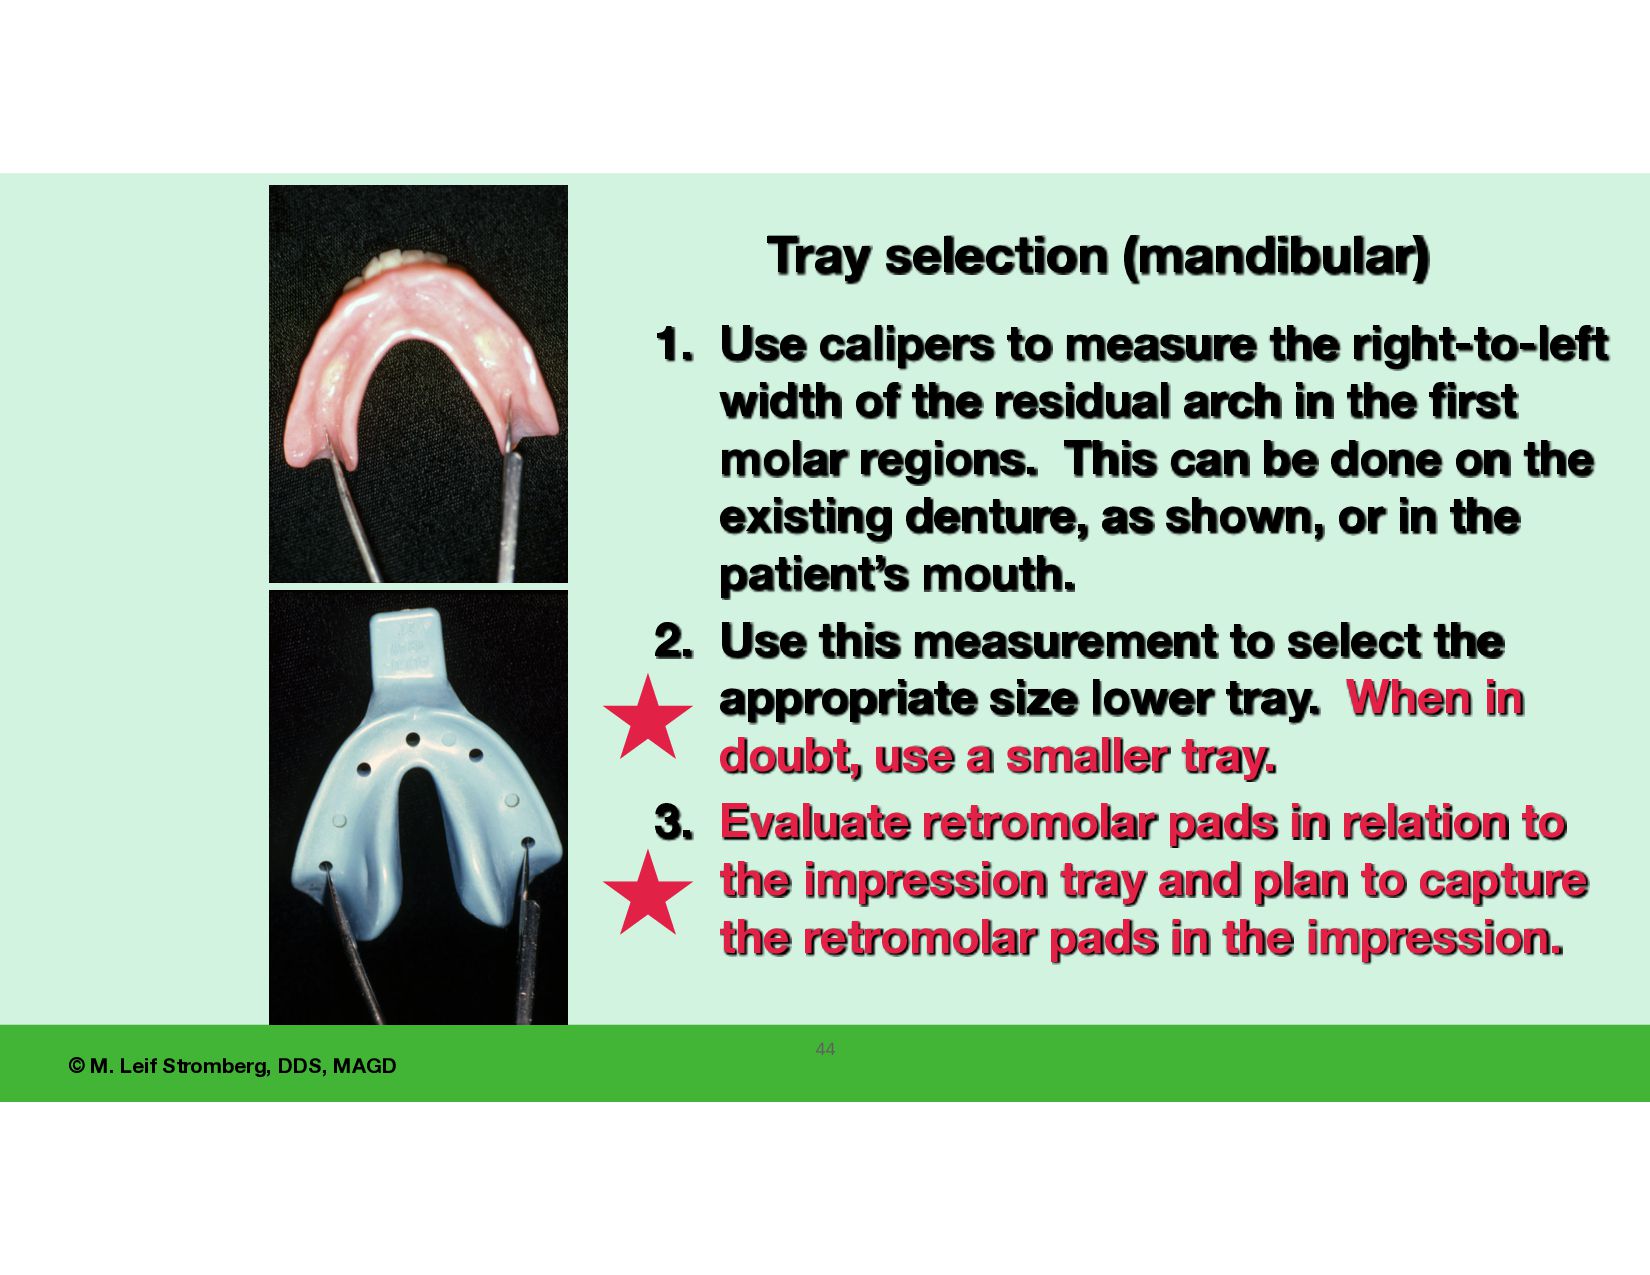
measure the right-to-left width of the residual arch in the first molar regions. This can be done on the existing denture, as shown, or in the patient’s mouth. 2. Use this measurement to select the appropriate size lower tray. When in doubt, use a smaller tray. 3. Evaluate retromolar pads in relation to the impression tray and plan to capture the retromolar pads in the impression. Tray selection (mandibular) 44
impression tray in the mouth to assess the following: 1. there is su ffi cient lingual clearance (1/4 inch thickness of alginate is ideal), and 2. the tray covers the retromolar pads to ensure capturing the pads in the impression. 45 Key to Success
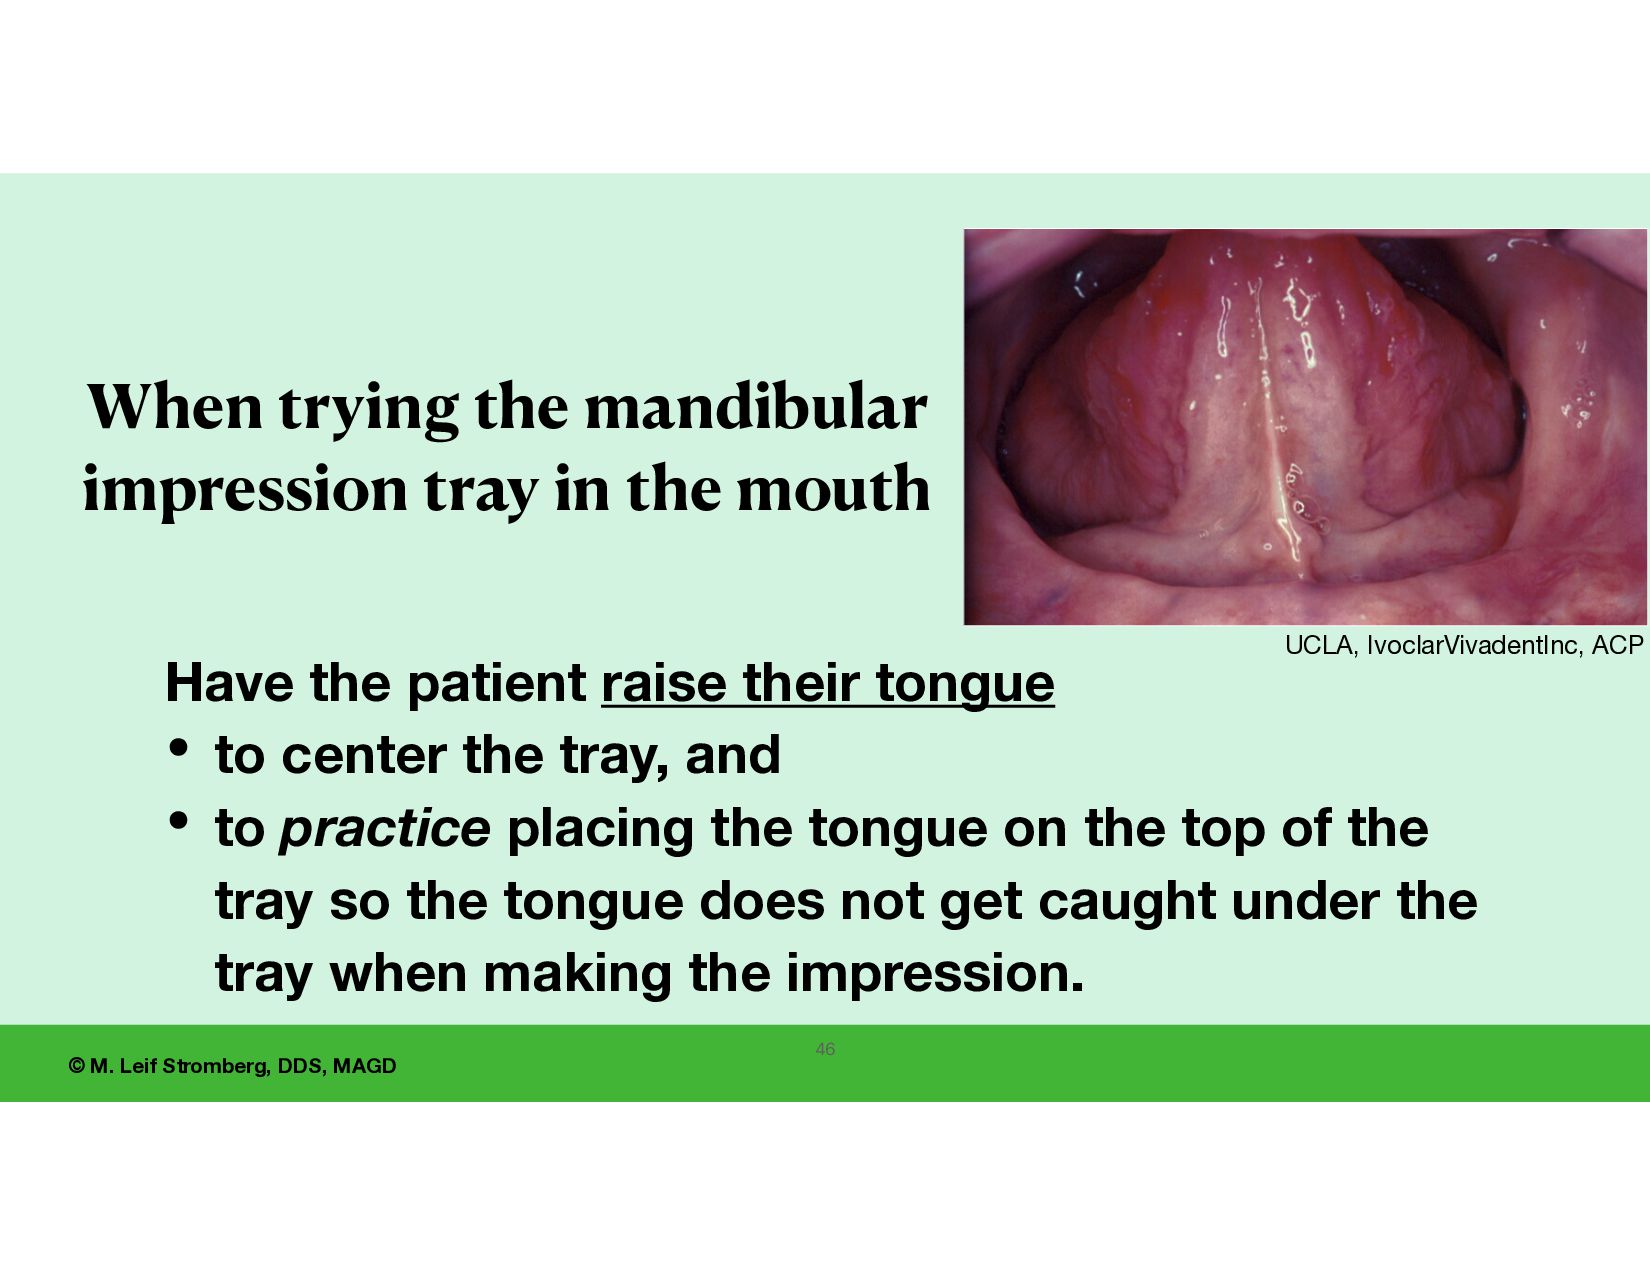
their tongue • to center the tray, and • to practice placing the tongue on the top of the tray so the tongue does not get caught under the tray when making the impression. When trying the mandibular impression tray in the mouth 46 UCLA, IvoclarVivadentInc, ACP
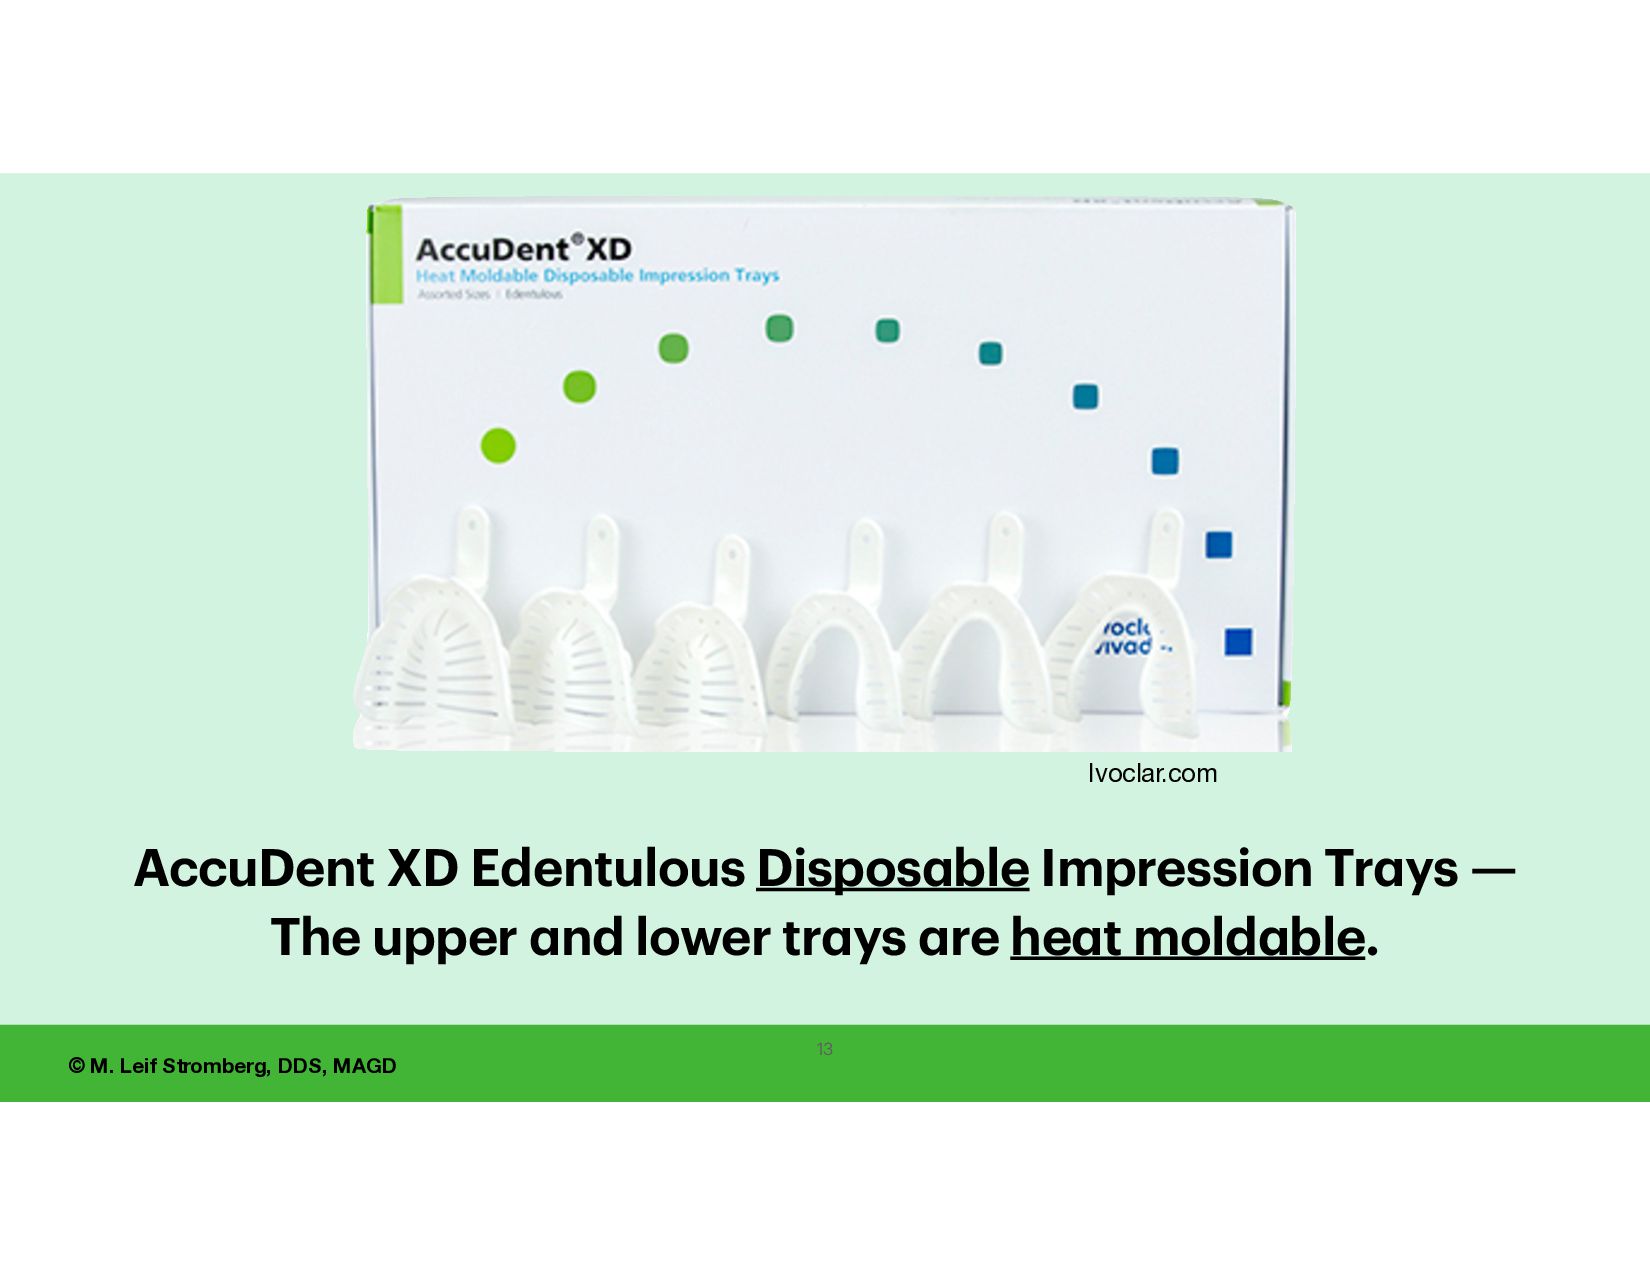
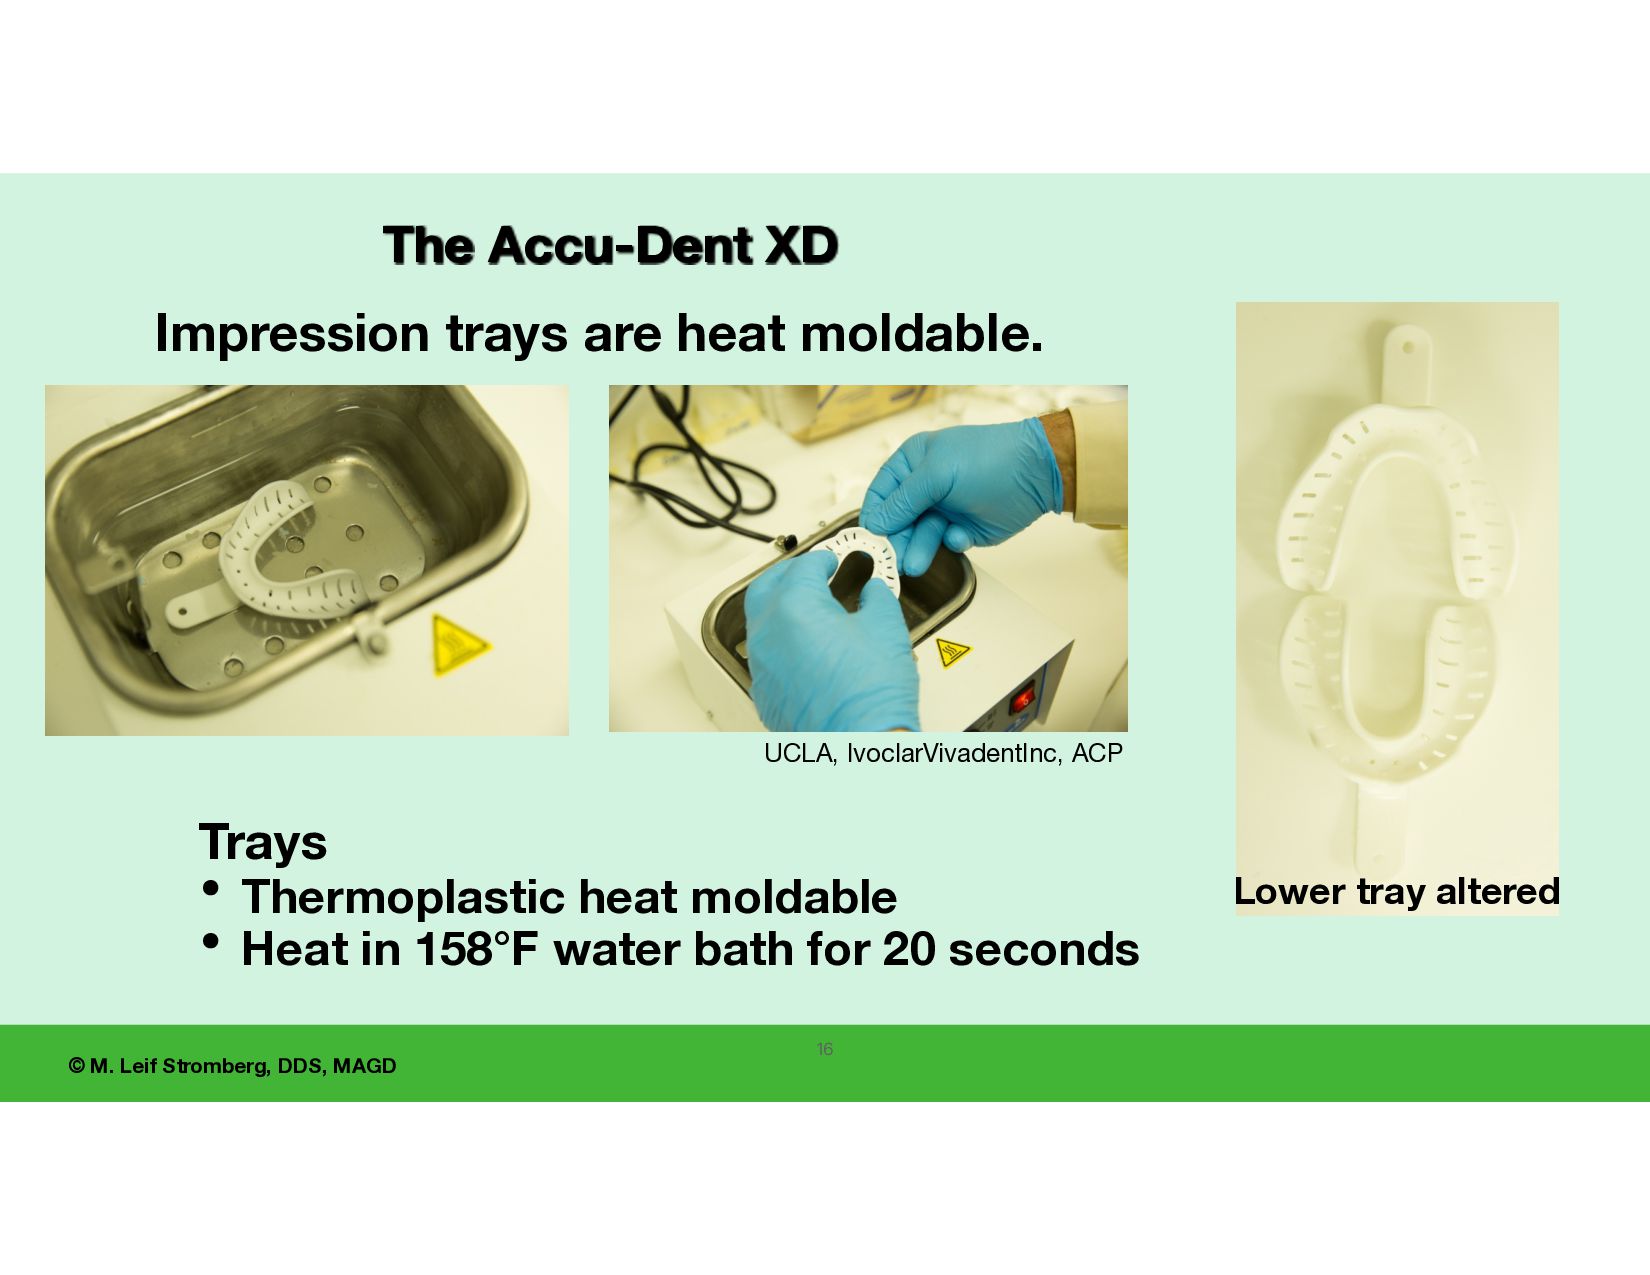
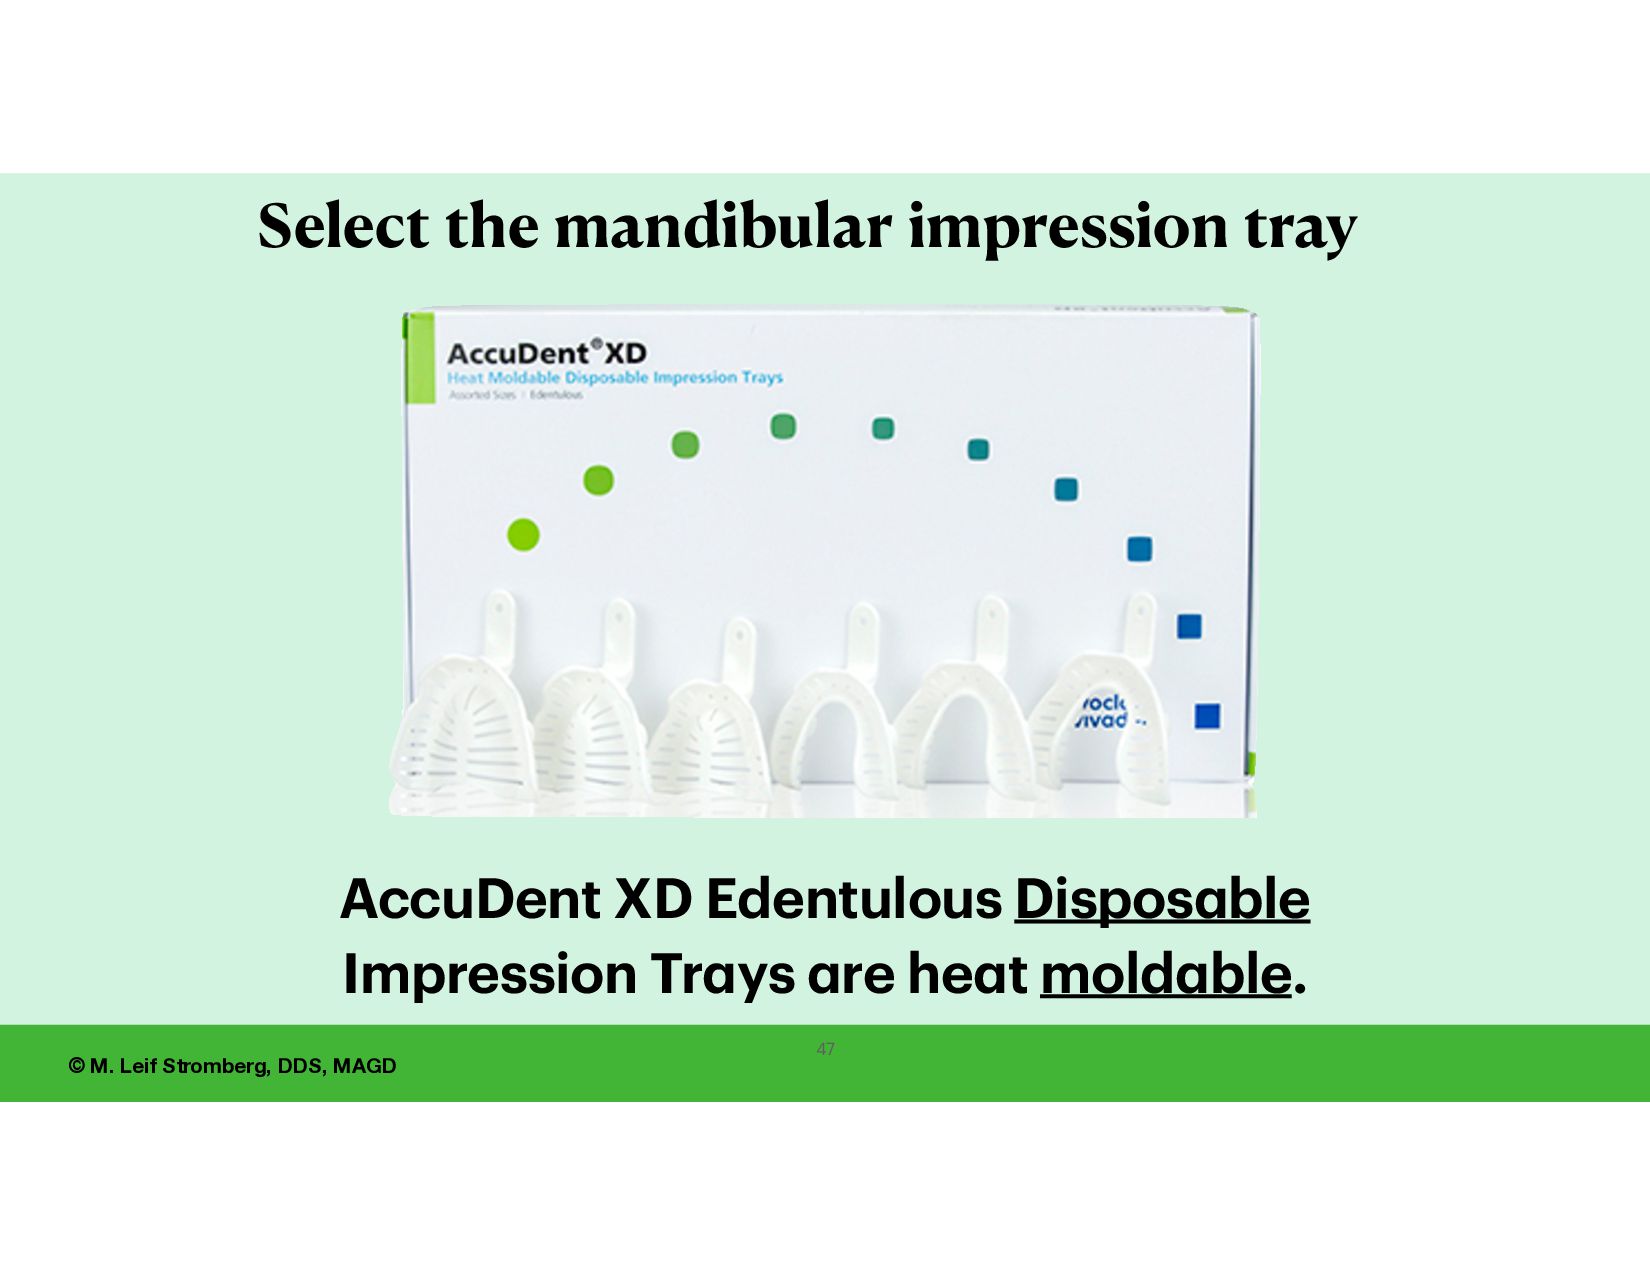
• Thermoplastic heat moldable • Heat in 158°F water bath for 20 seconds UCLA, IvoclarVivadentInc, ACP Lower tray altered Impression Tr a ys a re he a t mold ble. 48
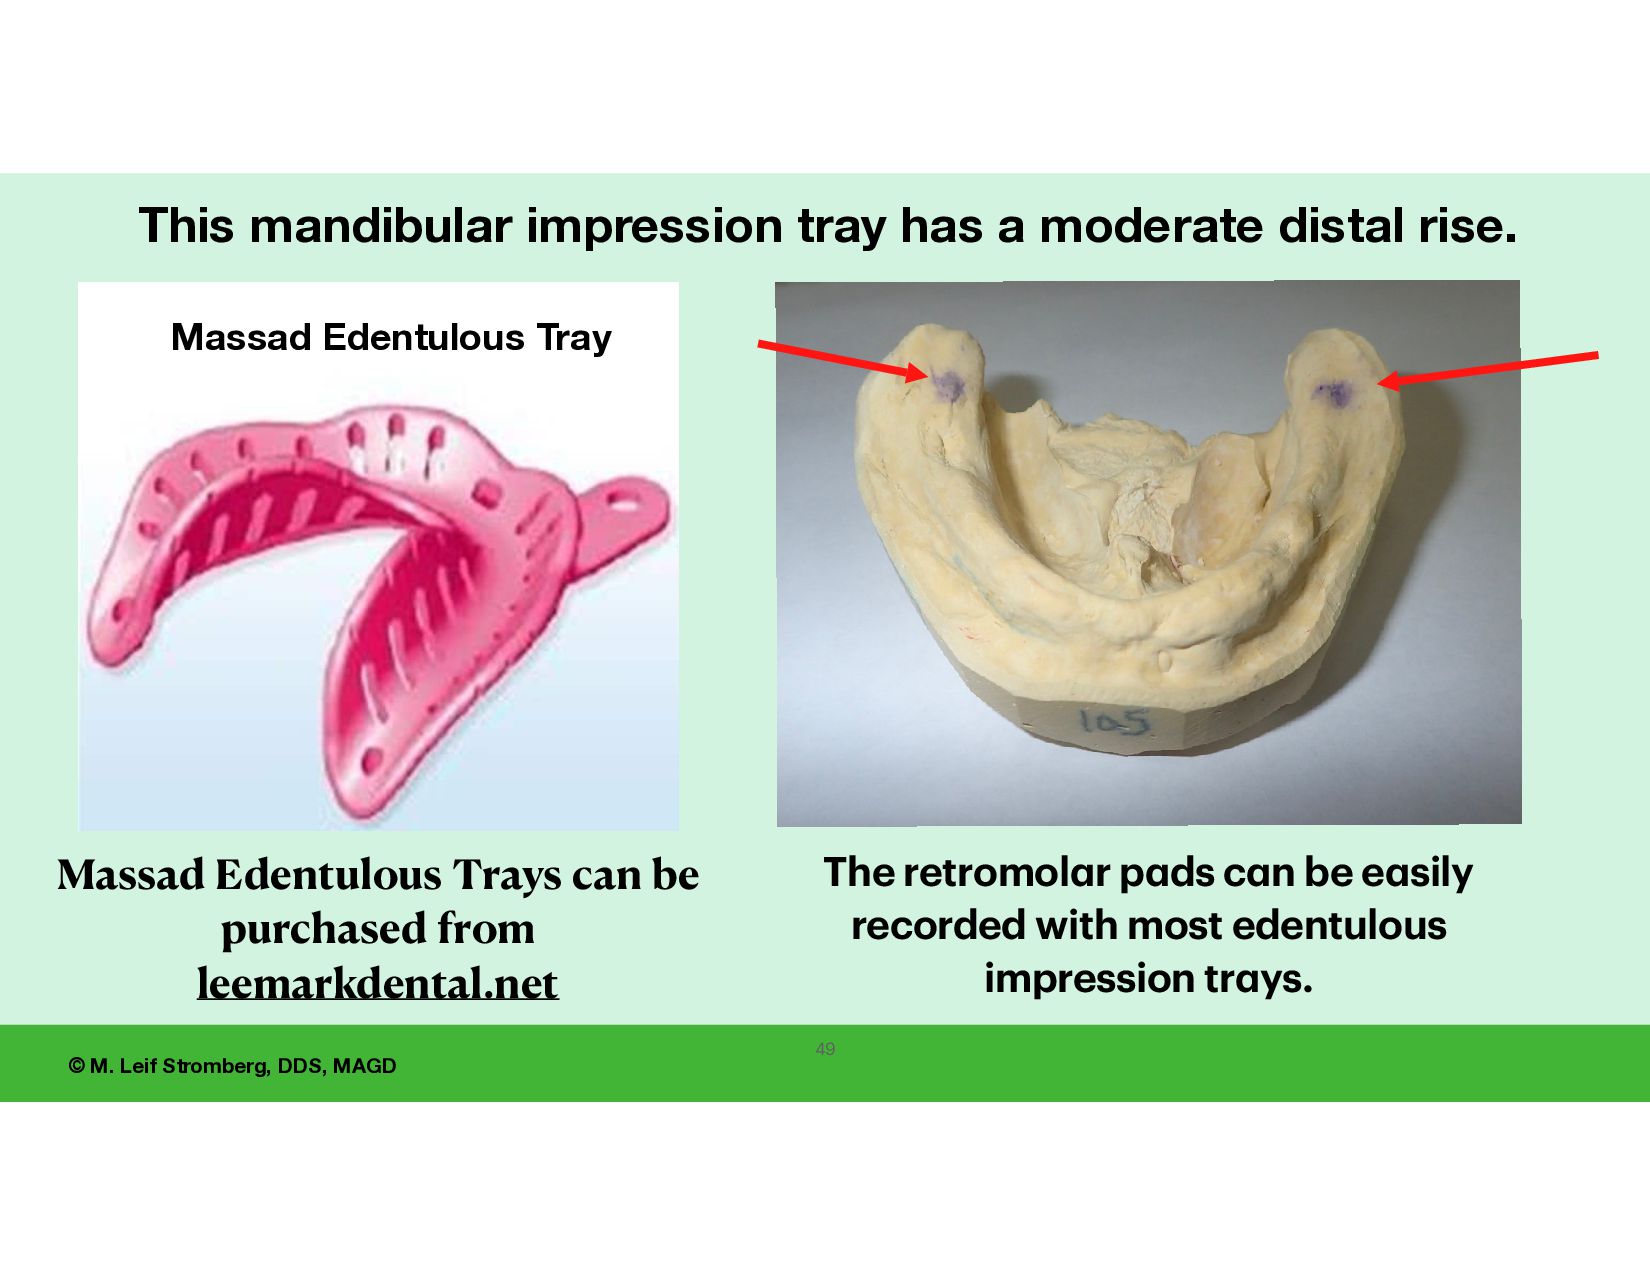
Edentulous Trays can be purchased from leemarkdental.net 49 The retromol a r p a ds c a n be e a sily recorded with most edentulous impression tr a ys. This mandibular impression tray has a moderate distal rise.
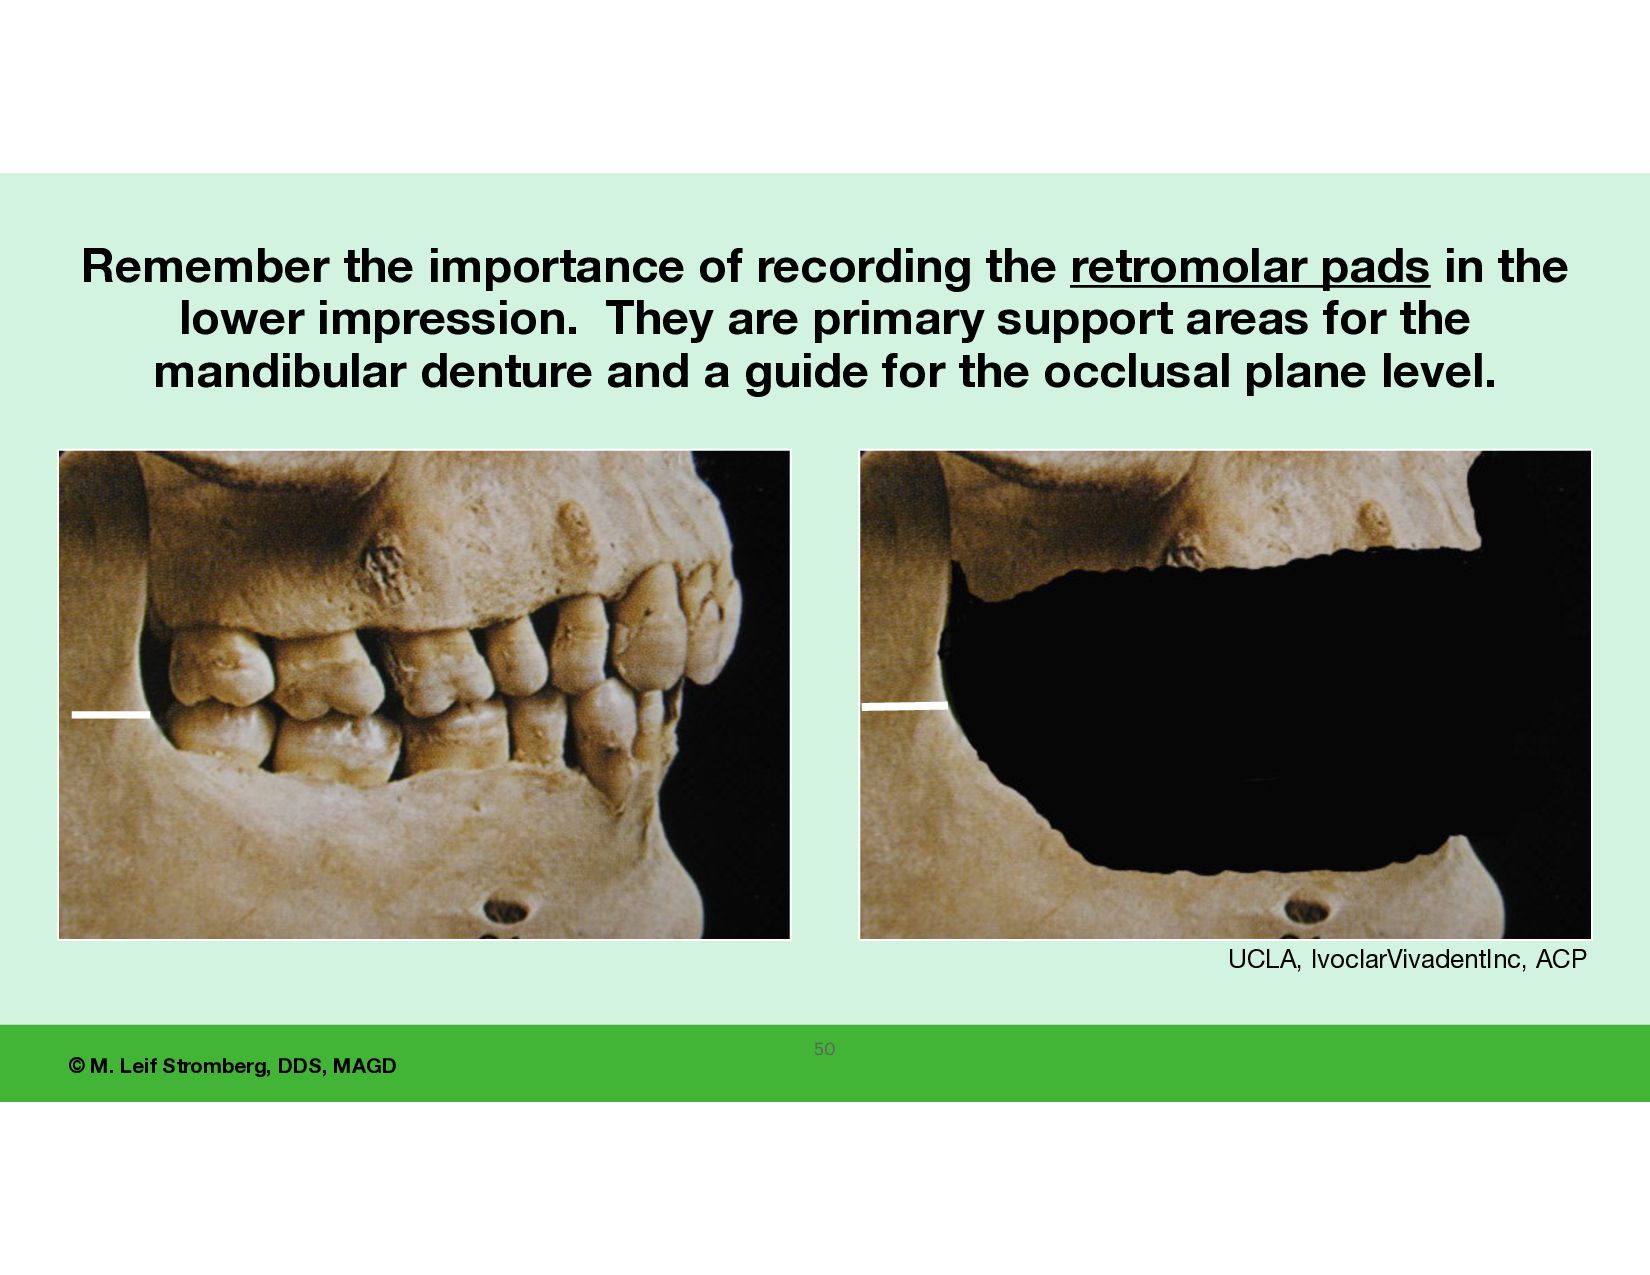
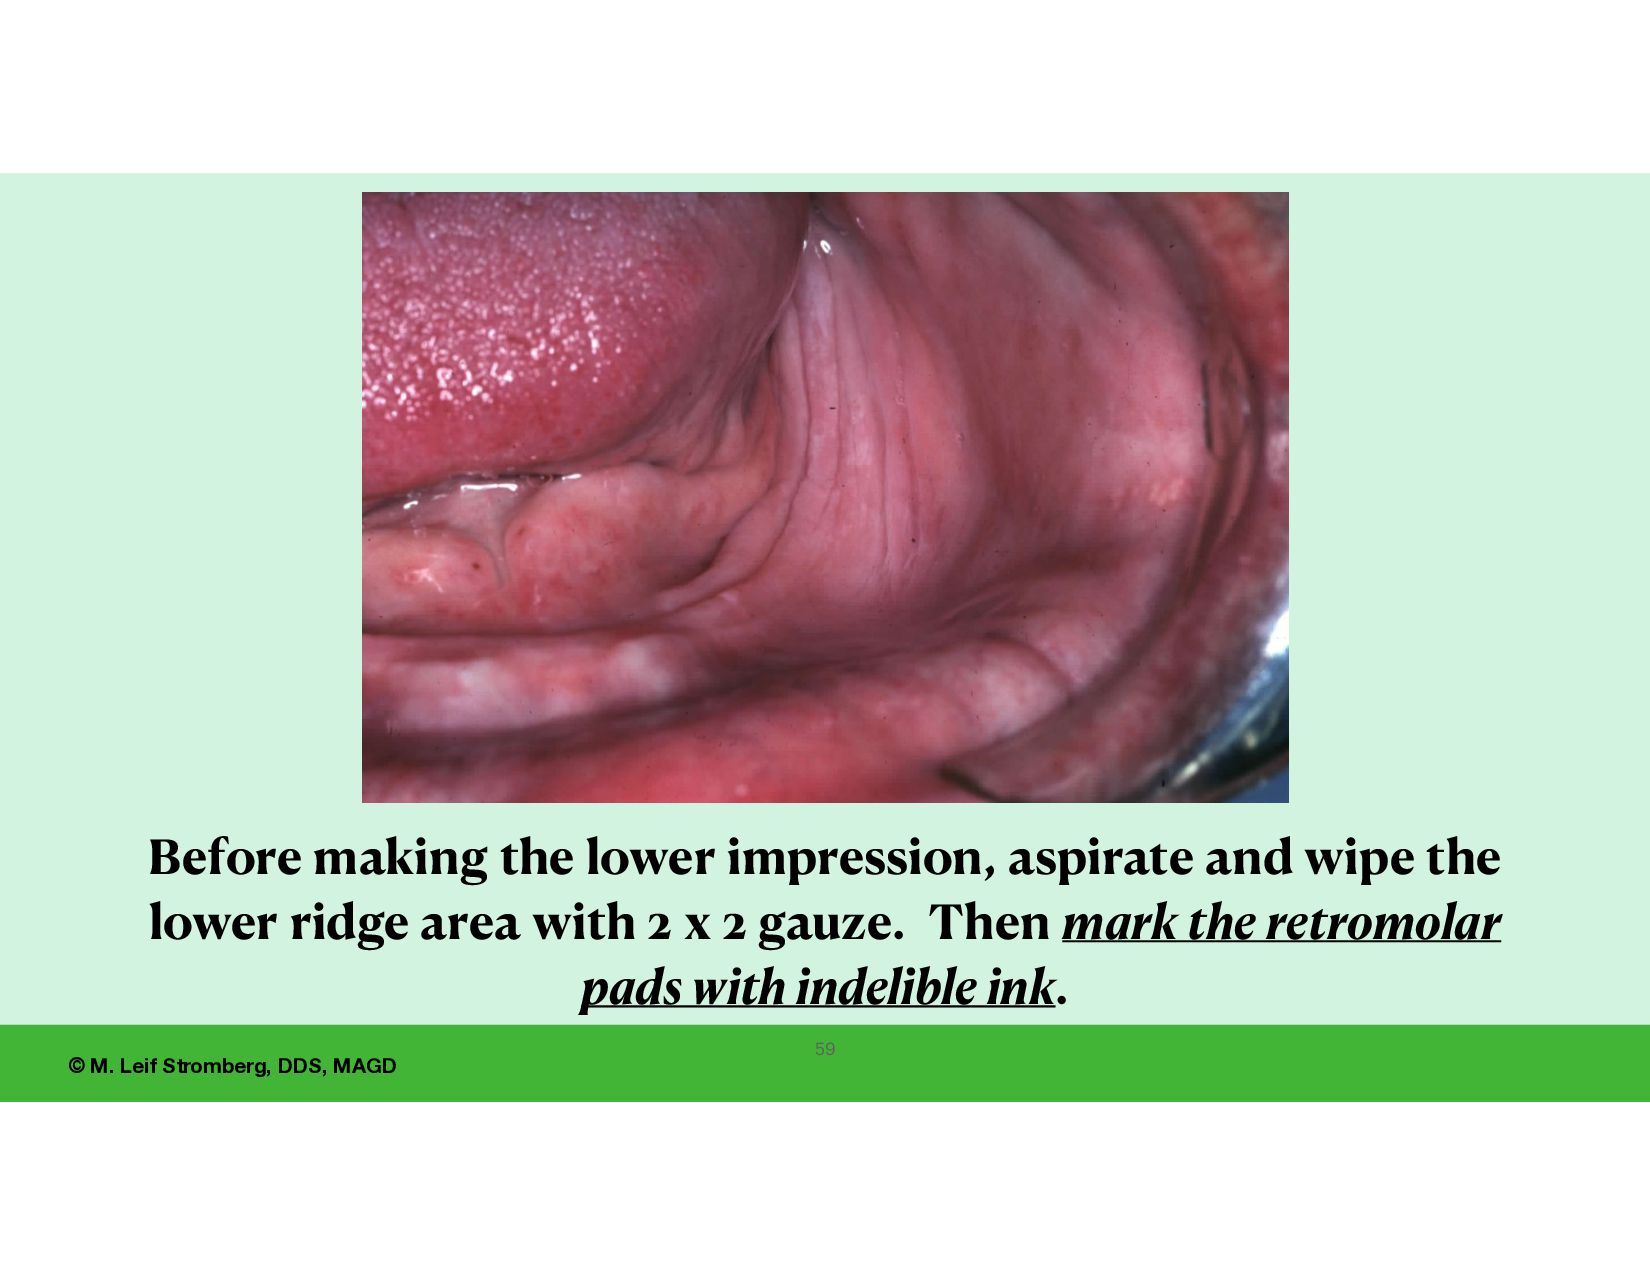
Remember the importance of recording the retromolar pads in the lower impression. They are primary support areas for the mandibular denture and a guide for the occlusal plane level.
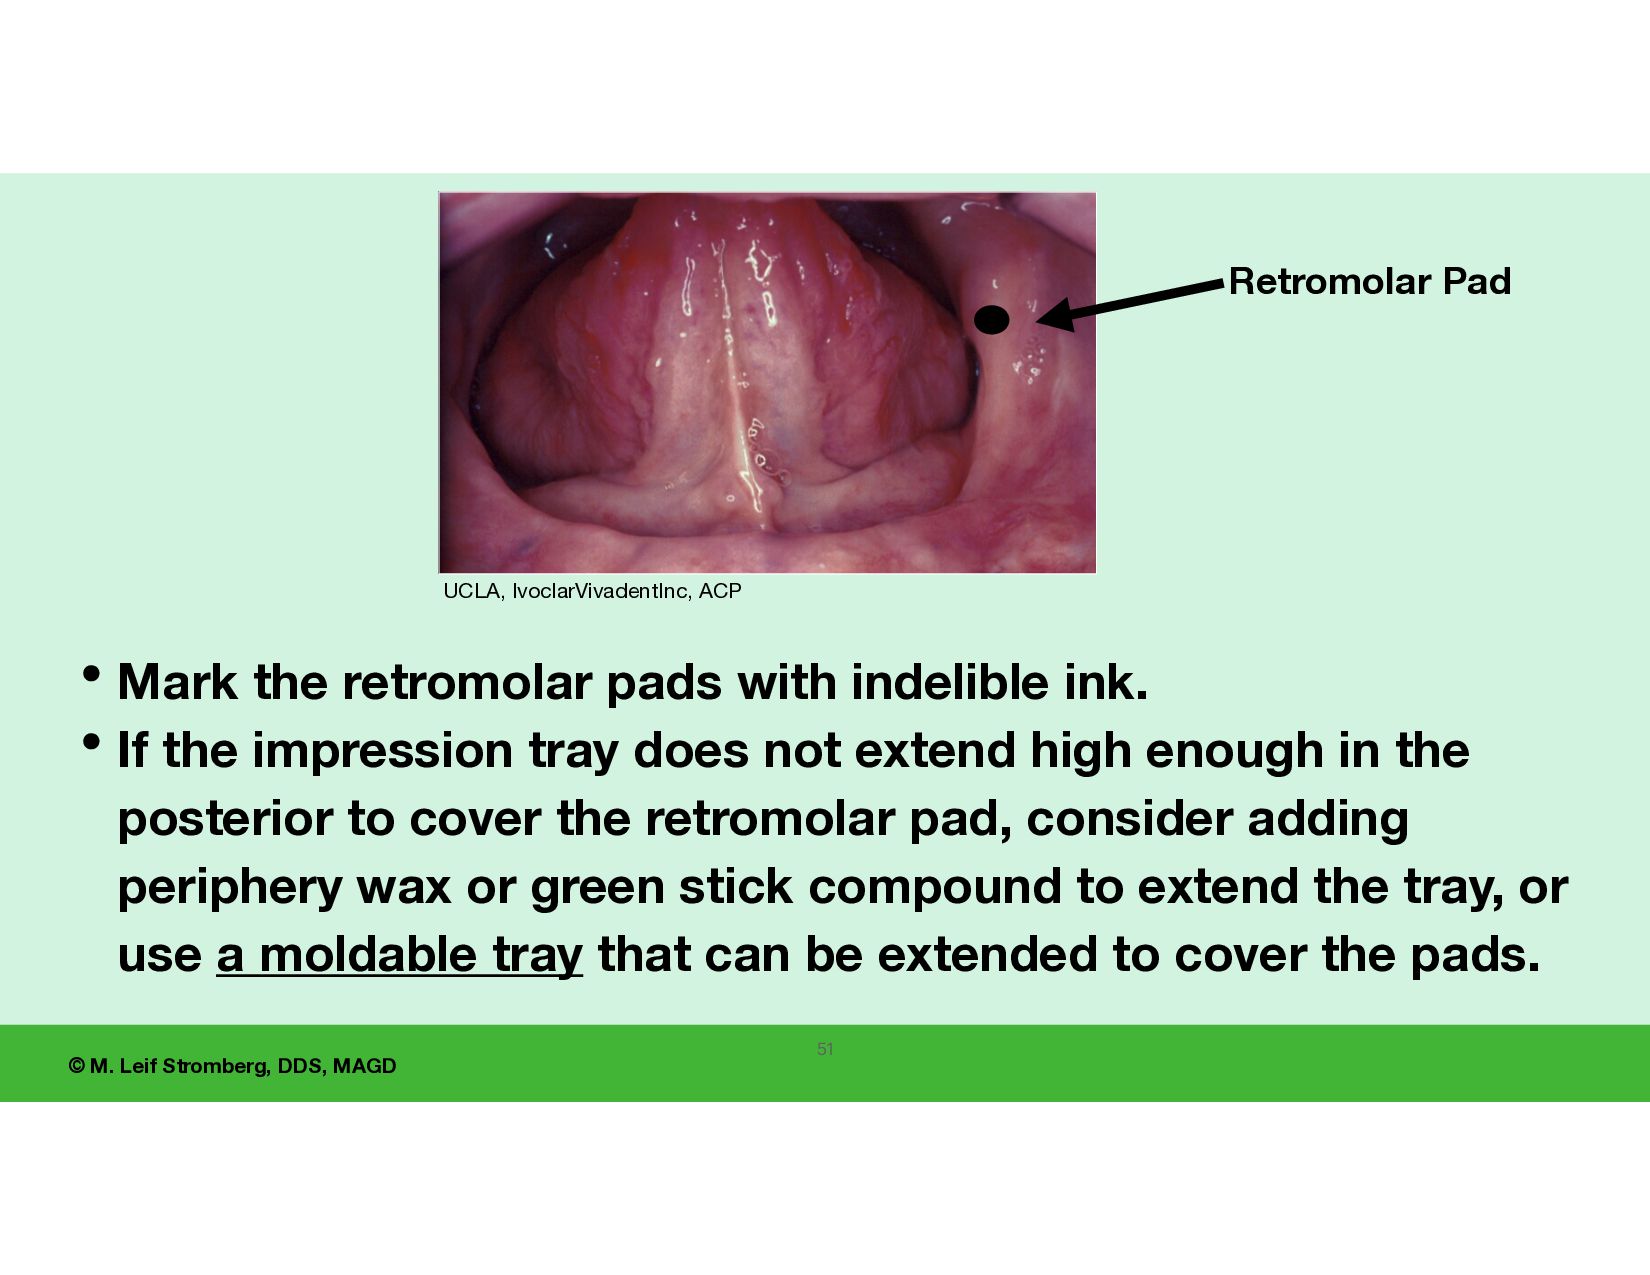
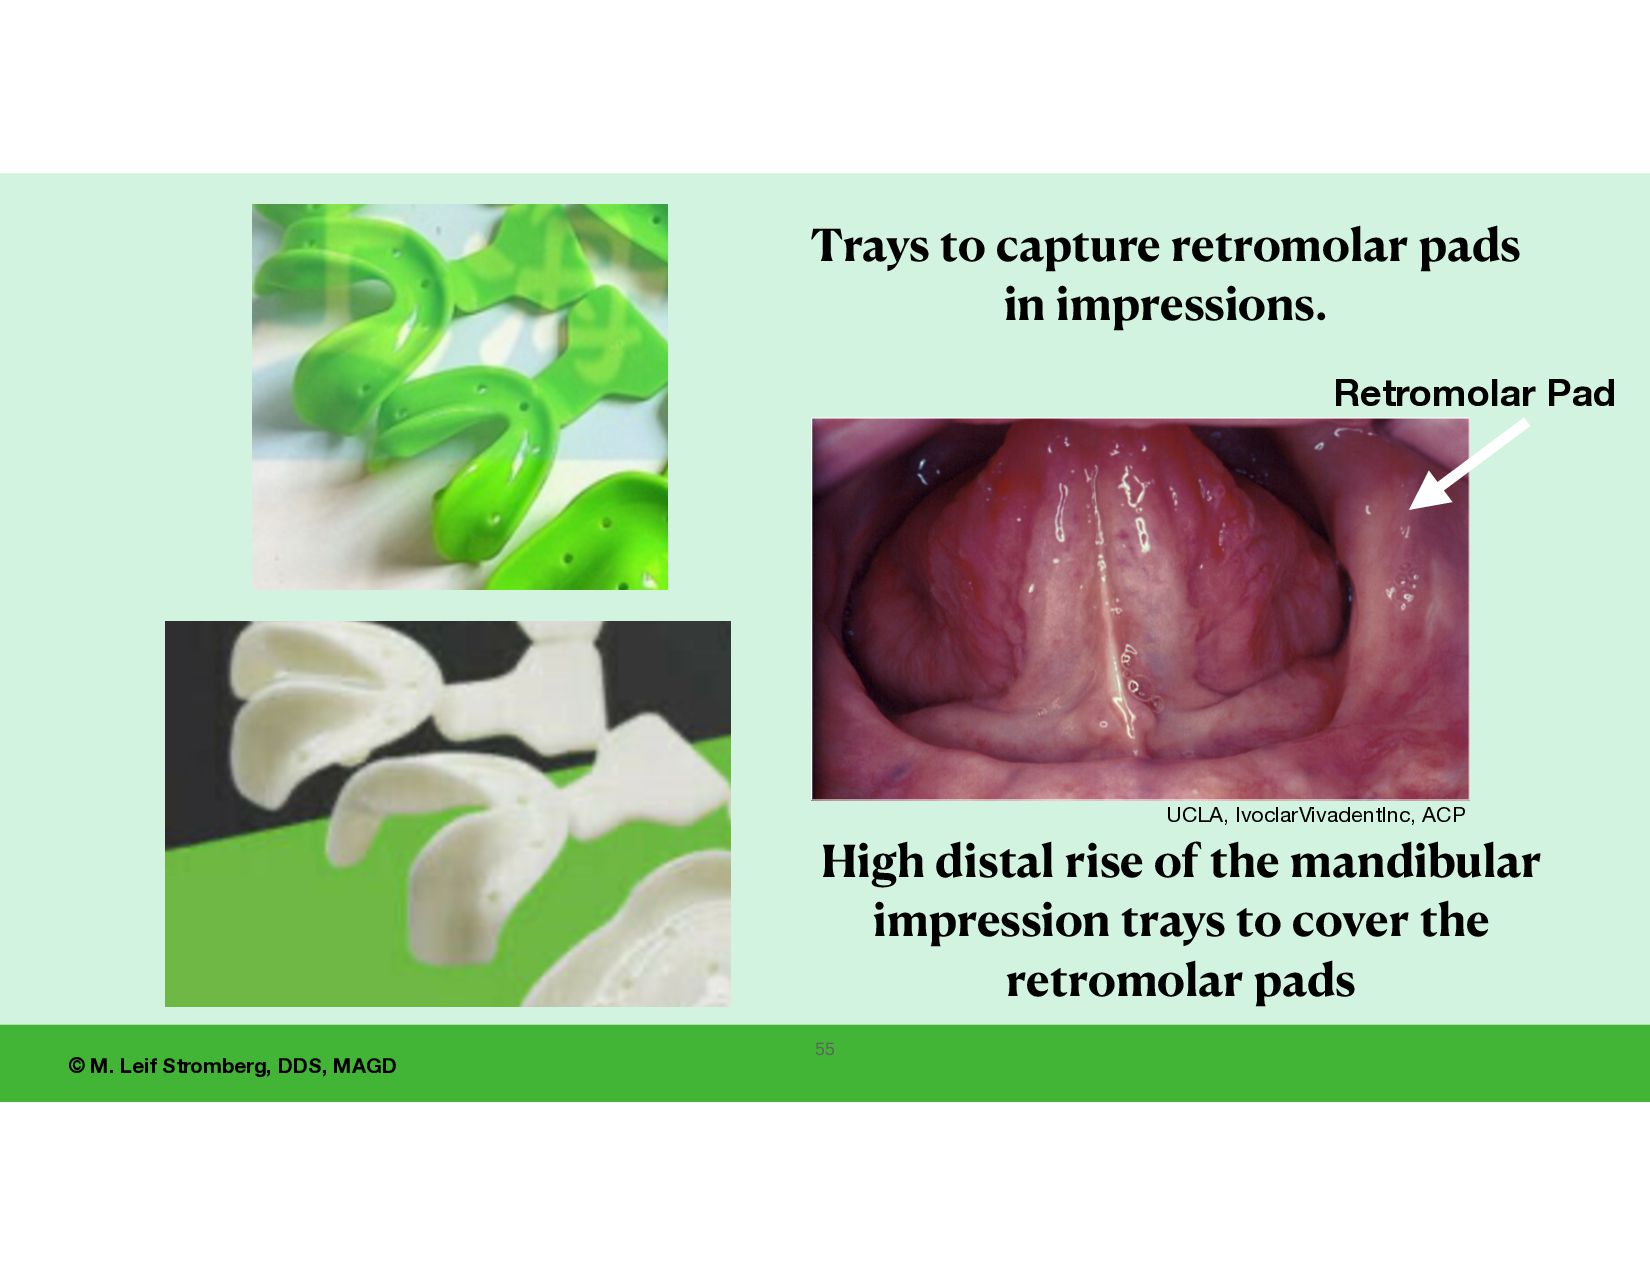
pads with indelible ink. • If the impression tray does not extend high enough in the posterior to cover the retromolar pad, consider adding periphery wax or green stick compound to extend the tray, or use a moldable tray that can be extended to cover the pads. 51 UCLA, IvoclarVivadentInc, ACP Retromolar Pad
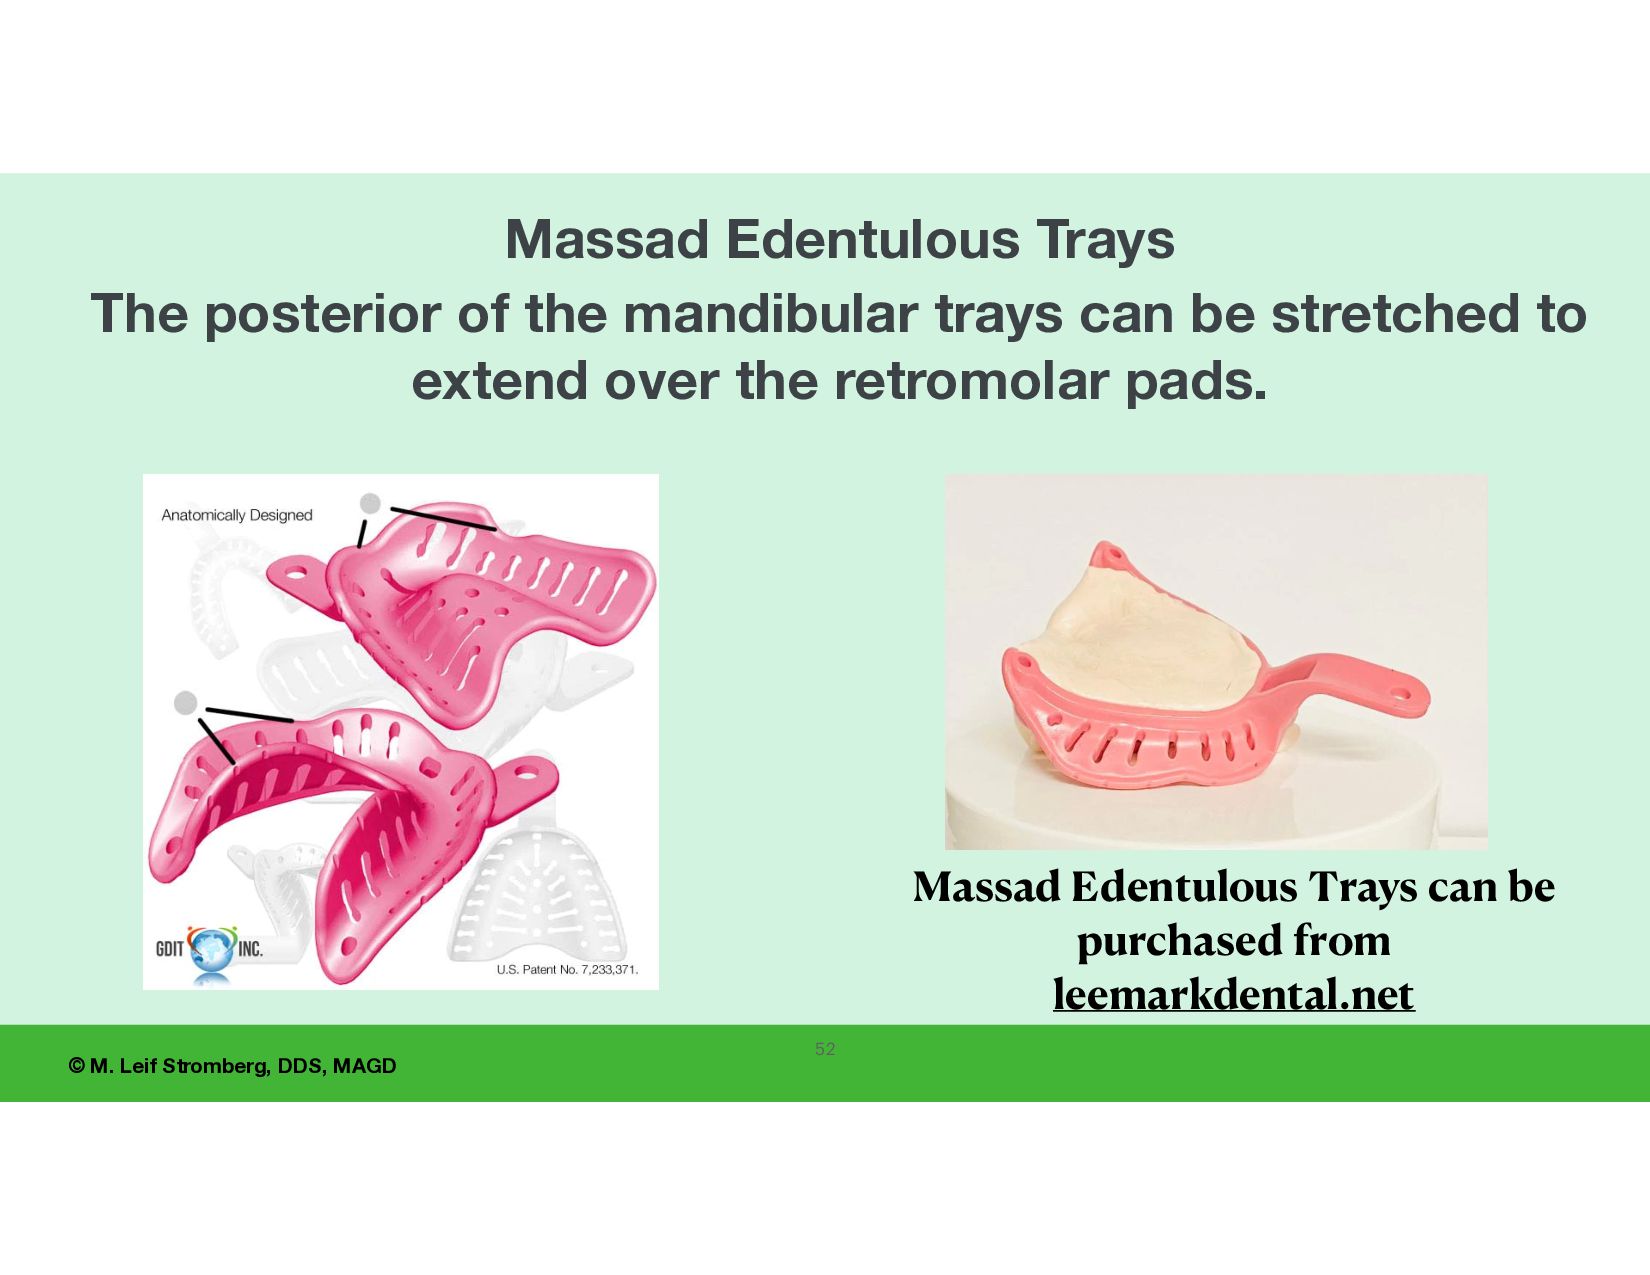
can be purchased from leemarkdental.net Massad Edentulous Trays The posterior of the mandibular trays can be stretched to extend over the retromolar pads.
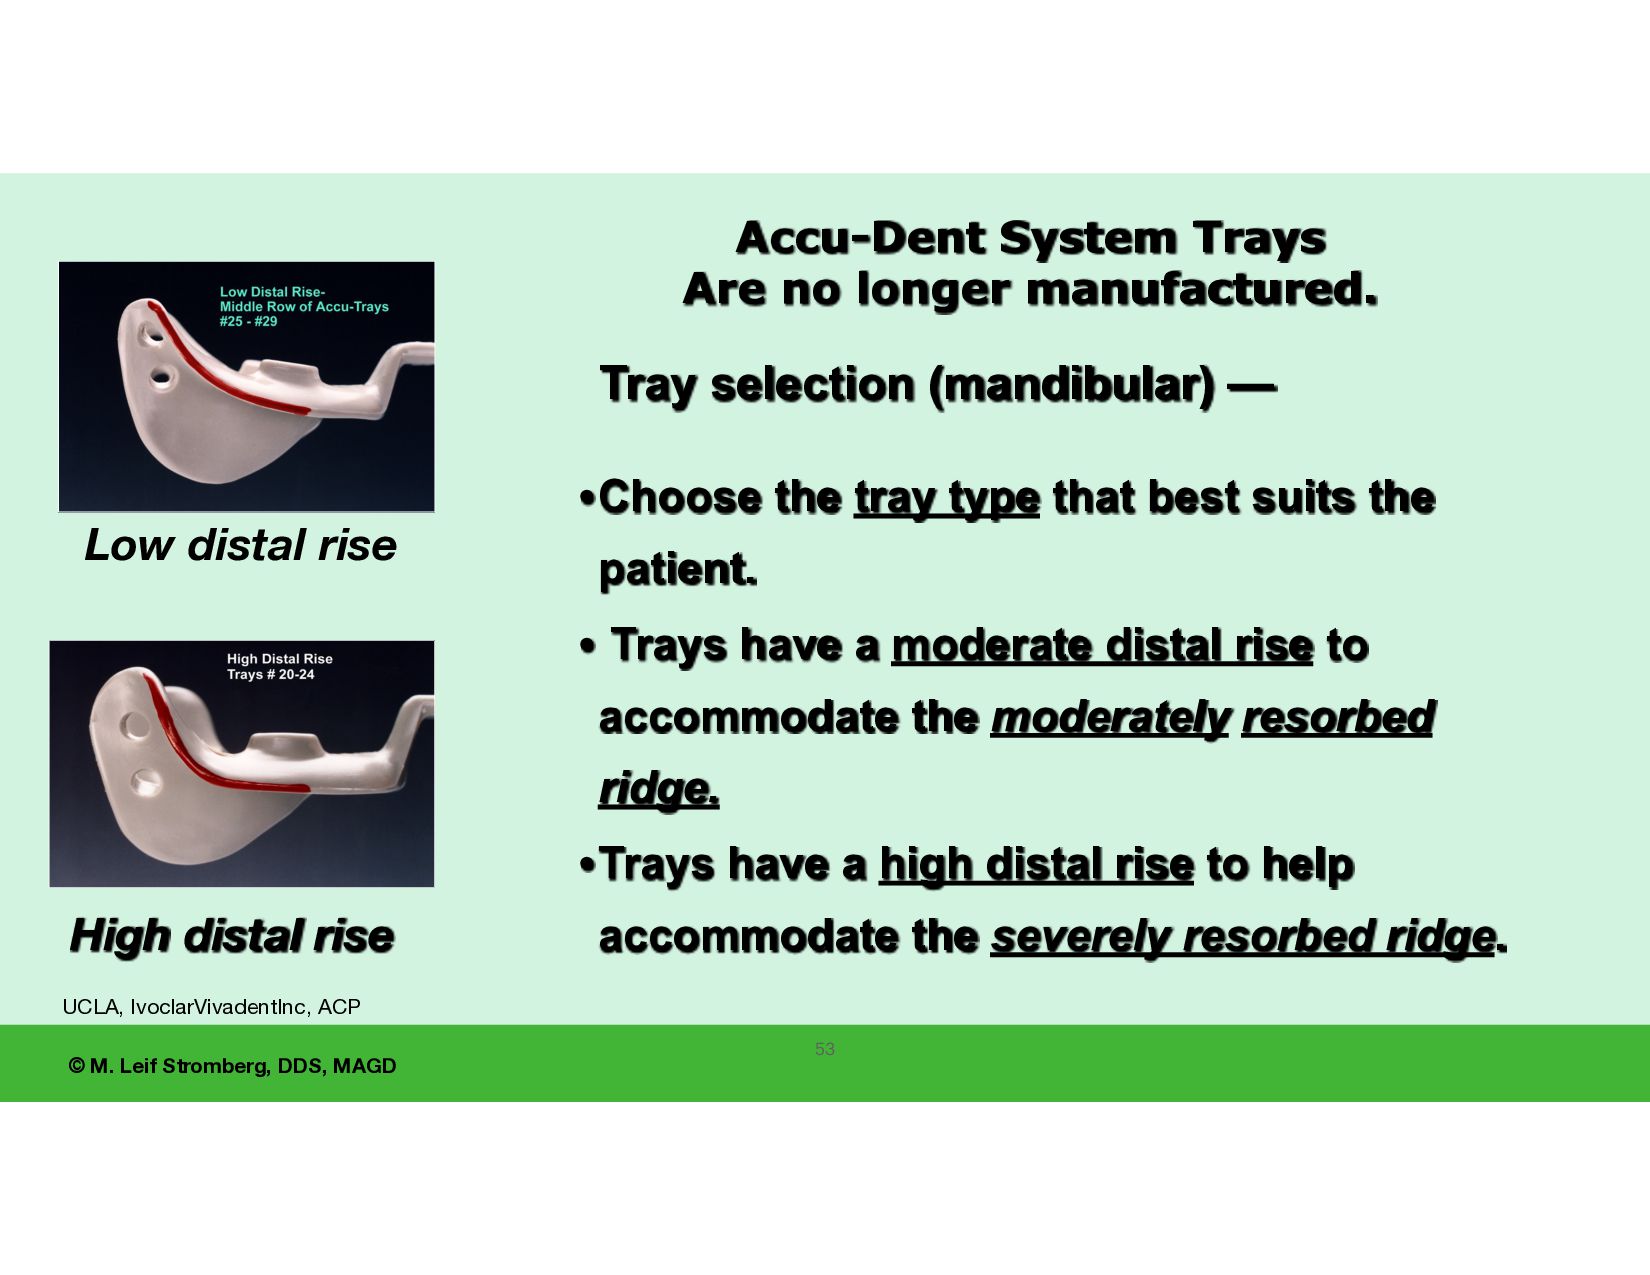
no longer manufactured. Tray selection (mandibular) — •Choose the tray type that best suits the patient. • Trays have a moderate distal rise to accommodate the moderately resorbed ridge. •Trays have a high distal rise to help accommodate the severely resorbed ridge. High distal rise UCLA, IvoclarVivadentInc, ACP 53 Low distal rise
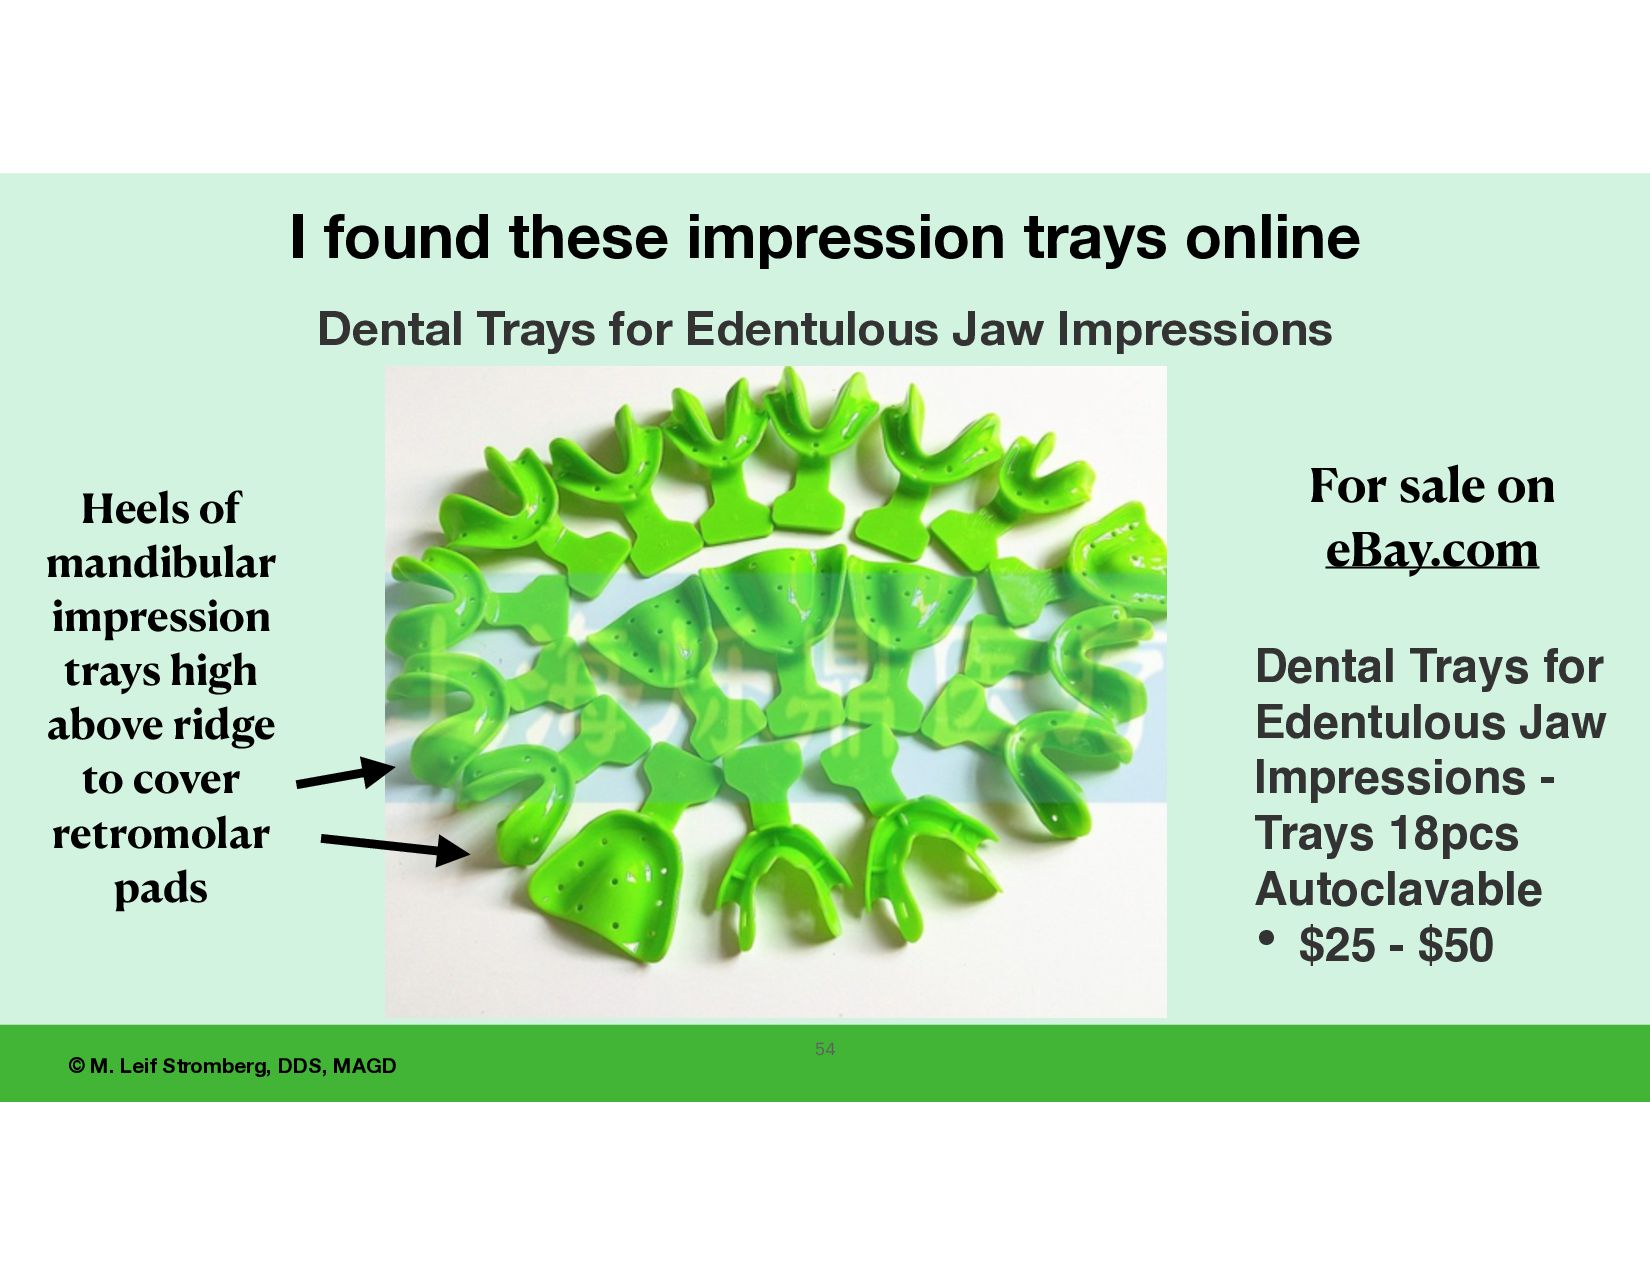
Jaw Impressions I found these impression trays online Heels of mandibular impression trays high above ridge to cover retromolar pads 54 For sale on eBay.com Dental Trays for Edentulous Jaw Impressions - Trays 18pcs Autoclavable • $25 - $50
to capture retromolar pads in impressions. High distal rise of the mandibular impression trays to cover the retromolar pads UCLA, IvoclarVivadentInc, ACP
AccuDent XD Impression System Alginate Syringe Material with water measuring vial and syringe Syringe alginate - light-bodied syringe alginate ows (low viscosity) yet stays in place (resists slumping). Place into the peripheral border areas using the AccuDent XD Syringe delivery system.
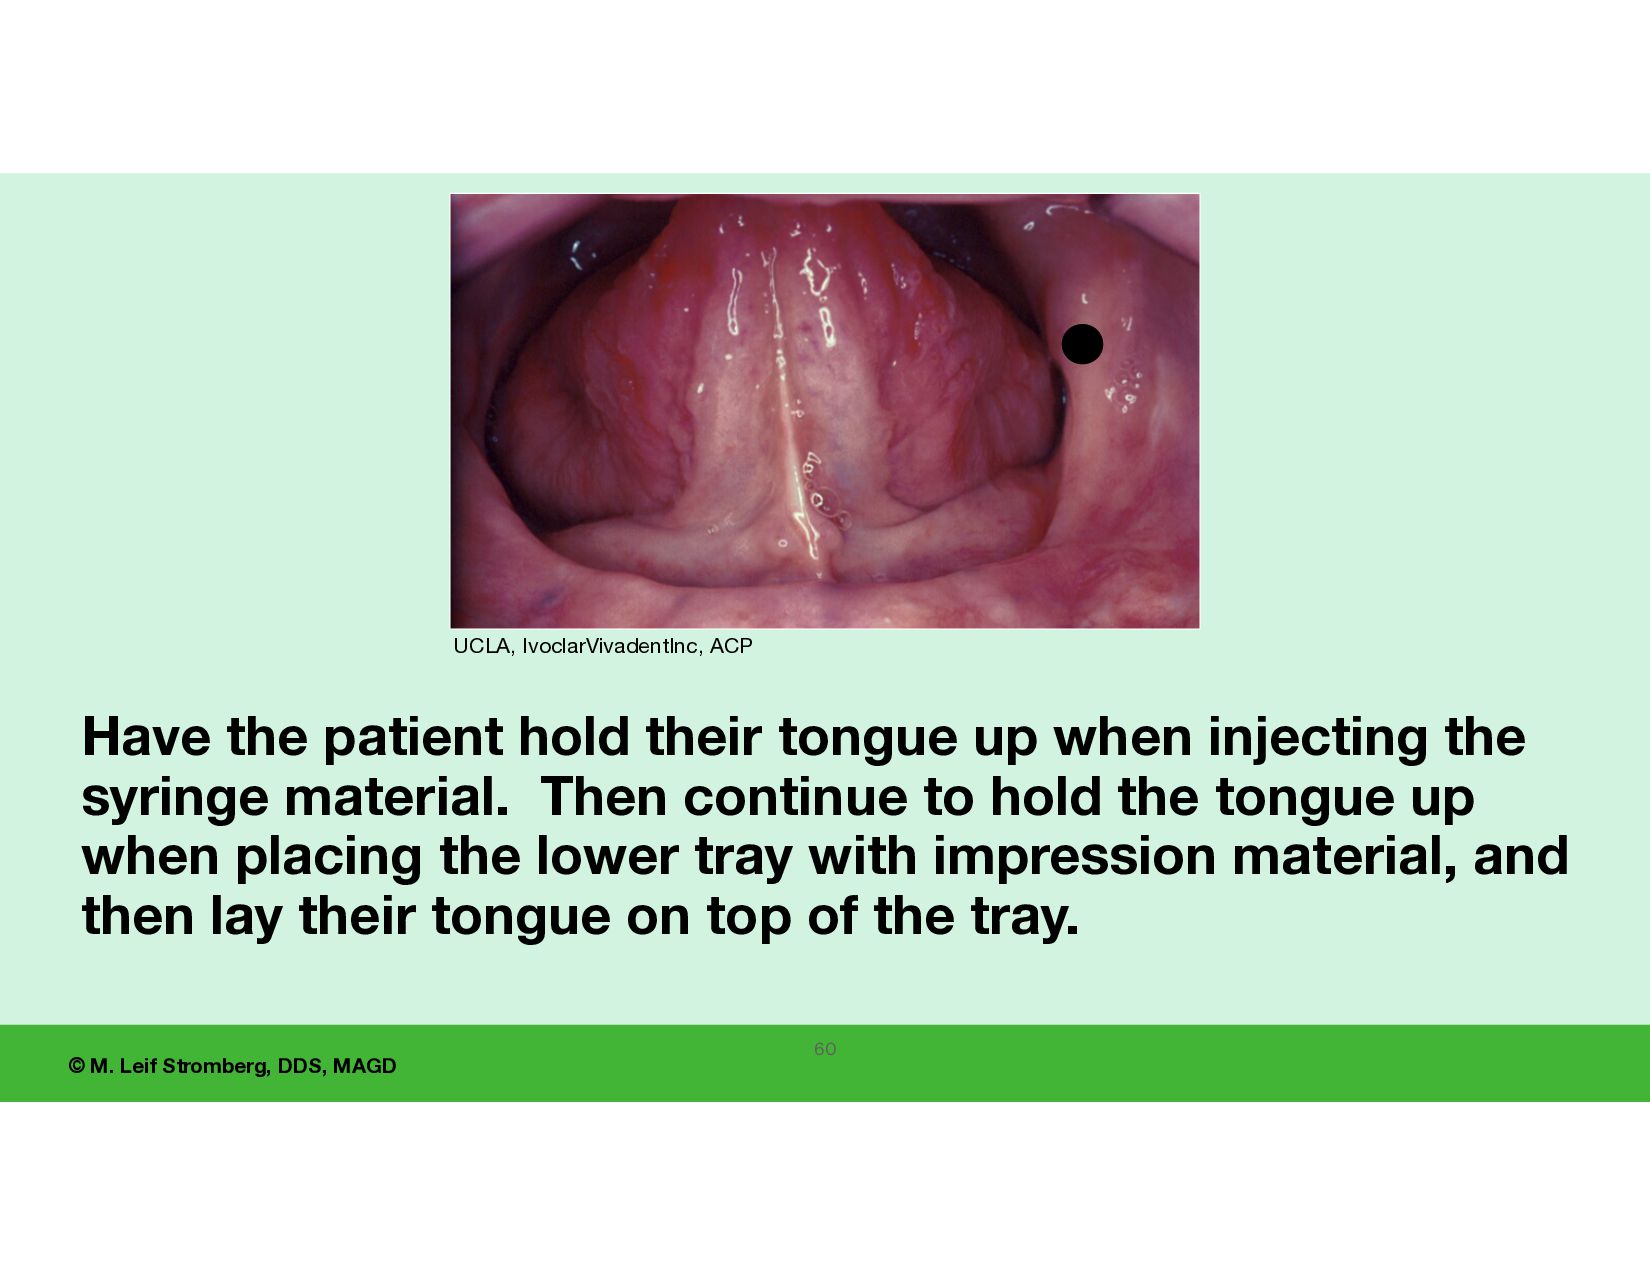
their tongue up when injecting the syringe material. Then continue to hold the tongue up when placing the lower tray with impression material, and then lay their tongue on top of the tray. 60 UCLA, IvoclarVivadentInc, ACP
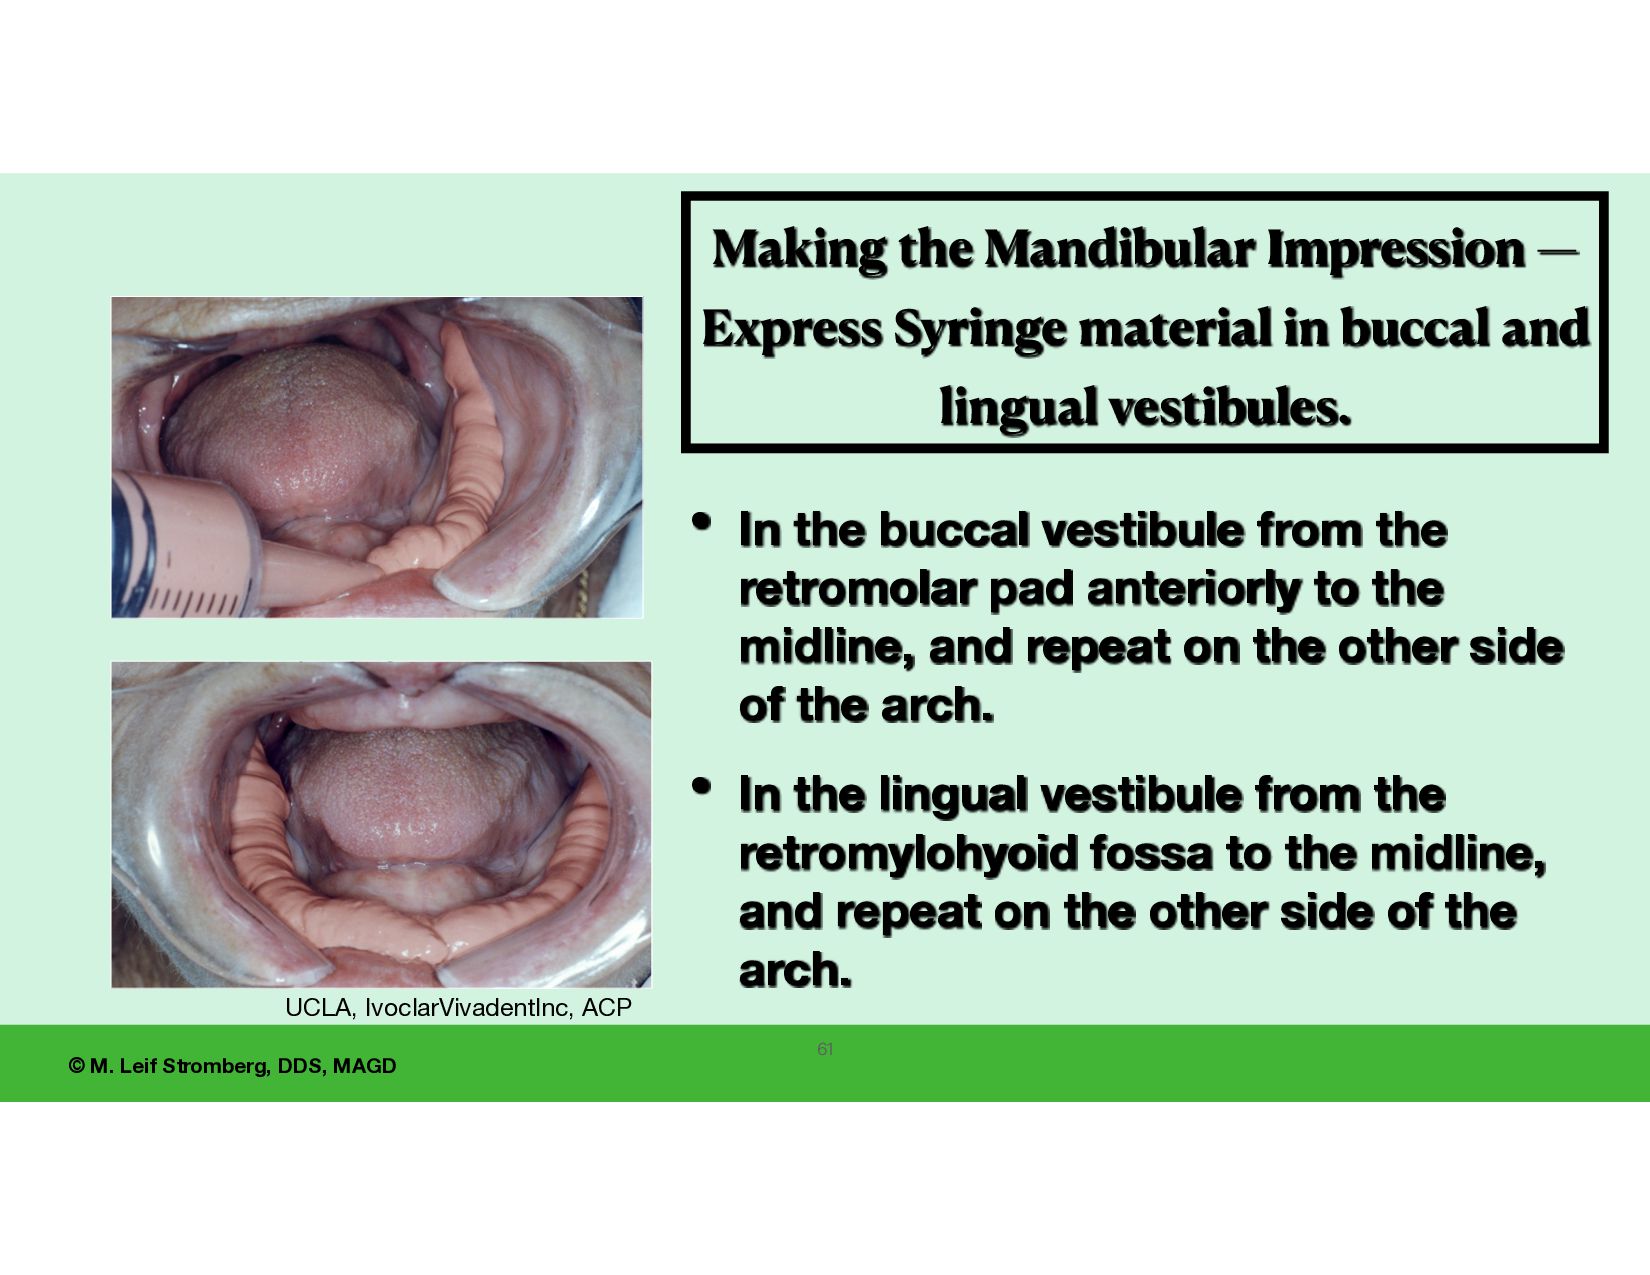
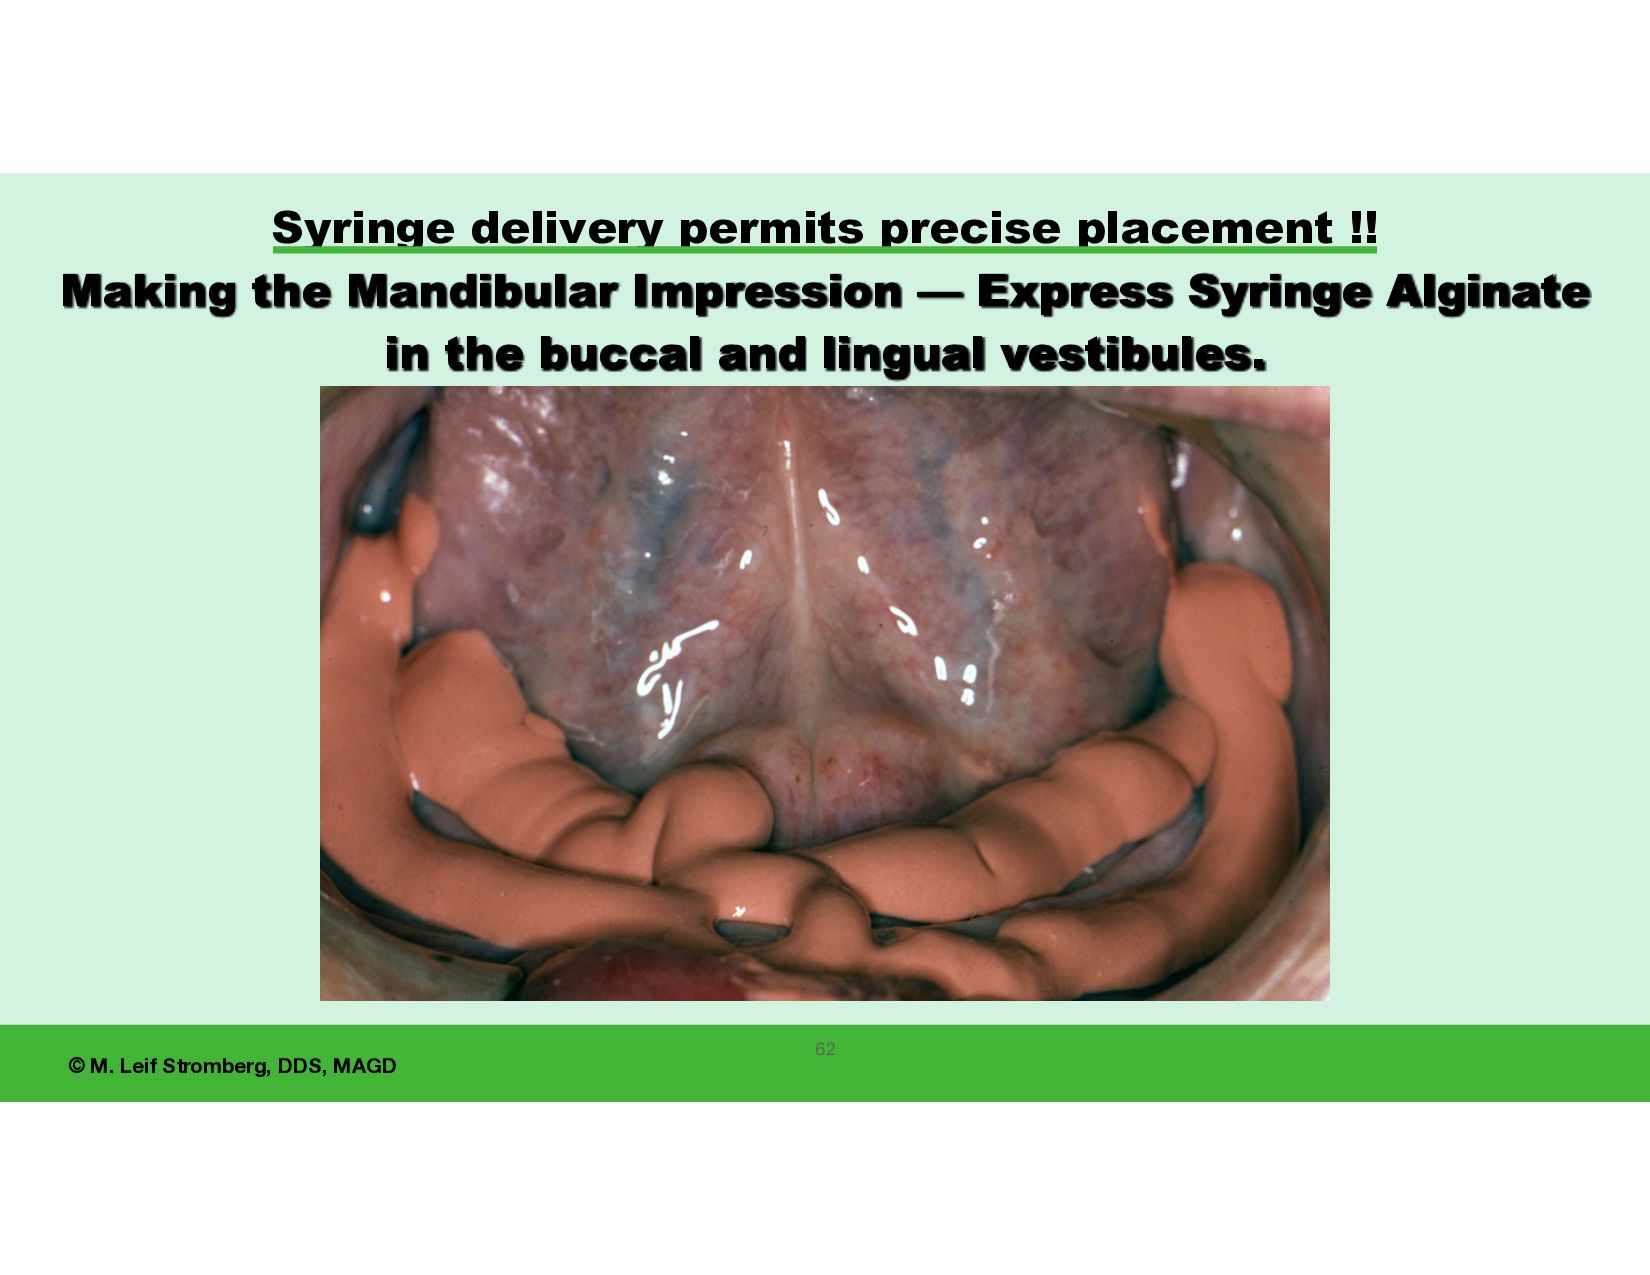
vestibule from the retromolar pad anteriorly to the midline, and repeat on the other side of the arch. • In the lingual vestibule from the retromylohyoid fossa to the midline, and repeat on the other side of the arch. Making the Mandibular Impression — Express Syringe material in buccal and lingual vestibules. UCLA, IvoclarVivadentInc, ACP 61
hold their tongue upward as you place and rotate the tray into position. 2. Seat the tray anterior to posterior until the Tray alginate appears above the posterior of the tray, which is above the retromolar pad. Then, stop seating the tray. 3. Have the patient rest their tongue on the top of the tray - and remain motionless. 64 UCLA, IvoclarVivadentInc, ACP
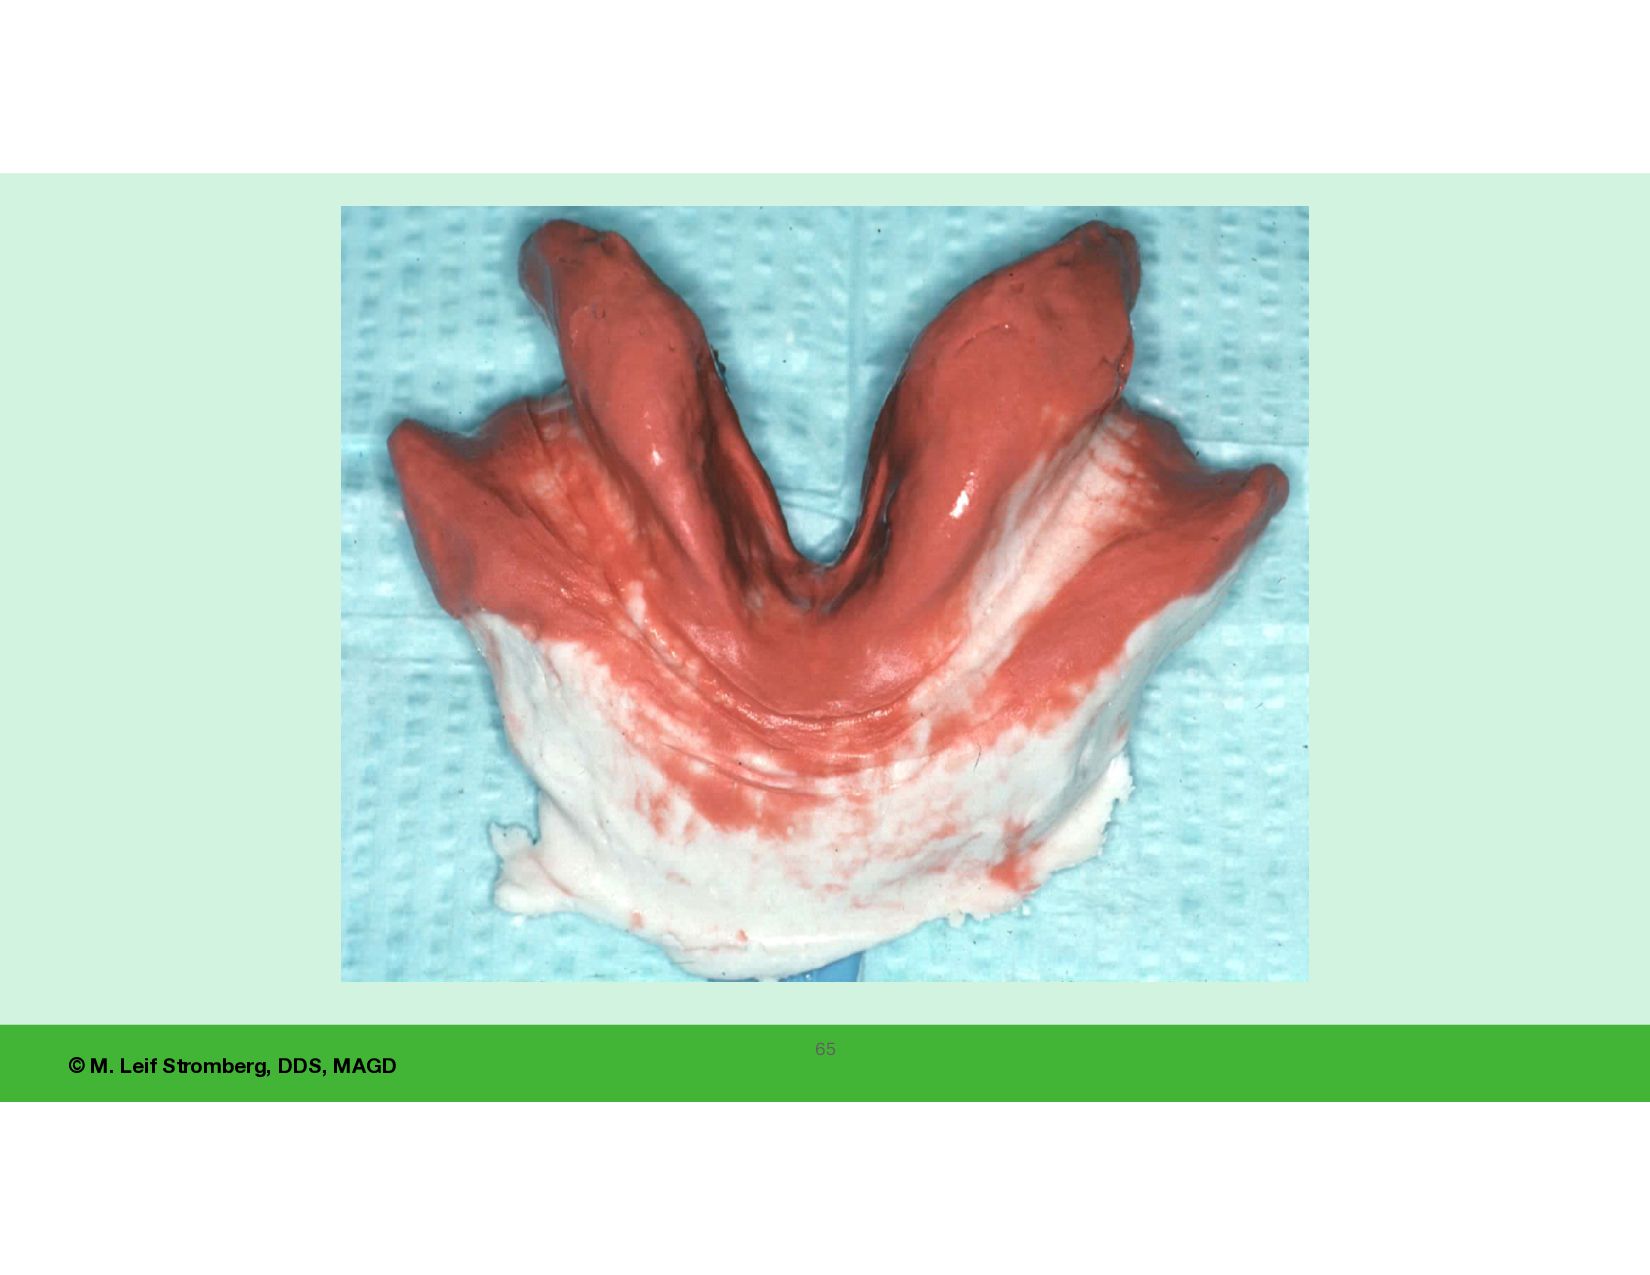
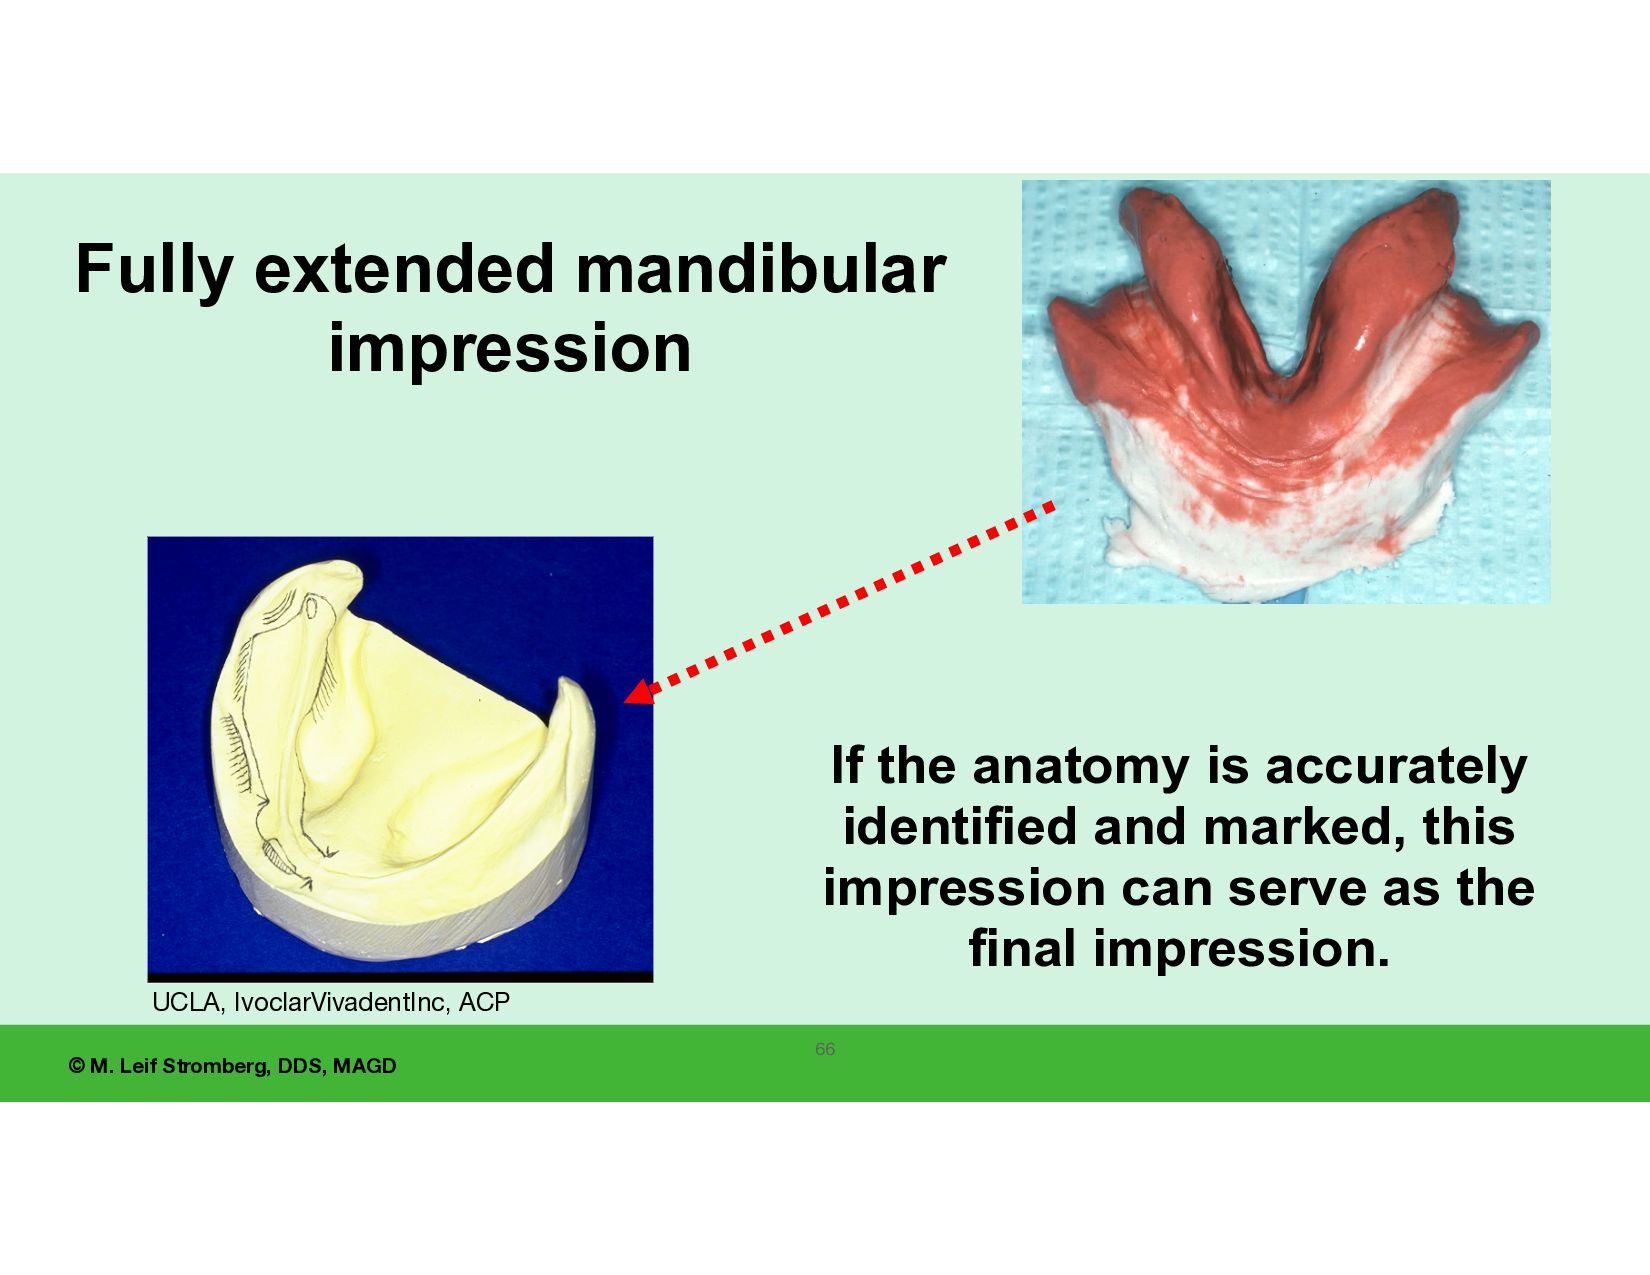
is accurately identified and marked, this impression can serve as the final impression. Fully extended mandibular impression UCLA, IvoclarVivadentInc, ACP
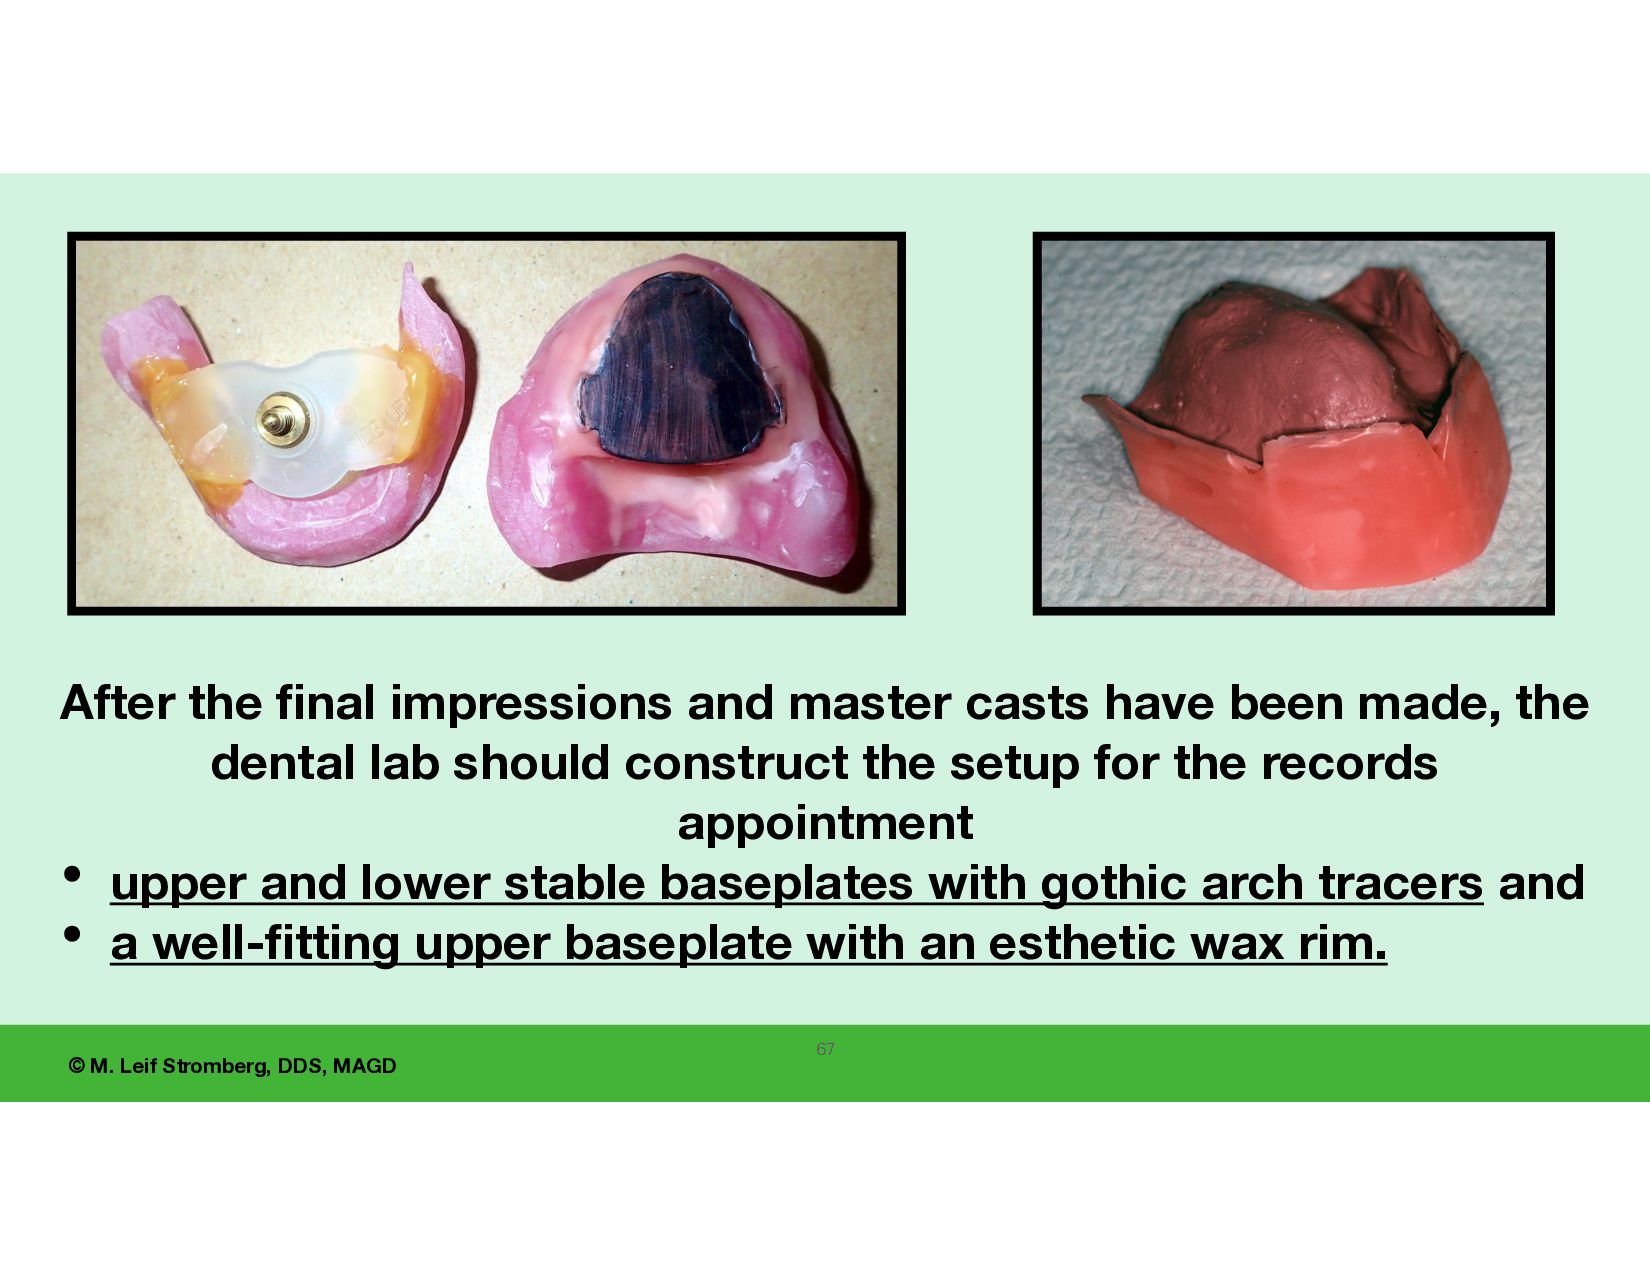
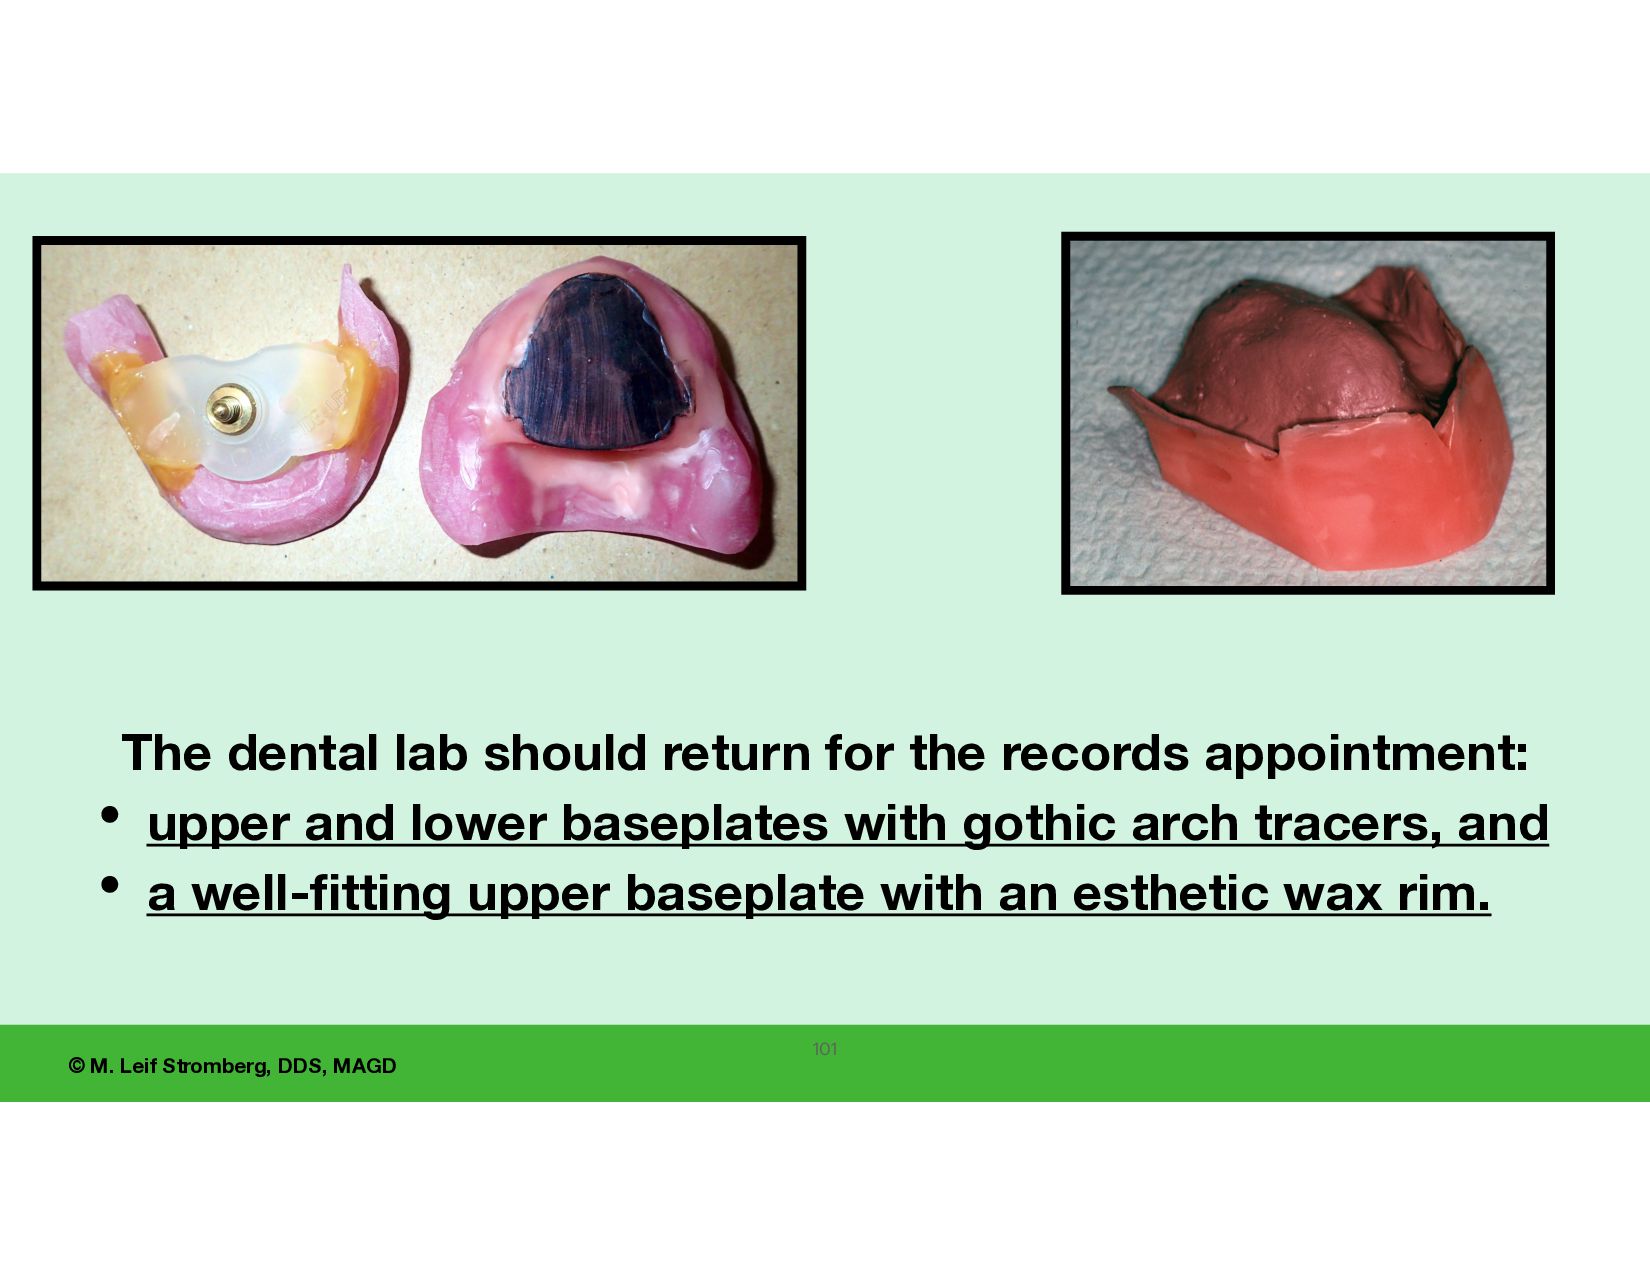
nal impressions and master casts have been made, the dental lab should construct the setup for the records appointment • upper and lower stable baseplates with gothic arch tracers and • a well- fi tting upper baseplate with an esthetic wax rim.
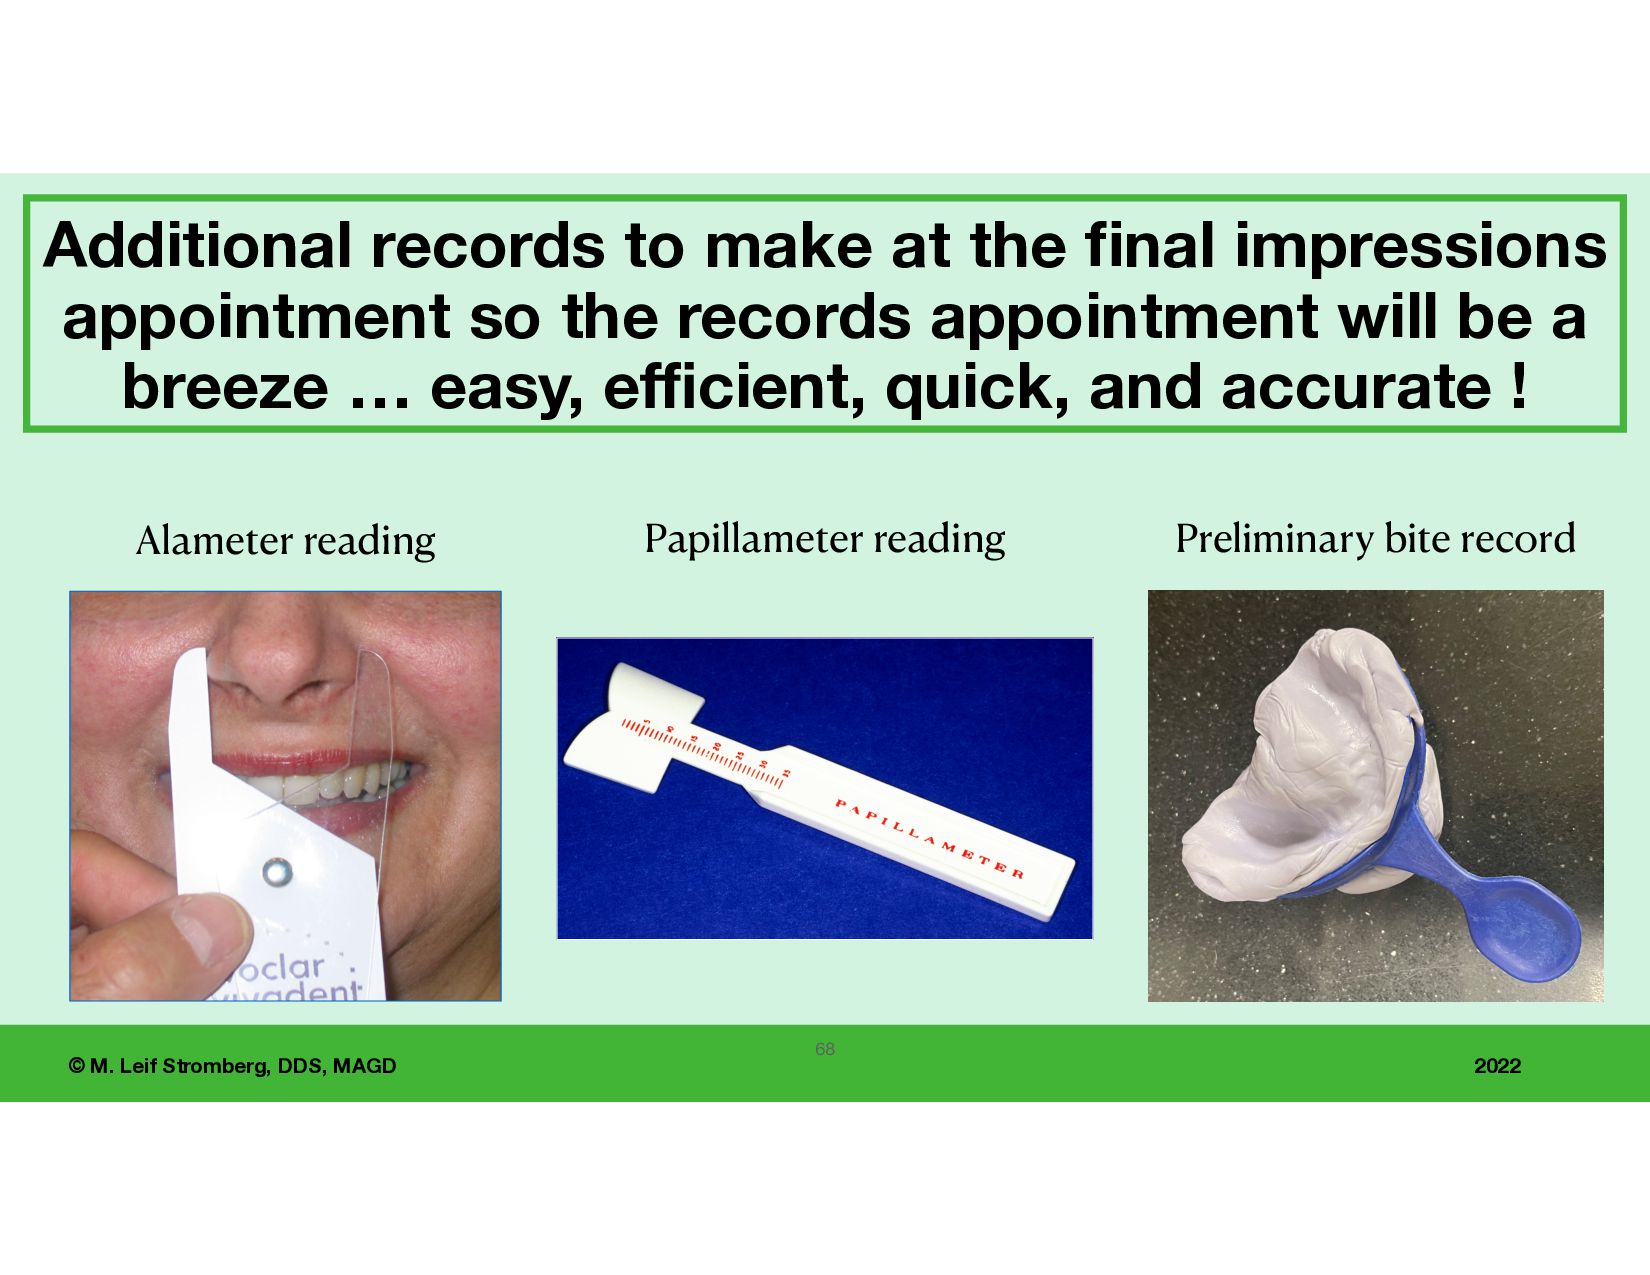
make at the nal impressions appointment so the records appointment will be a breeze … easy, e ff i cient, quick, and accurate ! 68 Papillameter reading Alameter reading Preliminary bite record
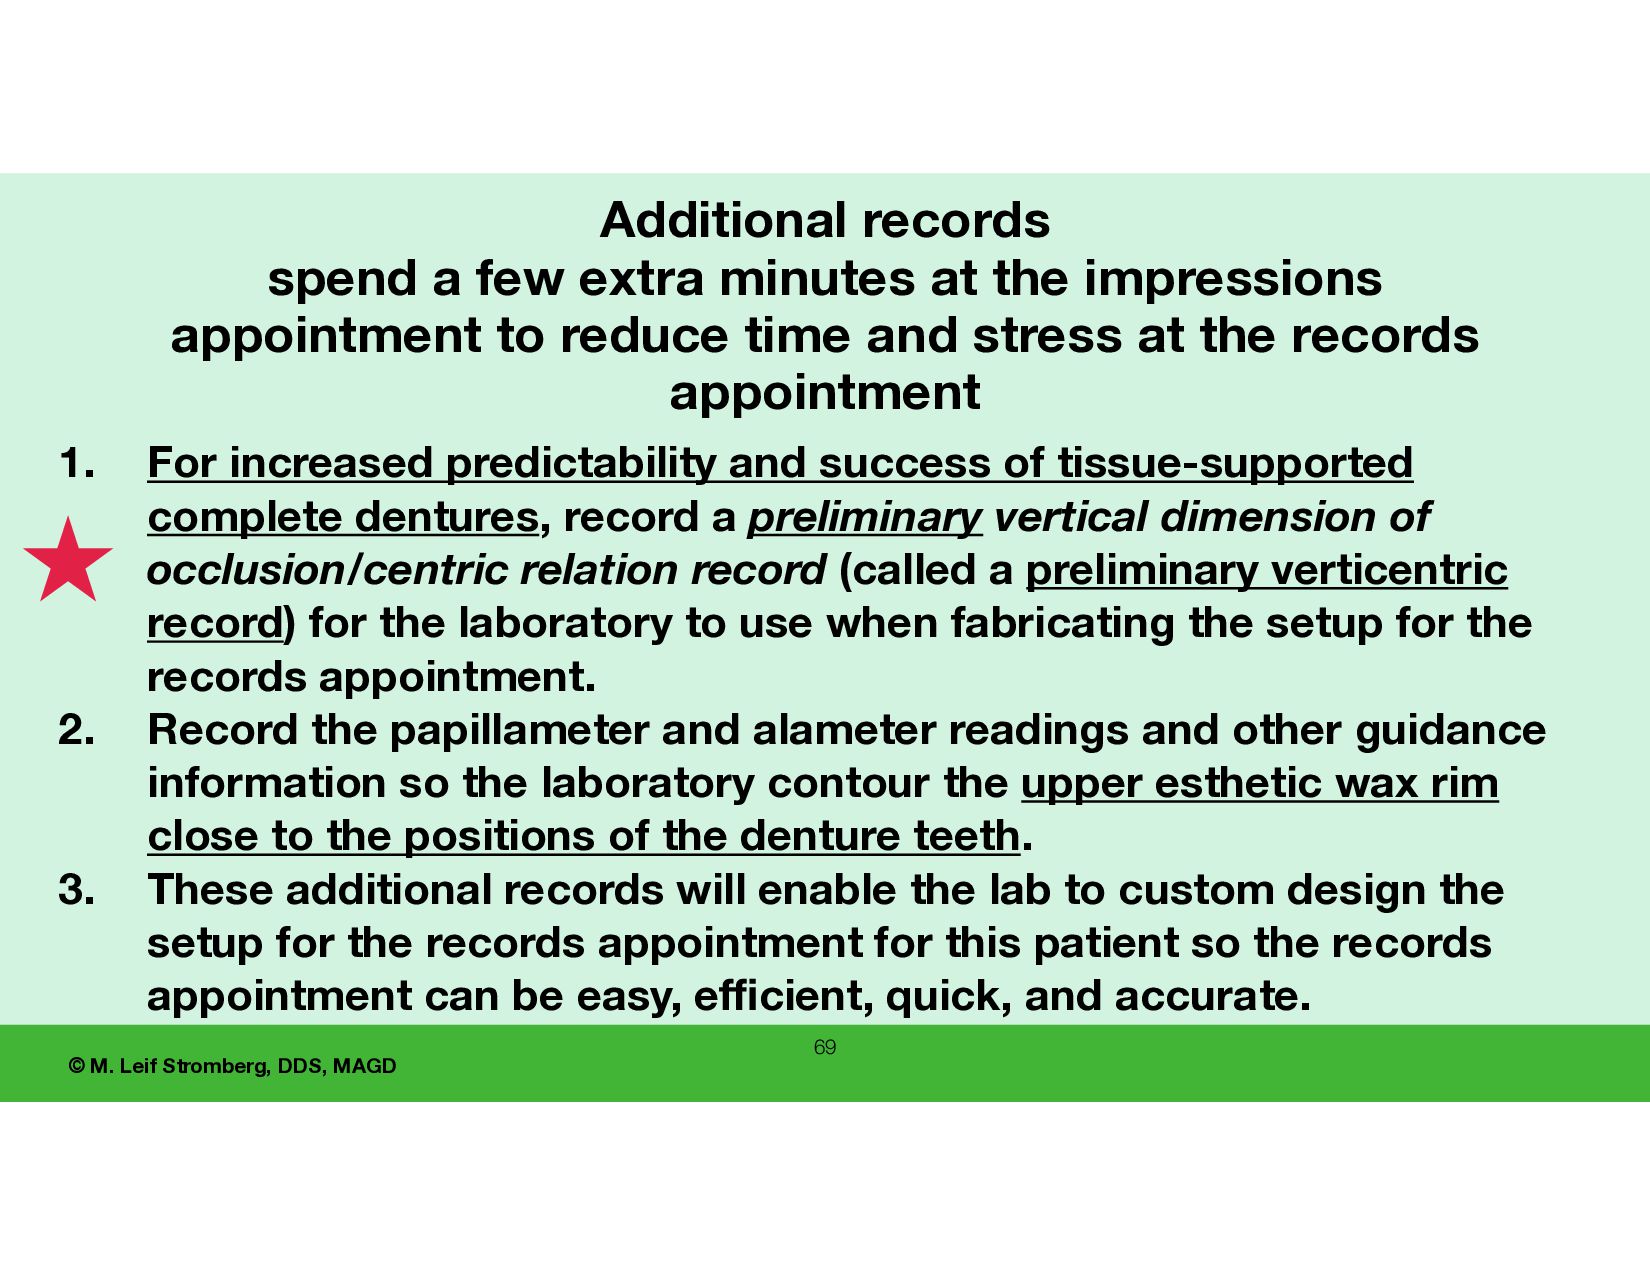
predictability and success of tissue-supported complete dentures, record a preliminary vertical dimension of occlusion/centric relation record (called a preliminary verticentric record) for the laboratory to use when fabricating the setup for the records appointment. 2. Record the papillameter and alameter readings and other guidance information so the laboratory contour the upper esthetic wax rim close to the positions of the denture teeth. 3. These additional records will enable the lab to custom design the setup for the records appointment for this patient so the records appointment can be easy, e ff i cient, quick, and accurate. Additional records spend a few extra minutes at the impressions appointment to reduce time and stress at the records appointment
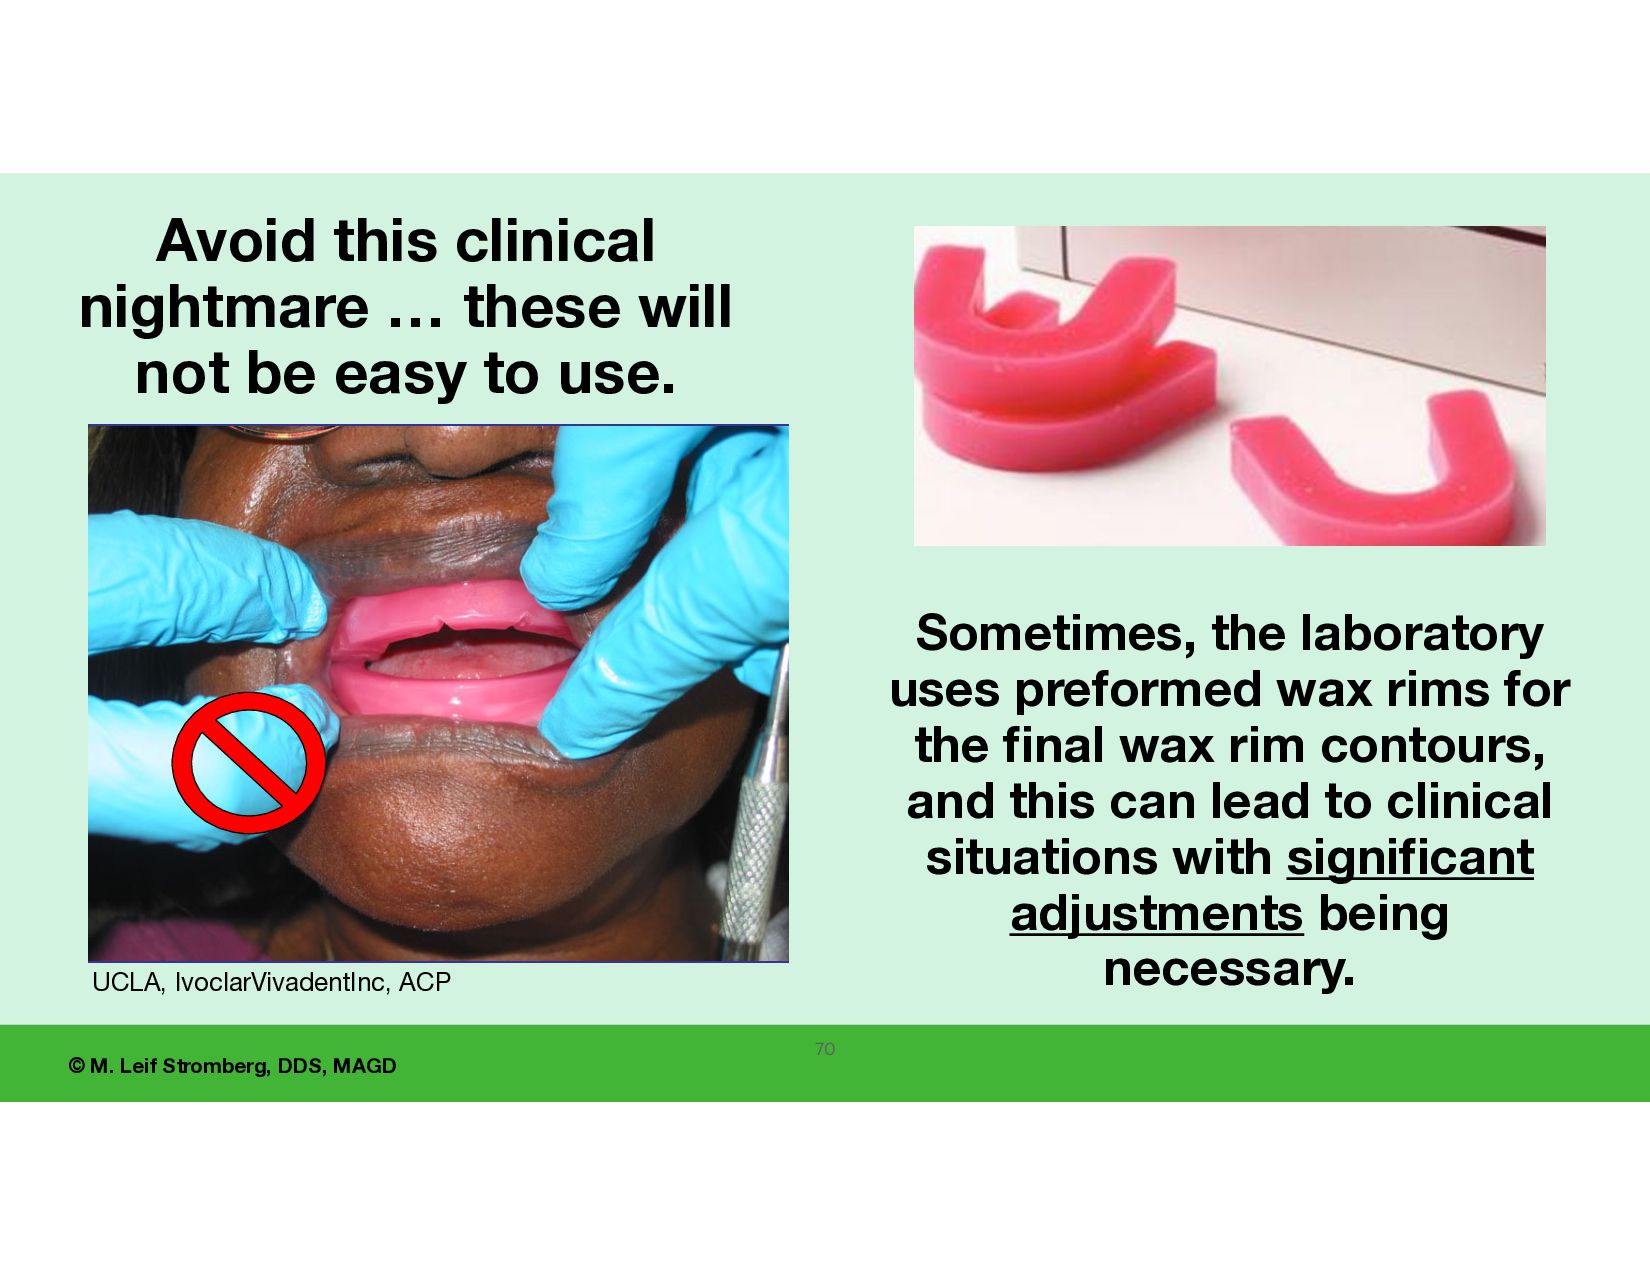
… these will not be easy to use. Sometimes, the laboratory uses preformed wax rims for the fi nal wax rim contours, and this can lead to clinical situations with signi fi cant adjustments being necessary. 70 UCLA, IvoclarVivadentInc, ACP 61
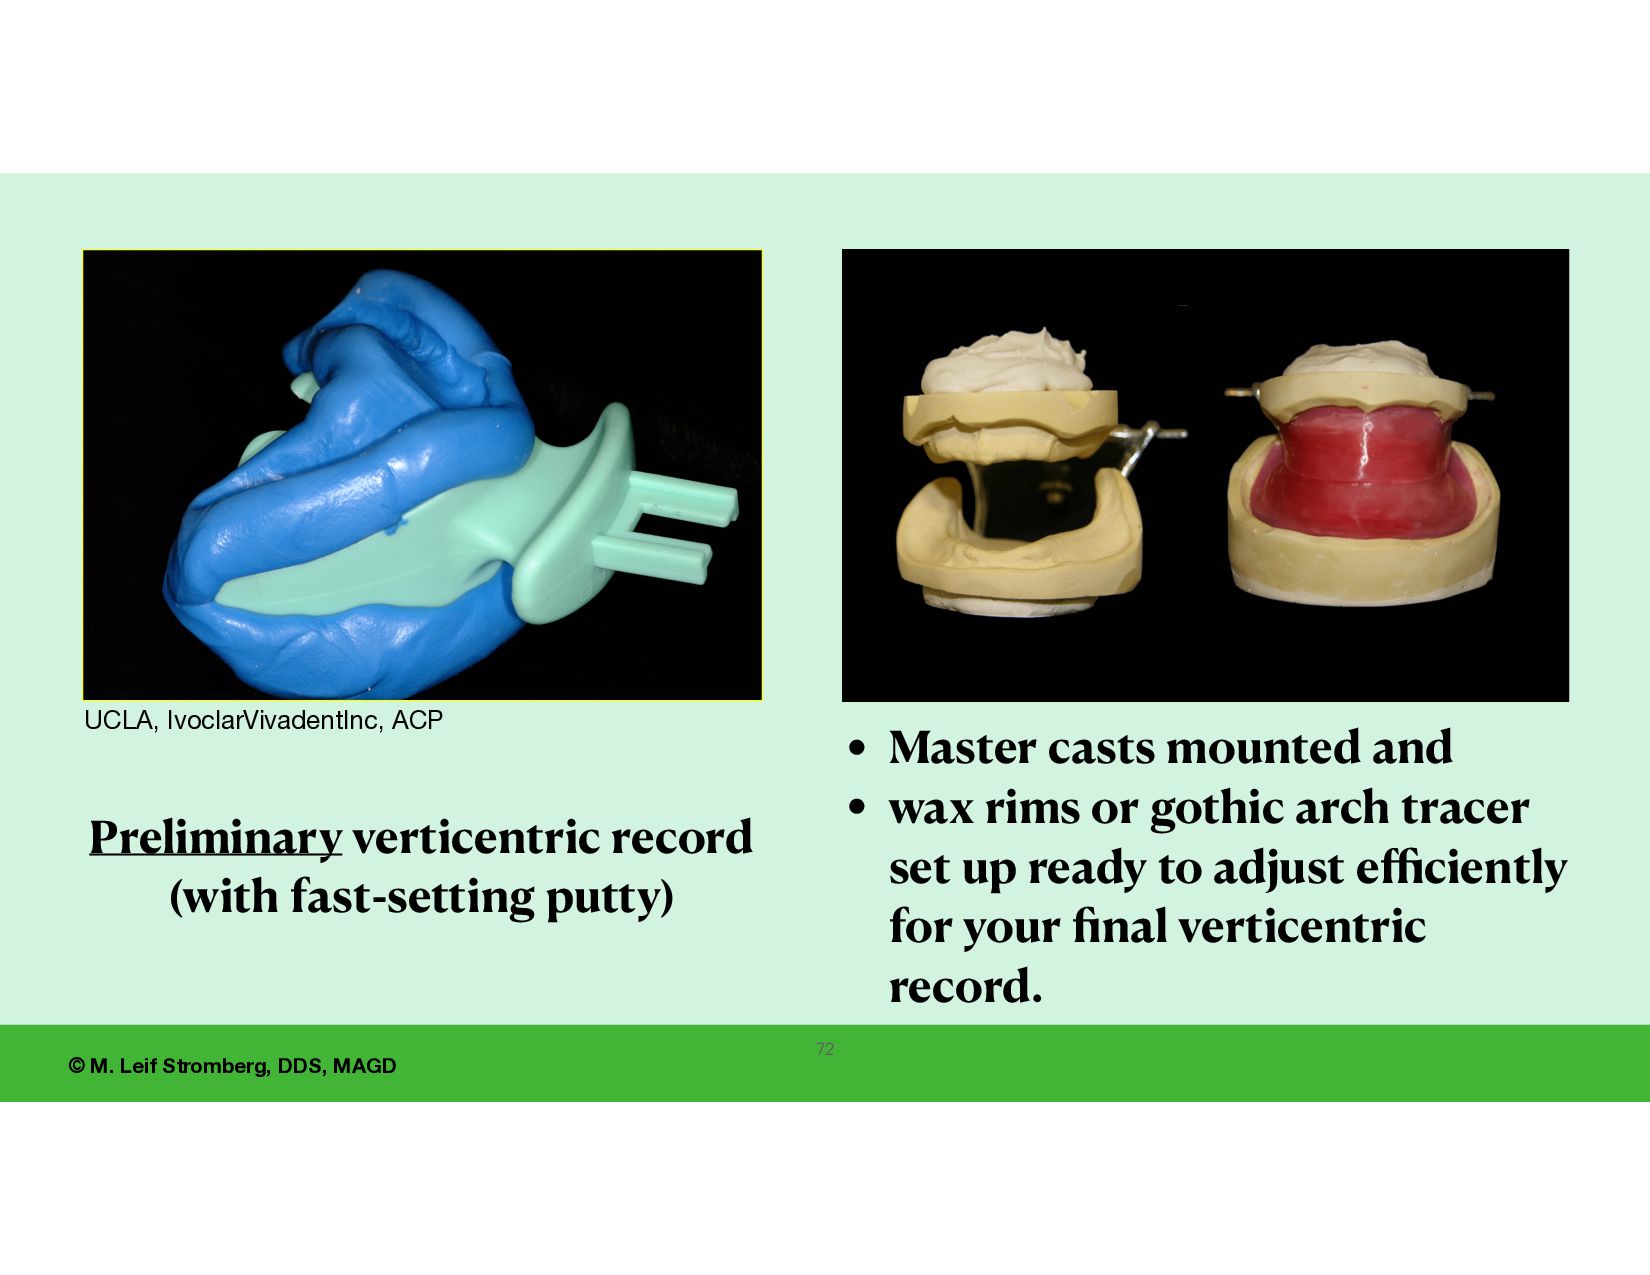
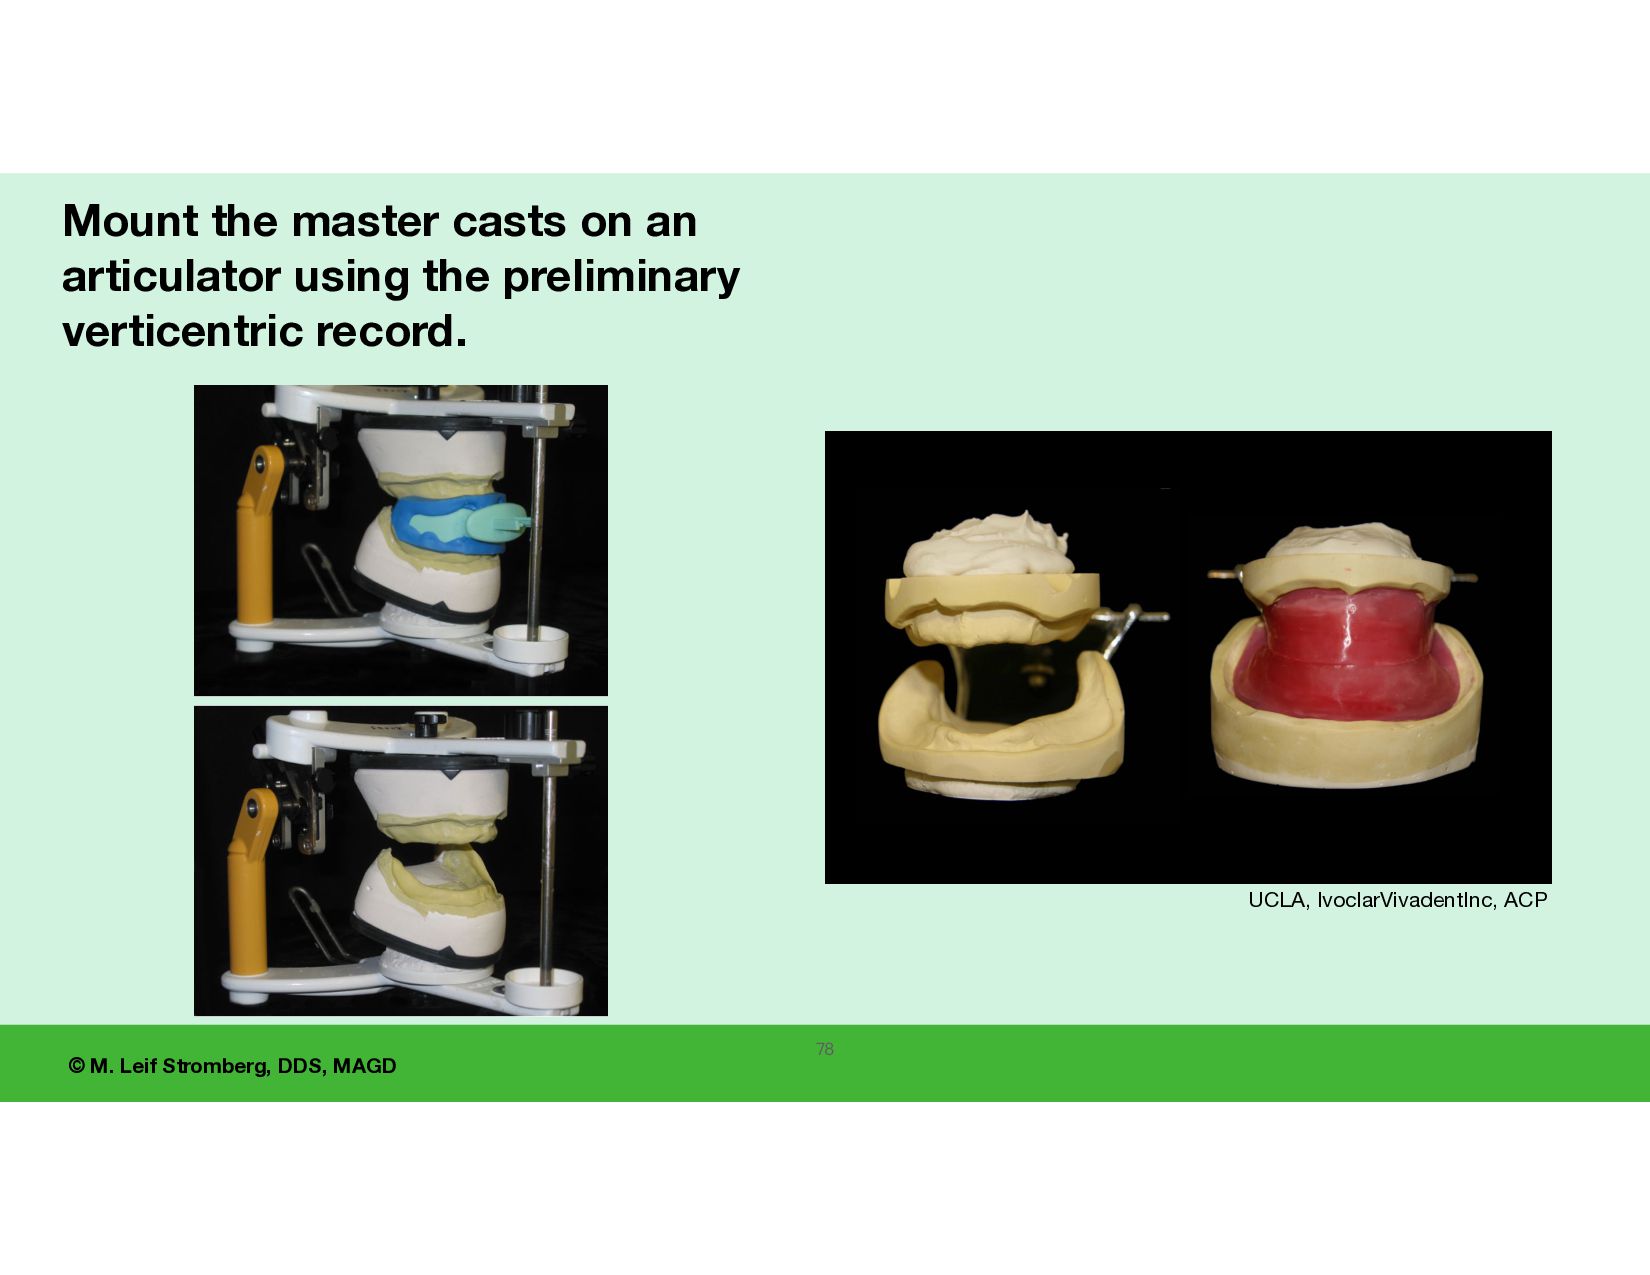
Preliminary verticentric record (with fast-setting putty) • Master casts mounted and • wax rims or gothic arch tracer set up ready to adjust e ff i ciently for your fi nal verticentric record. UCLA, IvoclarVivadentInc, ACP
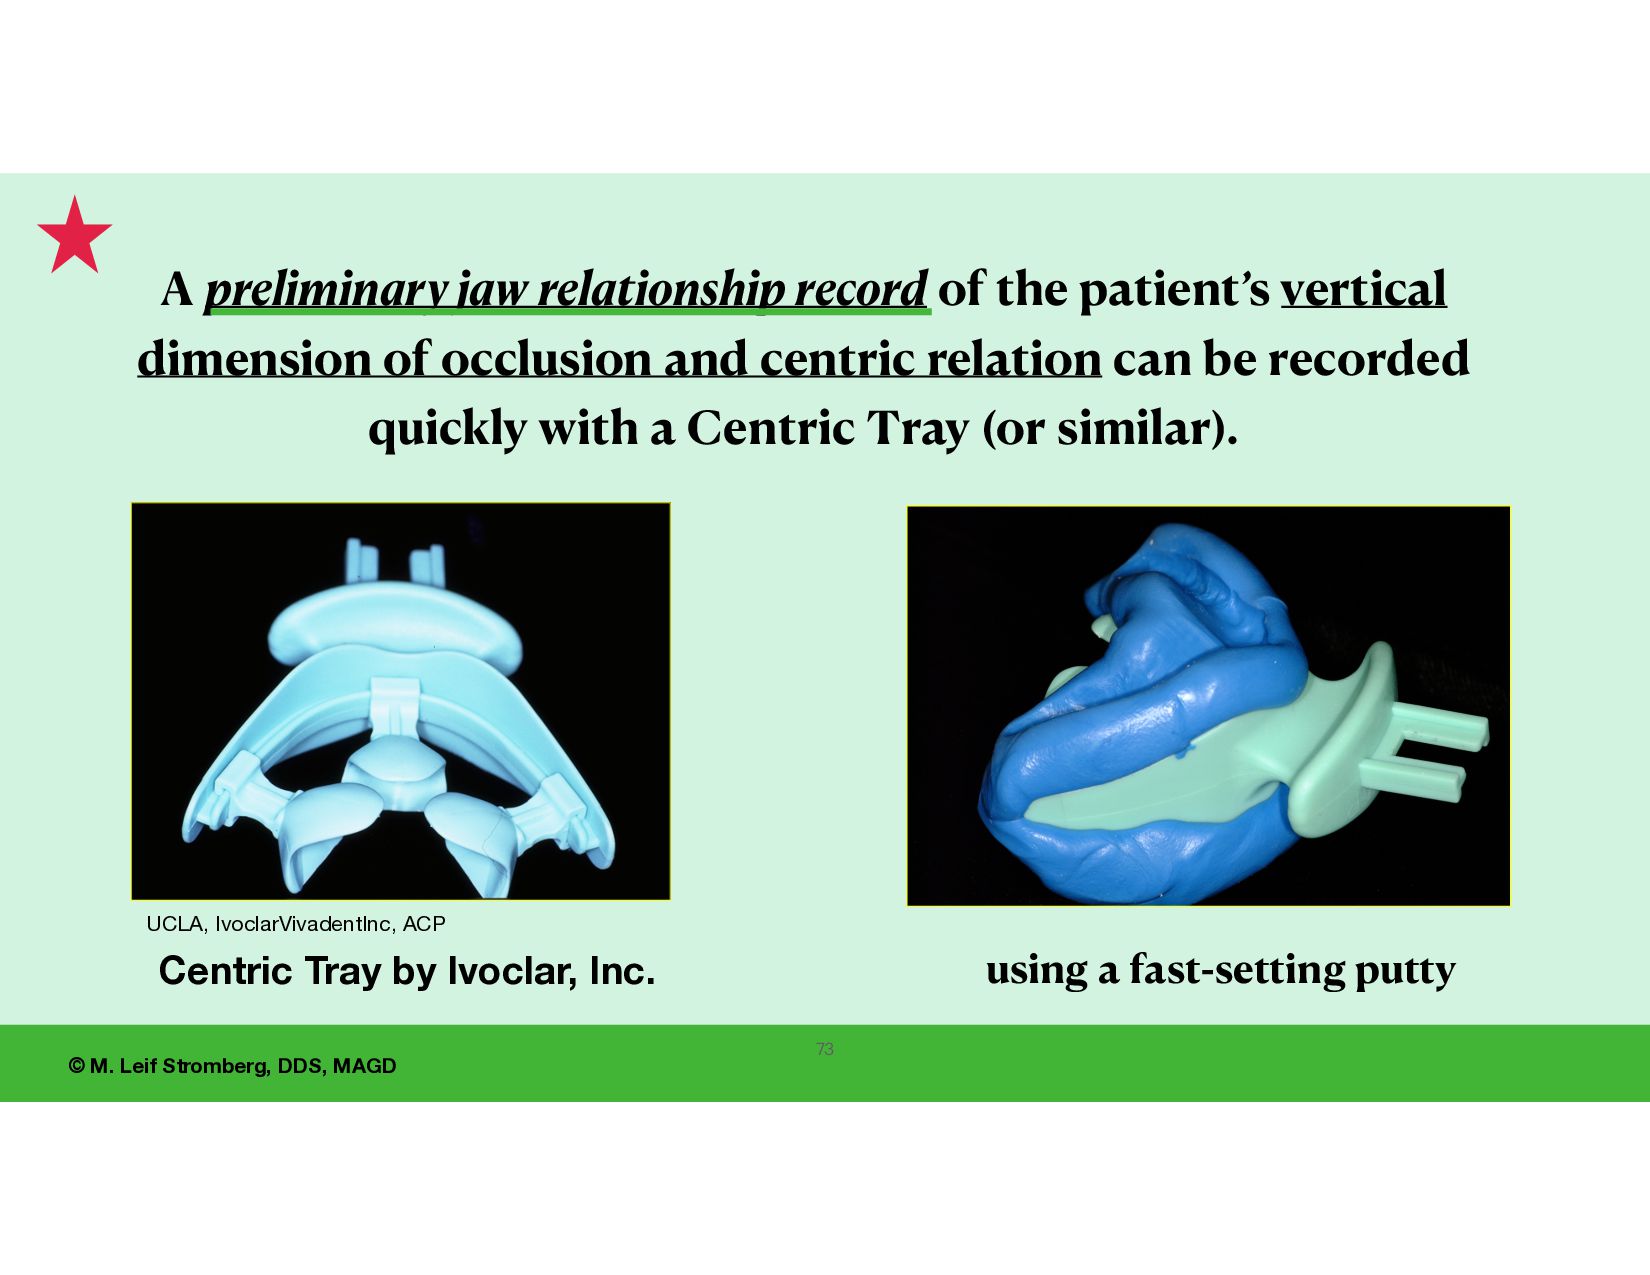
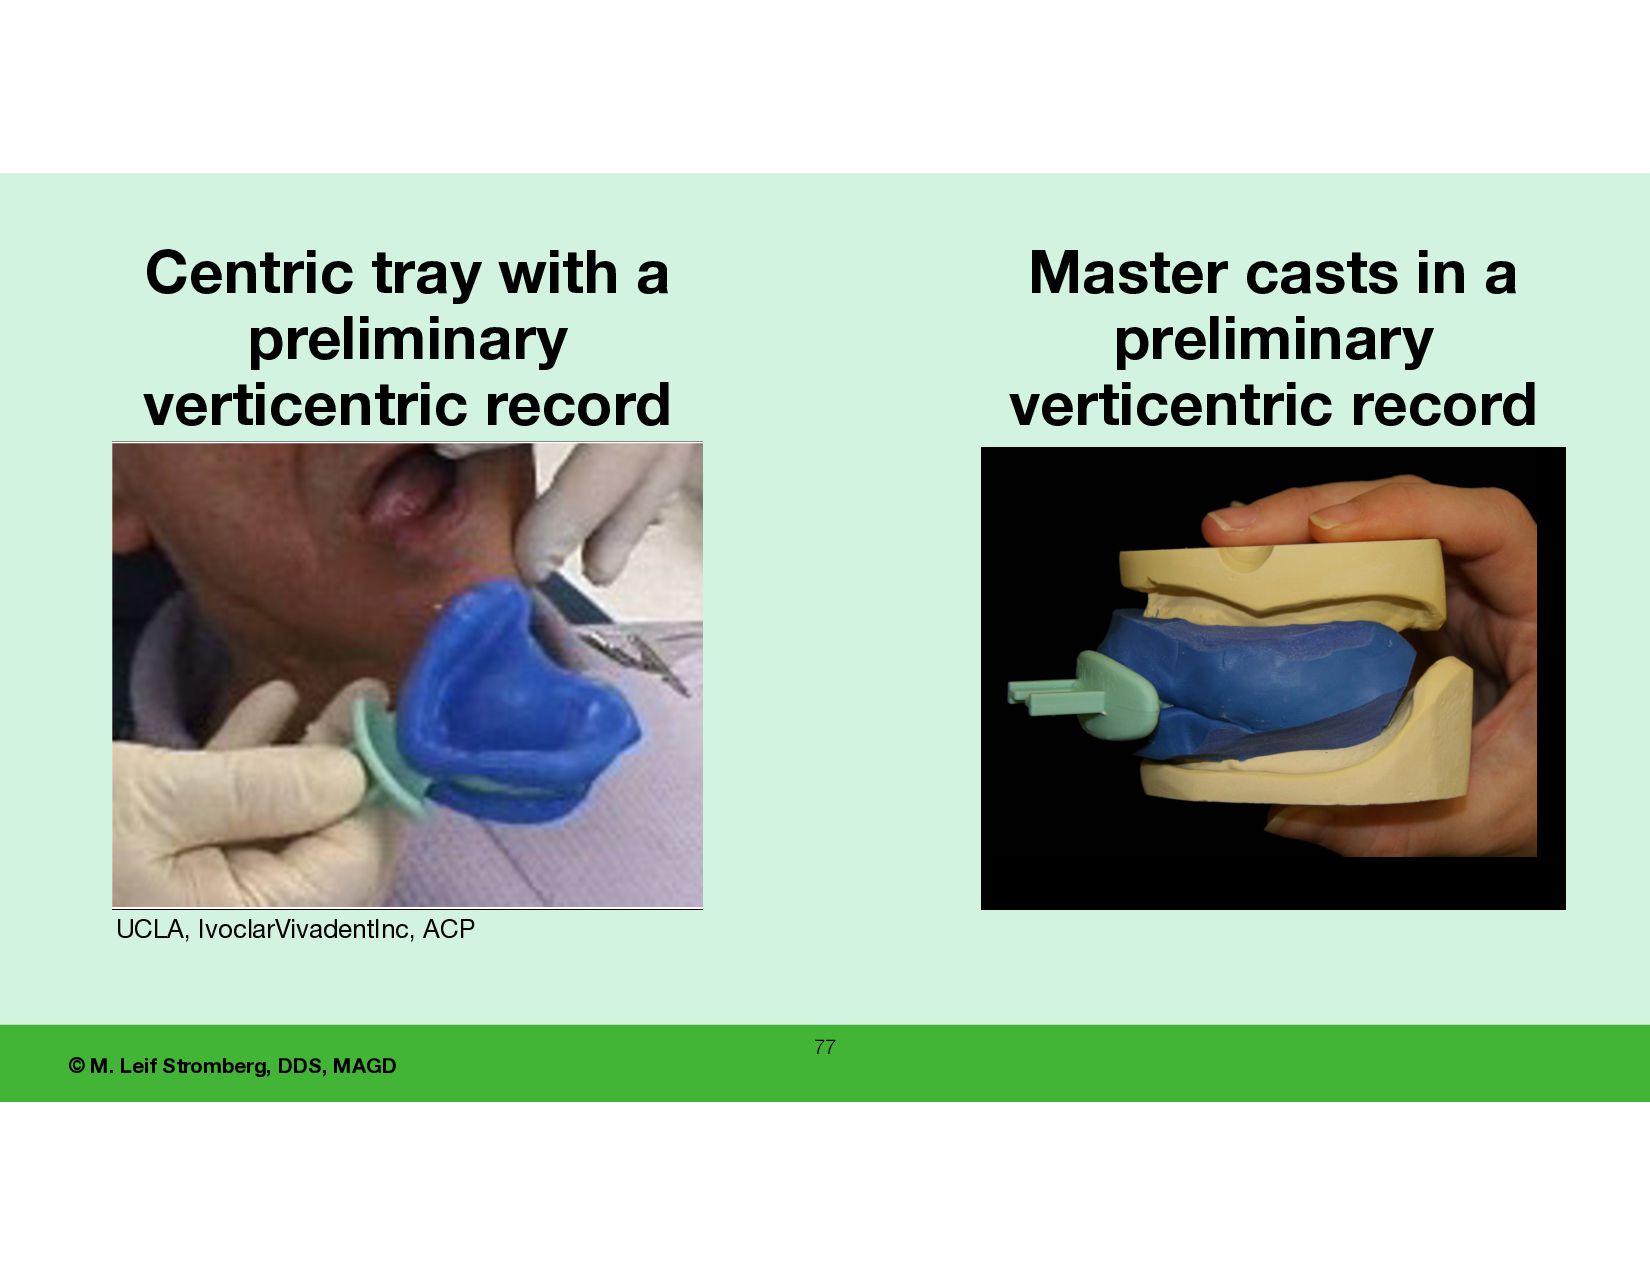
record of the patient’s vertical dimension of occlusion and centric relation can be recorded quickly with a Centric Tray (or similar). UCLA, IvoclarVivadentInc, ACP 73 Centric Tray by Ivoclar, Inc. using a fast-setting putty
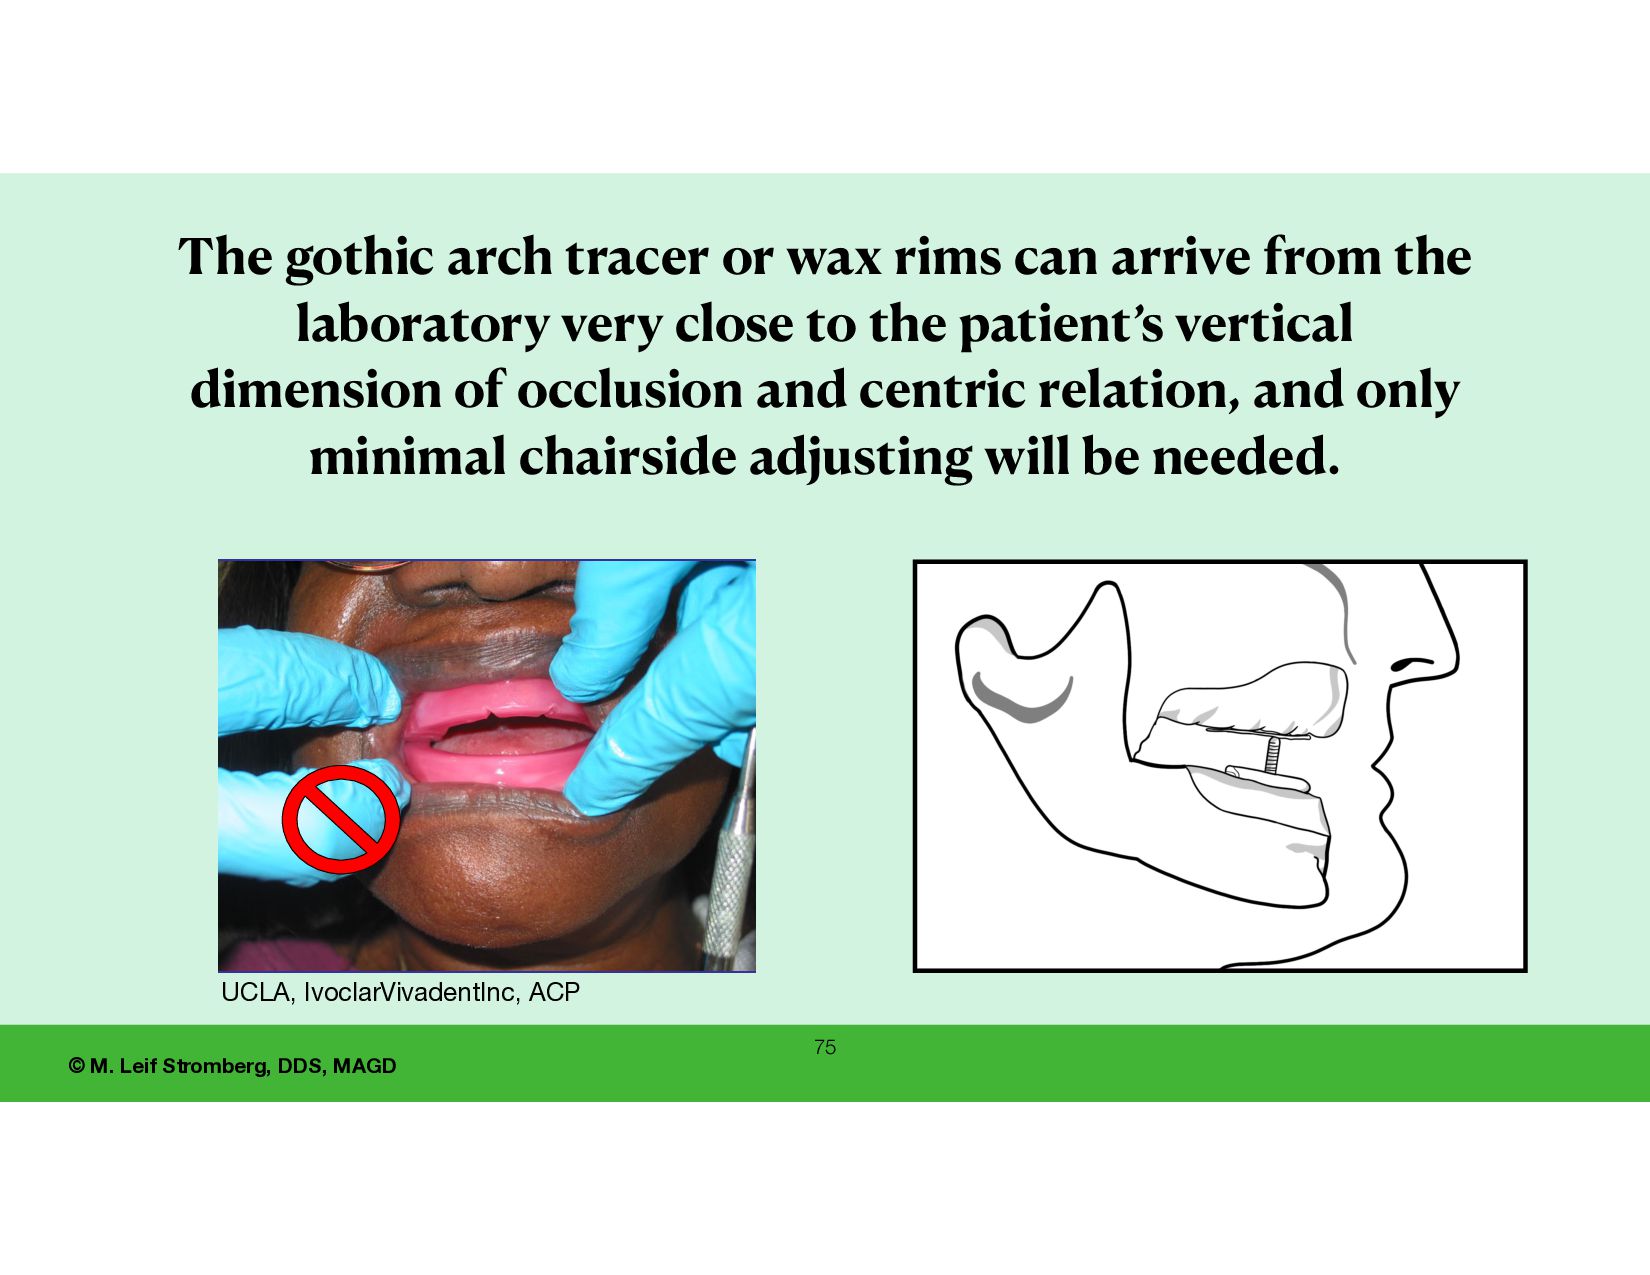
tracer or wax rims can arrive from the laboratory very close to the patient’s vertical dimension of occlusion and centric relation, and only minimal chairside adjusting will be needed. 61 UCLA, IvoclarVivadentInc, ACP
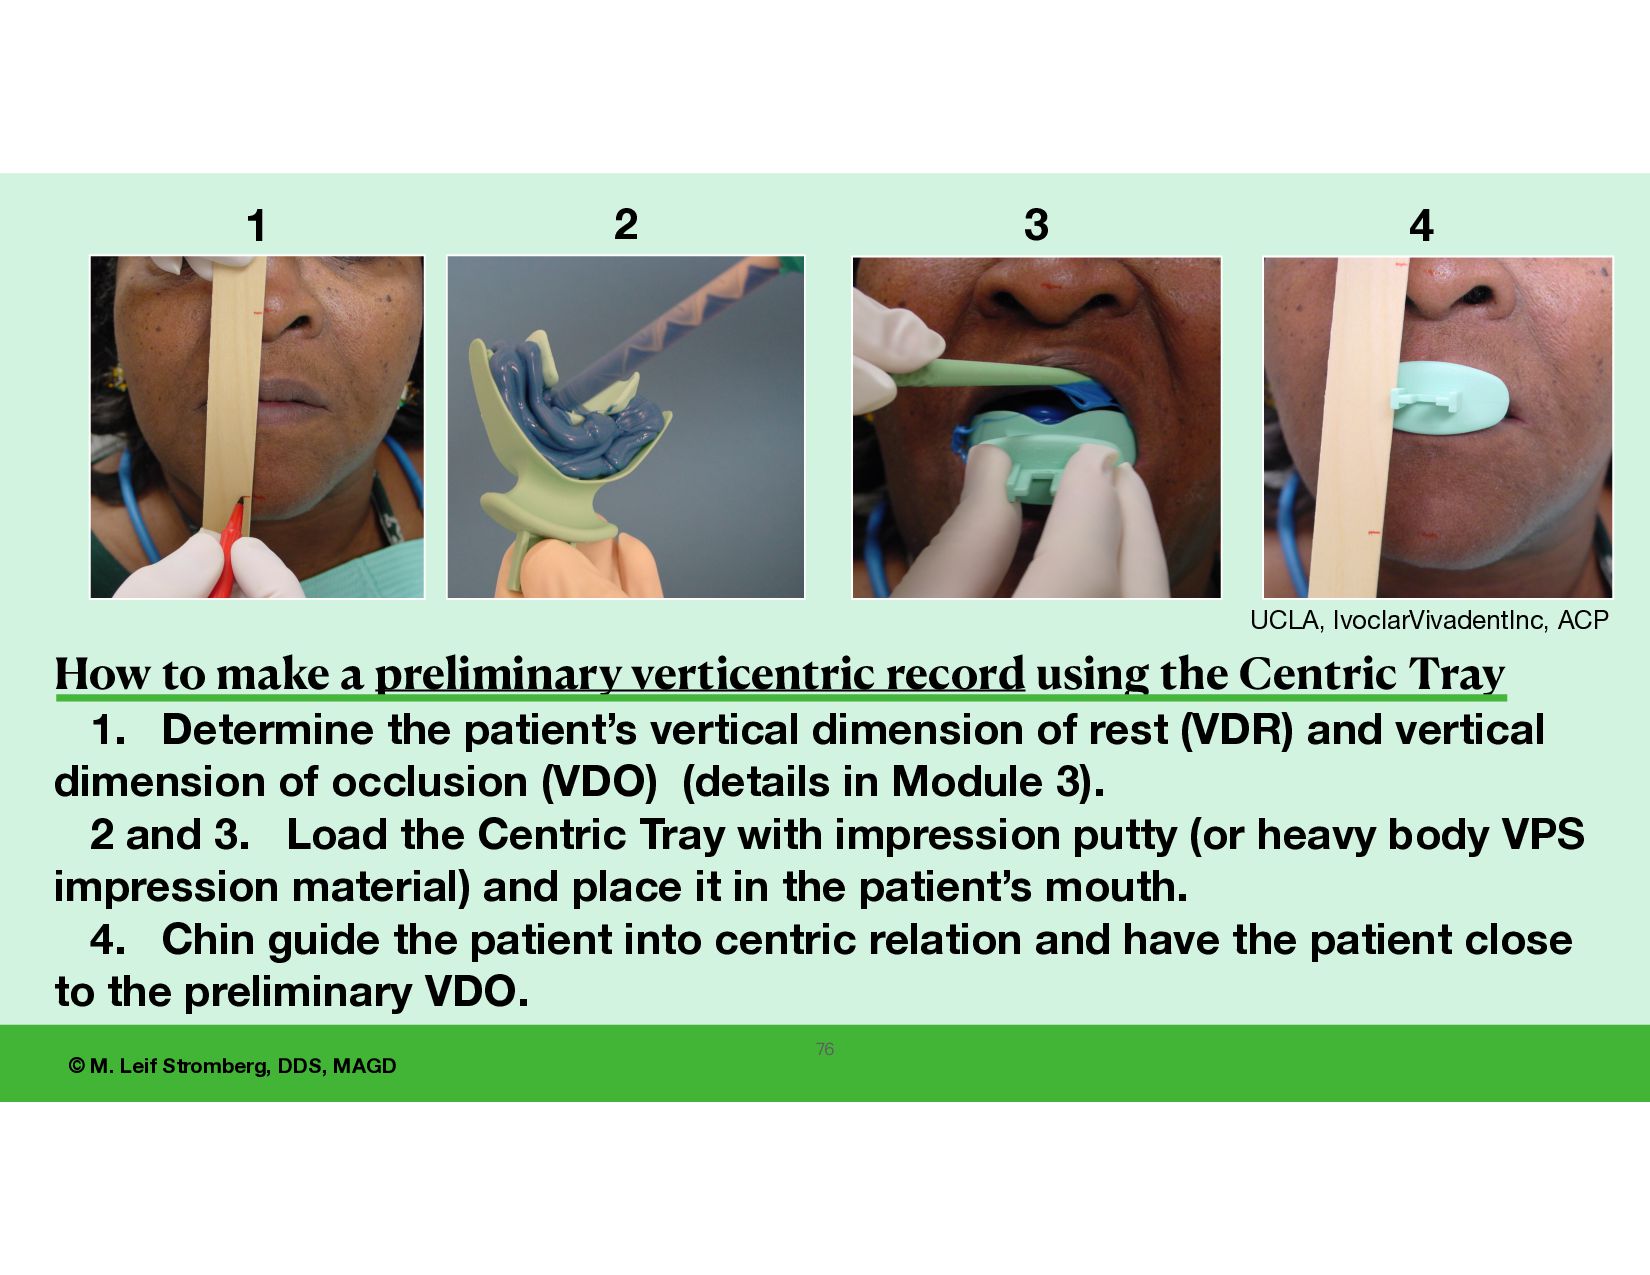
preliminary verticentric record using the Centric Tray 1. Determine the patient’s vertical dimension of rest (VDR) and vertical dimension of occlusion (VDO) (details in Module 3). 2 and 3. Load the Centric Tray with impression putty (or heavy body VPS impression material) and place it in the patient’s mouth. 4. Chin guide the patient into centric relation and have the patient close to the preliminary VDO. 1 2 3 4 UCLA, IvoclarVivadentInc, ACP 76
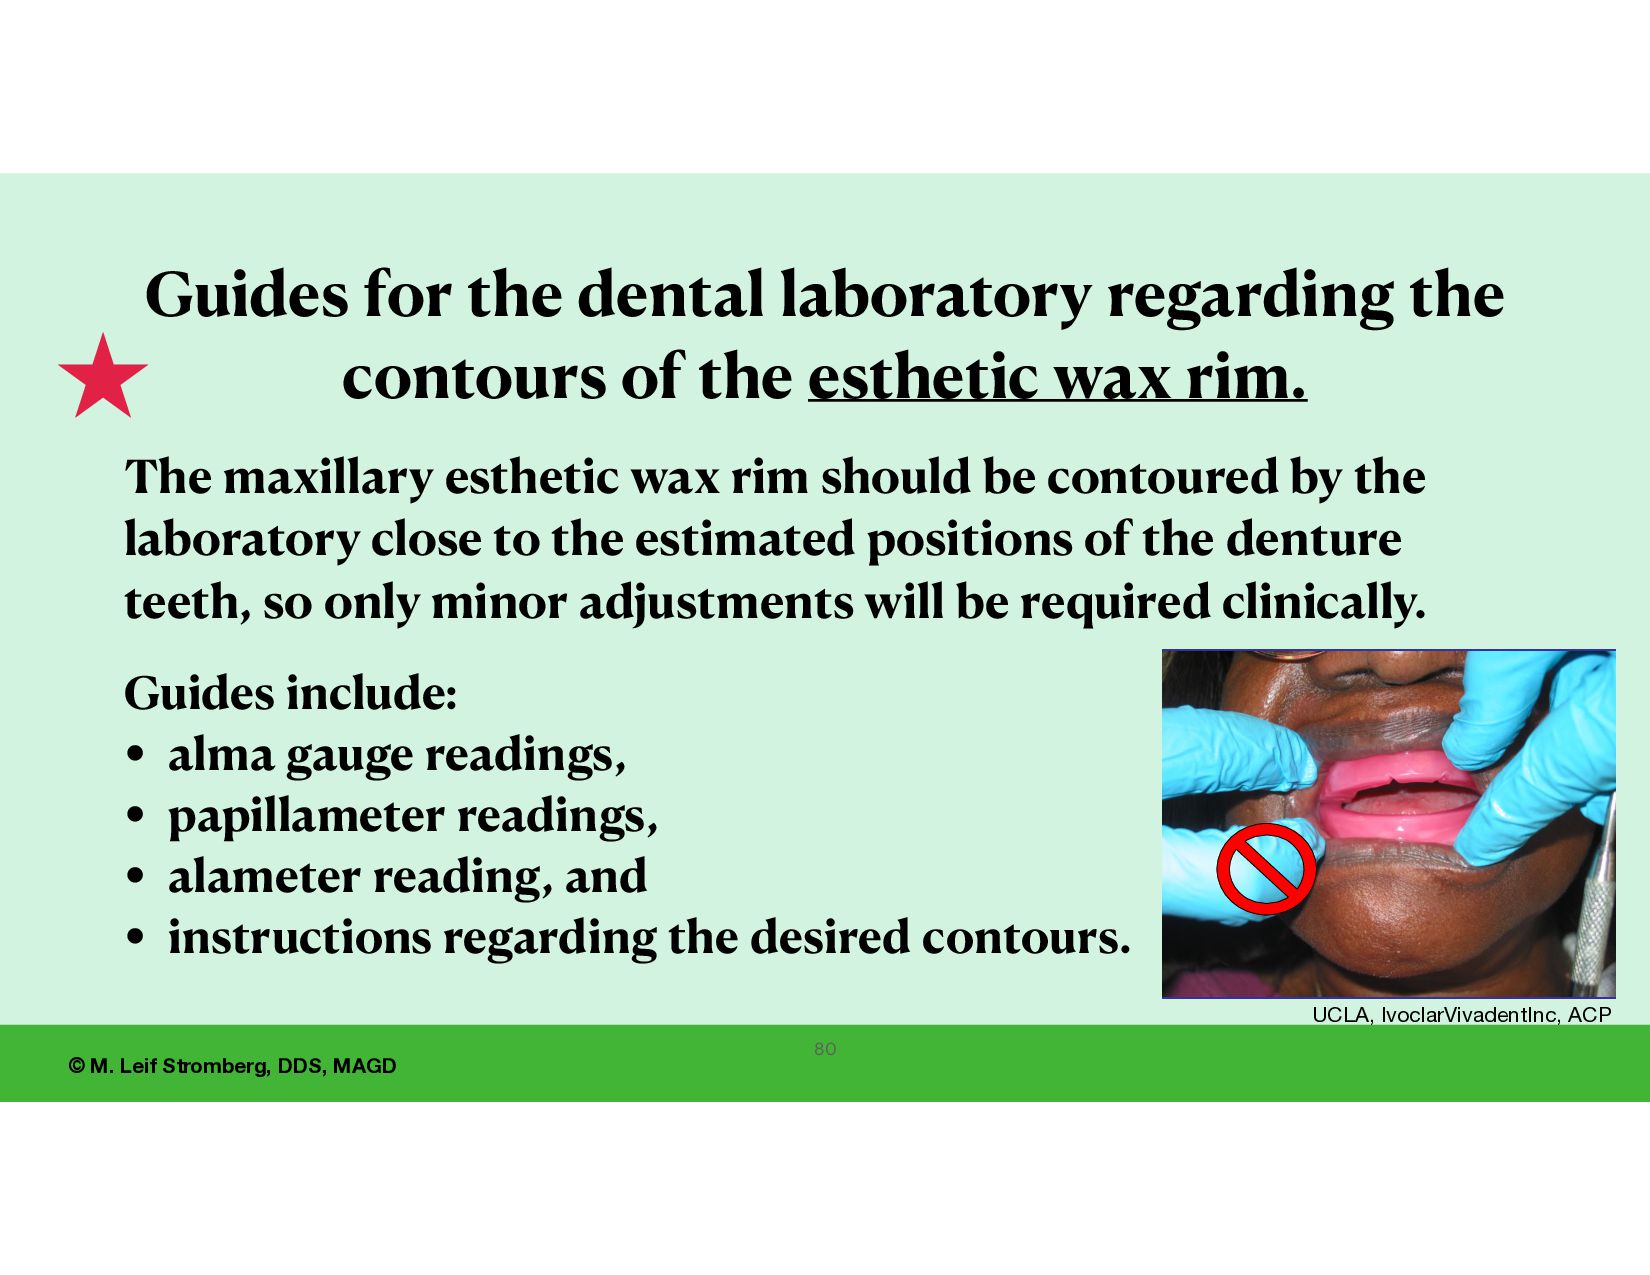
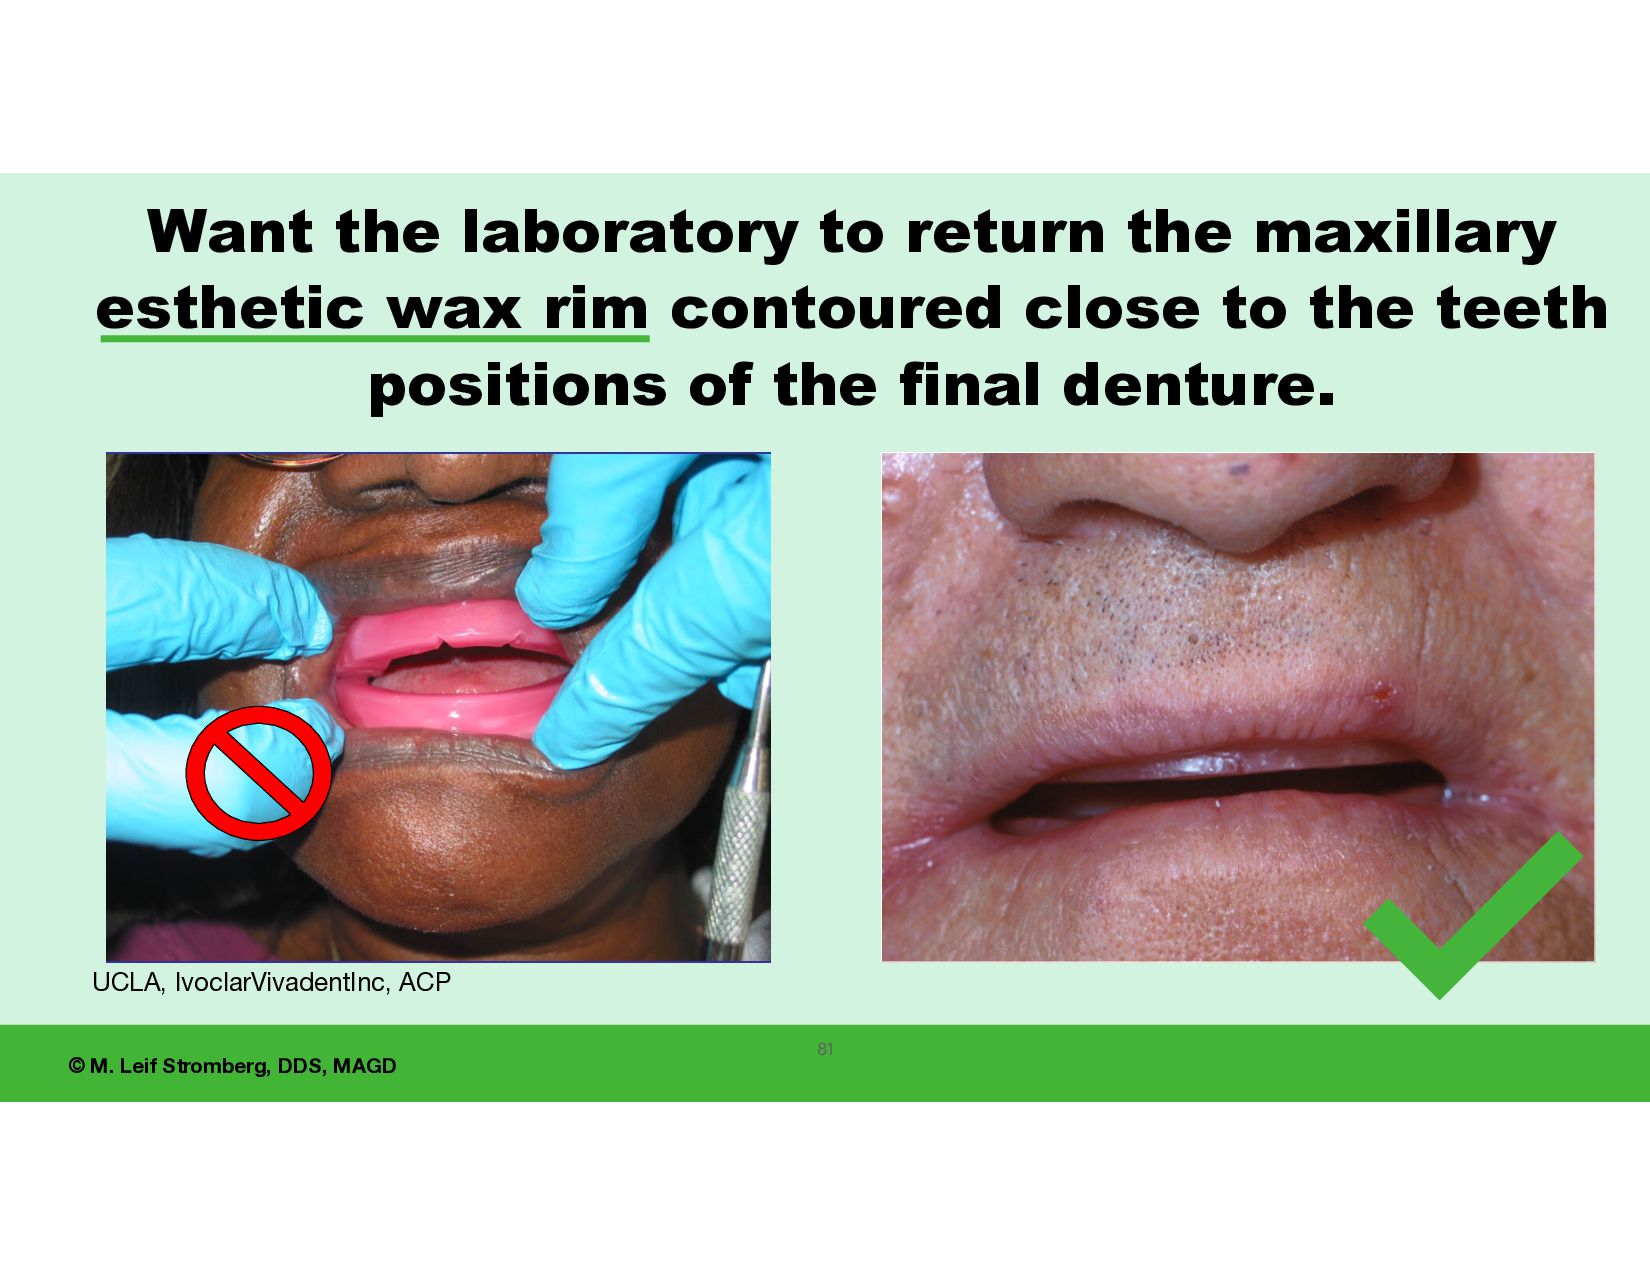
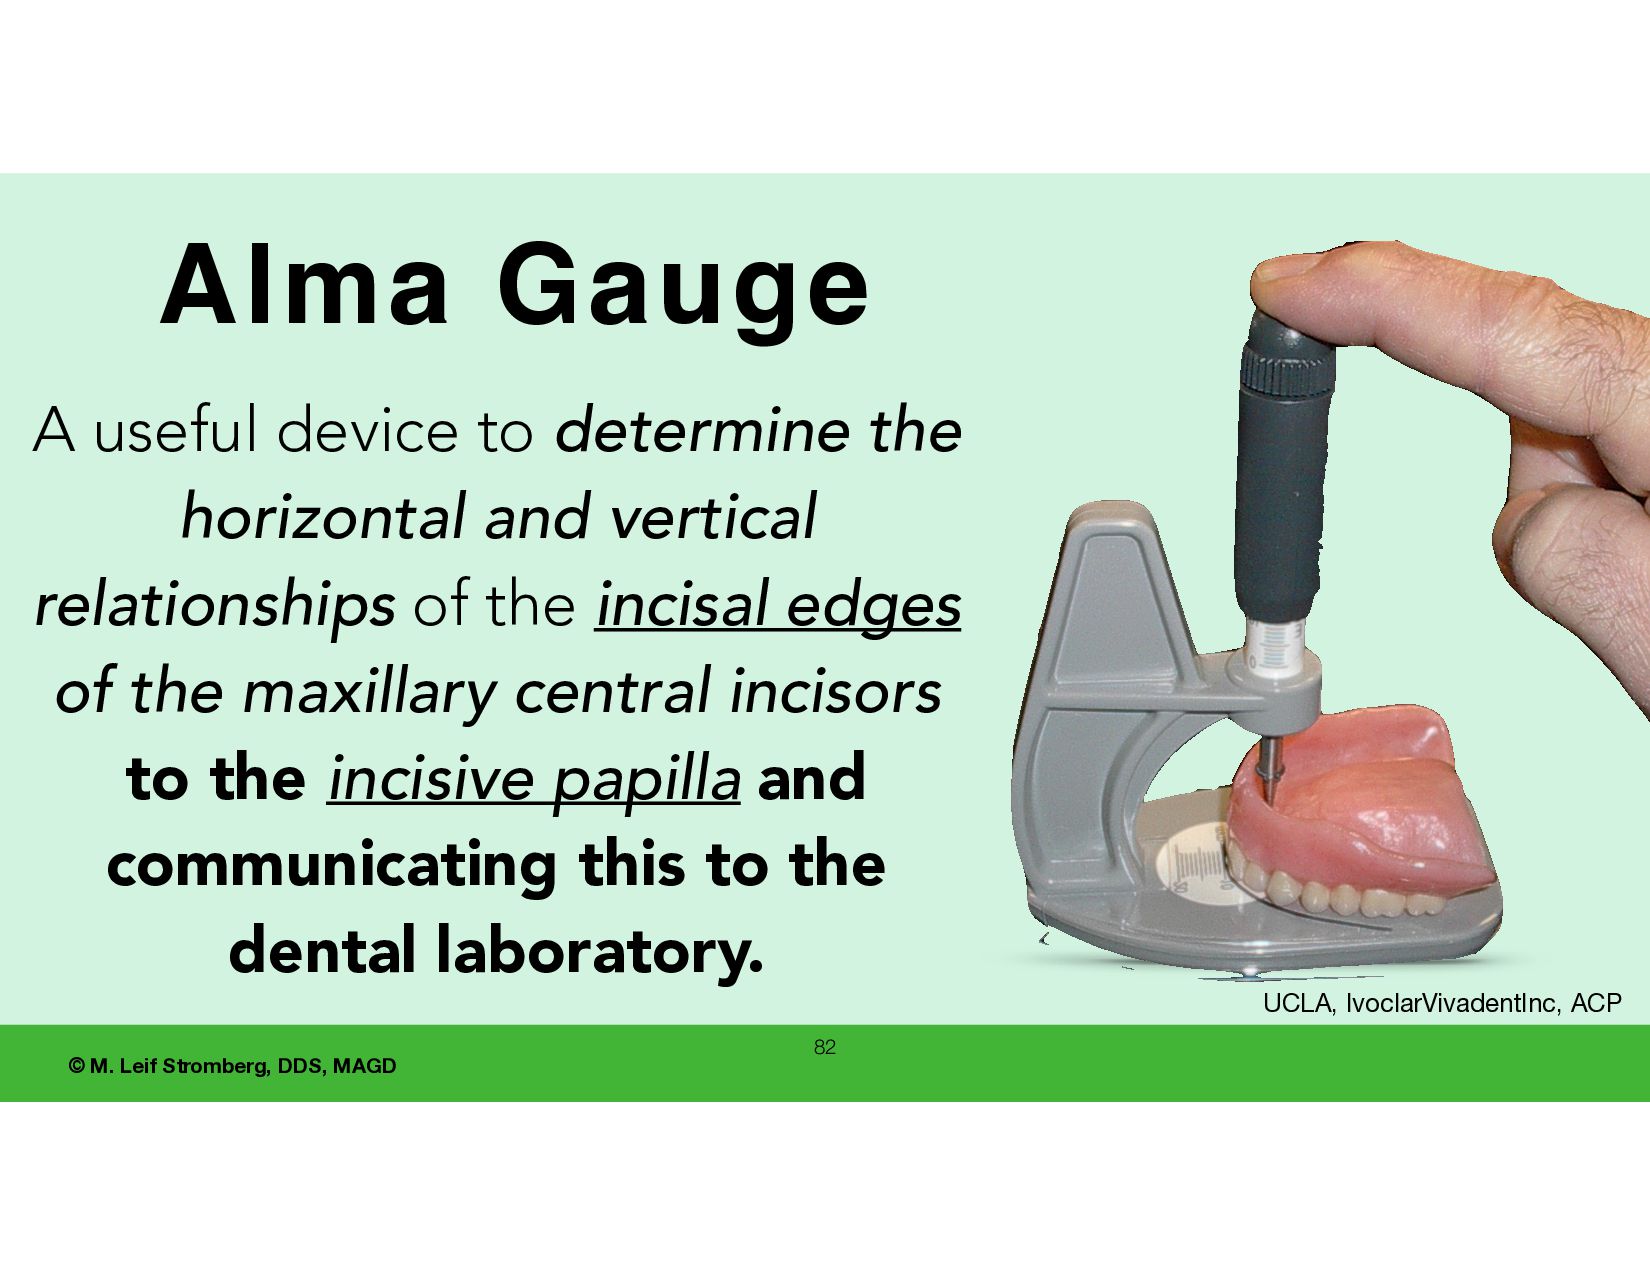
dental laboratory regarding the contours of the esthetic wax rim. The maxillary esthetic wax rim should be contoured by the laboratory close to the estimated positions of the denture teeth, so only minor adjustments will be required clinically. Guides include: • alma gauge readings, • papillameter readings, • alameter reading, and • instructions regarding the desired contours. 61 UCLA, IvoclarVivadentInc, ACP
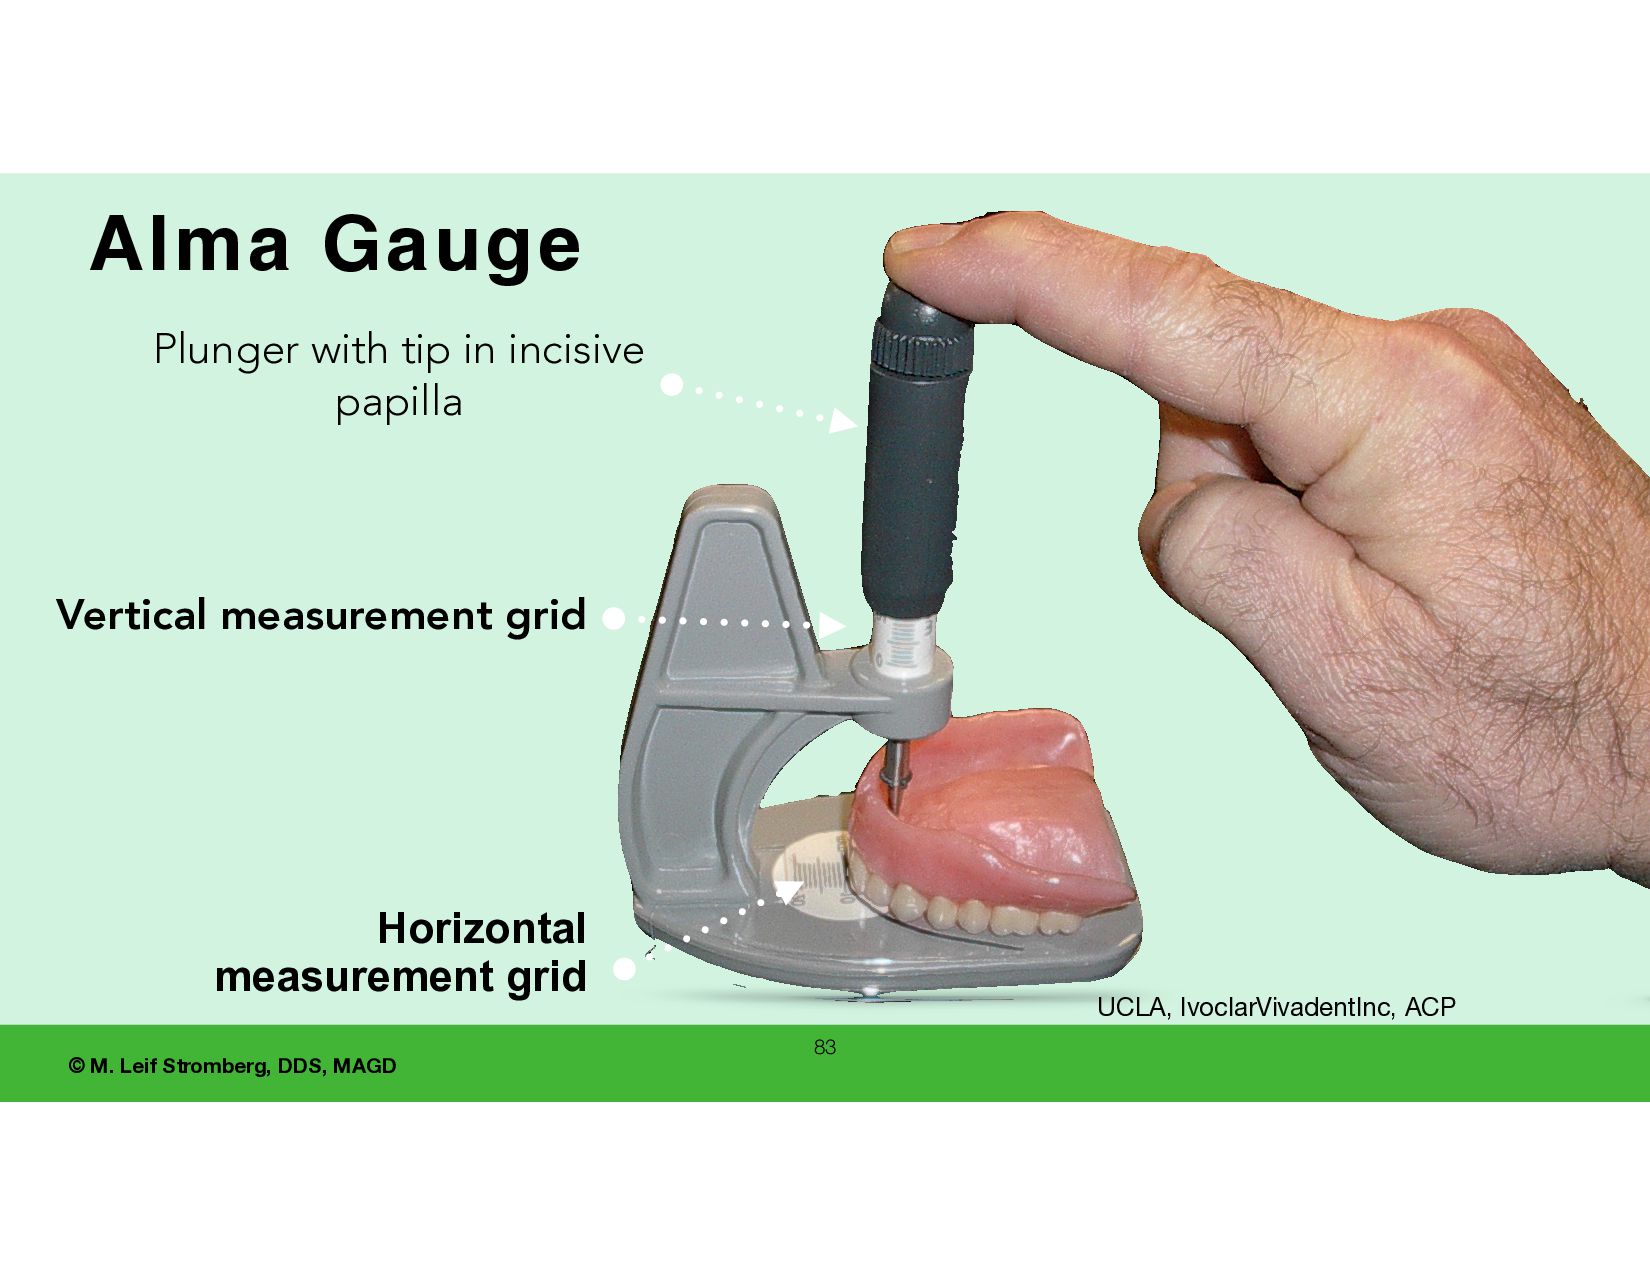
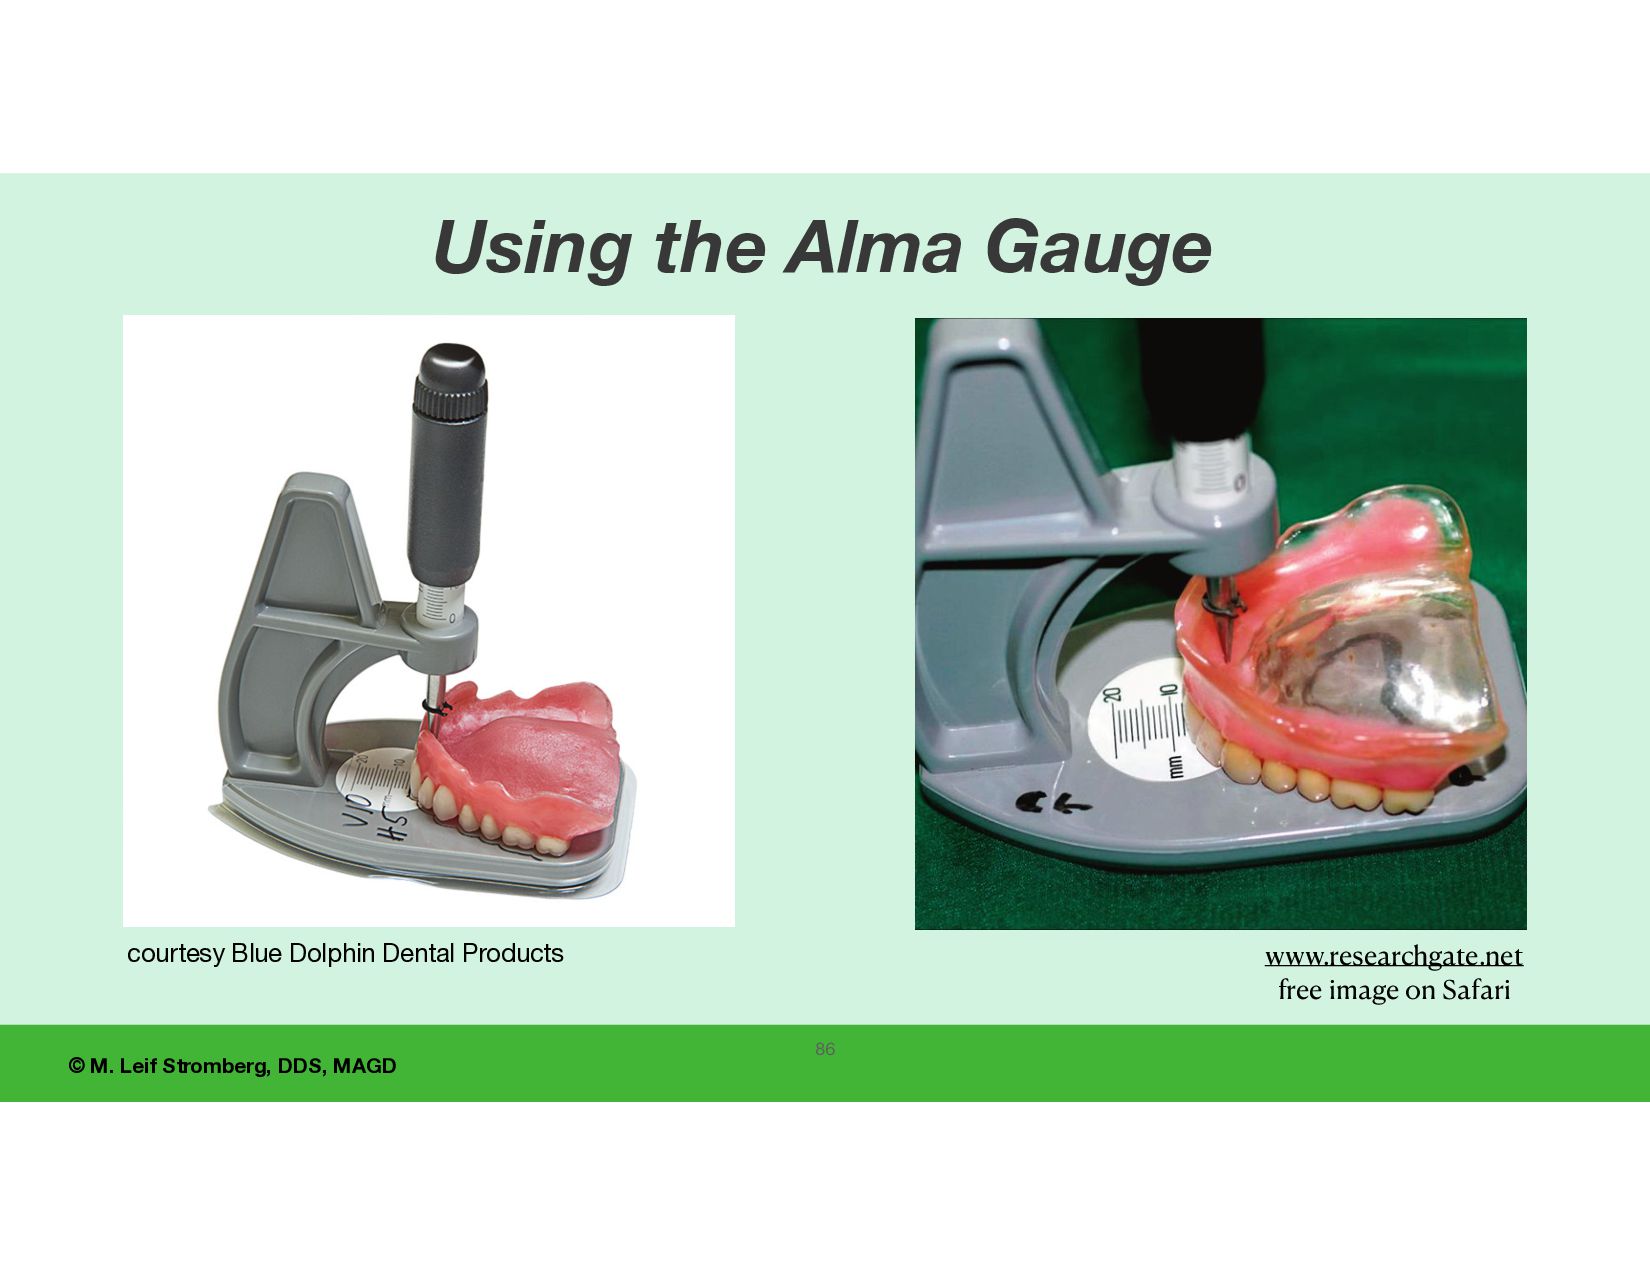
to determine the horizontal and vertical relationships of the incisal edges of the maxillary central incisors to the incisive papilla and communicating this to the dental laboratory. Alma Gauge UCLA, IvoclarVivadentInc, ACP
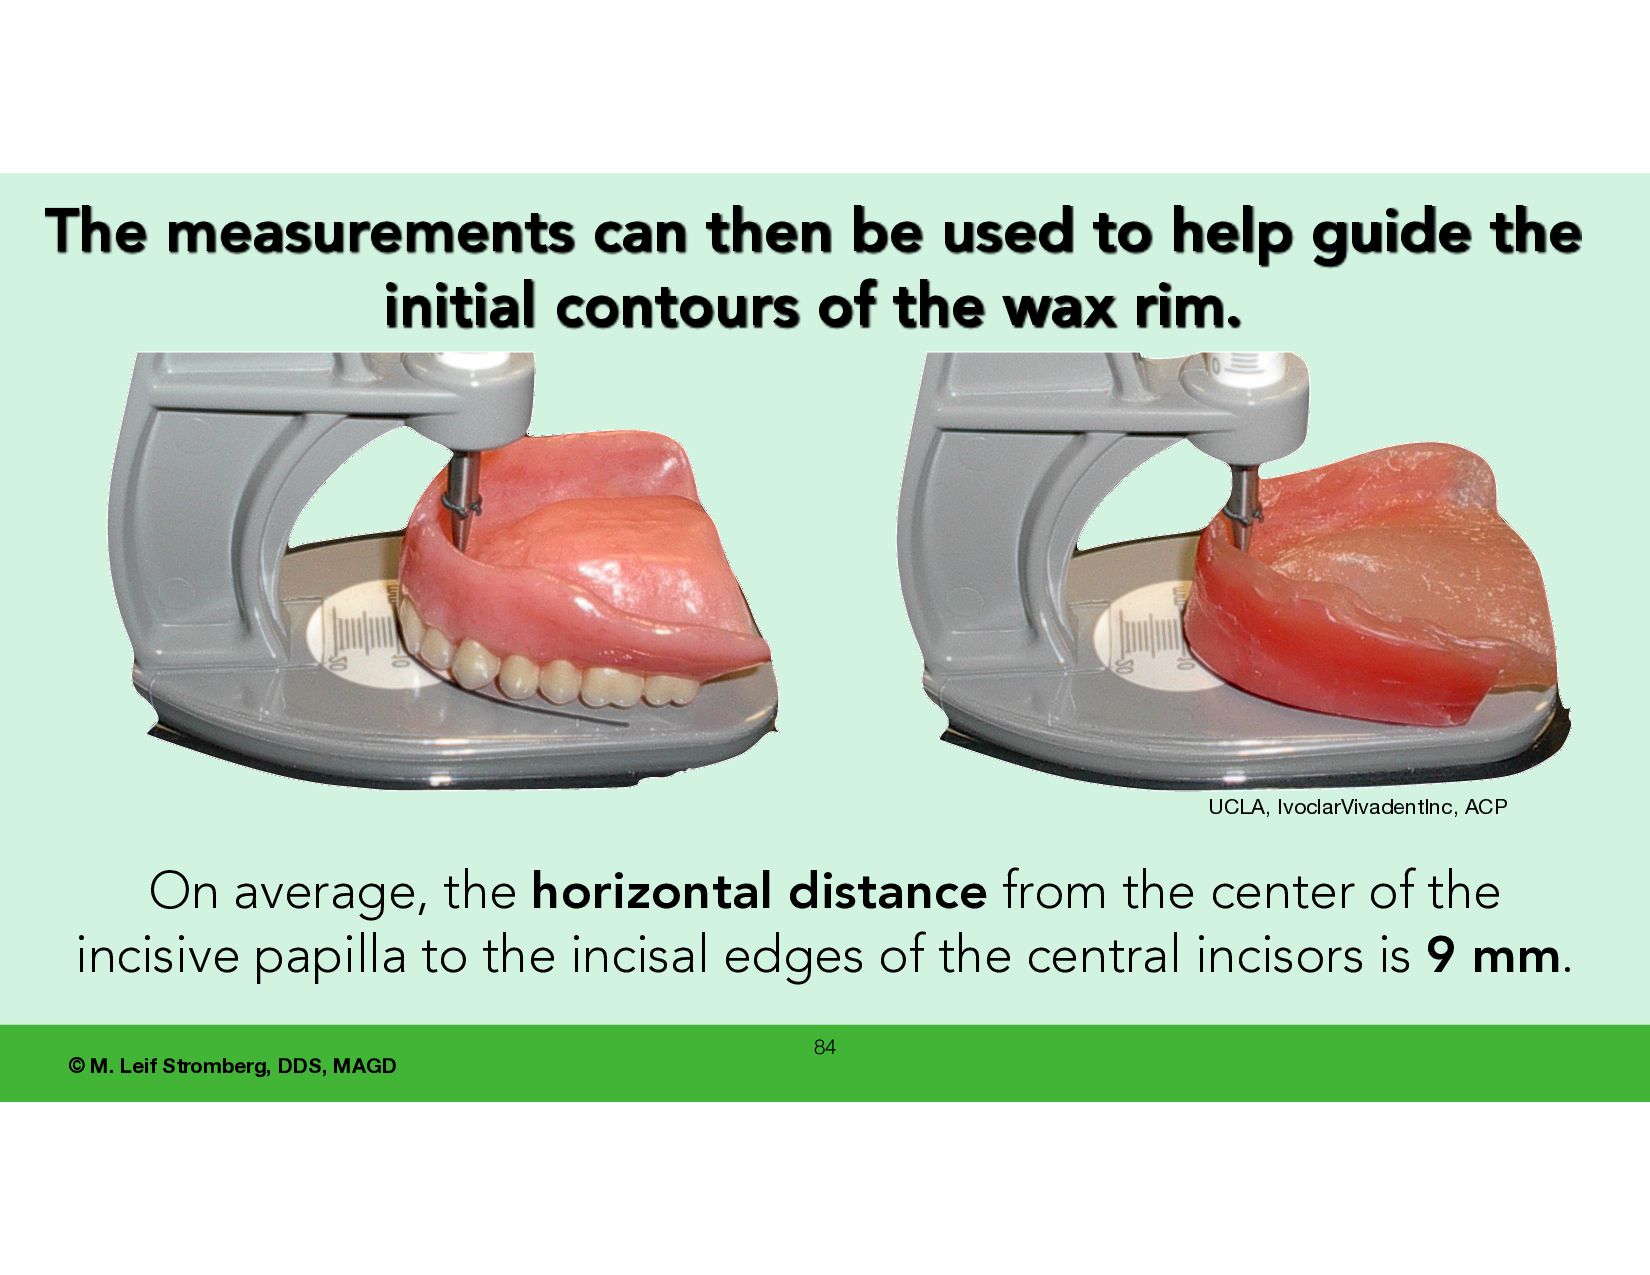
then be used to help guide the initial contours of the wax rim. On average, the horizontal distance from the center of the incisive papilla to the incisal edges of the central incisors is 9 mm. UCLA, IvoclarVivadentInc, ACP
on the edentulous ridge after extensive alveolar bone loss UCLA, IvoclarVivadent, ACP The central incisor natural teeth are located labial to the incisive papilla. 85 On average, the distance from the center of the incisive papilla to the labial surfaces of the central incisors is 9 mm.
are made and recorded • papillameter - measurement of upper lip length. • alameter - is a guide for the estimated width of the maxillary dental arch at the canines and a guide for the anterior denture teeth molds. 87
a device that measures the length of the patient’s upper lip in relation to the incisive papilla. • Measurement of the lip length below the incisive papilla. UCLA, IvoclarVivadentInc, ACP 88 measurement grid for lip length
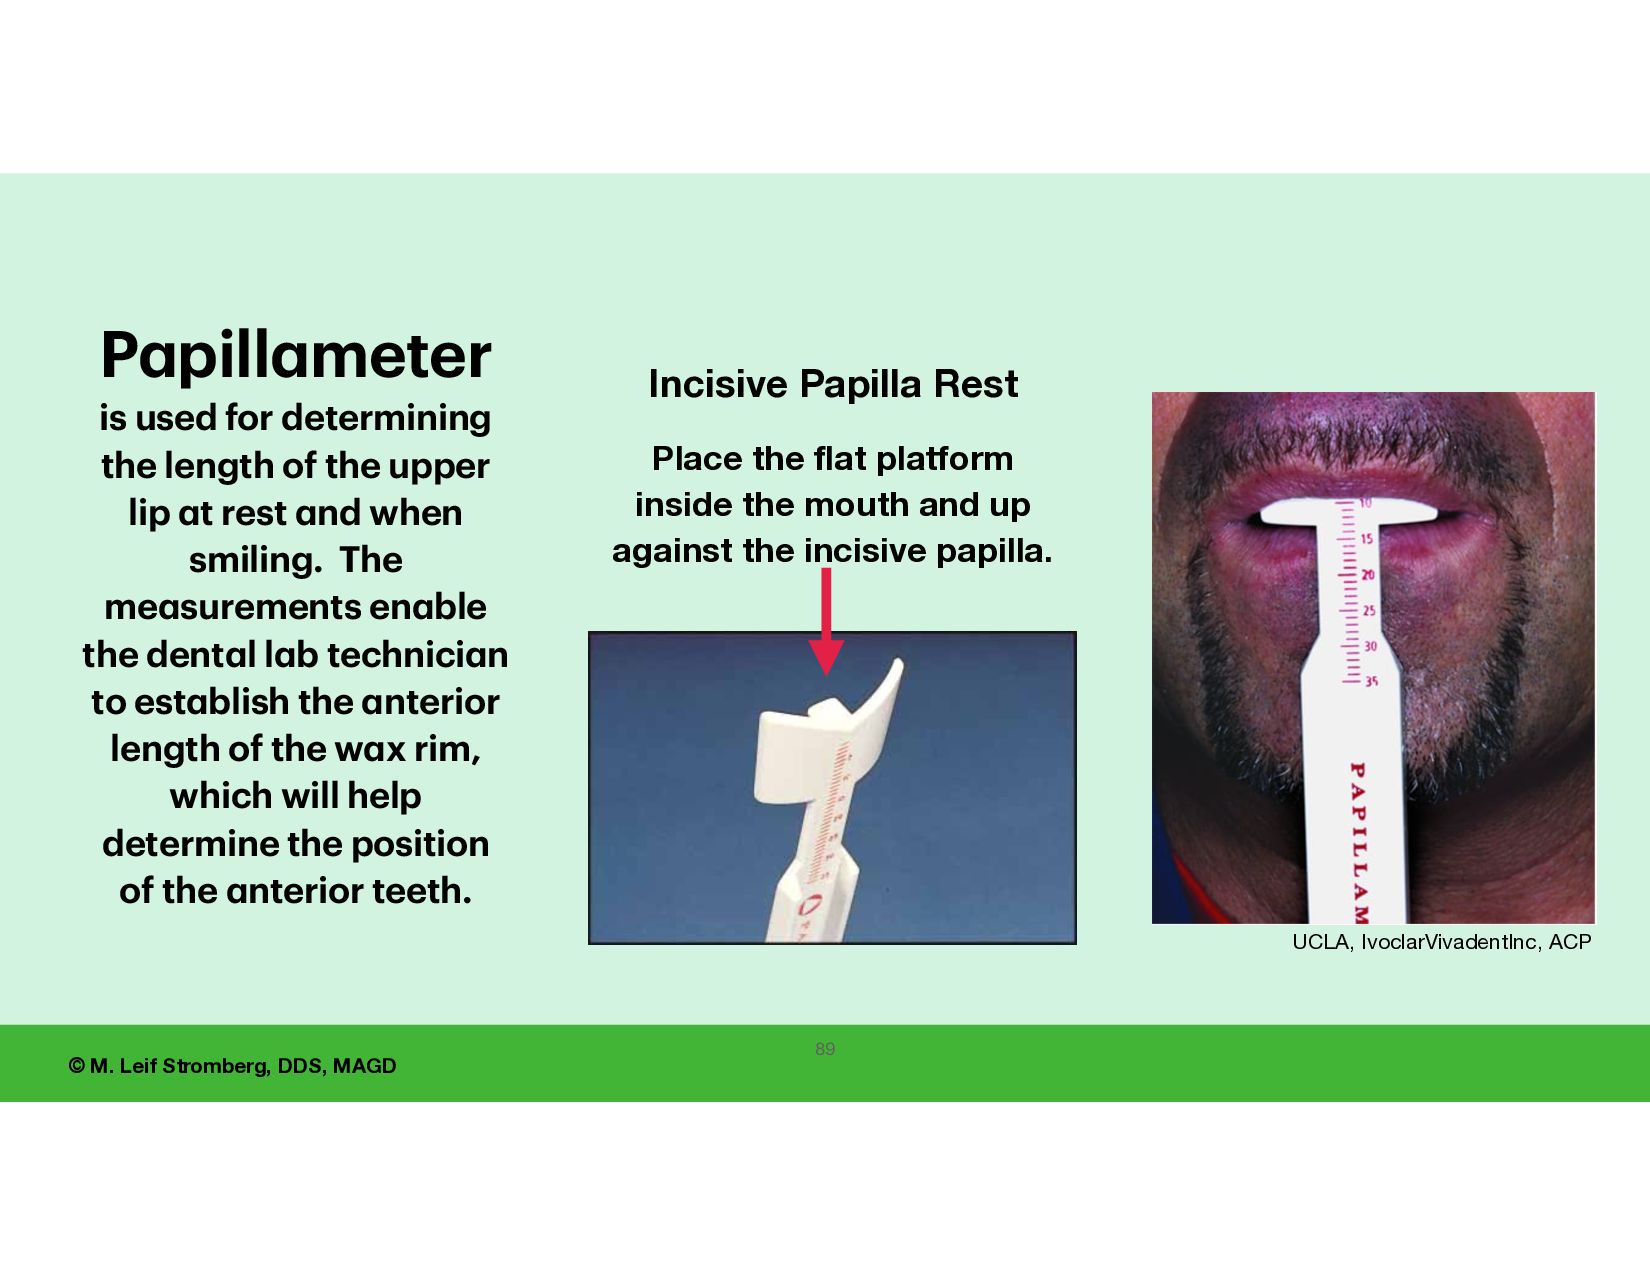
the flat platform inside the mouth and up against the incisive papilla. P a pill a meter is used for determining the length of the upper lip a t rest a nd when smiling. The me a surements en a ble the dent a l l a b technici a n to est a blish the a nterior length of the w a x rim, which will help determine the position of the a nterior teeth. 89 UCLA, IvoclarVivadentInc, ACP
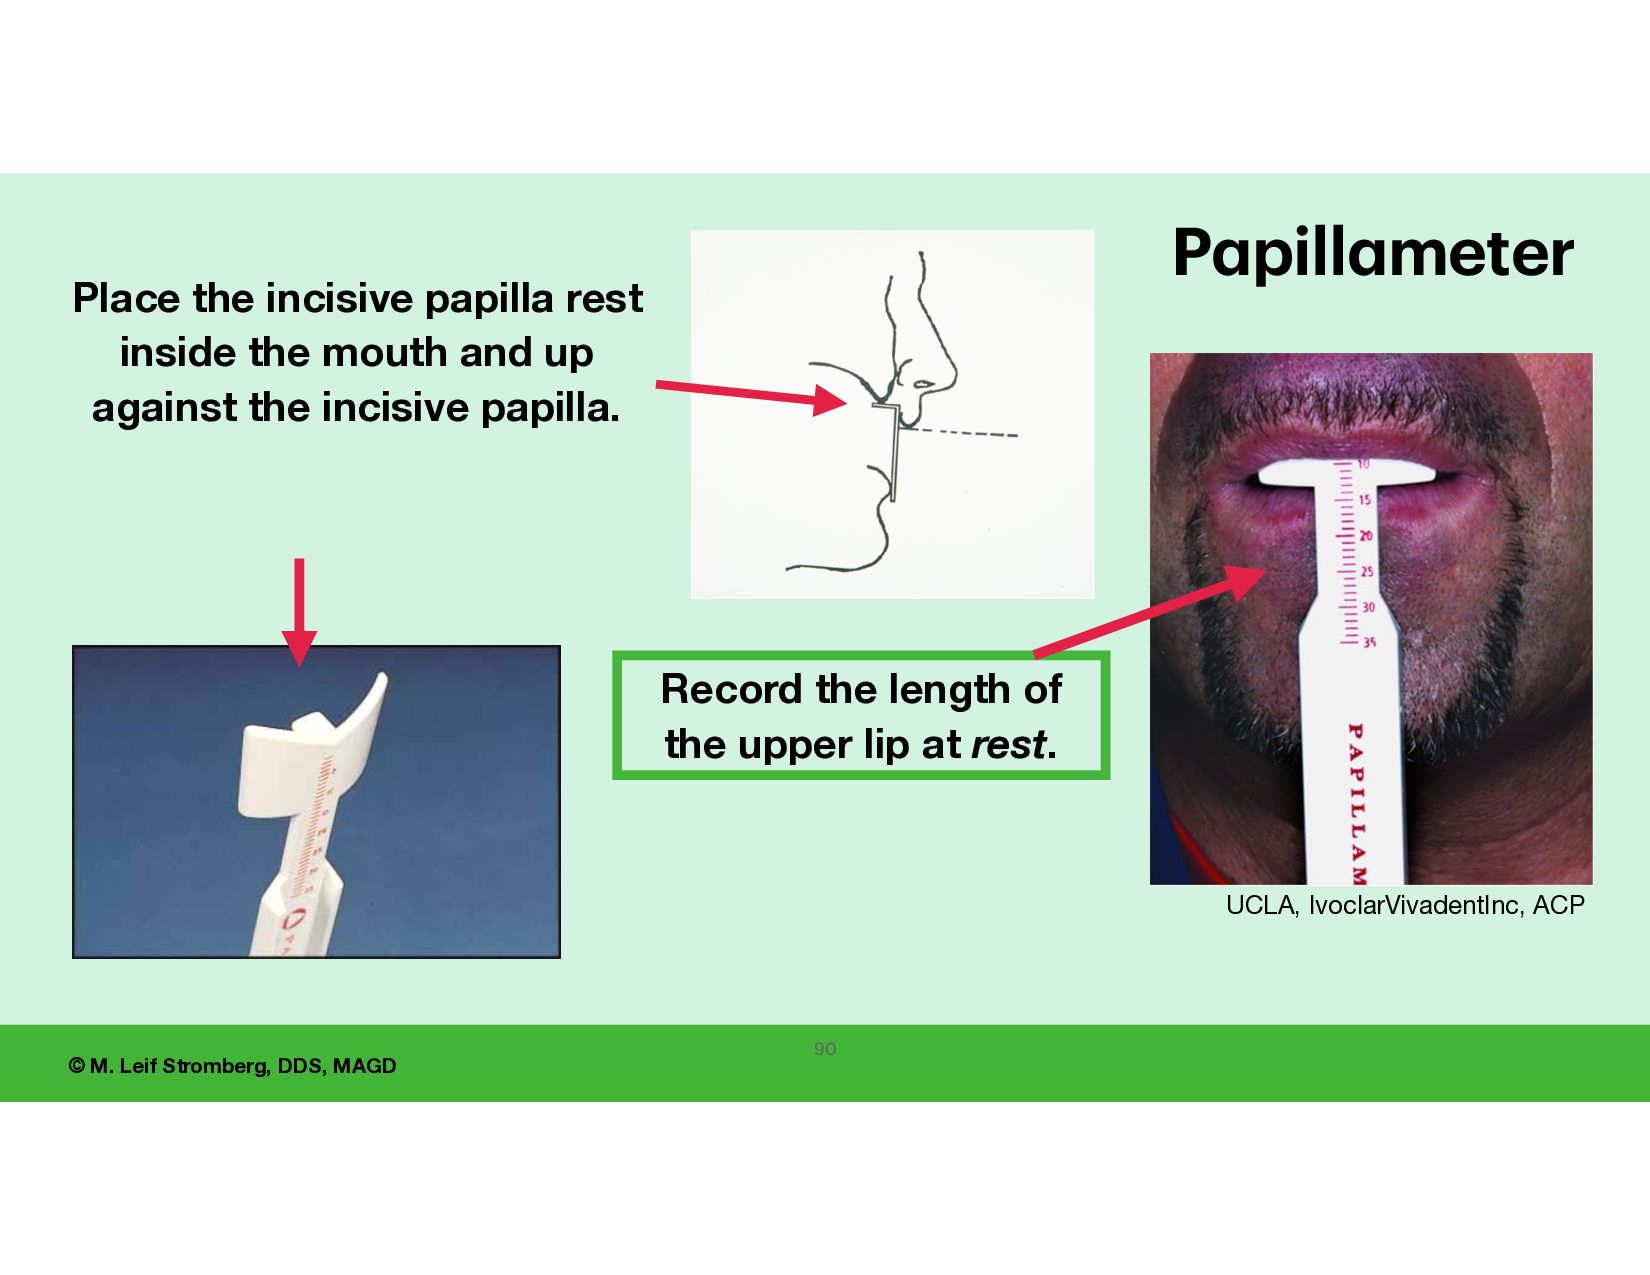
meter Place the incisive papilla rest inside the mouth and up against the incisive papilla. 90 Record the length of the upper lip at rest. UCLA, IvoclarVivadentInc, ACP
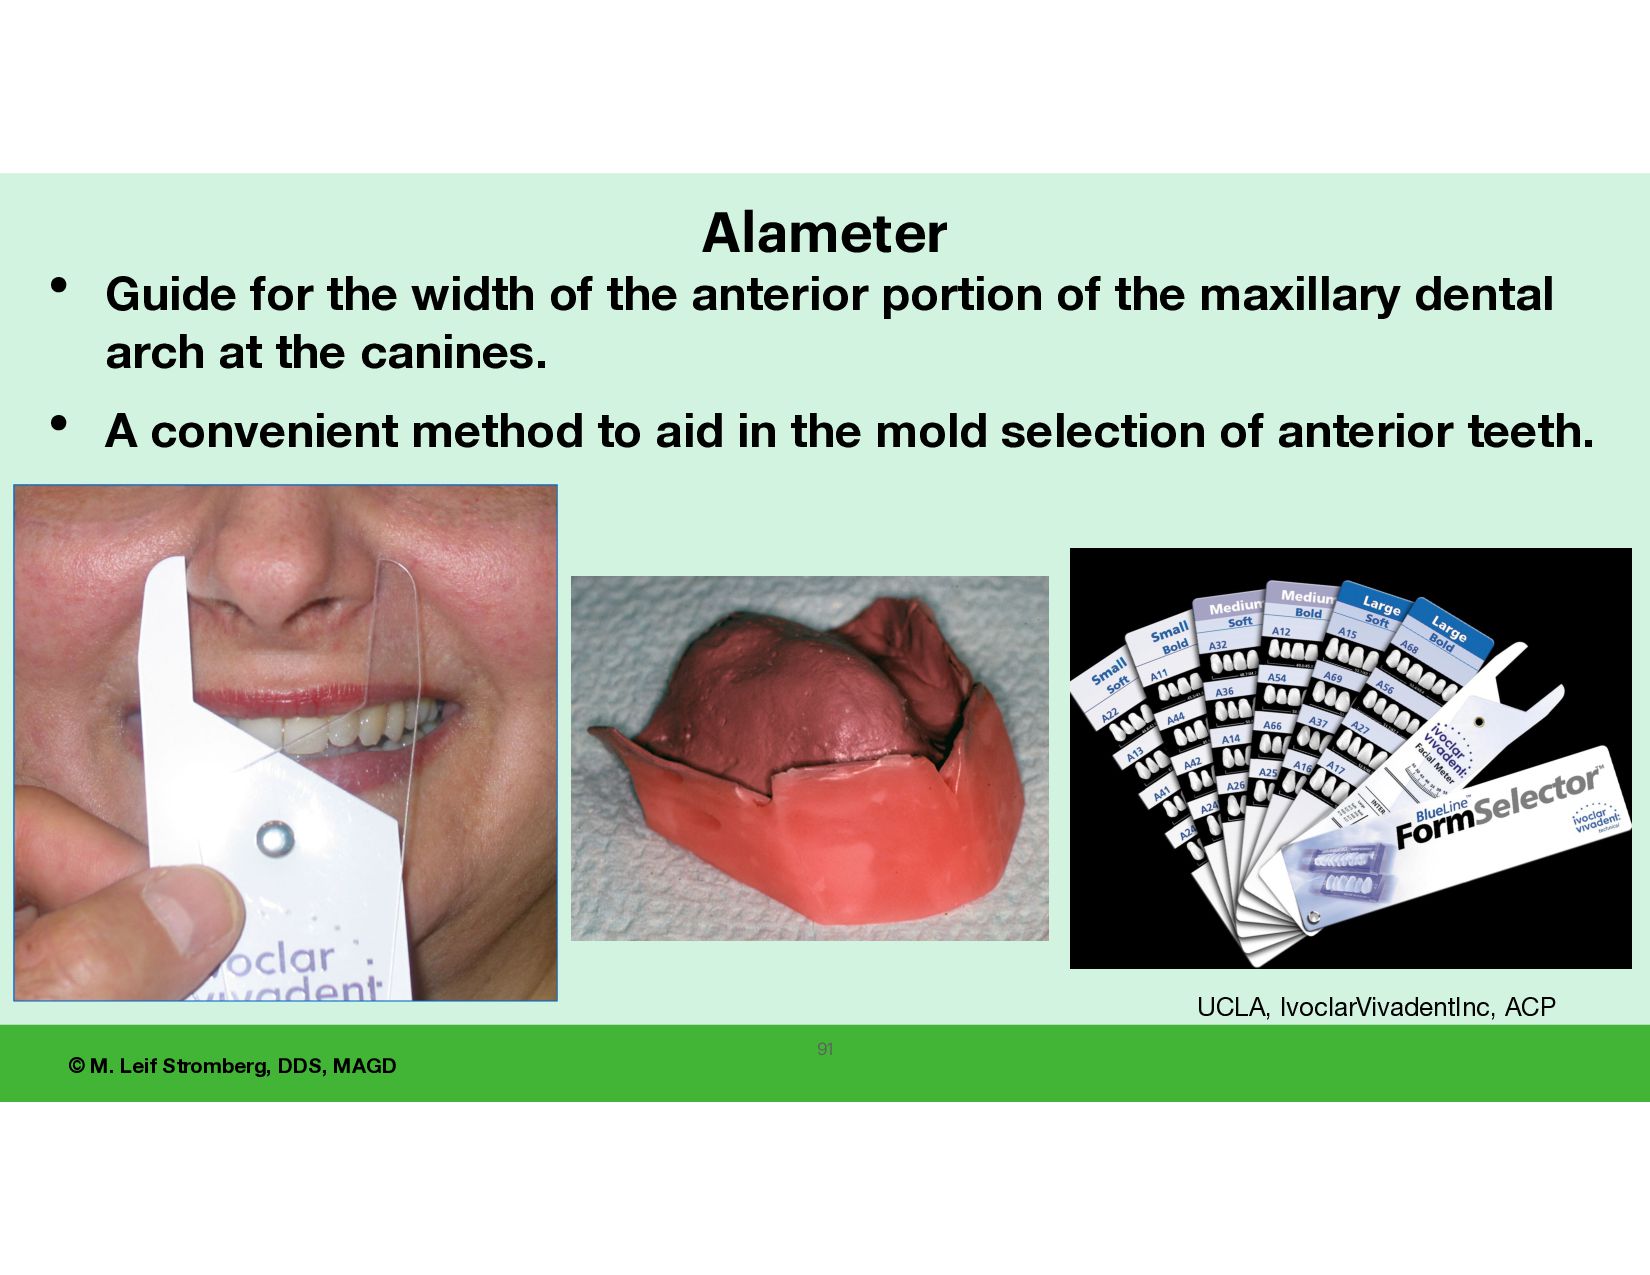
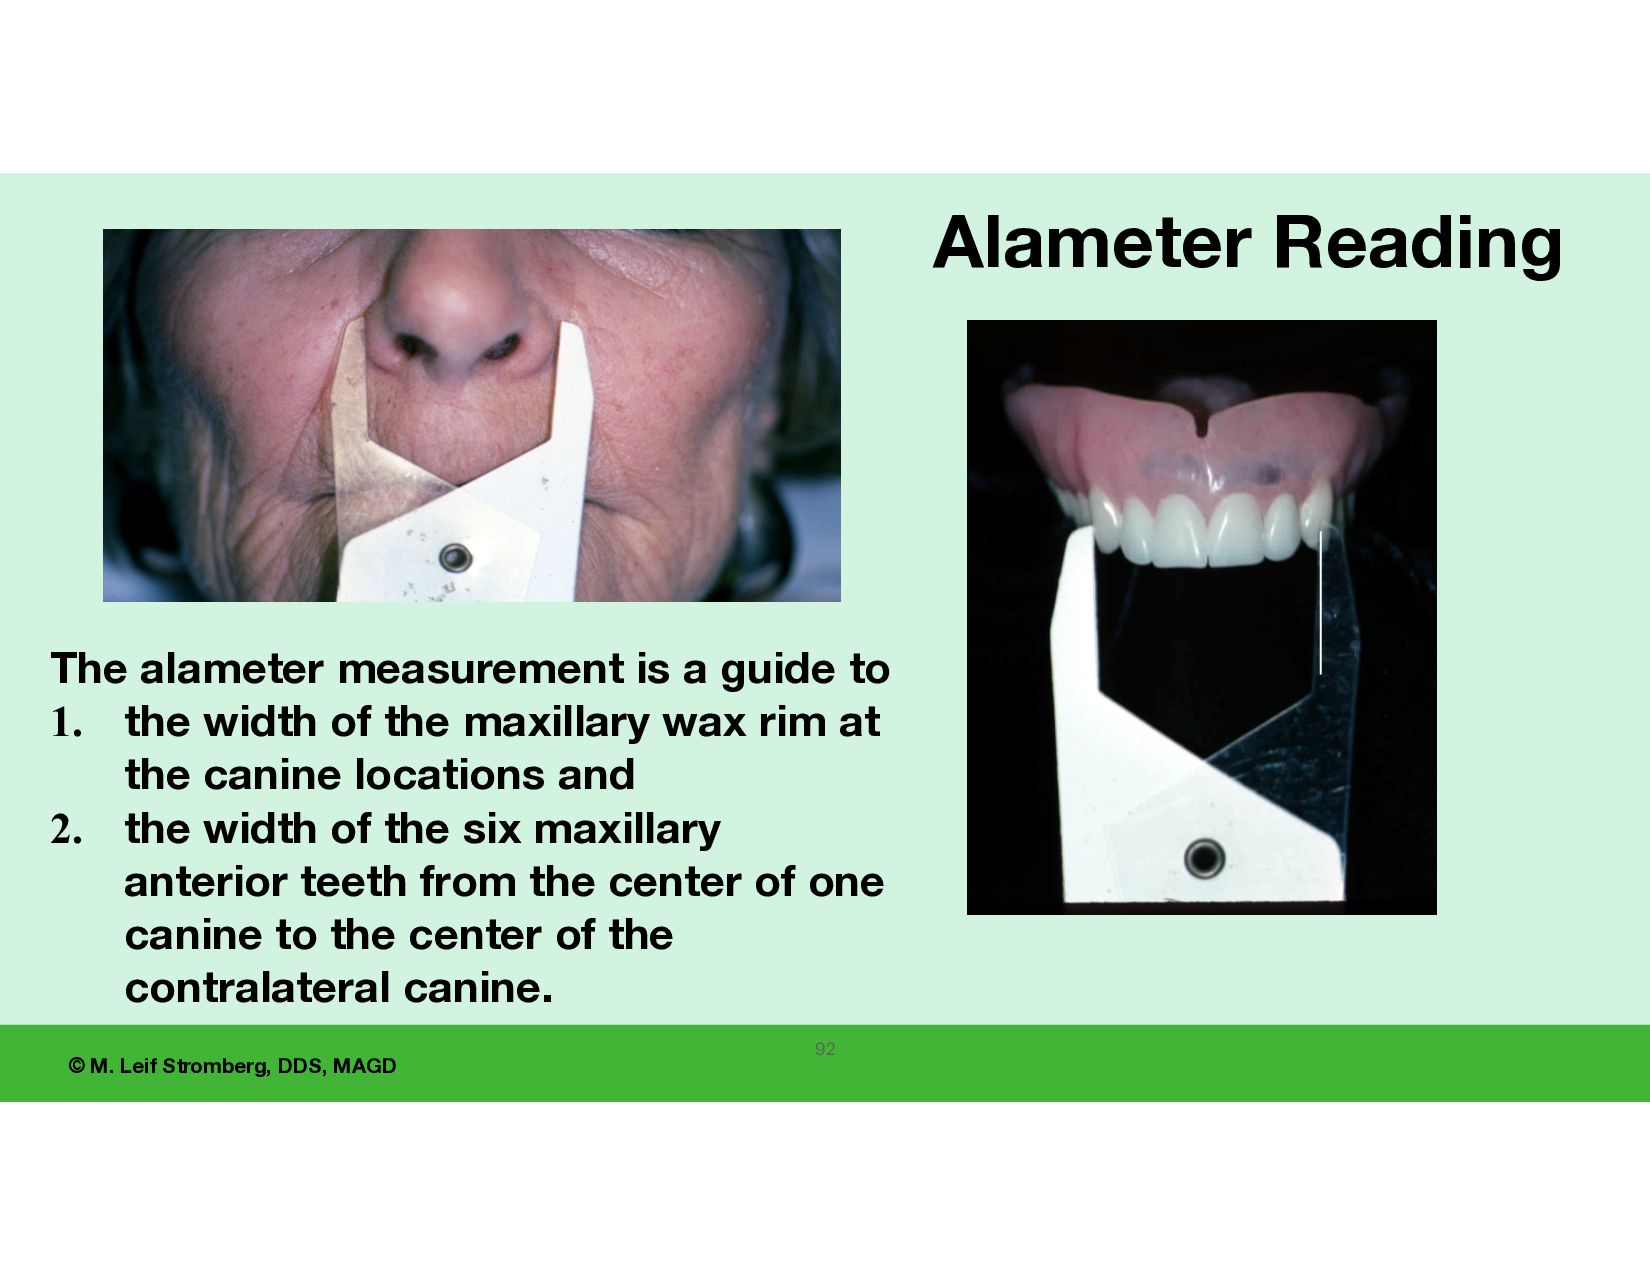
the width of the anterior portion of the maxillary dental arch at the canines. • A convenient method to aid in the mold selection of anterior teeth. 91 UCLA, IvoclarVivadentInc, ACP
measurement is a guide to 1. the width of the maxillary wax rim at the canine locations and 2. the width of the six maxillary anterior teeth from the center of one canine to the center of the contralateral canine. 92
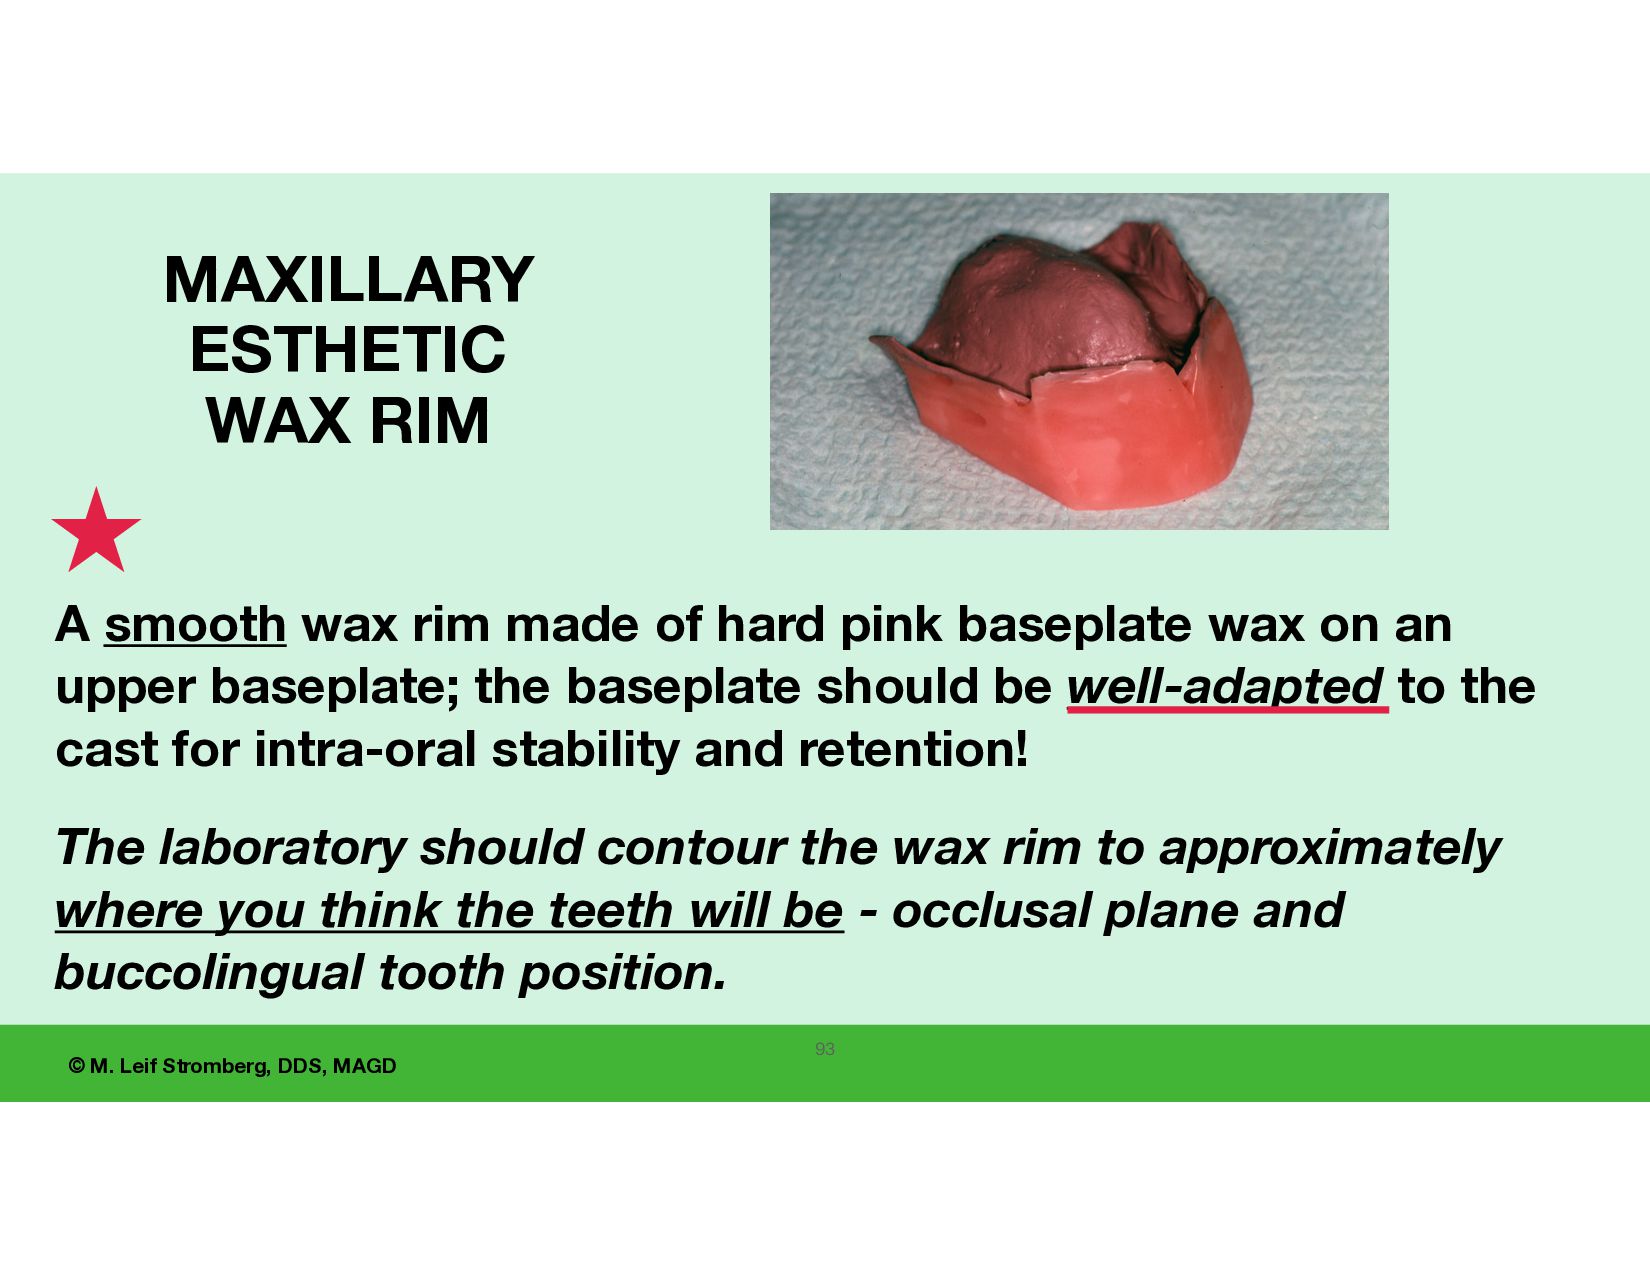
A smooth wax rim made of hard pink baseplate wax on an upper baseplate; the baseplate should be well-adapted to the cast for intra-oral stability and retention! The laboratory should contour the wax rim to approximately where you think the teeth will be - occlusal plane and buccolingual tooth position. 93
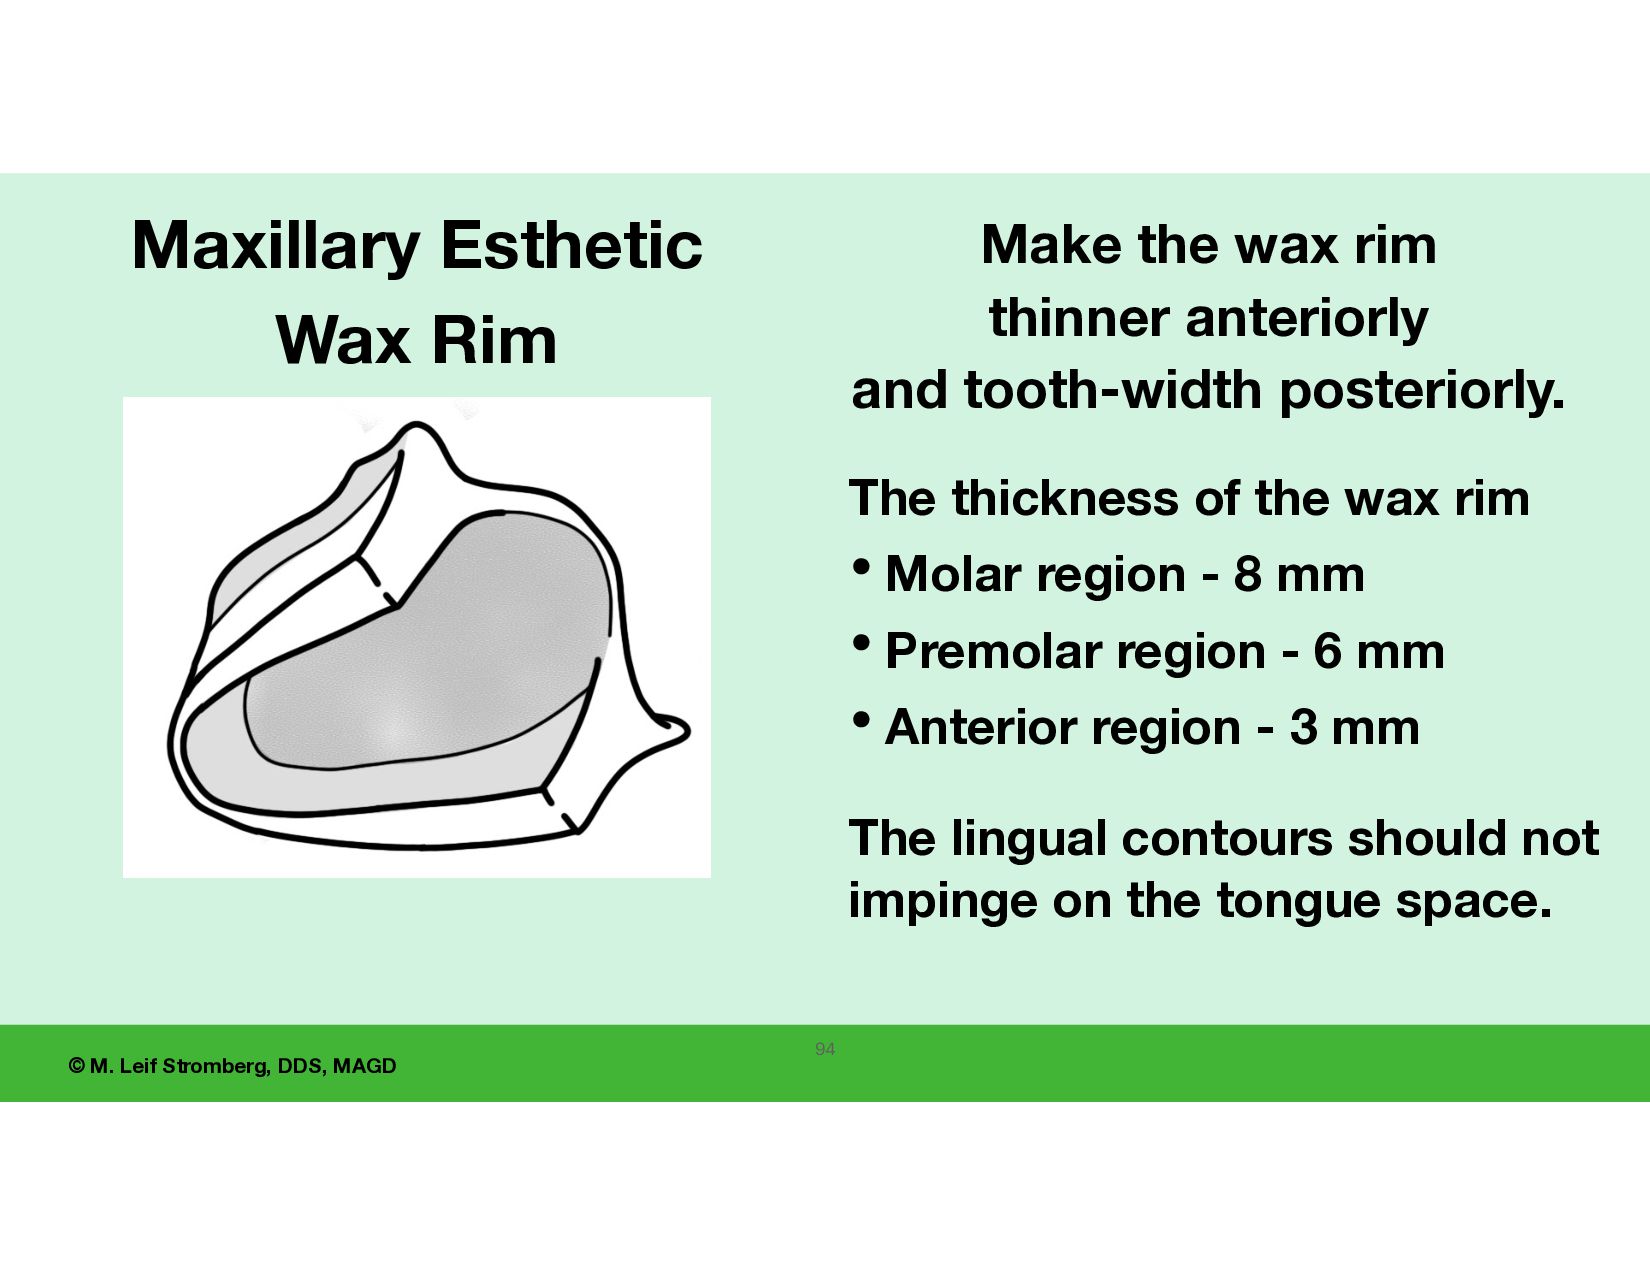
The thickness of the wax rim •Molar region - 8 mm •Premolar region - 6 mm •Anterior region - 3 mm The lingual contours should not impinge on the tongue space. Make the wax rim thinner anteriorly and tooth-width posteriorly. 94
rim on the right is bulky. The bucco-lingual thickness of the wax rim may feel uncomfortable to the patient and may result in decreased accuracy of the wax rim records. 95
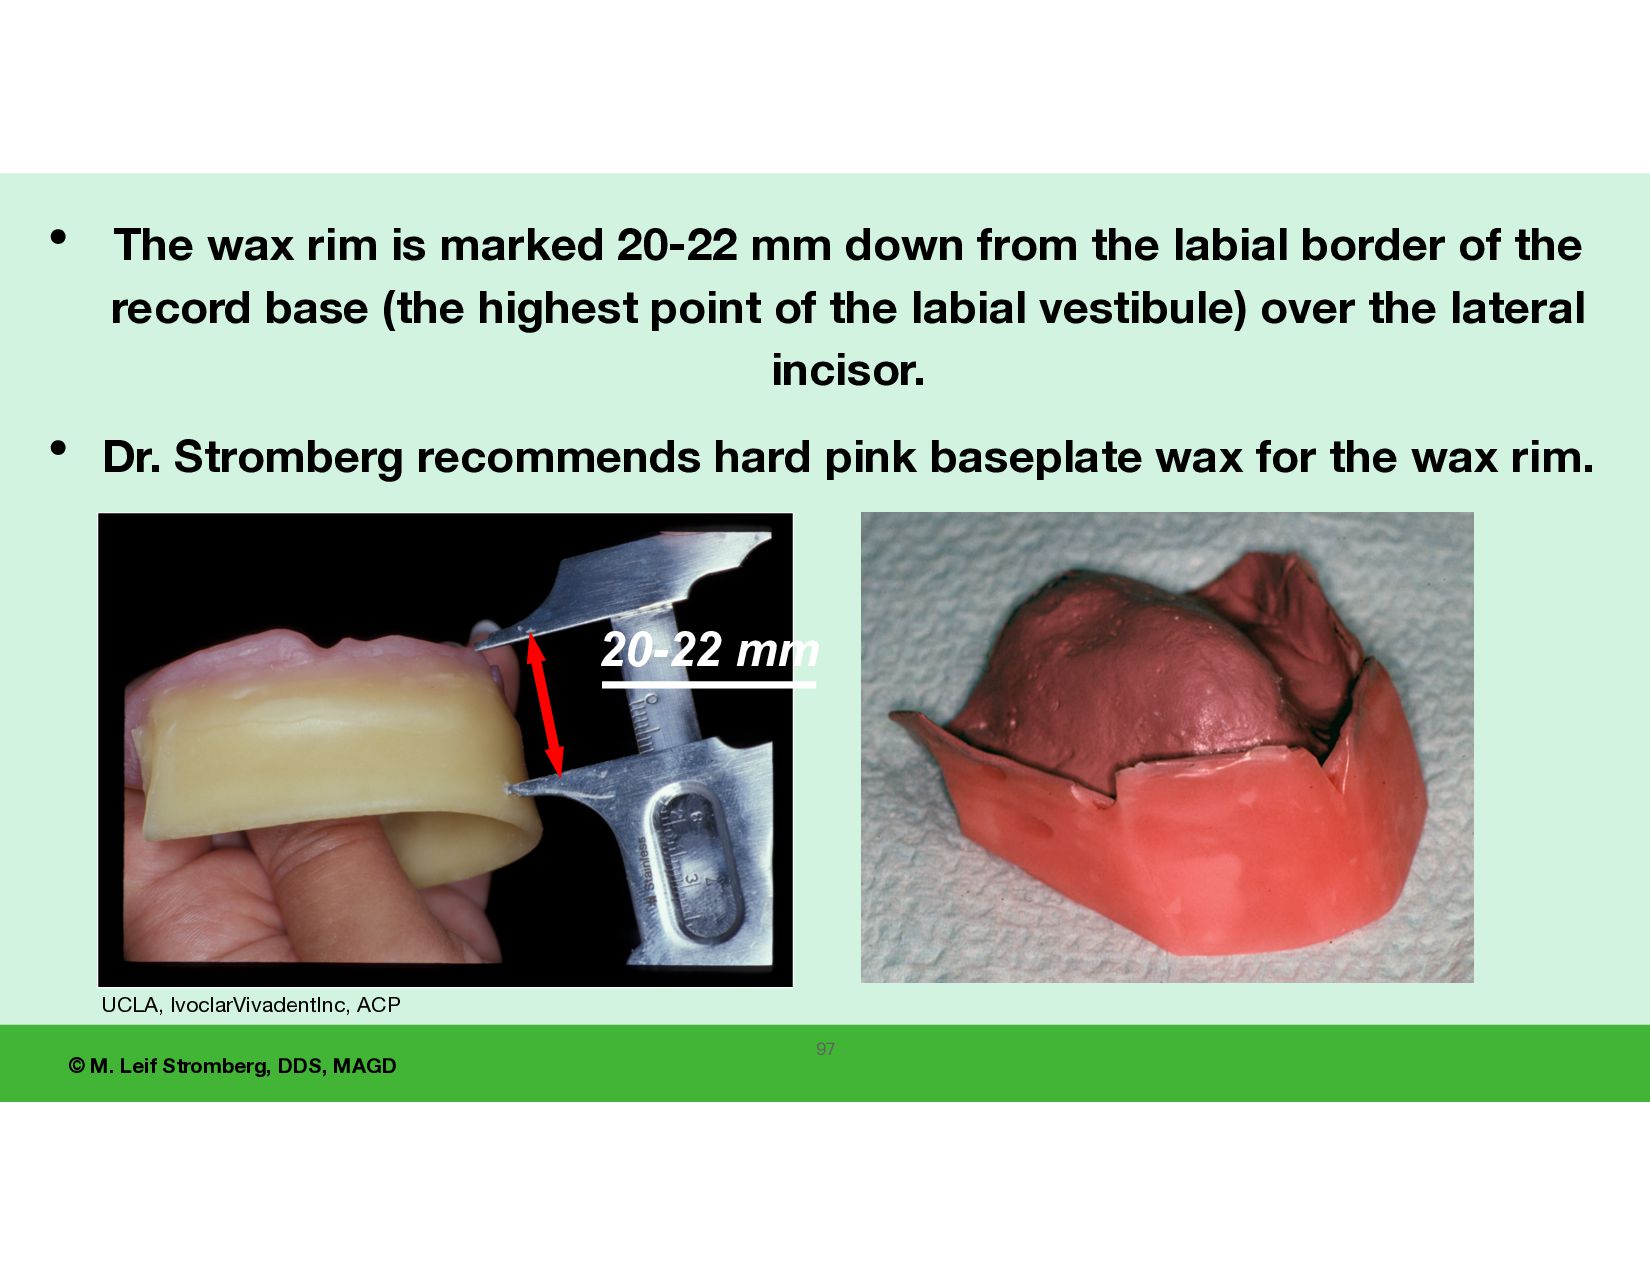
a maxillary esthetic wax rim at the lateral incisors is approximately 20 to 22 mm below the highest point of the labial vestibule above the lateral incisor to the incisal edge. This can be used when adjusting the length of the wax rim. 96
is marked 20-22 mm down from the labial border of the record base (the highest point of the labial vestibule) over the lateral incisor. • Dr. Stromberg recommends hard pink baseplate wax for the wax rim. UCLA, IvoclarVivadentInc, ACP 97 20-22 mm
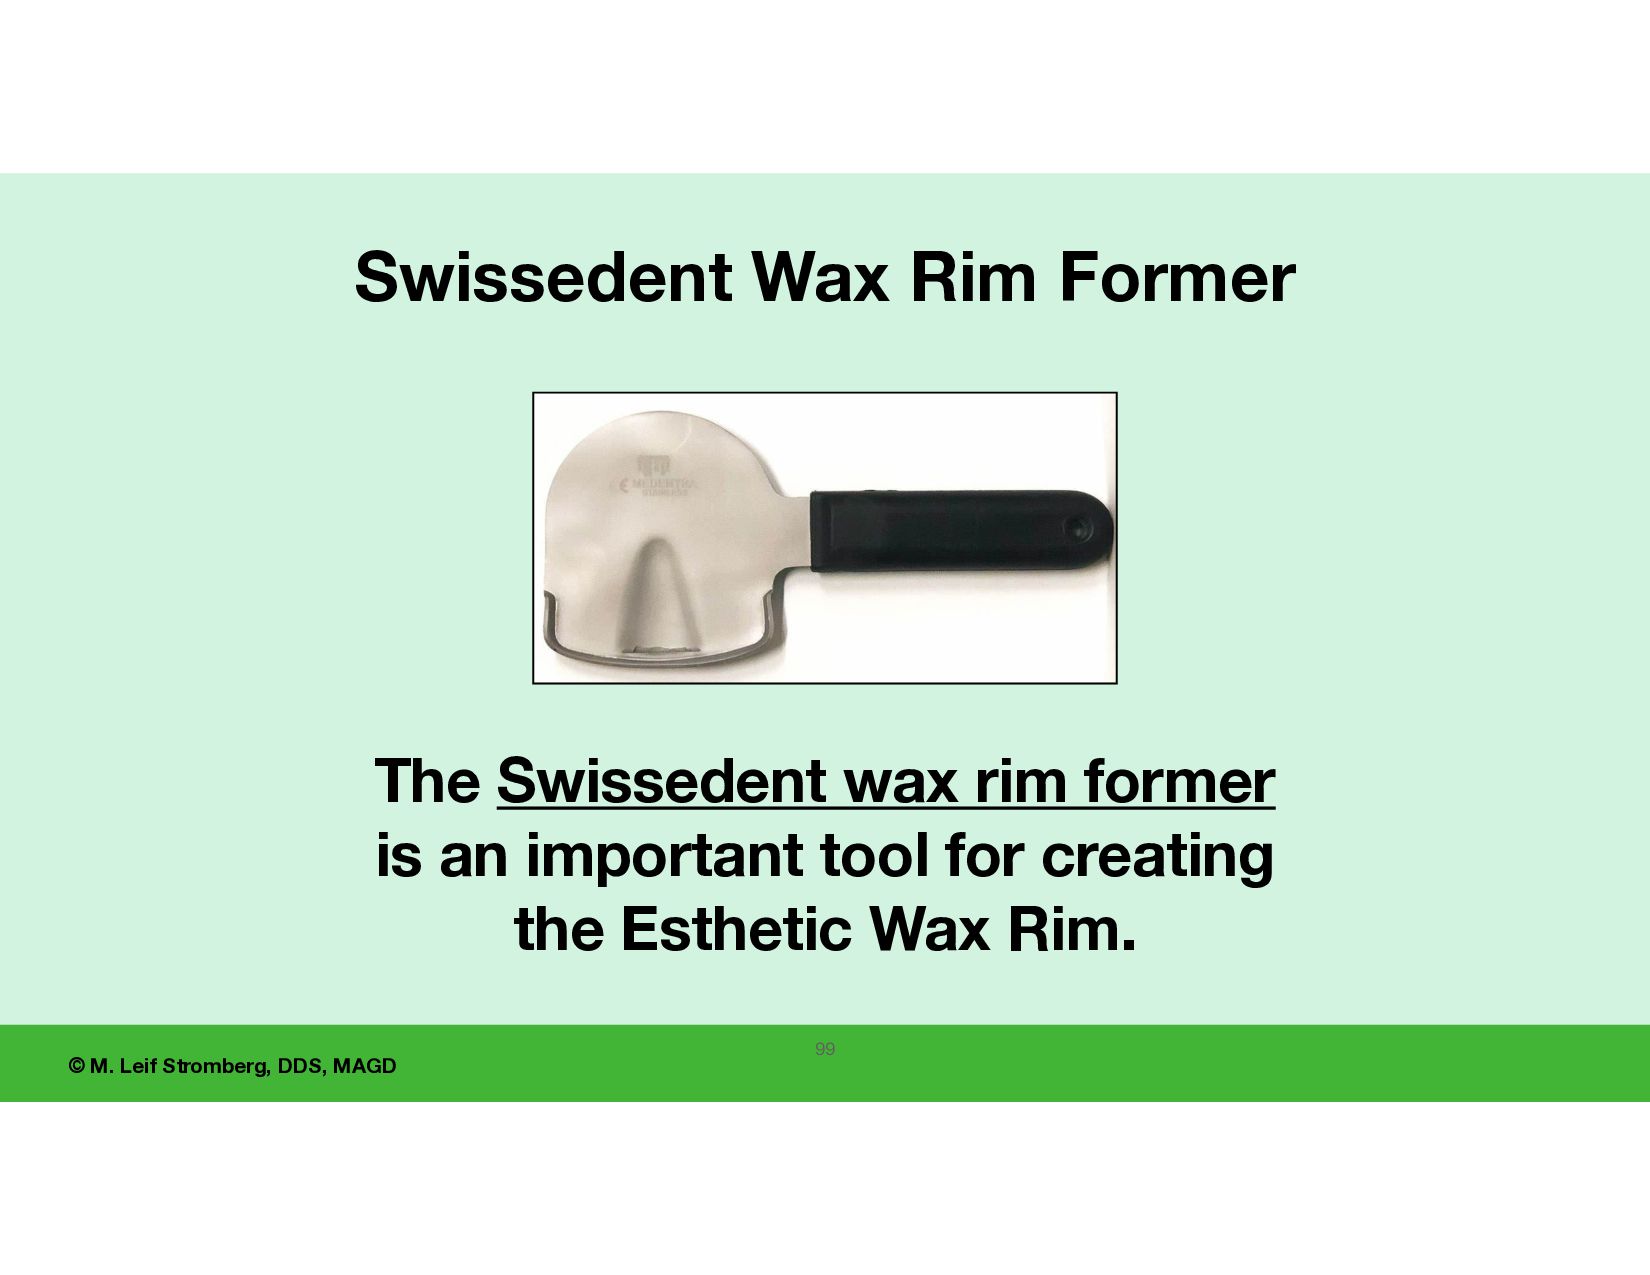
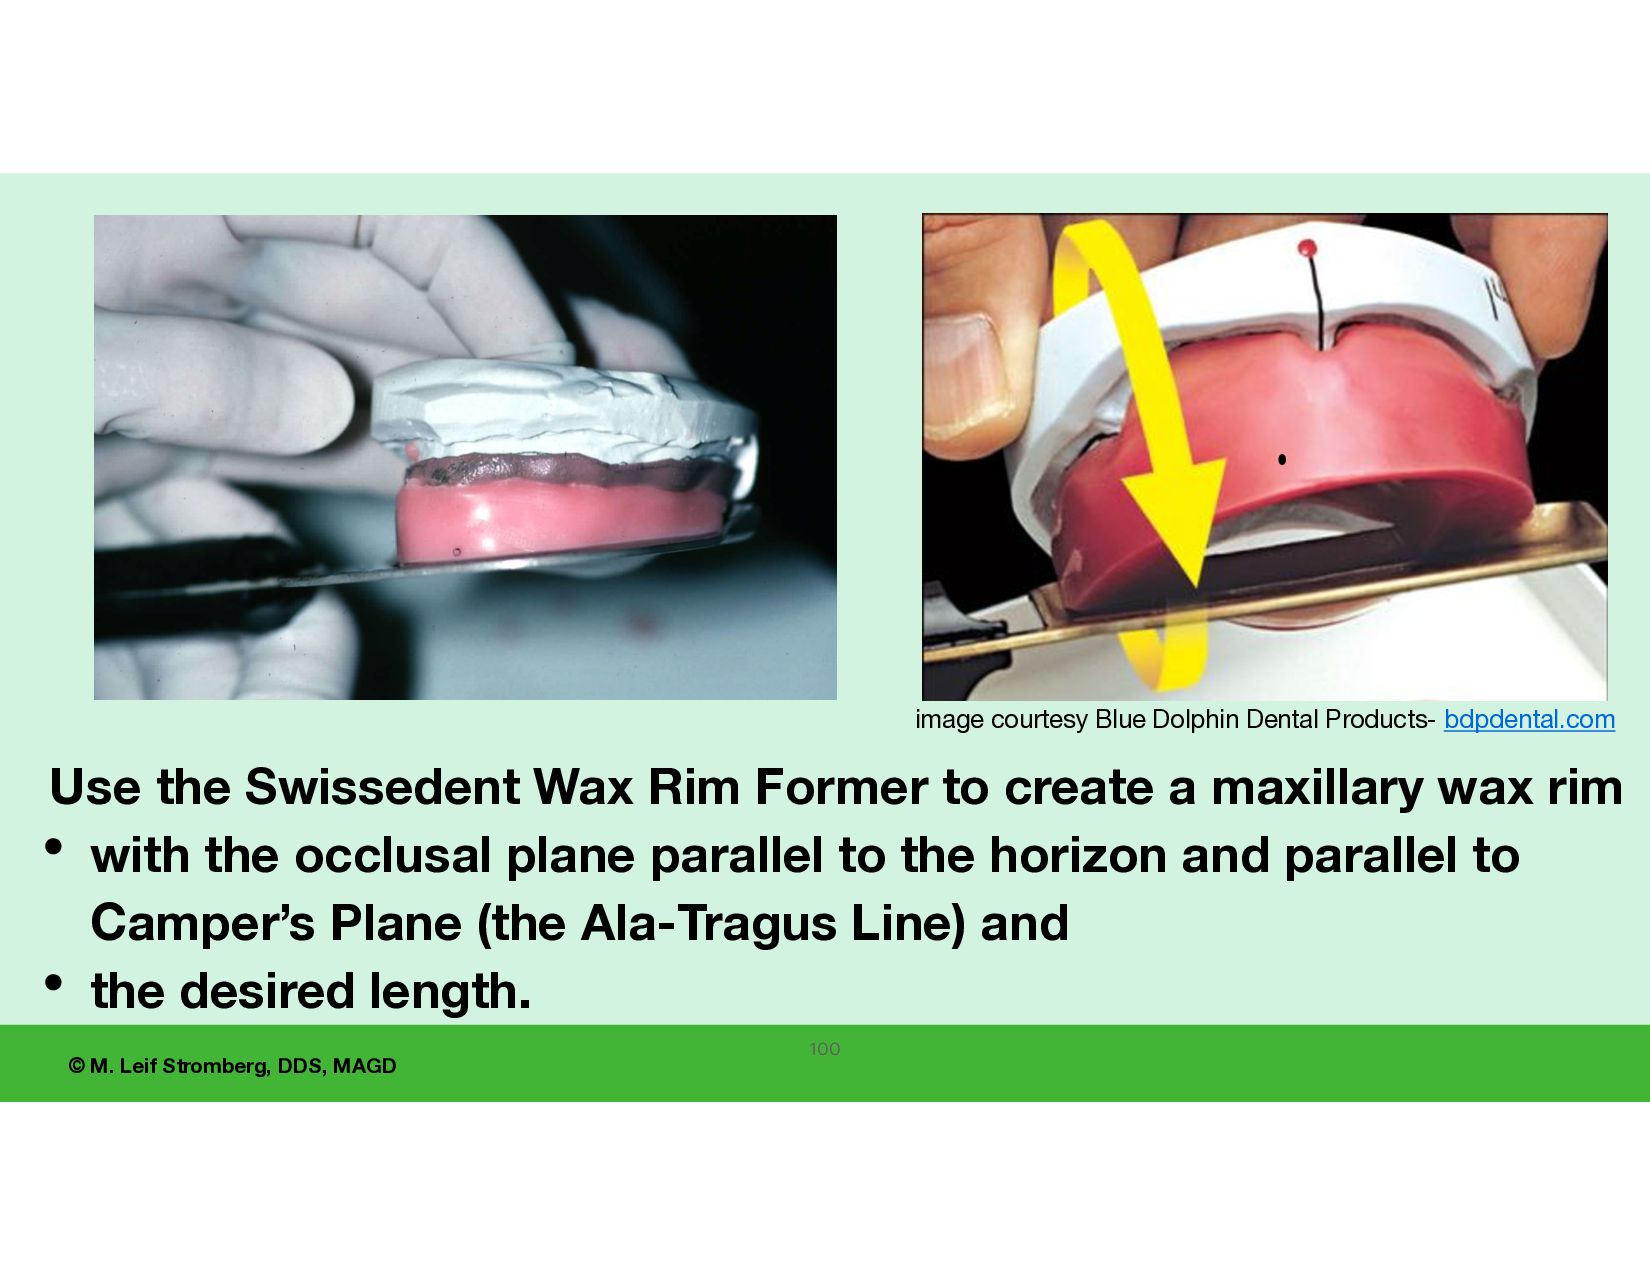
to create the occlusal plane The heated wax rim former is rotated upward against the wax rim. The rim is melted down to the desired dimensions. The rim of the rim former is placed in hamular notches and creates an occlusal plane parallel to the horizon. Wax fl ows through channel 98
Rim Former to create a maxillary wax rim • with the occlusal plane parallel to the horizon and parallel to Camper’s Plane (the Ala-Tragus Line) and • the desired length. image courtesy Blue Dolphin Dental Products- bdpdental.com 100
should return for the records appointment: • upper and lower baseplates with gothic arch tracers, and • a well- fi tting upper baseplate with an esthetic wax rim.
1. Important intra-oral landmarks to record in adequate nal impressions include all peripheral rolls, the retromolar pads, tuberosities, the vibrating line, and hamular notches. 2. Adequate maxillary and mandibular edentulous nal impressions can usually be obtained with the Accudent XD alginate impression system (Ivoclar, Inc.) 3. The use of the alma gauge and Swissedent wax rim former are helpful for contouring the maxillary esthetic wax rim. 4. In preparation for the records appointment, the lab should construct a well- fi tting maxillary baseplate with an esthetic wax rim contoured to be where you estimate the teeth will be located, and upper and lower baseplates with gothic arch tracers. 5. Record a preliminary verticentric record for the laboratory to use to set up the gothic arch tracer or wax rims. 102