Share
Embed
Transcript
37 slides
-
Sandeep Parikh Technical Product Marke4ng [email protected] Ge#ng
Started with MongoDB and Amazon Web Services -
What We’ll Cover • MongoDB components » AWS instances
• Deployment configura4ons • Storage configura4on • Produc4on 4ps • SeFng up a three-‐node replica set -
MongoDB Components • 64-‐bit instances • Where your data lives
• Needs RAM and Disk I/O mongod • Stateless request router • Lives on your app server • Minimal data needs mongos • Metadata server for sharded configura4ons • Minimal data needs • 64-‐bit instances config -
Amazon EC2 Components • mongod – Standard: Large
or Extra Large (typical) – Hi-‐Memory: XL, XXL or 4XL (large data sets) – Cluster instances provide increased capacity and bandwith • mongos – Deploy onto your app server (32 or 64-‐bit) • config – Standard instances – Micro instance is sufficient -
Single Node • mongod – 64-‐bit EC2 instance
• Storage – Mul4ple EBS volumes – RAID 10 – Configured using mdadm mongod RAID 10 -
Replica Set mongod primary RAID 10
mongod secondary RAID 10 mongod secondary RAID 10 -
Replica Set – Using Zones mongod primary
RAID 10 mongod secondary RAID 10 mongod secondary RAID 10 Zone 3 Zone 2 Zone 1 -
Replica Set – Mul4ple Regions app Region 1
Region 2 mongod primary RAID 10 mongod secondary RAID 10 mongod secondary RAID 10 -
Replica Set – Security Groups mongod primary
RAID 10 mongod secondary RAID 10 mongod secondary RAID 10 app “application” “database” -
Sharded Deployment Shard 1 Shard 2 Shard
3 config config config app server mongos app server mongos app server mongos -
Recommenda4ons • EBS-‐backed storage vs. instance-‐based –
Persistent vs. ephemeral • RAID 10: “striped mirrors” • 4-‐8 EBS volumes for best performance http://en.wikipedia.org/wiki/Nested_RAID_levels#RAID_1_.2B_0 -
Some Tips • Know your deployment – Security
– Instances – Storage • Configure filesystem as Ext4 or XFS • Reduce I/O overhead – noa4me, nodira4me • Raise file descriptor limits -
More Tips • EBS snapshots are an easy way
to back up data • Deploy in a trusted environment – Consider authen4ca4on -
Security Groups • Create groups for the following
– app servers – MongoDB components • Ports to remember – mongod: 27017, 28017 (web-‐based status) – mongod shard server: 27018 – mongos: 27017 – config: 27019 • Security groups act as ACLs • Instances are accessible via SSH keys -
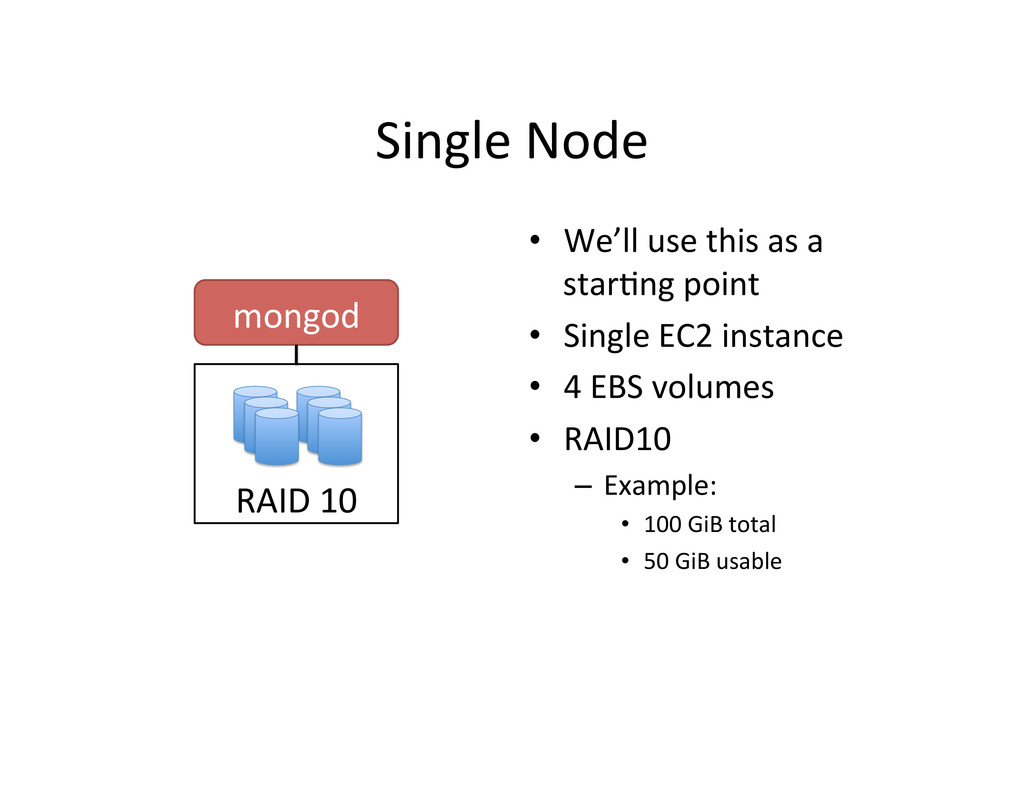
Single Node • We’ll use this as a
star4ng point • Single EC2 instance • 4 EBS volumes • RAID10 – Example: • 100 GiB total • 50 GiB usable mongod RAID 10 -
Crea4ng the Components $ ec2-run-instances ami-41814f28 -n 1 -g
database -k cluster-keypair -t m1.large -z us-east-1a! AMI count group keypair size zone Create an instance Create storage volumes (4x) $ ec2-create-volume –s 25 -z us-east-1a! size zone -
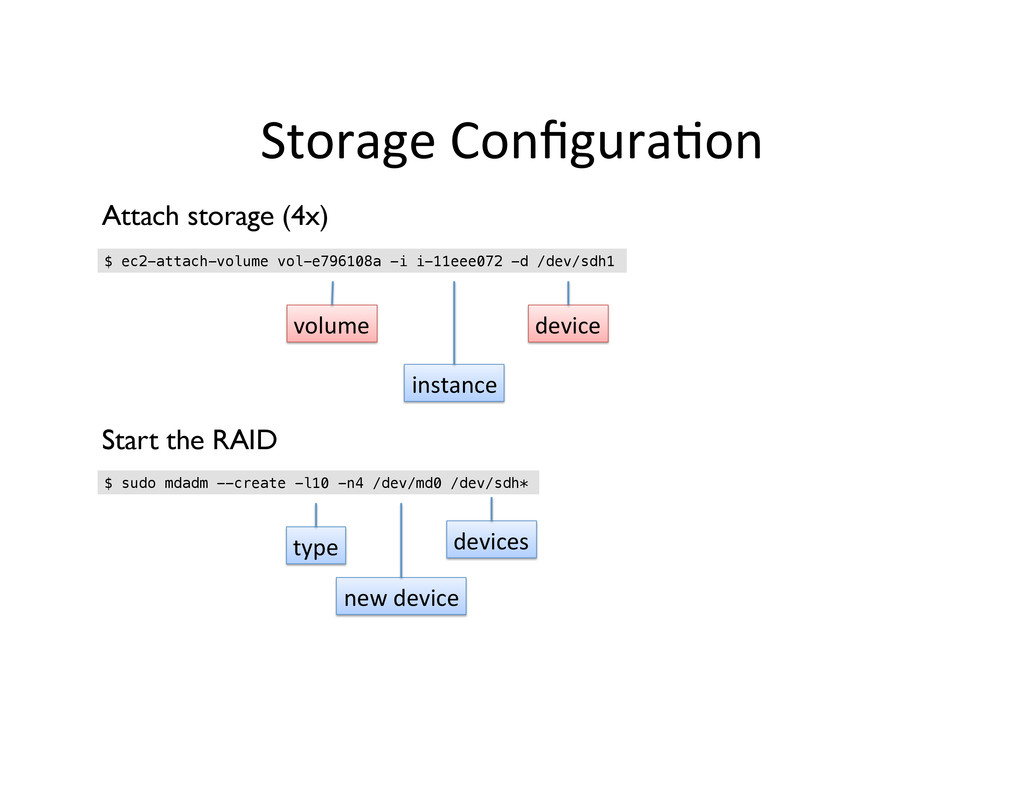
Storage Configura4on $ ec2-attach-volume vol-e796108a -i i-11eee072 -d /dev/sdh1!
volume instance device Attach storage (4x) Start the RAID $ sudo mdadm --create -l10 -n4 /dev/md0 /dev/sdh*! type new device devices -
Storage Configura4on $ sudo fdisk /dev/md0! $ sudo mkfs.ext4
/dev/md0p1! Partition device and make filesystem $ sudo mkdir /data! $ sudo chown `id -u` /data! Create mount point and set ownership $ sudo echo ‘/dev/md0p1 /data auto noatime,noexec,nodiratime 0 0’ >> /etc/fstab! $ sudo mount –a /dev/md0p1 /data! Update the filesystem table and mount -
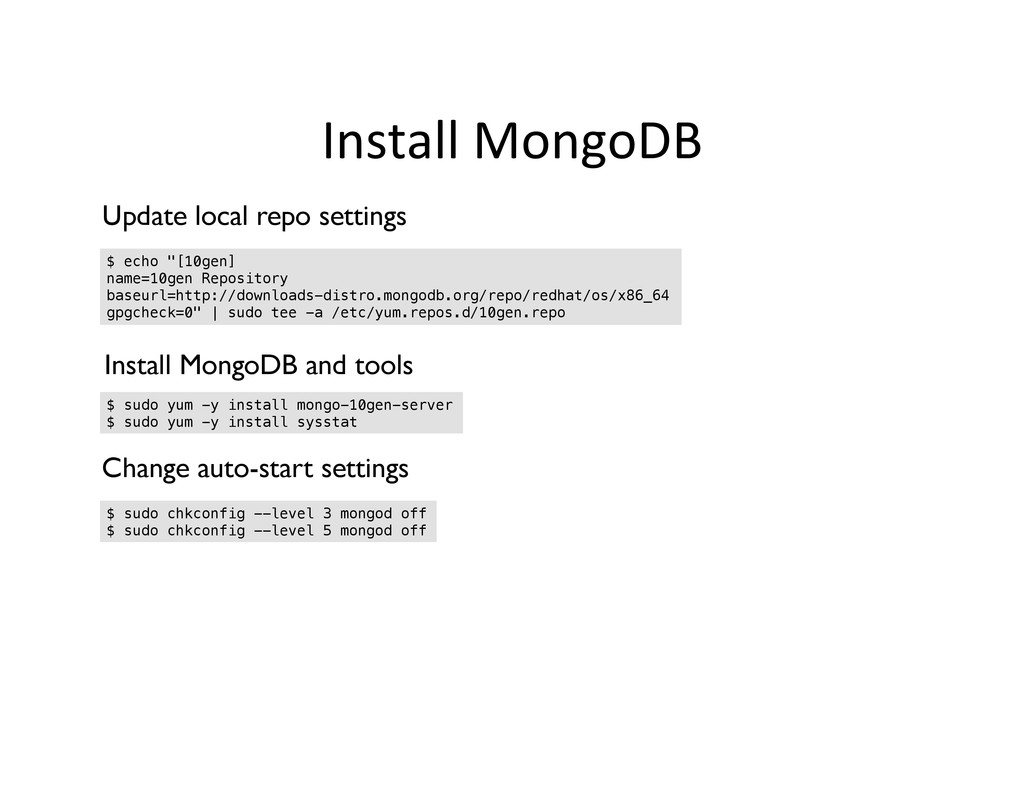
Install MongoDB $ echo "[10gen]! name=10gen Repository! baseurl=http://downloads-distro.mongodb.org/repo/redhat/os/x86_64! gpgcheck=0"
| sudo tee -a /etc/yum.repos.d/10gen.repo! Update local repo settings $ sudo yum -y install mongo-10gen-server! $ sudo yum -y install sysstat! Install MongoDB and tools $ sudo chkconfig --level 3 mongod off! $ sudo chkconfig --level 5 mongod off! Change auto-start settings -
MongoDB Configura4on $ sudo nano /etc/mongod.conf! ...! dbpath=/data! ...!
Set the dbpath $ sudo chkconfig mongod on! $ sudo /etc/init.d/mongod start! Set to autostart at boot and start the server now $ mongo! MongoDB shell version: 2.0.2! connecting to: test! >! Connect to MongoDB -
Adding Addi4onal Nodes • For each node, first
repeat steps for – Crea4ng instances and volumes – Configuring storage • Include replica set parameter in MongoDB configura4on • Start mongod -
MongoDB Configura4on $ sudo nano /etc/mongod.conf! ...! dbpath=/data! replSet=replicaSetName!
...! Set the dbpath $ sudo chkconfig mongod on! $ sudo /etc/init.d/mongod start! Set to autostart at boot and start the server now replica set name -
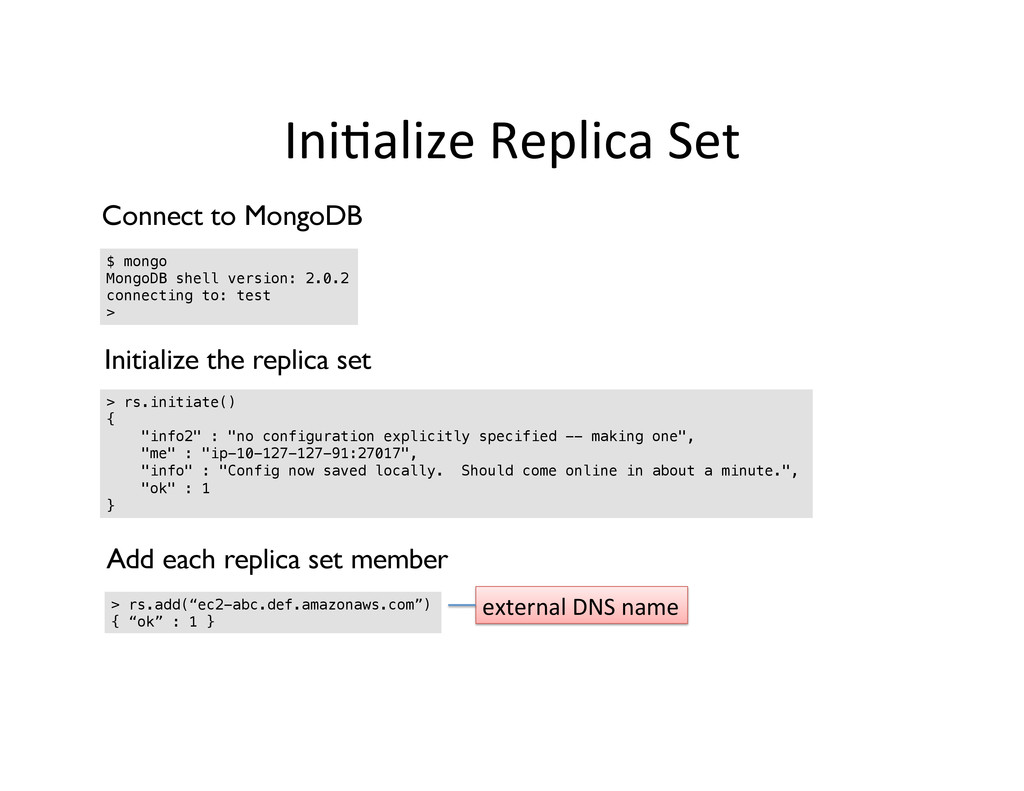
Ini4alize Replica Set $ mongo! MongoDB shell version: 2.0.2!
connecting to: test! >! Connect to MongoDB > rs.initiate()! {! "info2" : "no configuration explicitly specified -- making one",! "me" : "ip-10-127-127-91:27017",! "info" : "Config now saved locally. Should come online in about a minute.",! "ok" : 1! }! Initialize the replica set > rs.add(“ec2-abc.def.amazonaws.com”)! { “ok” : 1 }! Add each replica set member external DNS name -
Ini4alize Replica Set >! The mongo prompt should go
from this PRIMARY>! To this SECONDARY>! Or this -
Backing Up Your Data $ mongo! SECONDARY> use admin!
SECONDARY> db.runCommand({fsync:1,lock:1});! {! "info" : "now locked against writes, use db.$cmd.sys.unlock.findOne() to unlock",! "ok" : 1! }! Lock the database $ ec2-create-snapshot vol-1234abcd --description "MongoDB RAID backup1"! volume descrip4on Create a snapshot for each attached volume $ mdadm --detail /dev/md0p1! Run mdadm and note the UUID -
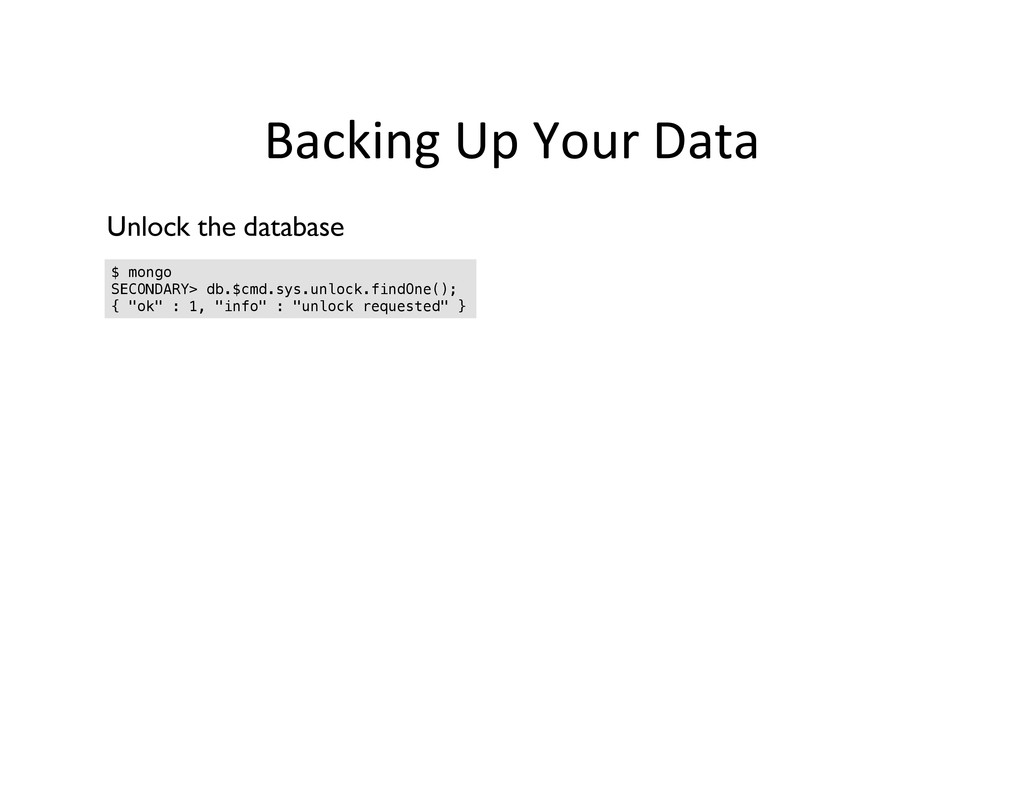
Backing Up Your Data $ mongo! SECONDARY> db.$cmd.sys.unlock.findOne();! {
"ok" : 1, "info" : "unlock requested" }! Unlock the database -
Restoring Your Data $ ec2-create-volume --availability-zone us-east-1a --snapshot vol-1234abcd!
$ ec2-attach-volume vol-1234abcd -i i-aa3bc4c8 -d /dev/sdh1! Create and attach a volume from each snapshot $ sudo mdadm --assemble --auto-update-homehost -u 07552c4d…a9c2f2fc --no-degraded /dev/md0! mdadm: /dev/md0 has been started with 4 drives.! Reassemble the RAID $ sudo mkdir /data2! $ sudo chown `id -u` /data2! Create mount point and set ownership UUID from mdadm -
Restoring Your Data Update the filesystem table and mount
$ sudo echo ‘/dev/md0p1 /data2 auto noatime,noexec,nodiratime 0 0’ >> /etc/fstab! $ sudo mount –a /dev/md0p1 /data2! $ mongod --dbpath /data2! $ mongo! MongoDB shell version: 2.0.2! connecting to: test! > use yourDb! > db.yourCollection.validate({full:true})! Verify the restore (optional, requires time and disk space) $ sudo cp /data2 /data! Set /data2 to /data -
Recommended Backup Methods • Create backups on secondary servers
when using replica4on – Doesn’t block on the primary – Secondary updates once unlocked • Use mongodump to backup live data – Collec4ons, databases, everything – Restore with mongorestore -
Learn More • MongoDB on Amazon Web Services white
paper: hnp://www.10gen.com/white-‐papers • Amazon EC2 info at MongoDB wiki: hnp://www.mongodb.org/display/DOCS/Amazon+EC2 • Scripts for working with EBS (crea4ng, anaching, etc.): hnps://gist.github.com/1482182 -
Contact Info • MongoDB – hnp://www.mongodb.org –
Downloads, Docs, Forums, etc. • 10gen – hnp://www.10gen.com/contact – [email protected] – Consul4ng, Support, etc. • Sandeep Parikh – [email protected]