Upgrade to Pro — share decks privately, control downloads, hide ads and more …

Caterpillar_Cat_D6H_TRACK-TYPE_TRACTOR__Prefix_...

dcfv
May 21, 2024
10

 Caterpillar_Cat_D6H_TRACK-TYPE_TRACTOR__Prefix_4RC__Service_Repair_Manual__4RC04000_and_up_.pdf

dcfv

May 21, 2024
Tweet

More Decks by dcfv

Transcript

  1. Shutdown SIS Previous Screen Product: TRACK-TYPE TRACTOR Model: D6H TRACK-TYPE

    TRACTOR 4RC Configuration: D6H & D6H LGP SERIES II TRACTORS / POWER SHIFT / 4RC04000-UP (MACHINE) POWERED BY 3306 ENGINE Disassembly and Assembly 3304B and 3306B Engines for Caterpillar Built Machines Media Number -SENR5598-09 Publication Date -01/01/2013 Date Updated -25/01/2013 i01112752 Crankshaft - Remove SMCS - 1202-011 Removal Procedure Table 1 Required Tools Tool Part Number Part Description Qty A 138-7575 Link Bracket 2 B 8B-7551 Bearing Puller 1 8B-7549 Puller Leg 2 3H-0465 Push-Puller Plate 4 1B-4207 Full Nut 2 8B-7560 Step Plate 1 1P-0820 Hydraulic Puller 1 9U-6600 Hand Hydraulic Pump 1 Start By: A. Remove the front housing. Refer to Disassembly and Assembly, "Front Housing - Remove". B. Remove the flywheel housing. Refer to Disassembly and Assembly, "Flywheel Housing - Remove and Install". C. Remove the engine oil pump. Refer to Disassembly and Assembly, "Engine Oil Pump - Remove". D. Remove the oil pan plate. Refer to Disassembly and Assembly, "Engine Oil Pan Plate - Remove and Install".
  2. NOTICE Keep all parts clean from contaminants. Contaminants may cause

    rapid wear and shortened component life. Illustration 1 g00503163 1. Turn the crankshaft until timing mark "C" on crankshaft gear (1) is aligned with timing mark "C" on camshaft gear (2) . Illustration 2 g00503180 2. Remove connecting rod nuts (4) and connecting rod caps (3) from the connecting rods. NOTICE Damage may occur to the fuel injection nozzle or the piston if the piston and connecting rod are pushed too far down in the cylinder liners.
  3. Note: The piston will be difficult to push down into

    the cylinder when the inlet valves and exhaust valves are closed. 3. Push down on the pistons that are not at the top center position in order to clear the crankshaft. 4. Remove main bearing cap bolts (5) and main bearing caps (6) from the cylinder block. Illustration 3 g00503320 5. Remove thrust plates (7) from the rear main bearing. Illustration 4 g00503353 6. Install Tool (A) and a suitable lifting device on crankshaft (8), as shown. Lift the crankshaft straight up from the cylinder block. The weight of the 3304B crankshaft is 65 kg (143 lb). The weight of the 3306B crankshaft is 95 Kg (210 lb).
  4. Illustration 5 g00503384 7. Use Tool (B) in order to

    remove the crankshaft gear and the oil seal wear sleeve from the crankshaft. Note: Put identification marks on the bearings and on the bearing caps prior to removal. 8. Remove the main bearings from the main bearing caps and from the cylinder block. Remove the connecting rod bearings from the connecting rods and from the connecting rod caps. Copyright 1993 - 2021 Caterpillar Inc. All Rights Reserved. Private Network For SIS Licensees. Thu Dec 9 13:21:23 UTC+0800 2021
  5. Shutdown SIS Previous Screen Product: TRACK-TYPE TRACTOR Model: D6H TRACK-TYPE

    TRACTOR 4RC Configuration: D6H & D6H LGP SERIES II TRACTORS / POWER SHIFT / 4RC04000-UP (MACHINE) POWERED BY 3306 ENGINE Disassembly and Assembly 3304B and 3306B Engines for Caterpillar Built Machines Media Number -SENR5598-09 Publication Date -01/01/2013 Date Updated -25/01/2013 i03706543 Crankshaft - Install SMCS - 1202-012 Installation Procedure Table 1 Required Tools Tool Part Number Part Description Qty A 138-7575 Link Bracket 2 B - Plastigage - C 8T-5096 Dial Indicator Group 1 NOTICE Keep all parts clean from contaminants. Contaminants may cause rapid wear and shortened component life. Note: Install the main bearings dry when the clearance checks are made. Put clean engine oil on the main bearings for final assembly. Note: Ensure that the upper halves and the lower halves of the main bearings are installed so that the bearing tabs fit into the bearing tab grooves in the cylinder block and in the main bearing caps.
  6. https://www.aservicemanualpdf.com/ My Dear Friend! Thank you very much for visiting.

    Full manual if required, please enter the following URL into your browser. https://www.aservicemanualpdf.com/
  7. Illustration 1 g00503582 1. If the bearings were removed from

    the engine, clean the bearing surfaces in the cylinder block and the main bearing caps. Install the upper halves of connecting rod bearings (1) and main bearings (2) . Illustration 2 g00503642 Hot oil and hot components can cause personal injury. Do not allow hot oil or hot components to contact the skin. 2. Heat crankshaft gear (3) to a maximum temperature of 315 °C (600 °F). Install crankshaft gear (3) on the crankshaft.
  8. Illustration 3 g00503668 3. Install Tooling (A) on the ends

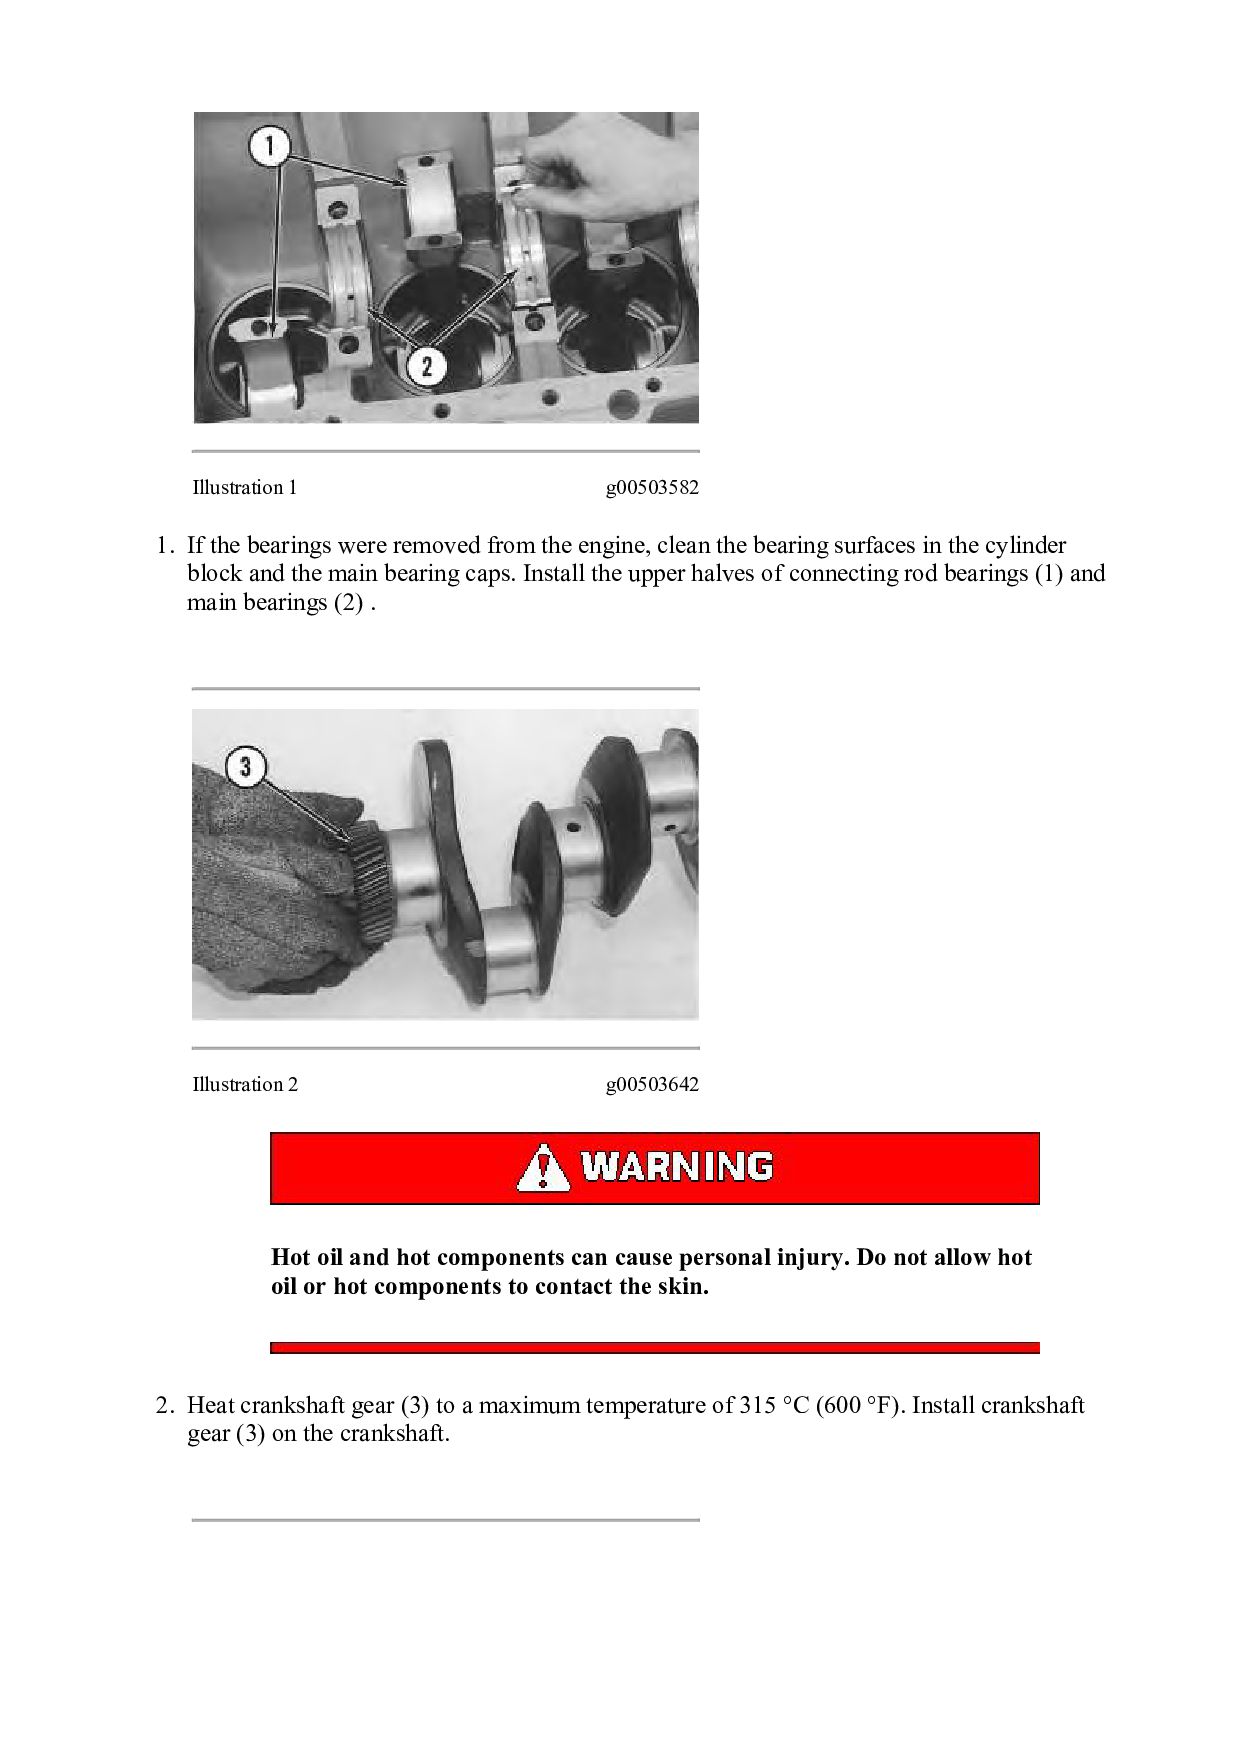
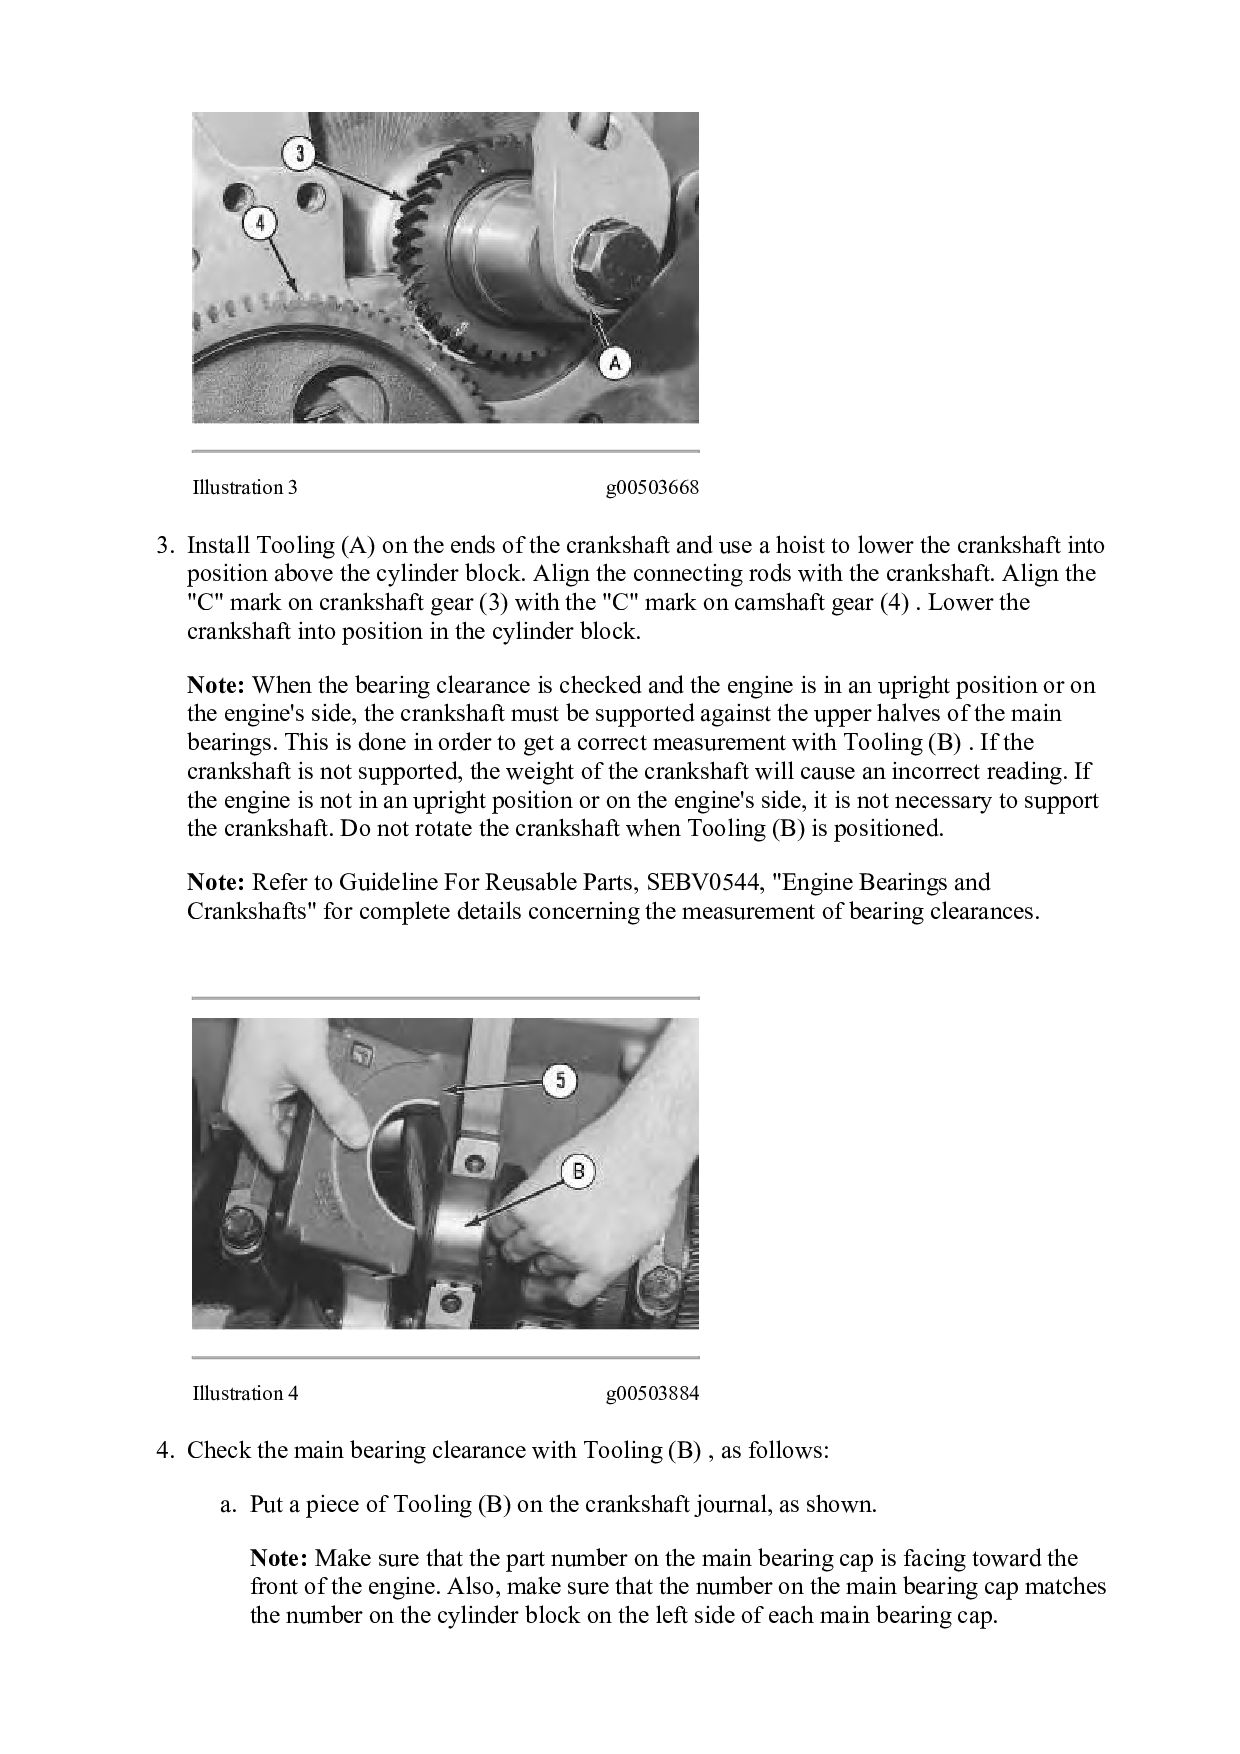
    of the crankshaft and use a hoist to lower the crankshaft into position above the cylinder block. Align the connecting rods with the crankshaft. Align the "C" mark on crankshaft gear (3) with the "C" mark on camshaft gear (4) . Lower the crankshaft into position in the cylinder block. Note: When the bearing clearance is checked and the engine is in an upright position or on the engine's side, the crankshaft must be supported against the upper halves of the main bearings. This is done in order to get a correct measurement with Tooling (B) . If the crankshaft is not supported, the weight of the crankshaft will cause an incorrect reading. If the engine is not in an upright position or on the engine's side, it is not necessary to support the crankshaft. Do not rotate the crankshaft when Tooling (B) is positioned. Note: Refer to Guideline For Reusable Parts, SEBV0544, "Engine Bearings and Crankshafts" for complete details concerning the measurement of bearing clearances. Illustration 4 g00503884 4. Check the main bearing clearance with Tooling (B) , as follows: a. Put a piece of Tooling (B) on the crankshaft journal, as shown. Note: Make sure that the part number on the main bearing cap is facing toward the front of the engine. Also, make sure that the number on the main bearing cap matches the number on the cylinder block on the left side of each main bearing cap.
  9. b. Put the main bearing caps in position in the

    engine. Put 4C-5593 Anti-Seize Compound on the bolt threads and the face of the washers. Install the bolts and tighten the bolts to a torque of 40 ± 4 N·m (30 ± 3 lb ft). c. Put a mark on each bolt and main bearing cap. Tighten the bolts for an additional 90 degrees (1/4 turn). d. Remove the main bearing caps and measure Tooling (B) in order to find the bearing clearance. The main bearing clearance for new bearings must be 0.076 to 0.165 mm (0.0030 to 0.0065 inch). The maximum permissible clearance with used bearings is 0.25 mm (0.010 inch). Illustration 5 g00503913 5. Put clean engine oil on thrust plate (7) for the rear main bearing. Install the new thrust plate so that the mark that is identified as the "BLOCK SIDE" faces toward the cylinder block and toward the tabs on the thrust plates in the machined area on the cylinder block. Tabs (6) will not allow thrust plate (7) to be installed backward. Illustration 6 g00504005 6. Install the remaining main bearing caps. Use the same procedure that is described in Step 4.b and Step 4.c.
  10. Illustration 7 g00504013 7. Check the crankshaft end play with

    Tooling (C) . The end play is controlled by the thrust plates on the rear main bearing. End play with new thrust plates must be 0.122 to 0.579 mm (0.0048 to 0.0228 inch). Illustration 8 g00504198 8. Pull the connecting rod into position against the crankshaft. Note: Install the connecting rod bearings dry when the clearance checks are made. Put clean engine oil on the connecting rod bearings for final assembly. 9. Install the lower half of rod bearing (8) in the connecting rod cap. Align the tab in the connecting rod bearing with the tab in the connecting rod cap. 10. In order to check the connecting rod bearing clearance, put Tooling (B) in position on the crankshaft, as shown. NOTICE
  11. When the connecting rod caps are installed, ensure that the

    identification marks are aligned. Illustration 9 g00504276 11. Make sure that the connecting rod is in position on the crankshaft. Install connecting rod cap (9) and the connecting rod nuts. 12. Tighten the connecting rod nuts to a torque of 40 ± 4 N·m (30 ± 3 lb ft). Mark the position of the connecting rod nuts. Tighten each nut for an additional 90 degrees (1/4 turn). 13. Remove connecting rod cap (9) and measure the thickness of the Plastigage on the crankshaft. The connecting rod clearance must be 0.076 to 0.168 mm (0.0030 to 0.0066) for new bearings. The maximum clearance for used connecting rod bearings should be 0.25 mm (0.010 inch). 14. Install connecting rod cap (9) and tighten the nuts. Refer to Step 12 for the tightening procedure. 15. Repeat Steps 8 through 14 for the remaining connecting rod bearings. End By: a. Install the oil pan plate. Refer to Disassembly and Assembly, "Engine Oil Pan Plate - Remove and Install". b. Install the engine oil pump. Refer to Disassembly and Assembly, "Engine Oil Pump - Install". c. Install the flywheel housing. Refer to Disassembly and Assembly, "Flywheel Housing - Remove and Install". d. Install the front housing. Refer to Disassembly and Assembly, "Front Housing - Install". Copyright 1993 - 2021 Caterpillar Inc. All Rights Reserved. Private Network For SIS Licensees. Thu Dec 9 13:22:22 UTC+0800 2021
  12. Shutdown SIS Previous Screen Product: TRACK-TYPE TRACTOR Model: D6H TRACK-TYPE

    TRACTOR 4RC Configuration: D6H & D6H LGP SERIES II TRACTORS / POWER SHIFT / 4RC04000-UP (MACHINE) POWERED BY 3306 ENGINE Disassembly and Assembly 3304B and 3306B Engines for Caterpillar Built Machines Media Number -SENR5598-09 Publication Date -01/01/2013 Date Updated -25/01/2013 i05977048 Bearing Clearance - Check SMCS - 1203-535; 1219-535 Measurement Procedure Table 1 Required Tools Tool Part Number Part Description Qty A 198-9142 Plastic Gauge (Green) 0.025 to 0.076 mm (0.001 to 0.003 inch) 1 198-9143 Plastic Gauge (Red) 0.051 to 0.152 mm (0.002 to 0.006 inch) 1 198-9144 Plastic Gauge (Blue) 0.102 to 0.229 mm (0.004 to 0.009 inch) 1 198-9145 Plastic Gauge (Yellow) 0.230 to 0.510 mm (0.009 to 0.020 inch) 1 Note: Plastic gauge may not be necessary when the engine is in the chassis. NOTICE Keep all parts clean from contaminants. Contaminants may cause rapid wear and shortened component life.
  13. Note: Cat does not recommend the checking of the actual

    bearing clearances particularly on small engines. This is because of the possibility of obtaining inaccurate results and the possibility of damaging the bearing or the journal surfaces. Each Cat engine bearing is quality checked for specific wall thickness. Note: The measurements should be within specifications and the correct bearings should be used. If the crankshaft journals and the bores for the block and the rods were measured during disassembly, no further checks are necessary. However, if the technician still wants to measure the bearing clearances, Tooling (A) is an acceptable method. Tooling (A) is less accurate on journals with small diameters if clearances are less than 0.10 mm (0.004 inch). NOTICE Lead wire, shim stock or a dial bore gauge can damage the bearing surfaces. The technician must be very careful to use Tooling (A) correctly. The following points must be remembered: • Ensure that the backs of the bearings and the bores are clean and dry. • Ensure that the bearing locking tabs are properly seated in the tab grooves. • The crankshaft must be free of oil at the contact points of Tooling (A). 1. Put a piece of Tooling (A) on the crown of the bearing that is in the cap. Note: Do not allow Tooling (A) to extend over the edge of the bearing. 2. Use the correct torque-turn specifications in order to install the bearing cap. Do not use an impact wrench. Be careful not to dislodge the bearing when the cap is installed. Note: Do not turn the crankshaft when Tooling (A) is installed. 3. Carefully remove the cap, but do not remove Tooling (A). Measure the width of Tooling (A) while Tooling (A) is in the bearing cap or on the crankshaft journal. Refer to Illustration 1.
  14. Illustration 1 g01152855 Typical Example 4. Remove all of Tooling

    (A) before you install the bearing cap. Note: When Tooling (A) is used, the readings can sometimes be unclear. For example, all parts of Tooling (A) are not the same width. Measure the major width in order to ensure that the parts are within the specification range. Refer to Specifications Manual, "Connecting Rod Bearing Journal" and Specifications Manual, "Main Bearing Journal" for the correct clearances. Copyright 1993 - 2021 Caterpillar Inc. All Rights Reserved. Private Network For SIS Licensees. Thu Dec 9 13:23:21 UTC+0800 2021
  15. Shutdown SIS Previous Screen Product: TRACK-TYPE TRACTOR Model: D6H TRACK-TYPE

    TRACTOR 4RC Configuration: D6H & D6H LGP SERIES II TRACTORS / POWER SHIFT / 4RC04000-UP (MACHINE) POWERED BY 3306 ENGINE Disassembly and Assembly 3304B and 3306B Engines for Caterpillar Built Machines Media Number -SENR5598-09 Publication Date -01/01/2013 Date Updated -25/01/2013 i02107209 Coolant Temperature Sensor - Remove and Install SMCS - 1906-010 Removal Procedure NOTICE Keep all parts clean from contaminants. Contaminants may cause rapid wear and shortened component life. NOTICE Care must be taken to ensure that fluids are contained during performance of inspection, maintenance, testing, adjusting and repair of the product. Be prepared to collect the fluid with suitable containers before opening any compartment or disassembling any component containing fluids. Refer to Special Publication, NENG2500, "Caterpillar Tools and Shop Products Guide" for tools and supplies suitable to collect and contain fluids on Caterpillar products. Dispose of all fluids according to local regulations and mandates.
  16. Illustration 1 g00493120 1. Disconnect coolant temperature sensor (1) from

    the water pump elbow. Installation Procedure NOTICE Keep all parts clean from contaminants. Contaminants may cause rapid wear and shortened component life. Illustration 2 g00493120 1. Connect coolant temperature sensor (1) to the water pump elbow. Copyright 1993 - 2021 Caterpillar Inc. All Rights Reserved. Private Network For SIS Licensees. Thu Dec 9 13:24:20 UTC+0800 2021
  17. Shutdown SIS Previous Screen Product: TRACK-TYPE TRACTOR Model: D6H TRACK-TYPE

    TRACTOR 4RC Configuration: D6H & D6H LGP SERIES II TRACTORS / POWER SHIFT / 4RC04000-UP (MACHINE) POWERED BY 3306 ENGINE Disassembly and Assembly 3304B and 3306B Engines for Caterpillar Built Machines Media Number -SENR5598-09 Publication Date -01/01/2013 Date Updated -25/01/2013 i00968855 Engine Oil Pressure Sensor - Remove and Install SMCS - 1924-010 Removal Procedure NOTICE Keep all parts clean from contaminants. Contaminants may cause rapid wear and shortened component life. NOTICE Care must be taken to ensure that fluids are contained during performance of inspection, maintenance, testing, adjusting and repair of the machine. Be prepared to collect the fluid with suitable containers before opening any compartment or disassembling any component containing fluids. Refer to Special Publication, NENG2500, "Caterpillar Tools and Shop Products Guide", for tools and supplies suitable to collect and contain fluids in Caterpillar machines. Dispose of all fluids according to local regulations and mandates.
  18. Illustration 1 g00493628 Typical example 1. Put an identification mark

    on the wire for the engine oil pressure sensor. Disconnect wire (2) for the engine oil pressure sensor. 2. Remove engine oil pressure sensor (1) from the cylinder block. Installation Procedure NOTICE Keep all parts clean from contaminants. Contaminants may cause rapid wear and shortened component life. Illustration 2 g00493628 Typical example
  19. 1. Install engine oil pressure sensor (1) in the cylinder

    block. 2. Connect wire (2) for the engine oil pressure sensor. Copyright 1993 - 2021 Caterpillar Inc. All Rights Reserved. Private Network For SIS Licensees. Thu Dec 9 13:25:20 UTC+0800 2021
  20. Shutdown SIS Previous Screen Product: TRACK-TYPE TRACTOR Model: D6H TRACK-TYPE

    TRACTOR 4RC Configuration: D6H & D6H LGP SERIES II TRACTORS / POWER SHIFT / 4RC04000-UP (MACHINE) POWERED BY 3306 ENGINE Disassembly and Assembly 3304B and 3306B Engines for Caterpillar Built Machines Media Number -SENR5598-09 Publication Date -01/01/2013 Date Updated -25/01/2013 i00943434 Air Compressor - Remove and Install SMCS - 1803-010 Removal Procedure Do not disconnect the air lines until the air pressure in the system is at zero. If hose is disconnected under pressure it can cause personal injury. NOTICE Keep all parts clean from contaminants. Contaminants may cause rapid wear and shortened component life. NOTICE Care must be taken to ensure that fluids are contained during performance of inspection, maintenance, testing, adjusting and repair of the machine. Be prepared to collect the fluid with suitable containers before opening any compartment or disassembling any component containing fluids.
  21. Refer to Special Publication, NENG2500, "Caterpillar Tools and Shop Products

    Guide", for tools and supplies suitable to collect and contain fluids in Caterpillar machines. Dispose of all fluids according to local regulations and mandates. 1. Remove the air pressure from the air tank and drain the coolant from the cooling system. Illustration 1 g00484206 2. Disconnect hose (1), (2) and (9) from the air compressor. Remove tube (4) from the air compressor. 3. Remove bolt (5) and the washer. Remove clamp (7) from the breather tube. Move the breather tube aside. 4. Remove three bolts (3) and the washers that hold the air compressor to the timing gear housing. 5. Remove two bolts (6) and remove air compressor (8) and the gasket from the engine. Installation Procedure NOTICE Keep all parts clean from contaminants. Contaminants may cause rapid wear and shortened component life. Note: Check the condition of the gaskets and O-ring seals. If gaskets or O-ring seals are damaged, use new parts for replacement.
  22. Illustration 2 g00484206 1. Use three bolts (3) and the

    washers to install air compressor (8). Apply 4C-4030 Thread Lock Compound to the threads of two bolts (6). Torque bolts (6) to 160 ± 30 N·m (118 ± 22 lb ft). 2. Install clamp (7) for the breather tube with bolt (5) and the washer. 3. Install tube (4) and connect hoses (9), (2) and (1) to air compressor (8) . Copyright 1993 - 2021 Caterpillar Inc. All Rights Reserved. Private Network For SIS Licensees. Thu Dec 9 13:26:19 UTC+0800 2021
  23. Shutdown SIS Previous Screen Product: TRACK-TYPE TRACTOR Model: D6H TRACK-TYPE

    TRACTOR 4RC Configuration: D6H & D6H LGP SERIES II TRACTORS / POWER SHIFT / 4RC04000-UP (MACHINE) POWERED BY 3306 ENGINE Disassembly and Assembly Flexxaire Fan Media Number -RENR3699-07 Publication Date -01/02/2012 Date Updated -21/06/2016 i01797691 Torque Specifications (Flexxaire Fan) SMCS - 1359-779 General Information on Torques Exceptions to these torques are given in the Service Manual, if necessary. Prior to installation of any hardware, ensure that components are in near new condition. Bolts and threads must not be worn or damaged. Threads must not have burrs or nicks. Hardware must be free of rust and corrosion. Clean the hardware with a noncorrosive cleaner. Do not lubricate the fastener threads except for the rust preventive. The rust preventive should be applied by the supplier of that component for purposes of shipping and storage. Other applications for lubricating components may also be specified in the Service Manual. When you are tightening a fastener, a certified torque wrench must be used at all times. Two torque values exist in the tables that follow. The “Dry” values are for fasteners without adhesive. The “Wet” values are for fasteners with adhesive. Torques for Metric Fasteners Table 1 Metric Nuts and Bolts Thread Size Metric Torque Grade 10.9 Grade 8.8 Dry Wet Dry Wet M6 14 N·m (10 lb ft) 10 N·m (7.5 lb ft) - - M8 34 N·m (25 lb ft) 26 N·m (19 lb ft) 23 N·m (17 lb ft) 18 N·m (13 lb ft) M10 61 N·m (45 lb ft) 46 N·m (34 lb ft) 42 N·m (31 lb ft) 32 N·m (24 lb ft) M12 108 N·m (80 lb ft) 81 N·m (60 lb ft) 76 N·m (56 lb ft) 57 N·m (42 lb ft)
  24. M14 169 N·m (125 lb ft) 127 N·m (94 lb

    ft) 118 N·m (87 lb ft) 88 N·m (65 lb ft) M16 285 N·m (210 lb ft) 217 N·m (160 lb ft) 196 N·m (145 lb ft) 149 N·m (110 lb ft) M20 542 N·m (400 lb ft) 407 N·m (300 lb ft) - - M24 1003 N·m (740 lb ft) 752 N·m (555 lb ft) - - M30 2169 N·m (1600 lb ft) - - - M36 3660 N·m (2700 lb ft) - - - Table 2 Metric Studs Thread Size Metric Torque Dry Wet M6 8 N·m (6 lb ft) - M8 18 N·m (13 lb ft) - M10 35 N·m (26 lb ft) - M12 65 N·m (48 lb ft) - M16 108 N·m (80 lb ft) - M20 169 N·m (125 lb ft) - M24 406 N·m (300 lb ft) - M30 746 N·m (550 lb ft) - M36 1193 N·m (880 lb ft) - Torques for Standard Fasteners Table 3 Inch Nuts and Bolts (UNF) Thread Size Inch Torque Grade 8 Dry Wet #8 2.2 N·m (1.6 lb ft) 1.6 N·m (1.2 lb ft) #10 4.6 N·m (3.4 lb ft) 3.5 N·m (2.6 lb ft)
  25. 1/4 19 N·m (14 lb ft) 14 N·m (10 lb

    ft) 5/16 38 N·m (28 lb ft) 28 N·m (21 lb ft) 3/8 61 N·m (45 lb ft) 46 N·m (34 lb ft) 7/16 99 N·m (73 lb ft) 73 N·m (54 lb ft) 1/2 136 N·m (100 lb ft) 103 N·m (76 lb ft) 9/16 192 N·m (142 lb ft) 144 N·m (106 lb ft) 5/8 305 N·m (225 lb ft) 230 N·m (170 lb ft) 3/4 563 N·m (415 lb ft) 420 N·m (310 lb ft) 7/8 861 N·m (635 lb ft) 644 N·m (475 lb ft) 1 1261 N·m (930 lb ft) 949 N·m (700 lb ft) Table 4 Inch Nuts and Bolts (UNC) Thread Size Inch Torque Grade 8 Dry Wet #8 2.0 N·m (1.5 lb ft) 1.5 N·m (1.1 lb ft) #10 4 N·m (3 lb ft) 3.1 N·m (2.3 lb ft) 1/4 16 N·m (12 lb ft) 12 N·m (9 lb ft) 5/16 34 N·m (25 lb ft) 26 N·m (19 lb ft) 3/8 54 N·m (40 lb ft) 41 N·m (30 lb ft) 7/16 88 N·m (65 lb ft) 68 N·m (50 lb ft) 1/2 129 N·m (95 lb ft) 98 N·m (72 lb ft) 9/16 172 N·m (127 lb ft) 129 N·m (95 lb ft) 5/8 271 N·m (200 lb ft) 203 N·m (150 lb ft) 3/4 502 N·m (370 lb ft) 373 N·m (275 lb ft) 7/8 780 N·m (575 lb ft) 583 N·m (430 lb ft) 1 1152 N·m (850 lb ft) 868 N·m (640 lb ft) Table 5 NPT and NPTF Threaded Joints Size inch Threads per Inch Torque(1) Dry(2) Wet
  26. 1-16 27 11 N·m (8 lb ft) 11 N·m (8

    lb ft) 1/8 27 16 N·m (12 lb ft) 16 N·m (12 lb ft) 1/4 18 20 N·m (15 lb ft) 24 N·m (18 lb ft) 3/8 18 35 N·m (26 lb ft) 45 N·m (33 lb ft) 1/2 14 45 N·m (33 lb ft) 60 N·m (44 lb ft) 3/4 14 60 N·m (44 lb ft) 74 N·m (55 lb ft) 1 11.5 74 N·m (55 lb ft) 89 N·m (66 lb ft) (1) Use 50% of the recommended torque when either portion of the threaded connector is nonferrous. (2) Adhesive refers to either the thread lock compound or the thread sealant. Copyright 1993 - 2022 Caterpillar Inc. All Rights Reserved. Private Network For SIS Licensees. Tue Jan 25 08:35:51 UTC+0800 2022
  27. Shutdown SIS Previous Screen Product: TRACK-TYPE TRACTOR Model: D6H TRACK-TYPE

    TRACTOR 4RC Configuration: D6H & D6H LGP SERIES II TRACTORS / POWER SHIFT / 4RC04000-UP (MACHINE) POWERED BY 3306 ENGINE Disassembly and Assembly Flexxaire Fan Media Number -RENR3699-07 Publication Date -01/02/2012 Date Updated -21/06/2016 i01739978 Control System - Remove and Install SMCS - 1356-010-YC General Installation Installation of the Mark I Control System Illustration 1 g00564778 Mark I Control System (1) Mark I control box (2) AUTO-purge timer (3) Cable for remote display (4) Remote display (5) Pigtail
  28. Please write to us. Our email: [email protected] Please go to

    the homepage to get the full manual, or other brand PDF manuals. Home Site: aservicemanualpdf.com
  29. Thank you very much for your reading. Please Click Here.

    Then Get COMPLETE MANUAL. NO WAITING NOTE: If there is no response to click on the link above, please download the PDF document first and then click on it.
  30. (6) Actuator (7) Temperature and ground cable (8) Temperature sensor

    (9) Position sensor (10) Power cable 1. Mount control box (1) in the operator's compartment. The mounting location should meet the following criteria: ◦ Ambient temperature of −40.0 °C (−40.0 °F) to 60.0 °C (140.0 °F) ◦ Minimal debris and vibration ◦ Safe from water that is high pressure ◦ Accessible for future adjustments or changes in setup The control box should be mounted in a vertical position, and vibration mounts that are supplied with the controller should be installed. 2. AUTO-purge timer (2) is located near control box (1). Connect the end of the cable for AUTO-purge timer (2) to the plug end of the cable for the AUTO-purge timer on control box (1). 3. Cable for remote display (3) may not be required for all installations. Connect the end of the cable for remote display (3) to the plug end of AUTO-purge timer (2). Connect the plug end of cable for remote display (3) into the end of the pigtail for remote display (4). 4. Mount remote display (4) on the dash or another convenient location. The remote display should be visible and accessible to the operator. Connect the end of the cable for remote display (4) to the plug end of the cable for remote display (3). 5. Connect the end of pigtail (5) to the plug end of the cable for control box (1). Pigtail (5) splits into a harness with three connectors. One end goes to actuator (6). One end goes to temperature sensor (8). One end goes to position sensor (9). 6. The following steps are for installation of actuator (6):
  31. Illustration 2 g00592444 (1) Actuator (2) Actuator rod (3) Actuator

    collar (4) Setscrew (5) Operator fork (6) Hitch pin (7) Mechanical stop (8) Position sensor (9) Alignment plate (10) Actuator clevis a. Remove hitch pin (6). b. Position operator fork (5) against mechanical stop (7). c. Manually turn actuator rod (2) outward until the rod is fully extended. When the rod reaches the end of travel, the actuator motor can be felt turning. d. Retract actuator rod (2) by the rotating actuator rod by 180 degrees. The actuator motor should not turn. e. Slide actuator (1) through actuator collar (3). Verify that the actuator collar is oriented so that setscrews (4) are facing away from actuator clevis (10). f. Retracting actuator rod (2) by 1/4 turn may be required in order to line up the hole in actuator rod (2) with the hole in operator fork (5). g. Insert hitch pin (6) through operator fork (5) and actuator rod (2). h. Verify that operator fork (5) is against mechanical stop (7). Make sure that the actuator motor is oriented in the correct position. The actuator motor must be clear of obstructions. Rotate the actuator in the collar prior to tightening setscrews (4).
  32. i. Apply 9S-3263 Thread Lock Compound to setscrews (4) and

    install the setscrews. Tighten the setscrew to a torque of 16 N·m (12 lb ft). Note: Do not tighten setscrews more than 1.5 threads below the surface. j. Connect the end of the cable for the actuator to the red and yellow plug of pigtail (5). 7. Connect the end of temperature and ground cable (7) to the plug with green and black wires of pigtail (5). The ground wire (green) is secured with a bolt that threads in to the support arm of the fan assembly. The brown lead wire is connected to the top of temperature sensor (8). 8. Thread temperature sensor (8) into the engine block. An area that is close to the water temperature regulator is recommended. Temperature sensor (8) comes with three thread adapters. The brown lead wire of temperature and ground cable (7) connects to the top of temperature sensor (8). Illustration 3 g00918804 (1) Mounting bracket for the position sensor (2) Bolt (3) Alignment plate (4) Mounting nut for the position sensor (5) Position sensor (6) Washer (7) Capscrew 9. The following steps are for installation of position sensor (9): a. Place mounting bracket (1) for the position sensor against alignment plate (3). b. Thread bolt (2) into mounting nut (4) for the position sensor through alignment plate (3) and position sensor mounting bracket (1). Tighten bolt (2) to a torque of 16.3 N·m (12.0 lb ft). c. Place position sensor (5) in the correct location. d. Put washer (6) on capscrew (7). Thread capscrew (7) into mounting nut (4) for the position sensor through position sensor (5).
  33. https://www.aservicemanualpdf.com/ My Dear Friend! Thank you very much for visiting.

    Full manual if required, please enter the following URL into your browser. https://www.aservicemanualpdf.com/