System.Collections; using System.Collections.Generic; using UnityEngine; using System; public class AirTapGesture : MonoBehaviour, IInputClickHandler { // Use this for initialization void Start () { } // Update is called once per frame void Update () { } public void OnInputClicked(InputClickedEventData eventData) { gameObject.AddComponent<Rigidbody>(); } } https://github.com/kaorun55/HoloHoL/blob/master/HelloHoloProject/Assets/AirTapGesture.cs 50
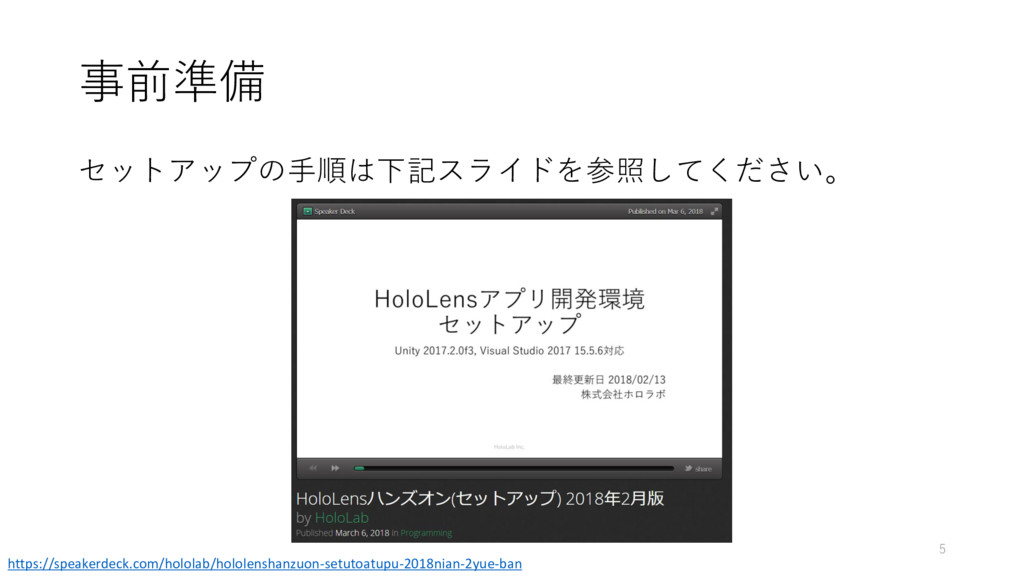
![事前準備 • HoloLens実機 • HoloLensに[Holographic Remoting]アプリをインストール • 開発PC • Windows](https://files.speakerdeck.com/presentations/3153eec2937b40399d80be0fbdc16682/slide_3.jpg)
![Unityプロジェクトの作成(1) 1. Unityを起動し[New]をクリックします。 9 1](https://files.speakerdeck.com/presentations/3153eec2937b40399d80be0fbdc16682/slide_8.jpg)
![Unityプロジェクトの作成(2) 1. プロジェクト名を入力します。 2. プロジェクトのフォルダを選択します。 3. [3D] にチェックします。 4. [Create](https://files.speakerdeck.com/presentations/3153eec2937b40399d80be0fbdc16682/slide_9.jpg)
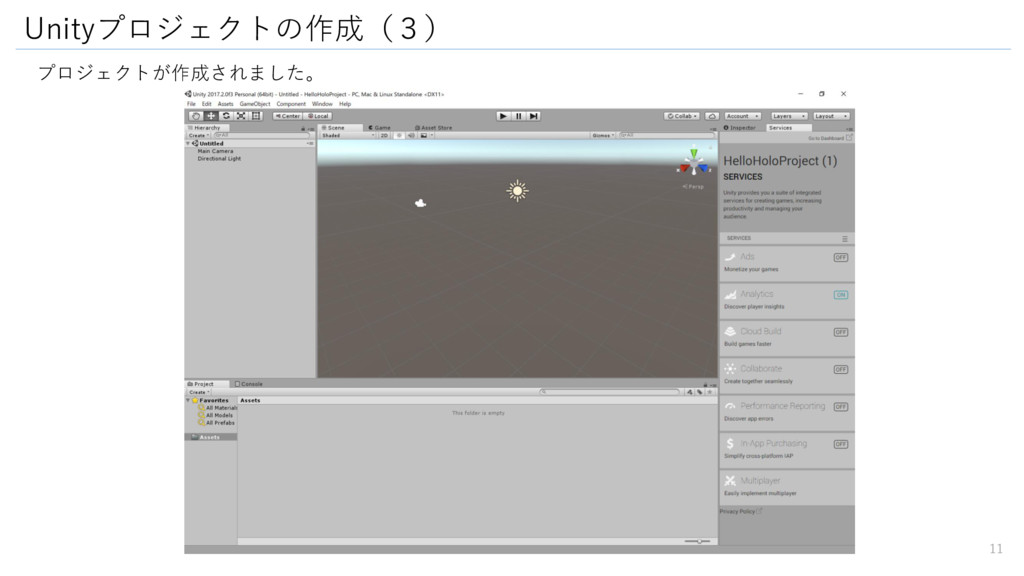
![シーンの保存(1) 1. メニューの [File] にある [Save Scene] をクリック(または [Ctrl+S] )します。](https://files.speakerdeck.com/presentations/3153eec2937b40399d80be0fbdc16682/slide_11.jpg)
![シーンの保存(2) 1. [Asset] フォルダにファイル名を入力([HoloProject]とします)して [保存] ボタンをクリックします。 1 13](https://files.speakerdeck.com/presentations/3153eec2937b40399d80be0fbdc16682/slide_12.jpg)
![MixedRealityToolkit-Unityのダウンロード(1) 1. https://github.com/Microsoft/MixedRealityToolkit-Unity/releases/tag/2017.2.1.0 から [HoloToolkit- Unity-2017.2.1.0.unitypackage] をダウンロードします。 15 1](https://files.speakerdeck.com/presentations/3153eec2937b40399d80be0fbdc16682/slide_14.jpg)
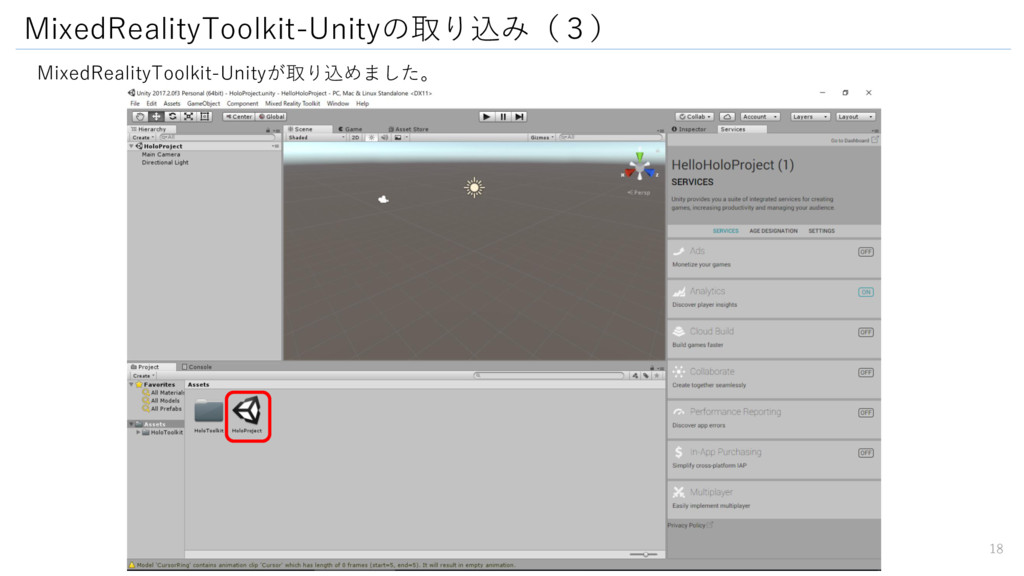
![MixedRealityToolkit-Unityの取り込み(1) 1. [HoloToolkit-Unity-2017.2.1.0.unitypackage]ファイルを Unity の [Project] ビューに入れます。 1 16](https://files.speakerdeck.com/presentations/3153eec2937b40399d80be0fbdc16682/slide_15.jpg)
![MixedRealityToolkit-Unityの取り込み(2) 1. [Import Unity Package] ダイアログが表示されるので [Import] を押します。 1 17](https://files.speakerdeck.com/presentations/3153eec2937b40399d80be0fbdc16682/slide_16.jpg)
![オプション:Unityエディターの配置を変える(1) 1. 右上にある [Layout] をクリックします 2. [2 by 3] をクリックします。](https://files.speakerdeck.com/presentations/3153eec2937b40399d80be0fbdc16682/slide_18.jpg)
![オプション:Unityエディターの配置を変える(2) 1. [Project] ビューの右上の小さなボタン (ハンバーガーメニュー) をクリックします。 2. [One Column Layout]](https://files.speakerdeck.com/presentations/3153eec2937b40399d80be0fbdc16682/slide_19.jpg)
![オプション:Unityエディターの配置を変える(3) [Project]ビューがツリー表示されるようになりました。 21](https://files.speakerdeck.com/presentations/3153eec2937b40399d80be0fbdc16682/slide_20.jpg)
![プロジェクトの初期設定(1) 1. メニューの [Mixed Reality Toolkit] にある [Configure] → [Apply](https://files.speakerdeck.com/presentations/3153eec2937b40399d80be0fbdc16682/slide_22.jpg)
![プロジェクトの初期設定(2) 1. 既定のチェック状態で [Apply] をクリックします。 24](https://files.speakerdeck.com/presentations/3153eec2937b40399d80be0fbdc16682/slide_23.jpg)
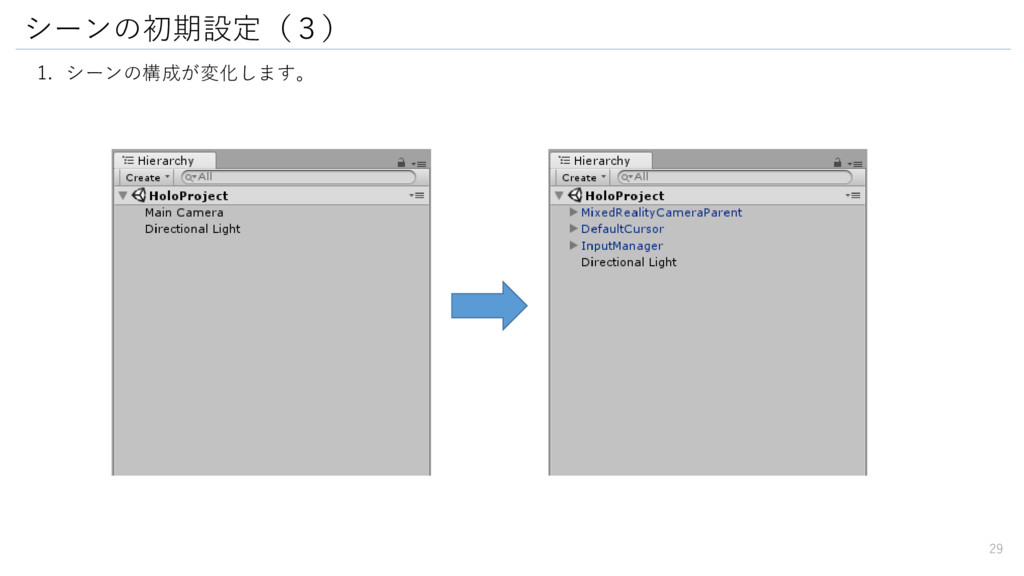
![シーンの初期設定(1) 1. メニューの [Mixed Reality Toolkit] にある [Configure] → [Apply](https://files.speakerdeck.com/presentations/3153eec2937b40399d80be0fbdc16682/slide_24.jpg)
![シーンの初期設定(2) 1. 既定のチェック状態で[Apply]をクリックします。 • 既定のシーン構成を置き換えるので、開発中のシーンへの適用は注意してください。 28 1](https://files.speakerdeck.com/presentations/3153eec2937b40399d80be0fbdc16682/slide_25.jpg)
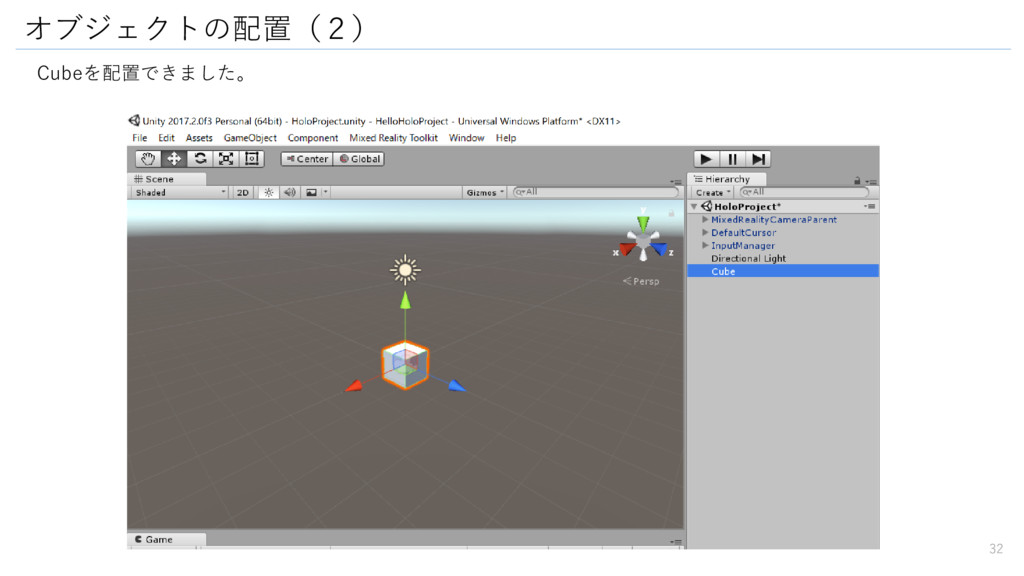
![オブジェクトの配置(1) 1. [Hierarchy] ビューの何もないところで左クリックし、選択を外します。 2. [Hierarchy] ビューの何もないところで右クリックし、[3D Object]→[Cube] を選択します。 31](https://files.speakerdeck.com/presentations/3153eec2937b40399d80be0fbdc16682/slide_28.jpg)
![Cubeの “Inspector” ビューを操作します。 1. [Position] を [0.5,0,2] に変更します。 2. [Scale]](https://files.speakerdeck.com/presentations/3153eec2937b40399d80be0fbdc16682/slide_30.jpg)
![オブジェクトの配置(4) 1. 同様に “Hierarchy” ビューで [Sphere] を配置します。 2. [Position] を](https://files.speakerdeck.com/presentations/3153eec2937b40399d80be0fbdc16682/slide_31.jpg)
![オブジェクトの配置(5) 1. 最後に “Hierarchy” ビューで [Capsule] を配置します。 2. [Position] を](https://files.speakerdeck.com/presentations/3153eec2937b40399d80be0fbdc16682/slide_32.jpg)
![Unity側の設定(1) 1. メニューの [Window]→[Holographic Emulation] をクリックします。 1 39](https://files.speakerdeck.com/presentations/3153eec2937b40399d80be0fbdc16682/slide_36.jpg)
![Unity側の設定(2) 1. [Holographic]ビューが表示されますが、警告(左図)になっている場合があります。 2. 右図の場合は[Unity側の設定(5)]に進んでください。 40 1 2](https://files.speakerdeck.com/presentations/3153eec2937b40399d80be0fbdc16682/slide_37.jpg)
![Unity側の設定(3) 1. メニューの [File]→[Build Settings] をクリックします。 41 1](https://files.speakerdeck.com/presentations/3153eec2937b40399d80be0fbdc16682/slide_38.jpg)
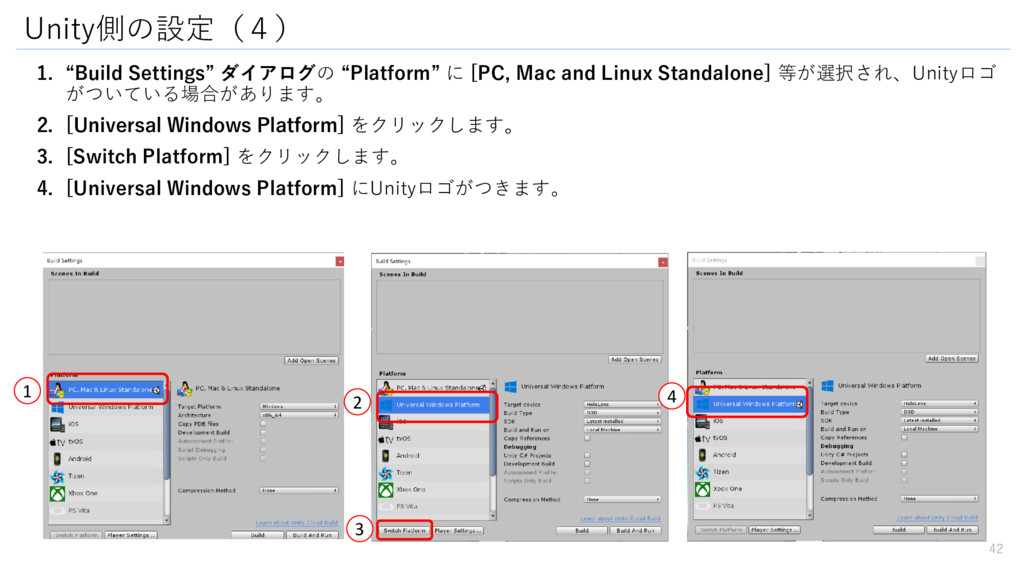
![Unity側の設定(5) 1. “Emulation Mode“ を [Remote to Device] に変更 2.](https://files.speakerdeck.com/presentations/3153eec2937b40399d80be0fbdc16682/slide_40.jpg)
![Connectボタンが押せない場合の対処 1. [Connect] ボタンが押せない場合。 2. [Enable Audio] のチェックを外します。 3. [Connect]](https://files.speakerdeck.com/presentations/3153eec2937b40399d80be0fbdc16682/slide_41.jpg)
![1. Unityの [再生] ボタンをクリックします。 HoloLens上にオブジェクトが表示されます。 Unity側の設定(6) 45 1](https://files.speakerdeck.com/presentations/3153eec2937b40399d80be0fbdc16682/slide_42.jpg)
![AirTapでオブジェクトが落ちるコードを作成(1) 1. “Project”ビューで右クリックし [Create]→[C# Script] をクリックします。 1 47](https://files.speakerdeck.com/presentations/3153eec2937b40399d80be0fbdc16682/slide_44.jpg)
![AirTapでオブジェクトが落ちるコードを作成(2) 1. スクリプト名に[AirTapGesture]と入力します。 1 48](https://files.speakerdeck.com/presentations/3153eec2937b40399d80be0fbdc16682/slide_45.jpg)
![AirTapでオブジェクトが落ちるコードを作成(3) 1. [AirTapGesture]スクリプトをダブルクリックしてVisual Studioを起動します。 49](https://files.speakerdeck.com/presentations/3153eec2937b40399d80be0fbdc16682/slide_46.jpg)
![1. “AirTapGesture” スクリプトを [Sphere] にドラッグアンドドロップします。 2. [Sphere] の “Inspector” ビューに](https://files.speakerdeck.com/presentations/3153eec2937b40399d80be0fbdc16682/slide_48.jpg)
![1. “AirTapGesture” スクリプトを [Cube] と [Capsule] にもドラッグアンドドロップします。 CubeとCapsuleもAir Tapで落ちるようになります。 AirTapでオブジェクトが落ちるコードを作成(7)](https://files.speakerdeck.com/presentations/3153eec2937b40399d80be0fbdc16682/slide_50.jpg)
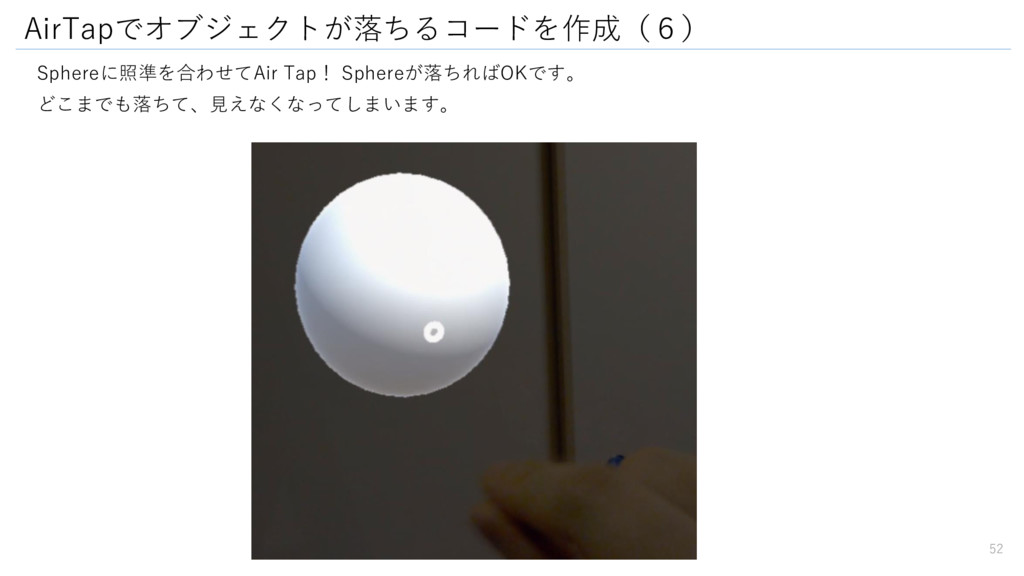
![1. “Project” ビューの [HoloToolkit]→[SpatialMapping]→[Prefab] にある [SpatialMapping] を “Hierarchy”ビューに追加します。 空間マッピングの設定(1) 1](https://files.speakerdeck.com/presentations/3153eec2937b40399d80be0fbdc16682/slide_52.jpg)
![空間マッピングの設定(2) 1. SpatialMappingを有効にする設定を追加します。 メニューの [Mixed Reality Toolkit]→[Configure]→[Apply UWP Capability Settings]](https://files.speakerdeck.com/presentations/3153eec2937b40399d80be0fbdc16682/slide_53.jpg)
![空間マッピングの設定(3) 1. HoloLensで使用できる機能の一覧が表示されるので[Spatial Perception]をチェックします。 2. [Apply]ボタンをクリックします。 1 2 57](https://files.speakerdeck.com/presentations/3153eec2937b40399d80be0fbdc16682/slide_54.jpg)
![1. メニューの [File | Build Settings] または [Shift+Ctrl+B]で “Build Settings”](https://files.speakerdeck.com/presentations/3153eec2937b40399d80be0fbdc16682/slide_56.jpg)
![実機デプロイ(2) 1. [Build] ボタンをクリックします。 2. 表示された Windows エクスプローラーで [新しいフォルダー] ボタンをクリックします。](https://files.speakerdeck.com/presentations/3153eec2937b40399d80be0fbdc16682/slide_57.jpg)
![実機デプロイ(3) 1. [プロジェクト名] フォルダーの [UWP] フォルダーにある [<プロジェクト名>.sln] ファイルを開きます。 1 62](https://files.speakerdeck.com/presentations/3153eec2937b40399d80be0fbdc16682/slide_59.jpg)
![実機デプロイ(4) 1. Visual Studioの構成部分を[Release],[x86],[Device] に変更します。 2. USBケーブルをPCとHoloLens間で接続して、[Device]ボタンをクリックします(HoloLensはUSBケーブルで 接続します) 1 2](https://files.speakerdeck.com/presentations/3153eec2937b40399d80be0fbdc16682/slide_60.jpg)