Taker with BCEHS • Professional Responder Instructor • Background in • Athletic Therapy • EMR & PCP Tell me about yourselves • Your name • What brought you here or what do you do for work? • What sport would you compete in if you were to go to the Olympics?
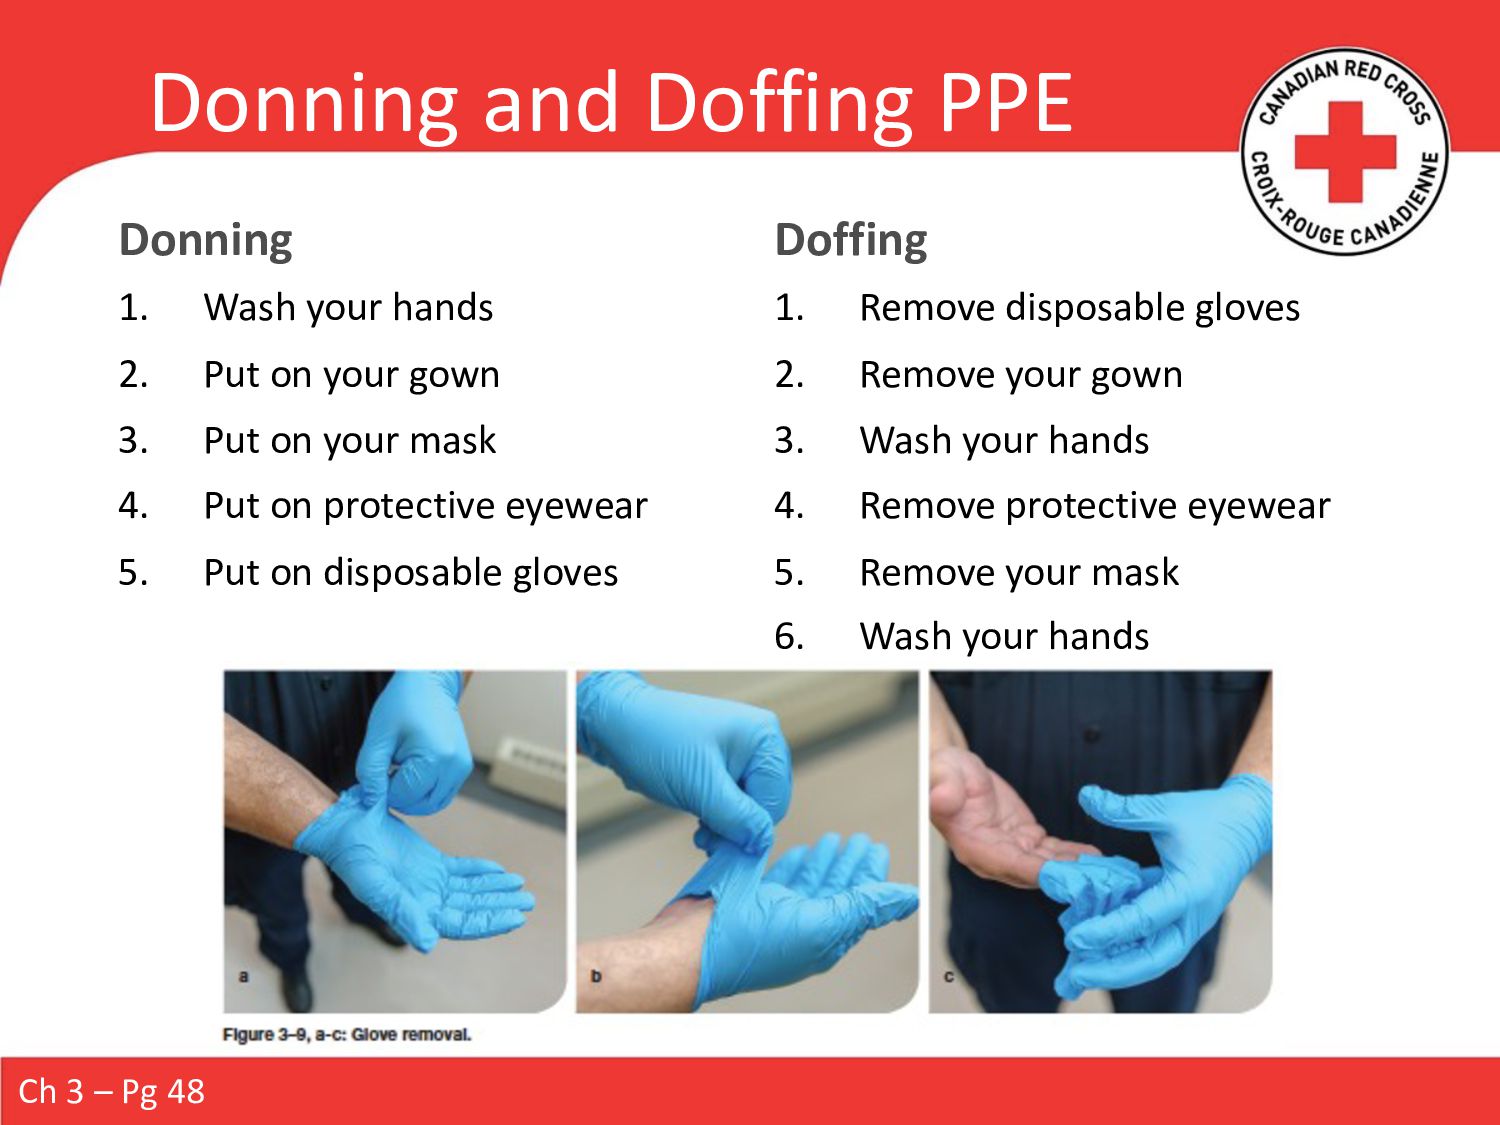
Put on your gown 3. Put on your mask 4. Put on protective eyewear 5. Put on disposable gloves Doffing 1. Remove disposable gloves 2. Remove your gown 3. Wash your hands 4. Remove protective eyewear 5. Remove your mask 6. Wash your hands Ch 3 – Pg 48
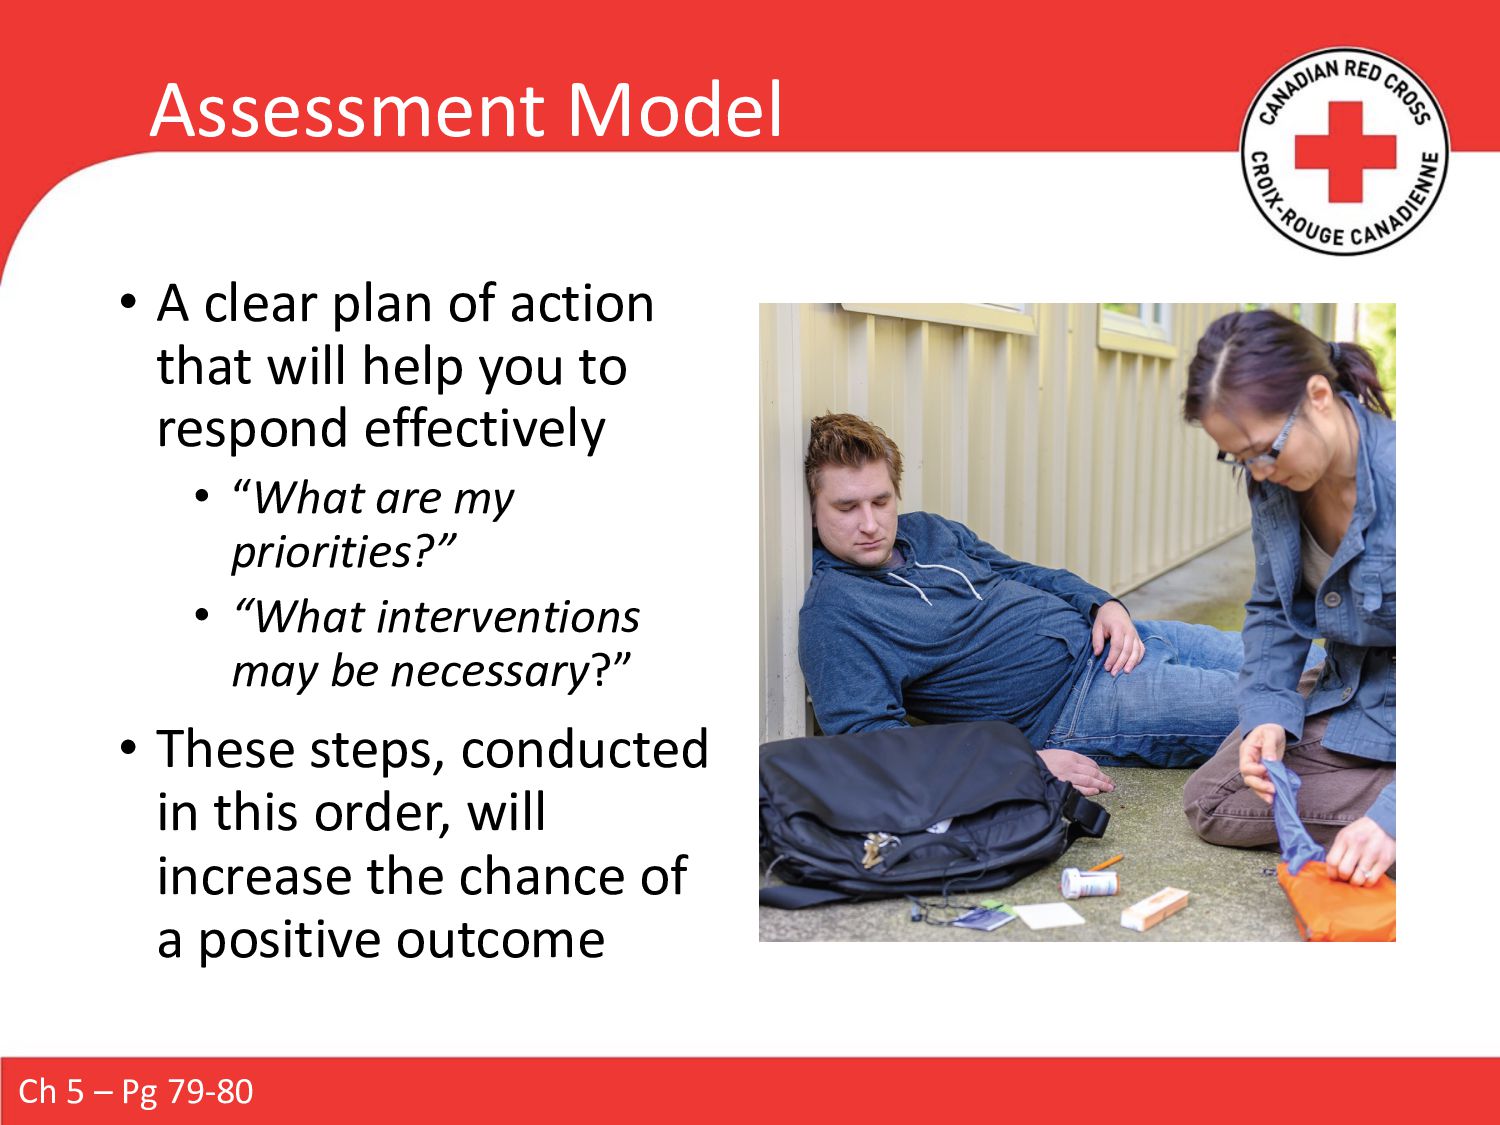
help you to respond effectively • “What are my priorities?” • “What interventions may be necessary?” • These steps, conducted in this order, will increase the chance of a positive outcome Ch 5 – Pg 79-80
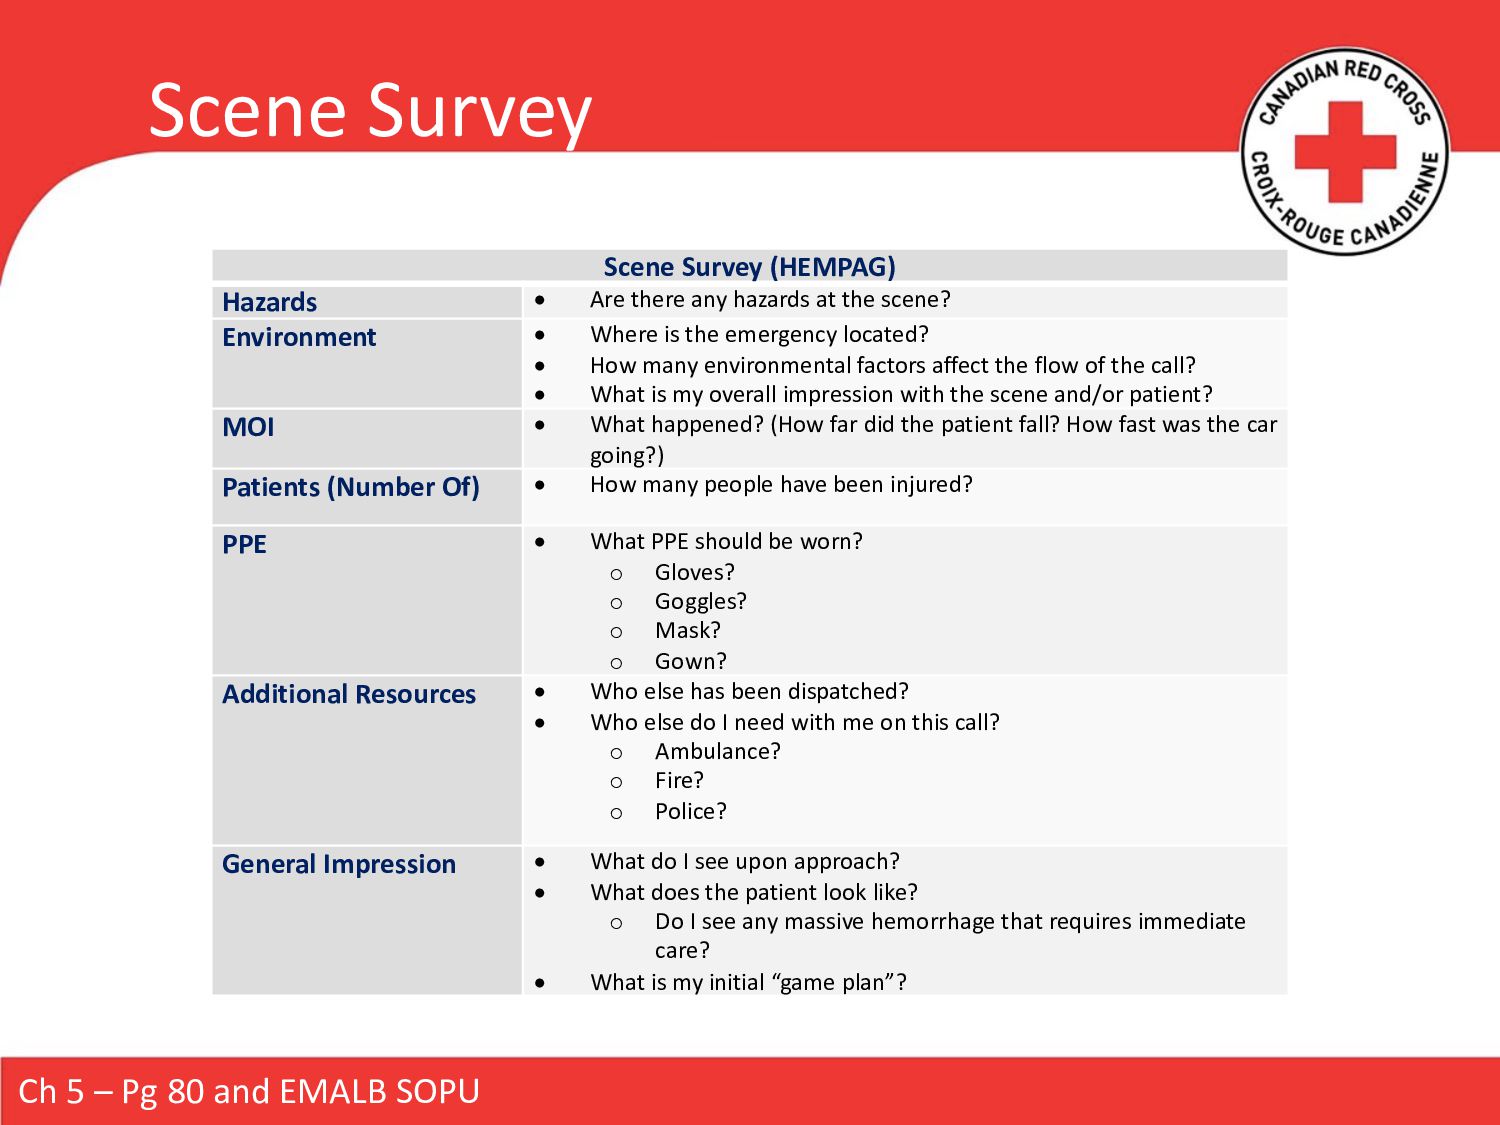
Scene Survey (HEMPAG) Hazards • Are there any hazards at the scene? Environment • Where is the emergency located? • How many environmental factors affect the flow of the call? • What is my overall impression with the scene and/or patient? MOI • What happened? (How far did the patient fall? How fast was the car going?) Patients (Number Of) • How many people have been injured? PPE • What PPE should be worn? o Gloves? o Goggles? o Mask? o Gown? Additional Resources • Who else has been dispatched? • Who else do I need with me on this call? o Ambulance? o Fire? o Police? General Impression • What do I see upon approach? • What does the patient look like? o Do I see any massive hemorrhage that requires immediate care? • What is my initial “game plan”?
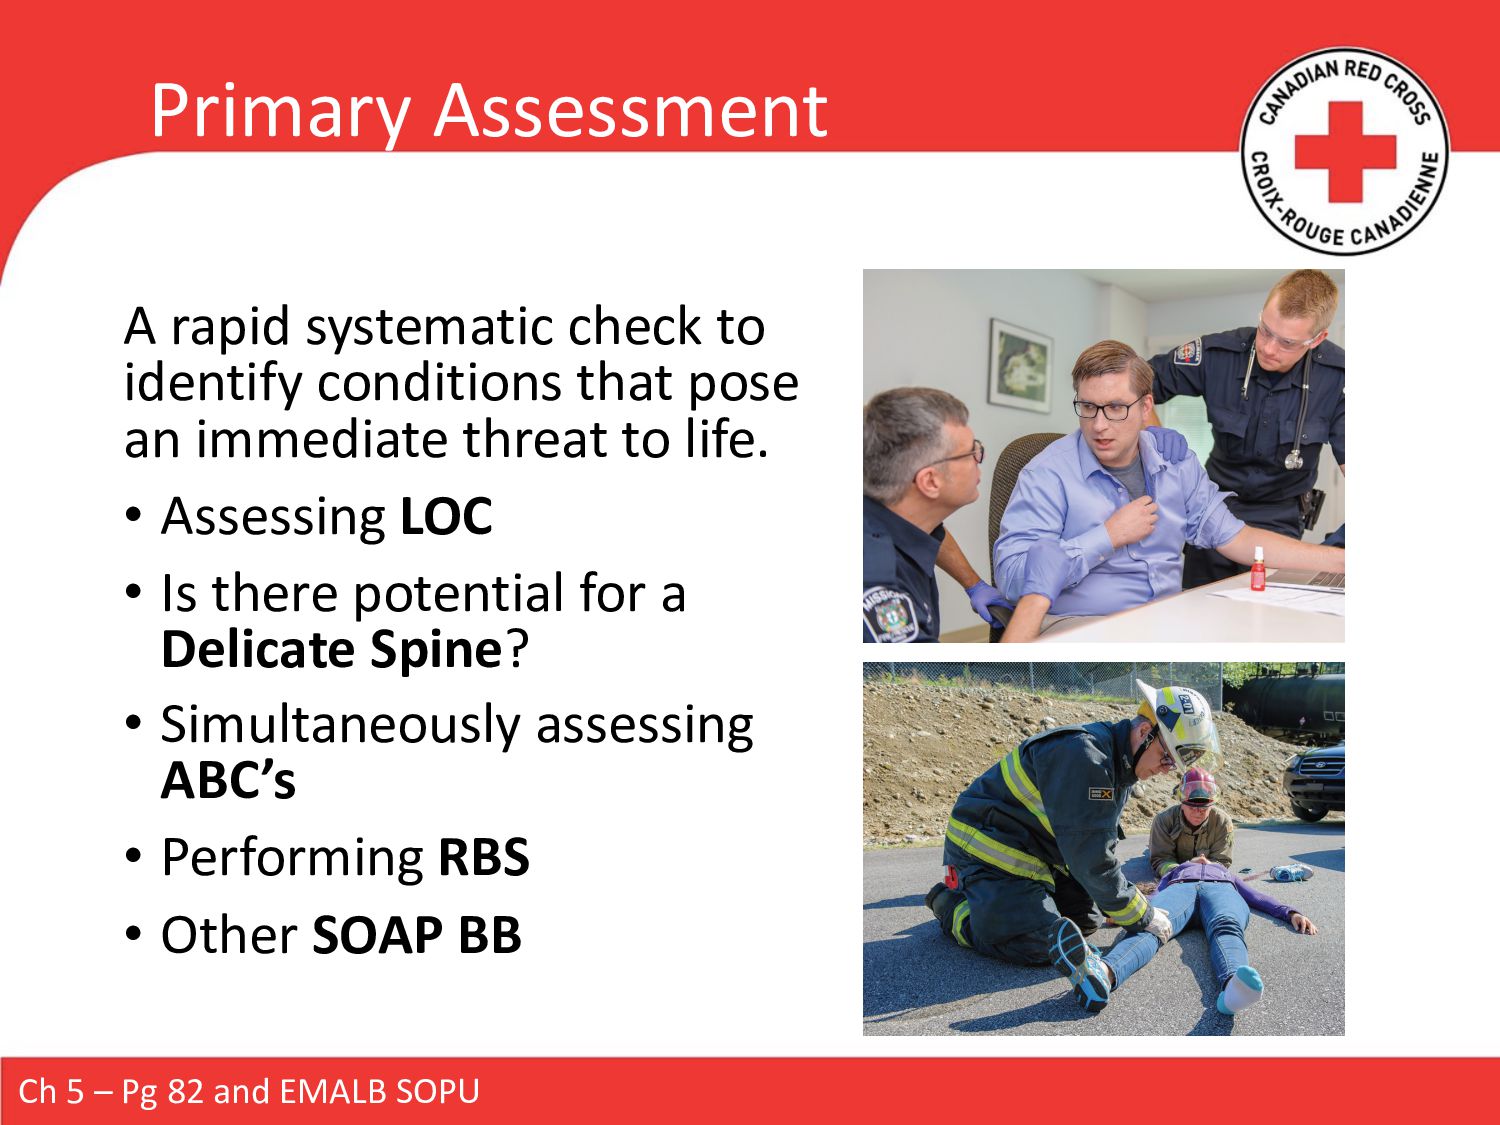
pose an immediate threat to life. • Assessing LOC • Is there potential for a Delicate Spine? • Simultaneously assessing ABC’s • Performing RBS • Other SOAP BB Ch 5 – Pg 82 and EMALB SOPU
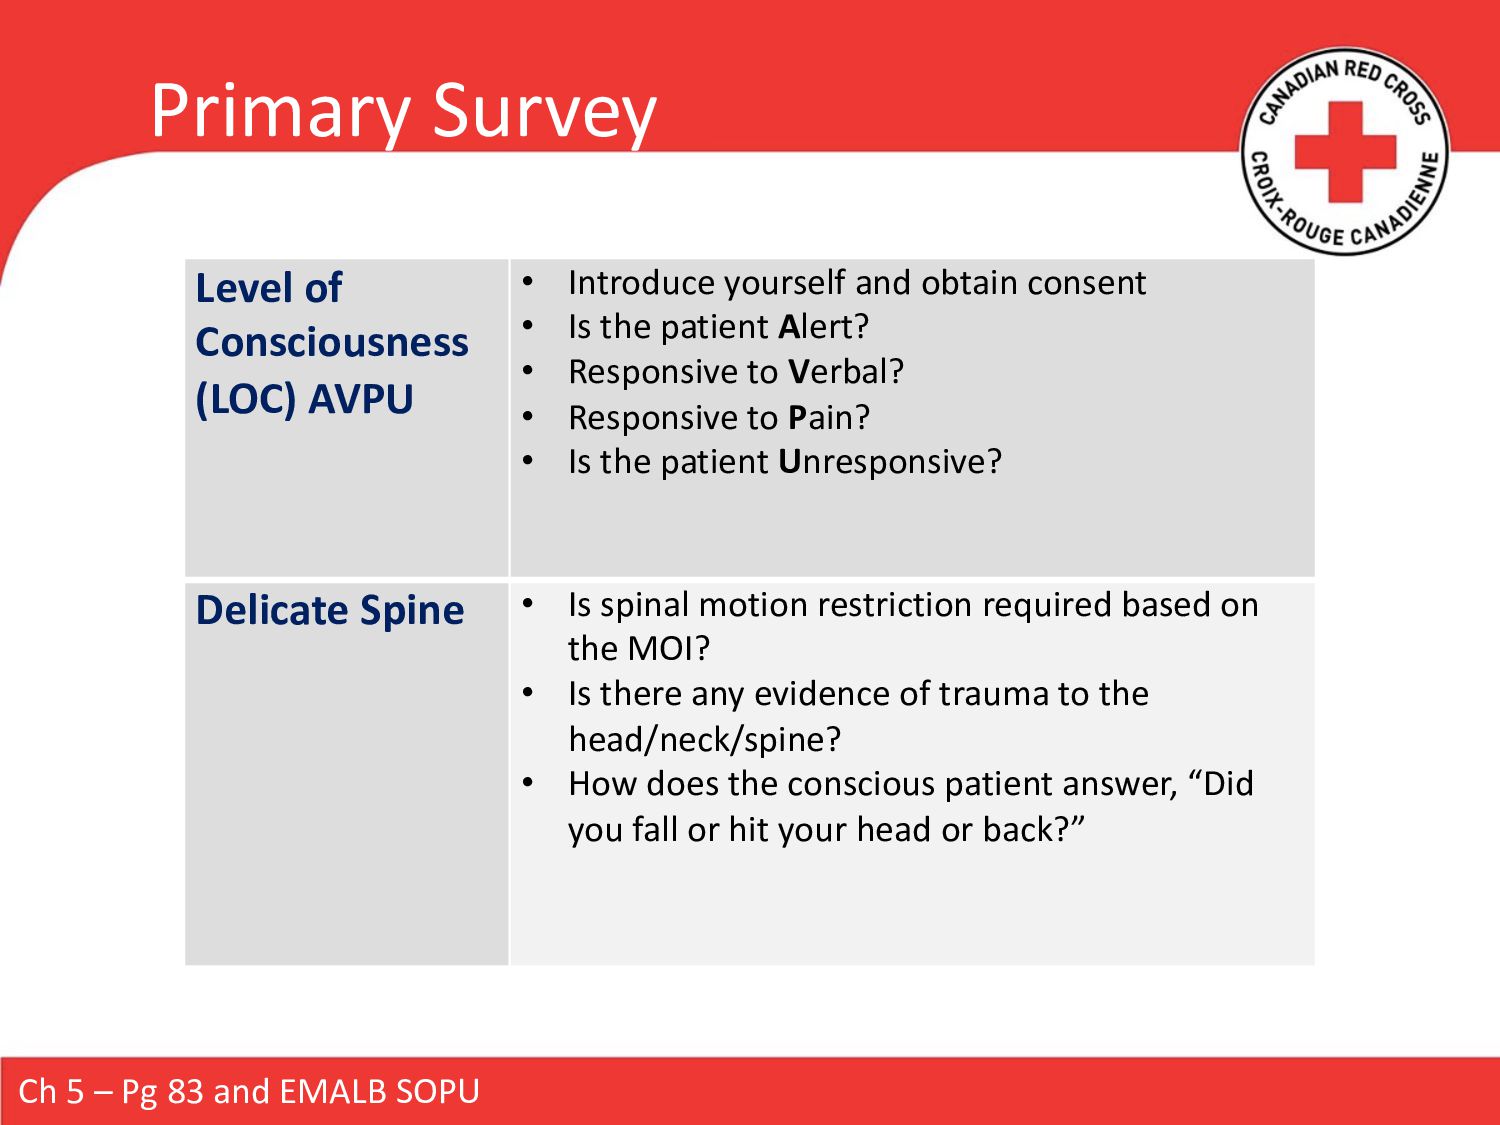
Level of Consciousness (LOC) AVPU • Introduce yourself and obtain consent • Is the patient Alert? • Responsive to Verbal? • Responsive to Pain? • Is the patient Unresponsive? Delicate Spine • Is spinal motion restriction required based on the MOI? • Is there any evidence of trauma to the head/neck/spine? • How does the conscious patient answer, “Did you fall or hit your head or back?”
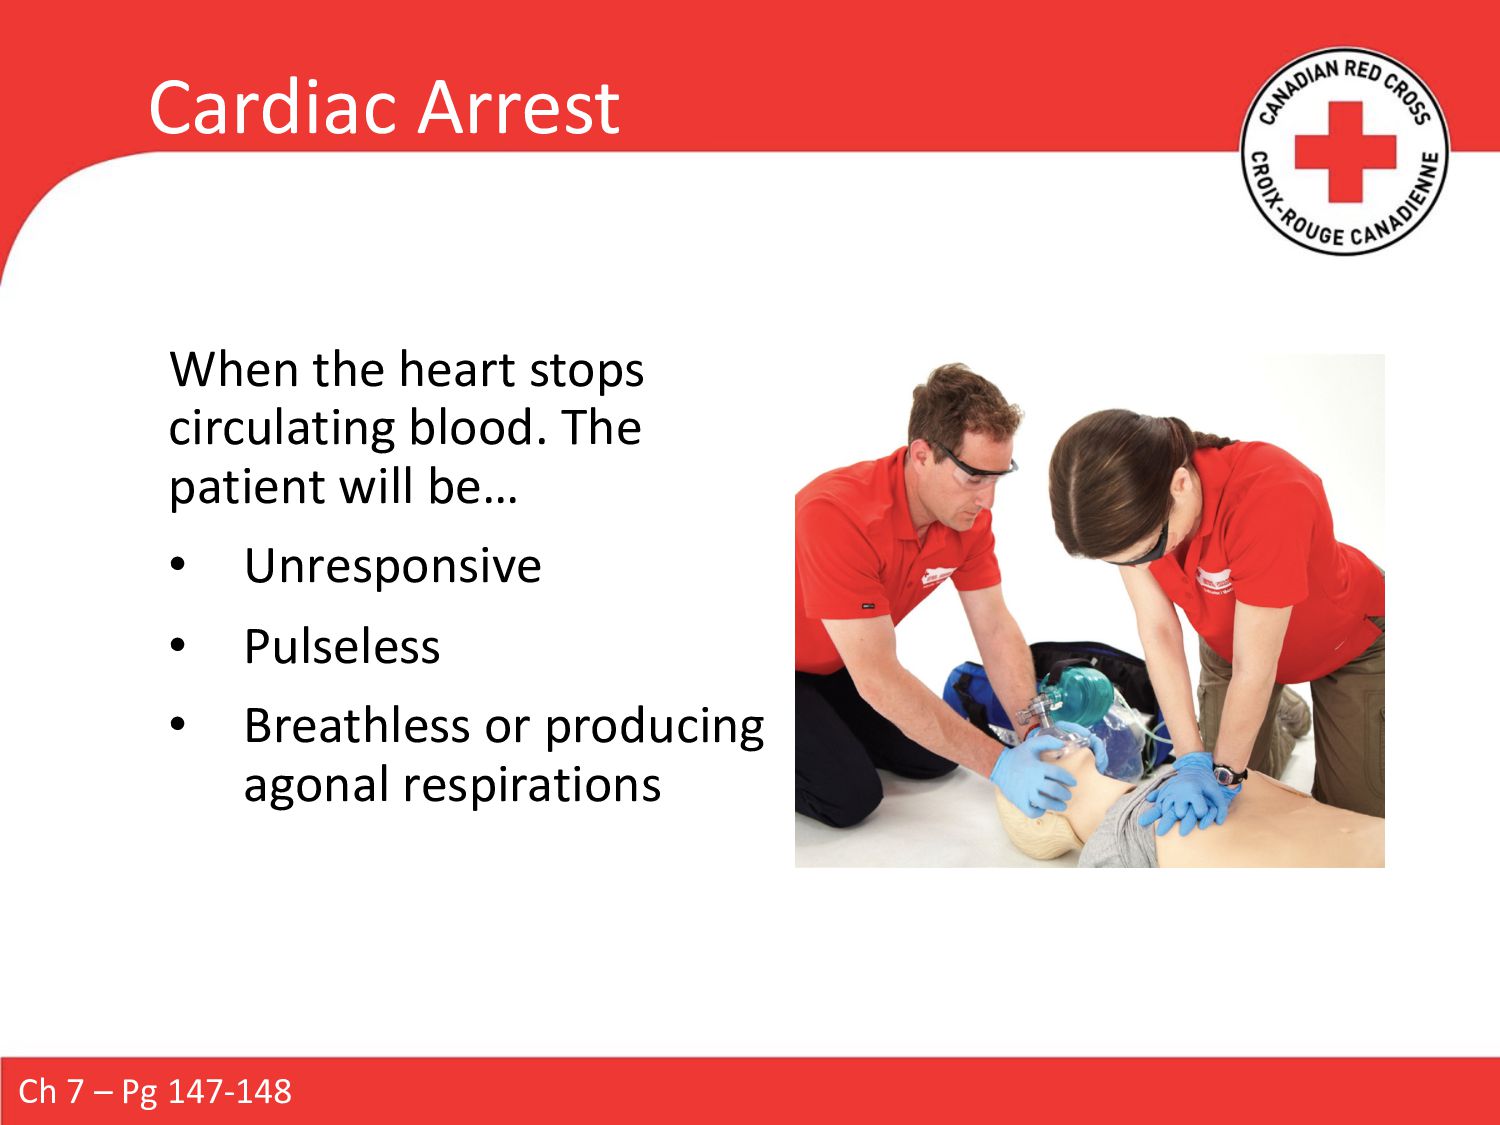
• Open with a head-tilt/chin-lift or jaw thrust • Is it clear? • Do I need to suction or roll to clear fluids? • Does the patient need an oropharyngeal airway (OPA) / nasopharyngeal airway (NPA)? Breathing • Assess rate and quality • Perform a simultaneous ABC check if the patient is unconscious (up to 10 seconds) • Assist ventilations if inadequate respirations • Ventilate if respiratory arrest Circulation Conscious = radial pulse Unconscious = carotid pulse Baby = brachial pulse • Perform a simultaneous ABC check if the patient is unconscious (up to 10 seconds) • CPR / AED if the patient is in cardiac arrest Ch 5 – Pg 84-86 and EMALB SOPU
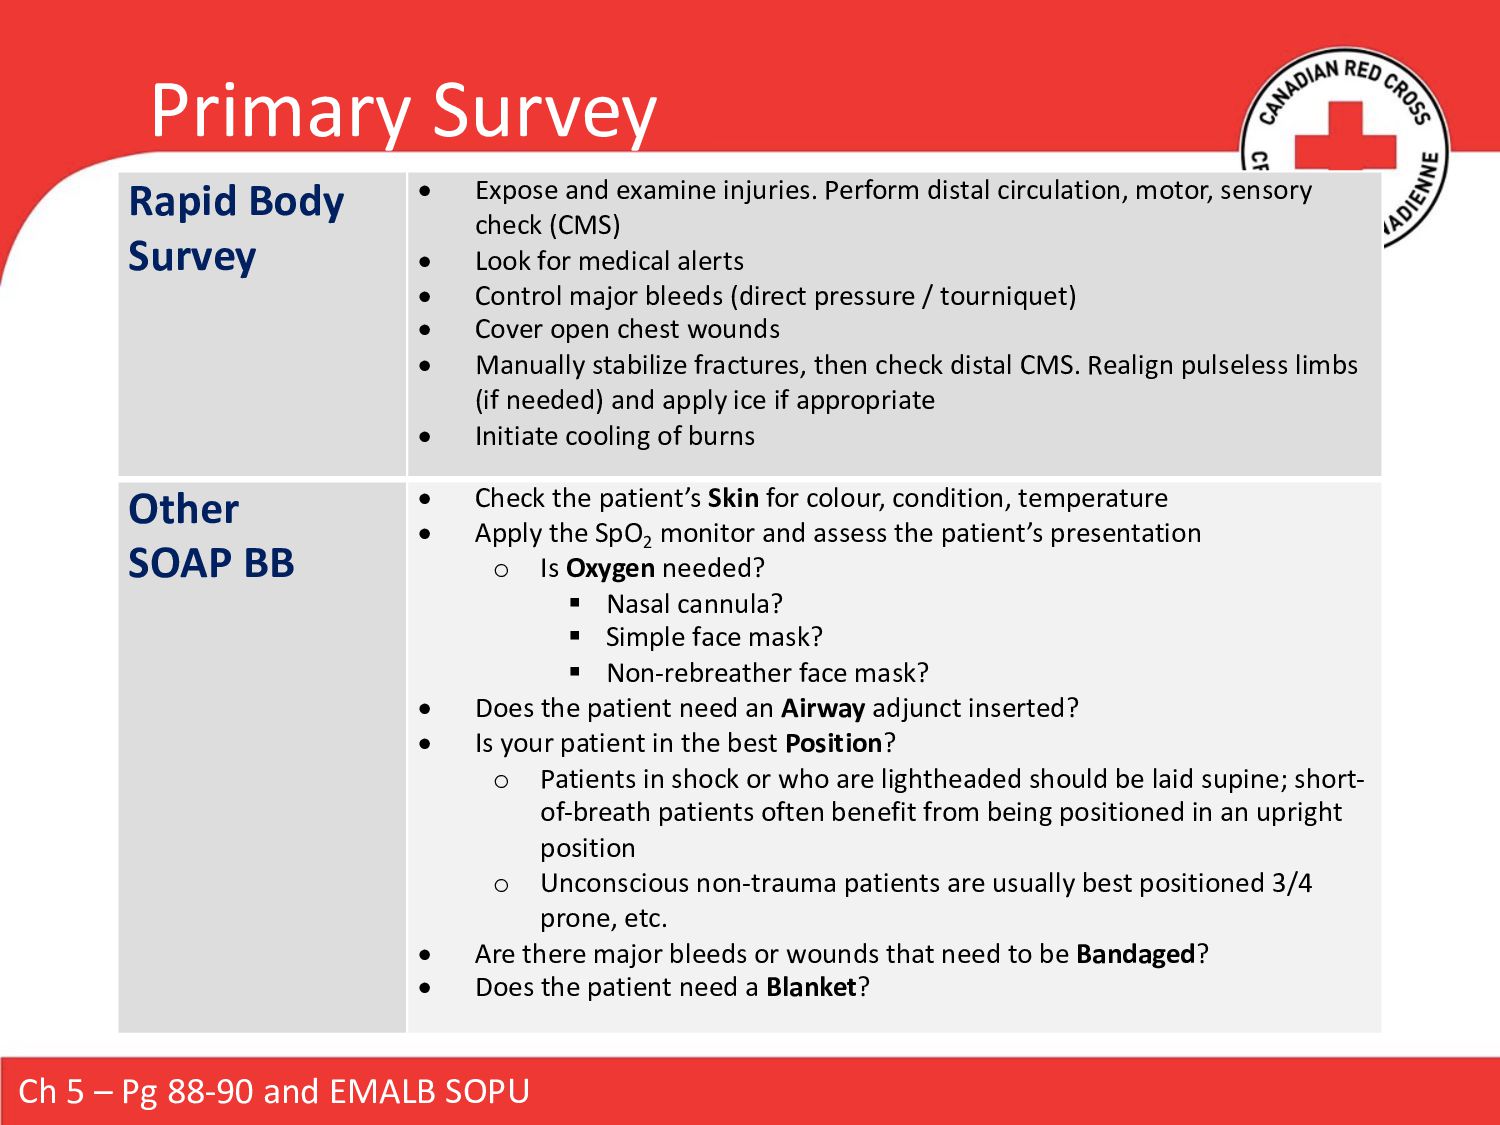
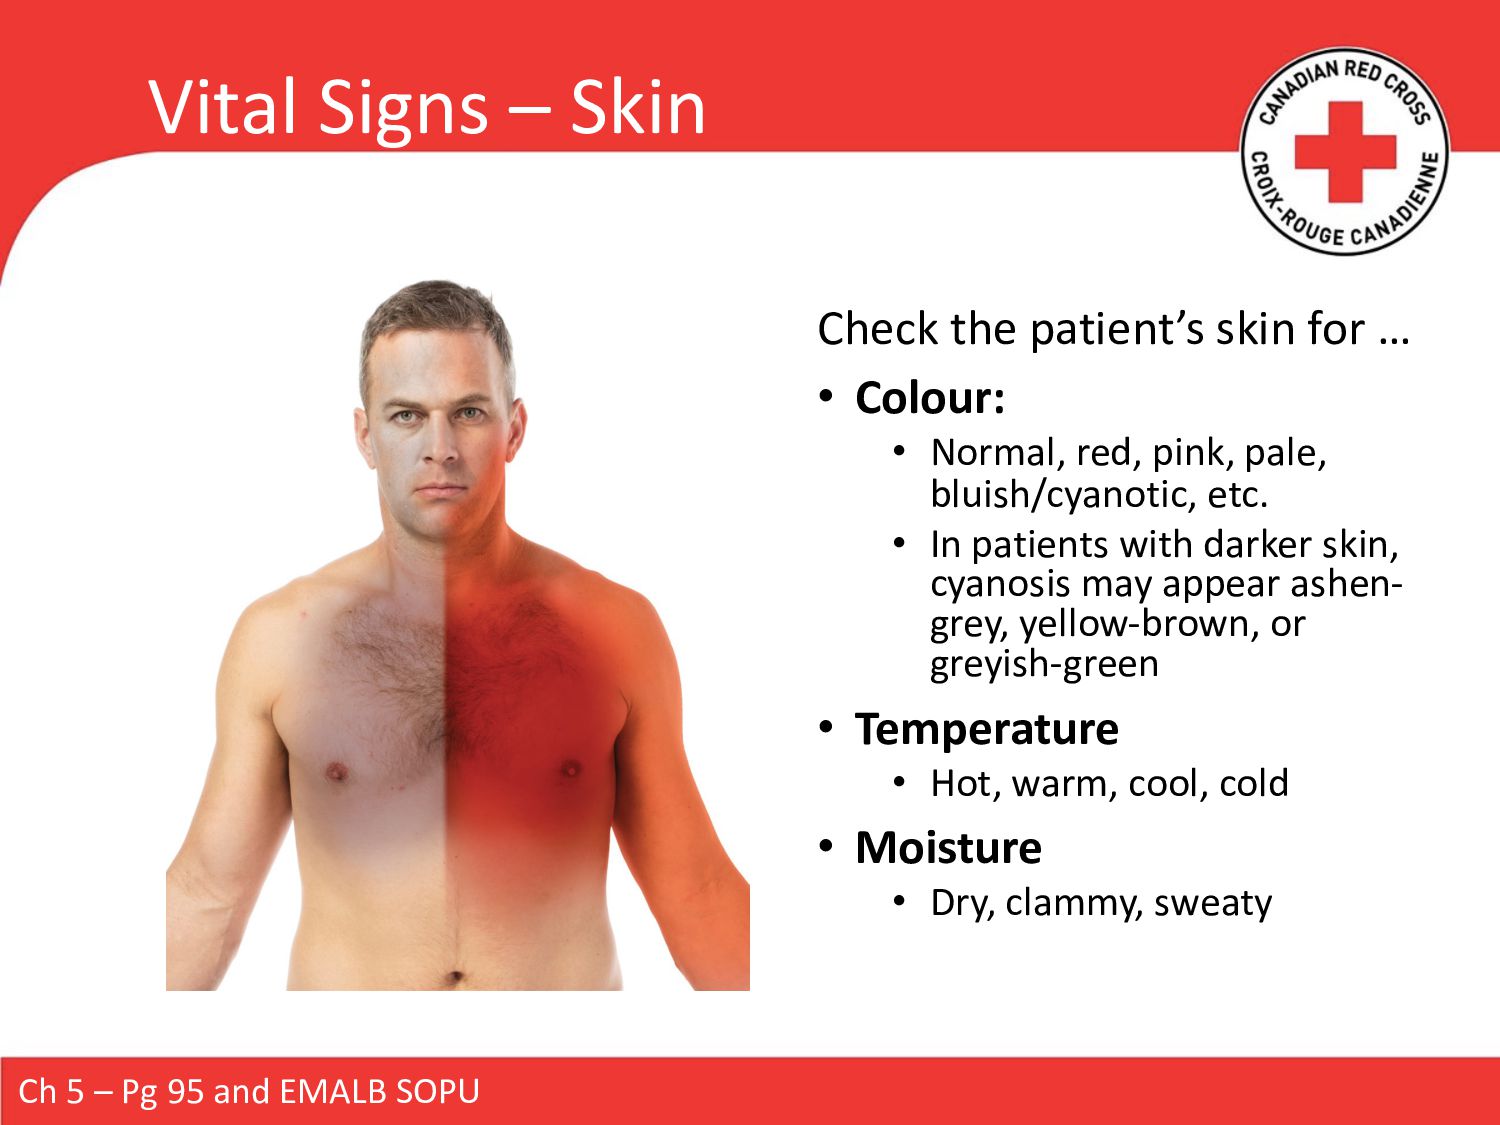
Perform distal circulation, motor, sensory check (CMS) • Look for medical alerts • Control major bleeds (direct pressure / tourniquet) • Cover open chest wounds • Manually stabilize fractures, then check distal CMS. Realign pulseless limbs (if needed) and apply ice if appropriate • Initiate cooling of burns Other SOAP BB • Check the patient’s Skin for colour, condition, temperature • Apply the SpO2 monitor and assess the patient’s presentation o Is Oxygen needed? § Nasal cannula? § Simple face mask? § Non-rebreather face mask? • Does the patient need an Airway adjunct inserted? • Is your patient in the best Position? o Patients in shock or who are lightheaded should be laid supine; short- of-breath patients often benefit from being positioned in an upright position o Unconscious non-trauma patients are usually best positioned 3/4 prone, etc. • Are there major bleeds or wounds that need to be Bandaged? • Does the patient need a Blanket? Ch 5 – Pg 88-90 and EMALB SOPU
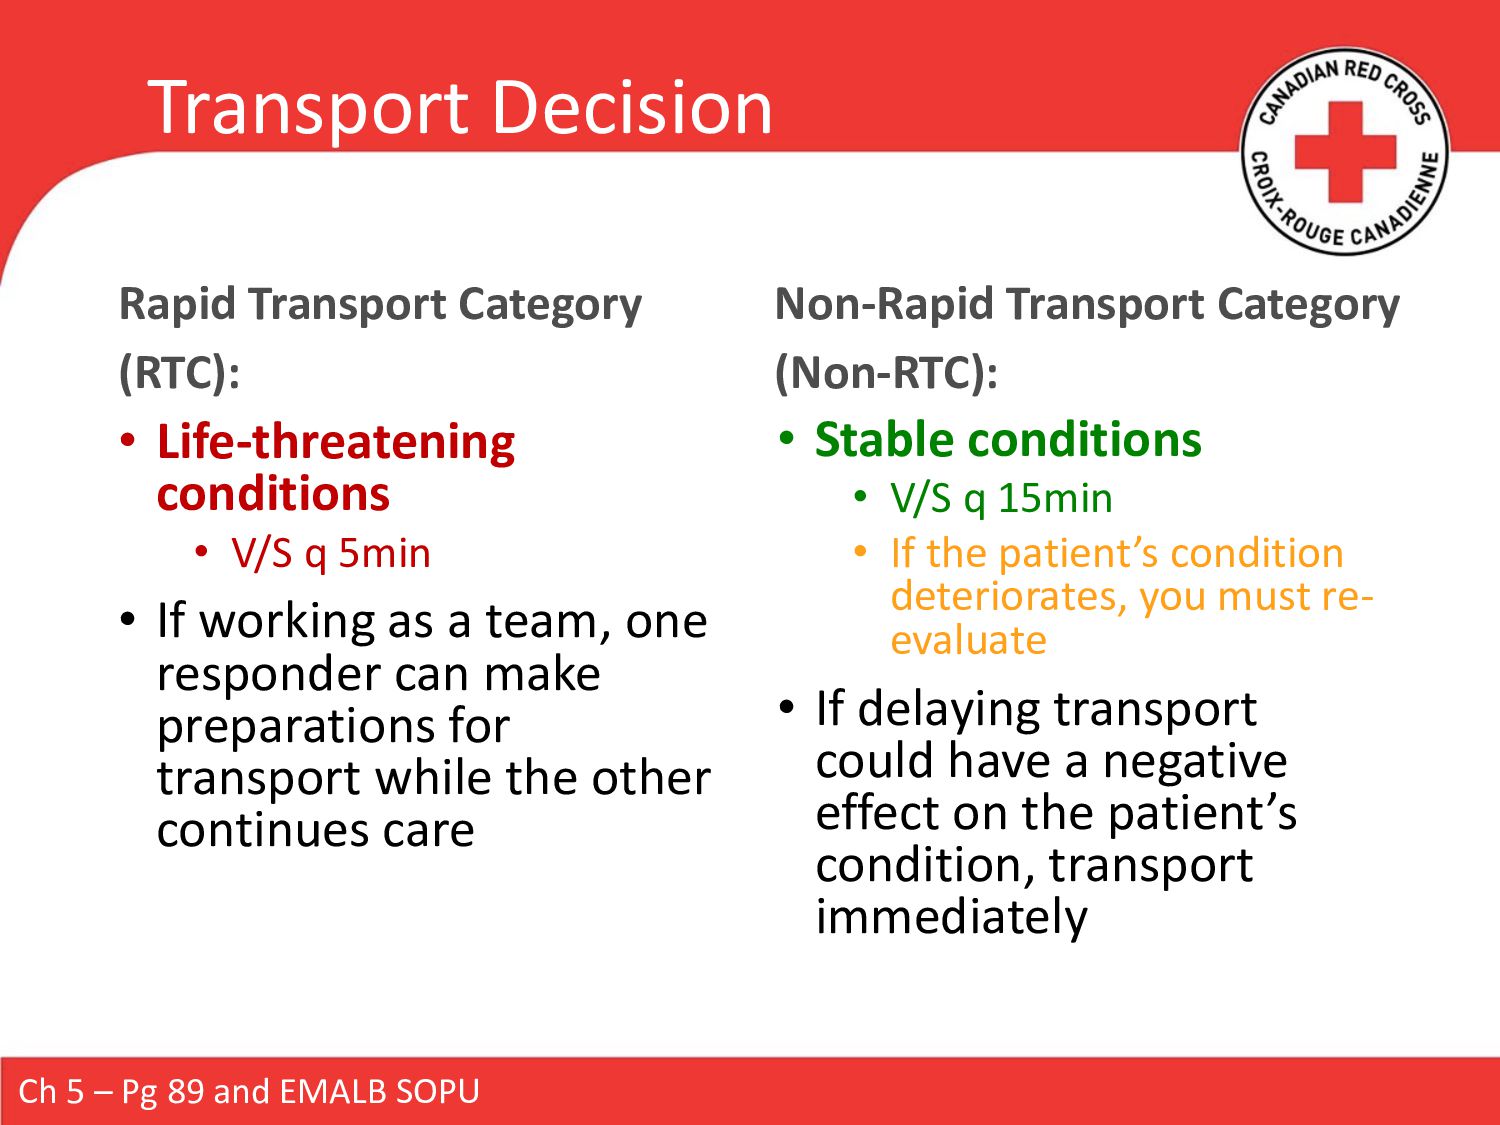
V/S q 5min • If working as a team, one responder can make preparations for transport while the other continues care Non-Rapid Transport Category (Non-RTC): • Stable conditions • V/S q 15min • If the patient’s condition deteriorates, you must re- evaluate • If delaying transport could have a negative effect on the patient’s condition, transport immediately Ch 5 – Pg 89 and EMALB SOPU
is stable, and enroute if the patient is unstable (and if the provider is working in a transport-capable capacity). Can reveal injuries or conditions that may become life-threatening. • History / Interview • Vital Signs • Head-To-Toe Examination Ch 5 – Pg 91 and EMALB SOPU
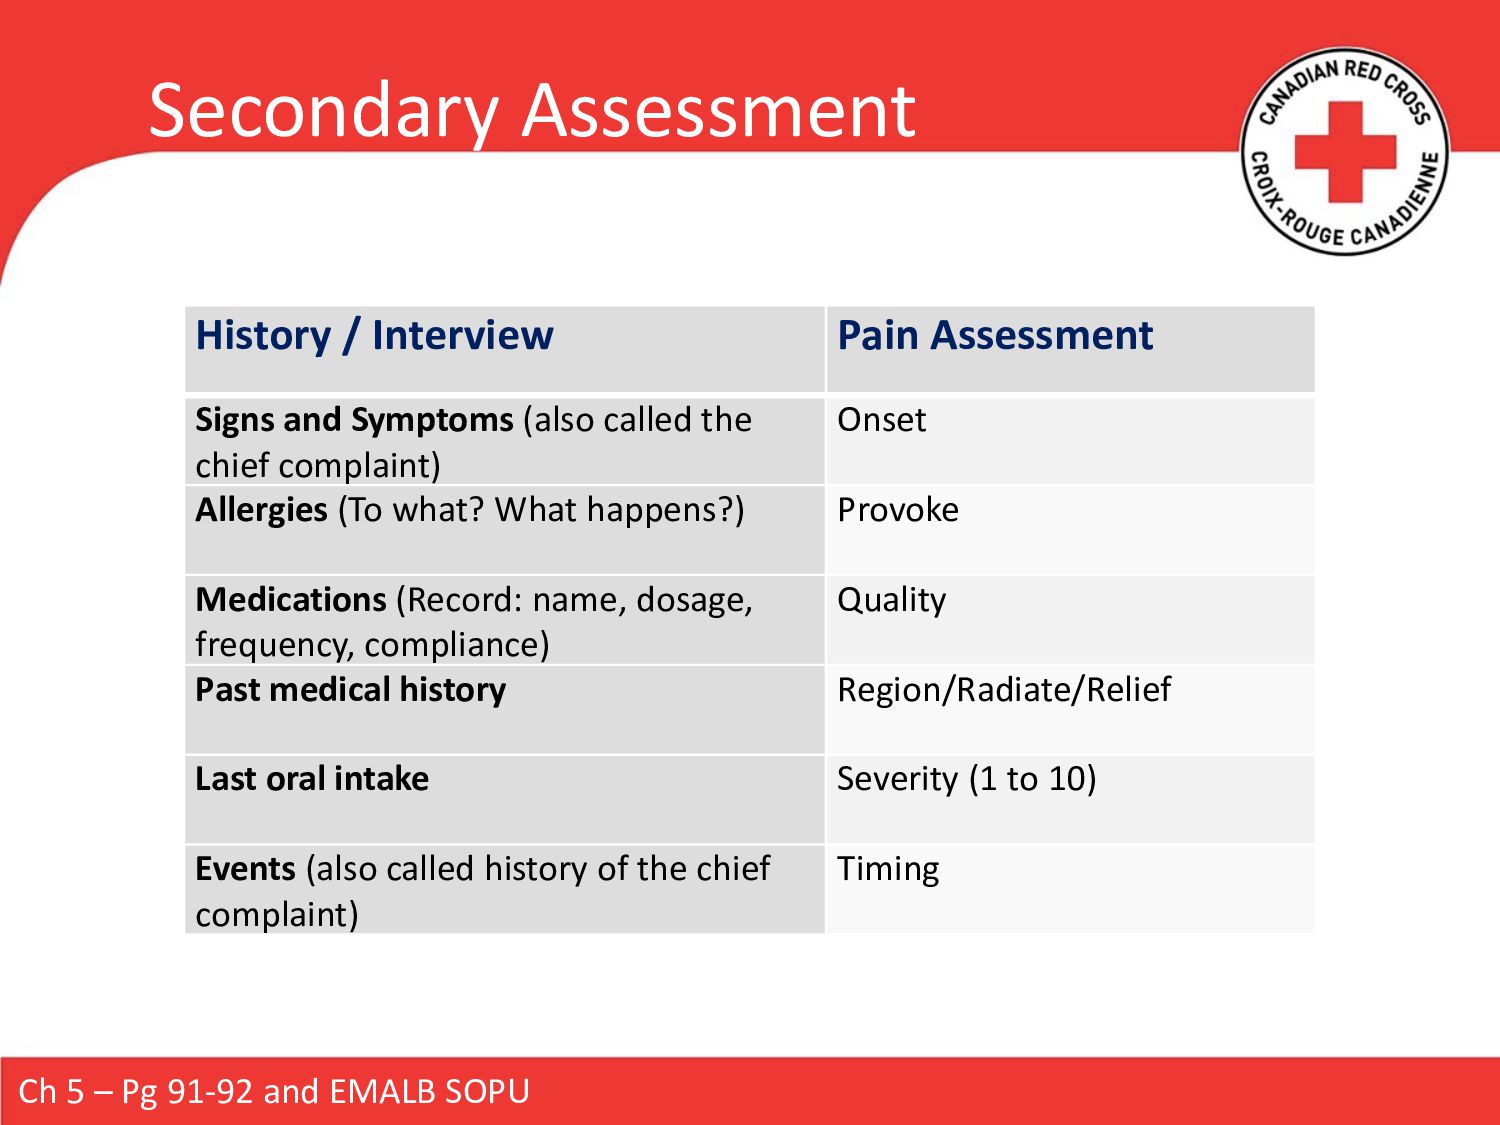
(also called the chief complaint) Onset Allergies (To what? What happens?) Provoke Medications (Record: name, dosage, frequency, compliance) Quality Past medical history Region/Radiate/Relief Last oral intake Severity (1 to 10) Events (also called history of the chief complaint) Timing Ch 5 – Pg 91-92 and EMALB SOPU
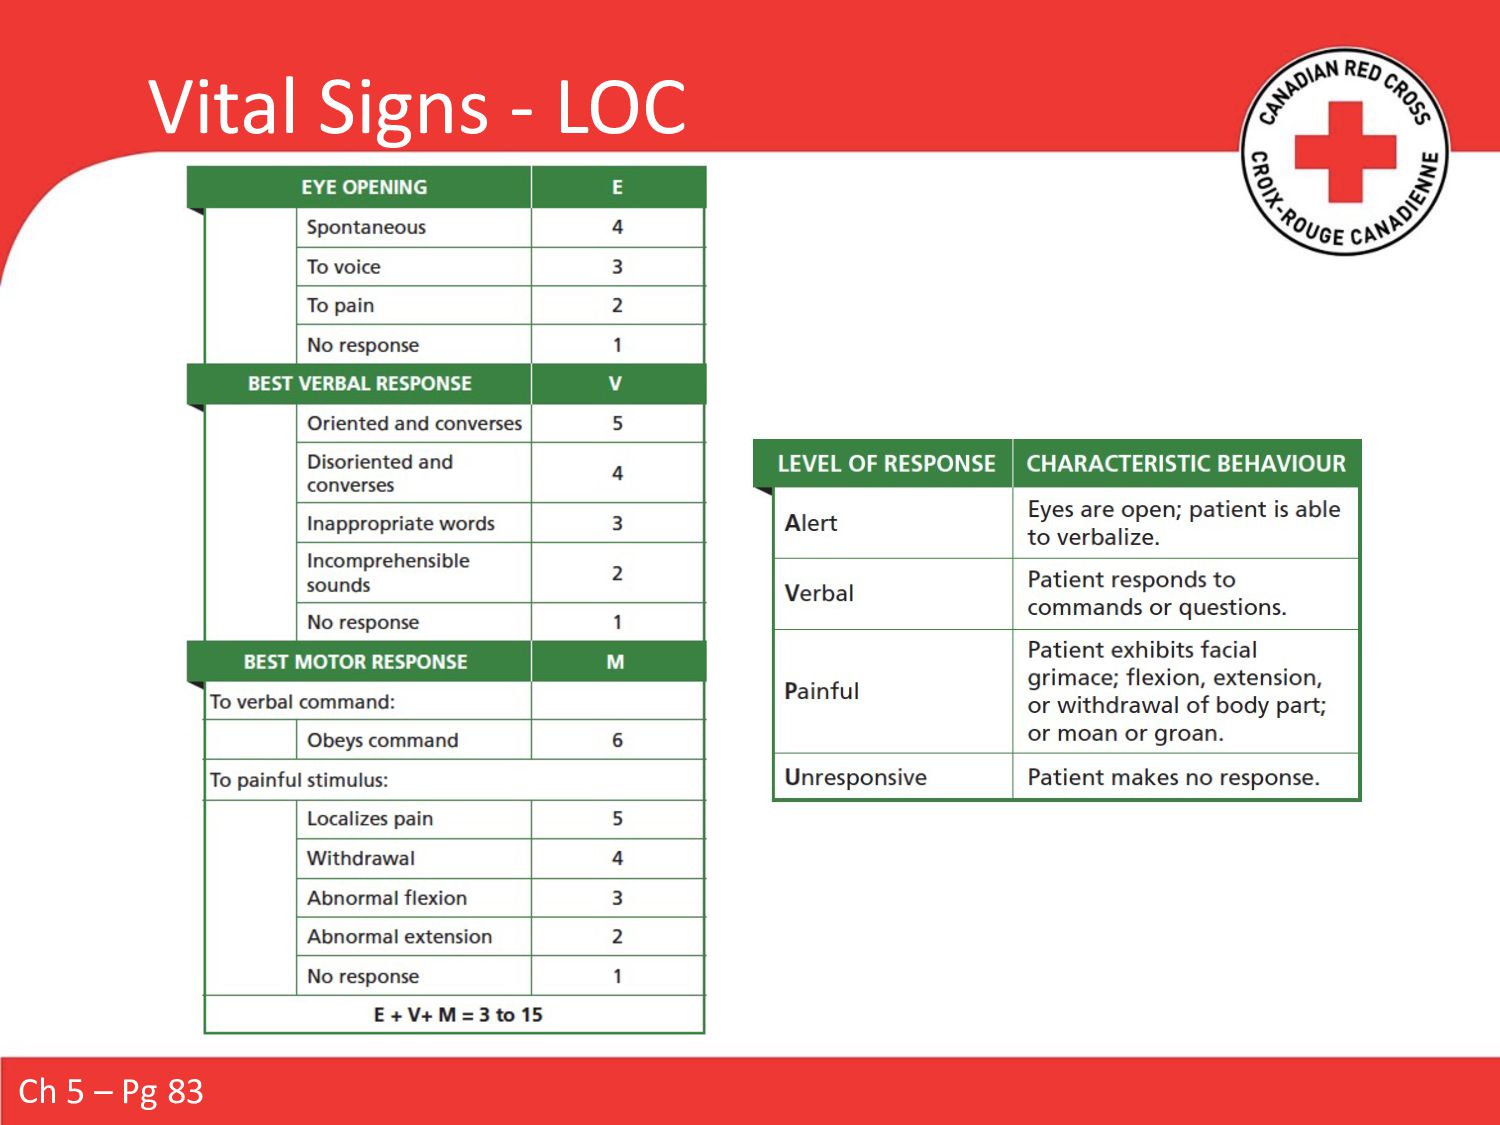
vital signs within 3 minutes LOC Using AVPU or the Glasgow Coma Scale (GCS) Blood Pressure Palpation or auscultation Heart Rate 15s check x 4 = rater per minute // rhythm // quality Breathing Rate 15s check x 4 = rater per minute // rhythm // quality SpO2 Apply pulse oximeter (if not already done) Skin Colour // condition // temperature Pupils Size // reaction to light // compare both pupils
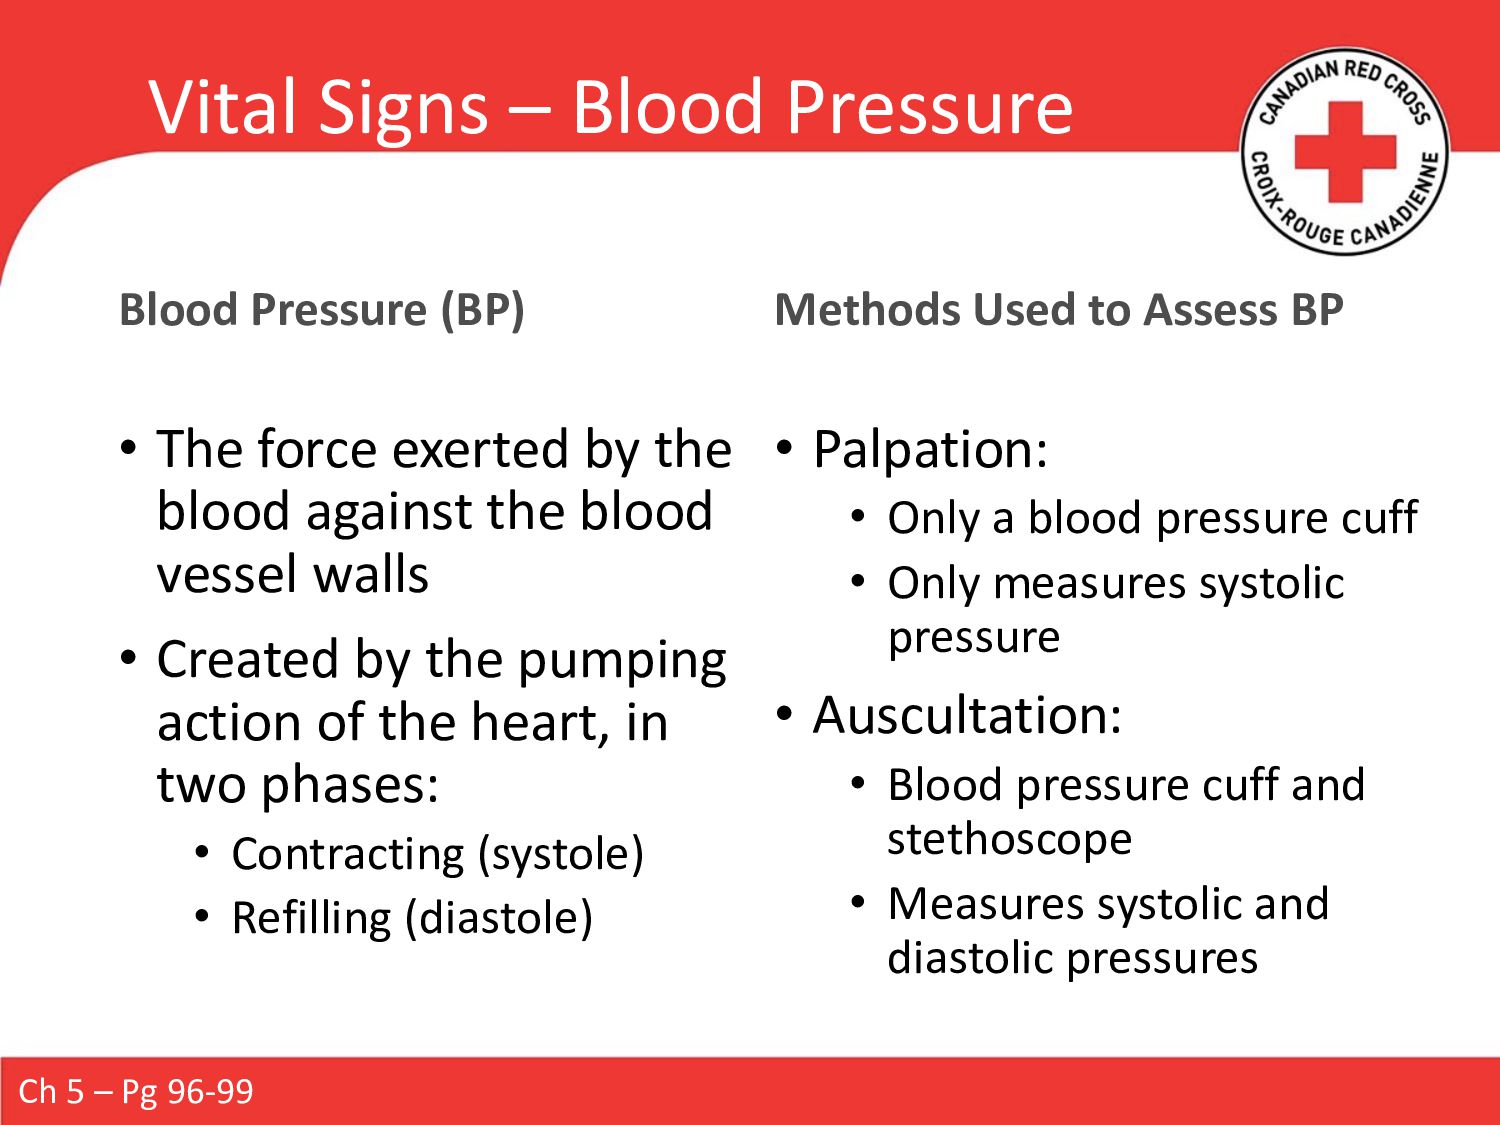
force exerted by the blood against the blood vessel walls • Created by the pumping action of the heart, in two phases: • Contracting (systole) • Refilling (diastole) Methods Used to Assess BP • Palpation: • Only a blood pressure cuff • Only measures systolic pressure • Auscultation: • Blood pressure cuff and stethoscope • Measures systolic and diastolic pressures Ch 5 – Pg 96-99
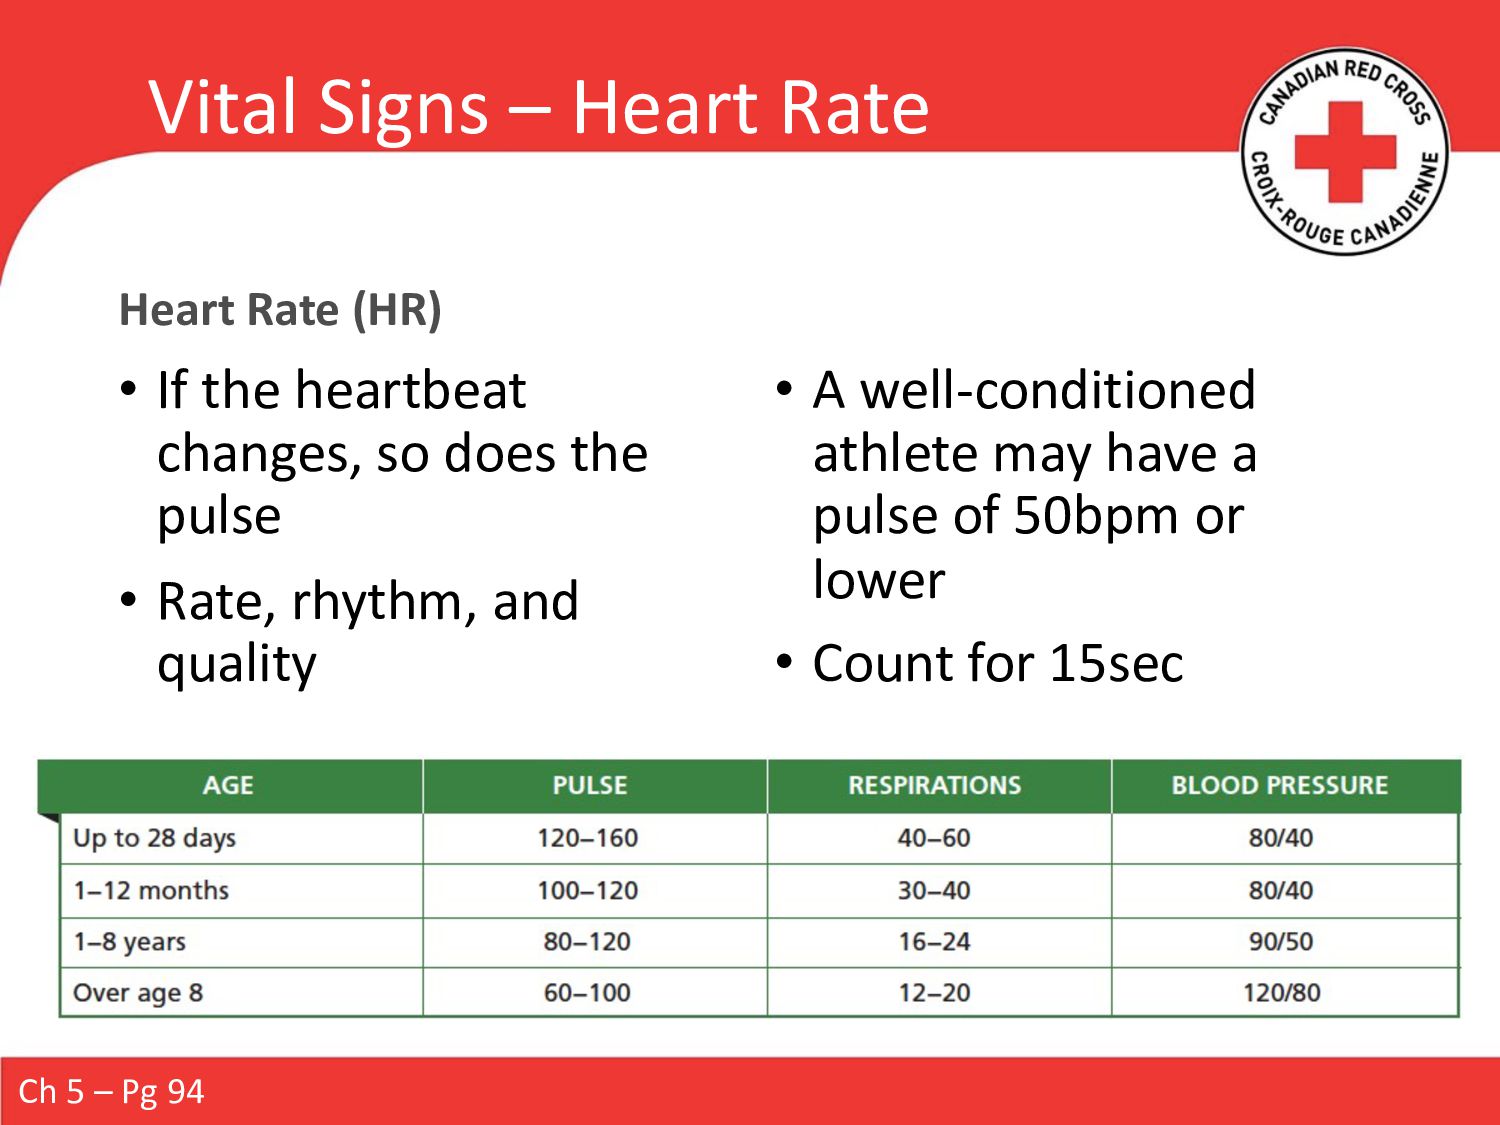
the heartbeat changes, so does the pulse • Rate, rhythm, and quality • A well-conditioned athlete may have a pulse of 50bpm or lower • Count for 15sec Ch 5 – Pg 94
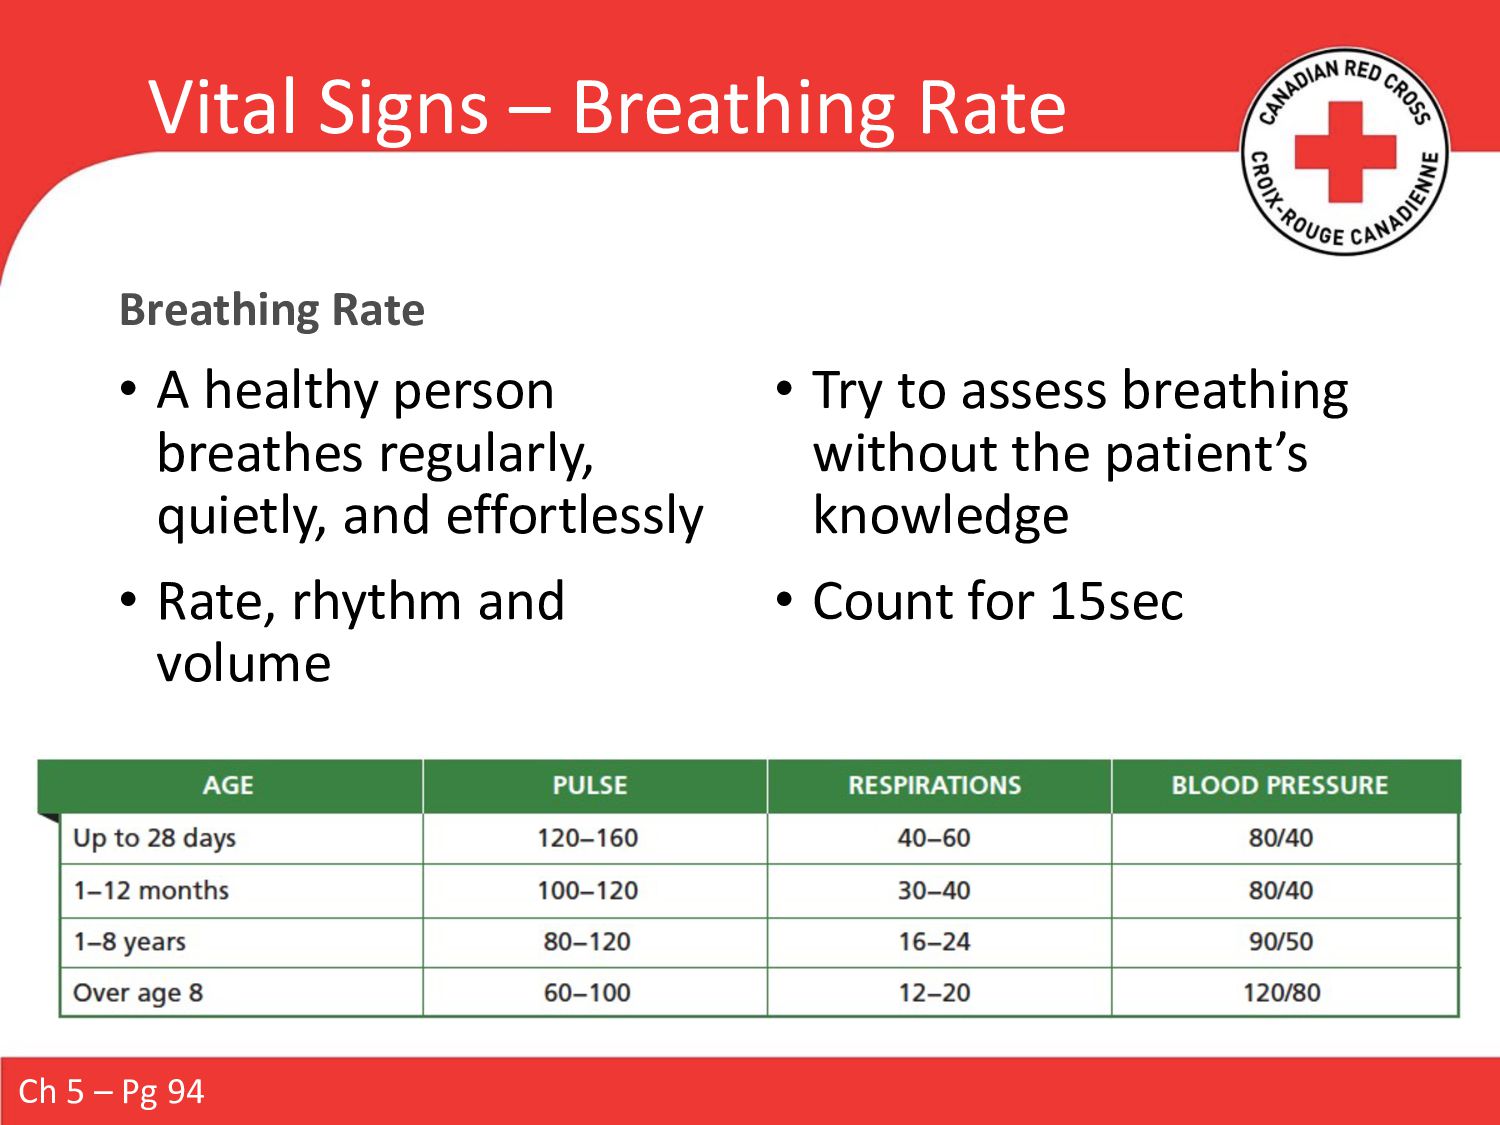
person breathes regularly, quietly, and effortlessly • Rate, rhythm and volume • Try to assess breathing without the patient’s knowledge • Count for 15sec Ch 5 – Pg 94
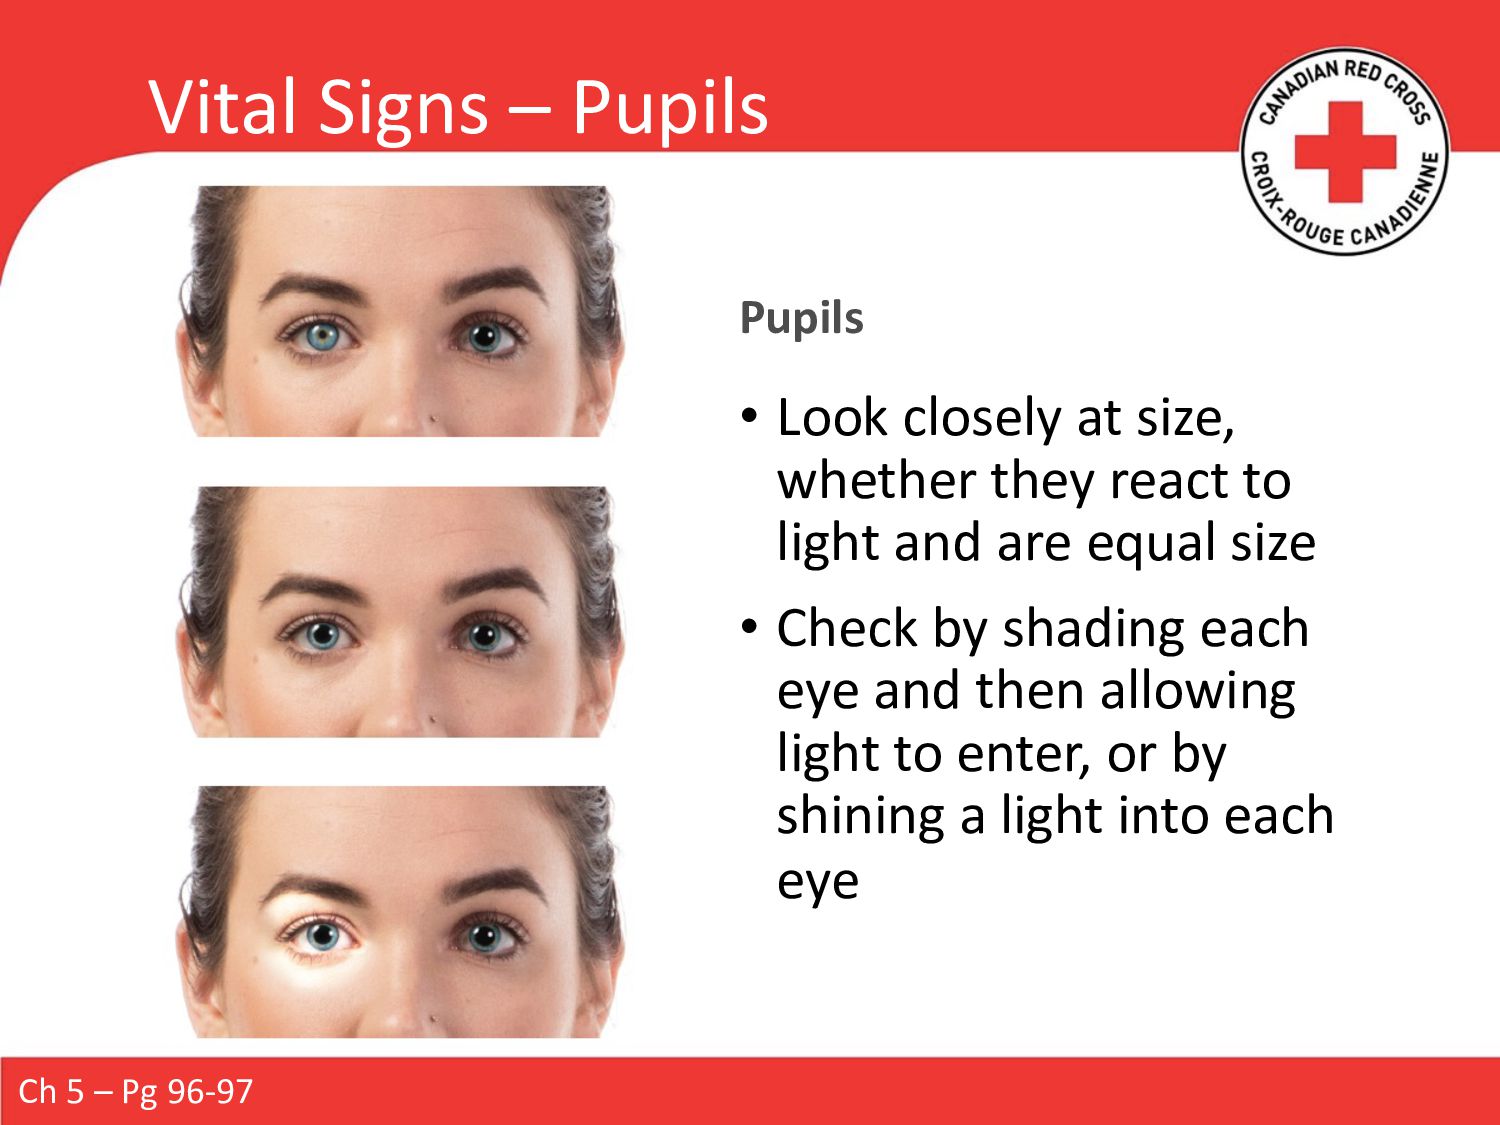
whether they react to light and are equal size • Check by shading each eye and then allowing light to enter, or by shining a light into each eye Ch 5 – Pg 96-97
• May not be immediately life- threatening, but they could become so • Balance is necessary: • Ensure that you are palpating effectively • Handle gently to avoid aggravating any existing injuries • Look for abnormalities: • Discolouration • Deformity • Bleeding • Etc. Ch 5 – Pg 100-101
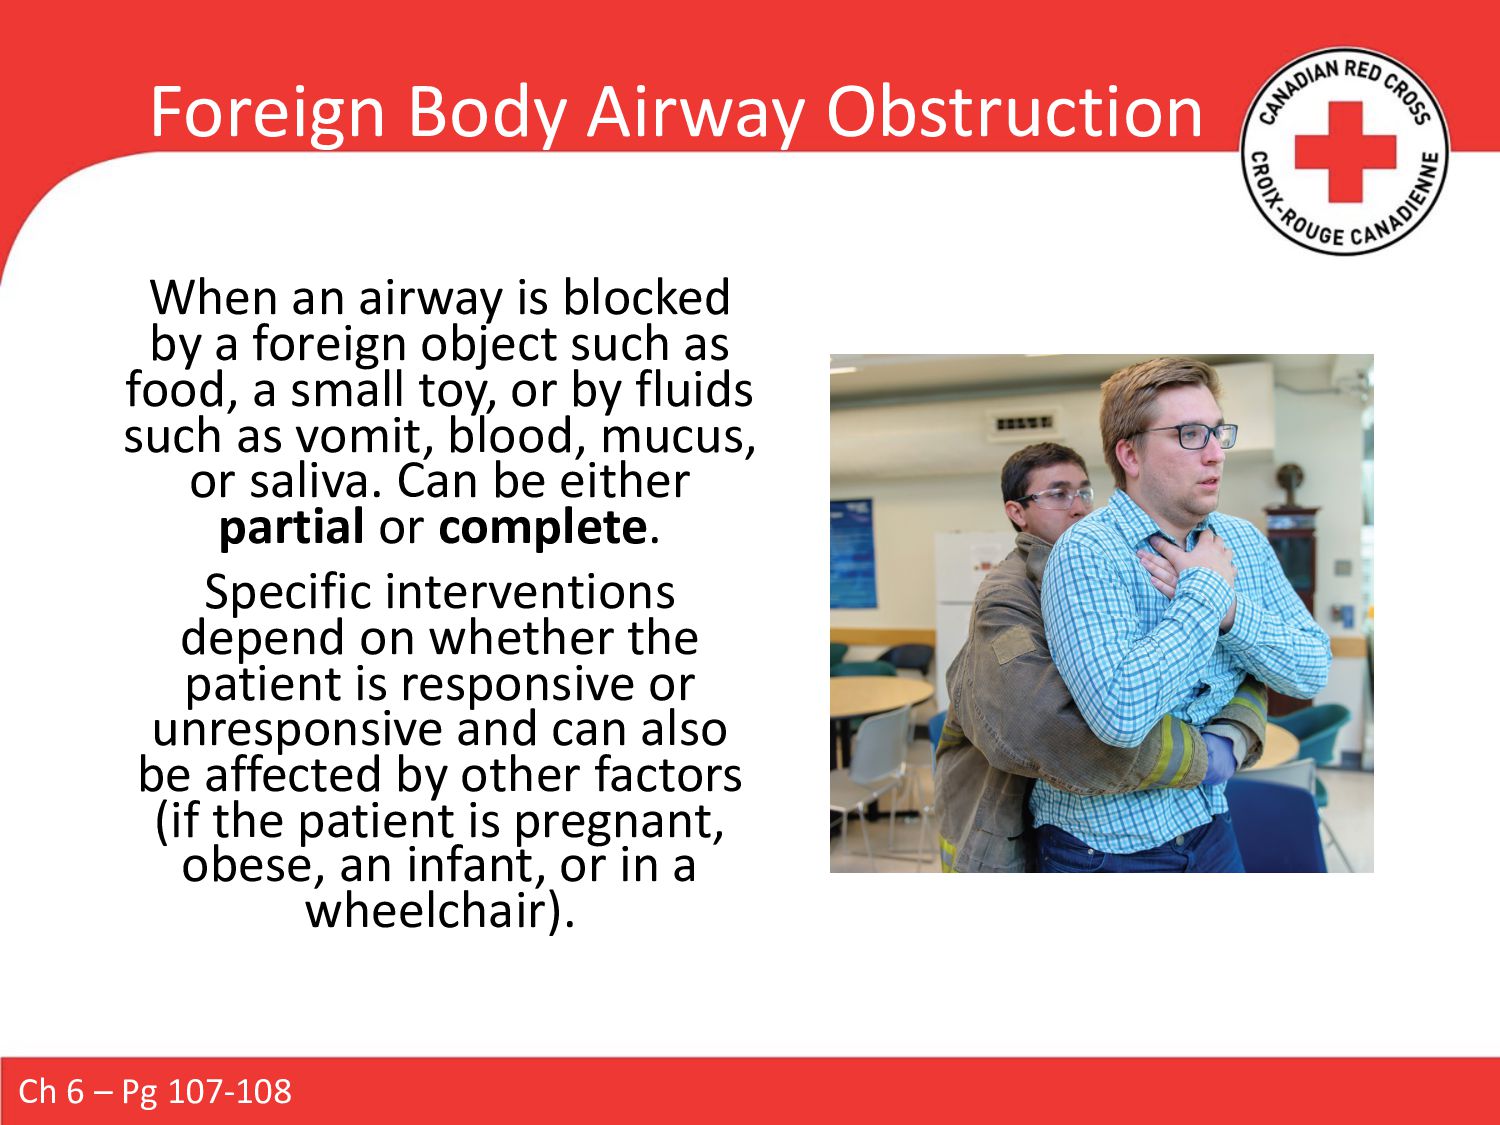
a foreign object such as food, a small toy, or by fluids such as vomit, blood, mucus, or saliva. Can be either partial or complete. Specific interventions depend on whether the patient is responsive or unresponsive and can also be affected by other factors (if the patient is pregnant, obese, an infant, or in a wheelchair). Ch 6 – Pg 107-108
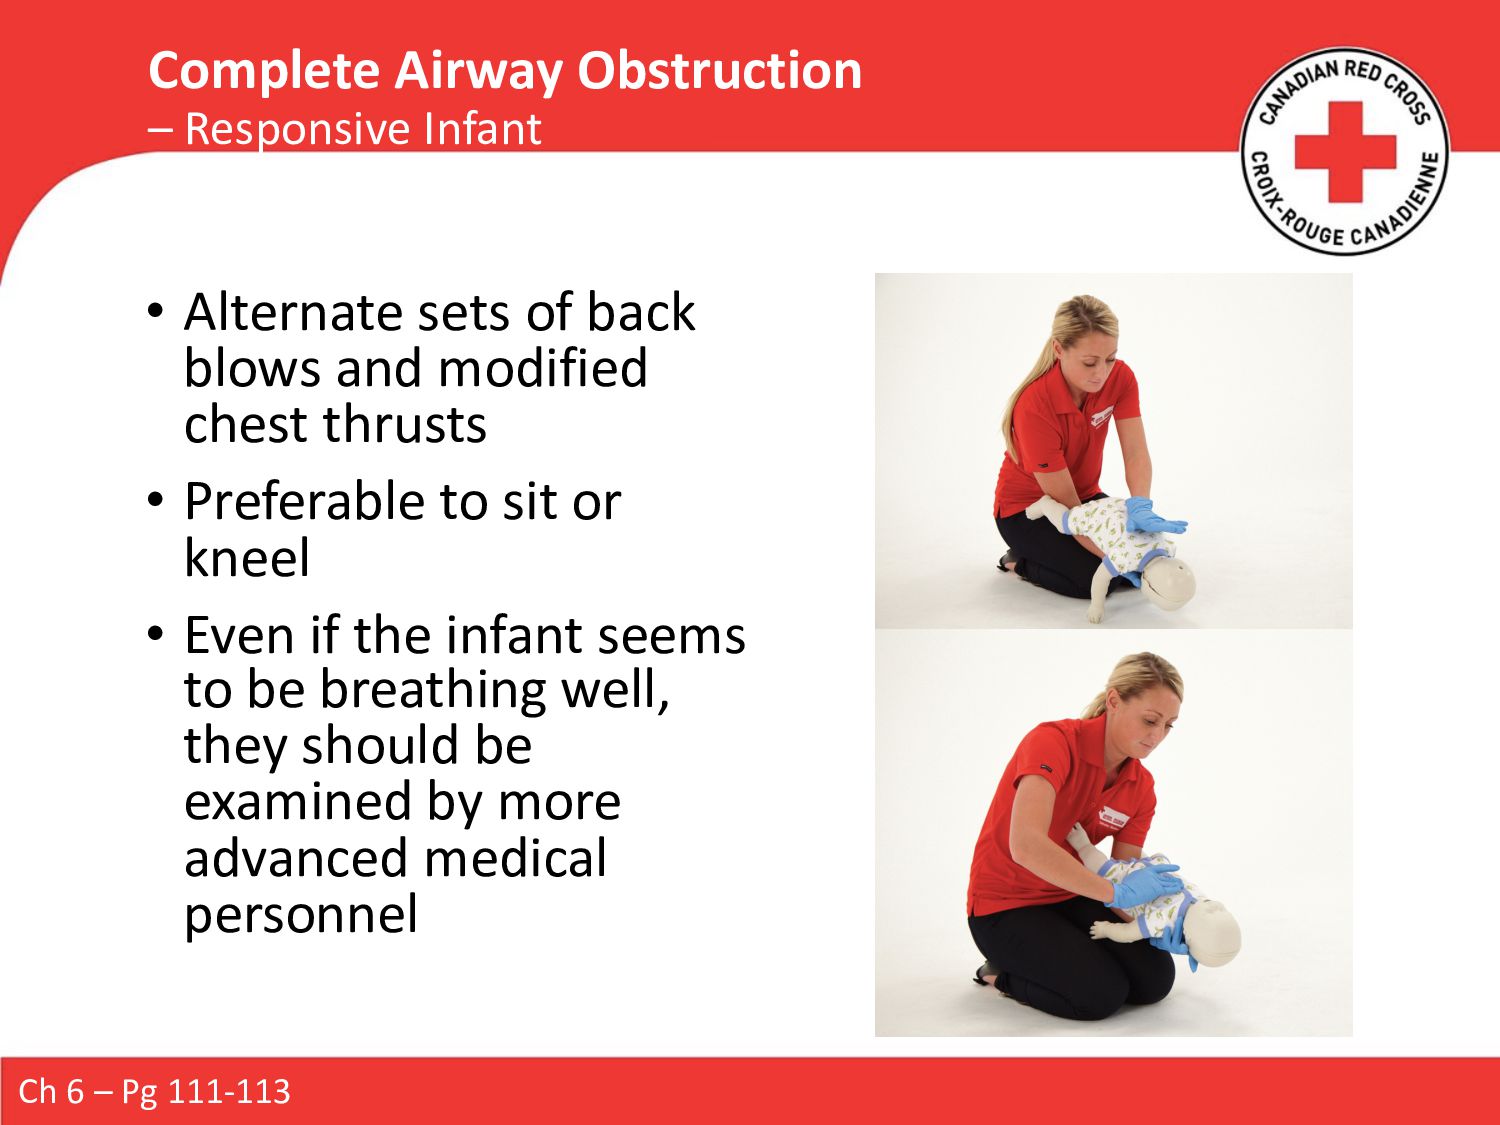
Infant • Alternate sets of back blows and modified chest thrusts • Preferable to sit or kneel • Even if the infant seems to be breathing well, they should be examined by more advanced medical personnel
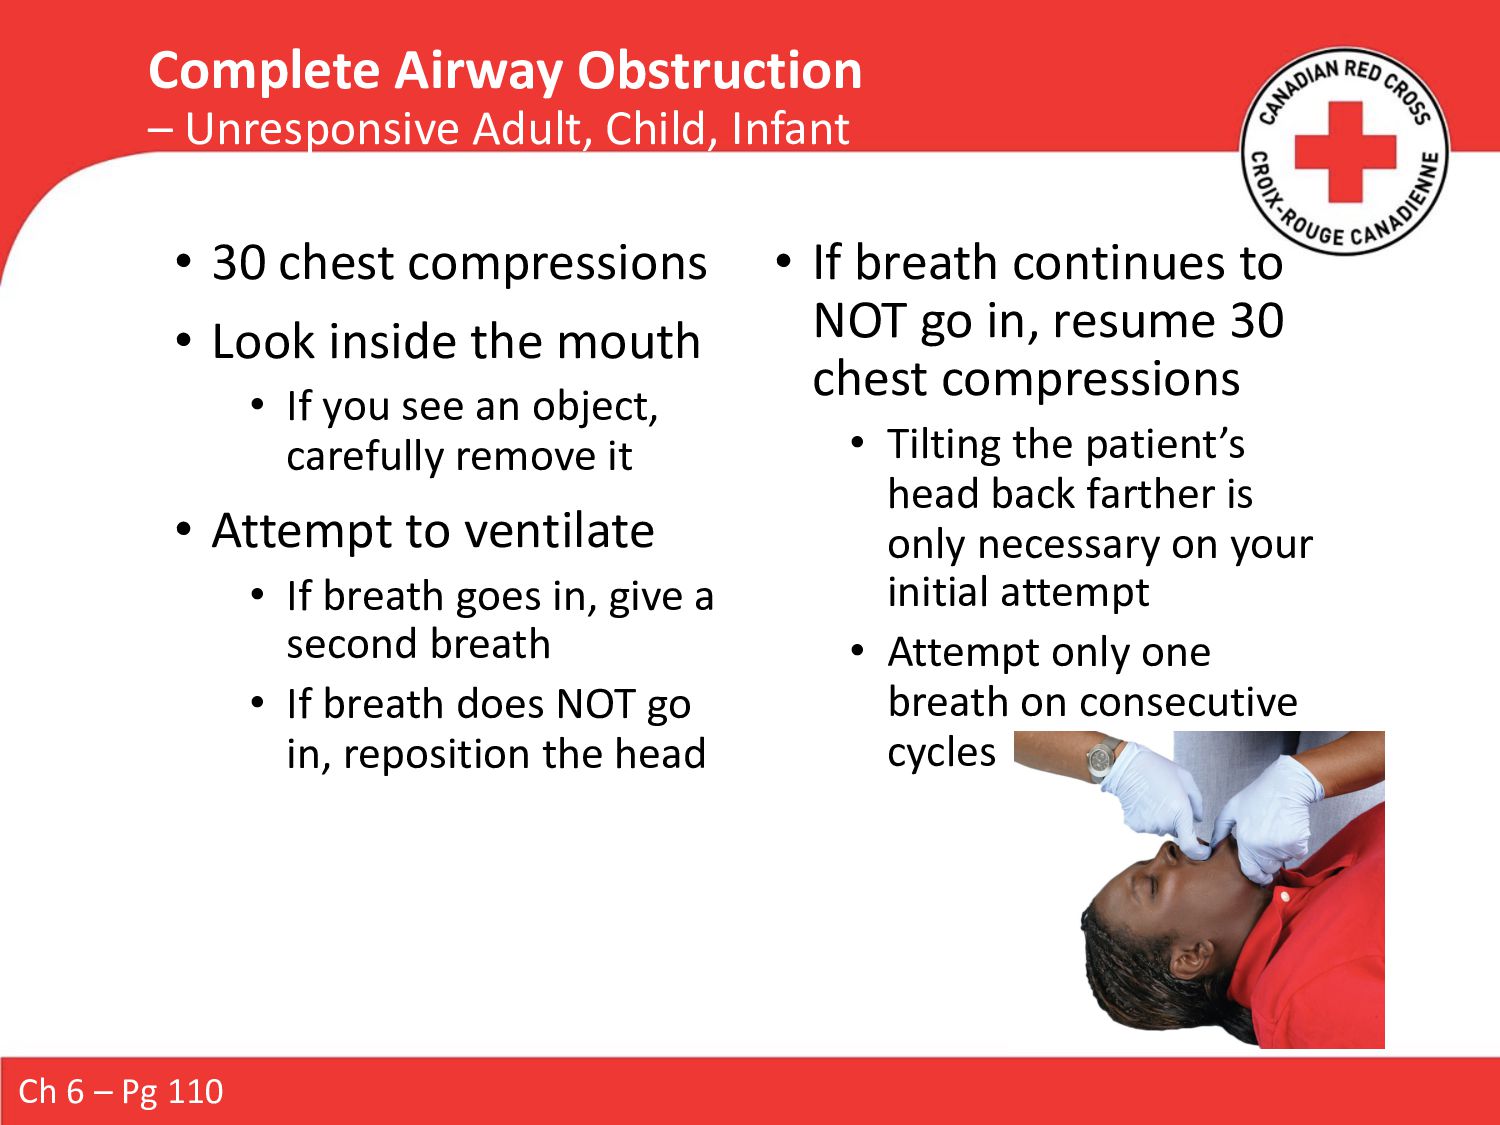
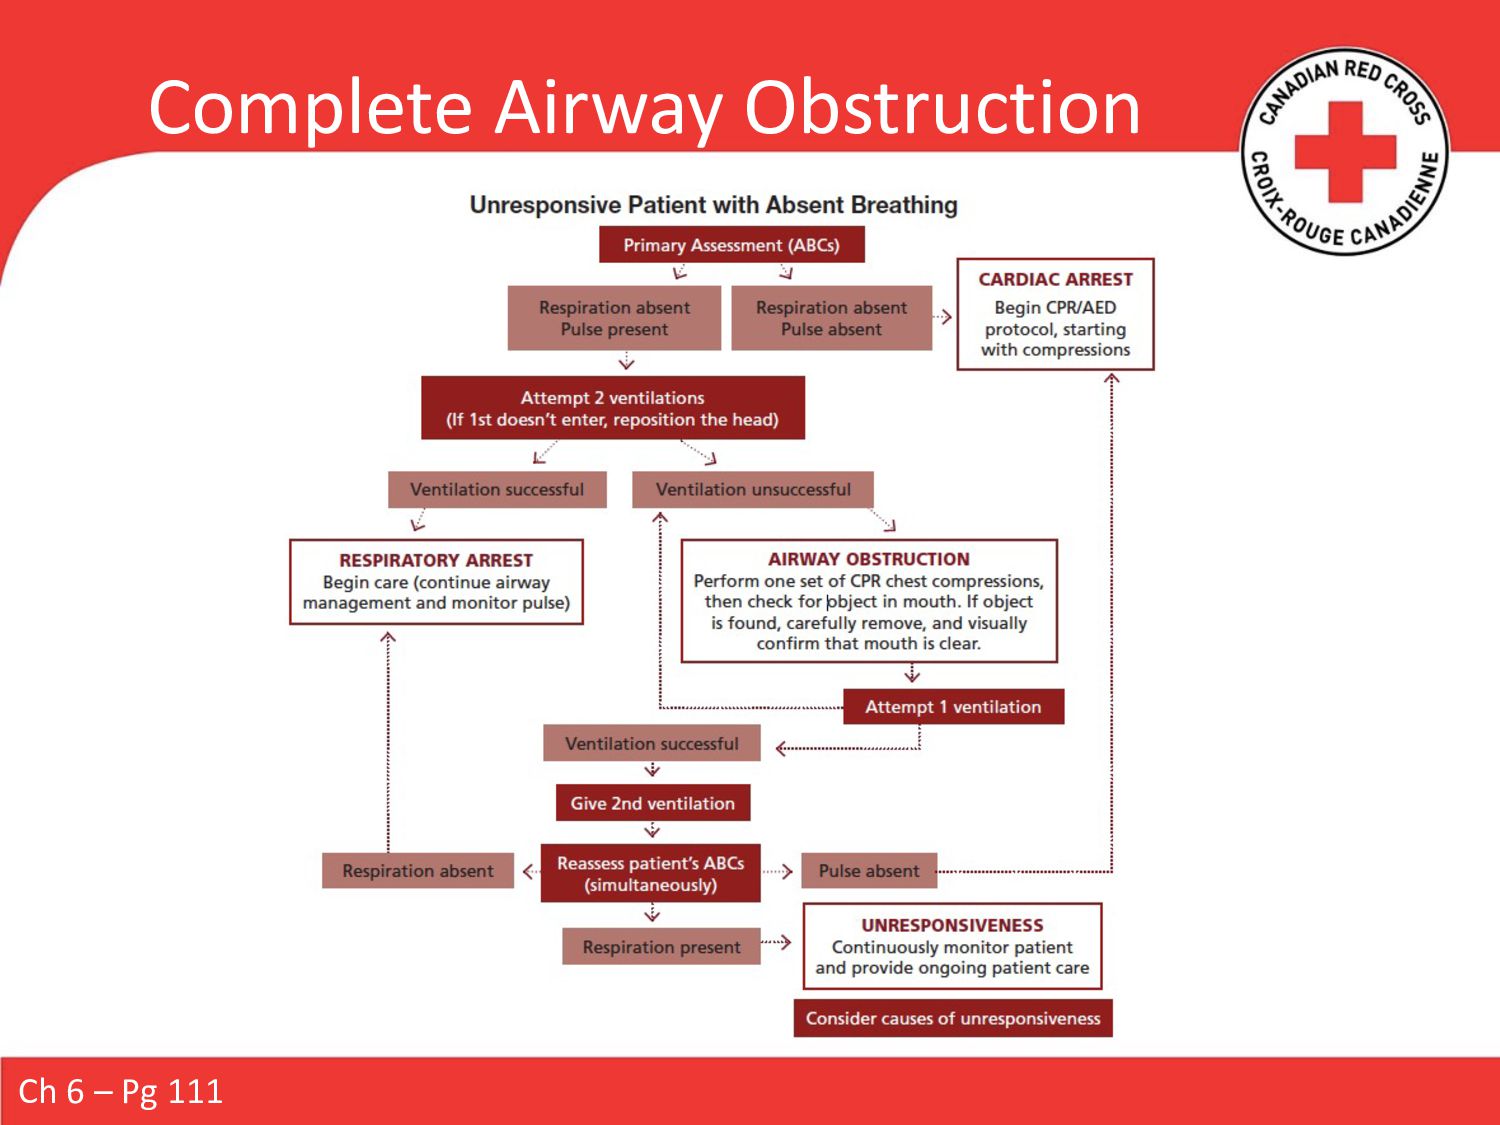
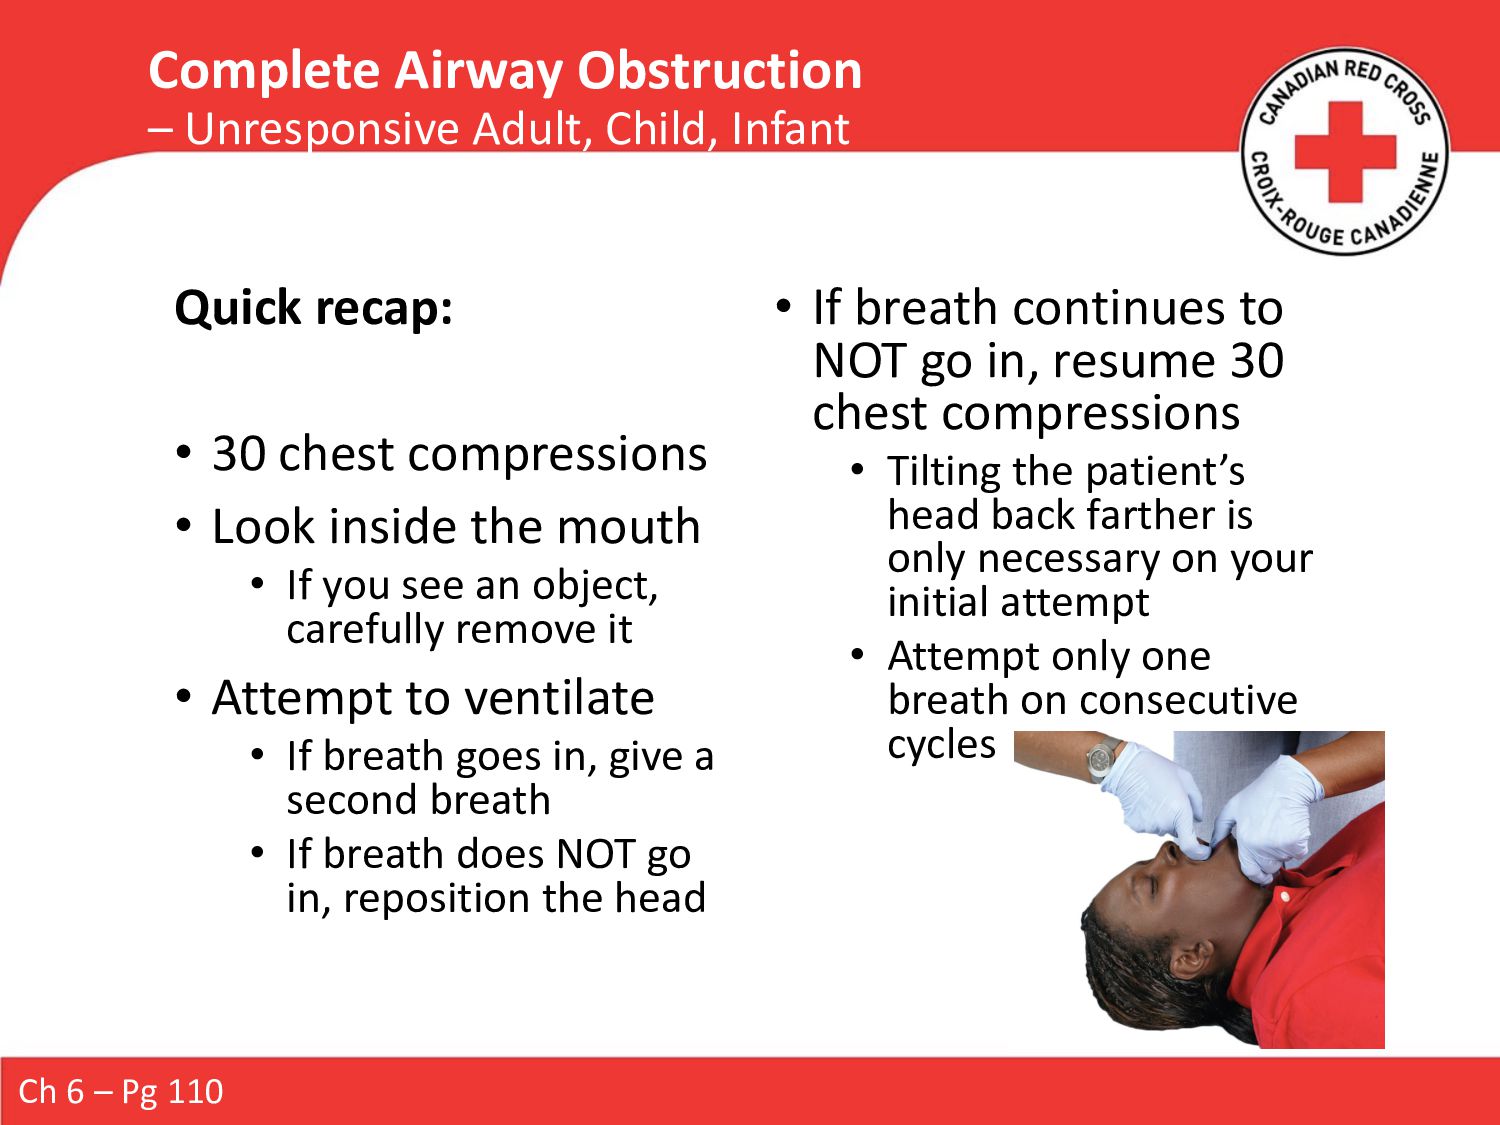
If you see an object, carefully remove it • Attempt to ventilate • If breath goes in, give a second breath • If breath does NOT go in, reposition the head • If breath continues to NOT go in, resume 30 chest compressions • Tilting the patient’s head back farther is only necessary on your initial attempt • Attempt only one breath on consecutive cycles Ch 6 – Pg 110 Complete Airway Obstruction – Unresponsive Adult, Child, Infant
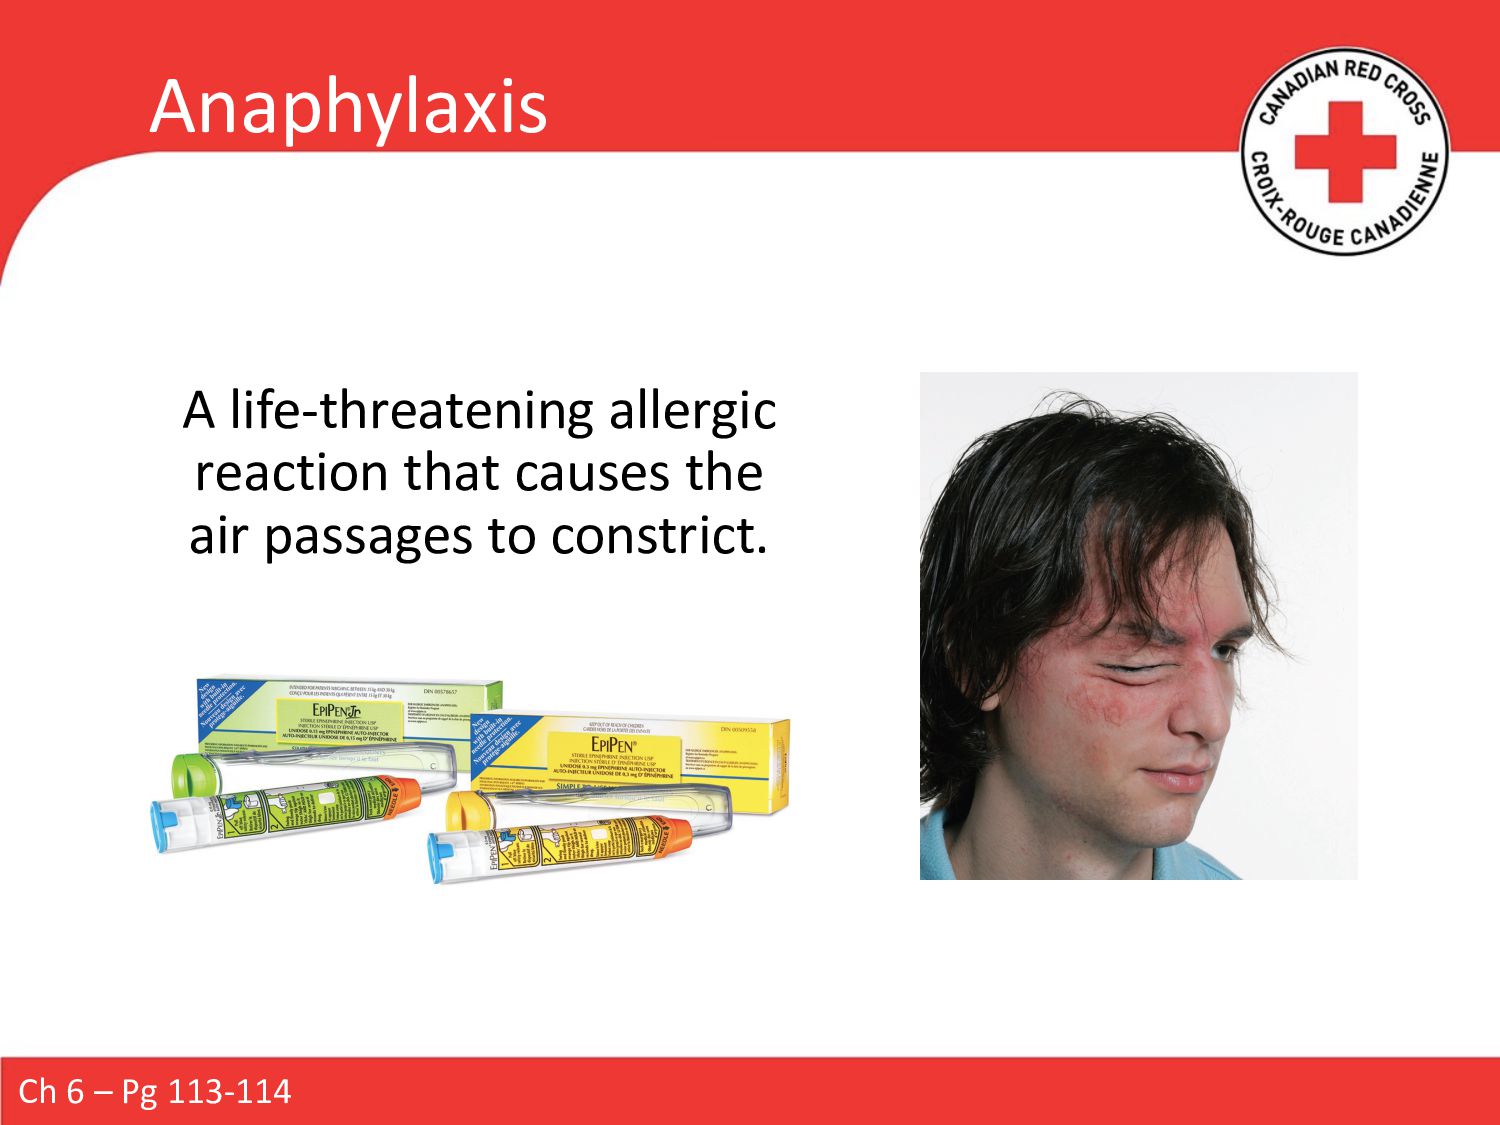
or rash after contact with possible allergen • Assess the patient’s airway and breathing • If patient is in respiratory distress or complains throat is closing, you should suspect anaphylaxis Treatment: • Help the patient into the most comfortable position for breathing • Monitor ABC’s • Keep them calm Allergic Reaction / ?Anaphylaxis Ch 6 – Pg 114
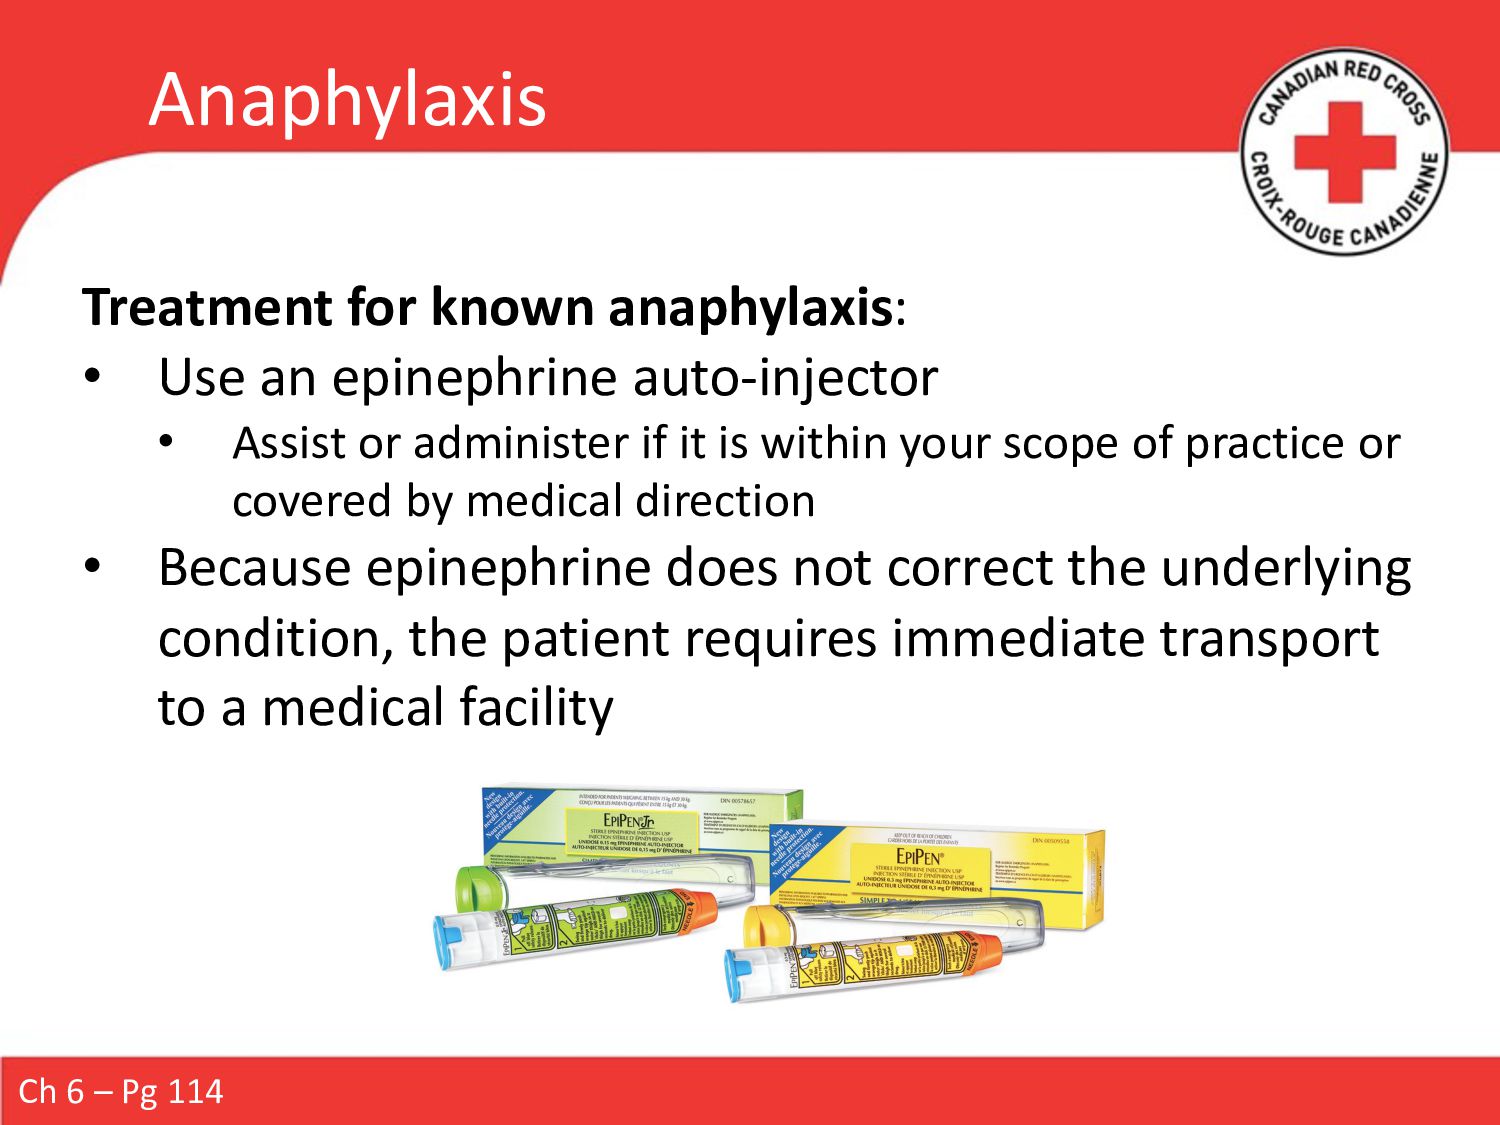
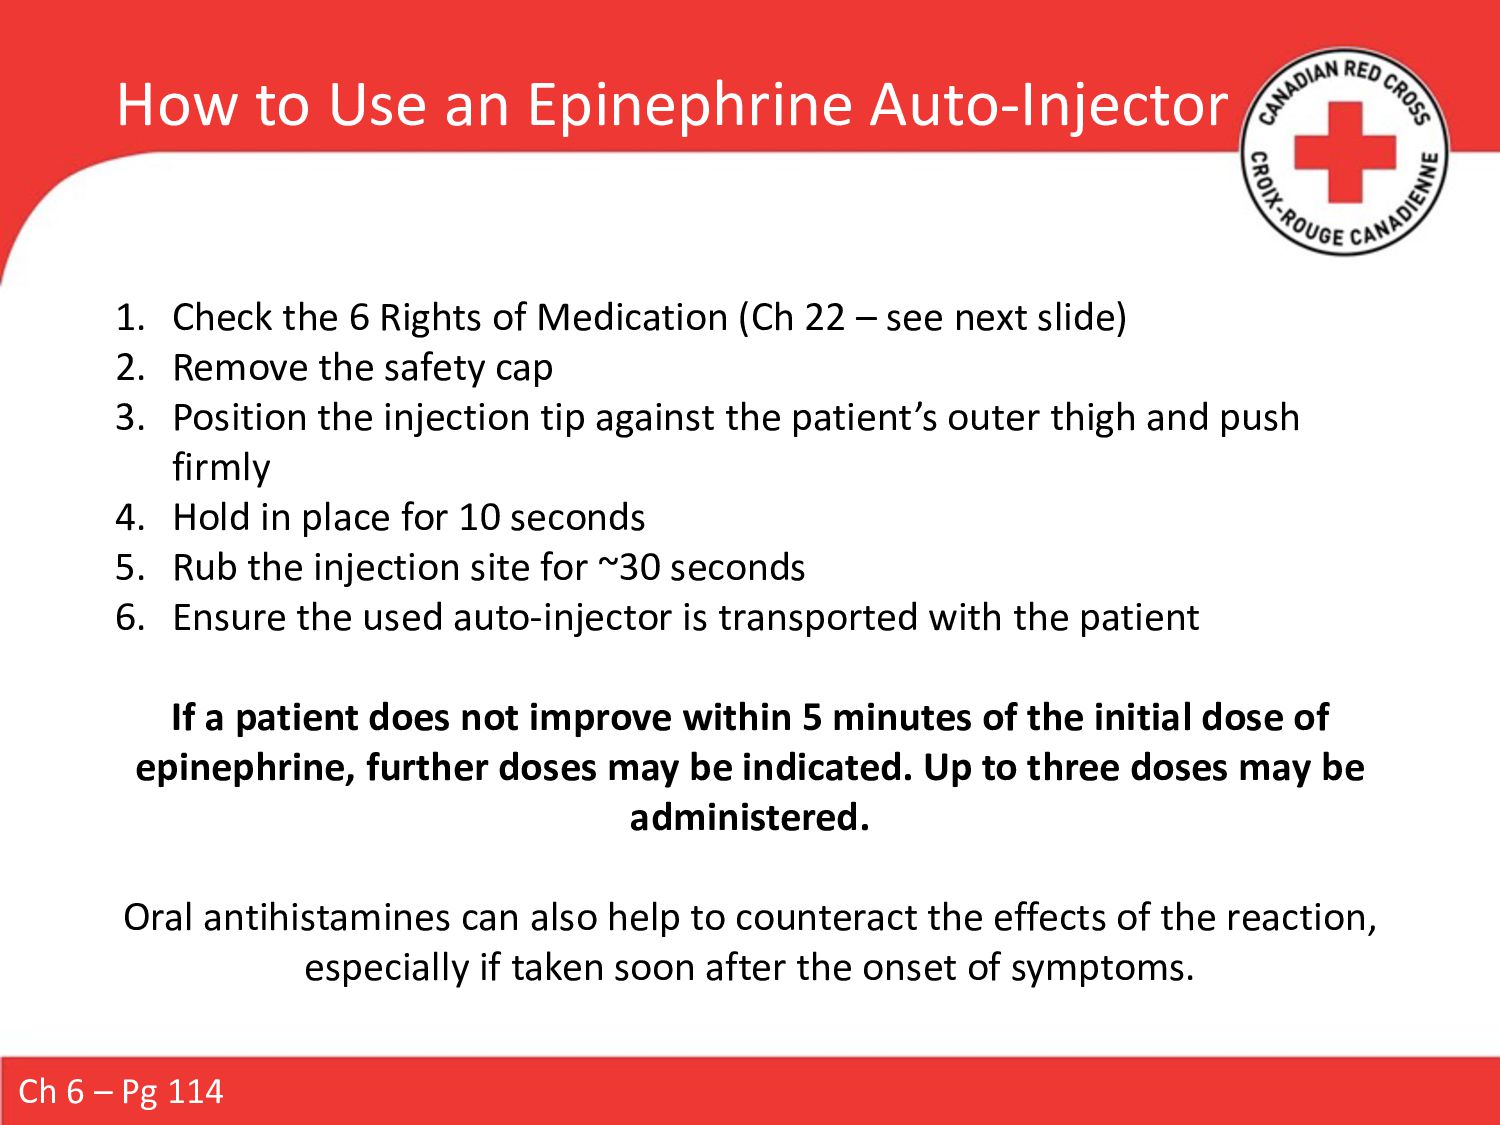
Assist or administer if it is within your scope of practice or covered by medical direction • Because epinephrine does not correct the underlying condition, the patient requires immediate transport to a medical facility Anaphylaxis Ch 6 – Pg 114
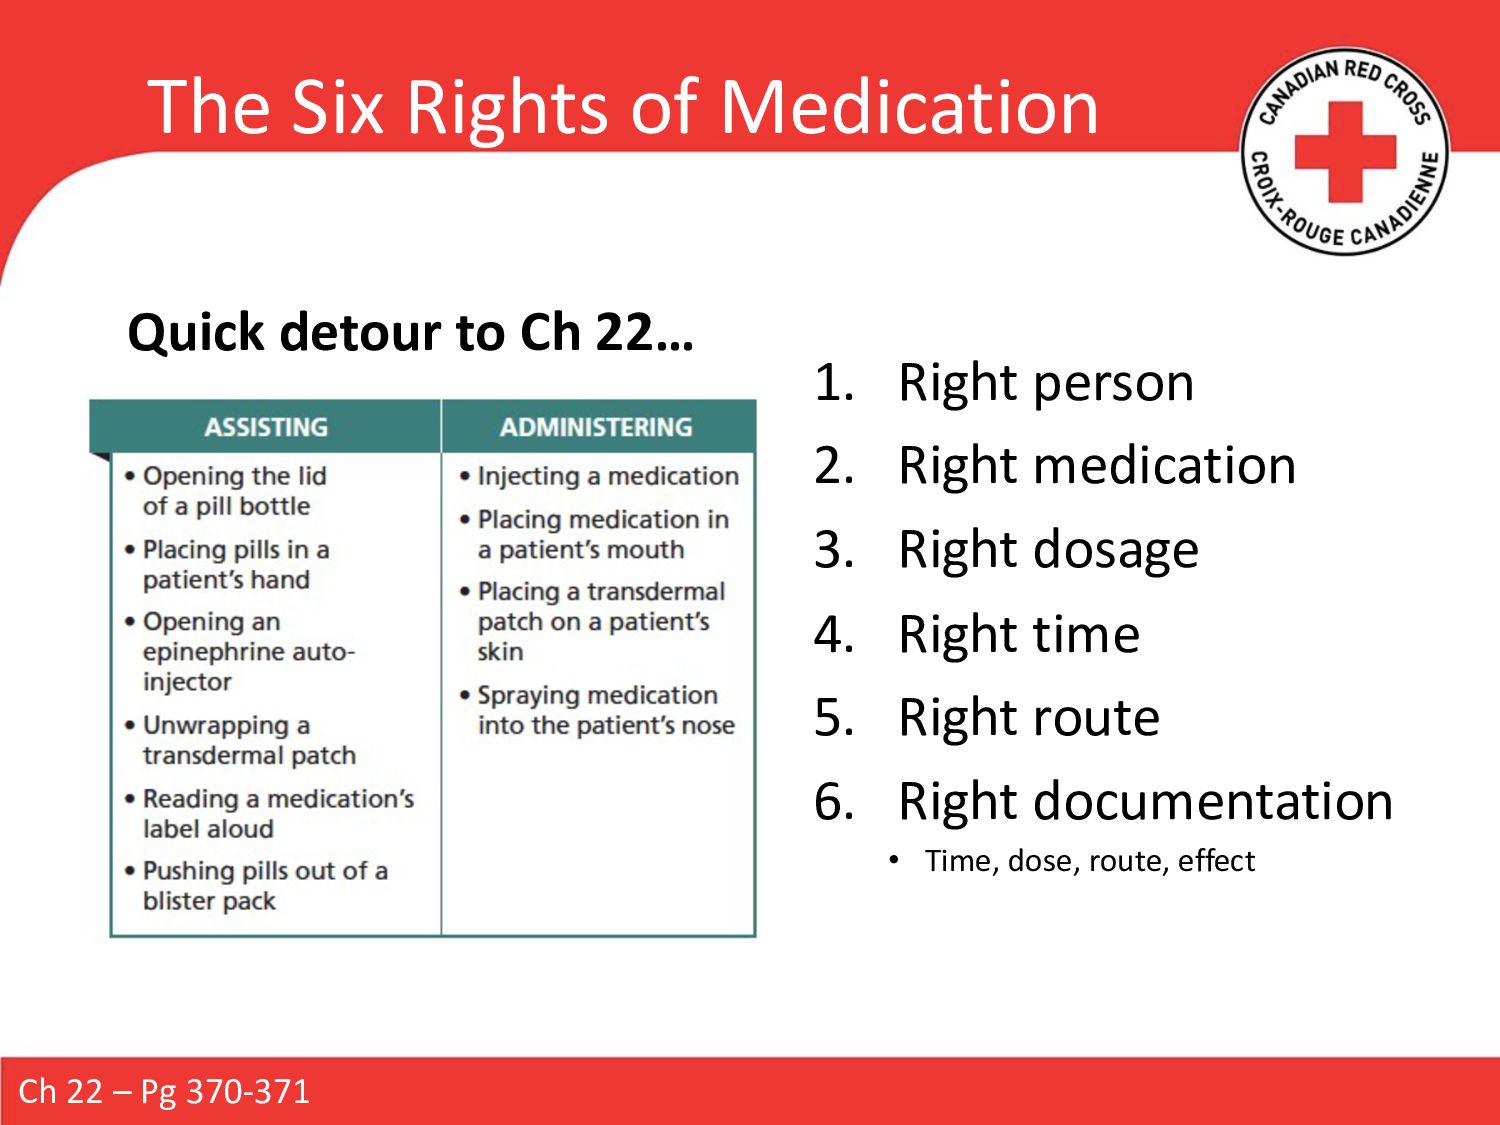
Rights of Medication (Ch 22 – see next slide) 2. Remove the safety cap 3. Position the injection tip against the patient’s outer thigh and push firmly 4. Hold in place for 10 seconds 5. Rub the injection site for ~30 seconds 6. Ensure the used auto-injector is transported with the patient If a patient does not improve within 5 minutes of the initial dose of epinephrine, further doses may be indicated. Up to three doses may be administered. Oral antihistamines can also help to counteract the effects of the reaction, especially if taken soon after the onset of symptoms. Ch 6 – Pg 114
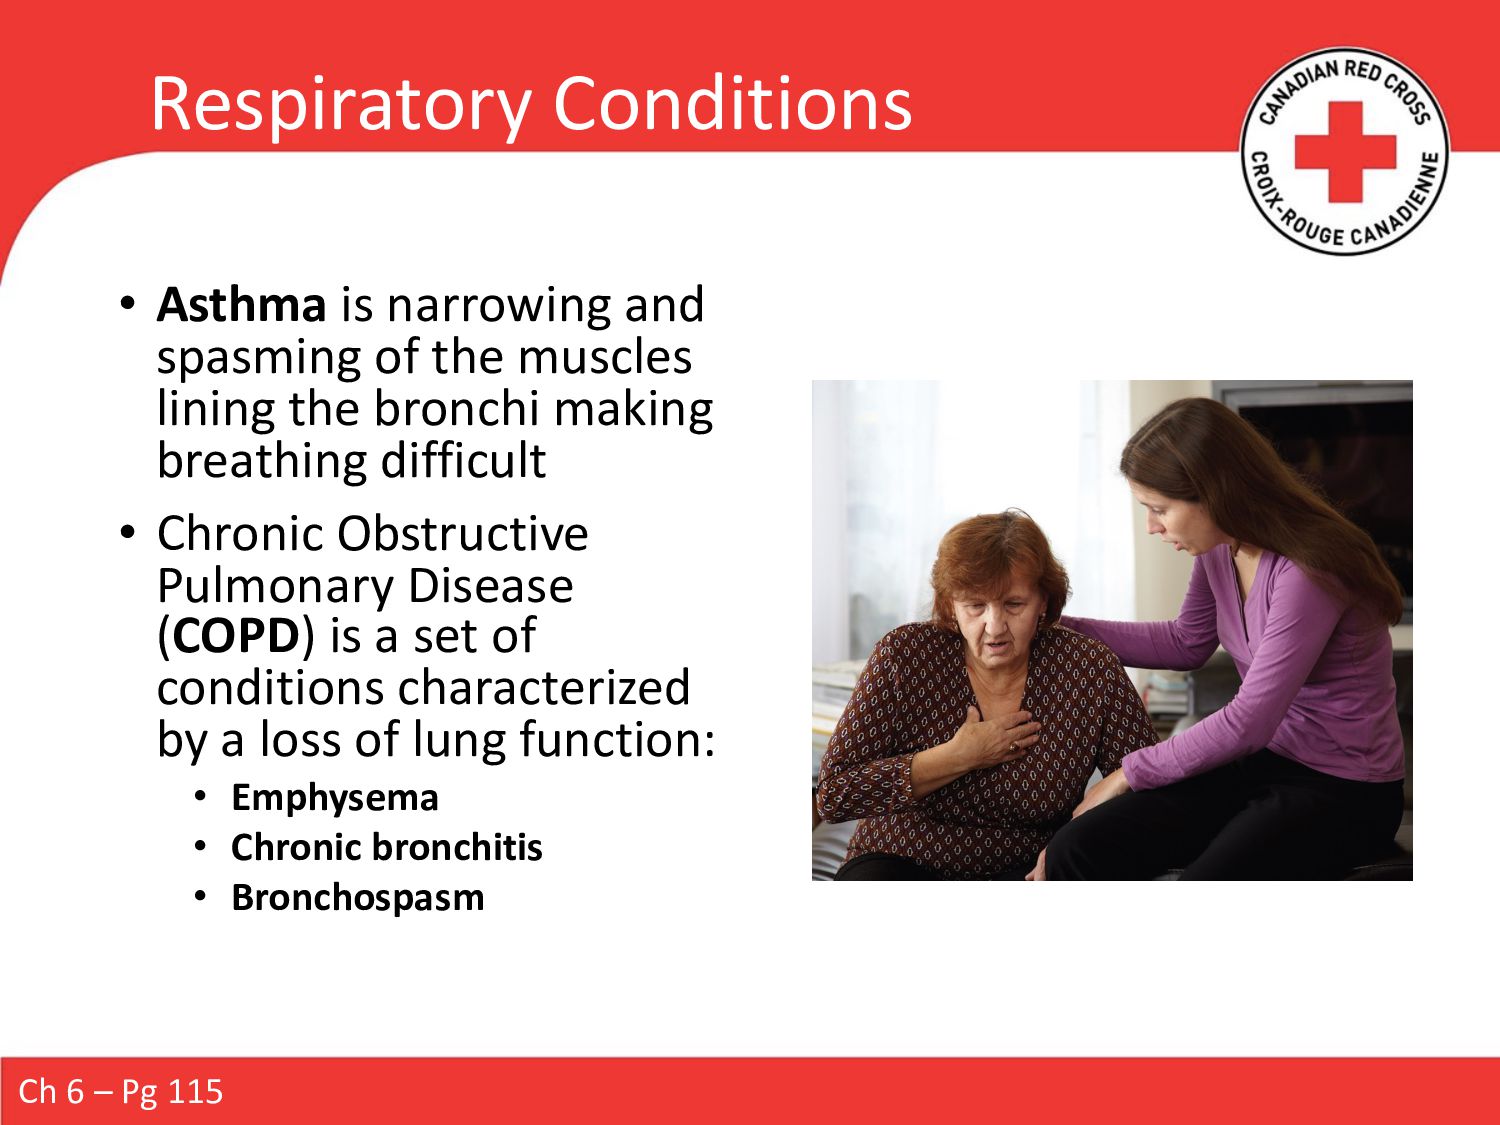
muscles lining the bronchi making breathing difficult • Chronic Obstructive Pulmonary Disease (COPD) is a set of conditions characterized by a loss of lung function: • Emphysema • Chronic bronchitis • Bronchospasm Ch 6 – Pg 115
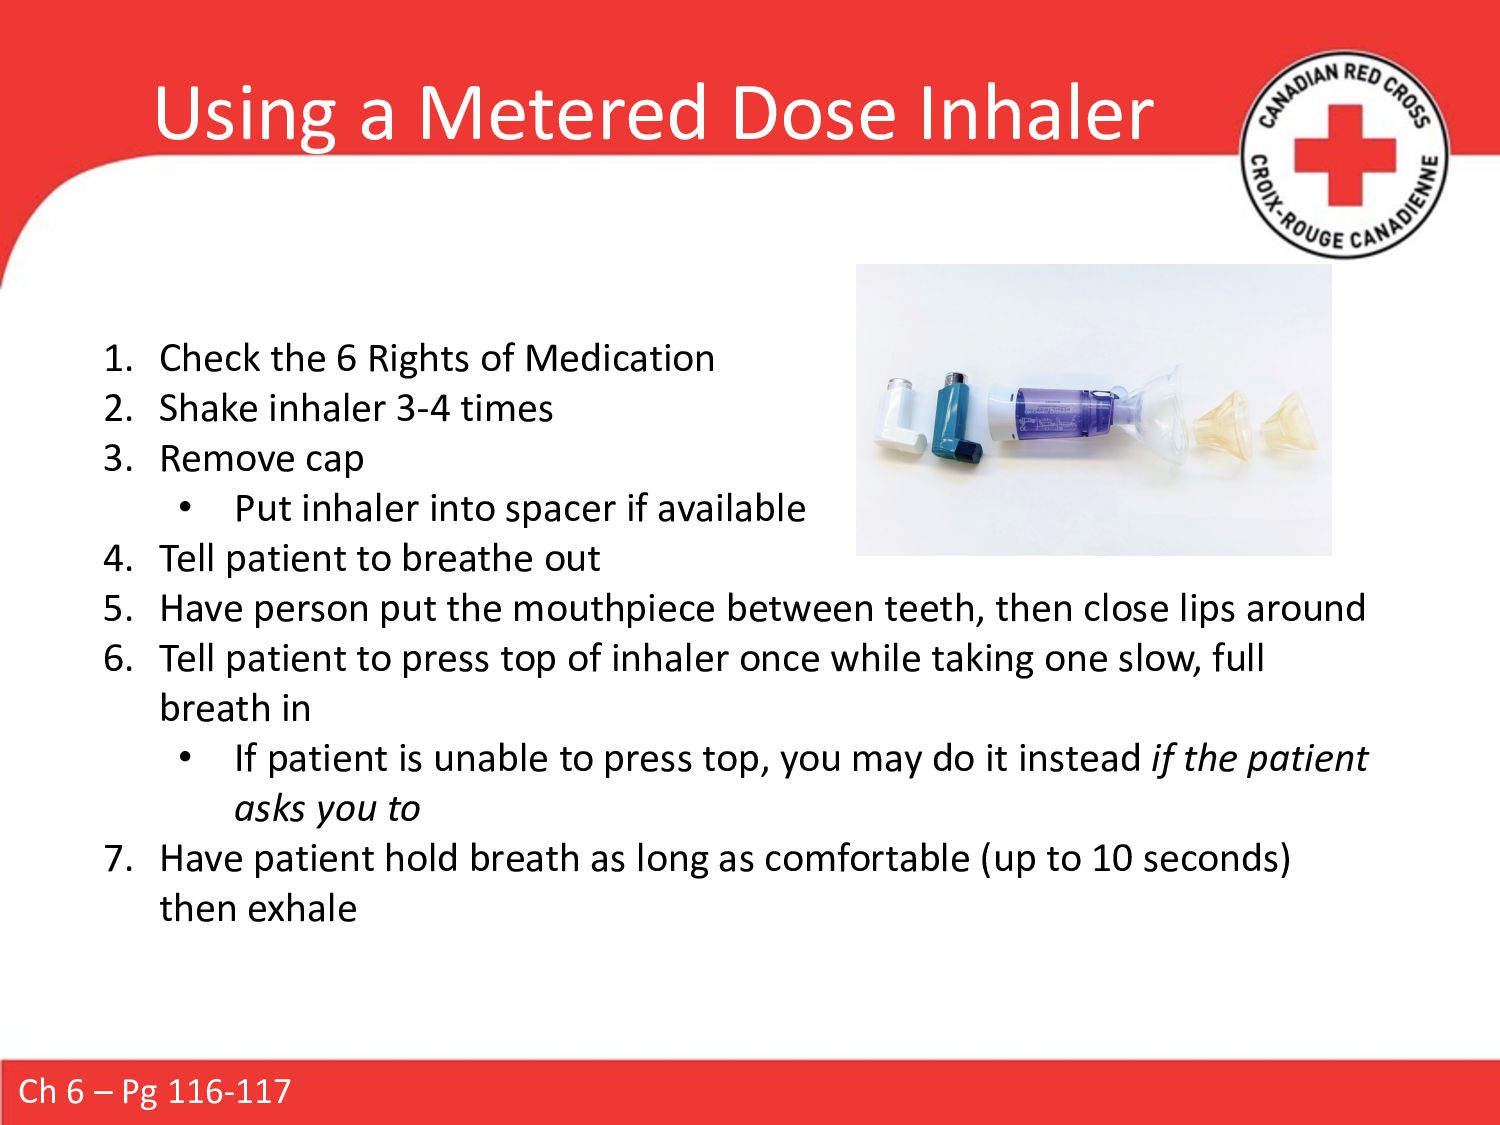
of Medication 2. Shake inhaler 3-4 times 3. Remove cap • Put inhaler into spacer if available 4. Tell patient to breathe out 5. Have person put the mouthpiece between teeth, then close lips around 6. Tell patient to press top of inhaler once while taking one slow, full breath in • If patient is unable to press top, you may do it instead if the patient asks you to 7. Have patient hold breath as long as comfortable (up to 10 seconds) then exhale Ch 6 – Pg 116-117
assist in keeping it patent. • Especially patients with a DLOR à tongue can cause an anatomical obstruction Remember: • FBAO’s must be cleared before an adjunct can be inserted • Adjuncts may not be sufficient to maintain patency on their own: • You must continue to monitor patient’s respirations and use manual techniques such as HTCL/Jaw Thrust as needed Ch 6 – Pg 131
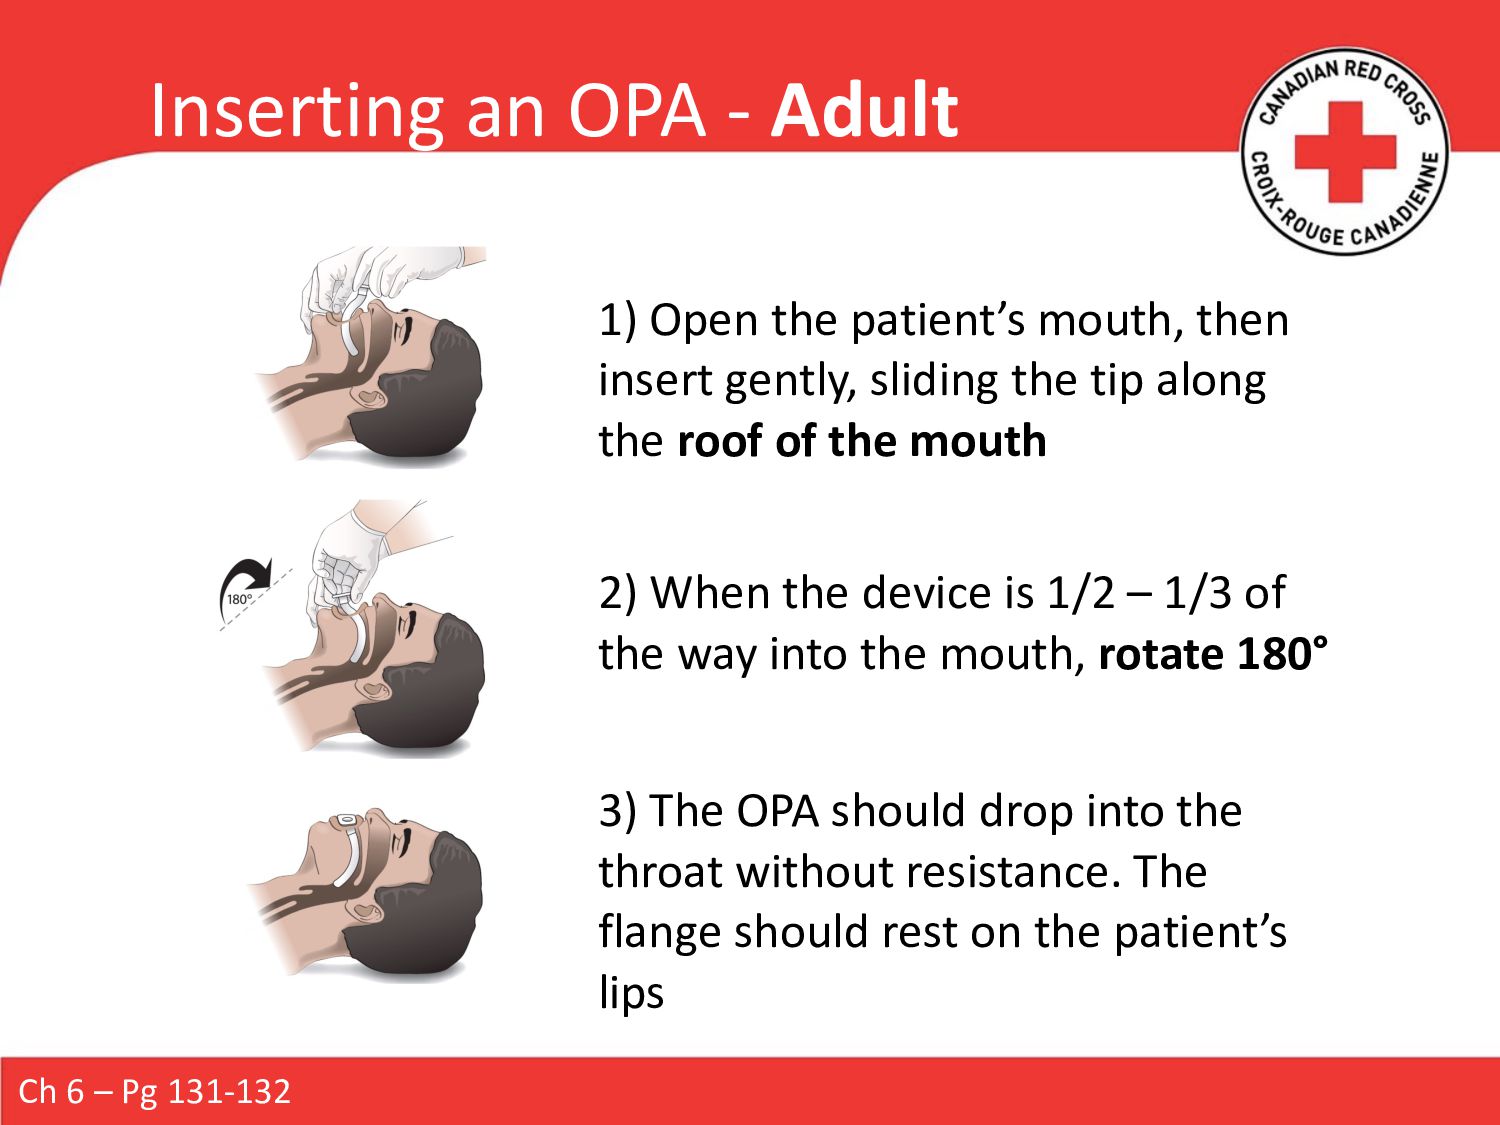
1) Open the patient’s mouth, then insert gently, sliding the tip along the roof of the mouth 2) When the device is 1/2 – 1/3 of the way into the mouth, rotate 180° 3) The OPA should drop into the throat without resistance. The flange should rest on the patient’s lips
1) Open the patient’s mouth, then insert gently, sliding the tip along the inside of the cheek 2) When the device is 1/2 – 1/3 of the way into the mouth, rotate 90° 3) The OPA should drop into the throat without resistance. The flange should rest on the patient’s lips
1) Hold the tongue against the bottom of the mouth with a tongue depressor 2) Place the OPA against the lower lip with the concave side facing down 3) Slide smoothly into place without rotating, following the natural curvature of the mouth and throat
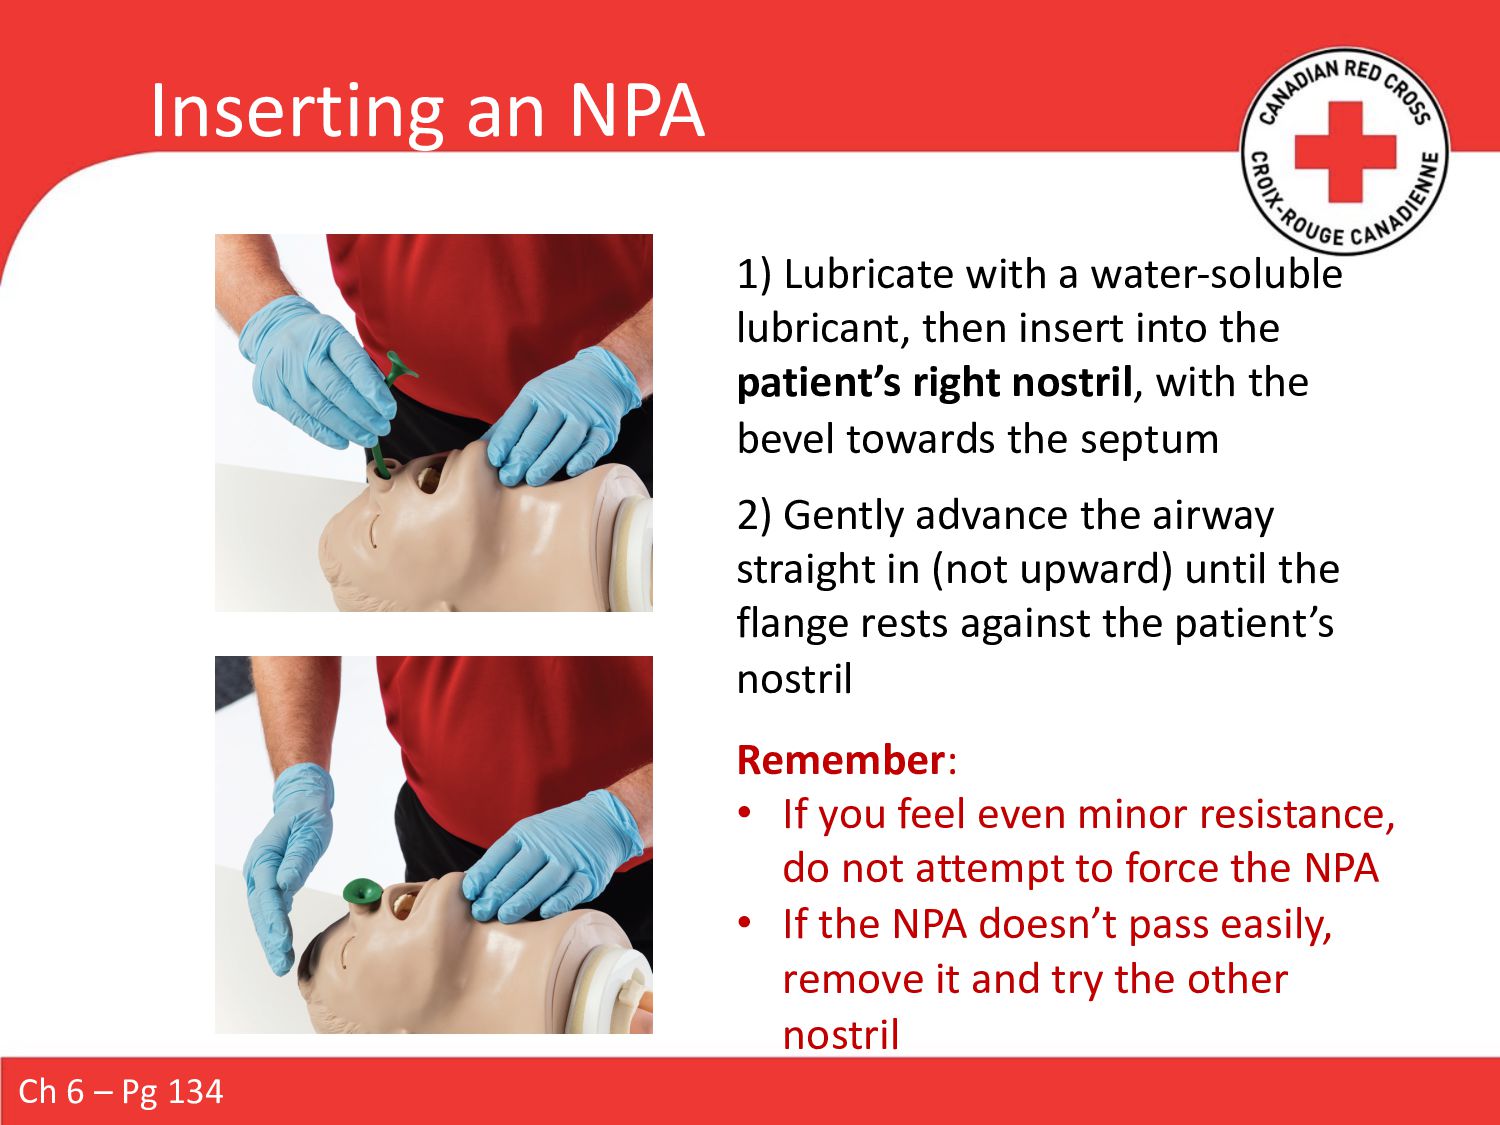
with a water-soluble lubricant, then insert into the patient’s right nostril, with the bevel towards the septum Remember: • If you feel even minor resistance, do not attempt to force the NPA • If the NPA doesn’t pass easily, remove it and try the other nostril 2) Gently advance the airway straight in (not upward) until the flange rests against the patient’s nostril
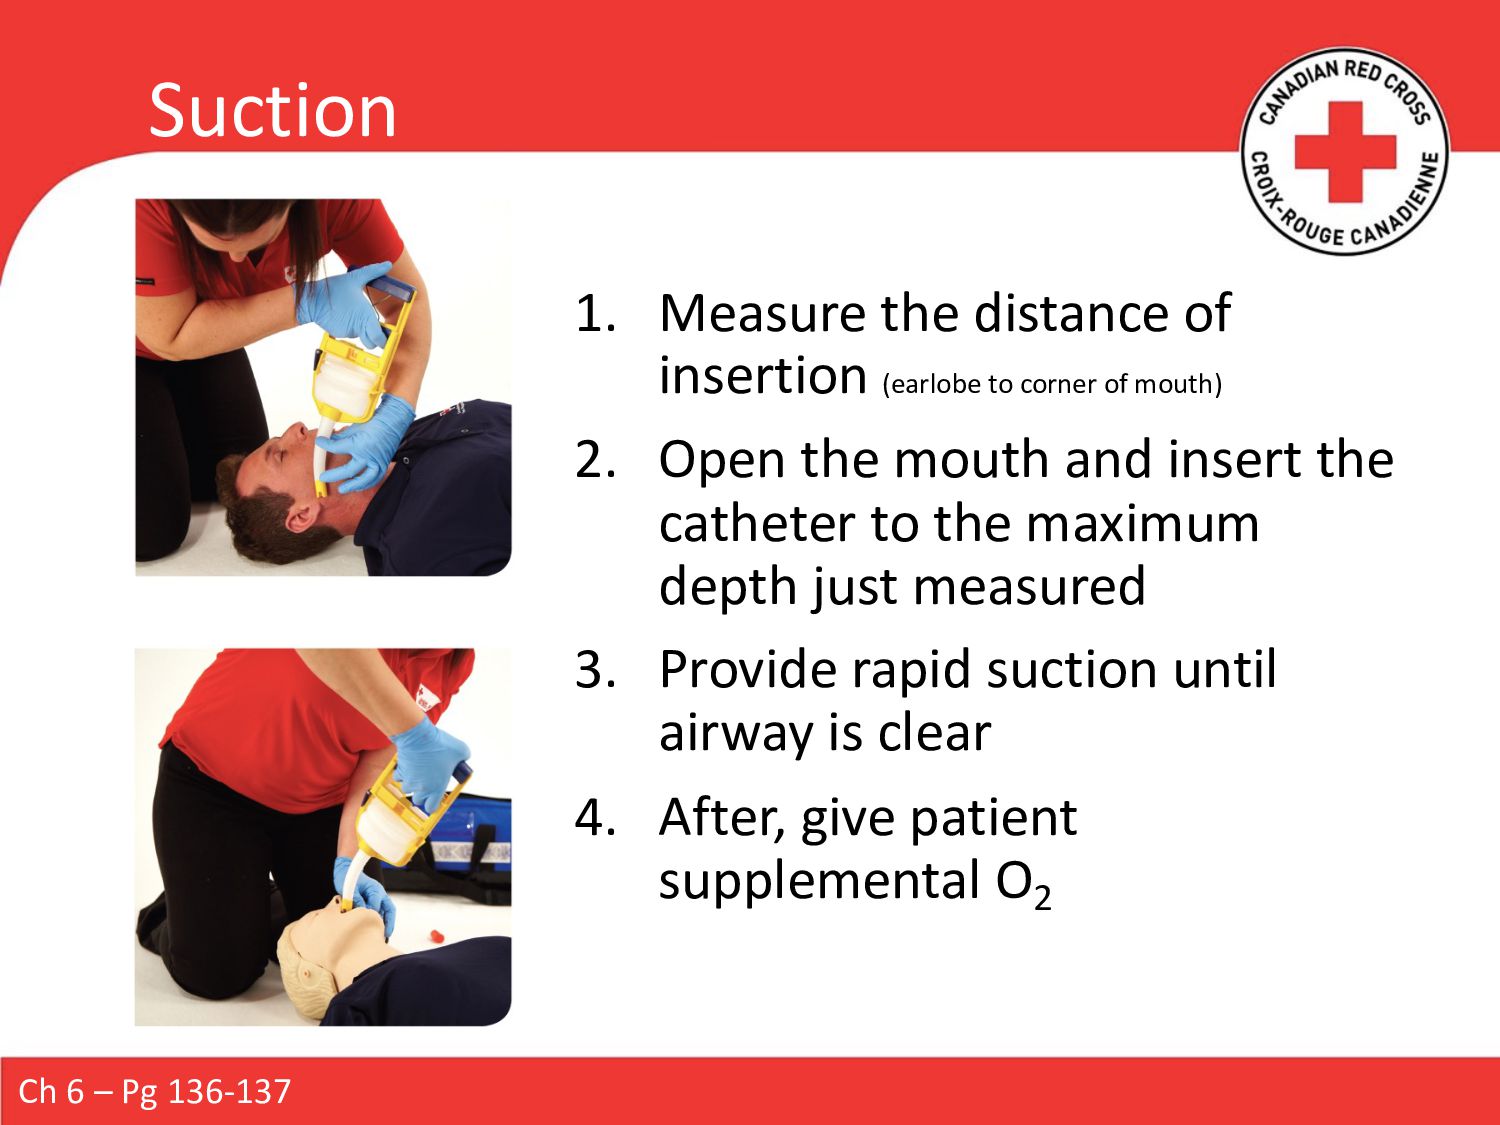
of mouth) 2. Open the mouth and insert the catheter to the maximum depth just measured 3. Provide rapid suction until airway is clear 4. After, give patient supplemental O2 Ch 6 – Pg 136-137
SpO2 . Remember: the pulse oximeter is a tool used to support your patient assessment à treat the patient no the tool! Ch 5 – Pg 87-88 Range SpO2 Delivery Device Flow Rate Function Mild Hypoxia 91-94% Nasal Cannula 1-4 LPM Breathing Standard Mask 6-10 LPM Breathing Moderate to Severe Hypoxia < 90% Non-Rebreather Mask (NRB) 10+ LPM Breathing Bag-Valve-Mask (BVM) 15 LPM Non-breathing or abnormal breathing rate (<8 // >30)
a patient’s lungs when their breathing is inadequate. Indicated for… • Respiratory arrest • Breathing rate <8 • Breathing rate >30 Adult: 1 every 5-6sec Child: 1 every 3-5 sec Infant/Neonate: 1 every 3 sec You should see the patient’s chest begin to rise with each ventilation. Check every 2 minutes whether the patient has begun to breathe spontaneously. Ch 6 – Pg 119-120
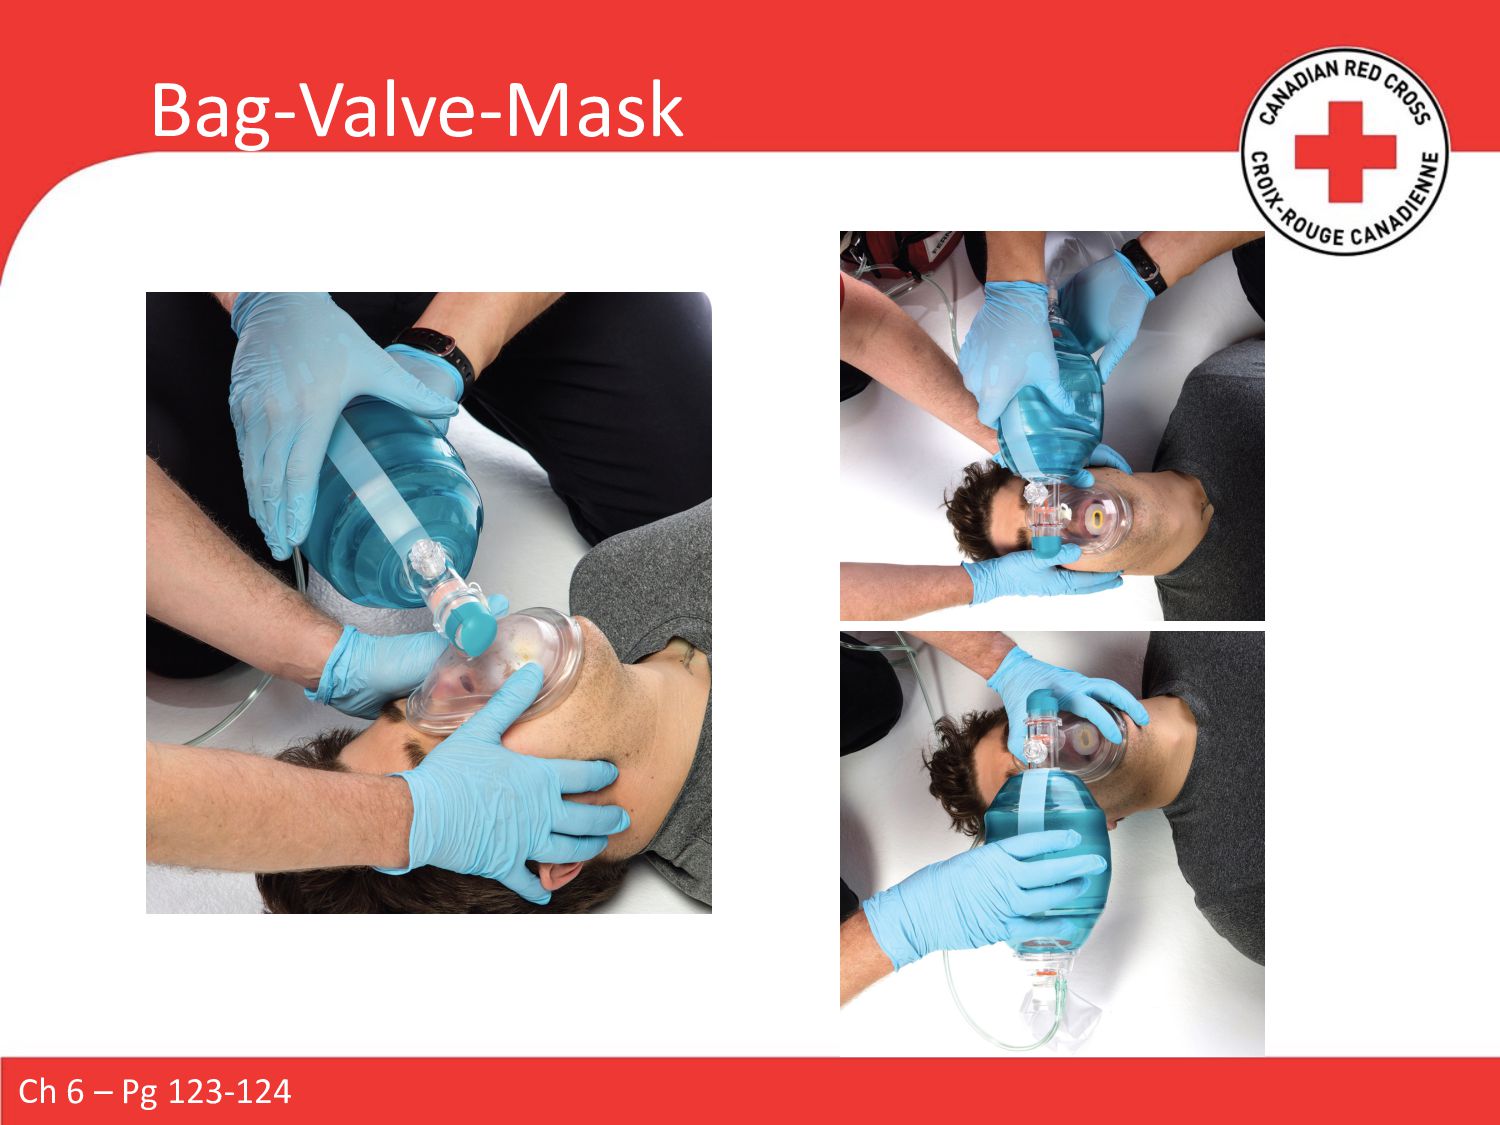
patient’s head • Positions mask and opens airway • Maintains a tight seal with the mask • Assess pulse Responder B • Provides ventilations by squeezing the bag • Smoothly • Not forcefully • Just enough for chest to start to rise • Counts rhythm Ch 6 – Pg 123
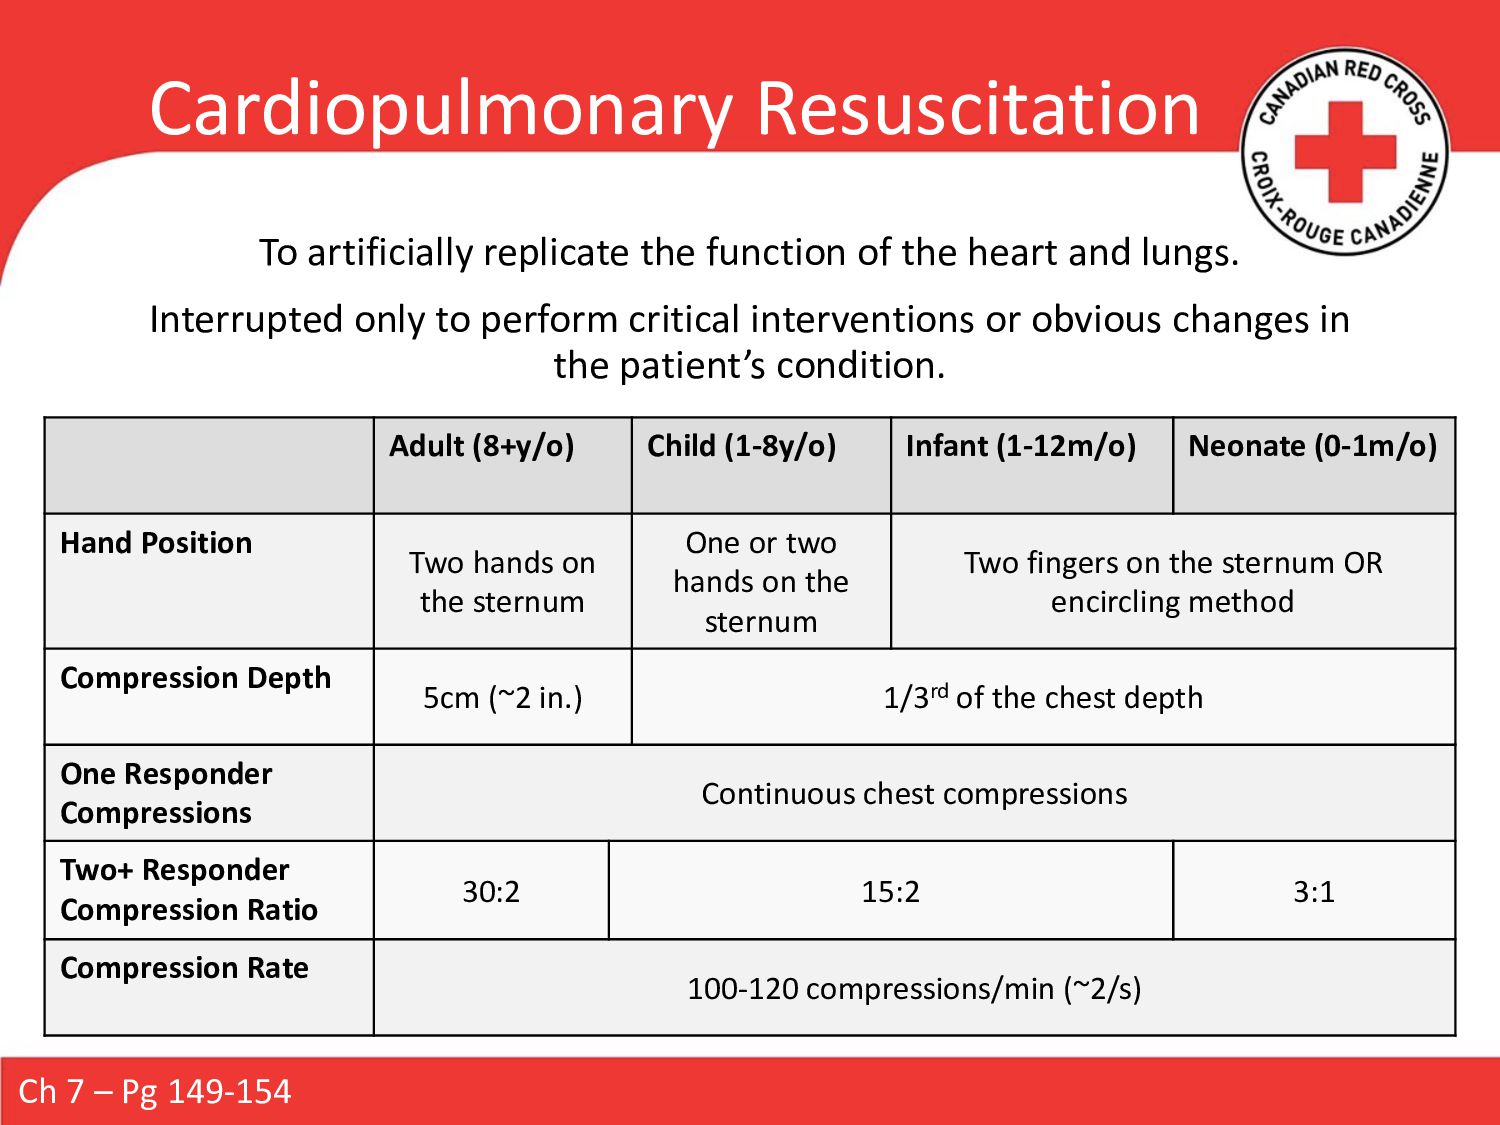
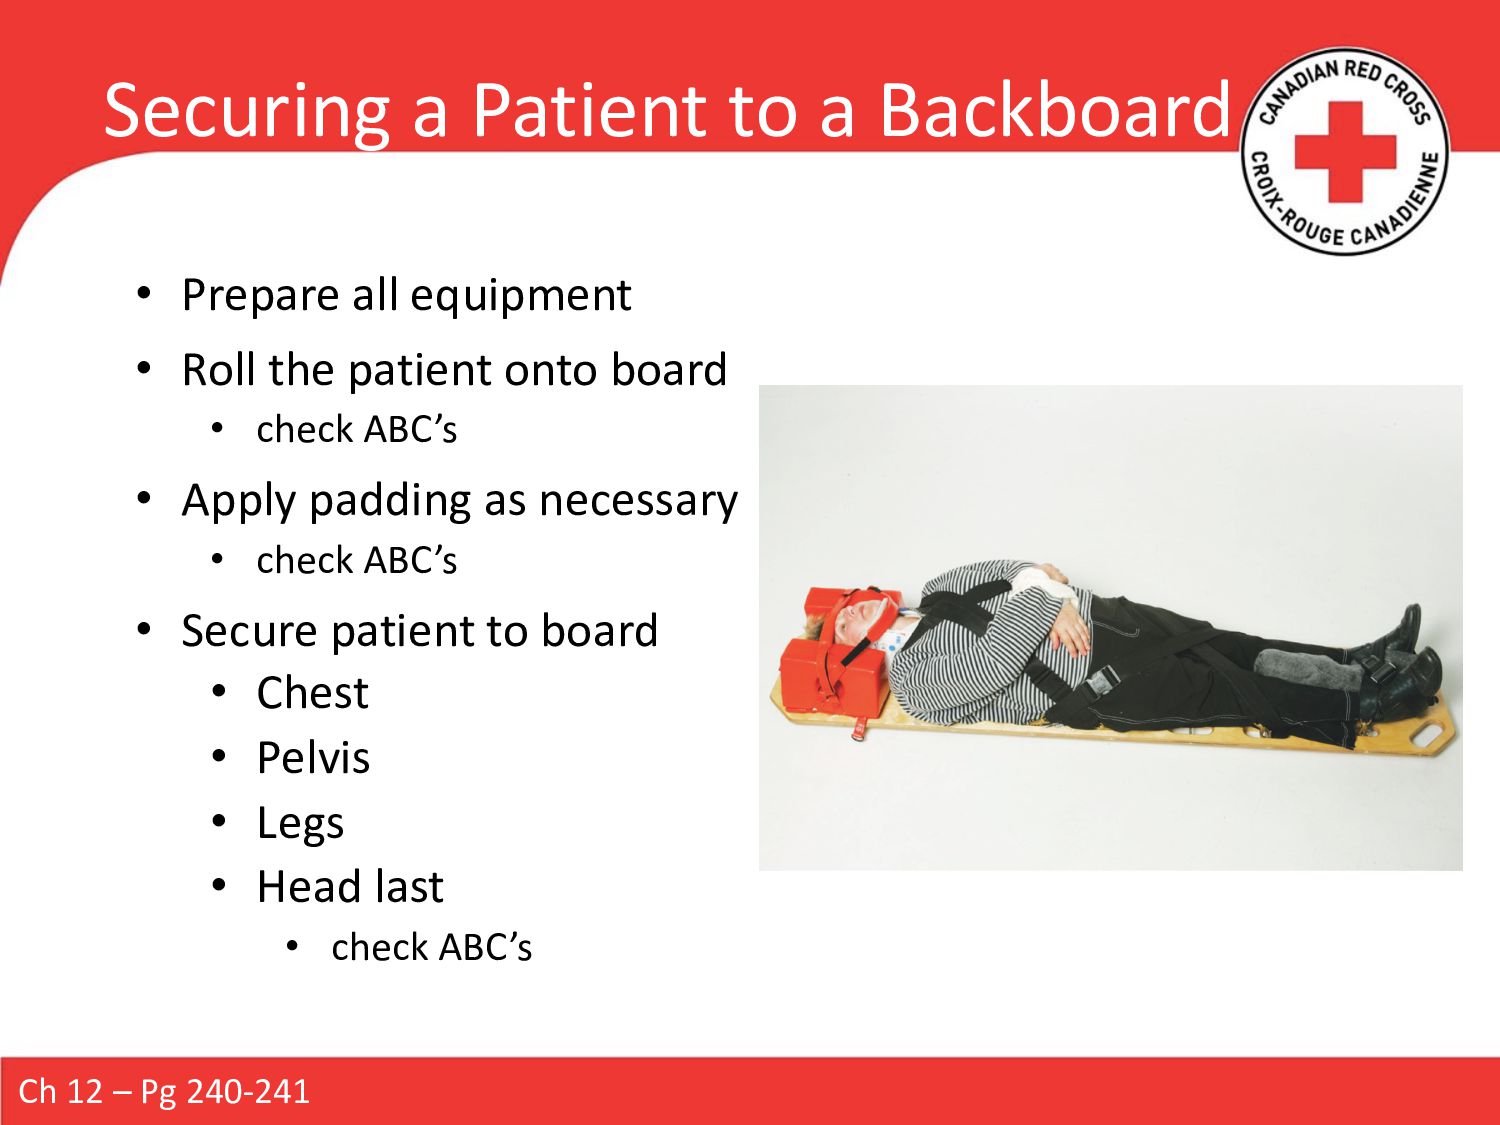
and lungs. Interrupted only to perform critical interventions or obvious changes in the patient’s condition. Adult (8+y/o) Child (1-8y/o) Infant (1-12m/o) Neonate (0-1m/o) Hand Position Two hands on the sternum One or two hands on the sternum Two fingers on the sternum OR encircling method Compression Depth 5cm (~2 in.) 1/3rd of the chest depth One Responder Compressions Continuous chest compressions Two+ Responder Compression Ratio 30:2 15:2 3:1 Compression Rate 100-120 compressions/min (~2/s) Ch 7 – Pg 149-154
mouth • If you see an object, carefully remove it • Attempt to ventilate • If breath goes in, give a second breath • If breath does NOT go in, reposition the head • If breath continues to NOT go in, resume 30 chest compressions • Tilting the patient’s head back farther is only necessary on your initial attempt • Attempt only one breath on consecutive cycles Ch 6 – Pg 110 Complete Airway Obstruction – Unresponsive Adult, Child, Infant
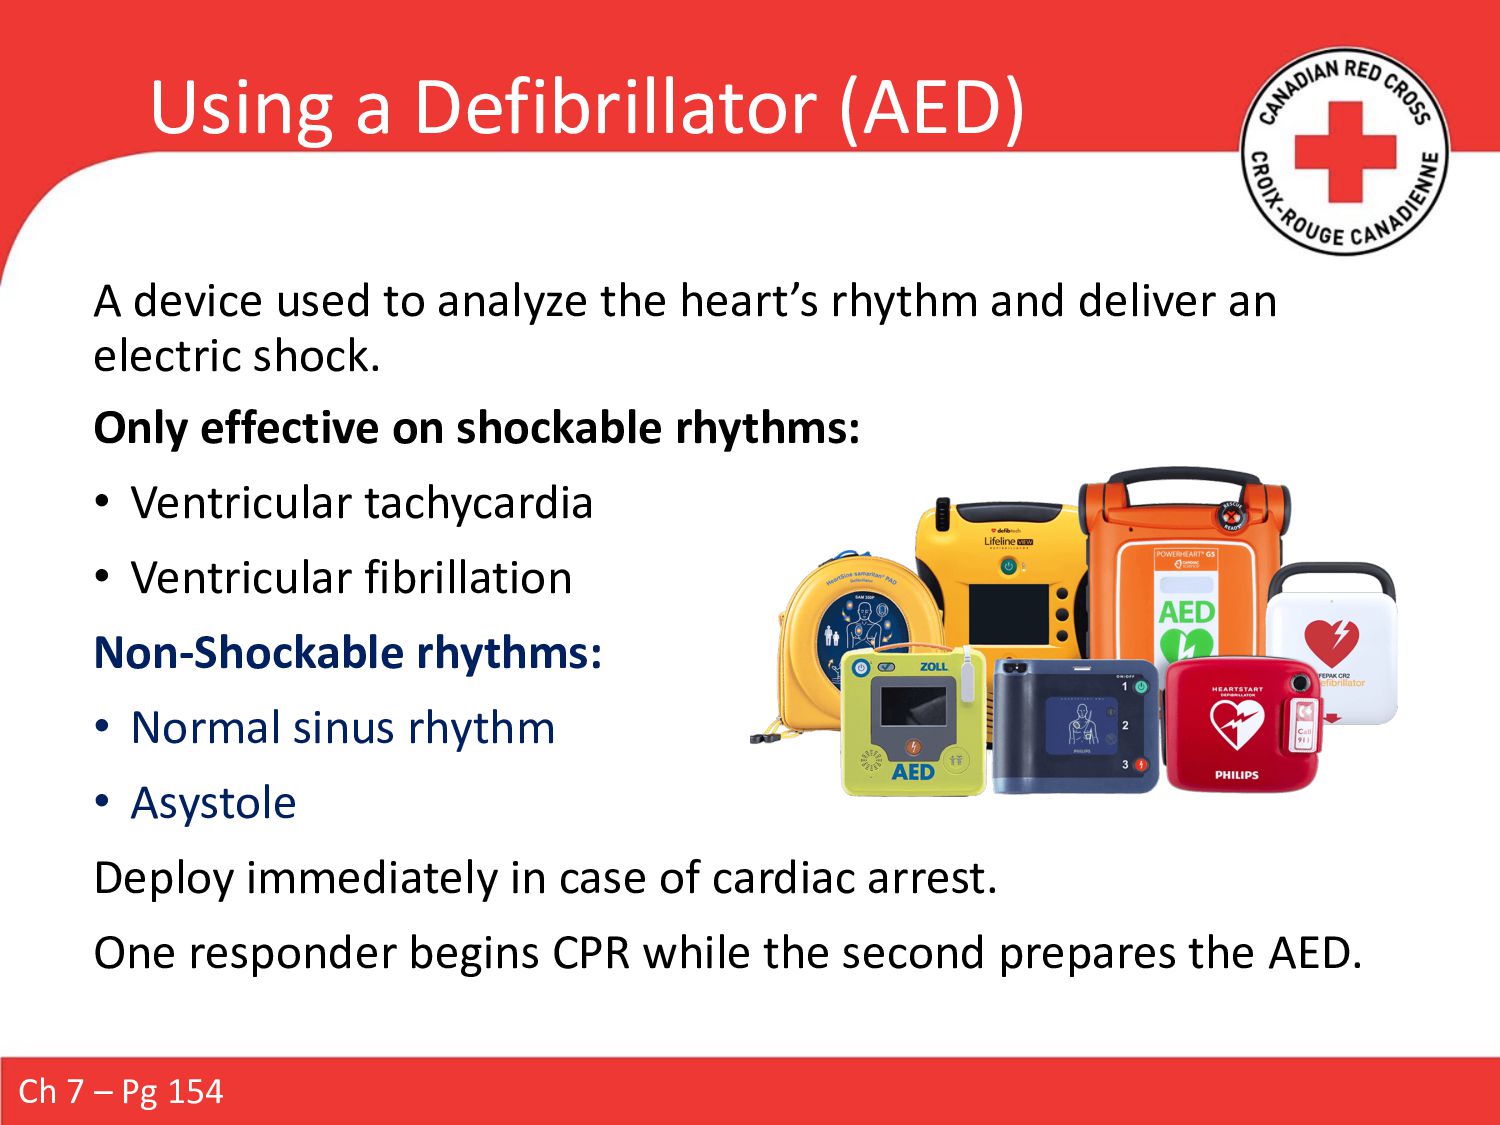
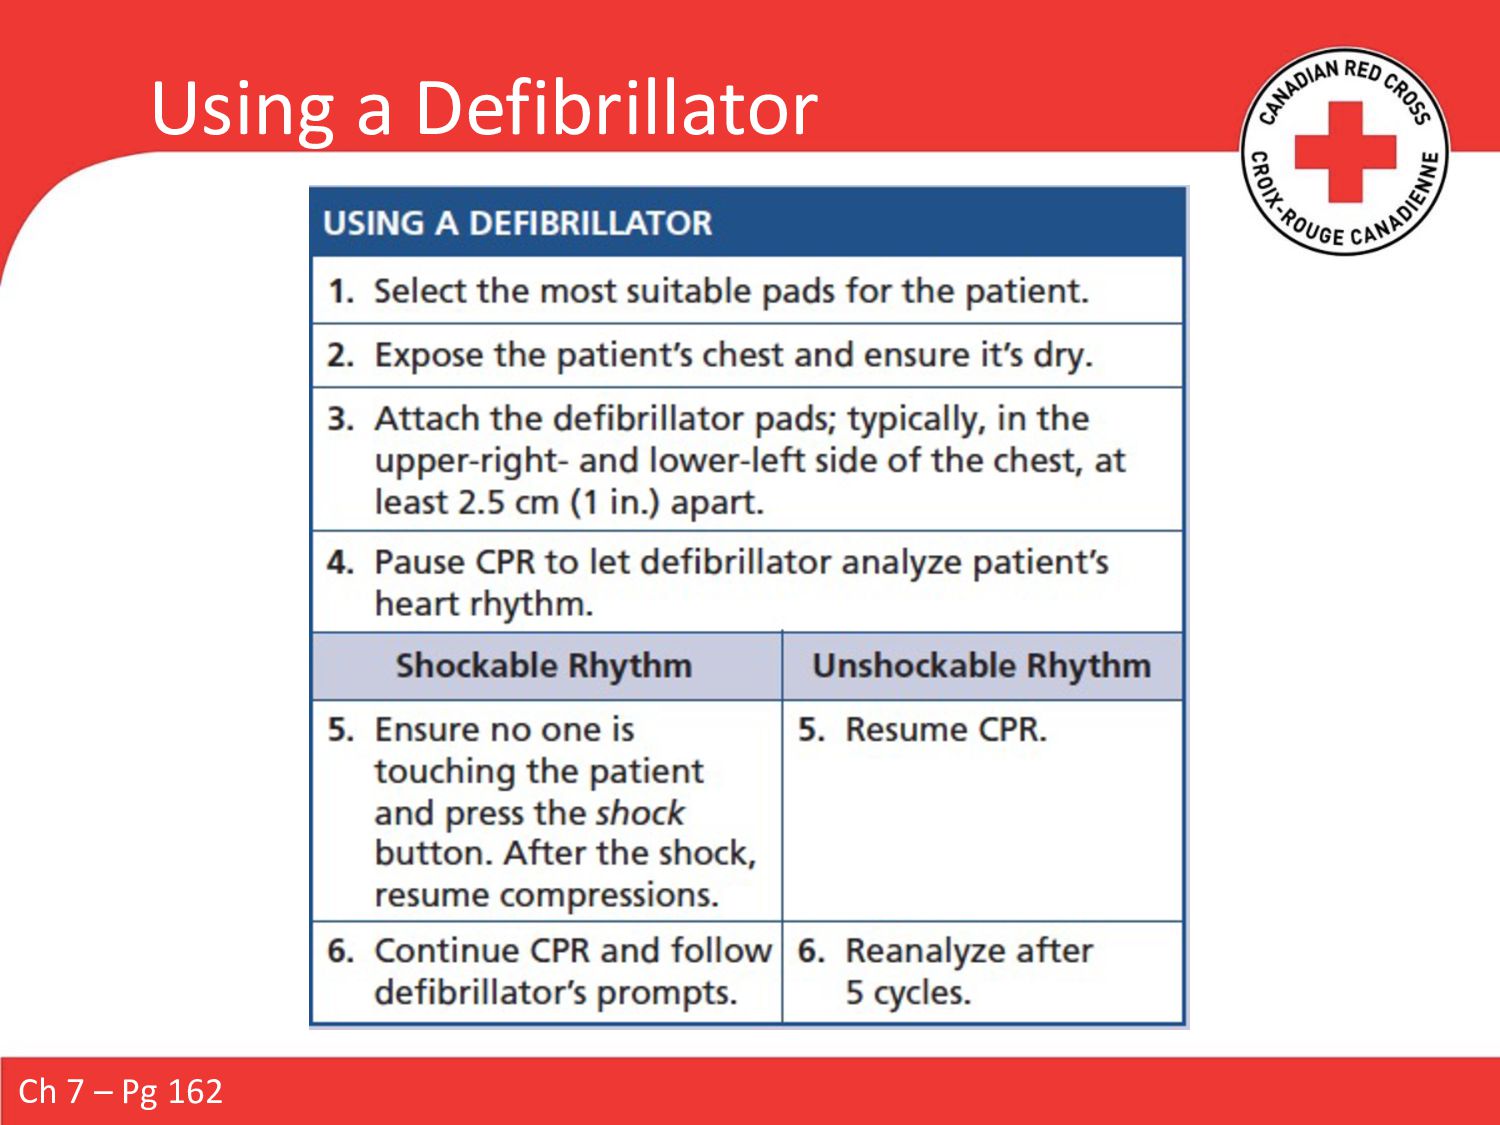
heart’s rhythm and deliver an electric shock. Only effective on shockable rhythms: • Ventricular tachycardia • Ventricular fibrillation Non-Shockable rhythms: • Normal sinus rhythm • Asystole Deploy immediately in case of cardiac arrest. One responder begins CPR while the second prepares the AED. Ch 7 – Pg 154
vehicle • In the presence of flammable materials • If someone is touching the patient • Special situations: • Pregnant person (prop under right hip) • Transdermal medication patches • Implanted pacemakers / cardioverters • Body jewelry • Trauma to the torso • Patients in water • Rain or snow • Child/Infant (small chest) • Neonatal Ch 7 – Pg 155-156
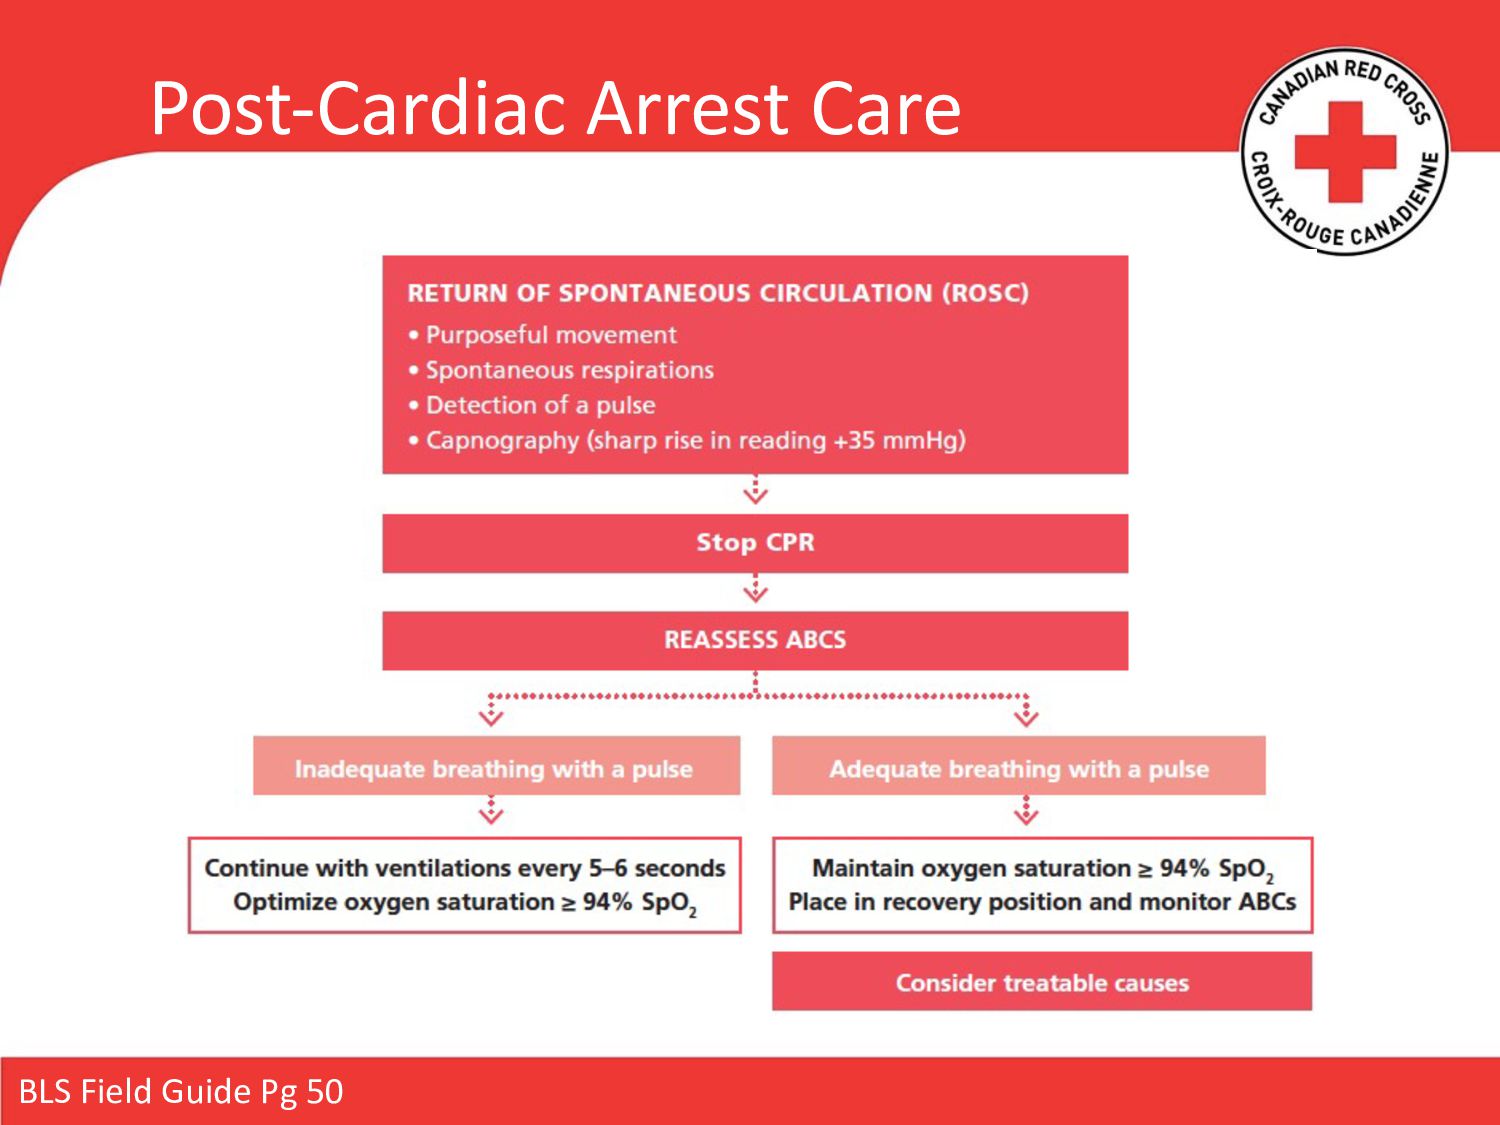
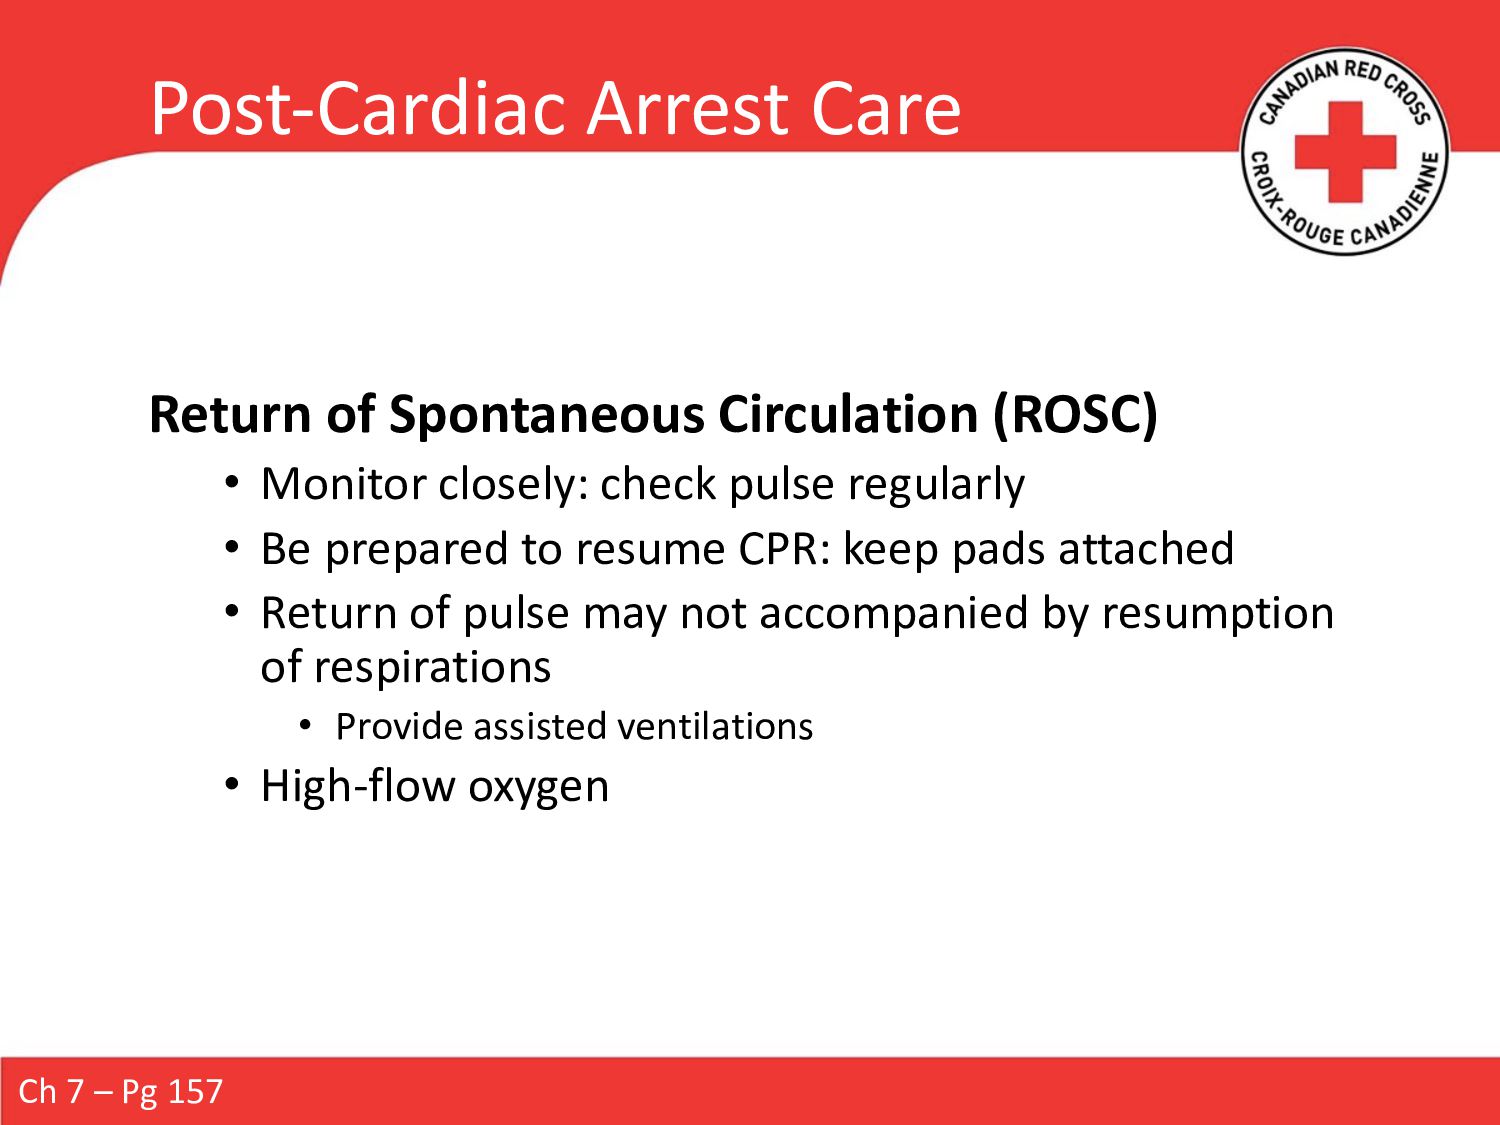
closely: check pulse regularly • Be prepared to resume CPR: keep pads attached • Return of pulse may not accompanied by resumption of respirations • Provide assisted ventilations • High-flow oxygen Ch 7 – Pg 157
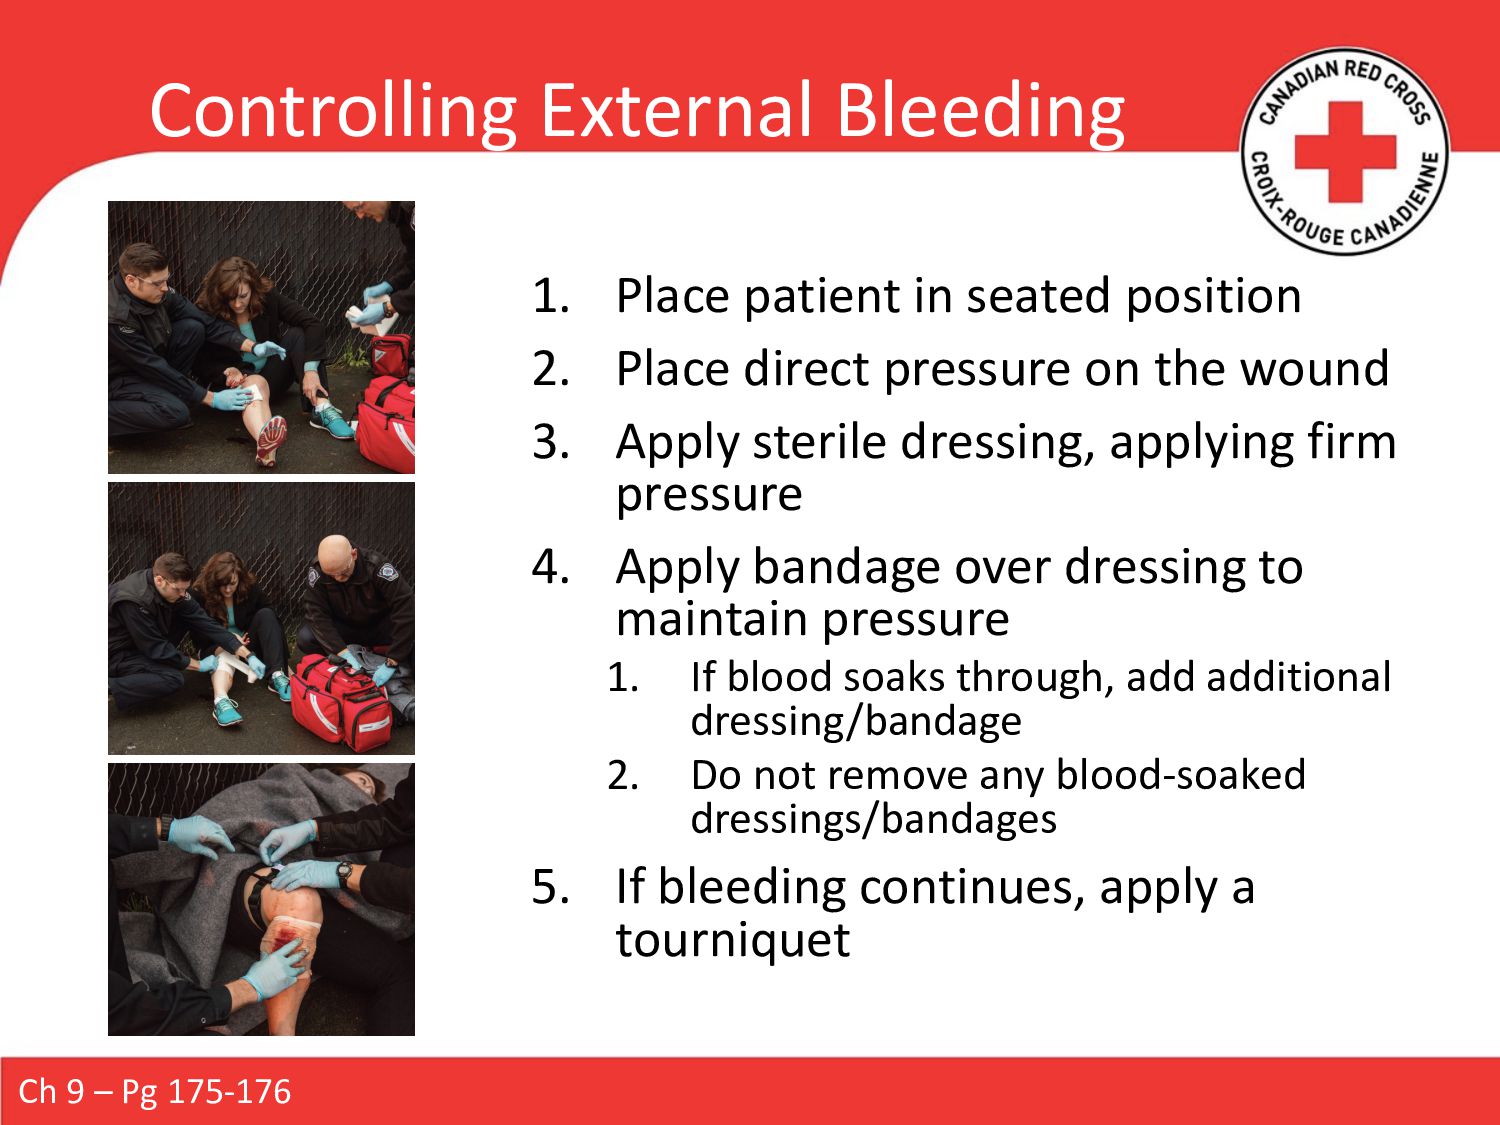
Place direct pressure on the wound 3. Apply sterile dressing, applying firm pressure 4. Apply bandage over dressing to maintain pressure 1. If blood soaks through, add additional dressing/bandage 2. Do not remove any blood-soaked dressings/bandages 5. If bleeding continues, apply a tourniquet Ch 9 – Pg 175-176
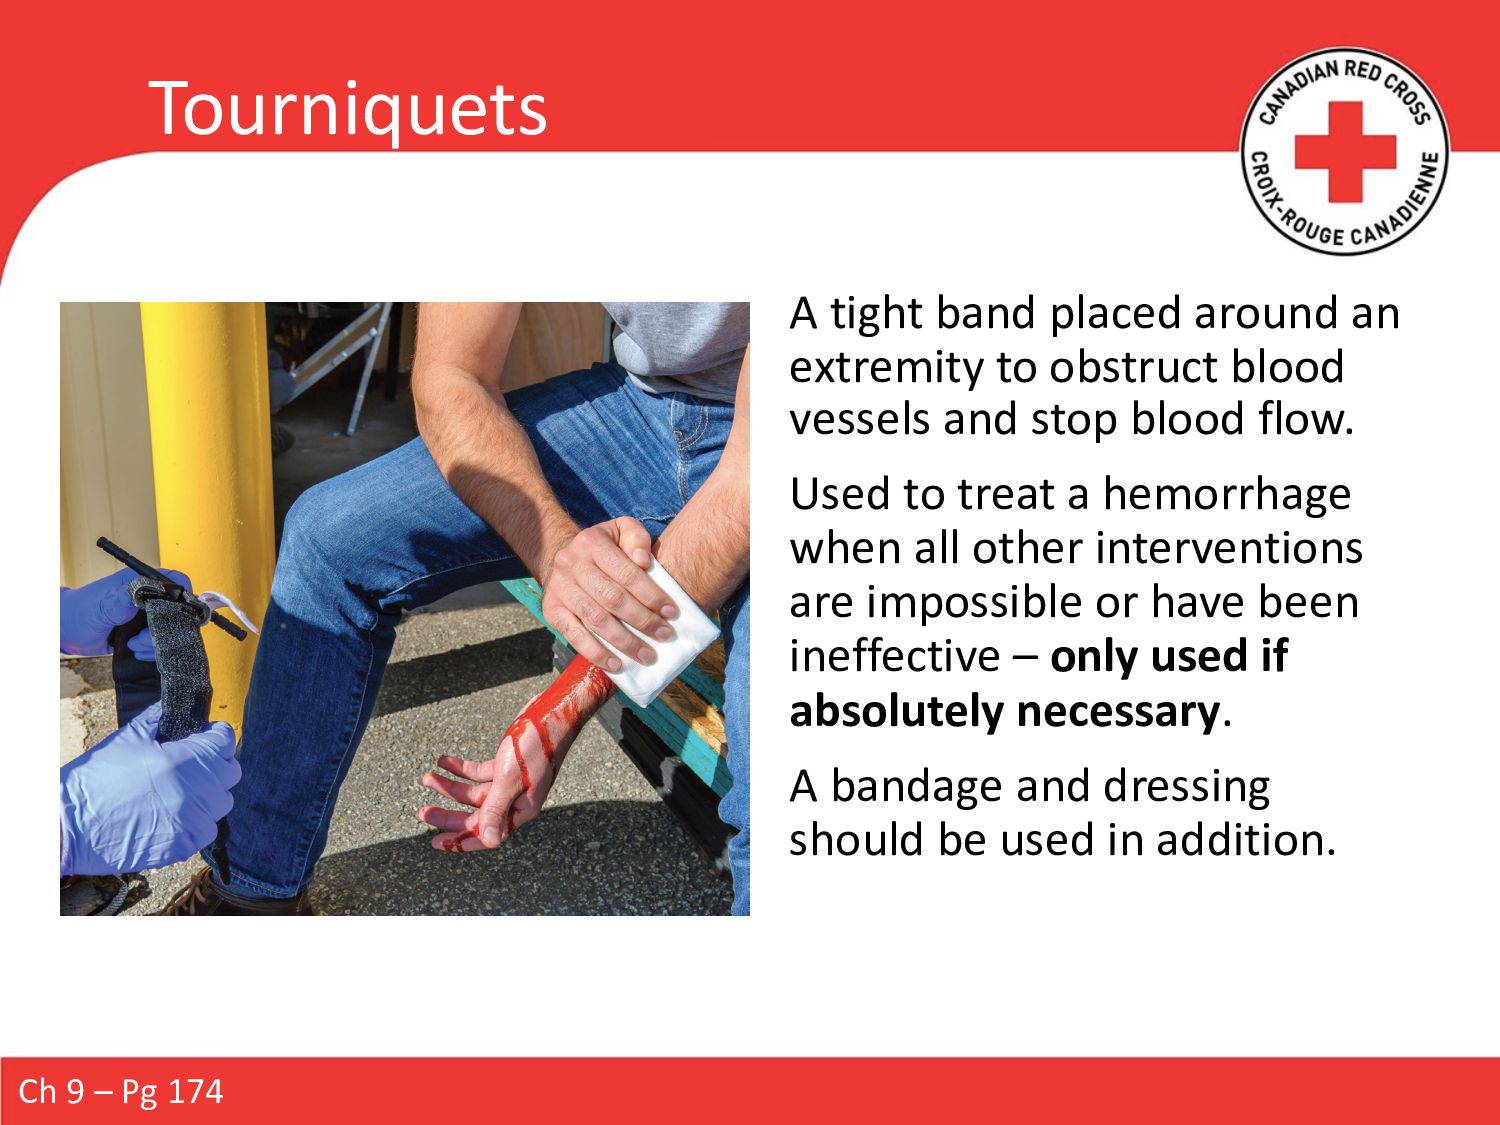
blood vessels and stop blood flow. Used to treat a hemorrhage when all other interventions are impossible or have been ineffective – only used if absolutely necessary. A bandage and dressing should be used in addition. Ch 9 – Pg 174
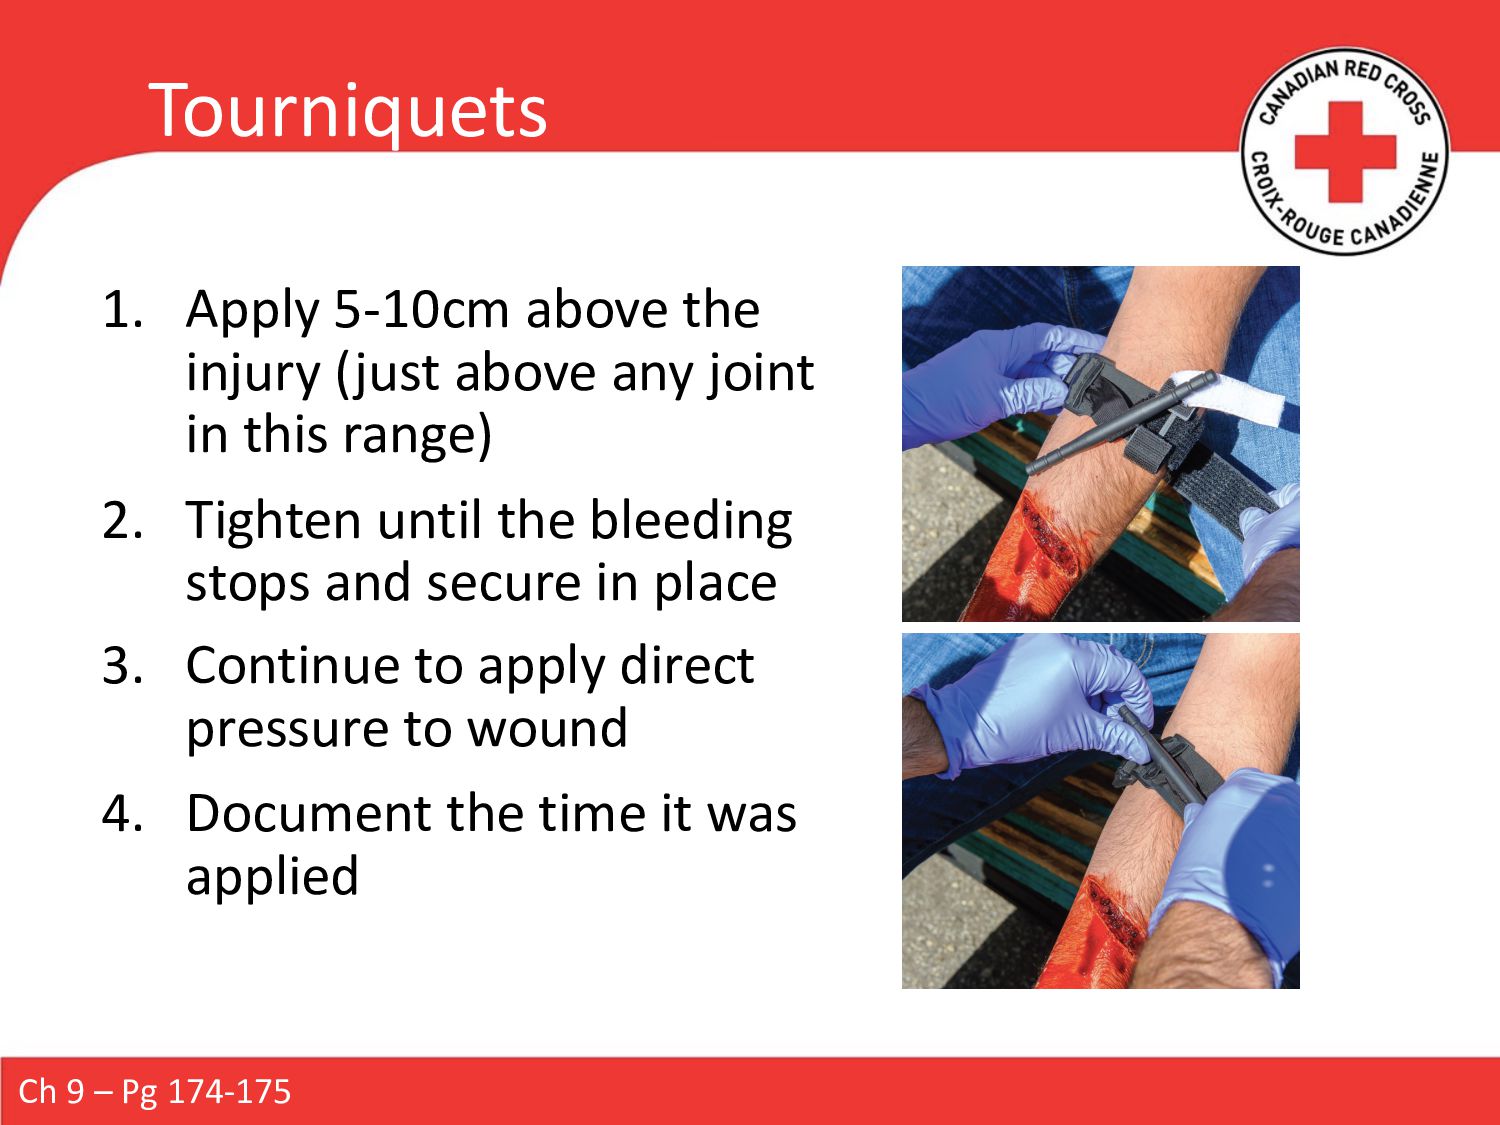
joint in this range) 2. Tighten until the bleeding stops and secure in place 3. Continue to apply direct pressure to wound 4. Document the time it was applied Ch 9 – Pg 174-175
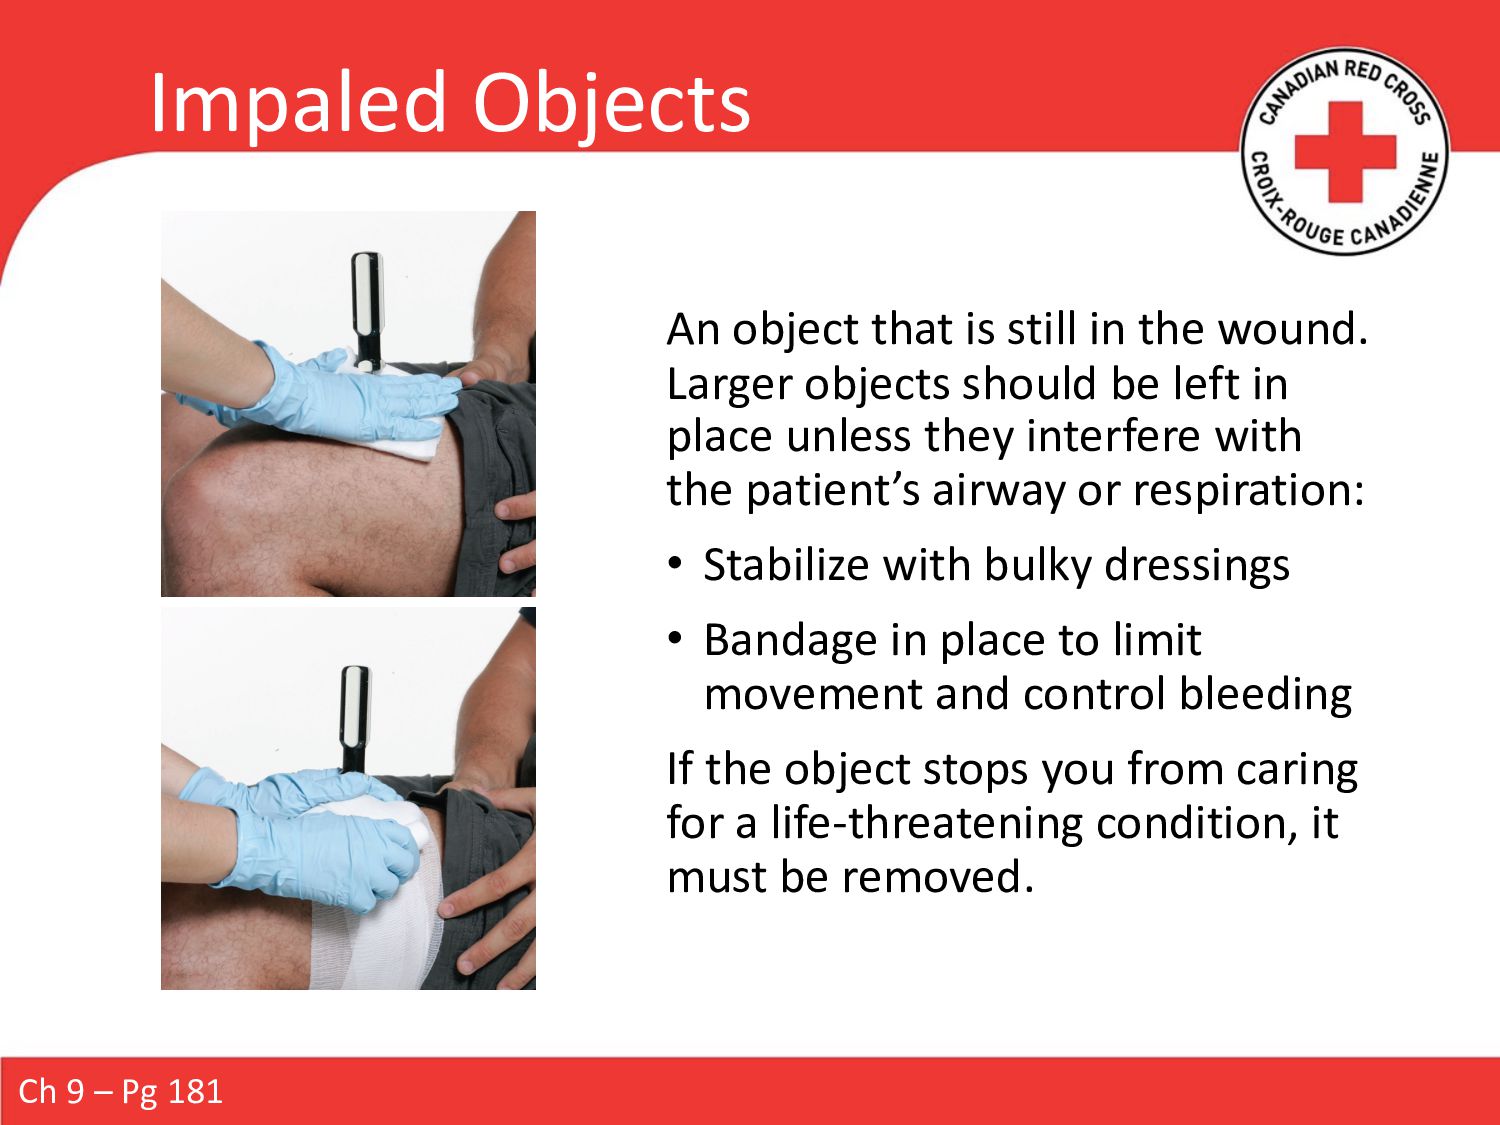
Larger objects should be left in place unless they interfere with the patient’s airway or respiration: • Stabilize with bulky dressings • Bandage in place to limit movement and control bleeding If the object stops you from caring for a life-threatening condition, it must be removed. Ch 9 – Pg 181
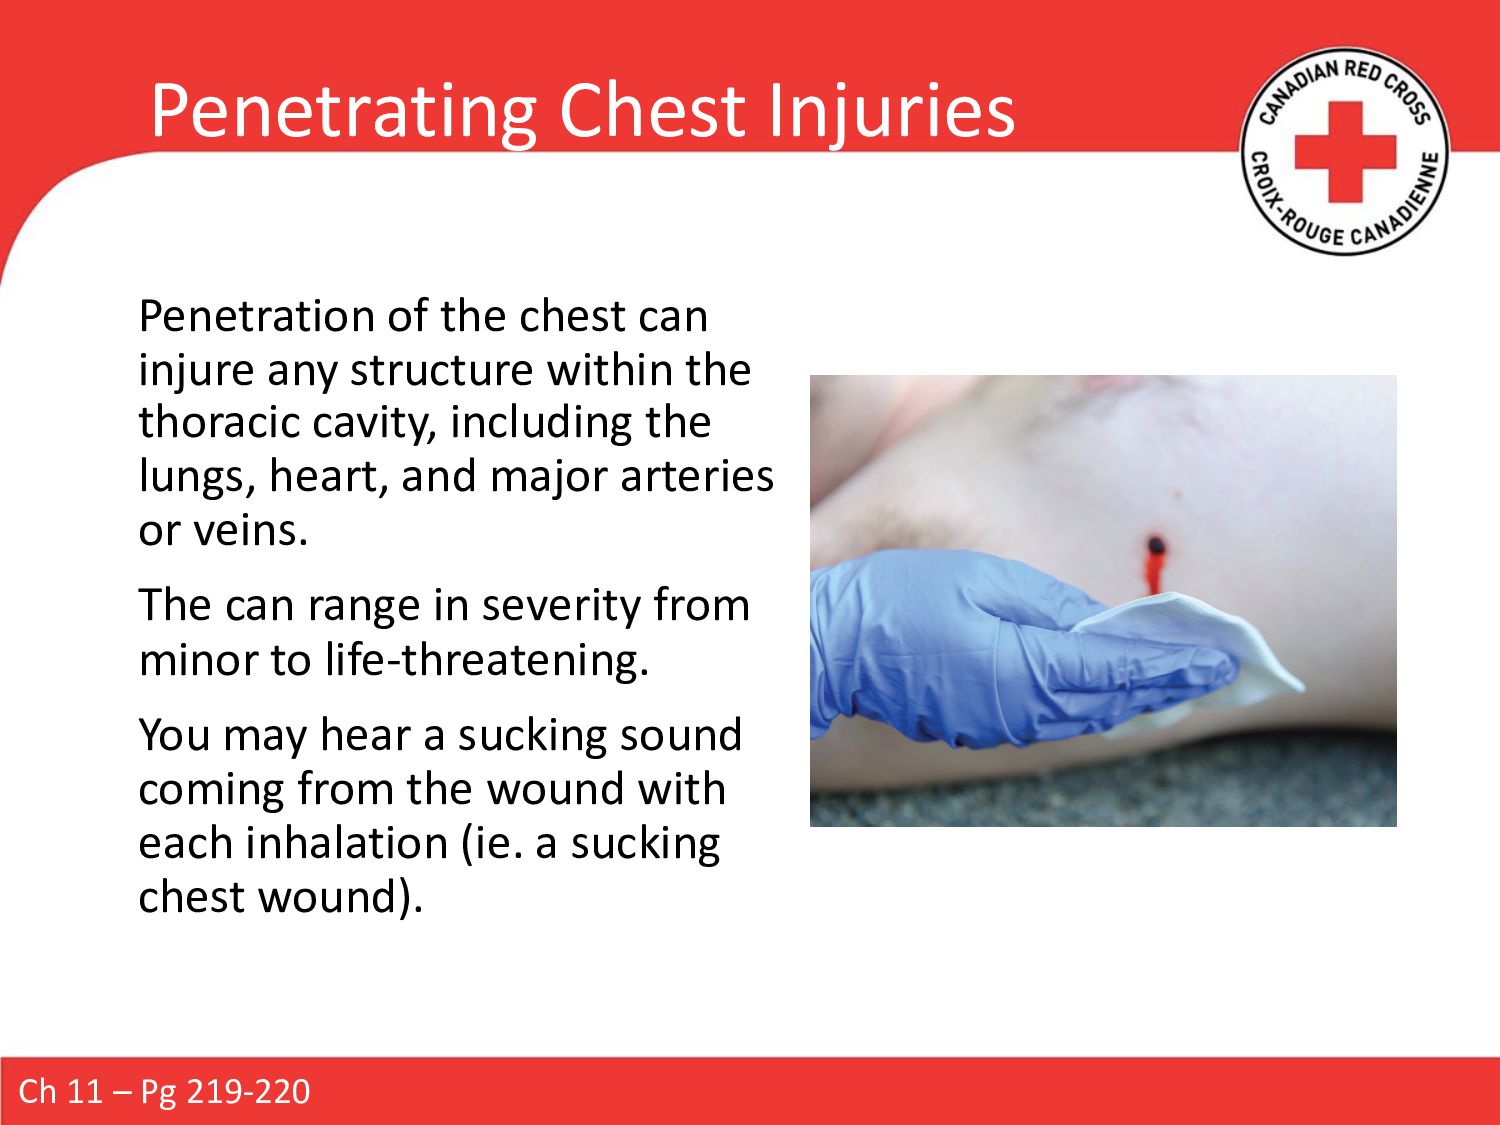
structure within the thoracic cavity, including the lungs, heart, and major arteries or veins. The can range in severity from minor to life-threatening. You may hear a sucking sound coming from the wound with each inhalation (ie. a sucking chest wound). Ch 11 – Pg 219-220
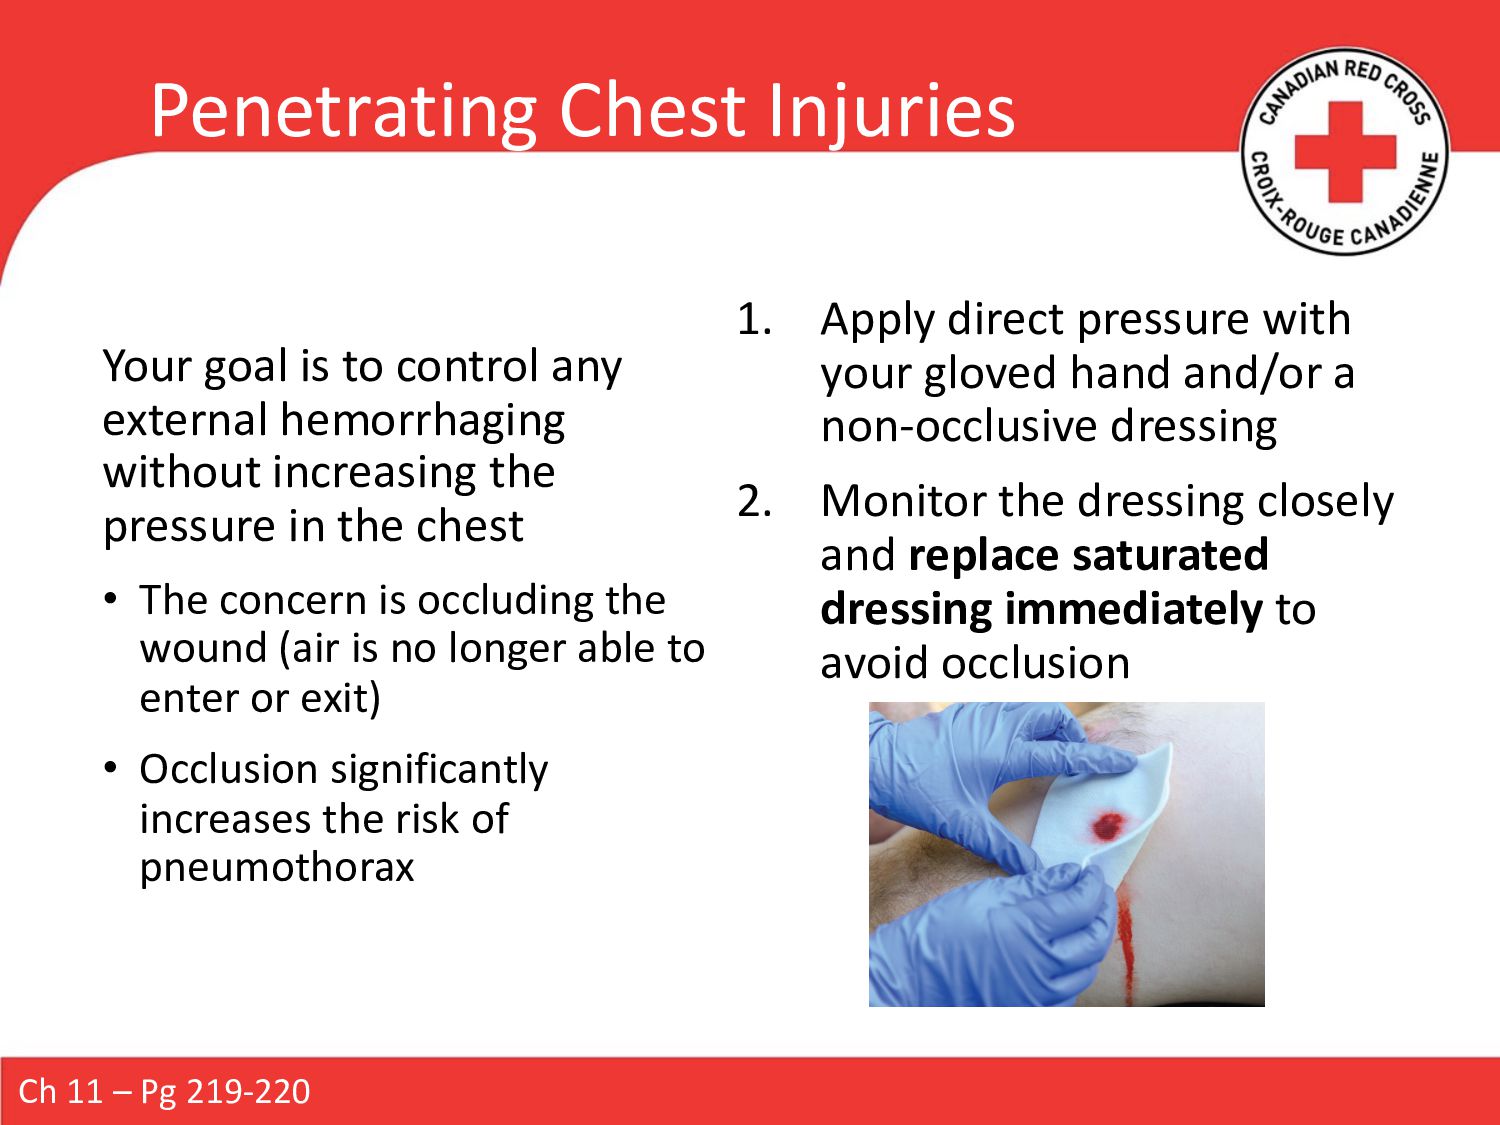
the pressure in the chest • The concern is occluding the wound (air is no longer able to enter or exit) • Occlusion significantly increases the risk of pneumothorax 1. Apply direct pressure with your gloved hand and/or a non-occlusive dressing 2. Monitor the dressing closely and replace saturated dressing immediately to avoid occlusion Ch 11 – Pg 219-220 Penetrating Chest Injuries
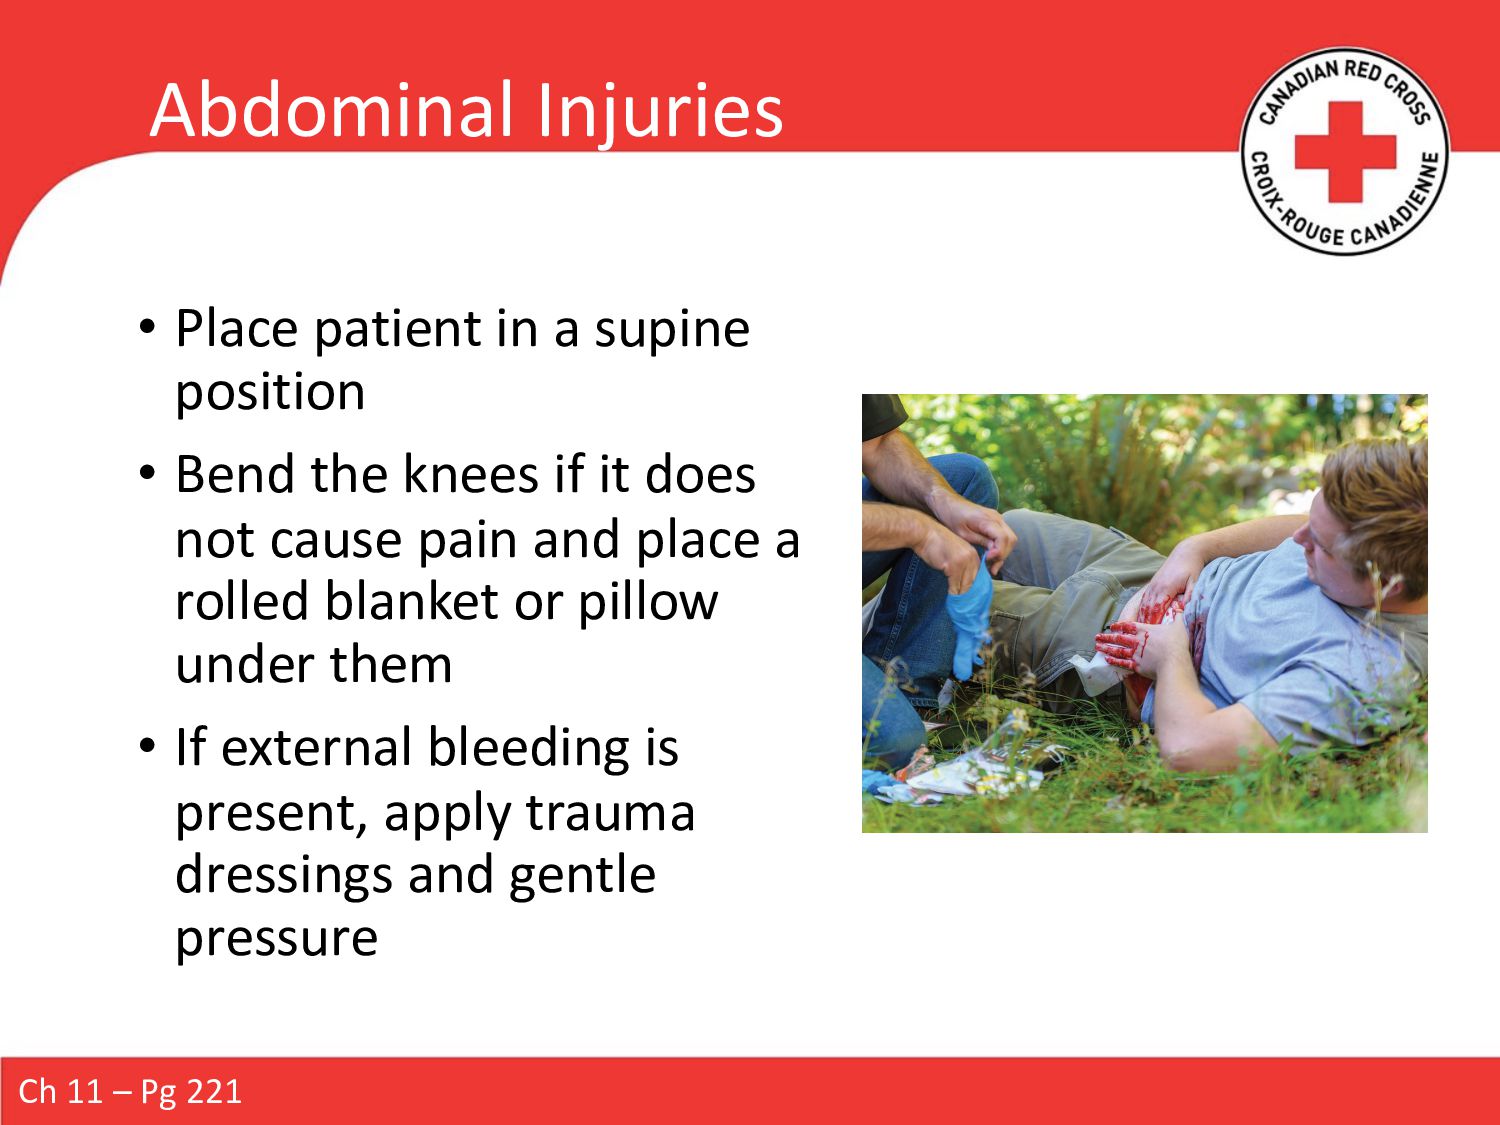
Bend the knees if it does not cause pain and place a rolled blanket or pillow under them • If external bleeding is present, apply trauma dressings and gentle pressure Ch 11 – Pg 221
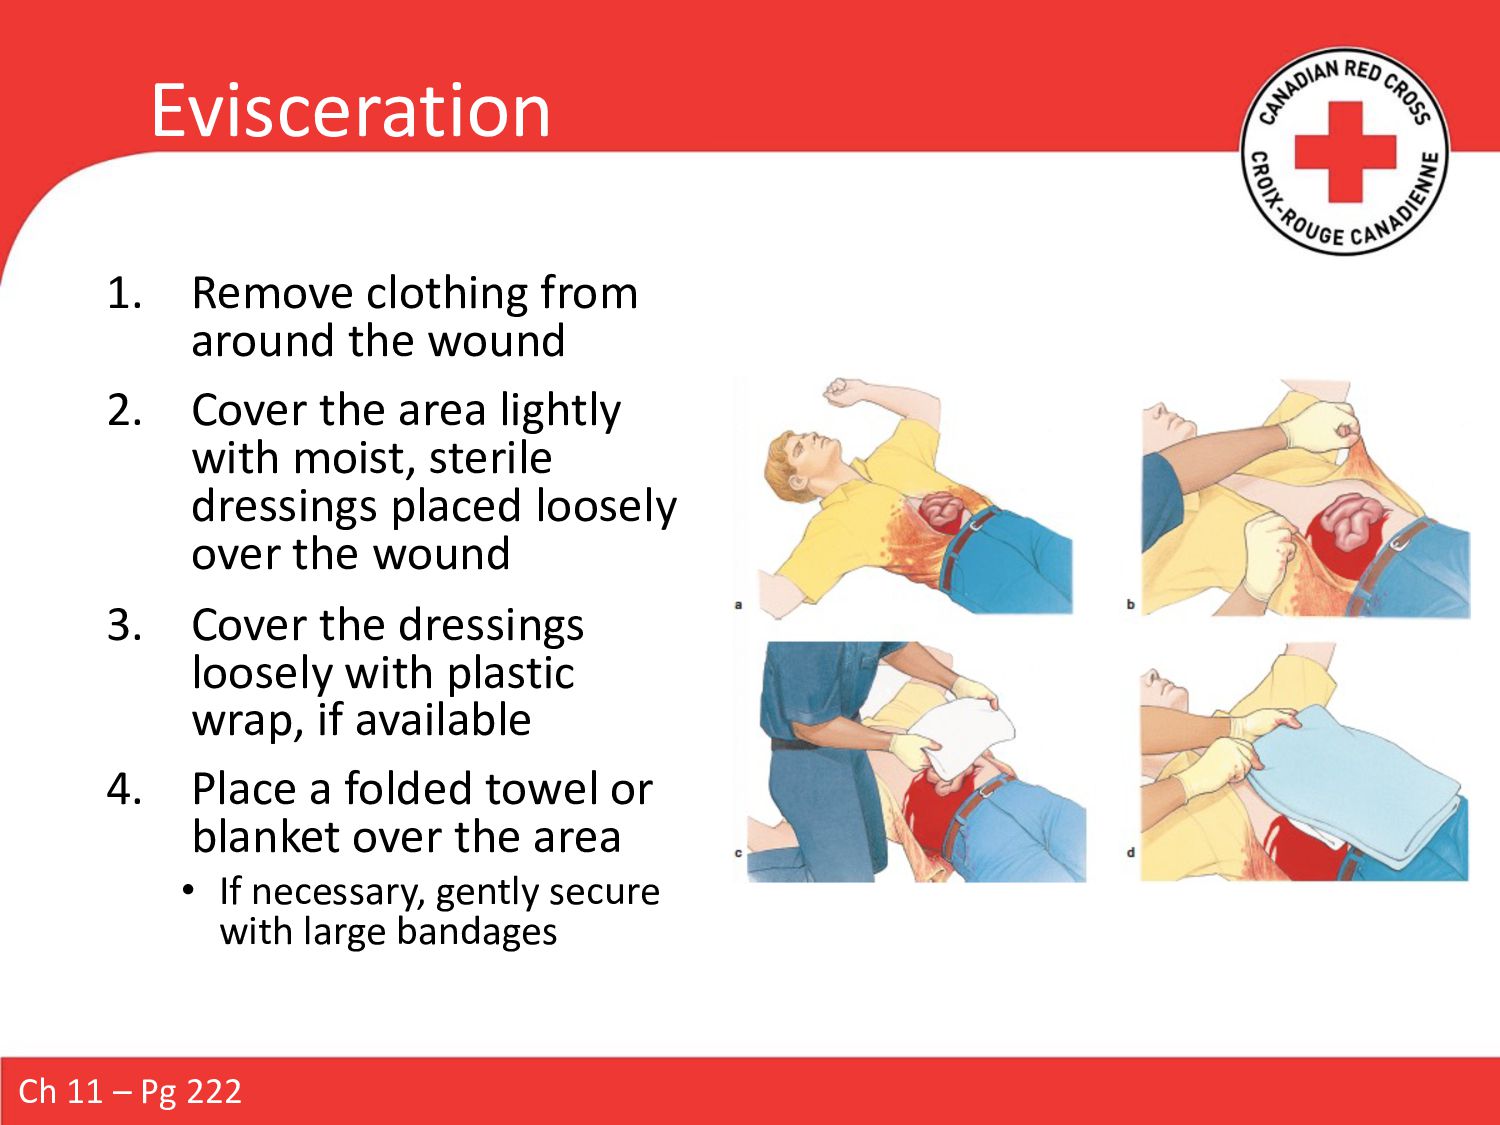
the area lightly with moist, sterile dressings placed loosely over the wound 3. Cover the dressings loosely with plastic wrap, if available 4. Place a folded towel or blanket over the area • If necessary, gently secure with large bandages Ch 11 – Pg 222
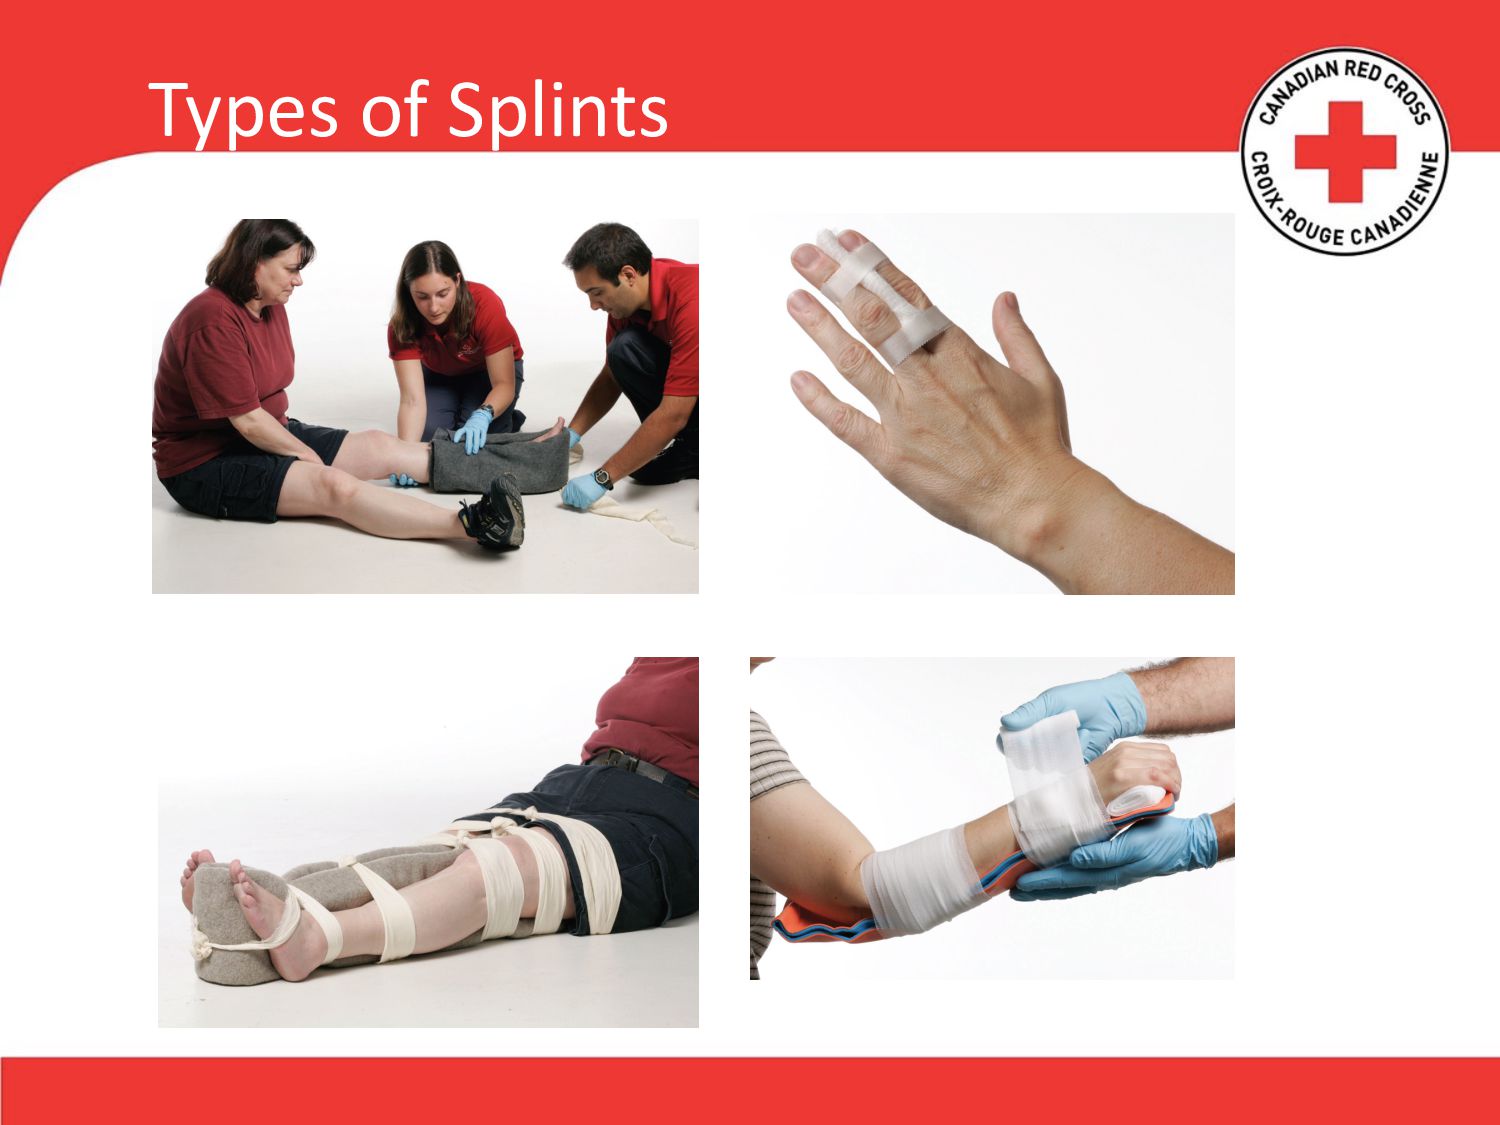
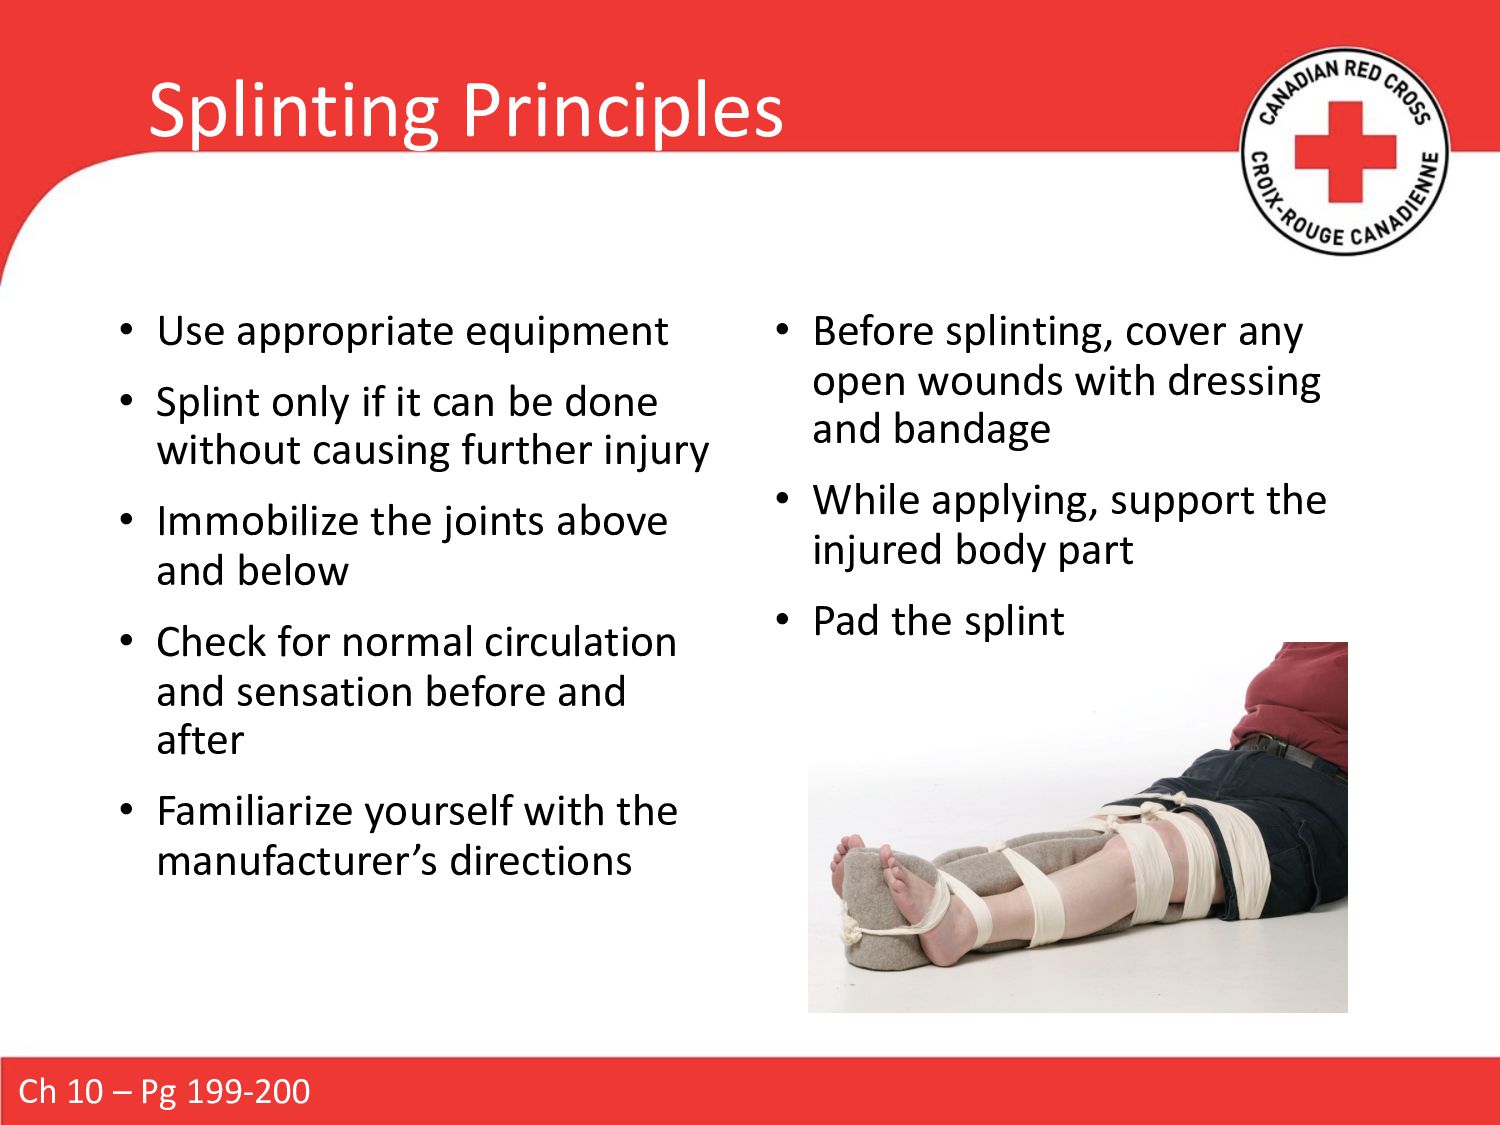
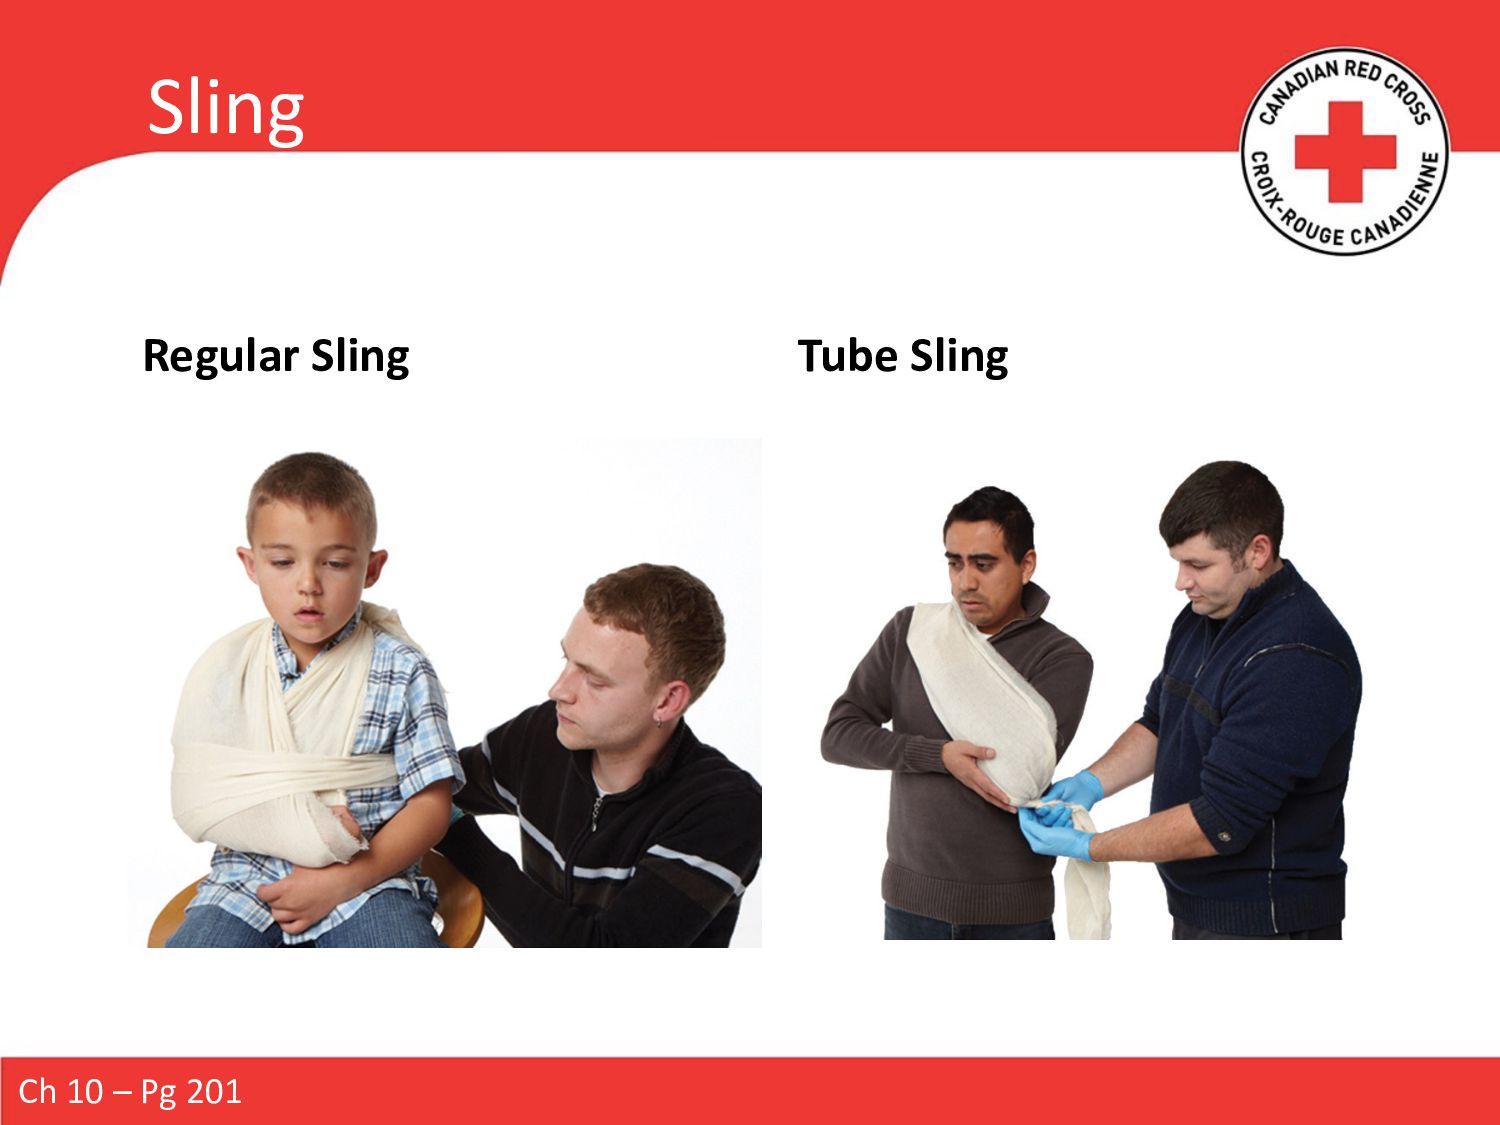
it can be done without causing further injury • Immobilize the joints above and below • Check for normal circulation and sensation before and after • Familiarize yourself with the manufacturer’s directions • Before splinting, cover any open wounds with dressing and bandage • While applying, support the injured body part • Pad the splint Ch 10 – Pg 199-200
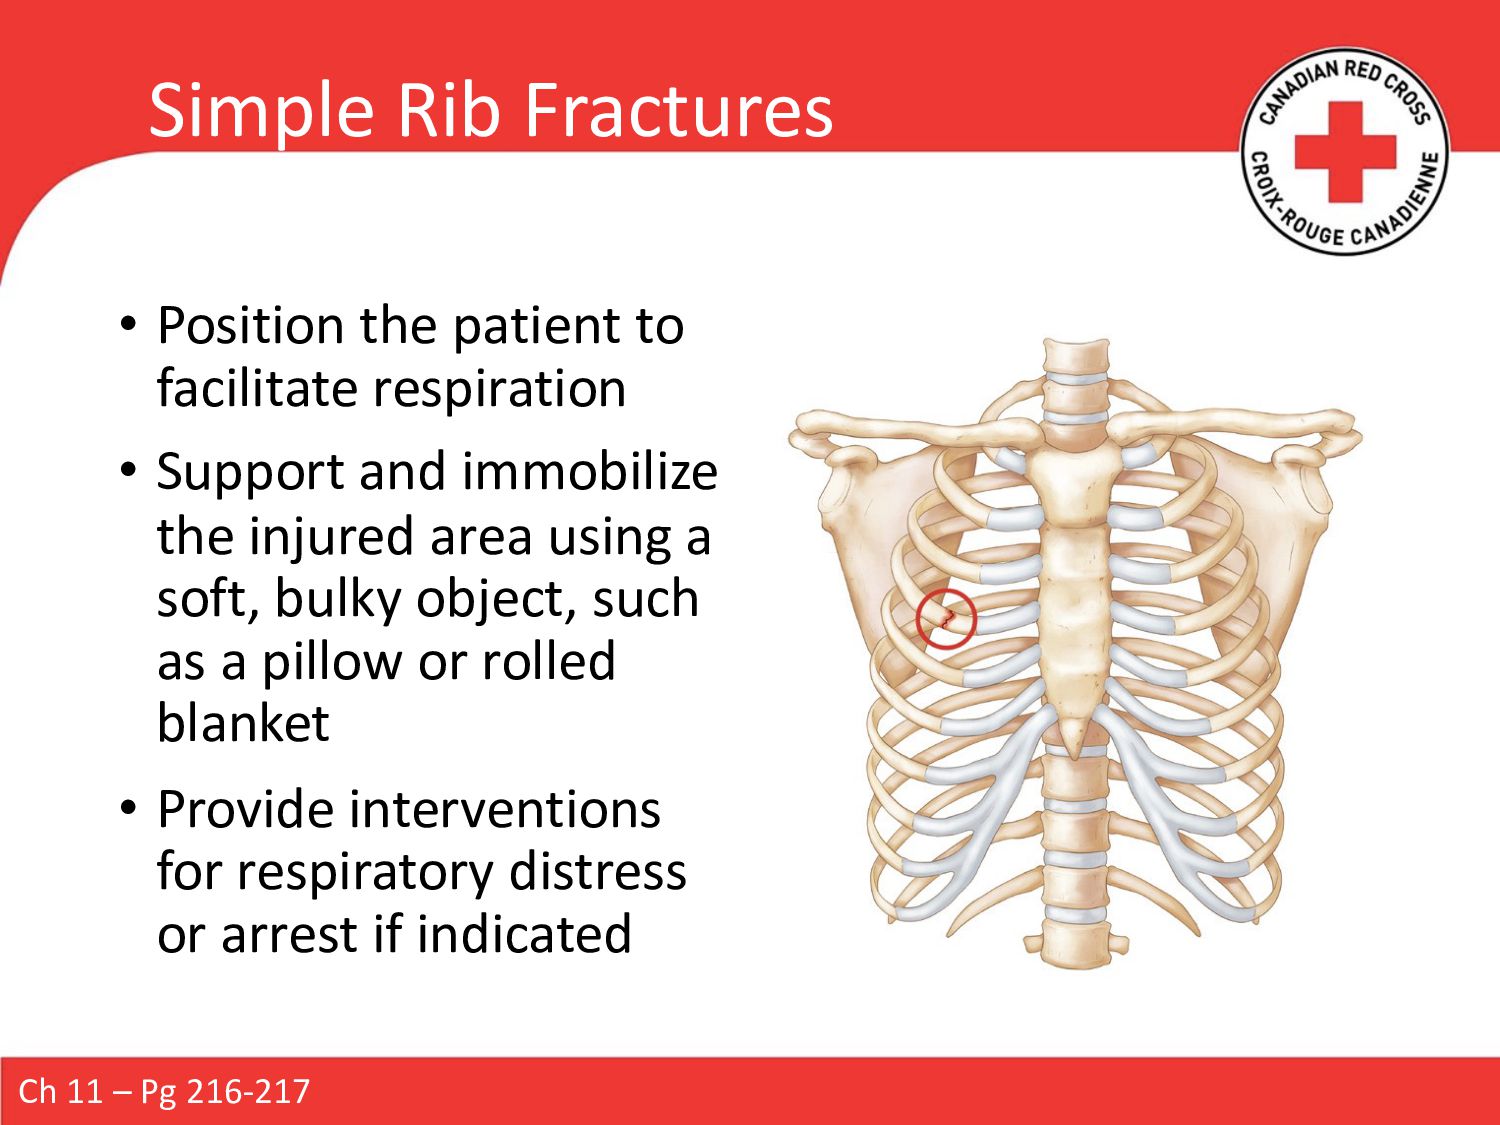
• Support and immobilize the injured area using a soft, bulky object, such as a pillow or rolled blanket • Provide interventions for respiratory distress or arrest if indicated Ch 11 – Pg 216-217
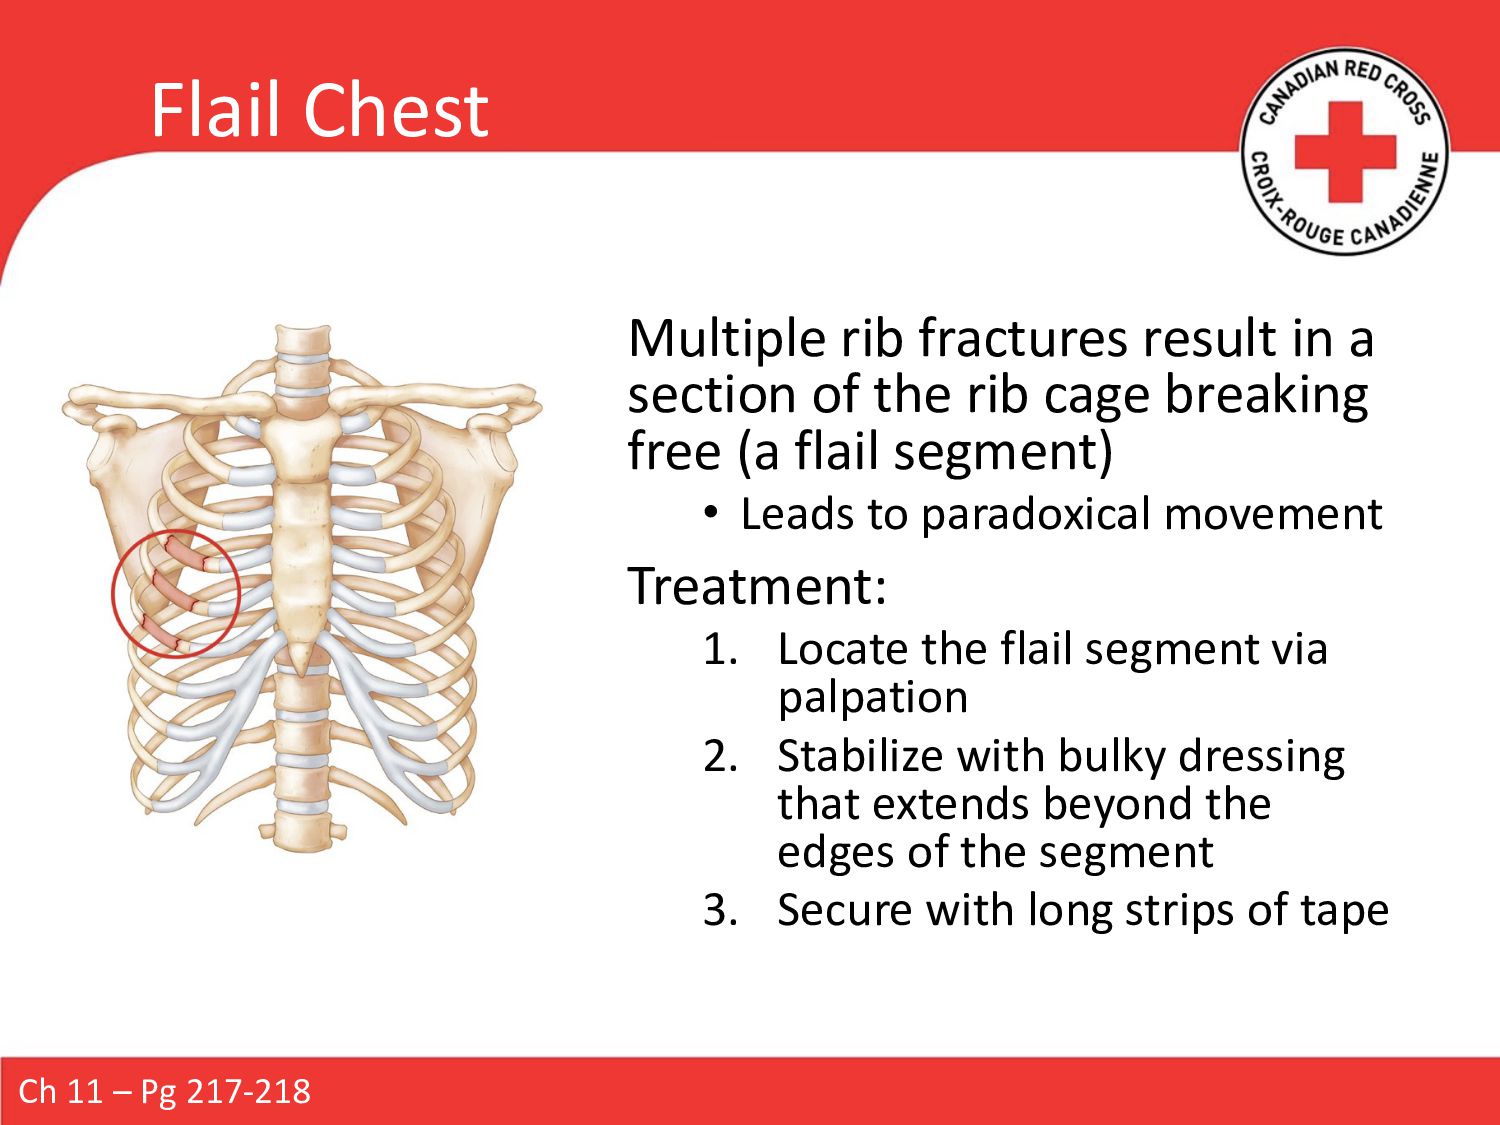
the rib cage breaking free (a flail segment) • Leads to paradoxical movement Treatment: 1. Locate the flail segment via palpation 2. Stabilize with bulky dressing that extends beyond the edges of the segment 3. Secure with long strips of tape Ch 11 – Pg 217-218
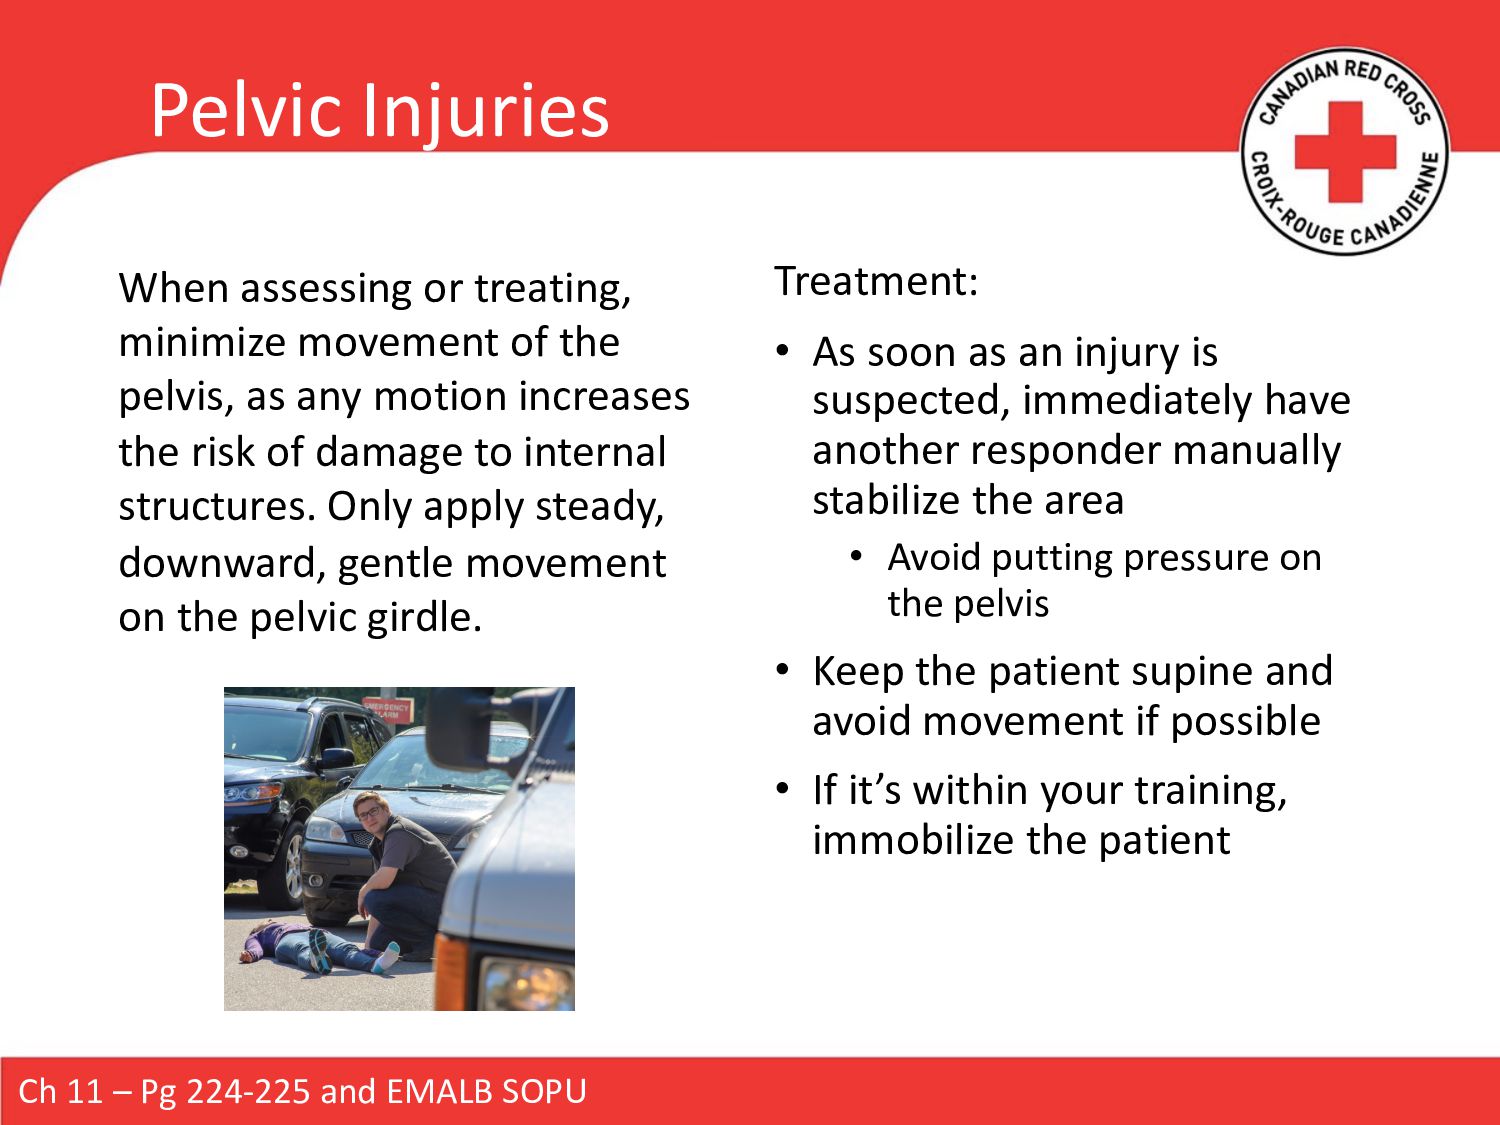
suspected, immediately have another responder manually stabilize the area • Avoid putting pressure on the pelvis • Keep the patient supine and avoid movement if possible • If it’s within your training, immobilize the patient Ch 11 – Pg 224-225 and EMALB SOPU When assessing or treating, minimize movement of the pelvis, as any motion increases the risk of damage to internal structures. Only apply steady, downward, gentle movement on the pelvic girdle.
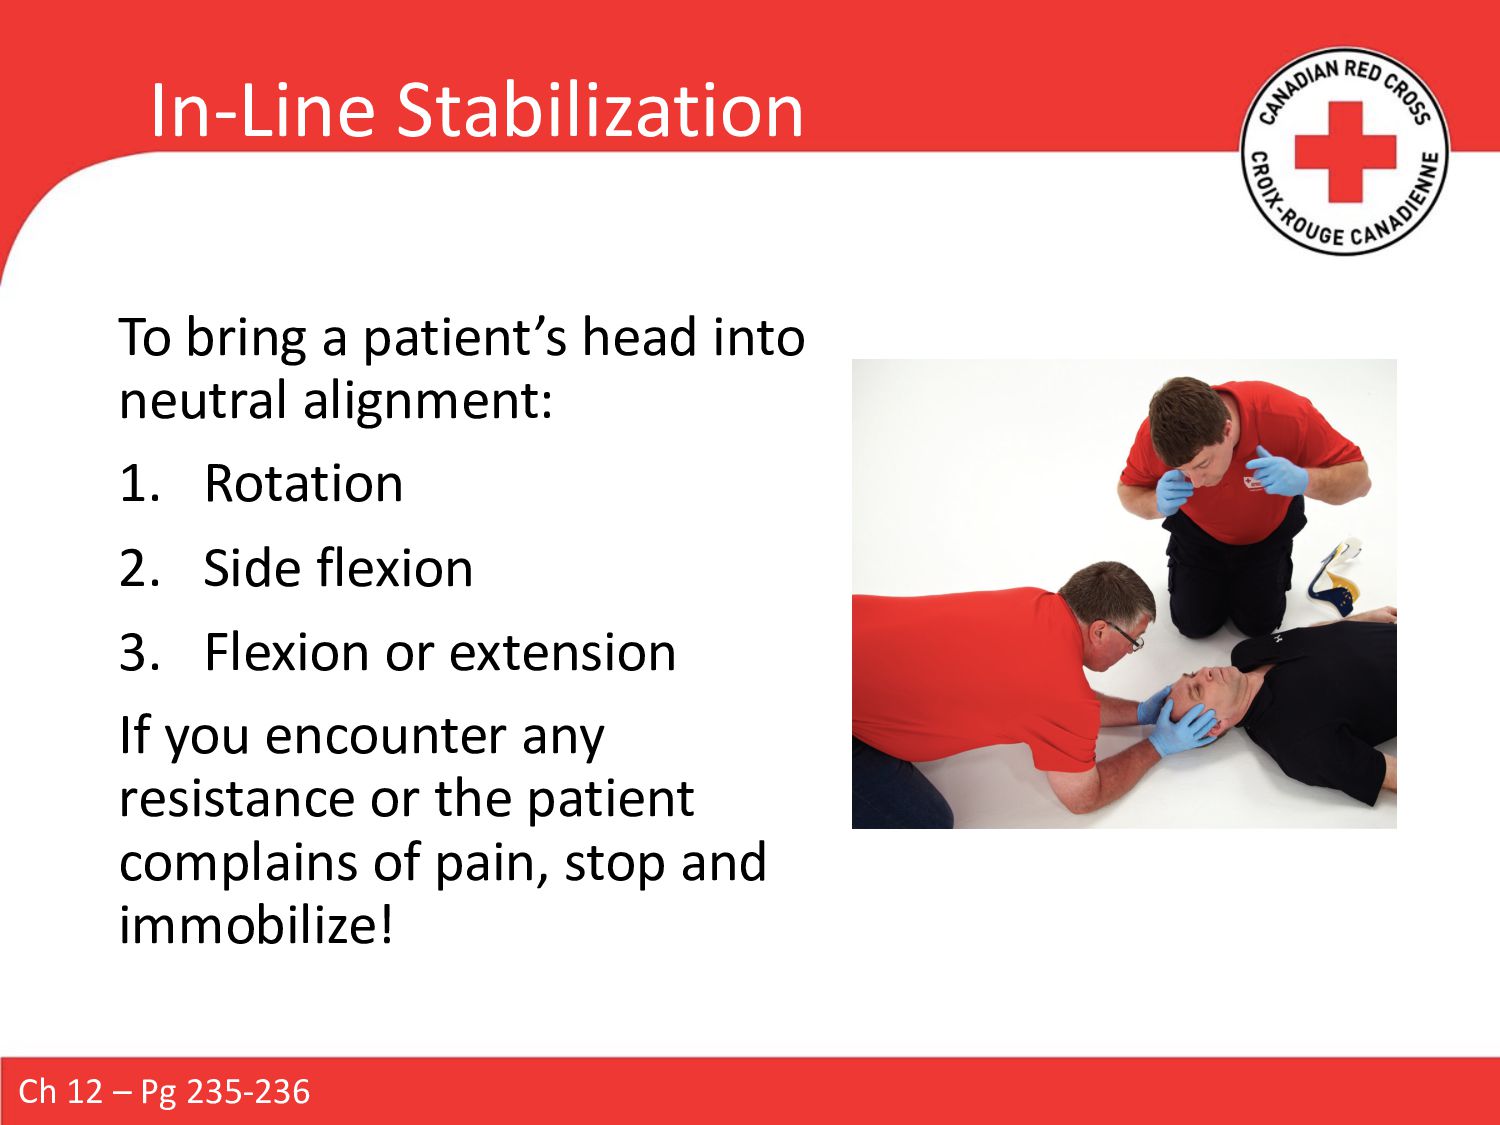
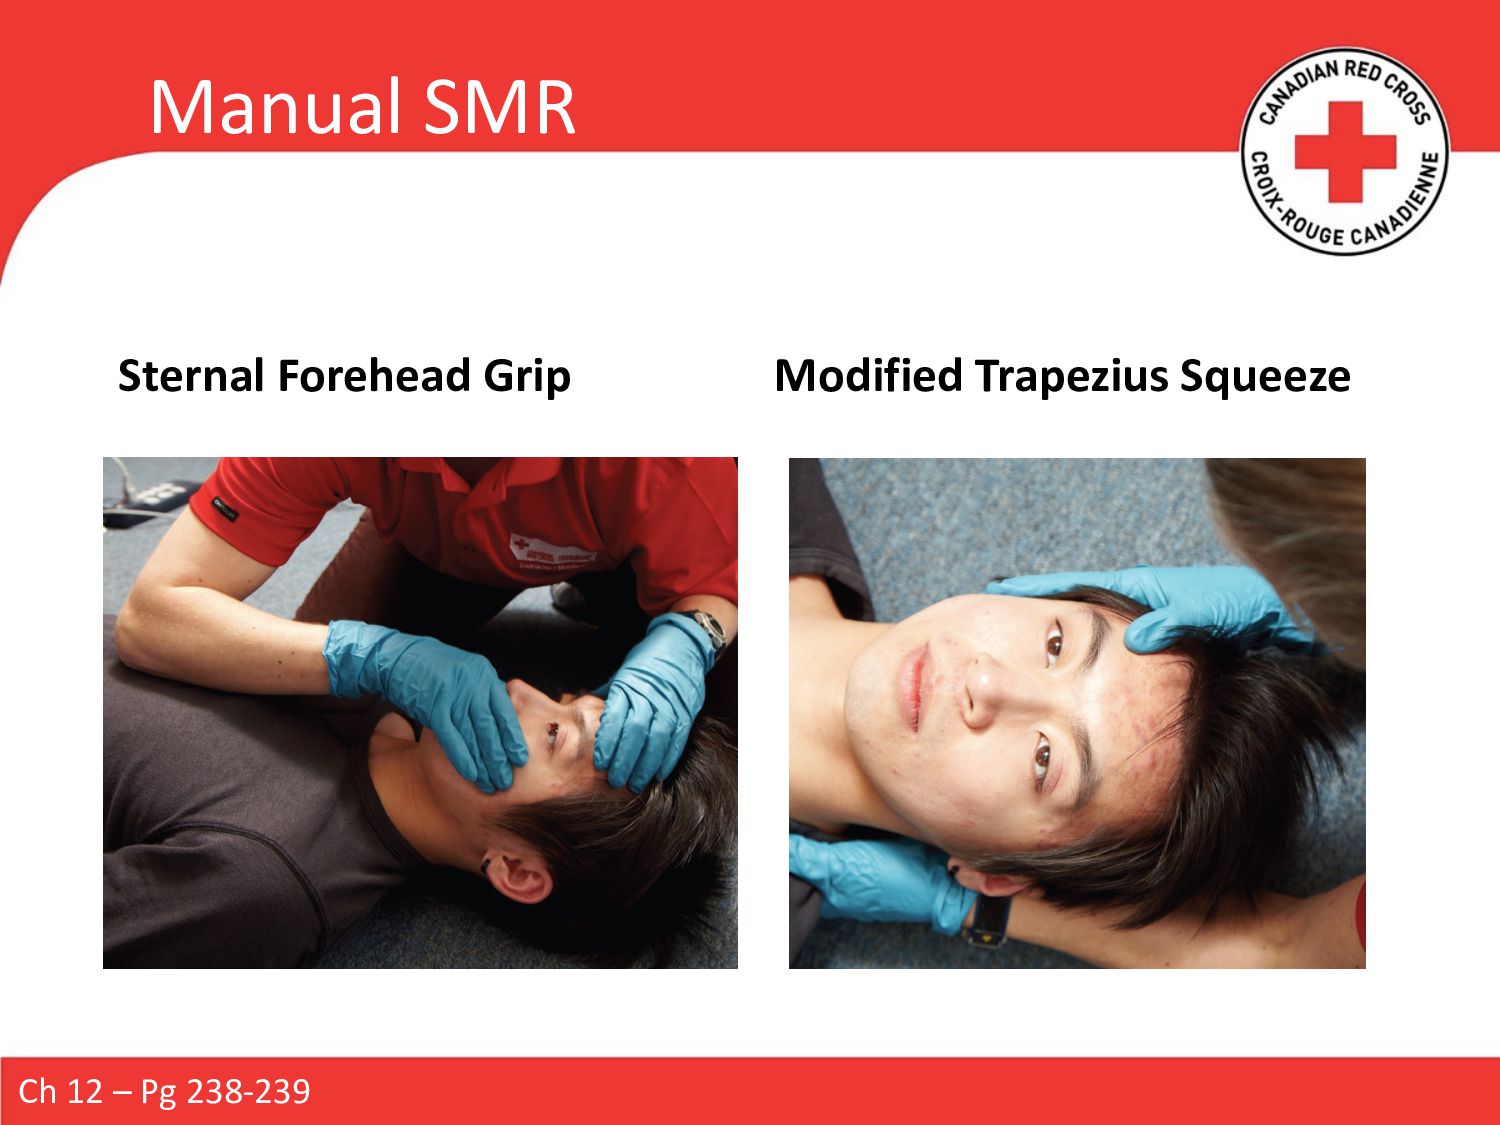
1. Rotation 2. Side flexion 3. Flexion or extension If you encounter any resistance or the patient complains of pain, stop and immobilize! Ch 12 – Pg 235-236
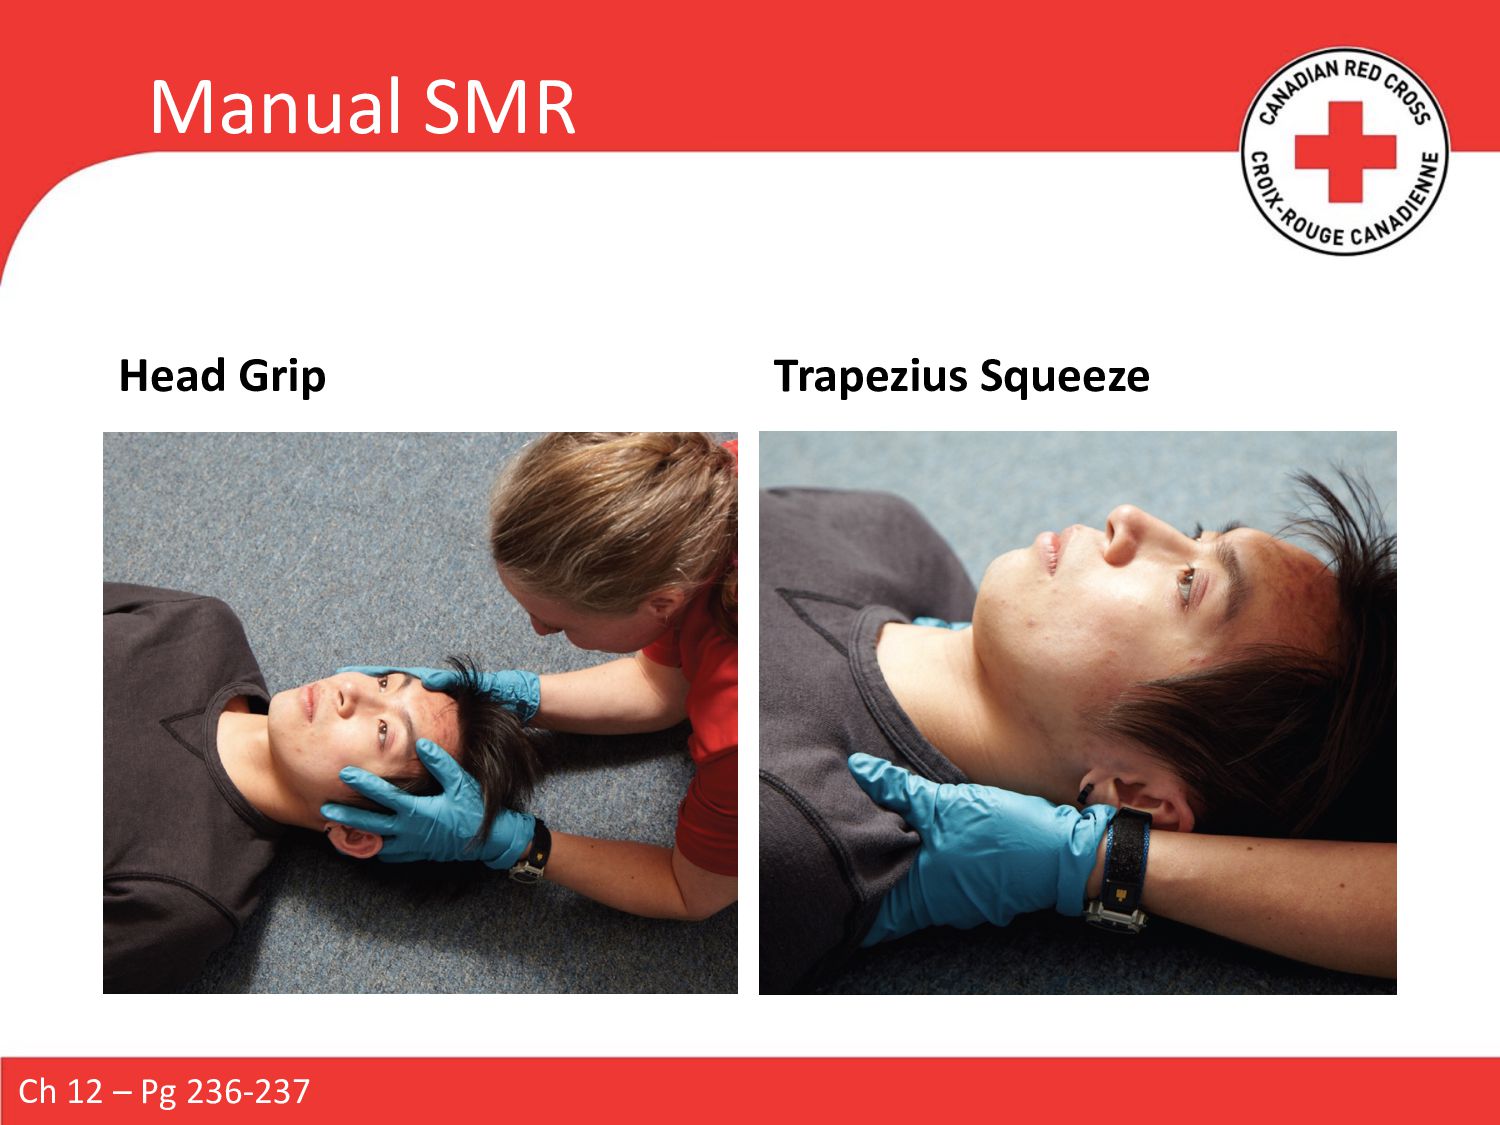
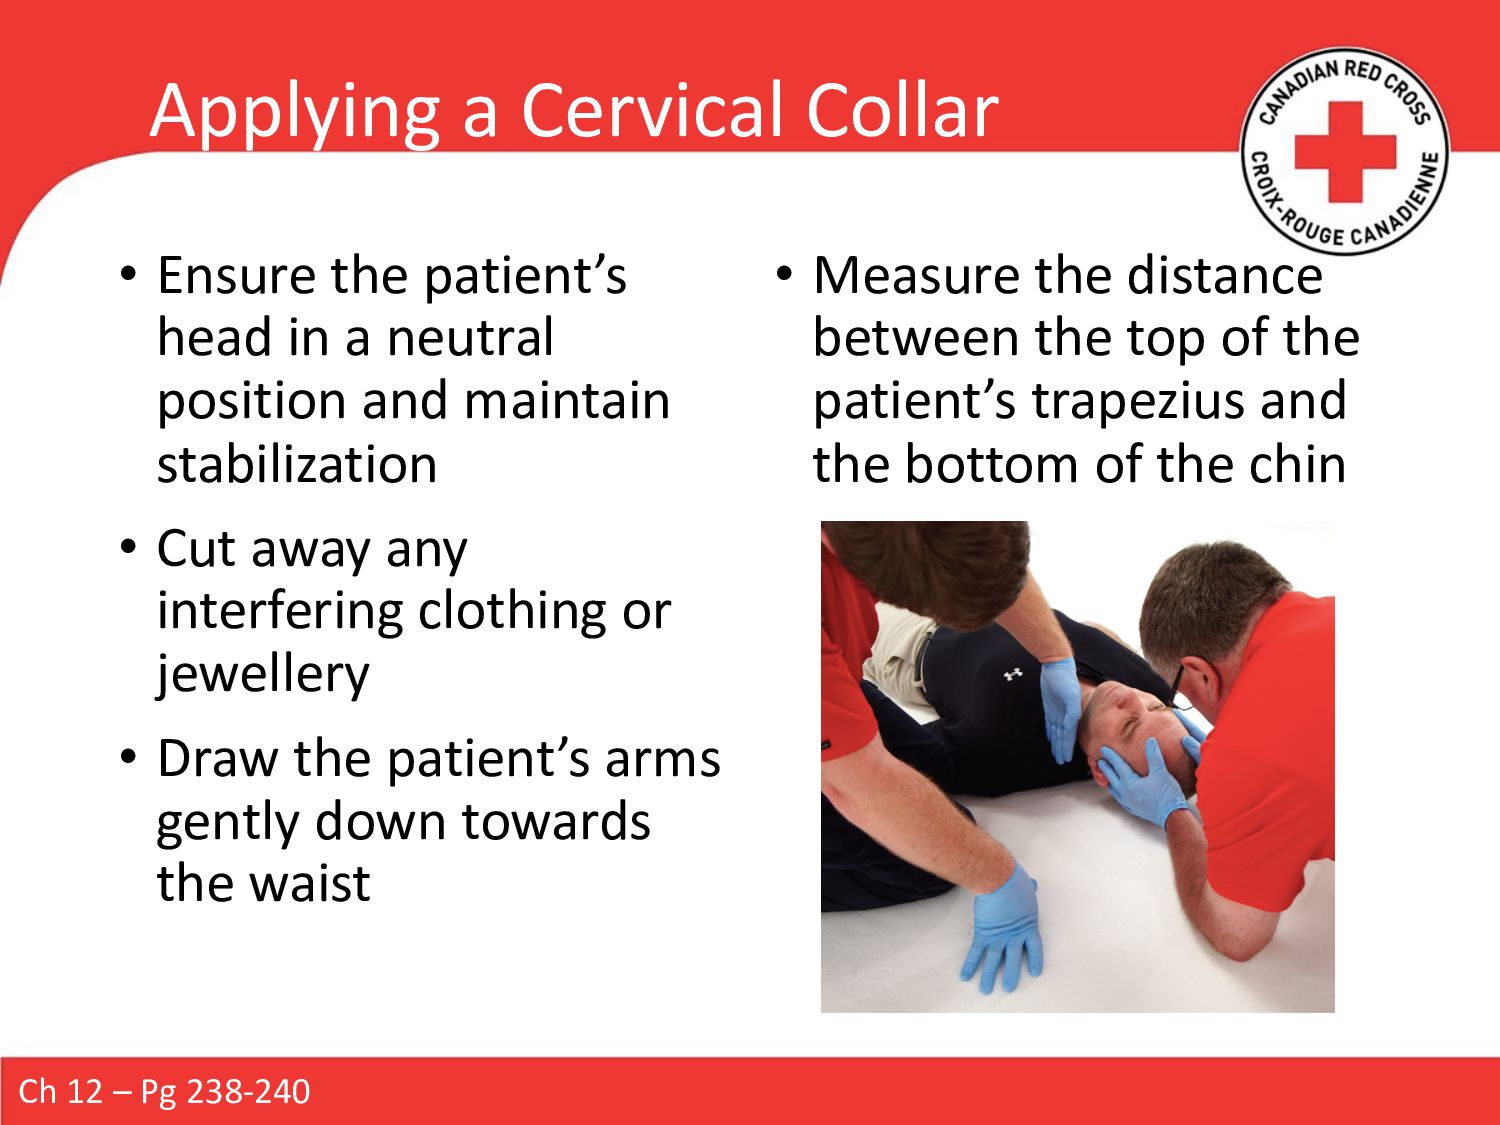
a neutral position and maintain stabilization • Cut away any interfering clothing or jewellery • Draw the patient’s arms gently down towards the waist • Measure the distance between the top of the patient’s trapezius and the bottom of the chin Ch 12 – Pg 238-240
and slide the strap end towards the back of the neck • Position the front of the collar beneath the patient’s chin • The chin piece should rest snugly beneath the chin, supporting it gently • The lower position of the collar should be centred and resting on the sternum • Reach carefully behind the neck to grasp the end of the strap and draw it around the back of the neck • Secure the collar with the strap • Visually check to make sure the collar is correctly paced and fitted properly • If the patient is responsive, ensure they can breathe normally • Maintain SMR until the patient is fully secured to a board Ch 12 – Pg 238-240