Upgrade to Pro — share decks privately, control downloads, hide ads and more …

IoT: internet of things with python

IoT: internet of things with python

Full stack home automation development with python: from micropython on esp 8266 to Home Assistant.

Lelio Campanile

April 21, 2018
Tweet

More Decks by Lelio Campanile

Other Decks in Programming

Transcript

  1. HI THERE, I’M LELIO CAMPANILE WORK AT UNICAMPANIA.IT TEACHER AT

    APPLE FOUNDATION COURSE FOR UNICAMPANIA. Follow me: @lelioc www.leliocampanile.it
  2. WHAT IS MICROPYTHON? Micropython is a lean and efficient implementation

    of Python 3 programming language. Python on bare metal! Open source project on github https://github.com/ micropython/micropython
  3. FEATURES ▸ Support for many architectures ▸ Mostly compatible with

    normal python syntax ▸ Fit in 256Kb of code space and 16Kb of RAM ▸ Interactive prompt for easy development (REPL) ▸ Python hardware-specific modules
  4. MICROPYTHON ON ESP 8266 (NODEMCU) firmware for ESP8266 from http://micropython.org/download#esp8266

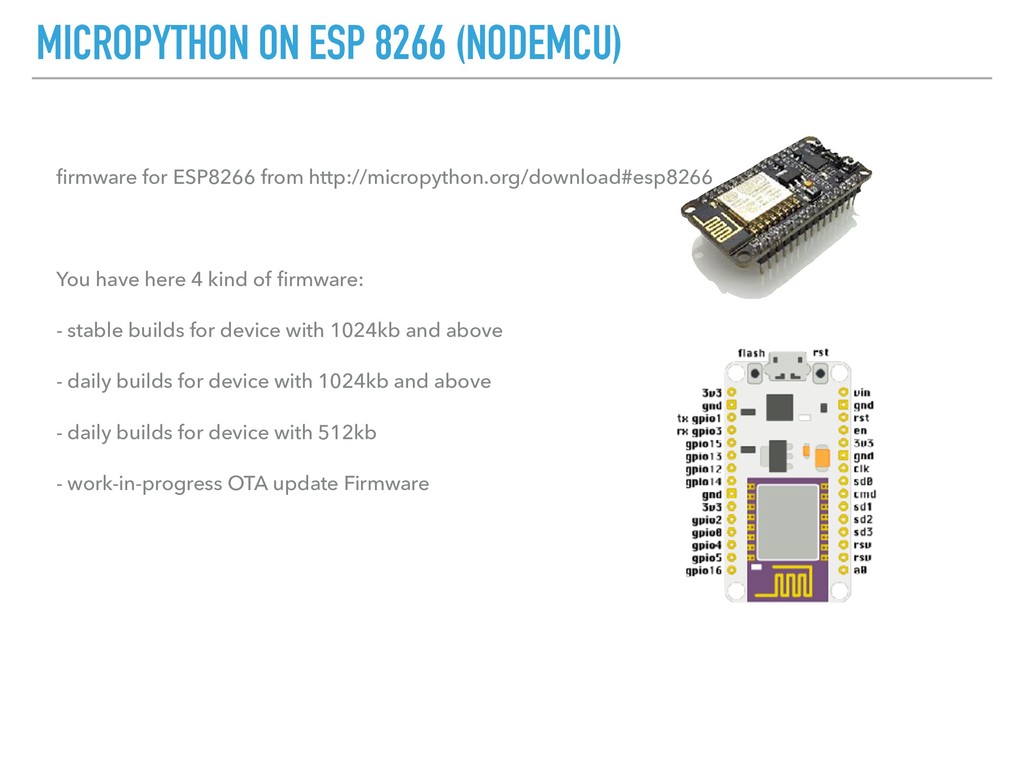
    You have here 4 kind of firmware: - stable builds for device with 1024kb and above - daily builds for device with 1024kb and above - daily builds for device with 512kb - work-in-progress OTA update Firmware
  5. DEPLOYING THE FIRMWARE/2 SIMPLY WAY WITH NODEMCU: It has an

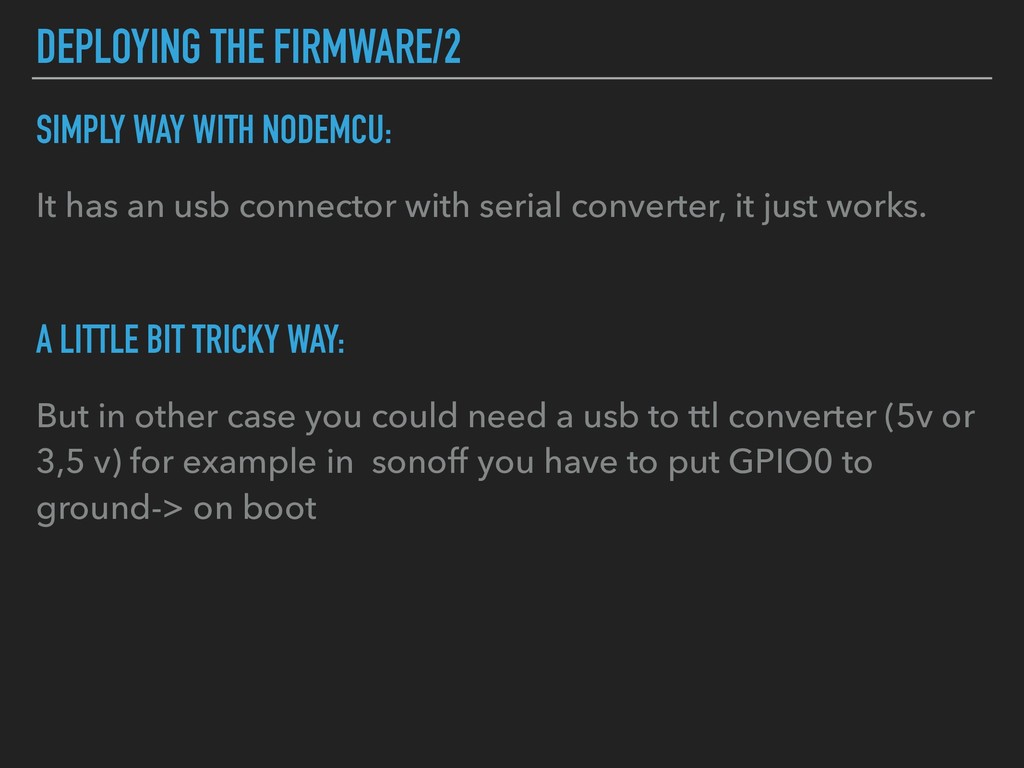
    usb connector with serial converter, it just works. A LITTLE BIT TRICKY WAY: But in other case you could need a usb to ttl converter (5v or 3,5 v) for example in sonoff you have to put GPIO0 to ground-> on boot
  6. WRITING TOOL FOR FIRMWARE Now you need a writing tool

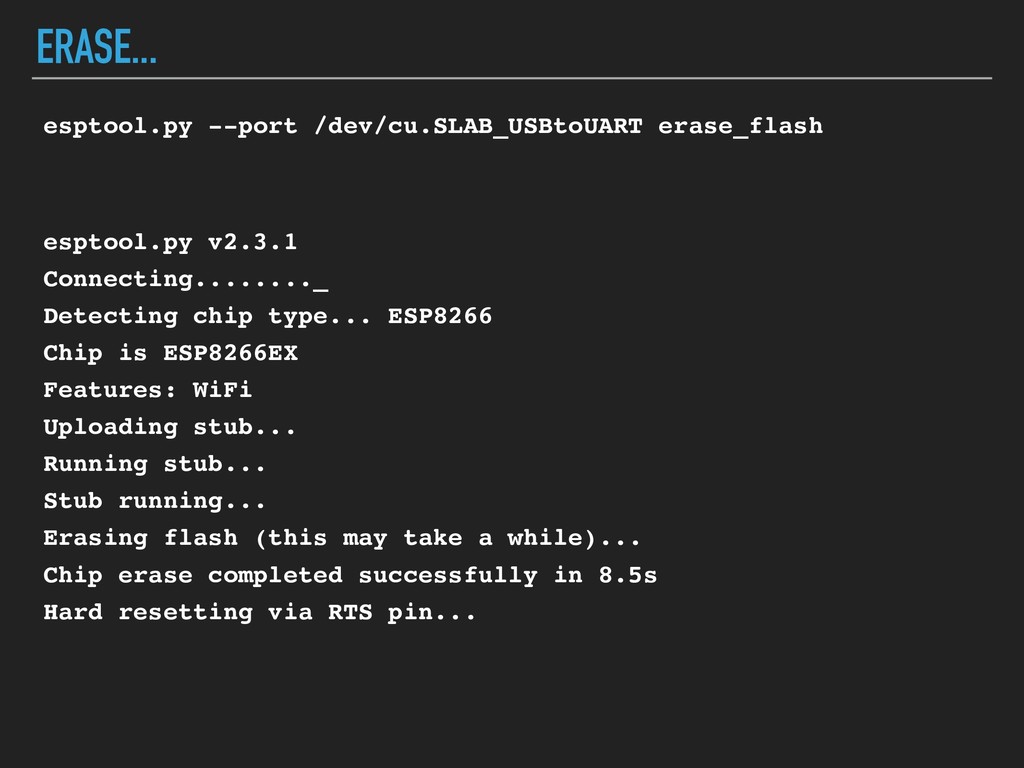
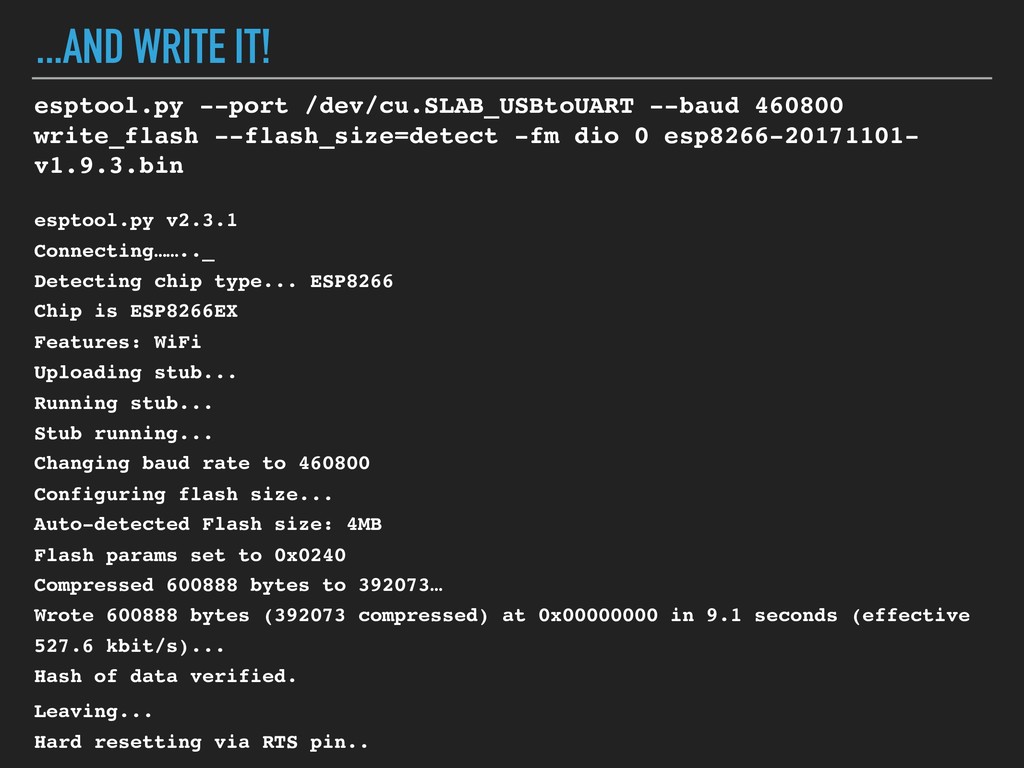
    MicroPython supports esptool (https://github.com/espressif/ esptool/), a python-based, open source and platform independent utility to write the ROM in ESP8266 and ESP32 chips: pip install esptool
  7. ERASE... esptool.py --port /dev/cu.SLAB_USBtoUART erase_flash esptool.py v2.3.1 Connecting........_ Detecting chip

    type... ESP8266 Chip is ESP8266EX Features: WiFi Uploading stub... Running stub... Stub running... Erasing flash (this may take a while)... Chip erase completed successfully in 8.5s Hard resetting via RTS pin...
  8. ...AND WRITE IT! esptool.py --port /dev/cu.SLAB_USBtoUART --baud 460800 write_flash --flash_size=detect

    -fm dio 0 esp8266-20171101- v1.9.3.bin esptool.py v2.3.1 Connecting…….._ Detecting chip type... ESP8266 Chip is ESP8266EX Features: WiFi Uploading stub... Running stub... Stub running... Changing baud rate to 460800 Configuring flash size... Auto-detected Flash size: 4MB Flash params set to 0x0240 Compressed 600888 bytes to 392073… Wrote 600888 bytes (392073 compressed) at 0x00000000 in 9.1 seconds (effective 527.6 kbit/s)... Hash of data verified. Leaving... Hard resetting via RTS pin..
  9. AT LAST! REBOOT NODE MCU AND CONNECT TO IT VIA

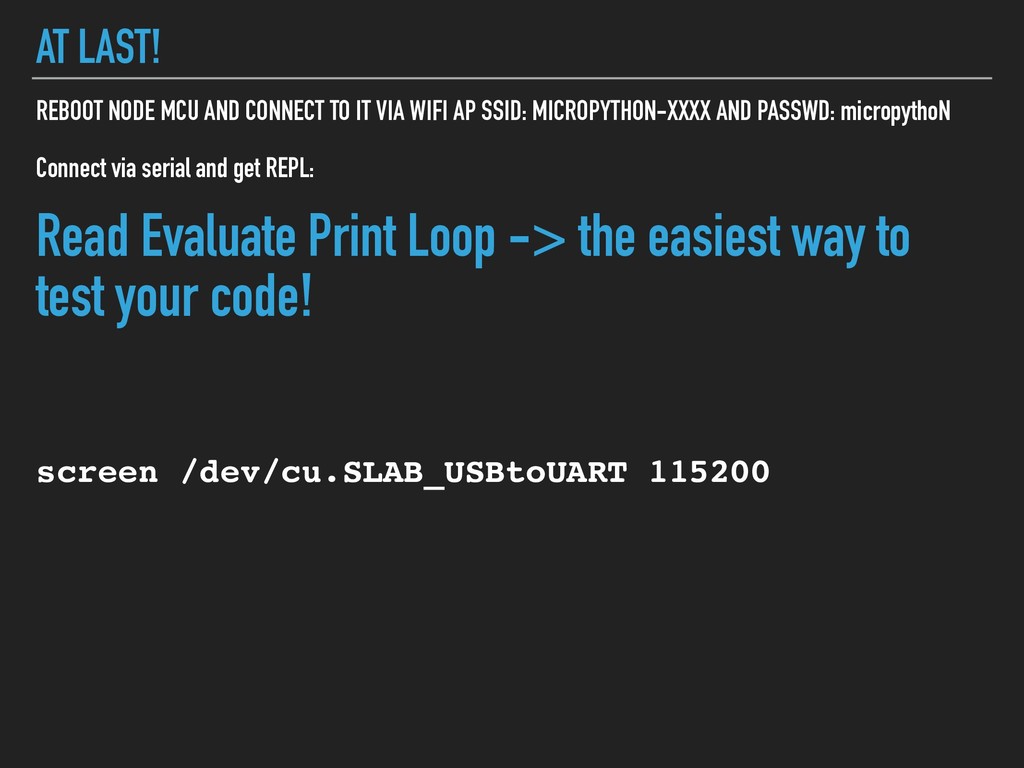
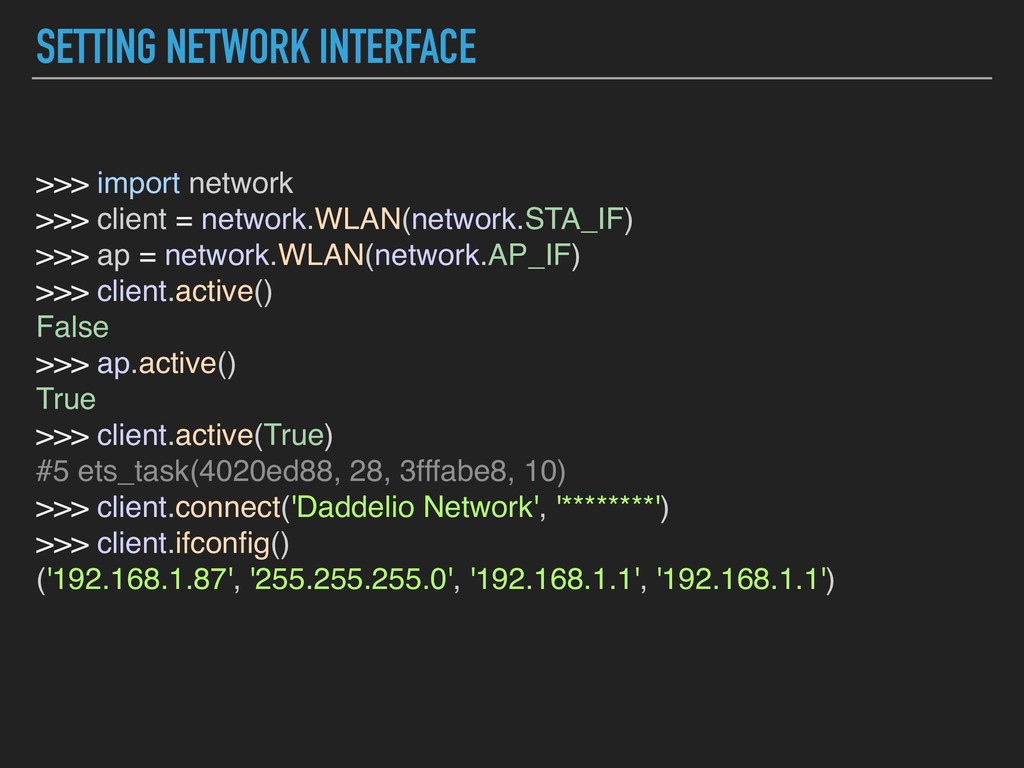
    WIFI AP SSID: MICROPYTHON-XXXX AND PASSWD: micropythoN Connect via serial and get REPL: Read Evaluate Print Loop -> the easiest way to test your code! screen /dev/cu.SLAB_USBtoUART 115200
  10. WEBREPL EASIEST WAY TO TEST YOUR CODE OVER WIFI, WITH

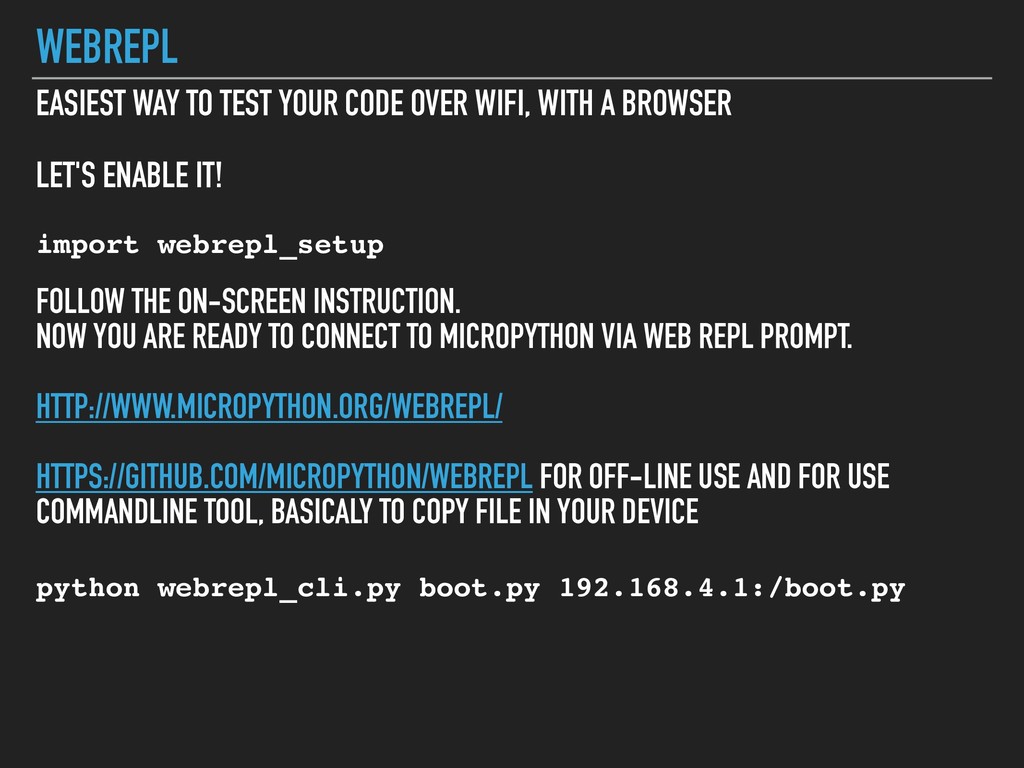
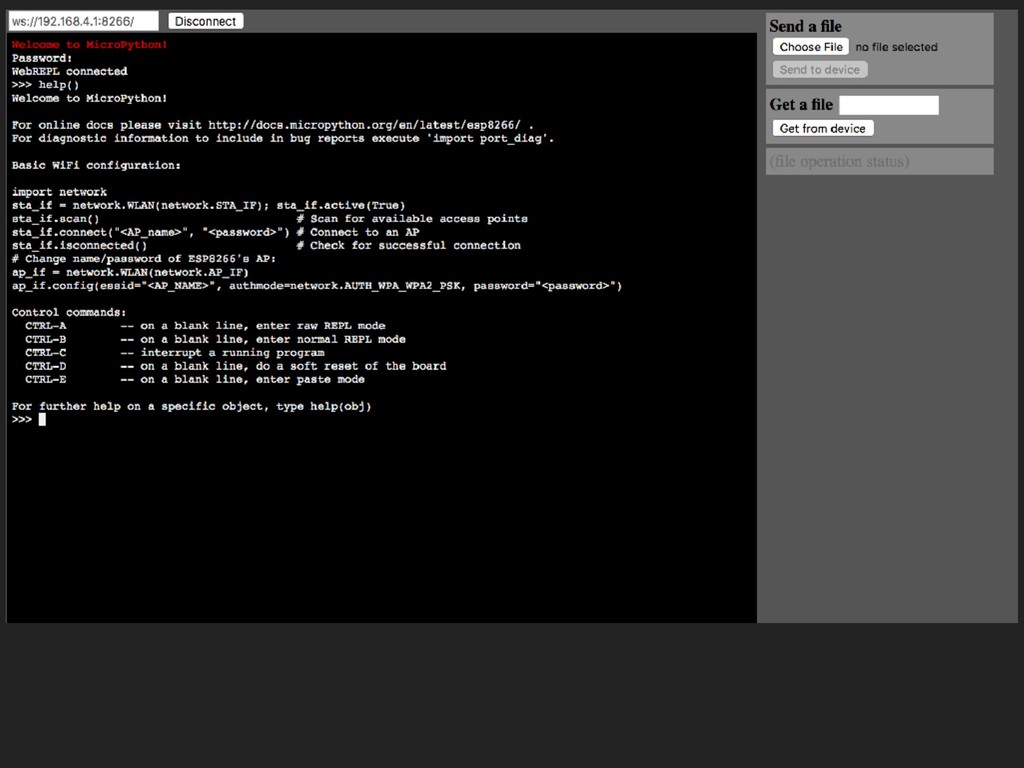
    A BROWSER LET'S ENABLE IT! import webrepl_setup FOLLOW THE ON-SCREEN INSTRUCTION. NOW YOU ARE READY TO CONNECT TO MICROPYTHON VIA WEB REPL PROMPT. HTTP://WWW.MICROPYTHON.ORG/WEBREPL/ HTTPS://GITHUB.COM/MICROPYTHON/WEBREPL FOR OFF-LINE USE AND FOR USE COMMANDLINE TOOL, BASICALY TO COPY FILE IN YOUR DEVICE python webrepl_cli.py boot.py 192.168.4.1:/boot.py
  11. MAC OS X TIPS Lists all usb device connected to

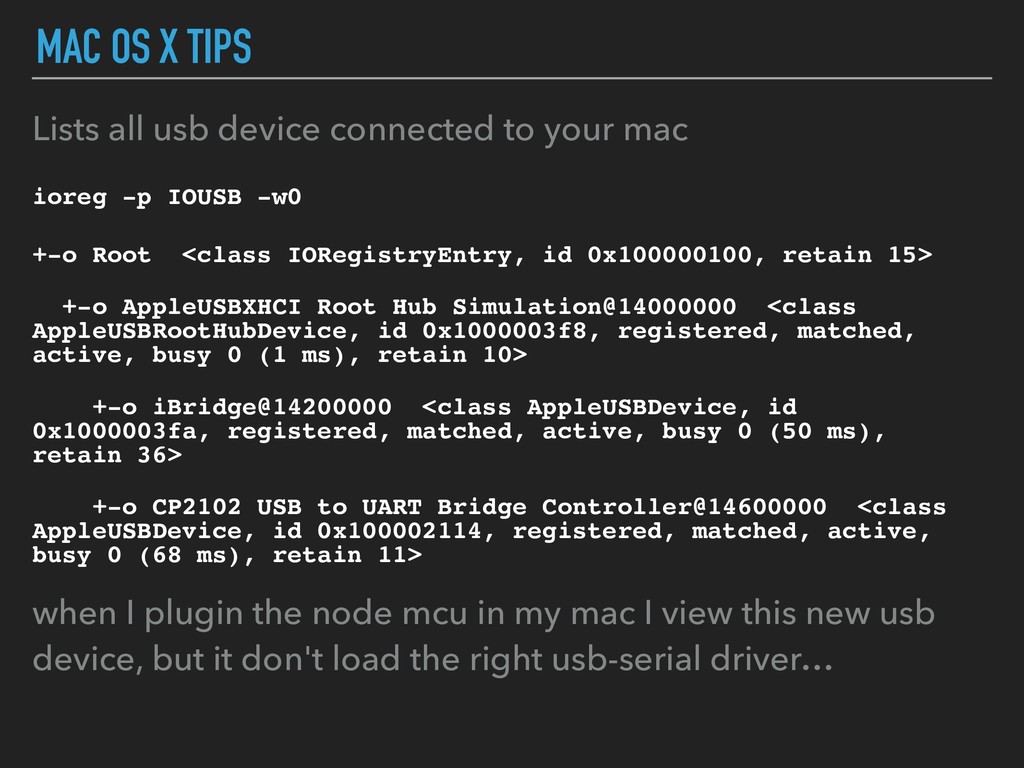
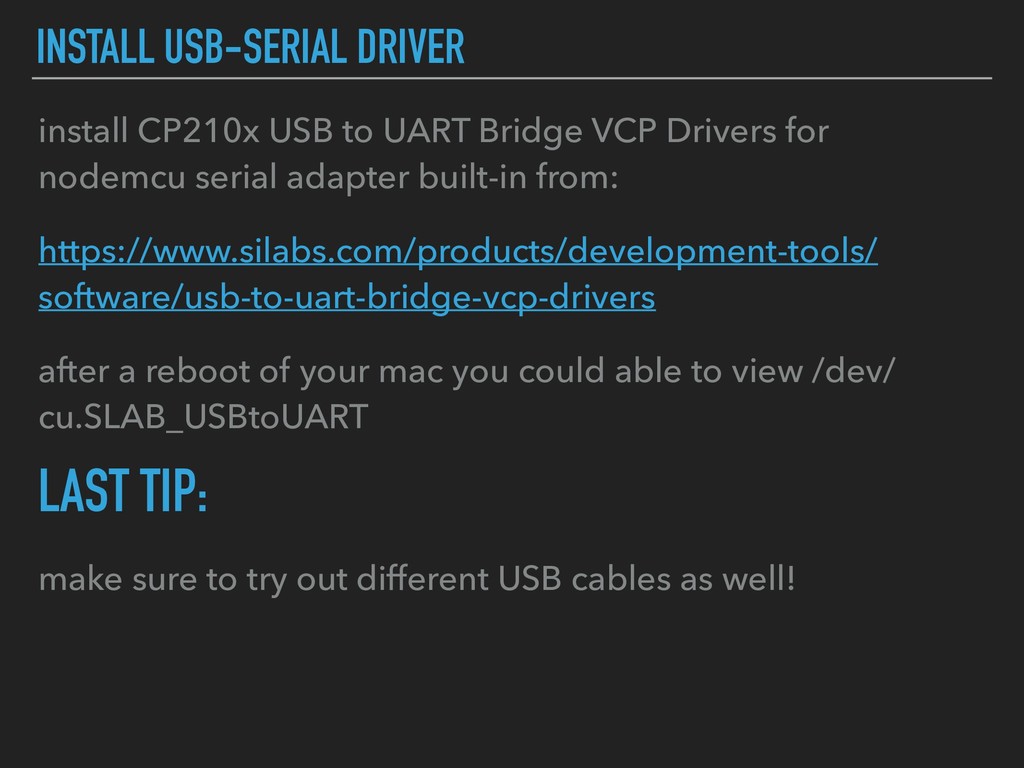
    your mac ioreg -p IOUSB -w0 +-o Root <class IORegistryEntry, id 0x100000100, retain 15> +-o AppleUSBXHCI Root Hub Simulation@14000000 <class AppleUSBRootHubDevice, id 0x1000003f8, registered, matched, active, busy 0 (1 ms), retain 10> +-o iBridge@14200000 <class AppleUSBDevice, id 0x1000003fa, registered, matched, active, busy 0 (50 ms), retain 36> +-o CP2102 USB to UART Bridge Controller@14600000 <class AppleUSBDevice, id 0x100002114, registered, matched, active, busy 0 (68 ms), retain 11> when I plugin the node mcu in my mac I view this new usb device, but it don't load the right usb-serial driver…
  12. INSTALL USB-SERIAL DRIVER install CP210x USB to UART Bridge VCP

    Drivers for nodemcu serial adapter built-in from: https://www.silabs.com/products/development-tools/ software/usb-to-uart-bridge-vcp-drivers after a reboot of your mac you could able to view /dev/ cu.SLAB_USBtoUART LAST TIP: make sure to try out different USB cables as well!
  13. SETTING NETWORK INTERFACE >>> import network 
 >>> client =

    network.WLAN(network.STA_IF) 
 >>> ap = network.WLAN(network.AP_IF) 
 >>> client.active() 
 False 
 >>> ap.active() 
 True 
 >>> client.active(True) 
 #5 ets_task(4020ed88, 28, 3fffabe8, 10) 
 >>> client.connect('Daddelio Network', '********') 
 >>> client.ifconfig() 
 ('192.168.1.87', '255.255.255.0', '192.168.1.1', '192.168.1.1') 
 

  14. INTERNAL FILESYSTEM # internal filesystem >>> import os >>> os.listdir()

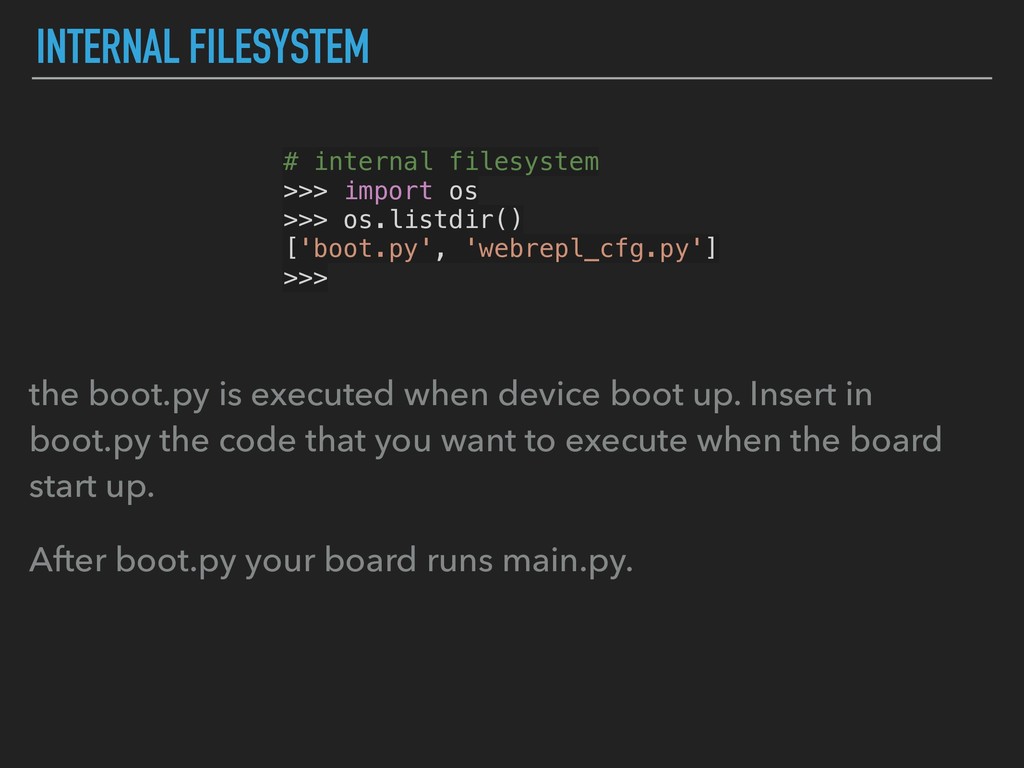
    ['boot.py', 'webrepl_cfg.py'] >>> the boot.py is executed when device boot up. Insert in boot.py the code that you want to execute when the board start up. After boot.py your board runs main.py.
  15. MEET THE EXTERNAL WORLD: GPIO BASICS # GPIO basics >>>

    import machine >>> led = machine.Pin(2, machine.Pin.OUT) >>> led.value() >>> 0 >>> led.on() >>> led.off()
  16. BLINK BUILT IN LED # blinking led >>> import time

    >>> for i in range(10): ... led.on() ... time.sleep(0.5) ... led.off() ... time.sleep(0.5) ...
  17. BREATHING LED # breathing led >>> import machine >>> import

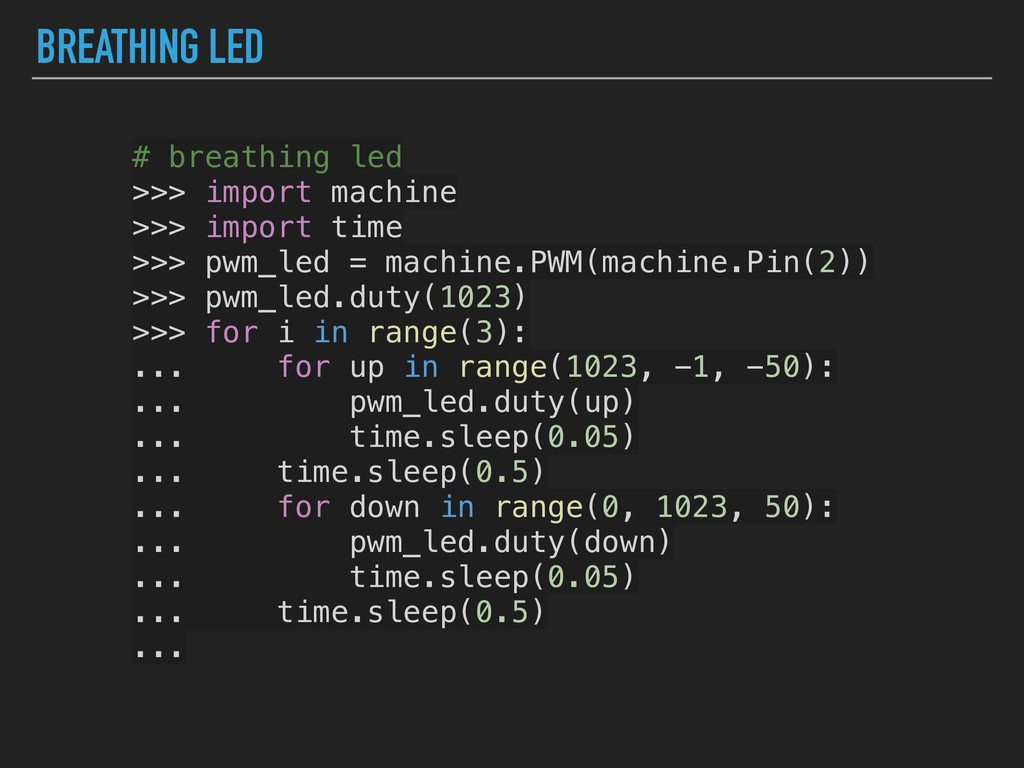
    time >>> pwm_led = machine.PWM(machine.Pin(2)) >>> pwm_led.duty(1023) >>> for i in range(3): ... for up in range(1023, -1, -50): ... pwm_led.duty(up) ... time.sleep(0.05) ... time.sleep(0.5) ... for down in range(0, 1023, 50): ... pwm_led.duty(down) ... time.sleep(0.05) ... time.sleep(0.5) ...
  18. GPIO IN: BUTTON TURN ON LED # button turn on

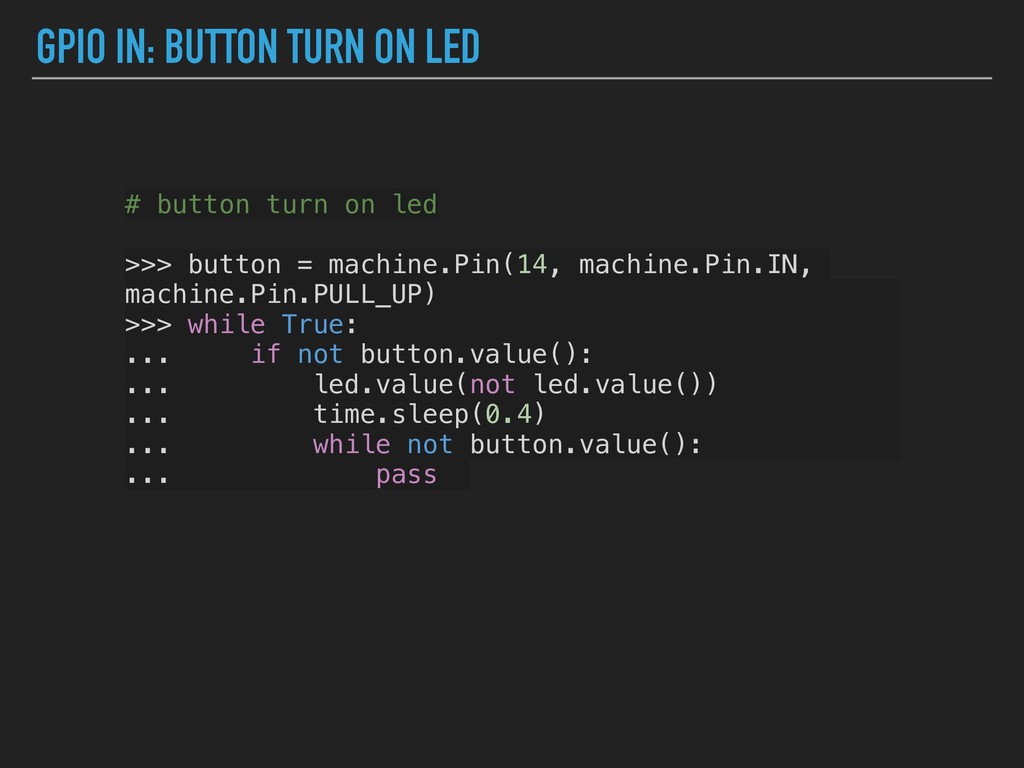
    led >>> button = machine.Pin(14, machine.Pin.IN, machine.Pin.PULL_UP) >>> while True: ... if not button.value(): ... led.value(not led.value()) ... time.sleep(0.4) ... while not button.value(): ... pass
  19. TEMPERATURE AND HUMIDITY z # DHT 11 temperature >>> import

    machine >>> import dht >>> dht_sensor = dht.DHT11(machine.Pin(2)) >>> dht_sensor.measure() >>> dht_sensor.temperature() >>> 22 >>> dht_sensor.humidity() >>> 64
  20. INSTALL IT ! You need python3, then: mkdir homeassistant cd

    homeassistant python3 -m venv . source bin/activate pip3 install wheel pip3 install homeassistant
  21. CONFIGURE HOME ASSISTANT It is simple!! you can configure mostly

    write one file: ~/.homeassistant/configuration.yaml And now home assistant tries to discover supported components on startup with no configuration!
  22. MQTT: MQ TELEMETRY TRANSPORT IT IS A SIMPLE LIGHTWEIGHT MESSAGING

    PROTOCOL, IT WORKS WITH LOW-BANDWITDH AND LOW RESOURCE ENVIROMENTS. IT IS PERFECT FOR IOT!
  23. PUBLISH-SUBSCRIBE A device can publish messages on a topic A

    device can be subscibed on a topic and receive the message
  24. TOPICS AND MESSSAGES Topics are a kind of channels Topics

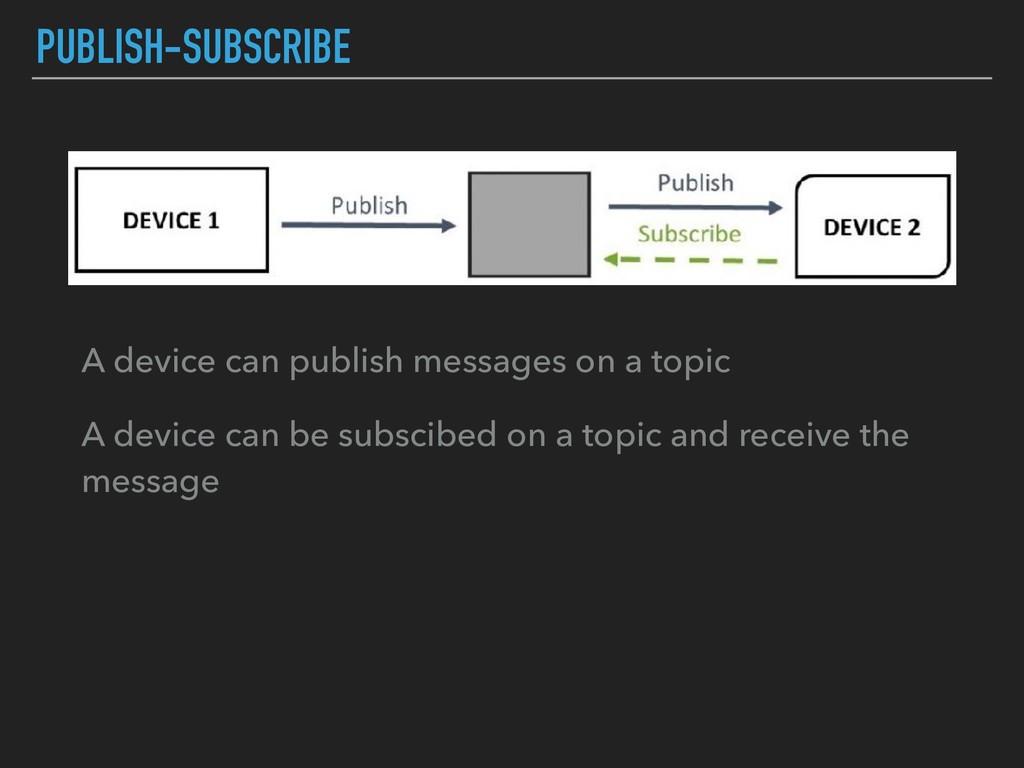
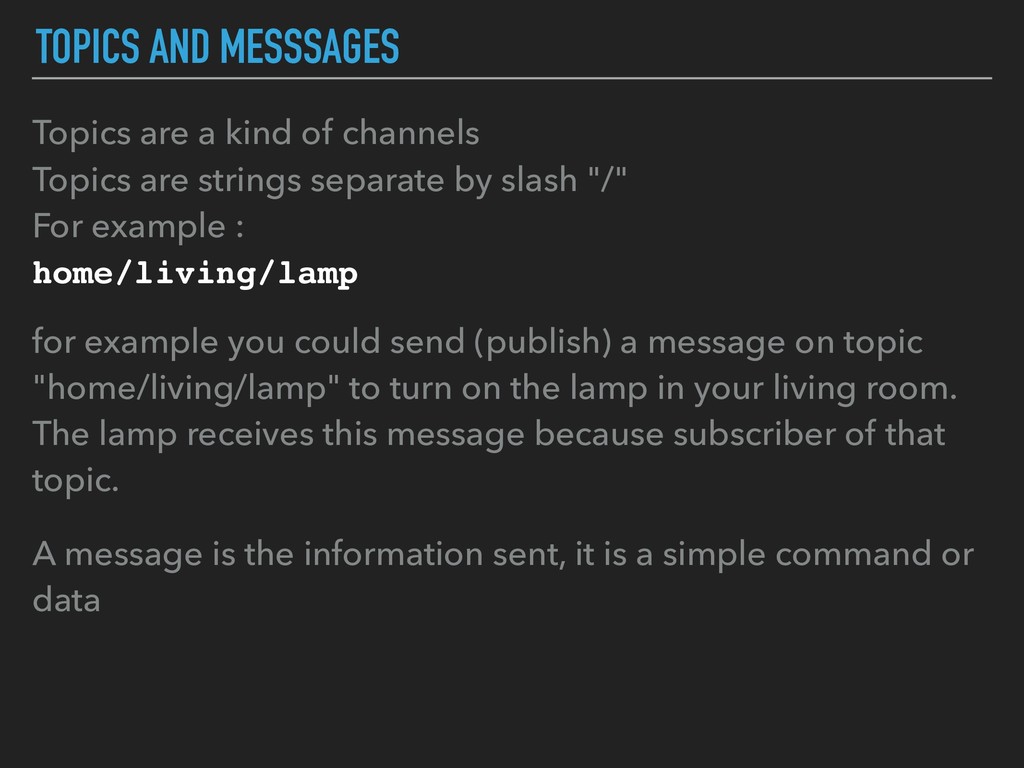
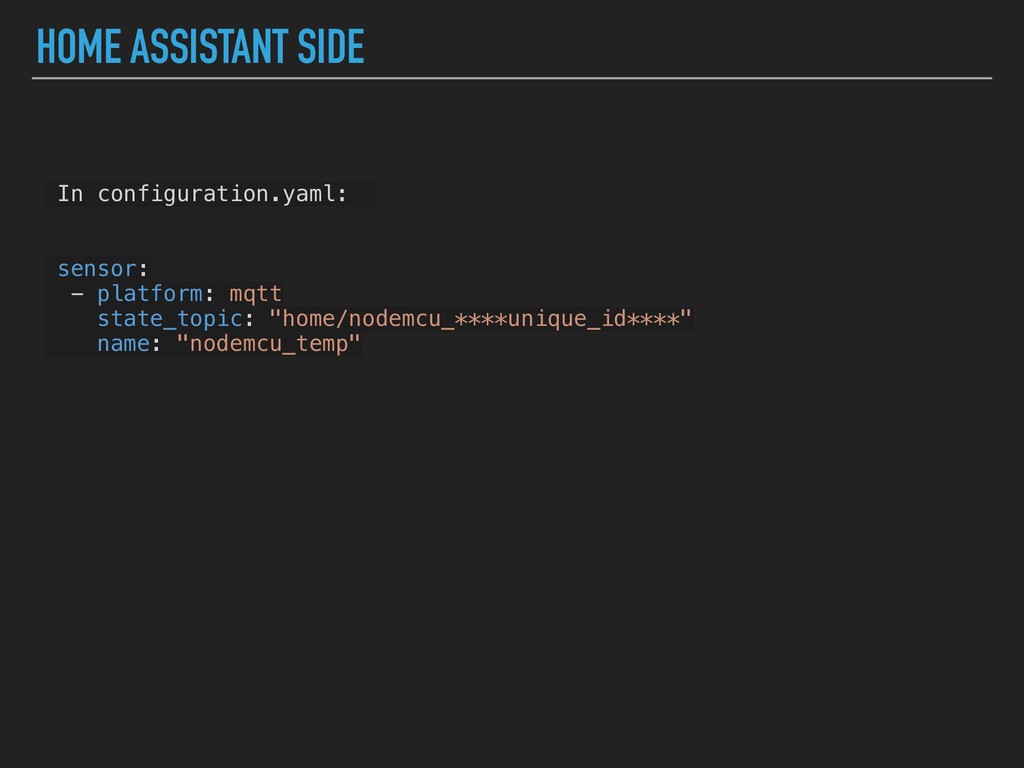
    are strings separate by slash "/" For example : home/living/lamp for example you could send (publish) a message on topic "home/living/lamp" to turn on the lamp in your living room. The lamp receives this message because subscriber of that topic. A message is the information sent, it is a simple command or data
  25. BROKER Broker is responsible to receive all messages, filtering and

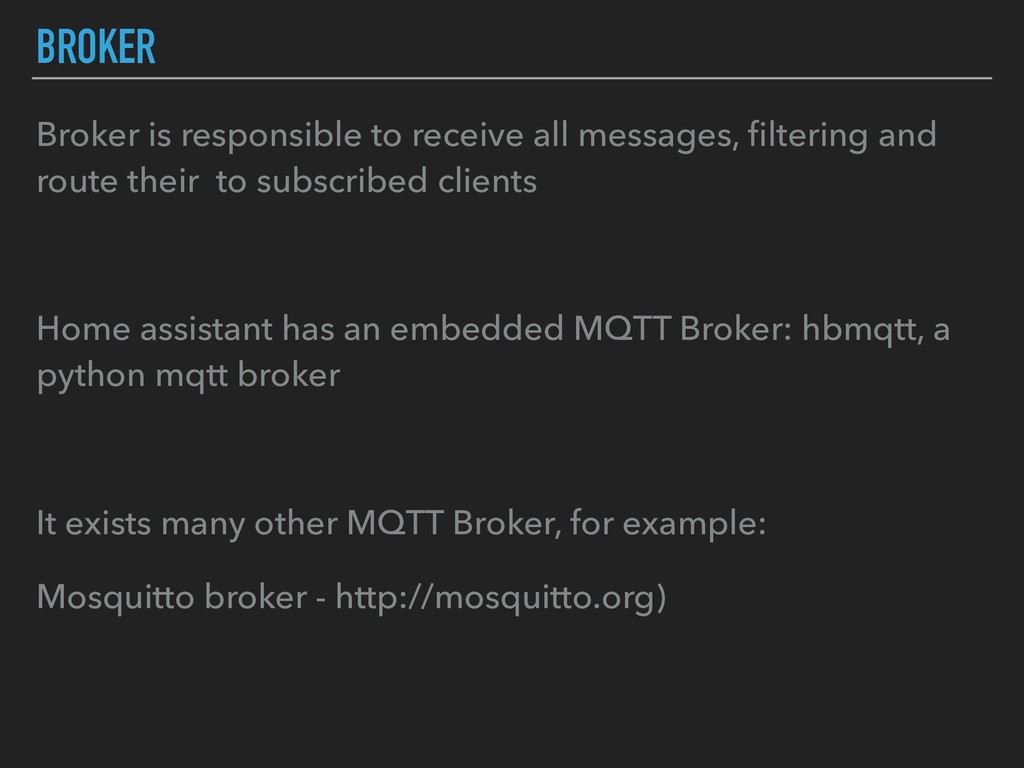
    route their to subscribed clients Home assistant has an embedded MQTT Broker: hbmqtt, a python mqtt broker It exists many other MQTT Broker, for example: Mosquitto broker - http://mosquitto.org)
  26. WHAT IS MY GOAL? NODEMCU WITH DHT11 THAT COMMUNICATE TO

    HOMEASSISTANT VIA MQTT PROTOCOL: FULL STACK PYTHON FOR IOT
  27. MICROPYTHON SIDE import machine import time import dht from umqtt.simple

    import MQTTClient broker = "192.168.1.65" topic = "home" client_id = "nodemcu_" + machine.unique_id() def main(): client = MQTTClient(client_it, broker) client.connect() while True: dht_sensor.measure() temp_data = dht_sensor.temperature() client.publish(topic+'/'+client_id, bytes(str(temp_data), 'utf-8')) time.sleep(60) if __name__ == '__main__': main()
  28. HOME ASSISTANT SIDE In configuration.yaml: sensor: - platform: mqtt state_topic:

    "home/nodemcu_****unique_id****" name: "nodemcu_temp"