Share
Embed

Transcript
51 slides
-
Outline - So far - JavaScript syntax, control statements, variables,
functions, objects - Built-in objects (Math, Array, etc.) - Today - Event-driven programming - Manipulating the DOM -
Events and event handling - Event-driven programming: execution is triggered
by user actions - Event is a notification that something specific has occurred - Event handler is a script that is executed in response to the appearance of an event - HTML tags are used to connect events to handlers <div class="green" ondblclick="myEvent('green double clicked');"></div> event handler event (double click) -
Events - Mouse events - Keyboard events - Frame/object events
- Form events - … and more - Clipboard, print, media, animation, etc. - See http://www.w3schools.com/jsref/dom_obj_event.asp for the full list -
Mouse events - onclick — click on an element -
ondblclick — double click on an element - onmousedown — mouse button pressed over an element - onmouseup — mouse button released over an element - onmouseover — when the pointer is moved onto an element, or onto one of its children - onmouseout — when a user moves the mouse pointer out of an element, or out of one of its children -
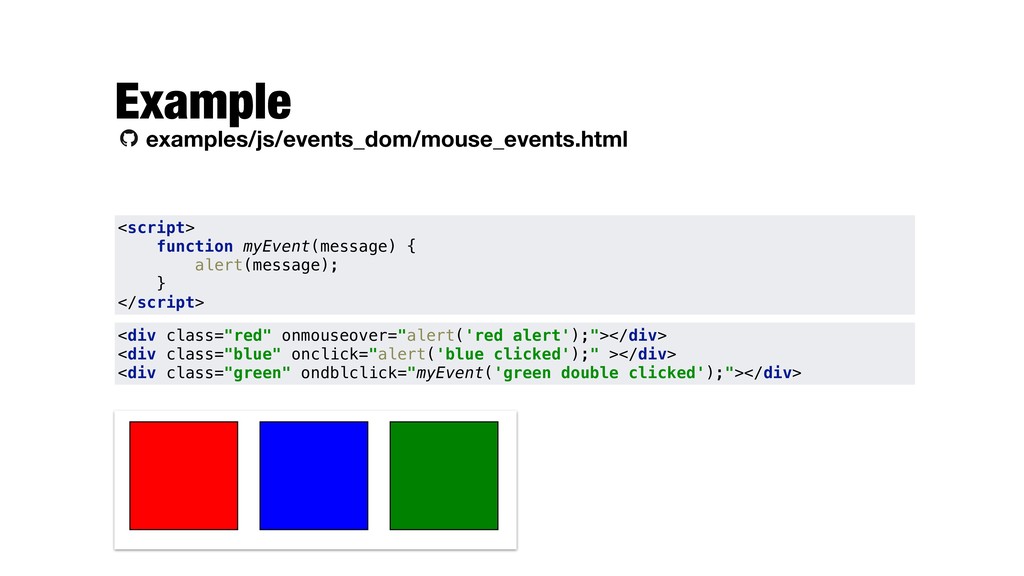
Example examples/js/events_dom/mouse_events.html <div class="red" onmouseover="alert('red alert');"></div> <div class="blue" onclick="alert('blue clicked');"
></div> <div class="green" ondblclick="myEvent('green double clicked');"></div> <script> function myEvent(message) { alert(message); } </script> -
Mouse event properties - Further properties of the event can
be accessed - button — which mouse button was pressed - clientX, clientY — coordinates of the mouse pointer, relative to the current window - screenX, screenY — coordinates of the mouse pointer, relative to the screen - shiftKey, ctrlKey, altKey, metaKey — boolean properties, reflecting the state of corresponding key: Shift, Ctrl, Alt or Command (Mac only) -
Example examples/js/events_dom/mouse_event_logger.html <div onclick="mhandle(event);"></div> <script> function mhandle(event) { var msg
= event.type + " button=" + event.button + " clientCoord=(" + event.clientX + ", " + event.clientY + ")" + " screenCoord=(" + event.screenX + ", " + event.screenY + ")" + (event.shiftKey ? " +shift" : "") + (event.ctrlKey ? " +ctrl" : "") + (event.altKey ? " +alt" : "") + (event.metaKey ? " +meta" : ""); document.getElementById("log").innerHTML += msg + "\n"; } </script> -
Keyboard events - onkeydown — when the user is pressing
a key - onkeypress — when the user presses a key (triggers after keydown) - onkeyup — when the user releases a key -
Working with keyboard events - Keydown/keyup are for any keys
- Keypress is for characters - Key event properties - keyCode — the scan-code of the key (i.e., which key was pressed; it’s the same for "a" and "A") - charCode — the ASCII character code - shiftKey, ctrlKey, altKey, metaKey — boolean properties, reflecting the state of corresponding key: Shift, Ctrl, Alt or Command (Mac only) -
Example examples/js/events_dom/keyboard_event_logger.html <script> function khandle(event) { var msg = event.type
+ " keyCode=" + event.keyCode + " charCode=" + event.charCode + (event.shiftKey ? " +shift" : "") + (event.ctrlKey ? " +ctrl" : "") + (event.altKey ? " +alt" : "") + (event.metaKey ? " +meta" : ""); document.getElementById("log").innerHTML += msg + "\n"; } </script> <input type="text" id="kinput" onkeydown="khandle(event);" onkeyup="khandle(event);" onkeypress="khandle(event);"/><br/> Log:<br/> <textarea rows="18" id="log"></textarea> -
Frame/object events - onload — when an object has loaded
- Most common usage: <body onload="…"> - onpageshow — when the user navigates to a webpage - onpagehide — when the user navigates away from a webpage - onresize — when the document view is resized - onscroll — when an element's scrollbar is being scrolled -
Form events - onfocus — when an element gets focus
- onblur — when an element loses focus - onchange — when the content/state of a form element has changed (for <input>, <select>, and <textarea>) - oninput — when an element gets user input (for <input> and <textarea>) - onsubmit — when a form is submitted - onreset — when a form is reset -
onchange vs. oninput - oninput occurs immediately after the value
of an element has changed - onchange occurs when the element loses focus, after the content has been changed - onchange also works for <select> (not just <input> and <textarea>) -
Example examples/js/events_dom/form_events.html <script> function setfocus(element) { element.style.backgroundColor = "yellow"; }
function input(element) { console.log(element.name + " oninput: " + element.value); } </script> <form name="test" onsubmit="alert('form submitted');"> <input type="text" name="name" size="20" placeholder="Firstname, lastname" onfocus="setfocus(this);" onblur="losefocus(this);" oninput="input(this);" onchange="change(this);"/> this refers to the this particular <input> element -
Document Object Model (DOM) - Internal model of the HTML
page - Consistent way (across all browsers) to gain access to the structure and content of HTML - A tree of HTML elements - Object model - Each HTML elements is an object (with methods and properties) - Plus two additional objects: document and window document html body div id="header" div id="content" div id="footer" div id="leftmenu" table p -
Interacting with the DOM - JavaScript can interact with the
DOM to get access to the elements and the content in them - Getting and setting the attributes of elements - Creating or adding elements - Removing elements -
Wait until the page has fully loaded! - In most
cases, we need to wait for the DOM to be fully created before start executing JavaScript code <script> function init() { ... } window.onload = init; </script> The init() function is assigned to the onload event of the (browser) window. -
Finding HTML elements - Finding elements by ID - Typically
saved to a variable so that we can refer to the element throughout the code - Finding elements by tag/class name - E.g., listing names and values of all input elements var element = document.getElementById("someid"); var x = document.getElementsByTagName("input"); for (var i = 0; i < x.length; i++) { console.log(x[i].name + ": " + x[i].value); } -
Getting properties of HTML elements - id — the value
of the id attribute - innerHTML — the HTML content (between the opening and closing tags) - tagName — the name of the HTML tag (in uppercase, e.g., P, DIV, H1, etc.) - getAttribute() — a specific attribute’s value - See a full list of properties and methods of the element object http://www.w3schools.com/jsref/dom_obj_all.asp var mydiv = document.getElementById("mydiv"); console.log("HTML content: " + mydiv.innerHTML); -
Changing HTML elements - Change the inner HTML - Change
the value of a specific attribute document.getElementById("mydiv").innerHTML = "new content"; document.getElementById("myImage").src = "landscape.jpg"; document.getElementById("myImage").setAttribute("src", "landscape.jpg"); document.getElementById("mydiv").innerHTML = "<p>new content</p>"; -
Changing CSS properties - style.x — the value of a
style property x - See http://www.w3schools.com/jsref/dom_obj_style.asp - Change the style property of an HTML element - Add/remove classes assigned to a HTML element var div = document.getElementById("mydiv"); if (!div.classList.contains("border")) { div.classList.add("border"); } else { div.classList.remove("border"); } document.getElementById("mydiv").style.backgroundColor = "blue"; document.getElementById("mydiv").style.height = "200px"; -
Assigning events to elements (1) - Setting the element’s on…
attribute in HTML <div id="mydiv" onclick="dosomething()"></div> <script> function dosomething() { … } </script> -
Assigning events to elements (2) - Modifying the element’s on…
property <script> function dosomething() { … } function init() { document.getElementById("mydiv").onclick = dosomething; } window.onload = init; </script> <div id="mydiv"></div> -
Assigning events to elements (3) - Using event listeners -
Attaches an event handler to an element without overwriting existing event handlers - Multiple event handlers might be added to one element - Event listeners can be removed too - See http://www.w3schools.com/js/js_htmldom_eventlistener.asp document.getElementById("myBtn").addEventListener("click", showAlert); document.getElementById("myBtn").addEventListener("click", log); document.getElementById("myBtn").removeEventListener("click", showAlert); -
Passing parameters to event handlers - Functions assigned to events
from JS cannot take arguments - Otherwise the function is immediately executed - Solution: use an "anonymous function" that calls the specified function with the parameters function changeColor(element) { … } function init() { var mydiv = document.getElementById("mydiv"); mydiv.style.backgroundColor = "blue"; mydiv.onclick = changeColor(mydiv); } Wrong! changeColor() executes immediately mydiv.onclick = function() {changeColor(mydiv);} -
Example examples/js/events_dom/event_listeners.html function init() { // assign showAlert() and log()
to all divs var x = document.getElementsByTagName("div"); for (var i = 0; i < x.length; i++) { x[i].addEventListener("click", showAlert); x[i].addEventListener("click", log); } // remove log() from elements that have the nolog class x = document.getElementsByClassName("nolog"); for (var i = 0; i < x.length; i++) { x[i].removeEventListener("click", log); } } -
Working with forms - Different element properties, depending on the
type of input - Common - name — name attribute - type — which type of form element it is - disabled — whether the element is disabled or not - form — reference to the form that contains the element - required — whether the input must be filled out before submitting the form -
Input text object - <input> and <textarea> elements - value
— get or set the value of the element - See - http://www.w3schools.com/jsref/dom_obj_text.asp - http://www.w3schools.com/jsref/dom_obj_textarea.asp <script> var name = document.getElementById("name"); console.log("Name: " + name.value); </script> <input type="text" name="name" id="name"/> -
Select list - Properties - length — number of options
in the list - value — value of the selected option - selectedIndex — index of the selected option - options[index].value — value of the option at a given index pos. - options[index].text — text corresponding to the option at a given index position - See - http://www.w3schools.com/jsref/dom_obj_select.asp -
<select name="country" id="country" onchange="processForm();"> <option value="--">Select</option> <option value="NO">Norway</option> <option value="SE">Sweden</option>
<option value="DK">Denmark</option> </select> <script> function processForm() { var name = document.getElementById("name"); console.log("Name: " + name.value); var country = document.getElementById("country"); for (var i = 0; i < country.length; i++) { console.log("[" + country[i].value + "] " + country[i].text + (country[i].selected ? " selected" : "")); } console.log("Selected: " + country.options[country.selectedIndex].text); } </script> Select list example examples/js/events_dom/form_elements.html -
Input checkbox and radio - Properties - checked — sets
or returns the checked state - See - http://www.w3schools.com/jsref/dom_obj_checkbox.asp - http://www.w3schools.com/jsref/dom_obj_radio.asp -
<label>Delivery <input type="radio" name="delivery" value="normal">Normal <input type="radio" name="delivery" value="extra">Extra <input
type="radio" name="delivery" value="hyper">Hyper </label> <script> function processForm() { var delivery = document.getElementsByName("delivery"); for (var i = 0; i < delivery.length; i++) { console.log("[" + (delivery[i].checked ? "X" : " ") + "] " + delivery[i].value); } } </script> Checkbox example examples/js/events_dom/form_events.html -
Form validation using JavaScript <form name="test" action="…" onsubmit="return checkForm();"> …
</form> <script> function checkForm() { var valid = true; // perform input check // set valid to false if it fails return valid; } </script> If the checkForm() function returns true the form will submit. If false, the form does nothing. -
DOM nodes - Everything is a node - The document
itself is a document node - All HTML elements are element nodes - All HTML attributes are attribute nodes - Text inside HTML elements are text nodes - Comments are comment nodes - The nodeType property returns the type of the node -
Traversing the DOM - Finding child elements (excl. text and
comment nodes) - childElementCount — number of child element an element has - children — child nodes of an element - hasChildNodes() — if an element has any child nodes - Finding child elements (incl. text and comment nodes) - childNode — child nodes of an element - The number of elements can be accessed using childNode.length - Finding parent element - parentNode — reference to the parent of the element -
Example examples/js/events_dom/dom_traverse.html function traverse(element, level) { var line = "";
// indentation for (var i = 0; i < level; i++) { line += " "; } // print element line += element.nodeName; console.log(line); // recursively traverse child elements if (element.hasChildNodes()) { for (var i = 0; i < element.children.length; i++) { traverse(element.children[i], level + 1); } } } window.onload = function () { traverse(document.body, 0); } -
Traversing the DOM (2) - Some convenience properties - firstChild
— first child node of an element - firstElementChild — first child element of an element - lastChild — last child node of an element - lastElementChild — last child element of an element - nextSibling — next node at the same node tree level - nextElementSibling — next element at the same node tree level - previousSibling — previous node at the same node tree level - previousElementSibling — previous element at the same node tree level - parentElement — parent element node of an element -
Hint for Exercise #6 - Change the style.display or style.visibility
property - Remember the difference CSS #mydiv { style.display: none; } CSS #mydiv { visibility: hidden; } -
Creating HTML elements - To add a new HTML element
- Create the element - Set the content of the element - or - Append it to an existing element (otherwise it won’t appear on the page) var h2 = document.createElement("h2"); h2.innerHTML = "Article header"; var text = document.createTextNode("Article header"); h2.appendChild(text); var art1 = document.getElementById("article1"); art1.appendChild(h2); -
Inserting new HTML element - appendChild() adds new element after
the last child element of the parent - insertBefore() inserts before a specified child node var newItem = document.createElement("li"); newItem.innerHTML = "Water"; // get the parent element var list = document.getElementById("mylist"); // insert before the first child list.insertBefore(newItem, list.children[0]); -
Removing or replacing HTML elements - To remove or replace
a HTML element - You must know the parent of the element - If you identified the element, you can use the parentNode property to find its parent - removeChild() — removes a given child element - replaceChild() — replaces a given child element var art1 = document.getElementById("article1"); art1.parentNode.removeChild(art1); var art1 = document.getElementById("article1"); var art2 = document.createElement("article"); art1.parentNode.replaceChild(art2, art1); -
Example examples/js/events_dom/dom_elements.html <body> <article id="article1"></article> </body> <script> function addArticleHeader() {
// create a new heading var h2 = document.createElement("h2"); // set the content of the new element h2.innerHTML = "Article header"; // identify parent element var art1 = document.getElementById("article1"); // append to parent element art1.appendChild(h2); } </script> -
Dev hint - When using JS to change the DOM,
use the browser’s web inspector tool to see the modified HTML source - Viewing the page source will only show the initial HTML -
References - W3C JavaScript and HTML DOM reference http://www.w3schools.com/jsref/default.asp -
W3C JS School http://www.w3schools.com/js/default.asp - Mozilla JavaScript reference https://developer.mozilla.org/en-US/docs/Web/JavaScript/ Reference
 ljehl
 yatabe
 signer
 yasulab
 adeputra13
 koheihasebe
 arnoknobbe
 pawan_pharm
 yasslab
 auctria
 rashwhitman
 andyhume
 sabderemane
 brad_frost
 kevinliebholz
 skoyamalab
 retrage
 inesmontani
 smashingmag
 deanohume
 jct
 oripsolob