Upgrade to Pro — share decks privately, control downloads, hide ads and more …

Arduino Workshop 101

Arduino Workshop 101

123 slides for a 5-hour hands-on introduction to basic electronics and Arduino programming.

Luciano Ramalho

March 12, 2014
Tweet

More Decks by Luciano Ramalho

Other Decks in Education

Transcript

  1. Program • Introductions • What can you do with Arduinos?

    • First circuit: Blink • Coding Dojo with Arduino • ABCofE: ABC of Electronics • Tra!c light circuit • Wrapping up 2 ☈ ☈ ☈
  2. Luciano Ramalho • Self-taught programmer since 1978 • BASIC, ASM

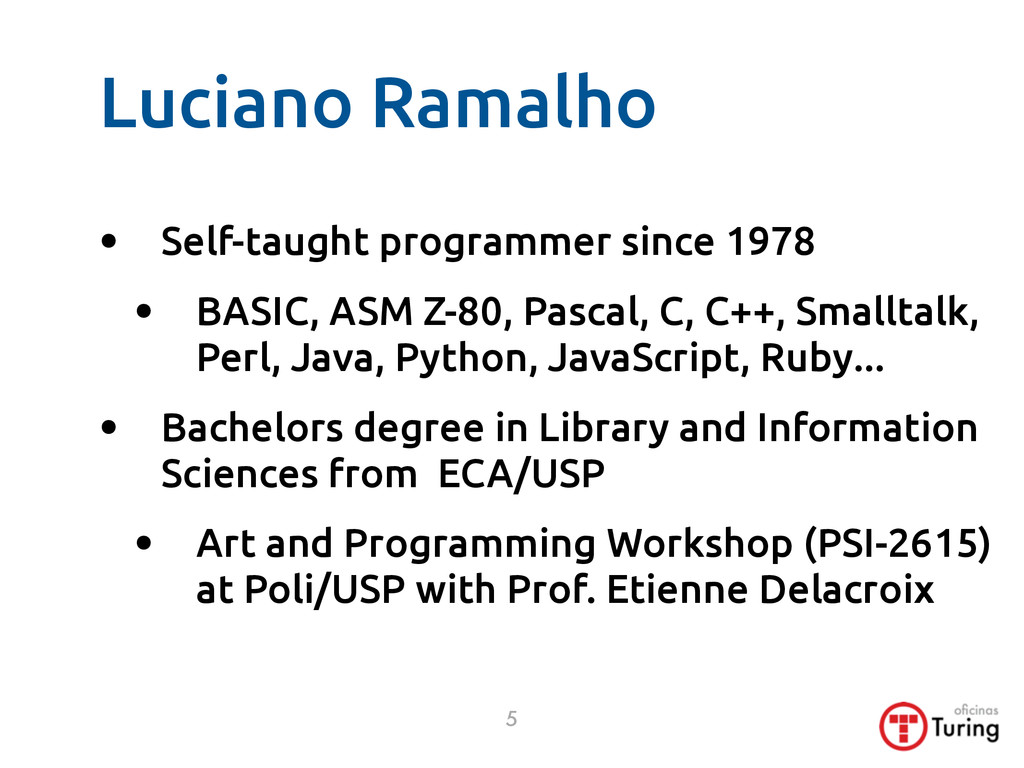
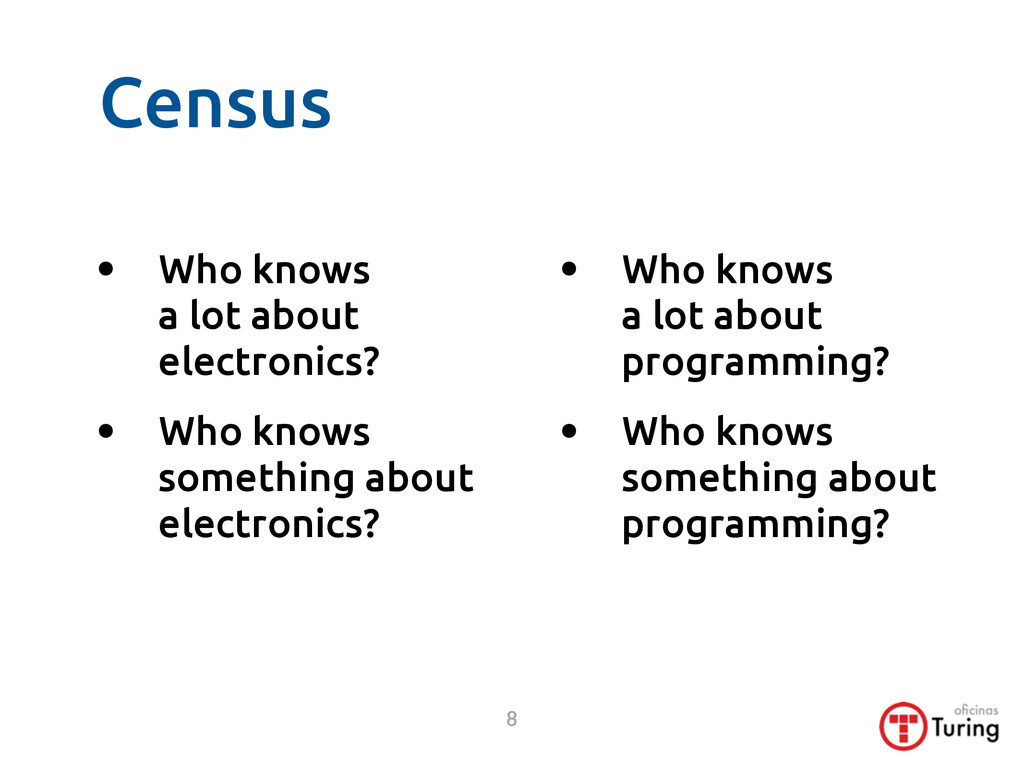
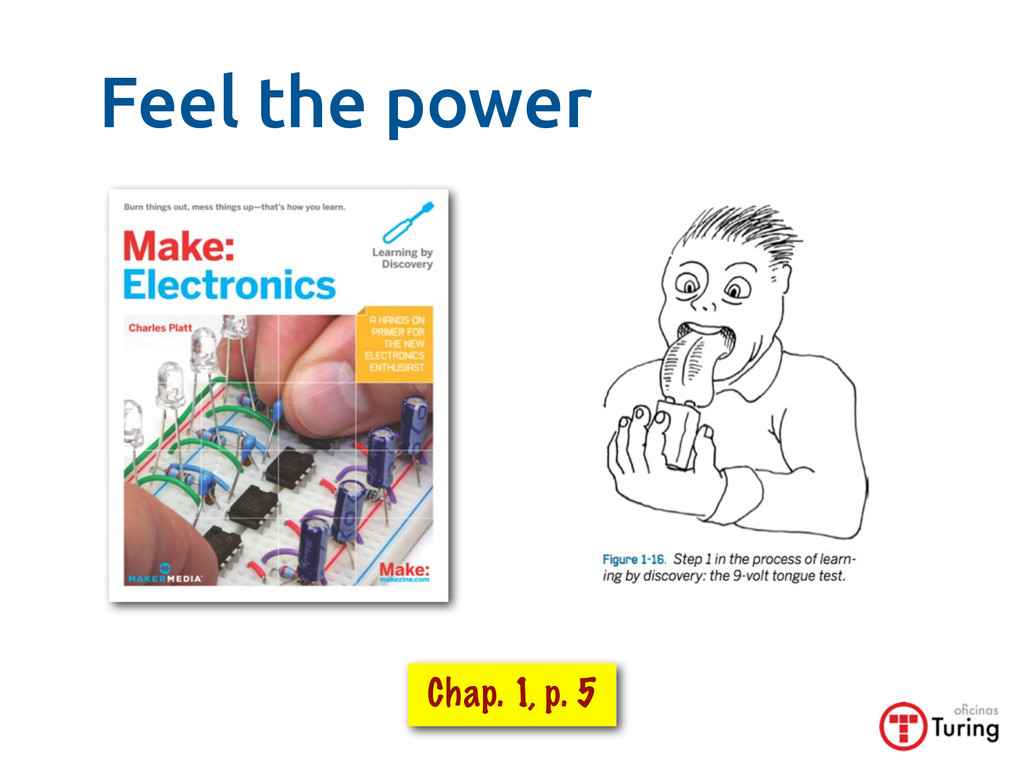
    Z-80, Pascal, C, C++, Smalltalk, Perl, Java, Python, JavaScript, Ruby... • Bachelors degree in Library and Information Sciences from ECA/USP • Art and Programming Workshop (PSI-2615) at Poli/USP with Prof. Etienne Delacroix 5
  3. Luciano Ramalho • Owner and teacher of O"cinas Turing •

    Partner and instructor at Python.pro.br • Founding member of Garoa Hacker Clube Turing.com.br oficinas 6
  4. Introduce yourselves • Find out the name, interests and hobbies

    of the people near you • Ask and tell your neighbors: • Why are you interested in Arduinos? • Do you have a project in mind? 5 minutes 7
  5. Census • Who knows a lot about electronics? • Who

    knows something about electronics? • Who knows a lot about programming? • Who knows something about programming? 8
  6. Census nothing some a lot 3 2 2 0 2

    3 0 1 0 LR Electronics Programming nothing some a lot 9
  7. Open hardware • Open hardware: free and open schematics and

    software + o#-the-shelf or home made components • Arduino is open hardware: copying is legal • Use of the Arduino brand: only under license
  8. • Breathalyzer-Microphone www.instructables.com/id/Breathalyzer-Microphone/ • Guitar Pedal www.instructables.com/id/Lo-"-Arduino-Guitar-Pedal/ • Balancing Robot

    (inspired by Segway) hacknmod.com/hack/make-a-mini-segway-using-the-arduino/ • High-speed photography trigger hacknmod.com/hack/high-speed-photography-how-to-trigger- using-arduino/ • Home automation www.makeuseof.com/tag/how-to-build-home-automation-system- raspberry-pi-and-arduino/ Simple projects 14
  9. A kit to get started ☐ LEDs ☐ 7-segment display

    ☐ 9g micro-servo ☐ Arduino compatible board ☐ USB cable Controller ☐ Breadboard ☐ Male-male jumpers ☐ Assorted resistors ☐ Push-button ☐ Potentiometer ☐ LDR (light sensor) ☐ Re!ective optical sensor ☐ Temperature sensor Basic parts Output devices Input devices 17
  10. Arduino Uno R3 • Development board with ATmega328 microcontroller and

    auxliliary circuits • Client USB interface (device) • On-board voltage regulator for 7-12V (recommended) 18
  11. Arduino: power in • From USB: 5V • 7 to

    12V DC adapter • Vin and GND : 7 to 12V DC 5V via USB 7 to 12V DC 19 GND, Vin
  12. Arduino: power out • 3.3 V and 5 V (+)

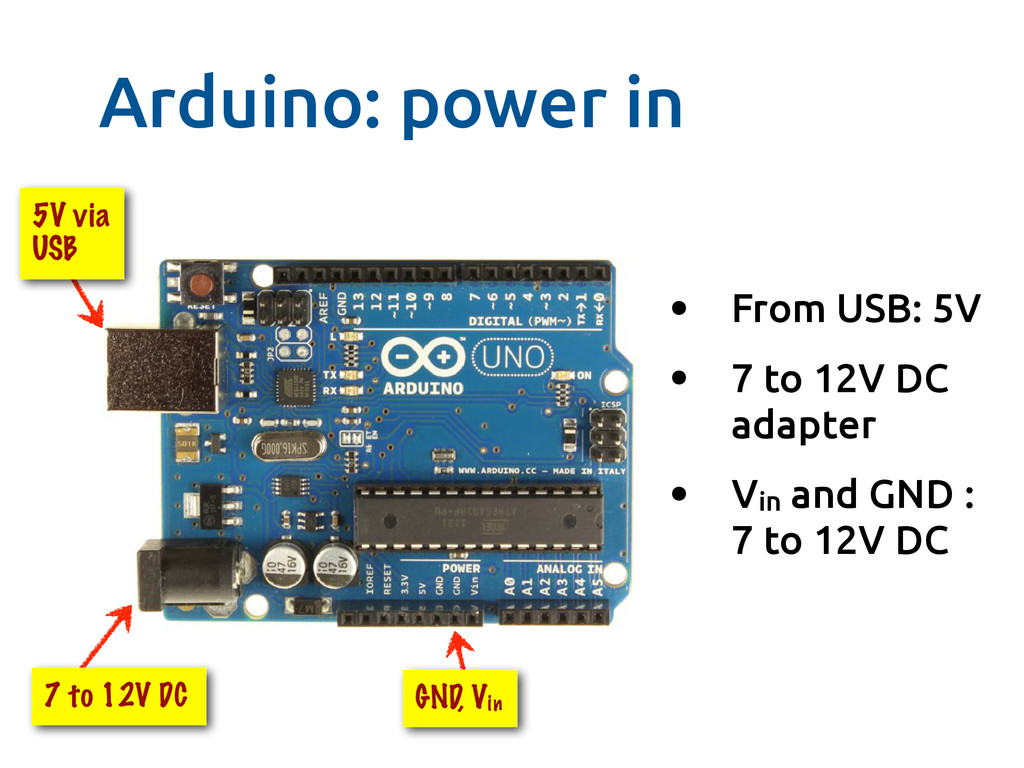
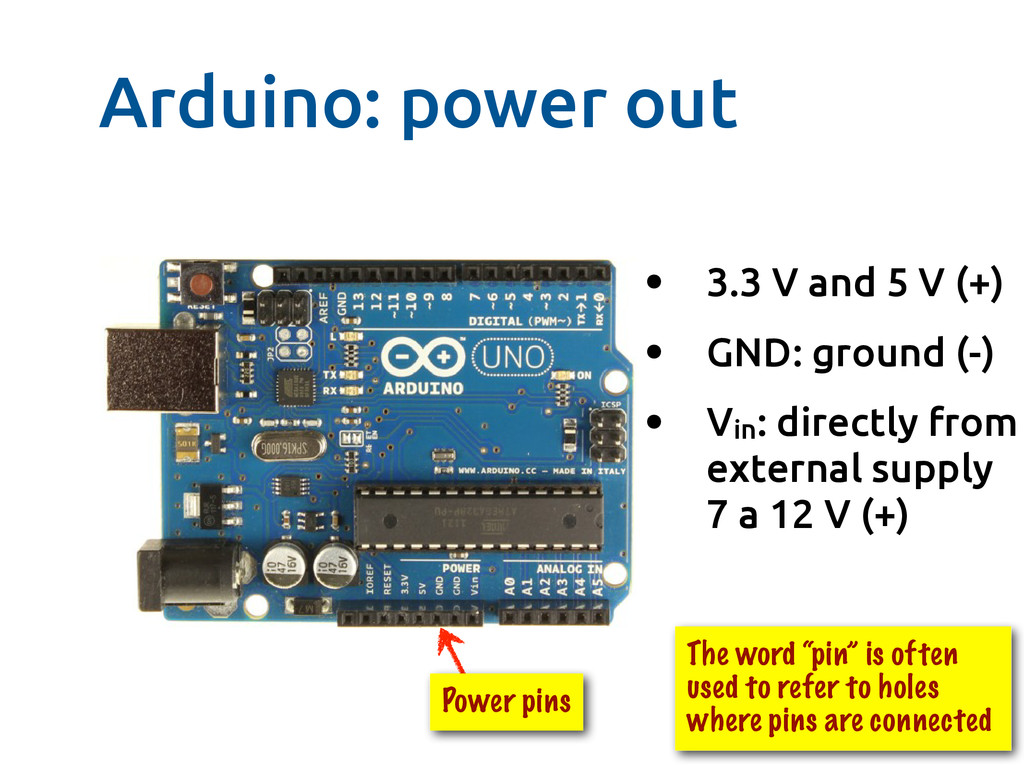
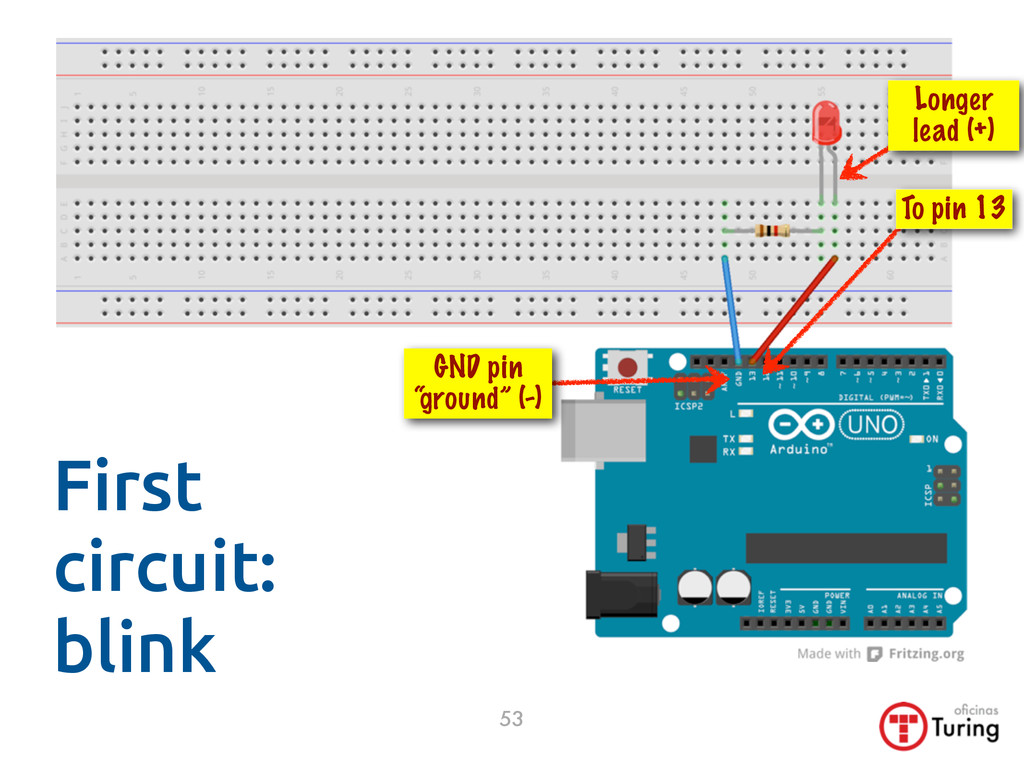
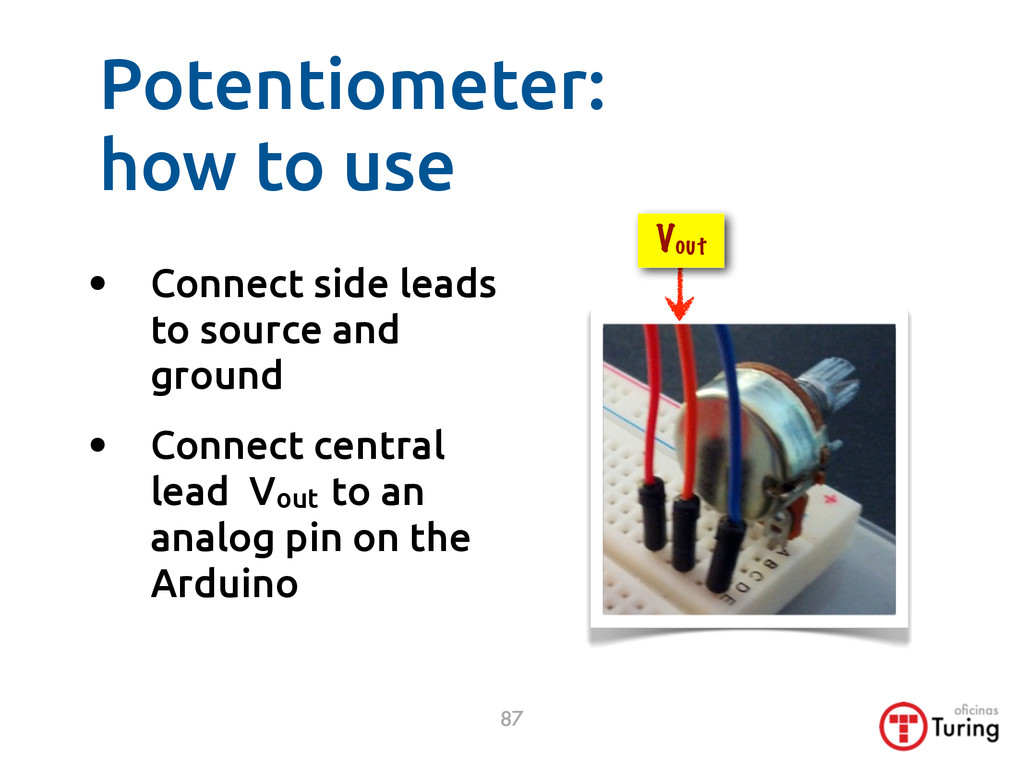
    • GND: ground (-) • Vin: directly from external supply 7 a 12 V (+) 20 Power pins The word “pin” is often used to refer to holes where pins are connected
  13. Input/output pins 14 digital input/ output pins: 0...13 6 analog

    input pins: A0...A5 6 with Pulse Width Modulation: PWM ʙ 21
  14. Inputs × outputs • Inputs: buttons, knobs, sensors etc. •

    Outputs: lights, motors, displays, buzzers etc. 22 ☐ LEDs ☐ 7-segment display ☐ 9g micro-servo ☐ Push-button ☐ Potentiometer ☐ LDR (light sensor) ☐ Re!ective optical sensor ☐ Temperature sensor Output devices Input devices
  15. Breadboard • Known in Brazil as “protoboard” • Available in

    di#erent sizes: • 830 points • 400 points • etc. pictured: 400 points 23
  16. 25

  17. Note: each part connects to two or more columns ...or

    connects one column to a power line
  18. Quiz: can I plug it like this? live examples by

    the teacher using the projection screen... 27
  19. LED: light-emitting diode • + lead (longer) connects to power

    source • % lead (shortest) connects to ground • Connect to resistor in series to protect from excessive current notch 29
  20. What is a resistor? • It reduces current • No

    polarity: may be connected either way • Rated in Ohms (Ω) • Symbols in schematics: 33
  21. Current • Unit: Ampère (A) • Symbol in formulae: I

    • 6.241 × 10¹⁸ electrons per second 9 V ÷ 330 Ω ≈ 0.027 A 27 mA 39
  22. Examples of current Hearing aid 0.7 mA 0.0007 A Cheap

    cell phone charger 500 mA 0.5 A Tablet charger 2.1 A 2.1 A Toaster (@120V) 16 A 16 A Automobile starter motor 120 A 120 A 40
  23. Ohm’s Law V = I × R I = V

    / R R = V / I I V R 41
  24. Suitable resistors for LEDs • In practice, to protect a

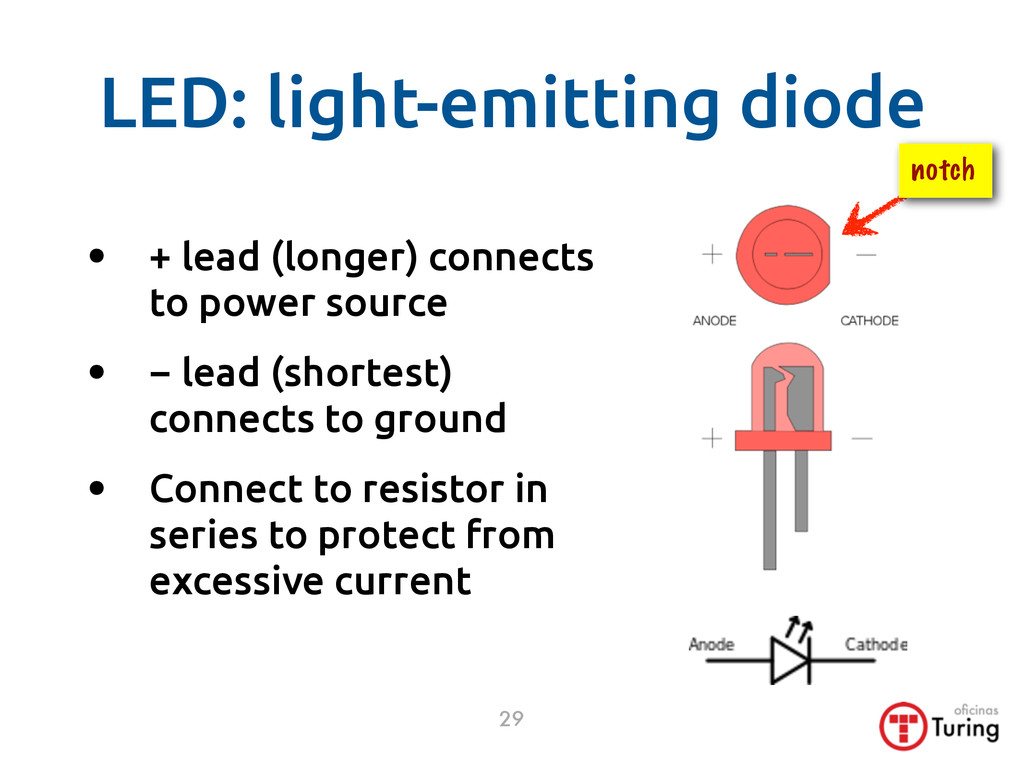
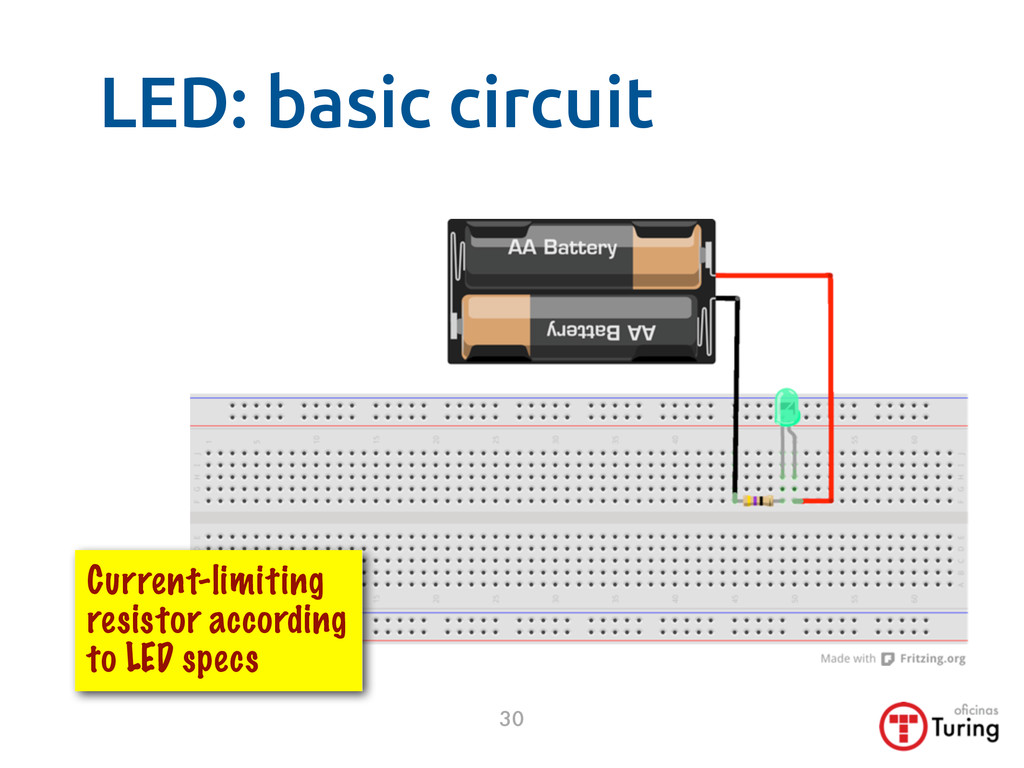
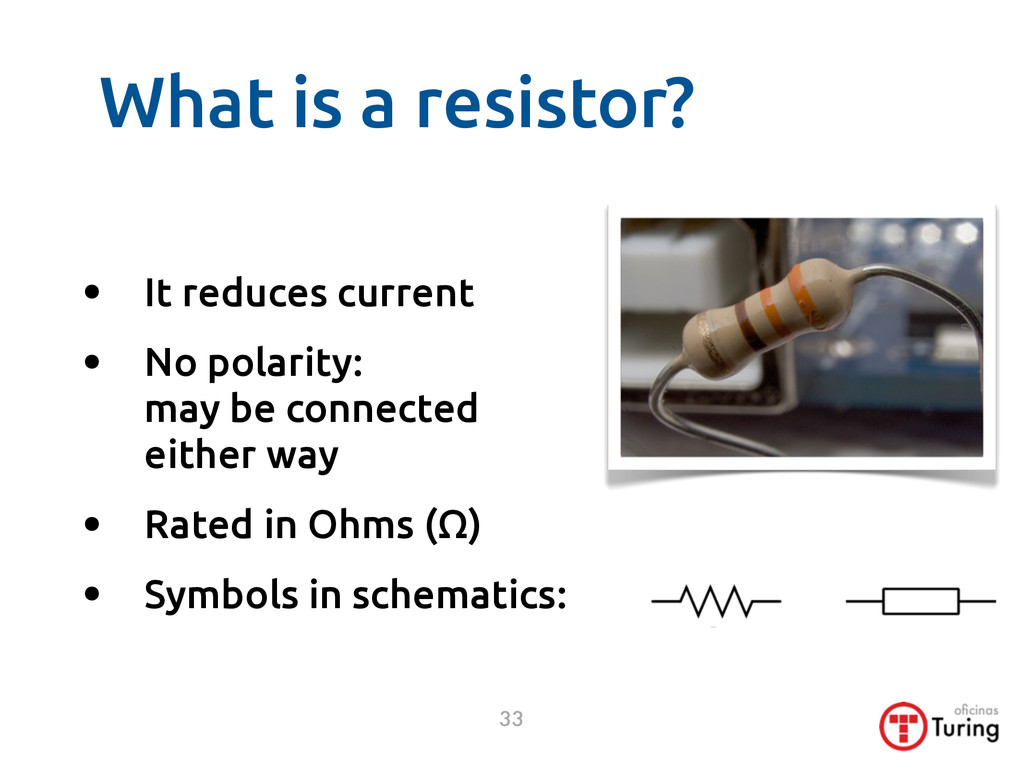
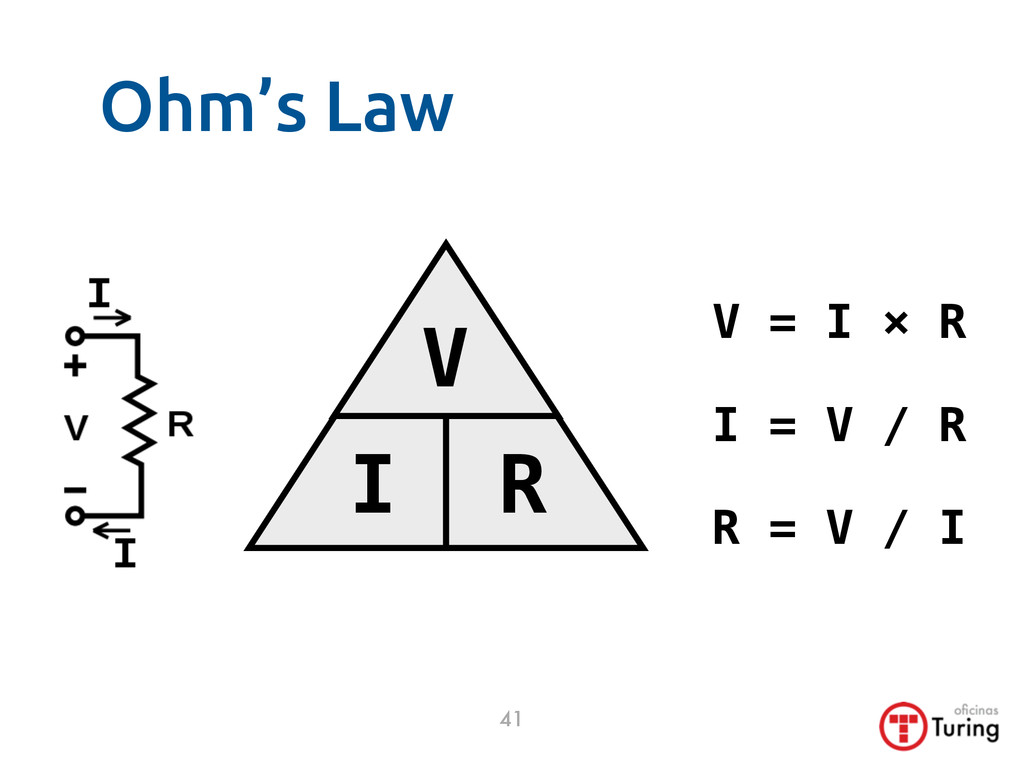
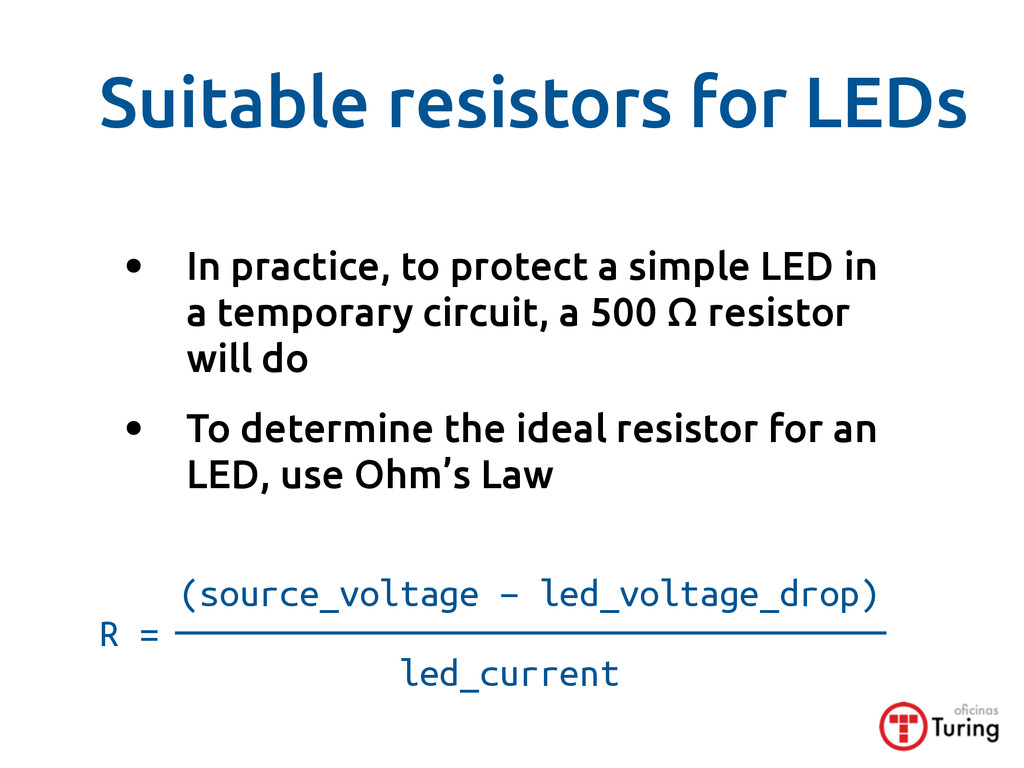
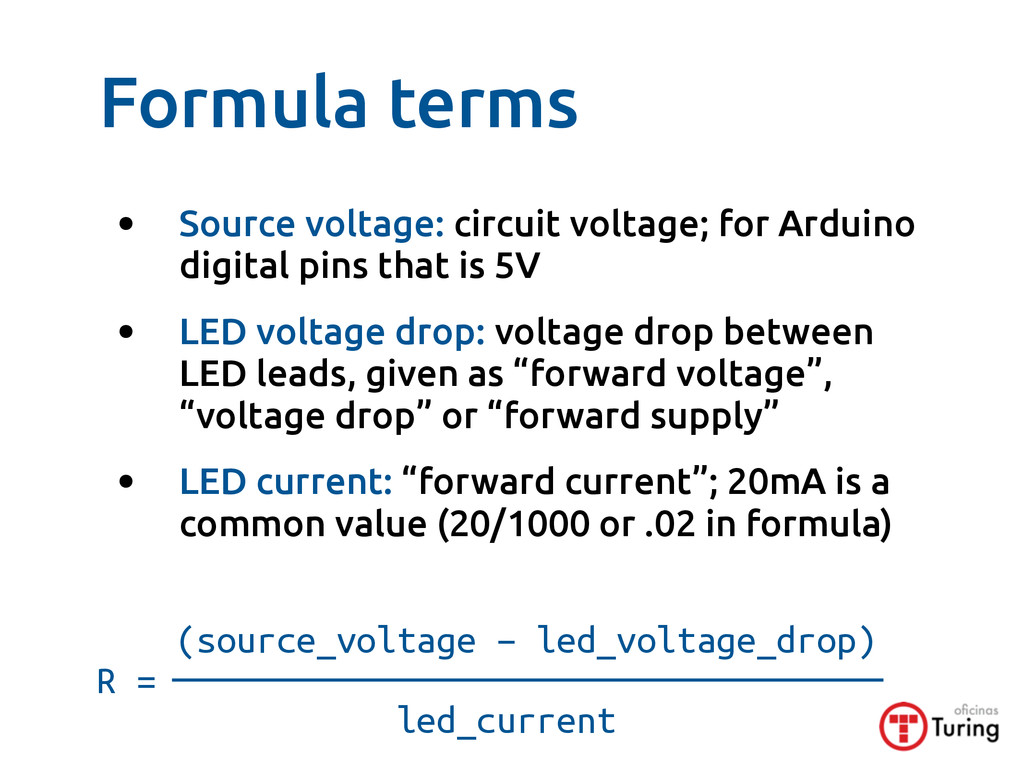
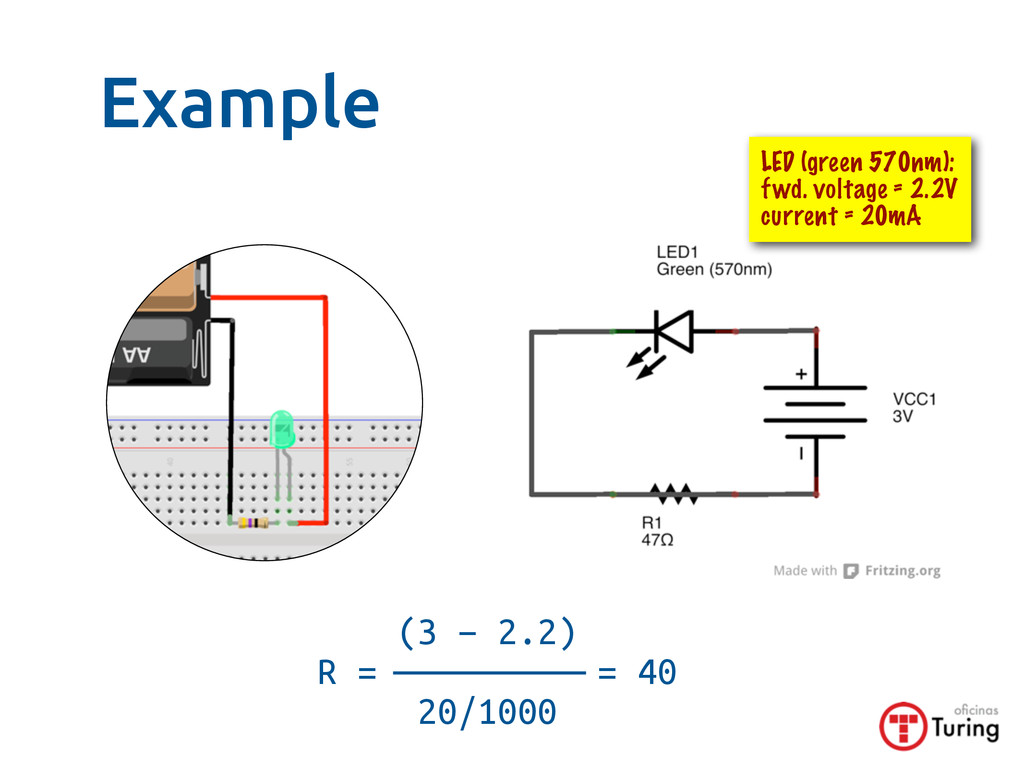
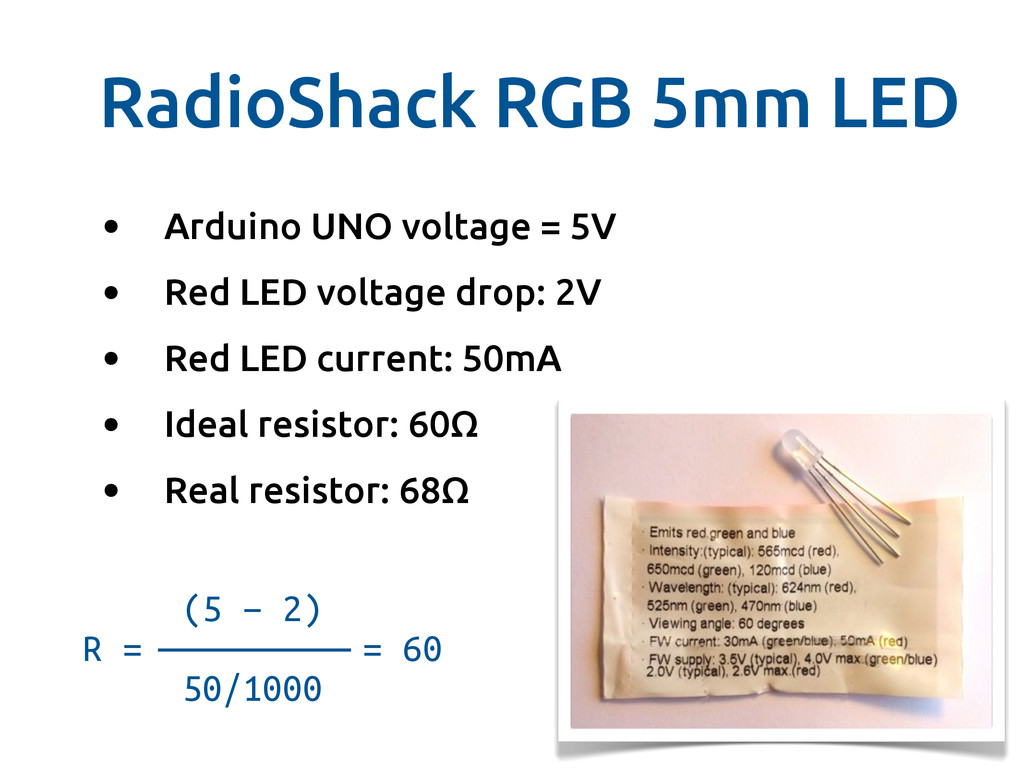
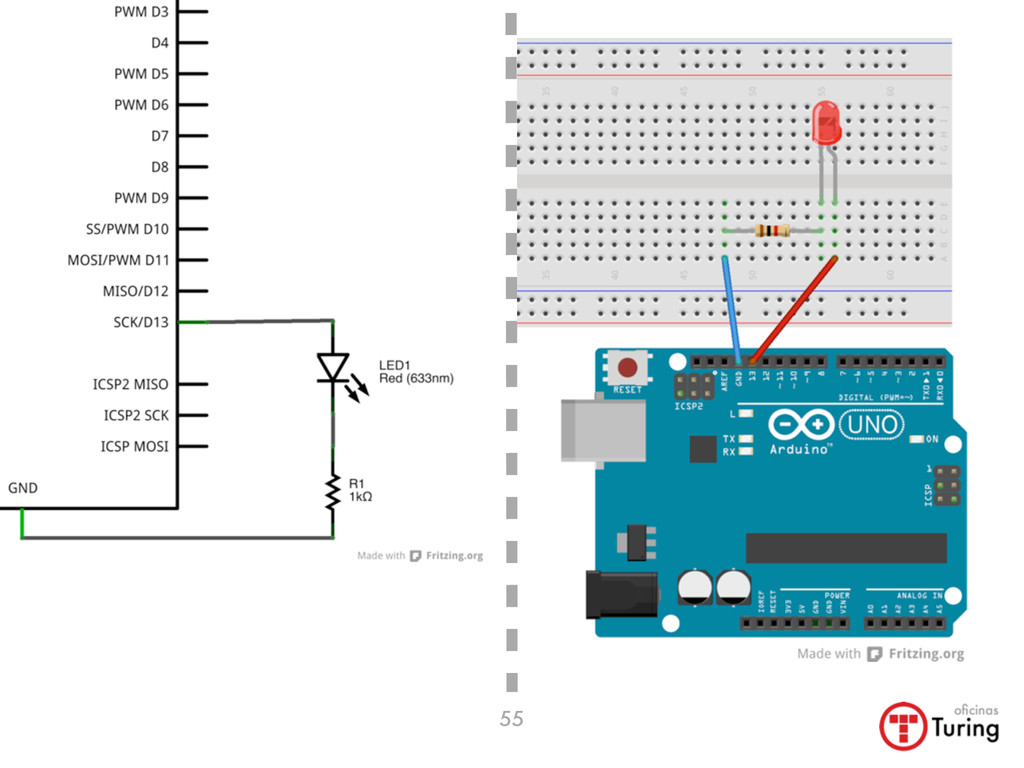
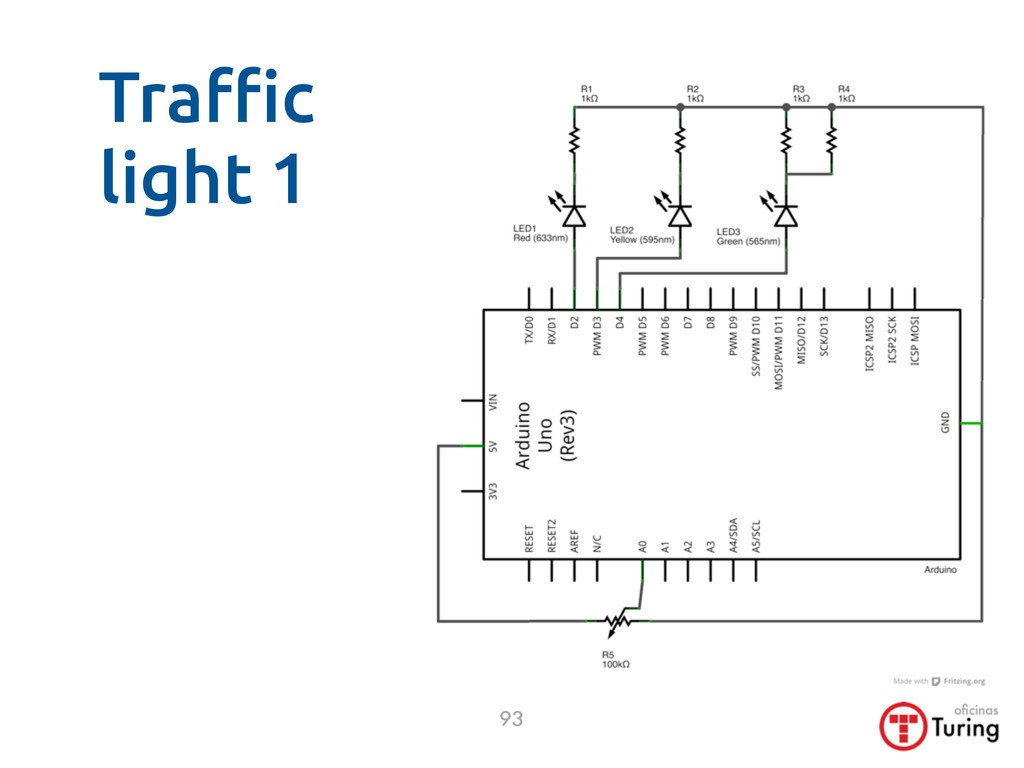
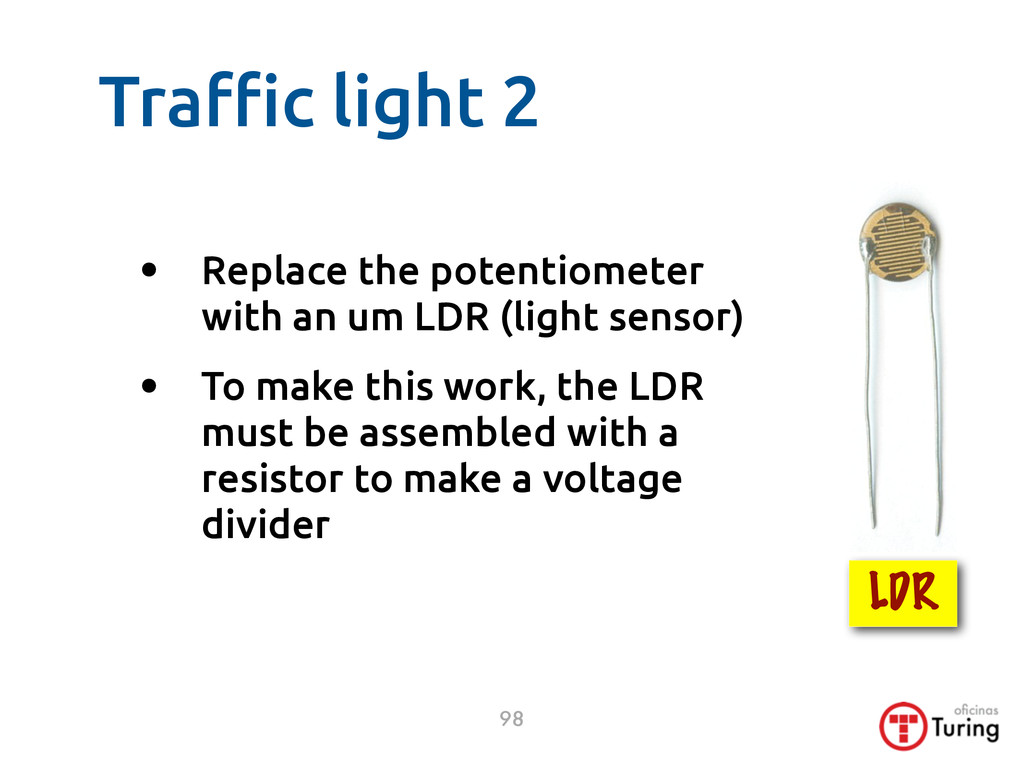
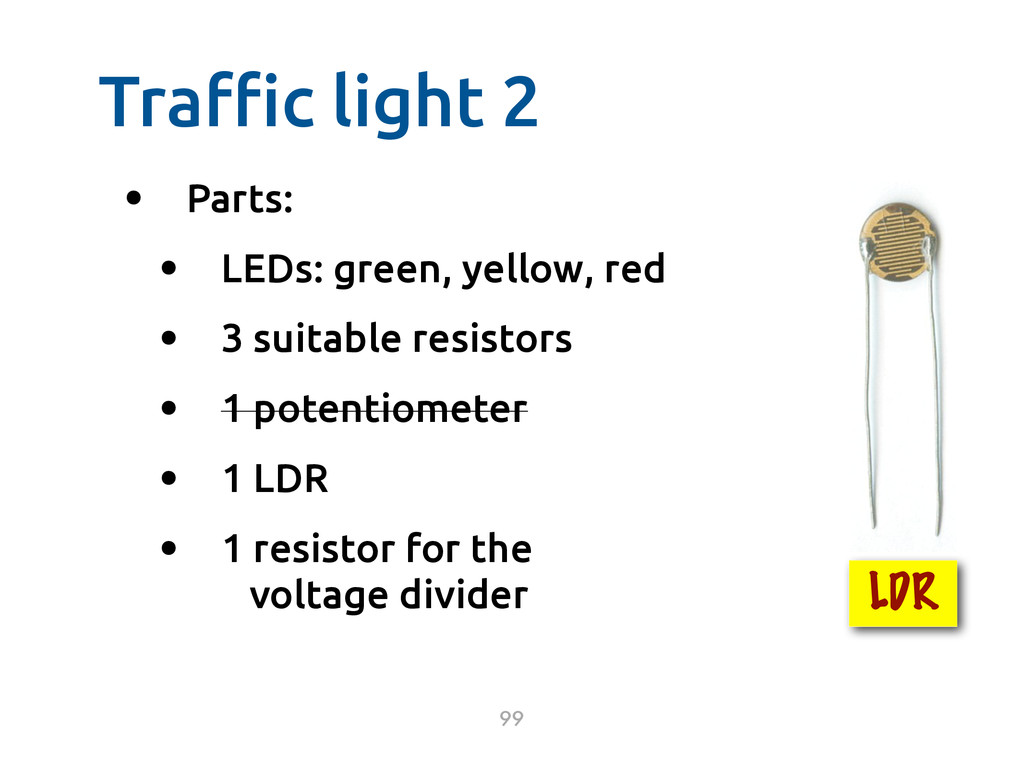
    simple LED in a temporary circuit, a 500 Ω resistor will do • To determine the ideal resistor for an LED, use Ohm’s Law (source_voltage − led_voltage_drop) R = led_current
  25. Formula terms • Source voltage: circuit voltage; for Arduino digital

    pins that is 5V • LED voltage drop: voltage drop between LED leads, given as “forward voltage”, “voltage drop” or “forward supply” • LED current: “forward current”; 20mA is a common value (20/1000 or .02 in formula) (source_voltage − led_voltage_drop) R = led_current
  26. Example 49 (3 − 2.2) R = = 40 20/1000

    LED (green 570nm): fwd. voltage = 2.2V current = 20mA
  27. RadioShack RGB 5mm LED • Arduino UNO voltage = 5V

    • Red LED voltage drop: 2V • Red LED current: 50mA • Ideal resistor: 60Ω • Real resistor: 68Ω 50 (5 − 2) R = = 60 50/1000
  28. 55

  29. Arduino IDE • Easy to use editor, based on Processing.org,

    designed for artists 57 arduino.cc/en/Main/Software
  30. Structure comments 59 Consider the comments in Portuguese a bonus:

    they make it easy to tell what is C++ and what is not
  31. C++ syntax tips • Every statement ends with ; (semicolon)

    • Each comma and semicolon counts, but spaces and line breaks are ignored • Upper case ≠ lower case • ex. Alpha ≠ alpha ≠ ALPHA 72
  32. The UNO microcontroller: Atmel ATmega328 • “AVR” family • clock:

    16 MHz • SRAM: 2 KB • EEPROM: 1 KB • Flash: 32 KB 76
  33. Inputs and outputs of the ATmega328 • 28 pins total

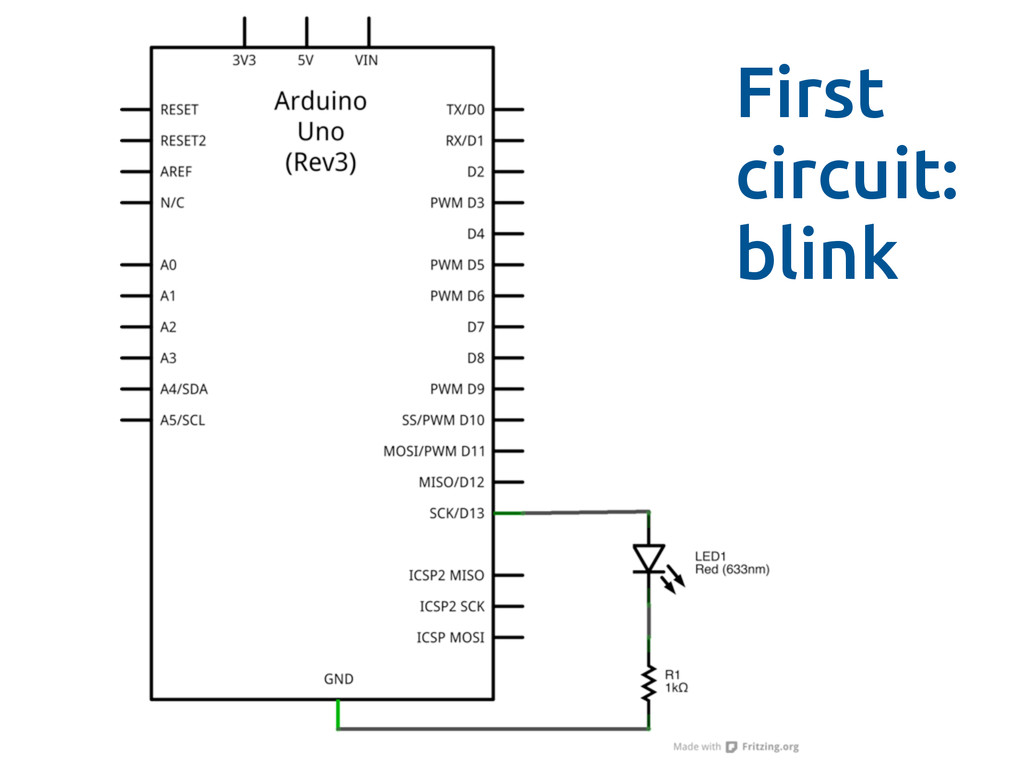
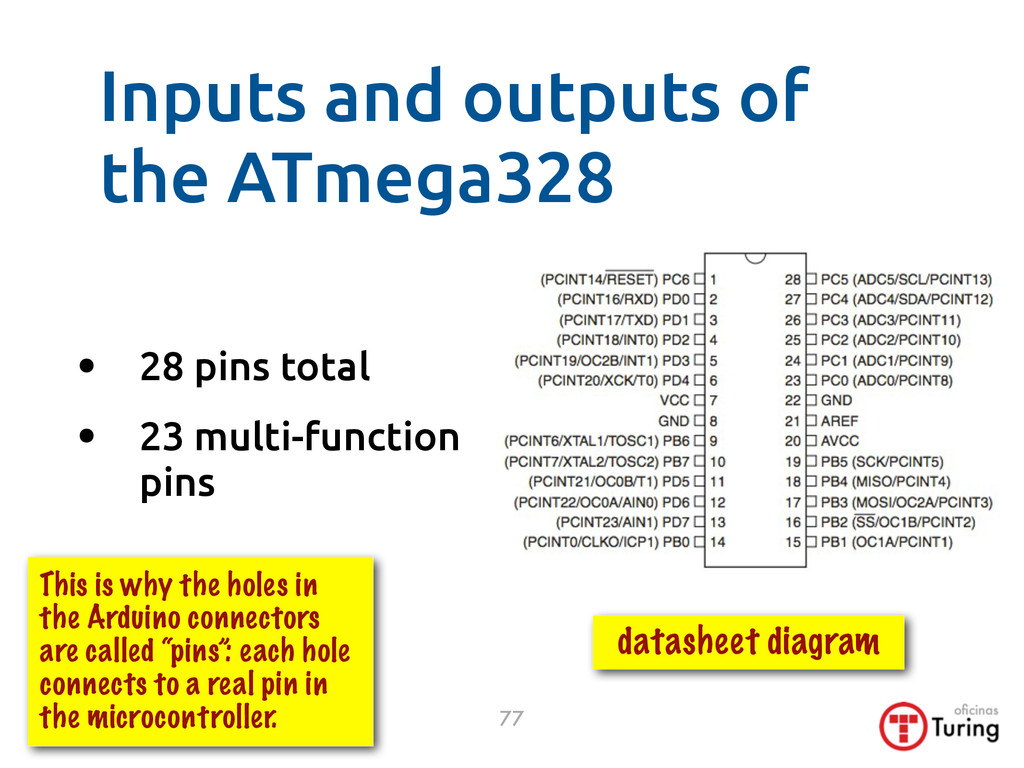
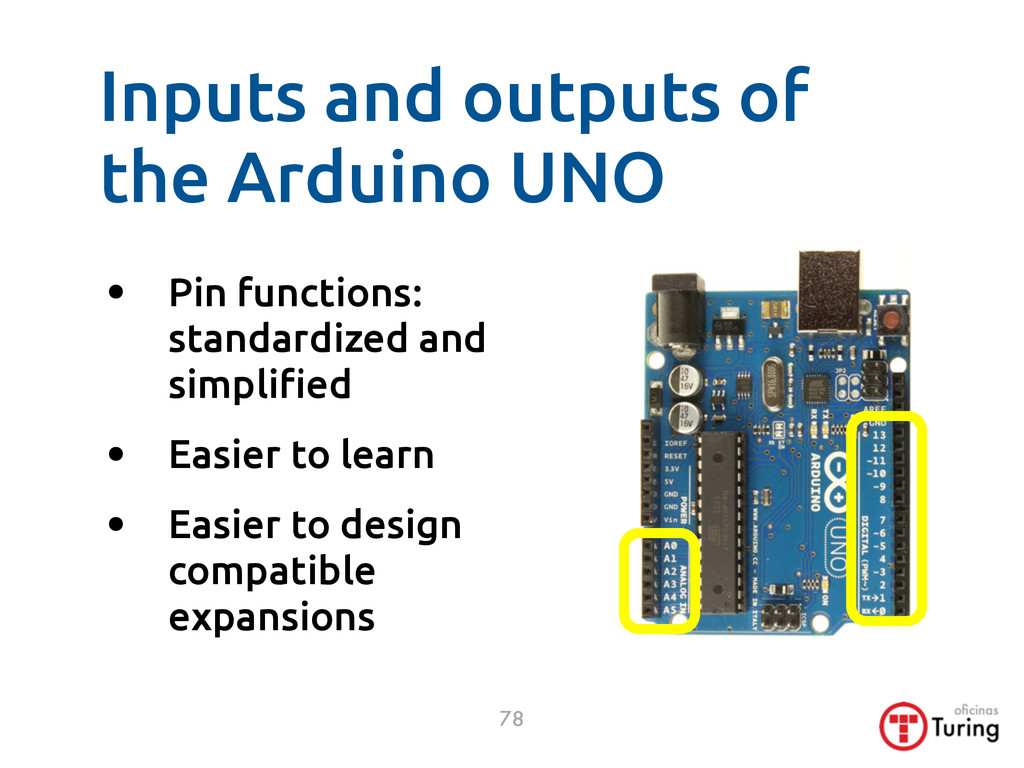
    • 23 multi-function pins 77 datasheet diagram This is why the holes in the Arduino connectors are called “pins”: each hole connects to a real pin in the microcontroller.
  34. • Pin functions: standardized and simpli"ed • Easier to learn

    • Easier to design compatible expansions 78 Inputs and outputs of the Arduino UNO
  35. Shields 79 Arduino with two stacked shields • Expansion boards

    • Some examples: • Ethernet, Wi-Fi, motor driver, acelerometer, GPS, LCD touch screen...
  36. Shields 80 5 stacked shields! • More examples: • GPRS,

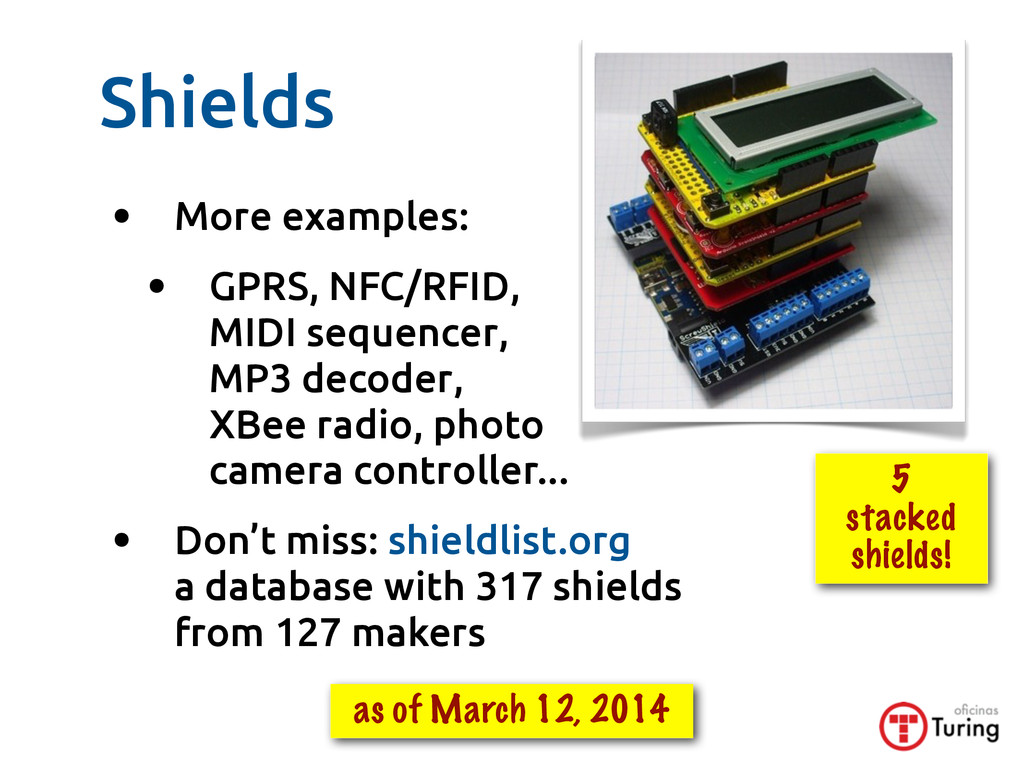
    NFC/RFID, MIDI sequencer, MP3 decoder, XBee radio, photo camera controller... • Don’t miss: shieldlist.org a database with 317 shields from 127 makers as of March 12, 2014
  37. 83

  38. 84 Reset button Voltage regulator LED connected to “pin 13”

    ATMega328 Power-on LED connects to FTDI adapter for programming via USB 16MHz crystal
  39. Potentiometer: how to use 87 Vout • Connect side leads

    to source and ground • Connect central lead Vout to an analog pin on the Arduino
  40. Reading an LDR • 5V to LDR • 10k Ω

    resistor in series, to ground • between them: Vout connected to an analog pin (ex. A0) 90
  41. Tra!c light 1 • Parts: • LEDs: green, yellow, red

    • 3 suitable resistors • 1 potentiometer • Code: gist.github.com/ramalho/6202074 92
  42. Tra!c light 2 • Replace the potentiometer with an um

    LDR (light sensor) • To make this work, the LDR must be assembled with a resistor to make a voltage divider 98 LDR
  43. Tra!c light 2 • Parts: • LEDs: green, yellow, red

    • 3 suitable resistors • 1 potentiometer • 1 LDR • 1 resistor for the voltage divider 99 LDR
  44. Re)ective optical sensor • Detects near objects (up to 25mm

    or 1in) • Emitter: infrared LED (invisible light) • Sensor: phototransistor protected against visible light • Use with voltage divider bezel 102
  45. 7 segment display • 3 digits • model: CPS03631AB •

    typo: common anode • part number: CPS03631BR-11 pictured: CPS3631AR 105
  46. 7 segment display • “Common anode” means: all segments of

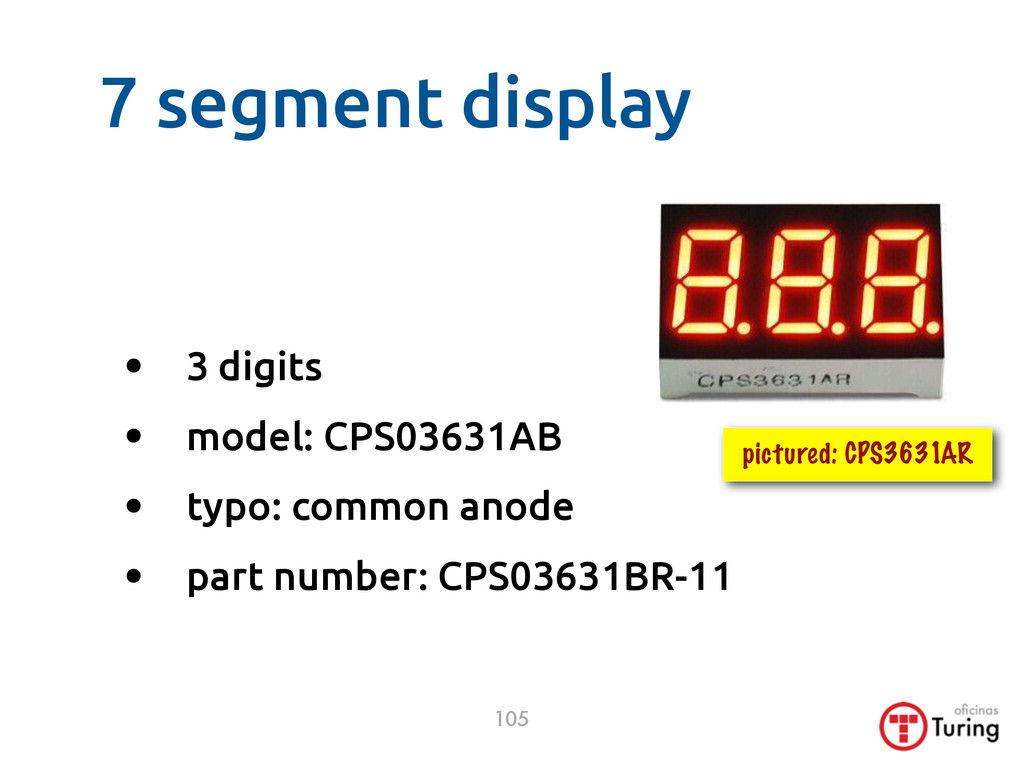
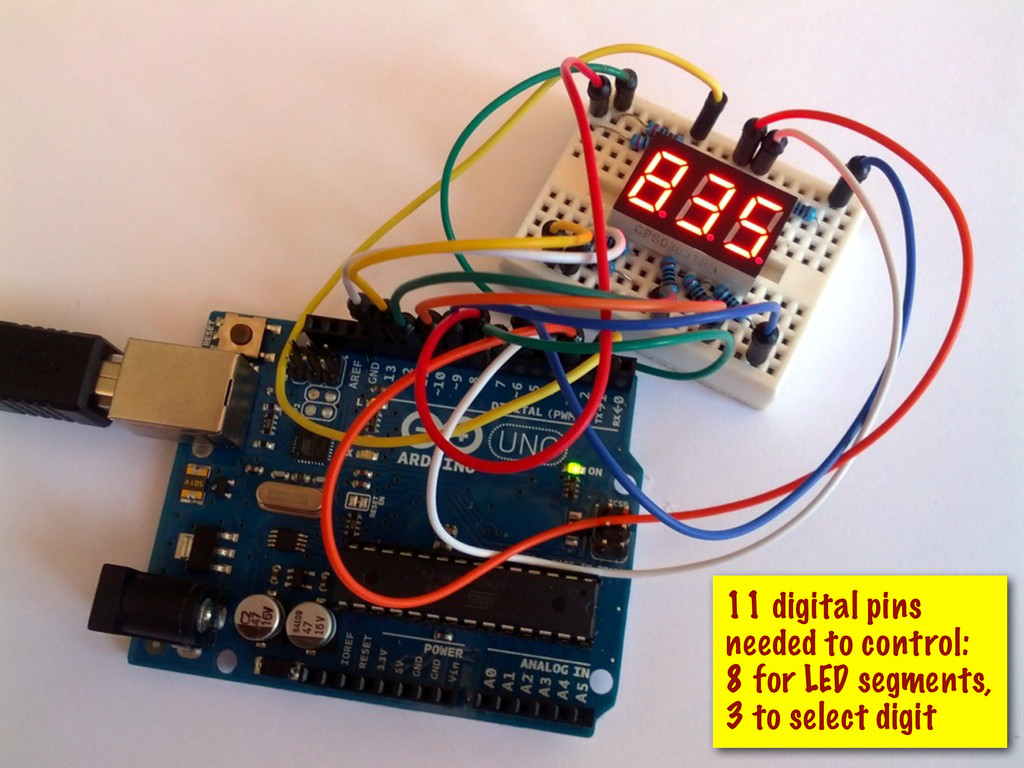
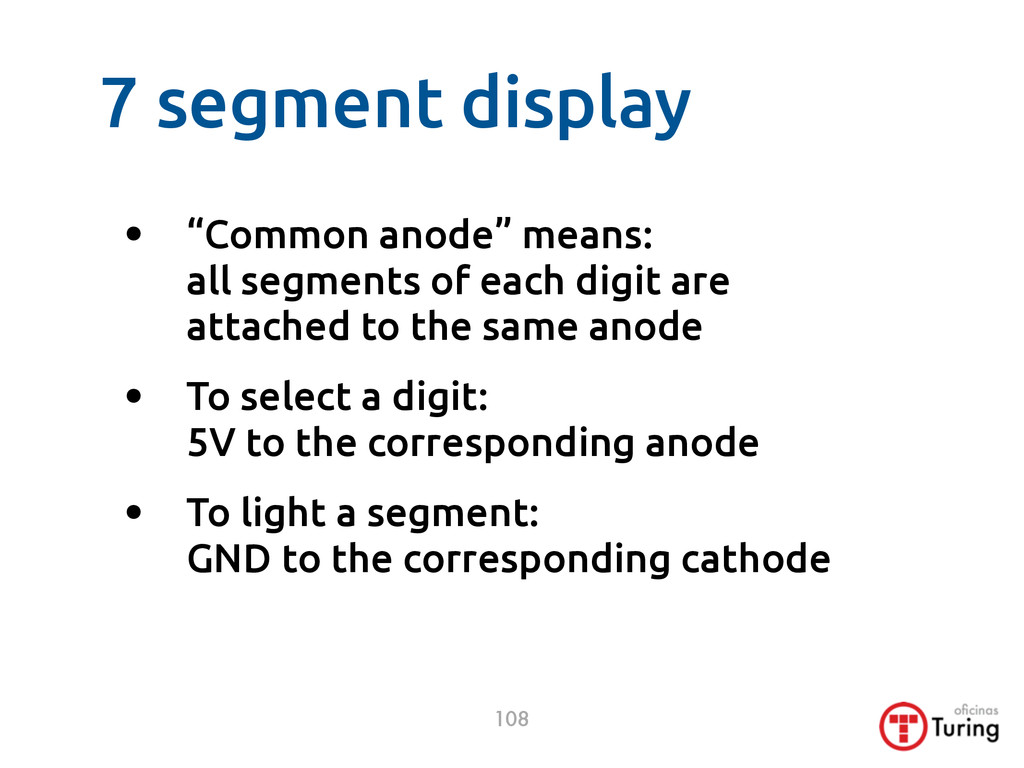
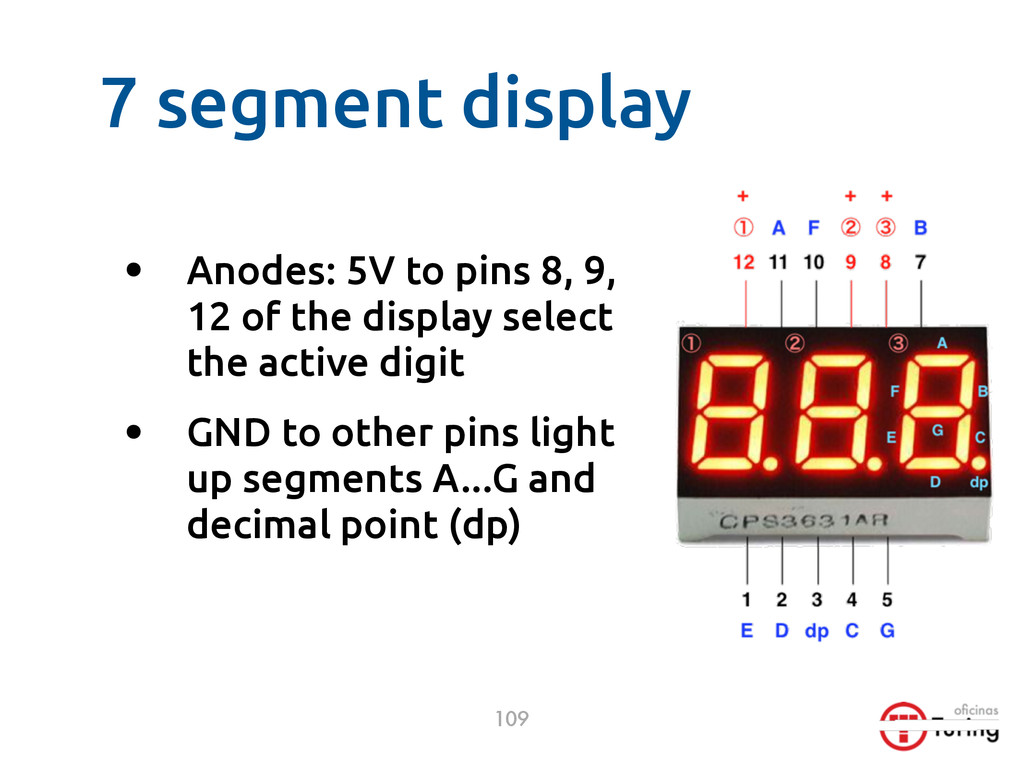
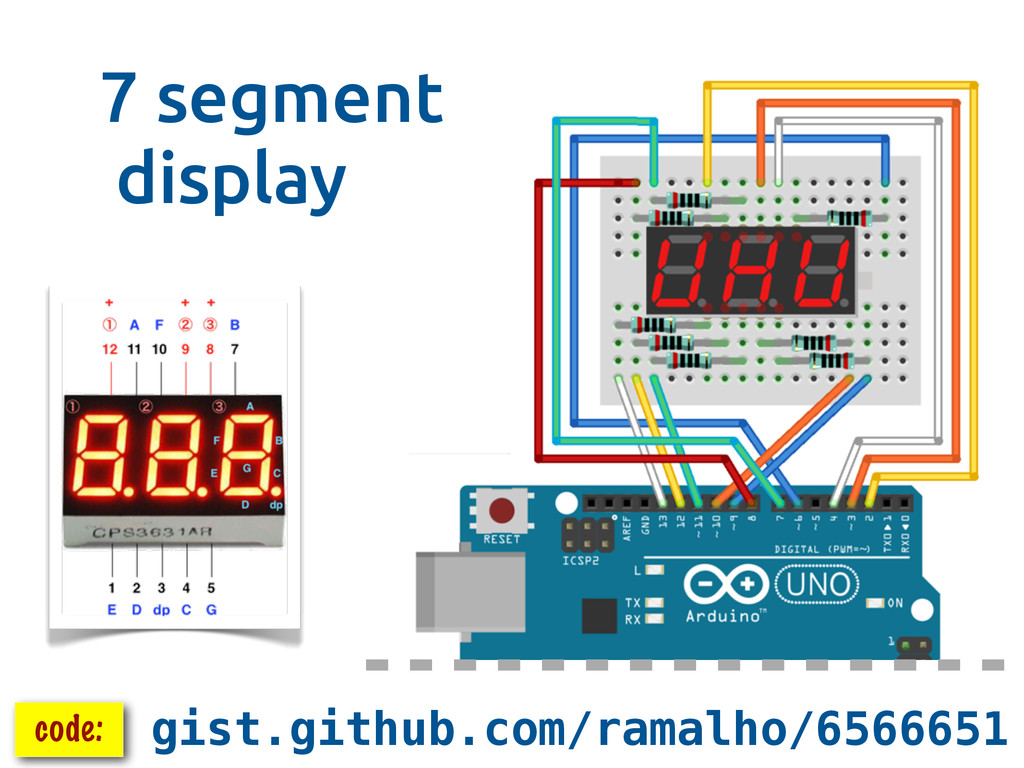
    each digit are attached to the same anode • To select a digit: 5V to the corresponding anode • To light a segment: GND to the corresponding cathode 108
  47. • Anodes: 5V to pins 8, 9, 12 of the

    display select the active digit • GND to other pins light up segments A...G and decimal point (dp) 109 7 segment display
  48. Servomotor • Controlled movement in 180° arch • Easy programming

    using Arduino Servo library • examples included with the Arduino IDE 111
  49. Servomotor 112 • You may need an external power source

    just for the servos External power source GND must connect to Arduino GND 5V DC Some servos draw more current than the Arduino can provide
  50. 113 TowerPro SG90 9g servo to external DC adapter 5V,

    1A common ground Arduino powered by USB
  51. References • O!cial Arduino site: arduino.cc • Arduino Experimentation Kit:

    oomlout.com/a/products/ardx • Laboratório de garagem labdegaragem.com • Web: blogs, videos, wikis, diagrams... 115
  52. Physical shops in São Paulo • Multcomercial, R. dos Timbiras,

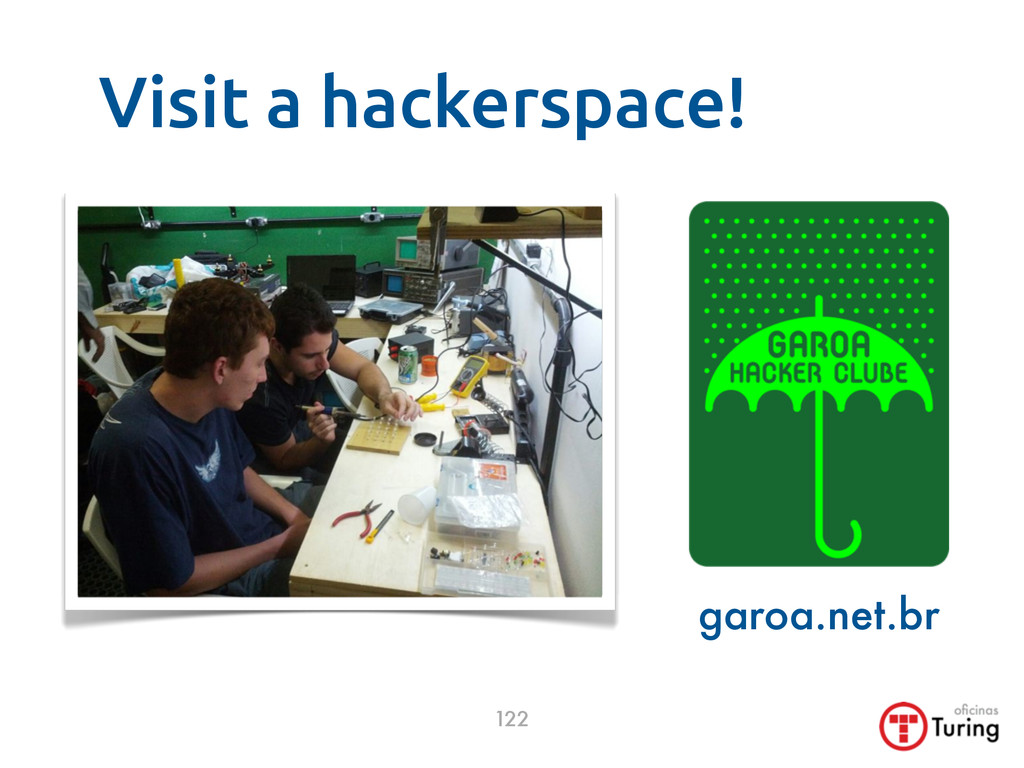
    257 • Side streets o# and parallel to Santa E"gênia, including junk stores • Laboratório de Garagem, Rua Berta, 60 (metrô Vila Mariana) • Neighborhood shops like Eletrônica Pinheiros, Rua Butantã, 133 119
  53. Online shops • Laboratório de Garagem: labdegaragem.com • Farnell Newark:

    farnellnewark.com.br • Adafruit: adafruit.com • Sparkfun: sparkfun.com • Seeedstudio: seeedstudio.com • Many: dx.com, ebay.com (many sellers) seeedstudio with 3 “e”! 120
  54. Seeedstudio Shield Bot • Line-following robot • Ready to go,

    only battery assembly is required • Fits an Arduino UNO under the chassics and shields above US $ 69.90 121
  55. Credits Turing.com.br oficinas 123 • Slides created, compiled and organized

    by Luciano Ramalho (O"cinas Turing) with the help of many sources • License for use and copying: Creative Commons BY-SA • You may copy and use for any purpose as long as attribution is given and you share derivative works under the same terms