Upgrade to Pro — share decks privately, control downloads, hide ads and more …

Develop your first mobile App for iOS and Android

Alco
March 12, 2013

Develop your first mobile App for iOS and Android

Alco

March 12, 2013
Tweet

More Decks by Alco

Other Decks in Programming

Transcript

  1. Develop your first mobile App for iOS and Android! Ricardo

    Alcocer // Platform Evangelist! March 12, 2013! Silicon Valley Titanium User Group!
  2. Base assumptions! •  You are not a “hardcore coder”! • 

    You know how to build websites with HTML and CSS! •  You have seen at least a little bit of Javascript!
  3. About Appcelerator Titanium! •  Not a language, but a high-level

    Javascript SDK! •  Allows you build Native Apps for iOS (iPhone, iPod Touch, iPad), Android (Phone and Tablet), Mobile Web, Blackberry 10 (beta), soon for Windows 8 and Tizen! •  Free/Open Source!! •  It’s Native, NOT web app!
  4. The design of your App is
 SUPER important! If the

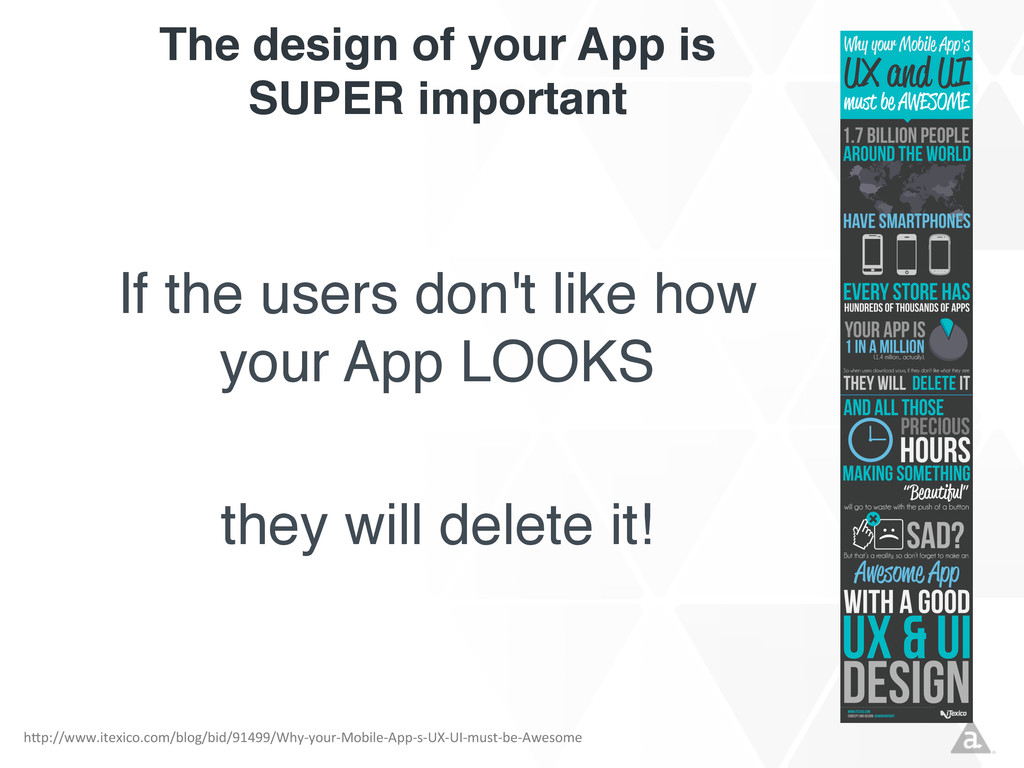
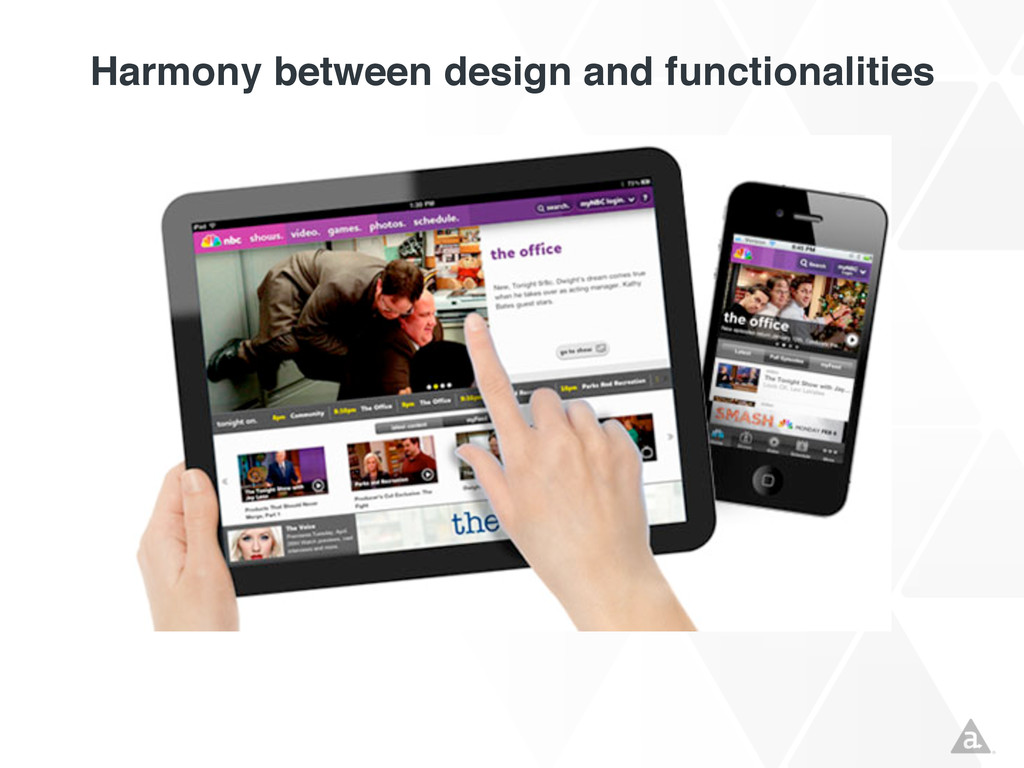
    users don't like how your App LOOKS ! ! they will delete it!! h"p://www.itexico.com/blog/bid/91499/Why-­‐your-­‐Mobile-­‐App-­‐s-­‐UX-­‐UI-­‐must-­‐be-­‐Awesome  
  5. Model   View   Controller   TSS   XML  

    JS   JS   Invisible  to  the  end-­‐user   User  Interface  Components   The MVC Pattern!
  6. Configure platform SDKs! SDKs  allow  you  to  compile  with  the

     naRve  tools  and  provide  you  with  Phone  Simulators  for  tesRng  
  7. Configure your project! In  reverse  URL  format:  ie.  (com.mycompany.myapp)  

      Select  target  plaYorms  for  this  project   Are  you  using  Appcelerator  Cloud  Services?   Name  for  your  App  
  8. These  two  work  together  to  build  UI   These  one

     implement  funcRonaliRes     and  interacRvity   Remember?   We  won’t  look  at  these  
  9. Running an App! You’ll  only  see  the  target   plaYorms

     you  explicitly     configured     iPhone  is  only  available  on  Mac   Android  is  available  on  Win,   Mac  and  Linux  
  10. Default index.xml! <Alloy>        <Window  class="container">    

                           <Label  id="label"  onClick="doClick">Hello,  World</Label>        </Window>   </Alloy>  
  11. Objects in index.xml! <Alloy>        <Window  class="container">  

                             <Label  id="label"  onClick="doClick">Hello,  World</Label>        </Window>   </Alloy>  
  12. index.xml + index.tss working together! <Alloy>        <Window

     class="container">              <Label  id="label"  onClick="doClick">Hello,  World</Label>        </Window>   </Alloy>   ".container":  {        backgroundColor:"white"   },   "Label":  {        width:  Ti.UI.SIZE,        height:  Ti.UI.SIZE,        color:  "#000"   }   XML   TSS  
  13. Thinking as a Web developer! DIV   DIV   DIV

      DIV   DIV   DIV   DIV   DIV   PAGE  
  14. In Titanium Terms! VIEW   VIEW   VIEW   VIEW

      VIEW   VIEW   VIEW   VIEW   Window   TableView  
  15. Building the App Structure (XML)! <Alloy>      <Window  class="container">

             <View  id="header">              <View  id="appicon"></View>              <Label  id="apptitle">Funny  Stuff</Label>          </View>          <TableView  id="mainlist">              <TableViewRow  id="listrow">                  <View  id="rowContainer">                      <View  id="rowIcon"></View>                      <Label  id="rowTitle">Some  Title</Label>                      <View  id="rowTypeContainer">                          <Label  id="rowTypeCaption">Type:</Label>                          <Label  id="rowTypeData">Some  Type</Label>                      </View>                  </View>              </TableViewRow>          </TableView>      </Window>   </Alloy>   Expected  Result  
  16. Building the App Structure (XML)! <Alloy>      <Window  class="container">

             <View  id="header">              <View  id="appicon"></View>              <Label  id="apptitle">Funny  Stuff</Label>          </View>          <TableView  id="mainlist">              <TableViewRow  id="listrow">                  <View  id="rowContainer">                      <View  id="rowIcon"></View>                      <Label  id="rowTitle">Some  Title</Label>                      <View  id="rowTypeContainer">                          <Label  id="rowTypeCaption">Type:</Label>                          <Label  id="rowTypeData">Some  Type</Label>                      </View>                  </View>              </TableViewRow>          </TableView>      </Window>   </Alloy>   Expected  Result  
  17. Hey! That’s not what I wanted! We  need  to  apply

     styling  to  the  elements.    Let’s  start  with  container  and  header  
  18. Styling the main “container” and “header”! ".container":  {    

     backgroundColor:"white",      layout:  'vertical'   },   "#header":{      height:  "50dp",      backgroundColor:  "blue"   }   Next:  the  “appicon”  area  
  19. Styling the “appicon”! "#appicon":{      width:  "50dp",    

     height:  "50dp",      left:  "0",      backgroundColor:  "#fff"   }   Next:  let’s  specify  a  height  for  the  “rowContainer”  
  20. The App so far! "#rowContainer":{    height:  "60dp"   }

      Next:  the  “rowIcon”  area  
  21. The App so far! "#rowIcon":{      lek:  “5dp”,  

       height:  "50dp",      width:  "50dp",      backgroundColor:  "red  "   }   Next:  the  rest  of  the  elements  in  the  “rowContainer”  
  22. The App so far! "#rowTitle":{      lek:  "60dp",  

       top:  "5dp",      width:  Ti.UI.SIZE,   },   "#rowTypeContainer":{      bo"om:  "5dp",      height:  "20dp",      width:  Ti.UI.SIZE,      layout:  "horizontal",      lek:  "60dp"   },   "#rowTypeCapRon":{      height:  Ti.UI.SIZE,      width:  Ti.UI.SIZE   },   "#rowTypeData":{      height:  Ti.UI.SIZE,      width:  Ti.UI.SIZE   }   Next:  some  colors  on  the  row  elements  
  23. The App so far! "#rowTypeCapRon":{      height:  Ti.UI.SIZE,  

       width:  Ti.UI.SIZE,      font:  {          fontSize:  "12dp"      }   },   "#rowTypeData":{      height:  Ti.UI.SIZE,      width:  Ti.UI.SIZE,      font:  {          fontSize:  "12dp"      }   }   Next:  some  colors  on  the  “header”  area  
  24. The App so far! "#header":{      height:  "50dp",  

       backgroundColor:  "#4698D6"   },   "#appRtle":{      font:  {          fontSize:  "20dp",      fontWeight:  "bold"      },      color:  "#fff"   }     Next:    more  styling  on  the  table  rows  
  25. The App so far! "#rowContainer":{      height:  "60dp",  

     top:  "5dp",      right:  "5dp",      bo"om:  "5dp",      lek:  "5dp",      borderWidth:  1,      borderColor:  "#cacaca",      borderRadius:  5   }     Next:  some  more  colors  on  the  table  row    
  26. The App so far! "#rowContainer":{      height:  "60dp",  

       top:  "5dp",    right:  "5dp",      bo"om:  "5dp",      lek:  "5dp",      backgroundColor:  "#f9f9f9",      borderWidth:  1,      borderColor:  "#cacaca",      borderRadius:  5   },   "#rowTypeCapRon":{      height:  Ti.UI.SIZE,      width:  Ti.UI.SIZE,      font:  {          fontSize:  "12dp",          fontWeight:  "bold"      },      color:  "#B73B22"   }     Next:  the  icon  on  the  row  
  27. The App so far! <View  id="rowIcon"  backgroundImage="/happyface.png"></View>   Images  live

     inside  the  /assets  folder.   We’ll  make  this  change  on  the  XML,  so  we  can   assign  different  images  to  each  row:   Next:  the  icon  on  the  “header”  
  28. The App so far! "#appicon":{      width:  "50dp",  

       height:  "50dp",      lek:  "0",      backgroundImage:  "/topicon.png"   }     Finally:  some  real  data  on  the  table  row  
  29. The App so far! <TableViewRow  id="listrow">    <View  id="rowContainer">  

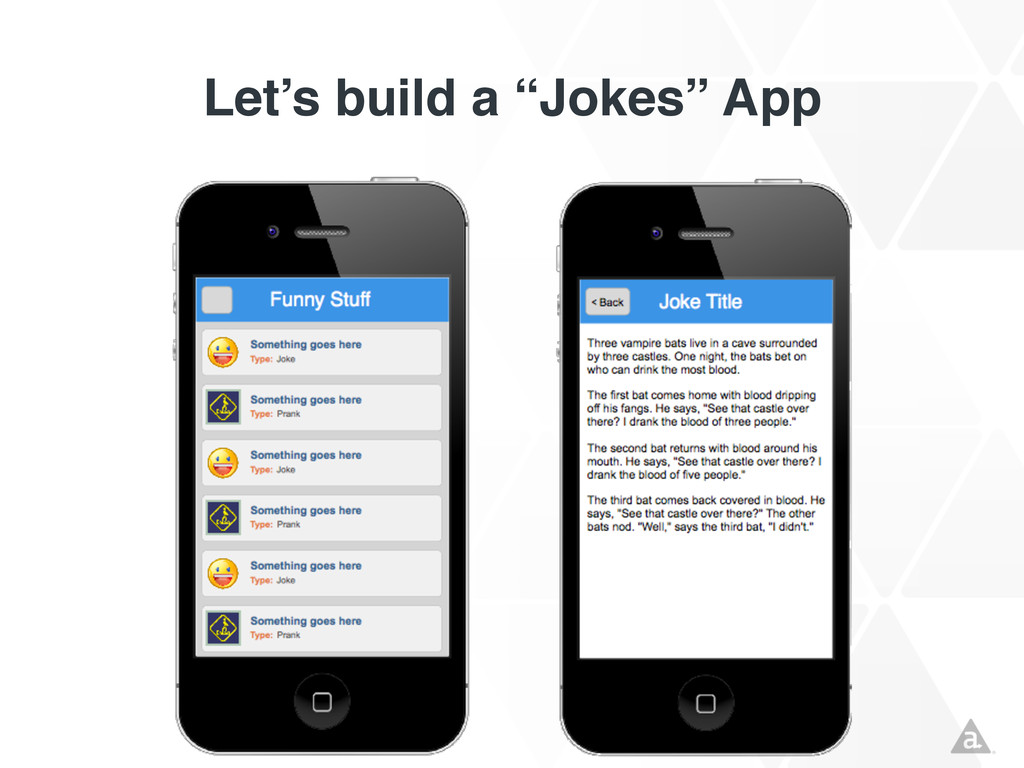
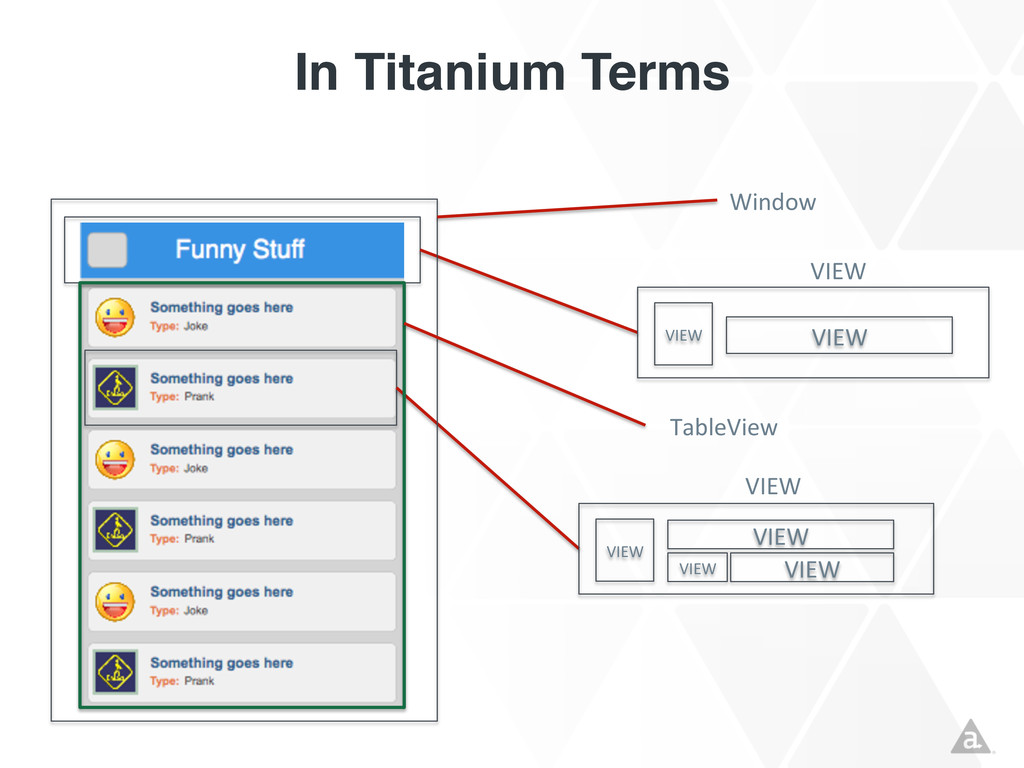
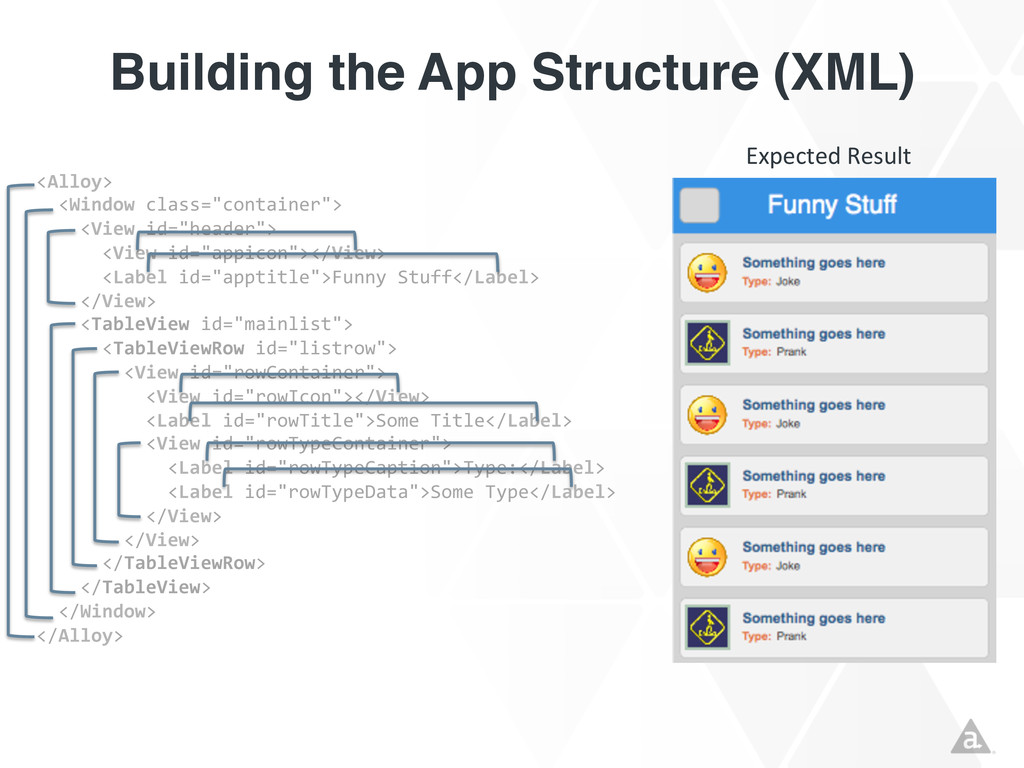
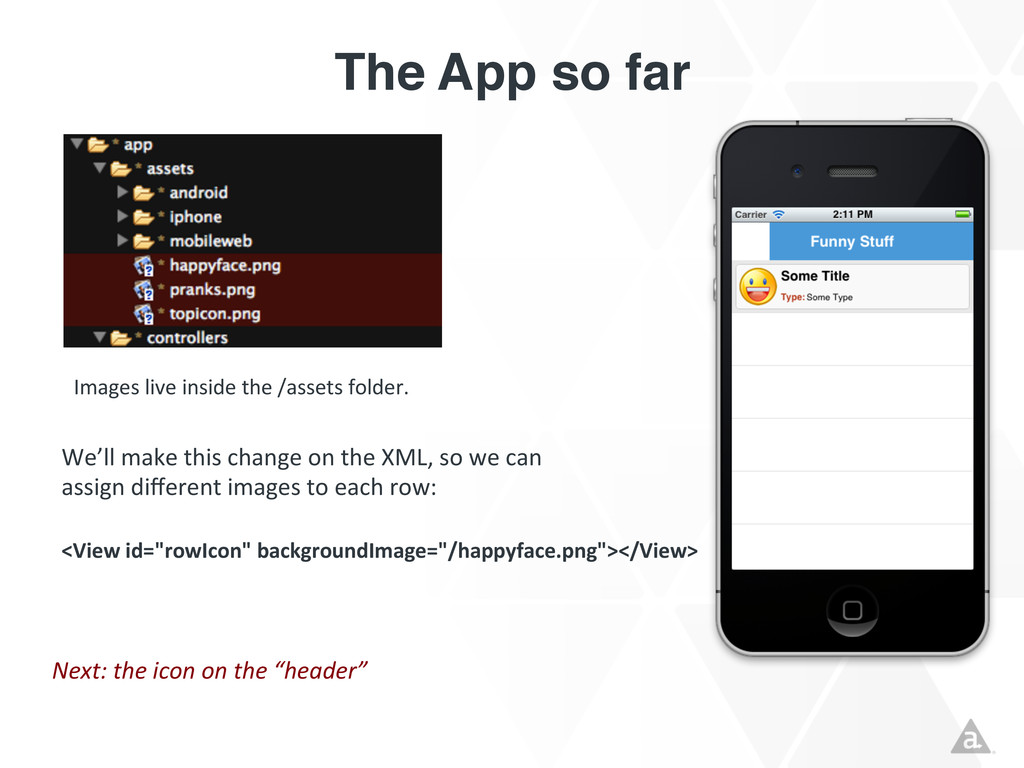
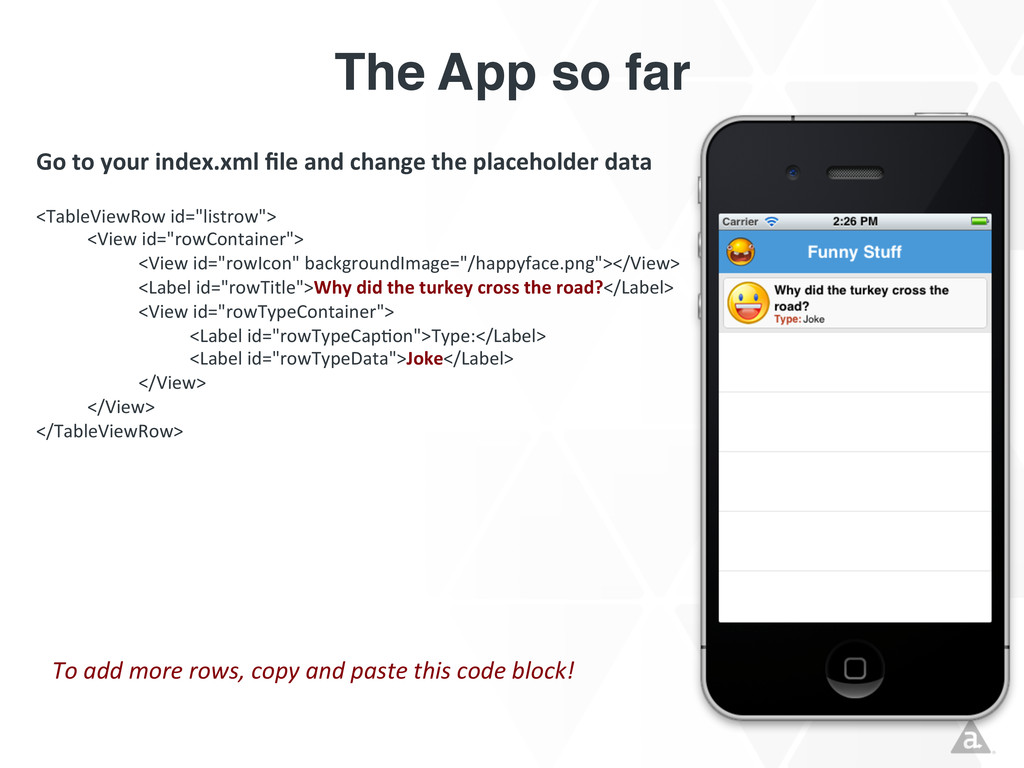
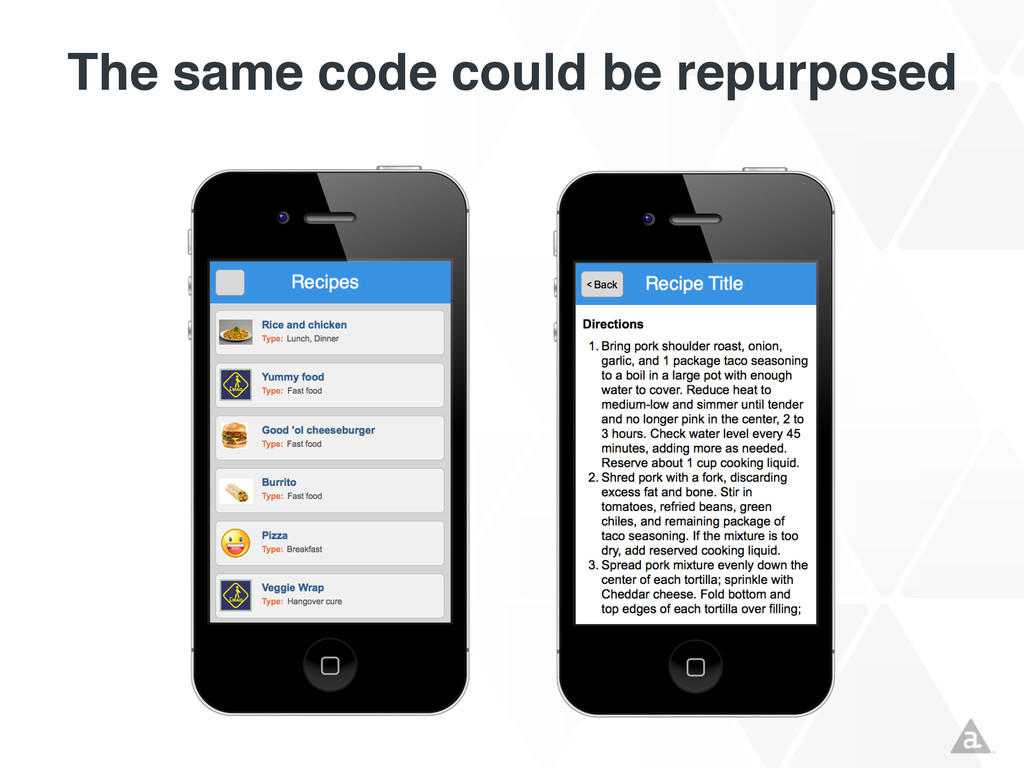
               <View  id="rowIcon"  backgroundImage="/happyface.png"></View>              <Label  id="rowTitle">Why  did  the  turkey  cross  the  road?</Label>              <View  id="rowTypeContainer">                    <Label  id="rowTypeCapRon">Type:</Label>                    <Label  id="rowTypeData">Joke</Label>              </View>        </View>   </TableViewRow>   Go  to  your  index.xml  file  and  change  the  placeholder  data   To  add  more  rows,  copy  and  paste  this  code  block!  
  30. The App so far! Use  the  same  procedure  to  create

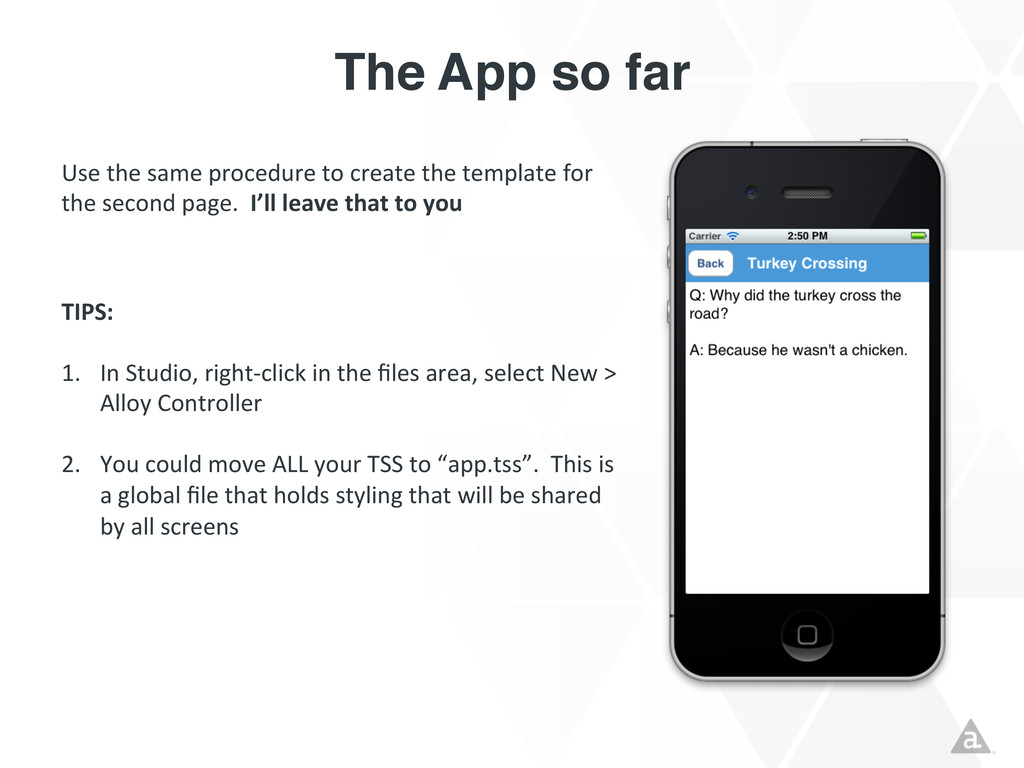
     the  template  for   the  second  page.    I’ll  leave  that  to  you   TIPS:       1.  In  Studio,  right-­‐click  in  the  files  area,  select  New  >   Alloy  Controller   2.  You  could  move  ALL  your  TSS  to  “app.tss”.    This  is   a  global  file  that  holds  styling  that  will  be  shared   by  all  screens    
  31. A little bit of code to link both files (1/4)!

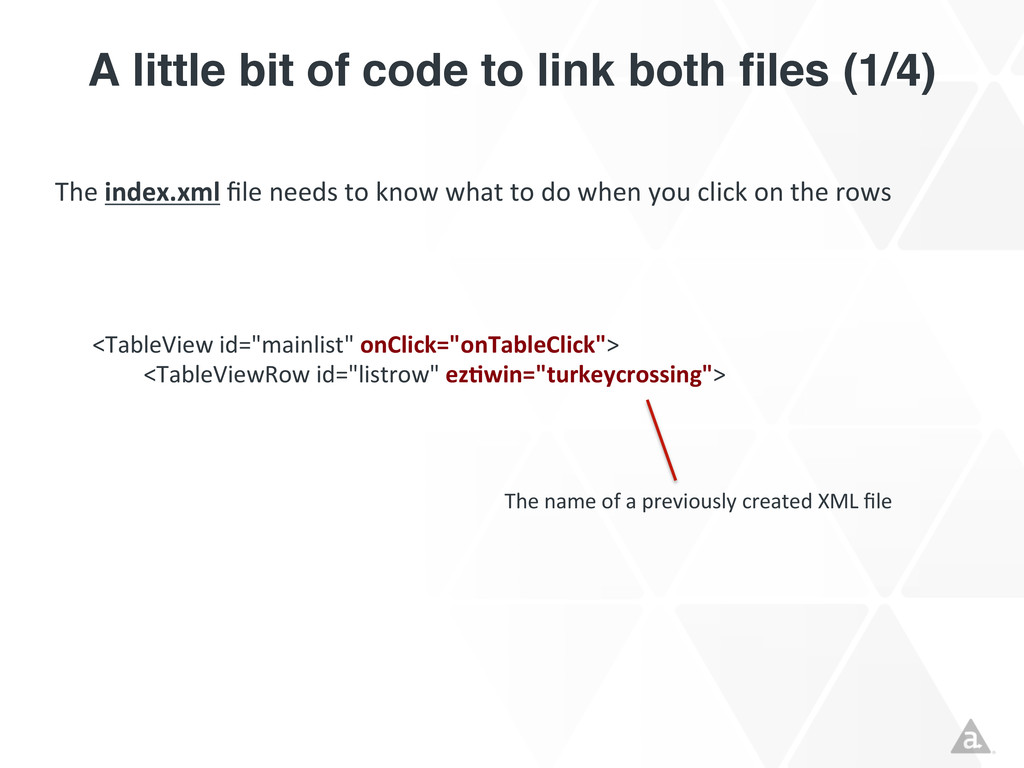
    <TableView  id="mainlist"  onClick="onTableClick">    <TableViewRow  id="listrow"  ezawin="turkeycrossing">         The  index.xml  file  needs  to  know  what  to  do  when  you  click  on  the  rows   The  name  of  a  previously  created  XML  file  
  32. A little bit of code to link both files (2/4)!

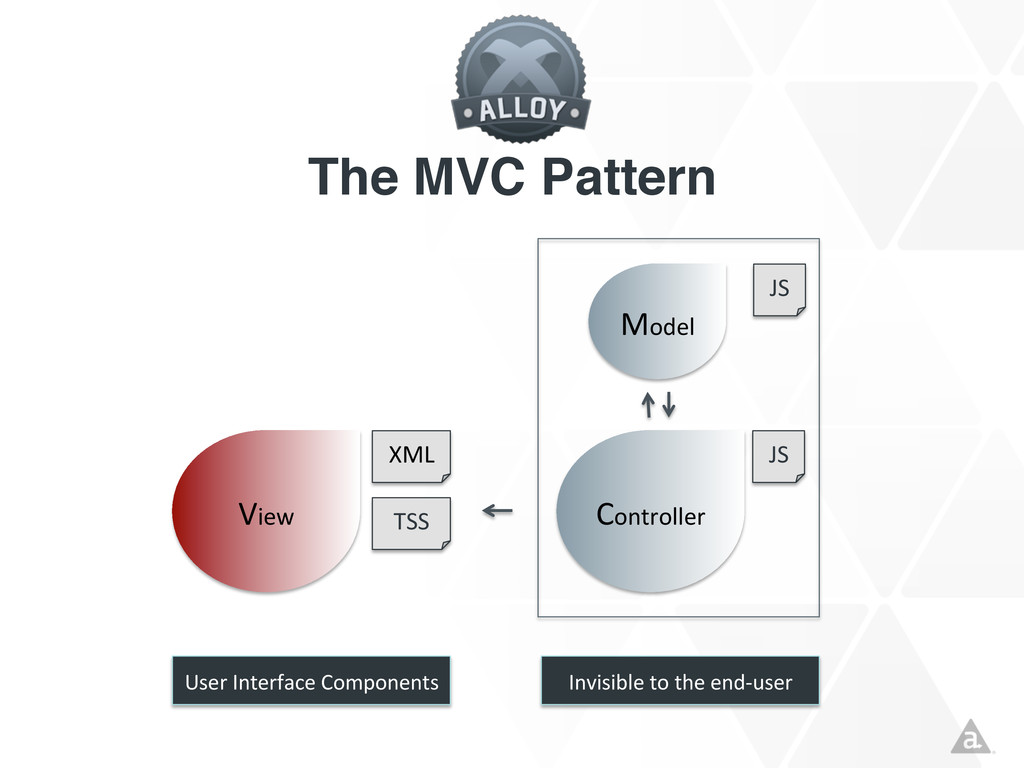
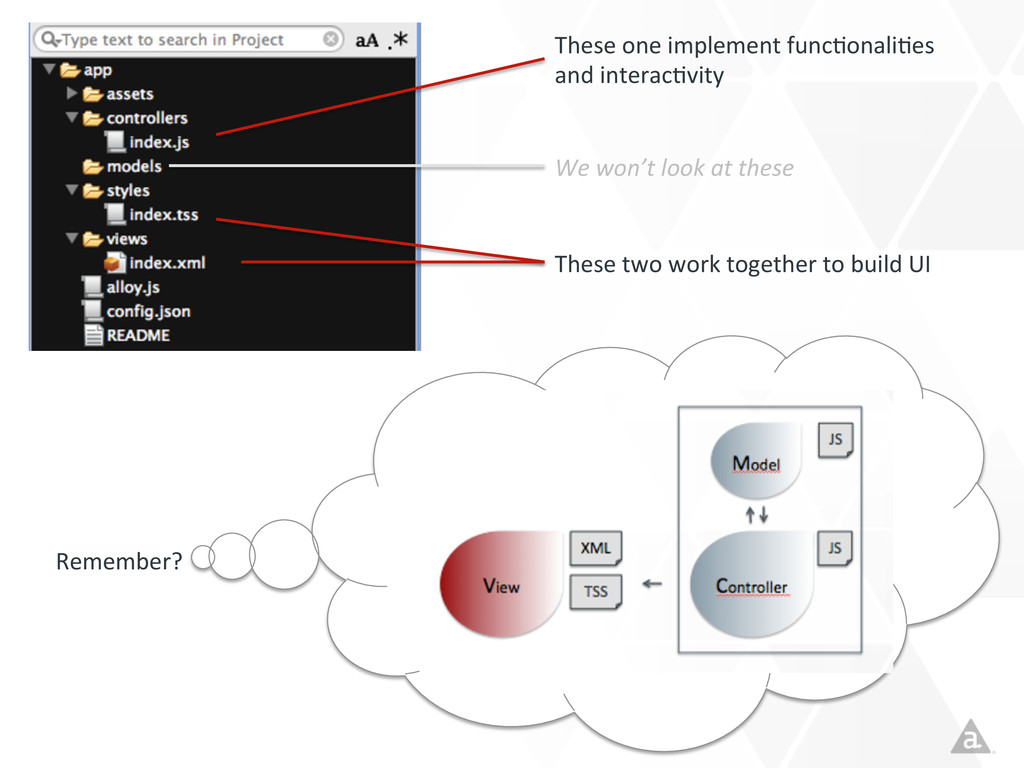
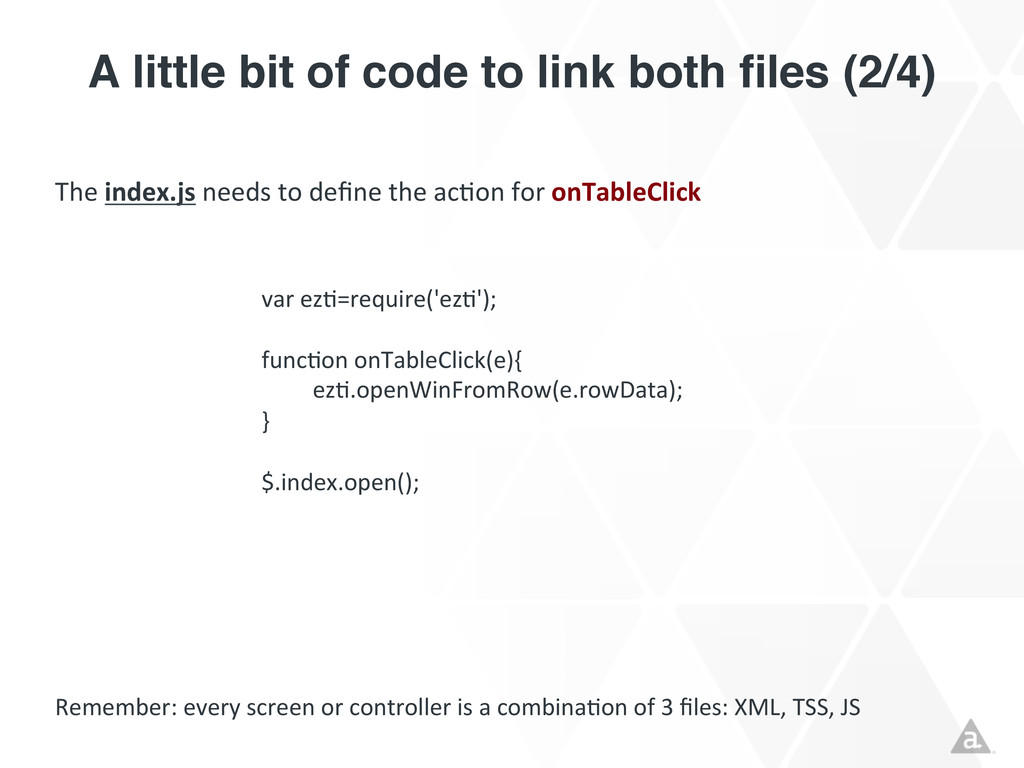
    var  ezR=require('ezR');     funcRon  onTableClick(e){    ezR.openWinFromRow(e.rowData);     }     $.index.open();         The  index.js  needs  to  define  the  acRon  for  onTableClick   Remember:  every  screen  or  controller  is  a  combinaRon  of  3  files:  XML,  TSS,  JS  
  33. A little bit of code to link both files (3/4)!

    <Bu"on  id="backbu"on"  plaYorm="ios"  onClick="closeme">Back</Bu"on>       On  each  “joke”  page,  define  the  acRon  for  the  “back”  bu"on  
  34. A little bit of code to link both files (4/4)!

    var  ezR=require('ezR');     funcRon  closeme(e){    ezR.closeWin($.turkeycrossing);     }       Define  the  acRon  for  the  closeme  
  35. Startup images and App Icons! Titanium  provides  templates  for  all

     the  images  you  need.    Simply   replace  with  your  own.  
  36. Much more! •  Command-line interface! •  Modules, Widgets, Sync Adapters!

    •  ACS – Appcelerator Cloud Services! •  Gaming via Lanica.com! •  Enterprise-ready!!
  37. Code + Slides! Code available at ! http://github.com/ricardoalcocer! ! Slides

    available at! http://speakerdeck.com/ricardoalcocer! http://slideshare.net/ralcocer! ! !