Upgrade to Pro — share decks privately, control downloads, hide ads and more …

node-FED

Raquel Vélez
November 28, 2012

 node-FED

A primer to Front-End Development in node.js

Raquel Vélez

November 28, 2012
Tweet

More Decks by Raquel Vélez

Other Decks in Technology

Transcript

  1. node.js: An Overview ✤ FED & BED - in the

    same language ✤ Fast! (In the browser & for development) ✤ Amazing for certain applications (but not all!) ✤ JIFASNIF
  2. node-FED : { mvc : 'express', html : 'jade', css

    : 'stylus' } * totally customizable *
  3. Perks of Jade - Functions, Loops mixin options(label, name, val,

    options) div label(for=name)= label select(id=name, name=name) option(value='') Please Choose each opt in options option(value=opt,selected=(opt===val))= opt div +options('Month', 'month', '',['Jan','Feb','Mar', 'Apr','May','Jun','Jul','Aug','Sep','Oct','Nov', 'Dec']) +options('Year', 'year', '2012', ['2008','2009','2010','2011','2012'])
  4. Perks of Jade - extends, block, append extends ../layouts/layout -->

    Sets up a layout framework block content --> Replaces content in the layout append scripts --> Adds content to the layout
  5. CSS : (Stylus| Sass|less|etc) ✤ Clean ✤ Intuitive ✤ Functions,

    variables, organized chaos ✤ http://learnboost.github.com/ stylus/
  6. Step 2: Run the Server ✤ cd PROJECT_NAME && npm

    install ✤ node app.js ✤ visit http://localhost:3000
  7. Step 5: Create a Mixin ✤ edit PROJECT_NAME/views/index.jade ✤ mixin

    description(label, name, placeholder) label= label input(name=name, placeholder=placeholder)
  8. Step 6: Create a Form ✤ edit PROJECT_NAME/views/index.jade ✤ form.awesome-form(action='#',

    method='POST') mixin description('Full Name: ', 'name', 'Roy G. Biv') mixin description('Email: ', 'email', '[email protected]' button.btn Enter...?
  9. Step 7: Start Styling! ✤ edit PROJECT_NAME/public/stylesheets/style.styl ✤ $btnBackground =

    #98F78E .awesome-form margin 0 auto width 50% .input-desc label width 25% display inline-block text-align right padding-right 5% input width 50% padding 1% 0.25em .submit-area text-align center .btn background-color $btnBackground margin-top 2em padding 1em 2%
  10. Step 8: Change Template Values ✤ edit PROJECT_NAME/routes/index.js ✤ res.render('index',

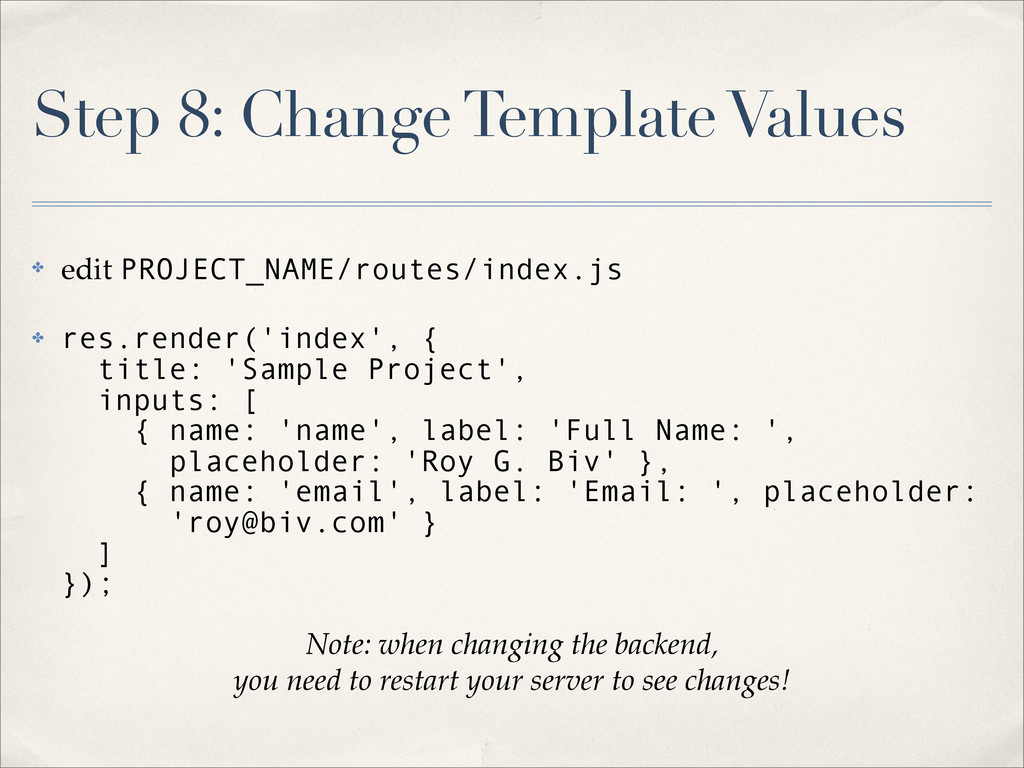
    { title: 'Sample Project', inputs: [ { name: 'name', label: 'Full Name: ', placeholder: 'Roy G. Biv' }, { name: 'email', label: 'Email: ', placeholder: '[email protected]' } ] }); Note: when changing the backend, you need to restart your server to see changes!
  11. Step 9: Update Your Views ✤ edit PROJECT_NAME/views/index.jade ✤ each

    input in inputs mixin description(input.label, input.name, input.placeholder)
  12. Step 10: Start Hacking! ✤ Add new routes ✤ Throw

    in some more layout/styling ✤ Ask questions (IRC is a great place to get help) ✤ Learn more as you go ✤ Become a totally badass node dev ;-)