Upgrade to Pro
— share decks privately, control downloads, hide ads and more …
Speaker Deck
Features
Speaker Deck
PRO
Sign in
Sign up for free
Search
Search
Getting Started with Arduino Programming
Search
Sponsored
·
Your Podcast. Everywhere. Effortlessly.
Share. Educate. Inspire. Entertain. You do you. We'll handle the rest.
→
Ahmed Sobhy
July 11, 2016
Programming
29
0
Share
Embed
Copy iframe code
Copy JS code
Copy link
Start on current slide
Getting Started with Arduino Programming
Ahmed Sobhy
July 11, 2016
More Decks by Ahmed Sobhy
See All by Ahmed Sobhy
ML Video Intelligence
sobhydo
0
34
Q&A Become an Internet of Things expert
sobhydo
0
140
Become an IoT expert lecture 3
sobhydo
0
77
Become an IoT expert lecture 2
sobhydo
0
150
Become an IoT expert lecture 1
sobhydo
0
130
The Future of Internet of Things is Artificial Intelligence | GDR Saudi’20
sobhydo
0
320
Introduction to TensorFlow using google cloud Platform
sobhydo
0
60
Introduction to Internet of Things using google cloud
sobhydo
0
39
The Future of Internet of Things is Artificial Intelligence
sobhydo
0
42
Other Decks in Programming
See All in Programming
軽量Java基盤の設計 DIコンテナに頼らない、長期保守と1秒起動の実現 JJUG CCC 2026 Spring
macha64
0
530
フロントエンドとバックエンドで「1文字」を揃えよう
youkidearitai
PRO
0
700
「エンジニアインターン、どうやって取った?」準備のリアルを語るLT会 Progate BAR
akiomatic
0
130
LLM本来の能力を解き放つサンドボックス技術とAI民主化への適用
yukukotani
3
4.1k
JJUG CCC 2026 Spring: JSpecify で実現する Kotlin フレンドリーな Java API 設計
ternbusty
1
170
技術記事、 専門家としてのプログラマ、 言語化
mizchi
13
6.1k
メソッドのジェネリクスでGoの夢は広がるか? / Kyoto.go #65
utgwkk
3
800
Composerを使ったサプライチェーン攻撃の様子を眺めてみる #phpstudy
o0h
PRO
2
250
Signal Forms: Details & Live Coding @enterJS 2026 in Mannheim
manfredsteyer
PRO
0
140
Datadog × OpenTelemetry 入門と実践のあいだ
kn_to_maxpno
1
160
Snowflake Summitでの新機能 CoCo / CoWork / snowflake-summit-2026-overall-what-new-coco
tatsuhiro
1
140
Semantic Version 単位で戦略を柔軟に変えて、パッケージアップデートを自動化する
daitasu
1
240
Featured
See All Featured
Claude Code どこまでも/ Claude Code Everywhere
nwiizo
65
56k
How to build a perfect <img>
jonoalderson
1
5.7k
From Legacy to Launchpad: Building Startup-Ready Communities
dugsong
0
230
The State of eCommerce SEO: How to Win in Today's Products SERPs - #SEOweek
aleyda
2
11k
Agile Leadership in an Agile Organization
kimpetersen
PRO
0
160
Why Your Marketing Sucks and What You Can Do About It - Sophie Logan
marketingsoph
0
170
How to Create Impact in a Changing Tech Landscape [PerfNow 2023]
tammyeverts
55
3.4k
Max Prin - Stacking Signals: How International SEO Comes Together (And Falls Apart)
techseoconnect
PRO
0
180
Fashionably flexible responsive web design (full day workshop)
malarkey
408
66k
Fight the Zombie Pattern Library - RWD Summit 2016
marcelosomers
234
17k
How to Get Subject Matter Experts Bought In and Actively Contributing to SEO & PR Initiatives.
livdayseo
0
140
Faster Mobile Websites
deanohume
310
31k
Transcript
MUSES_SECRET: ORF-RE Project - © PAMI Research Group – University
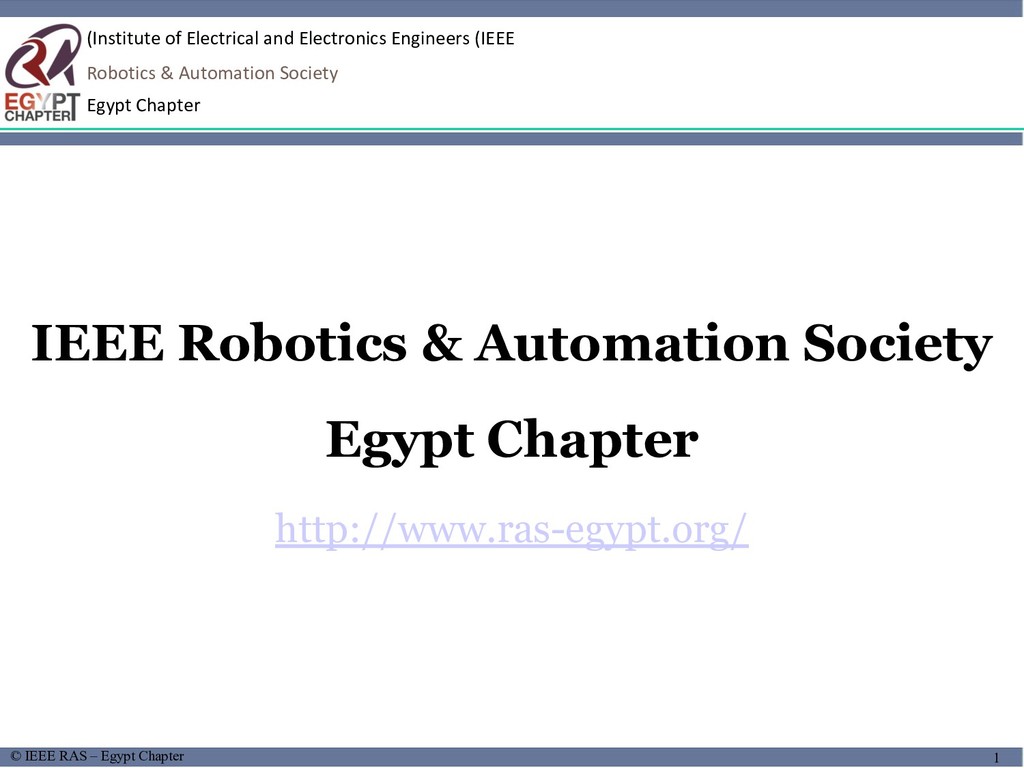
of Waterloo 1/22 1 © IEEE RAS – Egypt Chapter (Institute of Electrical and Electronics Engineers (IEEE Robotics & Automation Society Egypt Chapter IEEE Robotics & Automation Society Egypt Chapter http://www.ras-egypt.org/
MUSES_SECRET: ORF-RE Project - © PAMI Research Group – University
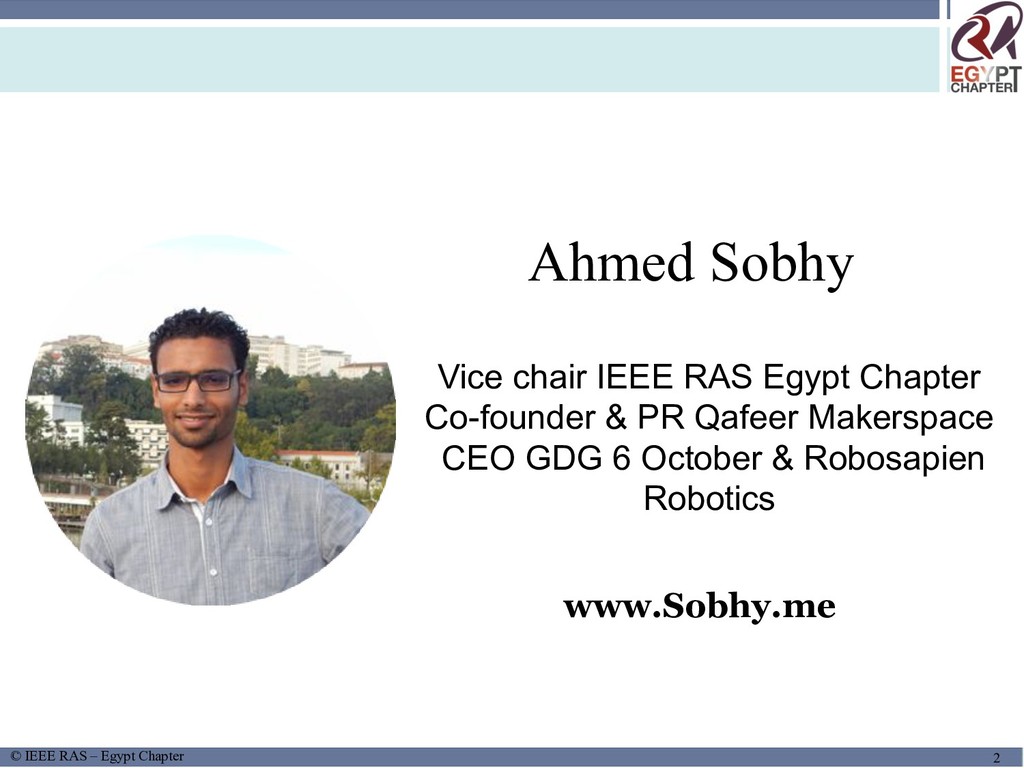
of Waterloo 2/22 2 © IEEE RAS – Egypt Chapter Ahmed Sobhy Vice chair IEEE RAS Egypt Chapter Co-founder & PR Qafeer Makerspace CEO GDG 6 October & Robosapien Robotics www.Sobhy.me
MUSES_SECRET: ORF-RE Project - © PAMI Research Group – University
of Waterloo 3/22 3 L1, How to build a real robot: 2011-2012 © IEEE RAS – Egypt Chapter Introduction : Arduino Lecture 2 How to build a real robot, University logo goes here
MUSES_SECRET: ORF-RE Project - © PAMI Research Group – University
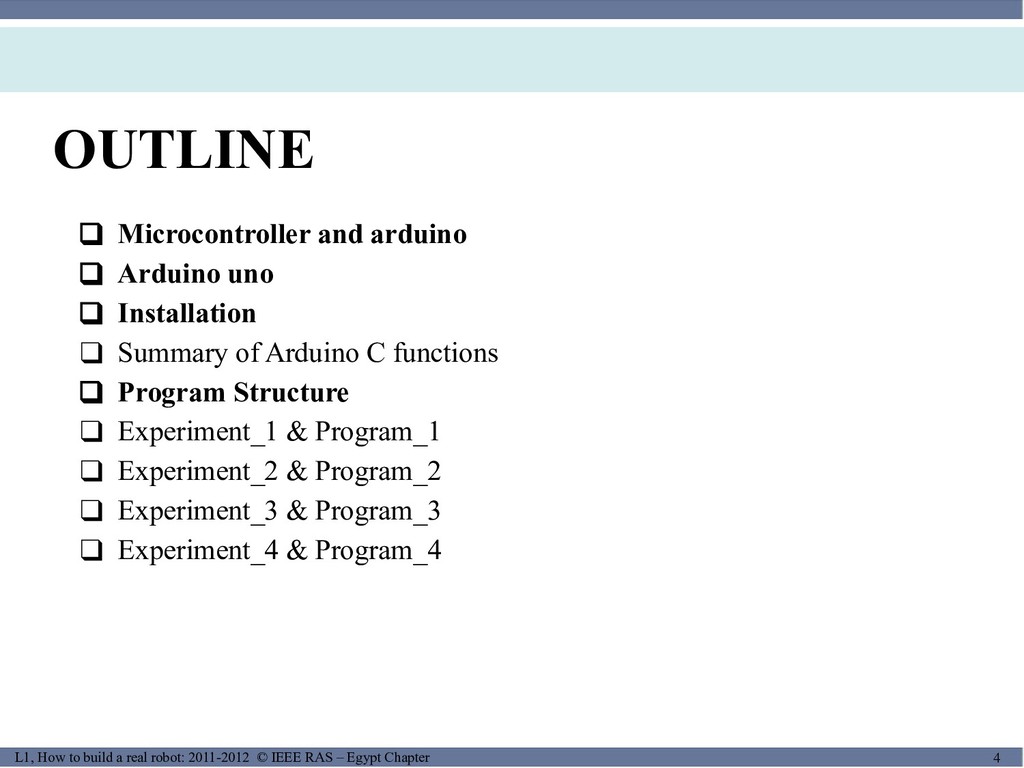
of Waterloo 4/22 4 L1, How to build a real robot: 2011-2012 © IEEE RAS – Egypt Chapter OUTLINE ❑ Microcontroller and arduino ❑ Arduino uno ❑ Installation ❑ Summary of Arduino C functions ❑ Program Structure ❑ Experiment_1 & Program_1 ❑ Experiment_2 & Program_2 ❑ Experiment_3 & Program_3 ❑ Experiment_4 & Program_4
MUSES_SECRET: ORF-RE Project - © PAMI Research Group – University
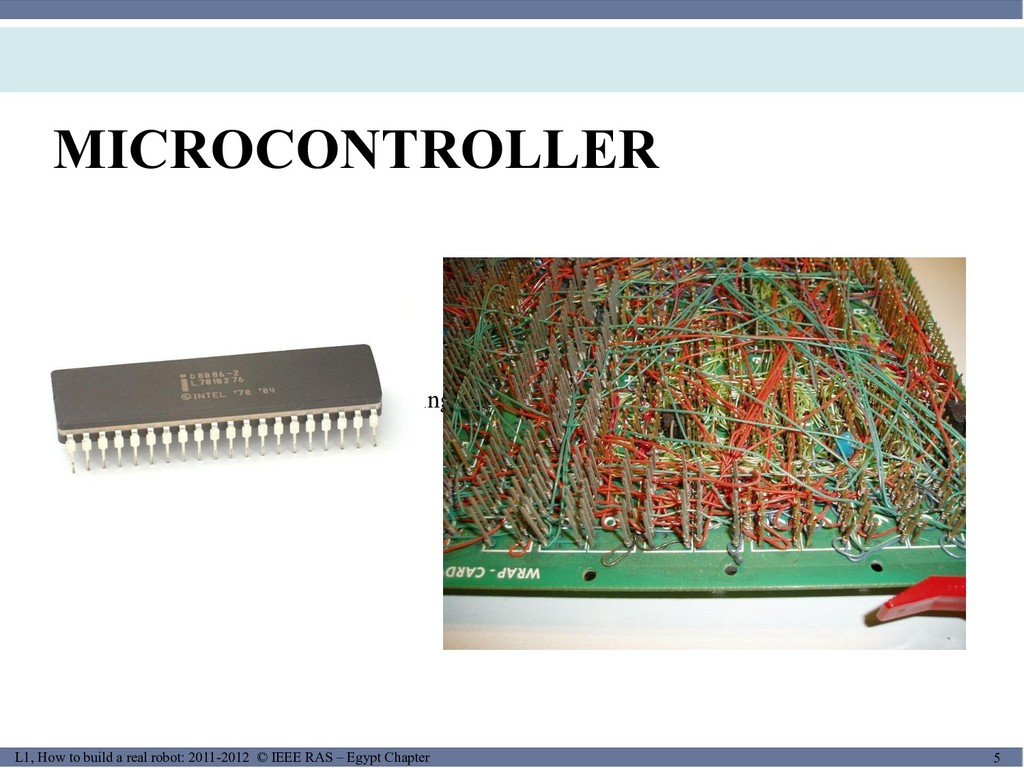
of Waterloo 5/22 5 L1, How to build a real robot: 2011-2012 © IEEE RAS – Egypt Chapter MICROCONTROLLER A small computer system on a single IC First used in 1975(Intel 8048)
MUSES_SECRET: ORF-RE Project - © PAMI Research Group – University
of Waterloo 6/22 6 L1, How to build a real robot: 2011-2012 © IEEE RAS – Egypt Chapter Programming environment is all Free Software The bootloader is Free Software The PCB board is under a Creative Commons License
MUSES_SECRET: ORF-RE Project - © PAMI Research Group – University
of Waterloo 7/22 7 L1, How to build a real robot: 2011-2012 © IEEE RAS – Egypt Chapter What is Arduino used for? Input Sensors Digital Input (Serial, SPI, I2C) Output LEDs Displays Speakers Control and Communication Drive other machinery Directly or using a communuication protocol
MUSES_SECRET: ORF-RE Project - © PAMI Research Group – University
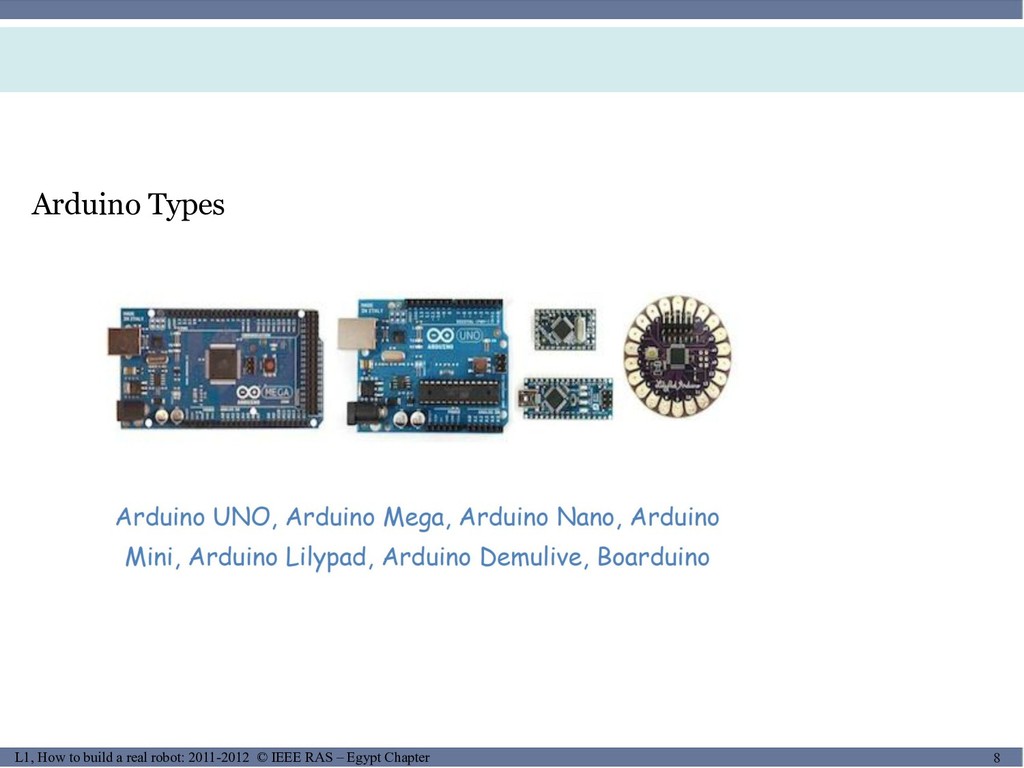
of Waterloo 8/22 8 L1, How to build a real robot: 2011-2012 © IEEE RAS – Egypt Chapter Arduino Types
MUSES_SECRET: ORF-RE Project - © PAMI Research Group – University
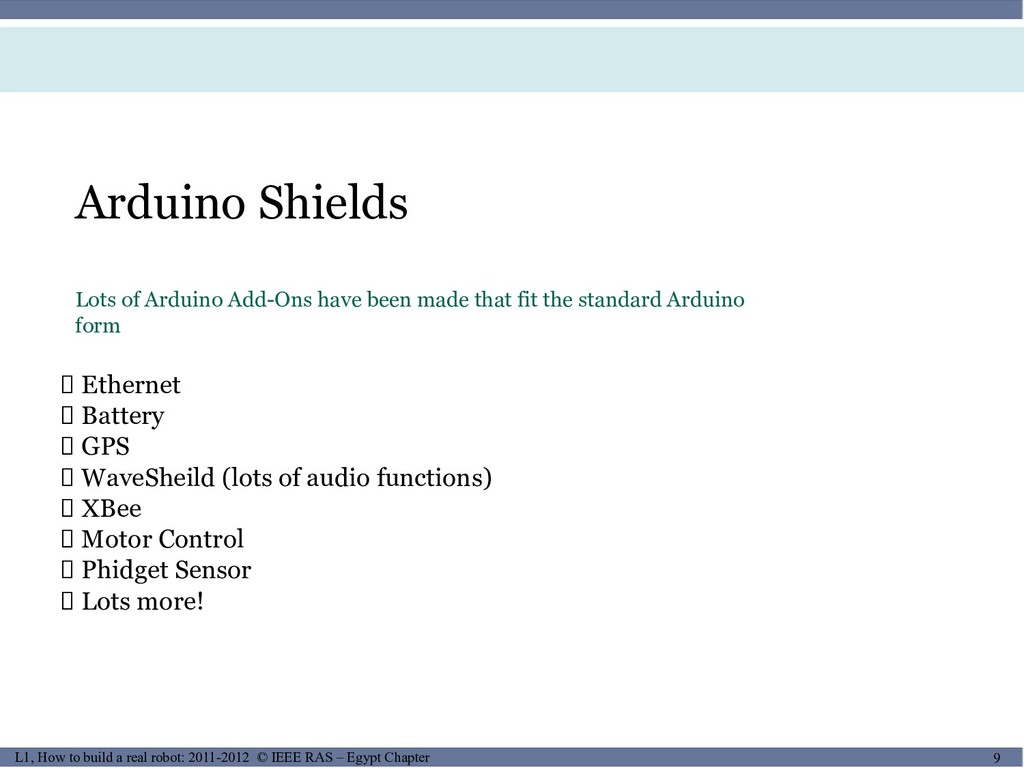
of Waterloo 9/22 9 L1, How to build a real robot: 2011-2012 © IEEE RAS – Egypt Chapter Arduino Shields Lots of Arduino Add-Ons have been made that fit the standard Arduino form Ethernet Battery GPS WaveSheild (lots of audio functions) XBee Motor Control Phidget Sensor Lots more!
MUSES_SECRET: ORF-RE Project - © PAMI Research Group – University
of Waterloo 10/22 10 L1, How to build a real robot: 2011-2012 © IEEE RAS – Egypt Chapter
MUSES_SECRET: ORF-RE Project - © PAMI Research Group – University
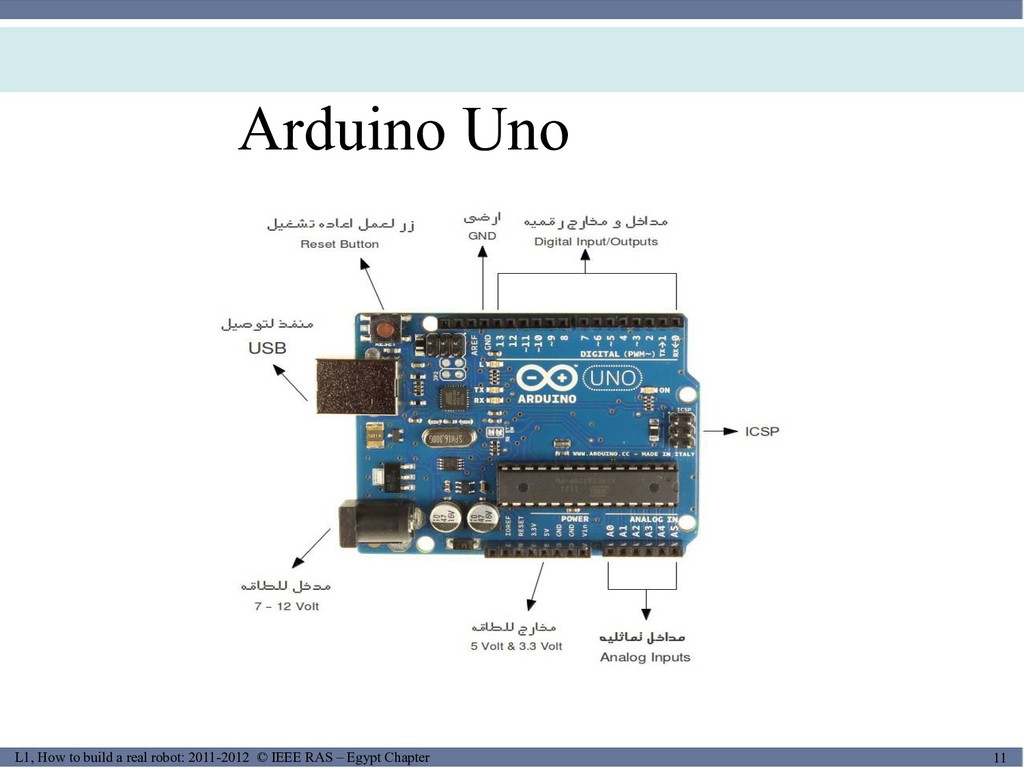
of Waterloo 11/22 11 L1, How to build a real robot: 2011-2012 © IEEE RAS – Egypt Chapter Arduino Uno
MUSES_SECRET: ORF-RE Project - © PAMI Research Group – University
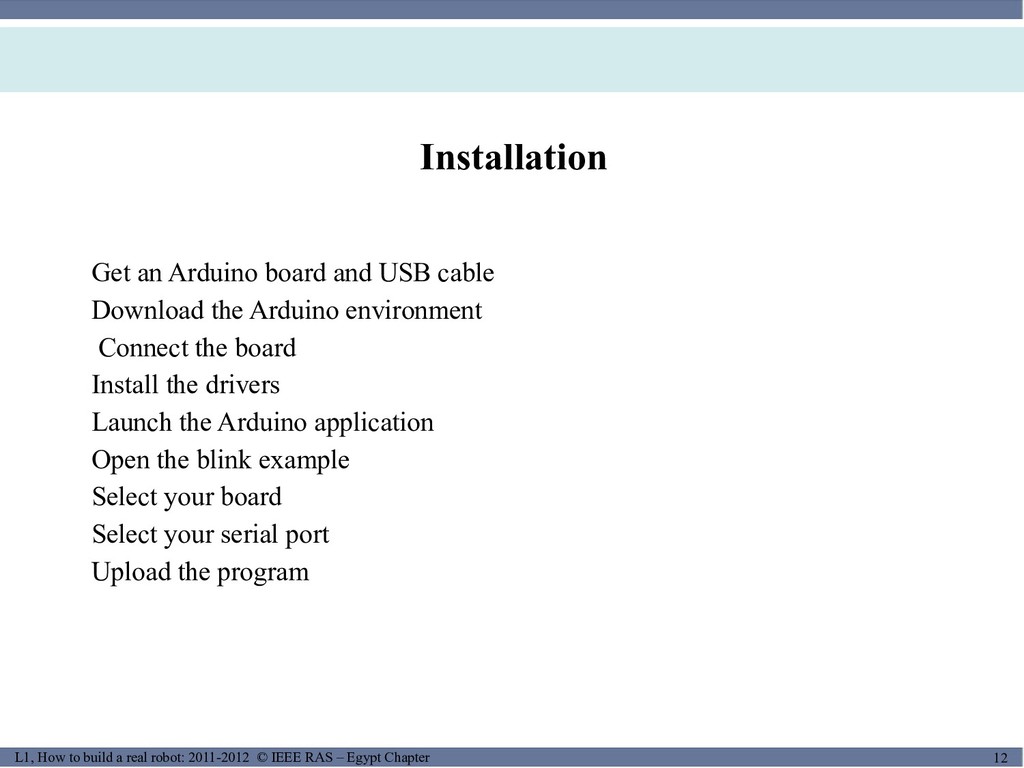
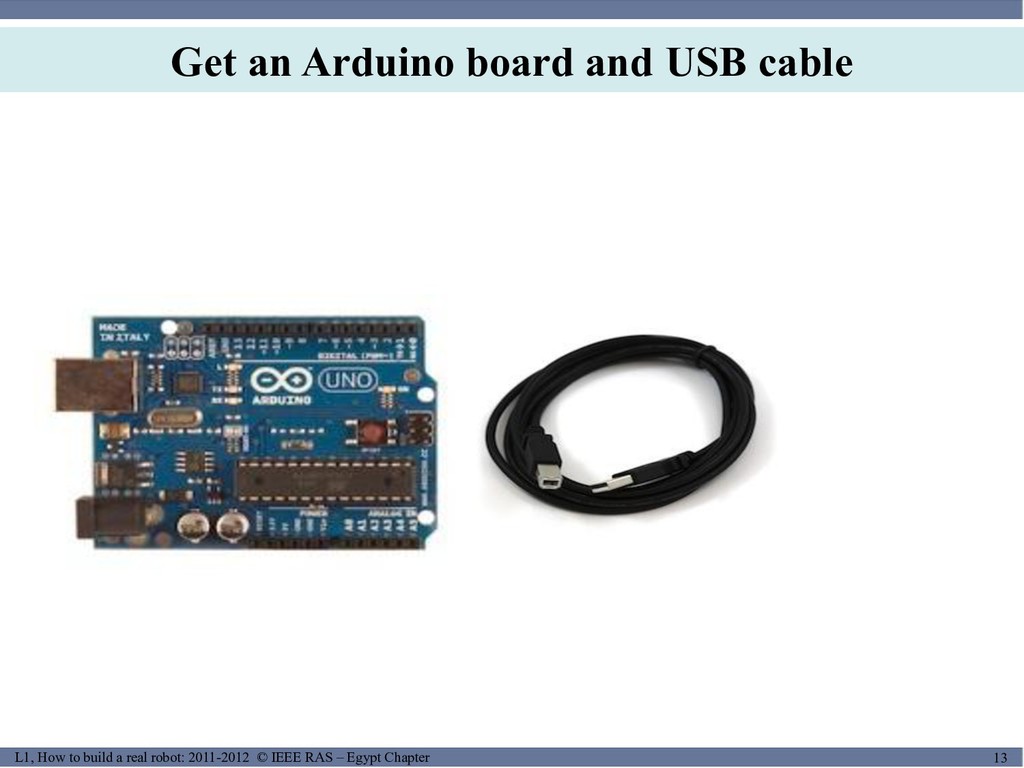
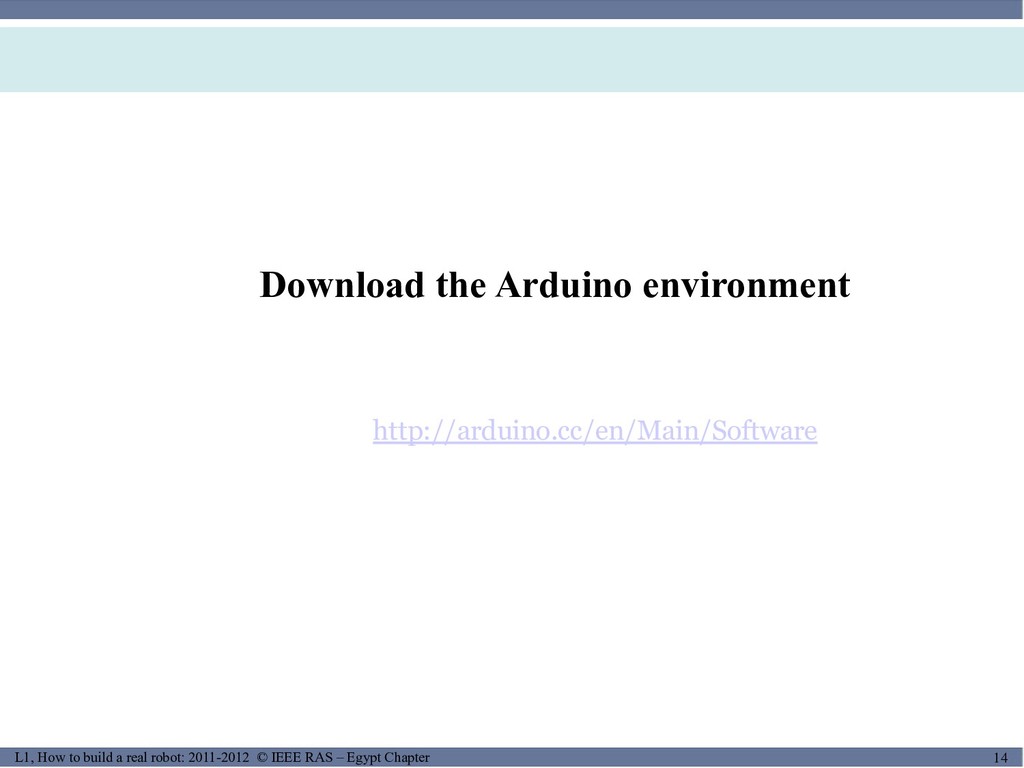
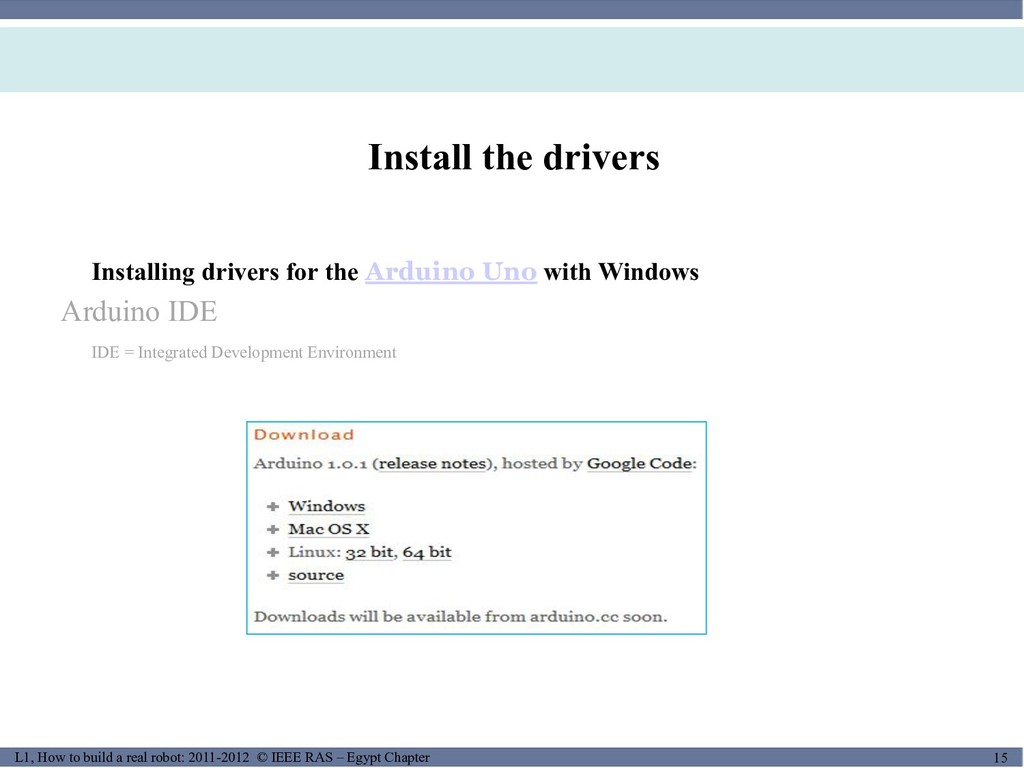
of Waterloo 12/22 12 L1, How to build a real robot: 2011-2012 © IEEE RAS – Egypt Chapter Installation ⚫ Get an Arduino board and USB cable ⚫ Download the Arduino environment ⚫ Connect the board ⚫ Install the drivers ⚫ Launch the Arduino application ⚫ Open the blink example ⚫ Select your board ⚫ Select your serial port ⚫ Upload the program
MUSES_SECRET: ORF-RE Project - © PAMI Research Group – University
of Waterloo 13/22 13 L1, How to build a real robot: 2011-2012 © IEEE RAS – Egypt Chapter Get an Arduino board and USB cable
MUSES_SECRET: ORF-RE Project - © PAMI Research Group – University
of Waterloo 14/22 14 L1, How to build a real robot: 2011-2012 © IEEE RAS – Egypt Chapter Download the Arduino environment ⚫ http://arduino.cc/en/Main/Software
MUSES_SECRET: ORF-RE Project - © PAMI Research Group – University
of Waterloo 15/22 15 L1, How to build a real robot: 2011-2012 © IEEE RAS – Egypt Chapter Install the drivers ⚫ Installing drivers for the Arduino Uno with Windows Arduino IDE ⚫ IDE = Integrated Development Environment
MUSES_SECRET: ORF-RE Project - © PAMI Research Group – University
of Waterloo 16/22 16 L1, How to build a real robot: 2011-2012 © IEEE RAS – Egypt Chapter • find the file that you downloaded on your computer • copy this file to the hard drive location where you want to install the Arduino software • double click on Compressed file to view Arduino-related files
MUSES_SECRET: ORF-RE Project - © PAMI Research Group – University
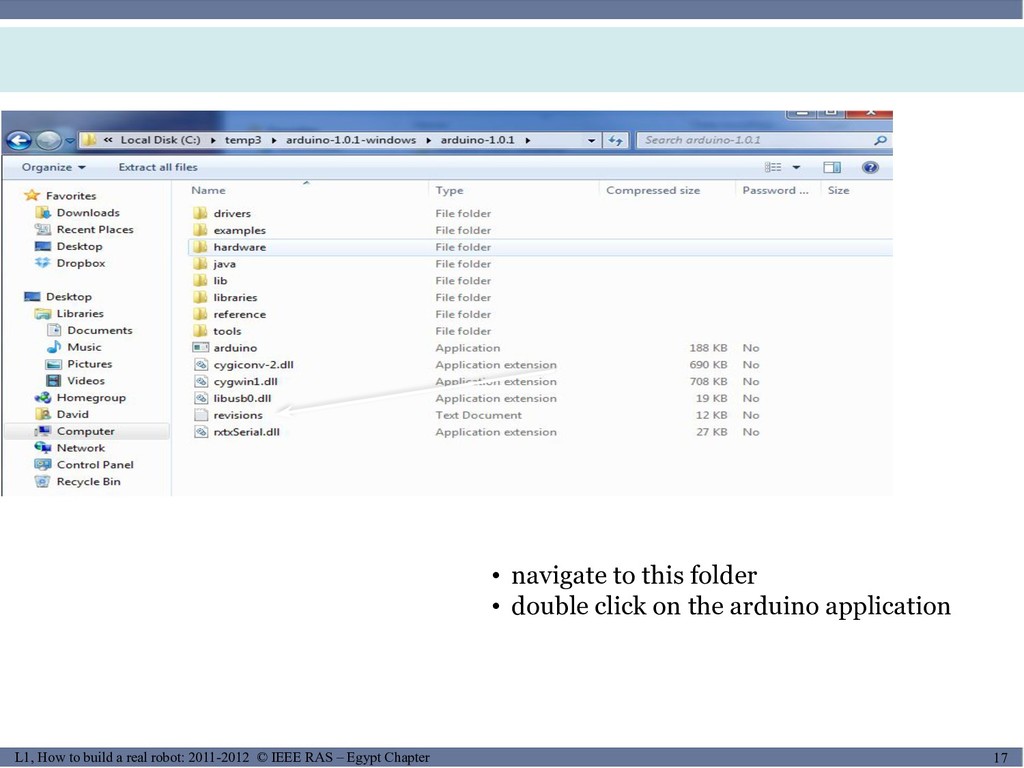
of Waterloo 17/22 17 L1, How to build a real robot: 2011-2012 © IEEE RAS – Egypt Chapter • navigate to this folder • double click on the arduino application
MUSES_SECRET: ORF-RE Project - © PAMI Research Group – University
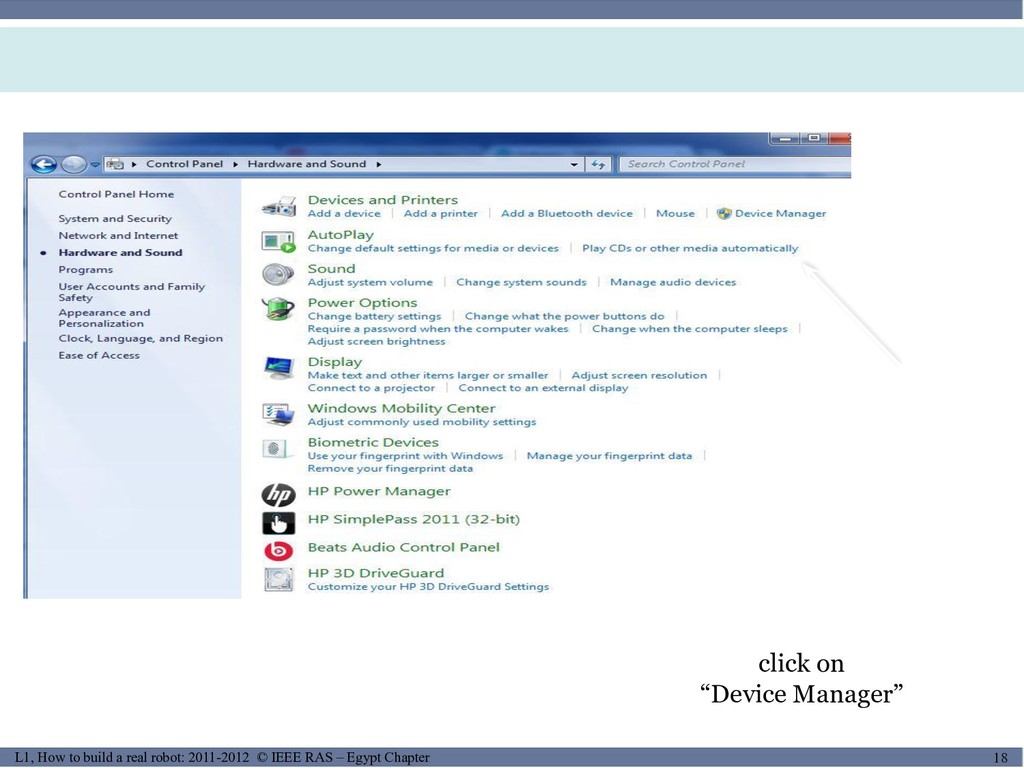
of Waterloo 18/22 18 L1, How to build a real robot: 2011-2012 © IEEE RAS – Egypt Chapter click on “Device Manager”
MUSES_SECRET: ORF-RE Project - © PAMI Research Group – University
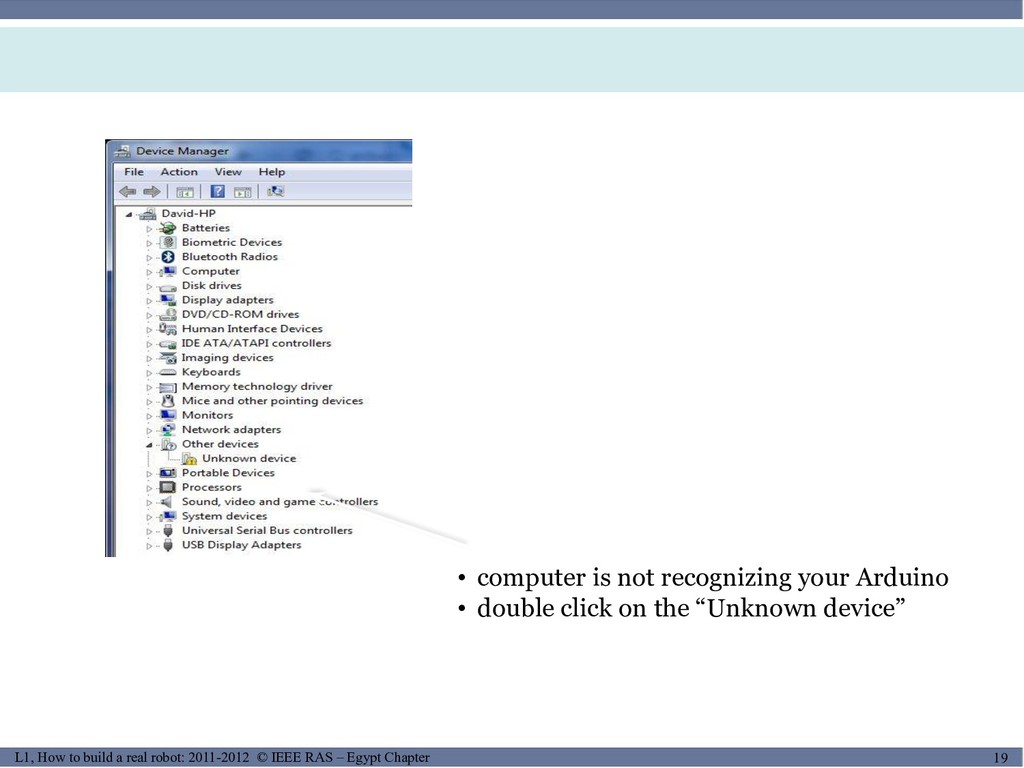
of Waterloo 19/22 19 L1, How to build a real robot: 2011-2012 © IEEE RAS – Egypt Chapter • computer is not recognizing your Arduino • double click on the “Unknown device”
MUSES_SECRET: ORF-RE Project - © PAMI Research Group – University
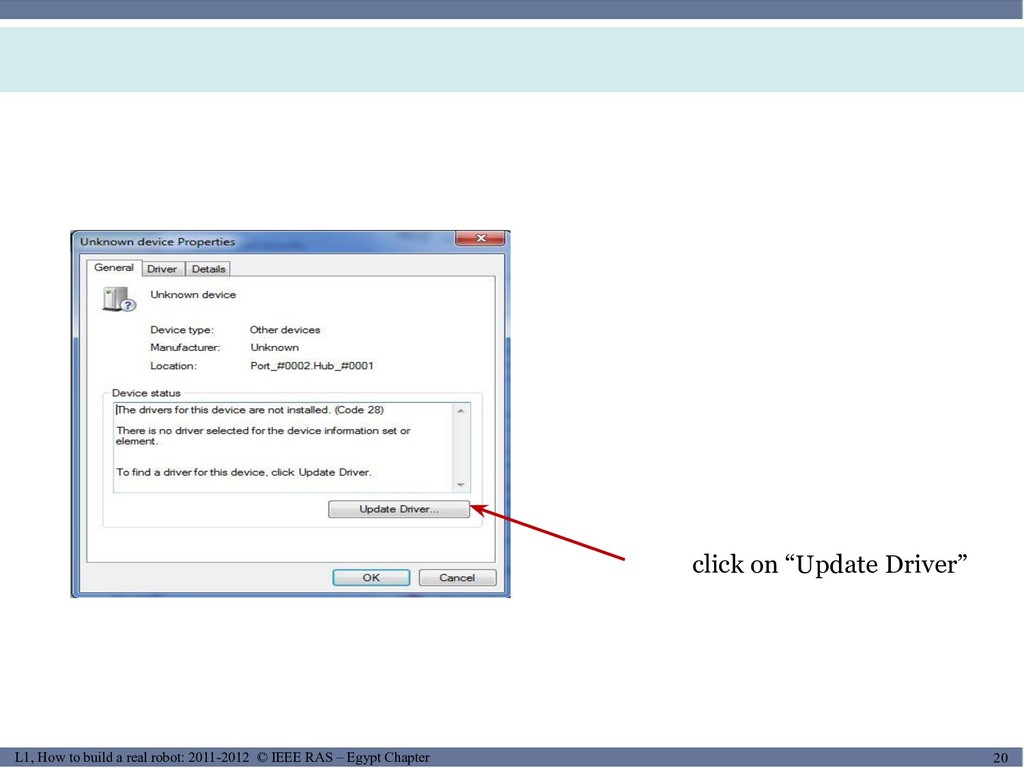
of Waterloo 20/22 20 L1, How to build a real robot: 2011-2012 © IEEE RAS – Egypt Chapter click on “Update Driver”
MUSES_SECRET: ORF-RE Project - © PAMI Research Group – University
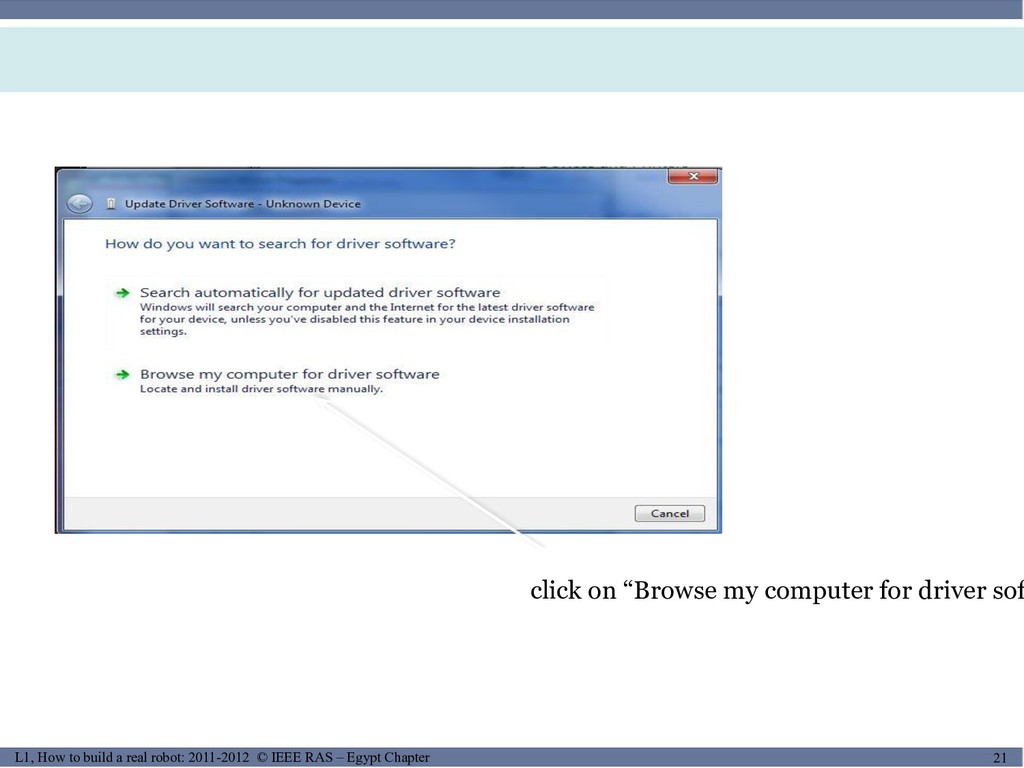
of Waterloo 21/22 21 L1, How to build a real robot: 2011-2012 © IEEE RAS – Egypt Chapter click on “Browse my computer for driver sof
MUSES_SECRET: ORF-RE Project - © PAMI Research Group – University
of Waterloo 22/22 22 L1, How to build a real robot: 2011-2012 © IEEE RAS – Egypt Chapter browse for the folder where you extracted the Arduino softw
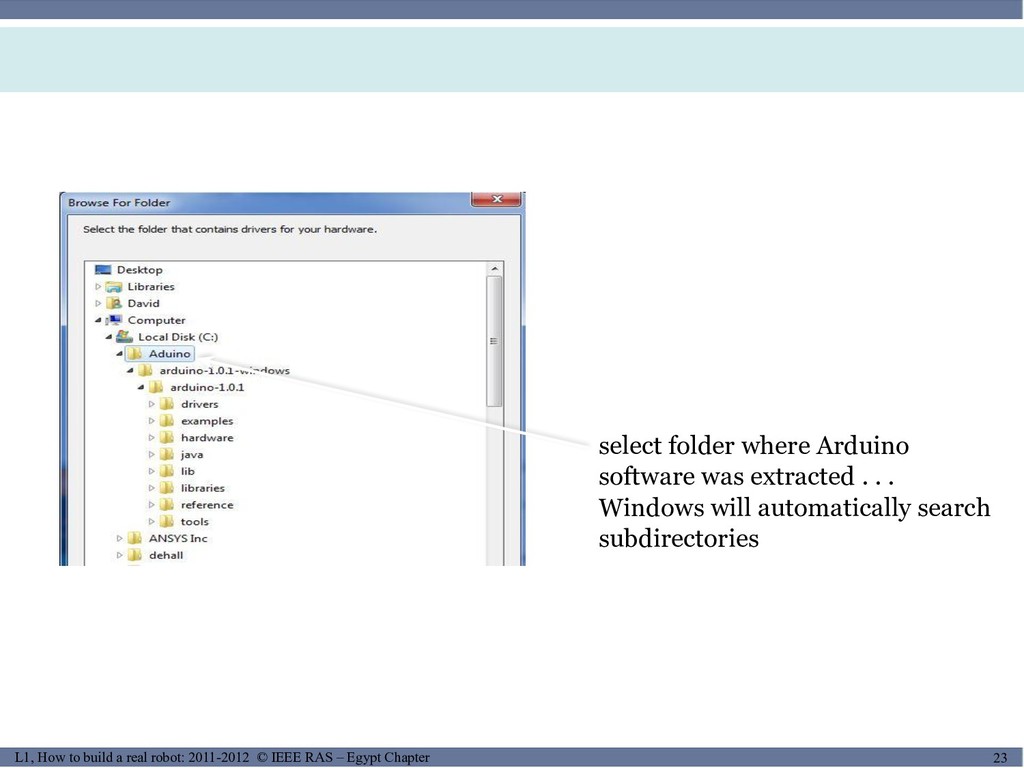
MUSES_SECRET: ORF-RE Project - © PAMI Research Group – University
of Waterloo 23/22 23 L1, How to build a real robot: 2011-2012 © IEEE RAS – Egypt Chapter select folder where Arduino software was extracted . . . Windows will automatically search subdirectories
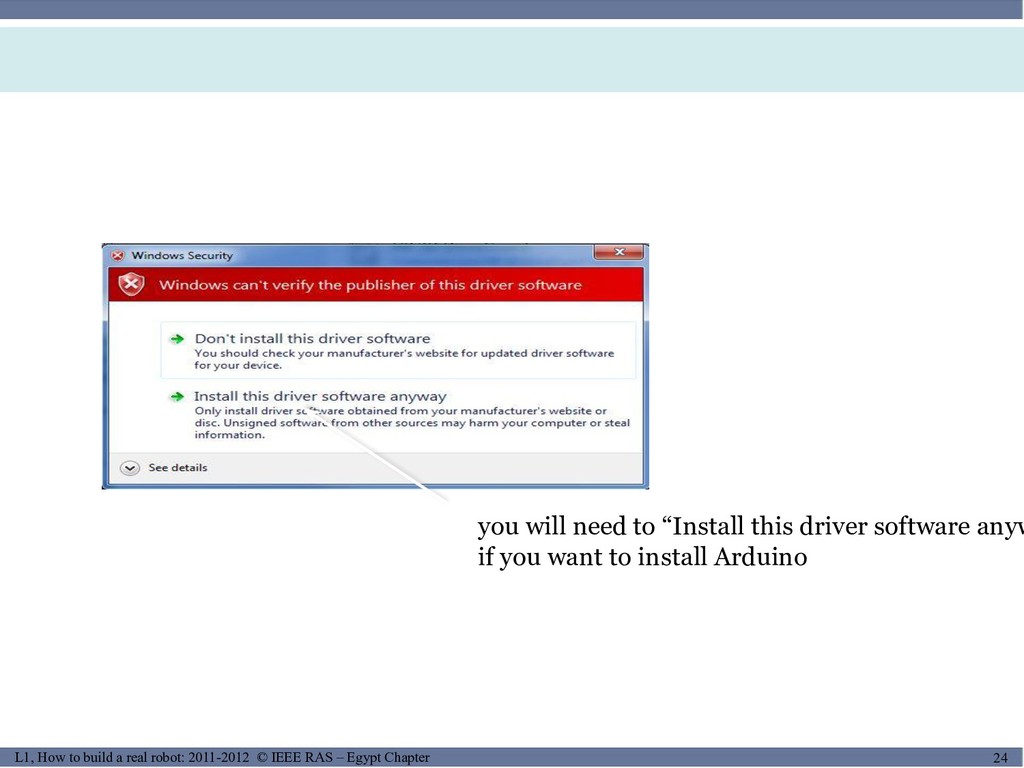
MUSES_SECRET: ORF-RE Project - © PAMI Research Group – University
of Waterloo 24/22 24 L1, How to build a real robot: 2011-2012 © IEEE RAS – Egypt Chapter you will need to “Install this driver software anyw if you want to install Arduino
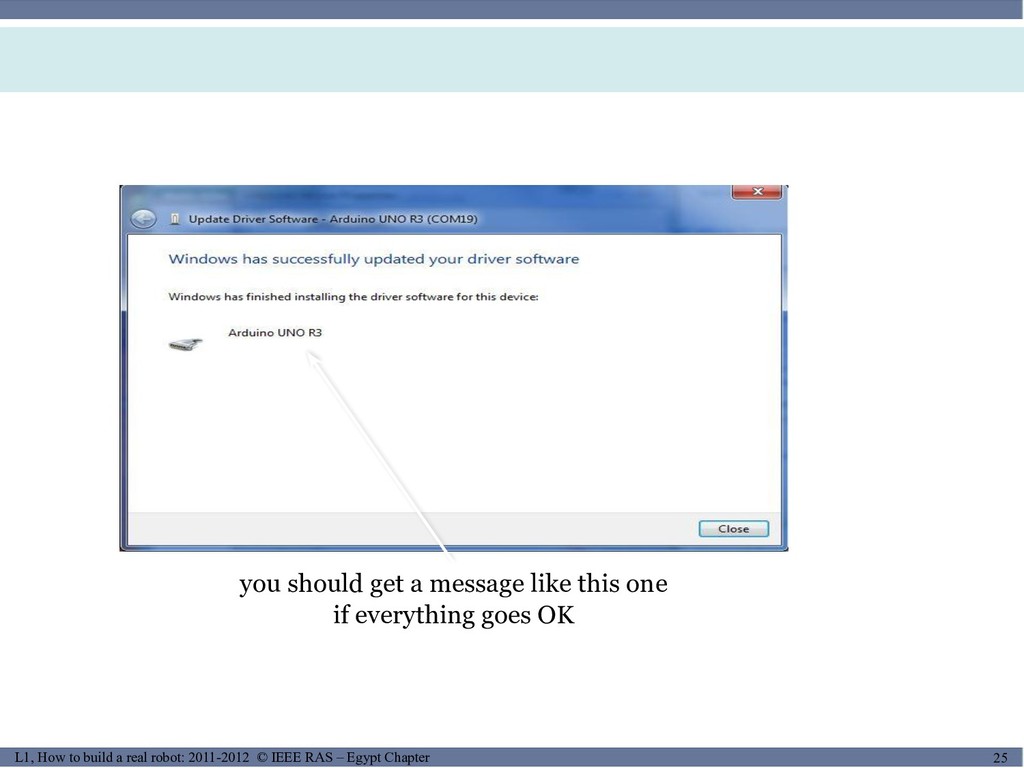
MUSES_SECRET: ORF-RE Project - © PAMI Research Group – University
of Waterloo 25/22 25 L1, How to build a real robot: 2011-2012 © IEEE RAS – Egypt Chapter you should get a message like this one if everything goes OK
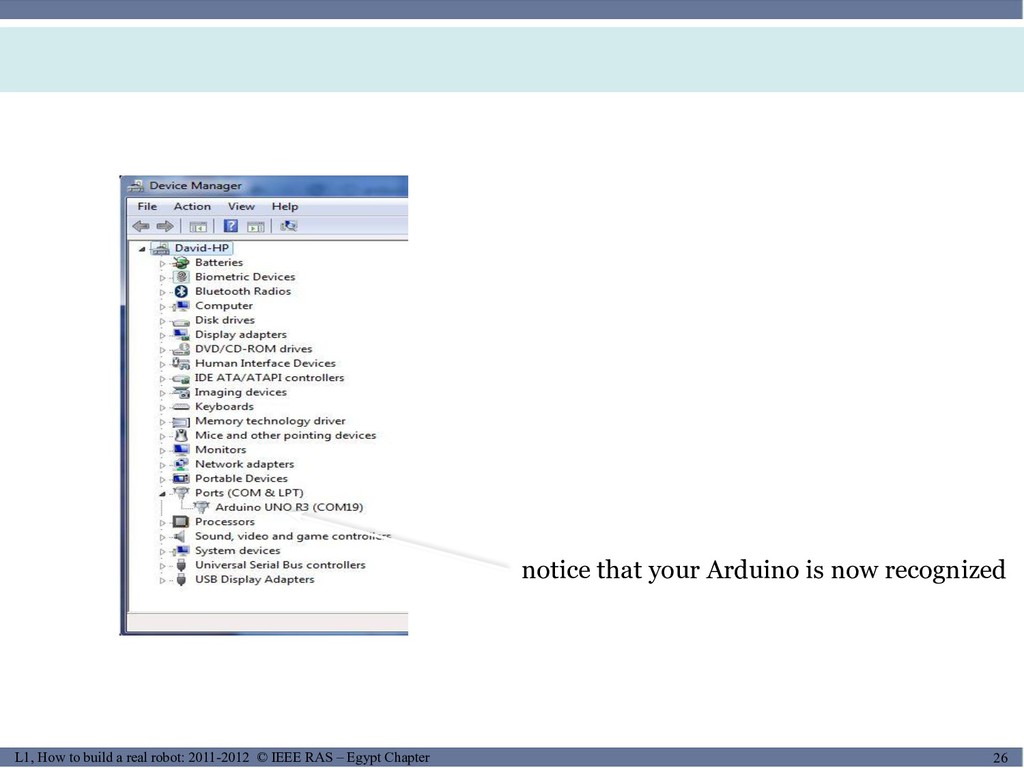
MUSES_SECRET: ORF-RE Project - © PAMI Research Group – University
of Waterloo 26/22 26 L1, How to build a real robot: 2011-2012 © IEEE RAS – Egypt Chapter notice that your Arduino is now recognized
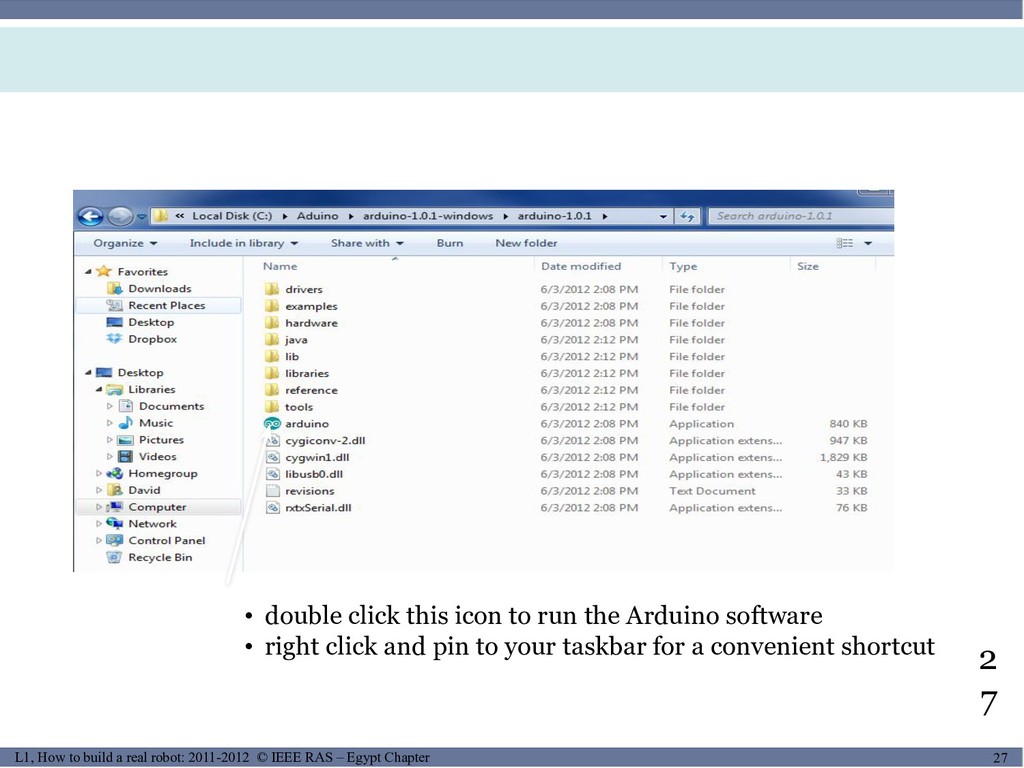
MUSES_SECRET: ORF-RE Project - © PAMI Research Group – University
of Waterloo 27/22 27 L1, How to build a real robot: 2011-2012 © IEEE RAS – Egypt Chapter 2 7 • double click this icon to run the Arduino software • right click and pin to your taskbar for a convenient shortcut
MUSES_SECRET: ORF-RE Project - © PAMI Research Group – University
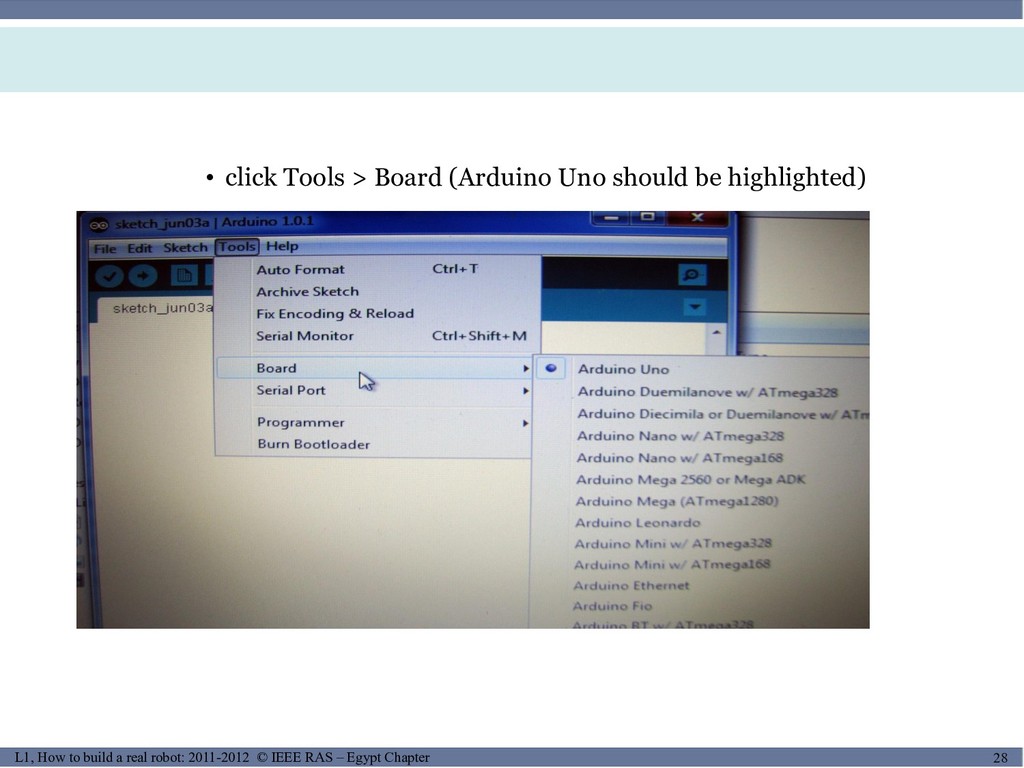
of Waterloo 28/22 28 L1, How to build a real robot: 2011-2012 © IEEE RAS – Egypt Chapter • click Tools > Board (Arduino Uno should be highlighted)
MUSES_SECRET: ORF-RE Project - © PAMI Research Group – University
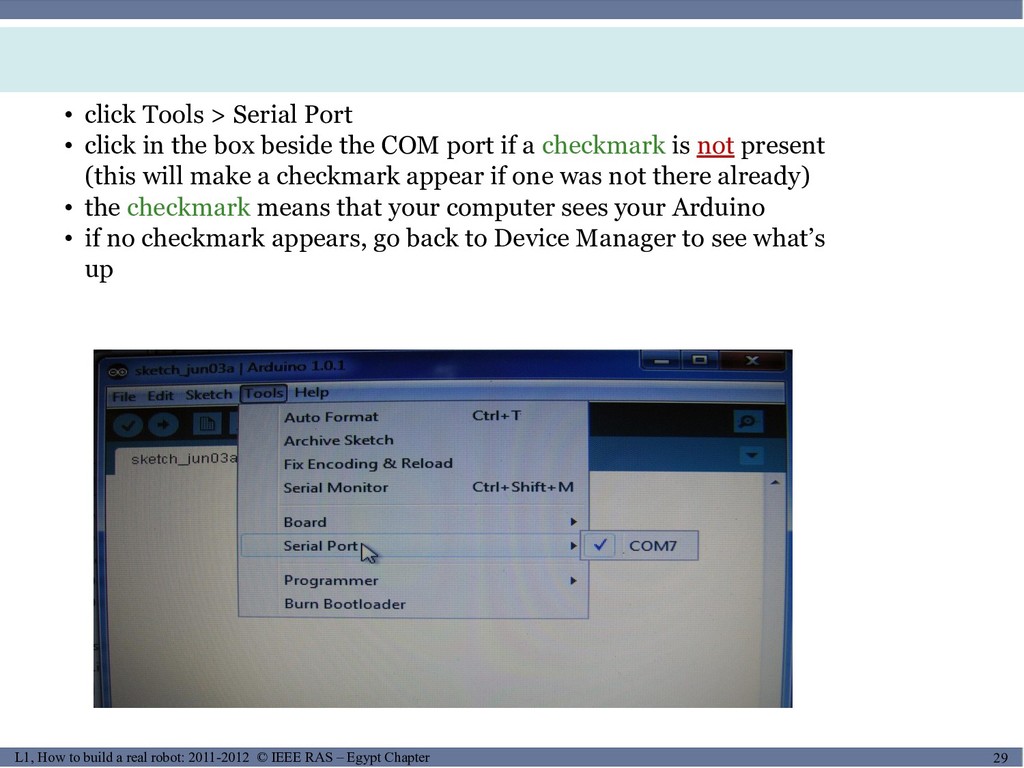
of Waterloo 29/22 29 L1, How to build a real robot: 2011-2012 © IEEE RAS – Egypt Chapter • click Tools > Serial Port • click in the box beside the COM port if a checkmark is not present (this will make a checkmark appear if one was not there already) • the checkmark means that your computer sees your Arduino • if no checkmark appears, go back to Device Manager to see what’s up
MUSES_SECRET: ORF-RE Project - © PAMI Research Group – University
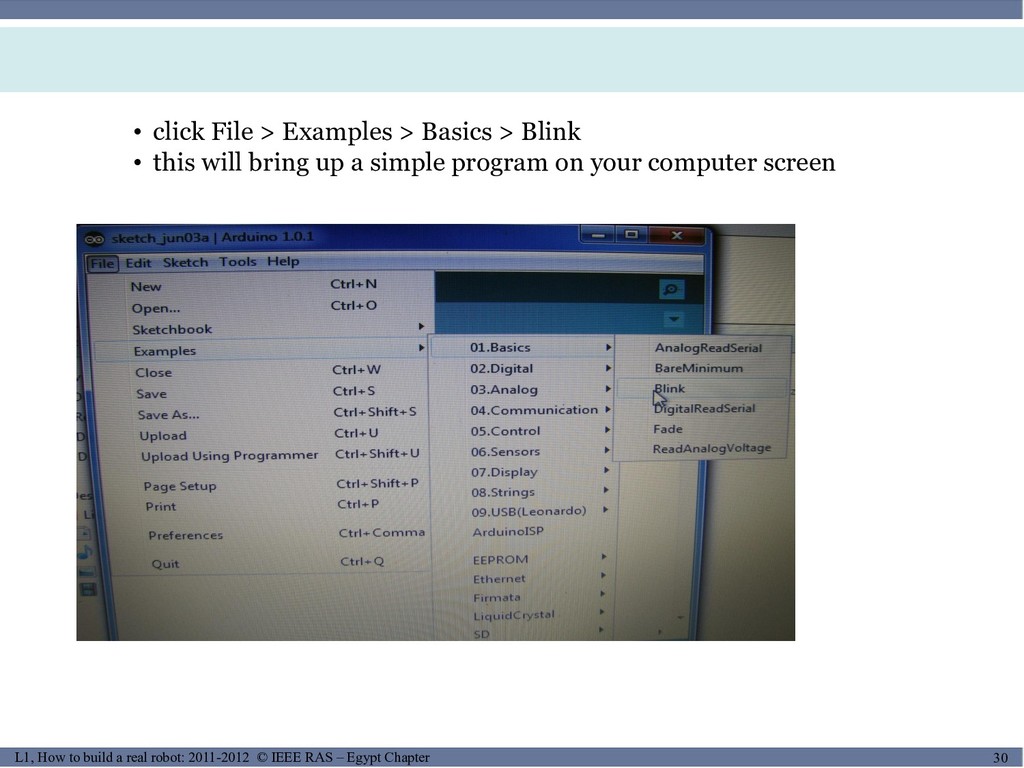
of Waterloo 30/22 30 L1, How to build a real robot: 2011-2012 © IEEE RAS – Egypt Chapter • click File > Examples > Basics > Blink • this will bring up a simple program on your computer screen
MUSES_SECRET: ORF-RE Project - © PAMI Research Group – University
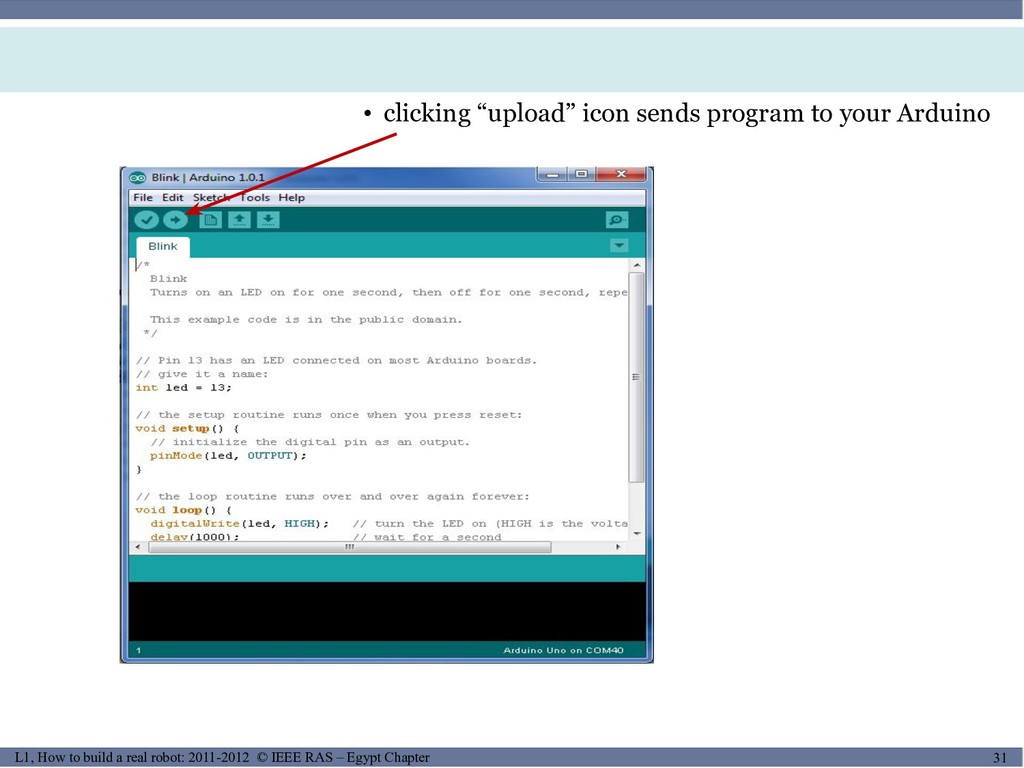
of Waterloo 31/22 31 L1, How to build a real robot: 2011-2012 © IEEE RAS – Egypt Chapter • clicking “upload” icon sends program to your Arduino
MUSES_SECRET: ORF-RE Project - © PAMI Research Group – University
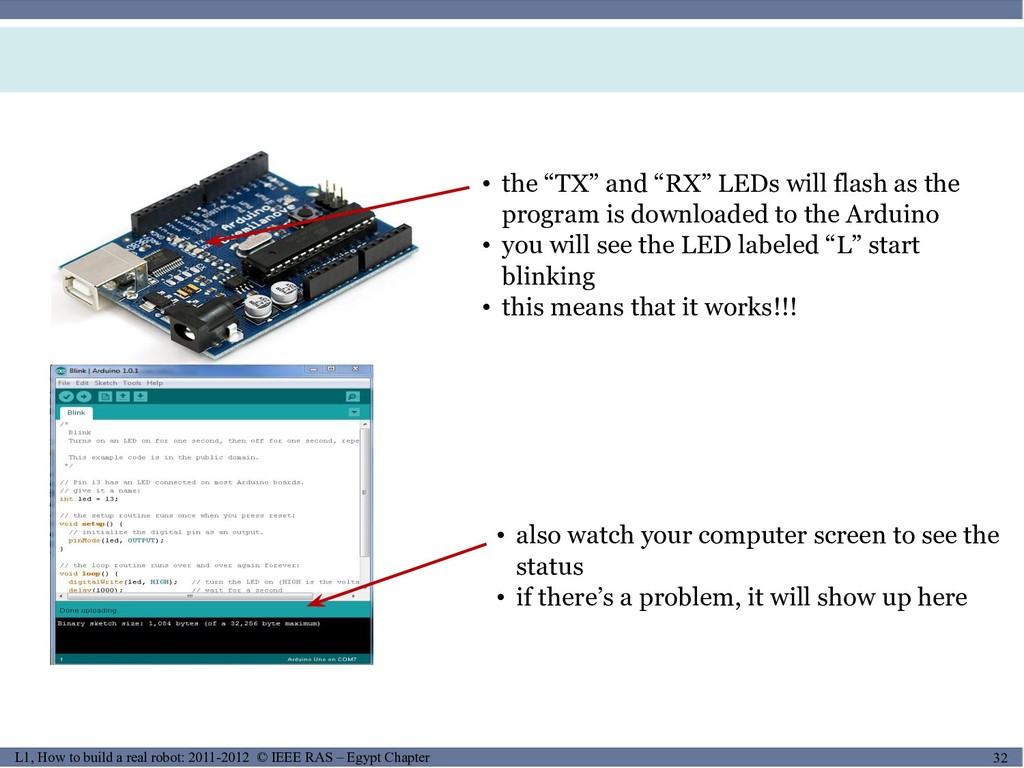
of Waterloo 32/22 32 L1, How to build a real robot: 2011-2012 © IEEE RAS – Egypt Chapter • the “TX” and “RX” LEDs will flash as the program is downloaded to the Arduino • you will see the LED labeled “L” start blinking • this means that it works!!! • also watch your computer screen to see the status • if there’s a problem, it will show up here
MUSES_SECRET: ORF-RE Project - © PAMI Research Group – University
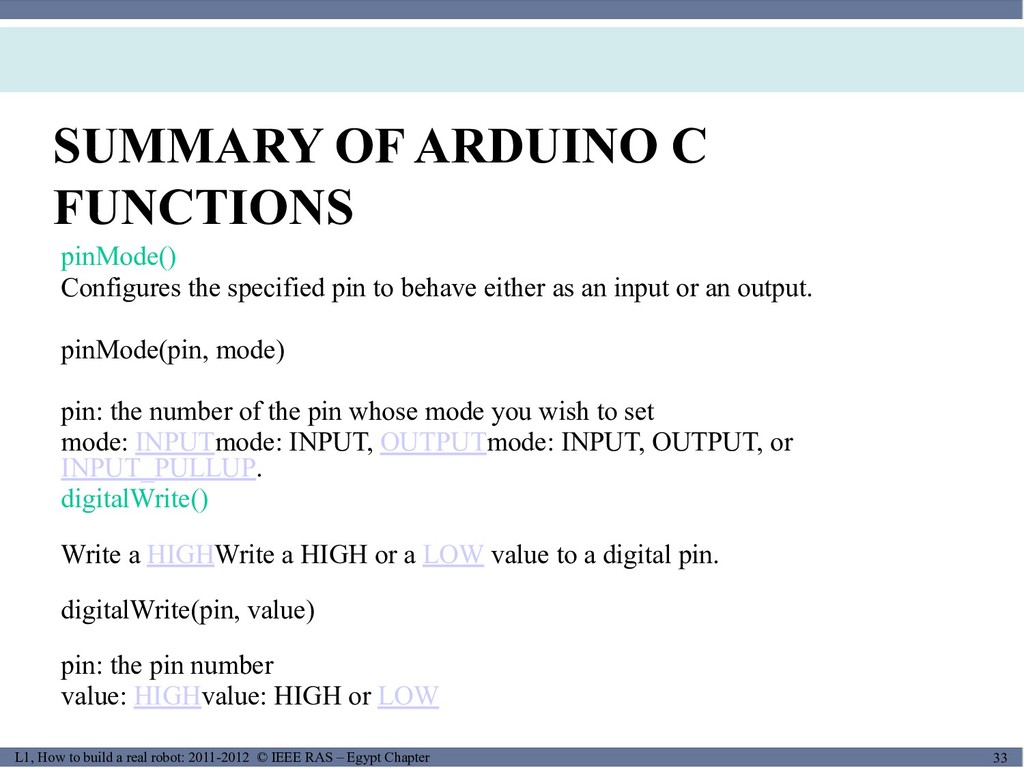
of Waterloo 33/22 33 L1, How to build a real robot: 2011-2012 © IEEE RAS – Egypt Chapter SUMMARY OF ARDUINO C FUNCTIONS pinMode() Configures the specified pin to behave either as an input or an output. Syntax pinMode(pin, mode) Parameters pin: the number of the pin whose mode you wish to set mode: INPUTmode: INPUT, OUTPUTmode: INPUT, OUTPUT, or INPUT_PULLUP. digitalWrite() Description Write a HIGHWrite a HIGH or a LOW value to a digital pin. Syntax digitalWrite(pin, value) Parameters pin: the pin number value: HIGHvalue: HIGH or LOW
MUSES_SECRET: ORF-RE Project - © PAMI Research Group – University
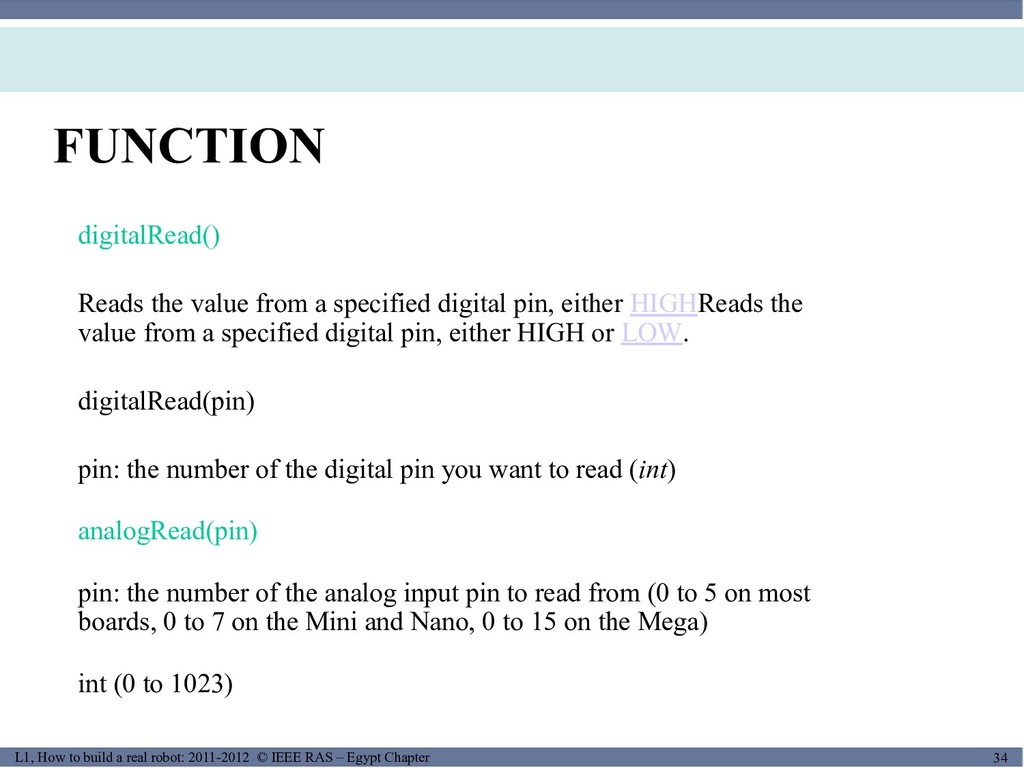
of Waterloo 34/22 34 L1, How to build a real robot: 2011-2012 © IEEE RAS – Egypt Chapter FUNCTION digitalRead() Description Reads the value from a specified digital pin, either HIGHReads the value from a specified digital pin, either HIGH or LOW. Syntax digitalRead(pin) Parameters pin: the number of the digital pin you want to read (int) Syntax analogRead(pin) Parameters pin: the number of the analog input pin to read from (0 to 5 on most boards, 0 to 7 on the Mini and Nano, 0 to 15 on the Mega) Returns int (0 to 1023)
MUSES_SECRET: ORF-RE Project - © PAMI Research Group – University
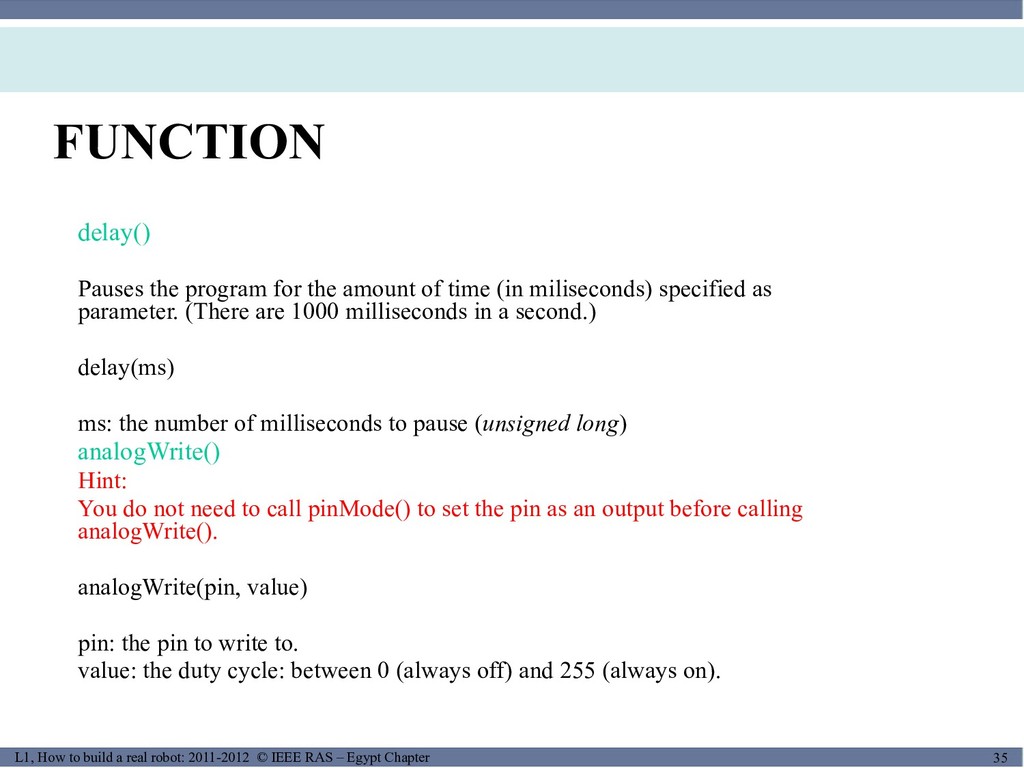
of Waterloo 35/22 35 L1, How to build a real robot: 2011-2012 © IEEE RAS – Egypt Chapter FUNCTION delay() Description Pauses the program for the amount of time (in miliseconds) specified as parameter. (There are 1000 milliseconds in a second.) Syntax delay(ms) Parameters ms: the number of milliseconds to pause (unsigned long) analogWrite() Hint: You do not need to call pinMode() to set the pin as an output before calling analogWrite(). Syntax analogWrite(pin, value) Parameters pin: the pin to write to. value: the duty cycle: between 0 (always off) and 255 (always on).
MUSES_SECRET: ORF-RE Project - © PAMI Research Group – University
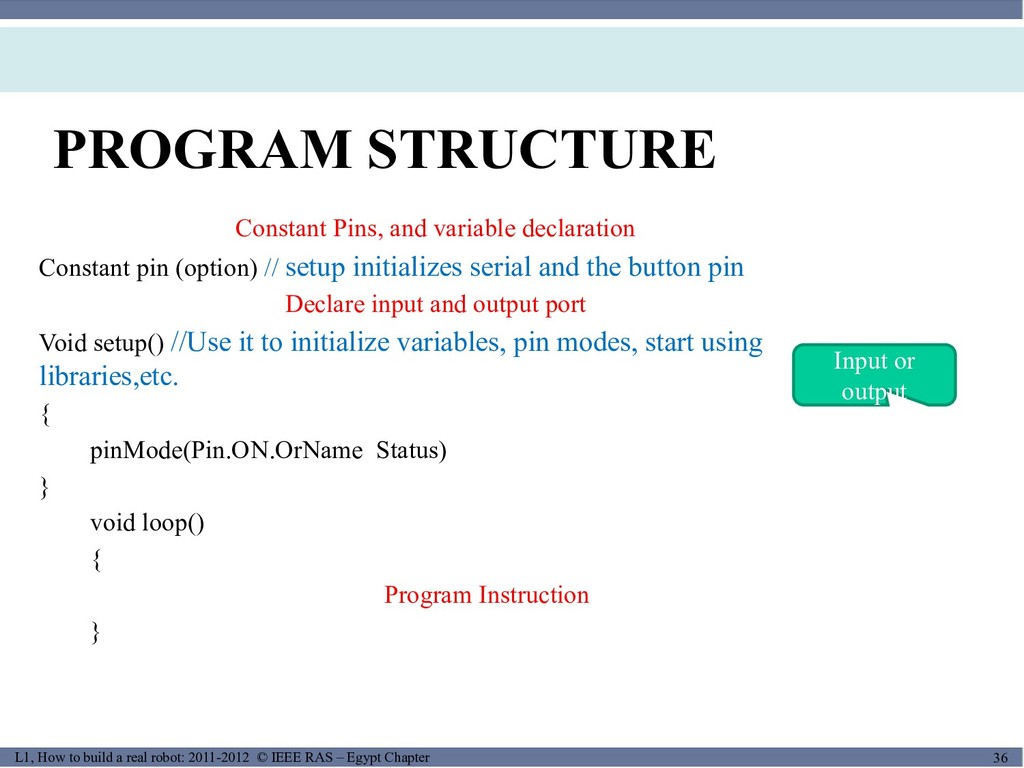
of Waterloo 36/22 36 L1, How to build a real robot: 2011-2012 © IEEE RAS – Egypt Chapter PROGRAM STRUCTURE Constant Pins, and variable declaration Constant pin (option) // setup initializes serial and the button pin Declare input and output port Void setup() //Use it to initialize variables, pin modes, start using libraries,etc. { pinMode(Pin.ON.OrName Status) } void loop() { Program Instruction } Input or output
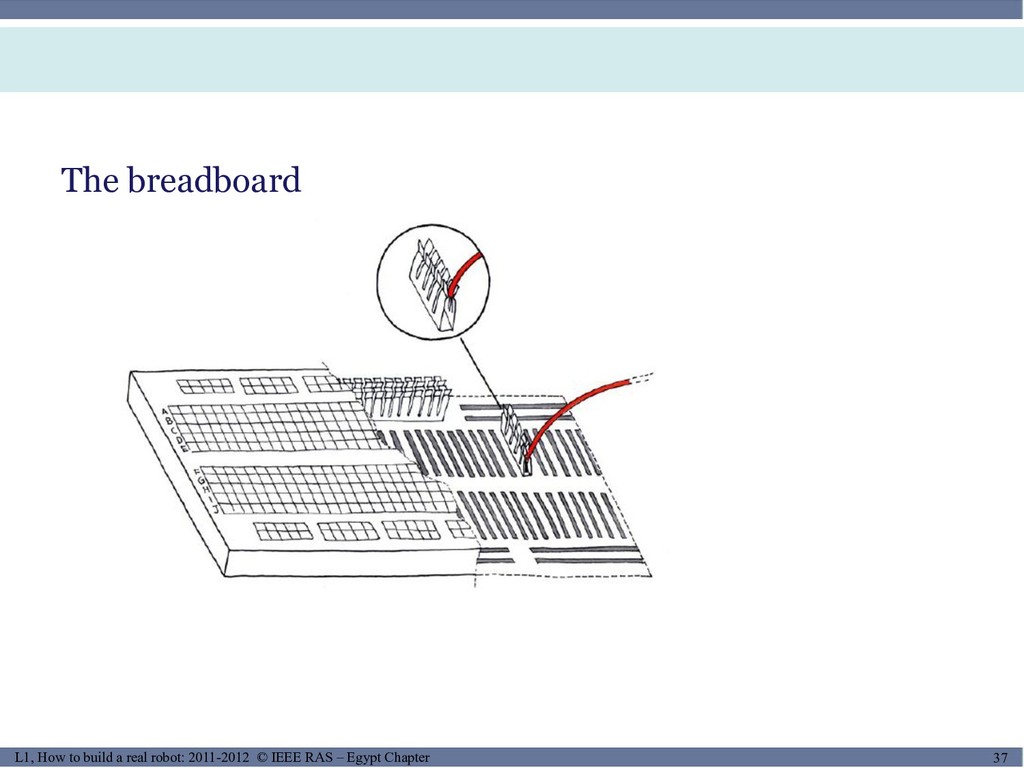
MUSES_SECRET: ORF-RE Project - © PAMI Research Group – University
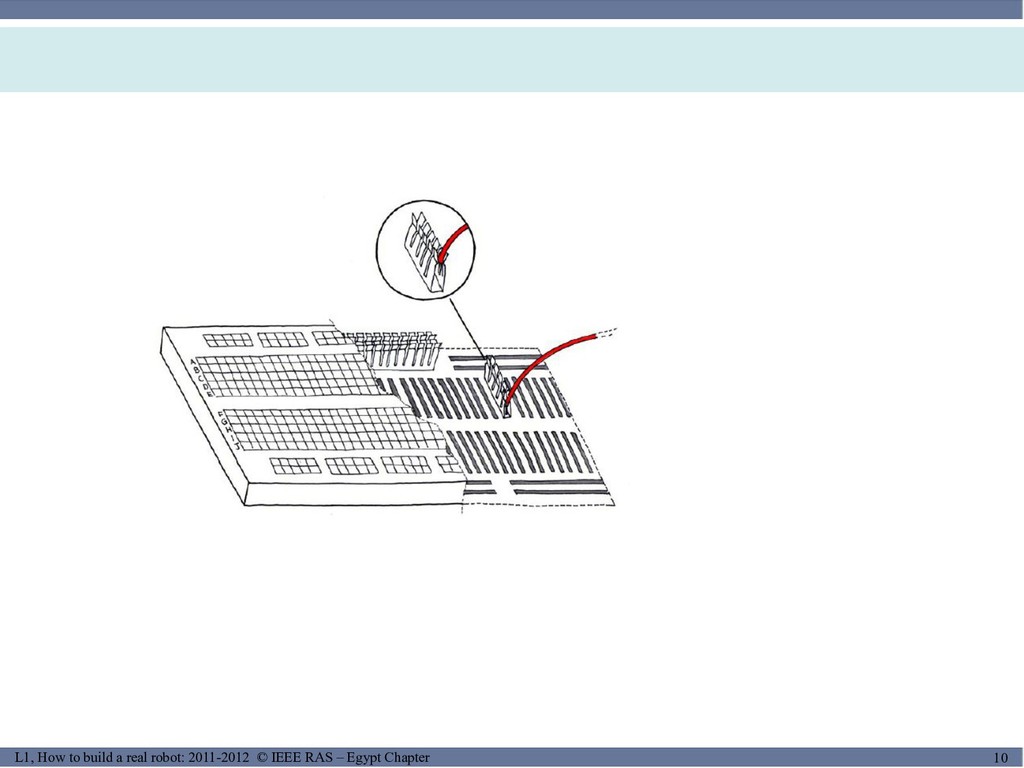
of Waterloo 37/22 37 L1, How to build a real robot: 2011-2012 © IEEE RAS – Egypt Chapter The breadboard
MUSES_SECRET: ORF-RE Project - © PAMI Research Group – University
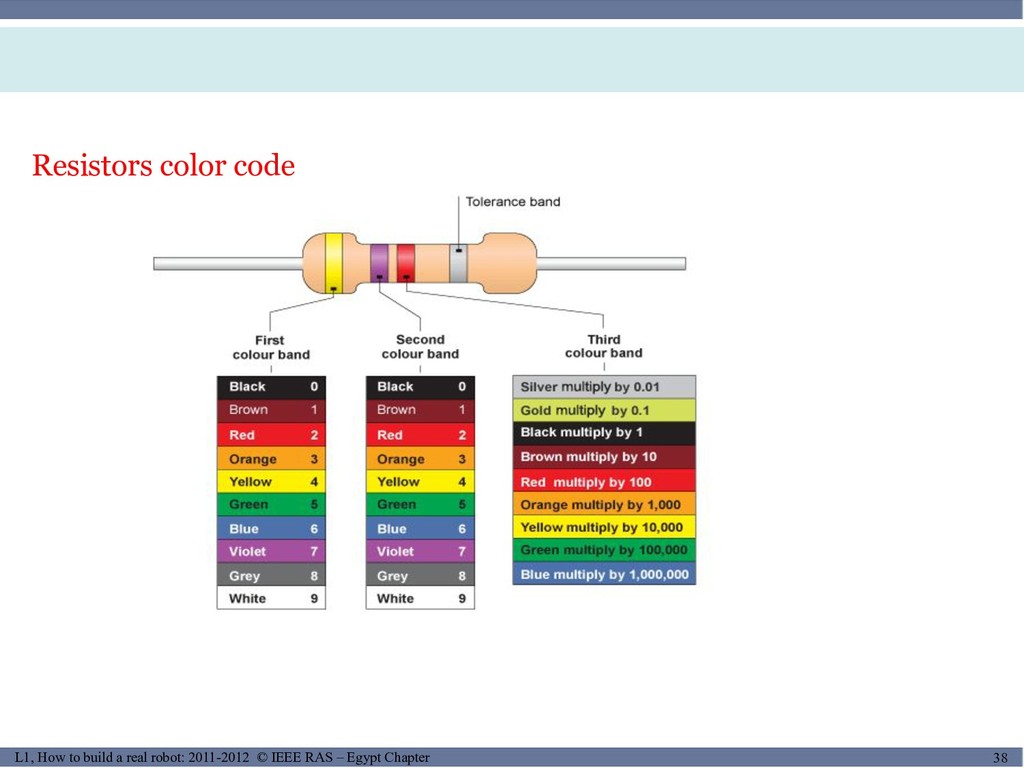
of Waterloo 38/22 38 L1, How to build a real robot: 2011-2012 © IEEE RAS – Egypt Chapter Resistors color code
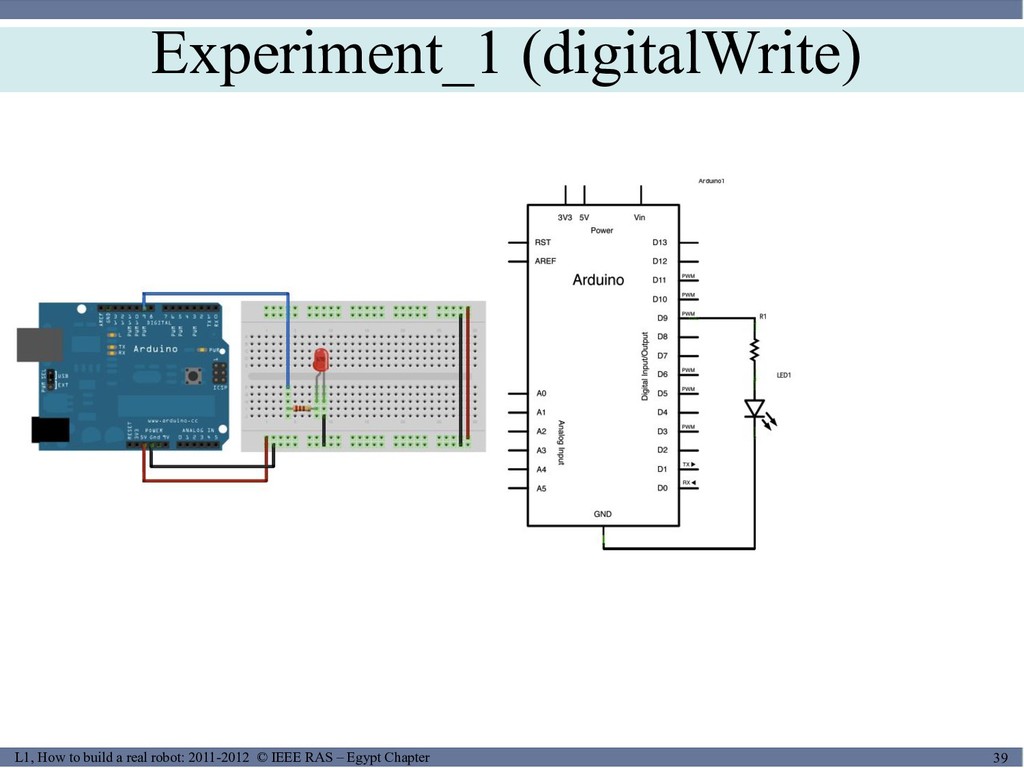
MUSES_SECRET: ORF-RE Project - © PAMI Research Group – University
of Waterloo 39/22 39 L1, How to build a real robot: 2011-2012 © IEEE RAS – Egypt Chapter Experiment_1 (digitalWrite)
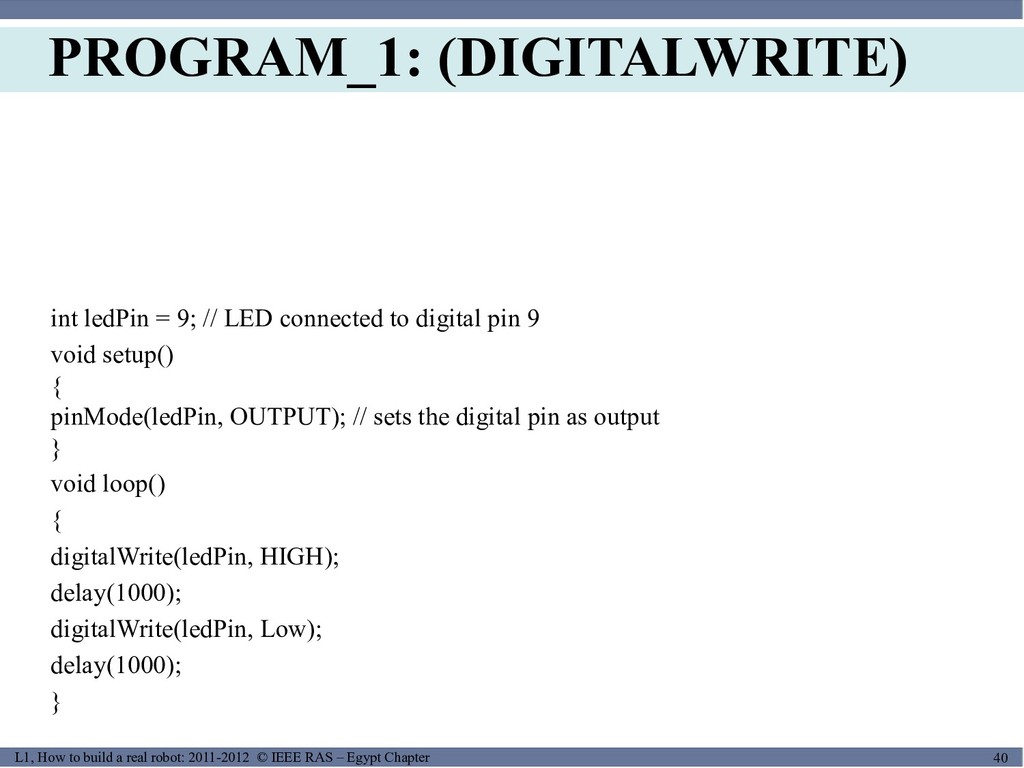
MUSES_SECRET: ORF-RE Project - © PAMI Research Group – University
of Waterloo 40/22 40 L1, How to build a real robot: 2011-2012 © IEEE RAS – Egypt Chapter PROGRAM_1: (DIGITALWRITE) int ledPin = 9; // LED connected to digital pin 9 void setup() { pinMode(ledPin, OUTPUT); // sets the digital pin as output } void loop() { digitalWrite(ledPin, HIGH); delay(1000); digitalWrite(ledPin, Low); delay(1000); }
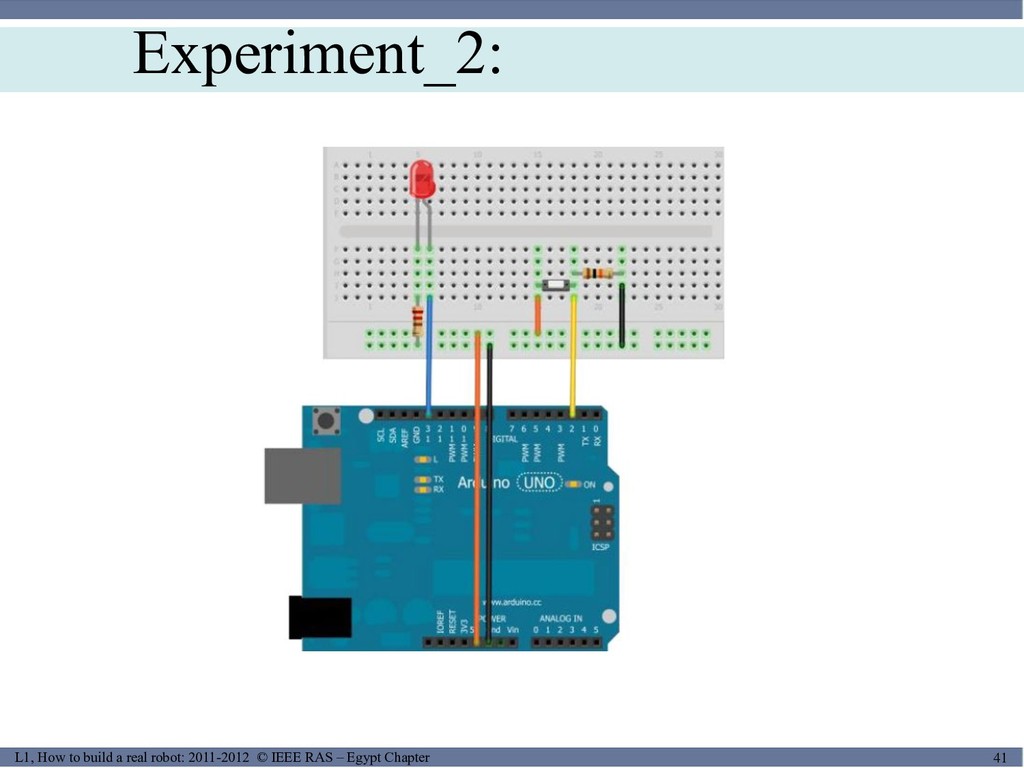
MUSES_SECRET: ORF-RE Project - © PAMI Research Group – University
of Waterloo 41/22 41 L1, How to build a real robot: 2011-2012 © IEEE RAS – Egypt Chapter Experiment_2:
MUSES_SECRET: ORF-RE Project - © PAMI Research Group – University
of Waterloo 42/22 42 L1, How to build a real robot: 2011-2012 © IEEE RAS – Egypt Chapter PROGRAM_2: (DIGITAL READ) int ledPin = 13; // LED connected to digital pin 13 int swtPin = 2; // switch connected to digital pin 2 char x = 0; void setup() { pinMode(ledPin, OUTPUT); // sets the digital pin as output pinMode(swtPin, INPUT); //sets the digital pin as input } void loop() { x = digitalRead(swtPin); digitalWrite(ledPin, x); }
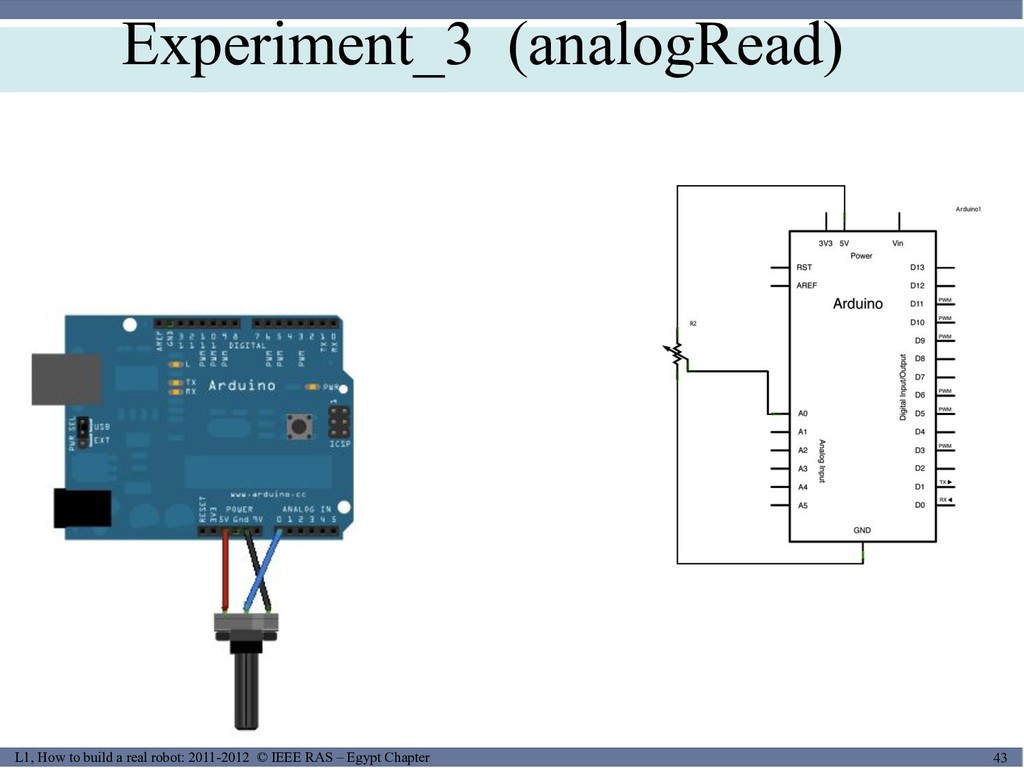
MUSES_SECRET: ORF-RE Project - © PAMI Research Group – University
of Waterloo 43/22 43 L1, How to build a real robot: 2011-2012 © IEEE RAS – Egypt Chapter Experiment_3 (analogRead)
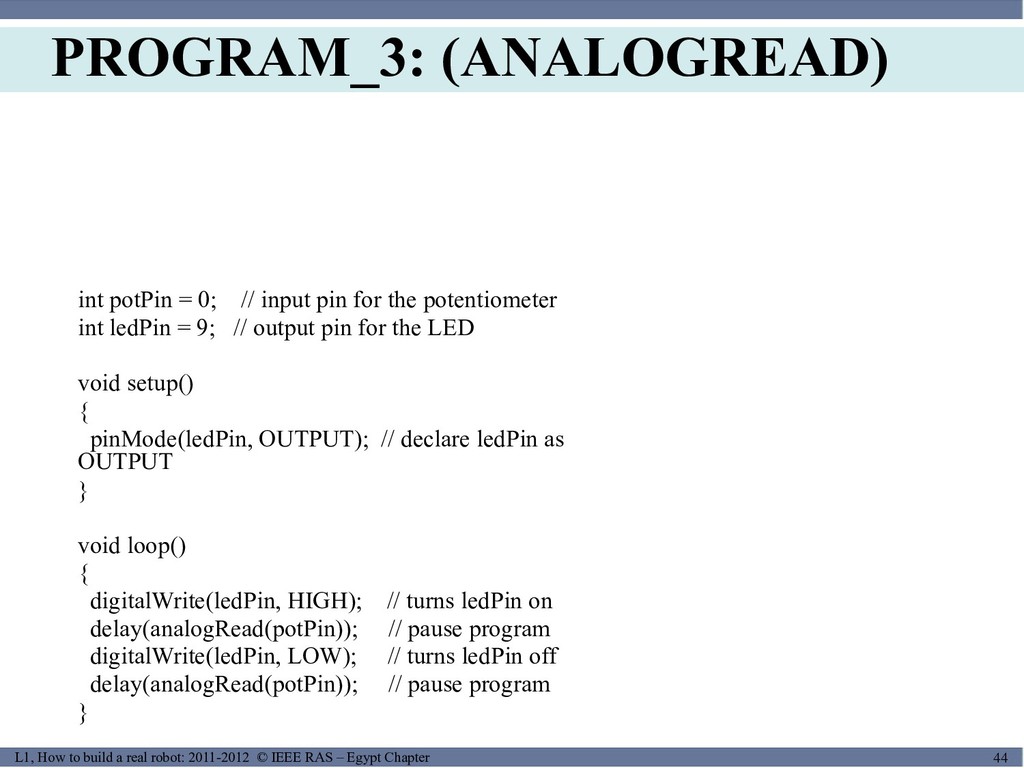
MUSES_SECRET: ORF-RE Project - © PAMI Research Group – University
of Waterloo 44/22 44 L1, How to build a real robot: 2011-2012 © IEEE RAS – Egypt Chapter PROGRAM_3: (ANALOGREAD) int potPin = 0; // input pin for the potentiometer int ledPin = 9; // output pin for the LED void setup() { pinMode(ledPin, OUTPUT); // declare ledPin as OUTPUT } void loop() { digitalWrite(ledPin, HIGH); // turns ledPin on delay(analogRead(potPin)); // pause program digitalWrite(ledPin, LOW); // turns ledPin off delay(analogRead(potPin)); // pause program }
MUSES_SECRET: ORF-RE Project - © PAMI Research Group – University
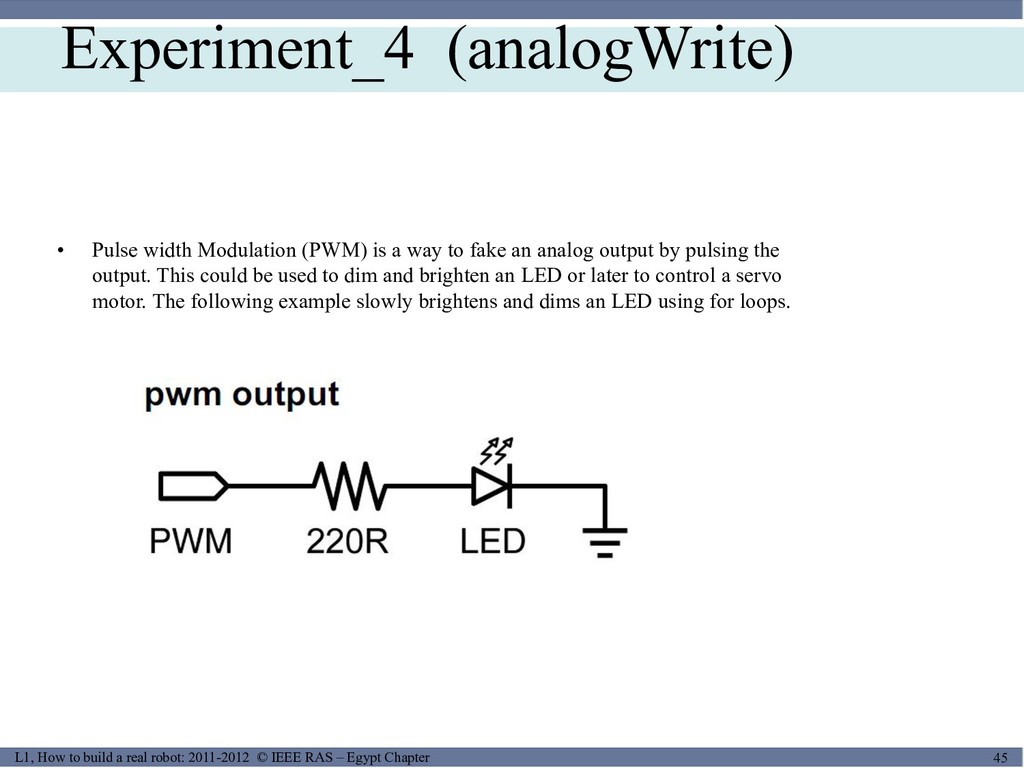
of Waterloo 45/22 45 L1, How to build a real robot: 2011-2012 © IEEE RAS – Egypt Chapter Experiment_4 (analogWrite) • Pulse width Modulation (PWM) is a way to fake an analog output by pulsing the output. This could be used to dim and brighten an LED or later to control a servo motor. The following example slowly brightens and dims an LED using for loops.
MUSES_SECRET: ORF-RE Project - © PAMI Research Group – University
of Waterloo 46/22 46 L1, How to build a real robot: 2011-2012 © IEEE RAS – Egypt Chapter PROGRAM_4: (ANALOGWRITE) int ledPin = 9; // PWM pin for the LED void setup(){} // no setup needed void loop() { for (int i=0; i<=255; i++) // ascending value for i { analogWrite(ledPin, i); // sets brightess level to i delay(10); // pauses for 100ms } for (int i=255; i>=0; i--) // descending value for i { analogWrite(ledPin, i); // sets brightess level to i delay(10); // pauses for 100ms } }
MUSES_SECRET: ORF-RE Project - © PAMI Research Group – University
of Waterloo 47/22 47 L1, How to build a real robot: 2011-2012 © IEEE RAS – Egypt Chapter THANKS