Started With WordPress This Easy to follow, Step by Step Guide for Beginners shows you how to start your own Blog or Website using WordPress. This Guide is also available in online form and was written for people who don’t possess any knowledge, technical skills or experience with WordPress or website development. Want to Learn WordPress and become an Expert? Or simply want to start a WordPress Blog? Starting your own WordPress Website or Blog is easy with WordPress.
WordPress is web software you can use to easily create a visually stunning website or blog. The core software is built by hundreds of community volunteers and is now the most popular blogging & website software in the world. Ready to get started? It’s Easy As… 1. Choose a Domain Name. Your online address 2. Find a Web Host. You’re Online Home 3. Install WordPress. Your Online Property Choose a Domain Name Before you can install WordPress you’ll need to choose a domain name for your blog. This will be the unique website address where your visitors find your site on the internet. Choosing a domain name is the first step towards starting your own WordPress blog. If you already own a domain name enter it here and follow the instructions. WordPress Hosting Requirements If for some reason you don’t want to sign up with our recommended WordPress web host, here are the specs you’ll need for installing WordPress with an alternative web host. 1. PHP version 5.2.4 or greater 2. MySQL version 5.0 or greater 3. Apache server Besides Bluehost, we also provide a list of other web hosting options for you on The Resources page. Another great option for hosting WordPress is Hostgator. Enter Hostgator Coupon Code: TwentyEleven and Save 25%
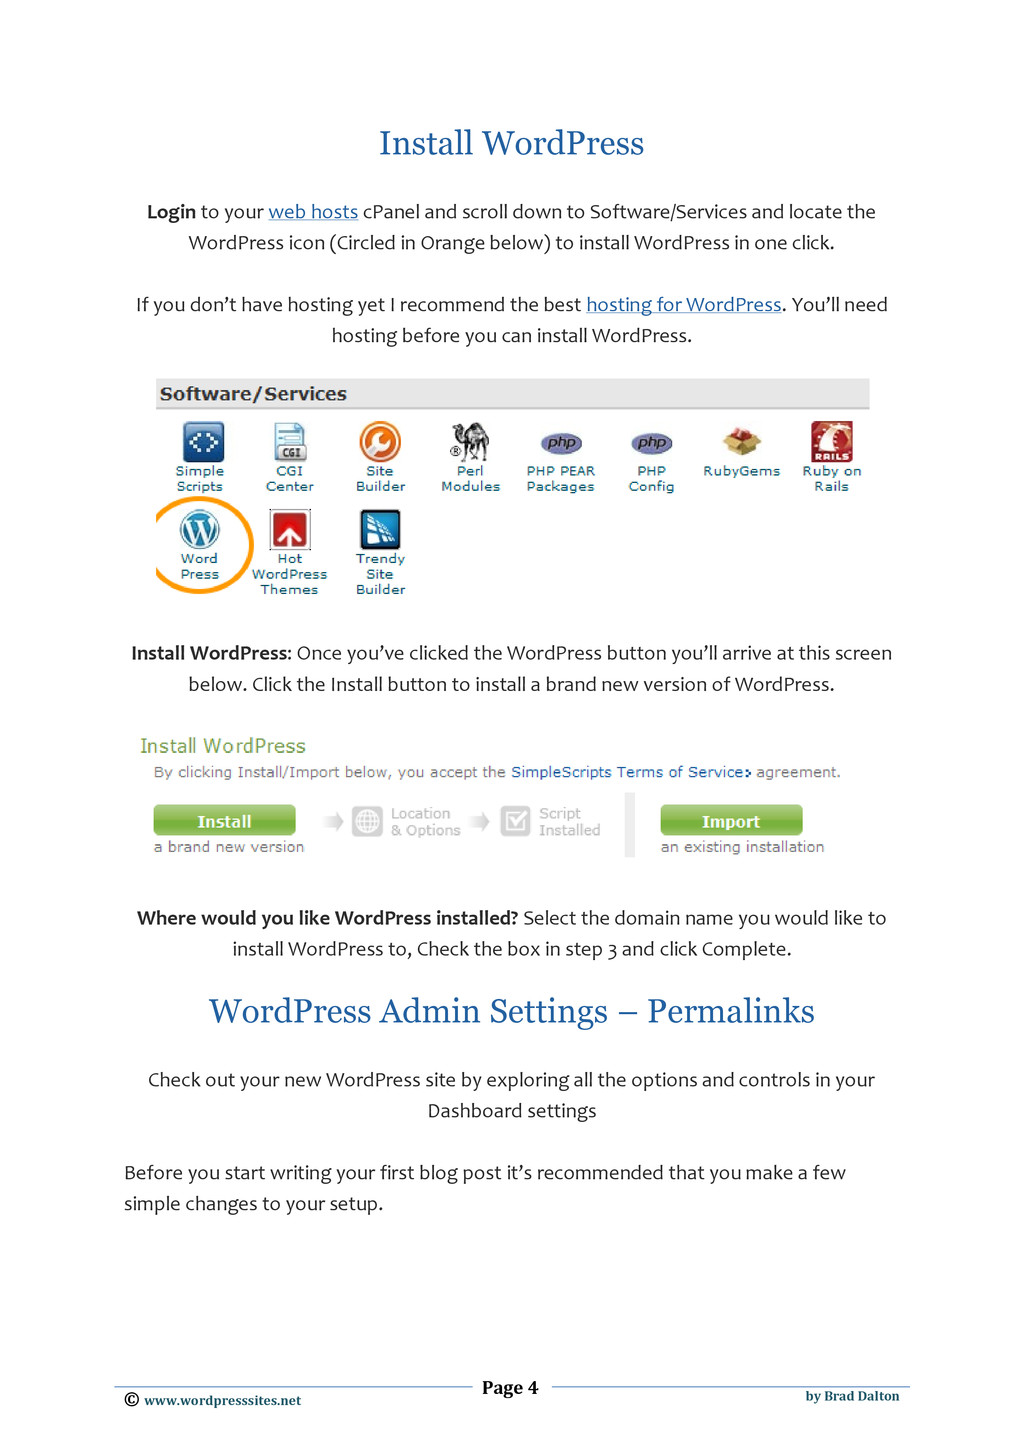
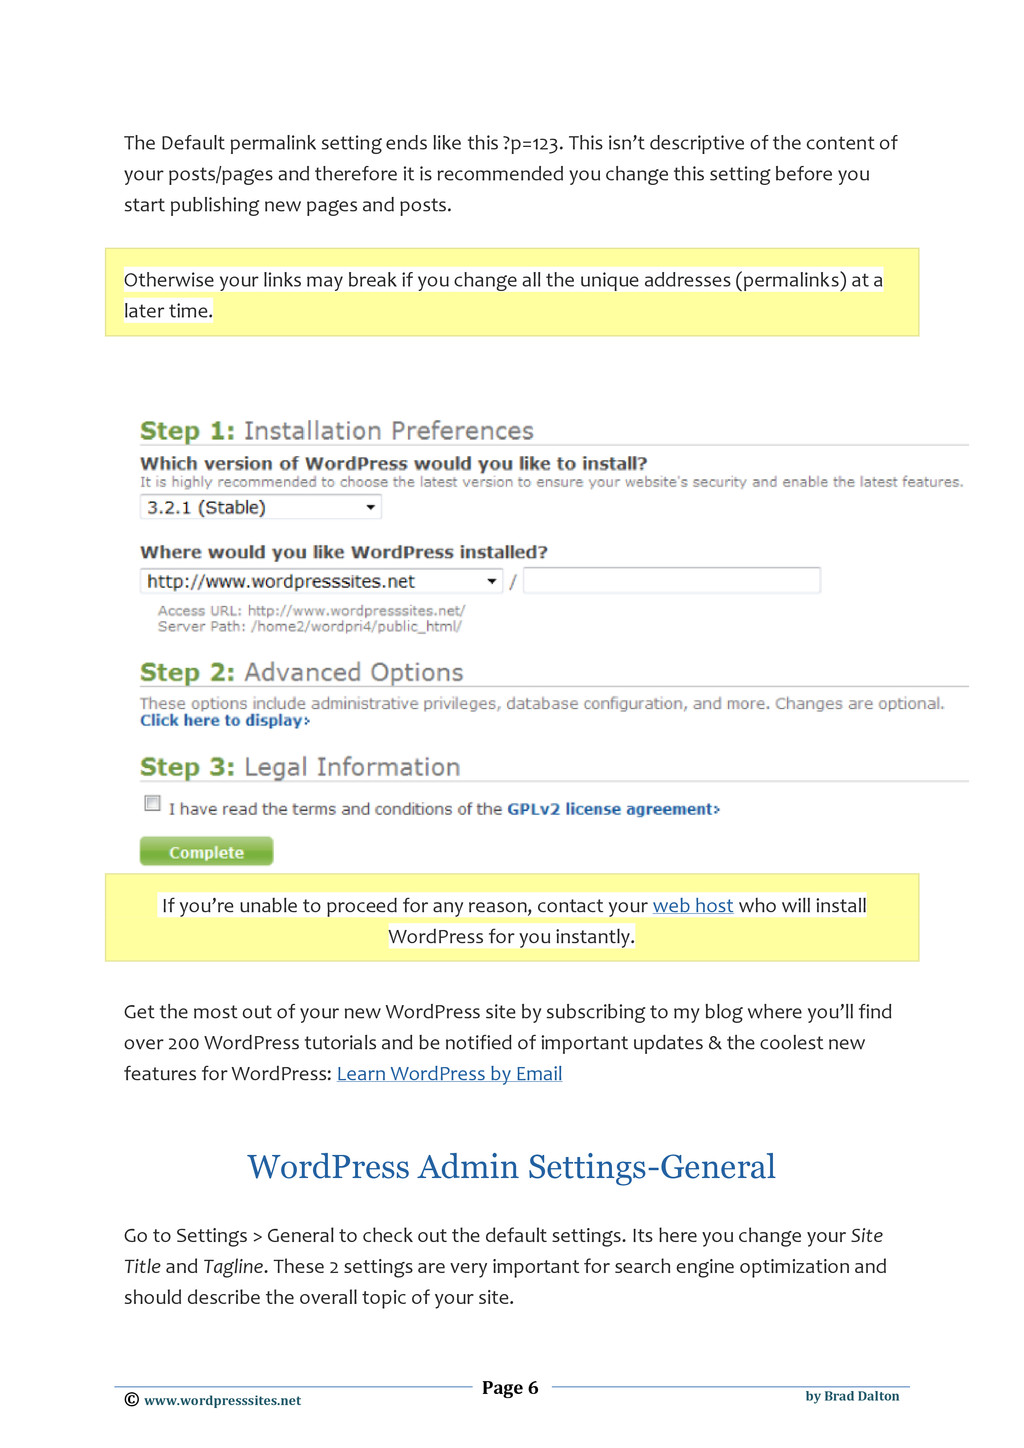
to your web hosts cPanel and scroll down to Software/Services and locate the WordPress icon (Circled in Orange below) to install WordPress in one click. If you don’t have hosting yet I recommend the best hosting for WordPress. You’ll need hosting before you can install WordPress. Install WordPress: Once you’ve clicked the WordPress button you’ll arrive at this screen below. Click the Install button to install a brand new version of WordPress. Where would you like WordPress installed? Select the domain name you would like to install WordPress to, Check the box in step 3 and click Complete. WordPress Admin Settings – Permalinks Check out your new WordPress site by exploring all the options and controls in your Dashboard settings Before you start writing your first blog post it’s recommended that you make a few simple changes to your setup.
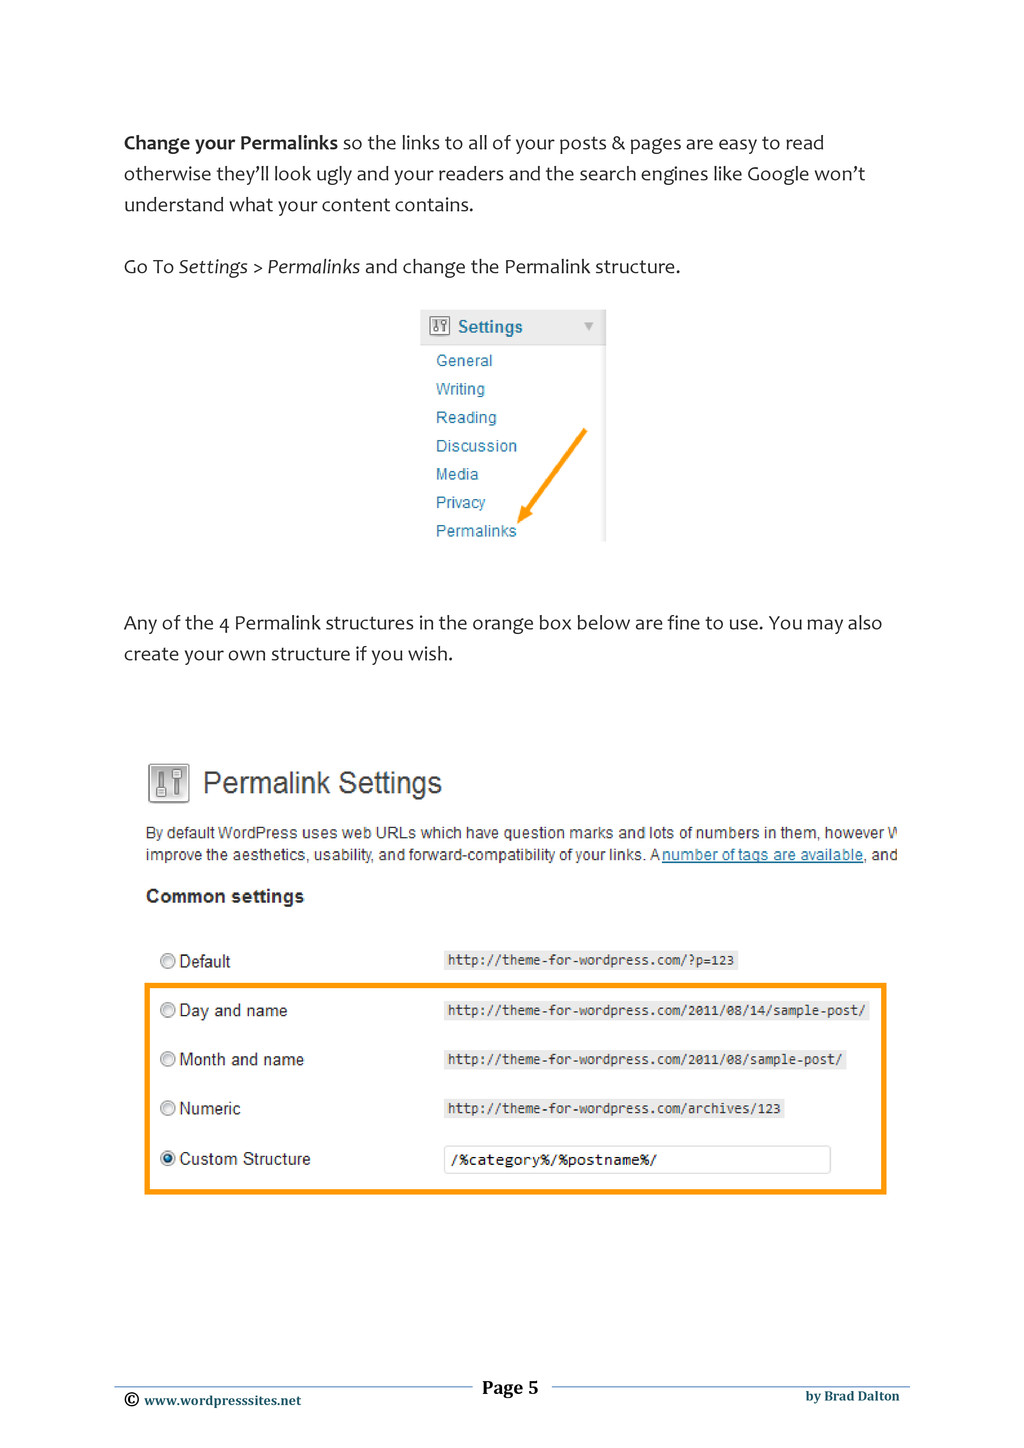
so the links to all of your posts & pages are easy to read otherwise they’ll look ugly and your readers and the search engines like Google won’t understand what your content contains. Go To Settings > Permalinks and change the Permalink structure. Any of the 4 Permalink structures in the orange box below are fine to use. You may also create your own structure if you wish.
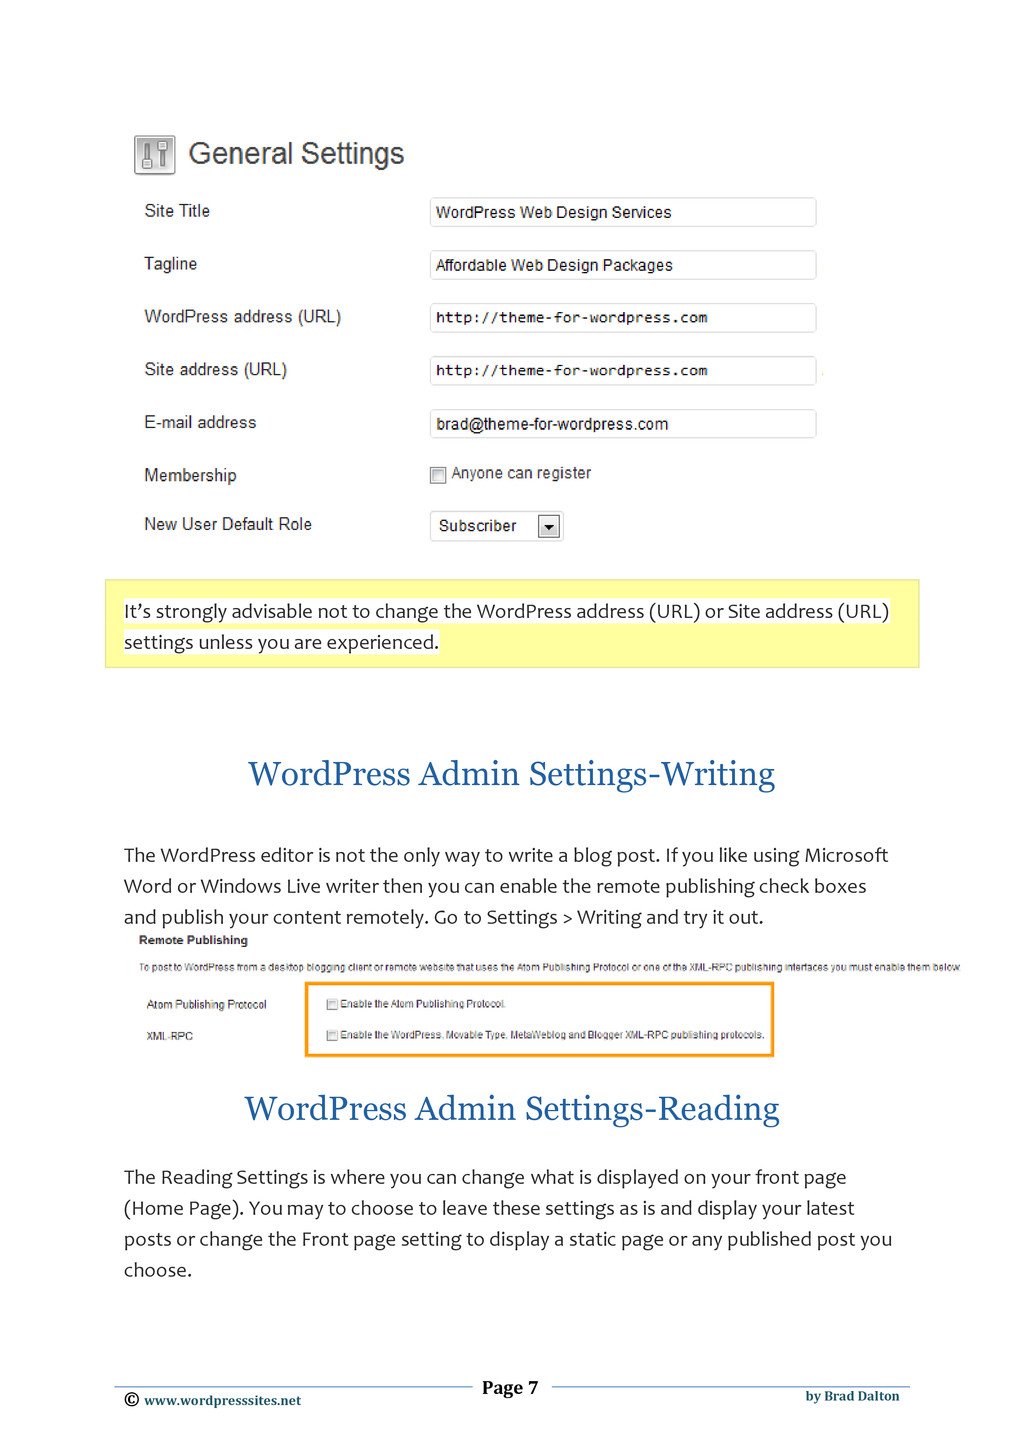
setting ends like this ?p=123. This isn’t descriptive of the content of your posts/pages and therefore it is recommended you change this setting before you start publishing new pages and posts. Otherwise your links may break if you change all the unique addresses (permalinks) at a later time. If you’re unable to proceed for any reason, contact your web host who will install WordPress for you instantly. Get the most out of your new WordPress site by subscribing to my blog where you’ll find over 200 WordPress tutorials and be notified of important updates & the coolest new features for WordPress: Learn WordPress by Email WordPress Admin Settings-General Go to Settings > General to check out the default settings. Its here you change your Site Title and Tagline. These 2 settings are very important for search engine optimization and should describe the overall topic of your site.
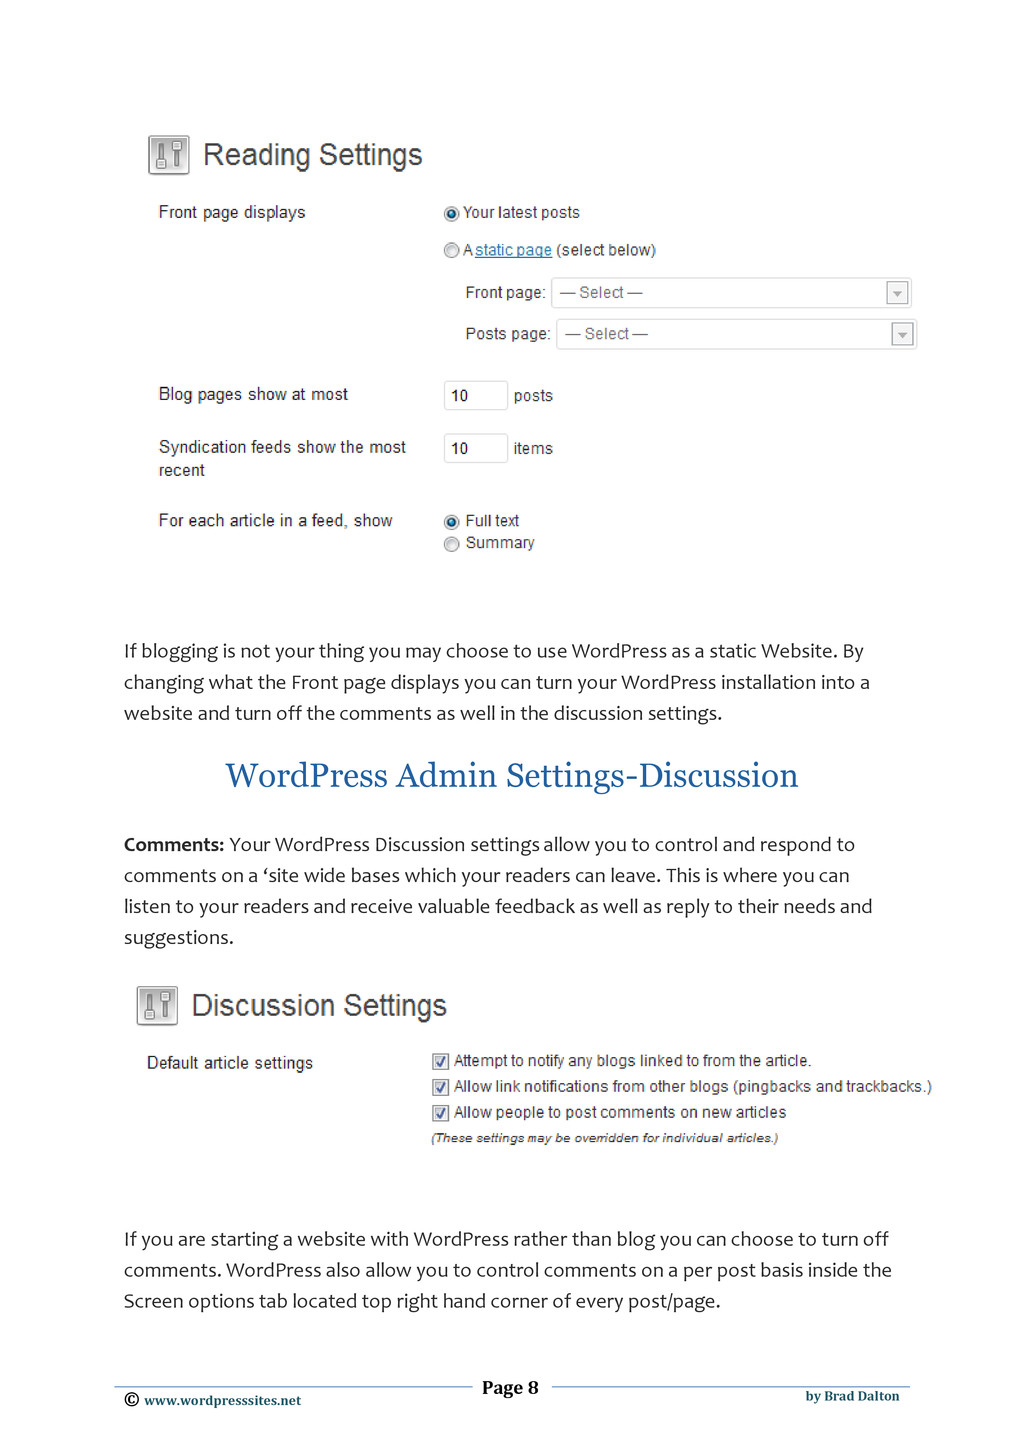
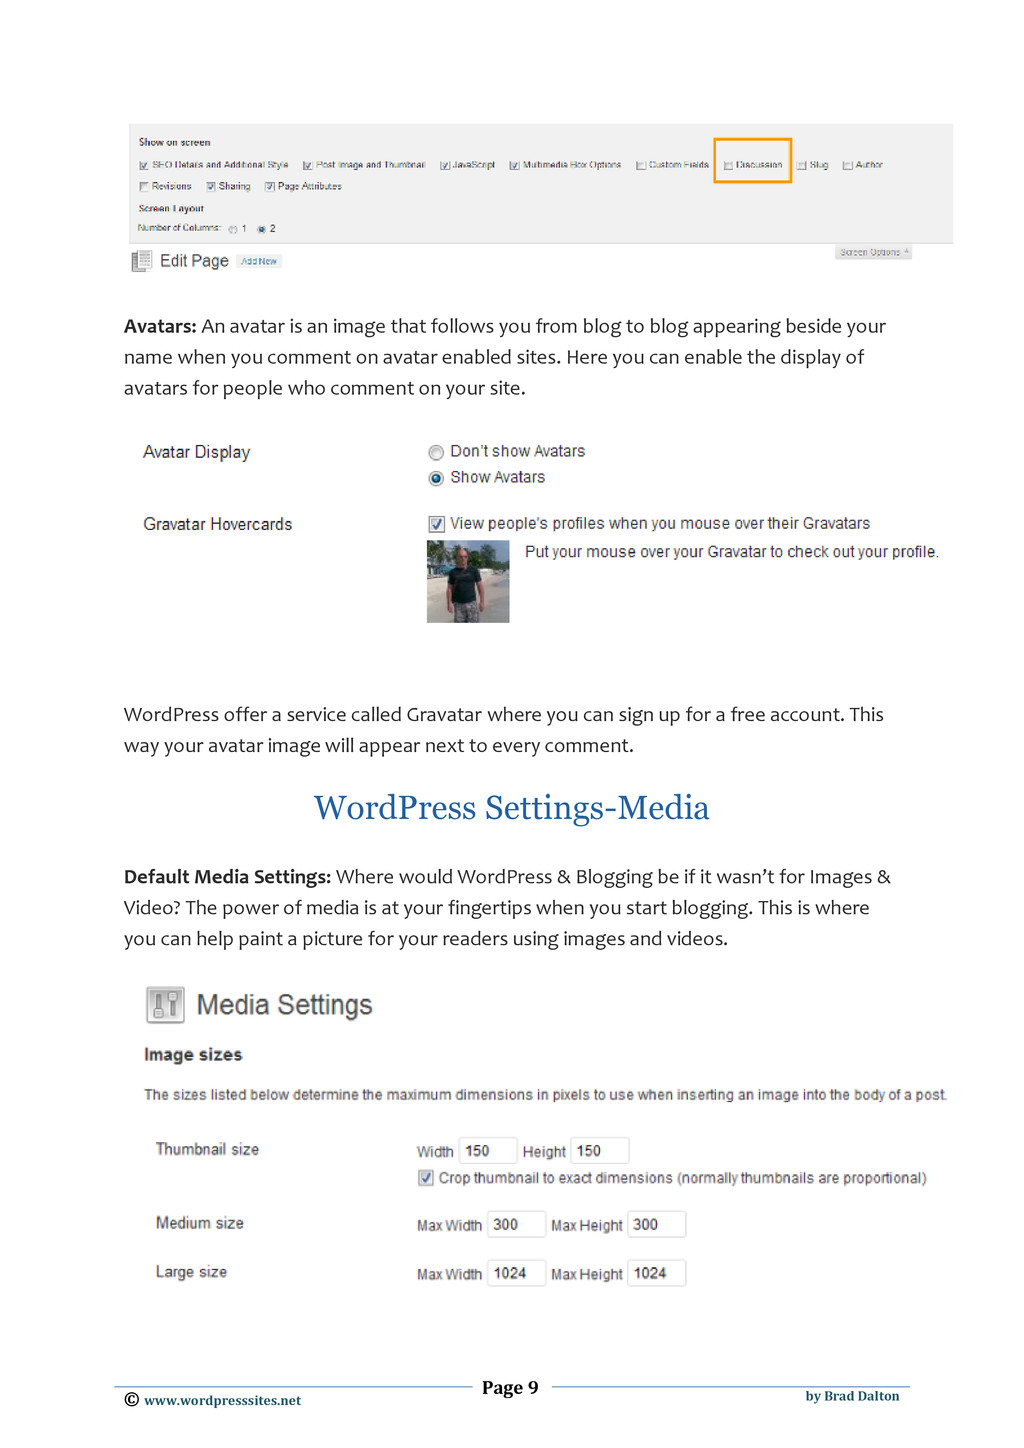
not to change the WordPress address (URL) or Site address (URL) settings unless you are experienced. WordPress Admin Settings-Writing The WordPress editor is not the only way to write a blog post. If you like using Microsoft Word or Windows Live writer then you can enable the remote publishing check boxes and publish your content remotely. Go to Settings > Writing and try it out. WordPress Admin Settings-Reading The Reading Settings is where you can change what is displayed on your front page (Home Page). You may to choose to leave these settings as is and display your latest posts or change the Front page setting to display a static page or any published post you choose.
not your thing you may choose to use WordPress as a static Website. By changing what the Front page displays you can turn your WordPress installation into a website and turn off the comments as well in the discussion settings. WordPress Admin Settings-Discussion Comments: Your WordPress Discussion settings allow you to control and respond to comments on a ‘site wide bases which your readers can leave. This is where you can listen to your readers and receive valuable feedback as well as reply to their needs and suggestions. If you are starting a website with WordPress rather than blog you can choose to turn off comments. WordPress also allow you to control comments on a per post basis inside the Screen options tab located top right hand corner of every post/page.
is an image that follows you from blog to blog appearing beside your name when you comment on avatar enabled sites. Here you can enable the display of avatars for people who comment on your site. WordPress offer a service called Gravatar where you can sign up for a free account. This way your avatar image will appear next to every comment. WordPress Settings-Media Default Media Settings: Where would WordPress & Blogging be if it wasn’t for Images & Video? The power of media is at your fingertips when you start blogging. This is where you can help paint a picture for your readers using images and videos.
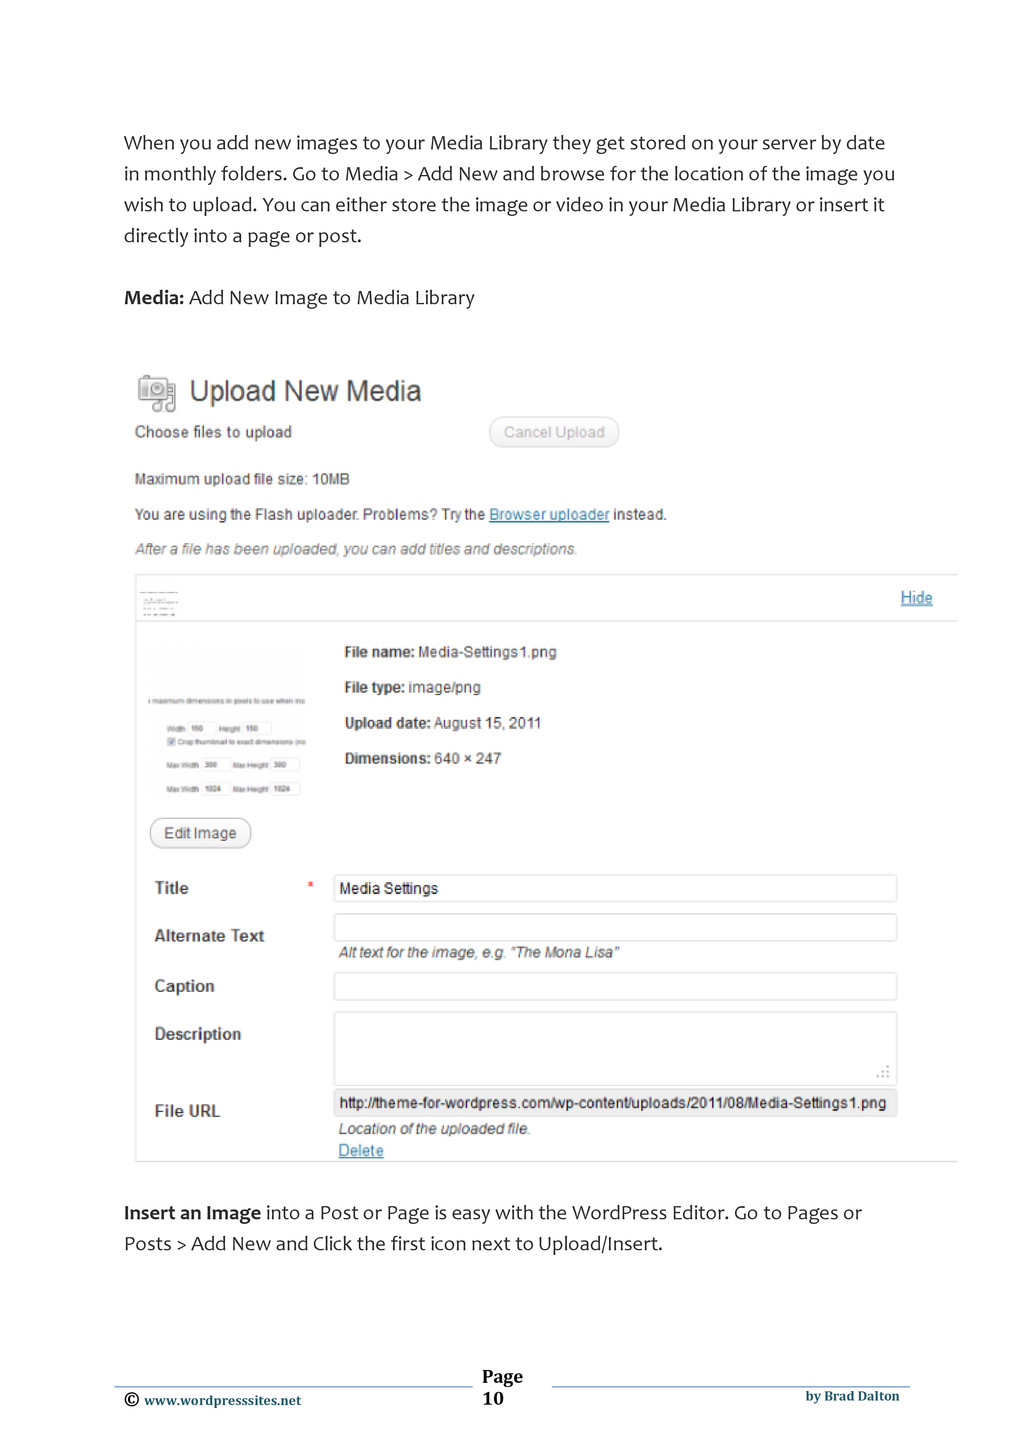
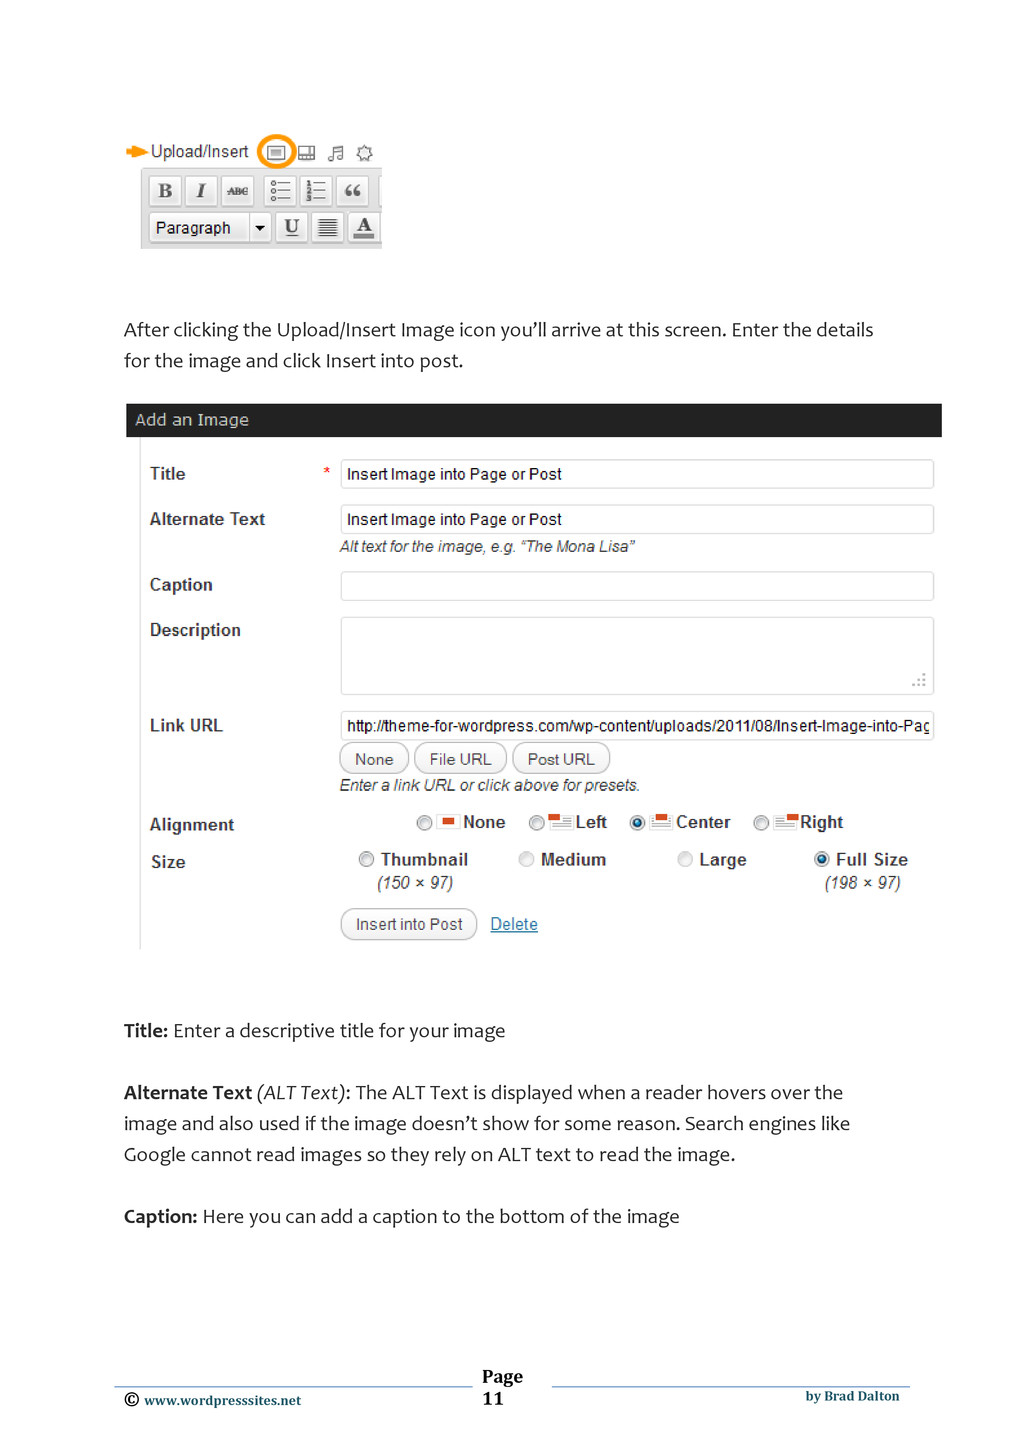
new images to your Media Library they get stored on your server by date in monthly folders. Go to Media > Add New and browse for the location of the image you wish to upload. You can either store the image or video in your Media Library or insert it directly into a page or post. Media: Add New Image to Media Library Insert an Image into a Post or Page is easy with the WordPress Editor. Go to Pages or Posts > Add New and Click the first icon next to Upload/Insert.
Upload/Insert Image icon you’ll arrive at this screen. Enter the details for the image and click Insert into post. Title: Enter a descriptive title for your image Alternate Text (ALT Text): The ALT Text is displayed when a reader hovers over the image and also used if the image doesn’t show for some reason. Search engines like Google cannot read images so they rely on ALT text to read the image. Caption: Here you can add a caption to the bottom of the image
for your reference and can be viewed in the media library. The Description will only be displayed on the attachment page when a reader clicks the image. Link URL: You may choose to link the image to another post/page or website by changing the Link URL to another address Alignment: You can insert the image to the left or right of your post/page so the text wraps around the image. Otherwise you can insert the image in the Centre without any text wrapping around your image. Selecting the ‘None’ option will insert the image without any text wrapping around it to the left of your page. Size: These size selections are based on the default media settings at the top of this page. When used your image will be resized to your Default image settings or you can simply choose the Full size. WordPress Admin Settings-Privacy By default your privacy setting should be set to allow everyone view your site including the search engines like Google and Bing. If you would like to keep your site private, you can change this setting and the search engines will not index your sites content. Appearance & Themes The 2011 Default theme your WordPress site comes installed with is called Twenty Eleven. It’s a great theme however the only problem is over 20 million other WordPress users have access to it as well, for free. Personalizing the appearance of your site so its unique is something that’s important considering there’s hundreds of millions of websites on the internet.
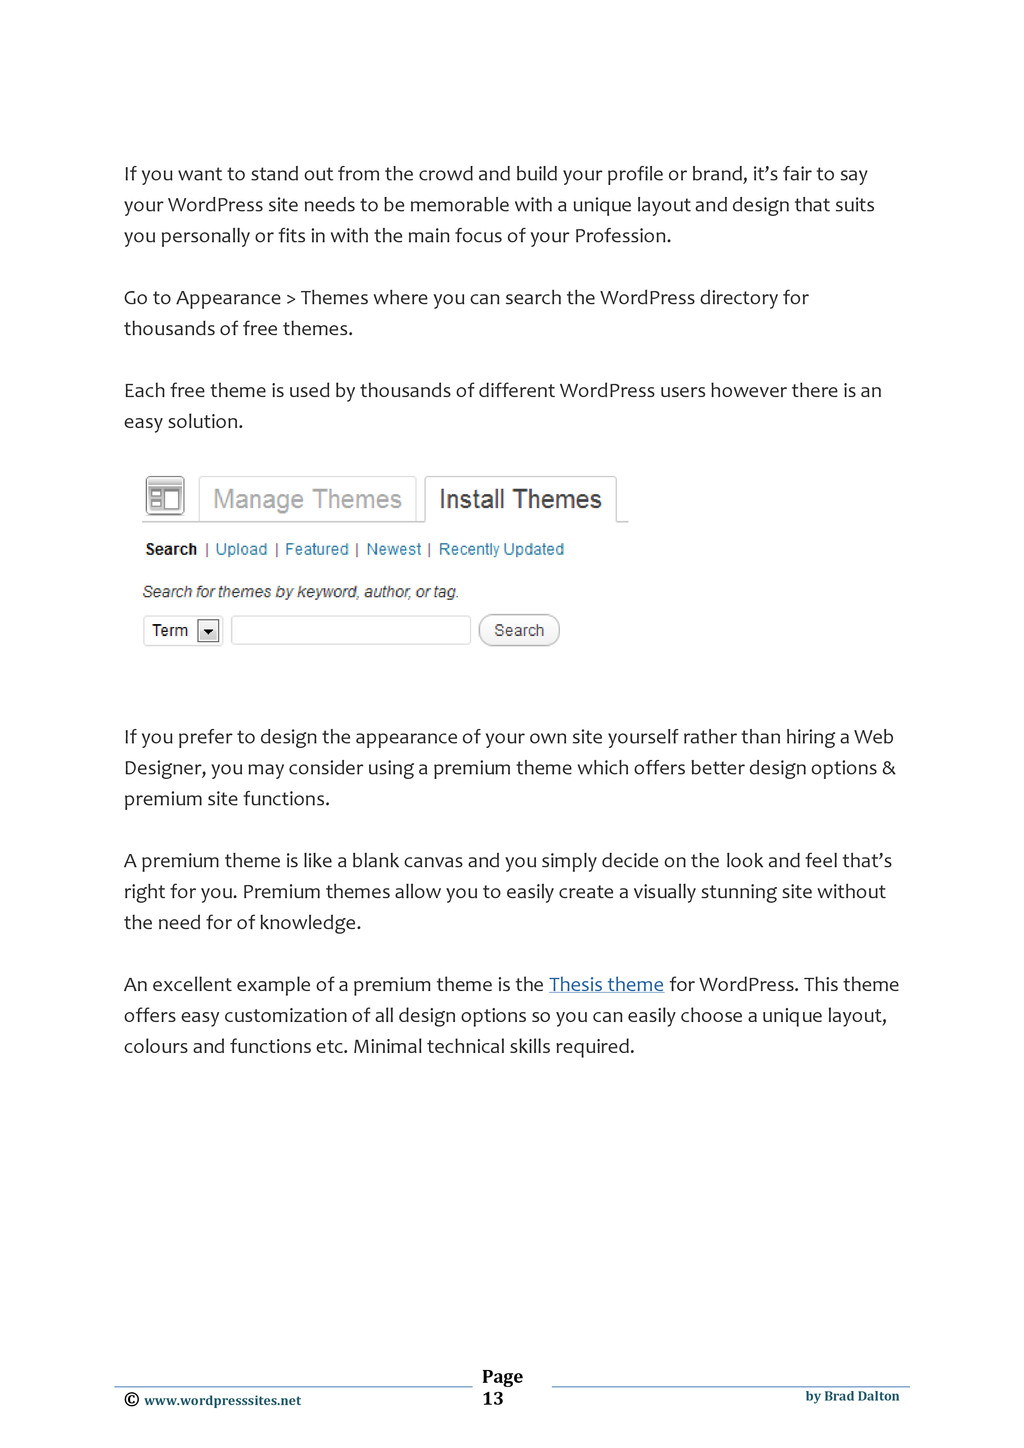
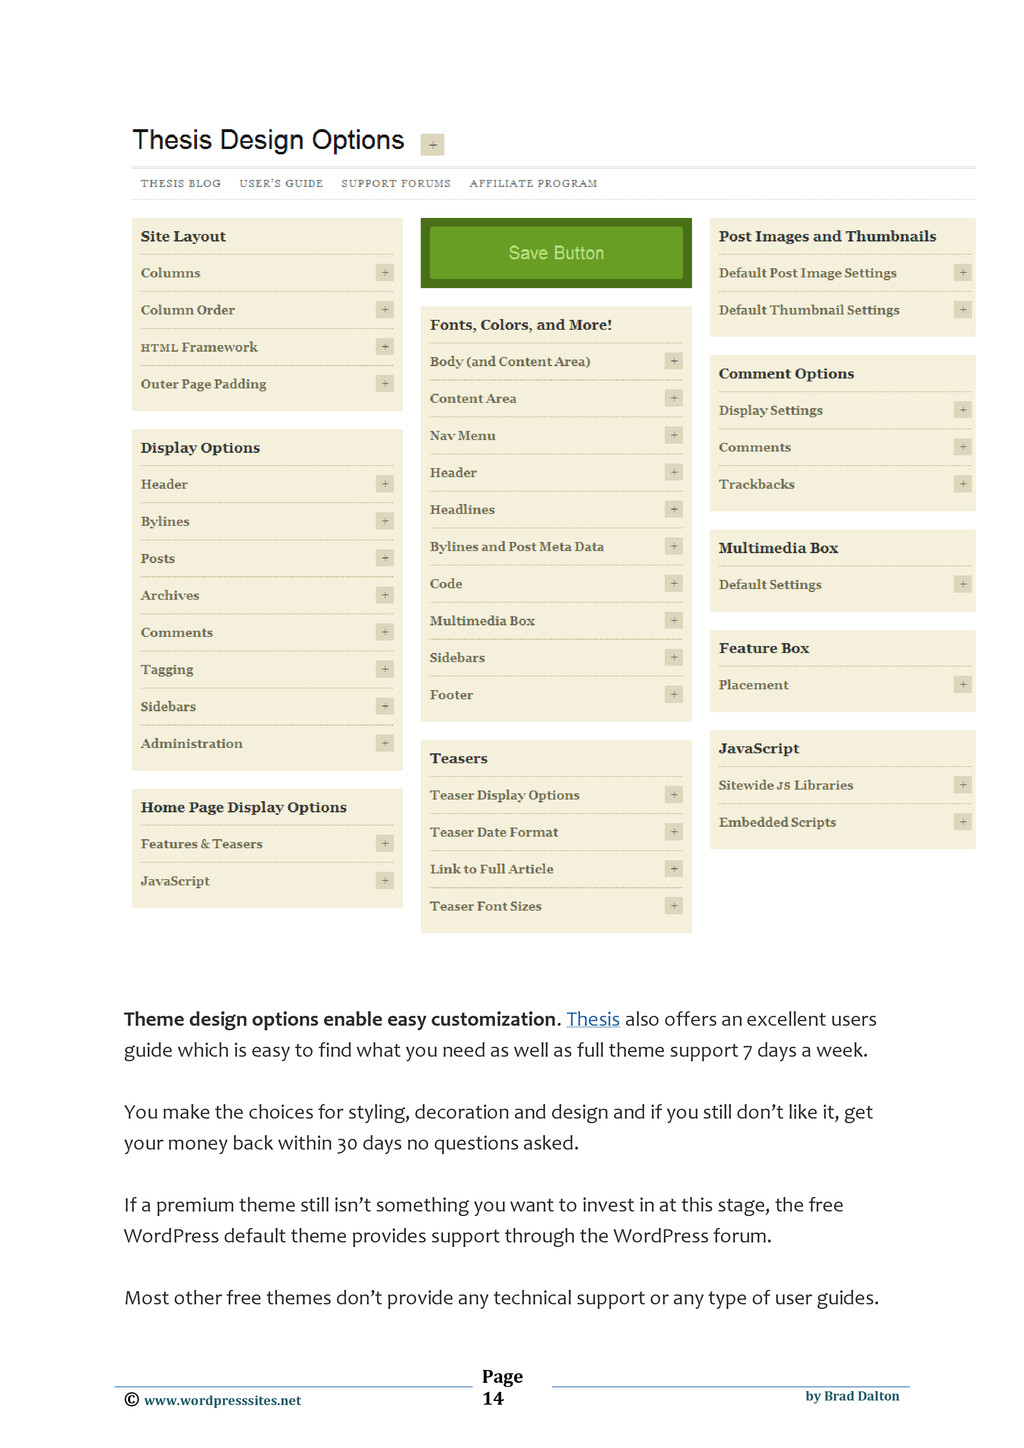
to stand out from the crowd and build your profile or brand, it’s fair to say your WordPress site needs to be memorable with a unique layout and design that suits you personally or fits in with the main focus of your Profession. Go to Appearance > Themes where you can search the WordPress directory for thousands of free themes. Each free theme is used by thousands of different WordPress users however there is an easy solution. If you prefer to design the appearance of your own site yourself rather than hiring a Web Designer, you may consider using a premium theme which offers better design options & premium site functions. A premium theme is like a blank canvas and you simply decide on the look and feel that’s right for you. Premium themes allow you to easily create a visually stunning site without the need for of knowledge. An excellent example of a premium theme is the Thesis theme for WordPress. This theme offers easy customization of all design options so you can easily choose a unique layout, colours and functions etc. Minimal technical skills required.
enable easy customization. Thesis also offers an excellent users guide which is easy to find what you need as well as full theme support 7 days a week. You make the choices for styling, decoration and design and if you still don’t like it, get your money back within 30 days no questions asked. If a premium theme still isn’t something you want to invest in at this stage, the free WordPress default theme provides support through the WordPress forum. Most other free themes don’t provide any technical support or any type of user guides.
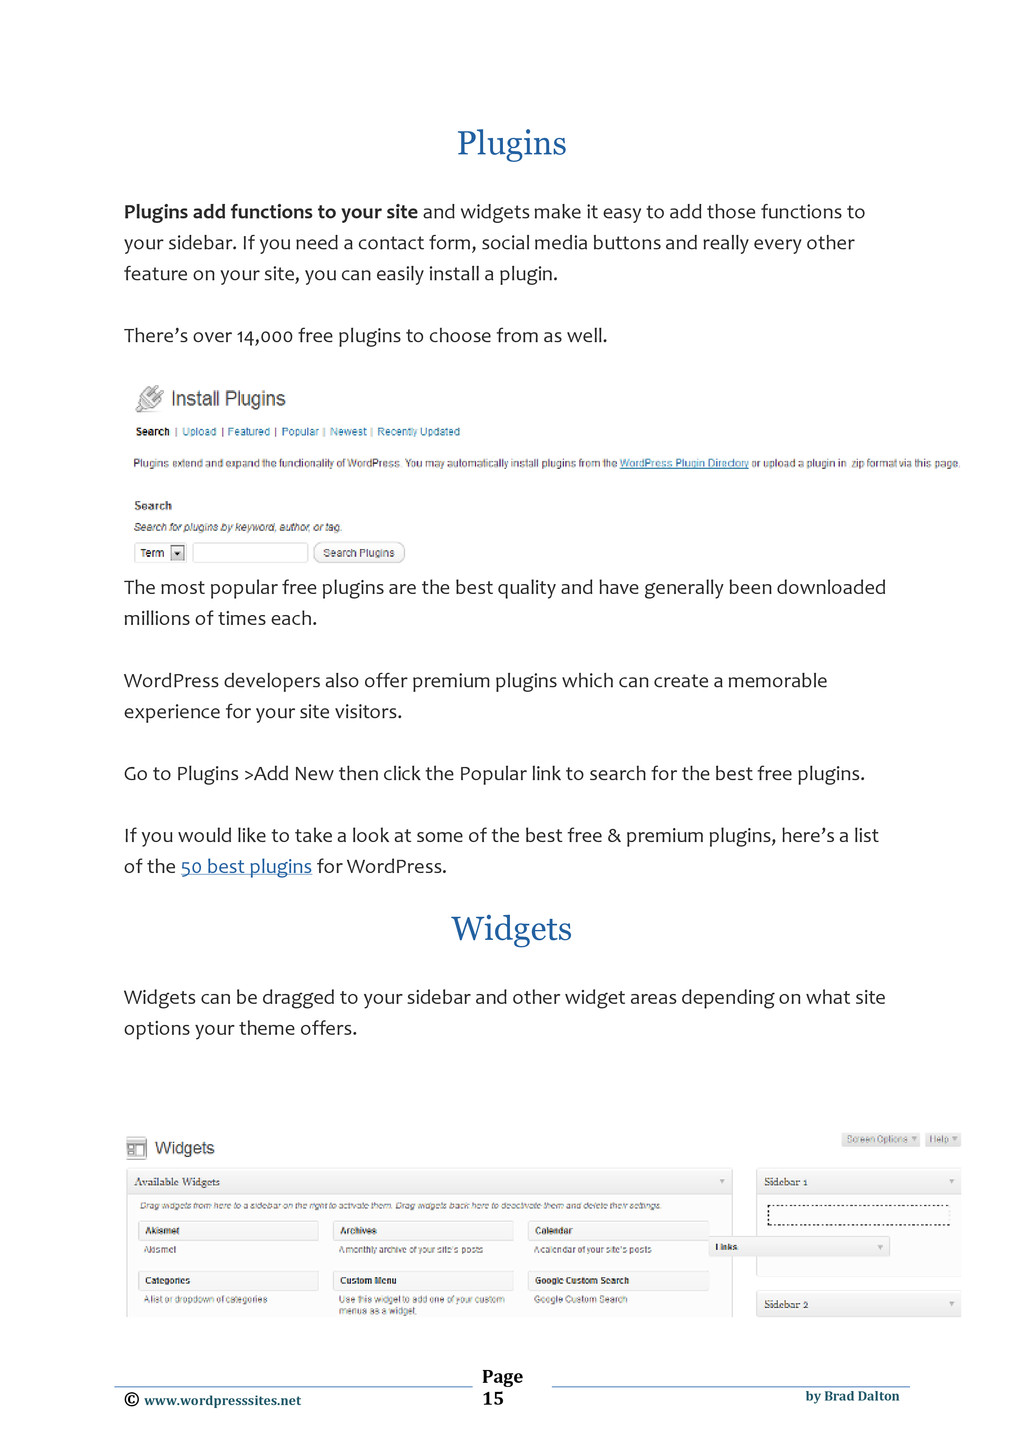
functions to your site and widgets make it easy to add those functions to your sidebar. If you need a contact form, social media buttons and really every other feature on your site, you can easily install a plugin. There’s over 14,000 free plugins to choose from as well. The most popular free plugins are the best quality and have generally been downloaded millions of times each. WordPress developers also offer premium plugins which can create a memorable experience for your site visitors. Go to Plugins >Add New then click the Popular link to search for the best free plugins. If you would like to take a look at some of the best free & premium plugins, here’s a list of the 50 best plugins for WordPress. Widgets Widgets can be dragged to your sidebar and other widget areas depending on what site options your theme offers.
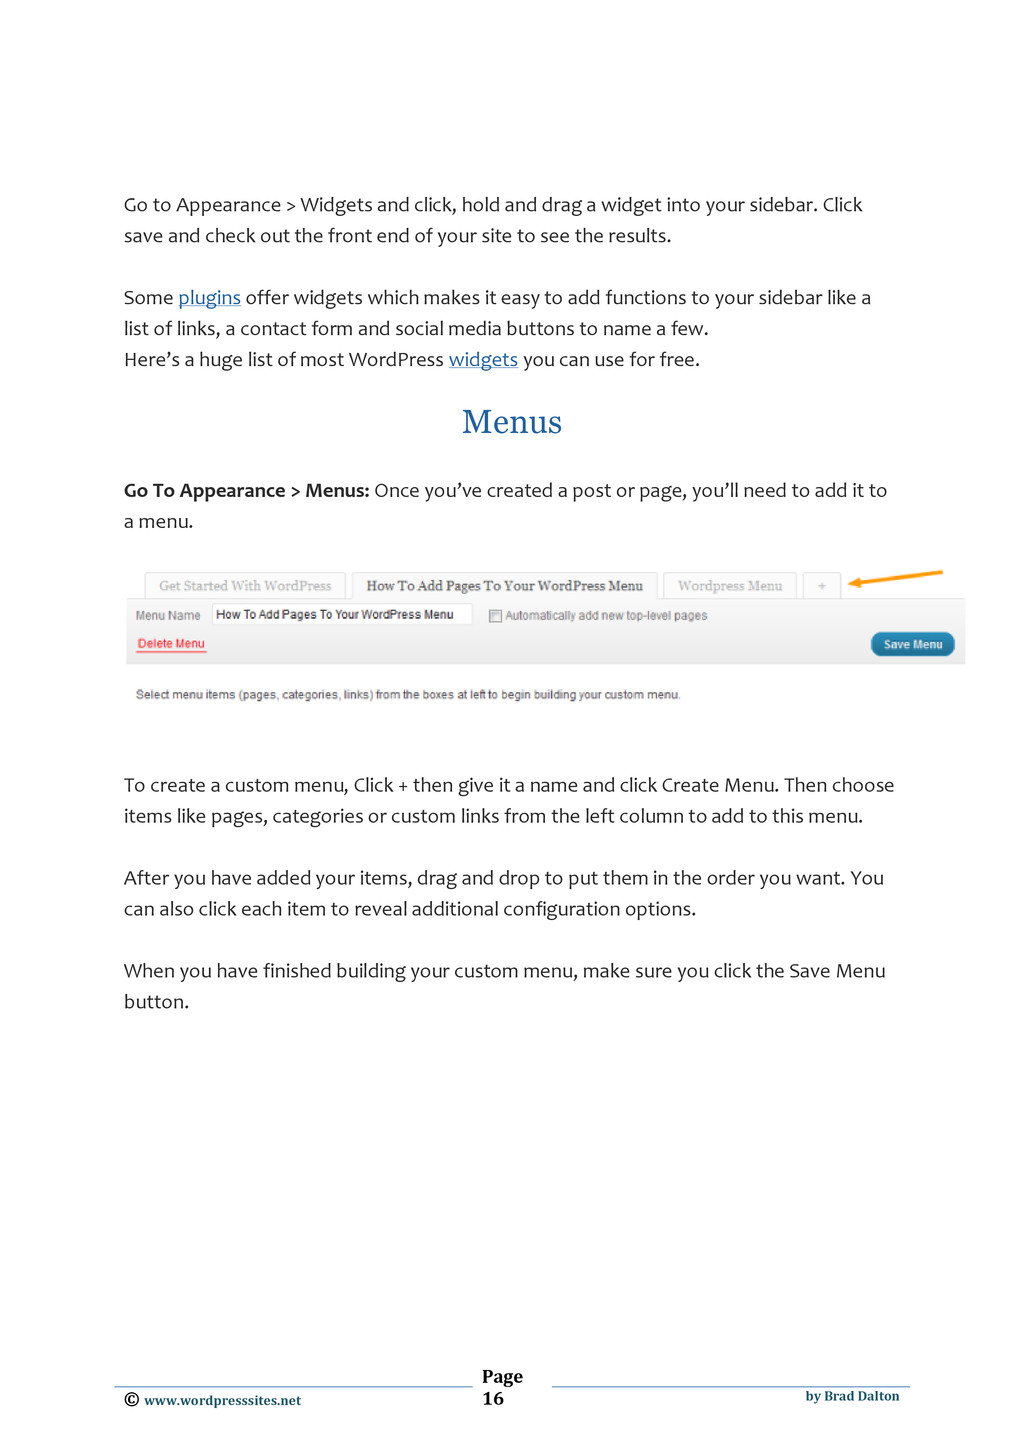
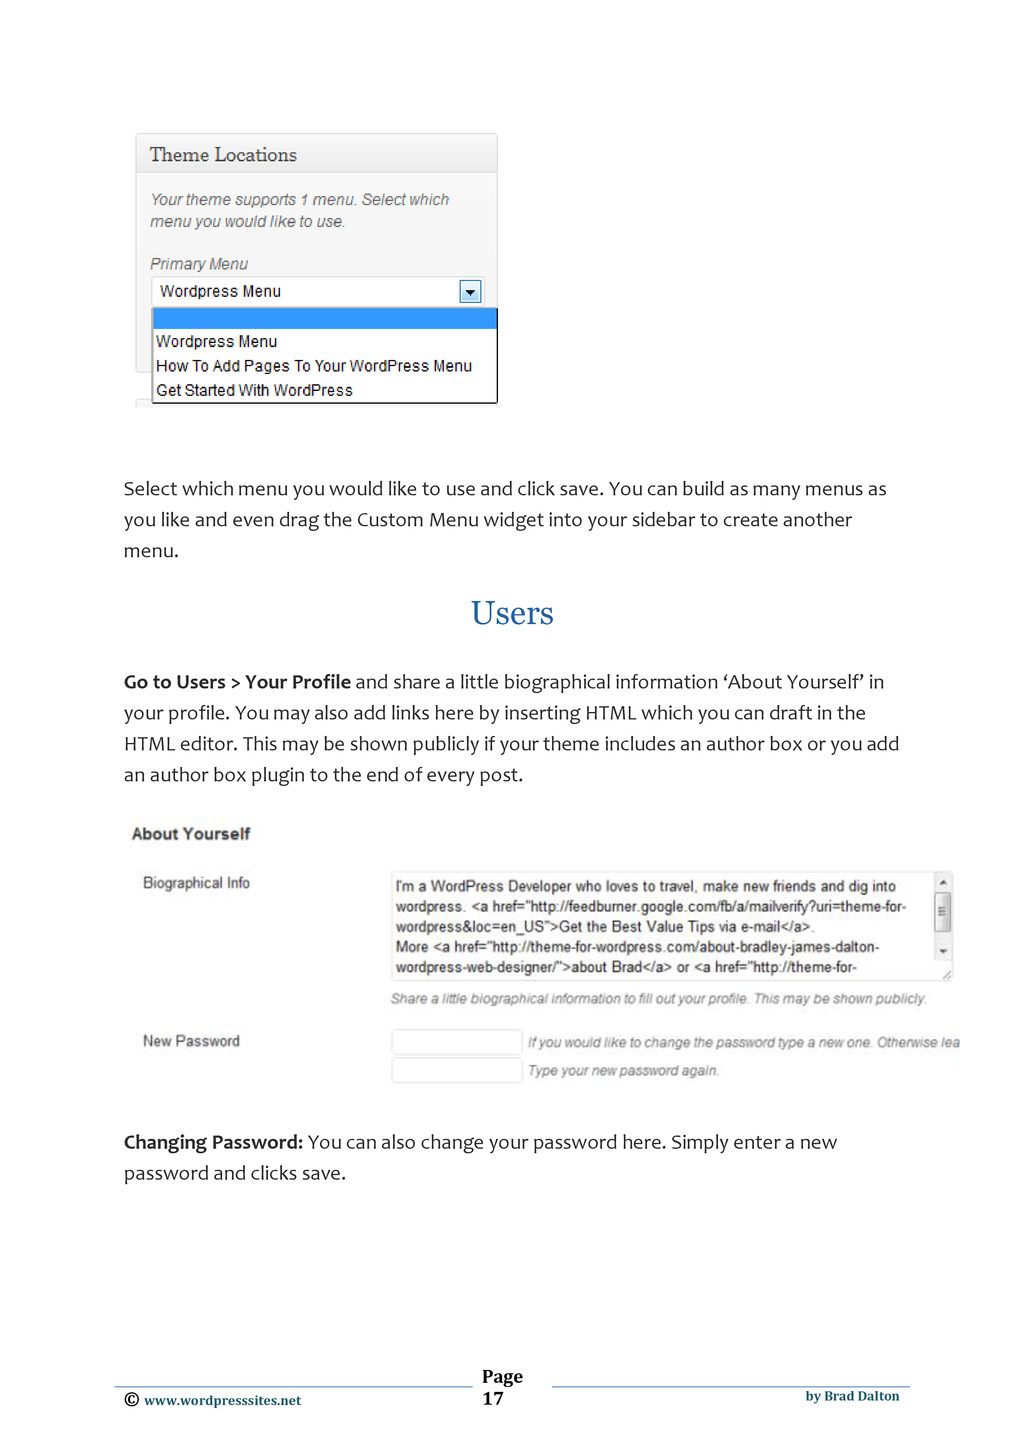
> Widgets and click, hold and drag a widget into your sidebar. Click save and check out the front end of your site to see the results. Some plugins offer widgets which makes it easy to add functions to your sidebar like a list of links, a contact form and social media buttons to name a few. Here’s a huge list of most WordPress widgets you can use for free. Menus Go To Appearance > Menus: Once you’ve created a post or page, you’ll need to add it to a menu. To create a custom menu, Click + then give it a name and click Create Menu. Then choose items like pages, categories or custom links from the left column to add to this menu. After you have added your items, drag and drop to put them in the order you want. You can also click each item to reveal additional configuration options. When you have finished building your custom menu, make sure you click the Save Menu button.
you would like to use and click save. You can build as many menus as you like and even drag the Custom Menu widget into your sidebar to create another menu. Users Go to Users > Your Profile and share a little biographical information ‘About Yourself’ in your profile. You may also add links here by inserting HTML which you can draft in the HTML editor. This may be shown publicly if your theme includes an author box or you add an author box plugin to the end of every post. Changing Password: You can also change your password here. Simply enter a new password and clicks save.
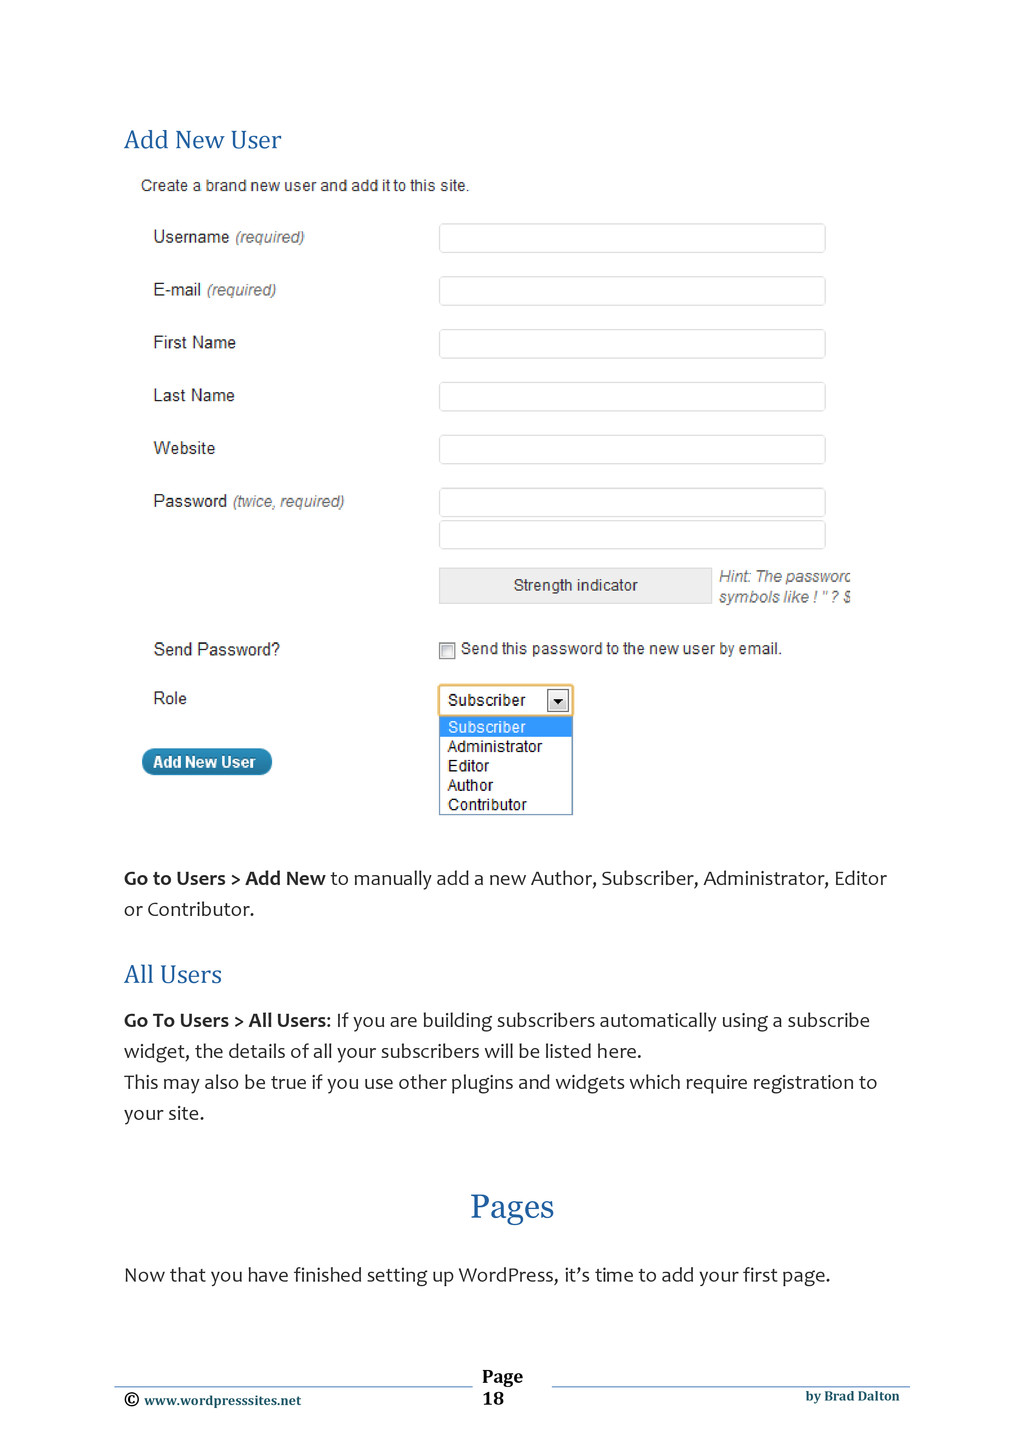
Go to Users > Add New to manually add a new Author, Subscriber, Administrator, Editor or Contributor. All Users Go To Users > All Users: If you are building subscribers automatically using a subscribe widget, the details of all your subscribers will be listed here. This may also be true if you use other plugins and widgets which require registration to your site. Pages Now that you have finished setting up WordPress, it’s time to add your first page.
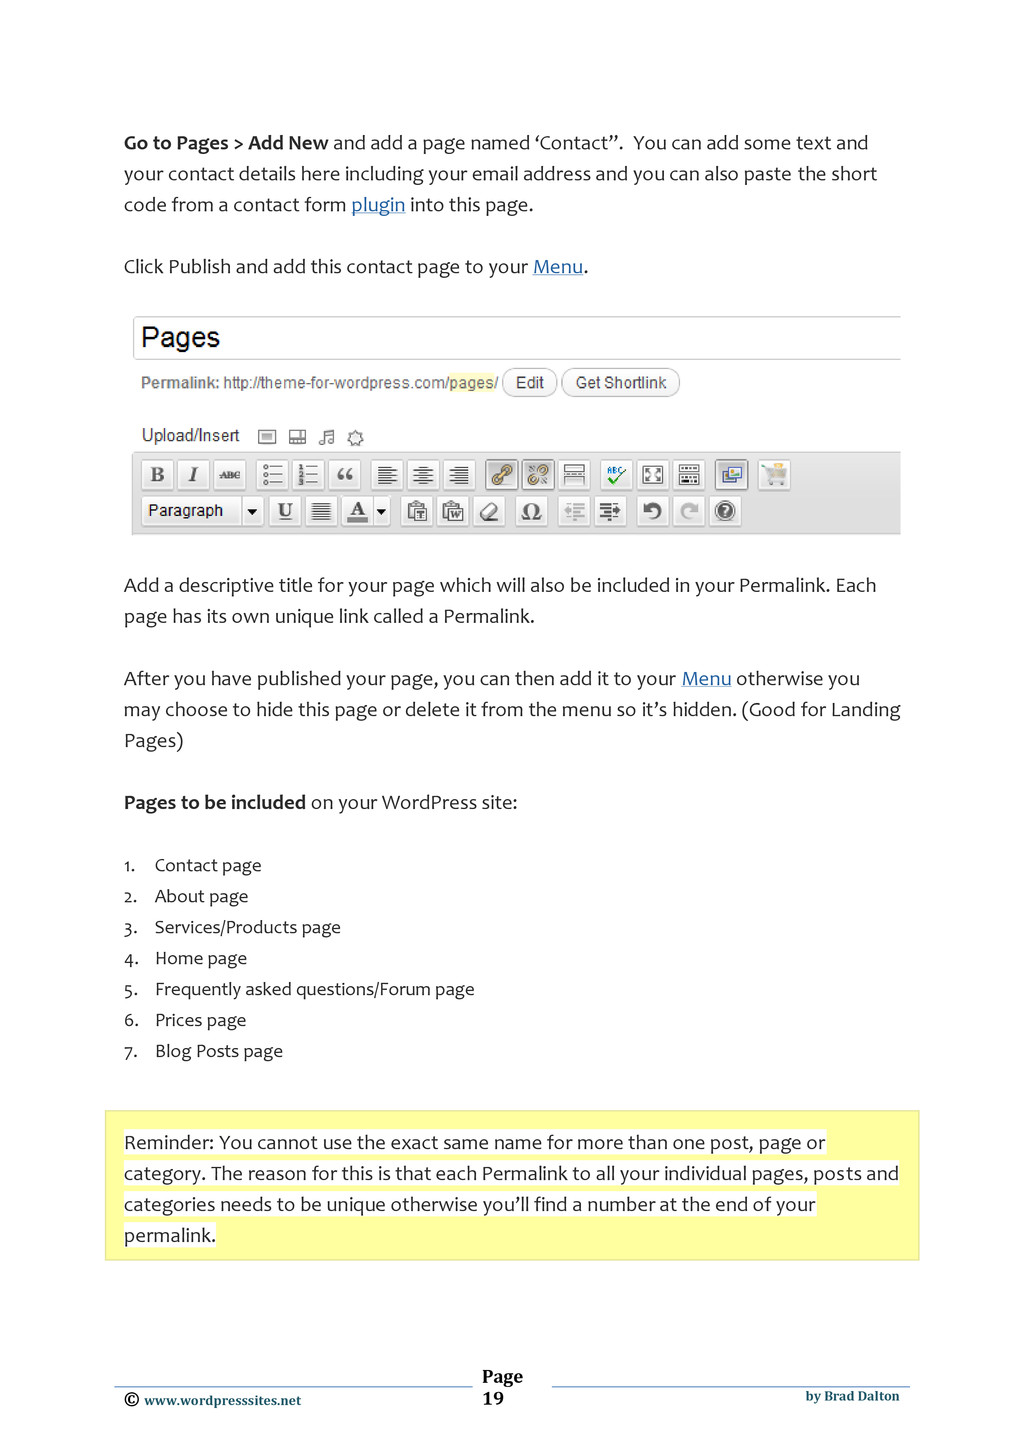
> Add New and add a page named ‘Contact”. You can add some text and your contact details here including your email address and you can also paste the short code from a contact form plugin into this page. Click Publish and add this contact page to your Menu. Add a descriptive title for your page which will also be included in your Permalink. Each page has its own unique link called a Permalink. After you have published your page, you can then add it to your Menu otherwise you may choose to hide this page or delete it from the menu so it’s hidden. (Good for Landing Pages) Pages to be included on your WordPress site: 1. Contact page 2. About page 3. Services/Products page 4. Home page 5. Frequently asked questions/Forum page 6. Prices page 7. Blog Posts page Reminder: You cannot use the exact same name for more than one post, page or category. The reason for this is that each Permalink to all your individual pages, posts and categories needs to be unique otherwise you’ll find a number at the end of your permalink.
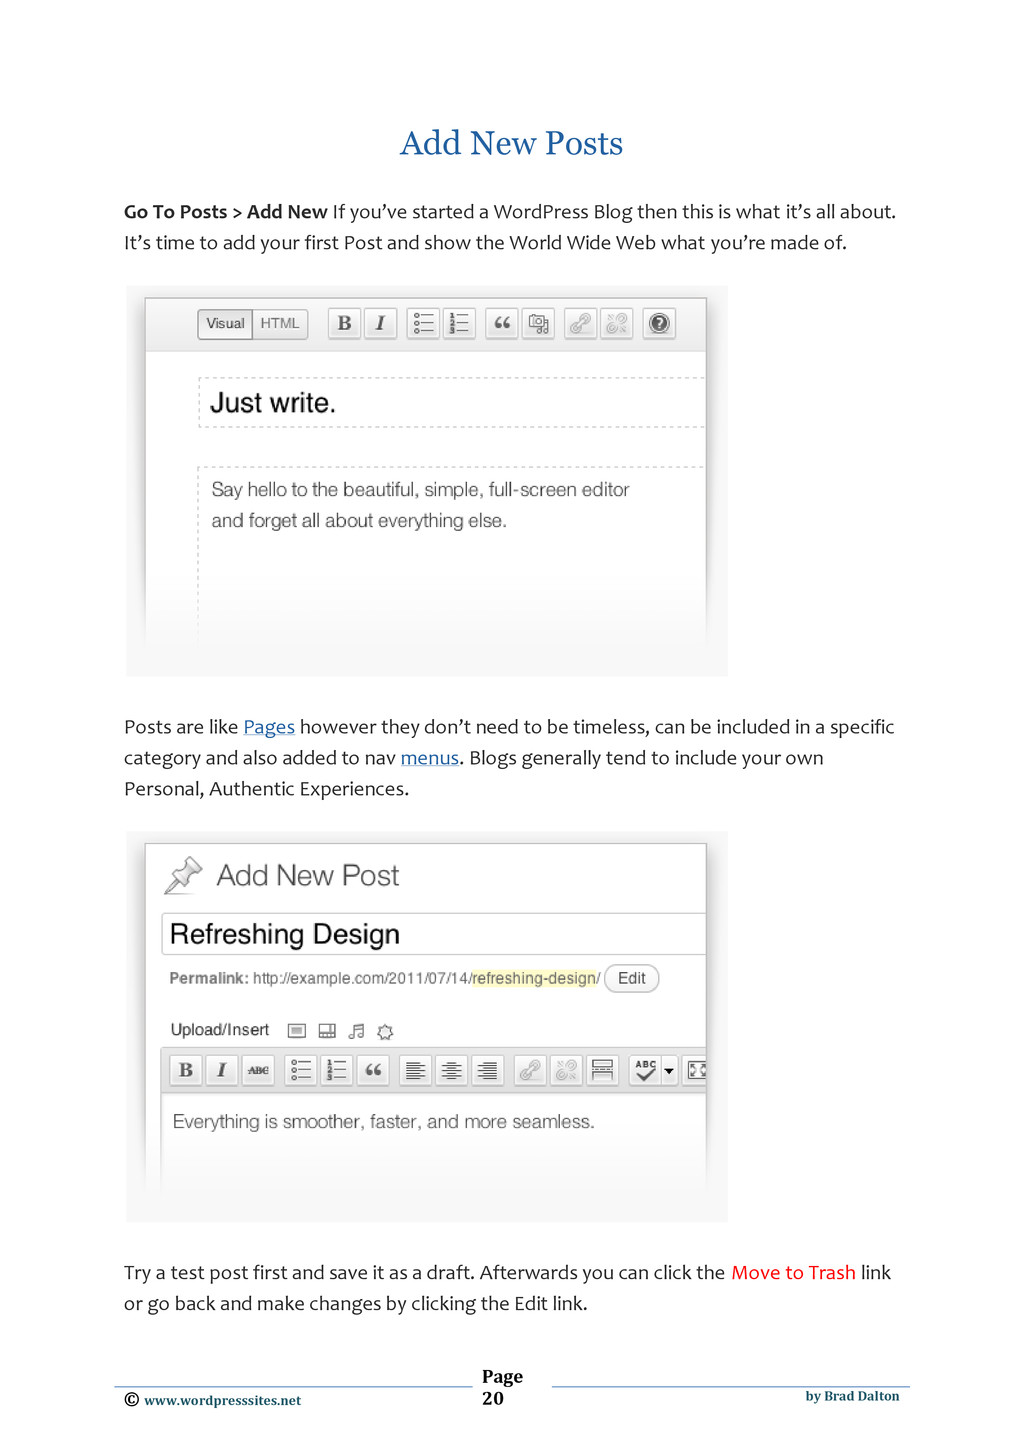
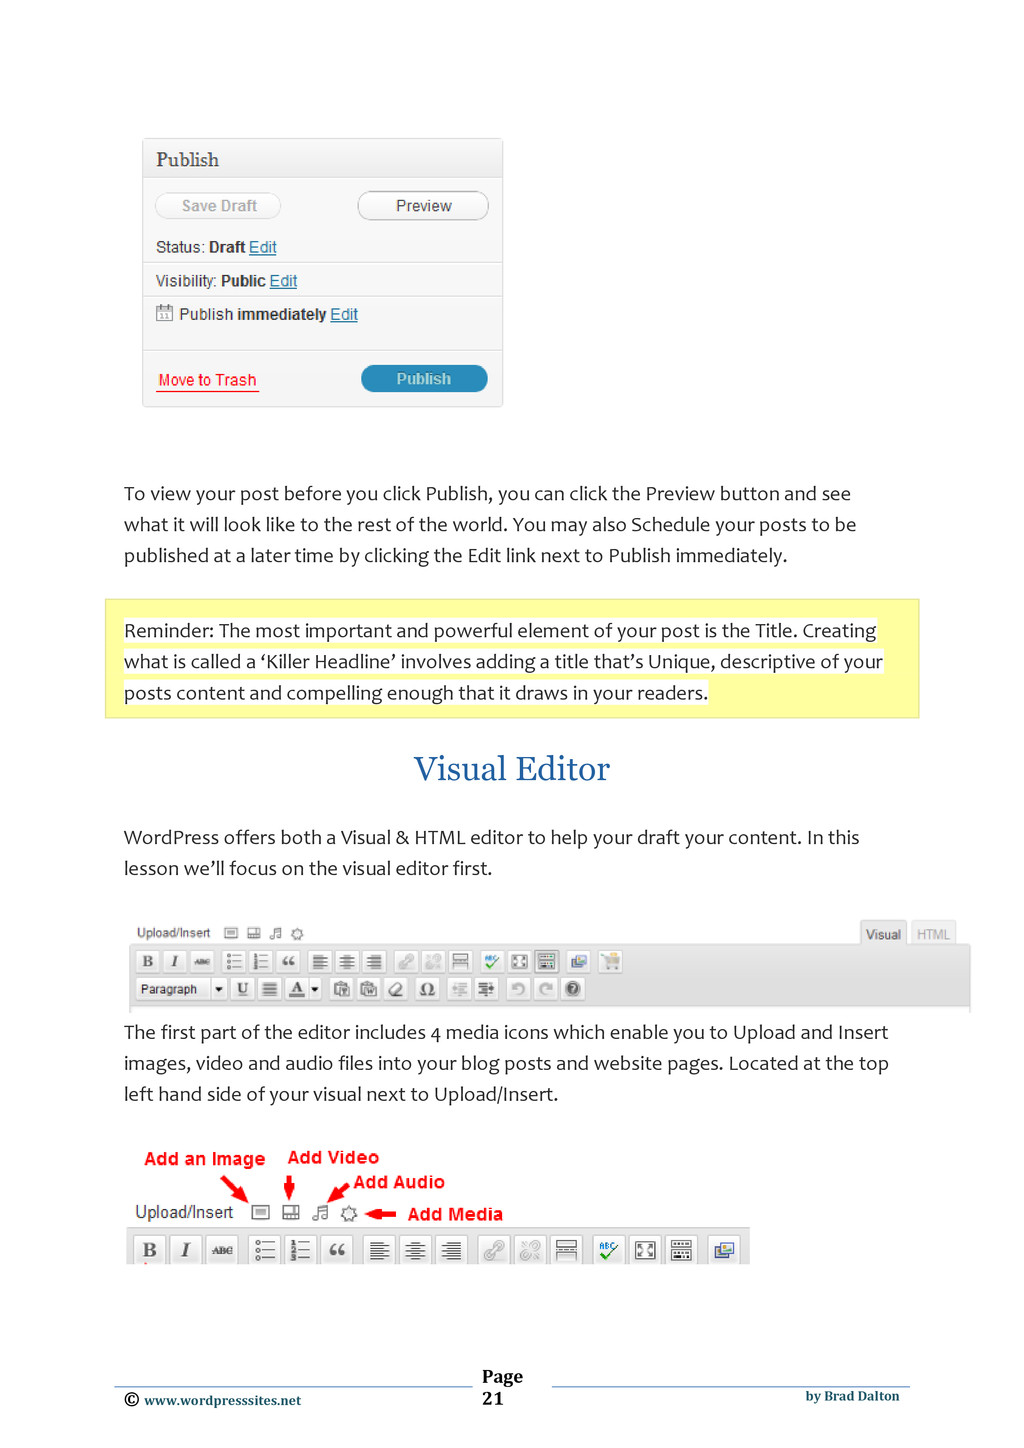
Go To Posts > Add New If you’ve started a WordPress Blog then this is what it’s all about. It’s time to add your first Post and show the World Wide Web what you’re made of. Posts are like Pages however they don’t need to be timeless, can be included in a specific category and also added to nav menus. Blogs generally tend to include your own Personal, Authentic Experiences. Try a test post first and save it as a draft. Afterwards you can click the Move to Trash link or go back and make changes by clicking the Edit link.
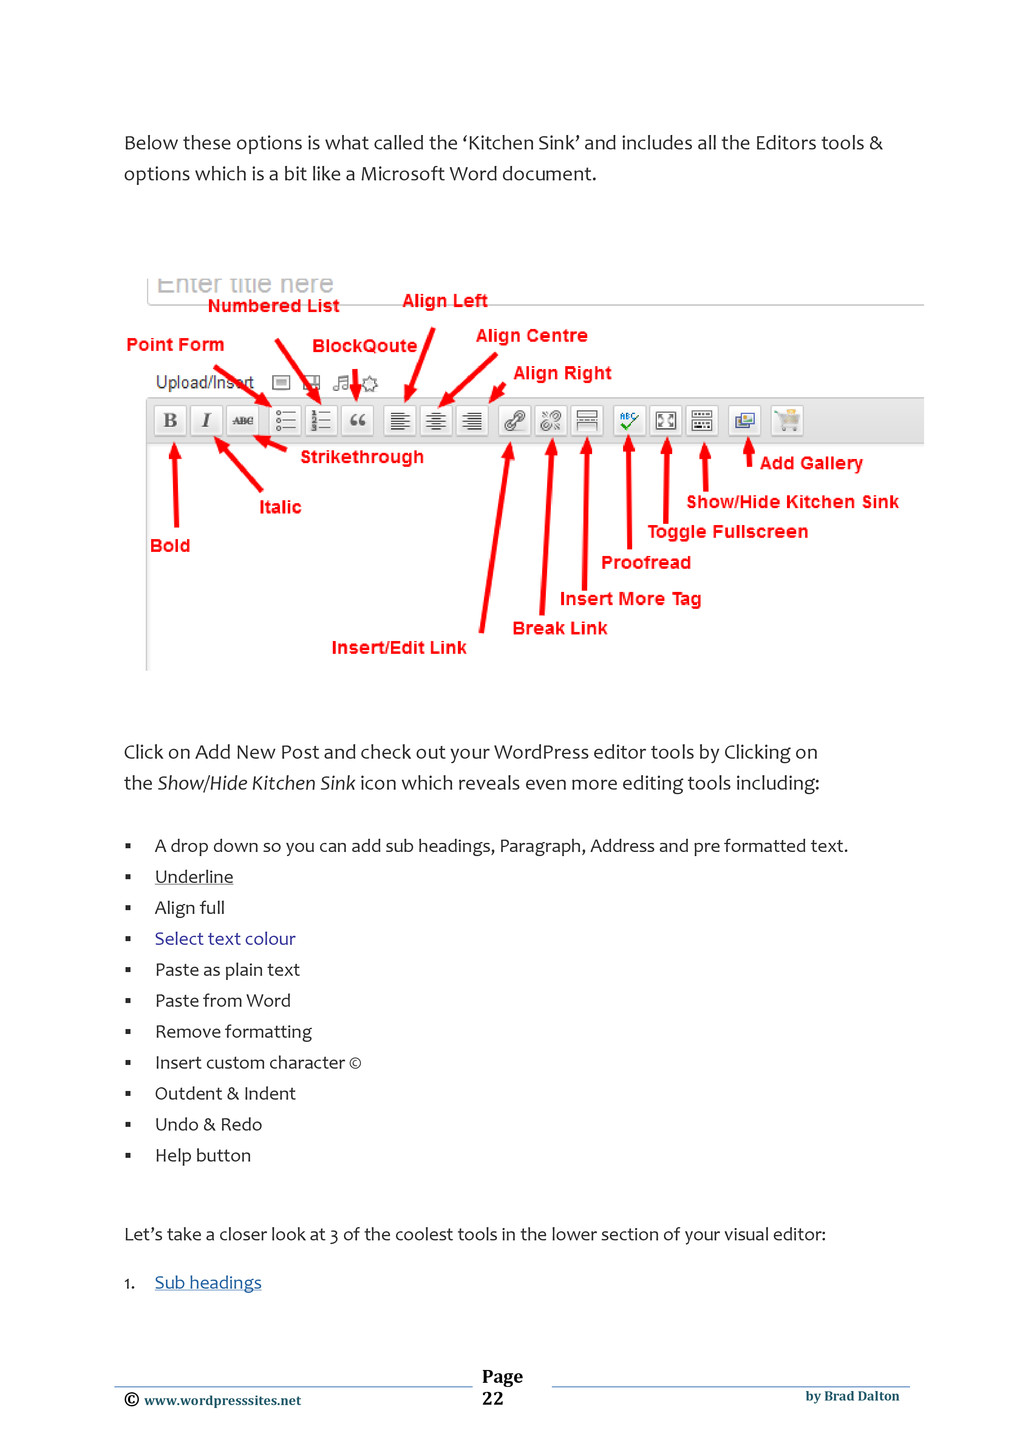
post before you click Publish, you can click the Preview button and see what it will look like to the rest of the world. You may also Schedule your posts to be published at a later time by clicking the Edit link next to Publish immediately. Reminder: The most important and powerful element of your post is the Title. Creating what is called a ‘Killer Headline’ involves adding a title that’s Unique, descriptive of your posts content and compelling enough that it draws in your readers. Visual Editor WordPress offers both a Visual & HTML editor to help your draft your content. In this lesson we’ll focus on the visual editor first. The first part of the editor includes 4 media icons which enable you to Upload and Insert images, video and audio files into your blog posts and website pages. Located at the top left hand side of your visual next to Upload/Insert.
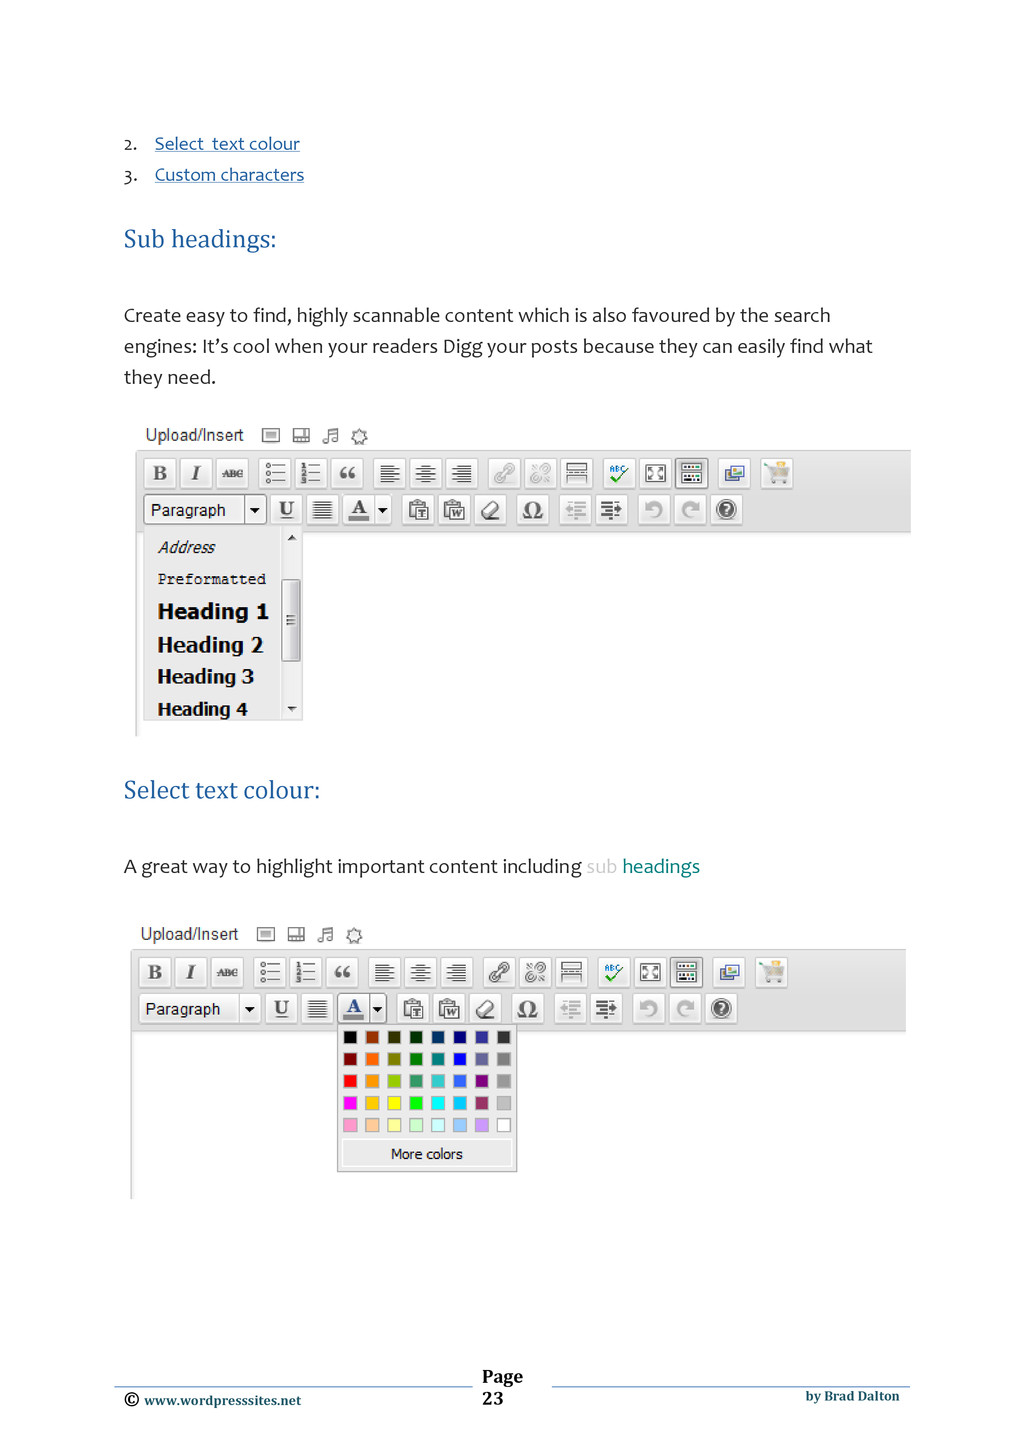
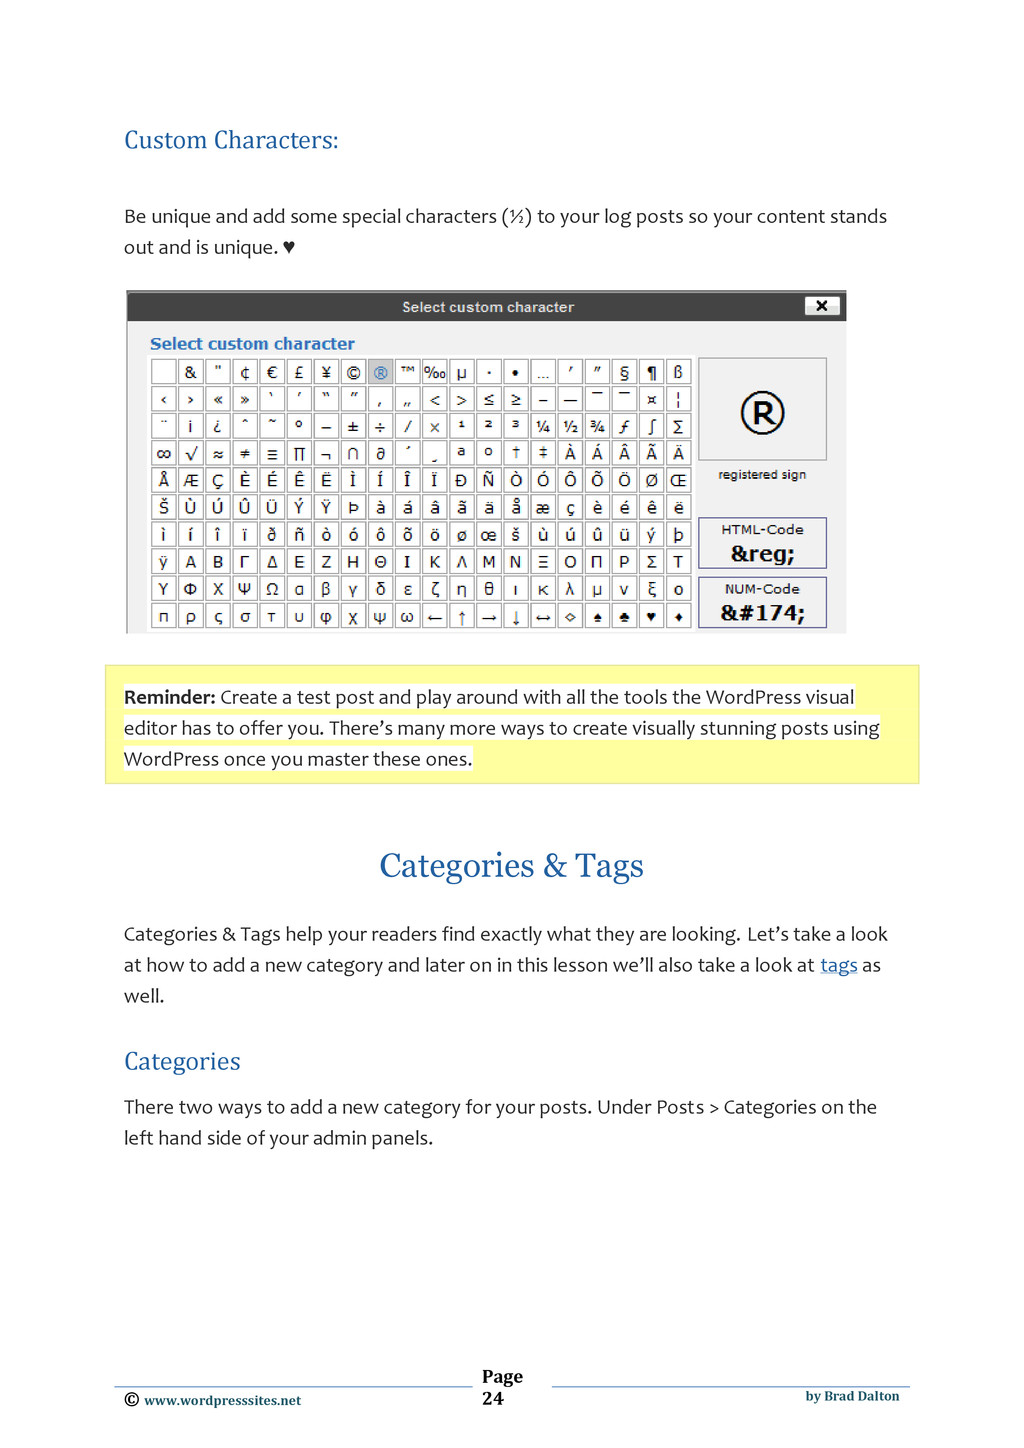
colour 3. Custom characters Sub headings: Create easy to find, highly scannable content which is also favoured by the search engines: It’s cool when your readers Digg your posts because they can easily find what they need. Select text colour: A great way to highlight important content including sub headings
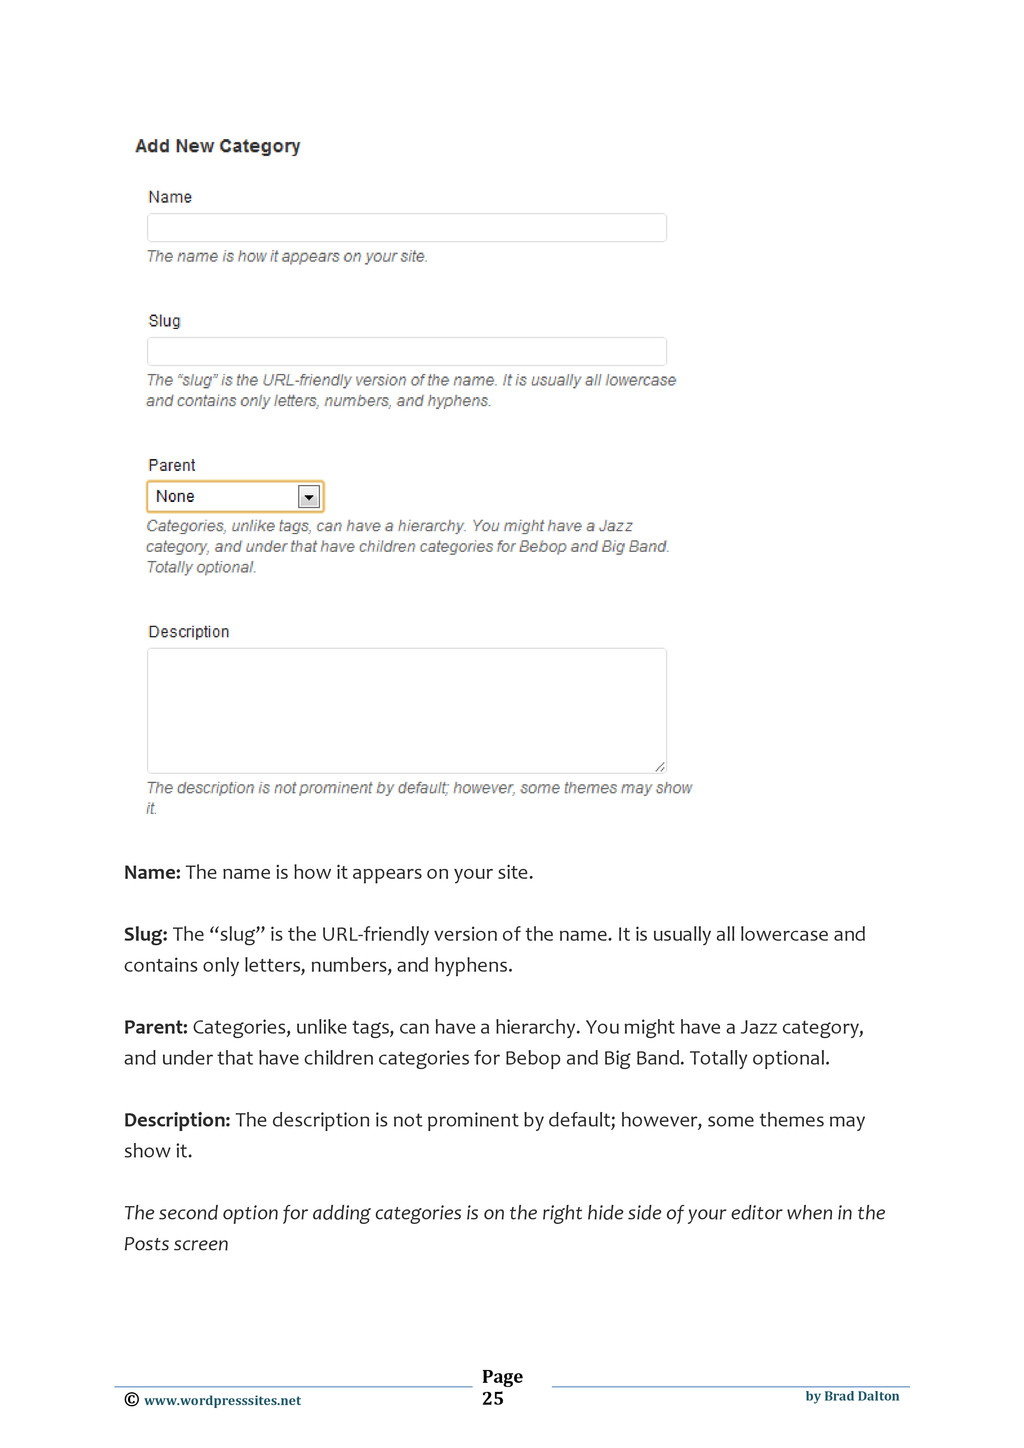
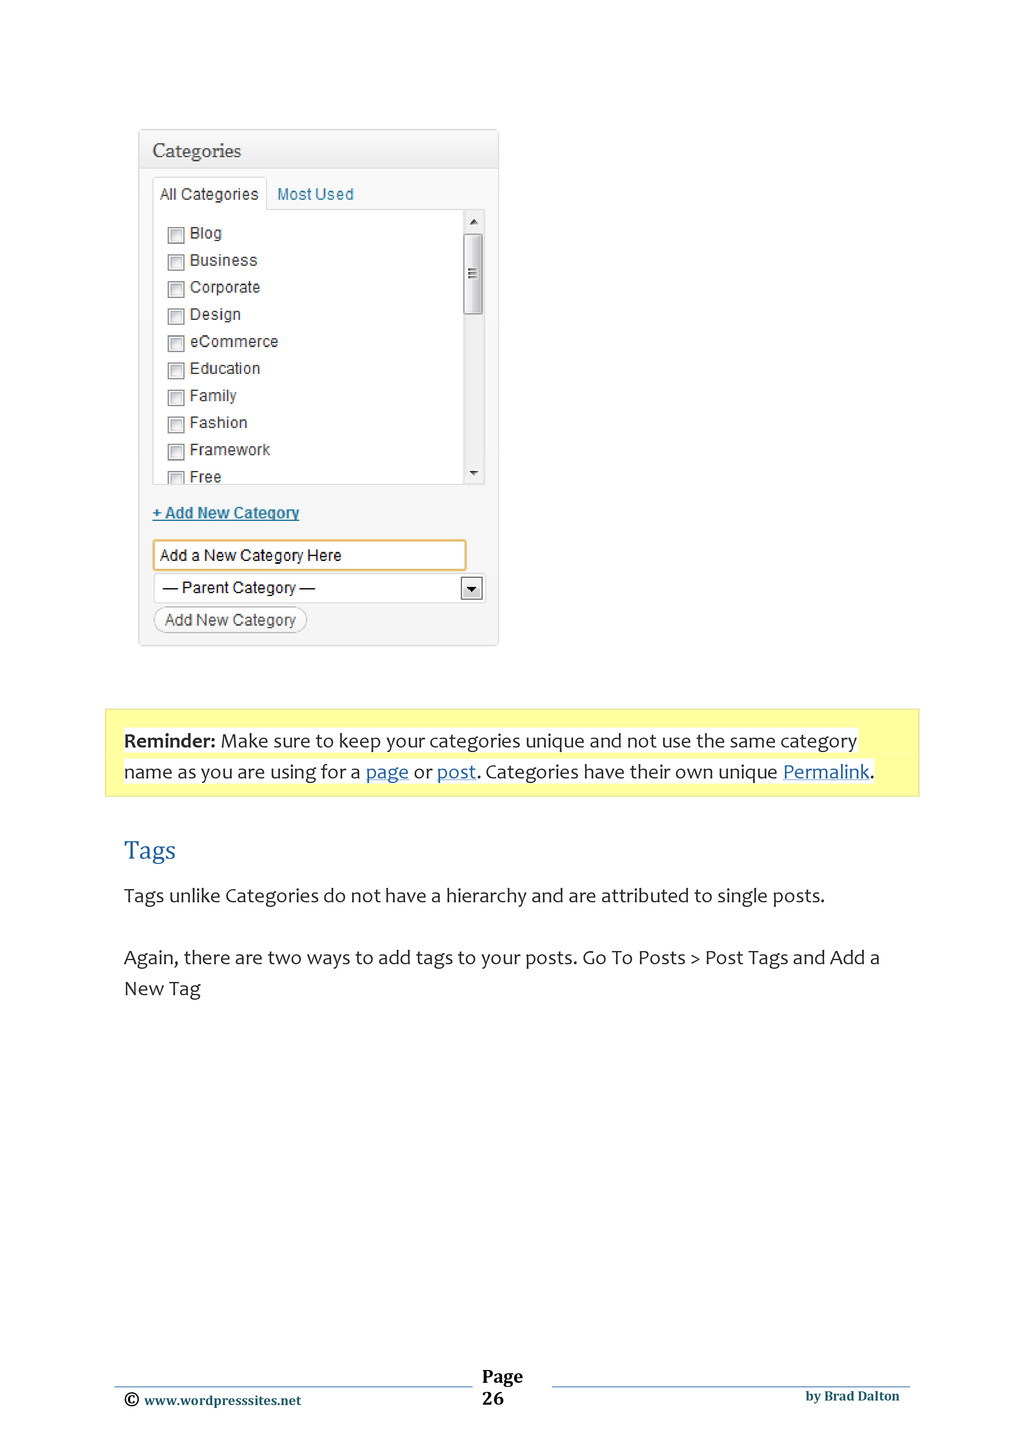
unique and add some special characters (½) to your log posts so your content stands out and is unique. ♥ Reminder: Create a test post and play around with all the tools the WordPress visual editor has to offer you. There’s many more ways to create visually stunning posts using WordPress once you master these ones. Categories & Tags Categories & Tags help your readers find exactly what they are looking. Let’s take a look at how to add a new category and later on in this lesson we’ll also take a look at tags as well. Categories There two ways to add a new category for your posts. Under Posts > Categories on the left hand side of your admin panels.
is how it appears on your site. Slug: The “slug” is the URL-friendly version of the name. It is usually all lowercase and contains only letters, numbers, and hyphens. Parent: Categories, unlike tags, can have a hierarchy. You might have a Jazz category, and under that have children categories for Bebop and Big Band. Totally optional. Description: The description is not prominent by default; however, some themes may show it. The second option for adding categories is on the right hide side of your editor when in the Posts screen
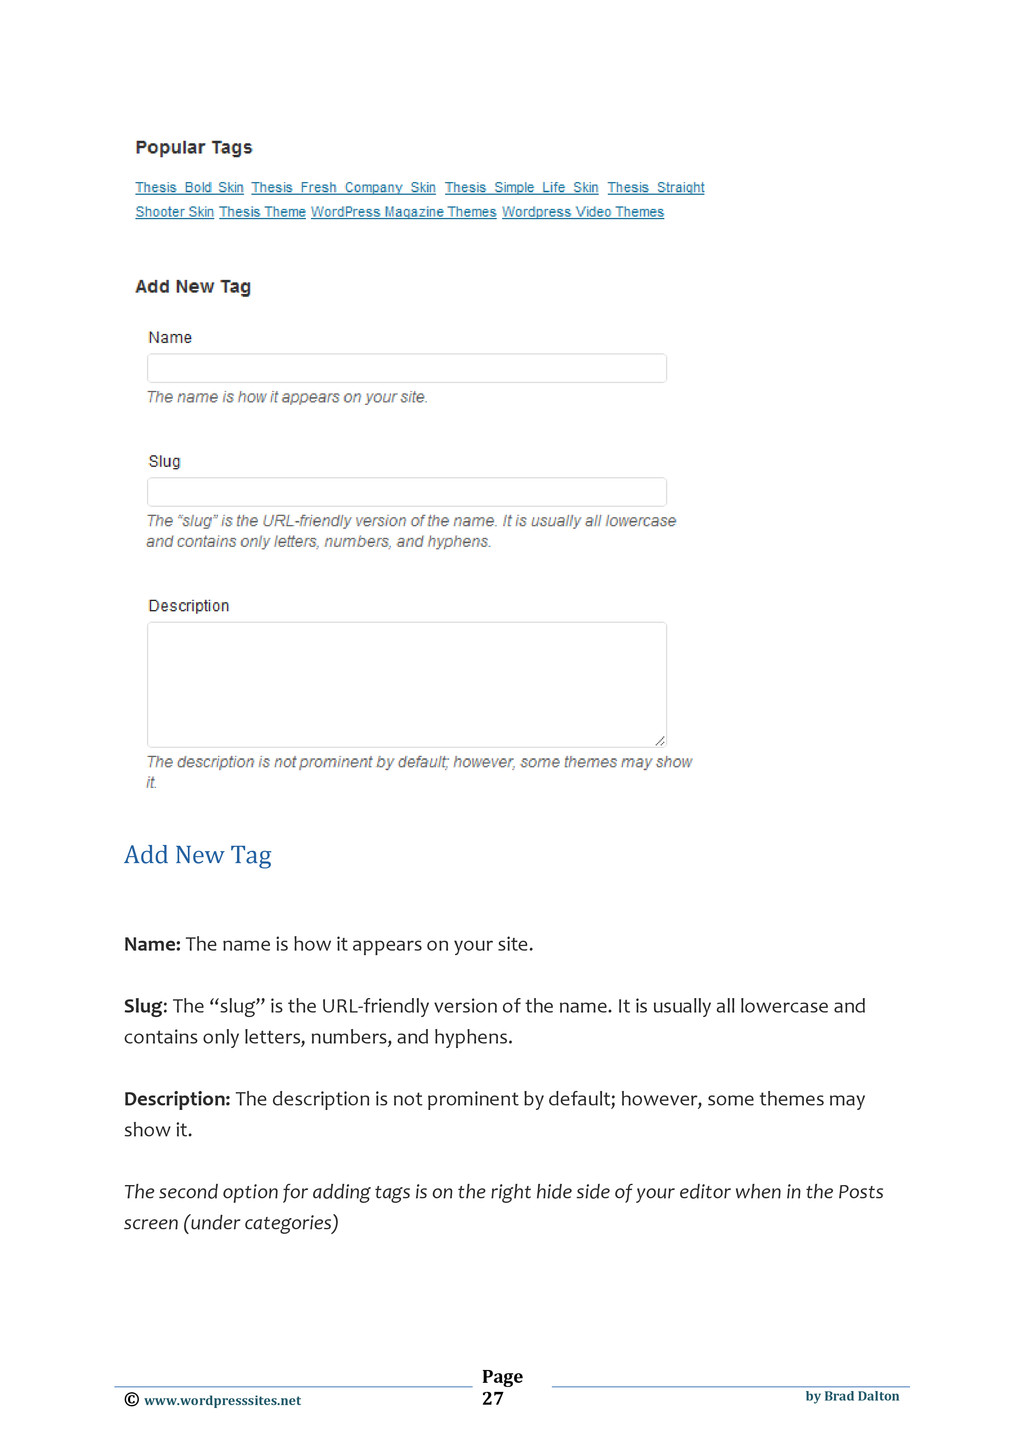
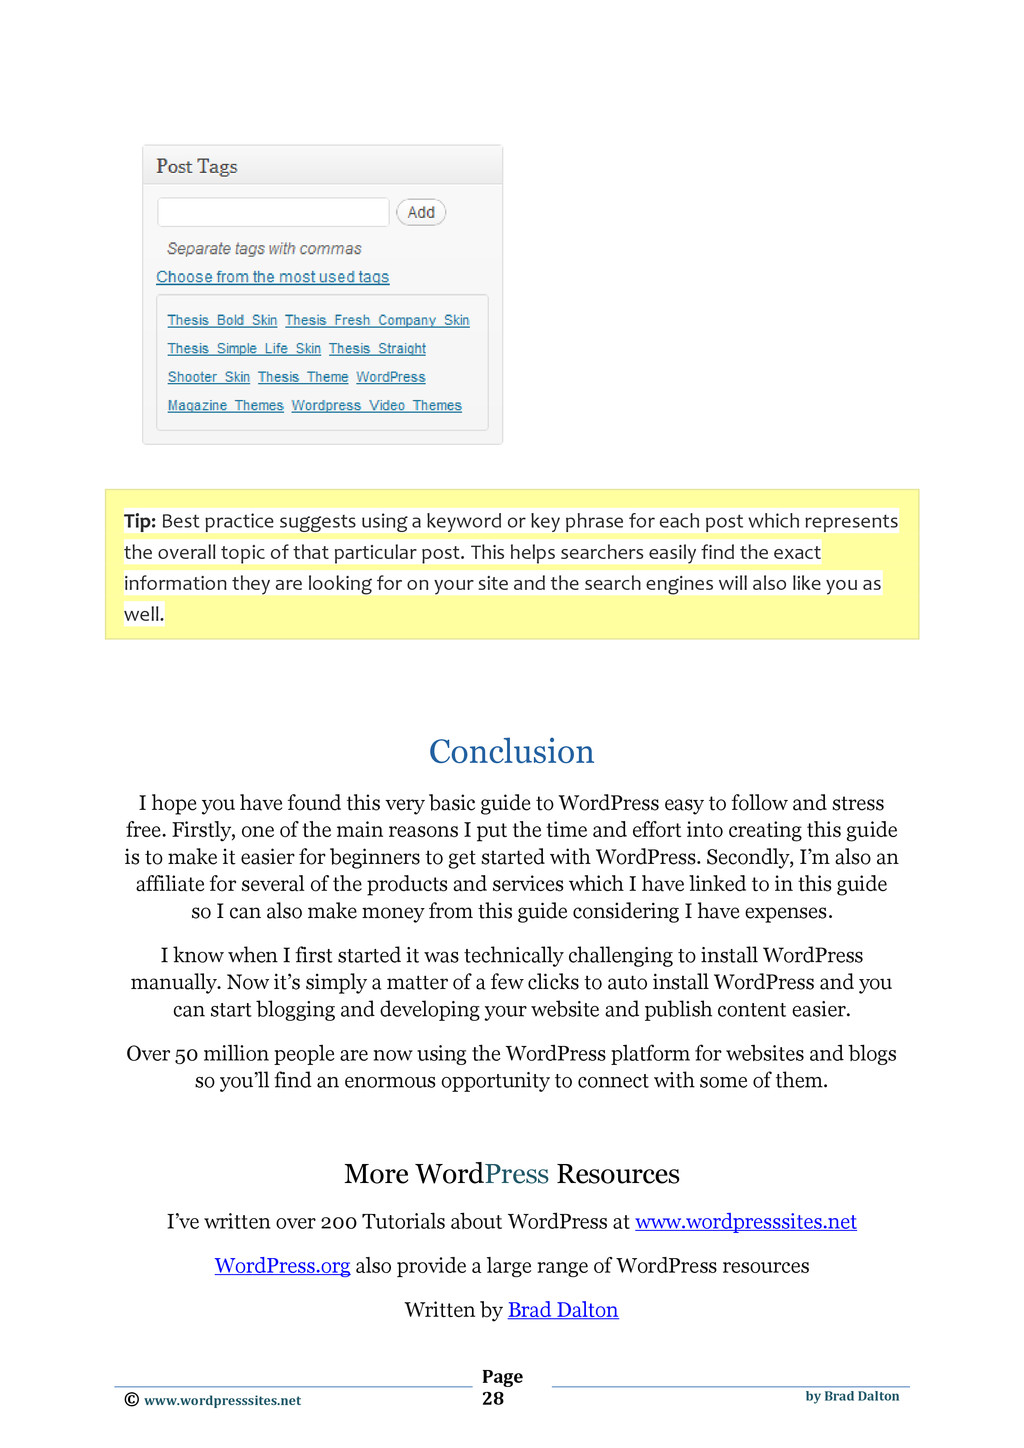
to keep your categories unique and not use the same category name as you are using for a page or post. Categories have their own unique Permalink. Tags Tags unlike Categories do not have a hierarchy and are attributed to single posts. Again, there are two ways to add tags to your posts. Go To Posts > Post Tags and Add a New Tag
Name: The name is how it appears on your site. Slug: The “slug” is the URL-friendly version of the name. It is usually all lowercase and contains only letters, numbers, and hyphens. Description: The description is not prominent by default; however, some themes may show it. The second option for adding tags is on the right hide side of your editor when in the Posts screen (under categories)
suggests using a keyword or key phrase for each post which represents the overall topic of that particular post. This helps searchers easily find the exact information they are looking for on your site and the search engines will also like you as well. Conclusion I hope you have found this very basic guide to WordPress easy to follow and stress free. Firstly, one of the main reasons I put the time and effort into creating this guide is to make it easier for beginners to get started with WordPress. Secondly, I’m also an affiliate for several of the products and services which I have linked to in this guide so I can also make money from this guide considering I have expenses. I know when I first started it was technically challenging to install WordPress manually. Now it’s simply a matter of a few clicks to auto install WordPress and you can start blogging and developing your website and publish content easier. Over 50 million people are now using the WordPress platform for websites and blogs so you’ll find an enormous opportunity to connect with some of them. More WordPress Resources I’ve written over 200 Tutorials about WordPress at www.wordpresssites.net WordPress.org also provide a large range of WordPress resources Written by Brad Dalton