Upgrade to Pro — share decks privately, control downloads, hide ads and more …

ReactとバックエンドサービスAppPotで学ぶモダンWebアプリケーション入門

AppPot
February 14, 2017

 ReactとバックエンドサービスAppPotで学ぶモダンWebアプリケーション入門

AppPot

February 14, 2017
Tweet

More Decks by AppPot

Other Decks in Programming

Transcript

  1. Copyright ©2017, NC Design & Consulting Co., Ltd. All rights

    reserved. ハンズオントレーニングの⽬的 n  モダンなWebアプリケーションの開発技術・開発⼿法の基 礎を学ぶ n  バックエンドサービス AppPotを使った開発を体験する
  2. Copyright ©2017/02/15 , NC Design & Consulting Co., Ltd. All

    rights reserved. 内容 時間 モダンWebアプリケーションとは 5分 ハンズオンで作成するアプリの概要 5分 Reactとは 10分 AppPotとは 15分 演習の準備 10分 Exercise 0 : React Hello World 20分 休憩 10分 Exercise 1 : AppPotへアプリを登録 10分 Exercise 2 : テーブルの⽣成 35分 Exercise 3 : 検索機能の実装 45分 休憩 10分 Exercise 4 : 登録機能の実装 45分 Exercise 5 : 更新機能の実装 30分 Exercise 6 : 削除機能の実装 15分 Exercise 7 : ログイン機能の実装 30分 Exercise 8 : ログアウト機能の実装 10分 タイムテーブル
  3. Copyright ©2017, NC Design & Consulting Co., Ltd. All rights

    reserved. モダンWebアプリケーションとは
  4. Copyright ©2017, NC Design & Consulting Co., Ltd. All rights

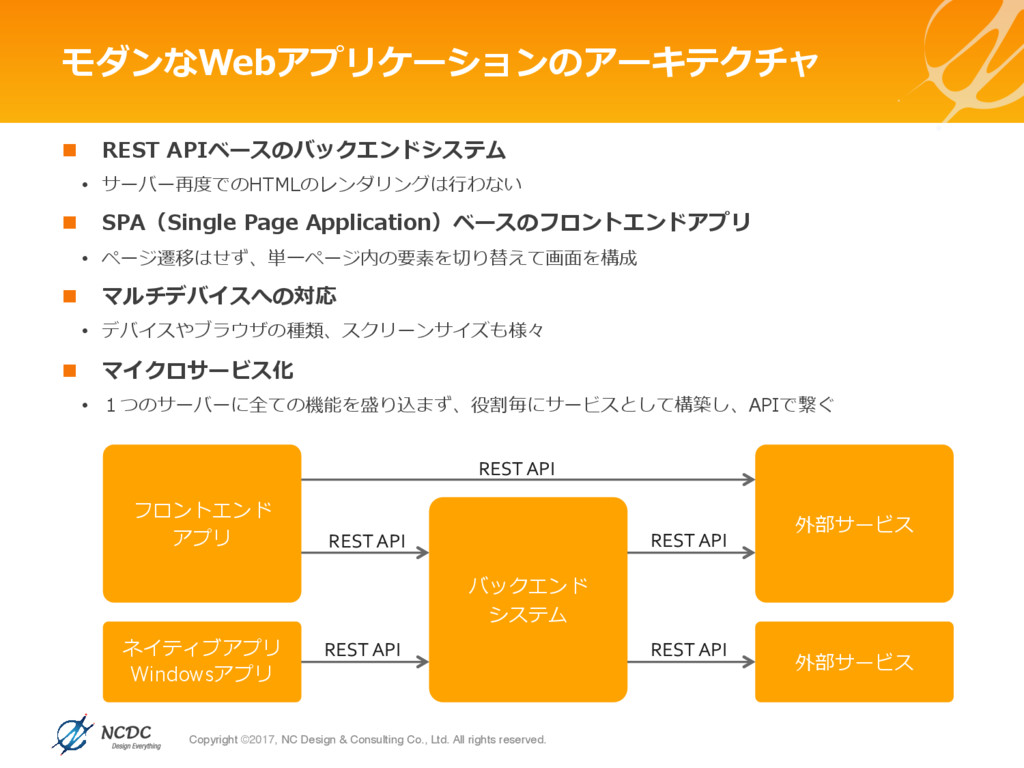
    reserved. 外部サービス バックエンド システム ネイティブアプリ Windowsアプリ フロントエンド アプリ モダンなWebアプリケーションのアーキテクチャ n  REST APIベースのバックエンドシステム •  サーバー再度でのHTMLのレンダリングは⾏わない n  SPA(Single Page Application)ベースのフロントエンドアプリ •  ページ遷移はせず、単⼀ページ内の要素を切り替えて画⾯を構成 n  マルチデバイスへの対応 •  デバイスやブラウザの種類、スクリーンサイズも様々 n  マイクロサービス化 •  1つのサーバーに全ての機能を盛り込まず、役割毎にサービスとして構築し、APIで繋ぐ 外部サービス REST API REST API REST API REST API REST API
  5. Copyright ©2017/02/15 , NC Design & Consulting Co., Ltd. All

    rights reserved. フロントエンド開発の技術スタック 種類 製品例 説明 MV*フレームワーク React/Angular/Vue.js/ Knockout.js プレゼンテーションロジックとそれ以外ロジックを分離し、処理 のフローと依存関係をシンプルに保つためのJavaScriptのフレー ムワーク altJS TypeScript/CoffeeScript/ Dart/ES6 ブラウザやnode.js上で動作するJavaScriptを代替するプログラミ ング⾔語 トランスパイルする事でJavaScriptが⽣成される 型システム Google Closure Compiler/ TypeScript/Flow 型のないJavaScriptに型を持たせるための仕組 CSSフレームワーク Bootstrap/Semantic UI/ Material UI 統⼀的なデザインのシステムを効率的に実装するためのCSSのフ レームワーク パッケージマネージャー npm/bower/Yarn JavaScriptライブラリの依存関係を管理するツール CSSプリプロセッサ Sass/Scss/LESS 煩雑になりやすいCSSを構造化したりロジックを注⼊したりでき るようにすることで効率的に管理できるようにする仕組 CSSのためのメタ⾔語 ビルドツール webpack/Browserify ソースコードからアプリとして必要なランタイムを⽣成するツー ル altJSのコンパイルやCSSプロプロセッサの実⾏などを⾏う テスティング フレームワーク Jasmine/mocha/Jest テストをコードで実装し、繰り返し⾃動実⾏可能にするための ツール タスクランナー Gulp/Grunt 開発作業や運⽤作業を⾃動化するためのスクリプトをJavaScript で実装し実⾏するためのツール 上述のツールだけでは⾃動化出来ない隙間の処理を埋め、各種 ツールをインテグレーションする
  6. Copyright ©2017, NC Design & Consulting Co., Ltd. All rights

    reserved. ハンズオンで作成するアプリの概要
  7. Copyright ©2017/02/15 , NC Design & Consulting Co., Ltd. All

    rights reserved. ハンズオンアプリの仕様 n  処理概要 •  サーバーにあるDBにアクセスし、顧客テーブルのデータのCRUDを⾏う
  8. Copyright ©2017, NC Design & Consulting Co., Ltd. All rights

    reserved. ハンズオンアプリで利⽤する技術スタック 種類 利⽤製品 補⾜ MV*フレームワーク React ReactはReduxと共に利⽤されるケースが多いが、今回は React単体で利⽤ altJS ES6 サードパーティが提供する⾔語は使わず、国際標準となっ ているECMAScript 6を利⽤し、babelでES5へトランスパ イルする 型システム ー 今回は時間の関係上、型システムを利⽤しない CSSフレームワーク Bootstrap パッケージマネージャー npm CSSプリプロセッサ ー 今回は時間の関係上、CSSプリプロセッサを利⽤しない ビルドツール Browserify 役割がシンプルなBrowserifyを利⽤し、ブラウザでもnpm で管理したモジュールを利⽤できるようにする テスティングフレームワーク ー 今回は時間の関係上、テスティングフレームワークを利⽤ しない タスクランナー ー 今回は構成がシンプルなので、タスクランナーを利⽤する 必要がない
  9. Copyright ©2017, NC Design & Consulting Co., Ltd. All rights

    reserved. Reactとは n  SPA向けのJavaScriptプレゼンテーションフレームワーク •  コンポーネント指向によるUIのコンポーネント化 HTMLによるUI(DOM要素)は部品化する仕組を持たないため、DRYにできない UIのマークアップとそれにともなう処理をUIコンポーネントとしてカプセル化して、再利⽤を可能 にしている •  単⽅向バインディングによる処理フローの単純化 Model→DOMだけのバインディングをサポートし、DOM→Modelは明⽰的な実装が必要 双⽅向の場合では、バインディングによる値の変更箇所の管理が煩雑になり、修正時の影響範囲が 不透明になりがち •  Virtual DOMによる設計の単純化 状態とDOMの各要素の関係を管理せず、状態が変化したら常にDOMツリー全体を再描画する仕組 状態とDOM様相の関係管理から開放され、設計がシンプルになる DOMツリー全体の再描画を⾏なうと速度が問題になるが、Virtual DOMでは内部で差分管理し、再 描画前後で実際に変更がある部分だけ描画するため、速度が劣化しない
  10. Copyright ©2017, NC Design & Consulting Co., Ltd. All rights

    reserved. Reactの概略アーキテクチャ Component Server Event Handler state DOM (Virtual DOM) UI Event Handler Component Component Component Component Component Component ツリー下位の DOMをサブ部 品化 状態管理⽤の オブジェクト 状態 変更 変更の通知 と再描画 変更の通知 と再描画 コンポーネント 内でDOMと状態 と振る舞いをカ プセル化 常に単⽅向への処理フロー Server
  11. Copyright ©2017, NC Design & Consulting Co., Ltd. All rights

    reserved. 特徴③ 特徴② AppPotとは 企業のスマートデバイス活⽤を⽀援する モバイルアプリの開発/運⽤プラットフォームです 既存の社内システムとの 連携が容易 サーバー開発不要 企業で必要な機能を 実装済み 特徴① ίετ࡟ݮº։ൃظؒ୹ॖ
  12. Copyright ©2017, NC Design & Consulting Co., Ltd. All rights

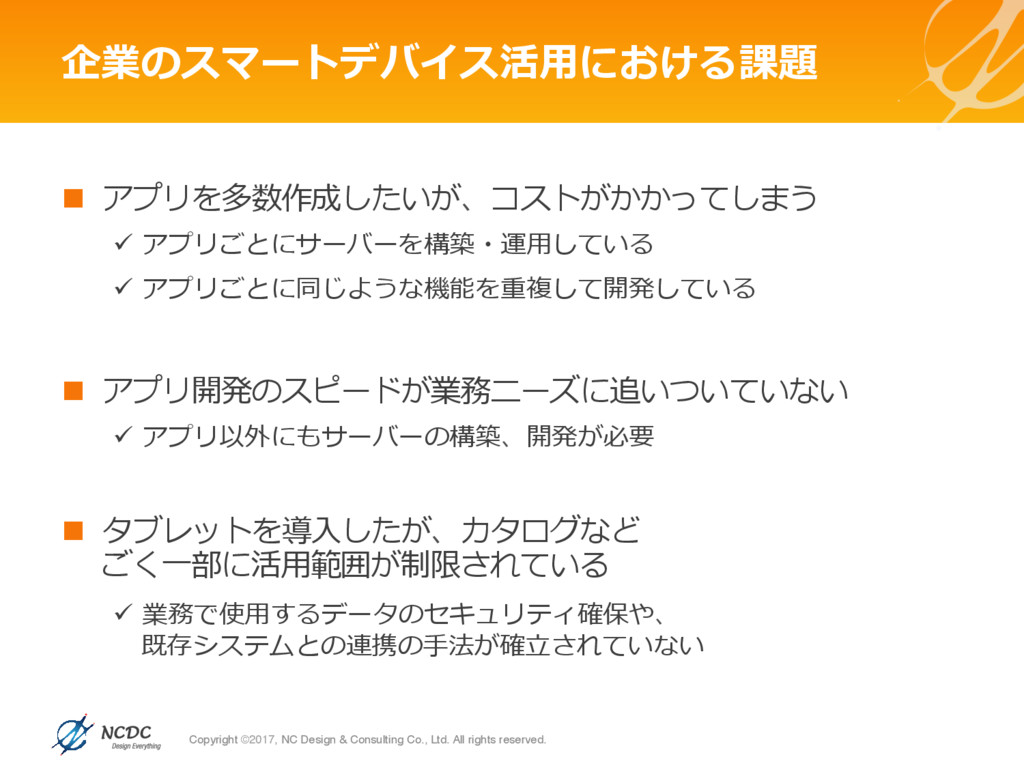
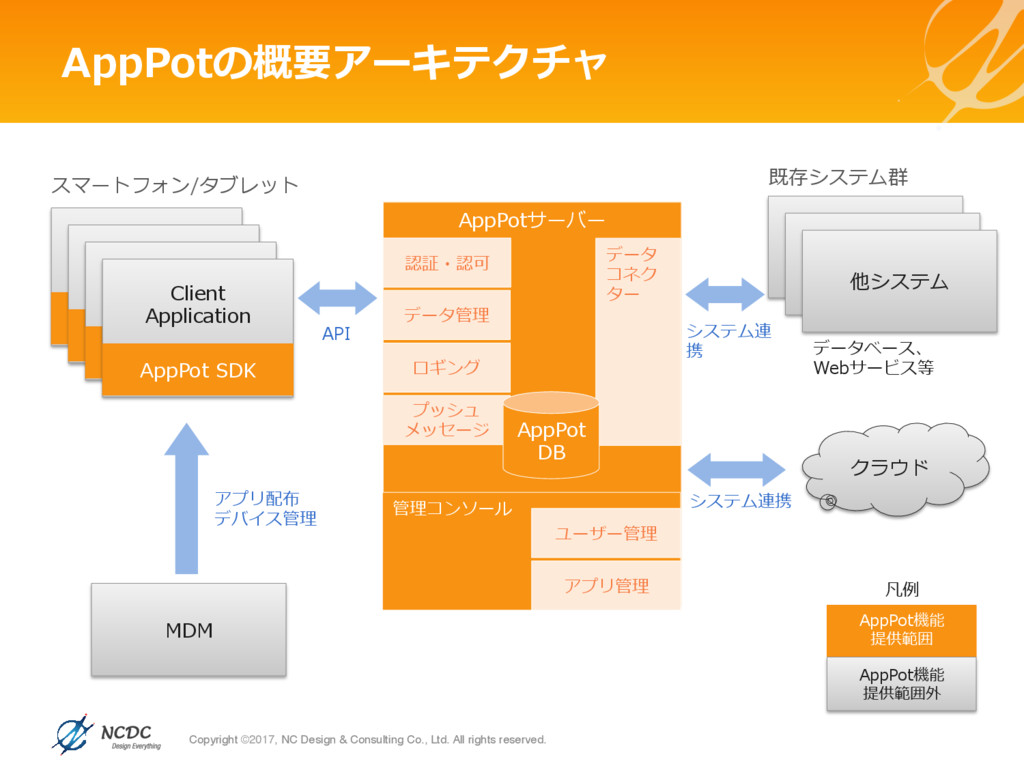
    reserved. 企業のスマートデバイス活⽤における課題 n  アプリを多数作成したいが、コストがかかってしまう ü  アプリごとにサーバーを構築・運⽤している ü  アプリごとに同じような機能を重複して開発している n  アプリ開発のスピードが業務ニーズに追いついていない ü  アプリ以外にもサーバーの構築、開発が必要 n  タブレットを導⼊したが、カタログなど ごく⼀部に活⽤範囲が制限されている ü  業務で使⽤するデータのセキュリティ確保や、 既存システムとの連携の⼿法が確⽴されていない
  13. Copyright ©2017, NC Design & Consulting Co., Ltd. All rights

    reserved. AppPotの導⼊効果 サーバー開発が不要でモバイルアプリの導⼊のリードタイム、コスト削減 ユーザー 部門 IT部門 モバイルアプリ エンジニア サーバーアプリ エンジニア インフラ エンジニア アプリ作成依頼 作業依頼 データセンター を借りなきゃ! セキュリティの設計は 時間がかかる。 どうやって基幹システ ムに接続するか 画⾯は早くできたん だけど・・・ 2ヶ⽉以内に マーケティング⽤ のアプリが必要! 2ヶ⽉は 無理です ユーザー部門 IT部門 モバイルアプリ エンジニア アプリ作成依頼 作業依頼 画⾯だけの開発 であれば、すぐ できます 2ヶ⽉以内に マーケティング⽤の アプリが必要! OKです 従来型のアプリ開発 AppPotを使⽤したアプリ開発
  14. Copyright ©2017, NC Design & Consulting Co., Ltd. All rights

    reserved. AppPotが提供する主な機能 ①  グループ、ユーザー及びアプリの権限管理 ②  ログイン/ログアウトなどの認証 LDAP / Active Directory / Google Apps連携も可能 ③  端末とサーバー間のデータの同期 ④  アプリの使⽤状況、エラーの情報収集 ⑤  端末内のデータの暗号化 ⑥  プッシュメッセージの送受信 ⑦  Eメールの送受信 ⑧  バイナリファイルAPI ⑨  他システムとの連携(データベース、Webサービス他)
  15. Copyright ©2017, NC Design & Consulting Co., Ltd. All rights

    reserved. クラウド AppPotの概要アーキテクチャ AppPotサーバー Systems 既存システム群 Systems 他システム データ コネク ター         認証・認可 データ管理 プッシュ メッセージ ロギング 管理コンソール データベース、 Webサービス等 アプリ配布 デバイス管理 AppPot DB Client Application SDK Client Application SDK Client Application SDK Client Application AppPot SDK AppPot機能 提供範囲 AppPot機能 提供範囲外 スマートフォン/タブレット システム連 携 システム連携 API MDM 凡例 ユーザー管理 アプリ管理
  16. Copyright ©2017, NC Design & Consulting Co., Ltd. All rights

    reserved. 開発環境の準備 n  node.jsとnpmのインストール •  ダウンロードページ https://nodejs.org/en/download/ n  GitHubでハンズオンのコードを公開中 •  https://github.com/NCDCHub/AppPot-React-HandsOn •  ダウンロード⽅法 gitでcloneする GitHubのreleaseからzipファイルをダウンロードし、任意のディレクトリに展開   release > v1.0.0 > Source code (zip)
  17. Copyright ©2017, NC Design & Consulting Co., Ltd. All rights

    reserved. ハンズオンアプリコード全体像の説明 AppPot-React-HandsOn ├── exercise00 ... エクササイズ0の解答コード ├── exercise02 ... エクササイズ2の解答コード ├── exercise03 ... エクササイズ3の解答コード ├── exercise04 ... エクササイズ4の解答コード ├── exercise05 ... エクササイズ5の解答コード ├── exercise06 ... エクササイズ6の解答コード ├── exercise07 ... エクササイズ7の解答コード ├── exercise08 ... エクササイズ8の解答コード └── work ... 今回のハンズオンで作業してもらうディレクトリ    ├── pub ... Webサーバーのドキュメントルート │ ├── css ... 各種CSSファイル格納フォルダ    │ ├── index.html ... HTMLのルートページ │ └── bundle.js ... 各種JavaScriptファイルのビルド後のモジュール    └── src ... ビルド前のJavaScriptファイルの配置ディレクトリ
  18. Copyright ©2017, NC Design & Consulting Co., Ltd. All rights

    reserved. Exercise 0 React Hello World
  19. Copyright ©2017/02/15 , NC Design & Consulting Co., Ltd. All

    rights reserved. Hello Worldの実装 24 import React from "react"; import ReactDOM from "react-dom"; class App extends React.Component { render() { return ( <div> Hello World! </div> ); } } ReactDOM.render( <App /> , document.getElementById("content") ); src/App.js (新規作成) 利⽤するモジュールのインポート 宣⾔ •  Classの定義 •  Reactのコンポーネントは React.Componentを継承する renderメソッドにて、このコンポー ネントが呼び出されることによって 表⽰されるHTMLを定義 アプリを実⾏する事によって表⽰さ れるHTMLを定義
  20. Copyright ©2017/02/15 , NC Design & Consulting Co., Ltd. All

    rights reserved. Hello Worldの実⾏ 25 $ cd AppPot-React-HandsOn/work $ npm install $ node_modules/.bin/browserify -t [ babelify ] src/App.js -o pub/bundle.js $ node_modules/.bin/http-server -c-1 Starting up http-server, serving ./ Available on: http://127.0.0.1:8080 http://192.168.0.7:8080 Hit CTRL-C to stop the server コマンドライン package.jsonに定義された依存モ ジュールをダウンロードし、 node_modulesに配置 アプリのビルドを実⾏ ソースのルートファイル: src/main.js ビルド結果ファイル: pub/bundle.sj 動作確認⽤のHTTP サーバーの起動 ブラウザからこのURL+/ pub/にアクセスすると動作 確認可能 ※Windowsで実⾏される場合はパスレパレターを¥に 置き換えて実⾏してください。
  21. Copyright ©2017/02/15 , NC Design & Consulting Co., Ltd. All

    rights reserved. 依存しているライブラリ "dependencies": { "apppot-sdk": "^2.3.5", "bootstrap": "^3.3.7", "es6-promise": "^4.0.5", "moment": "^2.17.1", "react": "^15.3.2", "react-dom": "^15.3.2", "react-modal": "^1.6.5", "react-router": "^3.0.2" }, "devDependencies": { "babel-preset-es2015": "^6.22.0", "babel-preset-react": "^6.16.0", "babelify": "^7.3.0", "browserify": "^13.1.0", "http-server": "^0.9.0" } package.json アプリの動作に必要なライブラリ アプリの開発に必要なライブラリ
  22. Copyright ©2017, NC Design & Consulting Co., Ltd. All rights

    reserved. Exercise 1 AppPotへアプリを登録
  23. Copyright ©2017, NC Design & Consulting Co., Ltd. All rights

    reserved. 演習内容 n  AppPotの管理コンソールから作成するアプリの登録を⾏な う 管理者IDでログイン アプリの情報を⼊⼒ アプリを登録
  24. Copyright ©2017, NC Design & Consulting Co., Ltd. All rights

    reserved. 配布した管理者アカウントでログイン http://trial.apppot.net/apppot/
  25. Copyright ©2017, NC Design & Consulting Co., Ltd. All rights

    reserved. アプリ定義の作成 アプリ管理を選択 追加をクリック
  26. Copyright ©2017, NC Design & Consulting Co., Ltd. All rights

    reserved. アプリの情報を⼊⼒ 任意の名前 任意のID 今回は後でDBを識別す るために配布資料の値を 設定 バージョンの識別⼦ 任意の値 今回は60を指定 今回はMONITORを 指定 今回は開発を選択 開発と本番でログやPush通知 の環境などが切り替わる アプリにアクセスできるグループを指定 開発⽤に組み込みで⽤意されている””グ ループを指定 アプリID、アプリ バージョン、アプリ キーは後ほどコード 実装時に利⽤するの でコピーしておく
  27. Copyright ©2017, NC Design & Consulting Co., Ltd. All rights

    reserved. Exercise 2 テーブルの⽣成
  28. Copyright ©2017/02/15 , NC Design & Consulting Co., Ltd. All

    rights reserved. AppPotへの接続設定 import AppPotSDK from "apppot-sdk"; export default AppPotSDK.getService({ url: "http://trial.apppot.net/apppot/", appId: "XXXXXXXXXXXXXXXX", appKey: "XXXXXXXXXXXXXXXXXX", appVersion: "XXXXX", companyId: XXX }); src/config.js (新規作成) 割り当てられた テナントのIDを 指定 作成したアプリ のキーを指定 作成したアプリ のIDを指定 作成したアプリ のバージョンを 指定 AppPotのURL AppPot SDKの インポート 記述した設定内容のAppPotサービスを⽣ 成して外部から参照できるようにエクス ポートする
  29. Copyright ©2017/02/15 , NC Design & Consulting Co., Ltd. All

    rights reserved. データモデル(Customer)の定義 import AppPot from "./config"; export default AppPot.defineModel("Customer", { "customerId": { type: AppPot.DataType.Varchar }, "name": { type: AppPot.DataType.Varchar }, "zip": { type: AppPot.DataType.Varchar }, "address": { type: AppPot.DataType.Varchar }, "phone": { type: AppPot.DataType.Varchar }, "sex": { type: AppPot.DataType.Long } }); src/Customer.js (新規作成) 先程作成したAppPotサー ビスをインポート AppPot⽤のデータモデルを定義して 外部から参照できるようにエクス ポートする •  モデルのスキーマを定義 •  この定義を元にAppPotがDBに テーブルを⾃動⽣成する •  Varcharは⽂字列型、Longは整 数型
  30. Copyright ©2017/02/15 , NC Design & Consulting Co., Ltd. All

    rights reserved. テーブル⽣成処理呼び出しの実装 import React from "react"; import ReactDOM from "react-dom"; import AppPot from "./config"; import Customer from "./Customer"; class App extends React.Component { … } AppPot.LocalAuthenticator.login("XXXXXXXXXX", "XXXXXXXXXX") .then(function() { return AppPot.createDatabase([Customer]); }) .then(() => { ReactDOM.render( <App /> , document.getElementById("content") ); }) .catch((error) => { console.log(error); alert(error.description); }); src/App.js 先程定義したAppPotサービスと Customerをインポート •  AppPotによるログイン処理の呼び出し •  全てのAPIは認証済みでないと利⽤できな いため •  今回は予め登録済みの開発⽤ユーザーを固 定的に利⽤ •  ログイン処理はPromise型のAPIで提供 認証に成功した場合は、Customerモデルに 定義したスキーマでAppPot上にテーブルを ⽣成する処理を呼び出す 上記のいずれかの処理に失敗した場合は、 コンソールにログを出⼒し、アラートでエ ラーを表⽰
  31. Copyright ©2017/02/15 , NC Design & Consulting Co., Ltd. All

    rights reserved. Promiseとは ⾮同期処理によるコールバック地獄を解消するためのデザインパターン 連続する⾮同期処理をあたかもシーケルシャルな処理のように記述できる 順序付けしたい⾮同期処理間の依存関係を切り離せる // A→B→Cの順番で処理したい function asyncA() { 非同期処理A } function asyncB() { 非同期処理B } asyncA(); asyncB(); console.log('C'); // 従来のやり方 function asyncA(callbackB, callbackC) { 非同期処理A callbackB(callbackC); } function asyncB(callbackC) { 非同期処理B callbackC(); } asyncA(asyncB, function() { console.log('C'); }); // Promiseを使った場合 function asyncA() { return new Promise(function(resolve) { 非同期処理A resolve(); }); }; function asyncB() { return new Promise(function(resolve) { 非同期処理B resolve(); }); }; asyncA() .then(asyncB) .then(function() { console.log('C'); }); •  ⾮同期処理の呼び出しに 順序関係がある •  実際はこのコードのよう には実装できない •  通常はコールバックを使って順⼥性を担保する •  コールバックは数が増えるとネストが深くなり処 理がわかりにくい •  ⾮同期処理間に依存関係が⽣まれ再利⽤が難しい •  ⾮同期処理を同期処理に近い⾒た⽬で記述でき、 わかりやすい •  Promiseというプロトコルを介す事で⾮同期関 数間の依存関係がなくなり、再利⽤し易い
  32. Copyright ©2017, NC Design & Consulting Co., Ltd. All rights

    reserved. ⽣成されたデータベースの確認 n  phpMyAdminにアクセスしてCustomerテーブルが⽣成さ れているか確認 •  URLとアカウントは配布されている資料を確認してください •  ⽣成されるデータベース名は"apppot_{アプリID}_{アプリバージョン}
  33. Copyright ©2017, NC Design & Consulting Co., Ltd. All rights

    reserved. ⽣成されるテーブルのレイアウト n  テーブル名 •  customer(顧客テーブル) n  レイアウト 項⽬名 型 説明 objectId String サロゲートキー。AppPot組込項⽬。AppPotが⾃動更新。 customerId String 顧客ID name String 顧客名 zip String 郵便番号 address String 住所 phone String 電話番号 sex Number 性別(0:男性、1:⼥性) scopeType Number データの参照範囲。AppPot組込項⽬。 createTime Number クライアントでのデータ⽣成時間。UNIXTIME形式。AppPot組込項⽬。 updateTime Number クライアントでのデータ更新時間。UNIXTIME形式。AppPot組込項⽬。 createUserId Number データ⽣成ユーザID。AppPot組込項⽬。AppPotが⾃動更新。 groupIds String データ⽣成/更新したユーザの所属グループID。AppPot組込項⽬。AppPotが⾃動更新。 serverCreateTime String サーバで記録されるデータ作成⽇時。AppPot組込項⽬。AppPotが⾃動更新。 serverUpdateTime String サーバで記録されるデータ更新⽇時。AppPot組込項⽬。AppPotが⾃動更新。 serverRecordStatus Number レコードの状態。AppPot組込項⽬。AppPotが⾃動更新。
  34. Copyright ©2017, NC Design & Consulting Co., Ltd. All rights

    reserved. Exercise 3 検索機能の実装
  35. Copyright ©2017, NC Design & Consulting Co., Ltd. All rights

    reserved. 完成イメージ 検索条件を⼊⼒し、検 索ボタンを押下すると 検索結果が表⽰される
  36. Copyright ©2017/02/15 , NC Design & Consulting Co., Ltd. All

    rights reserved. 顧客⼀覧画⾯の実装 41 import React from "react"; import CustomerCondition from "./CustomerCondition"; import CustomerTable from "./CustomerTable"; import Customer from "./Customer"; import AppPot from "./config"; export default class CustomerListPage extends React.Component { constructor(props) { super(props); this.state = { customers: []}; this.findList = this.findList.bind(this); } findList(customerId, customerName) { Customer.select() .where("#Customer.customerId like ? AND #Customer.name like ?", "%" + customerId + "%", "%" + customerName + "%") .orderBy('#Customer.customerId', AppPot.Model.Order.asc) .findList() .then((result) => { this.setState({ customers: result.Customer }); }) .catch(function(error) { console.error(error); alert(error.description); }); } render() { return ( <div> <div className="container"> <CustomerCondition onSearch={this.findList} /> <CustomerTable customers={this.state.customers} /> </div> </div> ); } } src/CustomerListPage.js (新規作成) •  検索結果をstateで状態管理 •  初期状態として空のリストを設定 コンポーネント内に定義する関数内で"this"を利 ⽤したい場合は、コンストラクタで関数に対し てthisをバインドする必要がある •  指定したクエリでデータアクセスを実⾏する API呼び出し •  Customerテーブルに対してSELECTを実⾏ 検索結果をstateに設定 顧客⼀覧画⾯をレンダリング •  検索条件部をサブコンポーネント化 •  onSearchプロパティにて検索実⾏時に利⽤するfindList 関数を渡す •  Reactのプロパティは親コンポーネントから⼦コンポーネ ントにオブジェクトを渡す為の仕組 •  検索結果部をサブコンポーネント化 •  customersプロパティにstateで状態管理している検索結 果を渡す
  37. Copyright ©2017/02/15 , NC Design & Consulting Co., Ltd. All

    rights reserved. 検索条件部コンポーネントの実装 42 import React from "react"; export default class CustomerCondition extends React.Component { constructor(props) { super(props); this.state = { customerId: "", customerName: "" } this.handleInputChange = this.handleInputChange.bind(this); this.handleSearch = this.handleSearch.bind(this); } handleInputChange(event) { this.setState({ [event.target.name]: event.target.value }); } handleSearch() { this.props.onSearch(this.state.customerId, this.state.customerName); } (続く) src/CustomerCondition.js (新規作成) •  検索条件値をstateで状態管理 •  初期状態として空⽂字を設定 検索条件⼊⼒フィールドに値が⼊⼒され た場合に、stateの状態を⼊⼒された値に 書き換えるUIイベントを定義 検索ボタンをクリックした時に、親コンポー ネントにてonSearchプロパテイに指定された 関数を呼び出すUIイベントを定義
  38. Copyright ©2017/02/15 , NC Design & Consulting Co., Ltd. All

    rights reserved. 検索条件部コンポーネントの実装(続き) 43 (続き) render() { return ( <div className="panel panel-primary"> <div className="panel-heading"> <h3 className="panel-title text-center">顧客検索</h3> </div> <div className="panel-body"> <div className="form-horizontal"> <div className="form-group"> <div className="col-md-2"><label className="control-label pull-right">顧客ID</label></div> <div className="col-md-3"> <input type="text" name="customerId" className="form-control" 
 value={this.state.customerId} onChange={this.handleInputChange} /> </div> </div> <div className="form-group" style={{marginBottom: 0 + 'px'}}> <div className="col-md-2"><label className="control-label pull-right">顧客名</label></div> <div className="col-md-3"> <input type="text" name="customerName" className="form-control"
 value={this.state.customerName} onChange={this.handleInputChange} /> </div> <div className="col-md-offset-4 col-md-3"> <input type="button" className="btn btn-primary pull-right" style={{width: 48 + '%'}} value="検索" onClick={this.handleSearch} /> </div> </div> </div> </div> </div> ); } } src/CustomerCondition.js (新規作成) •  検索条件値⼊⼒フィールドのvalue属性に stateで管理している検索条件値をバインド •  検索条件値⼊⼒フィールドのonChange属性 に先に定義した⼊⼒値変更時の関数を指定 •  顧客名⼊⼒フィールドも同様 検索ボタンのonClick属性に先に定義 したクリック処理の関数を指定 検索条件部である条件フィールドと 検索ボタンをレンダリング
  39. Copyright ©2017/02/15 , NC Design & Consulting Co., Ltd. All

    rights reserved. 検索結果部コンポーネントの実装 44 import React from "react"; import moment from "moment"; class CustomerRow extends React.Component { formatDate(date) { return moment(date).format("YYYY/MM/DD HH:mm:ss"); } render() { const { customer } = this.props; return ( <tr > <td>{customer.customerId}</td> <td>{customer.name}</td> <td>{customer.zip}</td> <td>{customer.address}</td> <td>{customer.phone}</td> <td>{customer.sex}</td> <td>{this.formatDate(customer.serverUpdateTime)}</td> </tr> ); } } (続く) src/CustomerTable.js (新規作成) 検索結果テーブルの1⾏をサブコン ポーネントとして定義 検索結果テーブルの1⾏をレンダリ ング •  tdタグに親コンポーネントのcustomerプロ パティで指定されたcustomerオブジェクト の各種項⽬値をバインド •  他の項⽬も同様
  40. Copyright ©2017/02/15 , NC Design & Consulting Co., Ltd. All

    rights reserved. 検索結果部コンポーネントの実装(続き) 45 (続き) export default class CustomerTable extends React.Component { render() { return ( <div> <table className="table table-striped"> <thead> <tr> <th>顧客ID</th> <th>顧客名</th> <th>郵便番号</th> <th>住所</th> <th>電話番号</th> <th>性別</th> <th>更新日</th> </tr> </thead> <tbody> {this.props.customers.map((customer) => { return <CustomerRow key={customer.objectId} customer={customer} />; })} </tbody> </table> </div> ); } } src/CustomerTable.js (新規作成) 検索結果テーブルをコンポーネント として定義 検索結果テーブルをレンダリ ング •  親コンポーネントのcustomersプロパティで指定された 検索結果⼀覧を表⽰ •  検索結果の⾏をサブコンポーネント化 •  検索結果の件数だけサブコンポーネントの定義をループ •  サブコンポーネントのcustomerプロパテイに各⾏に関連 づくcustomerオブジェクトを指定
  41. Copyright ©2017/02/15 , NC Design & Consulting Co., Ltd. All

    rights reserved. 検索結果画⾯をトップ画⾯として追加 46 import React from "react"; import ReactDOM from "react-dom"; import AppPot from "./config"; import Customer from "./Customer"; import CustomerListPage from "./CustomerListPage"; class App extends React.Component { render() { return ( <div> <CustomerListPage /> </div> ); } } AppPot.LocalAuthenticator.login("Trainer1", "Trainer1") … src/App.js 作成したCustomerListPageをイン ポート ルートコンポーネントにて、トッ プ画⾯の表⽰内容を CustomerListPageに変更
  42. Copyright ©2017, NC Design & Consulting Co., Ltd. All rights

    reserved. Exercise 4 登録機能の実装
  43. Copyright ©2017, NC Design & Consulting Co., Ltd. All rights

    reserved. 完成イメージ 新規作成ボタンを押下 するとデータ⼊⼒ダイ アログがポップアップ する 値を⼊⼒し保存ボタン を押下するとデータを DBに保存し⼀覧画⾯に 戻る 登録をキャンセルして ダイアログを閉じる
  44. Copyright ©2017/02/15 , NC Design & Consulting Co., Ltd. All

    rights reserved. 新規データ⼊⼒ダイアログの実装 49 import React from "react"; import Modal from "react-modal"; import Customer from "./Customer"; export default class CustomerDetailDialog extends React.Component { constructor(props) { super(props); this.state = { values: {} }; this.handleOpen = this.handleOpen.bind(this); this.handleInputChange = this.handleInputChange.bind(this); this.handleSubmit = this.handleSubmit.bind(this); } handleOpen() { this.setState({ values: { objectId: "", customerId: "", name: "", zip: "", address: "", phone: "", sex: "", serverCreateTime: "", serverUpdateTime: "" } }); } (続く) src/CustomerDetailDialog.js (新規作成) •  登録値をstateで状態管理 •  初期状態として空オブジェクト を設定 •  ダイアログオープン時のイベントを定義 •  stateで管理している登録値を空⽂字で初期化
  45. Copyright ©2017/02/15 , NC Design & Consulting Co., Ltd. All

    rights reserved. 新規データ⼊⼒ダイアログの実装(続き) 50 (続き) handleInputChange(event) { var values = this.state.values; values[event.target.name] = event.target.value; this.setState({ values: values }); } handleSubmit(event) { event.preventDefault(); const customer = new Customer(this.state.values); customer.insert() .then(() => { this.props.onRequestClose(); }) .catch((error) => { console.log(error); alert(error.description); }); return false; } nullToBlank(str) { return str == null || str == undefined ? "" : str; } (続く) src/CustomerDetailDialog.js (新規作成) 登録値⼊⼒フィールドに値が⼊⼒された 場合に、stateの状態を⼊⼒された値に書 き換えるUIイベントを定義 •  状態管理している⼊⼒値をインプットにCustomer オブジェクトを⽣成 •  ⽣成したオブジェクトの内容でDBにデータを登録 ブラウザのSubmitイベントをキャンセルし、 データの新規登録処理を実⾏させる 親コンポーネントにてonRequestCloseプロパ テイに指定された関数を呼び出す
  46. Copyright ©2017/02/15 , NC Design & Consulting Co., Ltd. All

    rights reserved. 新規データ⼊⼒ダイアログの実装(続き) 51 (続き) render() { return ( <Modal isOpen={this.props.isOpen} onRequestClose={this.props.onRequestClose} onAfterOpen={this.handleOpen} className="modal-content" overlayClassName="modal-overlay" contentLabel="Customer Detail Dialog" > <div className="panel panel-primary" style={{marginBottom: 0 + "px"}}> <div className="panel-heading"> <h3 className="panel-title text-center">顧客詳細</h3> </div> <form name="customerForm" onSubmit={this.handleSubmit}> <div className="panel-body"> <div className="form-group"> <label className="control-label" htmlFor="objectId">オブジェクトID</label> <input type="text" className="form-control" name="objectId" readOnly="readOnly" value={this.nullToBlank(this.state.values.objectId)} onChange={this.handleInputChange}/> </div> <div className="form-group"> <label className="control-label" htmlFor="customerId">顧客ID</label> <input type="text" className="form-control" name="customerId" required="required" value={this.nullToBlank(this.state.values.customerId)} onChange={this.handleInputChange} /> </div> …(省略) </div> <div className="panel-footer container-fluid" style={{paddingLeft: 0 + "px", paddingRight: 0 + "px"}}> <div className="row-fluid"> <div className="col-md-offset-3 col-md-6"> <input type="button" className="btn btn-primary" style={{width: 48 + "%"}} value="キャンセル" onClick={this.props.onRequestClose} /> <input type="submit" className="btn btn-primary pull-right" style={{width: 48 + "%"}} value="保存" /> </div> </div> </div> </form> </div> </Modal> ); } } src/CustomerDetailDialog.js (新規作成) 新規データ⼊⼒フォームをダイアロ グ化したHTMLをレンダリング ReactコンポーネントのModalダイ アログを定義 isOpenプロパティに親コンポーネン トで管理している開閉状態を指定 ダイアログオープン時のイベントに handleOpen関数を指定 ダイアログク ローズ時のイ ベントに親コ ンポーネント で onRequestClo seプロパテイ で指定した関 数を指定 データ⼊⼒⽤のフォームを定義 フォームサブミット時の イベントに handleSubmit関数を指 定 キャンセルボタン押下時のイベン トに親コンポーネントで onRequestCloseプロパテイで指 定した関数を指定 •  各⼊⼒項⽬毎にラベルと⼊ ⼒フィールドを定義 •  ⼊⼒フィールドのvalue属 性にstateで管理している ⼊⼒値をバインド •  バインドの際に値がnullの 場合は空⽂字に変換 •  ⼊⼒フィールドの onChange属性に handleInputChange関数 を指定 •  他の⼊⼒項⽬も同様
  47. Copyright ©2017/02/15 , NC Design & Consulting Co., Ltd. All

    rights reserved. 検索結果部に新規登録ボタンの追加 52 import React from "react"; import moment from "moment"; import CustomerDetailDialog from "./CustomerDetailDialog"; … export default class CustomerTable extends React.Component { constructor(props) { super(props); this.state = { isDialogOpen: false }; this.showDialog = this.showDialog.bind(this); this.closeDialog = this.closeDialog.bind(this); } showDialog() { this.setState({ isDialogOpen: true }); } closeDialog() { this.setState({ isDialogOpen: false }); } render() { return ( <div> <table className="table table-striped"> <caption> <input type="button" className="btn btn-primary btn-sm pull-right" value="新規作成" onClick={this.showDialog} /> </caption> <thead> … </thead> <tbody> … </tbody> </table> <CustomerDetailDialog isOpen={this.state.isDialogOpen} onRequestClose={this.closeDialog} /> </div> ); } } src/CustomerTable.js 作成したCustomerDetailDialogを インポート ダイアログの開閉状態をstateにて 状態管理 •  ダイアログをオープンする関数を定義し •  状態管理している開閉状態をtureにする •  ダイアログをクローズする関数を定義し •  状態管理している開閉状態をfalseにする •  テーブルのキャプションに新規登録ダイアログを オープンさせるボタンを配置 •  クリック時に先に定義したshowDialog関数を実⾏す るように指定 •  作成したCustomerDetailDialogを配置 •  isOpenプロパティに状態管理しているダイアログの開閉状態をバインド •  onRequestCloseプロパテイに先に定義したcloseDialog関数を指定
  48. Copyright ©2017, NC Design & Consulting Co., Ltd. All rights

    reserved. Exercise 5 更新機能の実装
  49. Copyright ©2017, NC Design & Consulting Co., Ltd. All rights

    reserved. 完成イメージ 編集ボタンを押下する と編集ダイアログが ポップアップする 値を⼊⼒し保存ボタン を押下するとデータを DBに保存し⼀覧画⾯に 戻る 更新をキャンセルして ダイアログを閉じる
  50. Copyright ©2017/02/15 , NC Design & Consulting Co., Ltd. All

    rights reserved. 検索結果の各⾏に編集ダイアログ表⽰ボタンを追加 55 import React from "react"; import moment from "moment"; import Customer from "./Customer"; import CustomerDetailDialog from "./CustomerDetailDialog"; class CustomerRow extends React.Component { formatDate(date) { return moment(date).format("YYYY/MM/DD HH:mm:ss"); } render() { const { customer } = this.props; return ( <tr > <td>{customer.customerId}</td> <td>{customer.name}</td> <td>{customer.zip}</td> <td>{customer.address}</td> <td>{customer.phone}</td> <td>{customer.sex}</td> <td>{this.formatDate(customer.serverUpdateTime)}</td> <td> <input type="button" className="btn btn-primary btn-xs" value="編集" onClick={(event) => { this.props.onClick(customer, "edit"); }} /> </td> </tr> ); } } (続く) src/CustomerTable.js •  CustomerRowに1列追加し、編集ボタン を配置 •  編集ボタンのonClickイベントに親コン ポーネントでonClickプロパティに指定 したshowDialog関数を指定 •  showDialog関数は編集モードを指定し、 この⾏に紐付いているcustomerオブ ジェクトを引数に指定
  51. Copyright ©2017/02/15 , NC Design & Consulting Co., Ltd. All

    rights reserved. 検索結果の各⾏に編集ダイアログ表⽰ボタンを追加(続き) 56 (続き) export default class CustomerTable extends React.Component { constructor(props) { super(props); this.state = { isDialogOpen: false, customer: null }; this.showDialog = this.showDialog.bind(this); this.closeDialog = this.closeDialog.bind(this); } showDialog(customer, mode) { customer.mode = mode; this.setState({ isDialogOpen: true, customer: customer }); } closeDialog() { this.setState({ isDialogOpen: false, customer: null }); } (続く) src/CustomerTable.js •  状態管理の対象にcustomerを追加 •  初期状態はnull •  showDialog関数の引数にcustomer とモードを追加 •  関数が呼び出されたタイミングで、 customerに編集モードを設定し、 stateにセットして状態管理する ダイアログが閉じられたら状態管理 していたcustomerをnullに初期化す る
  52. Copyright ©2017/02/15 , NC Design & Consulting Co., Ltd. All

    rights reserved. 検索結果の各⾏に編集ダイアログ表⽰ボタンを追加(続き) 57 (続き) render() { return ( <div> <table className="table table-striped"> <caption> <input type="button" className="btn btn-primary btn-sm pull-right" value="新規作成" onClick={(event) => { this.showDialog(new Customer(), "new"); }} /> </caption> <thead> <tr> <th>顧客ID</th> <th>顧客名</th> <th>郵便番号</th> <th>住所</th> <th>電話番号</th> <th>性別</th> <th>更新日</th> <th></th> </tr> </thead> <tbody> {this.props.customers.map((customer) => { return <CustomerRow key={customer.objectId} customer={customer} onClick={this.showDialog}/>; })} </tbody> </table> <CustomerDetailDialog customer={this.state.customer} isOpen={this.state.isDialogOpen} onRequestClose={this.closeDialog} /> </div> ); } } src/CustomerTable.js •  新規登録ボタン押下時のイベントに設定 する関数を拡張 •  新規登録モードで新しく⽣成した Customerオブジェクトを指定した showDialog関数を設定 編集ボタン⽤の列を追加 各⾏のonClickイベントに showDialog関数を指定 •  Dialogに対象のCustomerオブジェクトを指定 するプロパティを追加 •  stateで状態管理しているcustomerオブジェク トをバインド
  53. Copyright ©2017/02/15 , NC Design & Consulting Co., Ltd. All

    rights reserved. 詳細ダイアログに編集機能を追加 58 … export default class CustomerDetailDialog extends React.Component { … handleOpen() { const customer = this.props.customer; this.setState({ values: { objectId: customer.objectId, customerId: customer.customerId, name: customer.name, zip: customer.zip, address: customer.address, phone: customer.phone, sex: customer.sex, serverCreateTime: customer.serverCreateTime, serverUpdateTime: customer.serverUpdateTime } }); } … handleSubmit(event) { event.preventDefault(); const customer = this.props.customer; if (customer.mode == "new") { var promise = customer.insert(this.state.values); } else { var promise = customer.update(this.state.values); } promise.then(() => { this.props.onRequestClose(); }) .catch((error) => { console.log(error); alert(error.description); }); return false; } … src/CustomerDetailDialog.js ダイアログがオープンしたタイミングでプ ロパティに指定したcustomerオブジェク トの内容を状態管理しているvaluesオブ ジェクトにコピーする •  customerに指定されたmodeに応じて、 insertかupdateの処理を呼び替えるよう に修正 •  プロミス実⾏後の処理は新規登録と更新 で同じなので、処理を共通化
  54. Copyright ©2017, NC Design & Consulting Co., Ltd. All rights

    reserved. EXERCISE 6 削除機能の実装
  55. Copyright ©2017, NC Design & Consulting Co., Ltd. All rights

    reserved. 完成イメージ 編集ボタンを押下する と編集ダイアログが ポップアップする 削除ボタンを押下する と対象レコードをDBか ら削除し⼀覧画⾯に戻 る 更新・削除をキャンセ ルしてダイアログを閉 じる
  56. Copyright ©2017/02/15 , NC Design & Consulting Co., Ltd. All

    rights reserved. 詳細ダイアログに削除機能を追加 61 … export default class CustomerDetailDialog extends React.Component { constructor(props) { … this.handleDelete = this.handleDelete.bind(this); } … handleDelete() { this.props.customer.remove() .then(() => { this.props.onRequestClose(); }) .catch((error) => { console.log(error); alert(error.description); }); } … render() { return ( <Modal …> <div className="panel panel-primary" style={{marginBottom: 0 + "px"}}> <div className="panel-heading">…</div> <form name="customerForm" onSubmit={this.handleSubmit}> <div className="panel-body">…</div> <div className="panel-footer container-fluid" style={{paddingLeft: 0 + "px", paddingRight: 0 + "px"}}> <div className="row-fluid"> <div className="col-md-3"> {(() => { if (this.props.customer != null && this.props.customer.mode == "edit") { return <input type="button" className="btn btn-primary btn-block" value="削除" onClick={this.handleDelete} /> } })()} </div> <div className="col-md-offset-3 col-md-6">…</div> </div> </div> </form> </div> </Modal> ); } } src/CustomerDetailDialog.js handleDelete関数に thisをバインド •  プロパティに指定されたcustomerオブジェクトのr 削除処理を実⾏ •  削除に成功した場合は、親コンポーネントにて onRequestCloseプロパテイに指定された関数を呼 び出す •  削除ボタンを定義 •  ボタン押下時にhandleDelete関数を実⾏す るように定義 •  モードがeditの場合のみボタンを表⽰
  57. Copyright ©2017, NC Design & Consulting Co., Ltd. All rights

    reserved. EXERCISE 7 ログイン機能の実装
  58. Copyright ©2017, NC Design & Consulting Co., Ltd. All rights

    reserved. 完成イメージ 正しいID/PWを⼊⼒してログ インボタンを押下するとシステ ムにログインし顧客⼀覧画⾯に 遷移する
  59. Copyright ©2017/02/15 , NC Design & Consulting Co., Ltd. All

    rights reserved. 画⾯遷移処理の定義 64 import React from "react"; import ReactDOM from "react-dom"; import AppPot from "./config"; import { Router, Route, IndexRoute, hashHistory } from "react-router"; import LoginPage from "./LoginPage"; import CustomerListPage from "./CustomerListPage"; class App extends React.Component { render() { return ( <div> {this.props.children} </div> ); } } function requireAuth(nextState, replace) { if (!AppPot.LocalAuthenticator.isLogined()) { replace({ pathname: "/login", state: { nextPathname: nextState.location.pathname } }) } } ReactDOM.render( <Router history={hashHistory}> <Route path="/" component={App} > <IndexRoute component={CustomerListPage} onEnter={requireAuth} /> <Route path="/login" component={LoginPage} /> <Route path="/customers" component={CustomerListPage} onEnter={requireAuth} /> </Route> </Router> , document.getElementById("content") ); src/App.js 今回はreact-routerを使っ て画⾯遷移を実装 ログイン画⾯⽤のコンポーネントを インポート ※コンポーネントの詳細は後述 react-routerを使って遷移させたページコンポーネン トを表⽰される場合は、表⽰部分は {this.props.children}と定義する 未ログインの場合は/login = LoginPageへ強制的に 遷移させる処理を定義 •  react-routerを使ってuriとComponentをマッピ ングする •  特定のコンポネント内で部分的に遷移させる必 要がある場合は、マッピングの定義をネストし て表現する •  マッピングしたuriに遷移するタイミングで、 onEnterプロパティに指定した関数が実⾏され る •  今回はonEnterに認証チェック処理として requireAuth関数を指定する
  60. Copyright ©2017/02/15 , NC Design & Consulting Co., Ltd. All

    rights reserved. ログイン画⾯の実装 65 import React from "react"; import AppPot from "./config"; import Customer from "./Customer"; export default class LoginPage extends React.Component { constructor(props) { super(props); this.state = { userName: "", password: "", errorMsg: "" }; this.handleInputChange = this.handleInputChange.bind(this); this.login = this.login.bind(this); } handleInputChange(event) { this.setState({ [event.target.name]: event.target.value }); } login(event) { event.preventDefault(); AppPot.LocalAuthenticator.login(this.state.userName, this.state.password) .then(function() { return AppPot.createDatabase([Customer]); }) .then(() => { this.props.router.push("/customers"); }) .catch((error) => { if (error.code && error.code == "111") { this.setState({ errorMsg: error.description }); } else { console.log(error); alert(error.description); } }); return false; } (続く) src/LoginPage.js •  ⼊⼒値とエラーをstateで状態管理 •  初期状態として空⽂字を設定 検索条件⼊⼒フィールドに値が⼊⼒され た場合に、stateの状態を⼊⼒された値に 書き換えるUIイベントを定義 ログイン処理とテーブル⽣成処理を移⾏ ログインに成功したらルーターで指定し た/customers = CustomerListPageに遷 移 •  エラーコードが111の時はIDかパスワード が間違っている状態であるため、そのメッ セージを画⾯に表⽰する •  エラーが発⽣した場合は、表⽰するための メッセージをstateで状態管理する
  61. Copyright ©2017/02/15 , NC Design & Consulting Co., Ltd. All

    rights reserved. ログイン画⾯の実装(続き) 66 (続き) render() { return ( <div className="modal-dialog"> <div className="loginmodal-container"> <h1>Login to Your Account</h1><br /> <form onSubmit={this.login}> {(() => { if (this.state.errorMsg != "") { return <span className="text-danger">{this.state.errorMsg}</span> } })()} <input type="text" name="userName" placeholder="Username" required="required" value={this.state.userName} onChange={this.handleInputChange} /> <input type="password" name="password" placeholder="Password" required="required" value={this.state.password} onChange={this.handleInputChange} /> <input type="submit" name="login" className="login loginmodal-submit" value="Login" /> </form> </div> </div> ); } } src/LoginPage.js(新規作成) ログイン画⾯をレンダリング サブミット時にlogin関数を呼び出す ように指定 状態管理しているエラー メッセージに値が設定さ れている場合は、その メッセージを表⽰する •  ユーザー名⼊⼒フィールド のvalue属性にstateで管理 している⼊⼒値をバインド •  ⼊⼒フィールドの onChange属性に先に定義 した⼊⼒値変更時の関数を 指定 •  パスワード⼊⼒フィールド も同様
  62. Copyright ©2017, NC Design & Consulting Co., Ltd. All rights

    reserved. EXERCISE 8 ログアウト機能の実装
  63. Copyright ©2017/02/15 , NC Design & Consulting Co., Ltd. All

    rights reserved. ナビゲーションバーの実装 68 import React from "react"; import {Router, Link} from "react-router"; import AppPot from "./config"; export default class NavigationBar extends React.Component { constructor(props) { super(props); this.logout = this.logout.bind(this); } logout(event) { event.preventDefault(); AppPot.LocalAuthenticator.logout() .then(() => { this.props.router.push("/login"); }) .catch((error) => { console.error(error); }); return false; } (続く) src/NavigationBar.js(新規作成) ログアウト処理を実⾏ ログアウトに成功したらルーターで指定 した/login = LoginPageに遷移
  64. Copyright ©2017/02/15 , NC Design & Consulting Co., Ltd. All

    rights reserved. ナビゲーションバーの実装(続き) 69 (続き) render() { return ( <nav className="navbar navbar-default"> <div className="container"> <div className="navbar-header"> <a className="navbar-brand">AppPotハンズオンアプリ</a> </div> <ul className="nav navbar-nav"> <li className="active"><Link to="customers">顧客管理</Link></li> </ul> <ul className="nav navbar-nav navbar-right"> <li><a href="#" onClick={this.logout}>ログアウト</a></li> </ul> </div> </nav> ); } } src/NavigationBar.js(新規作成) ナビゲーションバーをレンダリング リンクをクリックするとlogout関数 を呼び出すように指定
  65. Copyright ©2017/02/15 , NC Design & Consulting Co., Ltd. All

    rights reserved. ナビゲーションバーをレイアウトする 70 … export default class CustomerListPage extends React.Component { … render() { return ( <div> <NavigationBar router={this.props.router}/> <div className="container"> <CustomerCondition onSearch={this.findList} /> <CustomerTable customers={this.state.customers} /> </div> </div> ); } } src/CustomerListPage.js リンクに利⽤するrouterを指定した NavigationBarを配置
  66. Copyright ©2017, NC Design & Consulting Co., Ltd. All rights

    reserved. AppPotの情報をフォローしてください! @app_pot @NextConceptDC セミナーの情報や、AppPotの新機能のアナウンスなどSNSを使って ⾏っています。ぜひフォローしてください!