Upgrade to Pro — share decks privately, control downloads, hide ads and more …

Kubernetes-101-workshop

 Kubernetes-101-workshop

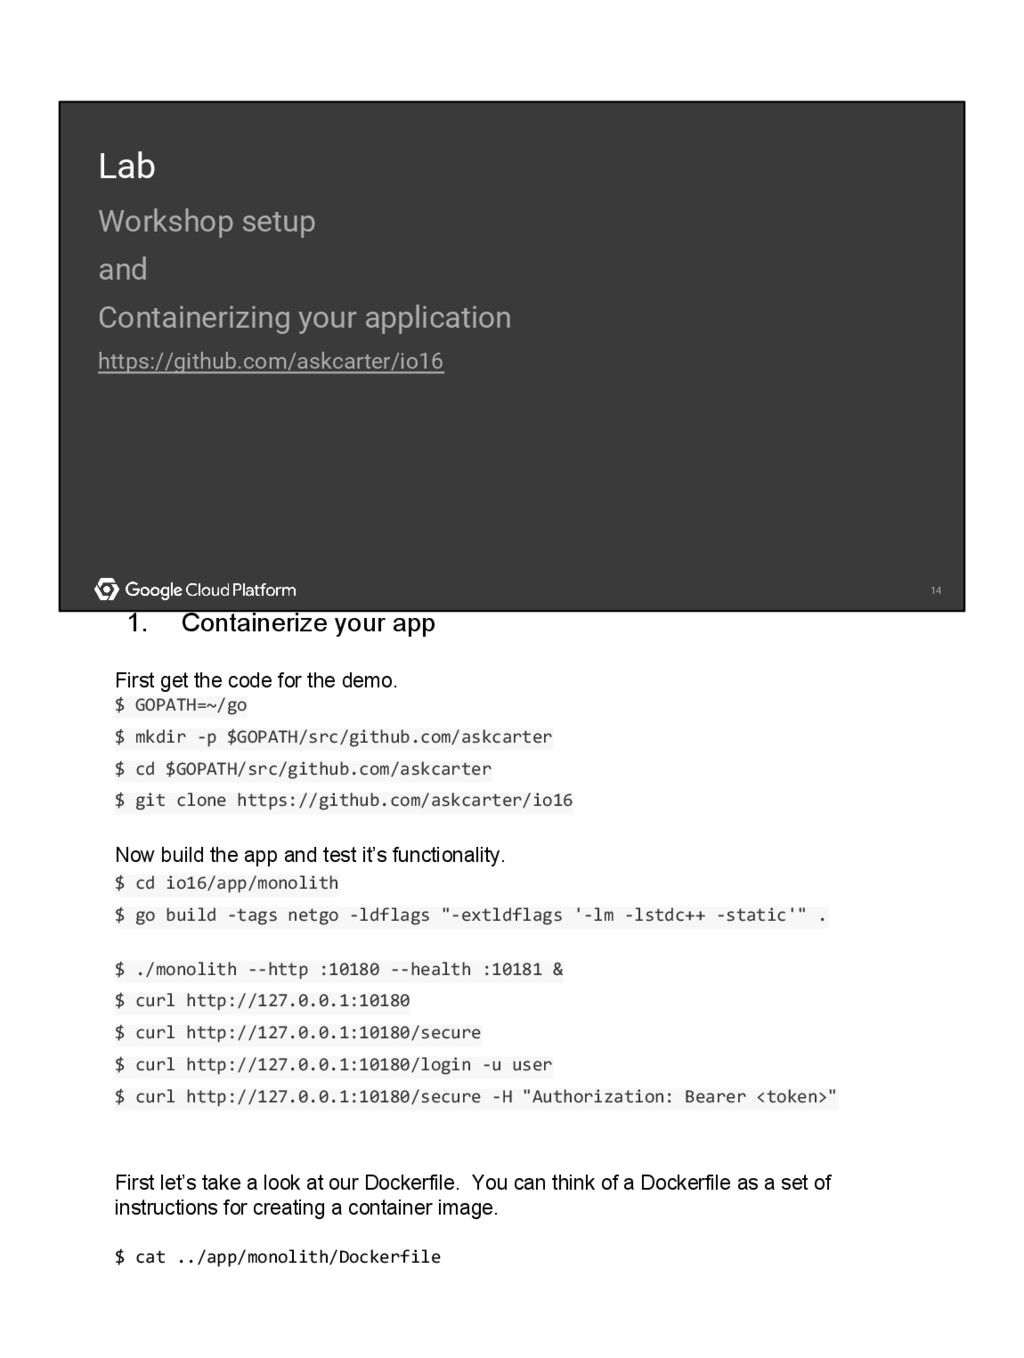
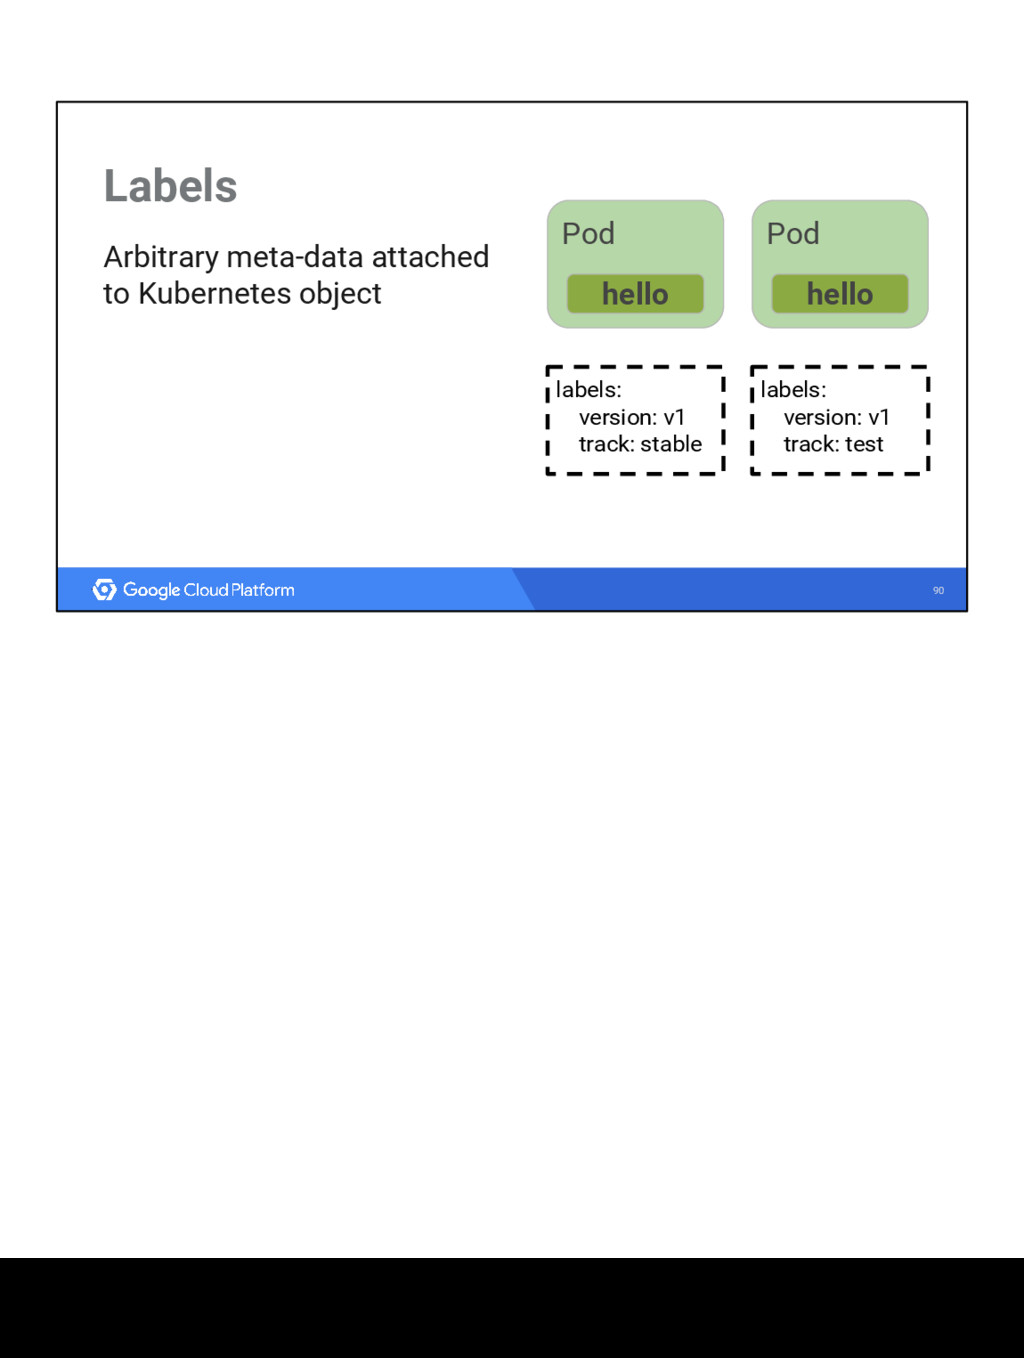
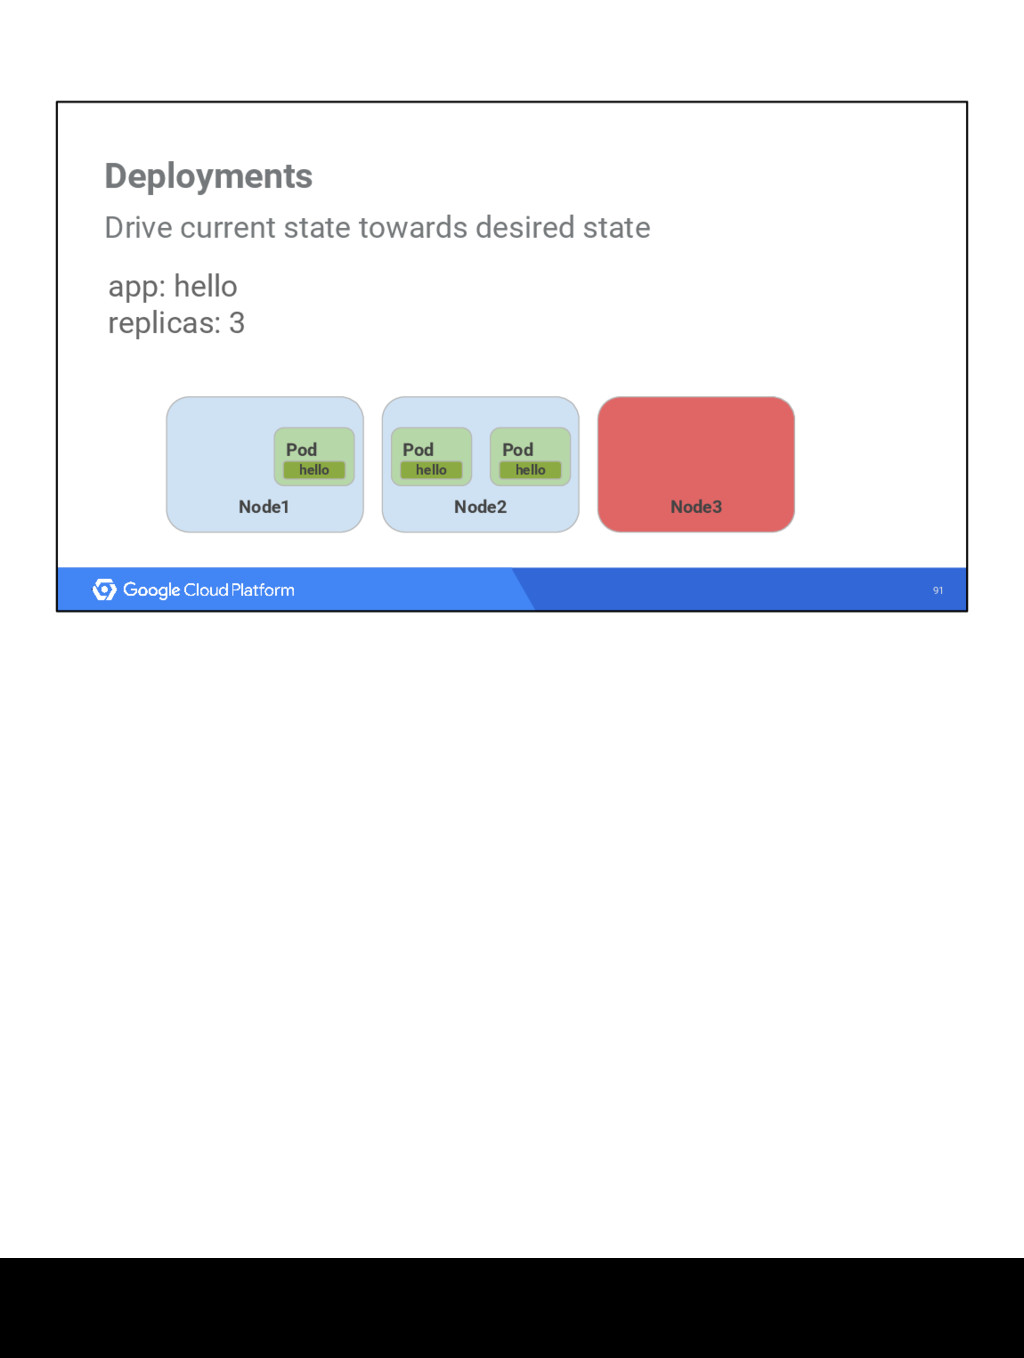
What is Kubernetes 101?
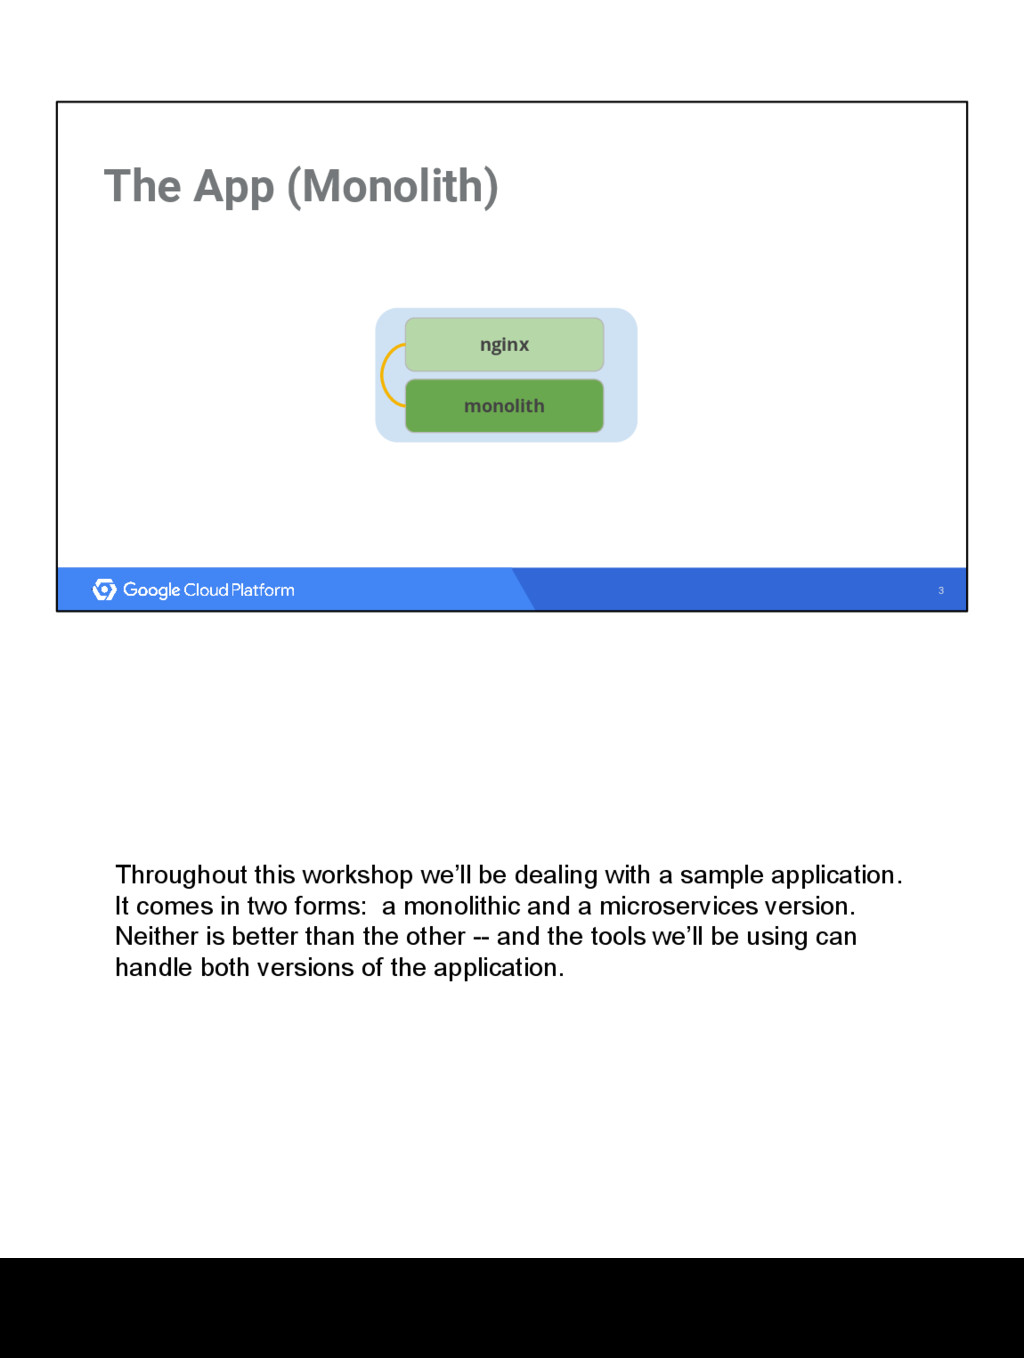
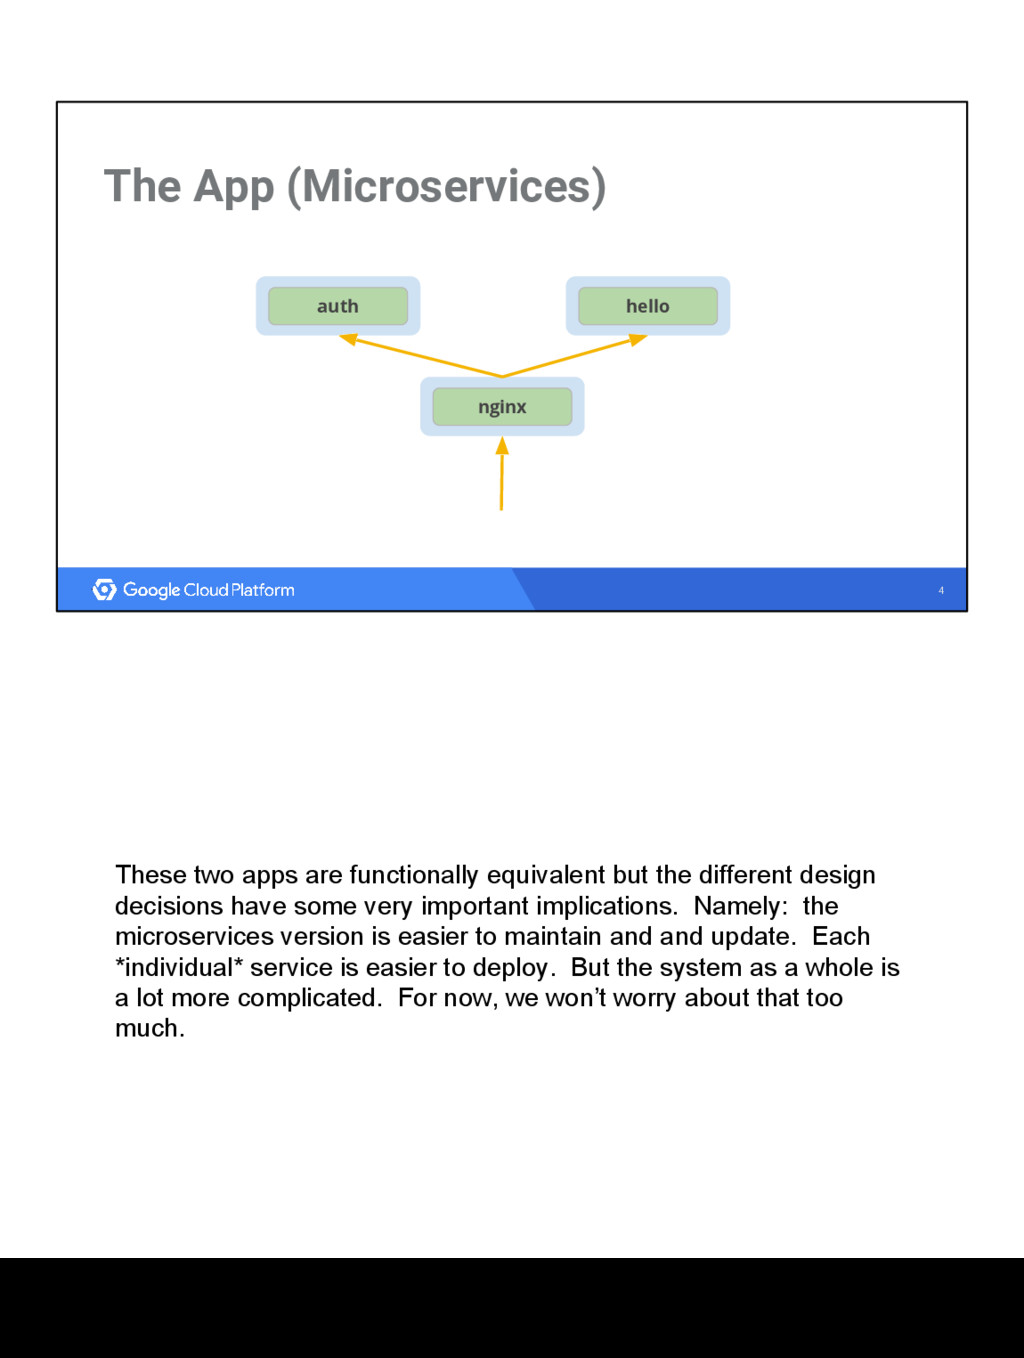
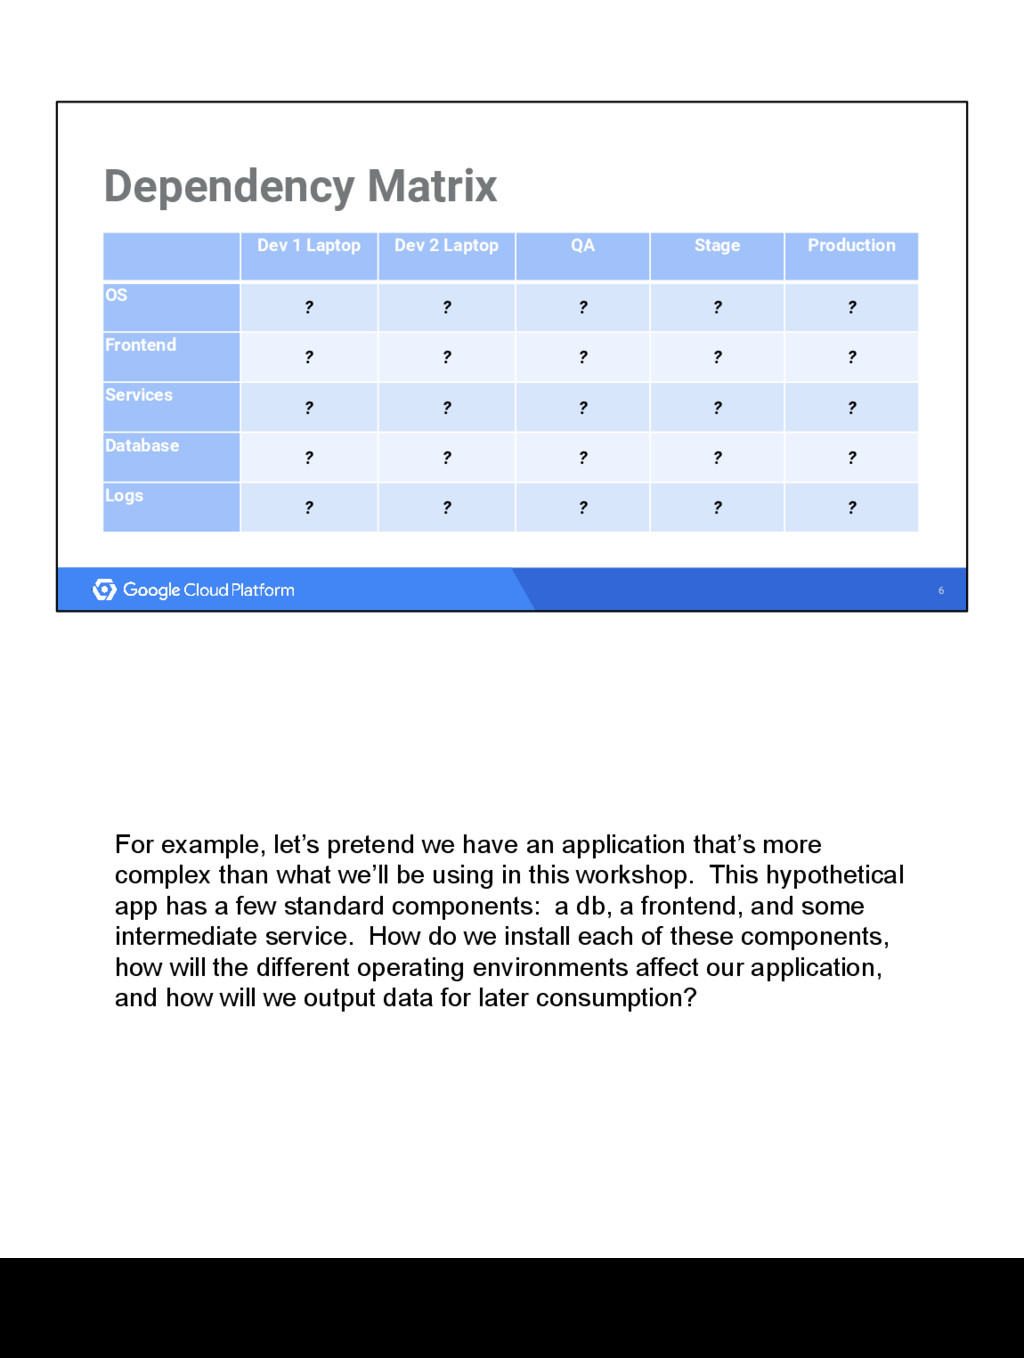
How do I manage application at scale? That’s a common question facing developers today and this code lab helps to make sense of the ever changing scalable app landscape. We'll use Docker and Kubernetes to deploy, scale, and manage a microservices based application in this workshop.

Carter Morgan

August 04, 2016
Tweet

More Decks by Carter Morgan

Other Decks in Technology

Transcript

  1. Kubernetes 101 Workshop
    Workshop setup:
    https://github.com/kelseyhightower/craft-kubernetes-workshop

    View Slide

  2. 2
    2
    What’s in this for you...
    Going to learn how to clear the three hurdles of designing scalable
    applications:
    1. The app (how to build, package, and distribute it)
    2. The infra (how you manage the complexities that come with
    scalable application)
    3. The wild (how you deal with living, evolving code in production)
    We’ll be using industry standard tooling: Docker and Kubernetes to
    show this.

    View Slide

  3. 3
    The App (Monolith)
    nginx
    monolith
    Throughout this workshop we’ll be dealing with a sample application.
    It comes in two forms: a monolithic and a microservices version.
    Neither is better than the other -- and the tools we’ll be using can
    handle both versions of the application.

    View Slide

  4. 4
    The App (Microservices)
    nginx
    hello
    auth
    These two apps are functionally equivalent but the different design
    decisions have some very important implications. Namely: the
    microservices version is easier to maintain and and update. Each
    *individual* service is easier to deploy. But the system as a whole is
    a lot more complicated. For now, we won’t worry about that too
    much.

    View Slide

  5. 5
    5
    Packaging and Distributing Apps
    Who is familiar with containers? Who is experimenting with them?
    Anybody using them in production?
    Containers were developed to be a lightweight solution to the
    problem of application isolation, security, and portability.

    View Slide

  6. 6
    Dependency Matrix
    Dev 1 Laptop Dev 2 Laptop QA Stage Production
    OS
    ? ? ? ? ?
    Frontend
    ? ? ? ? ?
    Services
    ? ? ? ? ?
    Database
    ? ? ? ? ?
    Logs
    ? ? ? ? ?
    For example, let’s pretend we have an application that’s more
    complex than what we’ll be using in this workshop. This hypothetical
    app has a few standard components: a db, a frontend, and some
    intermediate service. How do we install each of these components,
    how will the different operating environments affect our application,
    and how will we output data for later consumption?

    View Slide

  7. 7
    Dependency Matrix
    Dev 1 Laptop Dev 2 Laptop QA Stage Production
    OS
    OS X Windows Debian Debian Debian
    Frontend nginx
    (homebrew)
    nginx
    (download)
    nginx
    (apt-get)
    nginx
    (apt-get)
    nginx
    (apt-get)
    Services php
    (homebrew)
    php
    (download)
    php
    (apt-get)
    php
    (apt-get)
    php
    (apt-get)
    Database mysql
    (download)
    mysql
    (download)
    mysql
    (apt-get)
    mysql
    (apt-get)
    mysql
    (apt-get)
    Logs
    /usr/local/etc/nginx/logs/ C:\nginx-1.9.5\logs /var/log/nginx/ /var/log/nginx/ /var/log/nginx/
    Look at all of the different combinations! Managing this is complex --
    and leads to the “It works on my machine” syndrome. What if two
    instances of our database (which we downloaded and installed
    manually or with apt-get) use different versions? What if those
    versions depend on different core libraries? What if Dev 1 Laptop
    has different runtime libs installed than our Production
    machines?
    This leads to flaky, non-repeatable deployments.
    To combat this dependency hell, application isolation technologies
    were developed.

    View Slide

  8. 8
    Virtual Machines
    Hypervisor
    OS OS
    OS
    We already solved this problems. It’s called a VM.
    VM’s have their own OS, and their own carved out resources.
    But under a VM we are basically carving up resources onto smaller
    machines. So if a VM isn’t using all of their allocated memory, it’s just
    idle, you can’t move it around.
    And you can overcommit resources, but immediately after telling you
    that you can do this, any VM expert will then warn you about not
    doing it.
    And since we’re loading an OS it takes a long time to get started.
    To summarize: VMs give you *some* isolation, but they’re
    inefficient, highly coupled to the guest OS, and hard to manage. We
    can do better.

    View Slide

  9. ‹#›
    @kubernetesio
    It’s as if, upon running out of room in our laptop bag, we
    decide, aw hell, I’ll just strap a handle on an oil drum and put
    everything in there.
    I mean it works, It’s can store your stuff, but it’s heavy, slow
    and perhaps there is a better way .

    View Slide

  10. 10
    Container Host
    OS
    Containers
    Containers on the other hand share the same kernel, so that you can
    share resources as you need them.
    Containers share the same operating system kernel
    Container images are stateless and contain all
    dependencies
    ▪ static, portable binaries
    ▪ constructed from layered filesystems
    Containers provide isolation (from each other and from the
    host)
    Resources (CPU, RAM, Disk, etc.)
    Users
    Filesystem
    Network
    Containers solve a lot of the problems with VMs and they are a
    fundamentally different way of deploying and managing your
    applications.

    View Slide

  11. And you can spin up very fast. Now this does mean I for the most
    part can only use Linux. But is this a problem?

    View Slide

  12. 12
    Docker Containers
    FROM alpine:3.1
    MAINTAINER Carter Morgan
    ADD monolith /usr/bin/monolith
    ENTRYPOINT ["monolith"]
    What is Docker?
    What’s a Dockerfile?
    Note -- we’re using the alpine base image (considered something of
    a best practice) -- this way we’re not pulling in unnecessary runtime
    but we still have basic debugging features.
    Note -- This dockerfile is simple. That’s because we’re using docker
    for what it’s really good at -- packaging and distributing applications.
    For building, we’re going to build our application in CI (or in this
    workshop manually) and pull in that build artifact when we create our
    image. This helps keep images very small.

    View Slide

  13. 13
    Dependency Matrix
    Dev 1 Laptop Dev 2 Laptop QA Stage Production
    OS
    Frontend
    Services
    Database
    Logs
    So, what do container give us (in this case we’re using Docker
    containers)? We no longer have to worry about which operating
    environment our containers are running in. For the most part,
    versions aren’t as important either (assuming APIs and functionality
    don’t change). This is because each part of our stack is bundling its
    own dependencies.

    View Slide

  14. 14
    14
    Lab
    Workshop setup
    and
    Containerizing your application
    https://github.com/askcarter/io16
    1. Containerize your app
    First get the code for the demo.
    $ GOPATH=~/go
    $ mkdir -p $GOPATH/src/github.com/askcarter
    $ cd $GOPATH/src/github.com/askcarter
    $ git clone https://github.com/askcarter/io16
    Now build the app and test it’s functionality.
    $ cd io16/app/monolith
    $ go build -tags netgo -ldflags "-extldflags '-lm -lstdc++ -static'" .
    $ ./monolith --http :10180 --health :10181 &
    $ curl http://127.0.0.1:10180
    $ curl http://127.0.0.1:10180/secure
    $ curl http://127.0.0.1:10180/login -u user
    $ curl http://127.0.0.1:10180/secure -H "Authorization: Bearer "
    First let’s take a look at our Dockerfile. You can think of a Dockerfile as a set of
    instructions for creating a container image.
    $ cat ../app/monolith/Dockerfile

    View Slide

  15. From alpine:3.1
    MAINTAINER Carter Morgan
    ADD monolith /usr/bin/monolith
    ENTRYPOINT [“monolith”]
    Ok, this gives us an a pretty small image -- something a lot of people get wrong with
    Docker images.
    $ docker build -t askcarter/monolith:1.0.0 .
    $ docker push askcarter/monolith:1.0.0
    $ docker run -d askcarter/monolith:1.0.0
    $ docker ps
    $ docker inspect
    $ curl http://
    $ docker rm
    $ docker rmi askcarter/monolith:1.0.0

    View Slide

  16. 16
    16
    But that's just one machine!
    Discovery
    Scaling
    Security
    Monitoring Configuration
    Scheduling
    Health
    It turns out that packaging and distributing is just a small part to
    managing applications at scale.
    We need to know that our container are up and running. If they’re
    not we need to restart them. We need to be able to access
    containers when they come online. We need containers to be able
    to talk to each other. We need a safe and secure way to handle
    sensitive data. And more...
    Isolation: Keep jobs from interfering with each other
    Scheduling: Where should my job be run?
    Lifecycle: Keep my job running
    Discovery: Where is my job now?
    Constituency: Who is part of my job?
    Scale-up: Making my jobs bigger or smaller
    Auth{n,z}: Who can do things to my job?
    Monitoring: What’s happening with my job?
    Health: How is my job feeling?
    That’s a lot of complexity.

    View Slide

  17. 17
    Kubernetes
    Manage applications, not machines
    Open source, open API container
    orchestrator
    Supports multiple cloud and bare-metal
    environments
    Inspired and informed by Google’s
    experiences and internal systems
    What we need is a system to handle that complexity for us -- without
    locking us into any one vendor or way of doing things.
    Which leads us to Kubernetes.
    Kubernetes is an open source project container automation
    framework. It’s completely open source -- so you can go look at the
    code running your containers or even contribute to it. Kubernetes
    provides an open, pluggable API that can work with containers
    across multiple cloud providers. This means that as your
    applications grow, kubernetes help you manage that application (at
    scale) while still providing portability and options in case you need it.
    Kubernetes is based on learnings from how Google itself has been
    running applications and containers, internally. These learnings
    have given rise to new primitives, new ways of looking at
    orchestrating the cloud in order to abstract away the underlying

    View Slide

  18. machines.
    So that you can Manage applications, not machines

    View Slide

  19. 19
    19
    Kubernetes Concepts
    Cattle > Pets
    No grouping
    Modular
    Control Loops
    Network-centric
    Open > Closed
    Simple > Complex
    Legacy
    compatible
    Let’s explain how Kubernetes works. Let’s start with some of the
    concepts that underpin K8s
    Declarative > imperative: State your desired results, let the system
    actuate
    Control loops: Observe, rectify, repeat
    Simple > Complex: Try to do as little as possible
    Modularity: Components, interfaces, & plugins
    Legacy compatible: Requiring apps to change is a non-starter
    Network-centric: IP addresses are cheap
    No grouping: Labels are the only groups
    Bulk > hand-crafted: Manage your workload in bulk
    Open > Closed: Open Source, standards, REST, JSON, etc.

    View Slide

  20. 20
    20
    Cattle vs Pets
    Who is familiar with containers? Who is experimenting with them?
    Anybody using them in production?
    Containers were developed to be a lightweight solution to the
    problem of application isolation, security, and portability.

    View Slide

  21. 21
    Cattle vs Pets
    Cattle
    • Has a number
    • One is much like any other
    • Run as a group
    • If it gets ill, you make hamburgers
    Pet
    • Has a name
    • Is unique or rare
    • Personal Attention
    • If it gets ill, you make it better
    And you can see the obvious analogies to servers here. We’ve been
    woken up to deal with a sick pet-server. We’ve all been really proud
    of ourselve when we’ve figured out that we needed 12 of this type of
    machine, so we named them after the zodiac. It’s okay. We’ve all
    done it. It’s understandable.

    View Slide

  22. 22
    22
    Desired State
    One of the core concepts of Kubernetes - Desired State. Tell
    Kubernetes what you want, not what to do.

    View Slide

  23. 23
    Desired States
    ./create_docker_images.sh
    ./launch_frontend.sh x 3
    ./launch_services.sh x 2
    ./launch_backend.sh x 1
    Under an imperative system, you have a series of tasks. Create
    images, 3 frontends, create 2 services, etc.

    View Slide

  24. 24
    Desired States
    ./create_docker_images.sh
    ./launch_frontend.sh x 3
    ./launch_services.sh x 2
    ./launch_backend.sh x 1
    If something dies, something has to react. Under your worst case it’s
    an admin that has to react. Maybe you have something automated.

    View Slide

  25. 25
    Desired States
    There should be:
    3 Frontends
    2 Services
    1 Backend
    Under a desired state, you just say this is what I want, 3, 2, 1.
    Then if something blows up, you’re no longer in the desired state, so
    Kubernetes will fix it.

    View Slide

  26. 26
    26
    Employees, not Children
    One of the core concepts of Kubernetes - Desired State. Tell
    Kubernetes what you want, not what to do.

    View Slide

  27. 27
    Children vs Employees
    Child
    • Go upstairs
    • Get undressed
    • Put on pajamas
    • Brush your teeth
    • Pick out 2 stories
    Employee
    • Go get some sleep
    So you tell an employee or co-worker to go home and get some
    sleep, and that’s all you have to do. But you have to tell child
    everything in this rote set of steps. And those of you who don’t have
    children might be wondering, do you really have to tell them to go
    upstairs? YES otherwise you end up with a naked child in your living
    room.
    And this is like just sequential scripts. If you miss a key step you end
    up seeing things you wish you hadn’t.

    View Slide

  28. 28
    28
    Quick Kubernetes Demo
    This isn’t in any of the labs (stress that this is the imperative way to
    run kubernetes):
    Provision a cluster to work with. This step takes time (you’ll probably
    have already provisioned a cluster before the workshop).
    $ gcloud container clusters create work --num-nodes=6
    Run our docker image from before.
    $ kubectl run monolith --image askcarter/monolith:1.0.0
    Expose it to the world so we can interact with it. The external
    LoadBalancer will take ~1m to provision.
    $ kubectl expose deployment monolith --port 80 --type LoadBalancer
    Scale it up. (See how easy this is?)
    $ kubectl scale deployment monolith --replicas 7

    View Slide

  29. Interact with our app.
    $ kubectl get service monolith
    $ curl http://
    Clean up.
    $ kubectl delete services monolith
    $ kubectl delete deployment monolith

    View Slide

  30. 30
    30
    Pods

    View Slide

  31. 31
    Pods
    Logical Application
    • One or more containers
    and volumes
    • Shared namespaces
    • One IP per pod
    Pod
    nginx
    monolith
    NFS
    iSCSI
    GCE
    10.10.1.100
    A pod is the unit of scheduling in Kubernetes. It is a resource
    envelope in which one or more containers run. Containers that are
    part of the same pod are guaranteed to be scheduled together onto
    the same machine, and can share state via local volumes.
    Kubernetes is able to give every pod and service its own IP address.
    This removes the infrastructure complexity of managing ports, and
    allows developers to choose any ports they want rather than
    requiring their software to adapt to the ones chosen by the
    infrastructure. The latter point is crucial for making it easy to run
    off-the-shelf open-source applications on Kubernetes--pods can be
    treated much like VMs or physical hosts, with access to the full port
    space, oblivious to the fact that they may be sharing the same
    physical machine with other pods.

    View Slide

  32. 32
    32
    Lab
    Creating and managing pods
    https://github.com/kelseyhightower/craft-kubernetes-workshop

    View Slide

  33. 33
    33
    Health checks
    With containers in production, it’s not enough to know that a
    container is running. We need to know that the application inside of
    the container is functioning. To that end, Kubernetes allows for user
    defined health and readiness checks.
    Passing a readiness check tells Kubernetes that a pod is available to
    receive traffic. If it fails the readiness probes, Kubernetes will stop
    sending it traffic.
    Liveness checks on the other hand are used to tell Kubernetes when
    to restart a pod. If a pod fails three liveness checks that signifies
    that the app is malfunctioning and kubernetes will restart it. Let’s see
    a liveness check in action.

    View Slide

  34. 34
    Monitoring and Health Checks
    Node
    Kubelet Pod
    Pod
    app v1
    On every node is a daemon called a Kubelet. One of the Kubelet’s
    jobs is to ensure that pods are healthy.

    View Slide

  35. 35
    Monitoring and Health Checks
    Hey, app v1... You alive?
    Node
    Kubelet Pod
    app v1
    app v1
    Kubelets do this by sending out a probe that pods respond to.

    View Slide

  36. 36
    Monitoring and Health Checks
    Node
    Kubelet Nope!
    Pod
    app v1
    app v1
    If the Kubelet gets back multiple bad responses

    View Slide

  37. 37
    Monitoring and Health Checks
    OK, then I’m going to restart you...
    Node
    Kubelet Pod
    app v1
    app v1
    It restarts the Pod.

    View Slide

  38. 38
    Monitoring and Health Checks
    Node
    Kubelet Pod

    View Slide

  39. 39
    Monitoring and Health Checks
    Node
    Kubelet Pod
    app v1

    View Slide

  40. 40
    Monitoring and Health Checks
    Node
    Kubelet
    Hey, app v1... You alive?
    Pod
    app v1
    This cycle then starts all over again.

    View Slide

  41. 41
    Monitoring and Health Checks
    Node
    Kubelet Yes!
    Pod
    app v1
    And, hopefully, this time the app is functioning properly.

    View Slide

  42. 42
    42
    Lab
    Monitoring and health checks
    https://github.com/kelseyhightower/craft-kubernetes-workshop

    View Slide

  43. 43
    43
    Secrets
    So it would be nice not to have to bake sensitive credentials directly
    into our code or configuration. But as some point you have to.
    Secrets allows you to do it once, and not have do a lot of tap dancing
    to make it work.
    Secrets allow you to mount sensitive data as either a file in a volume,
    or directly into environment variables.
    The next few slides show an example of this. (We’ll be talking about
    secrets -- but a related concept, ConfigMaps, work similarly.)

    View Slide

  44. 44
    Secrets and Configmaps
    Kubernetes Master
    etcd
    API
    Server
    Node
    Kubelet
    secret
    $ kubectl create secret generic tls-certs --from-file=tls/
    Step 1: We use the `kubectl create secret` command to create our
    secret and let the Kubernetes API server now about it.

    View Slide

  45. 45
    Secrets and Configmaps
    Kubernetes Master
    etcd
    API
    Server
    Node
    Kubelet
    pod
    $ kubectl create -f pods/secure-monolith.yaml
    Step 2: Create a pod that references that secret. This reference
    lives in the Pod’s manifest (json or yaml) file under the Volumes
    entry.

    View Slide

  46. 46
    Secrets and Configmaps
    Kubernetes Master
    etcd
    API
    Server
    Node
    Kubelet
    API
    Server
    Node
    Kubelet Pod
    Pod
    Step 3: Kubernetes starts creating the pod

    View Slide

  47. 47
    Secrets and Configmaps
    Kubernetes Master
    etcd
    API
    Server
    Node
    Kubelet
    API
    Server
    Node
    Kubelet Pod
    Pod
    secret
    Step 3 (continued): The secret gets volume get loaded into the Pod.

    View Slide

  48. 48
    Secrets and Configmaps
    Kubernetes Master
    etcd
    API
    Server
    Node
    Kubelet
    API
    Server
    Node
    Kubelet Pod
    Pod
    /etc/tls
    secret
    Step 3 (continued): The secret volume gets mounted into the Pod
    contianer’s file system.

    View Slide

  49. 49
    Secrets and Configmaps
    Kubernetes Master
    etcd
    API
    Server
    Node
    Kubelet
    Node
    Kubelet Pod
    Pod
    /etc/tls
    /etc/tls
    10.10.1.100
    secret
    API
    Server
    Step 3 (continued): The pod is assigned an IP address.

    View Slide

  50. 50
    Secrets and Configmaps
    Kubernetes Master
    etcd
    API
    Server
    Node
    Kubelet
    API
    Server
    Node
    Kubelet Pod
    Pod
    /etc/tls
    nginx
    10.10.1.100
    secret
    Step 3 (continued): Finally, the Pod’s contianer is started.
    As you can see from this process -- the secrets (and config data if
    you’re using a ConfigMap) are available for the Pod’s containers
    *before* they are started. Kubernetes handles all of this for you.

    View Slide

  51. 51
    51
    Lab
    Managing application configurations and secrets
    https://github.com/kelseyhightower/craft-kubernetes-workshop

    View Slide

  52. 52
    52
    Services

    View Slide

  53. 53
    Services
    Pod
    hello
    Service
    Pod
    hello
    Pod
    hello
    Okay, so we’ve been talking about how containers are cattle, and we
    don’t care about them. But at some level we do. We don’t care
    which Pod serves up a particular request, but we have to get one of
    them to do it. How do we map this thing we don’t have a lot of
    regard for, to something we do - services.
    Services denote names we give to certain collection of pods so that
    we can map frontend-deployment-715099486-dj49s to frontend
    request.
    Kubernetes supports naming and load balancing using the service
    abstraction: a service has a name and maps to a dynamic set of
    pods defined by a label selector. Any container in the cluster can
    connect to the service using the service name. Under the covers,
    Kubernetes automatically load-balances connections to the service
    among the pods that match the label selector, and keeps track of
    where the pods are running as they get rescheduled over time due to
    failures.

    View Slide

  54. 54
    Services
    Persistent Endpoint for Pods
    Pod
    hello
    Service
    Pod
    hello
    Pod
    hello

    View Slide

  55. 55
    Persistent Endpoint for Pods
    • Use Labels to
    Select Pods
    Services
    Pod
    hello
    Service
    Pod
    hello
    Pod
    hello
    How do we do this? Labels.
    Labels are arbitrary key-value pairs that we can add to any pod.

    View Slide

  56. 56
    Labels
    Arbitrary meta-data attached
    to Kubernetes object
    Pod
    hello
    Pod
    hello
    labels:
    version: v1
    track: stable
    labels:
    version: v1
    track: test
    Let’s talk about labels for a second. This is how Kubernetes does
    grouping.
    Kubernetes supports labels which are arbitrary key/value pairs that
    users attach to pods (and in fact to any object in the system). Users
    can use additional labels to tag the service name, service instance
    (production, staging, test), and in general, any subset of their pods. A
    label query (called a “label selector”) is used to select which set of
    pods an operation should be applied to. Taken together, labels and
    deployments allow for very flexible update semantics.

    View Slide

  57. 57
    Labels
    selector: “version=v1”
    Pod
    hello
    Pod
    hello
    labels:
    version: v1
    track: stable
    labels:
    version: v1
    track: test

    View Slide

  58. 58
    Labels
    selector: “track=stable”
    Pod
    hello
    Pod
    hello
    labels:
    version: v1
    track: stable
    labels:
    version: v1
    track: test

    View Slide

  59. 59
    Services
    Persistent Endpoint for Pods
    • Use Labels to
    Select Pods
    • Internal or
    External IPs Pod
    hello
    Service
    Pod
    hello
    Pod
    hello
    By default, Kubernetes objects are only reachable from within their
    cluster -- these services are of type ClusterIP by default. This
    applies to services, as well. But Services also support externally
    visible IP addresses as well. As of the time of this writing, there are
    two external types: LoadBalancer and NodePort. A service of type
    LoadBalancer will round robin traffic to all of it’s targetted pods (like
    in the slide on screen). A service of type NodePort will open use the
    node’s IP address and a port given by the service to open up a
    communication pathway with your app.

    View Slide

  60. 60
    60
    Lab
    Creating and managing services
    https://github.com/kelseyhightower/craft-kubernetes-workshop

    View Slide

  61. 61
    61
    Deployments

    View Slide

  62. 62
    Drive current state towards desired state
    Deployments
    Node1 Node2 Node3
    Pod
    hello
    app: hello
    replicas: 1
    Until now, we haven’t really talked about machines. In my opinion,
    that’s one of the great things about Kubernetes -- it lets you focus on
    what really matters: the application. But, applications (or Pods in
    Kuberntes lingo) have to run on machines. You saw before that
    when we launched a Pod, Kubernetes assigned it to a machine (or
    Node in Kubernetes lingo) for us. Still, it would be nice if we didn’t
    have to launch Pods directly.
    To that end, Kubernetes gives us another structure called
    “Deployments”. Deployments understand “desired state”. Ie, we
    specify how many replicas we want of our application and a
    deployment will actively monitor our pods and make sure we always
    have enough running.
    On screen we have three Nodes and one Pod. Since we’ve only
    specified that we want one of our Pods running, all is good in the
    world.

    View Slide

  63. 63
    Drive current state towards desired state
    Deployments
    Node1 Node2 Node3
    Pod
    hello
    app: hello
    replicas: 3
    If we were to specify that we want 3 versions of our app running
    (possibly using `kubectl apply`), the Deployment would notice that
    our desired state doesn’t match our current state and work to rectify
    the problem.

    View Slide

  64. 64
    Drive current state towards desired state
    Deployments
    Node1 Node2 Node3
    Pod
    hello
    app: hello
    replicas: 3
    Pod
    hello
    Pod
    hello

    View Slide

  65. 65
    Drive current state towards desired state
    Deployments
    Node1 Node2 Node3
    Pod
    hello
    app: hello
    replicas: 3
    Pod
    hello
    If a Pod we’re to disappear for any reason (such as in the example
    above, where a Node went down, taking the Pod with it), the
    deployment would notice that and try to schedule a new Pod on one
    of the available machines.

    View Slide

  66. 66
    Drive current state towards desired state
    Deployments
    Node1 Node2 Node3
    Pod
    hello
    app: hello
    replicas: 3
    Pod
    hello
    Pod
    hello

    View Slide

  67. 67
    67
    Lab
    Creating and managing deployments
    https://github.com/kelseyhightower/craft-kubernetes-workshop

    View Slide

  68. 68
    68
    Rolling Updates

    View Slide

  69. 69
    Rolling Update
    Node1 Node3
    Node2
    ghost
    Pod
    app v1
    Service
    ghost
    Pod
    app v1
    Pod
    app v1
    So it happened - the code has changed. Now what do we do? We
    update it.
    When it comes to deploying code, we want to avoid downtime at all
    costs. We want to be able to cautiously rollout changes and, if
    necessary, be able to quickly roll back to a working state. Some
    design patterns in the space have evolved: namely Blue/Green and
    Canary deployments. Kubernetes can handle both but let’s take a
    second to see the built-in RollingUpdate strategy of
    Deployments.
    RollingUpdates allow us to rollout a new version of a Pod, while
    keeping the old version around. As we are scaling up the new
    version of our Pods, *both* will still be getting traffic. This allows us
    to cautiously test that the new version works as expected. And, if it
    doesn’t, we can stop the update and rollback to the version we had
    before.
    The next couple of slides show this in action.

    View Slide

  70. 70
    Rolling Update
    Node1 Node3
    Node2
    ghost
    Pod
    app v1
    Service
    ghost
    Pod
    app v1
    Pod
    app v1
    Pod
    app v2
    First we create a new version of our Pod.

    View Slide

  71. 71
    Rolling Update
    Node1 Node3
    Node2
    ghost
    Pod
    app v1
    Service
    ghost
    Pod
    app v1
    Pod
    app v1
    Pod
    app v2
    The the Service pics it up and start routing traffic to the new Pod.

    View Slide

  72. 72
    Rolling Update
    Node1 Node3
    Node2
    ghost
    Pod
    app v1
    Service
    ghost
    Pod
    app v1
    Pod
    app v1
    Pod
    app v2
    The we unhook on of the old Pods.

    View Slide

  73. 73
    Rolling Update
    Node1 Node3
    Node2
    Service
    ghost
    Pod
    app v1
    Pod
    app v1
    Pod
    app v2
    Finally, we get rid of it.

    View Slide

  74. 74
    Rolling Update
    Node1 Node3
    Node2
    Service
    ghost
    Pod
    app v1
    Pod
    app v1
    Pod
    app v2
    Pod
    app v2
    This cycle continues until we’re left with just the desired amount of
    Pods (all of which will be of our new version).

    View Slide

  75. 75
    Rolling Update
    Node1 Node3
    Node2
    Service
    ghost
    Pod
    app v1
    Pod
    app v1
    Pod
    app v2
    Pod
    app v2

    View Slide

  76. 76
    Rolling Update
    Node1 Node3
    Node2
    Service
    ghost
    Pod
    app v1
    Pod
    app v1
    Pod
    app v2
    Pod
    app v2

    View Slide

  77. 77
    Rolling Update
    Node1 Node3
    Node2
    Service
    Pod
    app v1
    Pod
    app v2
    Pod
    app v2

    View Slide

  78. 78
    Rolling Update
    Node1 Node3
    Node2
    Service
    Pod
    app v1
    Pod
    app v2
    Pod
    app v2
    Pod
    app v2

    View Slide

  79. 79
    Rolling Update
    Node1 Node3
    Node2
    Service
    Pod
    app v1
    Pod
    app v2
    Pod
    app v2
    Pod
    app v2

    View Slide

  80. 80
    Rolling Update
    Node1 Node3
    Node2
    Service
    Pod
    app v1
    Pod
    app v2
    Pod
    app v2
    Pod
    app v2

    View Slide

  81. 81
    Rolling Update
    Node1 Node3
    Node2
    Service
    Pod
    app v2
    Pod
    app v2
    Pod
    app v2

    View Slide

  82. 82
    82
    Lab
    Rolling out updates
    https://github.com/kelseyhightower/craft-kubernetes-workshop

    View Slide

  83. 83
    83
    Recap
    We addressed the three hurdles of designing scalable
    applications:
    1. The app (how to build, package, and distribute it): use
    containers!
    2. The infra (how you manage the complexities that come with
    scalable application): use an automation framework like K8s
    3. The wild (how you deal with living, evolving code in production):
    rolling updates, canaries, or Blue/Green deployments.
    Kubernetes gives you a production level stregth and flexibility for
    overcoming every hurdle. Let’s recap.

    View Slide

  84. 84
    Kubernetes
    Manage applications, not machines
    Open source, Open API container
    orchestrator
    Supports multiple cloud and bare-metal
    environments
    Inspired and informed by Google’s
    experiences and internal systems

    View Slide

  85. 85
    Container
    • Subatomic unit in
    Kubernetes
    • Can use Dockerfile just like
    you’re used to

    View Slide

  86. 86
    Pods
    Logical Application
    • One or more containers
    and volumes
    • Shared namespaces
    • One IP per pod
    Pod
    nginx
    monolith
    NFS
    iSCSI
    GCE
    10.10.1.100

    View Slide

  87. 87
    Monitoring and Health Checks
    Hey, app v1... You alive?
    Node
    Kubelet Pod
    app v1
    app v1

    View Slide

  88. 88
    Secrets and Configmaps
    Kubernetes Master
    etcd
    API
    Server
    Node
    Kubelet
    secret
    $ kubectl create secret generic tls-certs --from-file=tls/

    View Slide

  89. 89
    Services
    Persistent Endpoint for Pods
    • Use Labels to
    Select Pods
    • Internal or
    External IPs Pod
    hello
    Service
    Pod
    hello
    Pod
    hello

    View Slide

  90. 90
    Labels
    Arbitrary meta-data attached
    to Kubernetes object
    Pod
    hello
    Pod
    hello
    labels:
    version: v1
    track: stable
    labels:
    version: v1
    track: test

    View Slide

  91. 91
    Drive current state towards desired state
    Deployments
    Node1 Node2 Node3
    Pod
    hello
    app: hello
    replicas: 3
    Pod
    hello
    Pod
    hello

    View Slide

  92. 92
    Rolling Update
    Node1 Node3
    Node2
    ghost
    Pod
    app v1
    Service
    ghost
    Pod
    app v1
    Pod
    app v1
    Pod
    app v2

    View Slide

  93. 93
    But wait there’s more.
    • Persistent disks
    • Logging & Monitoring
    • Node & Pod Autoscaling
    • Web UI
    • Jobs & Daemon Sets
    • Cluster Federation
    • Ingress
    Kubernetes is a large complicated thing. There’s more that it can do
    than we went through here. We invite you to explore these things as
    you go forward with Kubernetes.
    Persistent Disk: Long lived storage
    Logging and Monitoring:
    Horizontal Pod Autoscaling:
    Vertical Node Autoscaling:
    Web UI:
    Jobs:
    Pet Sets:
    Daemon Sets:
    Cluster Federation:
    Ingress (L7 networking):

    View Slide

  94. 94
    Scalable Microservices with Kubernetes
    https://www.udacity.com/course/scalable-microservices-with-kubernetes--ud615
    If you want a more in-depth overview (plus extra goodies like
    interviews with the former Cloud Architect of Netflix, Adrian
    Cockcroft, and code walkthrough’s from Google’s Kelsey Hightower),
    go check out Udacity and Google’s free Kubernetes course:
    Scalable Microservices with Kubernetes.
    (The trailer is embedded in the slide -- feel free to play it.)

    View Slide

  95. Thank you!

    View Slide