Upgrade to Pro — share decks privately, control downloads, hide ads and more …

Pixel Punching PHP

Pixel Punching PHP

Doing common image editing tasks in PHP, showing how to do them in both GD and Imagick.

Bob Majdak Jr

June 12, 2012
Tweet

More Decks by Bob Majdak Jr

Other Decks in Programming

Transcript

  1. Introduction  Working with pictures is a must anymore to

    complete the whole social experience of the internet.  You will not memorize the API’s tonight. There are too many and they are full of weird.  Hopefully you get a feeling of knowing what you can/cannot do easy and know where to look to implement further.
  2. PHP Graphic Library Overview  GD  Imagick  GMagick

     Ignored because it is [just] a fork of Imagick with the design principles of never advancing API’s for sake of backwards compat. A noble goal but...  Could not find a working Windows build anyway.  Cairo  Vector graphics, neato stuff, but...  Not enough actual filled out documentation, so I haven’t really used it and I'd sound like a retard talking about it.  Exif  Not actually an image library. A JPEG meta data reading library. It cannot even write.
  3. GD Graphics Library  Graphics Draw Library  Originally GIF

    Draw.  Was unable to actually render GIF’s from 1999 to 2004 because the GIF license was revoked. In 2004 the GIF patent expired.  Has bindings for nearly every language [that matters] ever.  Not really worked on anymore. PHP maintains their copy that is how we get along with that.  Sort of a “Copy and Paste” based system.
  4. PHP GD Pro/Con Pros  Comes bundled with PHP. 

    Compiles anywhere first time.  Lightweight for lightweight work.  Most web hosts will have it. Cons  Cumbersome to do advanced work with.  OLD style API (pre- OOP) – Procedural  Larger jobs consume LOTS of resources.  Terribad at Alpha Channel (opacity)
  5. ImageMagick  Huge graphics library able to write support nearly

    any image format you could care to think of.  Basically, Photoshop for your CLI.  Layer based system.  Has support for OpenCL  Meaning, it can use your GPU to do stuff.
  6. Imagick Pro/Con Pros  Lots of advanced features.  Decent

    OOP interface. *  Does heavy lifting with ease. Cons  Arse and a half to compile the dependencies.  Method names a bit goofy. *
  7. The Server  PHP.INI  file_uploads = On  Enables

    uploads  upload_max_filesize = 10M  How large each file can be.  post_max_size = 10M  Technically this would limit you to files slightly less than 10M as there is other post data involved in the request taking up space.  max_file_uploads = 10  How many files per form.
  8. The Form  enctype is the only real key here.

     <form method=“post” enctype=“multipart/form-data” ...  File elements  <input type=“file” name=“something[]” />  Allows multiple files with ease.  $_FILES[‘something’][‘name’][\d+]
  9. The Upload $_FILES[‘derp’] Array ( [name] => Array ( [0]

    => hail__king_arthas_menethil.jpg [1] => zInfg.jpg [2] => f6Kik.jpg ) [type] => Array ( [0] => image/jpeg [1] => image/jpeg [2] => image/jpeg ) [tmp_name] => Array ( [0] => C:\Users\bob\AppData\Local\Temp\phpA18.tmp [1] => C:\Users\bob\AppData\Local\Temp\phpA19.tmp [2] => C:\Users\bob\AppData\Local\Temp\phpA1A.tmp ) [error] => Array ( [0] => 0 [1] => 0 [2] => 0 ) [size] => Array ( [0] => 235038 [1] => 176960 [2] => 61551 ) )
  10. Basic Geometric Tasks  Cropping  Resizing  Scaling 

    Thumbnailing  GD  imagecopyresampled  We use this with different maths to do it all.  Imagick  cropImage  resizeImage  thumbnailImage
  11. Cropping That’s a nice photo, too bad it has my

    Ex in it...  Cutting an image smaller than it already is, much like cutting a picture out of the newspaper or magazine.  Need to know:  The X and Y coords of the top left of the cutting box.  The Width and Height you want the final cut of or the X and Y of the lower right of the cutting box.  Both libraries use X,Y,W,H so you will then be calculating the W and H yourself if you use the lower right corner.
  12. Cropping Images - GD  PNG, 640x480. We want the

    region at 12x32+200x200. $old = imagecreatefrompng($filename);  Create Desired Size Canvas $new = imagecreatetruecolor(200,200);  Copy desired region from old to new. Save. Free Resources. imagecopyresampled( $new,$old, 0,0, 12,32, 200,200, 200,200 ); imagepng($new,$filename); imagedestroy($old); imagedestroy($new);
  13. Cropping Images - Imagick  PNG, 640x480. We want the

    region at 12x32+200x200. $img = new Imagick($filename);  Crop It. $img->cropImage(200,200, 12,32);  Save. Free Resources. $img->writeImage($filename); $img->destroy();
  14. Resizing A massage for pixels  Changing the Width and

    Height of an image to be a new Width and Height.  Aspect ratio? Honey badger don’t care.  Need to know your desired width and height.
  15. Resizing Images - GD  PNG, 640x480. We want to

    resize this to 200x200. $old = imagecreatefrompng($filename); $w = imagesx($old); $h = imagesy($old);  Create Desired Size Canvas $new = imagecreatetruecolor(200,200);  Copy desired region from old to new. Save. Free Resources. imagecopyresampled( $new, $old, 0,0 ,0,0, 200,200, $w,$h ); imagepng($new,$filename); imagedestroy($old); imagedestroy($new);
  16. Resizing Images - Imagick  PNG, 640x480. We want to

    resize this to 200x200. $img = new Imagick($filename);  Resize it. $img->resizeImage( 200,200, Imagick::FILTER_LANCZOS, 1 );  Save. Free Resources. $img->writeImage($filename); $img->destroy();
  17. Scaling I need this to fit in that frame... 

    Fit an image into a desired Width and Height, but keeping the aspect ratio to not distort the image.  One dimension will be smaller than the requested size, unless it was a perfect square and you asked for a perfect square.  Same as resize code but with an added magical function for maths.  [show the fine people a magical method for scaling bob]  Need to know the desired width and height and the current width and height of the image.  Proportions. If an image is 400x300, and we want it to fit in 100x100 w1 w2 400 100 -- = -- --- = --- (100*300) / 400 = h = 75 100x75 h1 h2 300 h
  18. Scaling Images - GD  PNG, 640x480. We want to

    scale this to fit in 200x200. $old = imagecreatefrompng($filename); list($w,$h) = array(imagesx($old),imagesy($old)); list($nw,$nh) = lol_magic_scale($w,$h,200,200);  Create Desired Size Canvas $new = imagecreatetruecolor($nw,$nh);  Copy. Save. Free. imagecopyresampled( $new, $old, 0,0 ,0,0, $nw,$nh, $w,$h ); imagepng($new,$filename); imagedestroy($old); imagedestroy($new);
  19. Scaling Images - Imagick  PNG, 640x480. We want to

    scale this to fit in 200x200. $img = new Imagick($filename);  Resize it. $img->resizeImage( 200,200, Imagick::FILTER_LANCZOS, 1, true );  Save. Free Resources. $img->writeImage($filename); $img->destroy();
  20. Thumbnailing Photo gallery previews, etc.  Creating a useful representation

    that is fill fit to a size, then with the excess cropped off.  Fill fit to the smallest dimension.  Crop excess in longest dimension.  For demo simplicity, our resulting image is a perfect square.  Need to know your desired size, and the image current width and height.
  21. Thumbnailing Images - GD $old = imagecreatefrompng($filename); $w = imagesx($old);

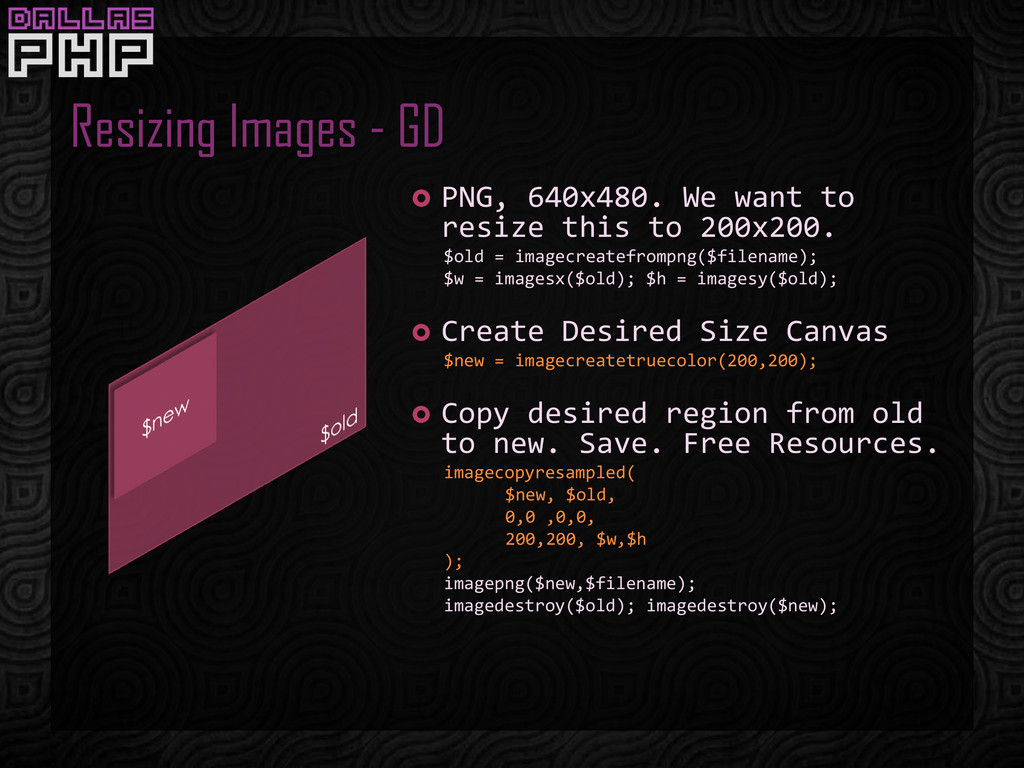
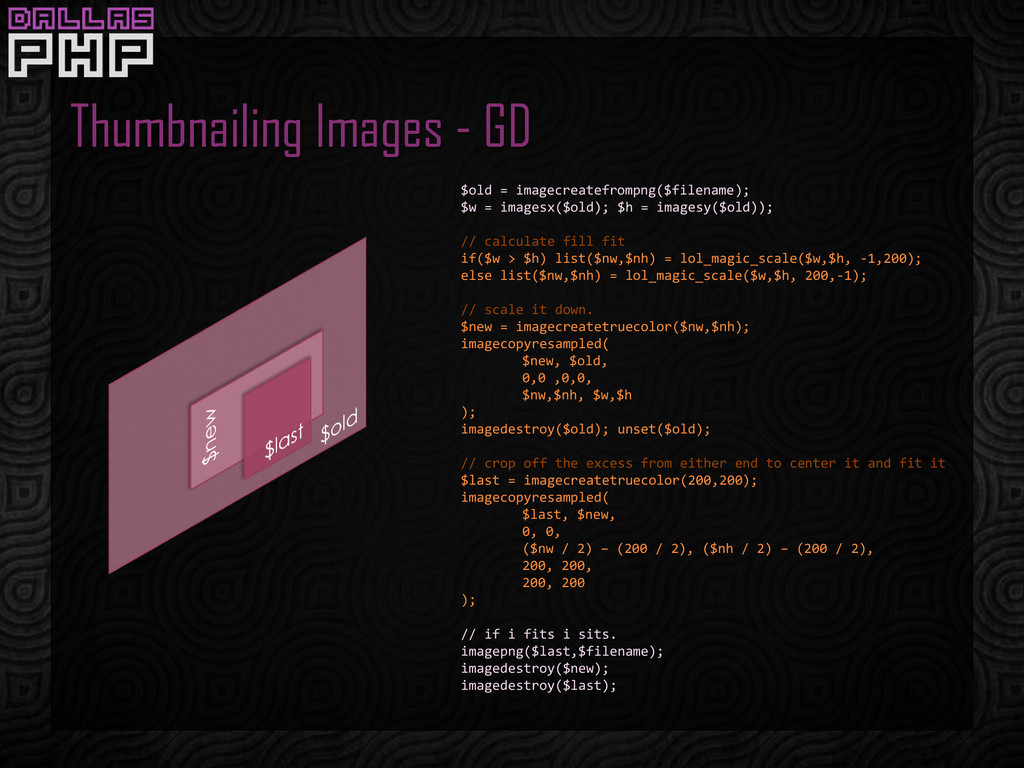
    $h = imagesy($old)); // calculate fill fit if($w > $h) list($nw,$nh) = lol_magic_scale($w,$h, -1,200); else list($nw,$nh) = lol_magic_scale($w,$h, 200,-1); // scale it down. $new = imagecreatetruecolor($nw,$nh); imagecopyresampled( $new, $old, 0,0 ,0,0, $nw,$nh, $w,$h ); imagedestroy($old); unset($old); // crop off the excess from either end to center it and fit it $last = imagecreatetruecolor(200,200); imagecopyresampled( $last, $new, 0, 0, ($nw / 2) – (200 / 2), ($nh / 2) – (200 / 2), 200, 200, 200, 200 ); // if i fits i sits. imagepng($last,$filename); imagedestroy($new); imagedestroy($last);
  22. Basic ‘Shoopin Shoop da woop  Desaturation  Sepia 

    Lots of other filters, but they are all more or less repetitive.  Watermarking  GD  imagefilter  imagecopyresampled  Imagick  modulateImage  sepiaToneImage  compositeImage
  23. Filters Almost over 9,000 GD  Negative  Greyscale 

    Brightness  Contrast  Colorize  Edge  Emboss  Blur  Sketch  Pixelate Imagick  Blur  3 Different Kinds  Brightness  Charcoal  Combine  Colorize  Color Replace  Distort  Enhance  Equalize  Flop  Frame  Gamma  Hue Shift  Level  Magnify  Median Filter  Modulate  Normalize  Oil Paint  Posturize  Rolling  Round corners  Sepia  Shade  Sharpen  Solarize  Stegano  Swirl  Texturize  Vignette
  24. Desaturate Images Black and white photographs GD $img = imagefrompng($filename);

    imagefilter( $img, IMG_FILTER_GRAYSCALE ); imagepng($img,$filename); imagedestroy($img); Imagick $img = new Imagick($filename); $img->modulateImage(100,0,100); $img->writeImage($filename); $img->destroy($filename);
  25. Sepia Tone Images Old photo aged photograph GD $img =

    imagefrompng($filename); imagefilter( $img, IMG_FILTER_GRAYSCALE ); imagefilter( $img, IMG_FILTER_COLORIZE, 90, 40, 3 ); imagepng($img,$filename); imagedestroy($img); Imagick $img = new Imagick($filename); $img->sepiaToneImage(80); $img->writeImage($filename); $img->destroy();
  26. Watermarking Overlaying a ghost image on an image. GD $img

    = imagefrompng($filename); $mark = imagefrompng($watermarkfile); list($iw,$ih) = array(imagesx($img),imagesy($img)); list($mw,$mh) = array(imagesx($mark),imagesy($mark)); imagefilter( $mark, IMG_FILTER_GRAYSCALE ); imagecopyresampled( $img, $mark, ($iw - $mw), ($ih - $mh), 0, 0, $mw, $mh, $mw, $mh ); imagepng($img,$filename); imagedestroy($img); imagedestroy($mark); Imagick $img = new Imagick($filename); $mark = new Imagick($watermarkfile); $x = $img->getImageWidth()–$mark->getImageWidth(); $y = $img->getImageHeight()-$mark->getImageHeight(); $mark->modulateImage(100,0,100); $img->compositeImage( $mark, Imagick::COMPOSITE_DEFAULT, $x, $y ); $img->writeImage($filename); $img->destroy(); $mark->destroy();
  27. How they handle drawing. GD  Draw directly on to

    the image resource you want to draw on.  Fast.  Super easy if you do not need anything too involved. Imagick  Draw on a special “draw layer” and then lay it on top of the image.  Great for advanced drawing. Not as easy.
  28. Drawing Shapes Drawing an ellipse over the entire image. GD

    $img = imagefrompng($filename); $w = imagesx($img); $h = imagesy($img); $red = imagecolorallocate($img,255,0,0); // diametre based imagefilledellipse( $img, floor($w/2), floor($h/2), $w, $h, $red ); imagepng($img,$filename); imagedestroy($img); Imagick $img = new Imagick($filename); $w = $img->getImageWidth(); $h = $img->getImageHeight(); $draw = new ImagickDraw; $draw->setFillColor(new ImagickPixel(‘red’)); // radius based $draw->ellipse( floor($w/2), floor($h/2), floor($w/2), floor($h/2), 0, 360 ); $img->drawImage($draw); $img->writeImage($filename); $img->destroy(); $draw->destroy();
  29. Writing Text on an Image Fonts are tricksy  Both

    Imagick and GD are suppose to have the ability to use the fonts installed on the system.  Except that works 0 times out of 10.  What does work? Absolute path to a font (TTF) file. That always works, in both libraries.  Font sizes: GD Points, Imagick Pixels. Derp.  PHP manual says Imagick is points too, but my own observations + other people say it is wrong.
  30. Writing Text on an Image – GD Apply directly to

    the forehead. GD $img = imagefrompng($filename); $color = imagecolorallocate($img,255,0,0); imagettftext( $img, $size, $angle, $x, $y, $color, $fontfile, $text ); imagepng($img,$filename); imagedestroy($img);
  31. Writing Text on an Image – Imagick Sort of works

    like an old typewriter. Really. Imagick $img = new Imagick($filename); $color = new ImagickPixel(‘red’); $draw = new ImagickDraw; $draw->setFont($fontfile); $draw->setFontSize($size); $draw->setFillColor($color); $img->annotateImage( $draw, $x, $y, $angle, $text ); $img->writeImage($filename); imagedestroy($img);
  32. So, You’re punching pixels in the face? Image processing is

    slow (relative to, say, a PING).  Try to avoid doing large image processing during a request, if possible.  Something goofy like cropping a user avatar? That’s something that is OK to do live.  Leaving the webserver and request hanging to render a 8 megapixel subway map is not.  How and when you process is something you have to think about how your app works.
  33. Still pixel punching? I know, those little guys never give

    up. Punch harder.  The larger your images are, the more RAM you will need to allow PHP to use.  memory_limit=300M  You are probably looking at a value around this if your users are uploading photos off their new smarty telephones for you to scale down to web size.  memory_limit=2G  And this is what you are looking at if you are going to try stuff like this...
  34. Doing something HUGE because I can Daniel said I was

    crazy. Daniel doesn’t even know. I can see you Daniel. 15306x7653 pixel map of the earth. 3650 long/lat points to plot. GD  3.5sec to open  3.3sec to desaturate  0.05sec to plot  6sec to write JPEG to disk. 11.1MB  74sec to write PNG to disk. 46.1MB.  Peak RAM use: 1,043 MB Imagick  3sec  1.5sec to desaturate  1sec to plot  0.4sec plot “done right”  4.5sec to write JPEG to disk. 9.4MB  30sec to write PNG to disk. 46.3MB  Peak RAM use: 450 MB
  35. Performance Summary  Small images, lots of drawing? GD. 

    Small images, lots of filtering? Imagick.  Large images, doing anything? Ehh eh. Well. Imagick would probably be your best bet to try first.  Imagick if you value your alpha channel.
  36. Reading Metadata (EXIF)  Imagick is the only one of

    the two with the ability to read the tags. $img = new Imagick($filename); $exif = $img->getImageProperties(‘exif:*’);  GD, Imagick, nor EXIF can actually write EXIF data back to the image.  Imagick has this: $img->setImageProperty(‘exif:Model’,’iPwn Furr’);  But it does not actually write the modified data to disk... a known issue in the actual ImageMagick library itself that they don’t really care about. Sadface.  Someone solved this with PEL: https://github.com/lsolesen/pel  A set of classes for manipulating EXIF data on images.
  37. Reading Metadata (EXIF) (Cont...)  Crazy API... but it works...

    require('PelJpeg.php'); $jpg = new PelJpeg('image.jpg'); $entry = $jpg->getExif()->getTiff()->getIfd()->getEntry(PelTag::MODEL); echo $entry->getValue, PHP_EOL; // outputs ‘iPhone 4’ on a photo from my phone. $entry->setValue('iPwn Furr'); $jpg->saveFile('image.jpg');  Important to note, this example here has no error checking. At any point those methods could have returned null and exploded the entire chain.  Opinion: We need a different kind of crazy person to go in and actually make that usable, unless there is a convenience class I completely missed because the documentation didn’t mention it.  e.g. I had to learn way more about the JPEG/EXIF binary format than I should have to set meta data with this.
  38. Metadata Alternatives  Things you could shell_exec...  Exiftool 

    Jhead  Just make sure you know how to escapeshellargs.
  39. The End Twitter: @bobmajdakjr Email: [email protected] Blog: http://catch404.net This entire

    codebase (demo site, apps, libraries) on Github. https://github.com/bobmajdak jr/dallasphp-image-tools- code