Upgrade to Pro — share decks privately, control downloads, hide ads and more …

Caterpillar_Cat_D6N_TRACK-TYPE_TRACTOR__Prefix_...

dcrfqdcnvk
May 21, 2024
4

 Caterpillar_Cat_D6N_TRACK-TYPE_TRACTOR__Prefix_GB6__Service_Repair_Manual__GB600001_and_up_.pdf

dcrfqdcnvk

May 21, 2024
Tweet

More Decks by dcrfqdcnvk

Transcript

  1. Shutdown SIS Previous Screen Product: TRACK-TYPE TRACTOR Model: D6N TRACK-TYPE

    TRACTOR GB6 Configuration: D6N TRACK-TYPE TRACTOR XL, LGP GB600001-UP (MACHINE) POWERED BY C7.1 Engine Disassembly and Assembly D6N Track-Type Tractor Power Train Media Number -UENR4080-03 Publication Date -01/09/2015 Date Updated -31/07/2018 i03902166 Final Drive - Assemble SMCS - 4050-016 Assembly Procedure Table 1 Required Tools Tool Part Number Part Description Qty A 138-7573 Link Bracket 3 D 138-7575 Link Bracket 2 E 1P-0520 Driver Gp 1 F 169-0503 Installation Kit 1 8M-9395 Seal Installer 1 G 1U-7234 Feeler Gauge 1
  2. Illustration 1 g01235241 1. Raise the temperature of bearing cone

    (21). Install bearing cone (21) onto spindle (23). 2. Use Tooling (F) (not shown) in order to install Duo-cone seal (22). Refer to Disassembly and Assembly, "Duo-Cone Conventional Seals - Install". Illustration 2 g01235238 3. Lower the temperature of bearing cups (19) and (18). 4. Install bearing cups (19) and (18) in hub (3). 5. Use Tooling (F) (not shown) in order to install Duo-cone seal (20) in hub (3). Refer to Disassembly and Assembly, "Duo-Cone Conventional Seals - Install".
  3. Illustration 3 g01235181 6. Install Tooling (D) and a suitable

    lifting device to hub (3). Install hub (3) onto the spindle. The weight of hub (3) is approximately 135 kg (298 lb). Illustration 4 g00990323 7. Install lip seal (16) and sleeve bearing (15).
  4. Illustration 6 g02145273 9. Raise the temperature of bearing cone

    (17). Install bearing cone (17) on the spindle. 10. Install hub (12) and gear (13) as an assembly. 11. Install retainer (11) and bolts (10). Tighten all bolts (10) in a star pattern. Tighten bolts (10) to a torque of 120 ± 20 N·m (89 ± 15 lb ft). Continually rotate hub (12) in order to properly seat bearing cone (17). Tighten bolts (10) to a torque of 120 ± 20 N·m (89 ± 15 lb ft) in order to ensure the proper torque. 12. Use Tooling (G) (not shown) in order to verify that the spindle is touching the retainer. 13. If necessary, repeat Step 11 and Step 12 in order to verify that bearing cone (17) is seated properly.
  5. https://www.aservicemanualpdf.com/ My Dear Friend! Thank you very much for visiting.

    Full manual if required, please enter the following URL into your browser. https://www.aservicemanualpdf.com/
  6. Illustration 7 g01234812 14. Lower the temperature of bearing cups

    (7). Install bearing cups (7) into gear (8). 15. Position bearing cones (6) and (9) into gear (8). 16. Position gear (8) into carrier (1). Illustration 8 g01235164 17. Lower the temperature of shaft (5). Use a suitable press in order to install shaft (5). Install shaft (5) until the end of the shaft is flush with the outer surface of carrier (1). 18. Install bolt (4) and the plate to carrier (1). 19. Verify that there is metal to metal contact between plates (4) and the shafts.
  7. 20. Repeat Steps 17 through 19 for the remaining shafts.

    Illustration 9 g01234745 21. Attach Tooling (A) to carrier (1). Position carrier (1) into hub (3). The weight of carrier (1) is approximately 41 kg (90 lb). 22. Install bolts (2). 23. Remove Tooling (A). End By: a. Install the final drive. Refer to Disassembly and Assembly, "Final Drive - Install". Copyright 1993 - 2021 Caterpillar Inc. All Rights Reserved. Private Network For SIS Licensees. Wed Oct 20 09:20:28 UTC+0800 2021
  8. Shutdown SIS Previous Screen Product: TRACK-TYPE TRACTOR Model: D6N TRACK-TYPE

    TRACTOR GB6 Configuration: D6N TRACK-TYPE TRACTOR XL, LGP GB600001-UP (MACHINE) POWERED BY C7.1 Engine Disassembly and Assembly D6N Track-Type Tractor Power Train Media Number -UENR4080-03 Publication Date -01/09/2015 Date Updated -31/07/2018 i06740931 Final Drive, Steering Differential, and Brake (Left Side) - Remove and Install SMCS - 4050-010-LT; 4132-010-LT Removal Procedure Table 1 Required Tools Tool Part Number Part Description Qty A 154-6181 Forcing Screw 3 B 439-3940 Bracket As 1 C 142-1664 Lifting Bracket Gp 1 D 8S-9906 Ratchet Puller 1 Start By: a. Separate the track. b. Remove the steering motor. c. Remove the axles. Personal injury can result from hydraulic oil pressure and hot oil.
  9. Hydraulic oil pressure can remain in the hydraulic system after

    the engine has been stopped. Serious injury can be caused if this pressure is not released before any service is done on the hydraulic system. Make sure all of the work tools have been lowered to the ground, and the oil is cool before removing any components or lines. Remove the oil filler cap only when the engine is stopped, and the filler cap is cool enough to touch with your bare hand. Illustration 1 g00992346 1. Remove bolts (1). Illustration 2 g00992348 2. Install Tooling (A) and remove adapter (2).
  10. Illustration 3 g00992349 3. Remove two bolts (3) and bolt

    (4) to install Tooling (B). Remove two bolts (5). Illustration 4 g00865077 4. Remove bolts (6) and the nuts from the top of the sprocket segment. 5. Attach Tooling (C) and a suitable lifting device to the final drive, steering differential, and brake (left side). The weight of the final drive, steering differential, and brake (left side) is approximately 680 kg (1500 lb). Illustration 5 g00992350
  11. 6. Remove remaining bolts (3) and the washers. Illustration 6

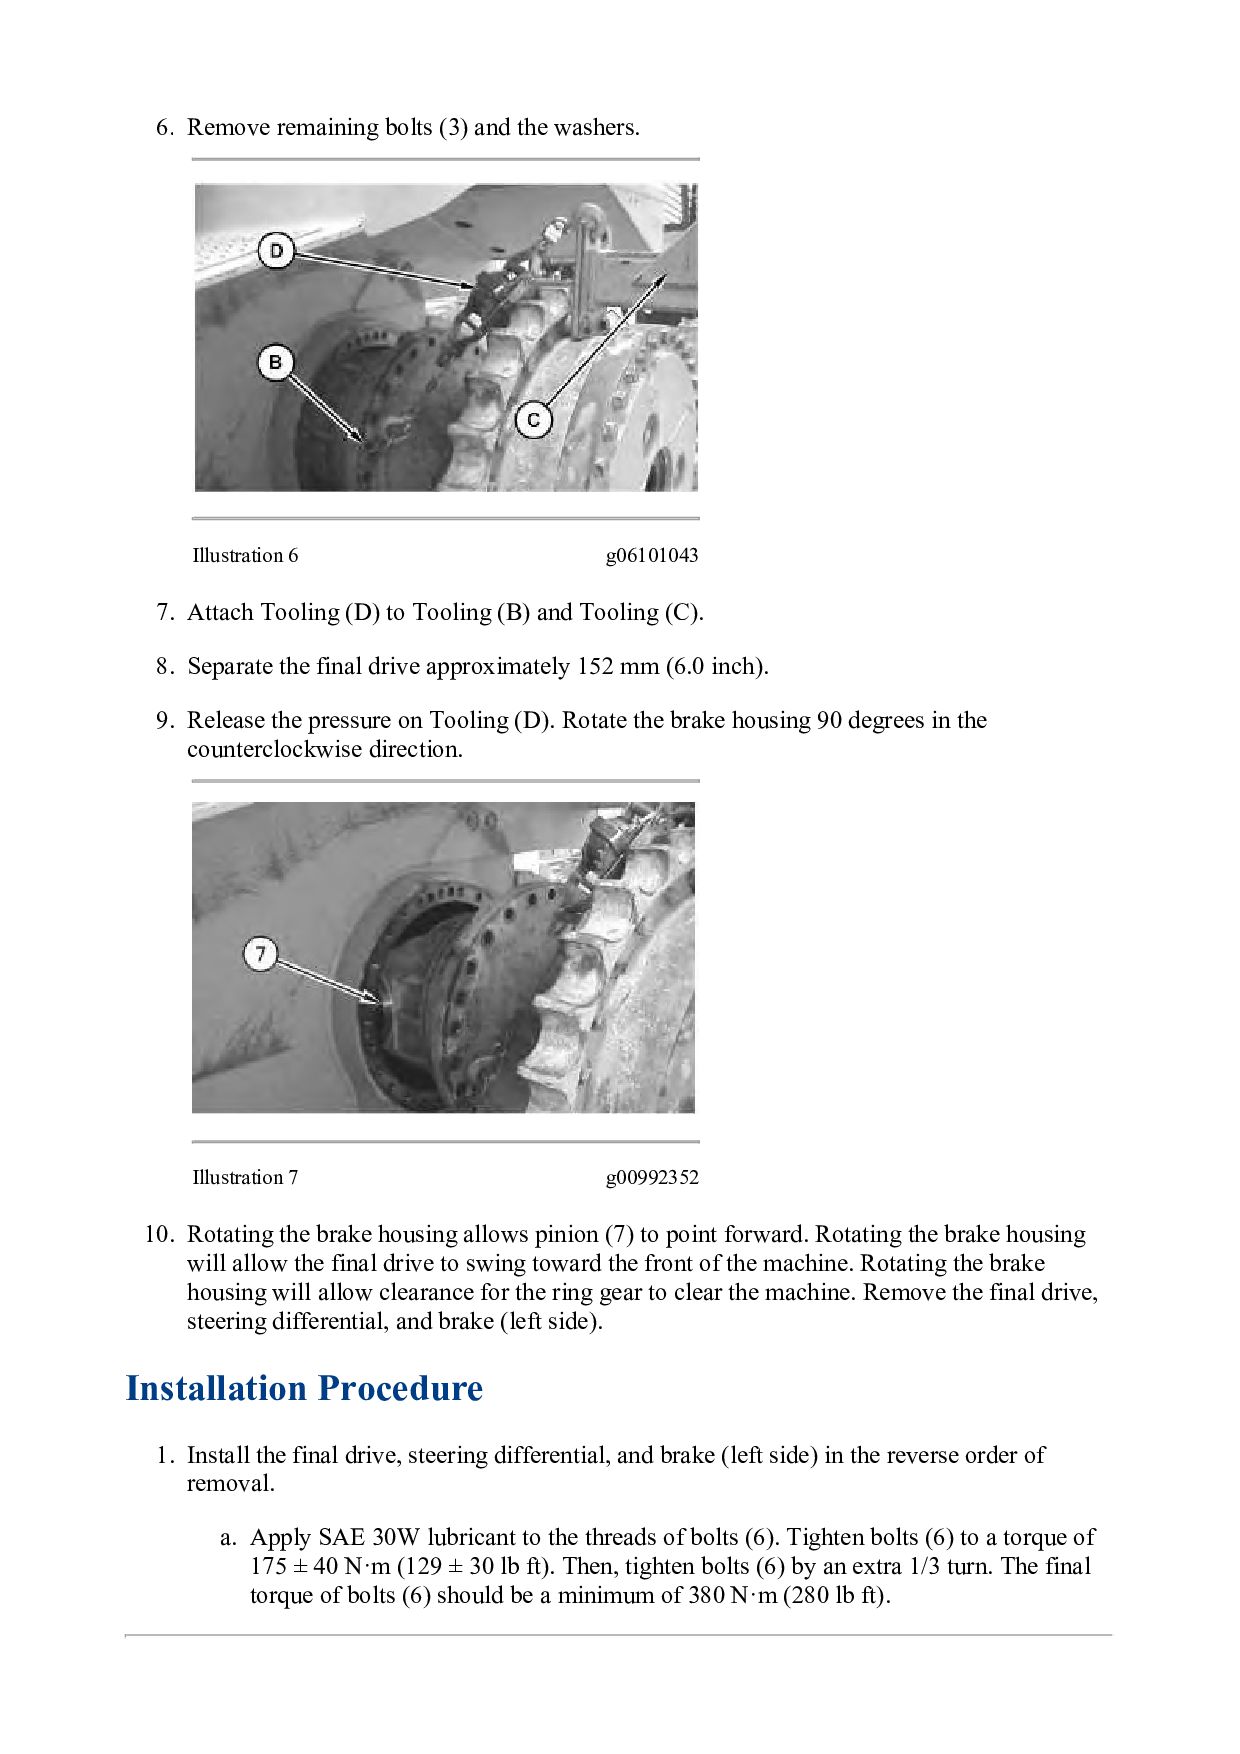
    g06101043 7. Attach Tooling (D) to Tooling (B) and Tooling (C). 8. Separate the final drive approximately 152 mm (6.0 inch). 9. Release the pressure on Tooling (D). Rotate the brake housing 90 degrees in the counterclockwise direction. Illustration 7 g00992352 10. Rotating the brake housing allows pinion (7) to point forward. Rotating the brake housing will allow the final drive to swing toward the front of the machine. Rotating the brake housing will allow clearance for the ring gear to clear the machine. Remove the final drive, steering differential, and brake (left side). Installation Procedure 1. Install the final drive, steering differential, and brake (left side) in the reverse order of removal. a. Apply SAE 30W lubricant to the threads of bolts (6). Tighten bolts (6) to a torque of 175 ± 40 N·m (129 ± 30 lb ft). Then, tighten bolts (6) by an extra 1/3 turn. The final torque of bolts (6) should be a minimum of 380 N·m (280 lb ft).
  12. Copyright 1993 - 2021 Caterpillar Inc. All Rights Reserved. Private

    Network For SIS Licensees. Wed Oct 20 09:21:24 UTC+0800 2021
  13. Shutdown SIS Previous Screen Product: TRACK-TYPE TRACTOR Model: D6N TRACK-TYPE

    TRACTOR GB6 Configuration: D6N TRACK-TYPE TRACTOR XL, LGP GB600001-UP (MACHINE) POWERED BY C7.1 Engine Disassembly and Assembly D6N Track-Type Tractor Power Train Media Number -UENR4080-03 Publication Date -01/09/2015 Date Updated -31/07/2018 i06983856 Steering Differential and Brake - Disassemble SMCS - 4131-015 Disassembly Procedure Table 1 Required Tools Tool Part Number Description Qty A 138-7573 Link Bracket 2 B 3K-4897 Spring Pin 8 C 6V-4072 Spanner Wrench 1 D 9S-9154 Step Plate 1 6V-3009 Bar 1 8S-6470 Forcing Screw 1 8S-5133 Plug 1 5P-8245 Washer 4 1D-4719 Full Nut 2 2H-6488 Bolt 2 E 9S-9154 Step Plate 1 6V-3009 Bar 1 8S-6470 Forcing Screw 1 8S-5133 Plug 1 5P-8245 Washer 4
  14. 1D-4719 Full Nut 2 1D-4574 Bolt 2 8H-0663 Bearing Puller

    1 F 138-7575 Link Bracket 3 G 8B-7550 Leg 2 8B-7559 Adapter 2 3H-0465 Plate 4 1P-0498 Plate 1 1B-4207 Full Nut 2 5H-9976 Screw 1 5B-0637 High Idle Nut 1 8H-0684 Ratchet Wrench 1 8B-7563 Handle 1 5F-7353 Washer 1 8B-7548 Push-Puller Tool Gp 1 Start By: a. Remove the left final drive, the steering differential, and the brake. Refer to Disassembly and Assembly, "Final Drive, Steering Differential, and Brake (Left Side) - Remove" .
  15. Illustration 2 g00823691 3. Install Tooling (A) and a suitable

    lifting device. 4. Remove sliding carrier (3). The weight of sliding carrier (3) is approximately 48 kg (105 lb). 5. Remove Tooling (A).
  16. Illustration 3 g06187075 6. Remove remaining bolts (2) and slinger

    (4) from planetary carrier (7). 7. Remove retaining ring (5), thrust ring (5A), and planetary carrier (7) from ring gear (6). Illustration 4 g00823775 8. Remove O-ring seal (10) from planetary carrier (7). 9. Use a hammer and a punch to push pin (12) in shaft (11). 10. Remove shaft (11), planetary gear (9), discs (8), and bearing (13) from planetary carrier (7). 11. Remove pin (12) from shaft (11). 12. Repeat Steps 9 through 11 for the remaining planetary gears.
  17. Illustration 5 g00823759 13. Remove lockring (14) and remove retaining

    ring (16). 14. Remove sun gear (15) from planetary carrier (18). 15. Remove spacer (17).
  18. Illustration 6 g00995126 16. Remove bolts (19), plate (20), and

    gear (21) from planetary carrier (18). 17. Use Tooling (B) to compress the retaining ring that holds planetary carrier (18) in ring gear (6). 18. Separate planetary carrier (18) from ring gear (6). 19. Remove the retaining ring from planetary carrier (18). 20. Use a hammer and a punch to push pin (23) in shaft (24).
  19. Illustration 7 g00823872 21. Remove shaft (24), planetary gear (22),

    discs (26), and bearing (25) from planetary carrier (18). 22. Remove pin (23) from shaft (24). 23. Repeat Steps 20 through 22 for the remaining planetary gears.
  20. Illustration 8 g00823878 24. Place a bolt in the teeth

    of pinion gear (27) to prevent movement.
  21. Illustration 9 g00823884 25. Bend the tang on lock washer

    (29) away from nut (28). 26. Use Tooling (C) to remove nut (28) from the pinion. 27. Remove lockwasher (29) and washer (30) from the pinion. 28. Remove bolts (32). 29. Remove carrier (31) from the support bracket.
  22. Illustration 10 g00823890 30. Use Tooling (D) to force pinion

    (27) from bearing cone (33) and carrier (31).
  23. Illustration 13 g00824265 33. Remove bolts (36). 34. Remove support

    bracket (37) and shims (38) from the housing. 35. Remove bolts (39). 36. Remove bevel gear (40) from housing (41).
  24. Illustration 14 g00824268 37. Attach Tooling (F) and a suitable

    lifting device to brake housing (42). Personal injury can result from parts and/or covers under spring pressure. Spring force will be released when covers are removed. Be prepared to hold spring loaded covers as the bolts are loosened. 38. Remove bolts (43). 39. Remove brake housing (42) from the final drive housing (44). The weight of brake housing (42) is approximately 150 kg (335 lb).
  25. Please write to us. Our email: [email protected] Please go to

    the homepage to get the full manual, or other brand PDF manuals. Home Site: aservicemanualpdf.com
  26. Thank you very much for your reading. Please Click Here.

    Then Get COMPLETE MANUAL. NO WAITING NOTE: If there is no response to click on the link above, please download the PDF document first and then click on it.
  27. Illustration 16 g00824349 40. Remove bolts and washers (45). 41.

    Remove retainer (46) and thrust washer (47). 42. Remove hub (48), the friction discs, and brake plates (49). 43. If necessary, remove ring (50) from hub (48). 44. Remove thrust washer (51). Personal injury can result from parts and/or covers under spring pressure. Spring force will be released when covers are removed. Be prepared to hold spring loaded covers as the bolts are loosened.
  28. Illustration 17 g00824351 45. Remove bolts (52) slowly. 46. Remove

    retainer (53), ring (54), and O-ring seal (55) from brake housing (42).
  29. Illustration 18 g00824691 47. Remove bolts (56), plate (57), shim

    pack (58), piston (59), and spring (60) from brake housing (42).
  30. https://www.aservicemanualpdf.com/ My Dear Friend! Thank you very much for visiting.

    Full manual if required, please enter the following URL into your browser. https://www.aservicemanualpdf.com/