of this hands-on session is to get you started with OpenStack. By the end of this session you should: - Be familiar with most of the OpenStack concepts. - Be able to drive your own OpenStack installation. - Be able to use OpenStack to deploy Cloud services.
Enrique Fernández Casado received both his Master in Computer Science and Security and Bachelor in Computer Science (Software Engineering track) from the Universitat Rovirai Virgili, Tarragona, Spain in 2011 and 2009, respectively. Before joining Ericsson AB in 2011 as a Research Engineer in the area of Packet Technologies, he worked for the ‘Arquitecturas y Servicios Telemáticos’ research group conducting state-of-the-art research on the field of Distributed Systems and Peer-to-Peer Networks. As a result of his work at AST he authored several international research publications. Since he joined Ericsson he has been involved in different Cloud- related activities ranging from prototyping tasks to more theoretical ones. Before joining the EU FP7 project SAIL, project he is currently contributing to, Enrique also participated in the internal Ericsson Research Cloud project. His interests include Distributed Systems, Cloud and Peer-to-Peer Computing and Software Engineering.
Cloud Management Platform designed to ease the management of private and public clouds, while avoiding vendor lock-in. › Originally started by NASA and Rackspace Hosting. › Now supported by 100+ companies around the world. – Ericsson is one of them. 1. Austin (October, 2010) 2. Bexar (February, 2011) 3. Cactus (April, 2011) 4. Diablo (October, 2011) 4. Essex (April, 2012) 5. Folsom (October, 2012) 6. Grizzly (2013?) 7. H? (2013?) OpenStack Releases
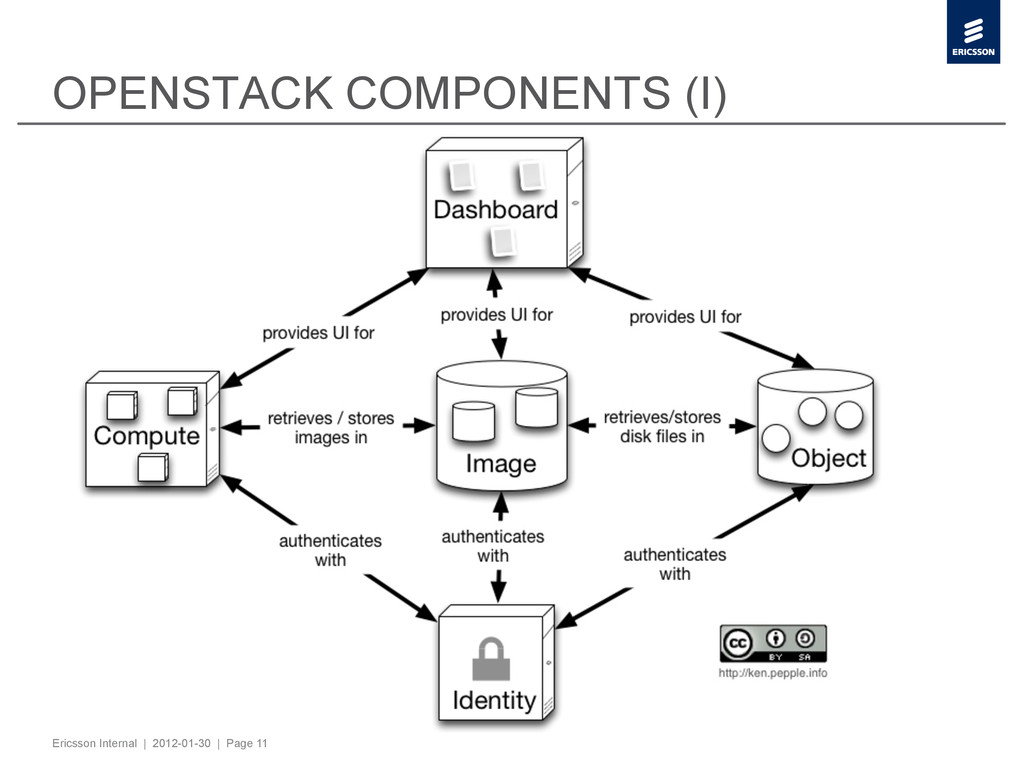
Provides functionality to create instances, manage networks, and control access through users and projects. nova-api. Entry point to the system. Triggers most of the orchestration activities as a response to incoming end-user requests. nova-scheduler. Determines which compute host an instance should be created on. nova-network. It is in charge of manipulating the network. Will eventually be replaced by Quantum. nova-compute. Responsible for manipulating (create, reboot, stop, terminate, …) instances.
Provides a RESTful interface for managing virtual disk images, which can be stored in a variety of back-end stores: § Local storage device § OpenStack Object Storage § Amazon Simple Storage Service (S3) § …
Provides an API to define network connectivity between devices from other OpenStack services (mainly, Nova VMs). It supports multiple network virtualization plugins, such as OpenVSwitch, Nicira NVP, Linux Bridge Networking, … Most of the plugins come in the form of a Quantum Agent -which is nothing but a script running on the same host as nova-compute is-, which contacts the central Quantum Service to gather configuration information, and communicates directly to the local network virtualization driver to set the desired connectivity between OpenStack devices.
Responsible for authenticating, authorizing, and managing tenant, user, role and service information. § Create Tenants. § Create Users and associate them to existing Tenants. § Define different Roles for different Users. § Issue Authentication Tokens. § Validate incoming requests. § … The user first authenticates himself by using the username and password that (hopefully) he (and only he) knows. After confirming the provided credentials are valid, Keystone will issue the user a token which he can then provide to demonstrate that his identity has been authenticated.
free storage (at least) › 2GB of RAM (at least) › Internet access › Linux flavor as host operating system (preferably) › VirtualBox hypervisor installed on your laptop › A (VirtualBox) VM running Ubuntu Desktop 12.04 32 bits
of 3) › First, we make sure we are installing OpenStack’s latest release, Folsom, and not an older one. sudo su apt-get install ubuntu-cloud-keyring echo “deb http://ubuntu-cloud.archive.canonical.com/ubuntu precise-updates/folsom main” >> /etc/apt/sources.list apt-get update
of 3) › Then, we install some software dependencies common to all the OpenStack components we are about to install. In this tutorial we assume the password of MySQL’s root user to be root Remember! apt-get install -y mysql-server python-mysqldb apt-get install -y rabbitmq-server
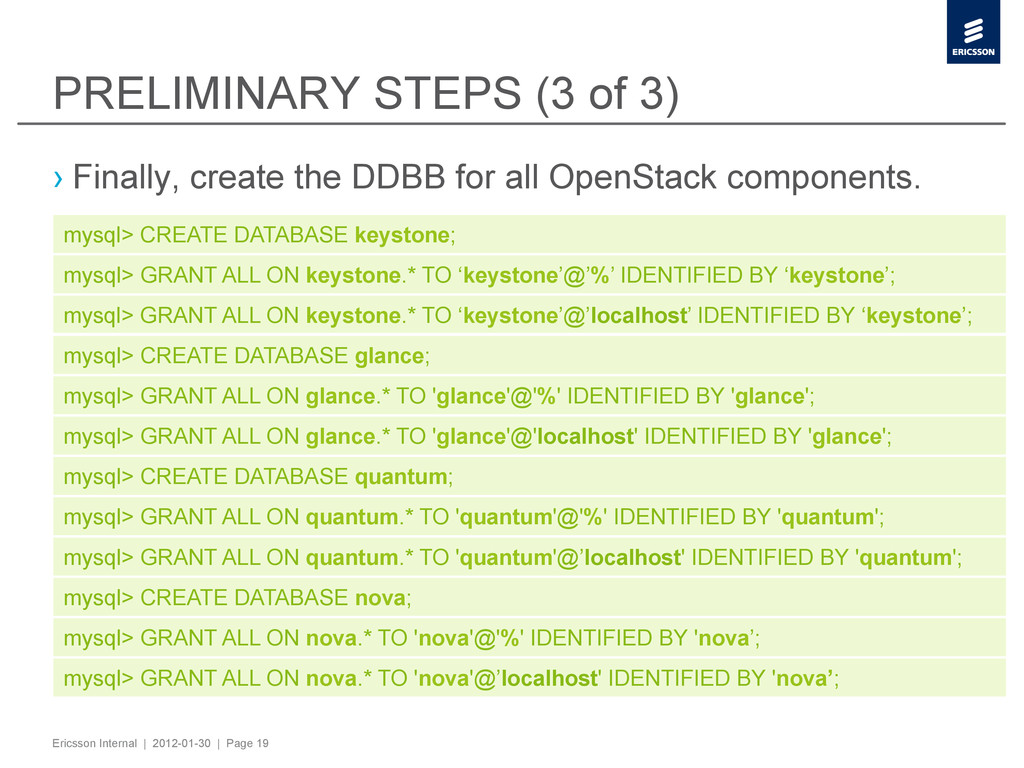
of 3) › Finally, create the DDBB for all OpenStack components. mysql> CREATE DATABASE keystone; mysql> GRANT ALL ON keystone.* TO ‘keystone’@’%’ IDENTIFIED BY ‘keystone’; mysql> GRANT ALL ON keystone.* TO ‘keystone’@’localhost’ IDENTIFIED BY ‘keystone’; mysql> CREATE DATABASE glance; mysql> GRANT ALL ON glance.* TO 'glance'@'%' IDENTIFIED BY 'glance'; mysql> GRANT ALL ON glance.* TO 'glance'@'localhost' IDENTIFIED BY 'glance'; mysql> CREATE DATABASE quantum; mysql> GRANT ALL ON quantum.* TO 'quantum'@'%' IDENTIFIED BY 'quantum'; mysql> GRANT ALL ON quantum.* TO 'quantum'@’localhost' IDENTIFIED BY 'quantum'; mysql> CREATE DATABASE nova; mysql> GRANT ALL ON nova.* TO 'nova'@'%' IDENTIFIED BY 'nova’; mysql> GRANT ALL ON nova.* TO 'nova'@’localhost' IDENTIFIED BY 'nova’;
of 4) › Install Keystone’s package › Edit Keystone’s configuration file, “/etc/keystone/keystone.conf”, to make use of the MySQL database we created in the previous slide; do not forget to set an administration token. › Restart the keystone service to apply the changes. › Create all the database tables required by Keystone. apt-get install -y keystone service keystone restart keystone-manage db_sync Verify tables required by Keystone have been created. mysql -ukeystone -pkeystone keystone mysql> SHOW TABLES; Beware!
of 4) › Now that we have Keystone properly configured, we are about to proceed with the creation of tenants, users, roles, services and end-points; and the assignment of users to tenants, roles to users, services to tenants, and end-points to services. › First, we create an end-user tenant (ericsson), and another tenant (service), as a placeholder for the services being offered. Before issuing the above mentioned commands, the following environment variables need to be set: SERVICE_ENDPOINT=http://localhost:35357/v2.0/ SERVICE_TOKEN=$ADMIN_TOKEN Beware! keystone tenant-create --name ericsson keystone tenant-create --name service
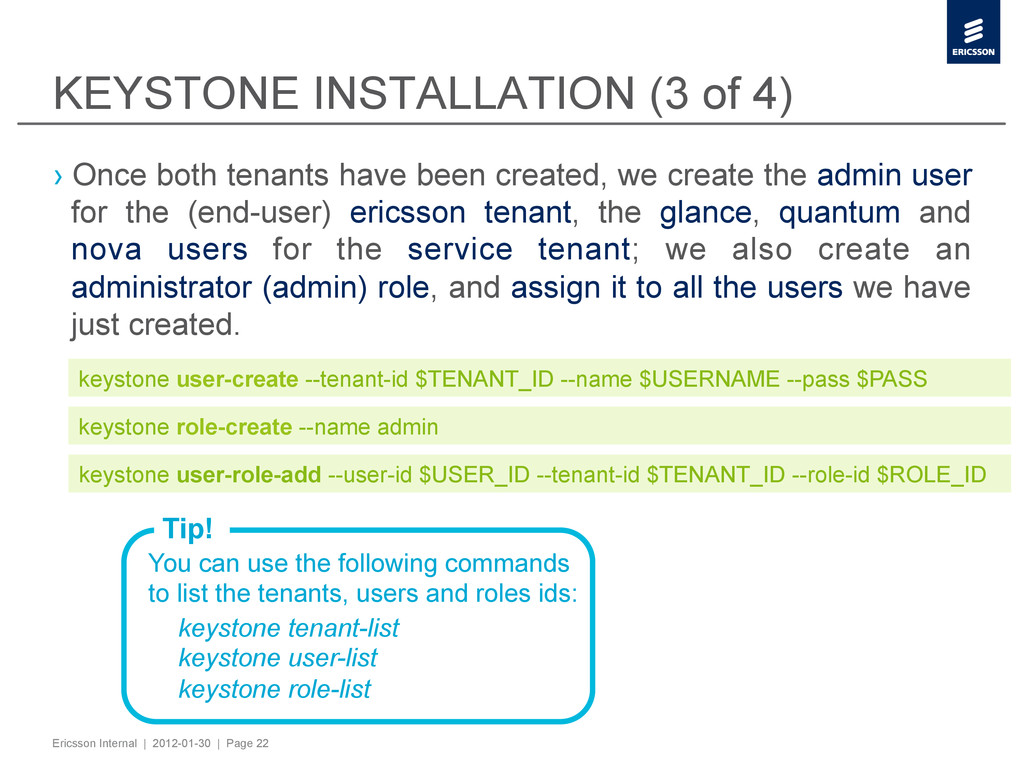
of 4) › Once both tenants have been created, we create the admin user for the (end-user) ericsson tenant, the glance, quantum and nova users for the service tenant; we also create an administrator (admin) role, and assign it to all the users we have just created. keystone user-create --tenant-id $TENANT_ID --name $USERNAME --pass $PASS keystone role-create --name admin keystone user-role-add --user-id $USER_ID --tenant-id $TENANT_ID --role-id $ROLE_ID You can use the following commands to list the tenants, users and roles ids: keystone tenant-list keystone user-list keystone role-list Tip!
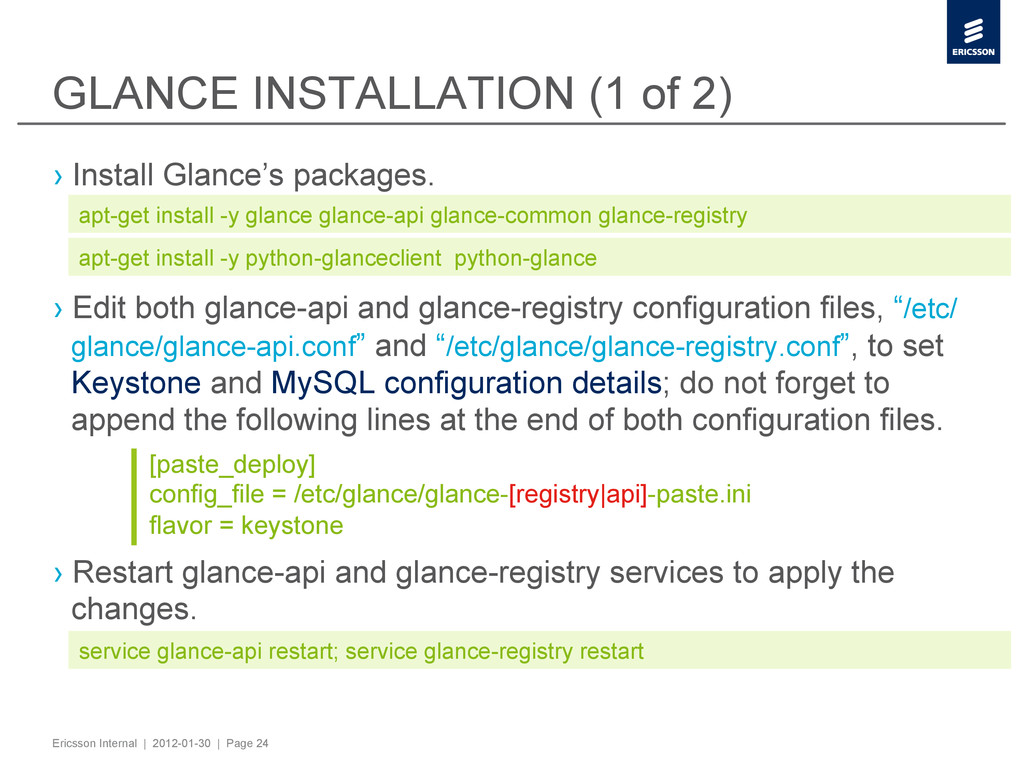
of 2) › Install Glance’s packages. › Edit both glance-api and glance-registry configuration files, “/etc/ glance/glance-api.conf” and “/etc/glance/glance-registry.conf”, to set Keystone and MySQL configuration details; do not forget to append the following lines at the end of both configuration files. › Restart glance-api and glance-registry services to apply the changes. apt-get install -y glance glance-api glance-common glance-registry apt-get install -y python-glanceclient python-glance service glance-api restart; service glance-registry restart [paste_deploy] config_file = /etc/glance/glance-[registry|api]-paste.ini flavor = keystone
of 2) › Initialize Glance’s database. › Download a test image. › Register the image in Glance. glance-manage version_control 0; glance-manage db_sync wget https://launchpad.net/cirros/trunk/0.3.0/+download/cirros-0.3.0-i386-disk.img glance add name="CirrOS i386" is_public=true disk_format=qcow2 container_format=bare < cirros-0.3.0-i386-disk.img Before issuing the last command, the following environment variables need to be set: OS_AUTH_URL=http://localhost:5000/v2.0/ OS_TENANT_NAME=ericsson OS_USERNAME=admin OS_PASSWORD=admin Beware!
of 3) › Edit OpenVSwitch plugin configuration file, “/etc/quantum/ plugins/openvswitch/ovs_quantum_plugin.ini”, to point to the previously created MySQL database. › Make sure OpenVSwitch is running. › Create the OpenVSwitch integration bridge (it has to be created on all machines running the OpenVSwitch agent). › Restart all Quantum services. ovs-vsctl add-br br-int service openvswitch-switch restart service quantum-server restart; service quantum-dhcp-agent restart; service quantum- plugin-openvswitch-agent restart
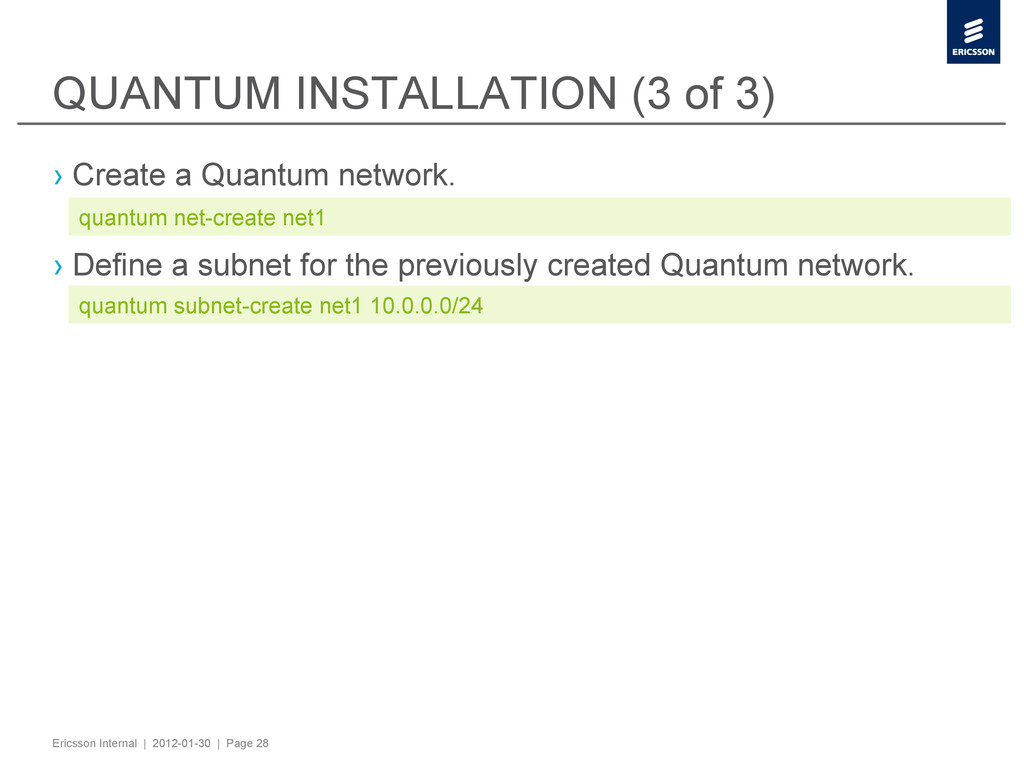
of 3) › Create a Quantum network. › Define a subnet for the previously created Quantum network. quantum net-create net1 quantum subnet-create net1 10.0.0.0/24
of 3) › Set Keystone credentials in “/etc/nova/api-paste.ini”. › Create all database tables required by Nova. › Restart all Nova services to apply changes. service nova-api restart; service nova-scheduler restart; service nova-network restart; service nova-compute restart; nova-manage db sync
4) › Get an authentication token › List all available images and get the ID of the image we registered in Glance a few steps ago. curl -X POST -H ”Content-type: application/json” http://localhost:5000/v2.0/tokens –d ’{”auth”: {”passwordCredentials”: {”username”:$USER_NAME, ”password”:$USER_PASS}, ”tenantId”:$TENANT_ID}}’ curl -X GET -H ”Accept: application/json” http://localhost:8774/v2/$TENANT_ID/images
4) › Get an authentication token › List all available images and get the ID of the image we registered in Glance a few steps ago. curl -X POST -H ”Content-type: application/json” http://localhost:5000/v2.0/tokens –d ’{”auth”: {”passwordCredentials”: {”username”:$USER_NAME, ”password”:$USER_PASS}, ”tenantId”:$TENANT_ID}}’ curl -X GET -H ”Accept: application/json” http://localhost:8774/v2/$TENANT_ID/images 401 Unauthorized
4) › Get an authentication token › List all available images and get the ID of the image we registered in Glance a few steps ago. › List all available flavors and choose best meeting your hardware requirements. curl -X POST -H ”Content-type: application/json” http://localhost:5000/v2.0/tokens –d ’{”auth”: {”passwordCredentials”: {”username”:$USER_NAME, ”password”:$USER_PASS}, ”tenantId”:$TENANT_ID}}’ curl -X GET -H ”Accept: application/json” http://localhost:8774/v2/$TENANT_ID/images 401 Unauthorized curl –X GET -H ”Accept: application/json” -H “X-Auth-Token: $AUTH_TOKEN” http:// localhost:8774/v2/$TENANT_ID/images curl -X GET -H ”Accept: application/json” -H “X-Auth-Token: $AUTH_TOKEN” http:// localhost:8774/v2/$TENANT_ID/flavors
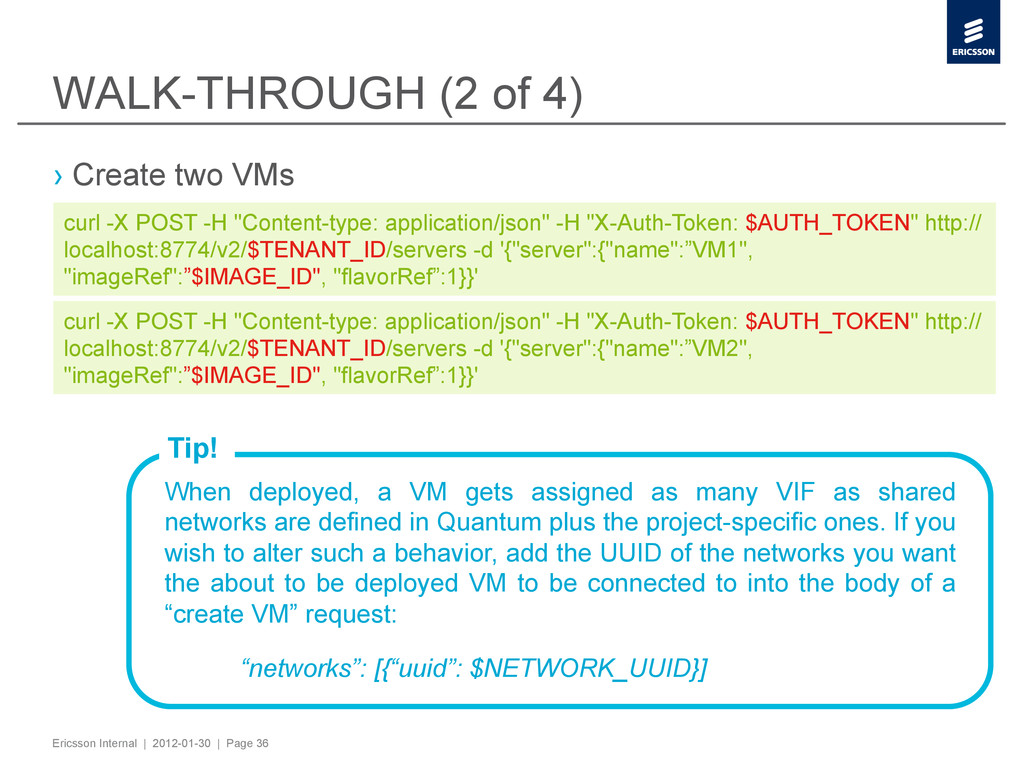
4) › Create two VMs curl -X POST -H "Content-type: application/json" -H "X-Auth-Token: $AUTH_TOKEN" http:// localhost:8774/v2/$TENANT_ID/servers -d '{"server":{"name":”VM1", "imageRef":”$IMAGE_ID", "flavorRef”:1}}' curl -X POST -H "Content-type: application/json" -H "X-Auth-Token: $AUTH_TOKEN" http:// localhost:8774/v2/$TENANT_ID/servers -d '{"server":{"name":”VM2", "imageRef":”$IMAGE_ID", "flavorRef”:1}}' When deployed, a VM gets assigned as many VIF as shared networks are defined in Quantum plus the project-specific ones. If you wish to alter such a behavior, add the UUID of the networks you want the about to be deployed VM to be connected to into the body of a “create VM” request: “networks”: [{“uuid”: $NETWORK_UUID}] Tip!
4) › Check how many running VMs you have. › Install virt-viewer on your compute host and log in into the deployed VMs. virsh list --all apt-get install -y virt-viewer curl -X GET -H ”Accept: application/json” -H “X-Auth-Token: $AUTH_TOKEN” http:// localhost:8774/v2/$TENANT_ID/servers virt-viewer $VM_ID & virsh and virt-viewer commands directly interact with the hypervisor, which means you might need to run these commands on each compute host (machine running the nova-compute service). Beware!
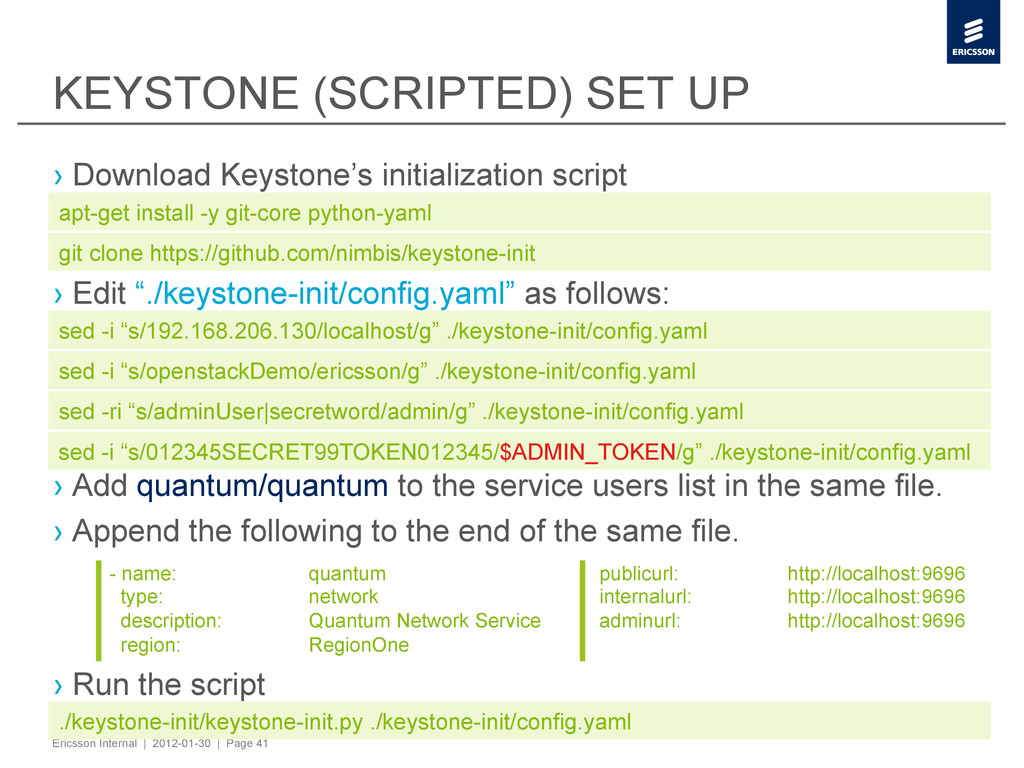
UP › Download Keystone’s initialization script › Edit “./keystone-init/config.yaml” as follows: › Add quantum/quantum to the service users list in the same file. › Append the following to the end of the same file. › Run the script apt-get install -y git-core python-yaml git clone https://github.com/nimbis/keystone-init sed -i “s/192.168.206.130/localhost/g” ./keystone-init/config.yaml sed -i “s/openstackDemo/ericsson/g” ./keystone-init/config.yaml ./keystone-init/keystone-init.py ./keystone-init/config.yaml - name: quantum type: network description: Quantum Network Service region: RegionOne publicurl: http://localhost:9696 internalurl: http://localhost:9696 adminurl: http://localhost:9696 sed -i “s/012345SECRET99TOKEN012345/$ADMIN_TOKEN/g” ./keystone-init/config.yaml sed -ri “s/adminUser|secretword/admin/g” ./keystone-init/config.yaml
![OPENSTACK Enrique Fernández Casado [email protected] [email protected] HANDS-ON SESSION:](https://files.speakerdeck.com/presentations/3175af80fdee0130f6d9022f0de05eea/slide_0.jpg)