advanced functions User’s Guide advanced functions Version Version 1 Publisher AU IT / BSS Support Fuglesangs Allé 4 8210 Aarhus V Knowledge group Advanced Multimedia Group Editors Margit Grønborg, Merethe Kirstine Juhl Hollen Reviewers Margit Grønborg, Merethe Kirstine Juhl Hollen Photos and graphics AU Kommunikation, Blackboard Design AU Kommunikation, Advanced Multimedia Group
- advanced functions Introduction Blackboard is the Learning Management System (LMS) at BSS, i.e. the online system for course management and e-learning at School of Business and Social Sciences at Aarhus Universitet. This user’s guide to advanced Blackboard functionality is intended for teachers at Aarhus Uni- versity. Among the subjects and functions that are described here are the collaborative tools and student feedback functions in Blackboard. Blackboard is accessed by login at blackboard.au.dk using WAYF login (’Where Are You From’). The password is the same as for mit.au.dk. A Blackboard support web page is available in case you have questions or need help logging on to or using Blackboard. Please visit this web page by clicking the link below in order to find the correct department or person to respond to your inquiry. bss.au.dk/bbsupport BSS Support, Aarhus Universitet K K K K
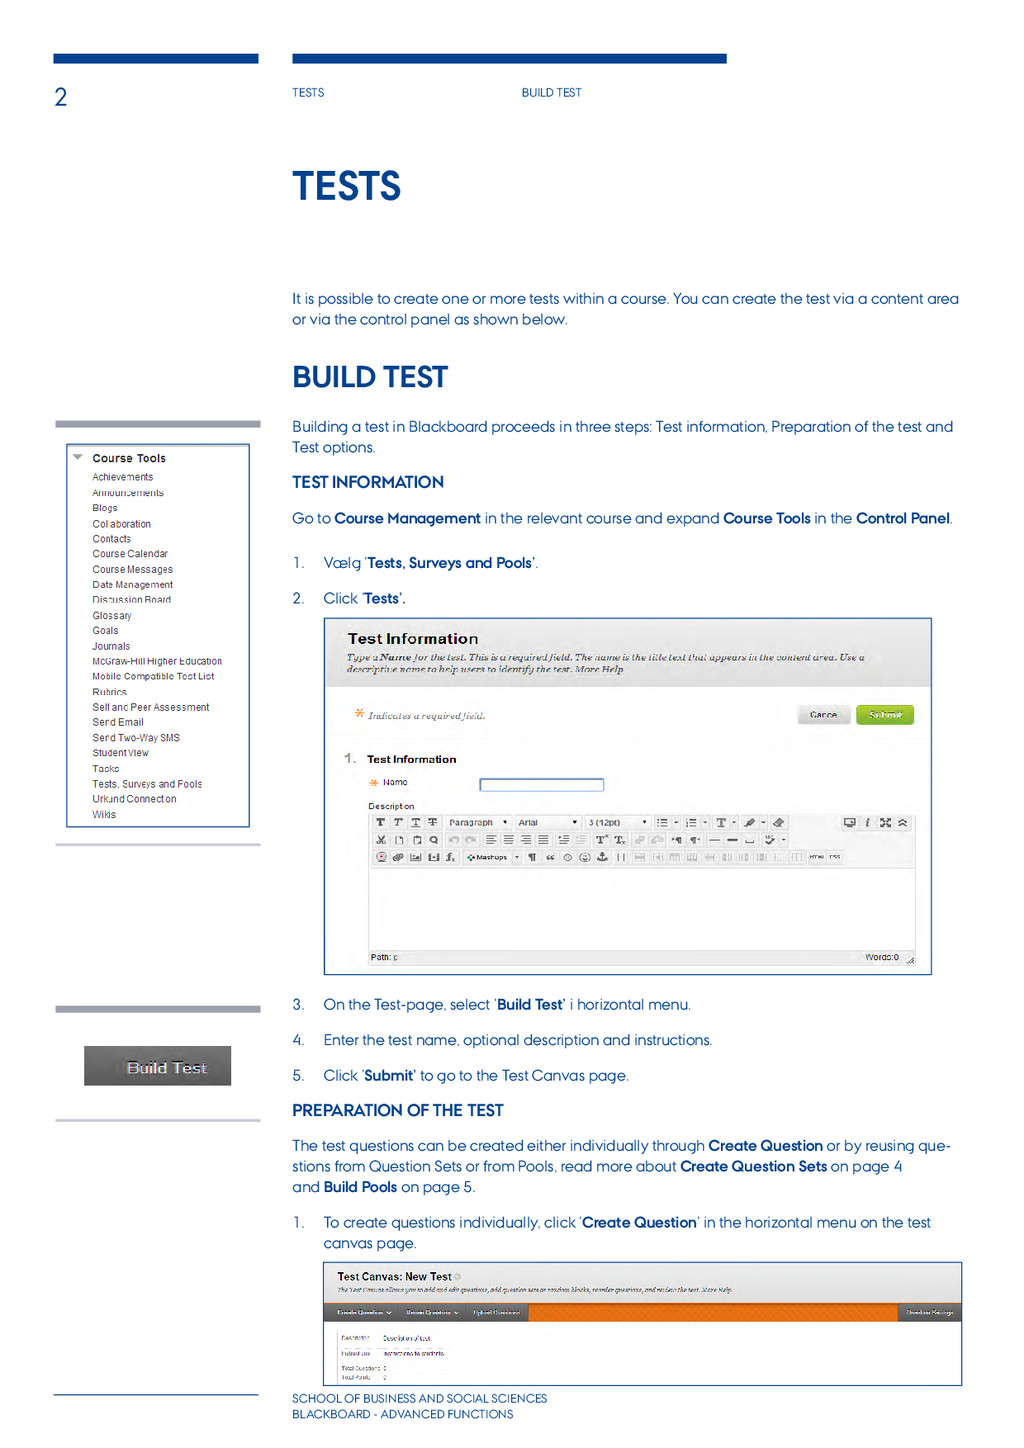
bLACKBOARD - advanced functions It is possible to create one or more tests within a course. You can create the test via a content area or via the control panel as shown below. Build Test Building a test in Blackboard proceeds in three steps: Test information, Preparation of the test and Test options. test information Go to Course Management in the relevant course and expand Course Tools in the Control Panel. 1. Vælg ’Tests, Surveys and Pools’. 2. Click ’Tests’. 3. On the Test-page, select ’Build Test’ i horizontal menu. 4. Enter the test name, optional description and instructions. 5. Click ’Submit’ to go to the Test Canvas page. Preparation of the Test The test questions can be created either individually through Create Question or by reusing que- stions from Question Sets or from Pools, read more about Create Question Sets on page 4 and Build Pools on page 5. 1. To create questions individually, click ’Create Question’ in the horizontal menu on the test canvas page. Tests
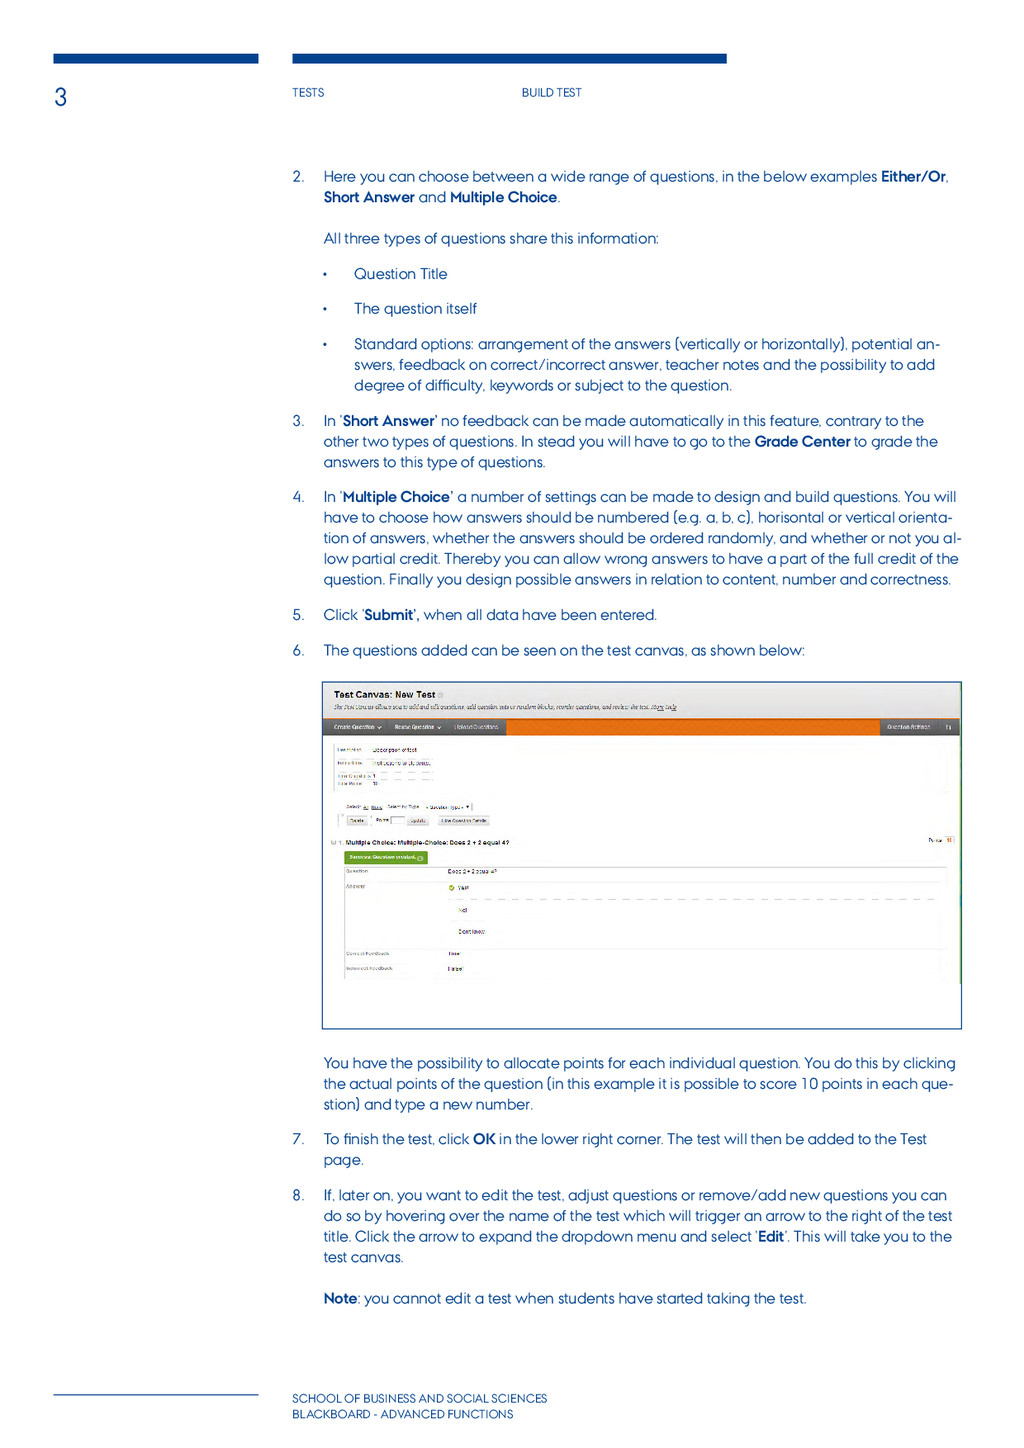
bLACKBOARD - advanced functions 2. Here you can choose between a wide range of questions, in the below examples Either/Or, Short Answer and Multiple Choice. All three types of questions share this information: • Question Title • The question itself • Standard options: arrangement of the answers (vertically or horizontally), potential an- swers, feedback on correct/incorrect answer, teacher notes and the possibility to add degree of difficulty, keywords or subject to the question. 3. In ’Short Answer’ no feedback can be made automatically in this feature, contrary to the other two types of questions. In stead you will have to go to the Grade Center to grade the answers to this type of questions. 4. In ’Multiple Choice’ a number of settings can be made to design and build questions. You will have to choose how answers should be numbered (e.g. a, b, c), horisontal or vertical orienta- tion of answers, whether the answers should be ordered randomly, and whether or not you al- low partial credit. Thereby you can allow wrong answers to have a part of the full credit of the question. Finally you design possible answers in relation to content, number and correctness. 5. Click ’Submit’, when all data have been entered. 6. The questions added can be seen on the test canvas, as shown below: You have the possibility to allocate points for each individual question. You do this by clicking the actual points of the question (in this example it is possible to score 10 points in each que- stion) and type a new number. 7. To finish the test, click OK in the lower right corner. The test will then be added to the Test page. 8. If, later on, you want to edit the test, adjust questions or remove/add new questions you can do so by hovering over the name of the test which will trigger an arrow to the right of the test title. Click the arrow to expand the dropdown menu and select ’Edit’. This will take you to the test canvas. Note: you cannot edit a test when students have started taking the test.
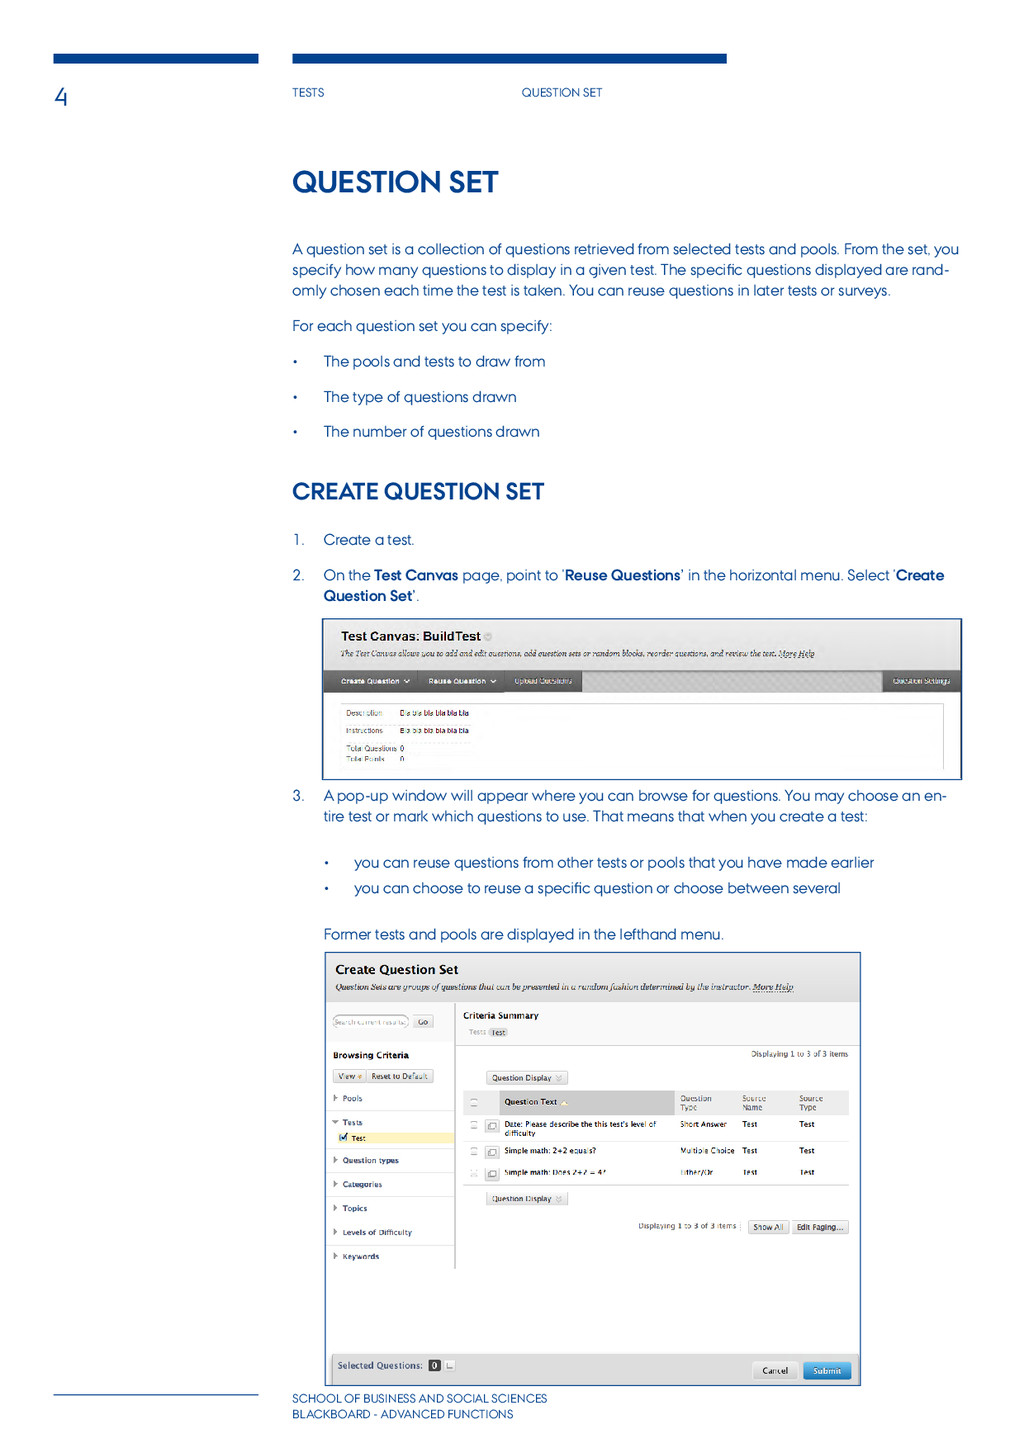
bLACKBOARD - advanced functions A question set is a collection of questions retrieved from selected tests and pools. From the set, you specify how many questions to display in a given test. The specific questions displayed are rand- omly chosen each time the test is taken. You can reuse questions in later tests or surveys. For each question set you can specify: • The pools and tests to draw from • The type of questions drawn • The number of questions drawn Create Question Set 1. Create a test. 2. On the Test Canvas page, point to ’Reuse Questions’ in the horizontal menu. Select ’Create Question Set’. 3. A pop-up window will appear where you can browse for questions. You may choose an en- tire test or mark which questions to use. That means that when you create a test: • you can reuse questions from other tests or pools that you have made earlier • you can choose to reuse a specific question or choose between several Former tests and pools are displayed in the lefthand menu. Question Set
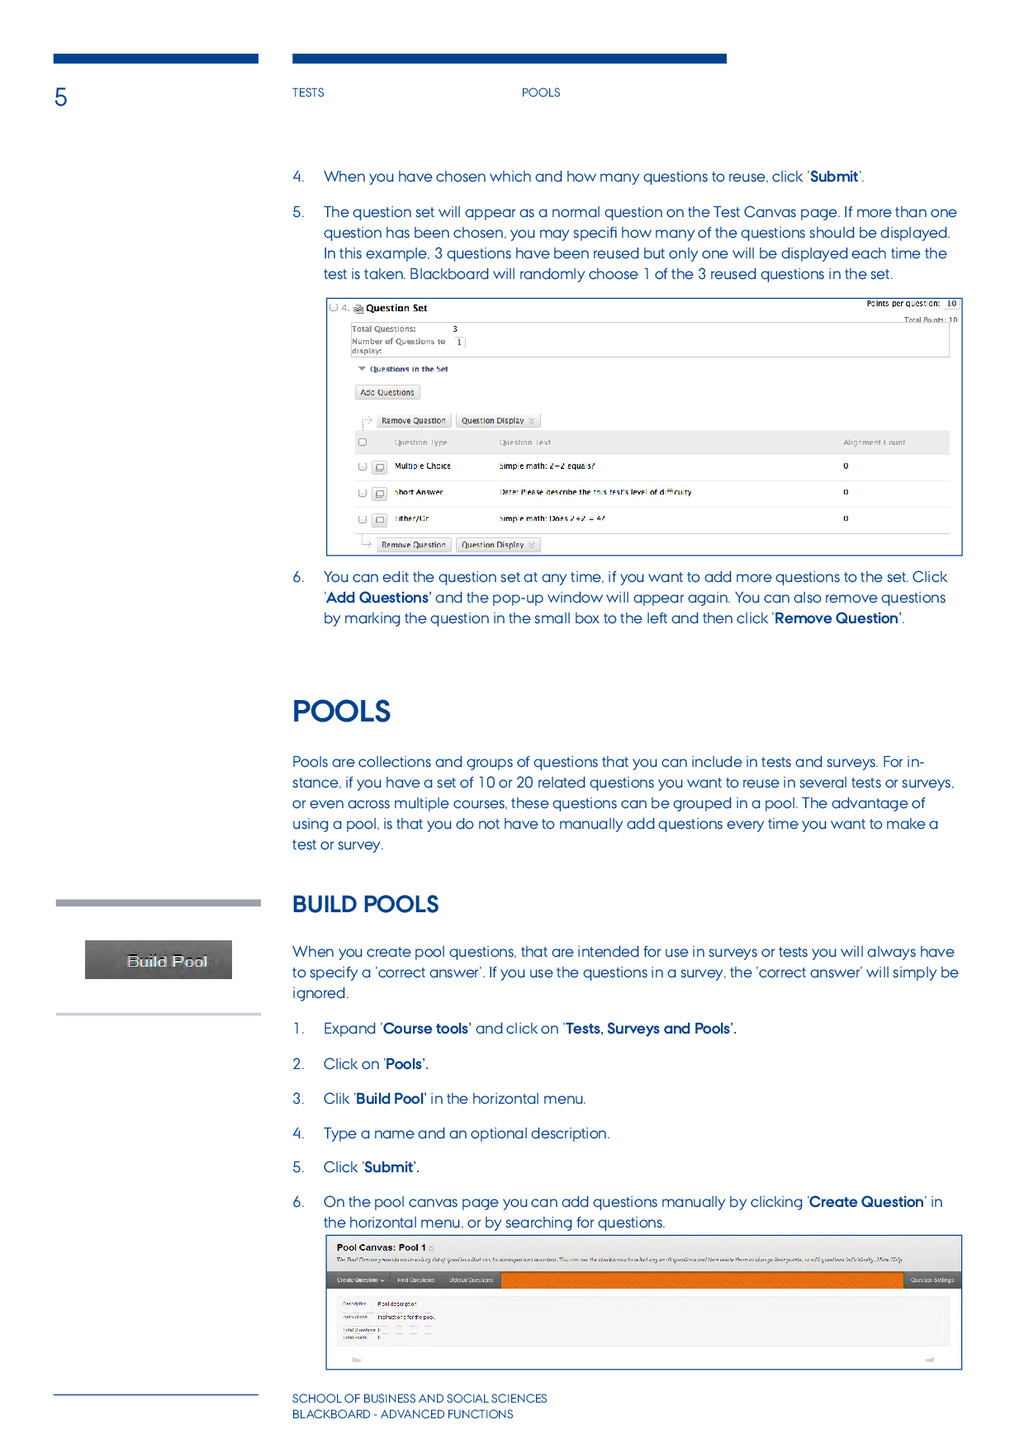
- advanced functions 4. When you have chosen which and how many questions to reuse, click ’Submit’. 5. The question set will appear as a normal question on the Test Canvas page. If more than one question has been chosen, you may specifi how many of the questions should be displayed. In this example, 3 questions have been reused but only one will be displayed each time the test is taken. Blackboard will randomly choose 1 of the 3 reused questions in the set. 6. You can edit the question set at any time, if you want to add more questions to the set. Click ’Add Questions’ and the pop-up window will appear again. You can also remove questions by marking the question in the small box to the left and then click ’Remove Question’. Pools Pools are collections and groups of questions that you can include in tests and surveys. For in- stance, if you have a set of 10 or 20 related questions you want to reuse in several tests or surveys, or even across multiple courses, these questions can be grouped in a pool. The advantage of using a pool, is that you do not have to manually add questions every time you want to make a test or survey. Build Pools When you create pool questions, that are intended for use in surveys or tests you will always have to specify a ’correct answer’. If you use the questions in a survey, the ’correct answer’ will simply be ignored. 1. Expand ’Course tools’ and click on ’Tests, Surveys and Pools’. 2. Click on ’Pools’. 3. Clik ’Build Pool’ in the horizontal menu. 4. Type a name and an optional description. 5. Click ’Submit’. 6. On the pool canvas page you can add questions manually by clicking ’Create Question’ in the horizontal menu, or by searching for questions.
- advanced functions • The procedure for adding questions is identical to adding questions to a test, see page 2. • Searching for questions works in the same way as described in the section ’Question Set’ on page 4 by clicking ’Find Questions’. There you can add already created questions from other tests to your pool. 7. When questions have been added, click OK. 8. In the Pool Canvas you can see the pool you have just added. You can always edit the con- tent of the pool by clicking the arrow to the left of the pool name. 9. You can reuse the questions from a pool when building a test. The procedure is the same as when using questions from a Question Set, see page 4. • on the test canvas page you can choose ’Reuse Question’ from the horizontal menu. Then choose ’Find Question’ • you now have the option to copy a question or to link to the question itself. • Note: when linking to a question from a pool a modification of the pool question will also change the test question. • Note! If course participants have already made attempts to the test, changing a que- stion may affect test scores. Therefore it is often better to copy a question than to change it. 10. When you have chosen to either copy or link to a question, you search for questions in the available pools. 11. Afterwards, you choose which questions to include in the particular test. 12. Click ’OK’ to go to Test Options. Test options You are now ready for setting the Test Options. 1. Test Information: type information of the test. 2. Test Availability: make the link available, choose the number of attempts, set optional due date or date restrictions. 3. Test Availability Exceptions: make the test available to single users or groups. 4. Due Date: select date and time for assessment and decide whether you will allow attempts after due date.
- advanced functions 5. Self-assessment Options: By default, the test is included in the Grade Centre where you can give feedback to students. 6. Test Results and Feedback: Choose settings for display of feedback and results. 7. Test Presentation: Choose, how questions should be presented to students. 8. Clik på ’Submit’.
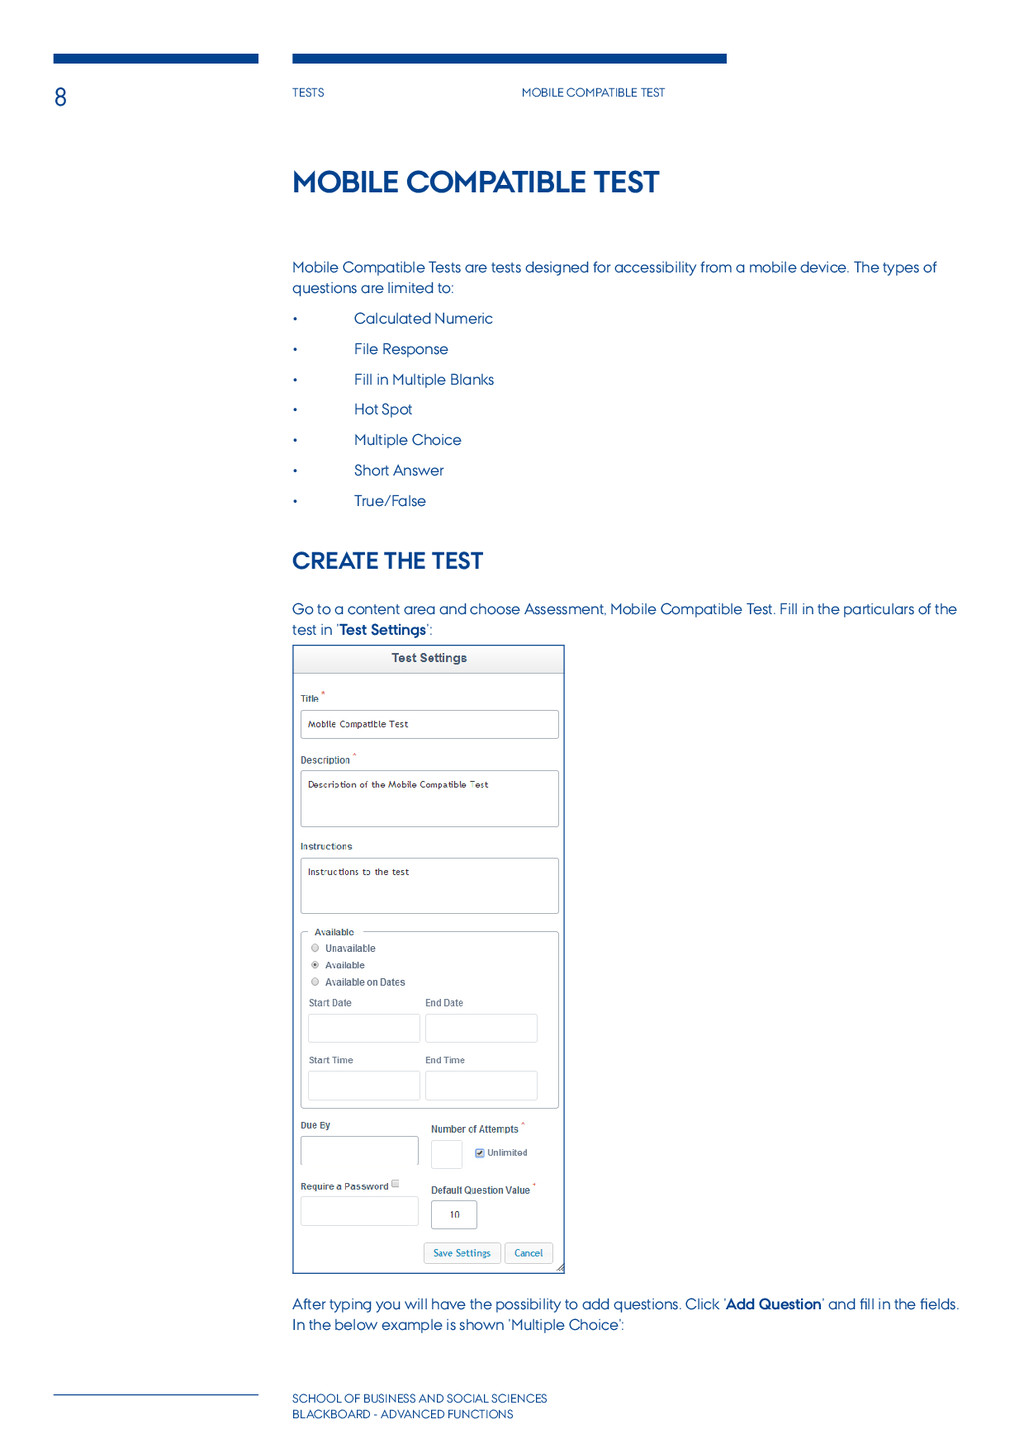
SCIENCES bLACKBOARD - advanced functions Mobile Compatible Test Mobile Compatible Tests are tests designed for accessibility from a mobile device. The types of questions are limited to: • Calculated Numeric • File Response • Fill in Multiple Blanks • Hot Spot • Multiple Choice • Short Answer • True/False Create the Test Go to a content area and choose Assessment, Mobile Compatible Test. Fill in the particulars of the test in ’Test Settings’: After typing you will have the possibility to add questions. Click ’Add Question’ and fill in the fields. In the below example is shown ’Multiple Choice’:
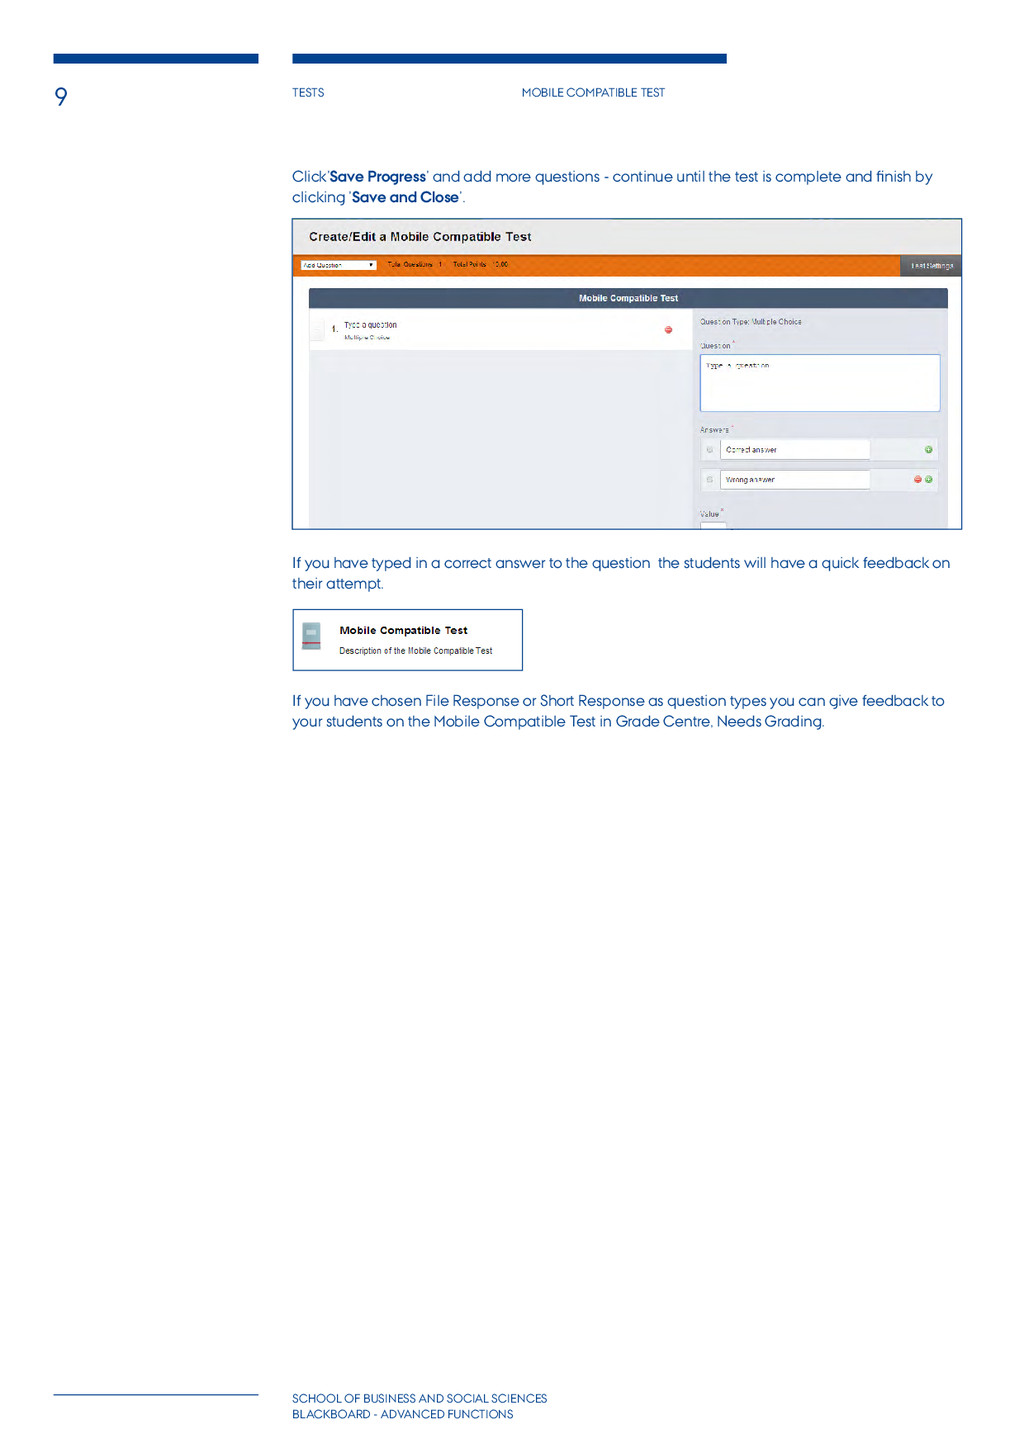
SCIENCES bLACKBOARD - advanced functions Click’Save Progress’ and add more questions - continue until the test is complete and finish by clicking ’Save and Close’. If you have typed in a correct answer to the question the students will have a quick feedback on their attempt. If you have chosen File Response or Short Response as question types you can give feedback to your students on the Mobile Compatible Test in Grade Centre, Needs Grading.
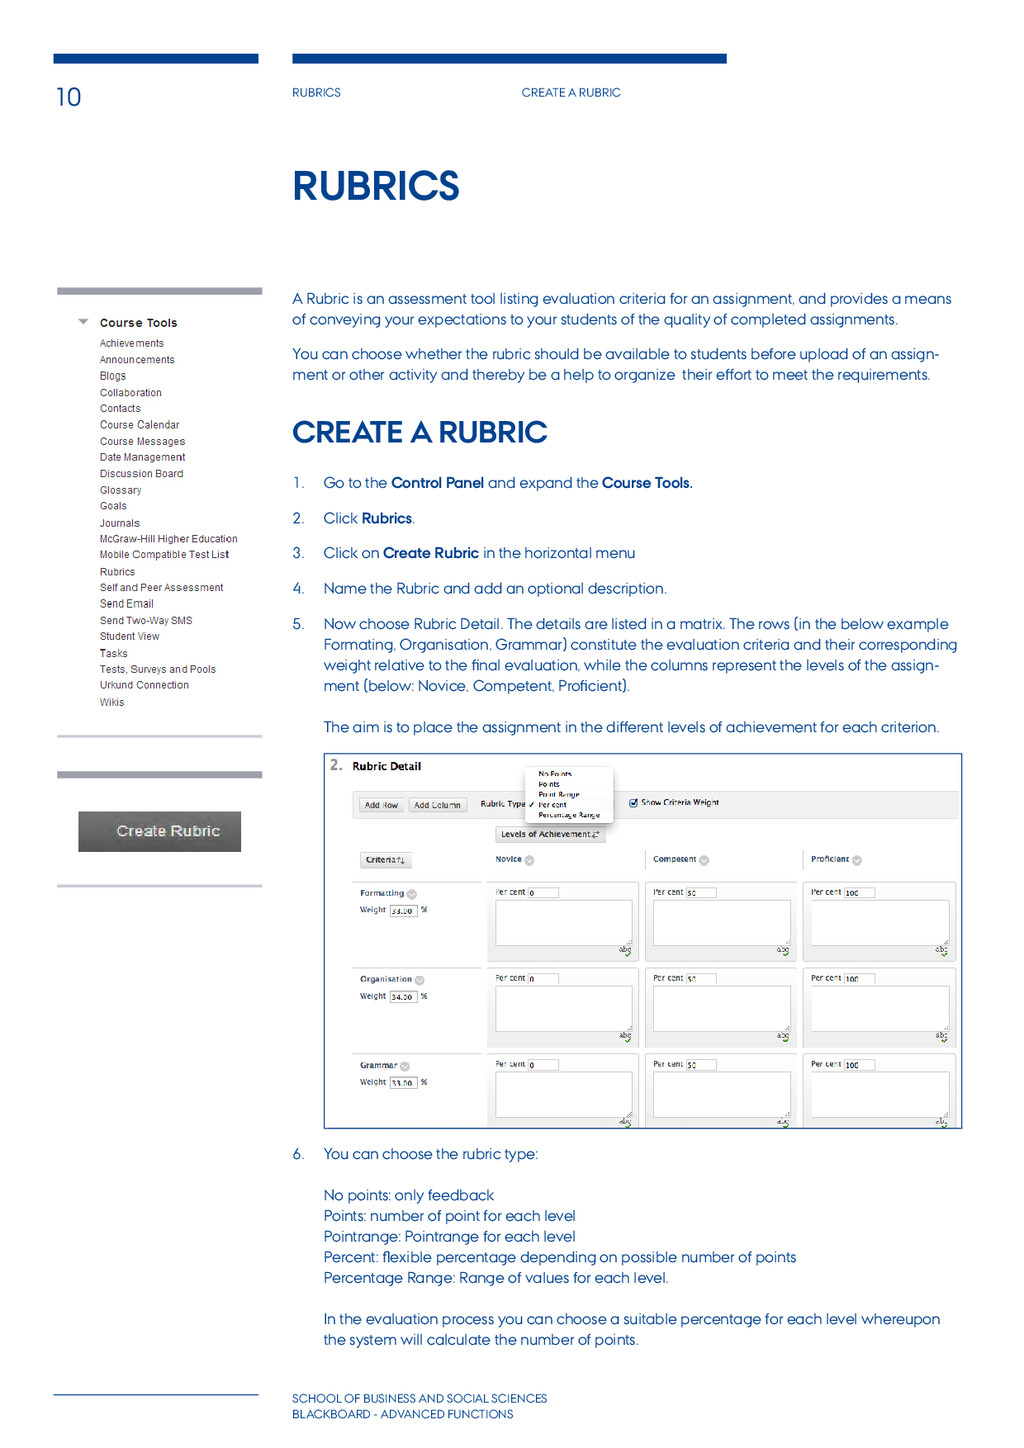
SCIENCES bLACKBOARD - advanced functions A Rubric is an assessment tool listing evaluation criteria for an assignment, and provides a means of conveying your expectations to your students of the quality of completed assignments. You can choose whether the rubric should be available to students before upload of an assign- ment or other activity and thereby be a help to organize their effort to meet the requirements. Create a Rubric 1. Go to the Control Panel and expand the Course Tools. 2. Click Rubrics. 3. Click on Create Rubric in the horizontal menu 4. Name the Rubric and add an optional description. 5. Now choose Rubric Detail. The details are listed in a matrix. The rows (in the below example Formating, Organisation, Grammar) constitute the evaluation criteria and their corresponding weight relative to the final evaluation, while the columns represent the levels of the assign- ment (below: Novice, Competent, Proficient). The aim is to place the assignment in the different levels of achievement for each criterion. 6. You can choose the rubric type: No points: only feedback Points: number of point for each level Pointrange: Pointrange for each level Percent: flexible percentage depending on possible number of points Percentage Range: Range of values for each level. In the evaluation process you can choose a suitable percentage for each level whereupon the system will calculate the number of points. Rubrics
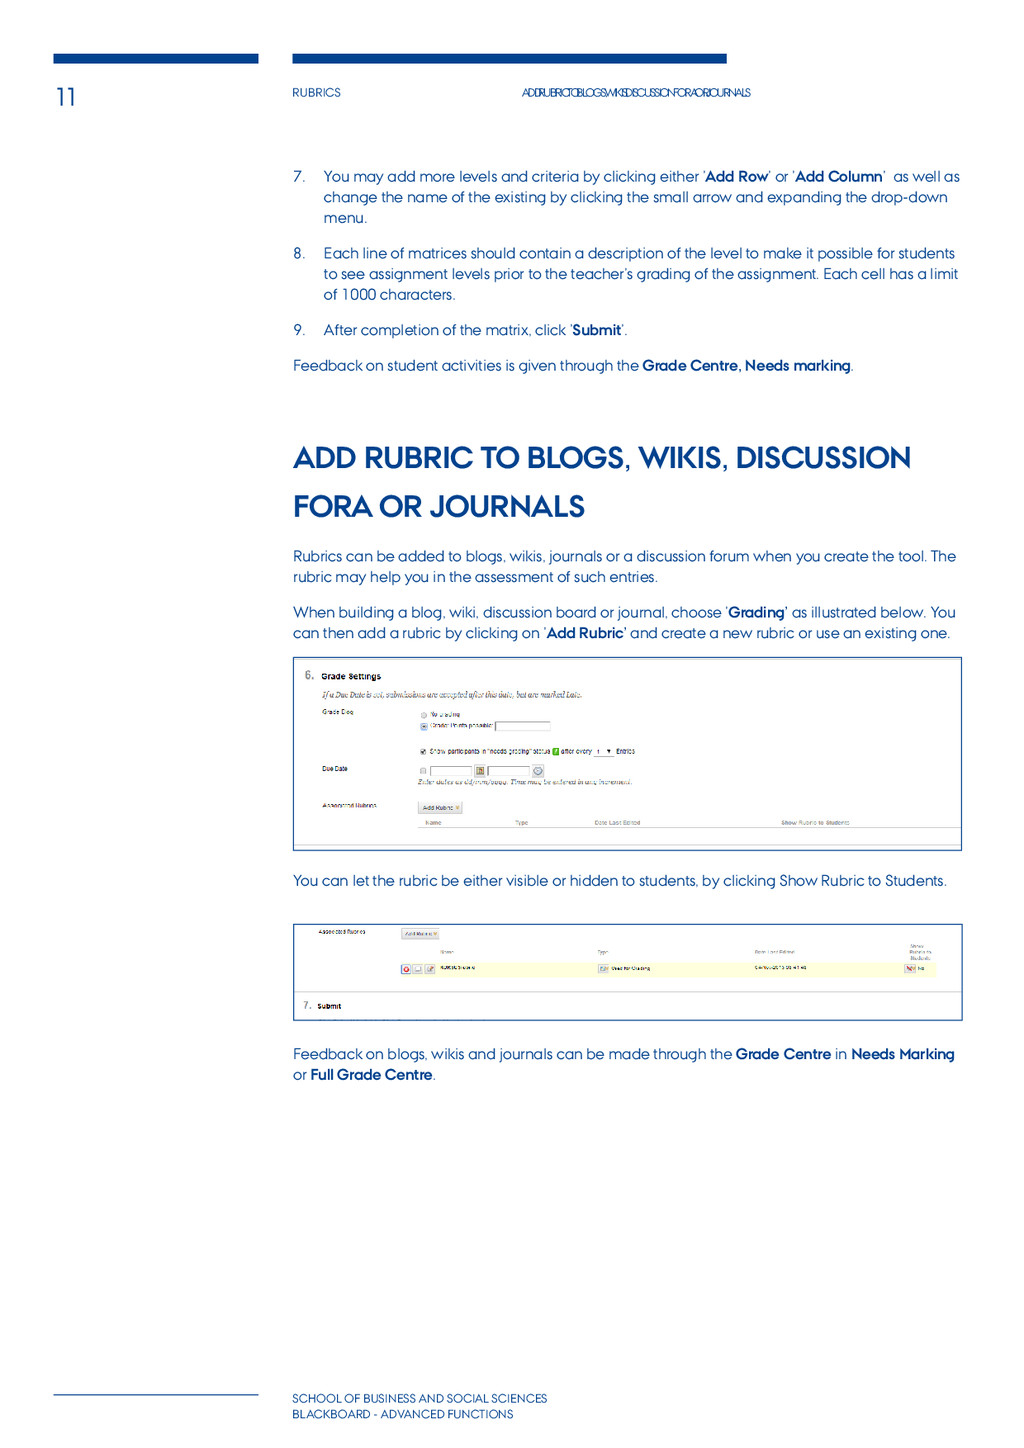
journals School of BUSINESS AND SOCIAL SCIENCES bLACKBOARD - advanced functions 7. You may add more levels and criteria by clicking either ’Add Row’ or ’Add Column’ as well as change the name of the existing by clicking the small arrow and expanding the drop-down menu. 8. Each line of matrices should contain a description of the level to make it possible for students to see assignment levels prior to the teacher’s grading of the assignment. Each cell has a limit of 1000 characters. 9. After completion of the matrix, click ’Submit’. Feedback on student activities is given through the Grade Centre, Needs marking. Add Rubric to Blogs, Wikis, Discussion Fora or Journals Rubrics can be added to blogs, wikis, journals or a discussion forum when you create the tool. The rubric may help you in the assessment of such entries. When building a blog, wiki, discussion board or journal, choose ’Grading’ as illustrated below. You can then add a rubric by clicking on ’Add Rubric’ and create a new rubric or use an existing one. You can let the rubric be either visible or hidden to students, by clicking Show Rubric to Students. Feedback on blogs, wikis and journals can be made through the Grade Centre in Needs Marking or Full Grade Centre.
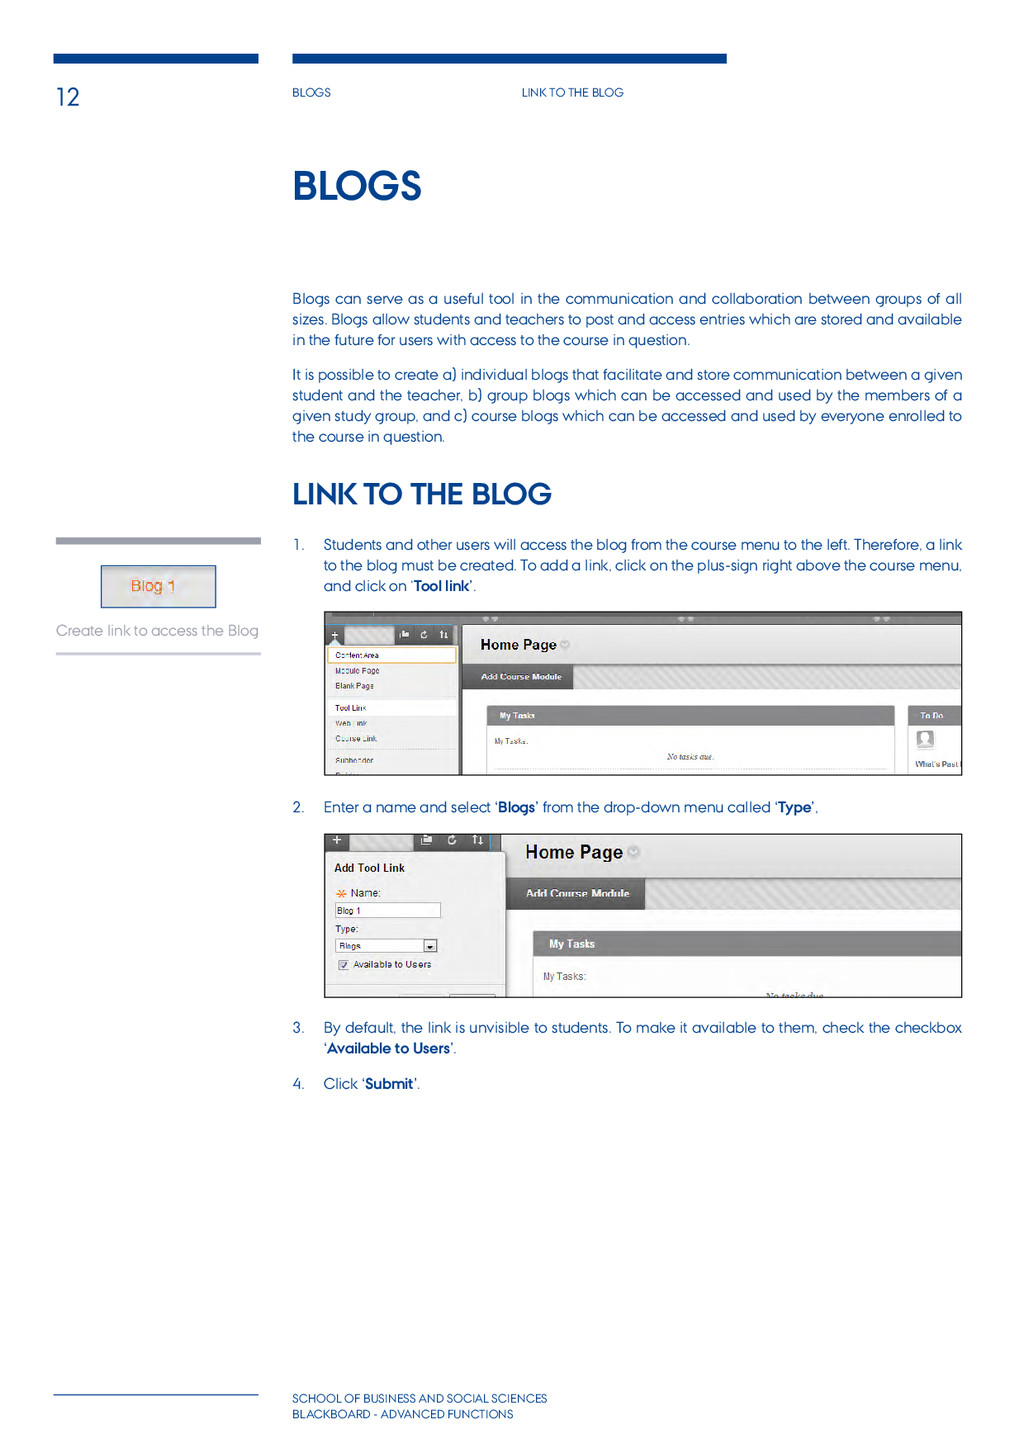
SOCIAL SCIENCES bLACKBOARD - advanced functions Blogs Blogs can serve as a useful tool in the communication and collaboration between groups of all sizes. Blogs allow students and teachers to post and access entries which are stored and available in the future for users with access to the course in question. It is possible to create a) individual blogs that facilitate and store communication between a given student and the teacher, b) group blogs which can be accessed and used by the members of a given study group, and c) course blogs which can be accessed and used by everyone enrolled to the course in question. Link to the Blog 1. Students and other users will access the blog from the course menu to the left. Therefore, a link to the blog must be created. To add a link, click on the plus-sign right above the course menu, and click on ‘Tool link’. 2. Enter a name and select ‘Blogs’ from the drop-down menu called ‘Type’, 3. By default, the link is unvisible to students. To make it available to them, check the checkbox ‘Available to Users’. 4. Click ‘Submit’. Create link to access the Blog
bLACKBOARD - advanced functions Create Blog 1. Click on the new link you just created in the course menu. 2. Click on ‘Create Blog’. 3. Give the blog a name. An available and optional feature is adding instructions to the blog in the text editor under ‘Instructions’. 4. To add rubrics to the blog click ’Grade - points possible’ in point ’6 Grade Settings’. Chosse ’Add Rubric’ and add an already made rubric or create another, see page 10. 5. Click on ‘Submit’ to save the blog. Use Blog 1. In order to use the blog, first click the tool link that you just created in the course menu. 2. Click the name of the blog and then click ‘Create Blog Entry’ in order to create and publish an entry in the blog. 3. Give your entry a title and compose the entry. 4. Click ‘Post Entry’ in order to publish your message. The blog entry is now saved and visible to other users. Post entries in blogs to other members of the course
bLACKBOARD - advanced functions 5. Switch to ‘Student View’ in the upper right corner in order to see how the blog looks for students. Anyone enrolled in the course can post entries and comments and thereby contribute to the communication and collaboration among multiple users. You can give feedback to your students on a blog, see page 21.
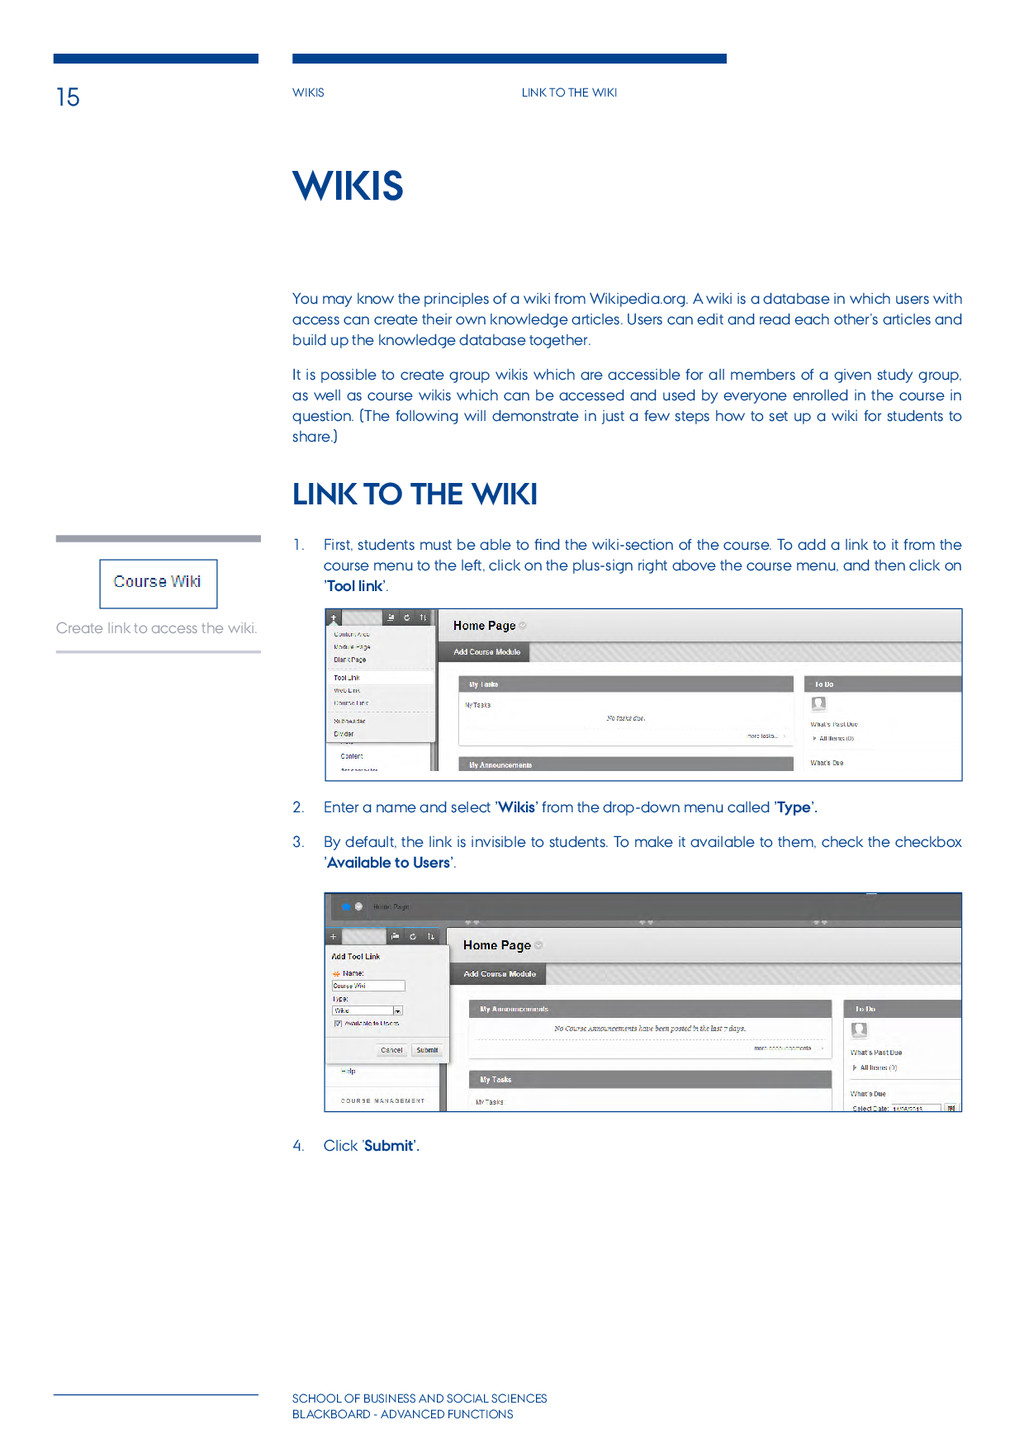
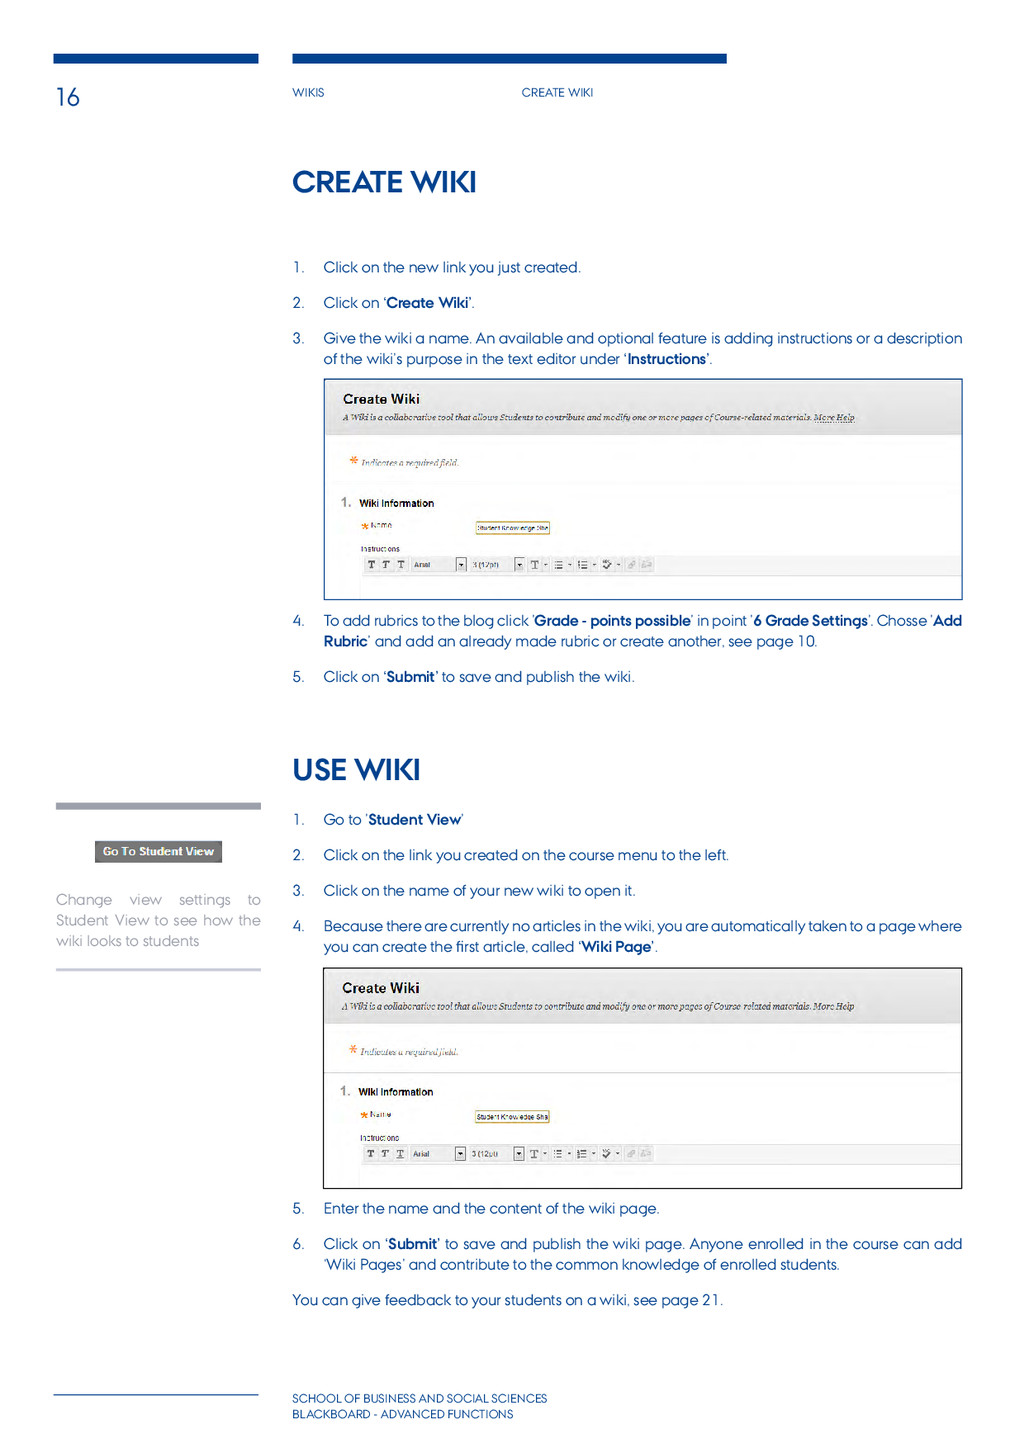
SOCIAL SCIENCES bLACKBOARD - advanced functions Wikis You may know the principles of a wiki from Wikipedia.org. A wiki is a database in which users with access can create their own knowledge articles. Users can edit and read each other’s articles and build up the knowledge database together. It is possible to create group wikis which are accessible for all members of a given study group, as well as course wikis which can be accessed and used by everyone enrolled in the course in question. (The following will demonstrate in just a few steps how to set up a wiki for students to share.) Link to the Wiki 1. First, students must be able to find the wiki-section of the course. To add a link to it from the course menu to the left, click on the plus-sign right above the course menu, and then click on ’Tool link’. 2. Enter a name and select ’Wikis’ from the drop-down menu called ’Type’. 3. By default, the link is invisible to students. To make it available to them, check the checkbox ’Available to Users’. 4. Click ’Submit’. Create link to access the wiki.
bLACKBOARD - advanced functions Create Wiki 1. Click on the new link you just created. 2. Click on ‘Create Wiki’. 3. Give the wiki a name. An available and optional feature is adding instructions or a description of the wiki’s purpose in the text editor under ‘Instructions’. 4. To add rubrics to the blog click ’Grade - points possible’ in point ’6 Grade Settings’. Chosse ’Add Rubric’ and add an already made rubric or create another, see page 10. 5. Click on ‘Submit’ to save and publish the wiki. Use Wiki 1. Go to ’Student View’ 2. Click on the link you created on the course menu to the left. 3. Click on the name of your new wiki to open it. 4. Because there are currently no articles in the wiki, you are automatically taken to a page where you can create the first article, called ‘Wiki Page’. 5. Enter the name and the content of the wiki page. 6. Click on ‘Submit’ to save and publish the wiki page. Anyone enrolled in the course can add ‘Wiki Pages’ and contribute to the common knowledge of enrolled students. You can give feedback to your students on a wiki, see page 21. Change view settings to Student View to see how the wiki looks to students
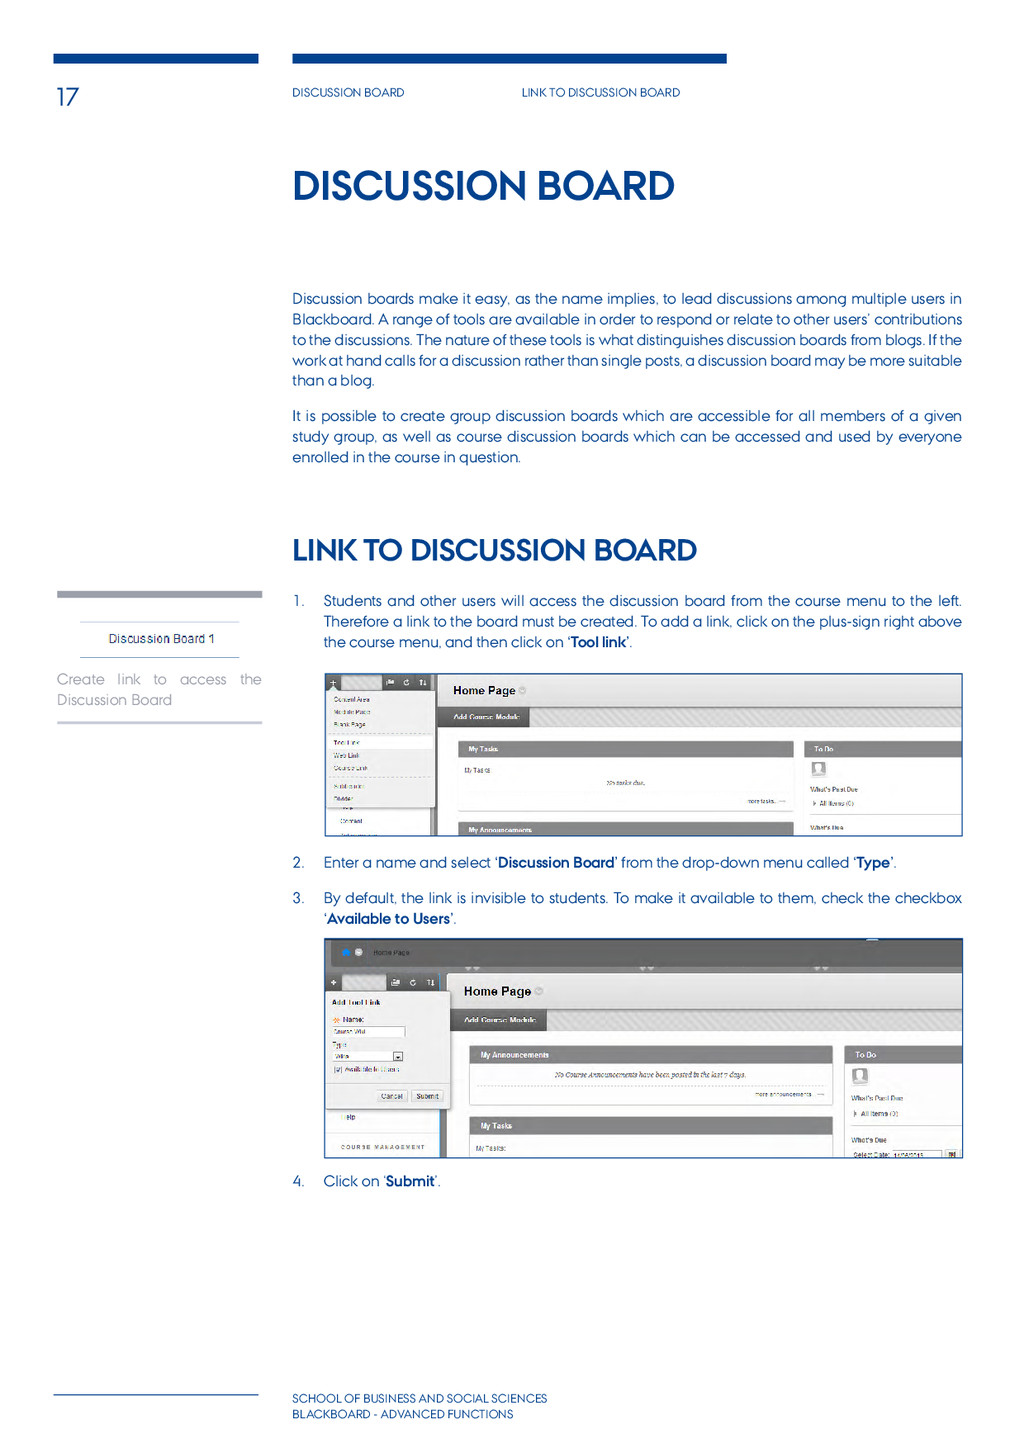
AND SOCIAL SCIENCES bLACKBOARD - advanced functions Discussion Board Discussion boards make it easy, as the name implies, to lead discussions among multiple users in Blackboard. A range of tools are available in order to respond or relate to other users’ contributions to the discussions. The nature of these tools is what distinguishes discussion boards from blogs. If the work at hand calls for a discussion rather than single posts, a discussion board may be more suitable than a blog. It is possible to create group discussion boards which are accessible for all members of a given study group, as well as course discussion boards which can be accessed and used by everyone enrolled in the course in question. Link to Discussion Board 1. Students and other users will access the discussion board from the course menu to the left. Therefore a link to the board must be created. To add a link, click on the plus-sign right above the course menu, and then click on ‘Tool link’. 2. Enter a name and select ‘Discussion Board’ from the drop-down menu called ‘Type’. 3. By default, the link is invisible to students. To make it available to them, check the checkbox ‘Available to Users’. 4. Click on ‘Submit’. Create link to access the Discussion Board
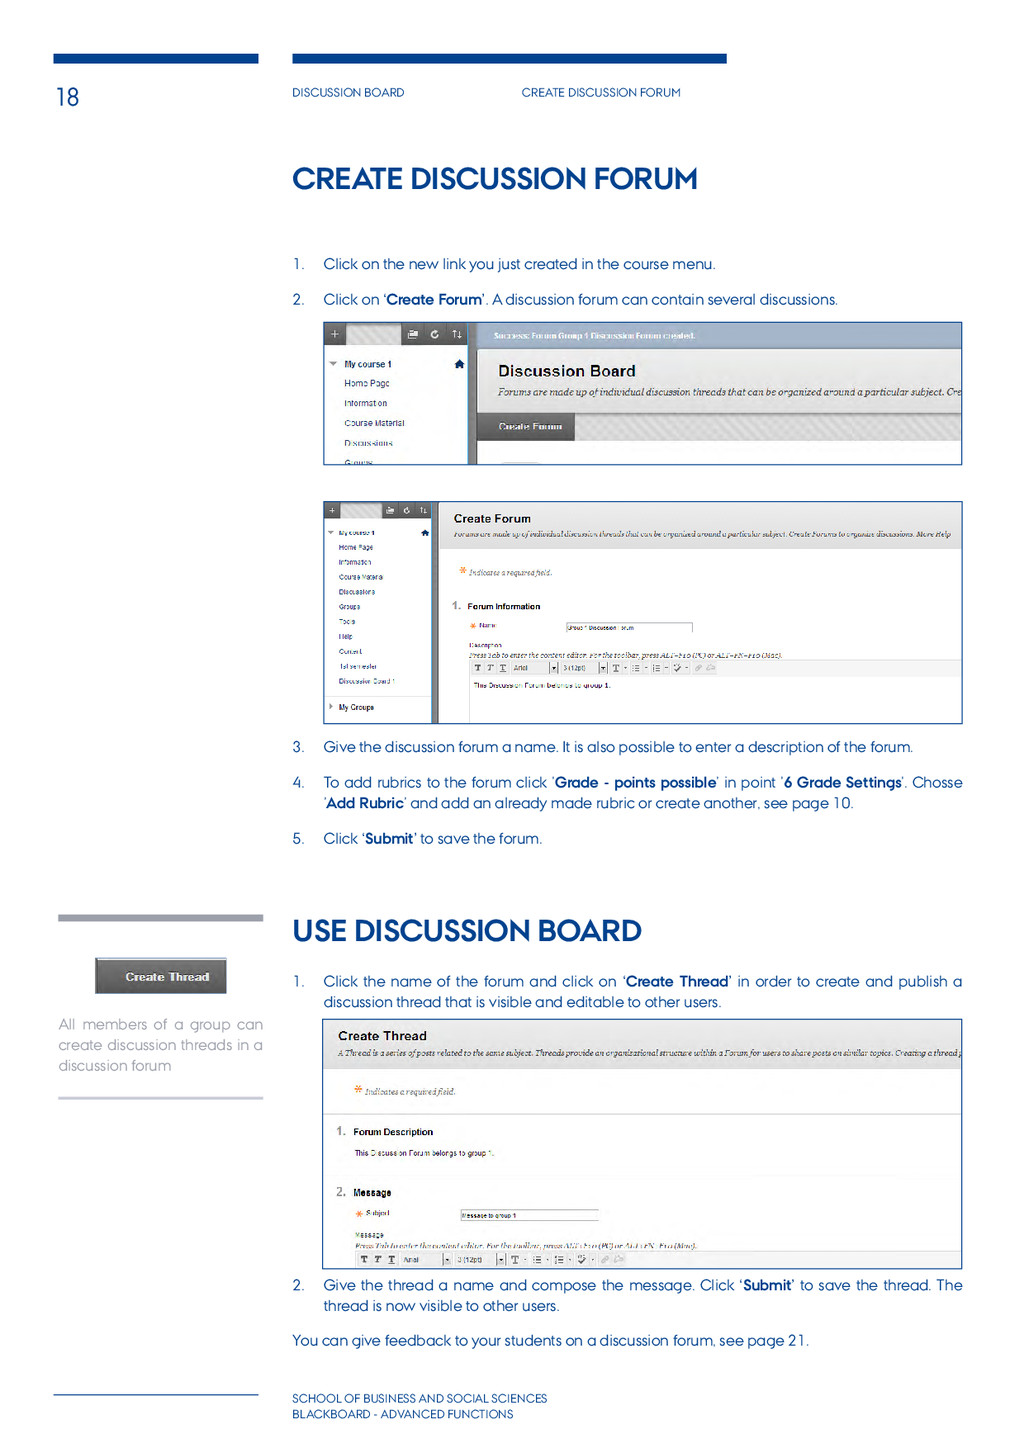
SOCIAL SCIENCES bLACKBOARD - advanced functions Create Discussion Forum 1. Click on the new link you just created in the course menu. 2. Click on ‘Create Forum’. A discussion forum can contain several discussions. 3. Give the discussion forum a name. It is also possible to enter a description of the forum. 4. To add rubrics to the forum click ’Grade - points possible’ in point ’6 Grade Settings’. Chosse ’Add Rubric’ and add an already made rubric or create another, see page 10. 5. Click ‘Submit’ to save the forum. Use Discussion Board 1. Click the name of the forum and click on ‘Create Thread’ in order to create and publish a discussion thread that is visible and editable to other users. 2. Give the thread a name and compose the message. Click ‘Submit’ to save the thread. The thread is now visible to other users. You can give feedback to your students on a discussion forum, see page 21. All members of a group can create discussion threads in a discussion forum
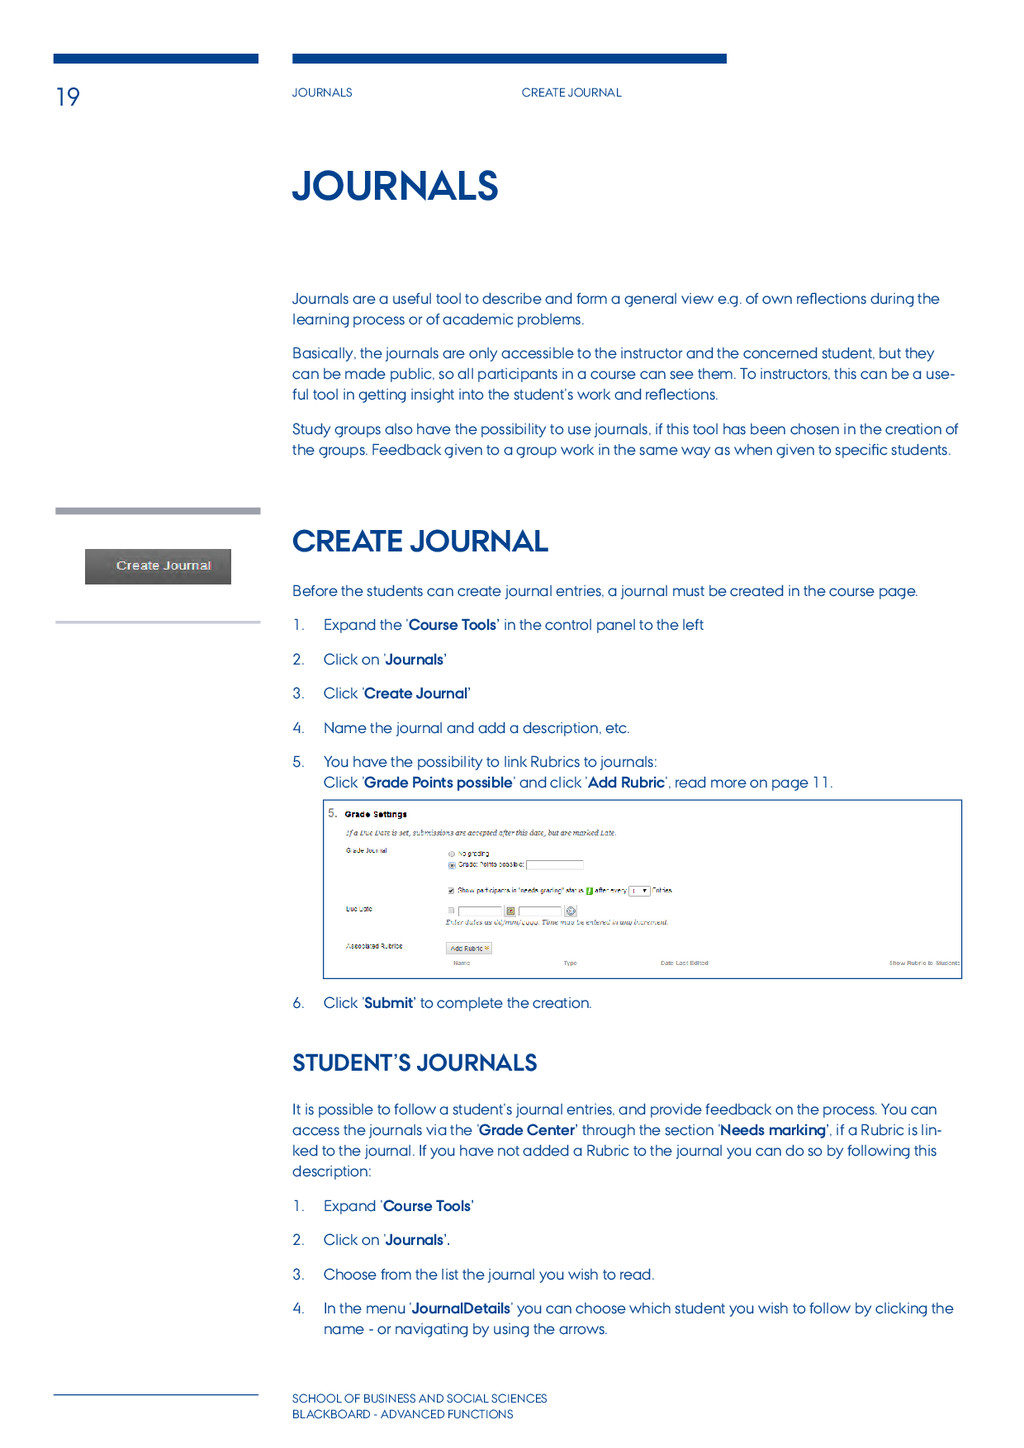
bLACKBOARD - advanced functions Journals Journals are a useful tool to describe and form a general view e.g. of own reflections during the learning process or of academic problems. Basically, the journals are only accessible to the instructor and the concerned student, but they can be made public, so all participants in a course can see them. To instructors, this can be a use- ful tool in getting insight into the student’s work and reflections. Study groups also have the possibility to use journals, if this tool has been chosen in the creation of the groups. Feedback given to a group work in the same way as when given to specific students. Create Journal Before the students can create journal entries, a journal must be created in the course page. 1. Expand the ’Course Tools’ in the control panel to the left 2. Click on ’Journals’ 3. Click ’Create Journal’ 4. Name the journal and add a description, etc. 5. You have the possibility to link Rubrics to journals: Click ’Grade Points possible’ and click ’Add Rubric’, read more on page 11. 6. Click ’Submit’ to complete the creation. Student’s Journals It is possible to follow a student’s journal entries, and provide feedback on the process. You can access the journals via the ’Grade Center’ through the section ’Needs marking’, if a Rubric is lin- ked to the journal. If you have not added a Rubric to the journal you can do so by following this description: 1. Expand ’Course Tools’ 2. Click on ’Journals’. 3. Choose from the list the journal you wish to read. 4. In the menu ’JournalDetails’ you can choose which student you wish to follow by clicking the name - or navigating by using the arrows.
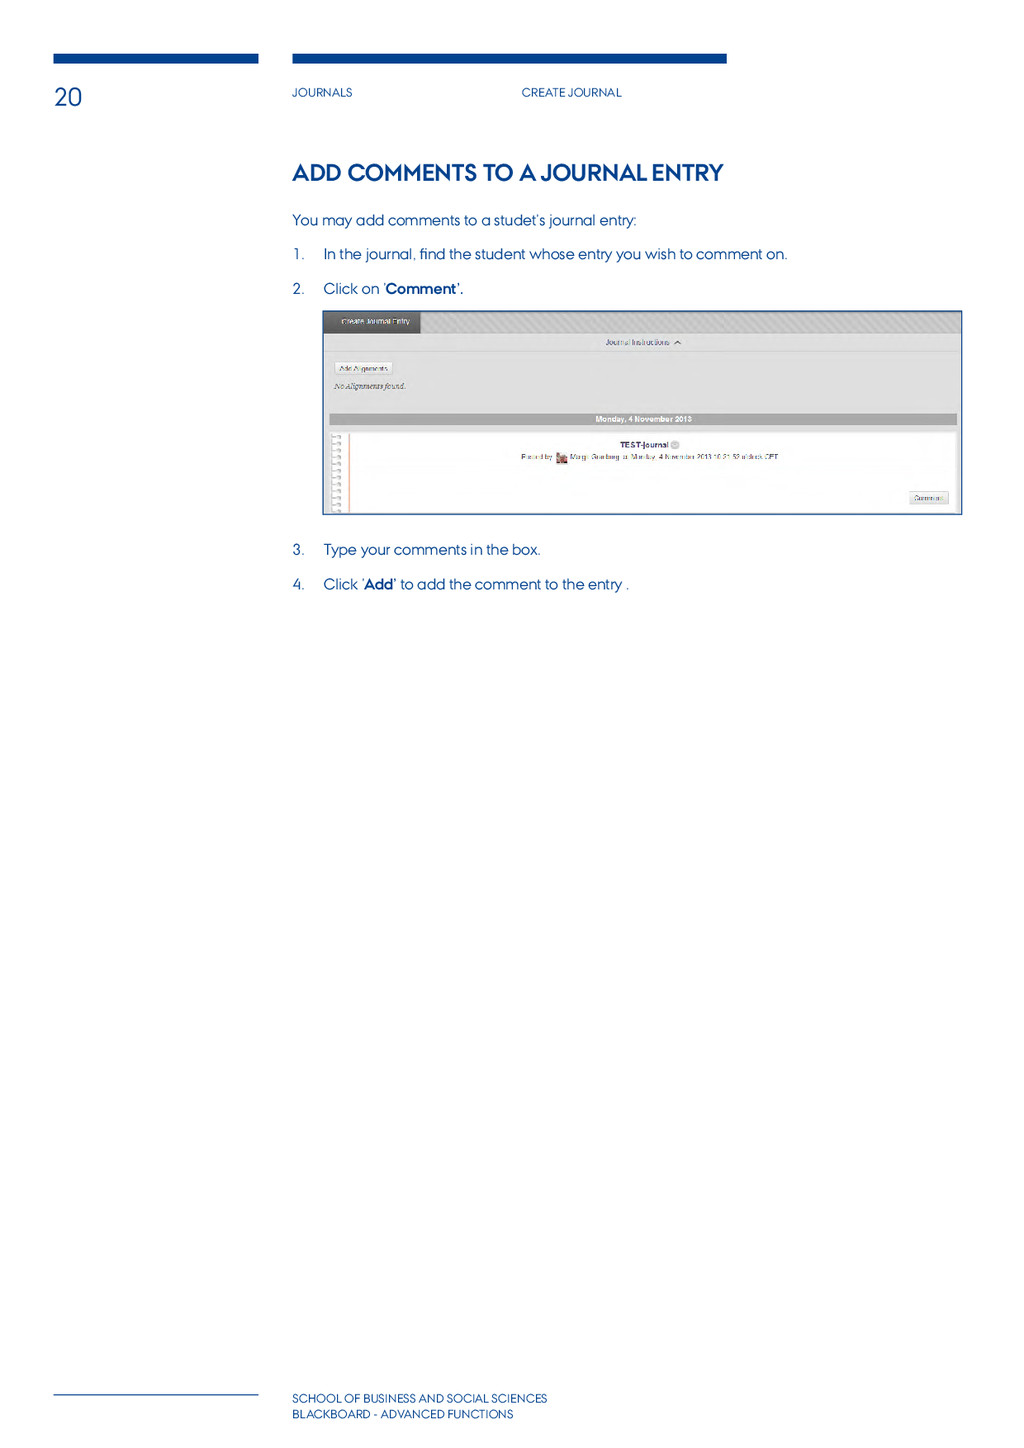
bLACKBOARD - advanced functions Add Comments to a Journal Entry You may add comments to a studet’s journal entry: 1. In the journal, find the student whose entry you wish to comment on. 2. Click on ’Comment’. 3. Type your comments in the box. 4. Click ’Add’ to add the comment to the entry .
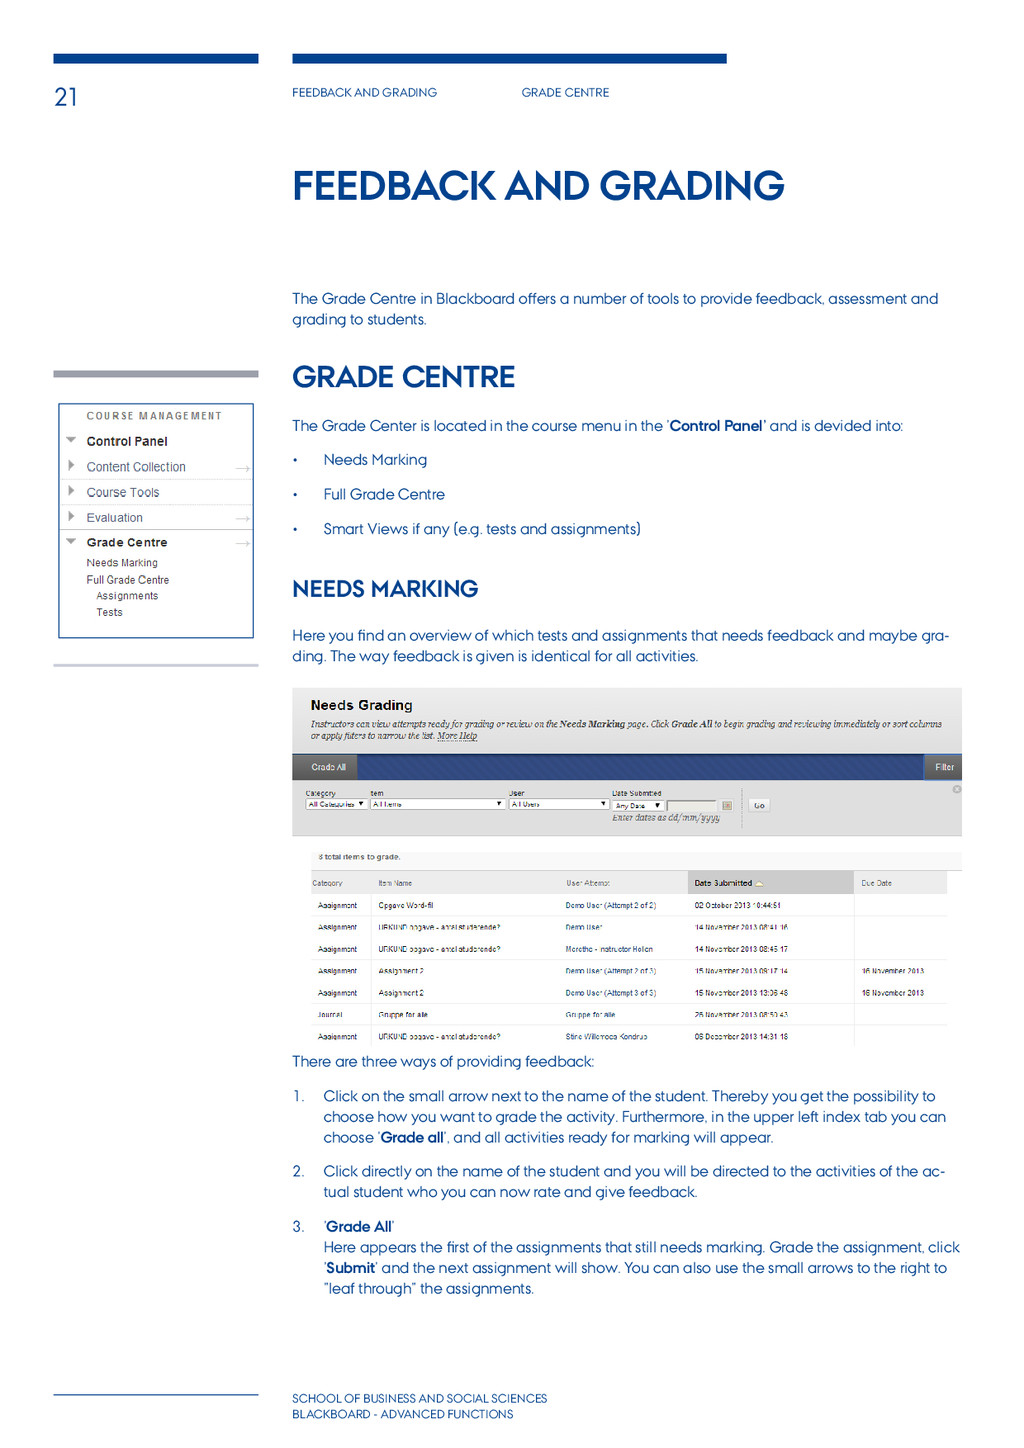
SOCIAL SCIENCES bLACKBOARD - advanced functions Feedback and grading The Grade Centre in Blackboard offers a number of tools to provide feedback, assessment and grading to students. Grade Centre The Grade Center is located in the course menu in the ’Control Panel’ and is devided into: • Needs Marking • Full Grade Centre • Smart Views if any (e.g. tests and assignments) Needs Marking Here you find an overview of which tests and assignments that needs feedback and maybe gra- ding. The way feedback is given is identical for all activities. There are three ways of providing feedback: 1. Click on the small arrow next to the name of the student. Thereby you get the possibility to choose how you want to grade the activity. Furthermore, in the upper left index tab you can choose ’Grade all’, and all activities ready for marking will appear. 2. Click directly on the name of the student and you will be directed to the activities of the ac- tual student who you can now rate and give feedback. 3. ’Grade All’ Here appears the first of the assignments that still needs marking. Grade the assignment, click ’Submit’ and the next assignment will show. You can also use the small arrows to the right to ”leaf through” the assignments.
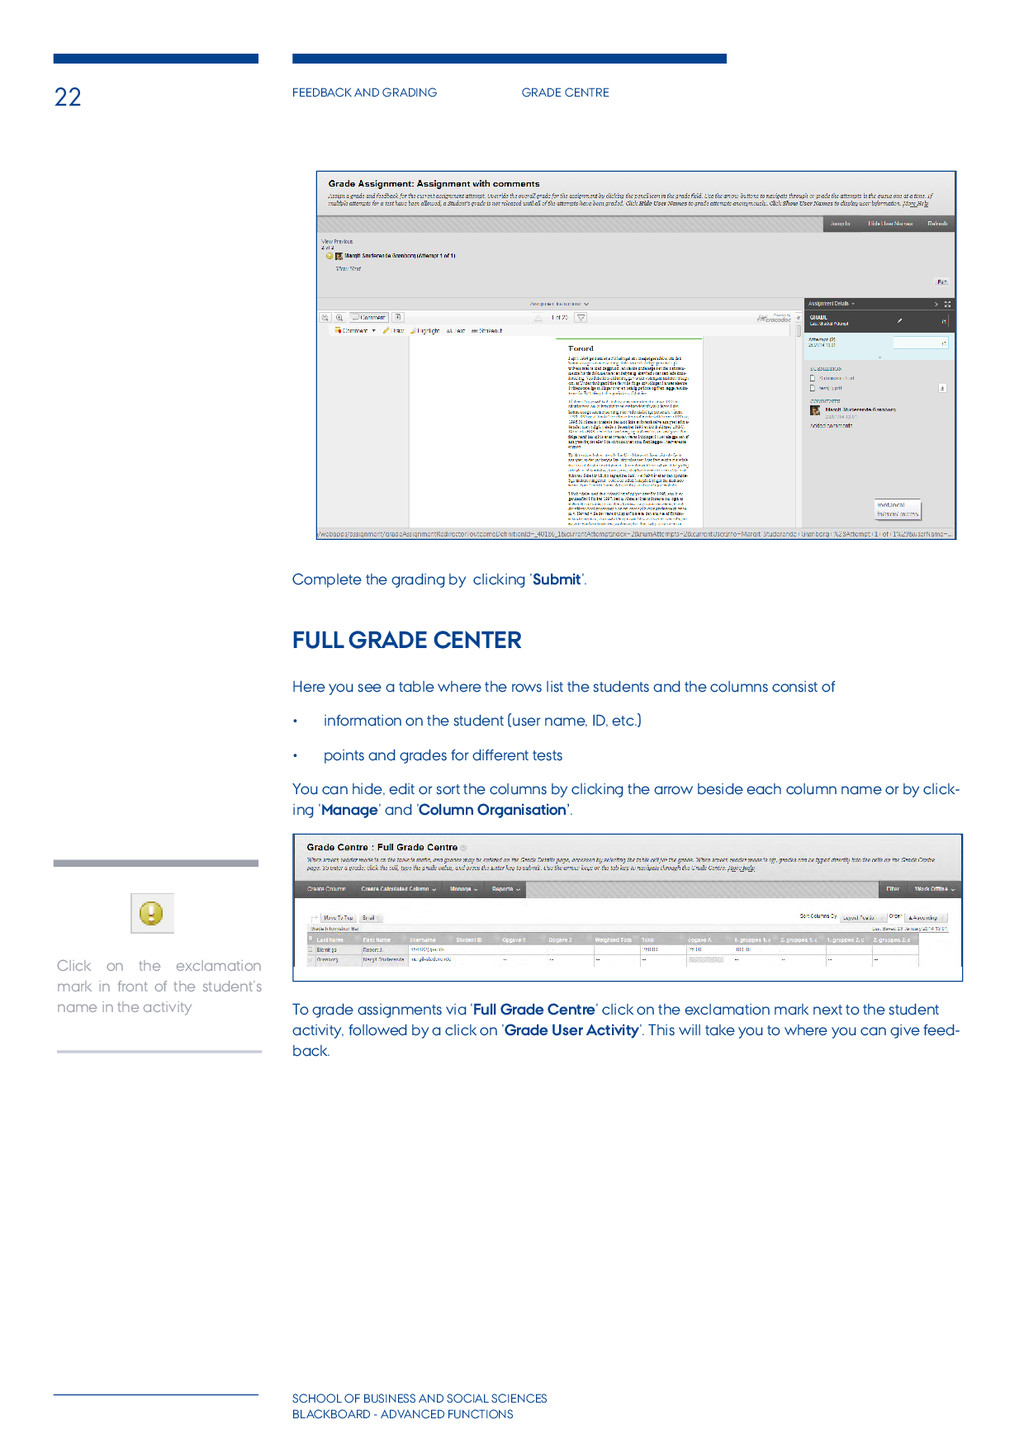
SOCIAL SCIENCES bLACKBOARD - advanced functions Complete the grading by clicking ’Submit’. Full Grade Center Here you see a table where the rows list the students and the columns consist of • information on the student (user name, ID, etc.) • points and grades for different tests You can hide, edit or sort the columns by clicking the arrow beside each column name or by click- ing ’Manage’ and ’Column Organisation’. To grade assignments via ’Full Grade Centre’ click on the exclamation mark next to the student activity, followed by a click on ’Grade User Activity’. This will take you to where you can give feed- back. Click on the exclamation mark in front of the student’s name in the activity
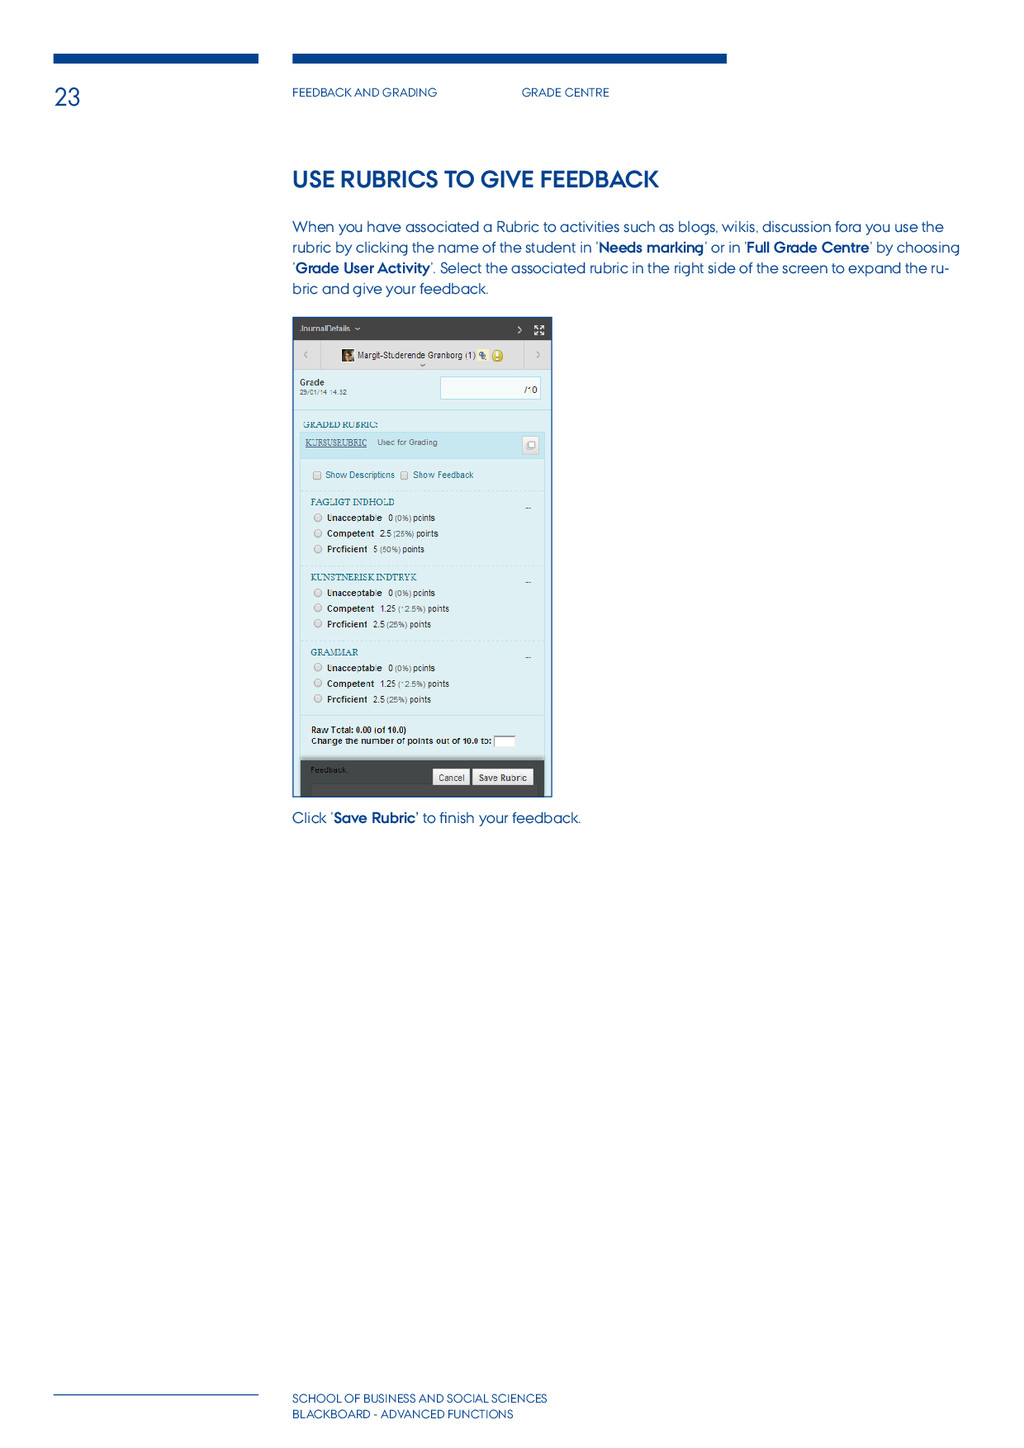
SOCIAL SCIENCES bLACKBOARD - advanced functions Use Rubrics to Give Feedback When you have associated a Rubric to activities such as blogs, wikis, discussion fora you use the rubric by clicking the name of the student in ’Needs marking’ or in ’Full Grade Centre’ by choosing ’Grade User Activity’. Select the associated rubric in the right side of the screen to expand the ru- bric and give your feedback. Click ’Save Rubric’ to finish your feedback.
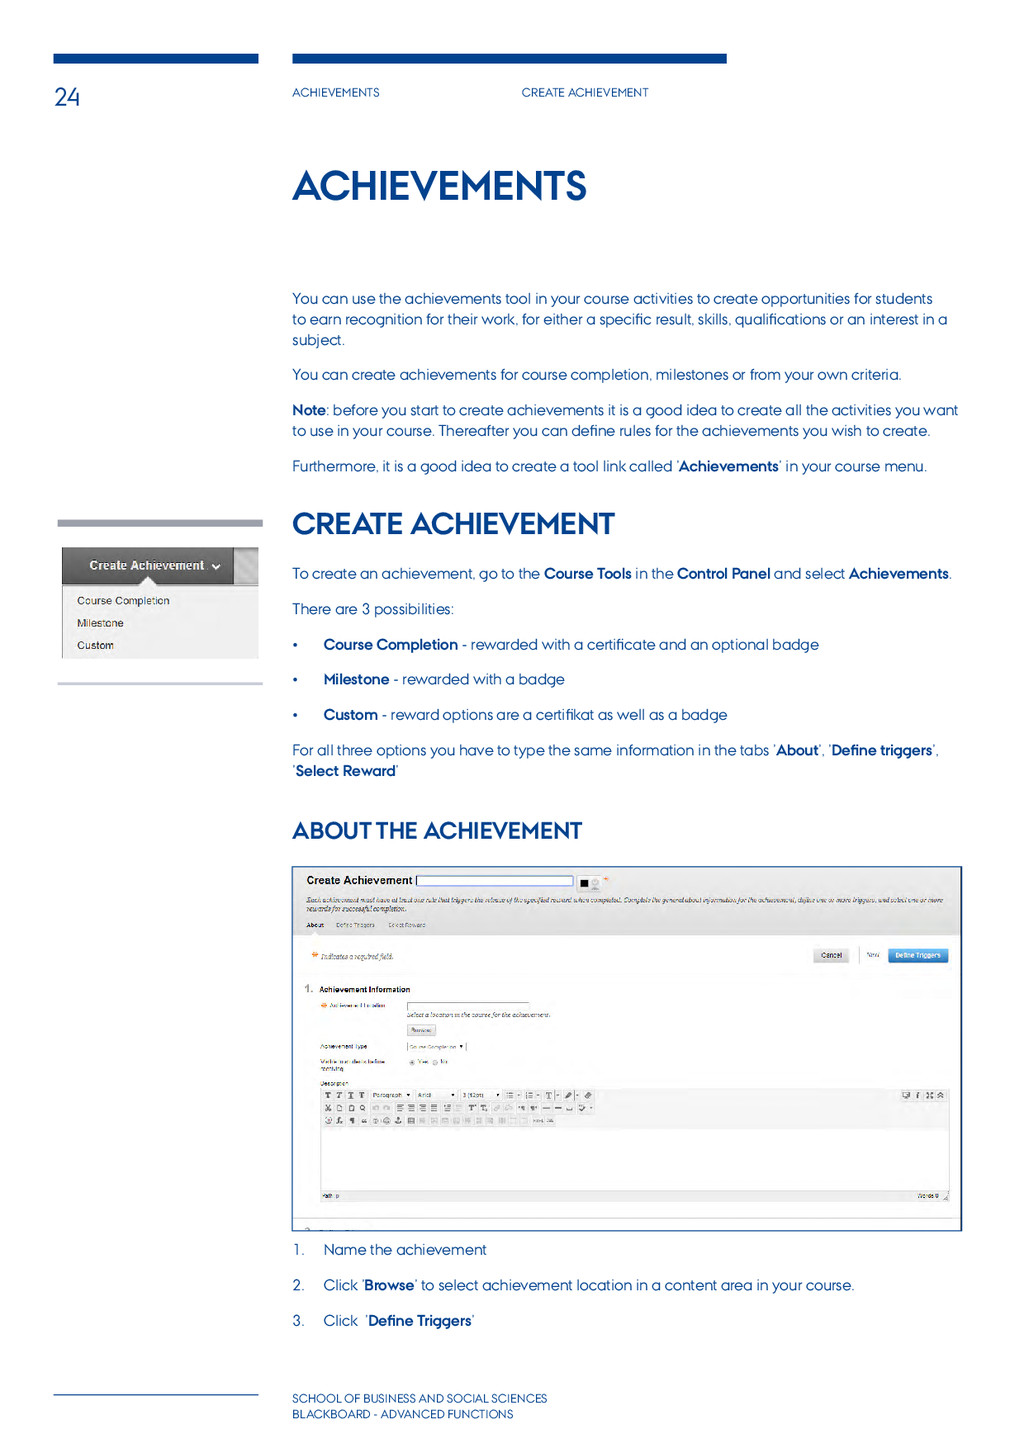
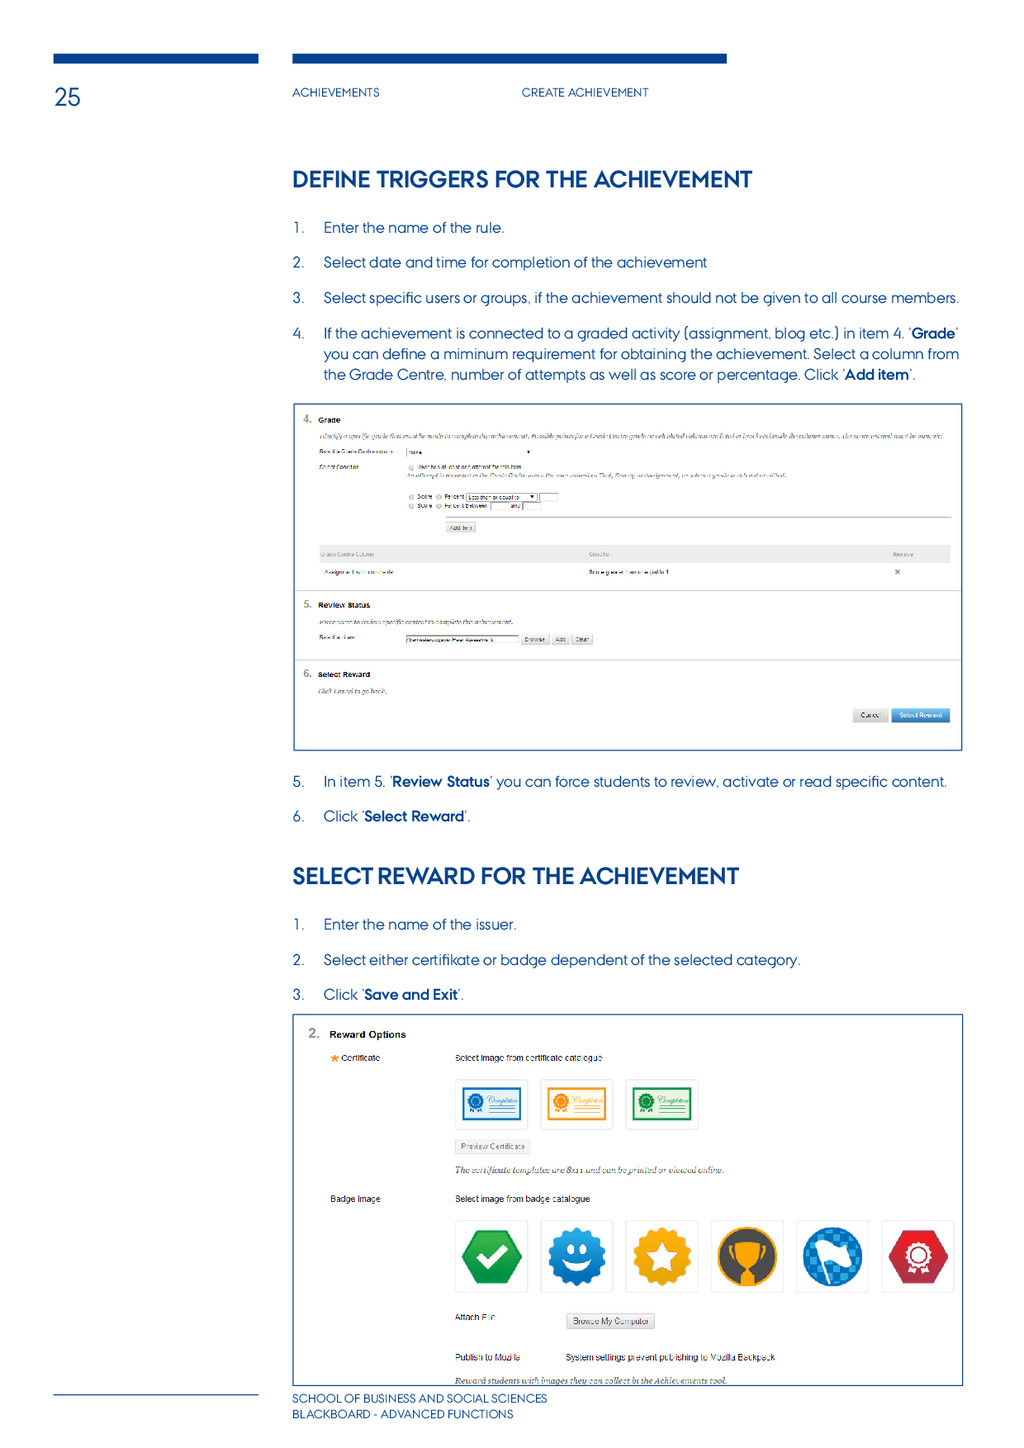
bLACKBOARD - advanced functions You can use the achievements tool in your course activities to create opportunities for students to earn recognition for their work, for either a specific result, skills, qualifications or an interest in a subject. You can create achievements for course completion, milestones or from your own criteria. Note: before you start to create achievements it is a good idea to create all the activities you want to use in your course. Thereafter you can define rules for the achievements you wish to create. Furthermore, it is a good idea to create a tool link called ’Achievements’ in your course menu. Create Achievement To create an achievement, go to the Course Tools in the Control Panel and select Achievements. There are 3 possibilities: • Course Completion - rewarded with a certificate and an optional badge • Milestone - rewarded with a badge • Custom - reward options are a certifikat as well as a badge For all three options you have to type the same information in the tabs ’About’, ’Define triggers’, ’Select Reward’ About the achievement 1. Name the achievement 2. Click ’Browse’ to select achievement location in a content area in your course. 3. Click ’Define Triggers’ Achievements
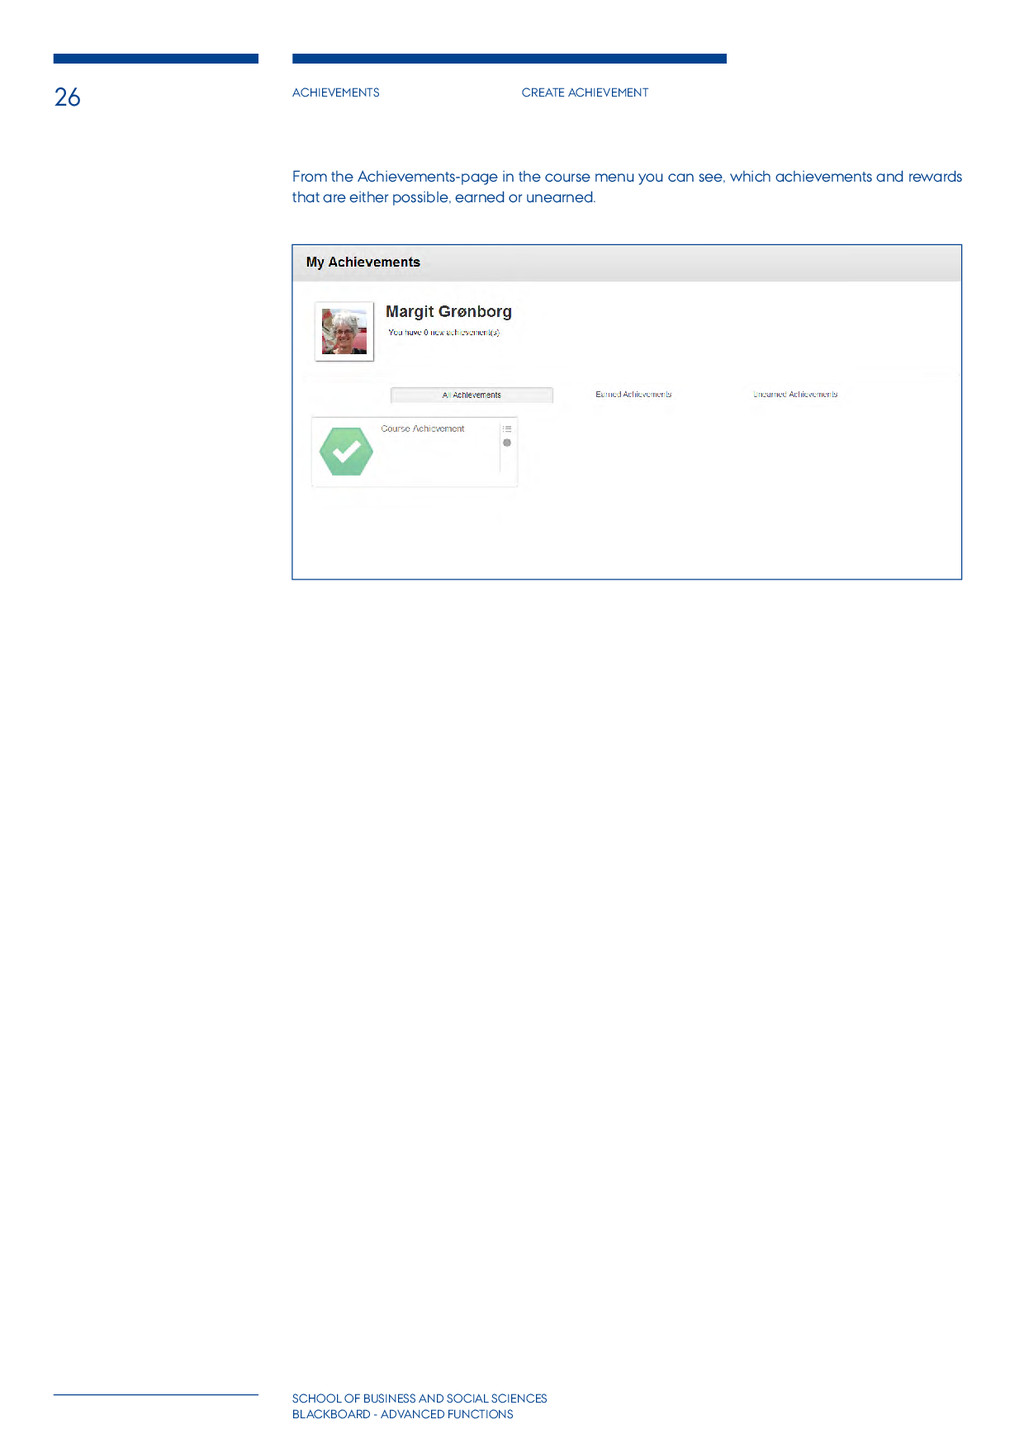
bLACKBOARD - advanced functions Define triggers for the achievement 1. Enter the name of the rule. 2. Select date and time for completion of the achievement 3. Select specific users or groups, if the achievement should not be given to all course members. 4. If the achievement is connected to a graded activity (assignment, blog etc.) in item 4. ’Grade’ you can define a miminum requirement for obtaining the achievement. Select a column from the Grade Centre, number of attempts as well as score or percentage. Click ’Add item’. 5. In item 5. ’Review Status’ you can force students to review, activate or read specific content. 6. Click ’Select Reward’. Select Reward for the Achievement 1. Enter the name of the issuer. 2. Select either certifikate or badge dependent of the selected category. 3. Click ’Save and Exit’.
bLACKBOARD - advanced functions From the Achievements-page in the course menu you can see, which achievements and rewards that are either possible, earned or unearned.
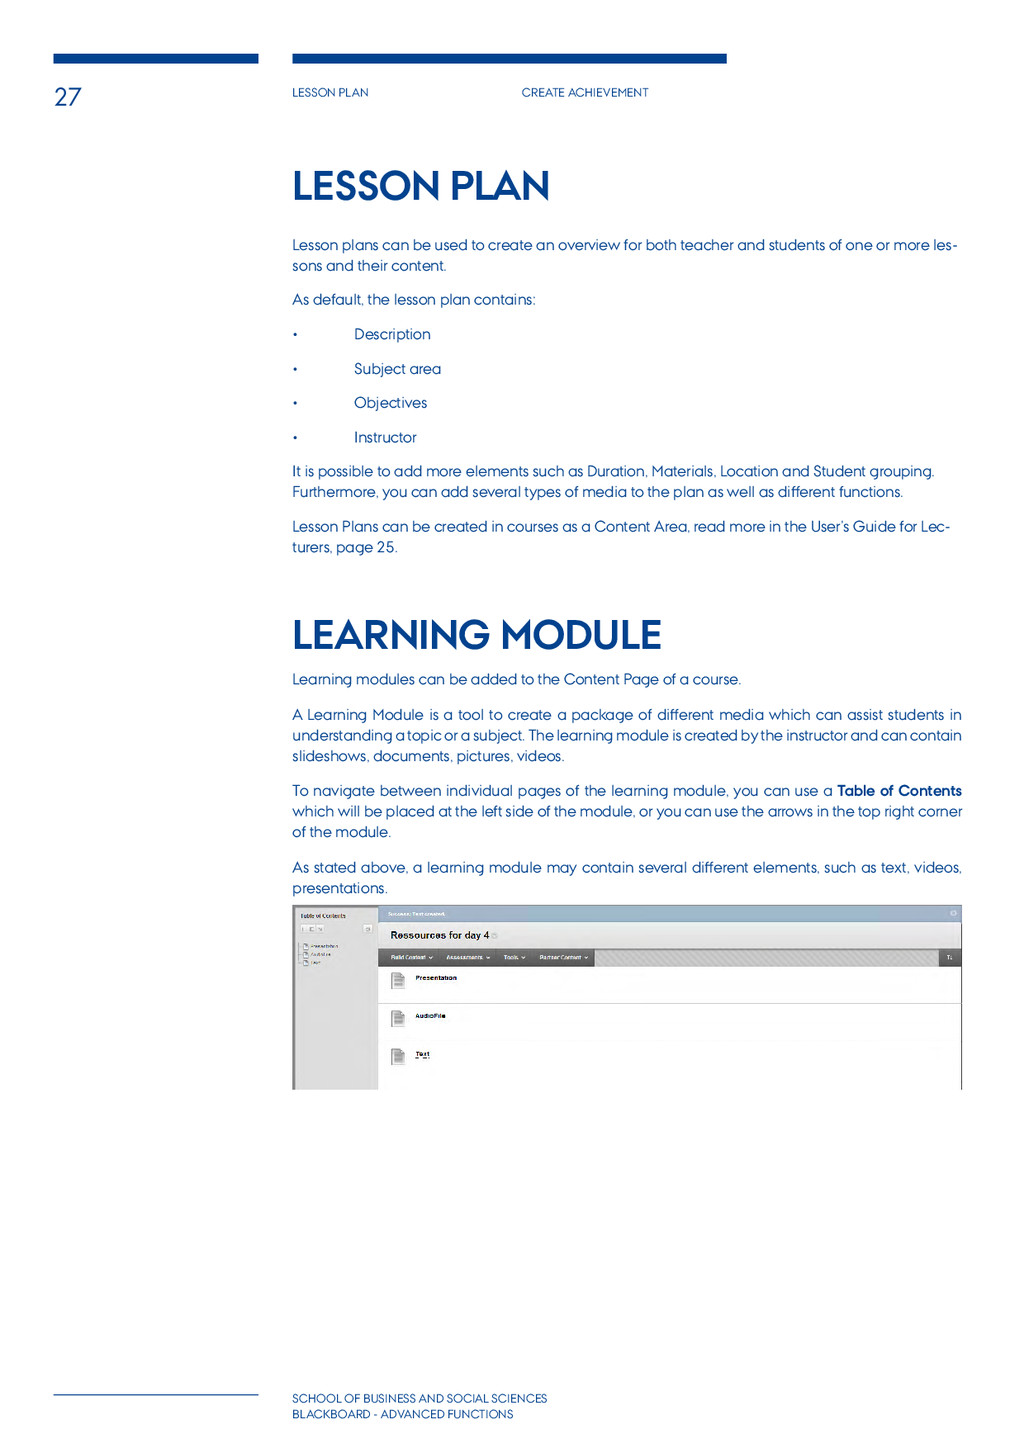
SCIENCES bLACKBOARD - advanced functions Lesson Plan Lesson plans can be used to create an overview for both teacher and students of one or more les- sons and their content. As default, the lesson plan contains: • Description • Subject area • Objectives • Instructor It is possible to add more elements such as Duration, Materials, Location and Student grouping. Furthermore, you can add several types of media to the plan as well as different functions. Lesson Plans can be created in courses as a Content Area, read more in the User’s Guide for Lec- turers, page 25. Learning Module Learning modules can be added to the Content Page of a course. A Learning Module is a tool to create a package of different media which can assist students in understanding a topic or a subject. The learning module is created by the instructor and can contain slideshows, documents, pictures, videos. To navigate between individual pages of the learning module, you can use a Table of Contents which will be placed at the left side of the module, or you can use the arrows in the top right corner of the module. As stated above, a learning module may contain several different elements, such as text, videos, presentations.
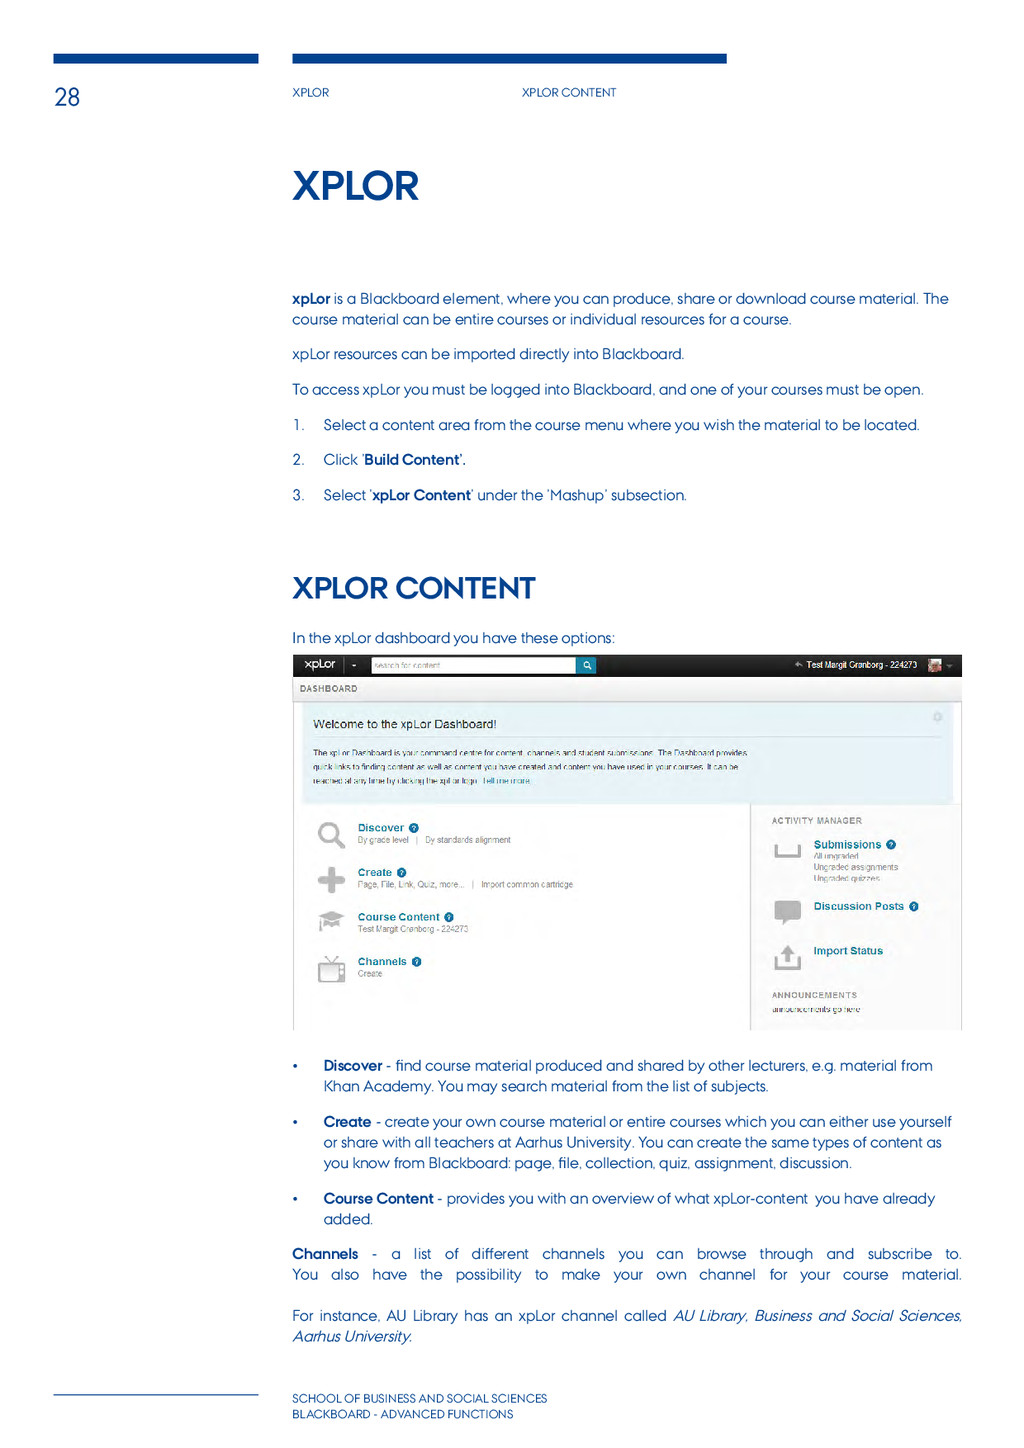
bLACKBOARD - advanced functions XPLOR xpLor is a Blackboard element, where you can produce, share or download course material. The course material can be entire courses or individual resources for a course. xpLor resources can be imported directly into Blackboard. To access xpLor you must be logged into Blackboard, and one of your courses must be open. 1. Select a content area from the course menu where you wish the material to be located. 2. Click ’Build Content’. 3. Select ’xpLor Content’ under the ’Mashup’ subsection. xpLor Content In the xpLor dashboard you have these options: • Discover - find course material produced and shared by other lecturers, e.g. material from Khan Academy. You may search material from the list of subjects. • Create - create your own course material or entire courses which you can either use yourself or share with all teachers at Aarhus University. You can create the same types of content as you know from Blackboard: page, file, collection, quiz, assignment, discussion. • Course Content - provides you with an overview of what xpLor-content you have already added. Channels - a list of different channels you can browse through and subscribe to. You also have the possibility to make your own channel for your course material. For instance, AU Library has an xpLor channel called AU Library, Business and Social Sciences, Aarhus University.
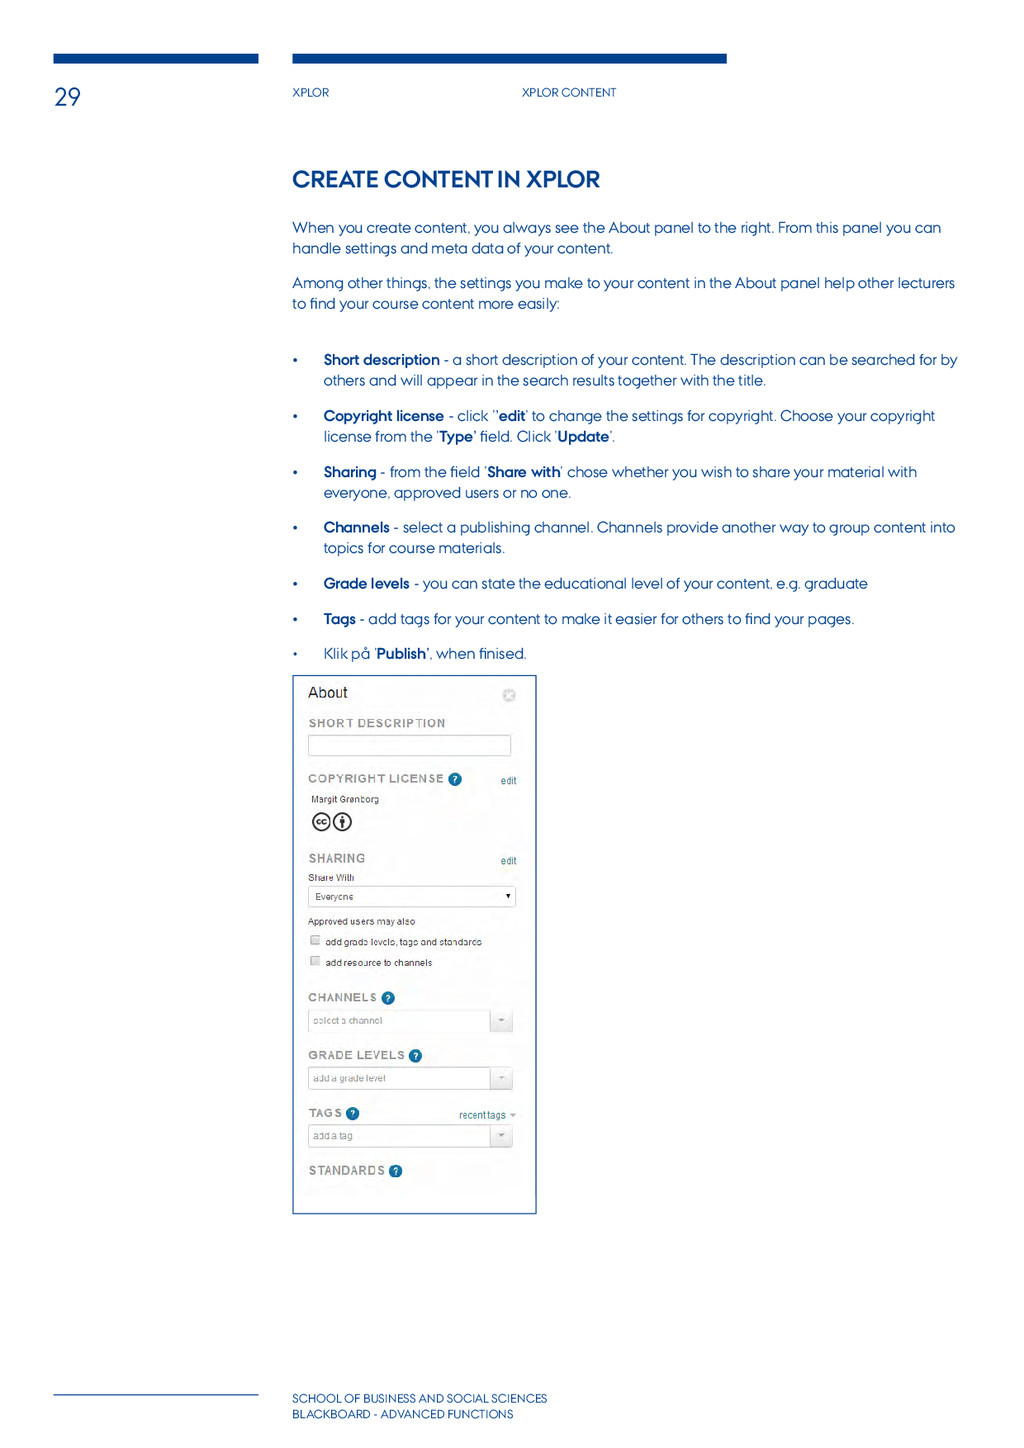
bLACKBOARD - advanced functions Create Content in xpLor When you create content, you always see the About panel to the right. From this panel you can handle settings and meta data of your content. Among other things, the settings you make to your content in the About panel help other lecturers to find your course content more easily: • Short description - a short description of your content. The description can be searched for by others and will appear in the search results together with the title. • Copyright license - click ’’edit’ to change the settings for copyright. Choose your copyright license from the ’Type’ field. Click ’Update’. • Sharing - from the field ’Share with’ chose whether you wish to share your material with everyone, approved users or no one. • Channels - select a publishing channel. Channels provide another way to group content into topics for course materials. • Grade levels - you can state the educational level of your content, e.g. graduate • Tags - add tags for your content to make it easier for others to find your pages. • Klik på ’Publish’, when finised.