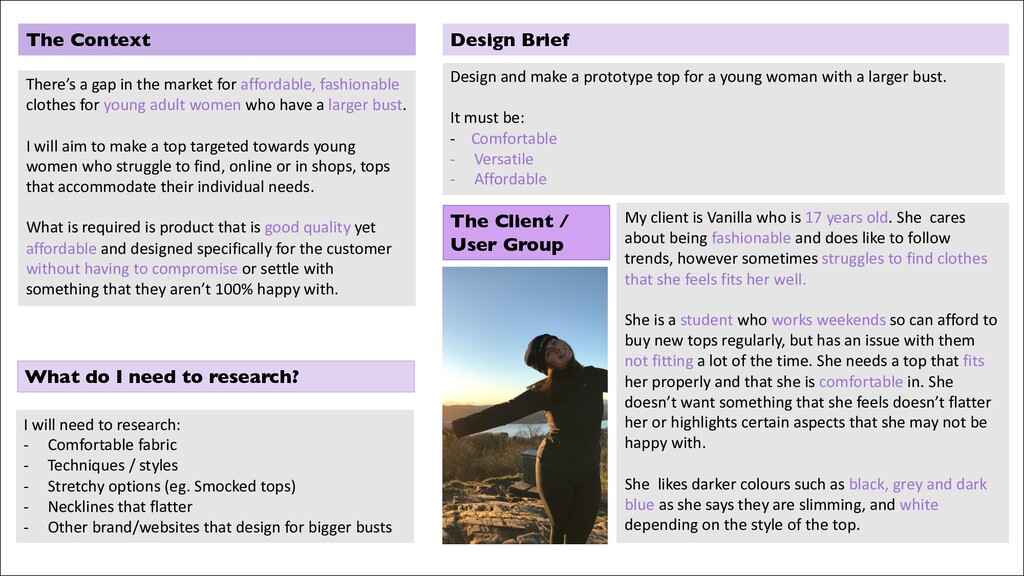
a gap in the market for affordable, fashionable clothes for young adult women who have a larger bust. I will aim to make a top targeted towards young women who struggle to find, online or in shops, tops that accommodate their individual needs. What is required is product that is good quality yet affordable and designed specifically for the customer without having to compromise or settle with something that they aren’t 100% happy with. My client is Vanilla who is 17 years old. She cares about being fashionable and does like to follow trends, however sometimes struggles to find clothes that she feels fits her well. She is a student who works weekends so can afford to buy new tops regularly, but has an issue with them not fitting a lot of the time. She needs a top that fits her properly and that she is comfortable in. She doesn’t want something that she feels doesn’t flatter her or highlights certain aspects that she may not be happy with. She likes darker colours such as black, grey and dark blue as she says they are slimming, and white depending on the style of the top. Design and make a prototype top for a young woman with a larger bust. It must be: - Comfortable - Versatile - Affordable What do I need to research? I will need to research: - Comfortable fabric - Techniques / styles - Stretchy options (eg. Smocked tops) - Necklines that flatter - Other brand/websites that design for bigger busts
new tops regularly however I cannot afford to buy tops that are tailored to fit me.” • Shows that there are not many options for younger girls with and average income to afford clothes that would actually fit them properly, whether they struggle with Vanilla’s issue of a large bust or another one. “I do care about looking fashionable and following trends however if I like a piece of clothing that is out of fashion I will still wear it because I know it fits me” • I could find tops that are in trend at the moment and see which of them Vanilla likes to narrow down the options. “I don’t mind” • Find tops both for formal occasions and for every day and see which Vanilla likes, it may help her make a decision on which she would prefer. “I like wearing dark colours like black, dark blue and grey. I like white depending on the style of the top. I don’t like orange and red” • I asked why she preferred darker colours and it was because it is ”a sliming colour “ • Find out which tops she has in white that she likes maybe? ”I will rewear a top that is not on trend if it fits me and flatters me well and I like the design” • New girls don’t tend to cater/think about girls with larger busts or different body types in general. “I have a larger bust than most girls my age that don’t always look best in tops I have bought for myself” • Vanilla’s bra size is 36G 1. Would you say your income was high or low? 2. Do you care about trends? Are you fashion conscious? 3. Would you prefer a top to wear everyday or a more formal/dressy top? 4. Are there any colours you prefer/wouldn’t like you top to be? 5. Would you like a top that will last you a long time or just to last whilst its in trend? 6. What are your personal issues when trying to find a top, why do you need me to make you one?
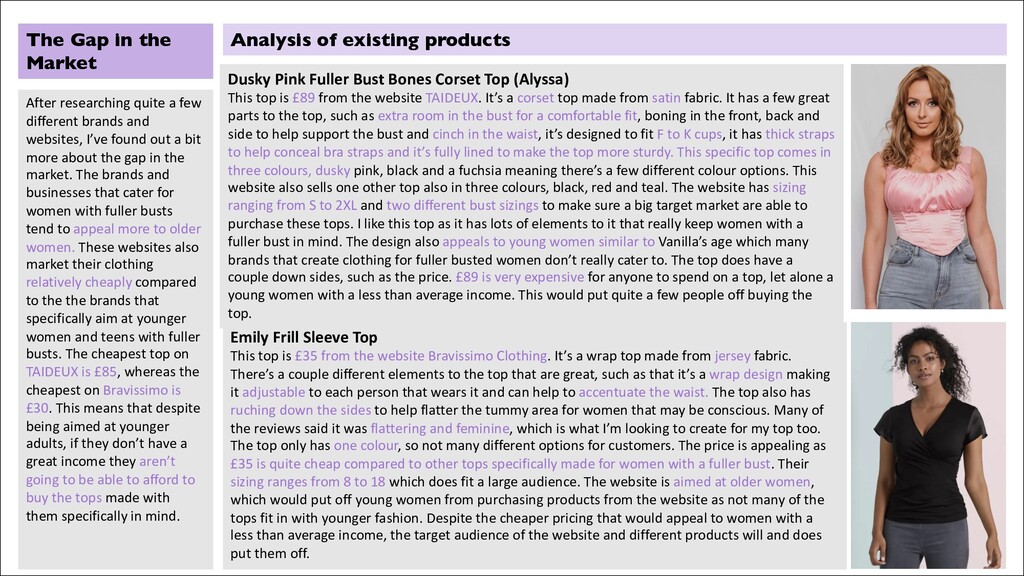
Pink Fuller Bust Bones Corset Top (Alyssa) This top is £89 from the website TAIDEUX. It’s a corset top made from satin fabric. It has a few great parts to the top, such as extra room in the bust for a comfortable fit, boning in the front, back and side to help support the bust and cinch in the waist, it’s designed to fit F to K cups, it has thick straps to help conceal bra straps and it’s fully lined to make the top more sturdy. This specific top comes in three colours, dusky pink, black and a fuchsia meaning there’s a few different colour options. This website also sells one other top also in three colours, black, red and teal. The website has sizing ranging from S to 2XL and two different bust sizings to make sure a big target market are able to purchase these tops. I like this top as it has lots of elements to it that really keep women with a fuller bust in mind. The design also appeals to young women similar to Vanilla’s age which many brands that create clothing for fuller busted women don’t really cater to. The top does have a couple down sides, such as the price. £89 is very expensive for anyone to spend on a top, let alone a young women with a less than average income. This would put quite a few people off buying the top. Emily Frill Sleeve Top This top is £35 from the website Bravissimo Clothing. It’s a wrap top made from jersey fabric. There’s a couple different elements to the top that are great, such as that it’s a wrap design making it adjustable to each person that wears it and can help to accentuate the waist. The top also has ruching down the sides to help flatter the tummy area for women that may be conscious. Many of the reviews said it was flattering and feminine, which is what I’m looking to create for my top too. The top only has one colour, so not many different options for customers. The price is appealing as £35 is quite cheap compared to other tops specifically made for women with a fuller bust. Their sizing ranges from 8 to 18 which does fit a large audience. The website is aimed at older women, which would put off young women from purchasing products from the website as not many of the tops fit in with younger fashion. Despite the cheaper pricing that would appeal to women with a less than average income, the target audience of the website and different products will and does put them off. After researching quite a few different brands and websites, I’ve found out a bit more about the gap in the market. The brands and businesses that cater for women with fuller busts tend to appeal more to older women. These websites also market their clothing relatively cheaply compared to the the brands that specifically aim at younger women and teens with fuller busts. The cheapest top on TAIDEUX is £85, whereas the cheapest on Bravissimo is £30. This means that despite being aimed at younger adults, if they don’t have a great income they aren’t going to be able to afford to buy the tops made with them specifically in mind.
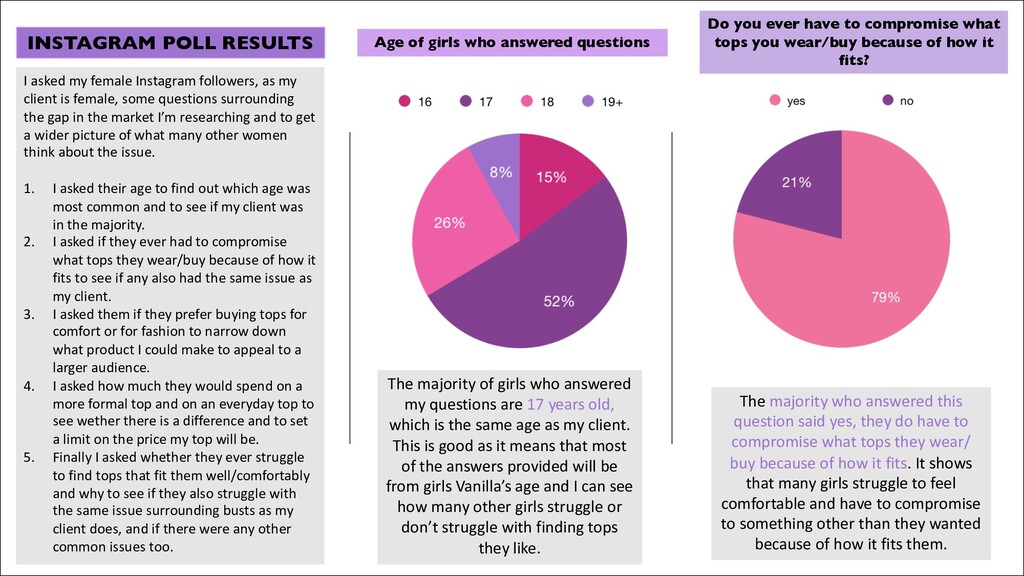
to compromise what tops you wear/buy because of how it fits? INSTAGRAM POLL RESULTS I asked my female Instagram followers, as my client is female, some questions surrounding the gap in the market I’m researching and to get a wider picture of what many other women think about the issue. 1. I asked their age to find out which age was most common and to see if my client was in the majority. 2. I asked if they ever had to compromise what tops they wear/buy because of how it fits to see if any also had the same issue as my client. 3. I asked them if they prefer buying tops for comfort or for fashion to narrow down what product I could make to appeal to a larger audience. 4. I asked how much they would spend on a more formal top and on an everyday top to see wether there is a difference and to set a limit on the price my top will be. 5. Finally I asked whether they ever struggle to find tops that fit them well/comfortably and why to see if they also struggle with the same issue surrounding busts as my client does, and if there were any other common issues too. The majority of girls who answered my questions are 17 years old, which is the same age as my client. This is good as it means that most of the answers provided will be from girls Vanilla’s age and I can see how many other girls struggle or don’t struggle with finding tops they like. The majority who answered this question said yes, they do have to compromise what tops they wear/ buy because of how it fits. It shows that many girls struggle to feel comfortable and have to compromise to something other than they wanted because of how it fits them.
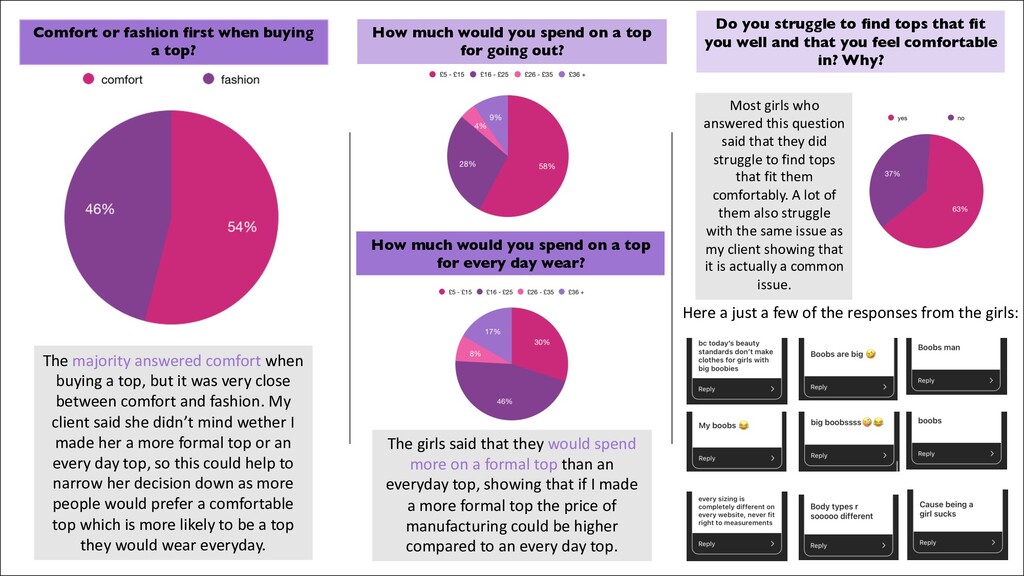
out? How much would you spend on a top for every day wear? Do you struggle to find tops that fit you well and that you feel comfortable in? Why? Comfort or fashion first when buying a top? The majority answered comfort when buying a top, but it was very close between comfort and fashion. My client said she didn’t mind wether I made her a more formal top or an every day top, so this could help to narrow her decision down as more people would prefer a comfortable top which is more likely to be a top they would wear everyday. The girls said that they would spend more on a formal top than an everyday top, showing that if I made a more formal top the price of manufacturing could be higher compared to an every day top. Most girls who answered this question said that they did struggle to find tops that fit them comfortably. A lot of them also struggle with the same issue as my client showing that it is actually a common issue. Here a just a few of the responses from the girls:
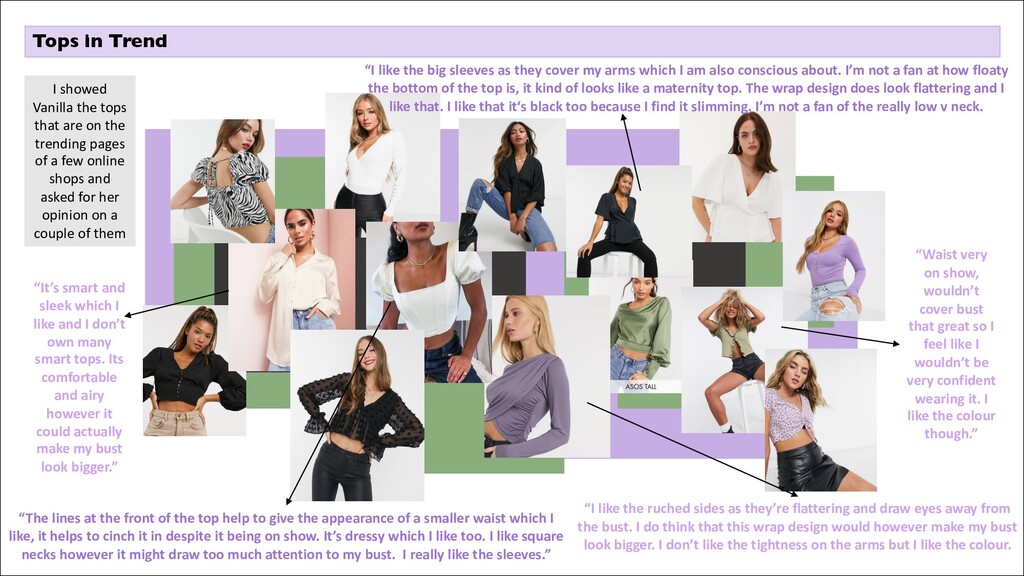
that great so I feel like I wouldn’t be very confident wearing it. I like the colour though.” “It’s smart and sleek which I like and I don’t own many smart tops. Its comfortable and airy however it could actually make my bust look bigger.” “The lines at the front of the top help to give the appearance of a smaller waist which I like, it helps to cinch it in despite it being on show. It’s dressy which I like too. I like square necks however it might draw too much attention to my bust. I really like the sleeves.” “I like the big sleeves as they cover my arms which I am also conscious about. I’m not a fan at how floaty the bottom of the top is, it kind of looks like a maternity top. The wrap design does look flattering and I like that. I like that it‘s black too because I find it slimming. I’m not a fan of the really low v neck. “I like the ruched sides as they’re flattering and draw eyes away from the bust. I do think that this wrap design would however make my bust look bigger. I don’t like the tightness on the arms but I like the colour. I showed Vanilla the tops that are on the trending pages of a few online shops and asked for her opinion on a couple of them
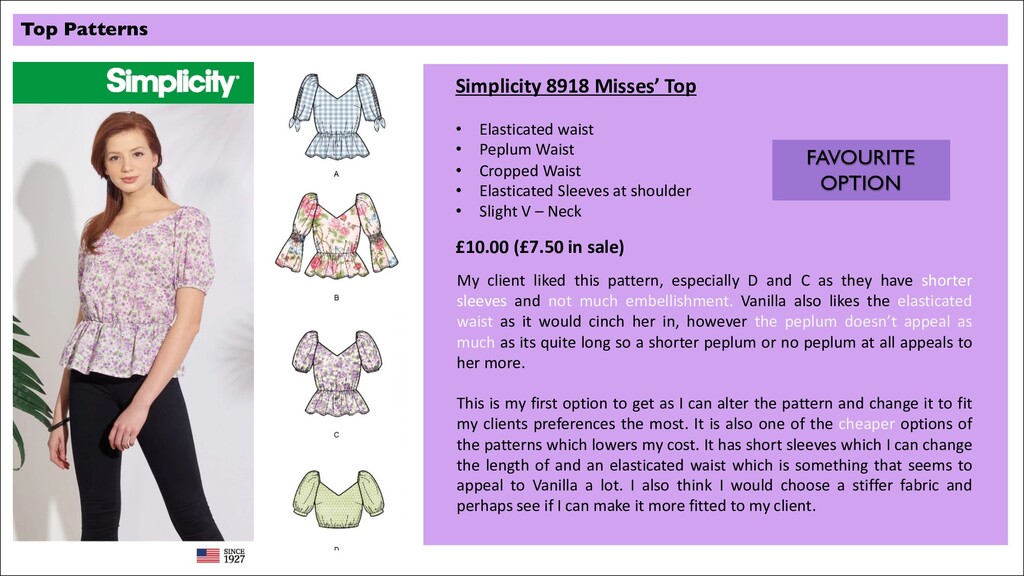
Peplum Waist • Cropped Waist • Elasticated Sleeves at shoulder • Slight V – Neck My client liked this pattern, especially D and C as they have shorter sleeves and not much embellishment. Vanilla also likes the elasticated waist as it would cinch her in, however the peplum doesn’t appeal as much as its quite long so a shorter peplum or no peplum at all appeals to her more. This is my first option to get as I can alter the pattern and change it to fit my clients preferences the most. It is also one of the cheaper options of the patterns which lowers my cost. It has short sleeves which I can change the length of and an elasticated waist which is something that seems to appeal to Vanilla a lot. I also think I would choose a stiffer fabric and perhaps see if I can make it more fitted to my client. FAVOURITE OPTION £10.00 (£7.50 in sale)
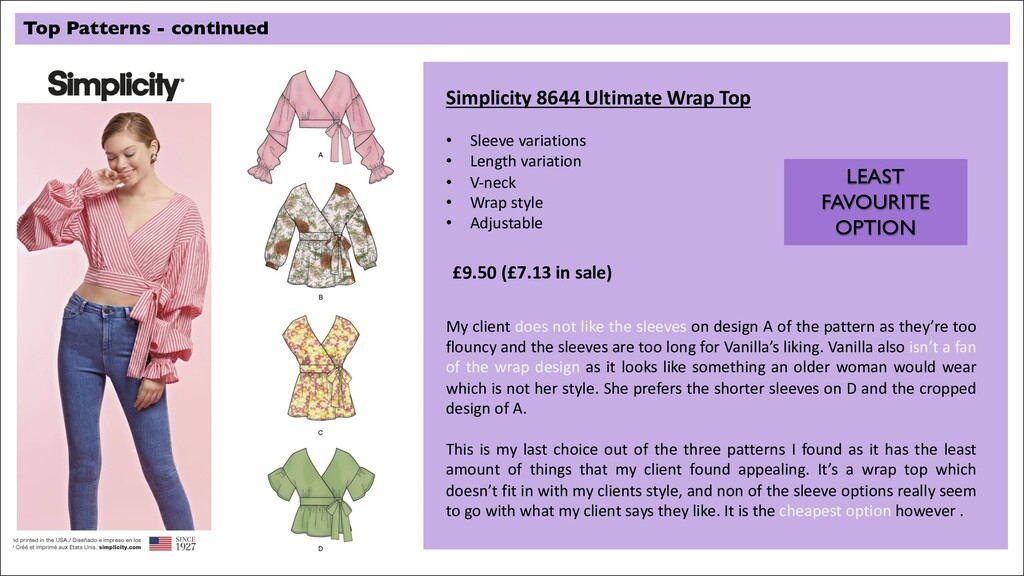
variation • V-neck • Wrap style • Adjustable My client does not like the sleeves on design A of the pattern as they’re too flouncy and the sleeves are too long for Vanilla’s liking. Vanilla also isn’t a fan of the wrap design as it looks like something an older woman would wear which is not her style. She prefers the shorter sleeves on D and the cropped design of A. This is my last choice out of the three patterns I found as it has the least amount of things that my client found appealing. It’s a wrap top which doesn’t fit in with my clients style, and non of the sleeve options really seem to go with what my client says they like. It is the cheapest option however . LEAST FAVOURITE OPTION Top Patterns - continued £9.50 (£7.13 in sale)
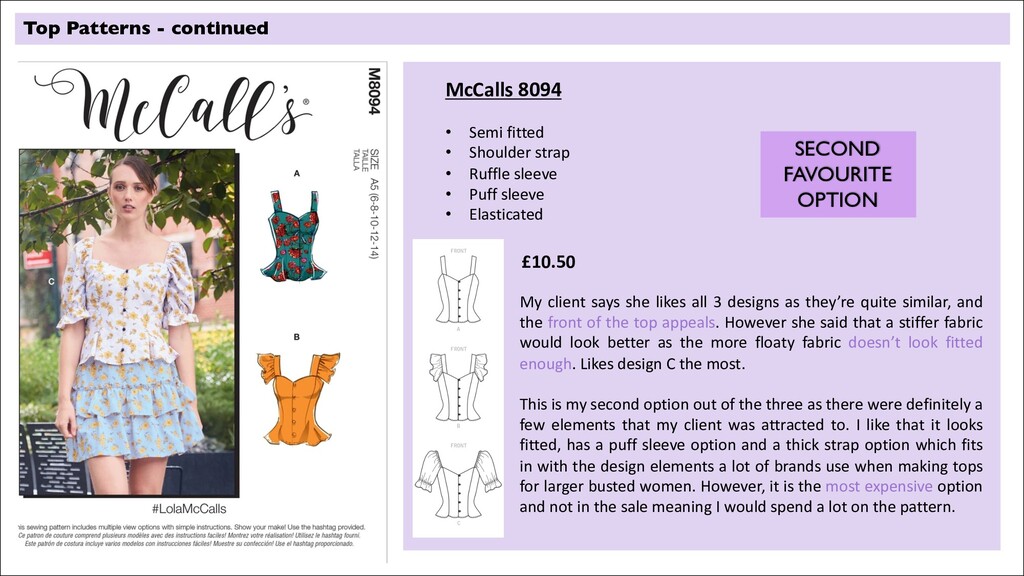
sleeve • Puff sleeve • Elasticated My client says she likes all 3 designs as they’re quite similar, and the front of the top appeals. However she said that a stiffer fabric would look better as the more floaty fabric doesn’t look fitted enough. Likes design C the most. This is my second option out of the three as there were definitely a few elements that my client was attracted to. I like that it looks fitted, has a puff sleeve option and a thick strap option which fits in with the design elements a lot of brands use when making tops for larger busted women. However, it is the most expensive option and not in the sale meaning I would spend a lot on the pattern. SECOND FAVOURITE OPTION Top Patterns - continued £10.50
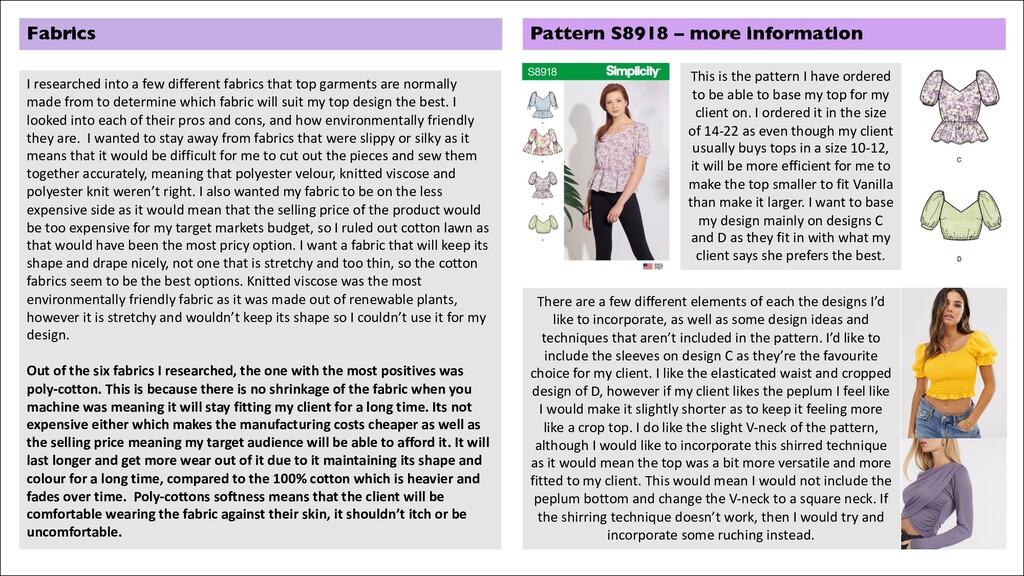
I have ordered to be able to base my top for my client on. I ordered it in the size of 14-22 as even though my client usually buys tops in a size 10-12, it will be more efficient for me to make the top smaller to fit Vanilla than make it larger. I want to base my design mainly on designs C and D as they fit in with what my client says she prefers the best. There are a few different elements of each the designs I’d like to incorporate, as well as some design ideas and techniques that aren’t included in the pattern. I’d like to include the sleeves on design C as they’re the favourite choice for my client. I like the elasticated waist and cropped design of D, however if my client likes the peplum I feel like I would make it slightly shorter as to keep it feeling more like a crop top. I do like the slight V-neck of the pattern, although I would like to incorporate this shirred technique as it would mean the top was a bit more versatile and more fitted to my client. This would mean I would not include the peplum bottom and change the V-neck to a square neck. If the shirring technique doesn’t work, then I would try and incorporate some ruching instead. I researched into a few different fabrics that top garments are normally made from to determine which fabric will suit my top design the best. I looked into each of their pros and cons, and how environmentally friendly they are. I wanted to stay away from fabrics that were slippy or silky as it means that it would be difficult for me to cut out the pieces and sew them together accurately, meaning that polyester velour, knitted viscose and polyester knit weren’t right. I also wanted my fabric to be on the less expensive side as it would mean that the selling price of the product would be too expensive for my target markets budget, so I ruled out cotton lawn as that would have been the most pricy option. I want a fabric that will keep its shape and drape nicely, not one that is stretchy and too thin, so the cotton fabrics seem to be the best options. Knitted viscose was the most environmentally friendly fabric as it was made out of renewable plants, however it is stretchy and wouldn’t keep its shape so I couldn’t use it for my design. Out of the six fabrics I researched, the one with the most positives was poly-cotton. This is because there is no shrinkage of the fabric when you machine was meaning it will stay fitting my client for a long time. Its not expensive either which makes the manufacturing costs cheaper as well as the selling price meaning my target audience will be able to afford it. It will last longer and get more wear out of it due to it maintaining its shape and colour for a long time, compared to the 100% cotton which is heavier and fades over time. Poly-cottons softness means that the client will be comfortable wearing the fabric against their skin, it shouldn’t itch or be uncomfortable.
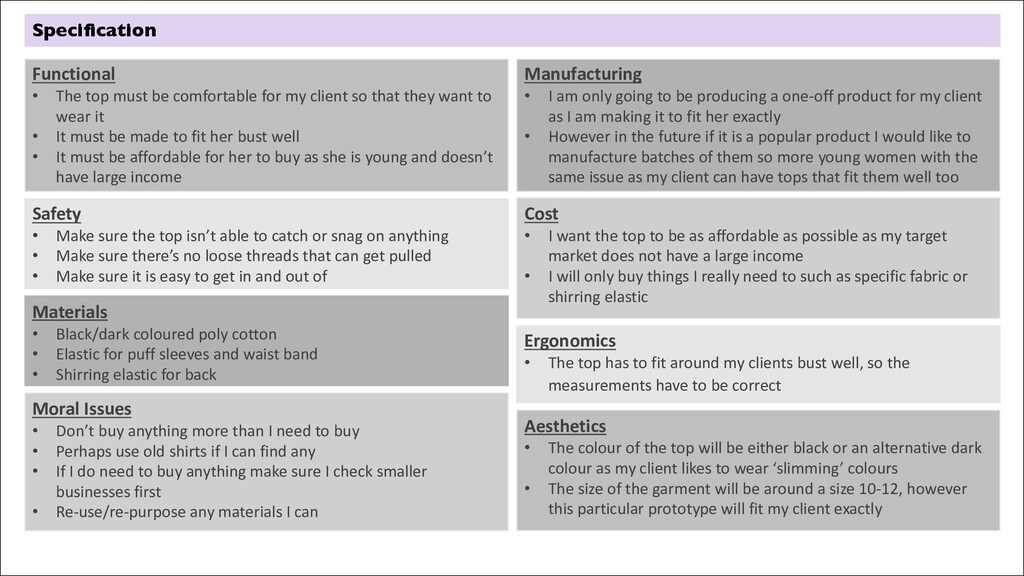
client so that they want to wear it • It must be made to fit her bust well • It must be affordable for her to buy as she is young and doesn’t have large income Manufacturing • I am only going to be producing a one-off product for my client as I am making it to fit her exactly • However in the future if it is a popular product I would like to manufacture batches of them so more young women with the same issue as my client can have tops that fit them well too Cost • I want the top to be as affordable as possible as my target market does not have a large income • I will only buy things I really need to such as specific fabric or shirring elastic Safety • Make sure the top isn’t able to catch or snag on anything • Make sure there’s no loose threads that can get pulled • Make sure it is easy to get in and out of Ergonomics • The top has to fit around my clients bust well, so the measurements have to be correct Materials • Black/dark coloured poly cotton • Elastic for puff sleeves and waist band • Shirring elastic for back Aesthetics • The colour of the top will be either black or an alternative dark colour as my client likes to wear ‘slimming’ colours • The size of the garment will be around a size 10-12, however this particular prototype will fit my client exactly Moral Issues • Don’t buy anything more than I need to buy • Perhaps use old shirts if I can find any • If I do need to buy anything make sure I check smaller businesses first • Re-use/re-purpose any materials I can
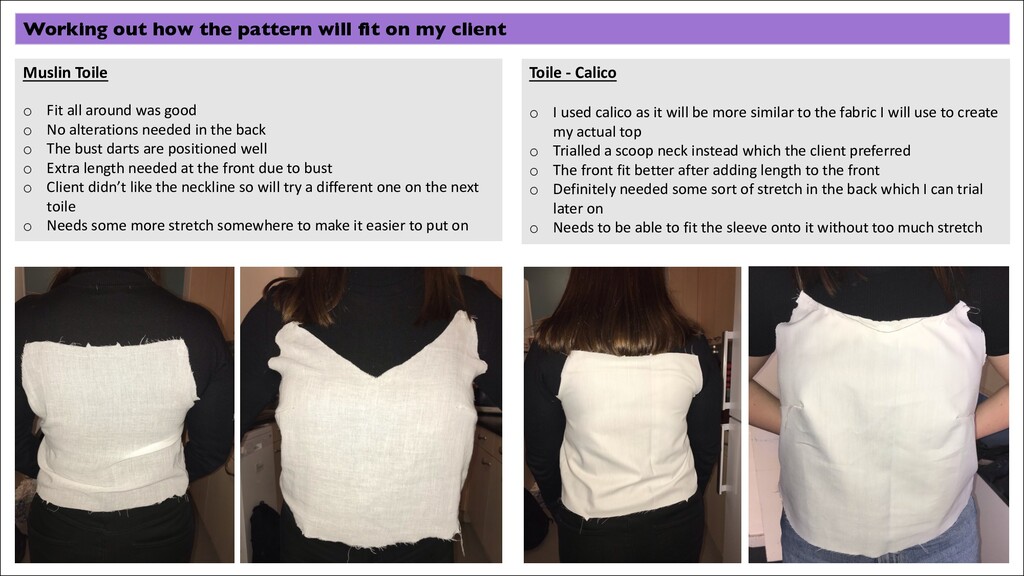
Muslin Toile o Fit all around was good o No alterations needed in the back o The bust darts are positioned well o Extra length needed at the front due to bust o Client didn’t like the neckline so will try a different one on the next toile o Needs some more stretch somewhere to make it easier to put on Toile - Calico o I used calico as it will be more similar to the fabric I will use to create my actual top o Trialled a scoop neck instead which the client preferred o The front fit better after adding length to the front o Definitely needed some sort of stretch in the back which I can trial later on o Needs to be able to fit the sleeve onto it without too much stretch
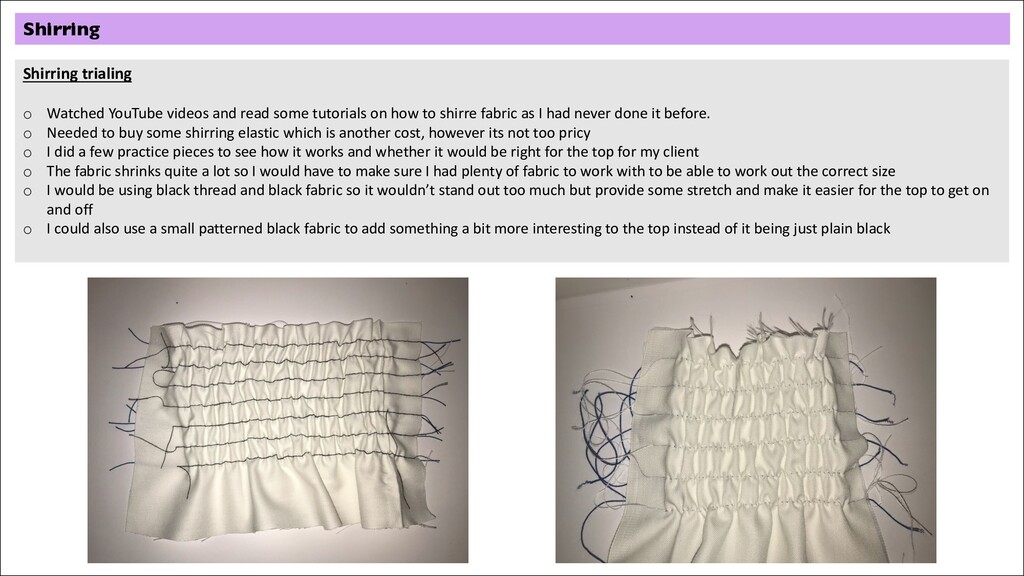
on how to shirre fabric as I had never done it before. o Needed to buy some shirring elastic which is another cost, however its not too pricy o I did a few practice pieces to see how it works and whether it would be right for the top for my client o The fabric shrinks quite a lot so I would have to make sure I had plenty of fabric to work with to be able to work out the correct size o I would be using black thread and black fabric so it wouldn’t stand out too much but provide some stretch and make it easier for the top to get on and off o I could also use a small patterned black fabric to add something a bit more interesting to the top instead of it being just plain black Shirring
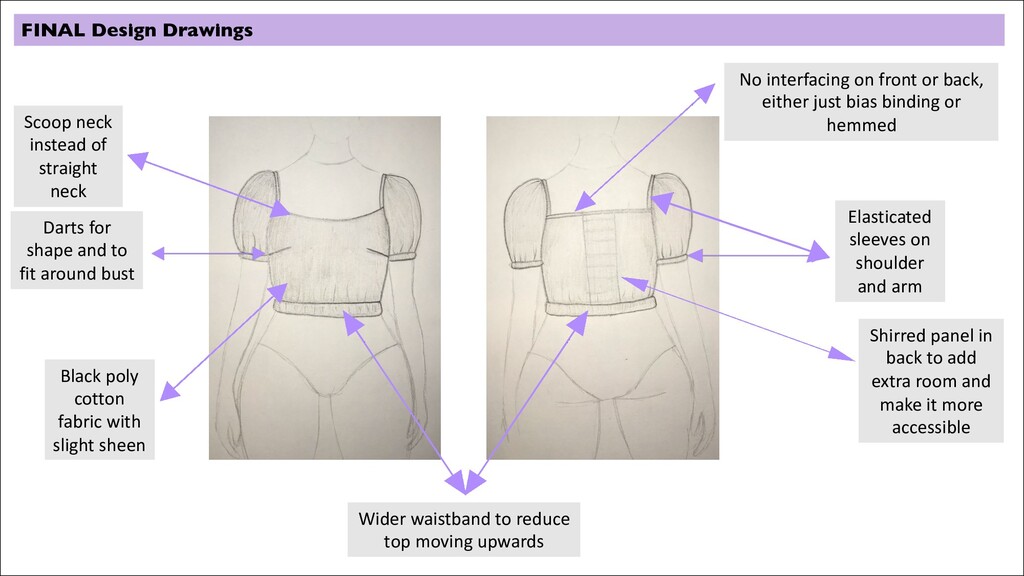
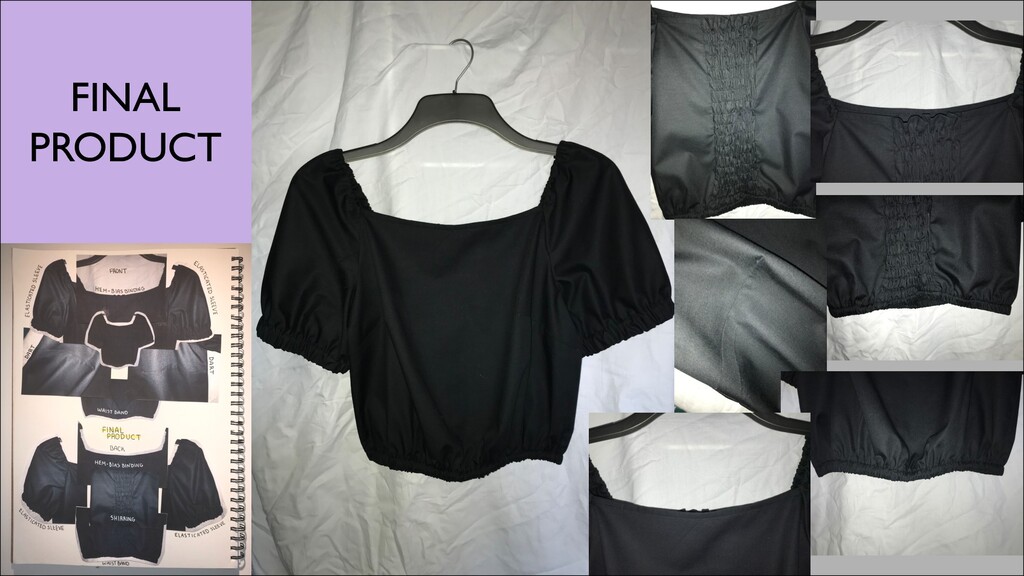
for shape and to fit around bust Black poly cotton fabric with slight sheen Wider waistband to reduce top moving upwards No interfacing on front or back, either just bias binding or hemmed Elasticated sleeves on shoulder and arm Shirred panel in back to add extra room and make it more accessible
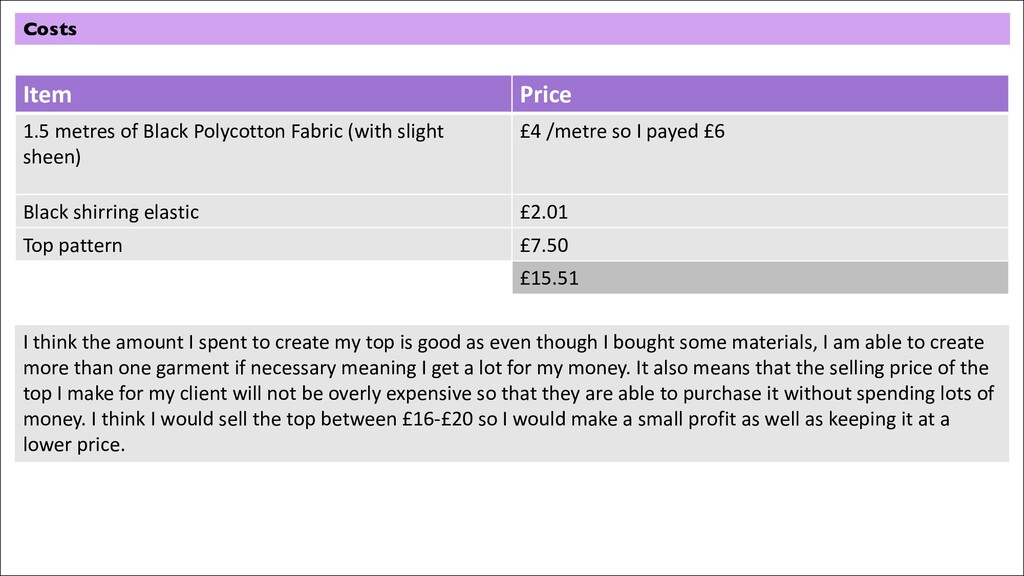
slight sheen) £4 /metre so I payed £6 Black shirring elastic £2.01 Top pattern £7.50 £15.51 I think the amount I spent to create my top is good as even though I bought some materials, I am able to create more than one garment if necessary meaning I get a lot for my money. It also means that the selling price of the top I make for my client will not be overly expensive so that they are able to purchase it without spending lots of money. I think I would sell the top between £16-£20 so I would make a small profit as well as keeping it at a lower price.
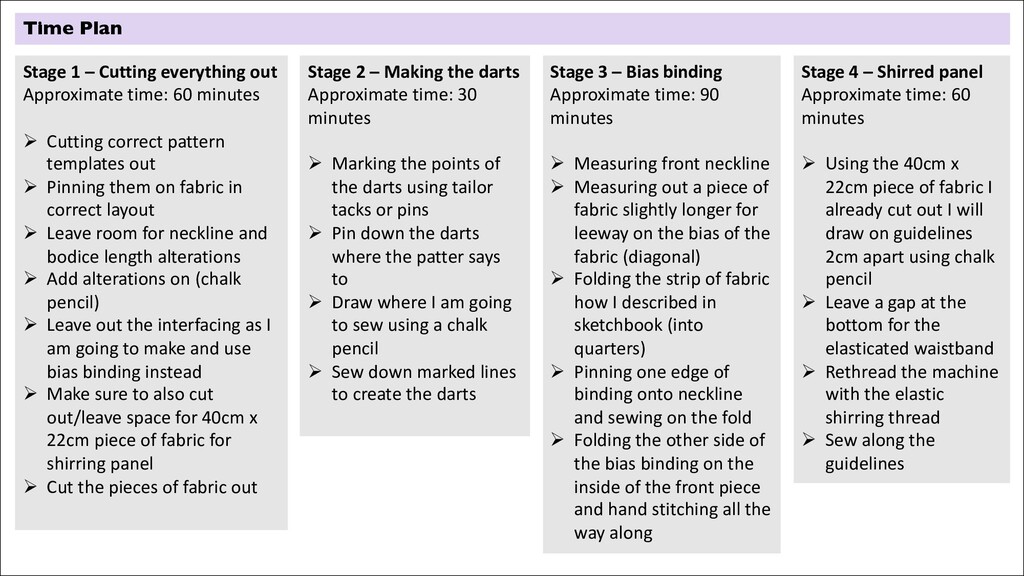
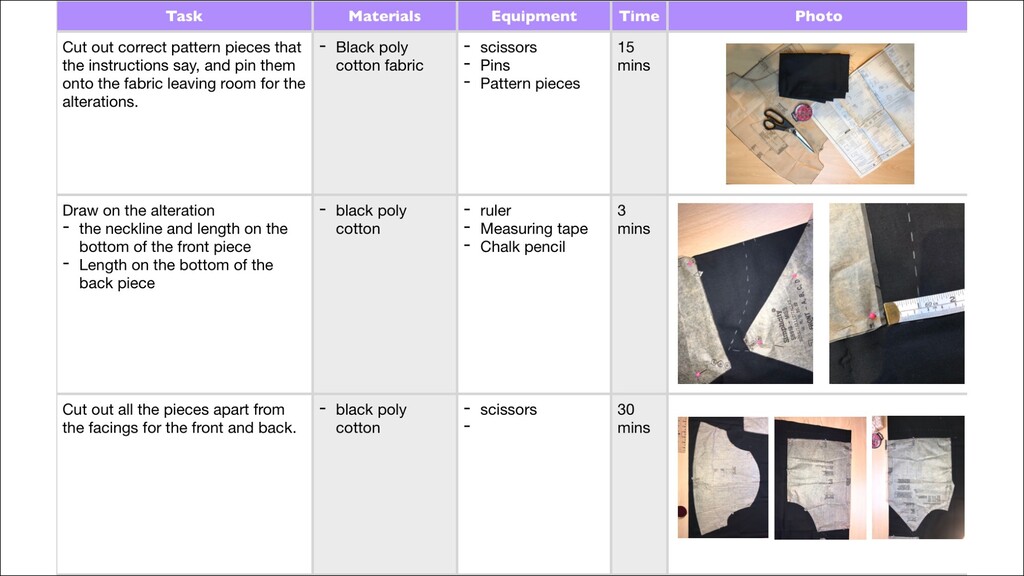
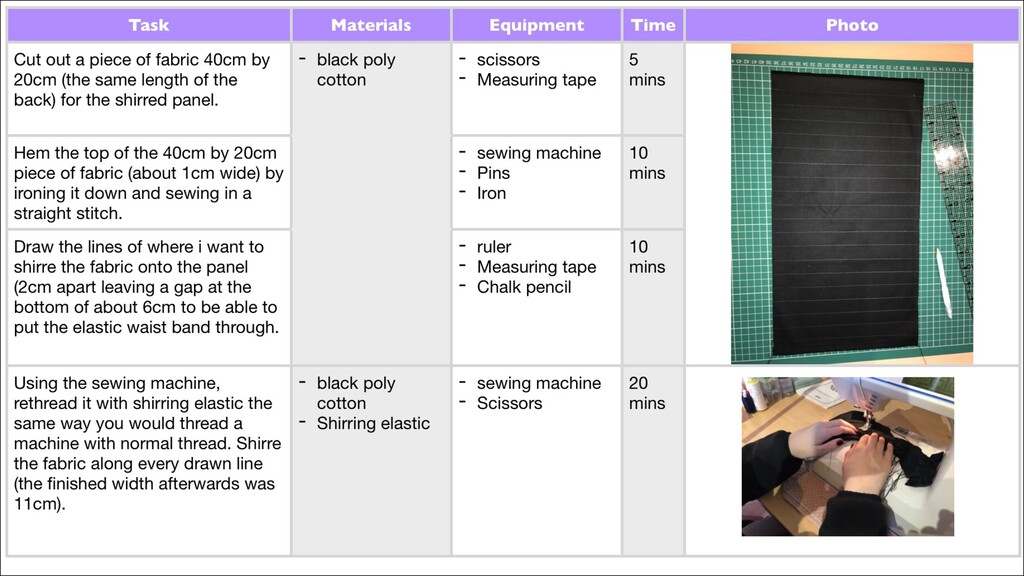
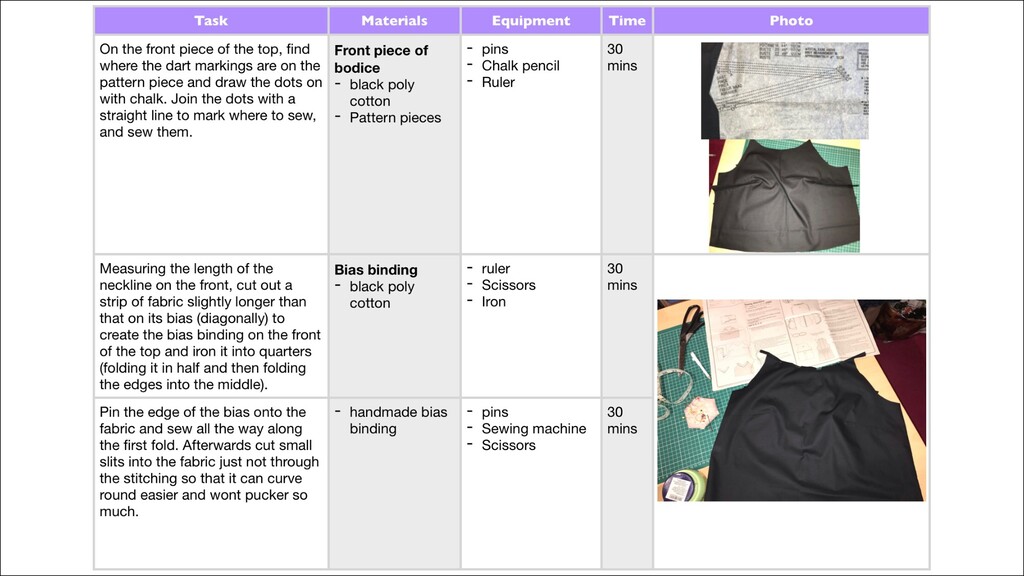
60 minutes Ø Cutting correct pattern templates out Ø Pinning them on fabric in correct layout Ø Leave room for neckline and bodice length alterations Ø Add alterations on (chalk pencil) Ø Leave out the interfacing as I am going to make and use bias binding instead Ø Make sure to also cut out/leave space for 40cm x 22cm piece of fabric for shirring panel Ø Cut the pieces of fabric out Stage 2 – Making the darts Approximate time: 30 minutes Ø Marking the points of the darts using tailor tacks or pins Ø Pin down the darts where the patter says to Ø Draw where I am going to sew using a chalk pencil Ø Sew down marked lines to create the darts Stage 3 – Bias binding Approximate time: 90 minutes Ø Measuring front neckline Ø Measuring out a piece of fabric slightly longer for leeway on the bias of the fabric (diagonal) Ø Folding the strip of fabric how I described in sketchbook (into quarters) Ø Pinning one edge of binding onto neckline and sewing on the fold Ø Folding the other side of the bias binding on the inside of the front piece and hand stitching all the way along Stage 4 – Shirred panel Approximate time: 60 minutes Ø Using the 40cm x 22cm piece of fabric I already cut out I will draw on guidelines 2cm apart using chalk pencil Ø Leave a gap at the bottom for the elasticated waistband Ø Rethread the machine with the elastic shirring thread Ø Sew along the guidelines
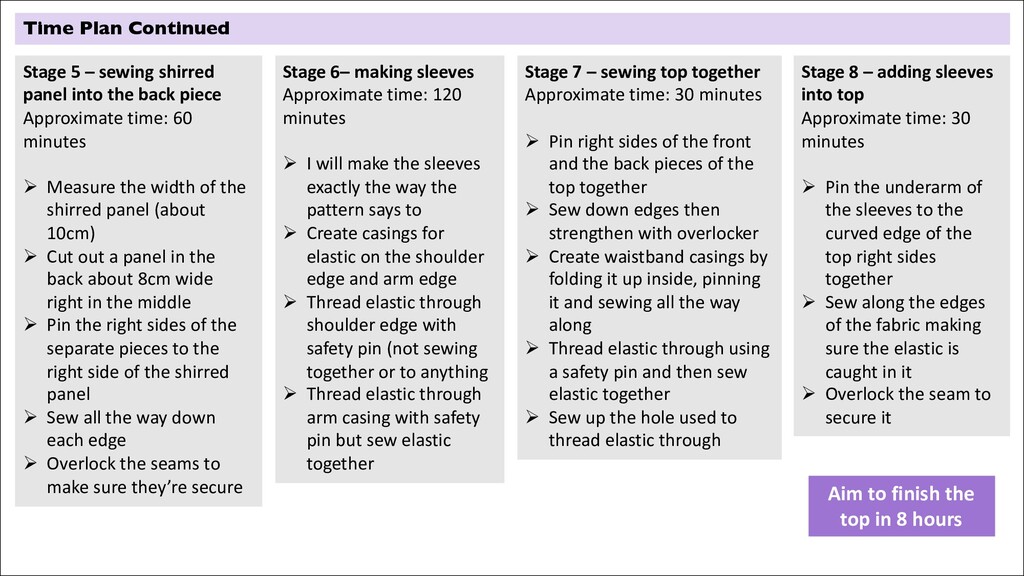
the back piece Approximate time: 60 minutes Ø Measure the width of the shirred panel (about 10cm) Ø Cut out a panel in the back about 8cm wide right in the middle Ø Pin the right sides of the separate pieces to the right side of the shirred panel Ø Sew all the way down each edge Ø Overlock the seams to make sure they’re secure Stage 6– making sleeves Approximate time: 120 minutes Ø I will make the sleeves exactly the way the pattern says to Ø Create casings for elastic on the shoulder edge and arm edge Ø Thread elastic through shoulder edge with safety pin (not sewing together or to anything Ø Thread elastic through arm casing with safety pin but sew elastic together Stage 7 – sewing top together Approximate time: 30 minutes Ø Pin right sides of the front and the back pieces of the top together Ø Sew down edges then strengthen with overlocker Ø Create waistband casings by folding it up inside, pinning it and sewing all the way along Ø Thread elastic through using a safety pin and then sew elastic together Ø Sew up the hole used to thread elastic through Stage 8 – adding sleeves into top Approximate time: 30 minutes Ø Pin the underarm of the sleeves to the curved edge of the top right sides together Ø Sew along the edges of the fabric making sure the elastic is caught in it Ø Overlock the seam to secure it Aim to finish the top in 8 hours
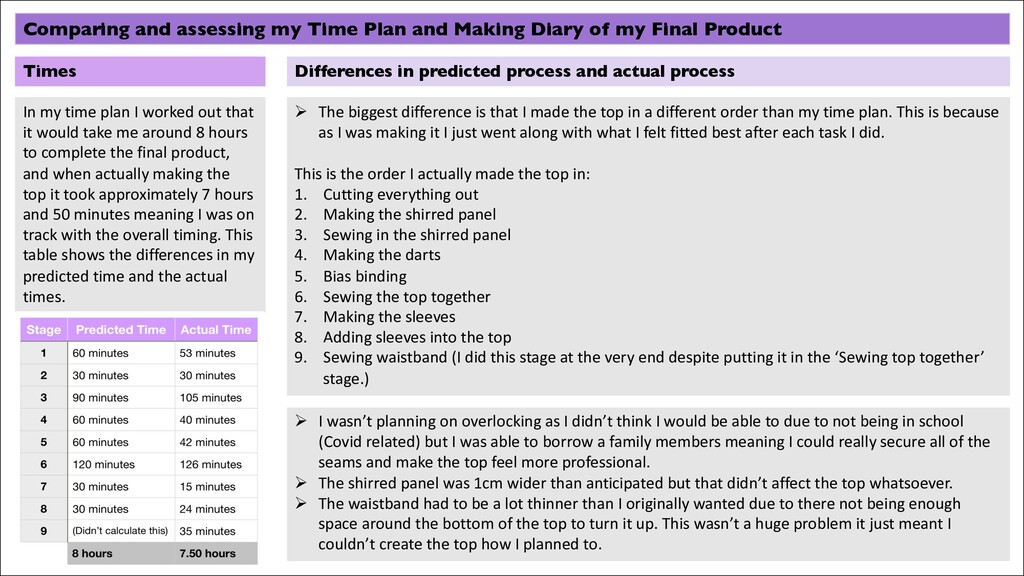
my Final Product In my time plan I worked out that it would take me around 8 hours to complete the final product, and when actually making the top it took approximately 7 hours and 50 minutes meaning I was on track with the overall timing. This table shows the differences in my predicted time and the actual times. Times Differences in predicted process and actual process Ø The biggest difference is that I made the top in a different order than my time plan. This is because as I was making it I just went along with what I felt fitted best after each task I did. This is the order I actually made the top in: 1. Cutting everything out 2. Making the shirred panel 3. Sewing in the shirred panel 4. Making the darts 5. Bias binding 6. Sewing the top together 7. Making the sleeves 8. Adding sleeves into the top 9. Sewing waistband (I did this stage at the very end despite putting it in the ‘Sewing top together’ stage.) Ø I wasn’t planning on overlocking as I didn’t think I would be able to due to not being in school (Covid related) but I was able to borrow a family members meaning I could really secure all of the seams and make the top feel more professional. Ø The shirred panel was 1cm wider than anticipated but that didn’t affect the top whatsoever. Ø The waistband had to be a lot thinner than I originally wanted due to there not being enough space around the bottom of the top to turn it up. This wasn’t a huge problem it just meant I couldn’t create the top how I planned to.
the decisions myself, but based them on interviews with my client and things I discussed with them: • Aesthetic • Fabrics • Design elements (eg. Shirring) SET BACKS • I didn’t leave enough room at the bottom of the top to make the wider waistband I originally intended to have. • I had to find a different elastic as the one I had was too wide. INSPIRATION • Finding a gap in the market for a target audience that struggles with finding clothing suitable for them was very inspiring. • All the research I did, especially when I did a questionnaire for a the group of girls within the same age range, was also very enlightening as I found out the issue of having a larger bust had on finding clothes affected a lot of young women. USEFULNESS OF INFORMATION • Researching other similar products and the gap in the market was useful as I found that tops made for younger women with larger busts were very expensive, and the cheaper options were aimed at middle- aged/older women. • Client interviews and questionnaires helped me to narrow down what I wanted my top to look aesthetically, as well as the design elements I wanted to include. • The huge group questionnaire helped me to determine the price range I wanted to keep my top in, preferred style (formal/informal) and other issues young women face surrounding clothing. • Researching current trends allowed me to get an insight into which trends my client preferred and which styles to stay away from when designing how I wanted the final product to look aesthetically. USEFULNESS OF MODELLING • I was able to trial prototypes on the client and alter them to make sure they would fit properly when it came to making the final product. • I was able to ask my client about certain things I wanted to change/add to the final product: • Neckline • Length of bodice • The shirring • Aesthetics RELATIONSHIP WITH CLIENT • My client is a good friend meaning it was easy for me to ask them questions. • We had the same timetable meaning that I had a lot of free time to ask them questions and for their opinions on things. • Lockdown has meant that getting the final product to my client for feedback, and getting photos of my client wearing the product has been difficult. TIME MANAGEMENT • I had a minimum of 20 hours to create my final product and I created it within 8 hours, which is what I predicted when creating my time plan. • I planned everything out carefully and made sure I had plenty of time in case anything went wrong. • I used my free periods as lesson time wasn’t enough. QUALITY CONTROL • I mades sure to check every single seam after sewing it to find any mistakes or anything wrong, and unpicked them if I needed to. • I checked the entire top after finishing it for any loose threads or anything that could snag and damage the top.
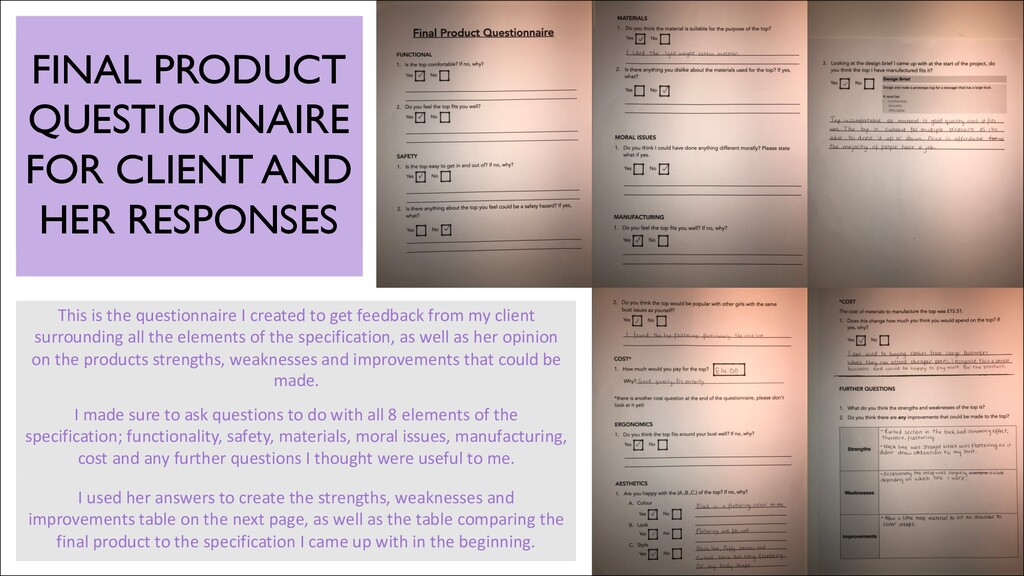
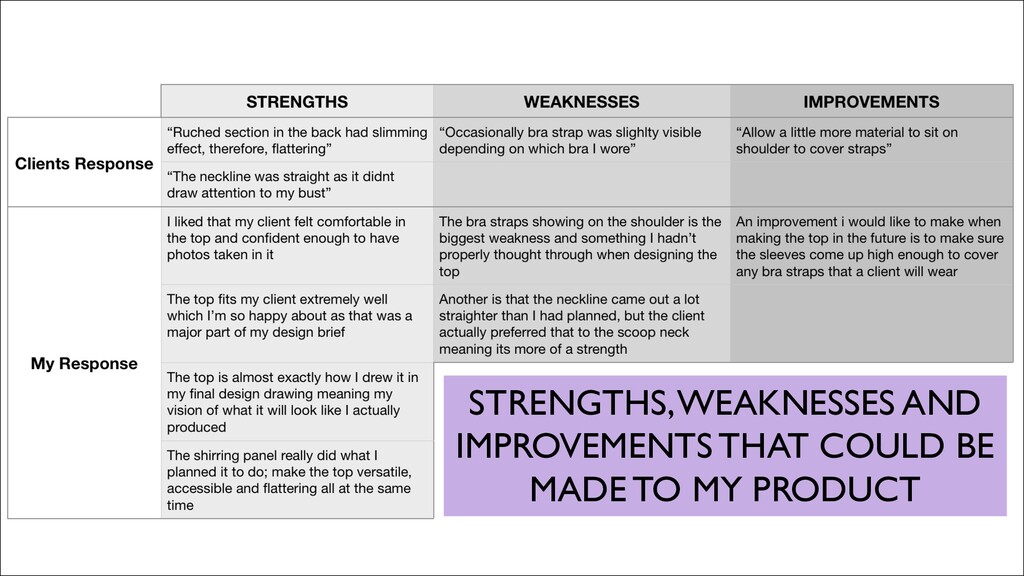
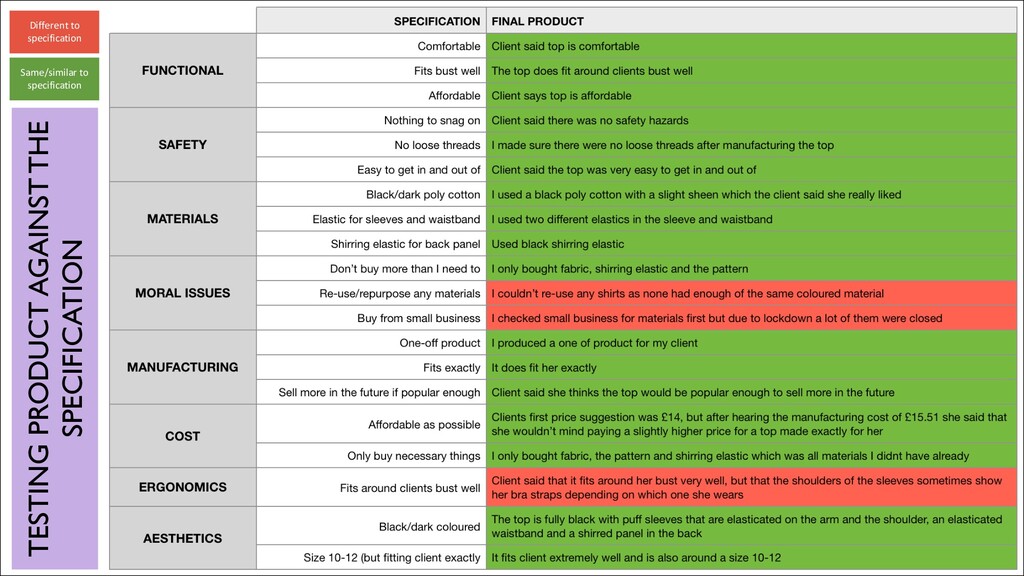
my client surrounding all the elements of the specification, as well as her opinion on the products strengths, weaknesses and improvements that could be made. I used her answers to create the strengths, weaknesses and improvements table on the next page, as well as the table comparing the final product to the specification I came up with in the beginning. I made sure to ask questions to do with all 8 elements of the specification; functionality, safety, materials, moral issues, manufacturing, cost and any further questions I thought were useful to me. FINAL PRODUCT QUESTIONNAIRE FOR CLIENT AND HER RESPONSES
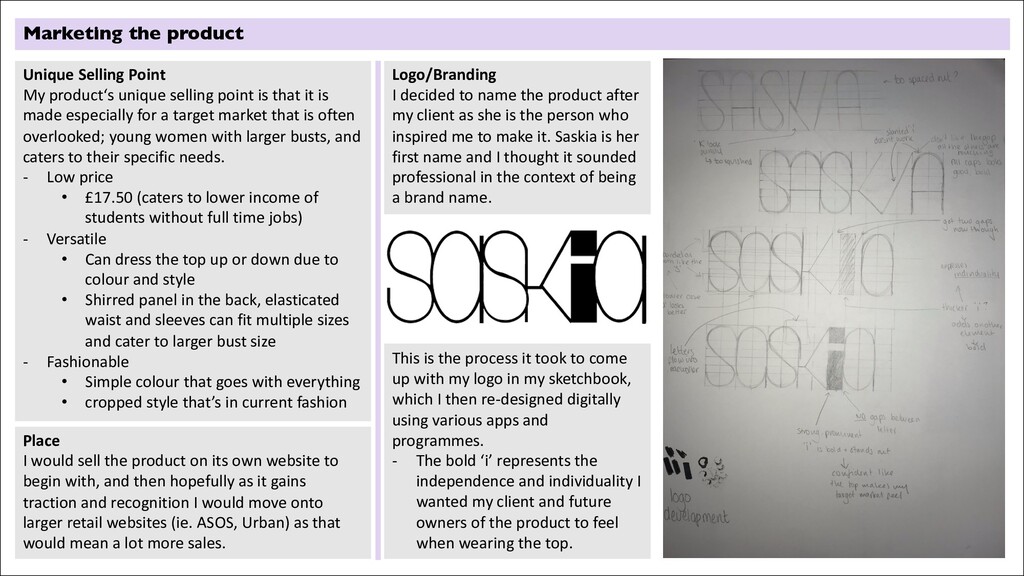
after my client as she is the person who inspired me to make it. Saskia is her first name and I thought it sounded professional in the context of being a brand name. This is the process it took to come up with my logo in my sketchbook, which I then re-designed digitally using various apps and programmes. - The bold ‘i’ represents the independence and individuality I wanted my client and future owners of the product to feel when wearing the top. Place I would sell the product on its own website to begin with, and then hopefully as it gains traction and recognition I would move onto larger retail websites (ie. ASOS, Urban) as that would mean a lot more sales. Unique Selling Point My product‘s unique selling point is that it is made especially for a target market that is often overlooked; young women with larger busts, and caters to their specific needs. - Low price • £17.50 (caters to lower income of students without full time jobs) - Versatile • Can dress the top up or down due to colour and style • Shirred panel in the back, elasticated waist and sleeves can fit multiple sizes and cater to larger bust size - Fashionable • Simple colour that goes with everything • cropped style that’s in current fashion
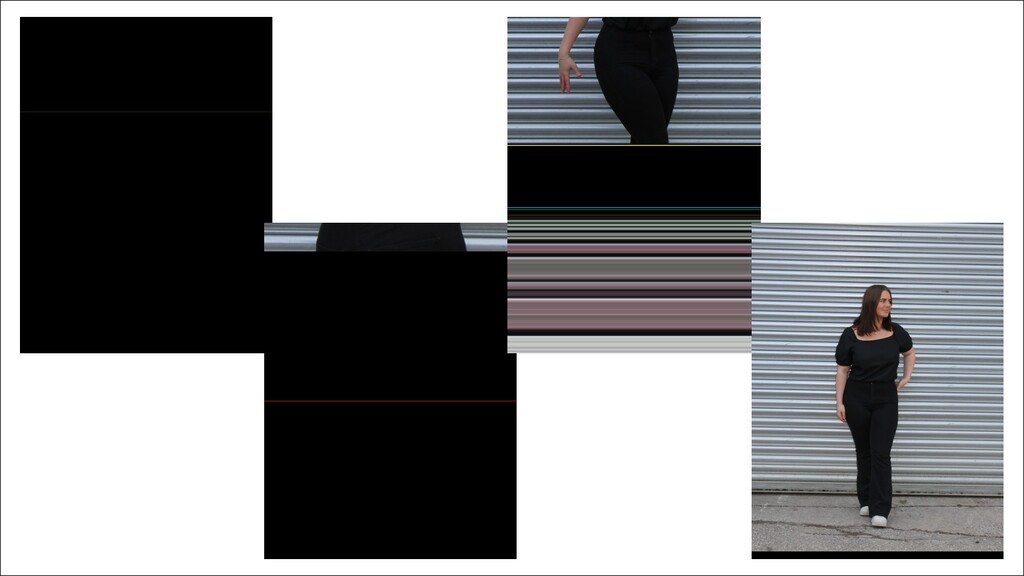
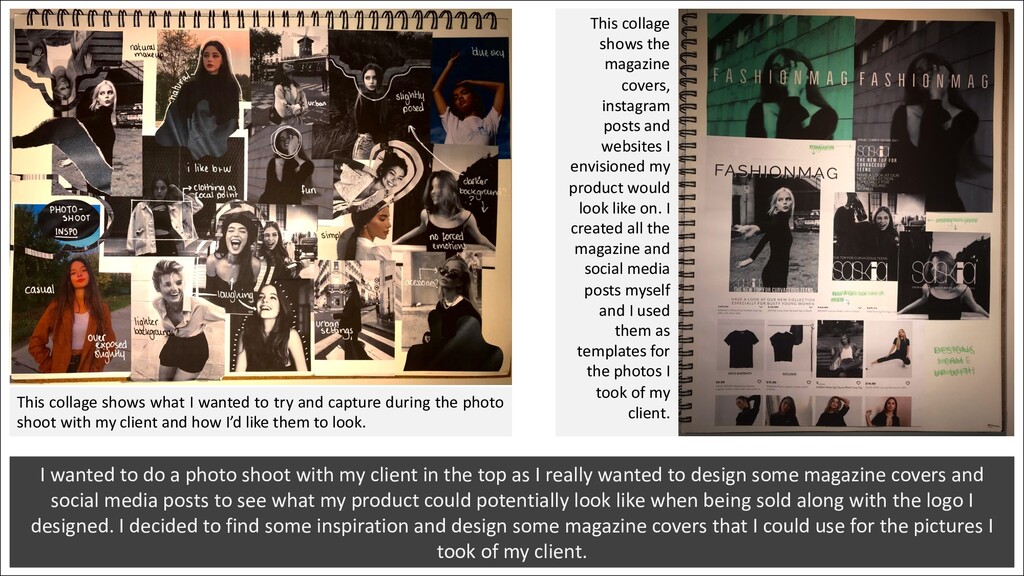
during the photo shoot with my client and how I’d like them to look. This collage shows the magazine covers, instagram posts and websites I envisioned my product would look like on. I created all the magazine and social media posts myself and I used them as templates for the photos I took of my client. I wanted to do a photo shoot with my client in the top as I really wanted to design some magazine covers and social media posts to see what my product could potentially look like when being sold along with the logo I designed. I decided to find some inspiration and design some magazine covers that I could use for the pictures I took of my client.
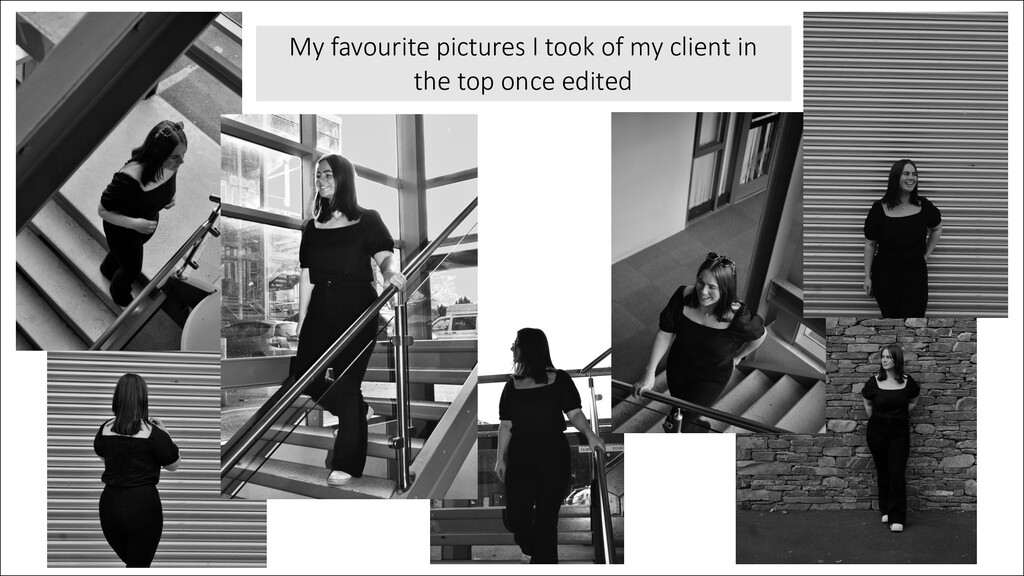
are two promotional social media posts, below is a website vision idea and what the product would look like on the ASOS website and on the left are two magazine cover ideas I liked the most. All of these use the logo and photos I took and edited of my client wearing the product I manufactured.