Upgrade to Pro — share decks privately, control downloads, hide ads and more …

First touch of no-code AI development with CatData

First touch of no-code AI development with CatData

* AI introduction slide with CatData
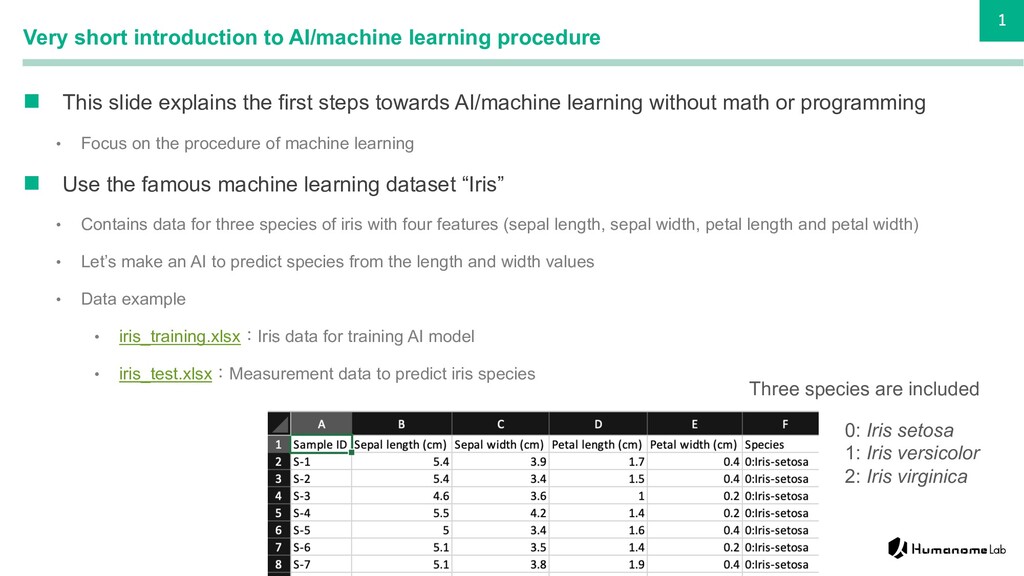
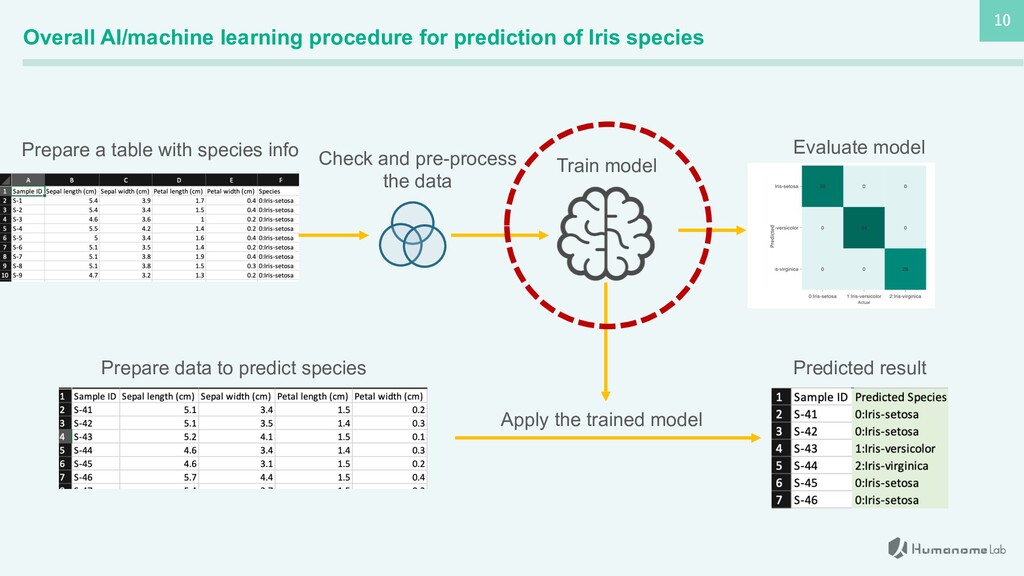
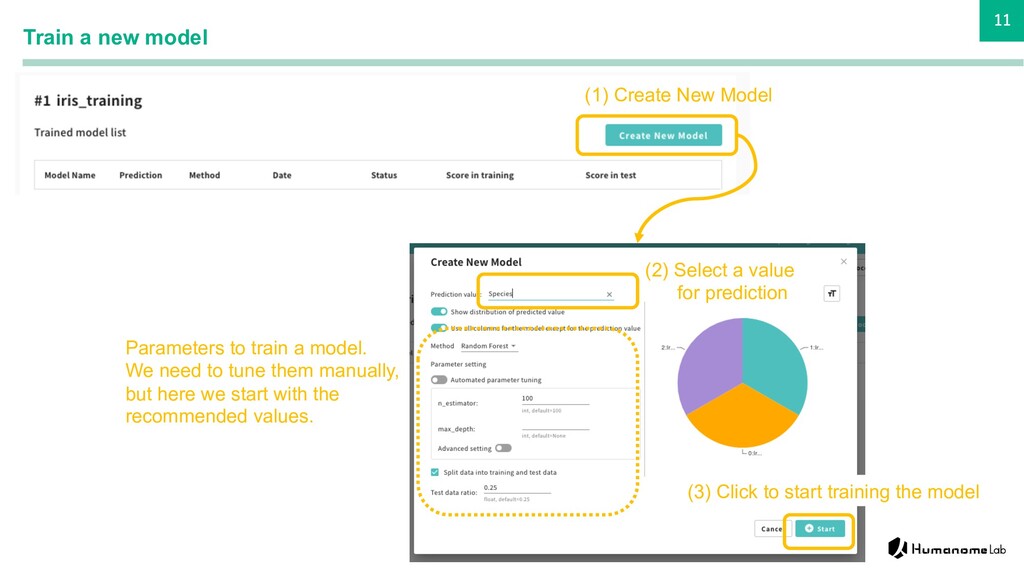
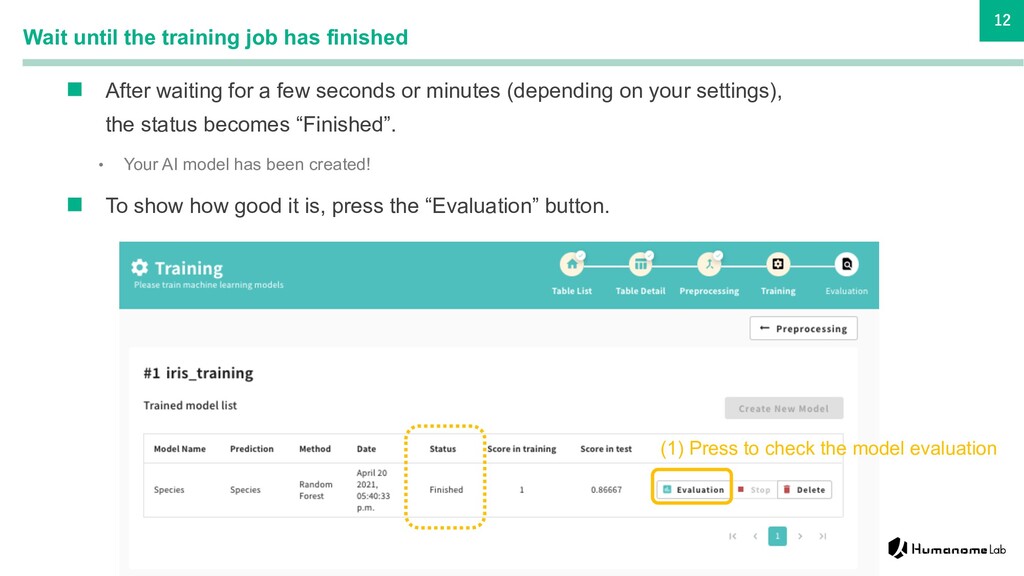
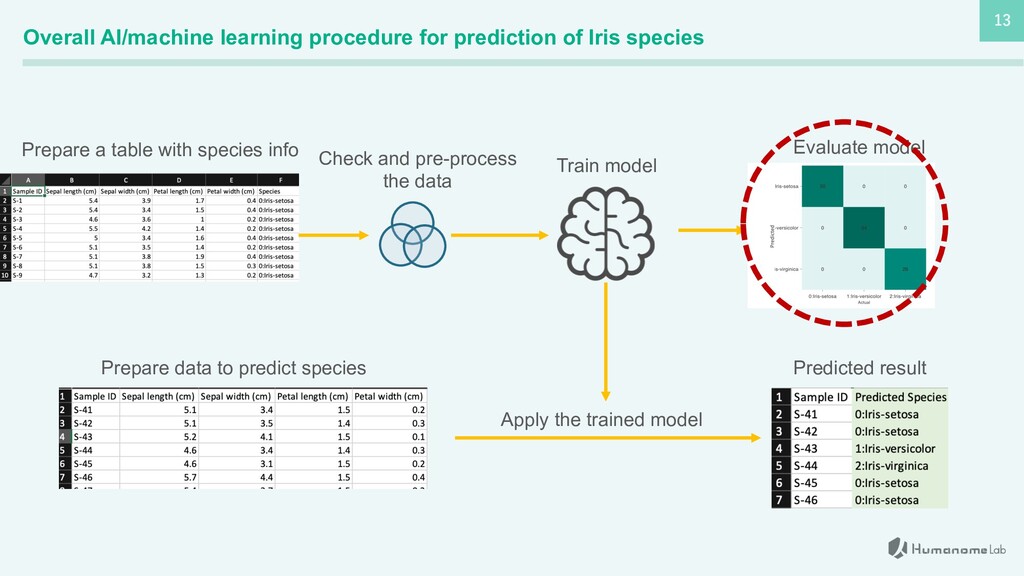
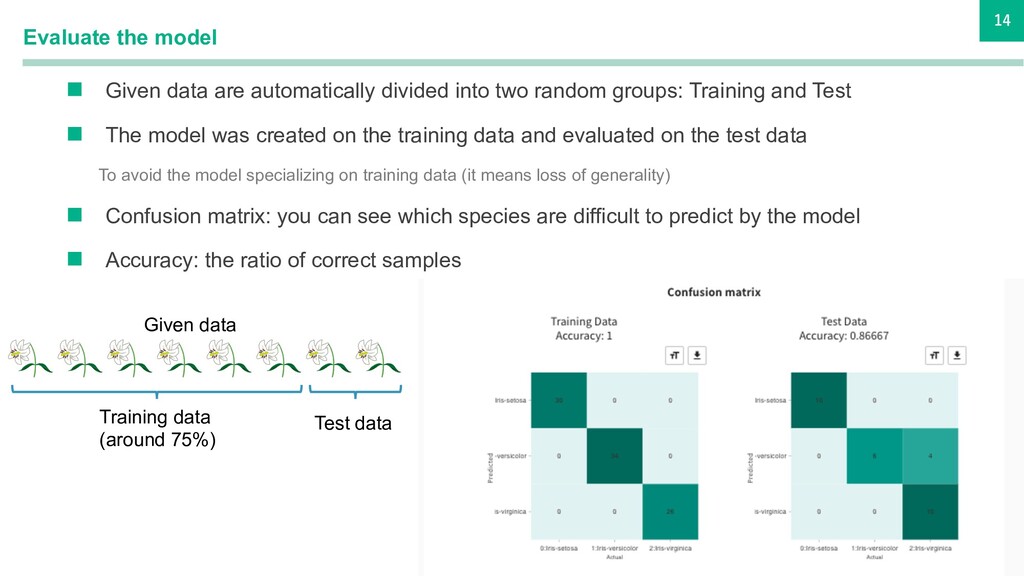
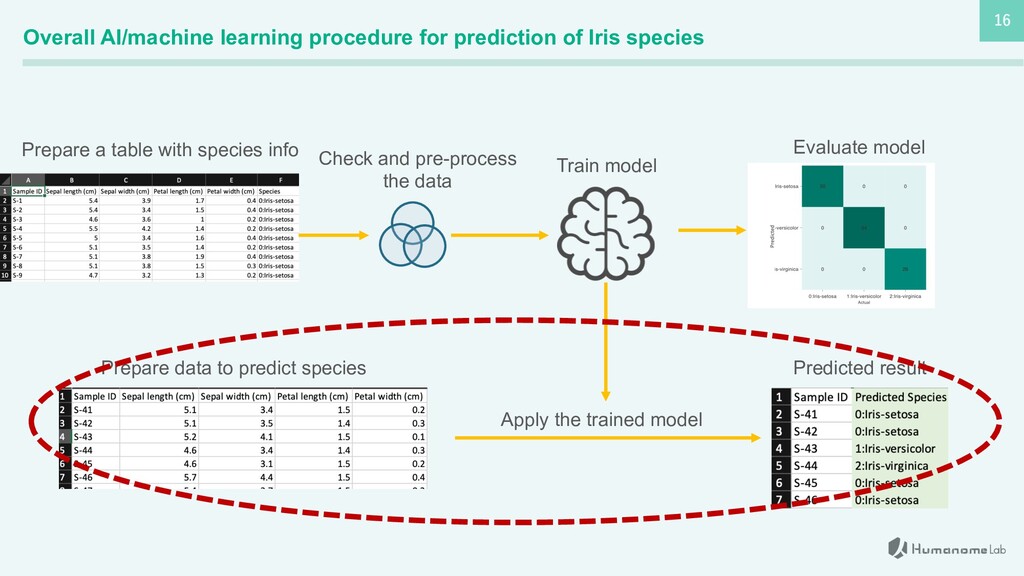
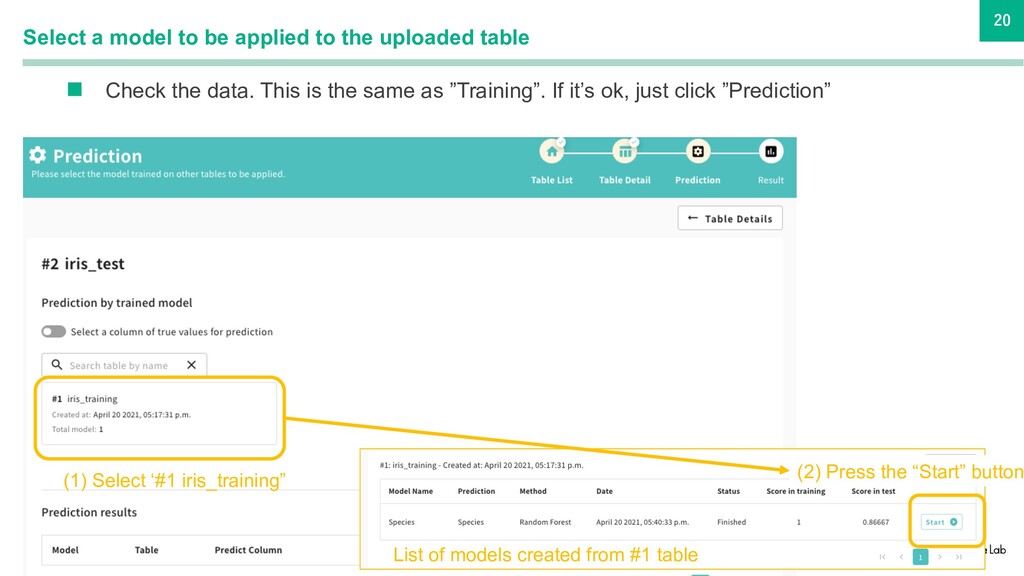
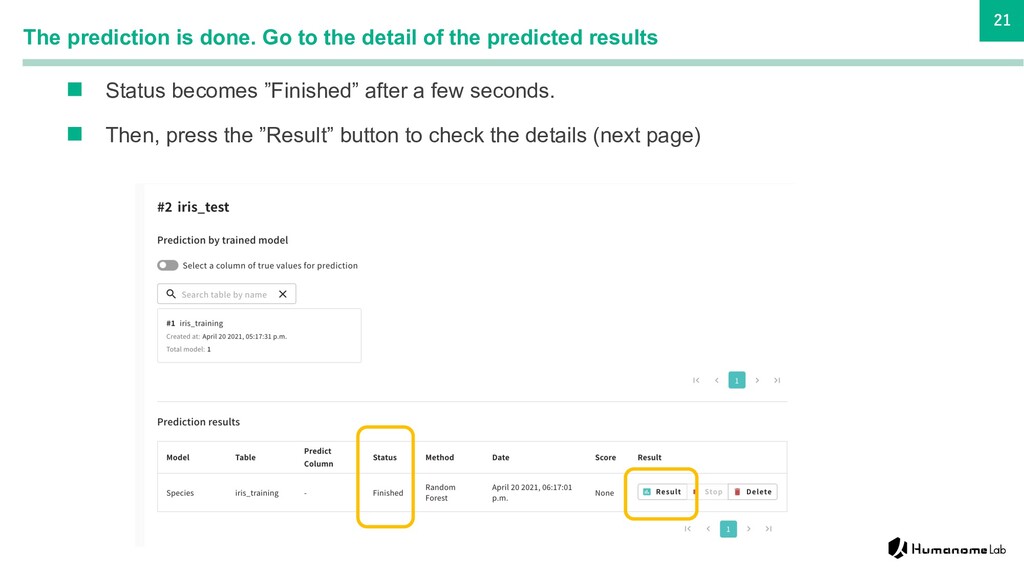
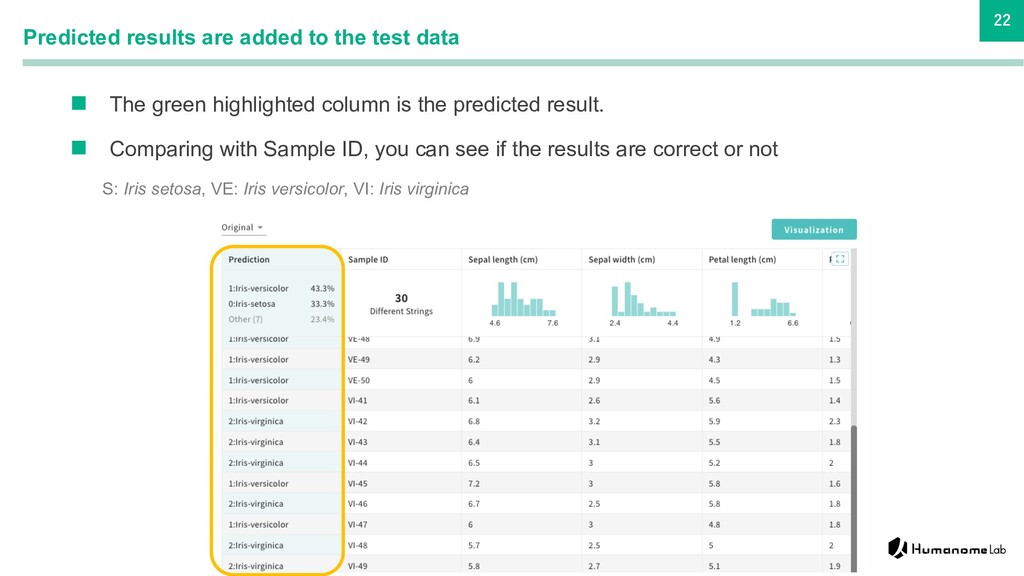
* AI model generation and prediction workflow is covered
* No-code experiment: no math or programmings are required.
* Used in the lecture for evolutional biology course of PhD students in University of Zurich and ETH.

HumanomeLab

April 22, 2021
Tweet

More Decks by HumanomeLab

Other Decks in Education

Transcript

  1. 1 Very short introduction to AI/machine learning procedure n This

    slide explains the first steps towards AI/machine learning without math or programming • Focus on the procedure of machine learning n Use the famous machine learning dataset “Iris” • Contains data for three species of iris with four features (sepal length, sepal width, petal length and petal width) • Let’s make an AI to predict species from the length and width values • Data example • iris_training.xlsx:Iris data for training AI model • iris_test.xlsx:Measurement data to predict iris species 0: Iris setosa 1: Iris versicolor 2: Iris virginica Three species are included
  2. 2 Make your account n Access via https://catdata.ai/sign-up/ n Input

    your information and press the ”Sign Up” button. n Authentication mail is sent to your e-mail address. Please press the link in the mail to confirm the address. https://catdata.ai/sign-in/
  3. 3 Overall AI/machine learning procedure for prediction of Iris species

    Train model Evaluate model Prepare data to predict species Apply the trained model Predicted result Check and pre-process the data Prepare a table with species info
  4. 4 Upload the data iris_training.xlsx n After signing-in, upload ”iris_training.xlsx”

    by clicking on the ”Create New Table” button. • https://humanome-public.s3.amazonaws.com/downloads/catdata/en/iris_training.xlsx
  5. 5 Let’s start training your first AI model (1) Check

    whether uploaded file is correct or not (2) Save (3) Select “Training” (4) Save n Select the purpose of the uploaded table. Here we select “Training” to train a model.
  6. 6 Overall AI/machine learning procedure for prediction of Iris species

    Train model Evaluate model Prepare data to predict species Apply the trained model Predicted result Check and pre-process the data Prepare a table with species info
  7. 7 Check the distribution of measured values Check whether distributions

    are expected ones or not (1) Select ‘#1 iris_training” (2) Go to “Edit Action Set” n Check the data. If your data have missing values (unexpected values), they are highlighted in red. (The Iris data is well-organized data with no missing values). Just go to next.
  8. 8 Pre-processing data if needed n Missing values and outliers

    can be removed here. To focus on a specific group (such as male/female), select the column header. Here, we need no specific selection. Go to the confirmation page. (1) Press ”Confirmation” (2) A warning appears, because “Sample ID” will be dropped as it cannot be used for model generation
  9. 9 Final data check n Check the data again because

    this is the last time to check the distribution. • You can find that “Sample ID” is removed automatically because it has a unique id for each sample. (1) Training (2) Data is fine.
  10. 10 Overall AI/machine learning procedure for prediction of Iris species

    Train model Evaluate model Prepare data to predict species Apply the trained model Predicted result Check and pre-process the data Prepare a table with species info
  11. 11 Train a new model (1) Create New Model (2)

    Select a value for prediction (3) Click to start training the model Parameters to train a model. We need to tune them manually, but here we start with the recommended values.
  12. 12 Wait until the training job has finished n After

    waiting for a few seconds or minutes (depending on your settings), the status becomes “Finished”. • Your AI model has been created! n To show how good it is, press the “Evaluation” button. (1) Press to check the model evaluation
  13. 13 Overall AI/machine learning procedure for prediction of Iris species

    Train model Evaluate model Prepare data to predict species Apply the trained model Predicted result Check and pre-process the data Prepare a table with species info
  14. 14 Evaluate the model n Given data are automatically divided

    into two random groups: Training and Test n The model was created on the training data and evaluated on the test data To avoid the model specializing on training data (it means loss of generality) n Confusion matrix: you can see which species are difficult to predict by the model n Accuracy: the ratio of correct samples Given data Training data (around 75%) Test data
  15. 15 Which values are important for the model? n In

    this model (RandomForest), we can see which features are important in the the model. n From the graph, Petal length and petal width are important to discriminate between classes n On the scatter plot (bottom right), this importance is confirmed.
  16. 16 Overall AI/machine learning procedure for prediction of Iris species

    Train model Evaluate model Prepare data to predict species Apply the trained model Predicted result Check and pre-process the data Prepare a table with species info
  17. 17 Upload the test data iris_test.xlsx n Upload ” iris_test.xlsx”

    after clicking the ”New Table” button. https://humanome-public.s3.amazonaws.com/downloads/catdata/en/iris_test.xlsx
  18. 18 Set the purpose of the uploaded table to “Prediction”

    (1) Check whether uploaded file is correct or not (2) Save (3) Select “Prediction” (4) Save n Select the purpose of the uploaded table. Here we select “Prediction” to evaluate a model.
  19. 19 Check whether the selected table is correct or not

    Check whether distributions are expected or not (1) Select ‘#2 iris_test” (2) Go to “Prediction” n Check the data. This is the same as ”Training”. If it’s ok, just click ”Prediction”
  20. 20 Select a model to be applied to the uploaded

    table (1) Select ‘#1 iris_training” n Check the data. This is the same as ”Training”. If it’s ok, just click ”Prediction” (2) Press the “Start” button List of models created from #1 table
  21. 21 The prediction is done. Go to the detail of

    the predicted results n Status becomes ”Finished” after a few seconds. n Then, press the ”Result” button to check the details (next page)
  22. 22 Predicted results are added to the test data n

    The green highlighted column is the predicted result. n Comparing with Sample ID, you can see if the results are correct or not S: Iris setosa, VE: Iris versicolor, VI: Iris virginica
  23. 23 Summary n This is a very short demonstration of

    AI/machine learning. n I focused on the workflow of AI/ML model generation and testing. I skipped some important words and measures. n Try to change models and parameters and see how the results differ. n If you have your own experimental data, try to make your model from the data. n Functions on the website are limited. If you would like to do a more detailed analysis, you should learn R or Python.