Upgrade to Pro — share decks privately, control downloads, hide ads and more …

BSD Kerberos on OpenBSD

Avatar for killman killman
September 26, 2012

BSD Kerberos on OpenBSD

Avatar for killman

killman

September 26, 2012
Tweet

Other Decks in Technology

Transcript

  1. 07/2012 4 Contents Editor in Chief: Ewa Dudzic [email protected] Supportive

    Editor Patrycja Przybyłowicz [email protected] Contributing: Michael W. Lucas, Antoine Jacoutot, Michael Shirk, Paul Ammann, Zhang Huangbin, Edward Tan, Diego Montalvo Top Betatesters & Proofreaders: Paul McMath, Bjørn Michelsen, Barry Grumbine, Eric De La Cruz Lugo, Luca Ferrari, Imad Soltani, Norman Golish, Pablo Halamaj, Cleiton Alves, Eric Geissinger, Darren Pilgrim, Christopher J. Umina, Michael Dexter, Luiz Claudio Pacheco Special Thanks: Denise Ebery Art Director: Ireneusz Pogroszewski DTP: Ireneusz Pogroszewski [email protected] Senior Consultant/Publisher: Paweł Marciniak [email protected] CEO: Ewa Dudzic [email protected] Production Director: Andrzej Kuca [email protected] Executive Ad Consultant: Ewa Dudzic [email protected] Advertising Sales: Patrycja Przybyłowicz [email protected] Publisher : Software Press Sp. z o.o. SK ul. Bokserska 1, 02-682 Warszawa Poland worldwide publishing tel: 1 917 338 36 31 www.bsdmag.org Software Press Sp z o.o. SK is looking for partners from all over the world. If you are interested in cooperation with us, please contact us via e-mail: 
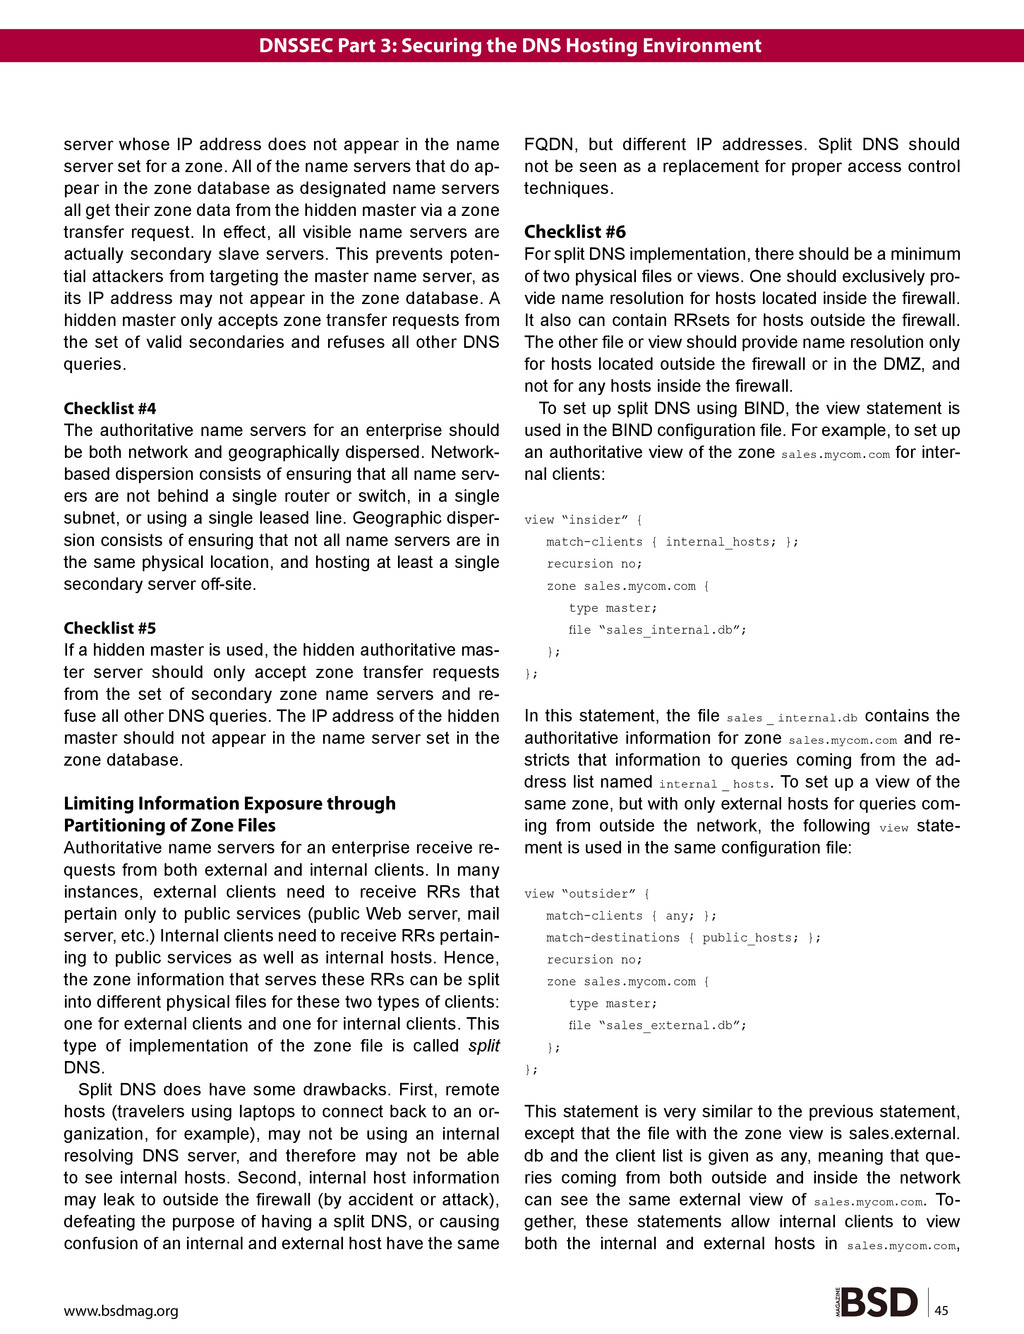
[email protected] All trade marks presented in the magazine were used only for informative purposes. All rights to trade marks presented in the magazine are reserved by the companies which own them. Mathematical formulas created by Design Science MathType™. Dear Readers, First news, we would like to share with you, is that we have finally published the analysis of feedback received in response to our open letter. You may find it on our website in section “Feedback”. We count that it will inspire some of you to write us and offer a help in covering topics, in which you are good at:) As feedback shows, you may be an expert in one and a novice in other. BSD community is based on the exchange of knowledge, experience and ideas. You give what you know and get what you need. That’s the unique charm of BSD systems! This issue starts with article about Open Source edition of iReadMail program written by its developer Zhang Huangbin. In Dev Corner Antoine Jacoutot will share with you his advanced knowledge about using Kerberos to manage user passwords and single-sign-on on OpenBSD. It will be a quick yet comprehensive overview on the topic. Although the issue is flagged with OpenBSD, FreeBSD users won’t be disappointed as well! In Dev Corner we will see an article titled: freebsd-update as Intrusion Detection System by Michael W. Lucas. It’s a well known name among BSD users. But that’s not all! Thanks to Michael and NoStarch publishing we have a nice surprise for you. In this issue you will find a special code with 30% off for Absolute FreeBSD 2nd edition! In Tips & Tricks we published a long and detailed “how to” on EasyPBI by Edward Tan. Specially for those who have never enough of pieces dedicated to upgrading ports:) Also in this issue you will find the continuation of two very good series on security. In TrustedBSD by Michael Shirk this time you will learn the configuration of the Mandatory Access Controls and how to apply the concepts of the Biba model to FreeBSD. Additionally, part 3 of DNSSEC series by Paul Ammann will provide the guidelines for secure configuration of the DNS hosting environment. Both well written, easy to follow and very practical. On last pages is interview with Gabriel Weinberg, who is a founder of DuckDuckGo search engine privacy oriented. Read it and you will stop to use google:) We hope that you will enjoy this issue and that each of you will find here something worth attention. Wish you a good read! Patrycja Przybylowicz & BSD Team
  2. www.bsdmag.org 5 Contents these configuration options on FreeBSD, there are

    fea- tures provided by TrustedBSD that add additional layers of specific security controls to fine tune the operating sys- tem for multilevel security From this article you will learn the configuration of the Mandatory Access Controls pro- vided by FreeBSD and how to apply the concepts of the Biba model to FreeBSD. DNSSEC Part 3: Securing the DNS Host- ing Environment By Paul Ammann DNS security can be distilled into two maxims: always run the latest version of your chosen DNS software pack- age, and never provide unnecessary information or ser- vices to strangers. Put another way, keep current and be stingy! The truth is: DNS servers are susceptible to the same types of vulnerabilities (platform, software, and net- work-level) as any other host on the Internet. This article will provide guidelines for secure configuration of the DNS hosting environment. The author focuses on three areas: content control of the zone file, securing the DNS host platform and software. Interview Interview with Gabriel Weinberg, Found- er of DuckDuckGo By Diego Montalvo & BSD Team DuckDuckGo is a general purpose search engine with way more instant answers, way less spam/clutter, and re- al privacy. Read the interview with its developer to find out more about the purpouses behing its unique features! What’s New Deploy a Full-featured Mail Server on OpenBSD 5.1 with iRedMail By Zhang Huangbin iRedMail installs and configures mail server binary pack- ages automatically from the official software reposito- ries provided by Linux/BSD distribution venders. These packages include: Postfix, Dovecot, Apache, OpenLDAP, MySQL or PostgreSQL, Amavisd and Roundcube. The ar- ticle is dedicated to Open Source edition of the program. Developers Corner freebsd-update as Intrusion Detection System By Michael W. Lucas One of the most annoying things a sysadmin can endure is a system intrusion. A script kiddie might only install an IRC bot, but a skilled intruder can carefully replace core system binaries so as to exploit more systems or extract more data. An Advanced Persistent Threat (APT) intruder might even patch and secure a penetrated system, so as to delay detection... Taming the Blowfish with a Dog By Antoine Jacoutot This article is meant to be a quick, yet comprehensive overview of using Kerberos to manage user passwords and single-sign-on on OpenBSD. It is by no way an ex- haustive documentation about Kerberos – entire books have been written about it! Tips & Tricks Upgrading Ports Using Portmaster By Edward Tan In this article we are going to talk a bit about Push Button Installer (PBI) packages and how we can quickly create these packages from existing software in the FreeBSD Ports Collection. The tool we will be using to facilitate the creation of these packages is called EasyPBI and it can be installed from FreeBSD Ports. Security Hardening FreeBSD with TrustedBSD and Mandatory Access Controls (MAC) Part 2 By Michael Shirk Most system administrators understand the need to lock down permissions for files and applications. In addition to 06 42 48 TM 12 38 24 14
  3. What’s New 07/2012 6 The article is dedicated to Open

    Source edition of the program. Together with iReadMail is shipped by default the iReadAdmin, which is available in dual licenses (one is GPL v2). The user can choose to install it or not. iRedMail Benefits • Fast deployment in less than one minute, easy to use and stable. • Control over your own data. You have all personal data on your hard disk, it is not on somebody else’s storage medium. • All components are free and open source softwares, and you get the bug fixes and updates of the used packages from the Linux/BSD distribution venders you trust, not iRedMail project. • Works on both non-virtualized and virtualized boxes, e.g. VMware, Xen, KVM, OpenVZ, VirtualBox, with i386 and x86_64/amd64 support. • Full-featured, easy to use web admin panel - iRed- Admin. You can setup mail server manually with the same softwares as used in iRedMail, but you can- not find a suitable web-based admin panel like iRe- dAdmin-Pro. Note: iRedAdmin is available in dual li- censes, the edition shipped in iRedMail is free and open source (GPL v2), and we’re talking about open source edition in this article. You can consider pur- chasing the full-featured edition, iRedAdmin-Pro, to gain more features. • Works on popular Linux/BSD distributions: • OpenBSD (of course) • Red Hat Enterprise Linux, CentOS, Scientific Linux • Debian, Ubuntu, Linux Mint • openSUSE • Gentoo Linux • FreeBSD System Requirements WARNING: iRedMail is designed to be deployed on a fresh server system, which means that your server does not have any mail related components installed, e.g. Deploy a Full-featured Mail Server on OpenBSD 5.1 with iRedMail iRedMail installs and configures mail server binary packages automatically from the official software repositories provided by Linux/BSD distribution venders. These packages include: Postfix, Dovecot, Apache, OpenLDAP, MySQL or PostgreSQL, Amavisd and Roundcube. What you will learn… • What iRedMail is • What iRedMail does • What benefits iRedMail provides • How to deploy a full-featured mail server on OpenBSD 5.1 in few minutes with iRedMail. All mail accounts will be stored in Open- LDAP. What you should know… • Login to OpenBSD • Type shell commands in a terminal • The email domain name you want to host your email service on What iRedMail is • A zero cost, fully fledged, full-featured mail server solution. All used packages are free and open source provided by the Linux/BSD distribution venders you trust. • An open source project, released under GPLv2, hosted on BitBucket: https://bitbucket.org/zhb/iredmail/
  4. www.bsdmag.org 7 Deploy a Full-featured Mail Server on OpenBSD 5.1

    with iRedMail Set PKG_PATH to your favorite location for installing binary packages iRedMail will install all required packages with the pkg_add command. It will automatically look for the location speci- fied in the PKG_PATH environment variable for required pack- ages. Now login to the OpenBSD server as the root user, and then set a valid PKG_PATH in /root/.profile. For example: export PKG_PATH=”http://ftp.openbsd.org/pub/OpenBSD/ `uname -r`/packages/`machine -a`/” Install the Bash shell because it’s required by iRedMail. # . /root/.profile # <- This steps is required, used to set PKG_PATH without re-login. # pkg_add bash Download the Latest Release of iRedMail • Visit the download page to get the latest release of iRedMail. http://www.iredmail.org/download.html • Upload iRedMail to your mail server via ftp or scp or whatever method available Then login to the server to install iRedMail. We assume you uploaded it to the /root/iRedMail-x.y.z.tar.bz2 directory (replace x.y.z by the actual version number). • Uncompress the iRedMail tarball: # cd /root/ # tar xjf iRedMail-x.y.z.tar.bz2 Start the iRedMail Installer We’re now ready to start the iRedMail installer. # cd /root/iRedMail-x.y.z/ # bash iRedMail.sh It will ask you to choose version numbers for several packages, please choose below versions for OpenBSD 5.1: • php-5.3 • openldap-2.4 • postfix-2.8 (stable release) • p5-Mail-SPF (instead of p5-Mail-SPF-Query) • gnupg (instead of gnupg-xxx-idea-card-ldap) MySQL, OpenLDAP, Postfix, Dovecot, Amavisd, etc. Al- though the installation procedure create backups of exist- ing files, your system may not be working as expected if you already have some of the packages already installed. To install iRedMail, you need: • A fresh, working OpenBSD system. Required file sets are: baseXX.tgz, etcXX.tgz, compXX.tgz, manXX.tgz, xbaseXX. tgz. The latest OpenBSD 5.1 release is supported. • At least 512MB of memory is required for production use. Note • All required packages will be installed with the pkg _ add command . • Apache chroot is disabled by default, required by web admin panel. • PF is enabled by default with basic rules for ssh and mail services. • spamd(8) is enabled by default for greylisting, whitelisting and blacklisting. • Sendmail is disabled by default, because it is re- placed by Postfix. Preparations Set a fully qualified domain name (FQDN) hostname on your server Enter command hostname to view the current hostname: $ hostname demo-mx.iredmail.org On OpenBSD, hostname is set in two files */etc/myname: hostname setting demo-mx.iredmail.org */etc/hosts: hostname <=> IP address mapping. Warning: List the FQDN hostname as first item. # Part of file: /etc/hosts 127.0.0.1 demo-mx.iredmail.org demo-mx localhost localhost.localdomain Verify the FQDN hostname. If it wasn’t changed, please reboot the server to make it work. $ hostname demo-mx.iredmail.org
  5. What’s New 07/2012 8 Screenshots of Installation Welcome and thanks

    for choosing iRedMail: Specify the location to store all mailboxes. The de- fault is /var/vmail/. Choose the backend to store mail accounts. Please choose one you’re familiar with. You can manage mail accounts with iRedAdmin, our web-based iRedMail admin panel. If you choose to store mail accounts in OpenLDAP, the iRedMail installer will ask you two questions about OpenLDAP. • LDAP suffix. • Password for LDAP root dn. Set password of MySQL root user. MySQL is used to store data of other applications, e.g. Roundcube 01 04 05 02 03
  6. www.bsdmag.org 9 Deploy a Full-featured Mail Server on OpenBSD 5.1

    with iRedMail webmail, Policyd, Amavisd-new. If you choose to store mail accounts in MySQL, you will see this dialog too. Add your first mail domain name Set admin password on your first mail domain. Note: • This account is used only for system administration, not a mail user. That means you can’t login to the webmail with this account. • You can login to iRedAdmin (web-based iRedMail ad- min panel) with this account for mail accont manage- ment. The login name is the full email address. • Admin username is hard-coded, you can create new admins with iRedAdmin after the installation is com- pleted. Set the password to the first mail user of your first mail domain. Note: • This account is a normal mail user. that means you can login to webmail with this account. The login name is the full email address. • The username is hard-coded. You can create new mail users with iRedAdmin after the installation is completed. Choose optional components. Note: Fail2ban and Awstats is not available on OpenBSD. After answered these questions, the iRedMail installer will ask for your confirmation to start the installation. It will install and configure the required packages automat- ically. Type ‘y’ or ‘Y’ (without quotes) and press ‘Enter’ to confirm (Listing 1). Important Things You Should Know After the Installation • Read /root/iRedMail-x.y.z/iRedMail.tips first, it con- tains: • URLs, usernames and passwords of web-based applications • Location of mail server related software configura- tion files • Some other important and/or sensitive information 06 07 08 09
  7. What’s New 07/2012 10 • Setup DNS record for SPF:

    http://code.google.com/p/ iredmail/wiki/DNS_SPF • Setup DNS record for DKIM: http://code.google. com/p/iredmail/wiki/DNS_DKIM Access Roundcube Webmail If you chose to install webmail during iRedMail installa- tion, the latest Roundcube webmail (0.7.2) will be installed for you. It’s accessible via HTTP and HTTPS. Now type https://your_server/mail/ in your favorite web browser, it will show you the login page of webmail. Input the username and password of first mail user we created during iRedMail installation, then press Enter, and you will be redirected to Inbox: (Figure 1). There are two emails in your Inbox. One contains de- tailed information about the iRedMail installation, and the other contains useful links for mail server administration. Click “Settings” in the top-right corner, it will show you some tabs of per-user webmail settings, you can change pass- word under tab “Password”: Figure 2. To create mail filter rules, just click tab “Filters”. It will show you two disabled template filters, one for vacation mes- sage, another for moving spam to the Junk folder (Figure 3). Access Web-based Admin Panel – iRedAdmin If you chose to install the web-based ad- min panel, iRedAdmin, during the iRed- Mail installation, the latest iRedAdmin (open source edi- tion) will be installed for you. It’s simple and easy to use, and is accessible via HTTPS only. Now type https://your_server/iredadmin/ in your favorite web browser, it will show you login page of admin panel like below: (Figure 4). Input the username and password of admin account we created during iRedMail installation, then click “Login”, you will be redirected to Dashboard of admin panel like below: (Figure 5). Under menu “Domains and Accounts”, you will see the first mail domain we cre- ated during iRedMail installation: (Figure 6). Click button “Add domain” to add new mail domain: (Figure 7). To see all mail users under certain domain, just click link in col- Listing 1. Configuration compleated ************************************************************************* **************************** WARNING *********************************** ************************************************************************* * * * Please do remember to *REMOVE* configuration file after installation * * completed successfully. * * * * * /root/iRedMail-x.y.z/config * * ************************************************************************* <<< iRedMail >>> Continue? [Y|n] Figure 2. settings_password Figure 4. Login Figure 3. settings_filters Figure 1. inbox
  8. www.bsdmag.org 11 Deploy a Full-featured Mail Server on OpenBSD 5.1

    with iRedMail umn “Users” under menu “Domains and Accounts”: (Fig- ure 8). Click button “+ Users” to create new mail user un- der same domain: (Figure 9). Under menu “Admins”, you will see the admin account created during iRedMail instal- lation: (Figure 10). Click button “Add admin” to add new mail admin: (Figure 11). Access Other Web Applications After the installation is completed, you can access web- based programs if you chose to install them. Replace ‘your_ server’ below by your actual server name or IP address. Get technical Support Please post all issues, feedback, feature requests and suggestions in the online support forum over at http:// www.iredmail.org/forum/. Zhang Huangbin Author of iRedMail project, freelance, big fan of OpenBSD. Figure 6. domain_list Figure 7. domain_create Figure 8. user_list Figure 10. admin_list Figure 11. admin_create Figure 9. user_create Figure 5. dashboard Table 1. URLs of webmail and other web applications Component URL Accessible via HTTP Accessible via HTTPS Webmail http://your_server/mail/ Yes Yes iRedAdmin (admin panel) httpS://your_server/iredadmin/ No Yes phpMyAdmin httpS://your_server/phpmyadmin/ No Yes phpLDAPadmin httpS://your_server/phpldapadmin/ No Yes
  9. 07/2012 12 Eventually, you’ll notice the intruder. Perhaps you find

    and fix the route used to break in. But what do you do with your system then? Maybe the intruder only installed that IRC bot, or maybe the system’s key pro- grams now pass all your authentication credentials and credit card numbers back to some kiddie porn ring. You can’t rebuild all your software, because your com- piler might now have extra features that benefit the intrud- er. (If you have not read Ken Thompson’s “Reflections on Trusting Trust,” from Communications of the ACM, vol 27, No. 8, August 1984, stop reading this article and go read it. It’s available at http://dl.acm.org/citation.cfm?id=358210 or through your favorite search engine.) The only thing to do is to reinstall the system from scratch, update all your software to the most secure versions, and double-check system security. I, for one, like to know just what kind of intruder broke in. A script kiddie will make me shrug, check system security, and move on. A skilled intruder will send me scurrying to deeply evaluate every system I manage. The skilled intruder will probably want to replace core system components, to help him gather more data and compromise more of my systems. If I can verify the in- tegrity of the core system components, I can make a re- alistic guess about the type of intruder I had. Verifying the core system won’t determine that I had a script kid- die, but if the intruder replaced a core system compo- nent I can be fairly sure the intruder was above average in skill. FreeBSD’s freebsd-update includes tools to verify your base system against the install files. freebsd-up- date isn’t as flexible as a tool like Tripwire, but it can be used without setting it up before the intrusion. It’s also limited to systems installed from release media or up- dated via freebsd-update. If you track -current or -stable, you cannot use this method. You’ll need a FreeBSD boot CD for the version you’re running, writable disk space such as a USB key or NFS share, and your compromised system. Life will be easier if you grab a copy of the compromised system’s /etc/fstab. This example was tested on a FreeBSD/i386 9.0-p1. Boot the FreeBSD install CD. Tell the installer to go into Live CD mode. You’ll get a login prompt. Log in as root, no password. You’ll get a read-only root directory, and mem- ory filesystems for /var and /tmp. Now you need network connectivity, including DNS res- olution. As /etc is mounted read-only, you can’t edit /etc/ resolv.conf. For the install CD, resolv.conf is a symlink to /tmp/bsdinstall_etc/resolv.conf. On the live CD, the direc- tory /tmp/bsdinstall_etc doesn’t exist. Create it, then either run dhclient or configure your interface by hand. The net- work interface on this system is em0. # mkdir /tmp/bsdinstall_etc # dhclient em0 freebsd- update as Intrusion Detection System One of the most annoying things a sysadmin can endure is a system intrusion. A script kiddie might only install an IRC bot, but a skilled intruder can carefully replace core system binaries so as to exploit more systems or extract more data. An Advanced Persistent Threat (APT) intruder might even patch and secure a penetrated system so as to delay detection. TM
  10. www.bsdmag.org 13 freebsd-update as Intrusion Detection System Now mount the

    disk partitions from the compromised system under /mnt. In a default FreeBSD 9.0 install, the entire system is installed as one large partition. If you have IDE or SATA disks, your root partition is probably /dev/ada0p2. I suggest mounting the partition read-only to avoid inflicting any accidental damage. # mount -o ro /dev/ada0p2 /mnt You also need a place to put the data files freebsd-update generates. Here I mount a NFS share for that purpose, but you could also use a flash drive or any other extra disk. As I’m already using /mnt for my hard drive, I’ll use /media for the NFS mount. My NFS server is at 192.0.2.8; use the address or hostname of your server. # mount_nfs 192.0.2.8:/tmp /media We’re now ready to compare the installed system to the one that freebsd-update expects. # freebsd-update -b /mnt IDS >> /media/update.ids Now go get lunch. The comparison takes about 15 min- utes on a fast system. When complete, the file will start with notices about find- ing FreeBSD update mirrors, loading metadata, and so on. Then you’ll see a bunch of entries like this: ... /dev has 0755 permissions, but should have 0555 permissions. /etc/group has SHA256 hash dd783...9a0, but should have SHA256 hash 04fa5...355. … These are objects in the filesystem that don’t match the default FreeBSD distribution expected by freebsd-update. Some of these are expected. Once you add a user, files like /etc/group and /etc/passwd change. The checksum should not match. You cannot assume that your chang- es to a file are the only changes, however. The intruder might have added his own user account. You must manu- ally verify every file that freebsd-update identifies. Rather than read the details of every file’s changes, generate a list of all suspect files. $ cat update.ids | awk ‘{print $1}’ /dev /etc/group ... This generates a nice list of files that differ from the dis- tribution media. On a virgin system, I would expect changes to files such as /etc/group, /etc/master.passwd, / etc/passwd, /etc/pwd.db, and /etc/spwd.db. On my system, I expect changes to /etc/motd, /etc/nsswitch.conf and var- ious /etc/pam.d files. I must manually verify those files – an intruder could have added steal _ auth _ credentials.so to PAM. But then this particular list ends in: ... /usr/bin/login /usr/sbin/sshd Uh oh. These files have changed. I certainly haven’t changed them. The intruder was sufficiently skilled to re- place important system files. I don’t know what changes he made to those programs, but I do know that I cannot trust this system. It’s time to change all passwords and SSH authentication keys on all related systems. The good news is, I know what programs the intruder replaced. There’s a good chance that if he compromised any other servers, he replaced /usr/bin/login and /usr/ sbin/sshd on them as well. If those files have changed on another system, I know it has been compromised. I can’t test those files locally, but I can copy them to another sys- tem and validate their checksums. Absence of evidence is not evidence of absence. An un- changed base system do not mean that the system was not penetrated. But freebsd-update’s IDS functionality gives you places to start looking. TM TM Michael W. Lucas Michael W Lucas lives in Detroit, Michigan. His recent books include Absolute FreeBSD, Network Flow Analysis, Cisco Routers for the Desperate, and SSH Mastery. His Web site is http://www.michaelwlucas.com
  11. 07/2012 14 If you need more information about Kerberos itself,

    its concepts and terminologies, refer to the following on- line resources: • http://www.ietf.org/rfc/rfc4120.txt (RFC for the The Kerberos Network Authentication Service version 5) • http://www.h5l.org/manual/heimdal-1-5-branch/info/ heimdal/ (for Heimdal Kerberos) • http://web.mit.edu/kerberos/krb5-latest/#docu mentation (for MIT Kerberos) Kerberos is a system for securely authenticating us- ers and services on a network. The initial implementa- tion came from MIT as part of “Project Athena” for dis- tributed computing (along with the Hesiod name ser- vice). Since then, several implementations were created, like the BSD-licensed Heimdal, which is what OpenBSD uses. Kerberos is also a core part of the Microsoft Active Directory directory service. The latest version of the pro- tocol is version 5 (aka Kerberos V). At the time of this writing, Heimdal is at version 1.5.2, but OpenBSD still uses the old 0.7.2 version. Authentication is done by the means of “tickets”, grant- ed by the KDC (“Key Distribution Center”). A ticket can be requested for a user (“johndoe”), a host (“serverfoo.bsd- mag.org) or a service (ldap, imap, …); these are called “principals” in Kerberos terminology. Initial Configuration The entire Kerberos configuration for clients and server is done in the /etc/kerberosV/krb5.conf(5) file. Typically, all can use the same krb5.conf, but in our case we will only use a small one on the clients, and get all the other required fields from DNS (see the next section). By using DNS, we could even go without any krb5.conf file on the clients, but we want to have forwardable tick- ets by default (your ticket will follow you from machine to machine as long as you use Kerberos to connect to them; i.e. you can use a ticket gotten from one host to be used on another one). OpenBSD comes with a ready-to-use /etc/kerberosV/ krb5.conf.example file which we can copy to /etc/kerberosV/ krb5.conf and edit to our needs. This file is the core of the Kerberos infrastructure con- figuration and it would require several articles to elaborate all possible options, so we will not go into too much detail (Listing 1 and Listing 2). [libdefaults] sets the default options. “default_realm” is our administrative REALM for which we will request tickets; in case of a cross-realm setup (see the cross-realm section at the end of this article) there can be several. “forwardable” asks for forwardable tickets by default. [realms] is where the REALM configuration is done. Taming the Blowfish with a Dog “Woof woof!” This article is meant to be a quick, yet comprehensive overview of using Kerberos to manage user passwords and single-sign-on on OpenBSD. It is by no way an exhaustive documentation about Kerberos – entire books have been written about it!
  12. www.bsdmag.org 15 Taming the Blowfish with a Dog tion from

    DNS (Listing 3). The records should be pretty much self-explanatory. The CNAME are just here so that we don’t need to re- member the FQDN of the KDCs. It’s easier to just use kerberos1 to access the master server rather than to re- member its hostname. The _kerberos record designates the domain REALM. The kerberos._udp kerberos._tcp give us the KDC host- names along with the protocol used to access them (can be udp, tcp, and/or http). There are 3 digit combinations in these records. The first one (00 or 10) is the “weight” of the record (which works like an MX record; the lowest For the BSDMAG.ORG we are declaring 2 KDCs (mas- ter and slave) and the kadmind(8) server (for remote ad- ministration); the kadmind(8) server must be the master Kerberos server. kerberos1.bsdmag.org and kerberos2.bsdmag. org must be resolvable hostnames. [domain_realm] is used to associate DNS domain names with a REALM. It is useful when dealing with sub-domain that need to be associate to a top level REALM (e.g. entity.bsdmag.org). [kdc] includes the configuration that is meant for the KDC servers only. It can override configuration from lib- defaults. “require-preauth” is enforced on the KDCs. Pre-authen- tication forces a principal to encrypt a time-stamp with his password or key. If the password is wrong, the KDC will not return any encrypted Ticket Granting Ticket (TGT). In the case preauth is not used, the client can send any kind of authentication request and the KDC will send the encrypted TGT to start the challenge authentication; the problem is that this TGT can be brute-forced offline, pre- auth prevents this. [kadmin] is used to configure the kadmind(8) service. By default we will use Kerberos version 5 keys and force pre- authentication (like we do for the KDCs). [logging] describes the logging configuration. In our case we will log all kadmind(8) activity under /var/heimdal/ kadmind.log. syslog(8) can be used for logging, see krb5. conf(5) for more information. [appdefaults] contains the default values for Kerberos utilities (kinit(1), ktutil(1)...). In our case we do not want to request AFS tickets when using kinit(1); requesting tickets to access AFS file-systems is the default on OpenBSD, but we don’t need it here (http://en.wikipedia.org/wiki/An- drew_File_System). A word of warning: Kerberos authentication is tight to the system time, a time-stamp is encrypted in the tickets. For this reason, the maximum time difference between a principal and a service cannot be greater than 5 minutes (300 seconds; this value is configurable using the “clock- skew” option under [libdefaults]). DNS Setup This part is optional in a Kerberos infrastructure but can become handy in case you don’t have a configuration dis- tribution system (like cfengine or puppet) to deploy the krb5.conf file over to all clients. It can also be used when the master is down for example to upgrade a slave to master by changing some DNS entries. Using DNS TXT records, a client will not need to know beforehand anything about the REALM nor the Kerberos servers used in the setup: it will get all required informa- Listing 1. /etc/kerberosV/krb5.conf on the master and slave [libdefaults] default_realm = BSDMAG.ORG forwardable = yes [realms] BSDMAG.ORG = { kdc = kerberos1.bsdmag.org kdc = kerberos2.bsdmag.org admin_server = kerberos1.bsdmag.org } [domain_realm] .bsdmag.org = BSDMAG.ORG [kdc] require-preauth = yes [kadmin] default_keys = v5 require-preauth = yes [logging] kadmind = FILE:/var/heimdal/kadmind.log [appdefaults] kinit = { afslog = no } Listing 2. Optional /etc/kerberosV/krb5.conf on the clients [libdefaults] default_realm = BSDMAG.ORG forwardable = yes
  13. 07/2012 16 number will be tried first). The third one

    holds the port on which the KDCs are listening for ticket granting requests. The kerberos-master._udp designates the master KDC. The kerberos-adm._udp designates the kadmind(8) server. The kpasswd_udp designates the kpasswdd(8) server. Setting up a REALM In Kerberos terminology, a REALM is an administrative domain; i.e. it can be viewed as a domain name in NIS (YP) or an Active Directory Domain under Microsoft Win- dows. It is the name-space used to distinguish a Kerberos site from another. The REALM name is usually the Internet domain name in uppercase (i.e. the right part of the Fully Qualified Do- main Name), and it is strongly advised to follow this con- vention. While a KDC can have several REALMS, we will only set up one for now. So let’s pretend our domain name is bsdmag.org, our REALM will be: BSDMAG.ORG. Now we are going to ini- tialize our REALM (which creates some mandatory en- tries) along with the master key used to encrypt the Ker- beros database. This is needed on the master Kerberos server only. Refer to the kadmin(8) and kstash(8) man pages to see a list of all possible options. We are passing the `-l’ switch to kadmin(8) to work in local mode; we must do this be- cause we cannot request tickets as there are no principals yet: in this mode, no authentication is needed because we access the database file directly (which is accessible by root only). On OpenBSD, Kerberos data is stored under /var/ heimdal, but this directory does not exist by default, so we need to create it first. # mkdir /var/heimdal # kstash –random-key kstash: writing key to `/var/heimdal/m-key’ # kadmin -l init BSDMAG.ORG Realm max ticket life [unlimited]: <enter> Realm max renewable ticket life [unlimited]: <enter> The content of /var/heimdal/m-key can be seen using the ktutil(8) command. # ktutil --keytab=/var/heimdal/m-key list /var/heimdal/m-key: Vno Type Principal 1 des3-cbc-sha1 K/[email protected] Now, that our REALM was properly created, we can start the Kerberos services • kdc, the Key Distribution Center which will serve tick- et requests • kadmind, which allows to remotely administer the Kerberos database • kpasswdd, which listens to password change requests # /etc/rc.d/kdc start kdc(ok) # /etc/rc.d/kadmind start kadmind(ok) # /etc/rc.d/kpasswdd start (ok) Note that we need to pass `-f’ to the rc.d(8) scripts, be- cause we did not add the kdc _ flags kadmind _ flags and kpasswdd _ flags variables in rc.conf.local(8) yet. To make sure these services will be started on boot, the following lines need to be added to / etc/rc.conf.local(8): kdc_flags= kadmind_flags= kpasswdd_flags= Our base Kerberos database is now ready and stored under /var/heimdal/heimdal.db (this contains the entire Kerberos da- ta so this file needs to be protected and backed-up on a regular basis – see below). The KDC is the central piece of the Kerberos setup and it is important to secure it as much as possible; compromise could jeopardize the en- tire network authentication infrastructure. Listing 3. Extract of a named(8) zone file containing Kerberos information kerberos IN CNAME serverfoo.bsdmag.org. kerberos1 IN CNAME serverfoo.bsdmag.org. kerberos2 IN CNAME serverbar.bsdmag.org. _kerberos IN TXT BSDMAG.ORG _kerberos._udp IN SRV 00 00 88 serverfoo.bsdmag.org. _kerberos._udp IN SRV 10 00 88 serverbar.bsdmag.org. _kerberos._tcp IN SRV 00 00 88 serverfoo.bsdmag.org. _kerberos._tcp IN SRV 10 00 88 serverbar.bsdmag.org. _kerberos-master._udp IN SRV 00 00 88 serverfoo.bsdmag.org. _kerberos-adm._tcp IN SRV 00 00 749 serverfoo.bsdmag.org. _kpasswd._udp IN SRV 00 00 464 serverfoo.bsdmag.org.
  14. www.bsdmag.org 17 Taming the Blowfish with a Dog Setting up

    a Slave Server Setting up a slave is pretty straightforward. Since we declared 2 KDCs in our krb5.conf file, in case the master (kerberos1) goes down, the slave (kerberos2) will take over ticket granting requests. First, we need to create the /var/heimdal directory with `mkdir /var/heimdal`. Then, the Kerberos master password keyfile needs to be copied over from the master server to the slave. The keyfile is located under /var/heimdal/m-key and should be copied verbatim and to the same path on the slave. Missing this file will prevent the kdc(8) from being able to decrypt the database. Once this is done, we can start the kdc(8) service on the slave: # /etc/rc.d/kdc -f start kdc(ok) Note that we need to pass `-f’ to the rc.d(8) script, be- cause we did not add the kdc _ flags variable in rc.conf. local(8) yet. To make the kdc(8) automatically start on boot, the fol- lowing line needs to be added to /etc/rc.conf.local(8): kdc_flags= At this point it is important to note that the kadmind(8) and kpasswdd(8) services should not run on the slave server; the reason is that the slave only stores a copy of the master Kerberos database which is not meant to be modified (changes will be lost once the master synchronizes its database to the slave). The last step of setting up a slave is to enable the hpropd(8) daemon, which will listen for in- coming database transfers from the master. hpropd(8) uses inetd(8), so make sure it is en- abled on the machine. The following line needs to be added to /etc/inet.conf(8): krb_prop stream tcp nowait root /usr/ libexec/hpropd hpropd Then inetd(8) will need to be reloaded for the change to take effect: # /etc/rc.d/inetd reload inetd(ok) To push the database from the master to the slave, we use the hprop(8) utility. It can be run manually, but it’s better to setup a cron(8) job, so that the database gets synchronized ev- ery XX minutes. Note that newer Heimdal versions use ipropd, which detects when a change is made to the database, in which case it gets synchronized automa- tically. Example of a cron(8) job on the master (DB will be pushed every 15 minutes): */15 * * * * /usr/libexec/hprop -E kerberos2.bsdmag.org Users Management To be able to request tickets for accessing a particular service, we obviously need to populate our database with users (“principals”). The first principals we are going to add are the Kerberos administrator users. Note that I wrote user*s*, not user; in- deed we are going to create 2 principals, one that will be used to get a regular user ticket needed to access kerber- ized services and one that will be used only for accessing the Kerberos administrative interface (kadmind(8)). Listing 4. Adding a user and the admin counterpart # kadmin -l kadmin> add johndoe Max ticket life [1 day]: <enter> Max renewable life [1 week]: <enter> Principal expiration time [never]: <enter> Password expiration time [never]: <enter> Attributes []: <enter> [email protected]’s Password: <password+enter> Verifying – [email protected]’s Password: <password+enter> kadmin> add johndoe/admin Max ticket life [1 day]: <enter> Max renewable life [1 week]: <enter> Principal expiration time [never]: <enter> Password expiration time [never]: <enter> Attributes []: <enter> johndoe/[email protected]’s Password: <password+enter> Verifying – johndoe/[email protected]’s Password: <password+enter> kadmin> exit
  15. 07/2012 18 The policy for naming a principal is the

    following: user{,/admin}|host|service@REALM (Listing 4) Now we can start requesting tickets for both johndoe and johndoe/admin. kinit(1) is used to get a ticket. kde- stroy(1) is used to remove a ticket. klist(1) is used to list our tickets (Listing 5). We are almost ready to roll... the last step will be to set- up kadmind(8) Access Control Lists. ACLs are configured in the /var/heimdal/kadmind.acl file on the master Kerberos server. The syntax is as follows: principal [priv1,priv2,...] [glob-pattern] Possible privileges are: add, cpw (change password), delete, get, list, modify and all. glob-pattern is used to restrict access to a particular ser- vice and/or REALM; it uses the same syntax as regular shell globbing (fnmatch(3)). Let’s setup an administrative us- er with full rights on the BSDMAG.ORG REALM by adding the following line in /var/heimdal/kadmind.acl: johndoe/admin all *@BSDMAG.ORG To confirm we now have admin- istrative access, let’s use this principal to modify the password of johndoe. We will not access the Kerbe- ros database in local mode direct- ly, but instead we will request an admin ticket, and then use kadmin(8) without any option, which will make it connect to the kadmind(8) server over the network (remember, using `kadmin -l’ as root accesses the database directly and does not require any authentication; see Listing 6). Of course, instead of the password we could have changed any value of the principal, like the expiration date... Note that kadmin(8) can be used non-interactively by passing the appropriate command line switches, see its man page for details. Since we are talking about passwords, here’s how to change one using the passwd(1) command against the kpasswdd(8) service running on the master. According to passwd(1), all that is needed to change a Kerberos password is to append the `-K’ switch. So let’s pretend we are logged into the system as “john- doe”: Listing 7. “I love it when a plan comes together!” Hosts and Services Management Hosts and services tickets are somehow similar to user tickets, except that keys are used instead of passwords. A host principal is used to get access to a host (e.g. con- sole login, ssh...). A service principal is used to get access to a service (e.g. ldap, imap...). The creation of a host or service principal is analogous to the creation of a user principal, with the notable ex- Listing 5. Get, destroy and list tickets $ kinit johndoe [email protected]’s Password: <password+enter> $ klist Credentials cache: FILE:/tmp/krb5cc_1000 Principal: [email protected] Issued Expires Principal May 19 07:56:38 May 19 17:56:38 krbtgt/BSDMAG.ORG@ BSDMAG.ORG $ kdestroy $ klist klist: No ticket file: /tmp/krb5cc_1000 Listing 6. Change the Kerberos password of user “johndoe” using kadmin(8) $ kinit johndoe/admin johndoe/[email protected]’s Password: <password+enter> $ kadmin kadmin> passwd johndoe [email protected]’s Password: <new_password+enter> Verifying – [email protected]’s Password: <new_ password+enter> kadmin> exit Listing 7. Change the Kerberos password of user “johndoe” using passwd(8) $ whoami johndoe $ passwd -K [email protected]’s Password: <password+enter> New password: <new_password+enter> Reply from server: Password changed
  16. www.bsdmag.org 19 Taming the Blowfish with a Dog ception that

    we will pass –random-key to the add command instead of being prompted for a password (Listing 8). We just created the host/[email protected] principal. Since a host or a service cannot authenticate using a password (obviously), we will need to extract its authen- tication key into the Kerberos keytab (/etc/kerberosV/krb5. keytab) on the host which provides the service. Keytab management is done using kutil(8), which we will use to list the keys in our keytab (Listing 9). As we can see, our keytab contains the keys for host/[email protected] in several en- cryption forms. Service tickets work the same. If you wanted to grant access to your IMAP server using Ker- beros, you would have to create an imap/<hostname> principal then extract its key under /etc/kerberosV/krb5.keytab on the IMAP server. Of course, your IMAP server needs to support Kerberos authentication (see the GSSAPI section below). Another popular service is ldap/ with the OpenLDAP serv- er which can use Kerberos authentication using cyrus-sasl and GSSAPI, but this is beyond the scope of this article (the ldapd(8) server in the OpenBSD base system can also handle Kerberos authentication, natively, using bsd_auth(3)). System Authentication As seen is the previous section, to be able to authenticate to a system, we need to have its corresponding host prin- cipal key stored in the keytab. We already did this, so let’s now setup our system for Kerberos authentication. It goes without saying that the user must exist on the system we wish to connect to; Kerberos only takes care of the authentication part (i.e. password), but if the user itself does not exist on the system (in master.passwd(5) or yp(8)), then logging in will of course not be possible. In this section, we will configure local logins, only (con- sole, XDM(1), etc.). Remote logins (ssh) will be covered in the next section. On OpenBSD, authentication is handled by bsd_auth(3) (as opposed to PAM(8) on most other UNIX-like systems), Listing 8. Add a computer principal to the Kerberos database $ kadmin kadmin> add --random-key host/serverfoo.bsdmag.org Max ticket life [1 day]: <enter> Max renewable life [1 week]: <enter> Principal expiration time [never]: <enter> Password expiration time [never]: <enter> Attributes []: <enter> kadmin> exit Listing 9. Extrat and list the keytab for host/serverfoo.bsdmag.org $ kadmin kadmin> ext --keytab=/etc/kerberosV/krb5.keytab host/serverfoo.bsdmag.org kadmin> exit # ktutil list FILE:/etc/kerberosV/krb5.keytab: Vno Type Principal 1 des-cbc-md5 host/[email protected] 1 des-cbc-md4 host/[email protected] 1 des-cbc-crc host/[email protected] 1 aes256-cts-hmac-sha1-96 host/[email protected] 1 arcfour-hmac-md5 host/[email protected] 1 des3-cbc-sha1 host/[email protected] Listing 10. Extract from /etc/login.conf for Kerberos authentication auth-defaults:auth=krb5-or-pwd,skey:
  17. 07/2012 20 and login configuration is done in /etc/login.conf(5). The

    default authentication schemes are set by the “auth-de- fault” field which is set to “passwd, skey” by default (local password file is tried first, then S/Key one-time password challenge). To enable Kerberos login authentication, we will modify this value and replace “password” with one of the 2 pos- sible values for Kerberos: • krb5, authentication is done against Kerberos only • krb5-or-pwd, authentication is done against Kerberos with a fallback on the local password database In our case we will use krb5-or-pwd, so that local au- thentication is used in case the KDCs are not reach- able (which is the case for roaming clients where a user needs to be able to login to his computer while being of- fline). The system is now ready for Kerberos login (both con- sole and graphical). Don’t forget that for Kerberos local login to work, the system you are logging on must have its host/ keytab ex- tracted in /etc/kerberosV/krb5.keytab (Listing 11). As we can see, login worked and we have a valid Ker- beros ticket that will allow us to authenticate against other Kerberos services on the network without having to enter our password again (single sign-on!). This can integrate very well in a NIS setup (with a ypserv(8) or ypldap(8) server), where user information is distributed by YP(8), while passwords are securely han- dled by Kerberos; that gives you a complete and secure distributed user management infrastructure. GSSAPI The “Generic Security Services Application Programming Interface” is an API that was created to provide a homoge- neous client-server authentication interface. Since version 5, Kerberos implements GSSAPI, which we will be using for remote login using ssh(1). First, let’s enable GSSAPI authentication on the ssh(1) server side by setting the GSSAPIAuthentication value to “yes” in /etc/ssh/sshd_config(5), and reloading sshd(8). Don’t mind the “Kerberos*” options, these are used for Kerberos version 4, only. Once this is done, we do the same for the client, and enable GSSAPIAuthentication and GSSAPIDelegateCredentials in /etc/ssh/ssh_config(5). Note that the client configuration is not a require- ment, as we can pass options to the ssh(1) util- ity to enable GSSAPI authentication. But if you plan on making it a default, then the configuration file is obviously preferred (Listing 12). As we can see, not only remote login works, but we can also jump to other machines (which have GSSAPI authentication enabled), without hav- ing t o enter our password again, our Ker- beros ticket is properly forwarded from one machine to the other. Another popular use of GSSAPI is with the OpenLDAP Listing 11. Login using a Kerberos password login: johndoe Password: <password+enter> <...> $ klist Credentials cache: FILE:/tmp/krb5cc_1000 Principal: [email protected] Issued Expires Principal May 20 09:13:02 May 20 19:13:02 krbtgt/BSDMAG.ORG@ BSDMAG.ORG Listing 12. Example of ticket forwarding over GSSAPI $ kinit [email protected]’s Password: $ ssh serverfoo.bsdmag.org <...> serverfoo.bsdmag.org $ ssh serverbar.bsdmag.org <...> $ hostname serverbar.bsdmag.org $ ssh serverblah.bsdmag.org <...> $ hostname serverblah.bsdmag.org $ klist Credentials cache: FILE:/tmp/krb5cc_Y31BLhIQHd Principal: [email protected] Issued Expires Principal May 20 12:31:39 May 20 22:30:16 krbtgt/BSDMAG.ORG@ BSDMAG.ORG
  18. www.bsdmag.org 21 Taming the Blowfish with a Dog server and

    cyrus-sasl, so that Kerberos users are used for authentication and ACLs instead of LDAP users (re- moving the need for storing passwords in the LDAP da- tabase). Cross-REALM Authentication Cross-REALM authentication is used when a KDC in one REALM needs to authenticate principals from a different REALM. For this to work, both KDCs need to share the same krbtgt key. So let’s pretend we want both BSDMAG.ORG and LINUXMAG.ORG to be able to authenticate users from each others. First, we need to create on the master KDC of each REALM the following Kerberos ticket granting users: • krbtgt/REALM@OTHER _ REALM • krbtgt/OTHER _ REALM@REALM The principals must share the same password (make sure to use a complex random password; Listing 13). The Kerberos infrastructure needs to be made aware of the other REALM. Some information will need to be added to /etc/kerberosV/ krb5.conf(5). In our case we will need to do the following: Listing 14. You should now be able to use kinit(1) to get user tickets for both REALMS. kinit will try to get a ticket for your default REALM (BSD- MAG.ORG), whereas kinit [email protected] will try to get a ticket for the user kiki in the LINUXMAG.ORG REALM. Note that in a DNS setup, the cross-REALM informa- tion needs to be available as well. In this case, the au- thoritative DNS server for the bsdmag.org domain (which includes Kerberos entries for the BSDMAG.ORG REALM) can be configured as a slave of the linuxmag.org domain (which would contain the information for the LINUXMAG.ORG REALM). Cross-REALM authentication can become very handy when handling large sites that use several REALMs, as you don’t need a user in each of the REALMs. Database Backup Backing-up the database is just a matter of using the dump command in kadmin(8), which will dump a copy of the database in human-readable format. This command is most useful in non-interactive mode on the Kerberos master, so that a cron(8) job can be setup to dump the database at regular intervals. # kadmin -l dump /path/to/heimdal.db.backup Listing 13. Add the LINUXMAG.ORG for cross-REALM authentication $ kadmin kadmin> add krbtgt/[email protected] Max ticket life [unlimited]: <enter> Max renewable life [unlimited]: <enter> Principal expiration time [never]: <enter> Password expiration time [never]: <enter> Attributes []: <enter> krbtgt/[email protected]’s Password: <password+enter> Verifying – krbtgt/[email protected]’s Password: <password+enter> kadmin> add krbtgt/[email protected] Max ticket life [unlimited]: <enter> Max renewable life [unlimited]: <enter> Principal expiration time [never]: <enter> Password expiration time [never]: <enter> Attributes []: <enter> krbtgt/[email protected]’s Password: <password+enter> Verifying – krbtgt/[email protected]’s Password: <password+enter> kadmin> exit Listing 14. Modifications to /etc/kerberosV/krb5.conf for cross- REALM authentication [libdefaults] the default realm needs to be modified to read: default_realm = BSDMAG.ORG LINUXMAG.ORG [realms] the cross-REALM information need to be added: LINUXMAG.ORG = { kdc = kerberos1.linuxmag.org kdc = kerberos2.linuxmag.org admin_server = kerberos1.linuxmag.org } the cross-REALM domain needs to be added: .linuxmag.org = LINUXMAG.ORG
  19. 07/2012 22 If the database is encrypted (which is the

    default), the encrypted keys can be left out of the dump by appending the --decrypt option to kadmin(8). To restore a database, we will be using the “load” command. # kadmin -l load /path/to/heimdal.db.backup Listing 15. Summary for setting up a Kerberos master # mkdir /var/heimdal # kstash -random-key kstash: writing key to ‘/var/heimdal/m-key’ # kadmin -l init \ --realm-max-ticket-life=”unlimited” \ --realm-max-renewable-life=”unlimited” BSDMAG.ORG # kadmin -l add --password=”PaSsWoRd” \ --max-ticket-life=”1d” \ --max-renewable-life=”1w” \ --expiration-time=”never” \ --pw-expiration-time=”never” \ --attributes=”” johndoe # kadmin -l add --password=”PaSsWoRd” \ --max-ticket-life=”1d” \ --max-renewable-life=”1w” \ --expiration-time=”never” \ --pw-expiration-time=”never” \ --attributes=”” johndoe/admin # kadmin -l add --random-key \ --max-ticket-life=”unlimited” \ --max-renewable-life=”unlimited” \ --expiration-time=”never” \ --pw-expiration-time=”never” \ --attributes=”” host/serverfoo.bsdmag.org # kadmin -l ext_keytab -k /etc/kerberosV/krb5.keytab host/serverfoo.bsdmag.org # echo ‘kdc_flags=\nkadmind_flags=\nkpasswdd_flags=’ >> / etc/rc.conf.local # echo ‘johndoe/admin\tall\t*@BSDMAG.ORG’ >> /var/ heimdal/kadmind.acl # echo ‘*/15 * * * *\t/usr/libexec/hprop -E kerberos2’ >> /var/cron/tabs/root Listing 16. Summary for setting up a Kerberos slave # echo ‘kdc_flags=’ >> /etc/rc.conf.local # echo ‘krb_prop stream tcp nowait root /usr/libexec/ hpropd hpropd’ \ >> /etc/inetd.conf Antoine Jacoutot Antoine Jacoutot is an OpenBSD developer living in Paris, France. He is responsible for more than 300 packages, wrote the sysmerge(8) utility and was involved in the OpenBSD rc.d(8) framework development. He is also a GNOME committer and a member of the GNOME foundation. He runs OpenBSD for pretty much everything. We can also “merge” entries from a dumped file into an existing database. # kadmin -l merge /path/to/heimdal.db.backup Cheat Sheet Using the /etc/kerberosV/krb5.conf provided at the begin- ning of this article, here’s a quick summary on how to set- up a Kerberos REALM from A to Z. Just replace the bold values with your own. • Master (Listing 15) • Slave (Listing 16) Now you can reboot both the master and slave servers, and start configuring services and hosts for Kerberos authentication! Conclusion Kerberos usually appears like black magic for newcom- ers. I hope this article would have unveiled some of its most useful features. It is very powerful, and when prop- erly set up, it offers a very secure infrastructure for dis- tributed passwords management. As with anything that handles authentication, particular care must be taken to create the configuration and secure all the services in- volved in the setup. Again, this article just quickly uncovered some aspects of Kerberos, there is much more to it than what was de- scribed here. Both MIT and Heimdal websites are a good starting point for detailed documentation (along with the man pages and `info heimdal’).
  20. the finest in geek entertainment no starch press Use discount

    code UPTIME to get 30% off Absolute FreeBSD 2nd Edition. Valid through July 2012. Free ebook with all print book purchases. http://www.nostarch.com Absolute FreeBSD, 2nd Edition Michael W. Lucas 978-1-59327-151-0 November 2007 $59.95 Print Book and FREE Ebook $47.95 Ebook (PDF, Mobi, and ePub) 30% OFF FOR BSD MAG READERS!
  21. Tips&Tricks 07/2012 24 For a system administrator that prefers hand

    made customized ports, installing ports from the source is the way to go. A port is actually the program’s origi- nal source plus information about its dependencies and in- stallation methods. This information is gathered into a port Makefile by the port’s maintainer. Port maintainers regularly monitor their ports for software patches and updates. When updates are released, the port maintainer edits the Make- file to add support for the updates and tests it. After testing, the port is then uploaded to the FreeBSD ports tree and thus made available to us. Then we make the port using its source, as described in the port’s Makefile, and the port can be installed onto the server with “make install”. The FreeBSD ports tree is being updated very frequent- ly as it has thousands of ports voluntarily maintained by port maintainers. As of this writing, there are slightly more than 23,000 ports available in the ports tree. Usually, the FreeBSD ports tree should be checked dai- ly so that the administrator knows when updates of ports are available. Installing these updates are important as Upgrading Ports Using Portmaster On a FreeBSD server, the system administrator has the choice of using either packages (binary) or the ports system (source). Packages are precompiled binaries from the source in the ports system. These packages come with some sane default options. It is sufficient for a server with minimum customization. What you will learn… • Introduction to portmaster and the ports tree • The infinity loop of upgrading ports • Some tips and tricks of using portmaster What you should know… • Installation of ports • Moving around FreeBSD filesystem Listing 1. Dependencies of a port # pkg_info -r apache-2* Information for apache-2.2.22_5: Depends on: Dependency: expat-2.0.1_2 Dependency: perl-5.12.4_4 Dependency: pcre-8.30_1 Dependency: gdbm-1.9.1 Dependency: db42-4.2.52_5 Dependency: libiconv-1.13.1_2 Dependency: apr-ipv6-devrandom- gdbm-db42-1.4.5.1.3.12_1 Listing 2. Dependents of a port # pkg_info -R apache-2* Information for apache-2.2.22_5: Required by: php5-5.3.10_1 pecl-APC-3.1.9_1 php5-gd-5.3.10_1 -- snip -- php5-zip-5.3.10_1 php5-zlib-5.3.10_1
  22. www.bsdmag.org 25 Upgrading Ports Using Portmaster Meet portmaster, the port

    upgrade utility that depends on Bourne Shell only. Unlike other port upgrade utilities that depend on a third party language to compile, portmaster is written in Bourne Shell only. This also means that /bin/sh, which comes with the base install of FreeBSD, is the only dependency. The portmaster utility does not generate or de- pend on its own database for port information, instead, it uses the ports database (in /var/db/ports/) and the port’s Makefile to determine the dependencies and dependents. Since this tool is new (started around year 2007, Febru- ary) and actively being developed, bug fixes are out faster compared to other, more seasoned, utilities. Before we go into our ports introduction, we need to un- derstand what it means to be a port’s dependency and dependent. A port’s dependent is a particular port, or a set of ports, that “depend on” the port being upgraded. The port’s dependency is “needed” for the port being upgrad- ed to work properly. Think of the port “tmux”. When upgrading “tmux”, “libev- ent” is the only dependency “tmux” has. From another view, when upgrading “libevent”, the dependent “tmux” has to be updated as well. So that the dependent is aware of the newly installed “libevent” port. they may contain bug fixes, security patches or feature up- grades. That is why the system administrator’s job does not end with setting up and configuring a server, instead, that is just the beginning of a never ending cycle. Upgrading ports. Introduction to Portmaster and the Ports Tree ‘’#!/bin/sh’’ The portmaster is a tool used to upgrade ports. Why port- master and not a more seasoned utility? From Doug Bar- ton, the author of portmaster utility: “Does the world really need one more port management tool? Well I’m not sure about the world, but I do know that none of the existing options worked for me, for a variety of reasons. The two biggest being that I do not want to have to install yet another language, and I do not want the over- head of a database to manage the information about what ports I have installed, etc. The goals I started with for this project were to use /bin/ sh so that nothing else would have to be installed for it to work, and to make use of the existing data in /var/db/pkg. I now have something that meets those goals, and does everything I want it to do, so I’m interested in sharing it with the community.” Listing 3. Updating ports tree # portsnap fetch update Looking up portsnap.FreeBSD.org mirrors... 9 mirrors found. Fetching snapshot tag from geodns-1.portsnap.freebsd.org... done. Fetching snapshot metadata... done. Updating from Sun May 20 07:42:23 MYT 2012 to Sun May 20 23:17:20 MYT 2012. Fetching 4 metadata patches... done. Applying metadata patches... done. Fetching 0 metadata files... done. Fetching 89 patches.....10....20....30....40....50....60....70....80.... done. Applying patches... done. Fetching 5 new ports or files... done. Removing old files and directories... done. Extracting new files: /usr/ports/LEGAL /usr/ports/MOVED /usr/ports/Mk/bsd.php.mk /usr/ports/Mk/bsd.pkgng.mk /usr/ports/Mk/bsd.port.mk /usr/ports/UPDATING -- snip -- Building new INDEX files... done.
  23. Tips&Tricks 07/2012 26 Additionally, the utility pkg_info can be used

    to find out more information on dependencies and dependents of a port. For example, to find the dependencies of a port, Example: pkg_info -r apache-2.2* (Refer to Listing 1 for reference) To find the dependents of the ports, Example: pkg_info -R apache-2.2* (Refer to Listing 2 for reference) Here are the nuts and bolts of the ports tree. The Free- BSD ports tree is kept under /usr/ports, ports are then sorted into different directories by category name. Go- ing down another level will be the name of the port. And lastly, the files that describe how and where an individual port is to be built and installed on the server, the Make- file. Example: /usr/ports/<category name>/<port name> Installed ports information is kept in /var/db/pkg/. It con- tains information about a port’s dependencies, depen- dents, file locations and some miscellaneous information about the port. This information is very important when it comes to upgrading a port. There is also the /var/db/ports/ directory, where options about a port are kept during the installation of the port. The options file is useful when one needs to find out what options have been enable/disable during the installation of a port. An alternative use of this information is the auto- mation of port installation. For example, the installation of a port using a shell script or a managed deployment sys- tem such as puppet. Conventionally, updating the ports tree uses csup, a CVS approach to updating the ports tree. This can be time con- suming as it tends to scan the whole ports tree and up- dates all necessary files and directories. Nowadays up- dating the ports tree can be done using the portsnap utility. portsnap will check and download a snapshot of an up- dated ports tree and then apply updates to the local ports tree. The portsnap utility stores its information and down- loaded snapshot in /var/db/portsnap. The steps to upgrading ports are actually a sequence of actions that include uninstalling the current port and rein- stall it with an updated version of the port. Of course this in- cludes the dependencies of the port as well. This can sound Listing 4. Listing of ports # portmaster -L ===>>> Root ports (No dependencies, not depended on) ===>>> cmake-2.8.8 ===>>> libtool-2.4.2 ===>>> portmaster-3.11 ===>>> rsync-3.0.9 ===>>> sysinfo-1.0.1 ===>>> unzip-6.0_1 ===>>> 6 root ports ===>>> Trunk ports (No dependencies, are depended on) ===>>> autoconf-wrapper-20101119 ===>>> automake-wrapper-20101119 ===>>> db42-4.2.52_5 ===>>> expat-2.0.1_2 ===>>> gdbm-1.9.1 ===>>> jpeg-8_3 ===>>> libevent-1.4.14b_2 ===>>> libiconv-1.14 ===>>> m4-1.4.16,1 ===>>> mysql-client-5.5.24 ===>>> oniguruma-4.7.1 ===>>> pcre-8.30_2 ===>>> perl-5.12.4_4 ===>>> pkg-config-0.25_1 ===>>> png-1.4.11 ===>>> t1lib-5.1.2_1,1 ===>>> tcl-modules-8.5.11 ===>>> 17 trunk ports ===>>> Branch ports (Have dependencies, are depended on) ===>>> apache-2.2.22_5 ===>>> apr-ipv6-devrandom-gdbm-db42-1.4.5.1.3.12_1 ===>>> autoconf-2.69 ===>>> freetype2-2.4.9_1 ===>>> gettext-0.18.1.1 ===>>> libxml2-2.7.8_2 ===>>> New version available: libxml2-2.7.8_3 ===>>> p5-Locale-gettext-1.05_3 ===>>> php5-5.4.3 -- snip -- ===>>> 66 total installed ports ===>>> 1 has a new version available
  24. Tips&Tricks 07/2012 28 more confusing when there are multiple levels

    of depen- dencies to upgrade; a port’s dependencies have their own dependencies to fulfill in order for this dependency port to work correctly. While uninstalling and then re-installing the new ports, the ports database is continually being updated and checked. A slight mistake when updating the ports da- tabase could leave the ports upgrade process a nightmare. Before we jump into using portmaster, let’s go through some simple steps to get portmaster up and running, from ports of course: Listing 5. Listing of outdated ports # portmaster -L | egrep -B1 '(ew|ort) version|Aborting|installed|dependencies|IGNORE|marked|Reason:|MOVED|deleted|ex ist|update' | grep -v '^--' ===>>> Root ports (No dependencies, not depended on) ===>>> Trunk ports (No dependencies, are depended on) ===>>> Branch ports (Have dependencies, are depended on) ===>>> libxml2-2.7.8_2 ===>>> New version available: libxml2-2.7.8_3 ===>>> Leaf ports (Have dependencies, not depended on) ===>>> 66 total installed ports ===>>> 1 has a new version available Listing 6. Listing of notes in /usr/ports/UPDATING pertaining to installed ports # pkg_updating -d 20111001 20120516: AFFECTS: users of lang/php5 AUTHOR: [email protected] PHP has been updated to 5.4. Suhosin patch has been disabled until the new version will be released (soon). Suhosing extension will take more time. LINKTHR option is now enabled by default, be sure to flag it if you are updating using an old saved configuration. sqlite2 extension has been permanently removed. If you want to remain at PHP 5.3, a new port (lang/php53) has been created for such purpose. 20120214: AFFECTS: users of devel/pcre AUTHOR: [email protected] Until all dependent ports have been updated you should update pcre in a manner that will preserve its old shared library. For example: # portmaster -w devel/pcre or # portupgrade devel/pcre
  25. www.bsdmag.org 29 Upgrading Ports Using Portmaster Listing 7. Upgrade of

    a port # portmaster -dwv dns/bind98* ===>>> Port directory: /usr/ports/dns/bind98 ===>>> Gathering distinfo list for installed ports ===>>> Launching 'make checksum' for dns/bind98 in background ===>>> Gathering dependency list for dns/bind98 from ports ===>>> Checking dependency: textproc/libxml2 ===>>> Launching child to update libxml2-2.7.8_2 to libxml2-2.7.8_3 dns/bind98 >> libxml2-2.7.8_2 ===>>> Port directory: /usr/ports/textproc/libxml2 ===>>> Launching 'make checksum' for textproc/libxml2 in background ===>>> Gathering dependency list for textproc/libxml2 from ports ===>>> Starting dependency check ===>>> Checking dependency: converters/libiconv ===>>> Launching child to update libiconv-1.13.1_2 to libiconv-1.14 dns/bind98 >> libxml2-2.7.8_2 >> libiconv-1.13.1_2 ===>>> Port directory: /usr/ports/converters/libiconv ===>>> Launching 'make checksum' for converters/libiconv in background ===>>> Gathering dependency list for converters/libiconv from ports ===>>> Starting dependency check ===>>> Checking dependency: devel/libtool ===>>> Initial dependency check complete for converters/ libiconv dns/bind98 >> libxml2-2.7.8_2 >> libiconv-1.13.1_2 ===>>> Continuing initial dependency check for textproc/ libxml2 ===>>> Checking dependency: devel/gmake ===>>> Checking dependency: devel/pkg-config ===>>> Initial dependency check complete for textproc/libxml2 dns/bind98 >> libxml2-2.7.8_2 ===>>> Continuing initial dependency check for dns/bind98 ===>>> Initial dependency check complete for dns/bind98 ===>>> The following actions will be taken if you choose to proceed: Install dns/bind98 Upgrade libxml2-2.7.8_2 to libxml2-2.7.8_3 Upgrade libiconv-1.13.1_2 to libiconv-1.14 ===>>> Proceed? y/n [y] ===>>> Starting build for dns/bind98 <<<=== ===>>> Starting check for build dependencies ===>>> Gathering dependency list for dns/bind98 from ports ===>>> Starting dependency check -- snip -- ===> Cleaning for bind98-9.8.2 ===>>> Keeping current distfile: bind-9.8.2.tar.gz ===>>> Keeping current distfile: bind-9.8.2.tar.gz.asc ===>>> Distfile cleaning complete ********************************************************* * _ _____ _____ _____ _ _ _____ ___ ___ _ _ * * / \|_ _|_ _| ____| \ | |_ _|_ _/ _ \| \ | | * * / _ \ | | | | | _| | \| | | | | | | | | \| | * * / ___ \| | | | | |___| |\ | | | | | |_| | |\ | * */_/ \_\_| |_| |_____|_| \_| |_| |___\___/|_| \_| * * * * If you are running BIND 9 in a chroot environment, make * * sure that there is a /dev/random device in the chroot. * * * * BIND 9 also requires configuration of rndc, including a * * "secret" key. The easiest, and most secure way to configure * * rndc is to run 'rndc-confgen -a' to generate the proper conf * * file, with a new random key, and appropriate file permissions. * * * * The /etc/rc.d/named script in the base will do both for you. * * * ********************************************************* ===>>> Done displaying pkg-message files ===>>> The following actions were performed: Upgrade of libiconv-1.13.1_2 to libiconv-1.14 Upgrade of libxml2-2.7.8_2 to libxml2-2.7.8_3 Installation of dns/bind98 (bind98-9.8.2)
  26. Tips&Tricks 07/2012 30 cd /usr/ports/ports-mgmt/portmaster make install clean So much

    for installation instruction, now it is time to start the walk through of a ports upgrade using portmaster. The Infinity loop of Ports Upgrade “while true; do” The first thing to do is update the ports tree to the current revision. This includes fetching the ports tree snapshot from a snapshot server, then extracting it to the local ports tree. The command below will achieve this: portsnap fetch update (Refer to Listing 3 for reference) If you like to fetch from a particular snapshot server, pass the -s parameter and specify the URL. Example: portsnap -s portsnap5.freebsd.org fetch update Now that the ports tree is updated, we’ll need to check the ports tree against the installed ports to see wheth- er any ports need to be upgraded. The portmaster utility provides a parameter to list these ports. The command along with the parameter is: portmaster -L (Refer to Listing 4 for reference) The listing might be very long and some ports that need updating might skip past our eyes. This is a longer com- mand that will list only ports that need updates, along with the port’s name: portmaster -L | egrep -B1 ‘(ew|ort) version|Aborting| installed|dependencies|IGNORE|marked|Reason:|MOVED| deleted|exist|update’ | grep -v ‘^--’ (Refer to Listing 5 for reference) Do take note of the list of ports that are outdated and need to be upgraded. This will need to be checked against the /usr/ports/UPDATING notes, to see if there are any caveats to upgrading it. The /usr/ports/UPDATING file contains all the last minutes notes on all the ports in the ports tree. Instead of going through every line in this file, there is a utility that displays the installed ports’ related entries. This significantly cuts down the time it takes to scan /usr/ports/UPDATING line by line. This is how to do it: Example: pkg_updating -d 20111001 (Refer to Listing 6 for reference) The above command will list out the /usr/ports/UPDATING entries that affect the currently installed ports since the 1st of October, 2011. The date is arbitrary, it is usual- ly the last time you scanned the /usr/ports/UPDATING file. After gathering a list of ports that need to be upgrad- ed, read the instructions needed to upgrade the affect- ed ports. Next, the command to upgrade a port and its depen- dents: portmaster -dwv <portname> Where <portname> can be a one of the following: • full name of port directory in /var/db/pkg • full path to /usr/ports/foo/bar • glob pattern of directories from /var/db/pkg Example: portmaster -dwv bind98* (Refer to Listing 7 for reference) After the above command is executed, portmaster will start checking the port’s dependents and, upon successful up- grade, update them with the upgraded port name and in- formation. If portmaster is not sure about compile options for the specified port, a screen will pop out and prompt for options. After that, a list of ports that are going to be up- graded will be displayed. At this point, answering “Y” will let portmaster do its job to upgrade this port. It will start downloading the source files needed to upgrade the ports and then perform the necessary upgrade. The parameters we fed into portmaster tell it to clean up the installation files (-d, in /usr/ports/distfiles), this will save some disk space. They also save old shared libraries before the port is deinstalled (-w, the libraries will be saved into /usr/local/lib/compat/pkg/), allowing us to restore the library if there is an incompatibility issue between the new port and installed libraries. This is the last resort though, as usually this kind of bug is submitted to the port main- tainer and gets resolved fairly soon. During the port up- grade, portmaster will also try to be as chatty as possible (-v), giving us a rough idea what portmaster is doing. These parameters (-dwv) are fully optional though. Do repeat the above command until all of your ports are upgraded. Another way of using portmaster to upgrade ports, is to upgrade all of the outdated port at once. To do this,
  27. www.bsdmag.org 31 Upgrading Ports Using Portmaster Listing 8a. Upgrade of

    all ports # portmaster -adwvn ===>>> Gathering distinfo list for installed ports ===>>> Sorting ports by category ===>>> Starting check of installed ports for available updates ===>>> Root ports: ===>>> cmake-2.8.8 ===>>> libtool-2.4.2 ===>>> portmaster-3.11 ===>>> rsync-3.0.9 ===>>> sysinfo-1.0.1 ===>>> unzip-6.0_1 ===>>> Trunk ports: ===>>> autoconf-wrapper-20101119 ===>>> automake-wrapper-20101119 ===>>> db42-4.2.52_5 ===>>> expat-2.0.1_2 ===>>> gdbm-1.9.1 ===>>> jpeg-8_3 ===>>> libevent-1.4.14b_2 ===>>> libiconv-1.14 ===>>> mysql-client-5.5.24 ===>>> oniguruma-4.7.1 ===>>> pcre-8.30_2 ===>>> perl-5.12.4_4 ===>>> pkg-config-0.25_1 ===>>> png-1.4.11 ===>>> t1lib-5.1.2_1,1 ===>>> tcl-modules-8.5.11 ===>>> Branch ports: ===>>> apache-2.2.22_5 ===>>> apr-ipv6-devrandom-gdbm-db42-1.4.5.1.3.12_1 ===>>> autoconf-2.69 ===>>> freetype2-2.4.9_1 ===>>> gettext-0.18.1.1 ===>>> libxml2-2.7.8_2 ===>>> Launching child to update libxml2-2.7.8_2 to libxml2-2.7.8_3 ===>>> Port directory: /usr/ports/textproc/libxml2 ===>>> Gathering dependency list for textproc/libxml2 from ports ===>>> Starting dependency check ===>>> Checking dependency: converters/libiconv ===>>> Checking dependency: devel/gmake ===>>> Checking dependency: devel/pkg-config ===>>> Initial dependency check complete for textproc/ libxml2 ===>>> Returning to update check of installed ports ===>>> p5-Locale-gettext-1.05_3 ===>>> php5-5.4.3 ===>>> php5-ctype-5.4.3 ===>>> php5-dom-5.4.3 ===>>> php5-filter-5.4.3 ===>>> php5-gd-5.4.3 ===>>> php5-hash-5.4.3 ===>>> php5-iconv-5.4.3 ===>>> php5-json-5.4.3 ===>>> php5-mbstring-5.4.3 ===>>> php5-mysql-5.4.3 ===>>> php5-pdo-5.4.3 ===>>> php5-pdo_sqlite-5.4.3 ===>>> php5-phar-5.4.3 ===>>> php5-posix-5.4.3 ===>>> php5-session-5.4.3 ===>>> php5-simplexml-5.4.3 ===>>> php5-sqlite3-5.4.3 ===>>> php5-tokenizer-5.4.3 ===>>> php5-xml-5.4.3 ===>>> php5-xmlreader-5.4.3 ===>>> php5-xmlwriter-5.4.3 ===>>> php5-zlib-5.4.3 ===>>> Leaf ports: ===>>> automake-1.12 ===>>> bash-4.2.28 ===>>> bind98-base-9.8.2 ===>>> bison-2.5,1 ===>>> gmake-3.82 ===>>> help2man-1.40.9 ===>>> mysql-server-5.5.24 ===>>> php5-extensions-1.7 ===>>> sudo-1.8.4_2 ===>>> suphp-0.7.1_5 ===>>> tcl-8.5.11 ===>>> tmux-1.6 ===>>> vim-7.3.515
  28. Tips&Tricks 07/2012 32 Example: portmaster -adwv (Refer to Listing 8

    for reference) The parameter “-a” will tell portmaster to act on all in- stalled ports, upgrade them if it is necessary. After an- swering “Y” to the list of ports to be upgraded, portmaster will do what is necessary to upgrade all of the installed ports, if needed. After this, get a coffee and sit back to watch how portmaster does its job.:) Some Tips and Tricks of Using Ports “case “$tips” in” The portmaster utility also provides some other useful func- tions. For example: portmaster can be use as a port instal- lation tool by just executing it as though it is upgrading a port. The portmaster utility will know that this is a new installation and install the port’s dependencies as usual. Example portmaster -dwv systutils/tmux This will install a fresh new copy, from ports, of the screen multiplexer program tmux if portmaster doesn’t find it installed. portmaster can also be used as a port deinstall tool, by passing the parameter “-e”. Example: portmaster -dve portupgrade-2.4* (Refer to Listing 9 for reference) This will uninstall the program portupgrade and delete the sources in /usr/ports/distfiles/. Upon executing it, portmaster will ask whether to delete the dependencies of this port. You should answer “Y” as these ports exist on- ly as a dependency of this port and should be useless if this port is uninstalled. portmaster can generate a list of installed ports that we can backup by passing the “--list-origins” parameter to it. This allows us to save the list of ports installed should we need to reinstall all of the ports. Example: portmaster --list-origins or portmaster --list-origins > backup-port-list.txt portmaster can also update the dependency information of a port. This is useful when fixing corrupted ports. The parameter to pass to portmaster is “--check-depends”. Listing 8b. Upgrade of all ports ===>>> The following actions will be taken if you choose to proceed: Upgrade libxml2-2.7.8_2 to libxml2-2.7.8_3 ===>>> Proceed? y/n [y] -- snip -- ===> Compressing manual pages for libxml2-2.7.8_3 ===> Running ldconfig /sbin/ldconfig -m /usr/local/lib ===> Registering installation for libxml2-2.7.8_3 ===> Cleaning for libxml2-2.7.8_3 ===>>> Updating dependency entry for libxml2-2.7.8_3 in each dependent port ===>>> bind98-base-9.8.2 ===>>> Updating @pkgdep for textproc/libxml2 ===>>> Installing the new +CONTENTS file ===>>> php5-5.4.3 ===>>> Updating @pkgdep for textproc/libxml2 ===>>> Installing the new +CONTENTS file -- snip again -- ===>>> suphp-0.7.1_5 ===>>> Updating @pkgdep for textproc/libxml2 ===>>> Installing the new +CONTENTS file ===>>> Updating libxml2-2.7.8_3/+REQUIRED_BY ===>>> Upgrade of libxml2-2.7.8_2 to libxml2-2.7.8_3 succeeded ===>>> Keeping current distfile: libxml2-2.7.8.tar.gz ===>>> Distfile cleaning complete ===>>> Returning to update check of installed ports ===>>> Update check of installed ports complete ===>>> The following actions were performed: Upgrade of libxml2-2.7.8_2 to libxml2-2.7.8_3
  29. Tips&Tricks 07/2012 34 Listing 9. Uninstall a port # portmaster

    -dve portupgrade-2.4* ===>>> Deleting all distfiles for ports-mgmt/portupgrade ===>>> Deleting stale distfile: pkgtools-pkgtools-b99f3ce. tar.gz ===>>> Deleting stale distfile: pkgtools-2.4.9.3.tar.bz2 ===>>> Distfile cleaning complete ===>>> Running pkg_delete -f portupgrade-2.4.9.3_1,2 ===>>> Running portmaster -s -v -d Information for ruby18-bdb-0.6.6: Comment: Ruby interface to Sleepycat's Berkeley DB revision 2 or later Description: Ruby-bdb is an interface to Sleepycat's Berkeley DB revision 2 or later. DB >= 2 is required. (some functionalities like join are not available with DB < 2.6) Author: Guy Decoux <[email protected]> WWW: http://moulon.inra.fr/ruby/bdb.html ===>>> ruby18-bdb-0.6.6 is no longer depended on, delete? y/n [n] y ===>>> Deleting all distfiles for databases/ruby-bdb ===>>> Distfile cleaning complete ===>>> Running pkg_delete -f ruby18-bdb-0.6.6 Information for db41-4.1.25_4: Comment: The Berkeley DB package, revision 4.1 Description: Version 4.1 of the Berkeley DB library. This version uses an underlying database format incompatible with revision 1 and a different standard API. Utilities are included in the distribution to convert v1.85 databases to v4.1 databases, and a backwards compatible API is provided to maintain compatibility with programs using the v1.85 interface. http://www.sleepycat.com/download/patchlogs.shtml WWW: http://www.oracle.com/us/products/database/ berkeley-db/db/ ===>>> db41-4.1.25_4 is no longer depended on, delete? y/n [n] y ===>>> Deleting all distfiles for databases/db41 ===>>> Deleting stale distfile: db-4.2.52.tar.gz ===>>> Distfile cleaning complete ===>>> Running pkg_delete -f db41-4.1.25_4 Listing 10. Update of port dependency information # portmaster --check-depends ===>>> Checking apache-2.2.22_5 ===>>> Checking apr-ipv6-devrandom- gdbm-db42-1.4.5.1.3.12_1 ===>>> Checking autoconf-2.69 ===>>> Checking autoconf-wrapper-20101119 ===>>> Checking automake-1.12 ===>>> Checking automake-wrapper-20101119 ===>>> Checking bash-4.2.28 ===>>> Checking bind98-base-9.8.2 ===>>> Checking bison-2.5,1 ===>>> Checking cmake-2.8.8 ===>>> Checking db42-4.2.52_5 ===>>> Checking expat-2.0.1_2 ===>>> Checking freetype2-2.4.9_1 ===>>> Checking gdbm-1.9.1 ===>>> Checking gettext-0.18.1.1 ===>>> Checking gmake-3.82 ===>>> Checking help2man-1.40.9 ===>>> Checking jpeg-8_3 -- snip --
  30. www.bsdmag.org 35 Upgrading Ports Using Portmaster Example: portmaster –check-depends (Refer

    to Listing 10 for reference) After upgrading a port, the dependent ports somehow went haywire, for example, the program core dump, inter- mittent shutdown of services, etc. This can happen if de- pendent ports are not aware of the new version of recently upgraded ports. Use the parameter “-r” to force portmaster to either re-compile or upgrade the dependent ports. Example: portmaster -dwvr apache-2.2* (Refer to Listing 11 for reference) For a massive port upgrade with limited internet band- width, we can tell portmaster to download the port’s in- stallation files first, then upgrade it later at a more conve- nient time. This can be achieved by passing the parame- ter “-F” to it. Example: portmaster -avF (Refer to Listing 12 for reference) Sometimes, after upgrading a port, the port’s dependen- cy behaves weirdly. This might cause the upgraded port Listing 11. Upgrade dependents port # portmaster -dwvr libevent* ===>>> Working on: libevent-1.4.14b_2 ===>>> Port directory: /usr/ports/devel/libevent ===>>> Launching 'make checksum' for devel/libevent in background ===>>> Gathering dependency list for devel/libevent from ports ===>>> No dependencies for devel/libevent ===>>> tmux-1.6 depends on libevent-1.4.14b_2 ===>>> Launching child to reinstall tmux-1.6 ===>>> Port directory: /usr/ports/sysutils/tmux ===>>> Launching 'make checksum' for sysutils/tmux in background ===>>> Gathering dependency list for sysutils/tmux from ports ===>>> Starting dependency check ===>>> Checking dependency: devel/autoconf ===>>> Checking dependency: devel/libevent ===>>> Initial dependency check complete for sysutils/ tmux ===>>> Returning to check of ports depending on libevent-1.4.14b_2 ===>>> Done checking ports that depend on libevent- 1.4.14b_2 ===>>> The following actions will be taken if you choose to proceed: Re-install libevent-1.4.14b_2 Re-install tmux-1.6 ===>>> Proceed? y/n [y] -- snip -- ===> Cleaning for tmux-1.6 ===>>> Re-installation of tmux-1.6 succeeded ===>>> Keeping current distfile: tmux-1.6.tar.gz ===>>> Distfile cleaning complete ===>>> Returning to check of ports depending on libevent-1.4.14b_2 ===>>> Done updating ports that depend on libevent- 1.4.14b_2 Terminated ===>>> The following actions were performed: Re-installation of libevent-1.4.14b_2 Re-installation of tmux-1.6
  31. Tips&Tricks 07/2012 36 to malfunction, e.g. core dump, unusual error

    happening in the logs, etc. If this is the case, recompiling the depen- dencies might help. The parameters “-t” and “-f” will tell portmaster to recursively re-compile the port’s dependen- cies. Do take note that this is NOT needed routinely but only use it when you suspect the dependencies or their libraries are giving problems, after upgrading a port. Example: portmaster -dwvft apache-2.2* The End ‘’fi, done, end’’ Before this article ends, this is the list of programs and parameters used: portsnap –s – Fetch files from the specified server or server pool. (default: portsnap.FreeBSD.org, or as given in the configura- tion file.) portmaster –a – check all ports, update as necessary –b – create and keep a backup package of an installed port –C – prevents ‘make clean’ from being run before building –d – always clean distfiles –e – expunge a port using pkg _ delete(1), and optionally remove all distfiles. Calls -s after it is done expunging in case removing the port causes a dependency to no longer be necessary. –f – always rebuild ports –F – fetch distfiles only –L – list all installed ports by category, and search for up- dates –R – used with the -r or -f options to skip ports updated on a previous run. When used with -r it will also pre- vent the rebuild of the parent port if it, and all of its dependencies are up to date. –r – rebuild the specified port, and all ports that depend on it. The list of dependent ports is built according to origin (i.e. category/portname) not by the version number of the installed port. So if you do “portmaster -r fooport-1.23” and it is necessary to restart using -R but the newly installed port is now fooport-1.24 you can do “portmaster -R -r fooport-1.24” and it should pick up where you left off. The -r option can be speci- fied more than once. –t – recurse dependencies thoroughly, using all-de- pends-list. RECOMMENDED FOR USE ONLY WHEN NEEDED, NOT ROUTINELY. When applied to the --clean-distfiles option it allows a distfile to be kept if it matches any up to date port, not just the ones that are installed. –w – save old shared libraries before deinstall Listing 12. Download port's installation file # portmaster -avF ===>>> Sorting ports by category ===>>> Starting check of installed ports for available updates ===>>> Root ports: ===>>> bpkg-2.1.7 ===>>> ja-nkf-2.1.2,1 ===>>> libtool-2.4.2 ===>>> portmaster-3.11 ===>>> rsync-3.0.9 ===>>> sl-3.03 ===>>> sysinfo-1.0.1 ===>>> Trunk ports: ===>>> autoconf-wrapper-20101119 ===>>> automake-wrapper-20101119 ===>>> dmidecode-2.11 ===>>> expat-2.0.1_2 ===>>> libevent-1.4.14b_2 ===>>> libiconv-1.13.1_2 ===>>> m4-1.4.16,1 ===>>> perl-5.12.4_3 ===>>> Launching child to update perl-5.12.4_3 to perl-5.12.4_4 ===>>> Port directory: /usr/ports/lang/perl5.12 ===>>> Launching 'make checksum' for lang/perl5.12 in background ===>>> Returning to update check of installed ports -- snip -- ===>>> Waiting for 1 distfile fetch to finish ===>>> Waiting for 1 distfile fetch to finish ===>>> Waiting for 1 distfile fetch to finish ===>>> Waiting for 1 distfile fetch to finish ===>>> Waiting for 1 distfile fetch to finish ===>>> Distfile fetching is complete
  32. www.bsdmag.org –v – verbose output –x – avoid building or

    updating ports that match this pat- tern. Can be specified more than once. If a port is not already installed the exclude pattern will be run against the directory name from /usr/ports –check-depends – cross-check and update dependency in- formation for all ports –list-origins – list directories from /usr/ports for root and leaf ports. This list is suitable for feeding to portmas- ter either on another machine or for reinstalling all ports. pkg_info –a – Show all currently installed packages. –R – For each of the specified packages, show the list of installed packages which require it. –r – For each of the specified packages, show the list of packages on which it depends. pkg_updating –d – Only entries newer than date are shown. Use a YYYYMMDD date format. The portmaster tool, has its own configuration file, /usr/ local/etc/portmaster.rc. For samples of the portmaster con- figuration file, refer to /usr/local/etc/portmaster.rc.sample. As for the “portsnap” tool, it also has it own configura- tion file, /etc/portsnap.conf. For more example uses of the “portsnap” tool, refer to man portsnap. This article merely covers the very basics of us- ing portmaster to upgrade ports. The portmaster tool has more options and examples then given in this article, man portmaster would tell all of it. For those that still have not tried portmaster yet, do give it a go. Most likely you will like how simple portmaster is and the options it offers. On the Web • http://dougbarton.us/portmaster.html – portmaster website • http://www.freshports.org/ports-mgmt/portmaster – some info on portmaster in FreshPorts • http://FreeBSD.org – The FreeBSD project Edward Tan Edward Tan is a passionate FreeBSD system administrator, try- ing to automate server administrative tasks using config man- agement, shell scripts, Perl and wondering how to give back to the FreeBSD community. Often, you can catch him on his blog @ http://psybermonkey.net.
  33. Security 07/2012 38 Since version 5.0 of FreeBSD, the TrustedBSD

    ex- tensions have been included with the default in- stall of the operating systems. By default, this functionality is disabled and requires support to be com- piled in or kernel modules to be loaded at boot time. For the purpose of this article, support will be loaded in with kernel modules already available with FreeBSD 9. Part 2 of the TrusteBSD series will cover the basic configuration of the mac_biba module. Warning Incorrect MAC settings can cause even the root user to not be able to login to the system. Be sure to run these tests on a VM or test machine to avoid any issues with production systems. As in the previous article, a certain set of users will help to illustrate how to use mandatory access controls (MAC) to fine tune access to specific file system objects. Listing 1 shows the layout of the users and groups setup on the file system. Hardening FreeBSD with TrustedBSD and Mandatory Access Controls (MAC) Part 2 Most system administrators understand the need to lock down permissions for files and applications. In addition to these configuration options on FreeBSD, there are features provided by TrustedBSD that add additional layers of specific security controls to fine tune the operating system for multilevel security. What you will learn... • Configuration of the Mandatory Access Controls provided by FreeBSD. • Applying the concepts of the Biba model to FreeBSD. What you should know... • Basic FreeBSD knowledge to navigate the command line • Familiarity with loader.conf to enable kernel modules at boot Listing 1. Directory setup on FreeBSD for several users called /data drwxr-xr-x root wheel /data drwxrwx--- root user-reg /data/user-reg -rwxrwx--- root user-reg /data/user-reg/secret-order.txt # groups user1 user1 user-reg # groups user2 user2 user-reg Listing 2. Loading the mac_biba module on system startup # echo ‘mac_biba_load=”YES”’ >> /boot/loader.conf Listing 3. Enable labels for the root file system (Warning: these commands are based on a default install with a single root partition and swap. If there are multiple partitions, edit the /etc/fstab by hand to ensure the root partition is set to ro) # sed -i ‘’ -e ‘s/rw/ro/’ /etc/fstab # reboot (Type 6 when it reboots to go into Single User Mode) # tunefs -l enable / # reboot (Let the OS boot normally) # mount -urw / # sed -i ‘’ -e ‘s/ro/rw/’ /etc/fstab (If there are multiple partitions, set root back to readwrite ‘rw’) # reboot
  34. www.bsdmag.org 39 Hardening FreeBSD with TrustedBSD and Mandatory Access Controls

    (MAC) Part 2 Listing 4. Setting up the default and insecure login classes in /etc/ login.conf (Note: make sure to run cap_mkdb /etc/login.conf once the login classes have been added/updated) default:\ :passwd_format=blf:\ :copyright=/etc/COPYRIGHT:\ :welcome=/etc/motd:\ :setenv=MAIL=/var/mail/$,BLOCKSIZE=K,FTP_PASSIVE_ MODE=YES:\ :path=/sbin /bin /usr/sbin /usr/bin /usr/games / usr/local/sbin /usr/local/bin ~/bin:\ :nologin=/var/run/nologin:\ :cputime=unlimited:\ :datasize=unlimited:\ :stacksize=unlimited:\ :memorylocked=unlimited:\ :memoryuse=unlimited:\ :filesize=unlimited:\ :coredumpsize=unlimited:\ :openfiles=unlimited:\ :maxproc=unlimited:\ :sbsize=unlimited:\ :vmemoryuse=unlimited:\ :pseudoterminals=unlimited:\ :priority=0:\ :ignoretime@:\ :umask=022:\ :label=biba/high: insecure:\ :passwd_format=blf:\ :copyright=/etc/COPYRIGHT:\ :welcome=/etc/motd:\ :setenv=MAIL=/var/mail/$,BLOCKSIZE=K,FTP_PASSIVE_ MODE=YES:\ :path=/sbin /bin /usr/sbin /usr/bin /usr/games / usr/local/sbin /usr/local/bin ~/bin:\ :nologin=/var/run/nologin:\ :cputime=unlimited:\ :datasize=unlimited:\ :stacksize=unlimited:\ :memorylocked=unlimited:\ :memoryuse=unlimited:\ :filesize=unlimited:\ :coredumpsize=unlimited:\ :openfiles=unlimited:\ :maxproc=unlimited:\ :sbsize=unlimited:\ :vmemoryuse=unlimited:\ :swapuse=unlimited:\ :pseudoterminals=unlimited:\ :priority=0:\ :ignoretime@:\ :umask=022:\ :label=biba/low: Listing 5. policy-biba.context file cat << EOF > /etc/policy-biba.context # This is the default BIBA policy for this system. # System: /var/run biba/equal /var/run/* biba/equal /dev biba/equal /dev/* biba/equal /var biba/equal /var/spool biba/equal /var/spool/* biba/equal /var/log biba/equal /var/log/* biba/equal /tmp biba/equal /var/tmp biba/equal /var/tmp/* biba/equal /var/spool/mqueue biba/equal /var/spool/clientmqueue biba/equal EOF (run the next command twice as root to set this policy on the root file system) # setfsmac -ef /etc/policy-biba.context / # setfsmac -ef /etc/policy-biba.context / (change /data/user-reg to biba/equal) # setfmac -R biba/equal /data (default login class is set to biba/high, insecure is set to biba/low) # pw user mod root -L default # pw user mod user2 -L default # pw user mod user1 -L insecureEhebuntr ipiortare,
  35. Security 07/2012 40 Listing 6. Demonstrates the current access for

    user1 of the insecure login class $ id uid=1002(user1) gid=1003(user1) groups=1003(user1),1002(user-reg) $ cd /data/user-reg/ $ ls -ltraZ total 20 drwxr-xr-x 3 root wheel biba/equal 512 May 23 16:28 .. -rwxrwx--- 1 root user-reg biba/equal 0 May 23 16:32 secret-order.txt drwxrwx--- 2 root user-reg biba/equal 512 May 23 16:32 . $ echo “Too Much Garbage” > secret-order.txt $ cat secret-order.txt Too Much Garbage Listing 7. Demonstration of the getpmac, getfmac, setfmac, setpmac. commands # getpmac biba/high(low-high) # cd /data/user-reg/ # getfmac secret-order.txt secret-order.txt: biba/equal # setfmac biba/high secret-order.txt # getfmac secret-order.txt secret-order.txt: biba/high # ls -lZ total 8 -rwxrwx--- 1 root user-reg biba/high 17 May 23 16:52 secret-order.txt # cat secret-order.txt Too Much Garbage Listing 8. The root account gives ownership of the file to user1. However, user1 can only read the # chown user1:user-reg secret-order.txt # exit (This sets user1 to the owner of the file, with group user- reg. Now login as user1) $ id uid=1002(user1) gid=1003(user1) groups=1003(user1),1002(user-reg) $ getpmac biba/low(low-high) $ cd /data/user-reg/ $ ls -ltraZ total 24 drwxr-xr-x 3 root wheel biba/equal 512 May 23 16:28 .. drwxrwx--- 2 root user-reg biba/equal 512 May 23 16:32 . -rwxrwx--- 1 user1 user-reg biba/high 17 May 23 16:52 secret-order.txt $ cat secret-order.txt Too Much Garbage $ echo “More Garbage” >> secret-order.txt cannot create secret-order.txt: Permission denied (Notice: user1 can read up, but cannot write above their security level.) Listing 9. user1 creates the low-order.txt file. user2 as a member of the default login class is at the biba/high level, which prevents reading a lower level file system object $ id uid=1002(user1) gid=1003(user1) groups=1003(user1),1002(user-reg) $ cd /data/user-reg/ $ echo “Low Garbage” > low-order.txt $ chmod 770 low-order.txt $ ls -ltraZ total 32 drwxr-xr-x 3 root wheel biba/equal 512 May 23 16:28 .. -rwxrwx--- 1 user1 user-reg biba/high 17 May 23 16:52 secret-order.txt drwxrwx--- 2 root user-reg biba/equal 512 May 23 17:21 . -rwxrwx--- 1 user1 user-reg biba/low 12 May 23 17:21 low-order.txt (Now login as user2 and try to manipulate both files.) $ id uid=1003(user2) gid=1004(user2) groups=1004(user2),1002(user-reg) $ cd /data/user-reg/ $ ls -ltraZ ls: low-order.txt: Permission denied total 24 drwxr-xr-x 3 root wheel biba/equal 512 May 23 16:28 .. -rwxrwx--- 1 user1 user-reg biba/high 17 May 23 16:52 secret-order.txt drwxrwx--- 2 root user-reg biba/equal 512 May 23 17:21 . cat: low-order.txt: Permission denied $ echo “More Garabage” >> low-order.txt $ cat low-order.txt cat: low-order.txt: Permission denied (Notice: The biba model does not prevent writing down, just reading data up) $ echo “More Garbage” >> secret-order.txt $ cat secret-order.txt More Garbage (Notice: user2 cannot read low-order.txt, but can read and write to secret-order.txt)
  36. www.bsdmag.org 41 Hardening FreeBSD with TrustedBSD and Mandatory Access Controls

    (MAC) Part 2 When using the mac_mls module, information cannot be written to a lower level object but can be written up to a higher level object. This provides confidentiality for higher levels but does nothing to address the integrity of the data when lower level subjects write up to high level objects. This flaw in integrity is addressed with the use of the Biba model developed by Kenneth Biba. Using the Biba model, higher level subjects cannot read information from lower level objects and lower level subjects cannot write up to higher level objects. This ensures the integrity of informa- tion coming from higher level objects as lower level sub- jects cannot tamper with the data. The Biba model is implemented using the mac_biba mod- ule in FreeBSD provided by the TrustedBSD framework. In order to load the module, add the following to /boot/ loader.conf as detailed in Listing 2. The next step is to configure labels to work on the root file system. This requires some configuration changes to mount the root file system as read only before trying to tune the file system. Listing 3 describes the necessary steps to enable label support for the root file system. Once the OS is loaded, run the mount command and multilabel should appear next to the root file system. The next step is to edit the login.conf file to setup different login classes to apply labels. There are a number of con- figuration options that are available, but for this article the following three labels will be used: biba/high, biba/ equal, biba/low. Similar to the mac_mls module, the biba/ equal label is essentially the default setting that excludes an object from the security policy. The default login class will be set to biba/high with a second insecure class be- ing set to biba/low. Listing 4 shows the default and inse- cure login classes as they need to be entered into /etc/ login.conf. Listing 5 is a context file that will set the biba context on the root file system to exclude files and directories that may affect functionality. user1 has now be set to the insecure login class. If root cannot run a command going forward, append the com- mand with setpmac biba/low to allow the writing to a lower level. As a test, login as user1 and run the following com- mands as shown in Listing 6. The most important commands for manipulating MAC labels are getpmac, getfmac, setfmac, setpmac. As mentioned in the beginning of the article, messing up security labels can prevent root from accessing a file or even logging into the system. The setpmac command allows for the process label to be changed in order to work around issues when even the root account can not make changes. Listing 7 shows some examples of using the root account to ac- cess and change object labels. In the previous article, with the use of the mac_mls mod- ule the insecure user1 could write data into a file that was set to a higher security label. With the mac_biba module, the same insecure user1 cannot write data into the file even if the user owns the file. Listing 8 shows the output of the commands used by user1 in trying to read and write to the secret-order.txt file. The insecure user1 is denied the ability to write to se- cret-order.txt, but user1 can read the file. Listing 9 shows the commands run as user1 to create the low-order.txt file, which sets the label to biba/low. Members of the default login class (biba/high) cannot read the low-order.txt file, which will maintain the integ- rity of any biba/high object when attempting to read from a biba/low object. Multiple labels utilizing the mac_mls and mac_biba modules can be used to create complex config- urations for access control. This topic will be discussed when combing the other security features of the Trusted- BSD framework in later articles. References • Biba model: http://en.wikipedia.org/wiki/Biba_Model • FreeBSD Handbook – Mandatory Access Cotnrol: http:// www.freebsd.org/doc/handbook/mac.html • MAC Biba Module: http://www.freebsd.org/doc/en_ US.ISO8859-1/books/handbook/mac-biba.html • TrustedBSD: http://www.trustedbsd.org/ Michael Shirk Michael Shirk is a BSD zealot who has worked with OpenBSD and FreeBSD for over 6 years. He works in the security community and supports Open-Source security products that run on BSD op- erating systems.
  37. Security 07/2012 42 The truth is: DNS servers are susceptible

    to the same types of vulnerabilities (platform, software, and network-level) as any other host on the Inter- net. This article will provide guidelines for secure configura- tion of the DNS hosting environment. Our discussion will focus on three areas: • Securing the DNS host platform • Securing DNS software • Content control of the zone file. Most of the information in this article will apply to BIND. When possible, additional information will be provided for other DNS authoritative packages such as NSD. Securing DNS Host Platform The platform on which the name server software runs should be hosted on properly secured OS. Most of the DNS installations run on a flavor of UNIX. Given this sce- nario, it is necessary to ensure the following: • The latest OS patches are installed. • Hosts that run the name server software shouldn’t provide any other services and therefore should be configured to respond to DNS traffic only. In oth- er words, the only allowed incoming messages to these hosts should be 53/UDP and 53/TCP. Outgo- ing DNS messages should be sent from a random port to minimize the risk of an attacker guessing the outgoing message port and sending a forged re- plied. Securing DNS Software Protection approaches for DNS software include choice of version, installation of patches, running it with restrict- ed privileges, restricting other applications in the execu- tion environment, dedicating instances for each function, controlling the set of hosts where software is installed, placement within the network, and limiting information ex- posure by logical/physical partitioning of zone file data or running two name server software instances for different client classes. Running the Latest Version of Name Server Software Each newer version of the name server software, espe- cially the BIND software, generally is devoid of vulner- abilities found in earlier versions because it has design changes incorporated to take care of those vulnerabili- ties. Of course, these vulnerabilities have been exploit- ed (i.e., some form of attack was launched), and suffi- cient information has been generated with respect to the nature of those exploits. Thus, it makes good business DNSSEC Part 3 Securing the DNS Hosting Environment DNS security can be distilled into two maxims: always run the latest version of your chosen DNS software package, and never provide unnecessary information or services to strangers. Put another way, keep current and be stingy! What you will learn… • Securing the DNS host platform • Securing DNS software • Content control of the zone file What you should know… • Some knowledge of how DNS works • Basic knowledge of BIND and NSD
  38. www.bsdmag.org 43 DNSSEC Part 3: Securing the DNS Hosting Environment

    server: hide-version: yes Checklist item #3 To prevent information about which version of name serv- er software is running on a system, name servers should be configured to refuse queries for its version information. Running Name Server Software with Restricted Privileges If the name server software is run as a privileged user (e.g., root in UNIX systems), any break-in into the soft- ware can have disastrous consequences in terms of re- sources resident in the name server platform. Specifically, a hacker who breaks into the software acquires unrestrict- ed access and therefore can potentially execute any com- mands or modify or delete any files. Hence, it is necessary to run the name server software as a non-privileged user with access restricted to specified directories to contain damages resulting from break-in. The user name under which the name server software needs to run can be specified by using the chroot com- mand in BIND. This is why this approach is known as run- ning the DNS server in a chroot jail. An example com- mand (entered on the command line) is the following: >named -u named –t /var/named where the options specify the following: –u specifies the userID to which the name server soft- ware will change after starting. This user account should be created prior to issuing the chroot com- mand. –t specifies the directory in which the name server soft- ware owner will use as the root “jail” and should have the appropriate privileges. This ability is also found in NSD as part of the NSD startup scripts. The default userID under which NSD runs is nsd and the default directory is /etc/nsd/. Both of these defaults can be changed in the NSD configuration file by adding: server: username: <userID> chroot: <dir> Running BIND in a Chroot Jail An alternative method to running name server software with restricted privilege is to use chroot. The idea behind sense to run the latest version of name server software because theoretically it is the safest version. Even if the software is the latest version, it is not safe to run it in de- fault mode. The security administrator should become familiar with the new security settings for the latest ver- sion. In some installations, it may not be possible to switch over to the latest version of name server software imme- diately. In these situations, the administrator should keep pace with vulnerabilities identified in the operational ver- sion and associated security patches. Checklist item #1 When installing the upgraded version of name server soft- ware, the administrator should make necessary changes to configuration parameters to take advantage of new se- curity features. Checklist item #2 Whether running the latest version or an earlier version, the administrator should be aware of the vulnerabilities, exploits, security fixes, and patches for the version that is in operation in the enterprise. The following actions are recommended (for BIND deployments): • Subscribe to ISC’s mailing list called “bind-announce” or “nsd-users” for NSD • Refer to the CERT/CC’s Vulnerability Notes Database at http://www.kb.cert.org/vuls/ • Refer to the NIST NVD metabase at http://nvd.nist.gov/ • Refer to the CVE Registry maintained by the Mitre Corporation at http://cve.mitre.org/index.html Turning off the Version Query There is a feature in BIND that returns the version number of the server daemon running if a special query is sent to the server. This query is for the string version.bind with query type TXT and query class Chaos (CH). This information may be of use to attackers who are looking for a specific ver- sion of BIND with a discovered weakness. BIND can be configured to refuse this type of query by having the following command in the BIND configuration file (/etc/named.conf). options { version none; }; There is a similar feature in NSD to refuse version que- ries. In the configuration file for NSD (/etc/nsd/nsd.conf).
  39. Security 07/2012 44 running BIND in a chroot jail is

    to limit the amount of ac- cess any malicious individual could gain by exploiting vul- nerabilities in BIND. It’s for the same reason that we run BIND as a non-root user. This should be considered as a supplement to the nor- mal security precautions (running the latest version, us- ing access control, etc.), certainly not as a replacement for them. As of version FreeBSD 8.x, BIND supports chrooted op- eration. Ron Aitchison covers this topic thoroughly in his book Pro DNS and BIND 10 (pages 288-293). Isolating the Name Server Software Even if the DNS software (e.g., BIND) is run on a secure OS, the vulnerabilities of other software programs on that platform can breach the security of DNS software. Hence, it is recommended that the platform on which the DNS software runs contains no programs other than those needed for OS and network support. If this is not possible due to resource constraints, care should be taken to en- sure to limit the number of services running on the same platform. Dedicated Name Server Instance for Each Function An authoritative name server serves RRs from its own zone file; this function is called an authoritative function. Serving RRs either from its cache (directly or by build- ing up its cache dynamically through iterative queries) is called a resolving function; this is how a resolving name server provides responses. A name server instance can be configured as an authoritative name server, a resolving name server, or both. Because of attacks such as cache poisoning, however, a resolving name server has to be run under security policy that is differ- ent from that of an authoritative name server. Hence, a name server instance should always be configured as either an authoritative name server or a resolving name server. An authoritative name server is only intended to pro- vide name resolution for the zones for which it has au- thoritative information. Hence, the security policy should have recursion turned off for this type of name server. Dis- abling recursion prevents an authoritative name server from sending queries on behalf of other name servers and building up a cache using responses. Disabling this func- tion eliminates the cache poisoning threat on authoritative serves and prevents their use as reflectors for DDoS at- tacks [BCP140]. In BIND, recursion is disabled by using the options statement in the BIND configuration file as fol- lows: options { recursion no; }; NSD can only operate as an authoritative only server. NSD cannot act as a recursive resolver and therefore does not have a comparable option, as it is NSD’s de- fault behavior. A resolving name server is only intended to provide re- solving services (processing resolving queries on behalf of clients) for internal clients. Thus, protection of resolving name servers can be ensured by restricting their types of interactions (also called transactions) to designated hosts through various configuration options in the configuration file of the name server software. Removing Name Server Software from Non-Designated Hosts DNS software should not be running or present in hosts that are not designated as name servers. The possibil- ity arises in the case of DNS BIND software because of the fact that many versions of UNIX (including Solaris and Linux versions) come installed with BIND as default. Hence, while taking an inventory of software in worksta- tions and servers of the enterprise as part of the security audit, it is necessary to look for BIND installations and re- move them from hosts that are not functioning as name servers. Network and Geographic Dispersion of Authoritative Name Servers Most enterprises have an authoritative primary server and a host of authoritative secondary name servers. It is es- sential that these authoritative name servers for an enter- prise be located on different network segments. This dis- persion ensures the availability of an authoritative name server not only in situations in which a particular router or switch fails but also during events involving an attack on an entire network segment. In addition to network- based dispersion, authoritative name servers should be dispersed geographically as well. In other words, in addi- tion to being located on different network segments, the authoritative name servers should not all be located within the same building. One approach that some organizations follow is to locate some authoritative name servers in their own premises and others in their ISPs’ data centers or in partnering organizations. Additionally, a network administrator may choose to use a “hidden” master authoritative server and only have secondary servers visible on the network. A hid- den master authoritative server is an authoritative DNS
  40. www.bsdmag.org 45 DNSSEC Part 3: Securing the DNS Hosting Environment

    server whose IP address does not appear in the name server set for a zone. All of the name servers that do ap- pear in the zone database as designated name servers all get their zone data from the hidden master via a zone transfer request. In effect, all visible name servers are actually secondary slave servers. This prevents poten- tial attackers from targeting the master name server, as its IP address may not appear in the zone database. A hidden master only accepts zone transfer requests from the set of valid secondaries and refuses all other DNS queries. Checklist #4 The authoritative name servers for an enterprise should be both network and geographically dispersed. Network- based dispersion consists of ensuring that all name serv- ers are not behind a single router or switch, in a single subnet, or using a single leased line. Geographic disper- sion consists of ensuring that not all name servers are in the same physical location, and hosting at least a single secondary server off-site. Checklist #5 If a hidden master is used, the hidden authoritative mas- ter server should only accept zone transfer requests from the set of secondary zone name servers and re- fuse all other DNS queries. The IP address of the hidden master should not appear in the name server set in the zone database. Limiting Information Exposure through Partitioning of Zone Files Authoritative name servers for an enterprise receive re- quests from both external and internal clients. In many instances, external clients need to receive RRs that pertain only to public services (public Web server, mail server, etc.) Internal clients need to receive RRs pertain- ing to public services as well as internal hosts. Hence, the zone information that serves these RRs can be split into different physical files for these two types of clients: one for external clients and one for internal clients. This type of implementation of the zone file is called split DNS. Split DNS does have some drawbacks. First, remote hosts (travelers using laptops to connect back to an or- ganization, for example), may not be using an internal resolving DNS server, and therefore may not be able to see internal hosts. Second, internal host information may leak to outside the firewall (by accident or attack), defeating the purpose of having a split DNS, or causing confusion of an internal and external host have the same FQDN, but different IP addresses. Split DNS should not be seen as a replacement for proper access control techniques. Checklist #6 For split DNS implementation, there should be a minimum of two physical files or views. One should exclusively pro- vide name resolution for hosts located inside the firewall. It also can contain RRsets for hosts outside the firewall. The other file or view should provide name resolution only for hosts located outside the firewall or in the DMZ, and not for any hosts inside the firewall. To set up split DNS using BIND, the view statement is used in the BIND configuration file. For example, to set up an authoritative view of the zone sales.mycom.com for inter- nal clients: view “insider” { match-clients { internal_hosts; }; recursion no; zone sales.mycom.com { type master; file “sales_internal.db”; }; }; In this statement, the file sales _ internal.db contains the authoritative information for zone sales.mycom.com and re- stricts that information to queries coming from the ad- dress list named internal _ hosts. To set up a view of the same zone, but with only external hosts for queries com- ing from outside the network, the following view state- ment is used in the same configuration file: view “outsider” { match-clients { any; }; match-destinations { public_hosts; }; recursion no; zone sales.mycom.com { type master; file “sales_external.db”; }; }; This statement is very similar to the previous statement, except that the file with the zone view is sales.external. db and the client list is given as any, meaning that que- ries coming from both outside and inside the network can see the same external view of sales.mycom.com. To- gether, these statements allow internal clients to view both the internal and external hosts in sales.mycom.com,
  41. Security 07/2012 46 whereas external hosts (not on the same

    network) can see only DNS information contained in the external view of the zone where the destination matches the address list public _ hosts. Limiting Information Exposure Through Separate Name Servers for Different Clients Instead of having the same set of authoritative name servers serve different types of clients, an enterprise could have two different sets of authoritative name serv- ers. One set, called external name servers, can be locat- ed within a DMZ; these would be the only name servers that are accessible to external clients and would serve RRs pertaining to hosts with public services (Web serv- ers that serve external Web pages or provide B2C ser- vices, mail servers, etc.) The other set, called internal name servers, is to be located within the firewall and should be configured so they are not reachable from out- side and hence provide naming services exclusively to internal clients. The purpose of both architecture options (i.e., two different sets of name servers and split DNS) is to prevent the outside world from knowing the IP ad- dresses of internal hosts. This configuration may be the only available option for enterprises that use DNS server software that does not have the view feature found in BIND or organizations that use NSD as their authorita- tive DNS server. Content Control of Zone File The only protection approach for content control of DNS zone file is the use of a zone file integrity check- er. The effectiveness of integrity checking using a zone file integrity checker depends upon the database of constraints built into the checker. Hence, the deploy- ment process consists of developing these constraints with the right logic and the only determinant of the truth value of these logical predicates are the parame- ter values for certain key fields in the format of various RRTypes. Summary Best practice protection for DNS hosts and software are as follows: • Running the latest version of name server software, or an earlier version with appropriate patches • Running name server software with restricted privi- leges • Isolating name server software • Setting up a dedicated name server instance for each function • Removing name server software from non-designat- ed hosts • Creating a topological and geographic dispersion of authoritative name servers for fault tolerance • Limiting IT resource information exposure through two different zone files in the same physical name server (termed as split DNS) or through separate name servers for different client classes. Control of undesirable content in the zone file is accom- plished by analyzing the contents for security implica- tions, formulating integrity constraints that will check for the presence of such contents and verifying the zone file data for satisfaction of those constraints. Therefore, the only protection approach is to develop the zone file integrity checker software that contains the neces- sary constraints and can be run against the zone file to flag those contents that violate the constraints. To aid in formulation of constraints, desirable field values (ranges or lists) in the various RRs of zone file are re- quired. These constraints need to be developed not on- ly for RRs in an unsigned zone but also for addition- al RRs in a signed zone (zones that have implement- ed the DNSSEC specification). Hence, the recommen- dations for control of content of zone files are deferred to Chapter 6 after discussion of deployment guidelines for DNSSEC in Chapter 5 so that they cover those addi- tional RRs as well. Paul Ammann Paul Ammann lives in New Fairfeld, CT with his wife and 4 cats. You can reach him at pq_aq (at) fastmail (dot) us.
  42. interview 07/2012 48 What year was DDG founded? In 2008.

    I actually started working on it at the end of 2007, incorporated Febuary 2008 and soft launched September 2008. How did you come upon the concept? Where you having dinner, or brainstorming with other engineers? It was really more of a random walk. I was doing a bunch of projects all around search and then gradually I thought hey, maybe some of this stuff could be used to do or at least improve a search engine. No real cool story, sorry :) Can you briefly explain what DDG is to those which have not yet heard of it? Sure. DuckDuckGo is a general purpose search engine with way more instant answers, way less spam/clutter, and real privacy. In other search engines the search results are personalized based on your Web history and personal profile. Why has DDG decided to go a different direction? We haven’t seen any compelling evidence that passive personalization is useful. On the other hand, it has some serious issues like putting people in personal „filter bub- bles”, which we’ve tried to explain at http://dontbubble.us/. To the extent that certain personal features are relevant (like selecting a geographic region to boost), we want to keep those tuning features opt-in to fulfill our promise of real privacy. DDG does not collect or share personal information... It seems that privacy is very important to you. Why so? I wasn’t personally aware of all the search privacy issues when starting DuckDuckGo, but quickly became educated after getting questions from users on Reddit and Hacker News. It was appealing to me personally and also I didn’t like the idea of handing information about users over to governments and others that request it by court order. Is it possible not to collect such data for marketing reasons? You can show an advertisement directly based on what was typed in, i.e. a mortgate ad if you type in mortgage. This ad is not reliant on personal information at all – just the immediate search. In comparison to other search engines what are some of the unique features of DDG? We focus a lot on instant answers, where we hope to give you useful information about your search with 0-clicks. These answers are on top of the traditional link results. We have a new platform at http://duckduckhack.com/ that al- lows developers to contribute to these answers in areas they care about. We also focus more aggressively remov- ing spam and delivering a less cluttered search experience. Interview with Gabriel Weinberg Founder of DuckDuckGo Gabriel Weinberg was educated at MIT in Physics and Technology Policy. Gabriel is an active angel investor and founder of DuckDuckGo. In his free time he works on a book “On Traction”.
  43. www.bsdmag.org 49 Interview with Gabriel Weinberg DDG is built on

    Open Source, can you list some of its components? You may find everything here: http://help.duckduckgo. com/customer/portal/articles/216392. How does DDG give back to the open-source community? We’ve been trying to give back in two ways. First, we are open sourcing more and more of our own stuff at https:// github.com/duckduckgo. We hope over time there will be more and more useful stuff there. Second, we’ve been giving away money (something significant to us) to FOSS each year. Half of this giveaway is to projects we use and half is driven by nominations from our community. Check out http:// ye.gg/foss2010 and http://ye.gg/foss2011 for more details. Is DDG cloud-based? If so what benefits and disadvantages do you find in using the cloud? Yes. We started using our own systems, but then even- tually moved most things to the cloud. The main benefits from us is not having to worry about maintaining hard- ware, being easily able to provision new servers, and be- ing easily able to replicate our setup overseas. You have joined the forces with Linux Mint, could you tell us more about this cooperation? They include us a default search engine choice with- in their Operating System, along with a number of other browsers and distros. It’s really a win-win. Their users get a compelling search alternative, and we also split revenue we receive to further open source development. What are some of the future features you plan to deploy on DDG? We’ve been working on a platform where developers can help develop instant answers for DuckDuckGo. Check it out at http://duckduckhack.com/. Other than that, better mobile apps! What advice would you give to any start-up company or engineers wanting to develop a large scale project? An oldie but goodie: don’t prematurely optimize. Get some early users and iterate based on their feedback. Then think an order of magnitude ahead, and try to think up and react to coming bottlenecks. Do you still partake in coding and UI design? Yes, all the time! by Diego Montalvo & BSD Team What has been one of the biggest obstacles in creating DDG? The most difficult thing in search engines isn’t technical but getting real people to switch their search engine. To do that, you need to deliver a differentiated and compelling search alternative, which is comprised of many moving parts. It took several years before people were switching consis- tently. Does DDG have any weak points? Sure. We still do better in the US than outside it, but we are actively working to close that gap in both speed and results. What BSD technologies do you use for DDG? We use FreeBSD for some of our backend systems. Why FreeBSD? What are in your opinion the advantages in using this system for that purpose? Does it have any weak points as far as DDG is concern? About 12 years ago I tried a bunch of OSs and liked Free- BSD the best :). It was the most intuitive to me in terms of how it was layed out and I liked the focus on the networking stack. The main weaknesses that are driving us away from it today are the difficulty in maintaing systems (mainly up- grading ports) and lack of support on Amazon AWS. Why did you decide to build your own search engine? What was it about other search technology that you felt needed change? Originally I was dissatisfied about two things with Google. First, I thought there was too much spam. Second, I thought you could leverage Wikipedia and other crowd sourced sites a lot more. Before you came up with DuckDuckGo what was your default search engine? Google. Have you always been interested in search technology? Yes, but from afar. The closest I got to it was really doing a lot of SEO in my last company. What was your first large scale project that you developed or founded? Hard to know what you mean by large-scale :). My first company was called learnection and was educational software to enable parents to connect more with their kids’ classrooms.
  44. Next issue is coming in August! In the next issue:

    • Continuation of security series on TrustedBSD and DNS • VPN Server with FreeBSD setup and management • Tuning ZFS on FreeBSD • Running Xfce Desktop Environment • and Other !
  45. Work with a vendor that supports the operating system you

    love! iX is the corporate sponsor of the PC-BSD® Project, a major corporate donor to the FreeBSD Foundation, and leads the FreeNAS™ development team -- all while employing some of the most brilliant minds in the FreeBSD® community. For BSD hardware and software expertise, look no further. 1-855-GREP-4-IX http://www.iXsystems.com/community What has your server vendor done for BSD lately? Probably, not much.