Upgrade to Pro — share decks privately, control downloads, hide ads and more …

Getting Started with the Raspberry Pi

Getting Started with the Raspberry Pi

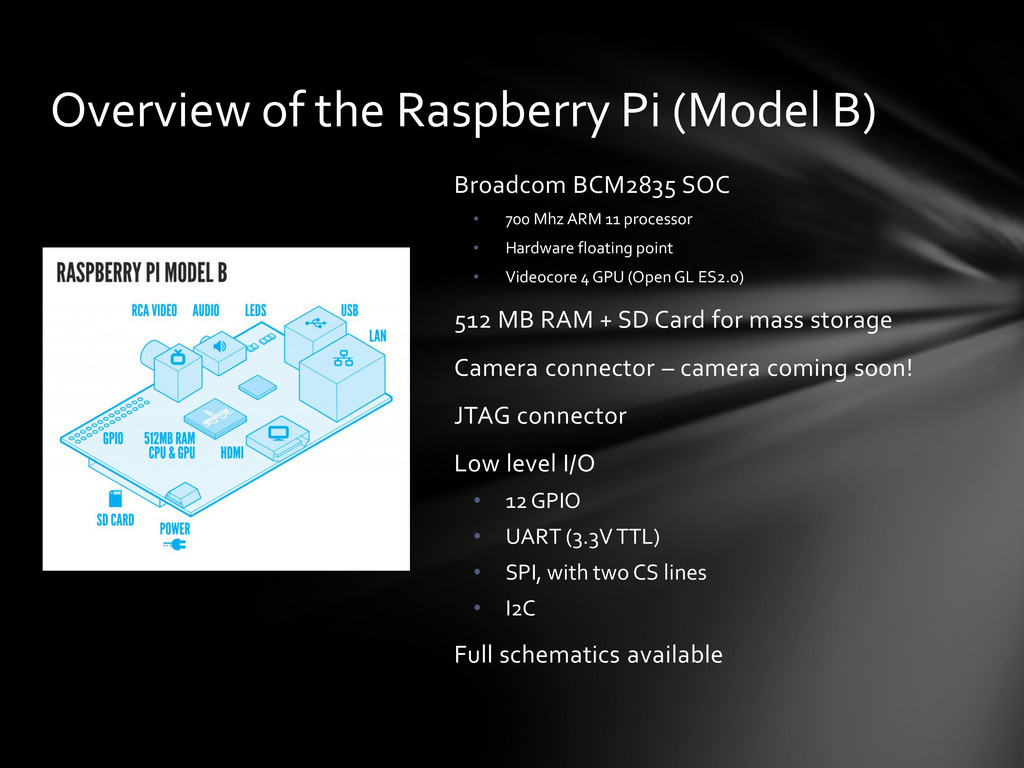
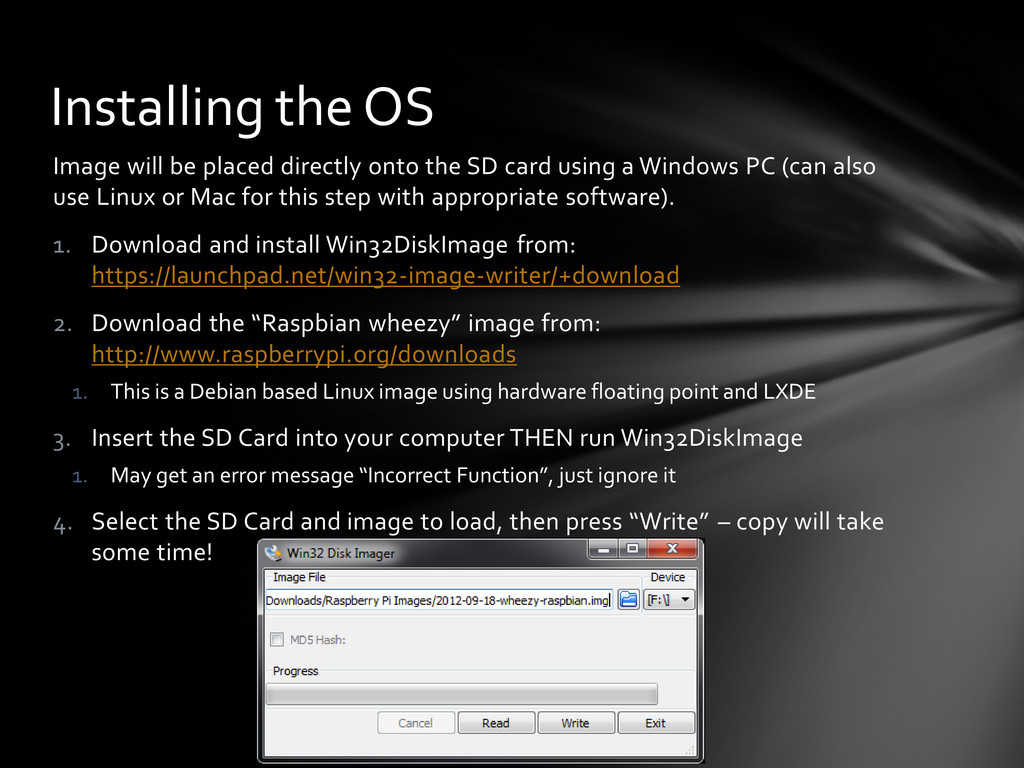
The Raspberry Pi is an inexpensive ($35), credit card sized computer that is able to run the Linux operating system. The card also contains USB ports, an Ethernet port, camera port, GPIO lines, serial ports, SPI port, HDMI port, and I2C port – just about anything you would want for an inexpensive and very powerful robot controller! Lloyd Moore will show us how to get started with this device. Specifically we'll talk about loading and configuring the operating system, installing the Qt (C++) development system, and controlling some of the ports.

Lloyd Moore

January 19, 2013
Tweet

More Decks by Lloyd Moore

Other Decks in Programming

Transcript

  1. Overview of the Raspberry Pi Installing the OS Setting up

    VNC Setting up Qt locally Serial port communications Resources Using a Mac Agenda
  2. Broadcom BCM2835 SOC • 700 Mhz ARM 11 processor •

    Hardware floating point • Videocore 4 GPU (Open GL ES2.0) 512 MB RAM + SD Card for mass storage Camera connector – camera coming soon! JTAG connector Low level I/O • 12 GPIO • UART (3.3V TTL) • SPI, with two CS lines • I2C Full schematics available Overview of the Raspberry Pi (Model B)
  3. To get started with the system you will need to

    add: • USB Keyboard • USB Mouse • SD Memory Card: 4GB or larger, Class 10 or better • Micro USB cable (Dollar stores have these cheap, and so does Amazon! http://www.amazon.com/gp/product/B003ES5ZSW/ref=oh_details_o00_s00_i01 ) • 5V USB Power Plug, 700mA or better (Can also use a bench supply, etc.) • Ethernet cable and wired network, wireless USB adapters also available • HDMI cable and monitor • Can also use HDMI to DVI converter/cable (Amazon has these cheap! http://www.amazon.com/gp/product/B004S4R5CK/ref=oh_details_o00_s00_i0o) May also want: • Multiple SD cards – really handy for experimenting • 1/8” stereo audio cable • 26 position IDC connectors and ribbon cable (Fry’s) • USB hub Additional Hardware
  4. Image will be placed directly onto the SD card using

    a Windows PC (can also use Linux or Mac for this step with appropriate software). 1. Download and install Win32DiskImage from: https://launchpad.net/win32-image-writer/+download 2. Download the “Raspbian wheezy” image from: http://www.raspberrypi.org/downloads 1. This is a Debian based Linux image using hardware floating point and LXDE 3. Insert the SD Card into your computer THEN run Win32DiskImage 1. May get an error message “Incorrect Function”, just ignore it 4. Select the SD Card and image to load, then press “Write” – copy will take some time! Installing the OS
  5. Install the SD card, attach USB keyboard, USB mouse, monitor

    into the Pi and apply power to the Pi. First screen configuration 1. Set time zone 2. Set memory allocation between CPU and GPU, 448M/64M standard 3. Enable SSH, if desired 4. Set boot behavior – straight to desktop or not, we’ll turn this on for now 5. Expand_rootfs and reboot Use the command sudo raspi-config to run the configuration program at any time after the first boot. First OS Run
  6. Points of Interest Start Menu Button Logout Button Multiple Desktops

    File Manager CPU Graph LX Terminal nano At this point you should also update the OS! 1. Open LX Terminal 2. sudo apt-get update 3. sudo apt-get upgrade Demo – Walk around the OS
  7. By setting up VNC you eliminate the need for a

    dedicated keyboard, mouse and monitor for the Raspberry Pi. 1. Open a command window: Accessories -> LXTerminal 2. Type: sudo apt-get install tightvncserver 3. Run vncserver and enter a password – srs_demo for the demo image 4. Edit /etc/init.d/bootmisc.sh to start vnc server on boot up A. sudo nano /etc/init.d/bootmisc.sh B. Scroll to end of text and add: su –c “vncserver :1 –geometry 1200x800 – depth 16” pi & C. Ctl-o, Ctl-x to save and exit D. Note: There are other more formal ways to do this – this one is simple! 5. Download and install Tight VNC Viewer for your desktop from: http://www.tightvnc.com/download.php Setup VNC – Optional Step
  8. From a console window type: sudo apt-get install g++-4.7 sudo

    apt-get install qt4-dev-tools sudo apt-get install qtcreator Qt Creator will now show up in the programming menu: Setup Qt Development Environment
  9. Start Qt Creator and then choose Tools->Options->Build&Run->Tool Chains Configure as

    shown by clicking Add->GCC: Configure Your Tool Chain
  10. On the same panel choose Qt Versions and configure as

    shown (may already be configured): Configure Qt Versions
  11. 3 wire serial port located on GPIO Pins 6 (GND),

    8(Tx), 10(Rx) Device name is: /dev/ttyAMA0 Voltage levels are 3.3V, and directly connected to SOC!!!! The good news is this will directly connect to a microcontroller! Not good for a PC! I’m using a level shifter for the demo to connect to the PC. AdaFruit has one for $10 (http://adafruit.com/products/954) Default is to use this for an OS console port, need to disable functionality: Configuring the Serial Port
  12. Disable the console output in /boot/cmdline.txt • In a console

    window type: sudo nano /boot/cmdline.txt Remove all references to /dev/ttyAMA0 Ctl-o <Enter> Ctl-x (to write the file back out and exit) • Typical modified line will appear as: dwc_otg.lpm_enable=0 root=/dev/mmcblk0p2 rootfstype=ext4 elevator=deadline rootwait Disable the getty in /etc/inittab In a console window type: • sudo nano /etc/inittab • comment last line: T0:23: respawn /sbin/getty –L ttyAMA0 115200 vt100 • Ctl-o <Enter> Ctl-x (to write the file back out and exit) Restart the Raspberry Pi for this to take effect • sudo reboot Configuring the Serial Port
  13. Can use standard GCC/Eclipse to program, however Qt provides a

    nice IDE and is cross platform environment (Windows, Linux, Mac, Android, Embedded Linux, Windows CE, iOS on the way) And it is FREE! (LGPL v2.1 and commercial licenses available) Will also be using QtExtSerialPort, a free Qt compatible serial port abstraction (MIT license) Will simply open the serial port set 57600N81 and send out “Hello World” Located in ~/SerialPi/SerialPi in the demo image, the project file is named SerialPi.pro The Demo Program
  14. The first time you open the SerialPi project you will

    be asked to configure it for the types of builds that you want to create. Configure the project as shown: Configure SerialPi Project
  15. Normally for embedded development you build on a host computer

    and deploy to a target computer. This can be faster overall but is much more complex to set up. To configure this project to run locally choose: 1. Deployment: Projects->Run Settings, 2. Run: Add->Deploy Configuration and set the path to the executable Configure No Deployment Runtime
  16. Gertboard Kit– Plugs into the IO header on the Raspberry

    Pi and contains: 12 buffered I/O lines 3 pushbutton switches 6 open collector drivers (50V 0.5A) 48V 4A motor controller 28 pin, DIP, Atmega controller 2 channel 12 bit ADC 2 channel 10 bit DAC BCM2835 Library – Open source library containing drivers and examples for: SPI GPIO Adapteva Project - $99 board, 16 cores, 26GFLOPS: http://arstechnica.com/information-technology/2012/09/99-raspberry-pi-sized- supercomputer-touted-in-kickstarter-project/ Few More Things
  17. Use Stuffit to unzip the download file (http://www.stuffit.com/mac-expander.html) To set

    up the SD card: • Insert the SD card into a card reader. I used the built-in card reader on my MacBook Air. • The card should show up in the Finder. Run Disk Utility (from the Applications/Utilities folder), find the SD card on the left, select the volume associated with that device, and then click on the "Unmount" button. This unmounts the volume but leaves the card connected we can blast it with the disk image. Do not click on the “Eject” button as this will also disconnect the card, and we won’t be able to talk to it. • Now we need to figure out the low-level (BSD) name to use to access the SD card. In Disk Utility, click on the item for the card reader and then click on the Info button at the top of the window. In the resulting window, you should see a line with the "disk identifier". On the MacBook Air it's "disk2", on the Mac Pro it's "disk5". Note that you want the disk identifier of the card, not the name of the volume (partition) on the card, which is generally something like “disk2s1”. If you get a volume device name, you need to click on the parent item, which is typically the name of the card reader, then choose Info. • Run the Terminal application • “cd” to the directory with the file decoded from the zip. If you haven't used the command line before and have no idea what I'm talking about, you can just move the SrsRaspPiDemo2.img file to your home folder, the folder the OS creates with your login name and holds all of your other folders, like Documents and Downloads. • Finally, we're going the use the dd command to transfer the image onto the card. A note of caution: this lets you blast data directly onto a drive, INSTANTLY destroying any data already there. That's a good thing, it's what we want to do, BUT if you get the wrong BSD name or do something stupid like swap the arguments, you can COMPLETELY trash your valuable data. BE CAREFUL!!! If you've done the steps above correctly, type the command below, replacing <diskX> with the disk identifier you found in the step above. The "if" argument means "input file" and "of" means "output file" so the command above says input the disk image file and output to the card reader. • dd if=SrsRaspPiDemo2.img of=/dev/<diskX> The transfer will take about 2 -3 hours depending on your system, this is normal and there is very little feedback – good time for having dinner! Using a Mac to Create the SD Card
  18. Raspberry Pi Home Page: http://www.raspberrypi.org/ Tight VNC Home Page: http://www.tightvnc.com/

    Qt Home Page: http://qt-project.org/ QExtSerialPort Home Page: http://code.google.com/p/qextserialport/ Gertboard: http://www.raspberrypi.org/archives/tag/gertboard BCM2835 Drivers: http://www.open.com.au/mikem/bcm2835/index.html BCM2835 Peripherals Datasheet: http://www.raspberrypi.org/wp- content/uploads/2012/02/BCM2835-ARM-Peripherals.pdf MagPi Magazine: http://www.themagpi.com/ Image of today’s session (8GB SD Card): http://www.CyberData- Robotics/Transfer/RaspPiImage.zip (Will be available until 2/28/2013) References