Upgrade to Pro — share decks privately, control downloads, hide ads and more …

Paul Vincent Craven - Easy 2D Game Creation With Arcade

Paul Vincent Craven - Easy 2D Game Creation With Arcade

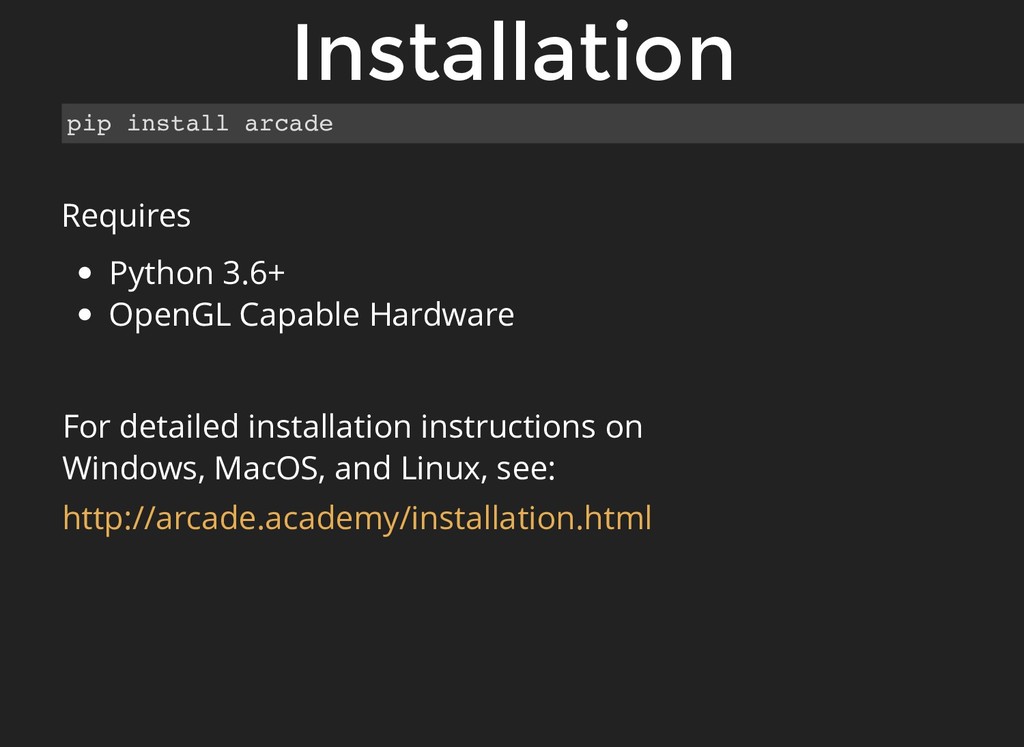
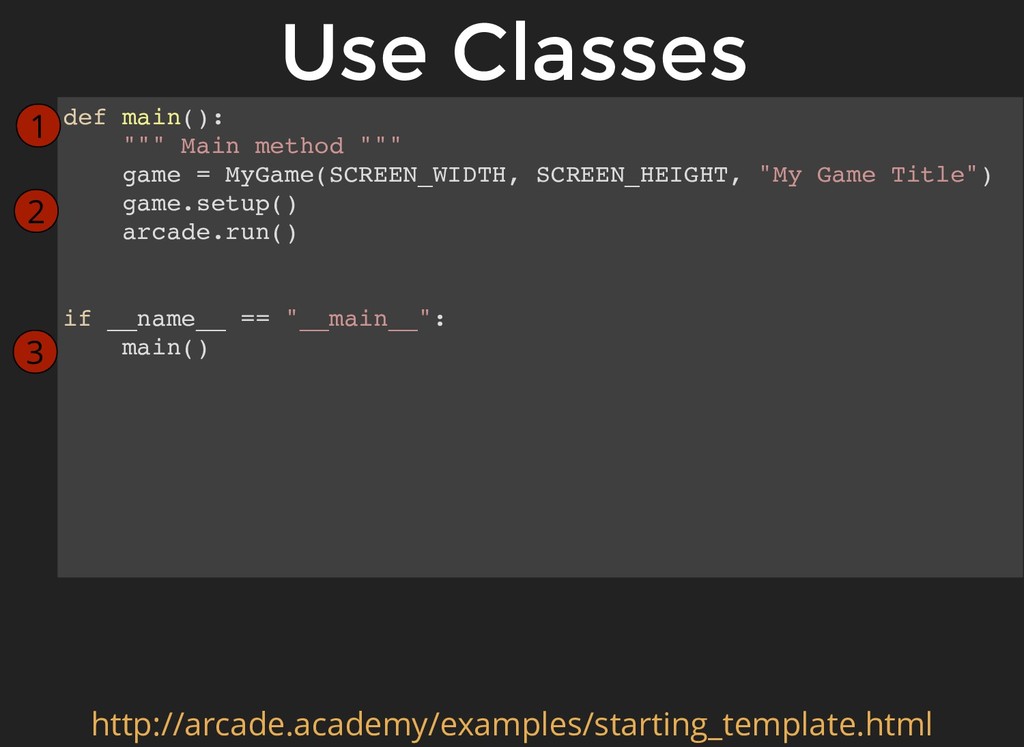
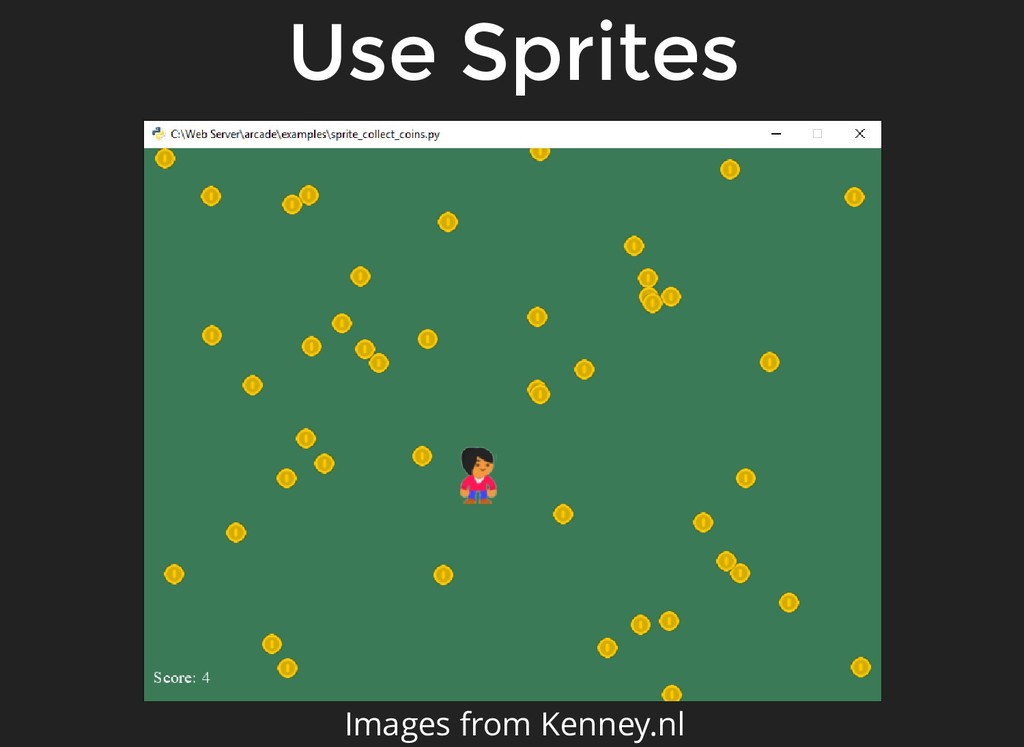
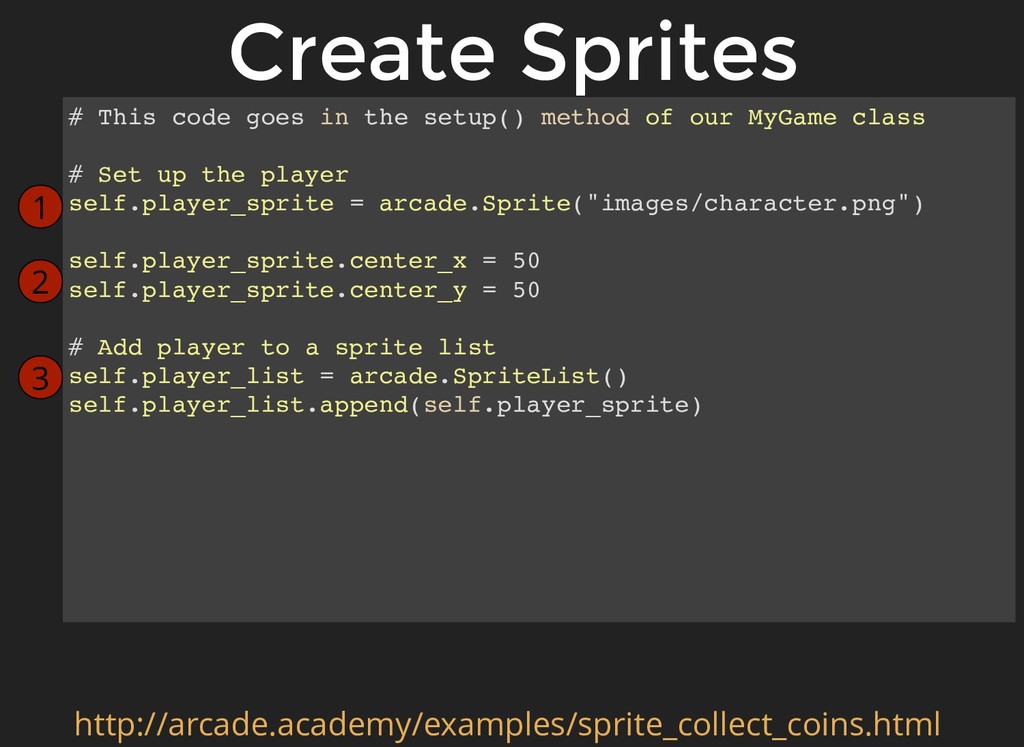
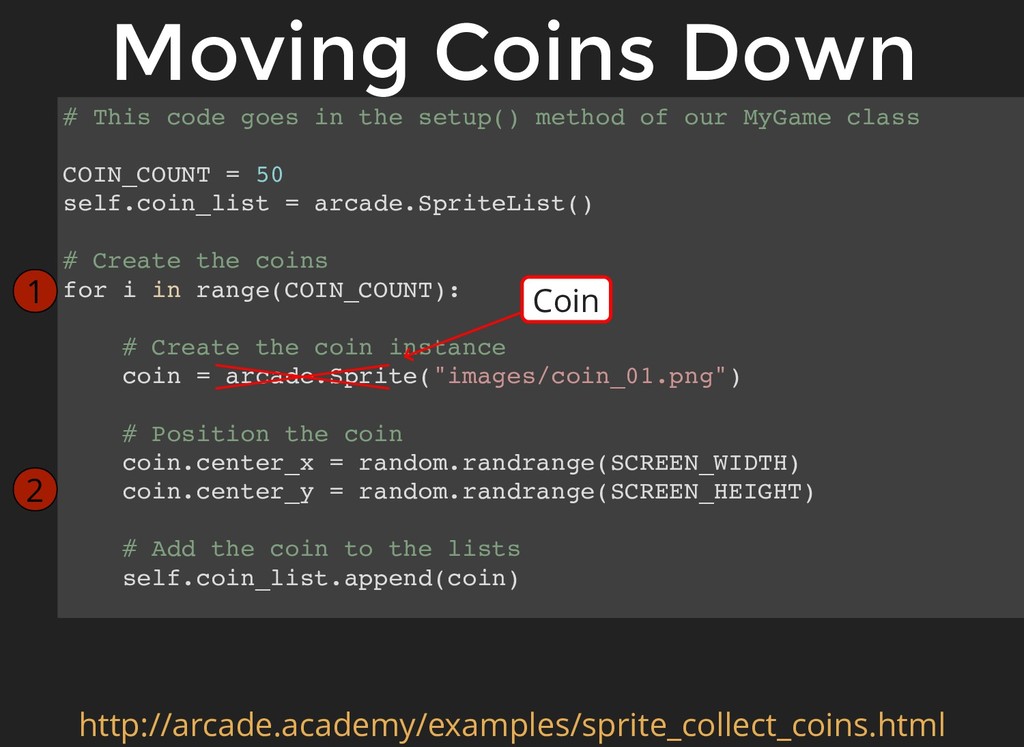
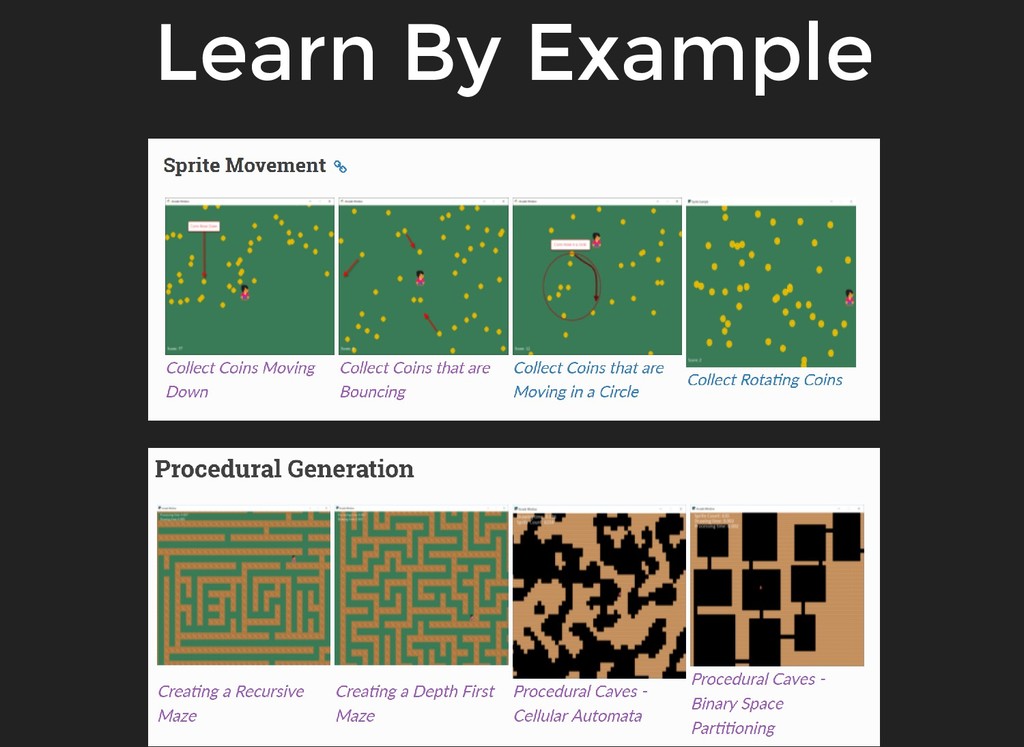
Want to have fun with Python? Do something visual? Get started today? Learn how to draw, animate, and use sprites for games with the [Python Arcade](http://arcade.academy/) library.

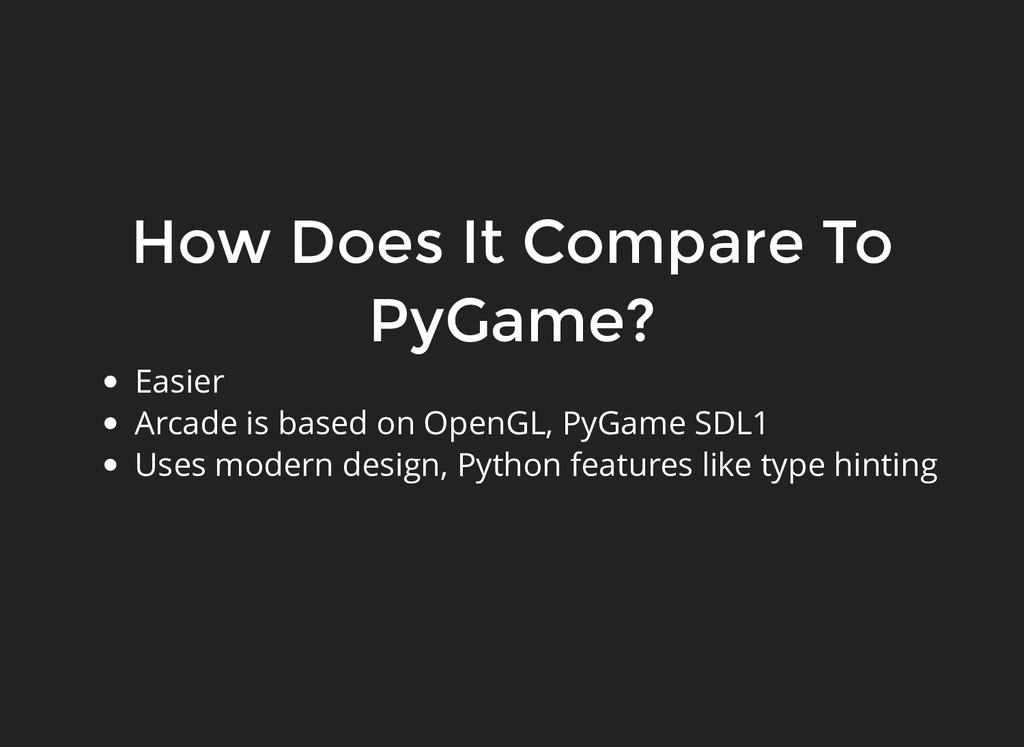
"Arcade" is an easy-to-use Python library for creating 2D arcade games. We'll show you how to get started creating your own game, and find plenty of example code to get an idea of what you can do with this library. If you are familiar with PyGame, Arcade is easier, more powerful, and uses recent Python features like type hinting and decorators.

This talk is great for beginners, educators, and people who want to create their own arcade games.

https://us.pycon.org/2018/schedule/presentation/100/

PyCon 2018

May 11, 2018
Tweet

More Decks by PyCon 2018

Other Decks in Programming

Transcript

  1. Easy 2D Game Creation Easy 2D Game Creation With Python

    And Arcade With Python And Arcade Paul Vincent Craven
  2. Hi, I'm Paul Craven. I'm going to show you how

    to get started creating 2D video games with Python and the Arcade library. Speaker notes
  3. You can explore and get more information about this by

    going on-line to "arcade.academy". There is a ton of information on this website. It is designed to get you up and going creating 2D games as painlessly as possible whether you are experienced or new to programming. There is also a link to a live view of these slides, so you can see the code easily, and follow any links for more information. Speaker notes
  4. Installation Installation pip install arcade Requires Python 3.6+ OpenGL Capable

    Hardware For detailed installation instructions on Windows, MacOS, and Linux, see: http://arcade.academy/installation.html
  5. In order to get started, you need to install the

    Arcade library. You can install the Arcade library like any other package on PyPi. Usually just typing "pip install arcade" will work. Or for Mac/Linux "pip3 install arcade" Arcade requires Python 3.6 or greater. It does require OpenGL support. That shouldn't be a problem for any semi-modern hardware. For more details on installation, see the installation instructions on arcade.academy. Speaker notes
  6. import arcade # Set constants for the screen size SCREEN_WIDTH

    = 600 SCREEN_HEIGHT = 600 # Open the window. Set the window title and dimensions arcade.open_window(SCREEN_WIDTH, SCREEN_HEIGHT, "Drawing Example" # --- Drawing Code Will Go Here --- # Keep the window open until the user hits the 'close' button arcade.run() 1 2 3 Open a Window Open a Window
  7. First step is opening a window. There are three lines

    of code you need to get this far. 1. Import the arcade library. 2. Use the open_window command, giving it how wide and high for the window. You also give a title of the window. If you just stopped here, you'd get a window that would pop up, but since your program ends, the window would immediately go away. That's no good. So you need the third line, which will keep the program running until you close the window. In a bit, we will start adding drawing code, and we'll put that where the arrow is. Speaker notes
  8. import arcade SCREEN_WIDTH = 600 SCREEN_HEIGHT = 600 # Open

    the window. Set the window title and dimensions arcade.open_window(SCREEN_WIDTH, SCREEN_HEIGHT, "Drawing Example" # Set the background color arcade.set_background_color(arcade.color.WHITE) # Clear screen and start render process arcade.start_render() # --- Drawing Commands Will Go Here --- # Finish drawing and display the result arcade.finish_render() # Keep the window open until the user hits the 'close' button arcade.run() 1 2 Drawing Setup Drawing Setup 3
  9. After getting a window open, the next step is to

    get it ready for drawing. Step one, use the set_background_color command to set the background color. We can use named colors or set the RGB value by using a three number tuple. Step Two, tell the computer to clear the screen to the current background color and get ready for drawing. Our drawing commands we'll eventually put where the arrow is Step Three, after we are done drawing, we want to "flip" the screen and show what we've drawn. That's what 'finish render' does. Nothing of what we have drawn is shown until we run the finish_render command. Speaker notes
  10. Ok, let's draw something simple. Like a smiley face. We'll

    need to draw one circle for the yellow face. Draw two circles for the eyes and an arc for the mouth. Speaker notes
  11. # Draw the face x = 300; y = 300;

    radius = 200 arcade.draw_circle_filled(x, y, radius, arcade.color.YELLOW) # Draw the right eye x = 370; y = 350; radius = 20 arcade.draw_circle_filled(x, y, radius, arcade.color.BLACK) # Draw the left eye x = 230; y = 350; radius = 20 arcade.draw_circle_filled(x, y, radius, arcade.color.BLACK) # Draw the smile x = 300; y = 280; width = 120; height = 100 start_angle = 190; end_angle = 350; line_width = 10 arcade.draw_arc_outline(x, y, width, height, arcade.color.BLACK, start_angle, end_angle, line_width) Drawing Drawing http://arcade.academy/examples/happy_face.html 1 2 3 4
  12. * Here we have the four drawing commands for the

    smiley face. * I've declared variables and set those to the values we need to make the code easier to read. * Just for the record, you should put variables each on their own line and NOT use semicolons. But it is really hard to fit the code on a slide if I do that. * We use three draw_circle_filled commands. One for the face and two for the eyes. * Our window is 600 by 600, so you can see we are drawing the face at 300, 300 making it at the exact center. * We use an arc for the smile. * An arc is one of the most complex things that we can draw, with the center, width, height, start and end angles. * You can see the full code for the program at the link below. Speaker notes
  13. draw_arc_filled() draw_arc_outline() draw_circle_filled() draw_circle_outline() draw_ellipse_filled() draw_ellipse_outline() draw_line() draw_line_strip() draw_lines() draw_parabola_filled()

    draw_parabola_outline() draw_point() draw_points() Drawing Commands Drawing Commands draw_rectangle_filled() draw_rectangle_outline() draw_lrtb_rectangle_filled() draw_lrtb_rectangle_outline() draw_xywh_rectangle_filled() draw_xywh_rectangle_outline() draw_polygon_filled() draw_polygon_outline() draw_text() load_texture() draw_texture_rectangle() draw_xywh_rectangle_textured() draw_triangle_filled() draw_triangle_outline() http://arcade.academy/quick_index.html
  14. There are several commands available for use in drawing primitive

    shapes. You can draw rectangles several different ways, depending on how you want to specify the coordinates. You can draw arcs, ellipses, lines, polygons, and text. You can rotate any of these as well. "textures" allow you to load images from the disk and display them. You can look up the details of each command by using the quick index at arcade academy. Speaker notes
  15. Even just with simple drawing primitives, it is possible to

    create some nice images. These are all from new programmers who were able to create these programs just a couple weeks into learning to program. For someone new to programming, it is a great way to get used to working with coordinates, using variables, calling functions, and looking up documentation. Even for expert programmers, it is just fun to make art. Speaker notes
  16. Wait! It is better programming if we put our code

    into functions. We don't want to leave our code and variables all strewn about. Not only do we want people to look at our images and say they look good, we want our code to be beautiful. Speaker notes
  17. Functions also give us the ability to reuse our code.

    We can create a library of functions for drawing trees, birds, and more. Then we don't have to re-write the code every time we want a tree. To create this image, I have a function for drawing a tree, and one for drawing a bird. Let's look at the tree drawing function. Speaker notes
  18. def draw_pine_tree(x, y): """ This function draws a pine tree

    at the specified location. """ # Draw the triangle on top of the trunk arcade.draw_triangle_filled(x + 40, y, x, y - 100, x + 80, y - 100, arcade.color.DARK_GREEN) # Draw the trunk arcade.draw_lrtb_rectangle_filled(x + 30, x + 50, y - 100, y - 140, arcade.color.DARK_BROWN) Draw With Functions Draw With Functions http://arcade.academy/examples/drawing_with_functions.html 1 2 3
  19. This is an example of using a function that draws

    the pine tree from the previous image. * Line 1 defines a draw_pine_tree function We take in an x and y as parameters, and use that to position the tree. * If you name the function well, this code becomes "self documenting." Even a non-programmer could look at this code and see that with a name like "draw_pine_tree" there's a good chance the code draws a pine tree. * Line 2 draws a dark green triangle for the top. We specify three x, y coordinates for each point in the triangle. We calculate where those are based on the x, y that was passed into the function. * Line 3 draws a brown rectangle for the trunk. If you are new to creating functions, this is an excellent way to hone your skills while creating a library of different things to draw. Speaker notes
  20. def main(): arcade.open_window(SCREEN_WIDTH, SCREEN_HEIGHT, "Drawing With Functions") arcade.start_render() # Call

    our drawing functions. draw_background() draw_pine_tree(50, 250) draw_pine_tree(350, 320) draw_bird(70, 500) draw_bird(470, 550) arcade.finish_render() arcade.run() if __name__ == "__main__": main() The Main Function The Main Function http://arcade.academy/examples/drawing_with_functions.html 1 2 3
  21. If you are putting all your code into functions, you

    can create a "main" function that is the starting code for our game. I've defined this in step one. Now if you look down at the bottom on step 2, this will call the main function and start our program. You can skip the 'if' statement and just call main() with the second line if you want. Keeping the 'if' statement will prevent the program from being run if we import it instead of run it. Looking at step 3, I'm calling all my functions that draw. With good function names, this can be self-documenting. Even a non-programmer can understand what is happening here. Speaker notes
  22. Wait! The experienced graphics programmer in the audience will know

    that the method of drawing that I've just described is very slow. Think about it, if I had a sky with 200 stars in it, then if my game ran at 60 times per second I'd be drawing 200 times 60 = 12,000 stars per second. It is much faster if I load those 200 stars on the graphics card ahead of time, and just tell the graphics card to draw the stars for me. That takes 12,000 drawing commands per second down to 60. Arcade supports this as well, and it is worth looking into. Speaker notes
  23. class MyGame(arcade.Window): def __init__(self, width, height, title): """ Initialize everything

    """ # Initialize the parent class super().__init__(width, height, title) arcade.set_background_color(arcade.color.AMAZON) def setup(self): """ Create the sprites and set up the game """ pass def on_draw(self): """ Render the screen. """ arcade.start_render() # TODO: Drawing code goes here Use Classes Use Classes 2 3 4 1
  24. * To make your program into an interactive game, you

    can use classes. * You can also use decorators, but I don't have time to cover that in this talk. * Step 1, we create our own class. We derive it from a parent Window class in the Arcade library. * Then we can over ride functions and add in the new functionality that we want. * Step 2, we are adding functionality to the init method, and we can set up our instance variables we'll use in our game here. * Step 3, in this setup method we will put all the code where we create the characters for our game, set up the walls, and everything else. * We don't put that code in our 'init' function, because if we separate it out, we can just add the ability to restart our game by simply calling setup again. * Step 4, we will put our code for drawing inside the on_draw function. * This is where all our drawing code goes Speaker notes
  25. def update(self, delta_time): """ All the logic to move, and

    the game logic goes here. pass def on_key_press(self, key, key_modifiers): """ Called whenever a key on the keyboard is pressed. """ pass def on_mouse_motion(self, x, y, delta_x, delta_y): """ Called whenever the mouse moves. """ pass def on_mouse_press(self, x, y, button, key_modifiers): """ Called when the user presses a mouse button. """ pass Use Classes Use Classes 1 2 3 http://arcade.academy/examples/starting_template.html 4
  26. Item 1, the update function is where we can put

    our code to move the objects in our the game, and to run other game logic, like detect collisions. It is important to keep the game logic code separated from the game drawing code. We can respond to user input by over-riding functions like these. * Item 2 is called any time the user presses a key. * Item 3 is called for mouse movement. * Item 4 is called for pressing a mouse button. You can look at the starting template code at the URL below to get an idea of all the functions that can be filled in. Oh, and if you haven't seen it before, "pass" is a keyword in Python that you can use when you don't have any code for a function or some other block of code. You should replace the "pass" keyword with your code. Or, if you don't have any code you want to run, just remove the function. Don't leave "pass" in your program as it is just a placeholder. Speaker notes
  27. def main(): """ Main method """ game = MyGame(SCREEN_WIDTH, SCREEN_HEIGHT,

    "My Game Title") game.setup() arcade.run() if __name__ == "__main__": main() Use Classes Use Classes 1 2 3 http://arcade.academy/examples/starting_template.html
  28. So we've defined our own window class, how do we

    get it to run? Usually, I use code like this. I have a main function that creates an instance of the class I just defined, call the setup method to start the game, and then run it. Speaker notes
  29. Sprites represent items on the screen that can be interacted

    with. In this screenshot, each coin is a sprite. The player is also a sprite. We manage sprites in lists. This makes it easy to detect collisions, draw, and update objects on the screen. Now, we'll go over code for a very simple game that allows the player to move around the screen collecting sprites. Speaker notes
  30. # This code goes in the setup() method of our

    MyGame class # Set up the player self.player_sprite = arcade.Sprite("images/character.png") self.player_sprite.center_x = 50 self.player_sprite.center_y = 50 # Add player to a sprite list self.player_list = arcade.SpriteList() self.player_list.append(self.player_sprite) Create Sprites Create Sprites http://arcade.academy/examples/sprite_collect_coins.html 1 2 3
  31. It is easy to create a sprite. Section 1 here

    creates a sprite from an image on the disk. You can also include an optional scaling factor if you want the sprite larger or smaller. Section 2 positions the sprite. Section 3 adds the sprite to a sprite list. Speaker notes
  32. The SpriteList Class The SpriteList Class Optimizes drawing by using

    vertex buffers and more Optimizes collision detection by using spatial hashing Allows you to control drawing order Easier management of your game logic
  33. The SpriteList class is important in creating your game. There

    are a lot of built-in optimizations to this class that help your game run faster. By using vertex buffers we can turn thousands of drawing calls per frame into one drawing call. This is particularly beneficial for groups of sprites that don't move, like walls. Static, non-moving sprites should be grouped separately from moving sprites. Detecting if one sprite is touching another sprite can take time. If there are a thousand walls in your level, then everything that can run into a wall needs to do a thousand checks, 60 times per second. We can get around that by using spatial hashing. We keep track of what sprites are close together, and can turn those thousand checks down to only the few sprites that are close by. By using sprite lists you can control what sets of sprites appear on top of other sprites. You can also use sprite lists for easier management in the logic of your game. You can keep the logic around coins, laser beams, platforms, and enemies all separate. Speaker notes
  34. # This code goes in the setup() method of our

    MyGame class COIN_COUNT = 50 self.coin_list = arcade.SpriteList() # Create the coins for i in range(COIN_COUNT): # Create the coin instance coin = arcade.Sprite("images/coin_01.png") # Position the coin coin.center_x = random.randrange(SCREEN_WIDTH) coin.center_y = random.randrange(SCREEN_HEIGHT) # Add the coin to the lists self.coin_list.append(coin) Create Sprites Create Sprites http://arcade.academy/examples/sprite_collect_coins.html 1 2
  35. This next bit of code places 50 coin sprites in

    random positions on the screen. The loop in part 1 runs our code block 50 times, and part 2 positions the sprite in a random location. We can use similar techniques to place sprites in a grid or some other pattern. As you can see, it doesn't take much code at all to do this. Speaker notes
  36. def on_draw(self): """ Render the screen. """ # This command

    has to happen before we start drawing arcade.start_render() # Draw all the sprites. self.wall_list.draw() self.coin_list.draw() self.player_sprite_list.draw() Drawing Sprites Drawing Sprites http://arcade.academy/examples/sprite_collect_coins.html 1 2
  37. Drawing with sprite lists is easy. The on_draw command in

    my game class, just needs to look like this. I call start_render I go through each sprite list I have, and draw it. Drawing should be done in back-to-front order. In this case, if a coin and a wall are in the same spot, the coin will appear over the wall rather than under it. Speaker notes
  38. def update(self, delta_time): # Generate a list of all coin

    sprites that collided with the player. coins_hit_list = arcade.check_for_collision_with_list(self.player_sp self.coin_list # Loop through each colliding sprite, remove it, and add to the scor for coin in coins_hit_list: coin.kill() self.score += 1 Sprite Collisions Sprite Collisions http://arcade.academy/examples/sprite_collect_coins.html 1 2
  39. You can detect if a sprite is hitting any other

    sprite in a list with the check_for_collision_with_list function. I am giving it two pieces of information. My player sprite. And a list of all the coin sprites. This function returns a new list that tells me what coins the player is in contact with. In this example, we loop through each colliding sprite and remove it with the kill function, then add a point to our score. This is code is not complicated. You can easily write this code. Speaker notes
  40. I haven't yet said how to move these sprites. How

    do we move the player with the mouse? How could we spice up the game by having the coins move down? Before we show that code, we need to understand the coordinate system. Speaker notes
  41. The coordinates of the world in our simple example look

    like this. For a 800 wide by 600 tall window, (0, 0) is in the lower left corner of our window. And (799, 599) is the upper right corner of our window. (Remember we start counting at zero.) To move a coin down, we'll need to make the y coordinate of our coin smaller. When a coin moves off the screen, the top of the coin will have a y coordinate less than zero. When we respawn a coin, we'll do it 20 to 100 pixels above the screen so it can smoothly slide into view. Speaker notes
  42. def on_mouse_motion(self, x, y, dx, dy): """ Handle Mouse Motion

    """ # Move the center of the player sprite to match the mouse x, self.player_sprite.center_x = x self.player_sprite.center_y = y Moving The Player Moving The Player http://arcade.academy/examples/sprite_collect_coins_move_down.html 1 2
  43. The easiest part of this is moving the player with

    the mouse. Remember the on_mouse_motion function? Just fill this function by removing the "pass" command and replacing it with code that takes the player sprite and setting its center to the mouse location. That's it! Speaker notes
  44. class Coin(arcade.Sprite): def reset_pos(self): # Reset the coin to a

    random spot above the screen self.center_y = random.randrange(SCREEN_HEIGHT + 20, SCREEN_HEIGHT + 100) self.center_x = random.randrange(SCREEN_WIDTH) def update(self): # Move the coin self.center_y -= 1 # See if the coin has fallen off the bottom of the screen. # If so, reset it. if self.top < 0: self.reset_pos() Moving Coins Down Moving Coins Down http://arcade.academy/examples/sprite_collect_coins_move_down.html 1 2 4 3 5 6
  45. The coins are more complex. Step 1, we can create

    a Coin class. Derive from Arcade's Sprite class so we get all the functionality of a Sprite, and just add our own. Skip down to step 4. Here we define an update() function to be called 60 times per second. Part 5 moves the sprite down 1 pixel. So, 60 pixels per second. Change the one to a bigger number to go faster, or a smaller number to go slower. Part 6 sees if the y-coordinate of the top of the sprite has gotten less than zero. If so, we reset the sprite to a random location at the top of the screen. That causes us to jump up to part two, reset_pos Here, in part 3 we respawn the coin in a random spot somewhere 20 to 100 pixels above the visible portion of the screen. Speaker notes
  46. # This code goes in the setup() method of our

    MyGame class COIN_COUNT = 50 self.coin_list = arcade.SpriteList() # Create the coins for i in range(COIN_COUNT): # Create the coin instance coin = arcade.Sprite("images/coin_01.png") # Position the coin coin.center_x = random.randrange(SCREEN_WIDTH) coin.center_y = random.randrange(SCREEN_HEIGHT) # Add the coin to the lists self.coin_list.append(coin) Moving Coins Down Moving Coins Down http://arcade.academy/examples/sprite_collect_coins.html 1 2 Coin
  47. Then, instead of creating an instance of Arcade's Sprite class,

    create an instance of our own class we just wrote. Forgetting to do this is a frequent mistake with new programmers that I've observed. Speaker notes
  48. def update(self, delta_time): """ Movement and game logic """ #

    Call update on all sprites (The sprites don't do much in this # example though.) self.coin_sprite_list.update() # Generate a list of all sprites that collided with the player. hit_list = arcade.check_for_collision_with_list(self.player_spri self.coin_sprite # Loop through each colliding sprite, remove it, and add to the for coin in hit_list: coin.kill() self.score += 1 Moving a Sprite Moving a Sprite http://arcade.academy/examples/sprite_collect_coins_move_down.html 1 2
  49. The sprite still won't move though. In the MyGame class

    we created, it also has an update method. Go back to the that update method, and add the code at point 2. Now when the window's update method is called, we call the update method on each sprite in that sprite list. Speaker notes
  50. Here are some examples of what you can do. We

    can easily create platformers with ramps and moving platforms. You can add in the PyMunk library, which works great for 2D physics. I had a student create a tower defense game. This game has a lot of sprites, collisions, explosions, and other things going on. Arcade keeps up with no problem. The student had programmed some in high school, and this was his first college programming class. This game is pretty amazing. You can have large maps. This is a procedurally generated dungeon with over 10,000 sprites making up the walls. We can go through it with no problem. Speaker notes
  51. One of the best ways to learn is not by

    textbook, but by example. There are many examples showing how to do code common techniques. I've taught students how to create games for ten years. Each time they say "How do you do this?" I create an example to show them. They are all here. You can see example code on how to shoot upward and hit items, like in a space invaders game. How to aim bullets with the mouse. What if you want the enemies to shoot back? They can do so at regular intervals, or randomly. They can even aim at the player. And what is a game without explosions? Learn how to add those. Speaker notes
  52. If you want an adventure, learn how to add walls

    the player can't move through. How to add items randomly, but not on walls. How to use a scrolling screen for a large world. How to animate sprites How to tile maps, add ramps, and moving platforms. How do you get enemies to move around? Speaker notes
  53. Besides having sprites move down, how can you get them

    to: Bounce around Move in a circle Rotate? There are examples for creating random mazes, caves, and rooms. Speaker notes
  54. What's Next? What's Next? Immediate: Isometric map examples and support

    Better support for the Tiled Map Editor Soon: Better decorator support Particle support Lighting / shader support
  55. What is up and coming with the Arcade library? Soon

    we'll have examples showing how to use isometric tiles and maps. Currently, support for the popular "Tile Map Editor" is limited. That's about to change. You'll easily be able to import maps created in Tiled. Soon, we plan on adding better support for decorators, particles for effects, and support for lighting and shaders. Speaker notes
  56. How Does It Compare To How Does It Compare To

    PyGame? PyGame? Easier Arcade is based on OpenGL, PyGame SDL1 Uses modern design, Python features like type hinting
  57. A question I often get is, how does this compare

    with PyGame? 1. It is easier. Now, I think PyGame is great. Arcade was inspired by PyGame. But after teaching with PyGame for about 10 years, one popular website, and one book, I had put together a lot of things on how I wished PyGame was better. And this is it. 2. SDL1 is an old, out of date, unsupported, cross-platform C++ library for graphics. OpenGL is a lot more powerful. 3. Using Python 3, type hinting, decorators, not having to manually program an event loop, Arcade is a better framework for programming, and learning to program Speaker notes
  58. Want To Contribute? Want To Contribute? Use GitHub! Code and

    documentation open for pull requests. There's also an open-source book on learning to program with Arcade and Python.
  59. Do you want to contribute to an open source library?

    We'd love to to have your contributions! All the code is on GitHub. The documentation as well. If you are new to pull requests, suggest documentation changes or grammar fixes to get some experiences. There's also an open-source book on learning how to program with Arcade that is available. If you are teaching someone how to program, you are welcome to use parts out of it. Speaker notes
  60. Contact Me: Contact Me: Paul Vincent Craven [email protected] @professorcraven Learn

    More: Learn More: http://arcade.academy Support: Support: www.reddit.com://r/pythonarcade
  61. If you would like to talk more about creating 2D

    games with Python, talk to me after this presentation. Give me a tweet, or shoot me an e-mail. I like talking about almost anything Python related, and networking with other enthusiasts is the best part of this conference. Speaker notes