Upgrade to Pro — share decks privately, control downloads, hide ads and more …

RenderPool Manual For Blender(Cycles)

Morgenrot.inc
February 13, 2023

RenderPool Manual For Blender(Cycles)

Morgenrot.inc

February 13, 2023
Tweet

More Decks by Morgenrot.inc

Other Decks in Technology

Transcript

  1. 01
    02
    Pack Resources/Relative Path/File Output/Archive to Zip
    03
    Upload/Set parameters/Rendering/Download
    04
    RenderPool Client App
    Purchase Points/Plans
    Preparation on Blender-Pack
    Render Pool Workflow
    Other Features
    Render Pool Manual
    For Blender (Cycles)

    View Slide

  2. 01
    Preparation on Blender-Pack

    View Slide

  3. ©2022 Morgenrot Inc. All rights reserved.
    1. Pack Resources
    Blender allows you to put textures in Blend
    files.
    You can add textures to your Blend files by
    selecting File-> External Data-> Pack
    Resource
    2

    View Slide

  4. ©2022 Morgenrot Inc. All rights reserved.
    1. Pack Resources
    When the resource is packed, you can
    notice that the file size is different from
    before.
    When you check Shader editor, the icon
    should differ from when the resource is not
    packed and packed.
    3

    View Slide

  5. ©2022 Morgenrot Inc. All rights reserved.
    Cache files, Alembic, ImageSequence,
    and VDB cannot be put in the Blend
    file, so put them after the folder
    where Blend is located.
    4
    2. Relative Path
    Good
    Bad

    View Slide

  6. ©2022 Morgenrot Inc. All rights reserved.
    After transferring the data, set the newly
    transferred file path from Find Missing File.
    5
    2. Relative Path

    View Slide

  7. ©2022 Morgenrot Inc. All rights reserved.
    In the render pool, the override of
    the render settings is the sample,
    export format, and target frame.
    So set the resolution in the render
    settings and the Compositor and File
    Output for the render pass you want
    to export in the composer node.
    6
    3. File Output
    set the resolution Set File Output for the render pass

    View Slide

  8. ©2022 Morgenrot Inc. All rights reserved.
    If you do not have a cache or any file
    that cannot be packed into .blend
    file, Ignore this step and proceed to
    upload Render pool
    After setting Cache, compress it into
    a Zip file, and we are ready to upload
    on Render pool.
    7
    (Optional)Archive to Zip

    View Slide

  9. 02
    Render Pool Workflow

    View Slide

  10. ©2022 Morgenrot Inc. All rights reserved.
    1. Upload File
    1. Press the BROWSE FILES button
    and select the .blend/zip file to
    upload. You can also drag and drop
    the file into this zone.
    2. Press UPLOAD FILE to start
    uploading.
    3. Uploaded files are added to the
    zone at the top.
    4. After completing the upload, click
    "Start Rendering" to go to the render
    setting.
    9

    View Slide

  11. ©2022 Morgenrot Inc. All rights reserved.
    2. Set each parameters
    Set each parameters
    ・RENDERER TYPE:
    BlenderCycles3.0, BlenderCycles2.93 can be selected
    ・ITERATIONS / SAMPLING:
    Sampling value. By default, in Blender's Render
    Properties> Sampling tab
    Contains the value of Max Samples.
    ・FILE FORMAT:
    Export Format(EXR, PNG, MPEG-4)
    ・RENDERING TARGET FRAME
    START FRAME VALUE :
    Specifies the beginning of the frame range to output.
    END FRAME VALUE:
    Specifies the end of the frame range to output
    Rendering is performed by the settings inside the
    .blend file except for these settings.
    10

    View Slide

  12. ©2022 Morgenrot Inc. All rights reserved.
    3. Estimated credit usege
    1. Select a resolution to estimate
    consumption points.
    Render Pool estimates the points to be consumed when
    rendering.
    The estimation is based on factors such as data
    amount, sampling, and frames.
    Depending on the content, the estimate may differ
    from the actual use.
    Final point usage is calculated based on the actual
    rendering time.
    2. Press START RENDER to start
    rendering.
    11

    View Slide

  13. ©2022 Morgenrot Inc. All rights reserved.
    3. Rendering
    Each frame is automatically
    distributed to servers in various
    locations.
    The job being rendered is
    ∟ If Success:Job can be confirmed on the success page
    and rendered page
    ∟ If Failed:Job will move to the Failed page
    ∟ If PAUSE in the middle:Job will move to the
    Pause/Cancel page
    If stuck at the end of the rendering process.
    Some servers are taking a long time to process the
    rendering.
    Please wait for a while and it will be processed.
    If the rendering still does not proceed, please contact
    us.
    If you are in a hurry, please pause and resume
    rendering again.
    12

    View Slide

  14. ©2022 Morgenrot Inc. All rights reserved.
    4. Download
    You can download the Compositor
    node image on the Rendered File
    page from the cloud Icon.
    And you can download the File
    Output node render pass from
    GENERATE AOVs.
    Add a check on the AOV you want to
    download.
    13

    View Slide

  15. 03
    Purchase Points/Plans

    View Slide

  16. ©2022 Morgenrot Inc. All rights reserved.
    Purchase Points/Plans
    RenderPool offers two pricing plans to meet
    your needs.
    ・Unlimited Rendering Plan (β)
    for unlimited rendering at a fixed price.
    ・Point Plan
    allows you to purchase points in advance for faster
    rendering.
    Cloud rendering is available by purchasing points or plans.
    Watermarks are not included in rendering with the "Unlimited
    Rendering Plan" or "Point Plan.”
    You can render without purchasing points or using trial points. The
    trial includes a watermark.
    15
    After logging into the Render Pool, click on Purchase Points

    View Slide

  17. 04
    Other Features - Render Pool Client App

    View Slide

  18. ©2022 Morgenrot Inc. All rights reserved.
    Render Pool Client App
    17
    1
    2
    3
    High-volume rendering made much more efficient
    Render 
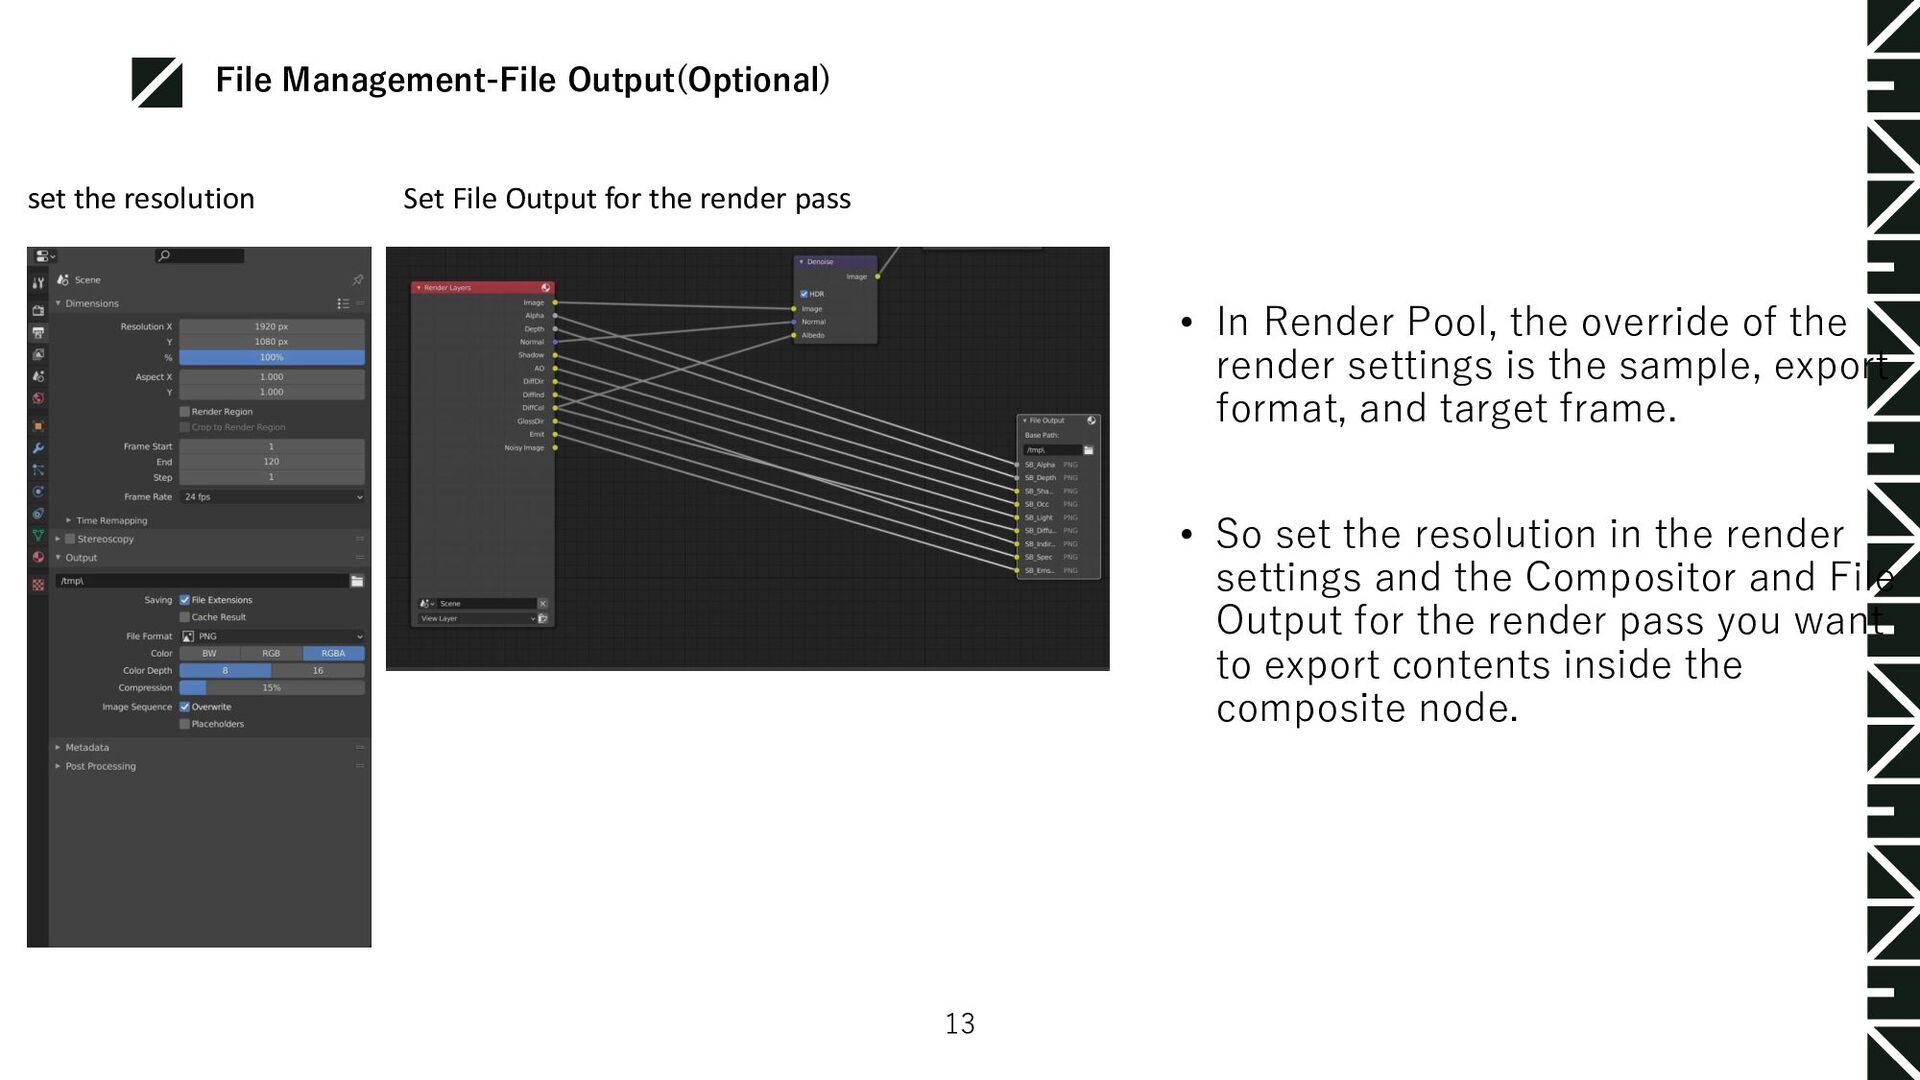
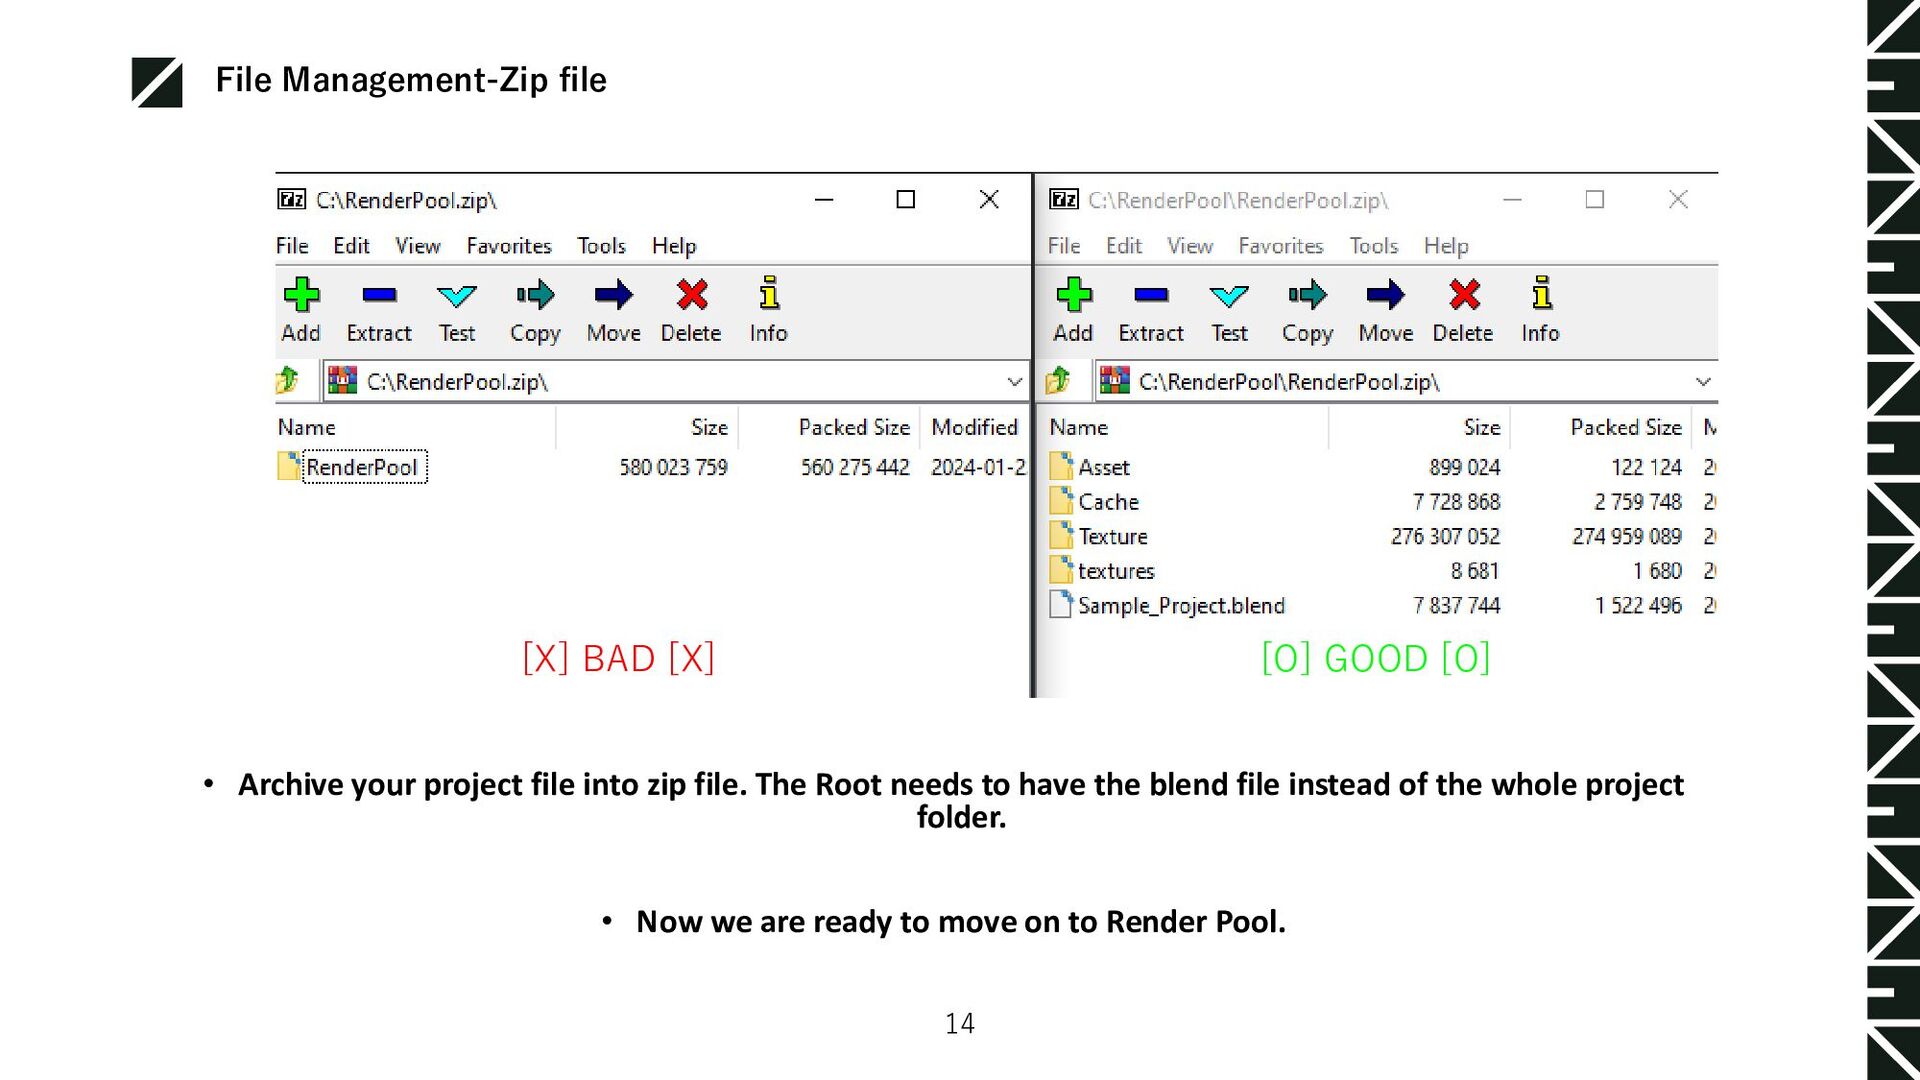
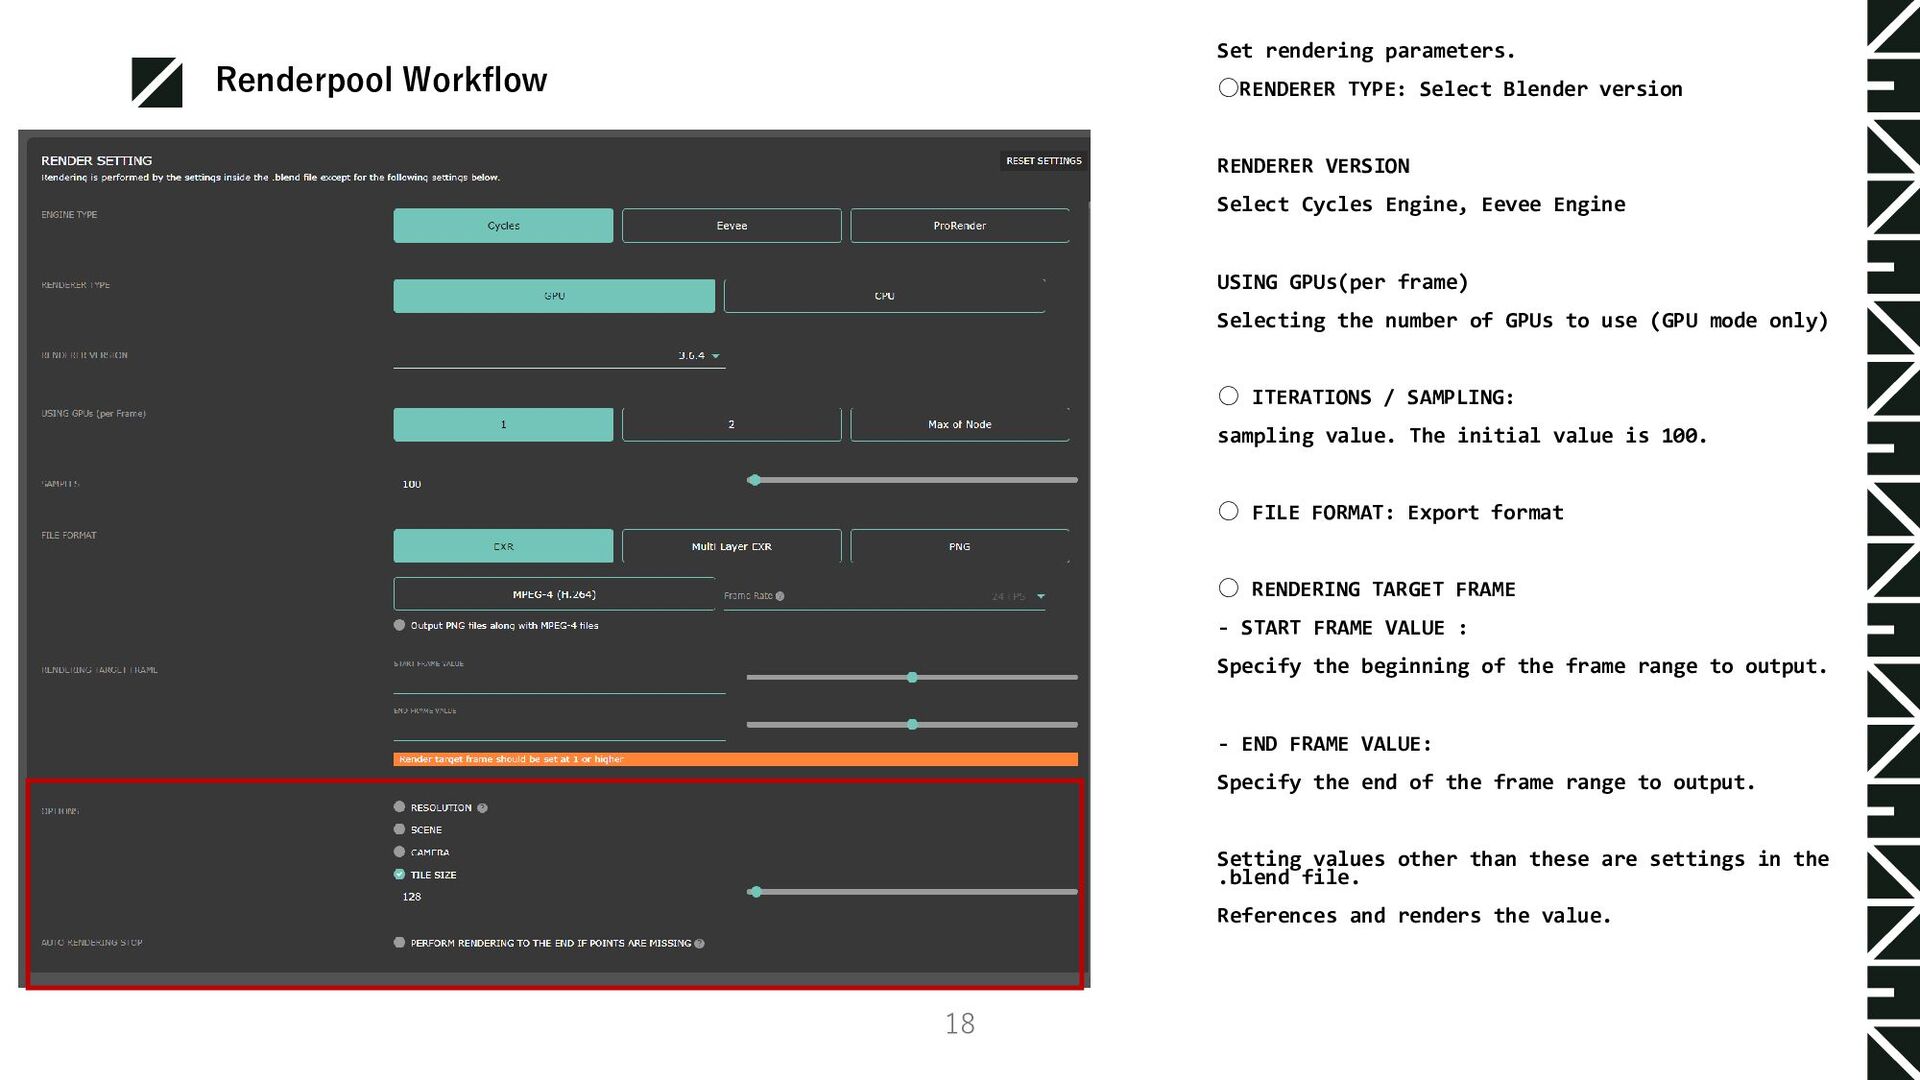
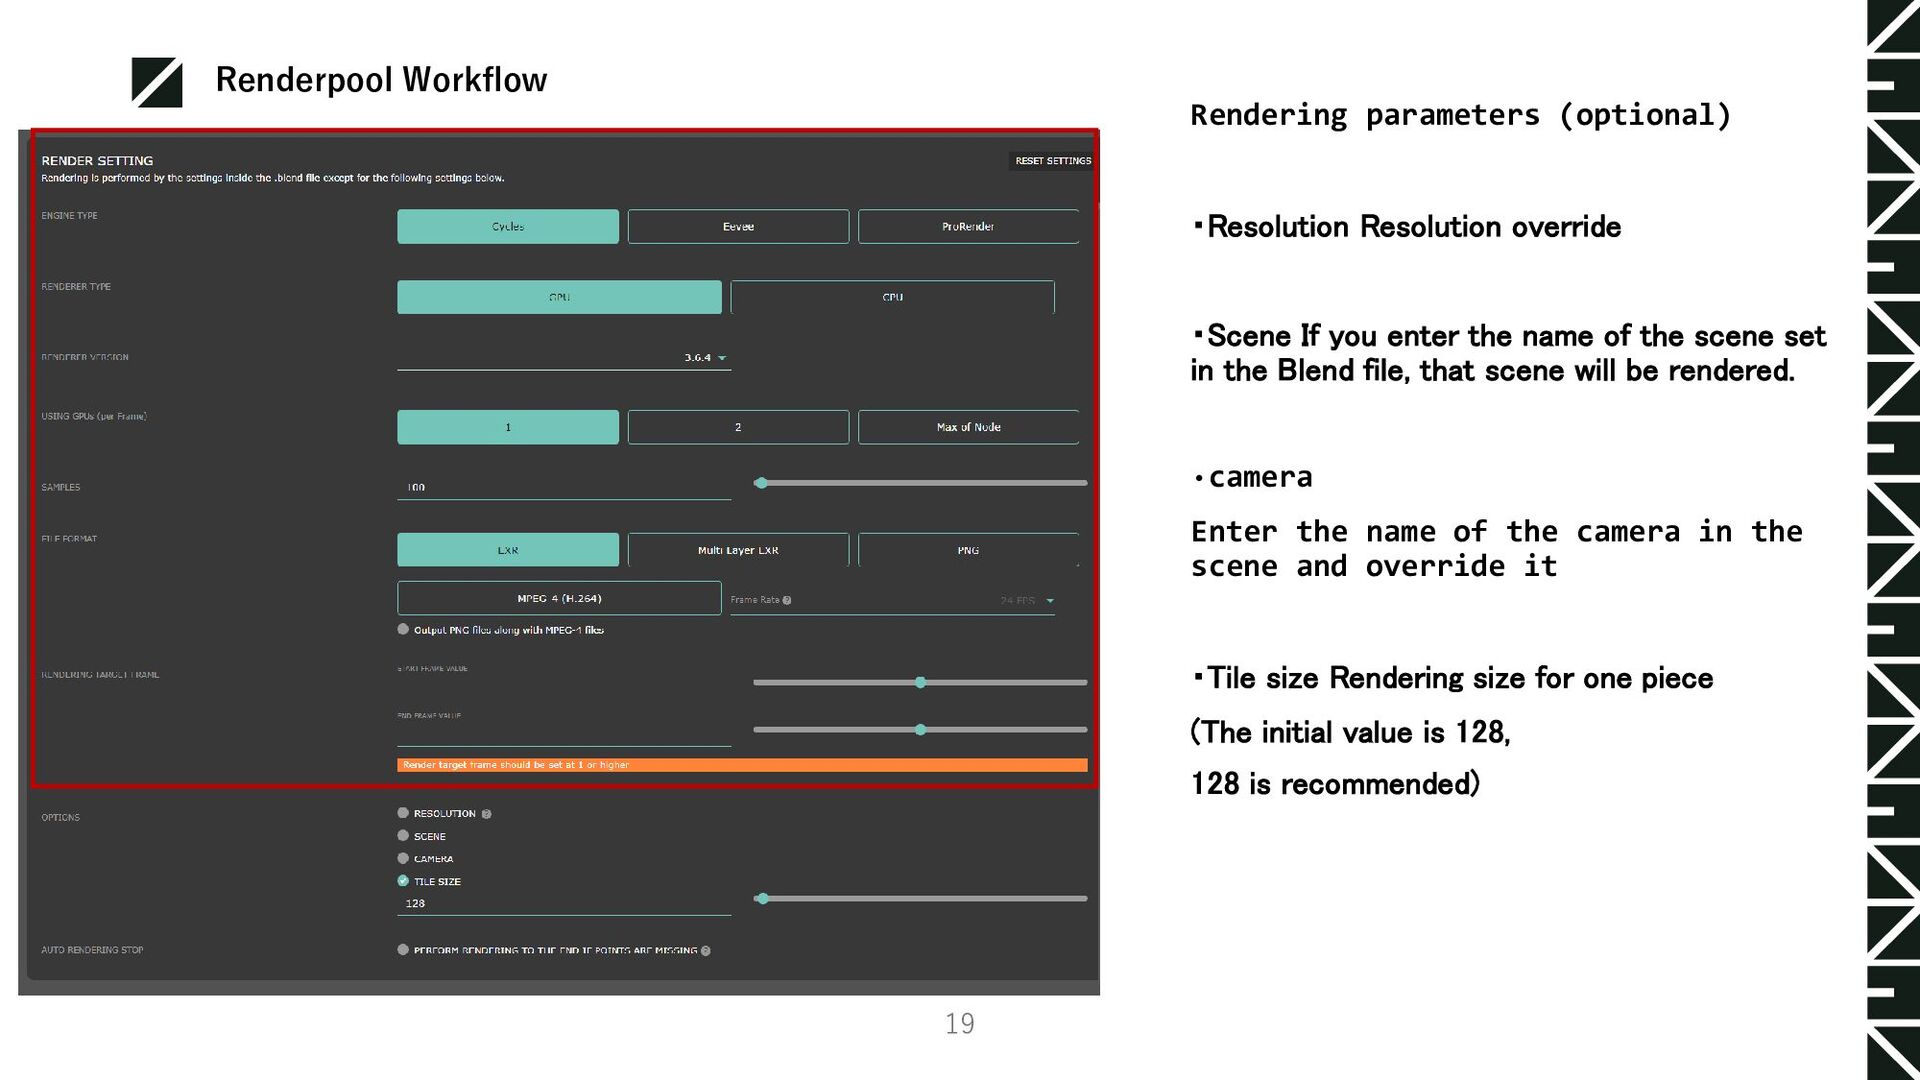
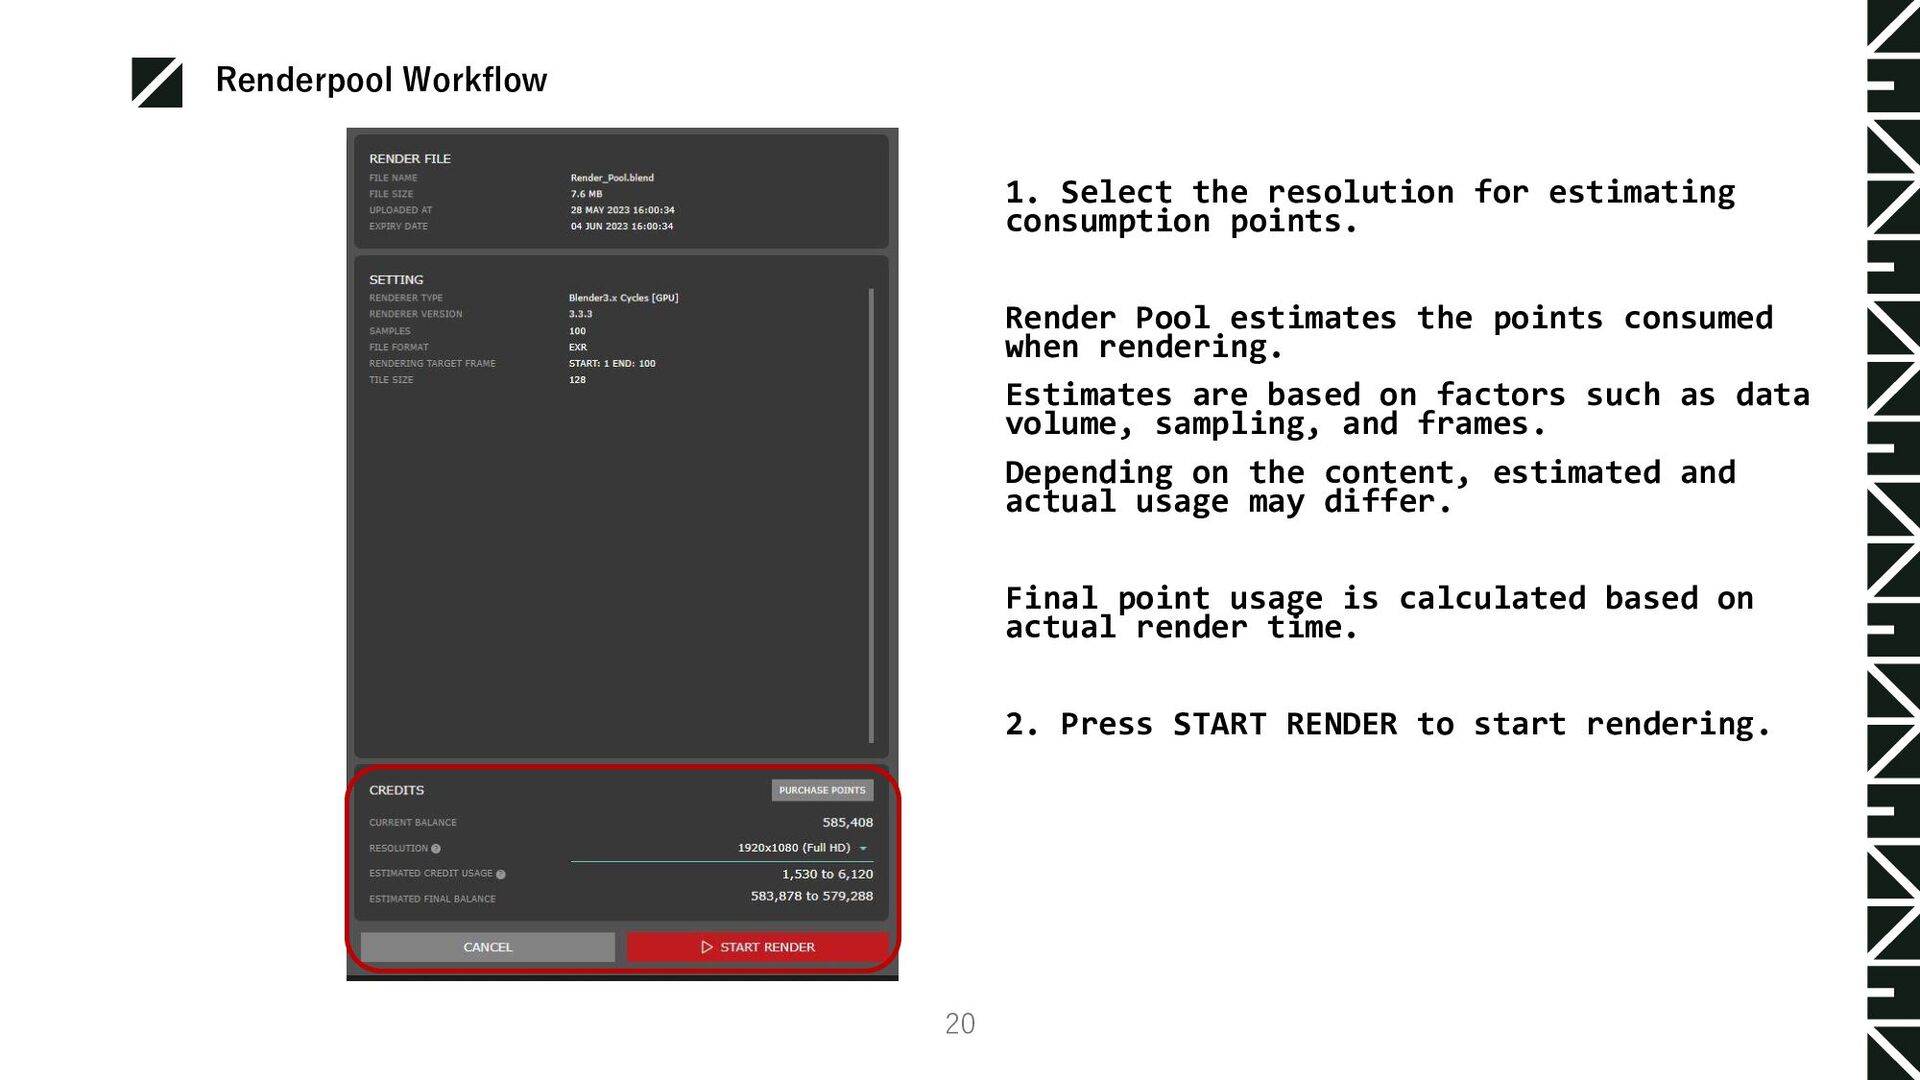
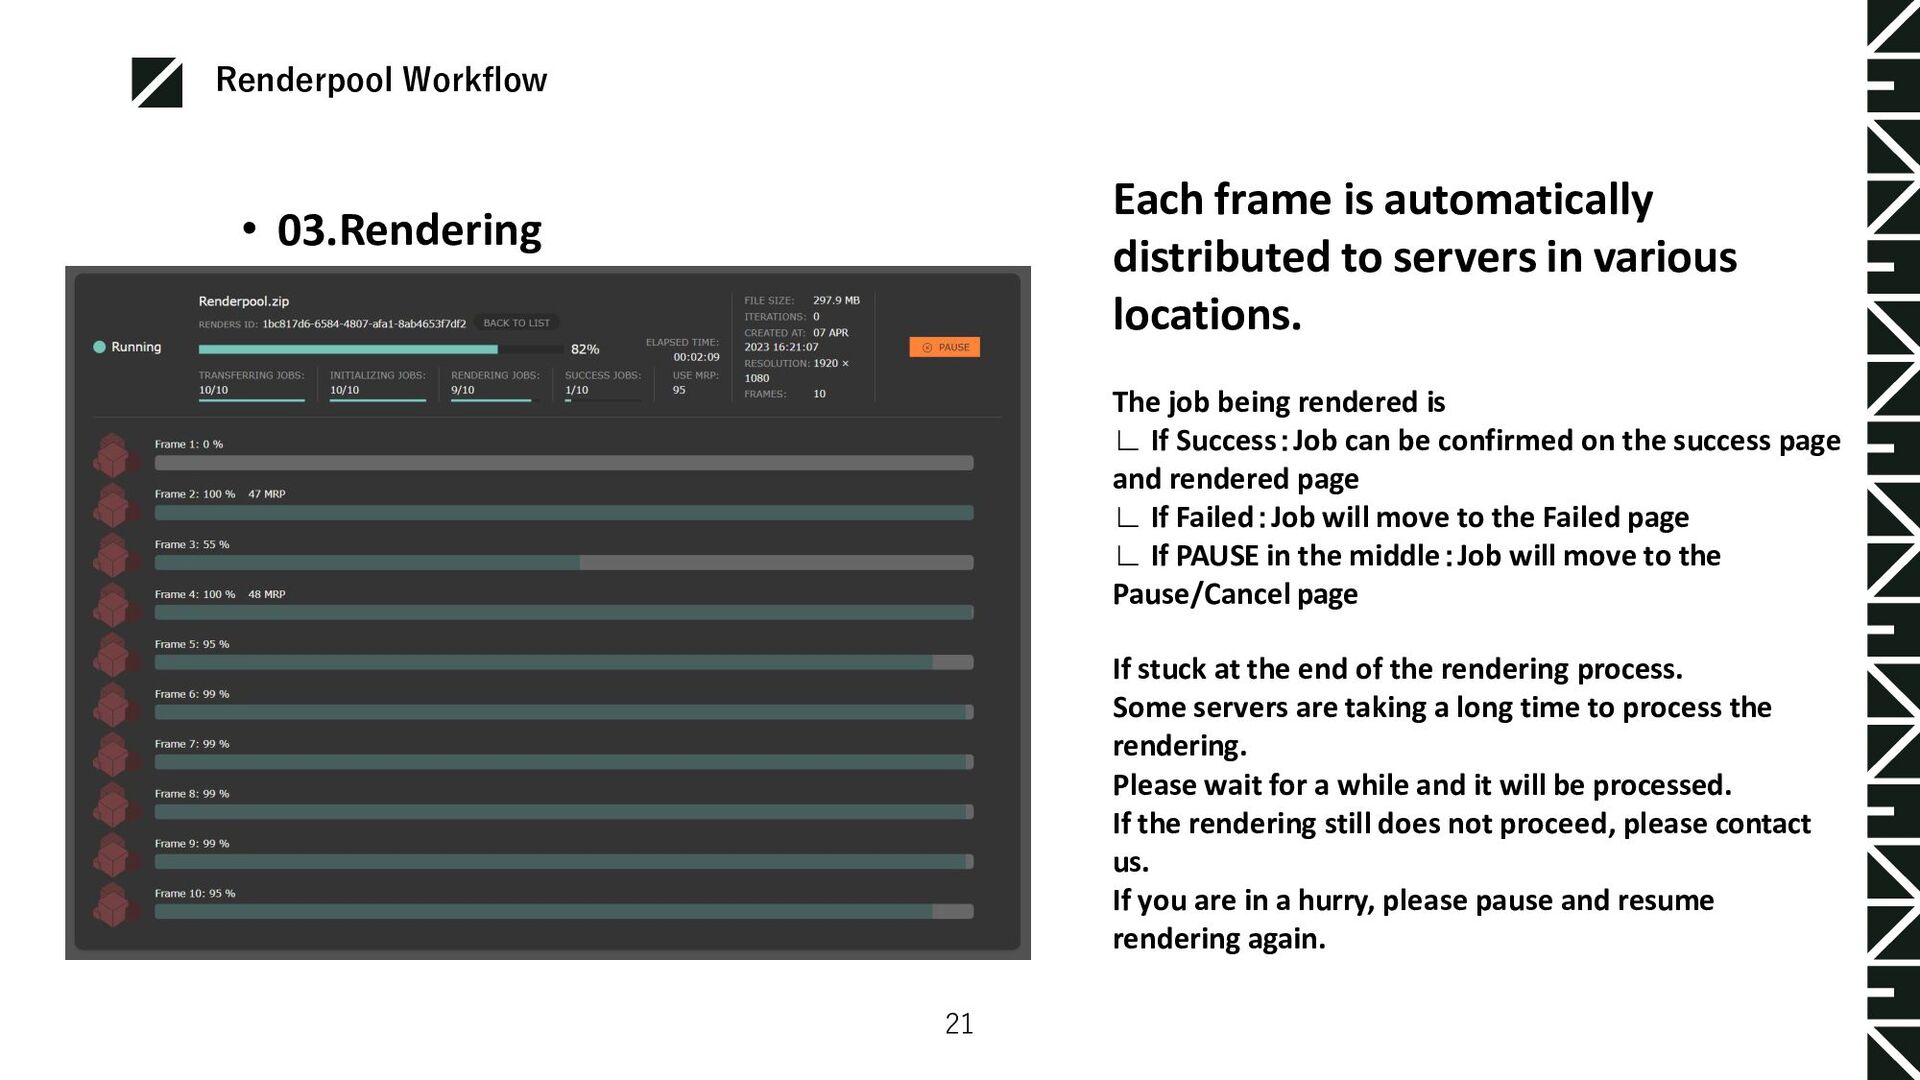
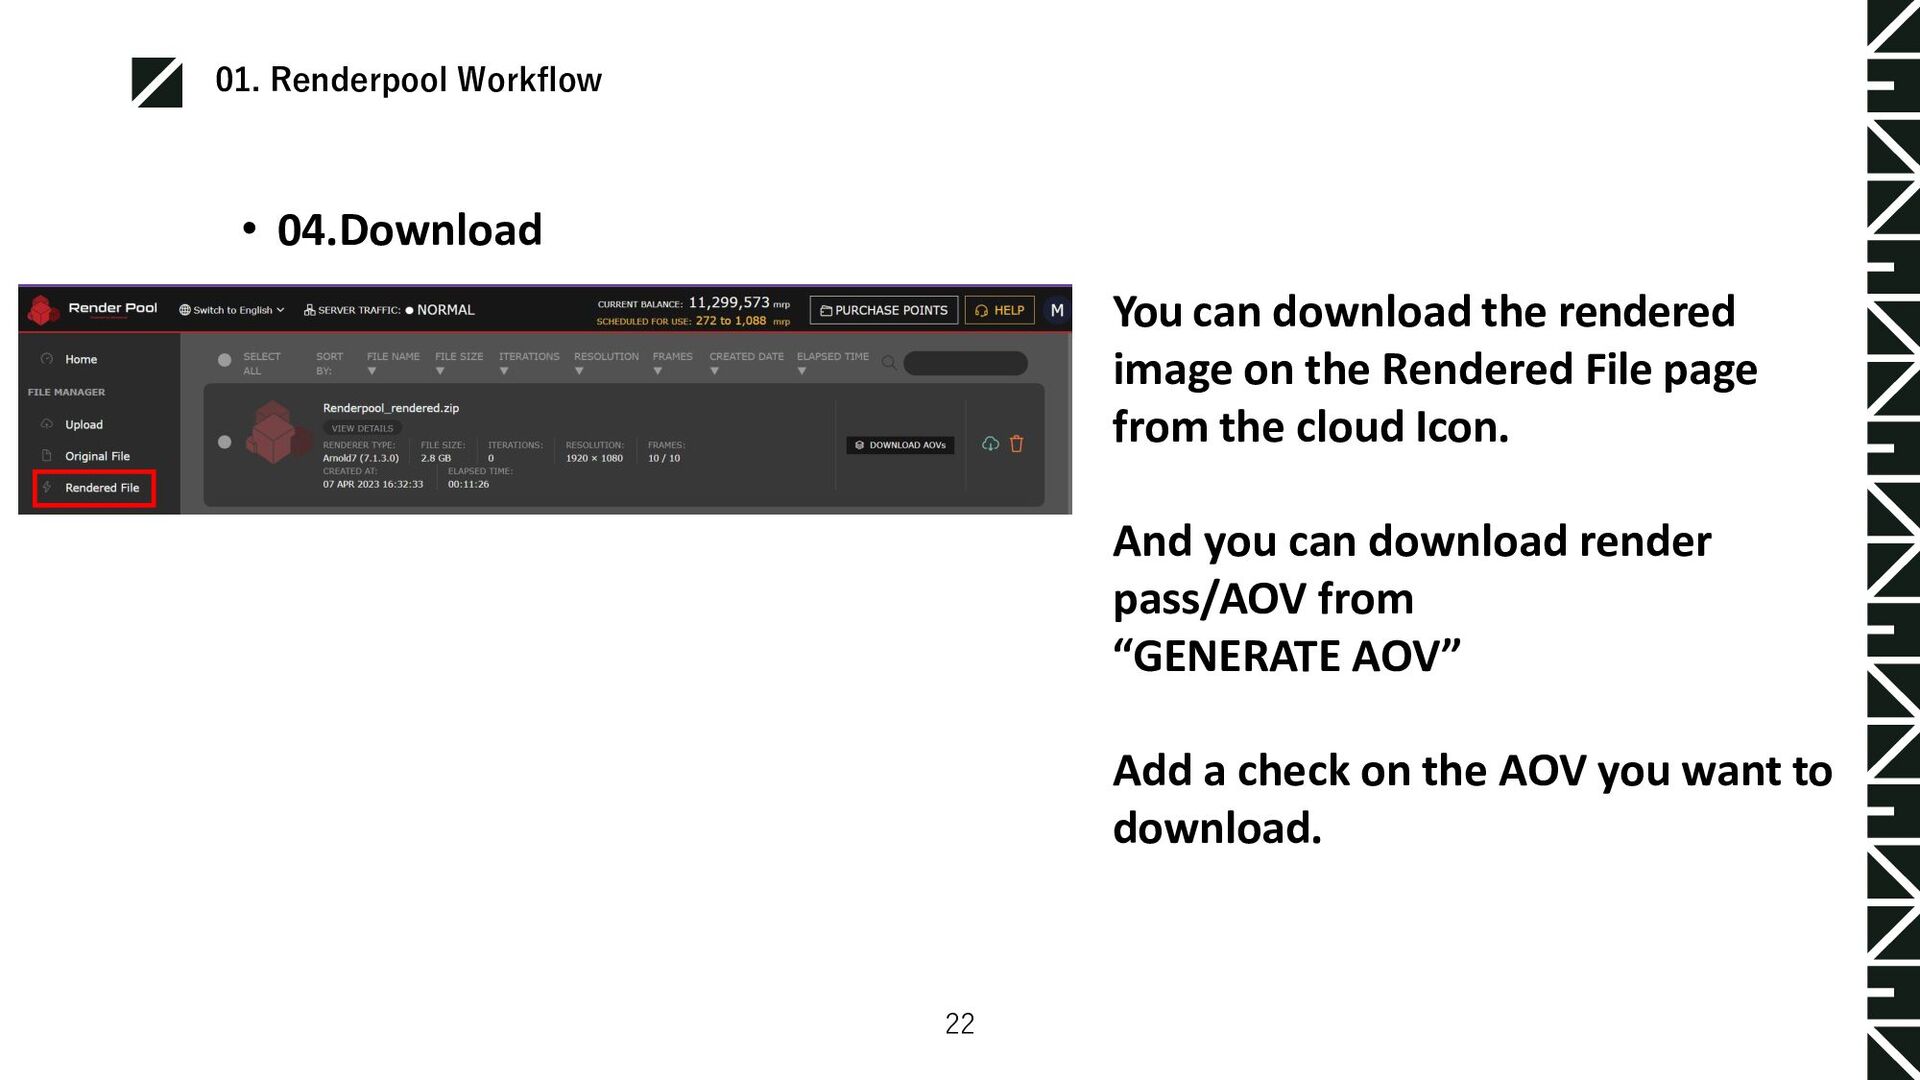
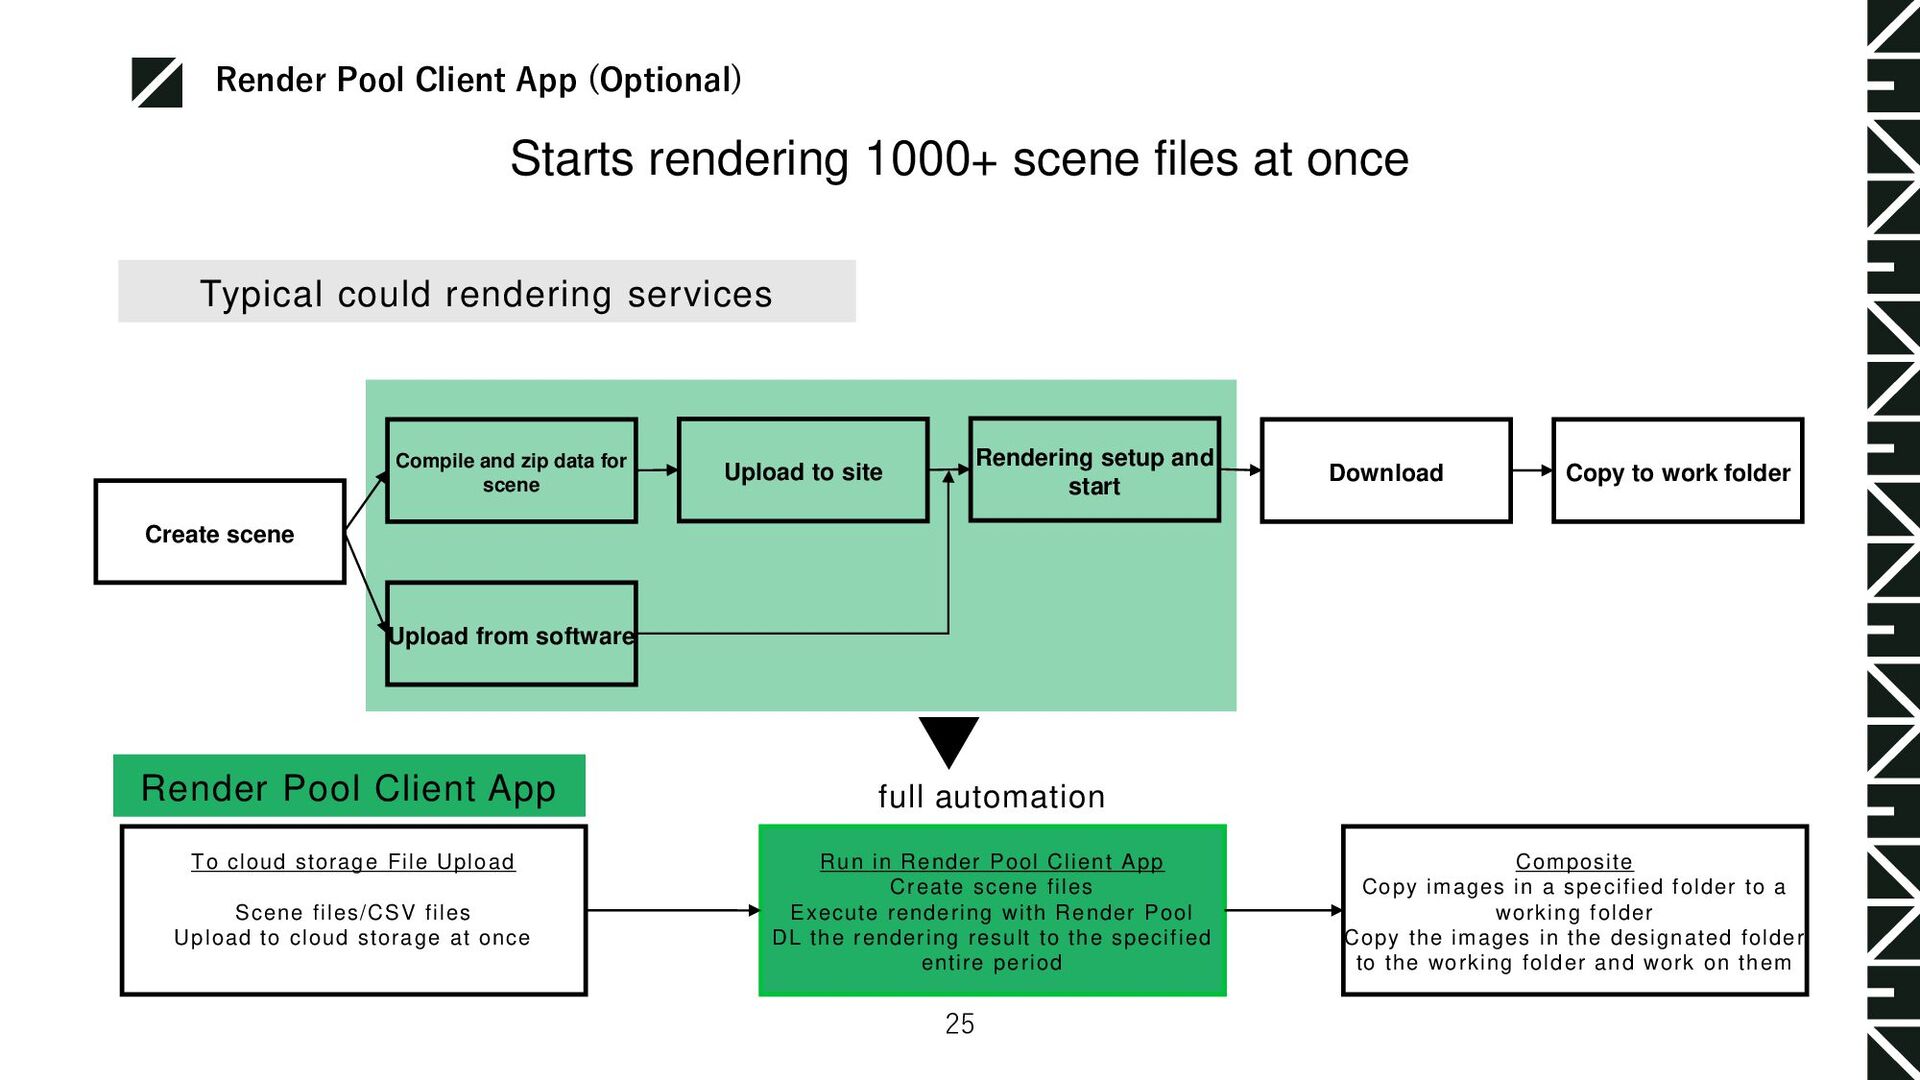
Pool and cloud storage are integrated via API to
    auto-render the specified Maya file.
    Rendered files are placed in the indicated folder.
    Enables large number of renderings to be done at the same
    ti

    Automatic scene file creation

    Maya files are automatically converted to rpr files and
    rendered. Do detailed customization with CSV.
    Rendered files are placed in a designated cloud storage location so
    data can easily be exchanged

    Cloud-based data exchange among affiliates

    PNG/EXR
    CSV
    Data exchange in
    the cloud
    ※ User provides cloud storage (Box, Dropbox, etc. recommended)

    Applications automate the entire process for rendering more scenes
    Auto-rendering

    View Slide

  19. ©2022 Morgenrot Inc. All rights reserved.
    Render Pool Client App
    18
    Starts rendering 1000+ scene files at once
    Render Pool Client App


    To cloud storage File Upload

    Scene files/CSV files
    Upload to cloud storage at once

    full automation


    Run in Render Pool Client App

    Create scene files
    Execute rendering with Render Pool
    DL the rendering result to the specified entire
    period

    Composite
    Copy images in a specified folder to a working
    folder
    Copy the images in the designated folder to
    the working folder and work on them
    Typical could rendering services

    Create scene

    Compile and zip data
    for scene
    Upload to site
 Download

    Rendering setup
    and start
    Copy to work folder

    Upload from
    software


    View Slide

  20. ©2022 Morgenrot Inc. All rights reserved.
    Render Pool Client App
    19
    Render Pool Client App is available to enterprise users individually.
    If you are interested, please contact our staff or reach out at the email below.

    [email protected]

    View Slide