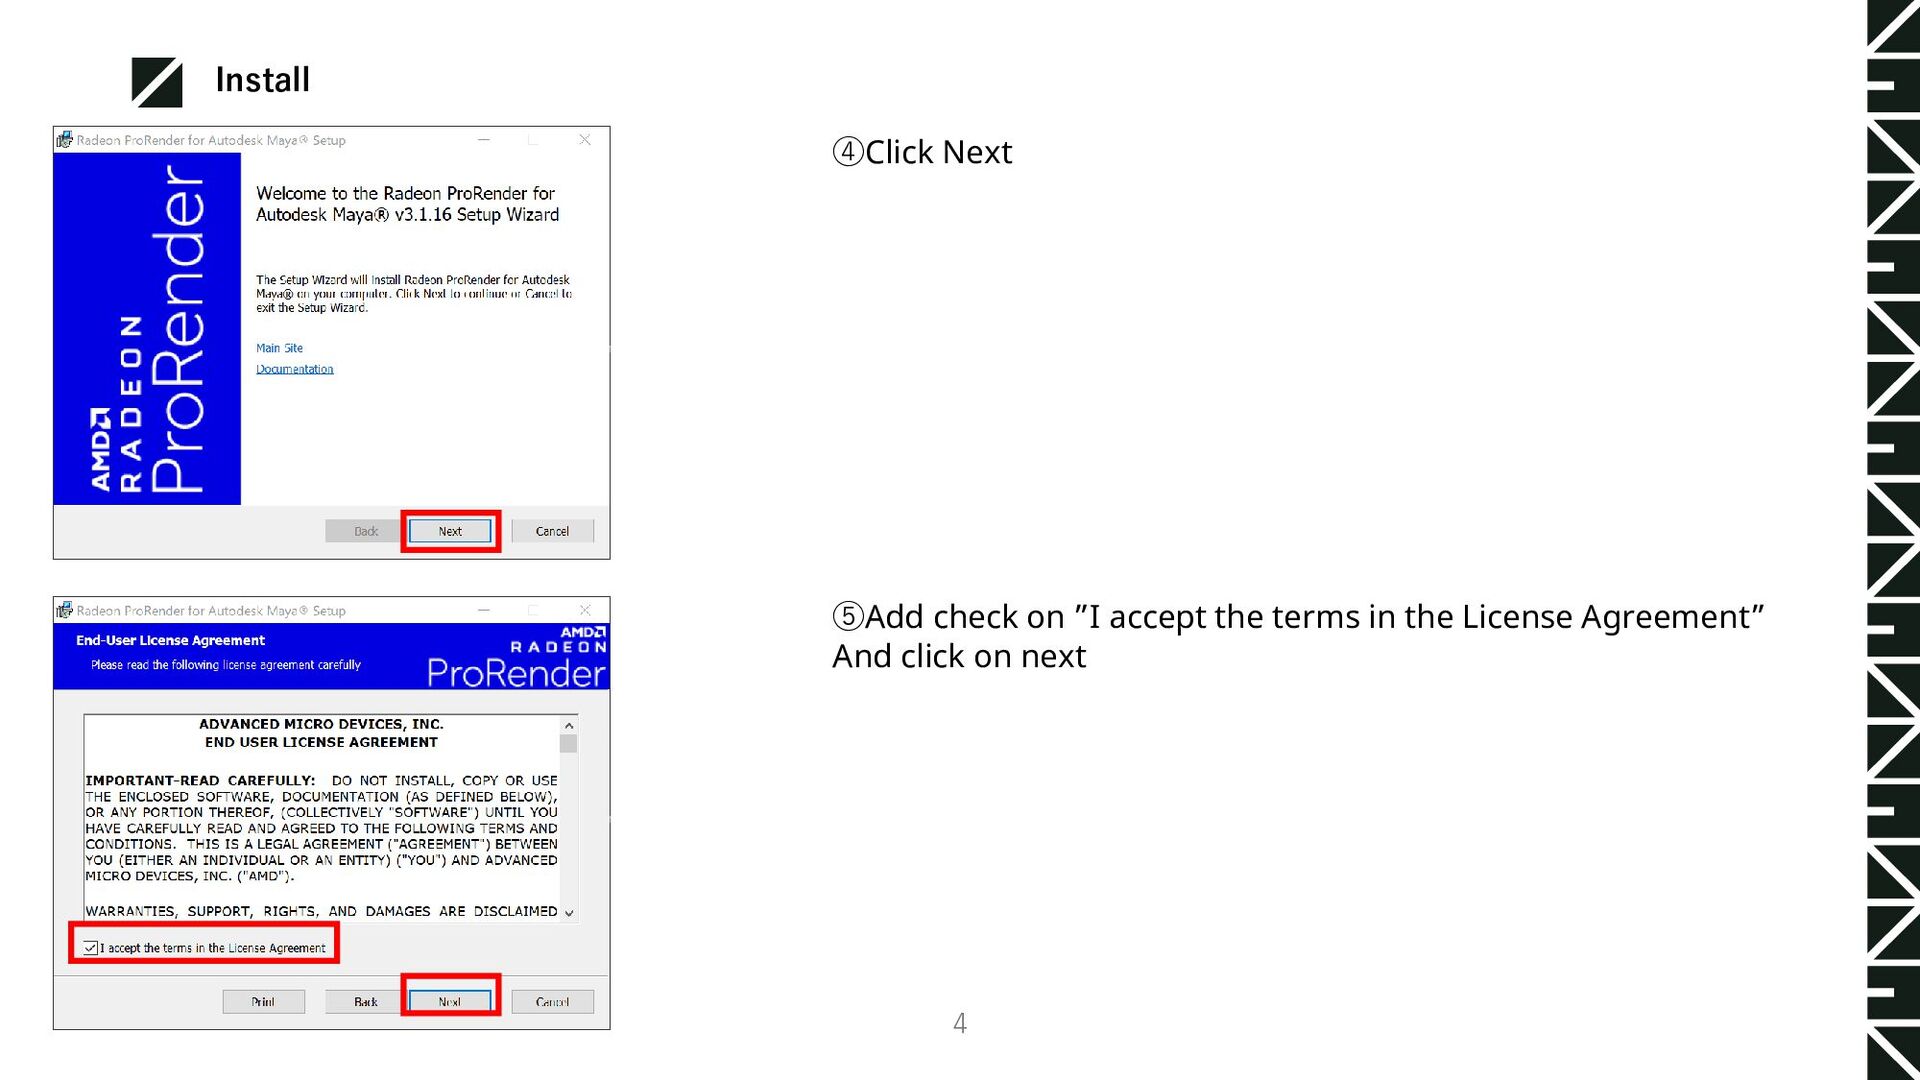
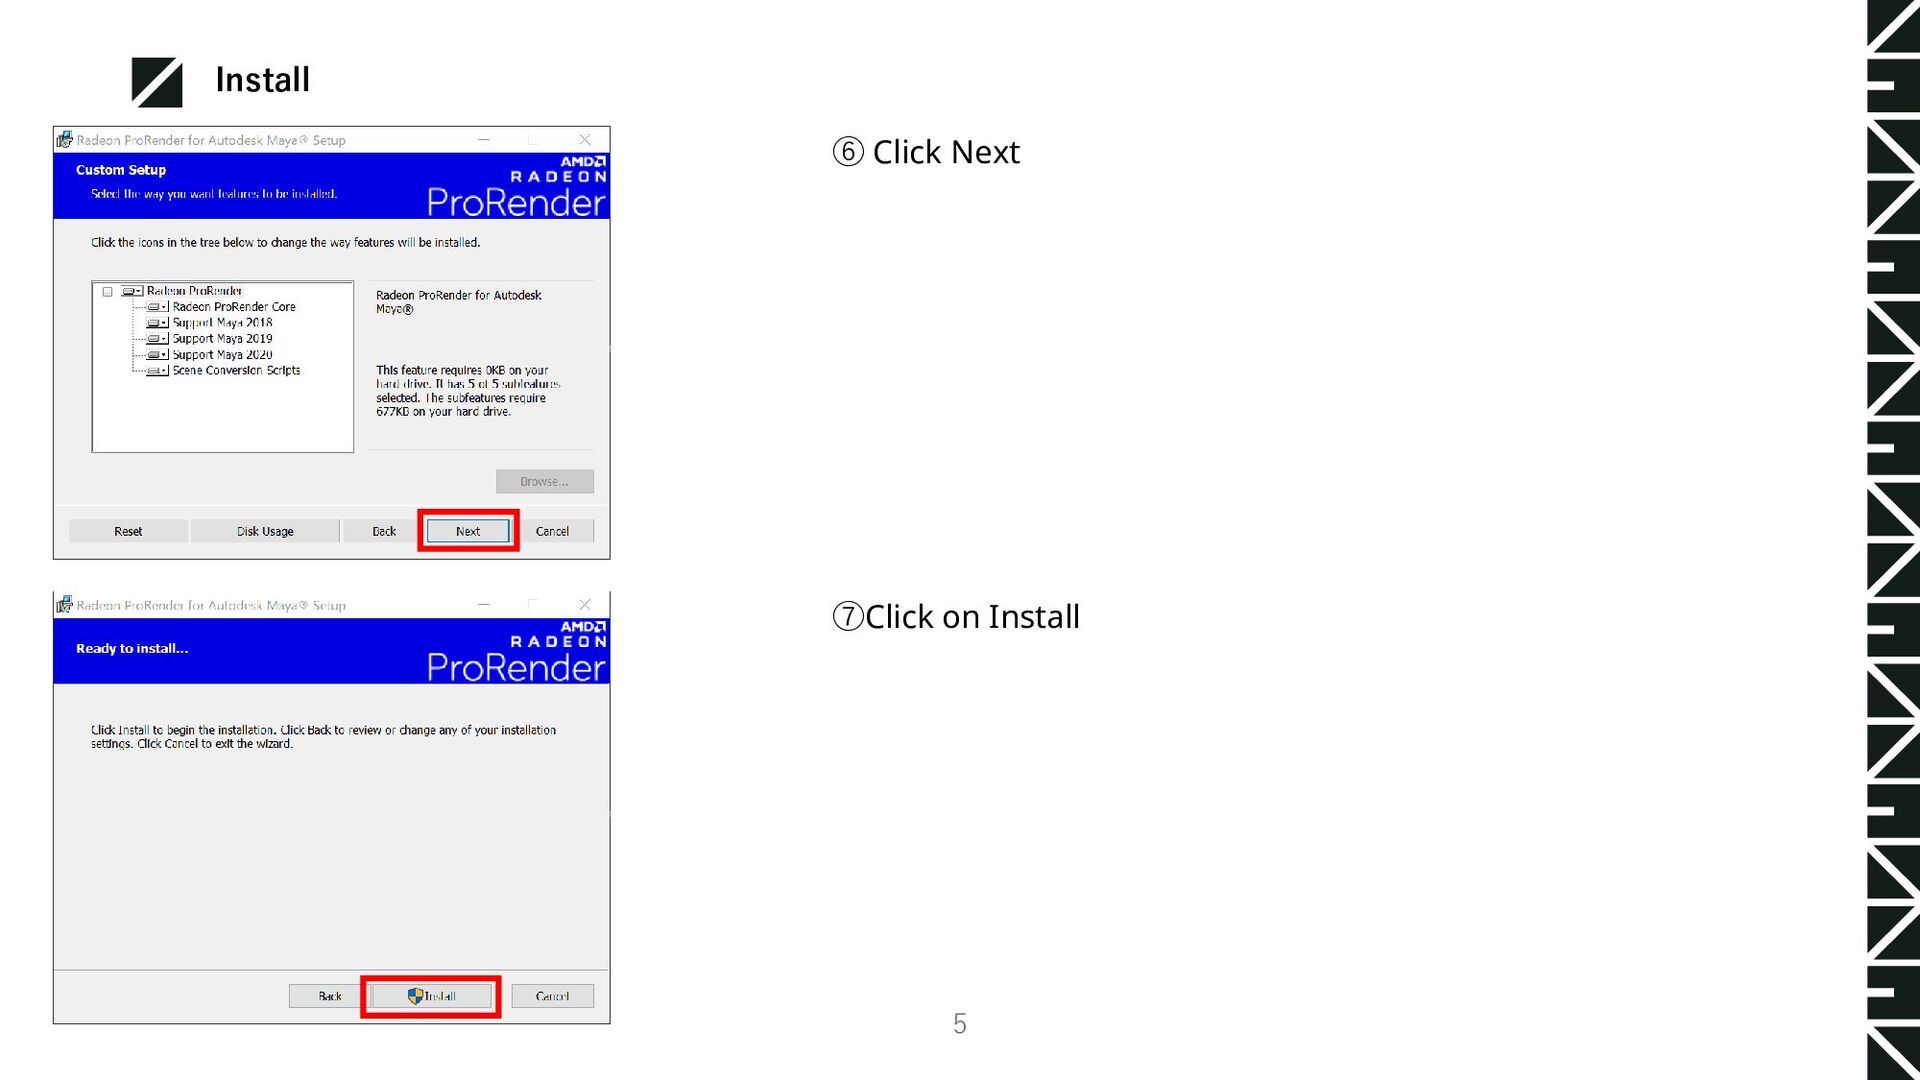
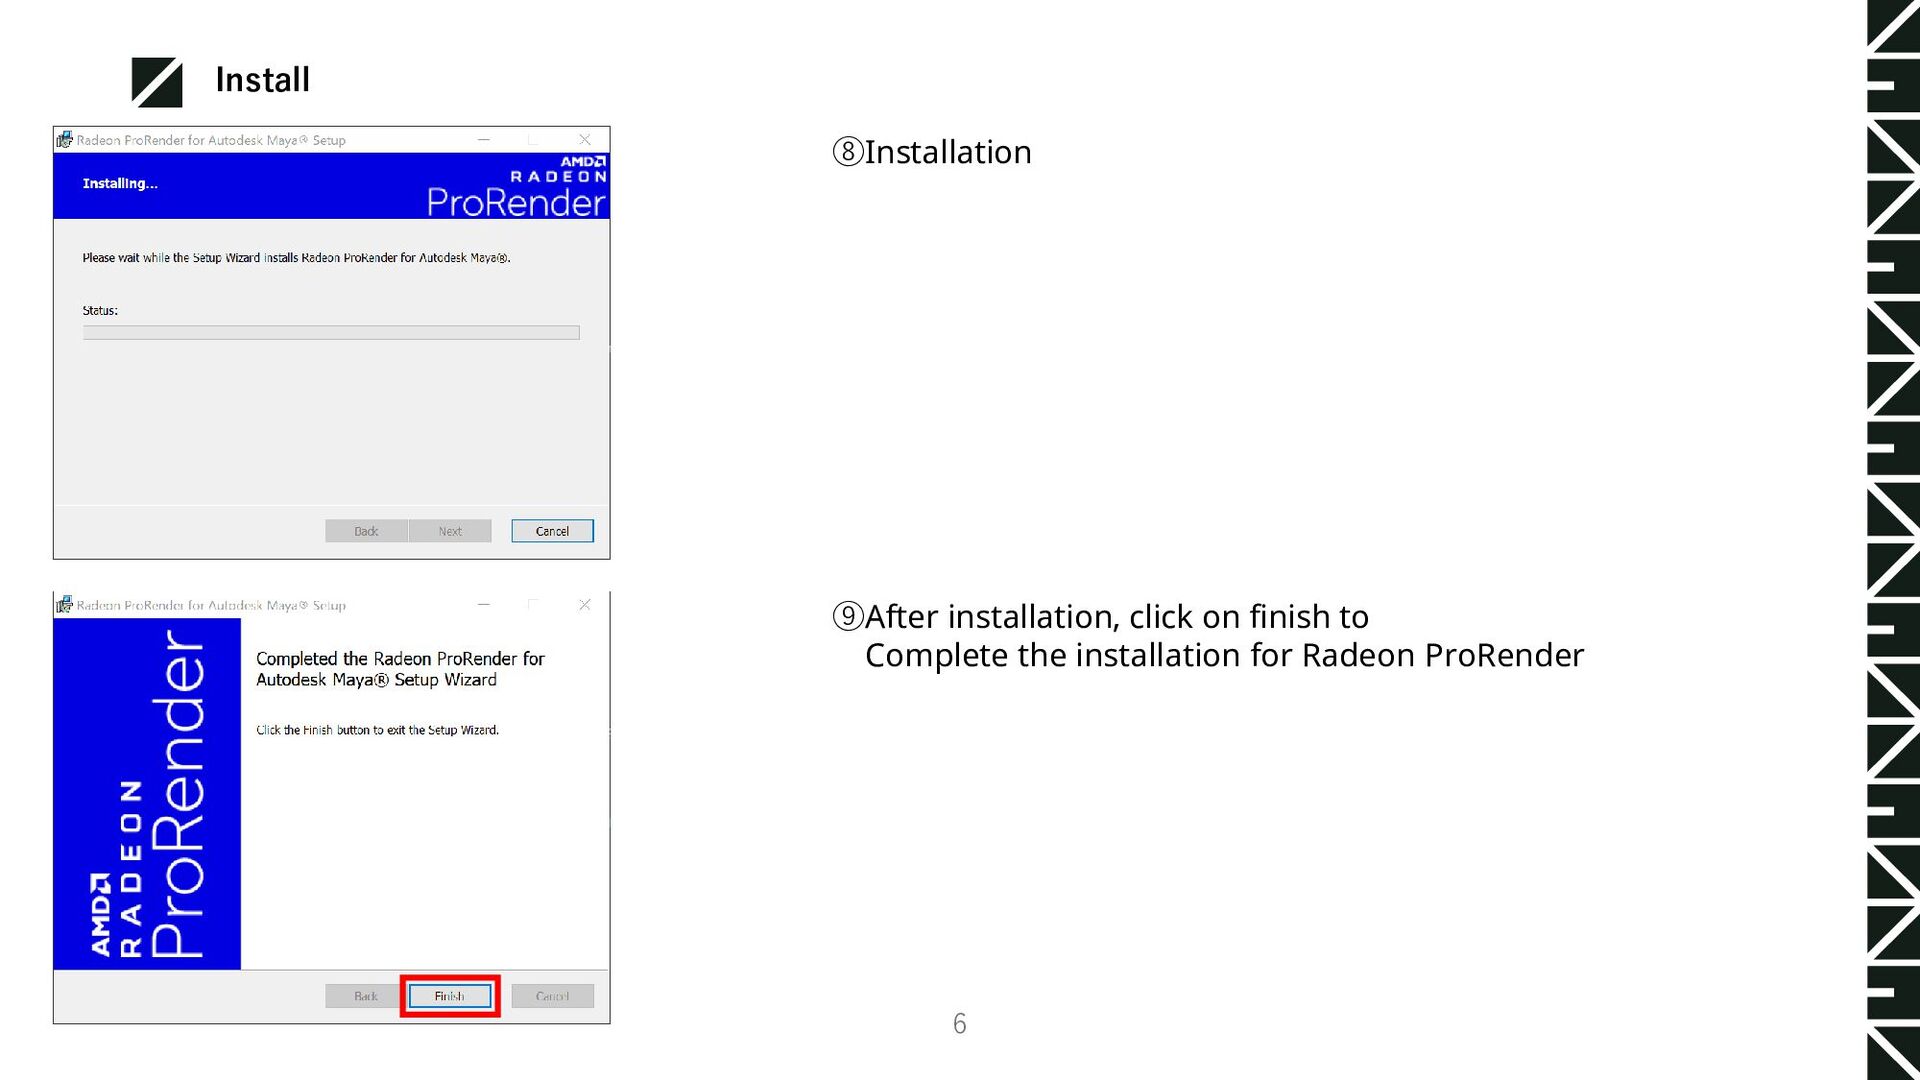
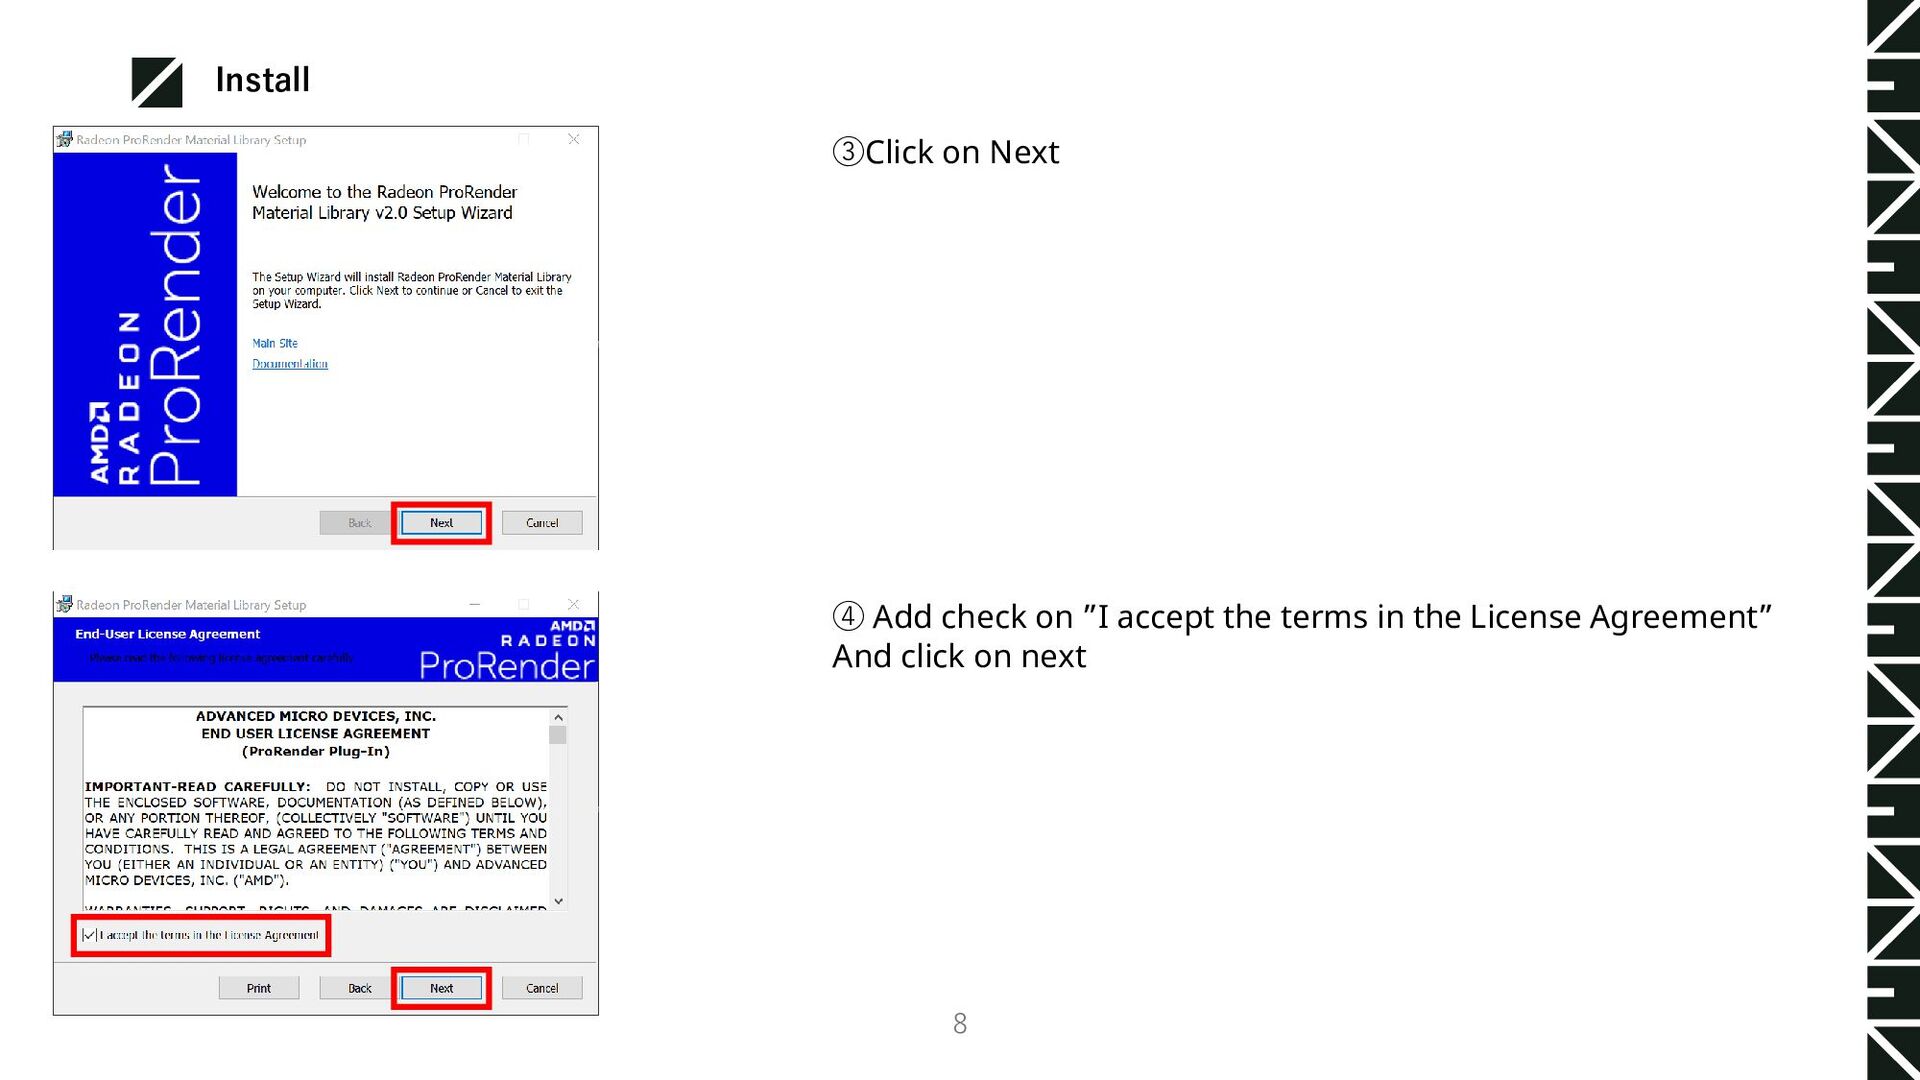
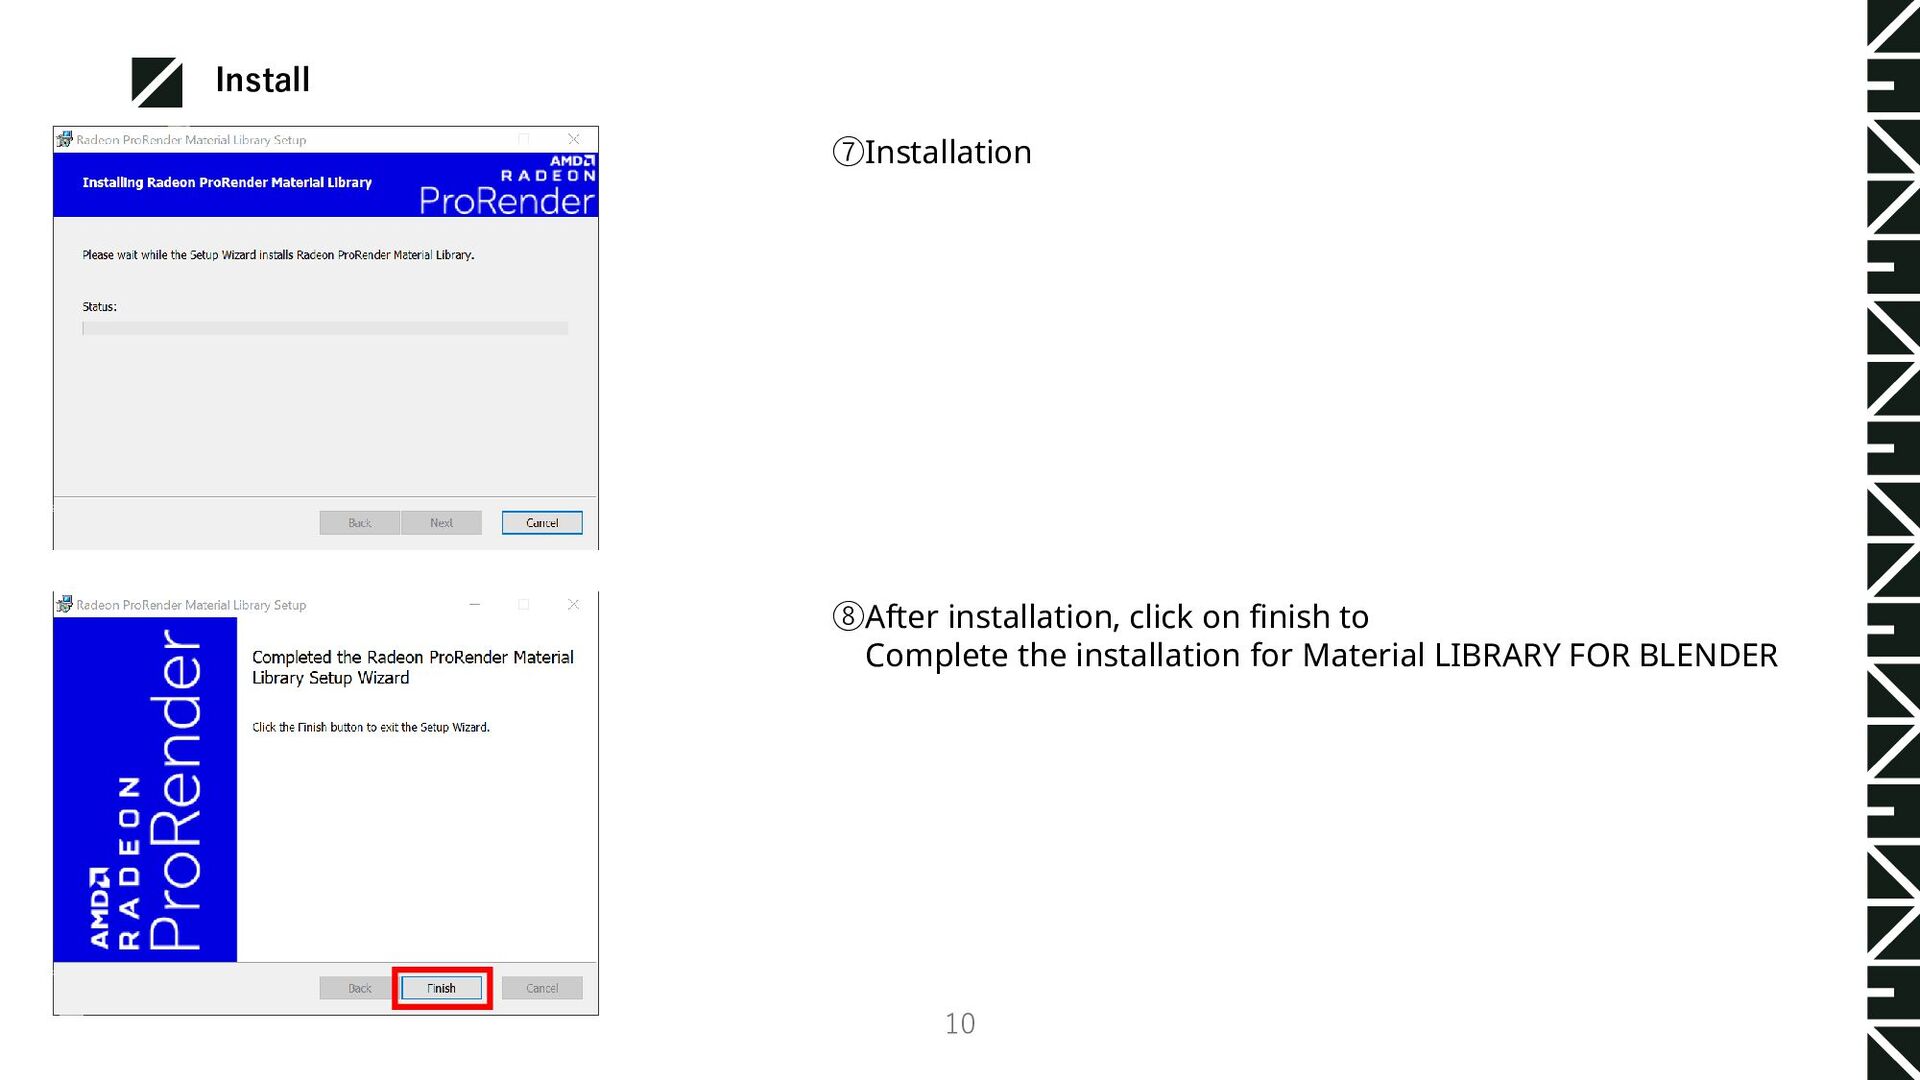
ProRender for Maya. • ※The installation instructions here are for Windows. • ①Install Python • https://www.python.org/downloads/windows/ • Download and install version 2.7 or higher from the above site. (Skip this step if the software is already installed.) • ②Install Radeon ProRender for Maya. • https://github.com/GPUOpen-LibrariesAndSDKs/RadeonProRenderMayaPlugin/releases • Download the installer from the above site. • ③Execute the Downloaded RadeonProRenderMaya.msi file.
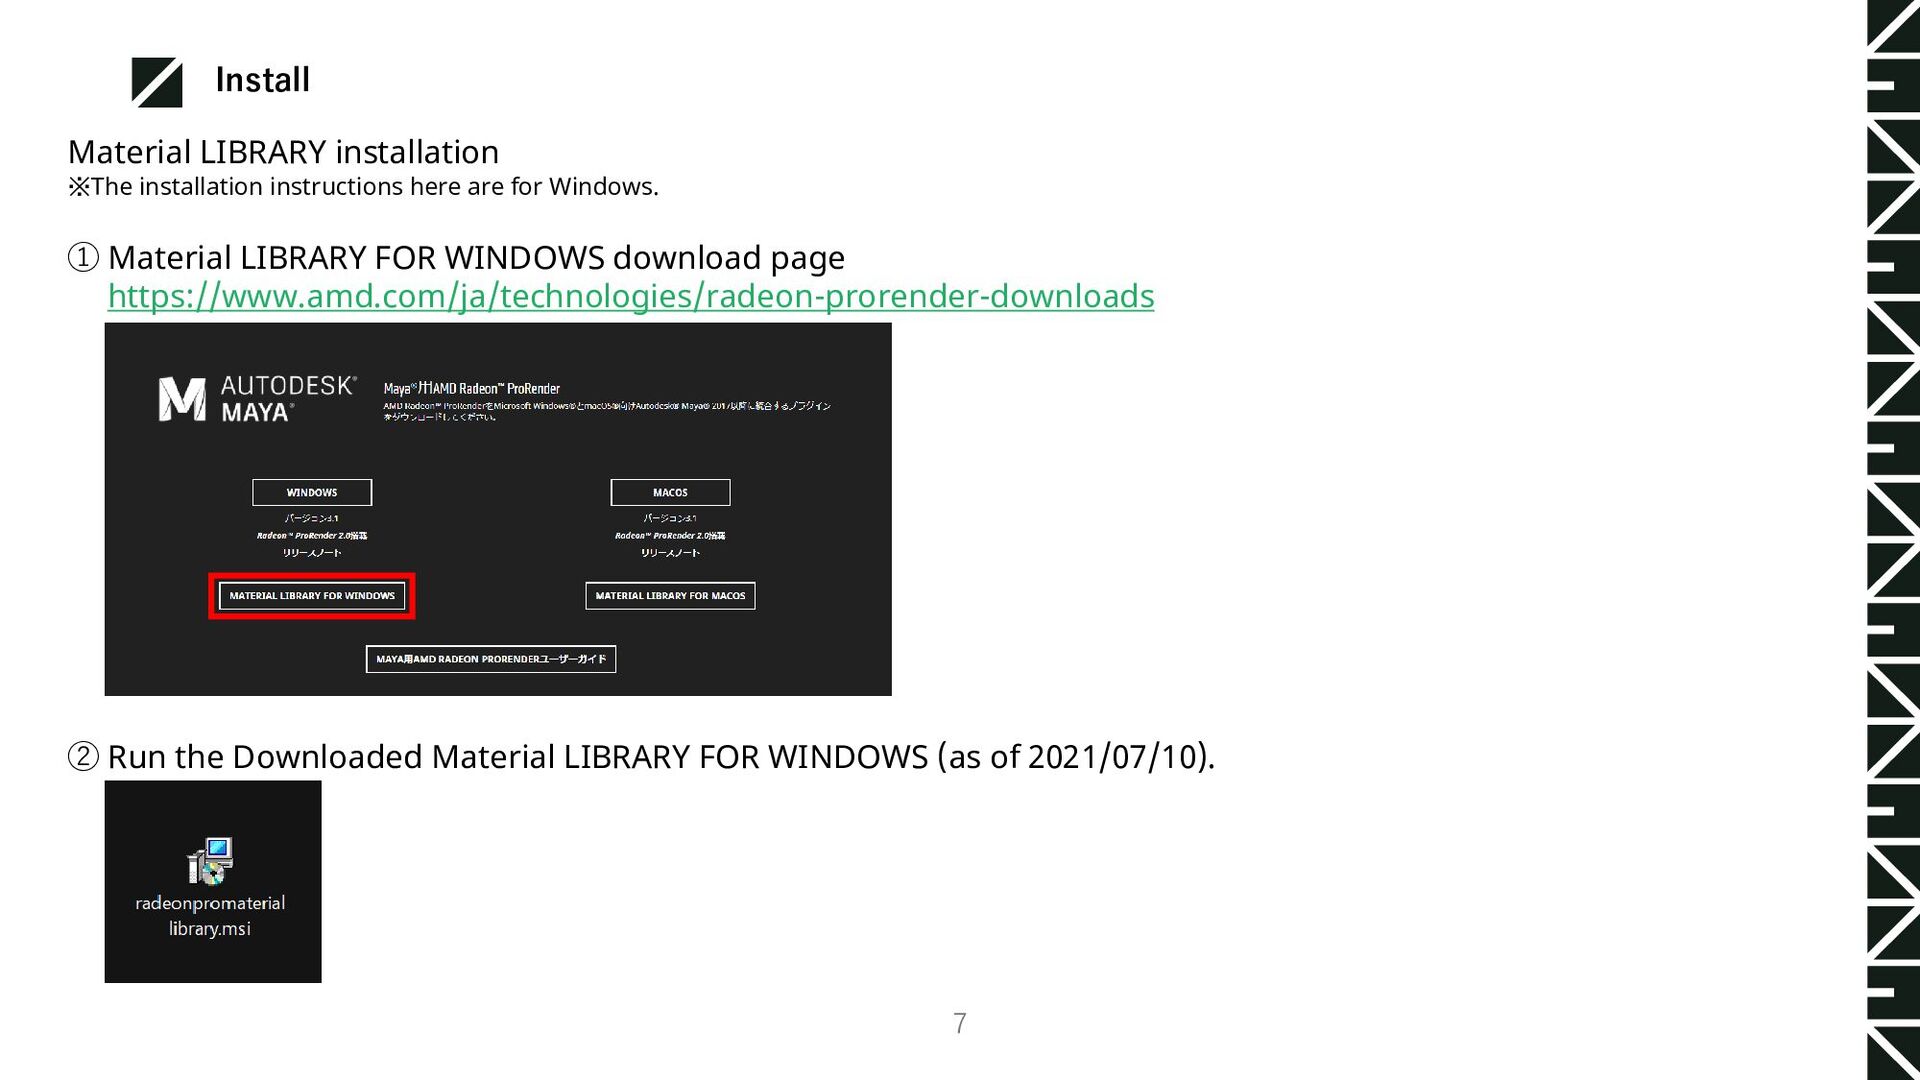
① Material LIBRARY FOR WINDOWS download page https://www.amd.com/ja/technologies/radeon-prorender-downloads ② Run the Downloaded Material LIBRARY FOR WINDOWS (as of 2021/07/10). Install 7
"RadeonProRender.mll". When you check Hypershade after loading Radeon ProRender Plugin, You can see that shaders specifically for Radeon ProRender are loaded. Do not check "Auto load" for plug-ins. Once the plug-in is loaded, the Radeon ProRender Global node and will remain in projects that do not use Radeon ProRender. This may have an impact on other projects CAUTION: Install 11
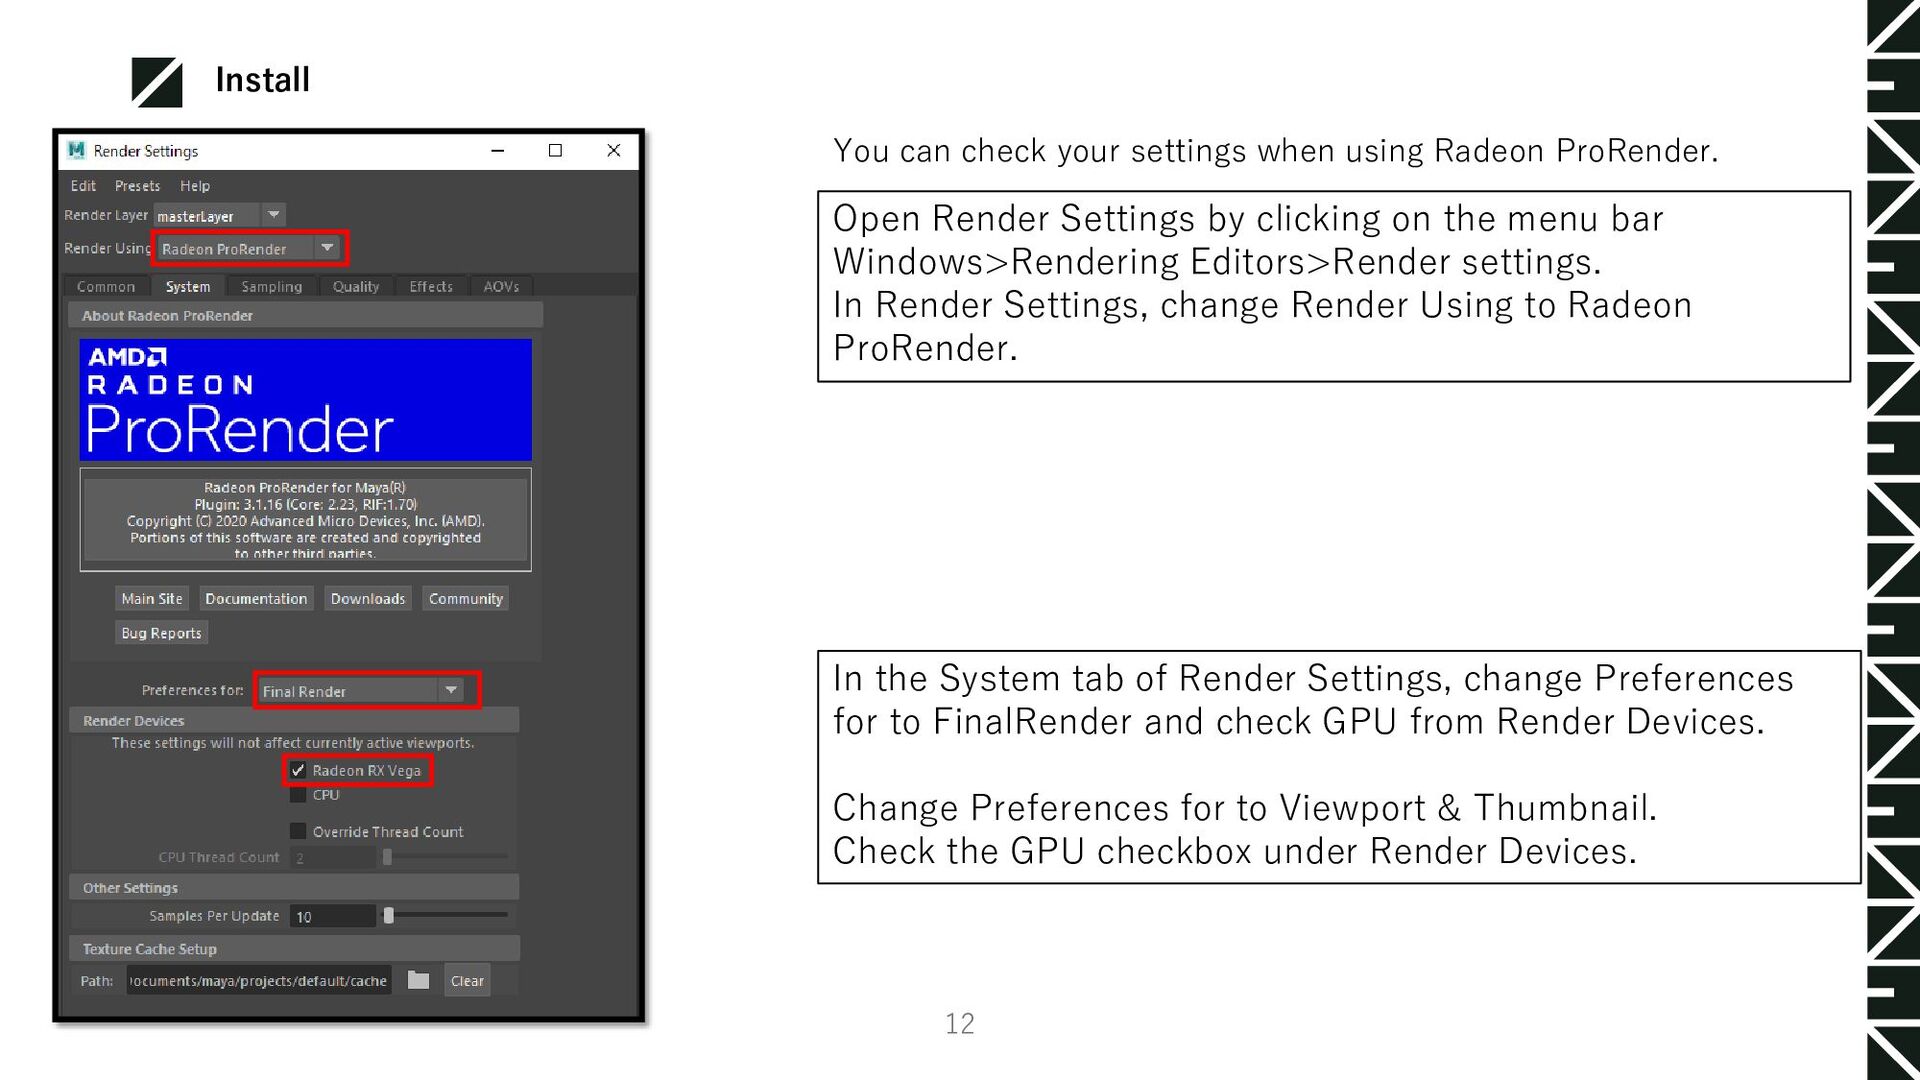
Editors>Render settings. In Render Settings, change Render Using to Radeon ProRender. In the System tab of Render Settings, change Preferences for to FinalRender and check GPU from Render Devices. Change Preferences for to Viewport & Thumbnail. Check the GPU checkbox under Render Devices. You can check your settings when using Radeon ProRender. Install 12
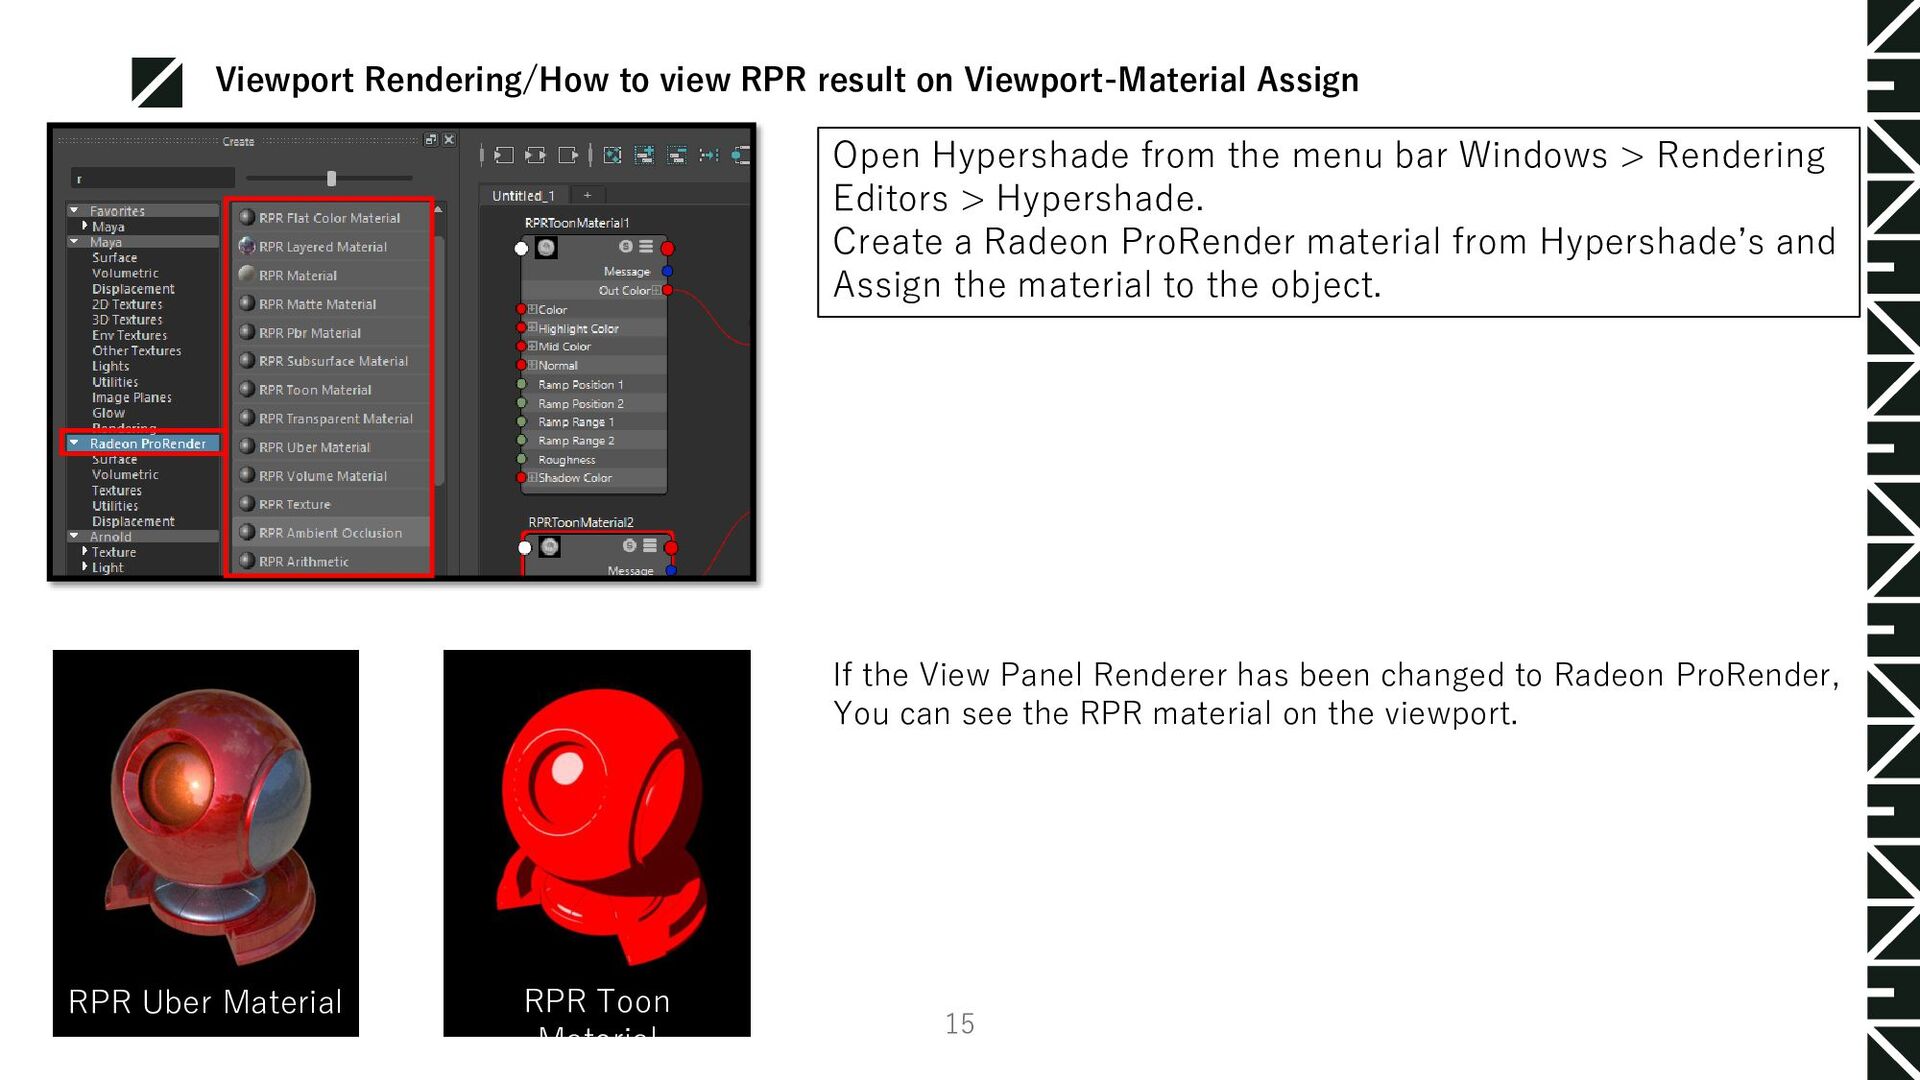
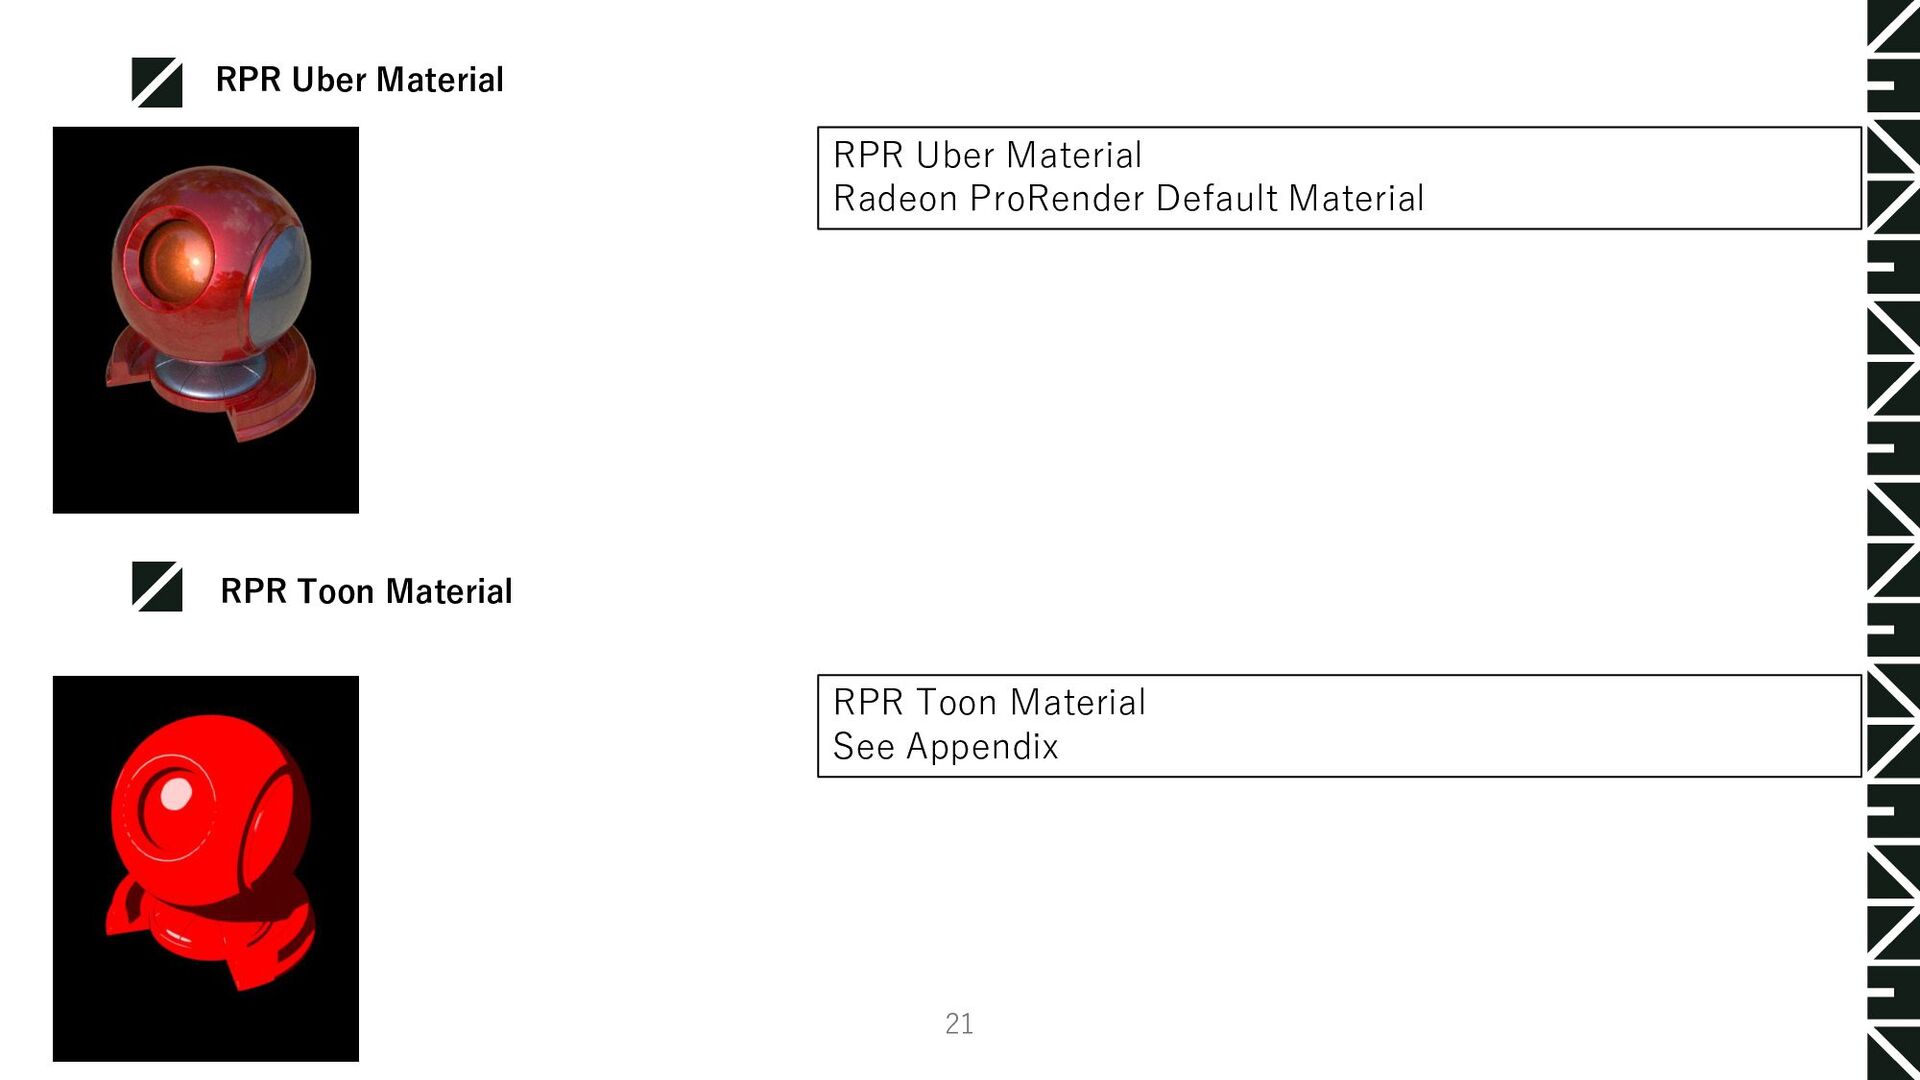
> Hypershade. Create a Radeon ProRender material from Hypershade’s and Assign the material to the object. If the View Panel Renderer has been changed to Radeon ProRender, You can see the RPR material on the viewport. RPR Uber Material RPR Toon Material Viewport Rendering/How to view RPR result on Viewport-Material Assign 15
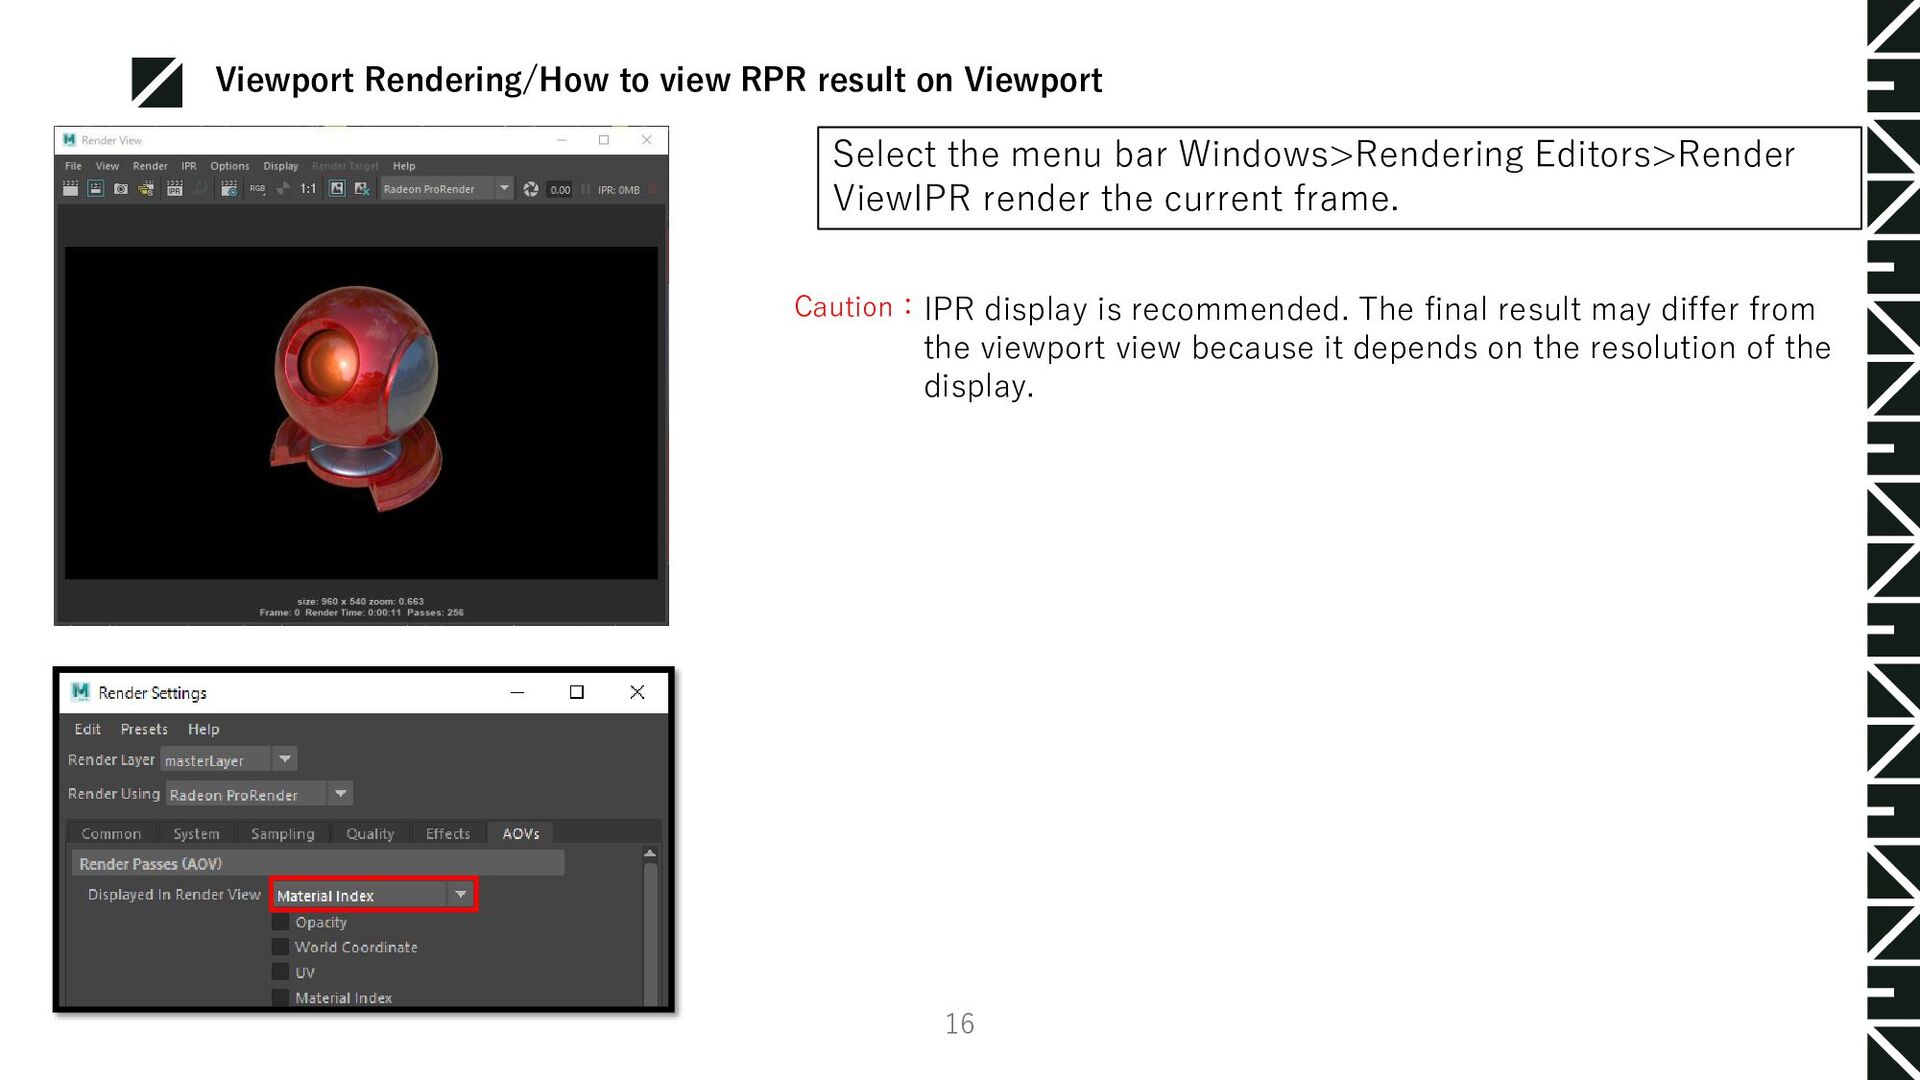
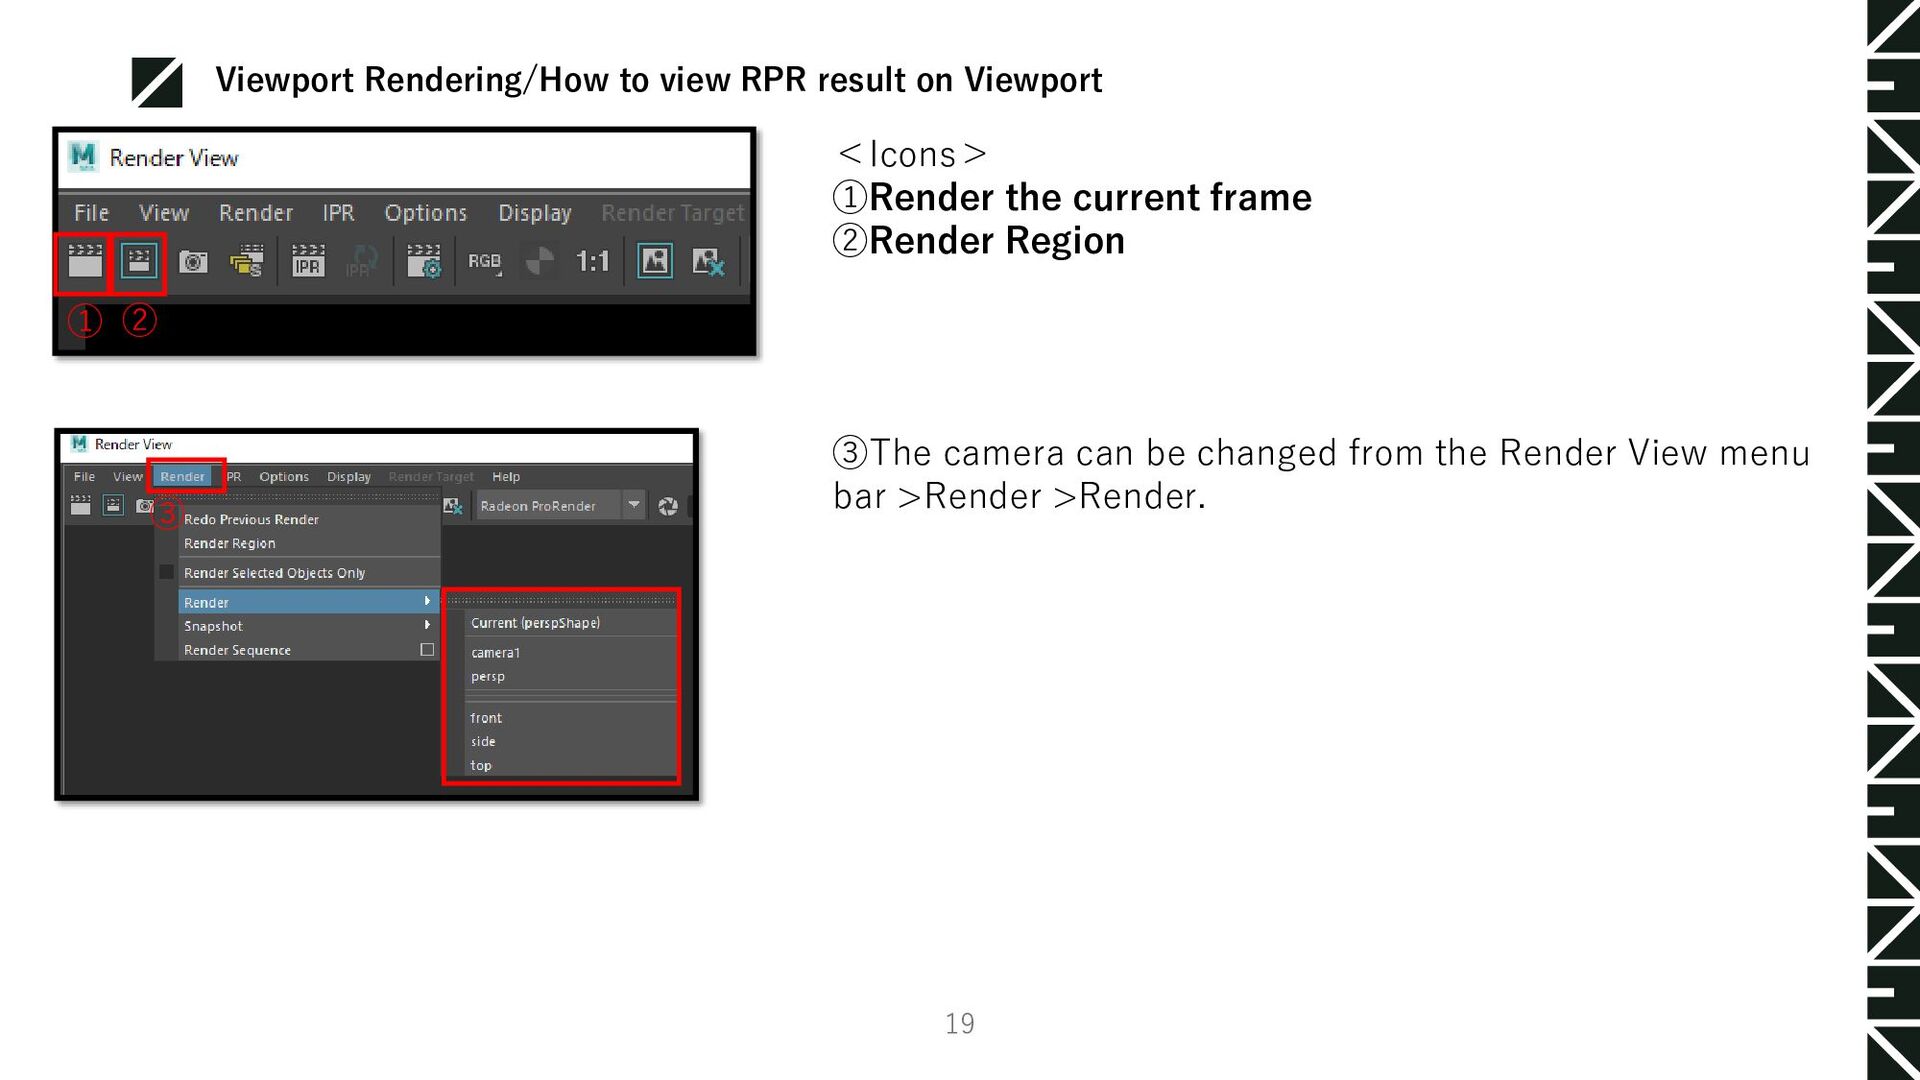
frame. IPR display is recommended. The final result may differ from the viewport view because it depends on the resolution of the display. Caution: Viewport Rendering/How to view RPR result on Viewport 16
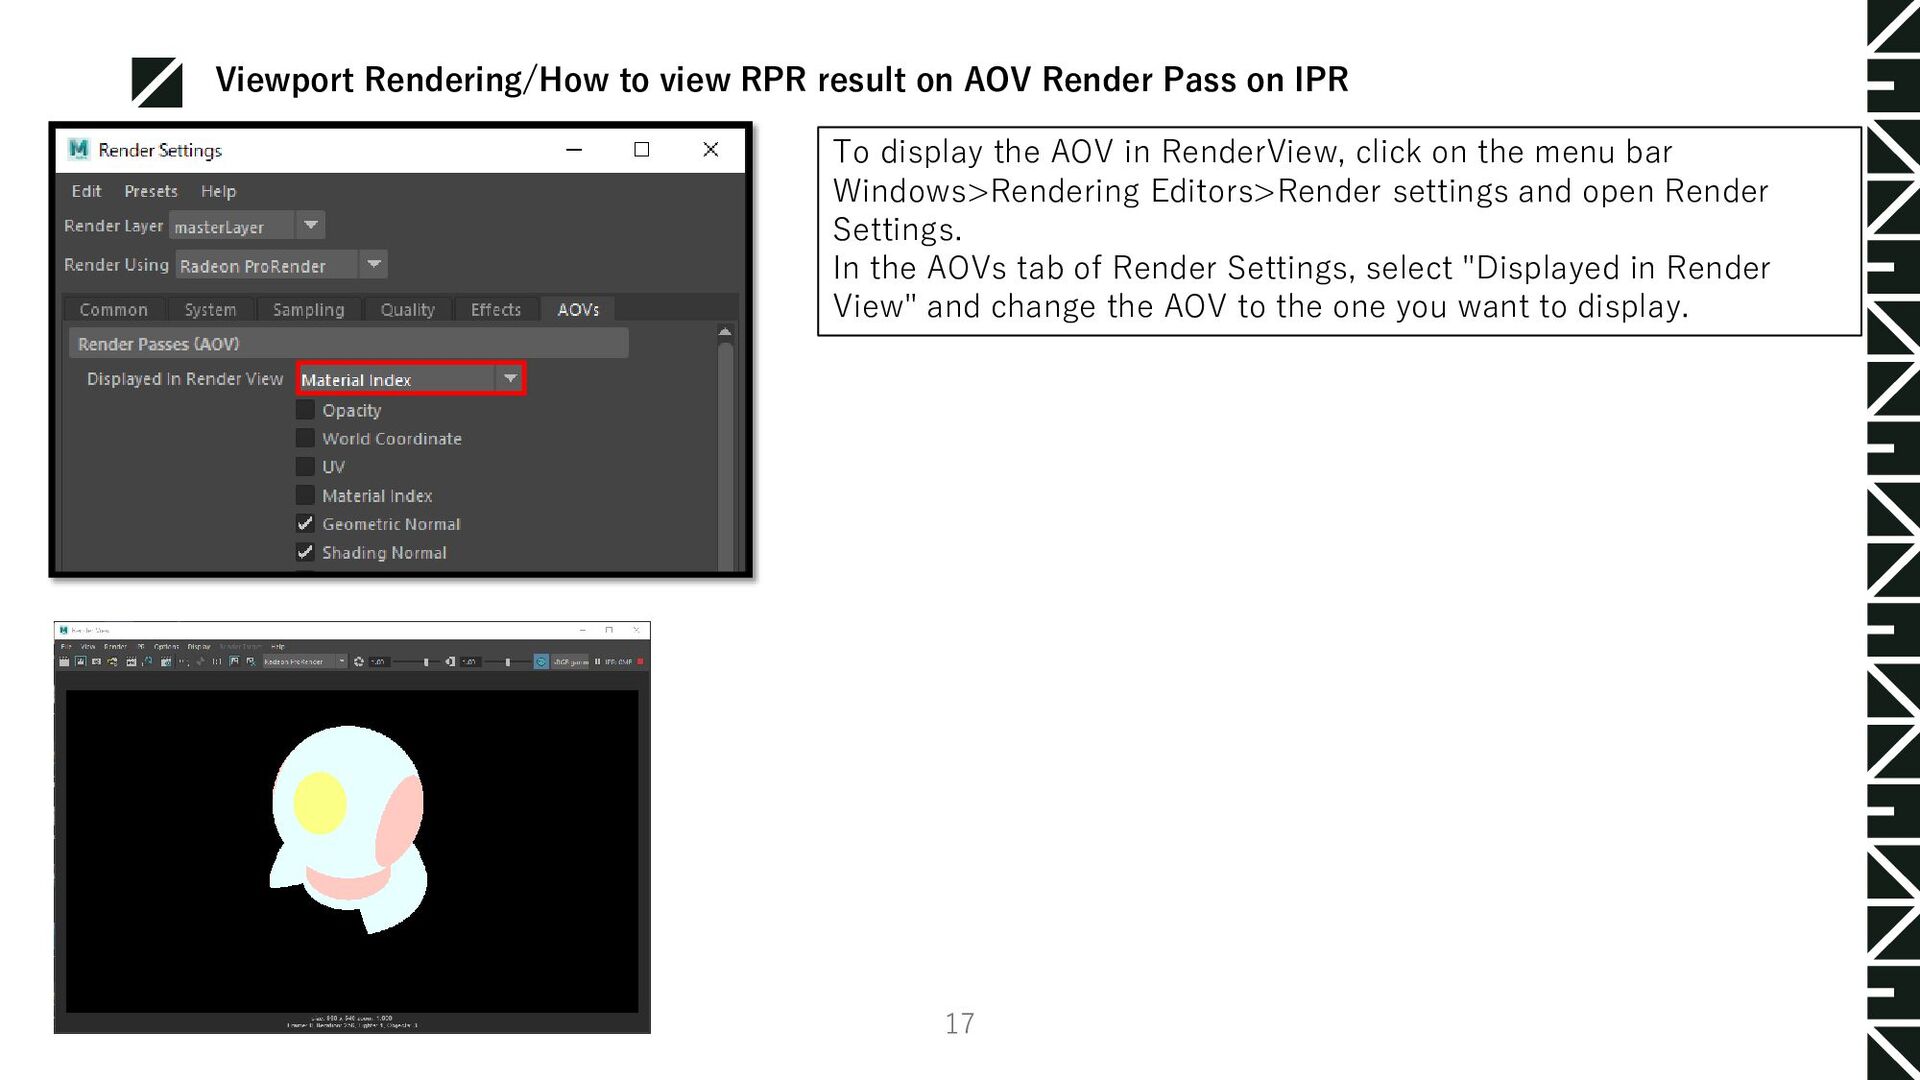
bar Windows>Rendering Editors>Render settings and open Render Settings. In the AOVs tab of Render Settings, select "Displayed in Render View" and change the AOV to the one you want to display. Viewport Rendering/How to view RPR result on AOV Render Pass on IPR 17
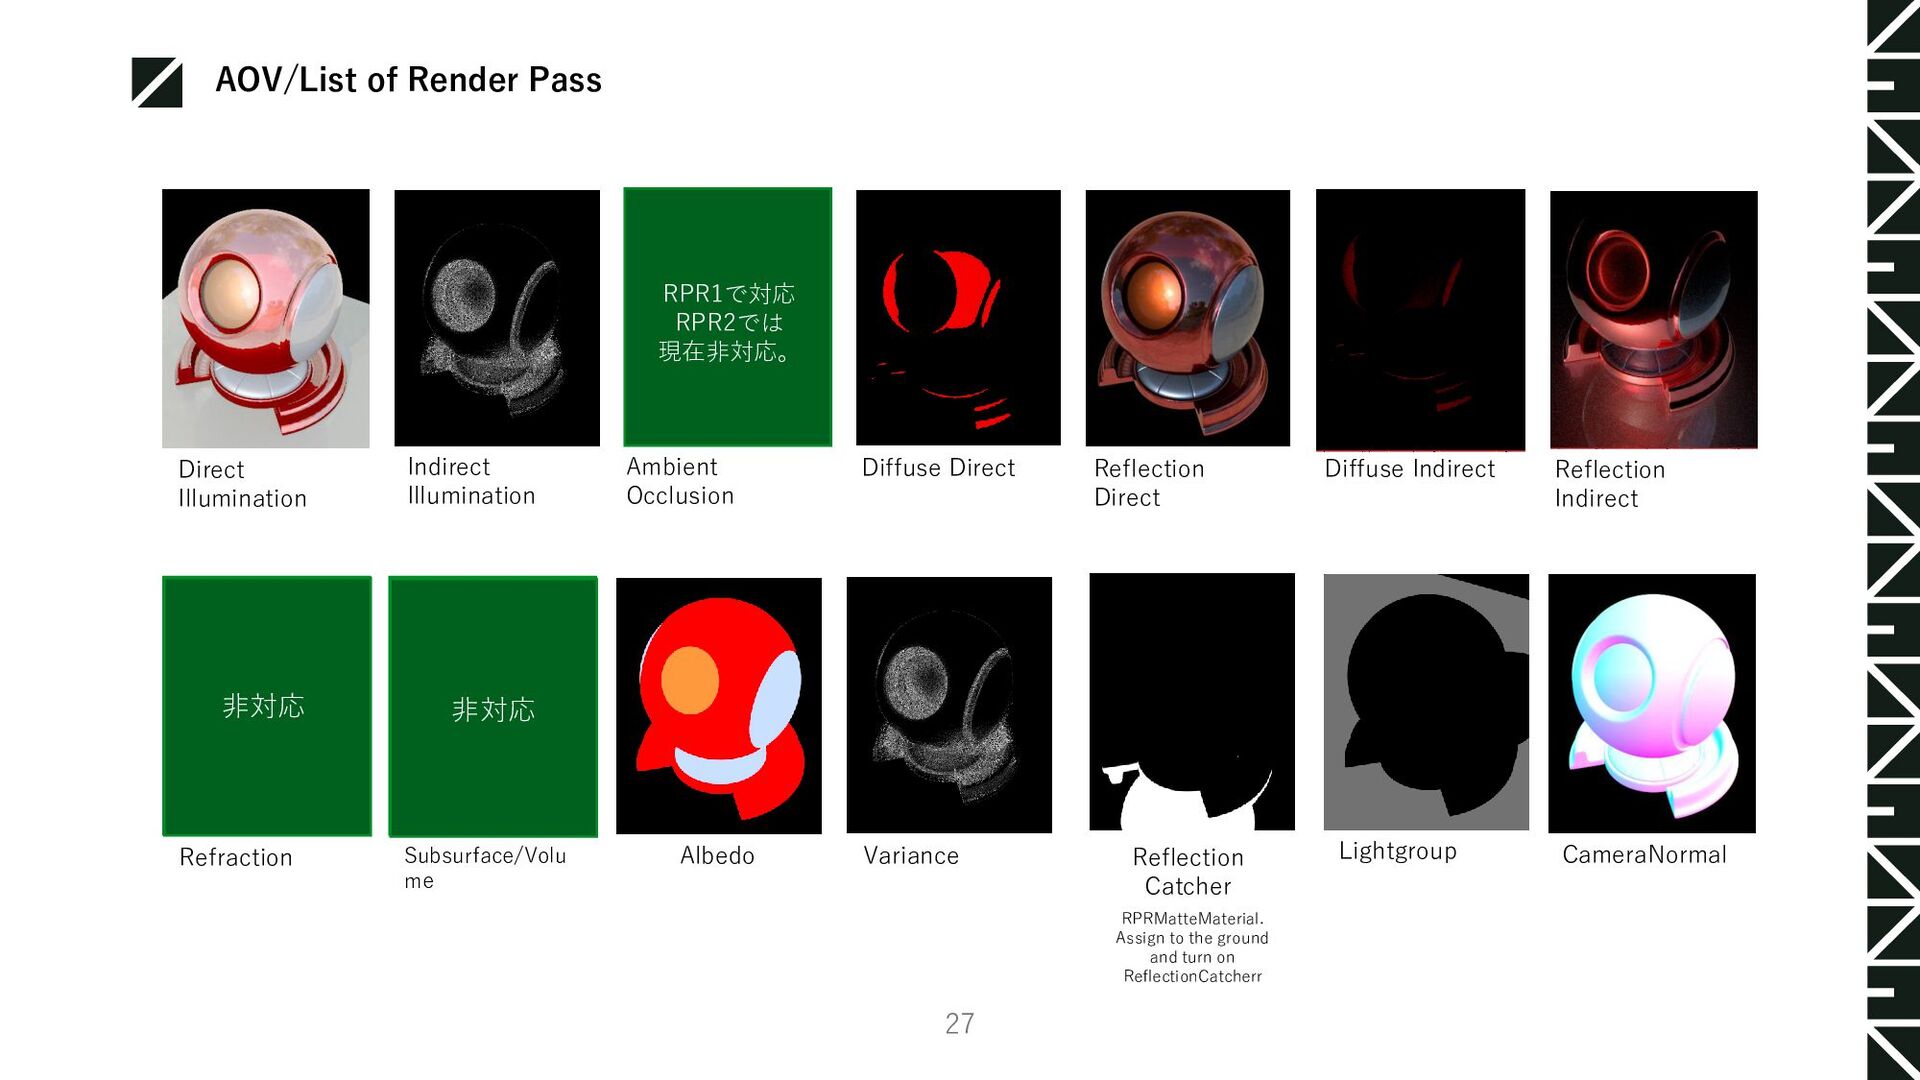
Coordinate UV Geometric Normal Shading Normal Depth / 深度 Object ID Object Group ID Shadow Catcher Background Emission Velocity 画像準備 中 ※Output in one color because of one object Assign RPRMatteMaterial to the ground and turn on Shadowcatcher 現在、非対応 画像準備 中
Occlusion Diffuse Direct Diffuse Indirect Reflection Direct Reflection Indirect Refraction Subsurface/Volu me Albedo Variance Lightgroup CameraNormal RPR1で対応 RPR2では 現在非対応。 画面が黒になる が黒になる Reflection Catcher RPRMatteMaterial. Assign to the ground and turn on ReflectionCatcherr 非対応 非対応
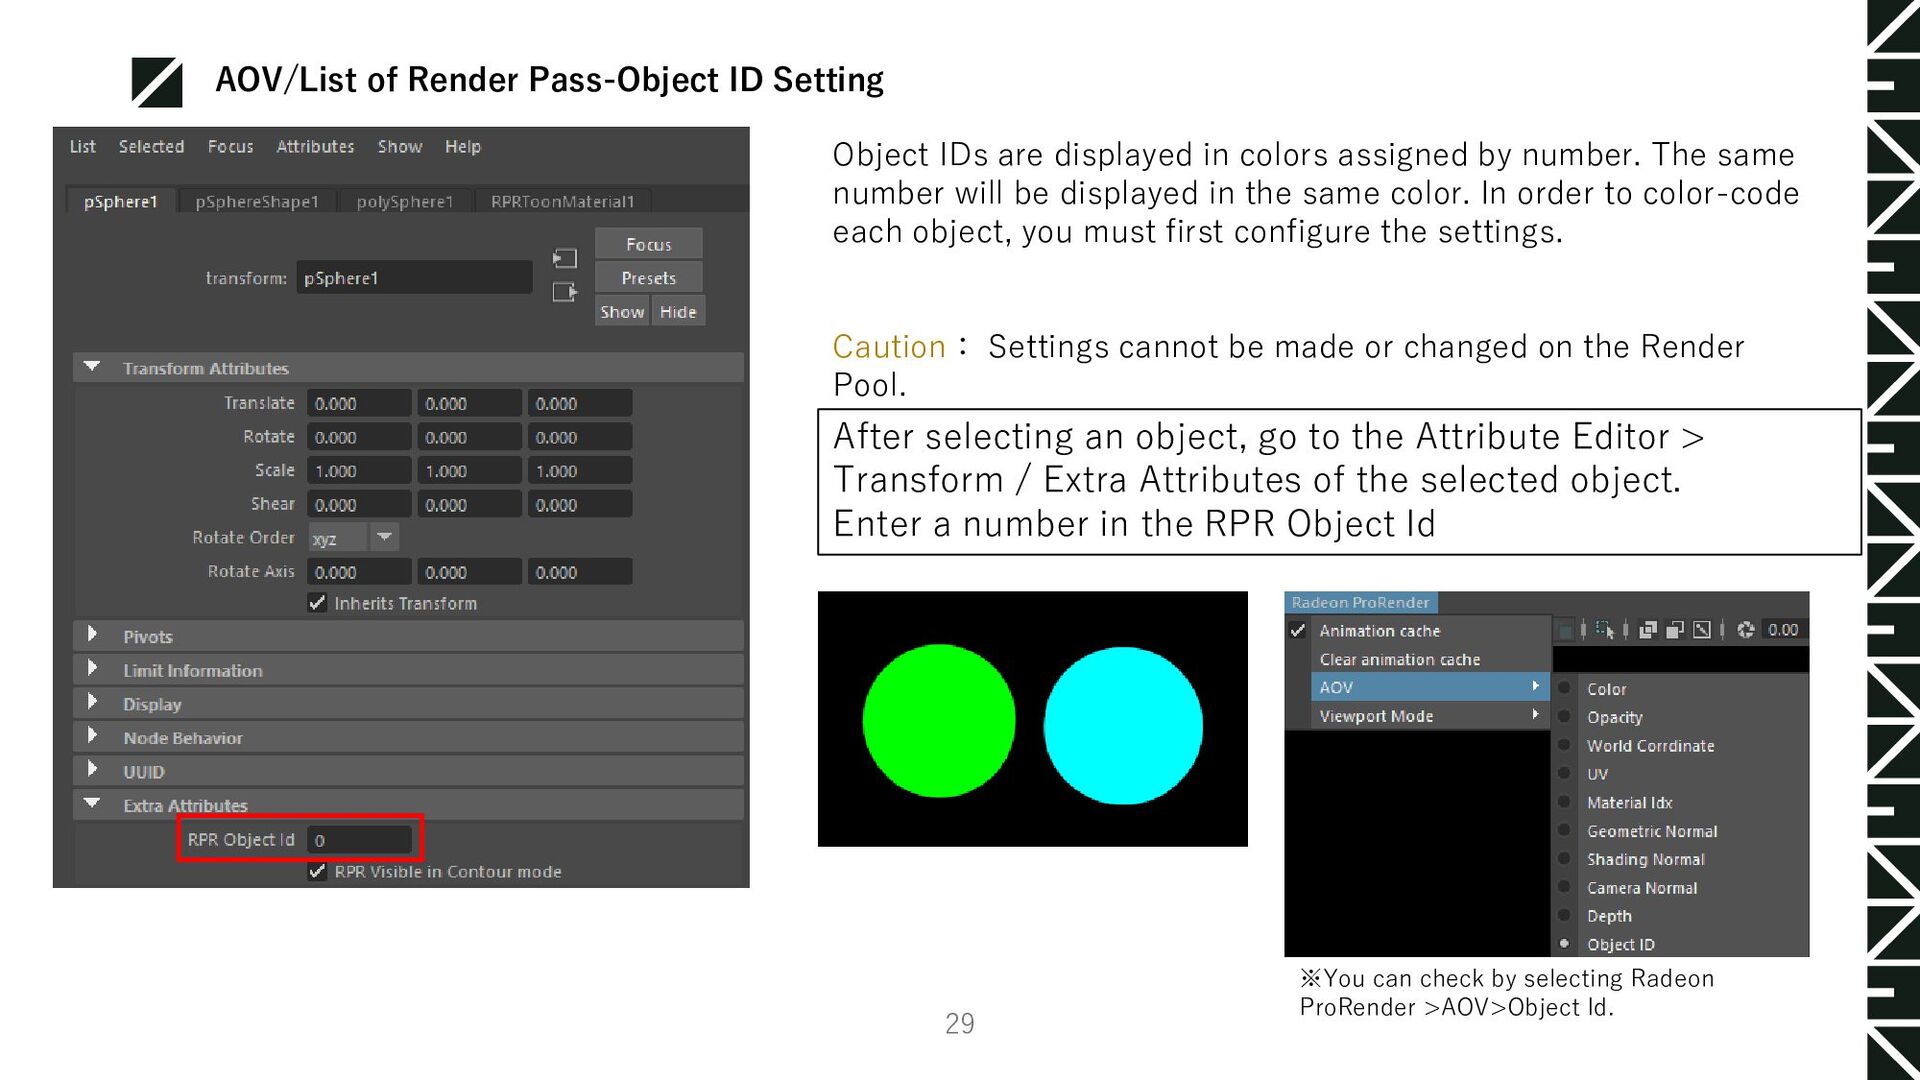
Transform / Extra Attributes of the selected object. Enter a number in the RPR Object Id ※You can check by selecting Radeon ProRender >AOV>Object Id. Object IDs are displayed in colors assigned by number. The same number will be displayed in the same color. In order to color-code each object, you must first configure the settings. Caution: Settings cannot be made or changed on the Render Pool. AOV/List of Render Pass-Object ID Setting 29
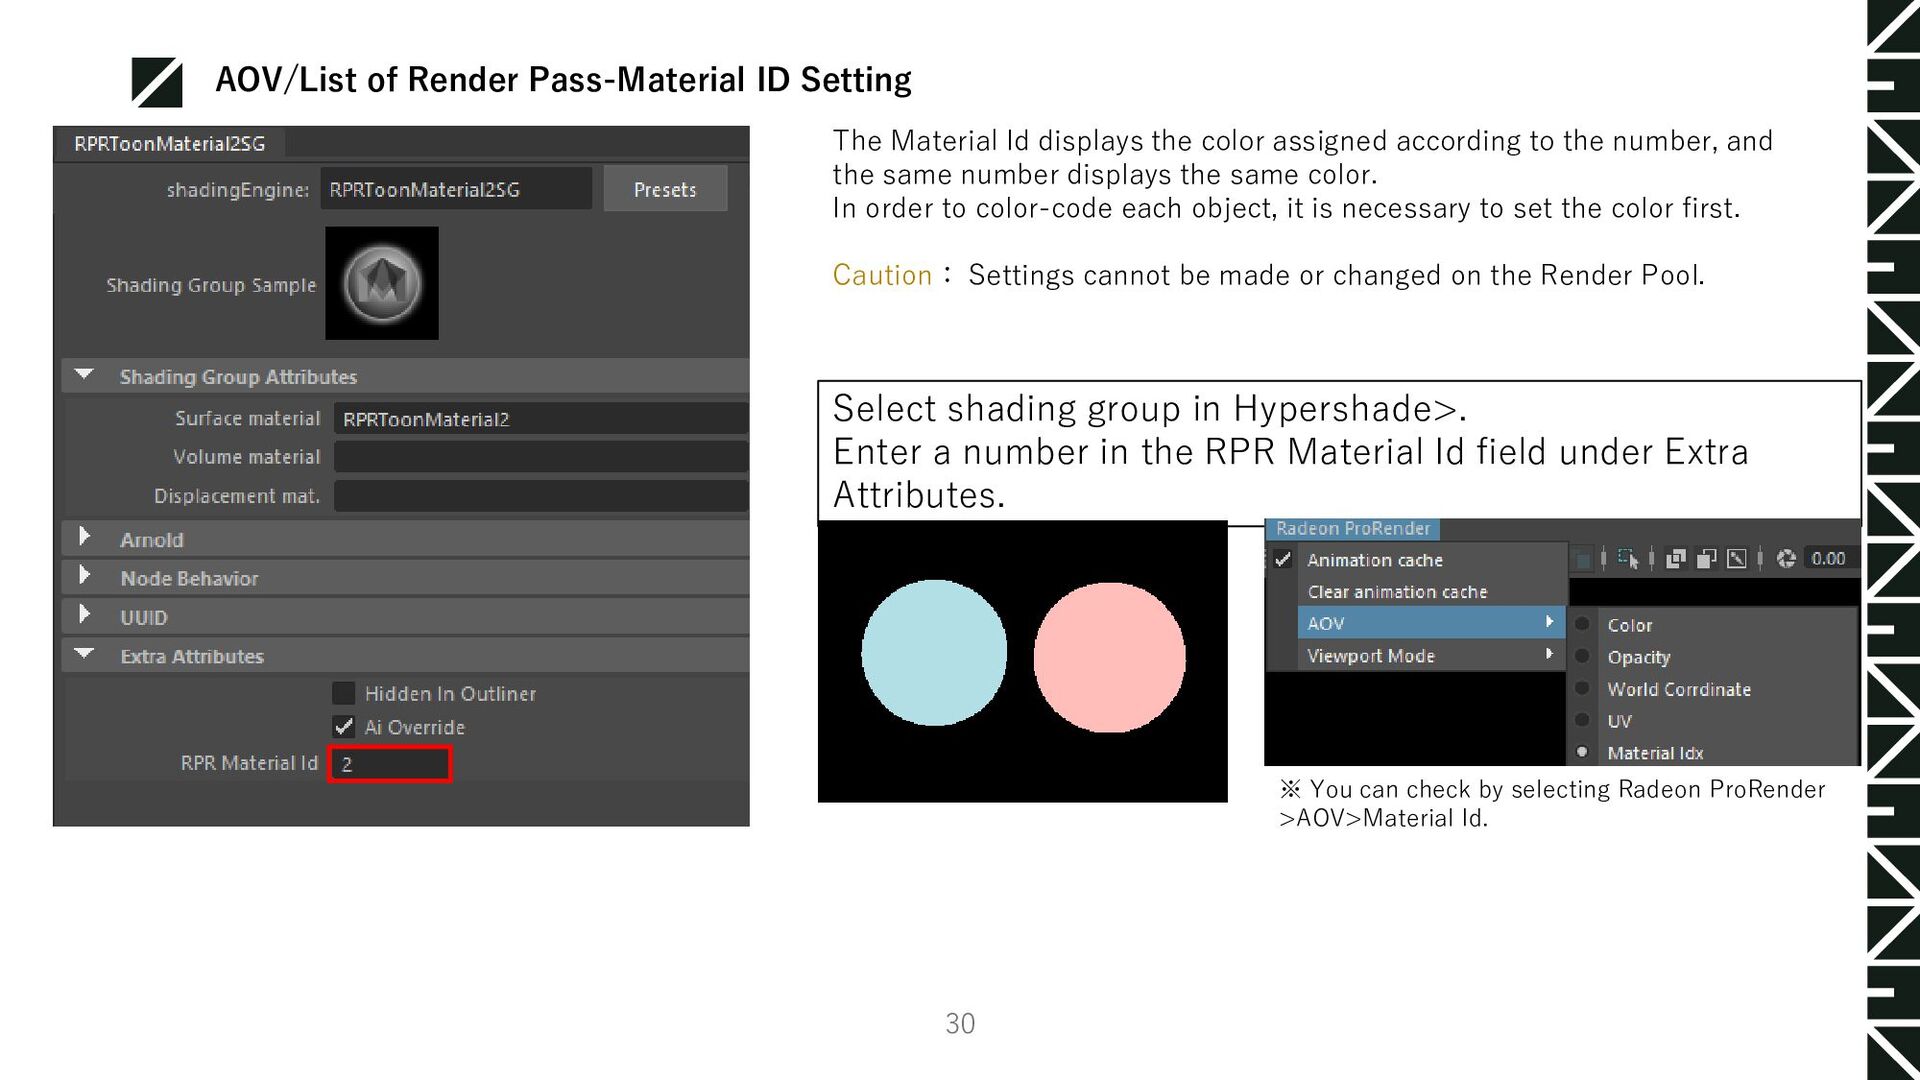
RPR Material Id field under Extra Attributes. ※ You can check by selecting Radeon ProRender >AOV>Material Id. The Material Id displays the color assigned according to the number, and the same number displays the same color. In order to color-code each object, it is necessary to set the color first. Caution: Settings cannot be made or changed on the Render Pool. AOV/List of Render Pass-Material ID Setting 30
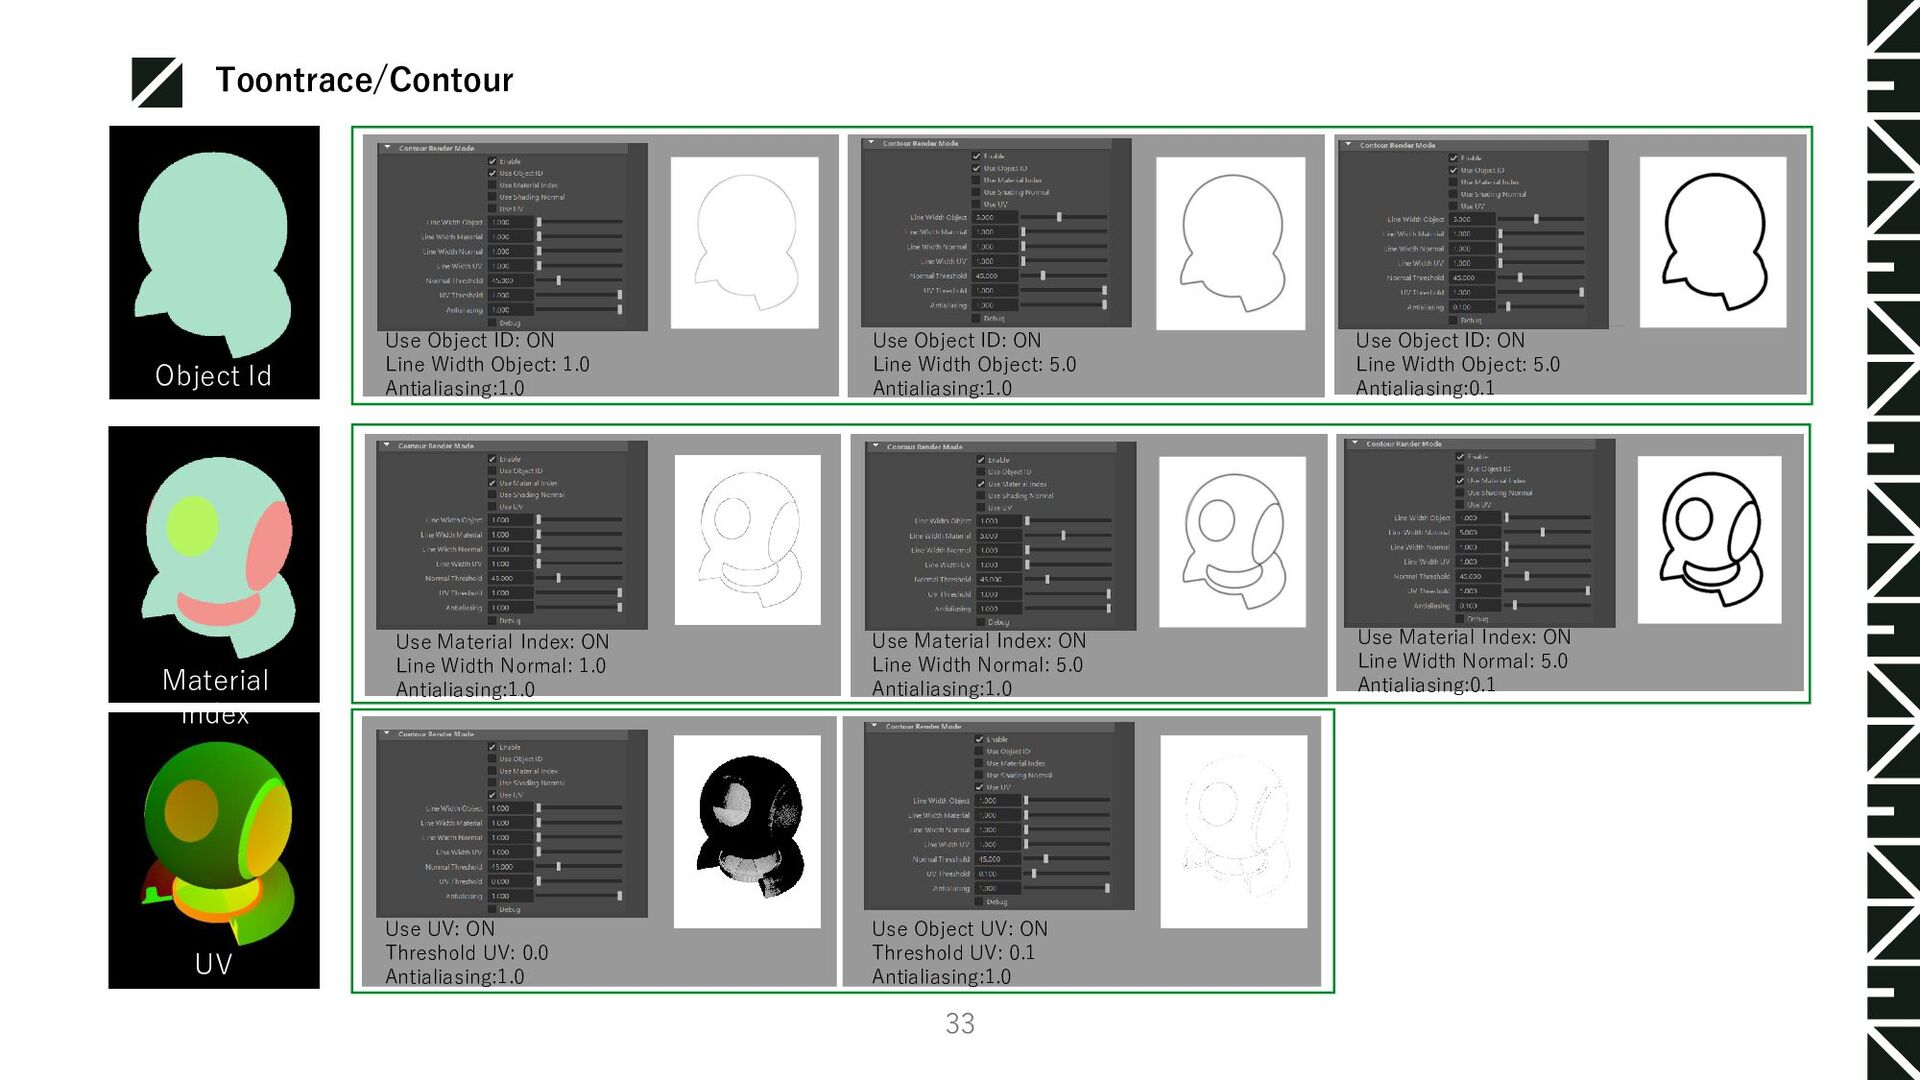
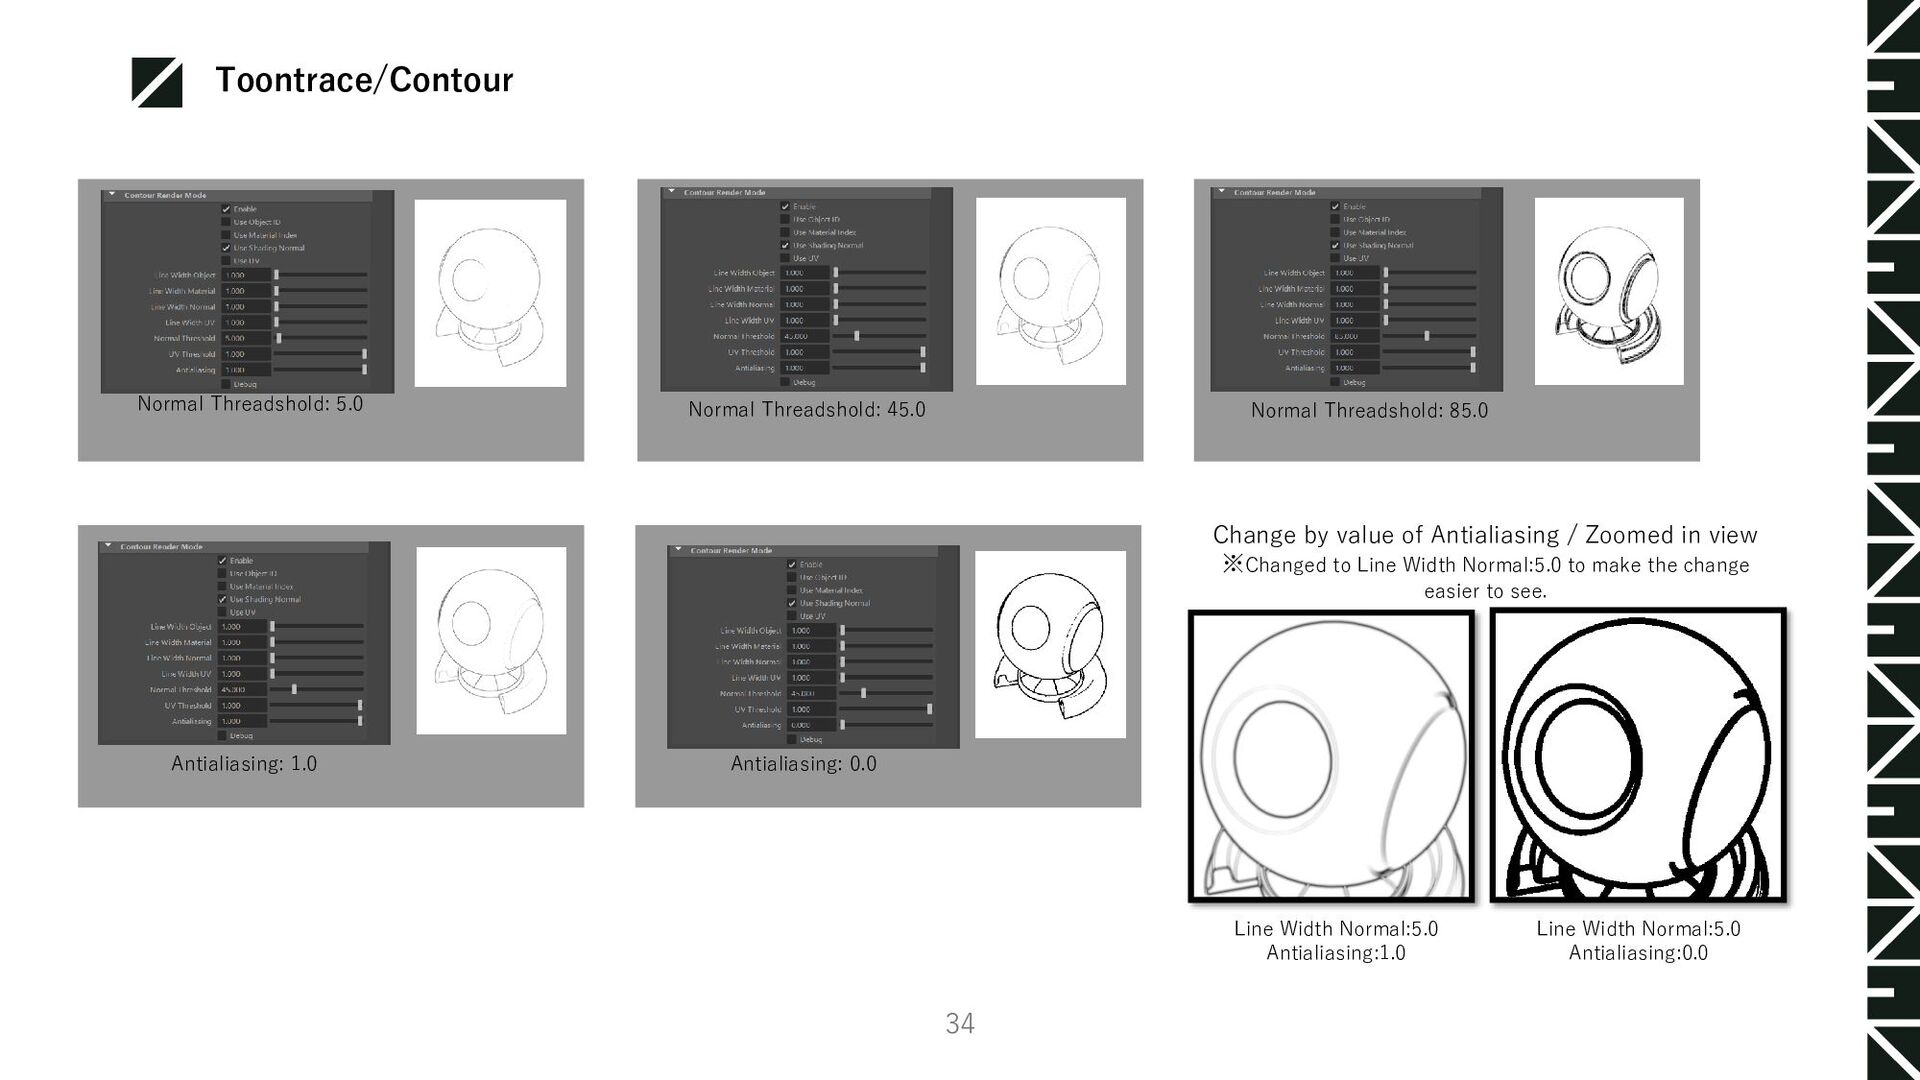
the Effects tab. Add check Contour Render Mode > Enable. ToonTrace settings. The Renderer in the viewport is set to If you have changed to Radeon ProRender ToonTrace is displayed in the viewport. Enable:O N Enable:OF F <Contour Render Mode> Outline Rendering: ToonTrace is displayed by turning it ON Use Object ID: Set ON/OFF of line output by Object ID Use Material Index: Set ON/OFF of line output by Material Index Use Shading Normal: Line output by normal threshold Line Width Object: Line thickness settings output by Use Object ID Line Width Material: Line thickness settings output by Use Material Index Line Width Normal: Line thickness setting output by Use Shading Normal Normal Threshold: Threshold of the line output by Use Shading Normal Antialiasing:Antialiasing strength (0.0 to 1.0) Use UV: Set ON/OFF of line output by UV Line Width UV Use UV to set the thickness of the output line. Threshold UV Use Threshold of the line output by UV Toontrace/Contour 32
Normal: 1.0 Antialiasing:1.0 Use Material Index: ON Line Width Normal: 5.0 Antialiasing:1.0 Use Material Index: ON Line Width Normal: 5.0 Antialiasing:0.1 Use Object ID: ON Line Width Object: 1.0 Antialiasing:1.0 Use Object ID: ON Line Width Object: 5.0 Antialiasing:1.0 Use Object ID: ON Line Width Object: 5.0 Antialiasing:0.1 UV Use UV: ON Threshold UV: 0.0 Antialiasing:1.0 Use Object UV: ON Threshold UV: 0.1 Antialiasing:1.0 Toontrace/Contour 33
1.0 Antialiasing: 0.0 Change by value of Antialiasing / Zoomed in view ※Changed to Line Width Normal:5.0 to make the change easier to see. Line Width Normal:5.0 Antialiasing:1.0 Line Width Normal:5.0 Antialiasing:0.0 Toontrace/Contour 34
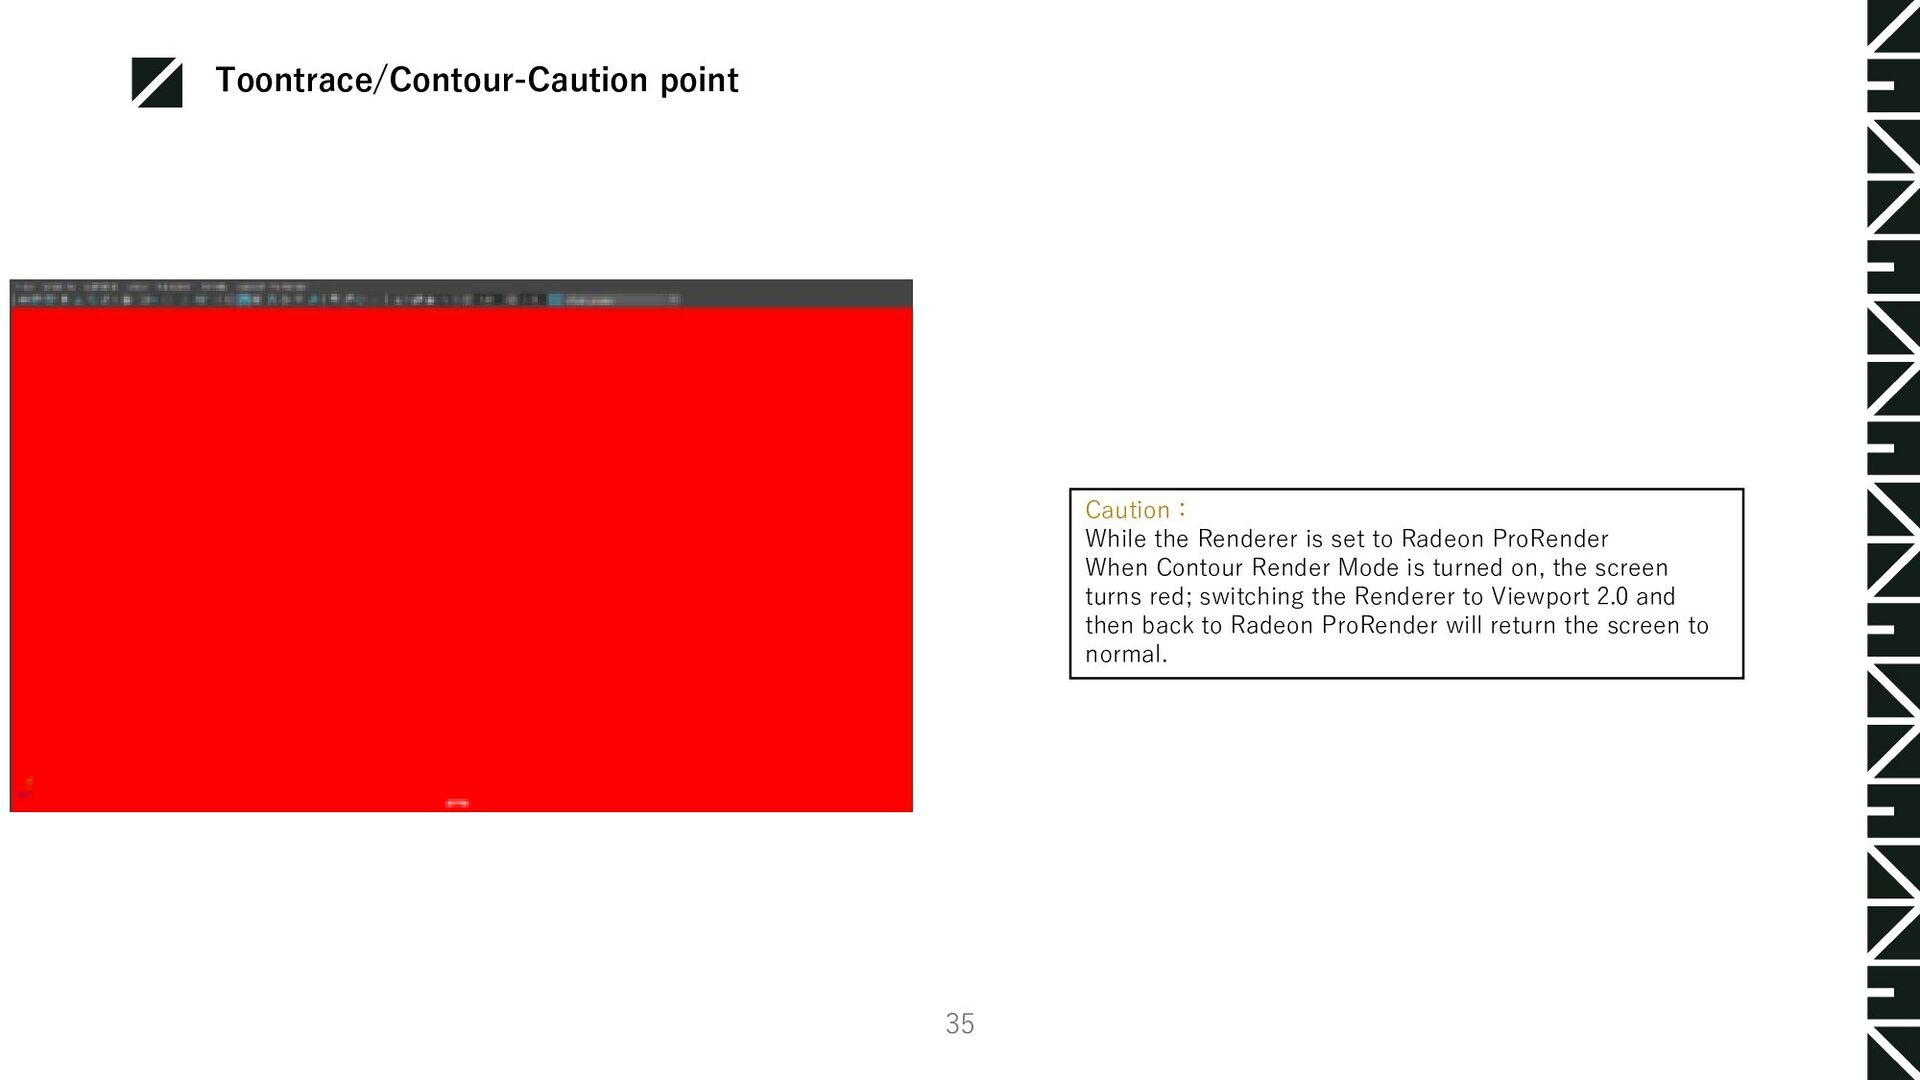
Contour Render Mode is turned on, the screen turns red; switching the Renderer to Viewport 2.0 and then back to Radeon ProRender will return the screen to normal. Toontrace/Contour-Caution point 35
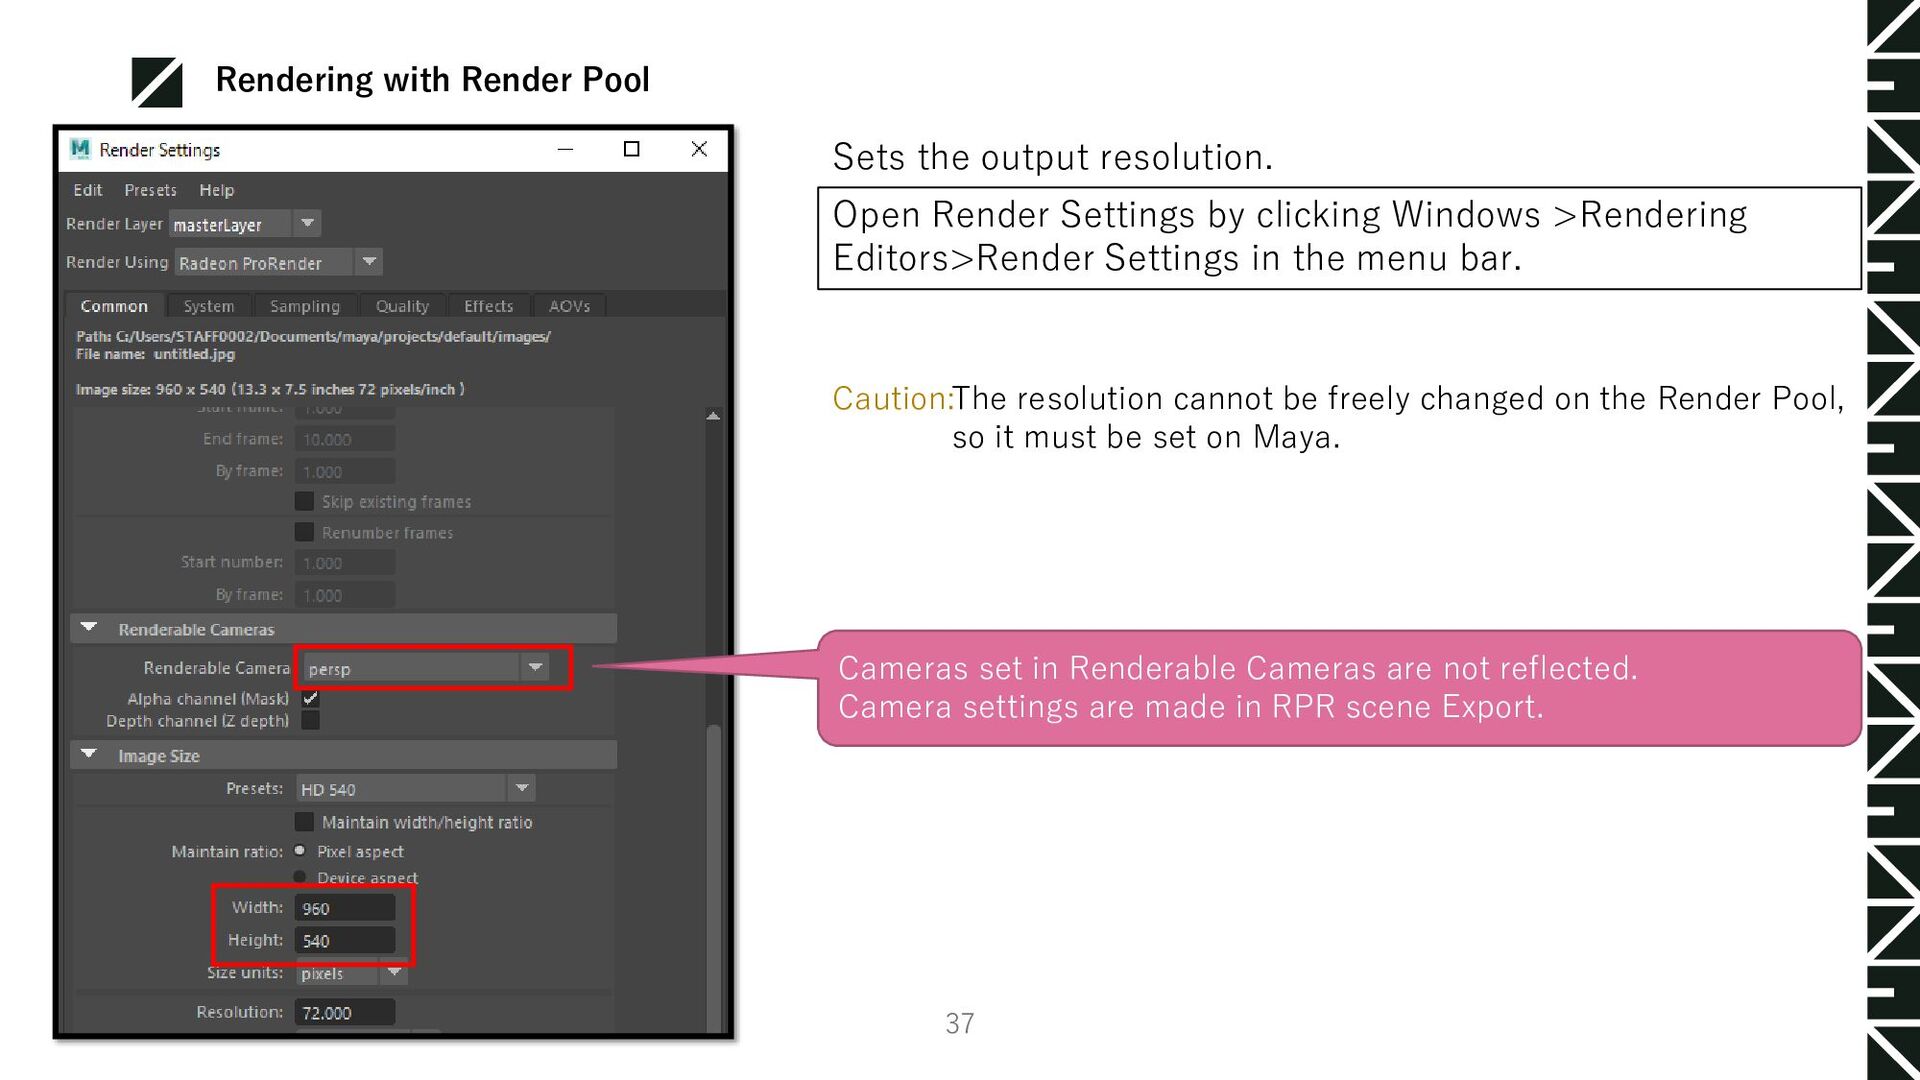
the menu bar. Caution: The resolution cannot be freely changed on the Render Pool, so it must be set on Maya. Sets the output resolution. Cameras set in Renderable Cameras are not reflected. Camera settings are made in RPR scene Export. Rendering with Render Pool 37
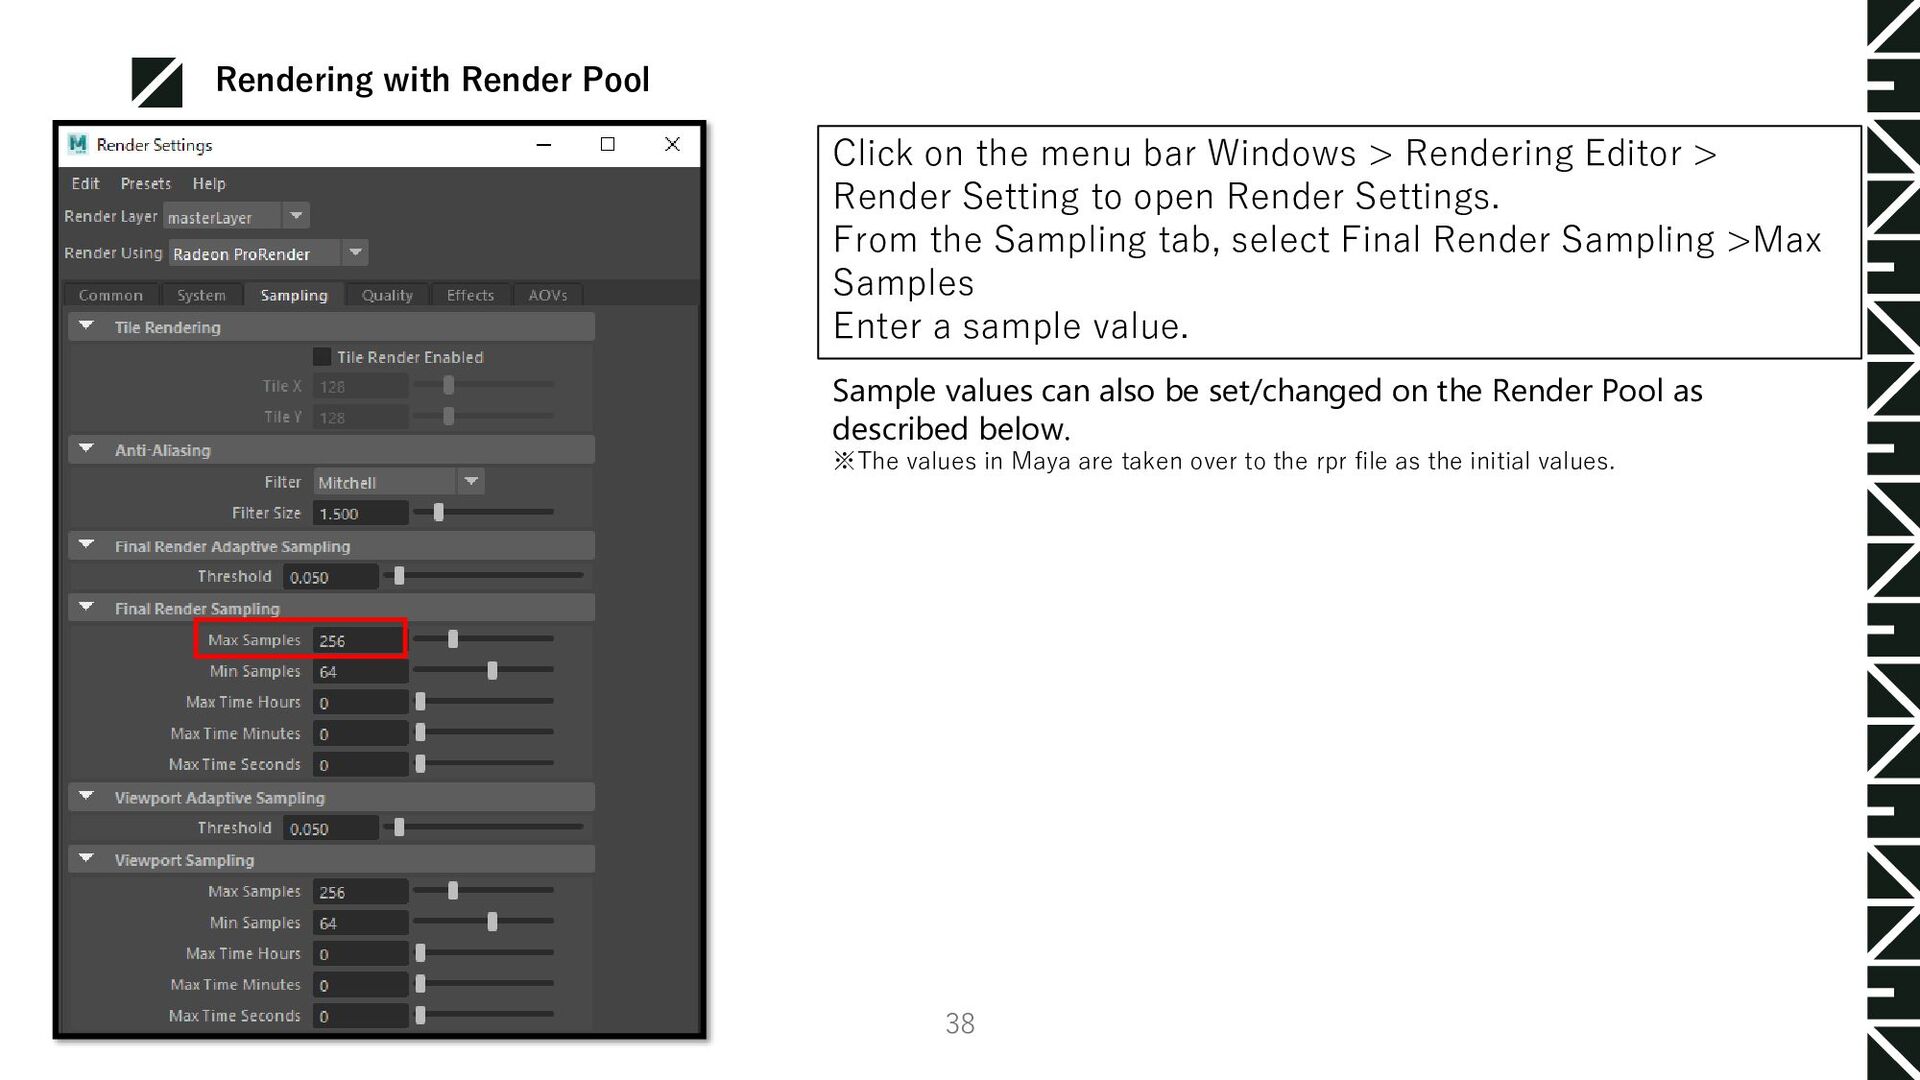
as described below. ※The values in Maya are taken over to the rpr file as the initial values. Click on the menu bar Windows > Rendering Editor > Render Setting to open Render Settings. From the Sampling tab, select Final Render Sampling >Max Samples Enter a sample value. Rendering with Render Pool 38
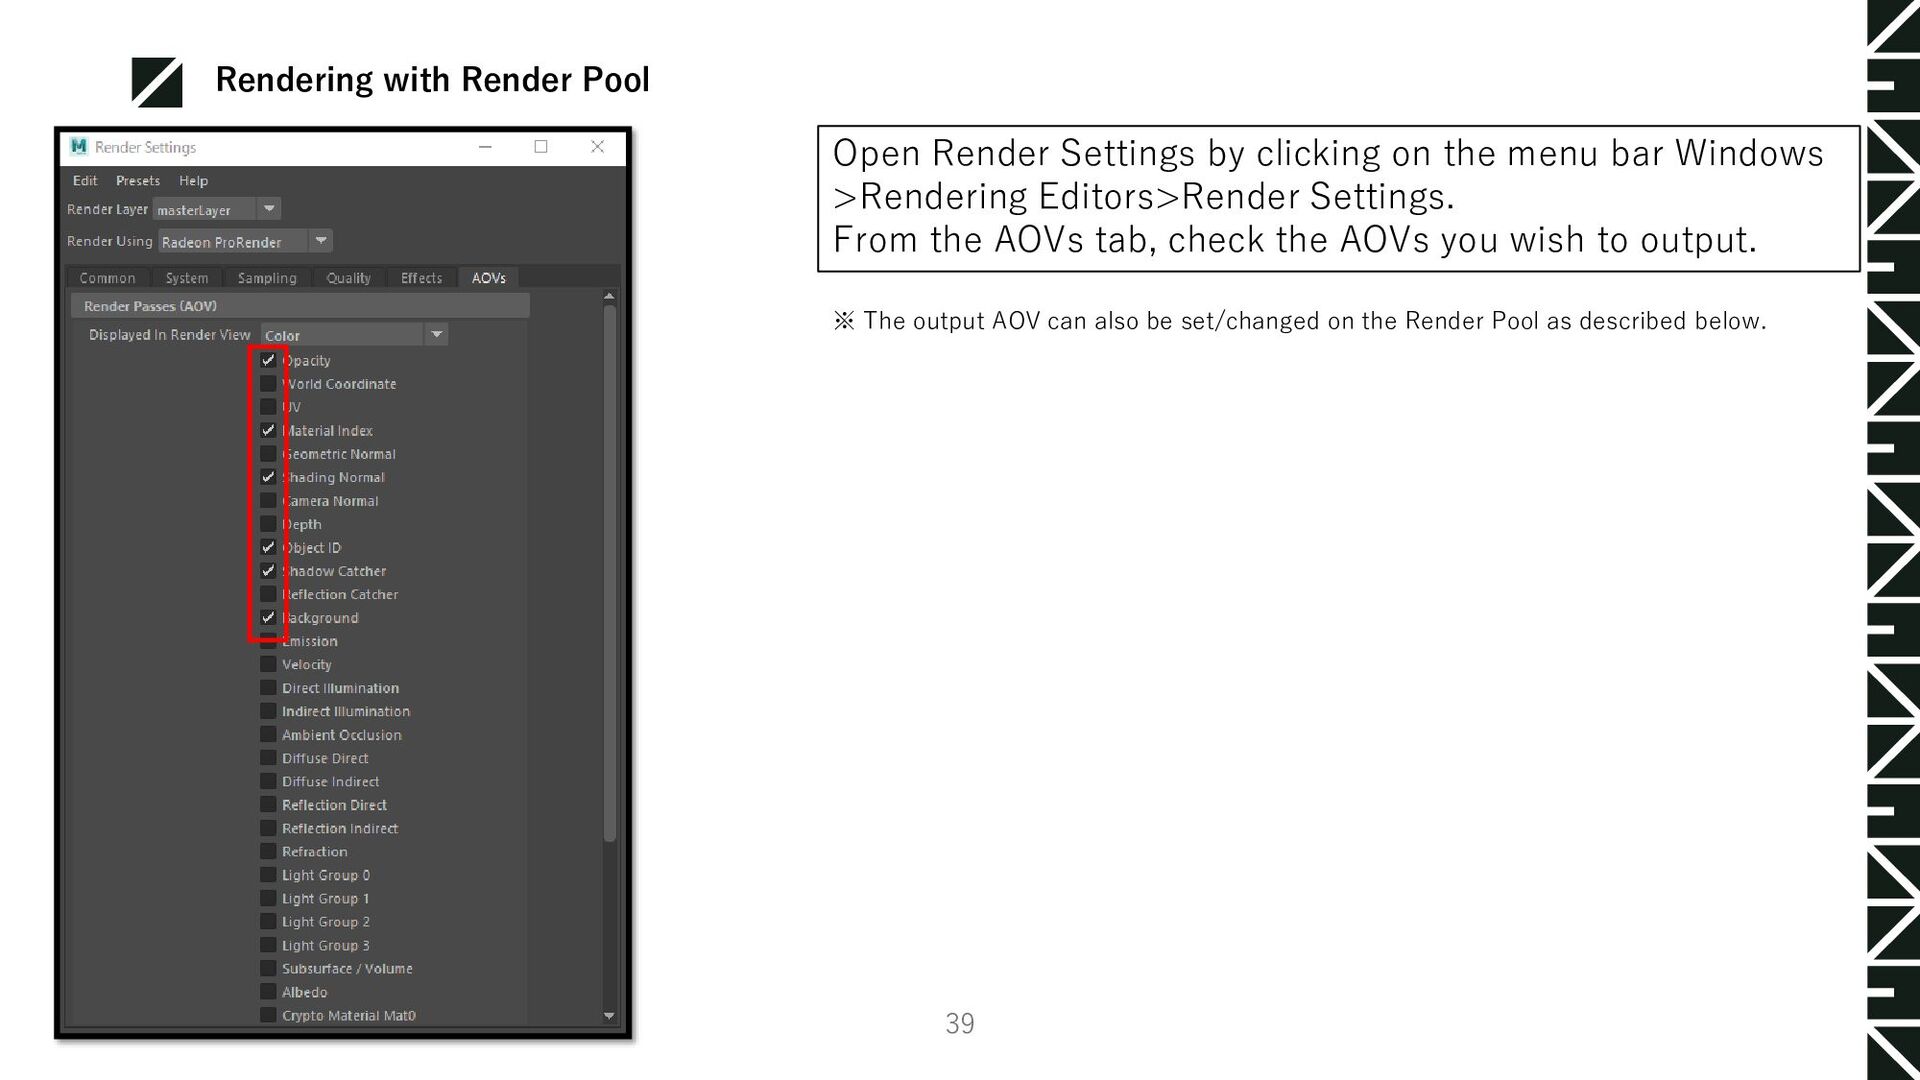
>Rendering Editors>Render Settings. From the AOVs tab, check the AOVs you wish to output. ※ The output AOV can also be set/changed on the Render Pool as described below. Rendering with Render Pool 39
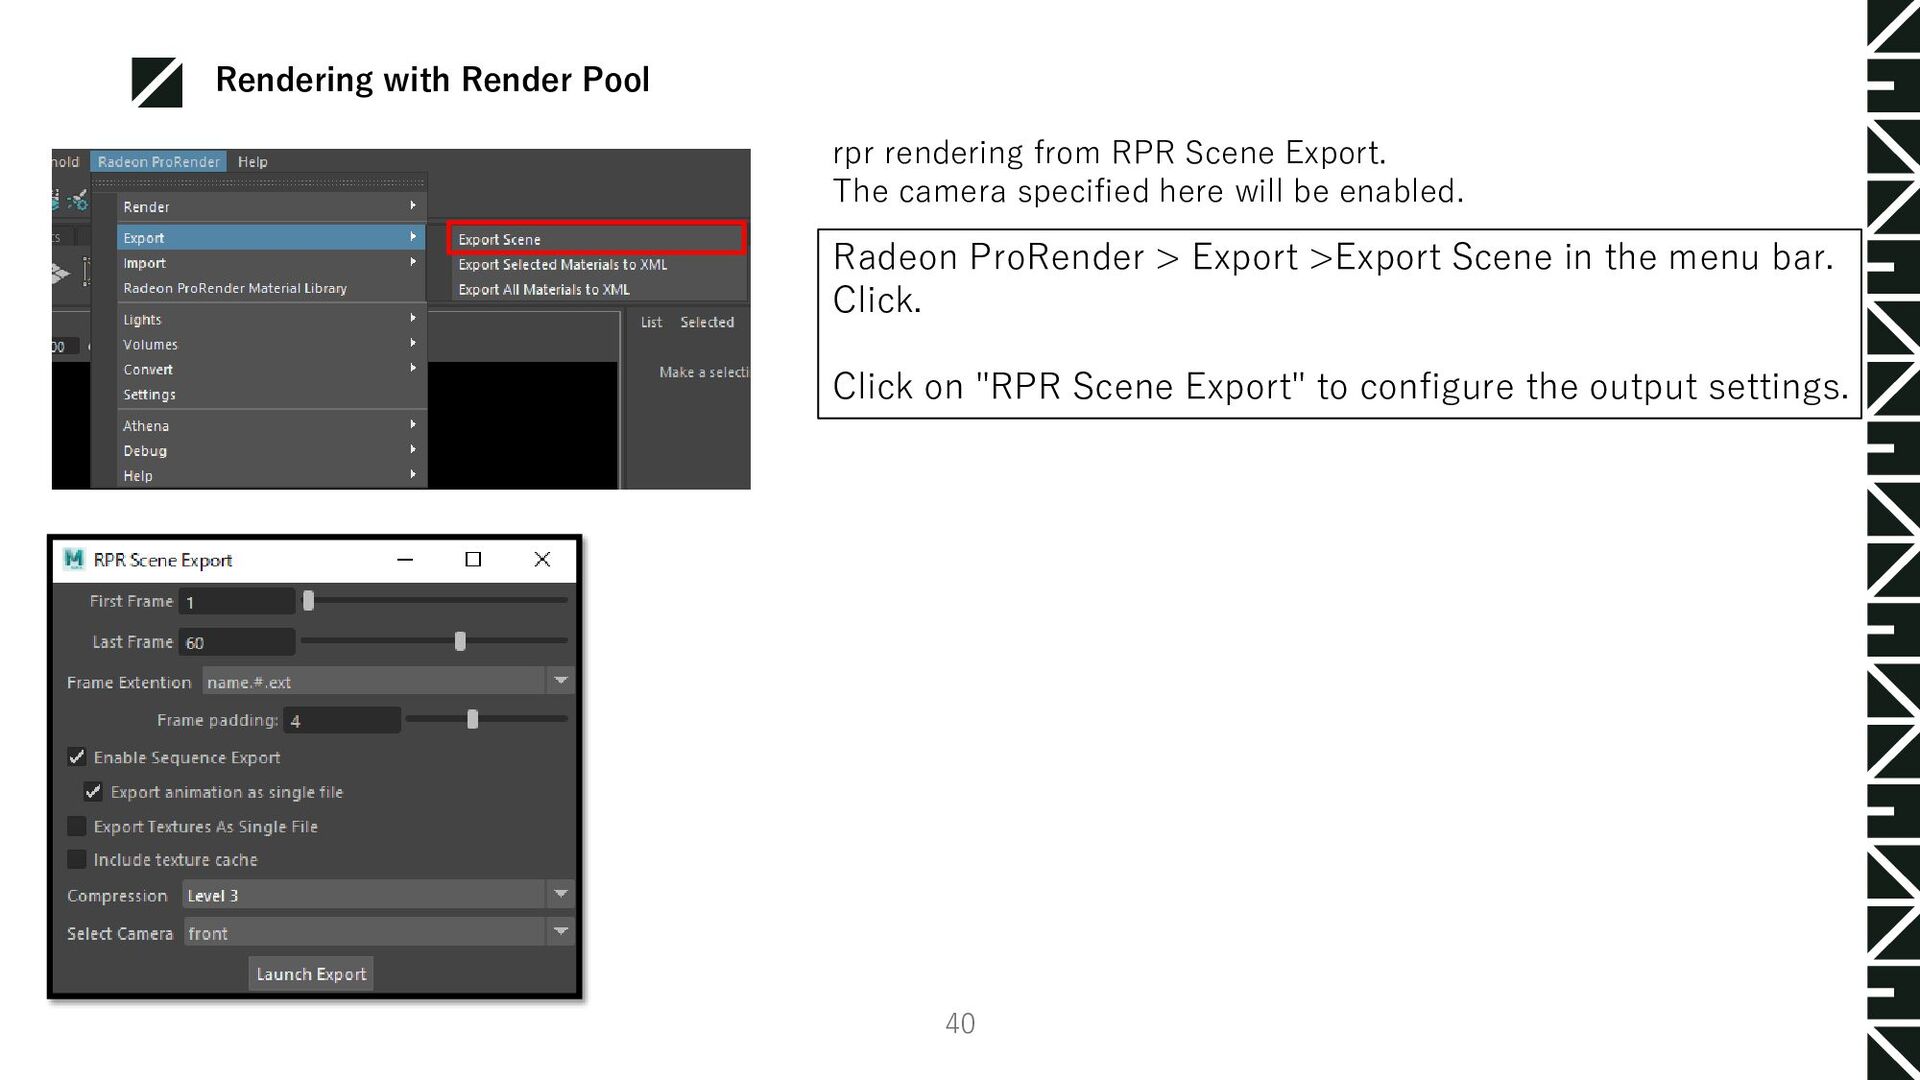
Click. Click on "RPR Scene Export" to configure the output settings. rpr rendering from RPR Scene Export. The camera specified here will be enabled. Rendering with Render Pool 40
First Frame will be output ※The current frame is output from RadeonProRenderMaya_3.2.3. You can apply more settings after adding check on Enable Sequence Export First Frame: Specifies the first frame of the export range. Last Frame: Specifies the last frame of the export range. Frame Extention: Naming convention for generated files. Frame padding:Specifies the number of frame digits to be generated. Export animation as single file: ON The deform values of the vertices are not output, only the transform values. OFF Outputs both the deform and transform values of a vertex. ※ it is recommended that the output be turned off. Export Textures As Single File: ON When exporting, no RPRsb files is created and a single RPR file is output. OFF During Export, the file is split into RPRsb. ※ It is recommended that the output be turned off. Compression: Compression ratio of geometry data. Select Camera: Specifies the camera to be rendered. Launch Export: Specify the location of the file to be output and start Exporting If Enable Sequence Export is Off, First Frame, Last Frame, Frame Extension, Frame padding areThe display will be grayed out. Rendering with Render Pool 41
zip or 7z. ※ Compression formats supported by RenderPool The output folder for RPR-ized data contains .rprsb files, .json files, .rpr files and other data are written out. Upload the compressed version to Render Pool.
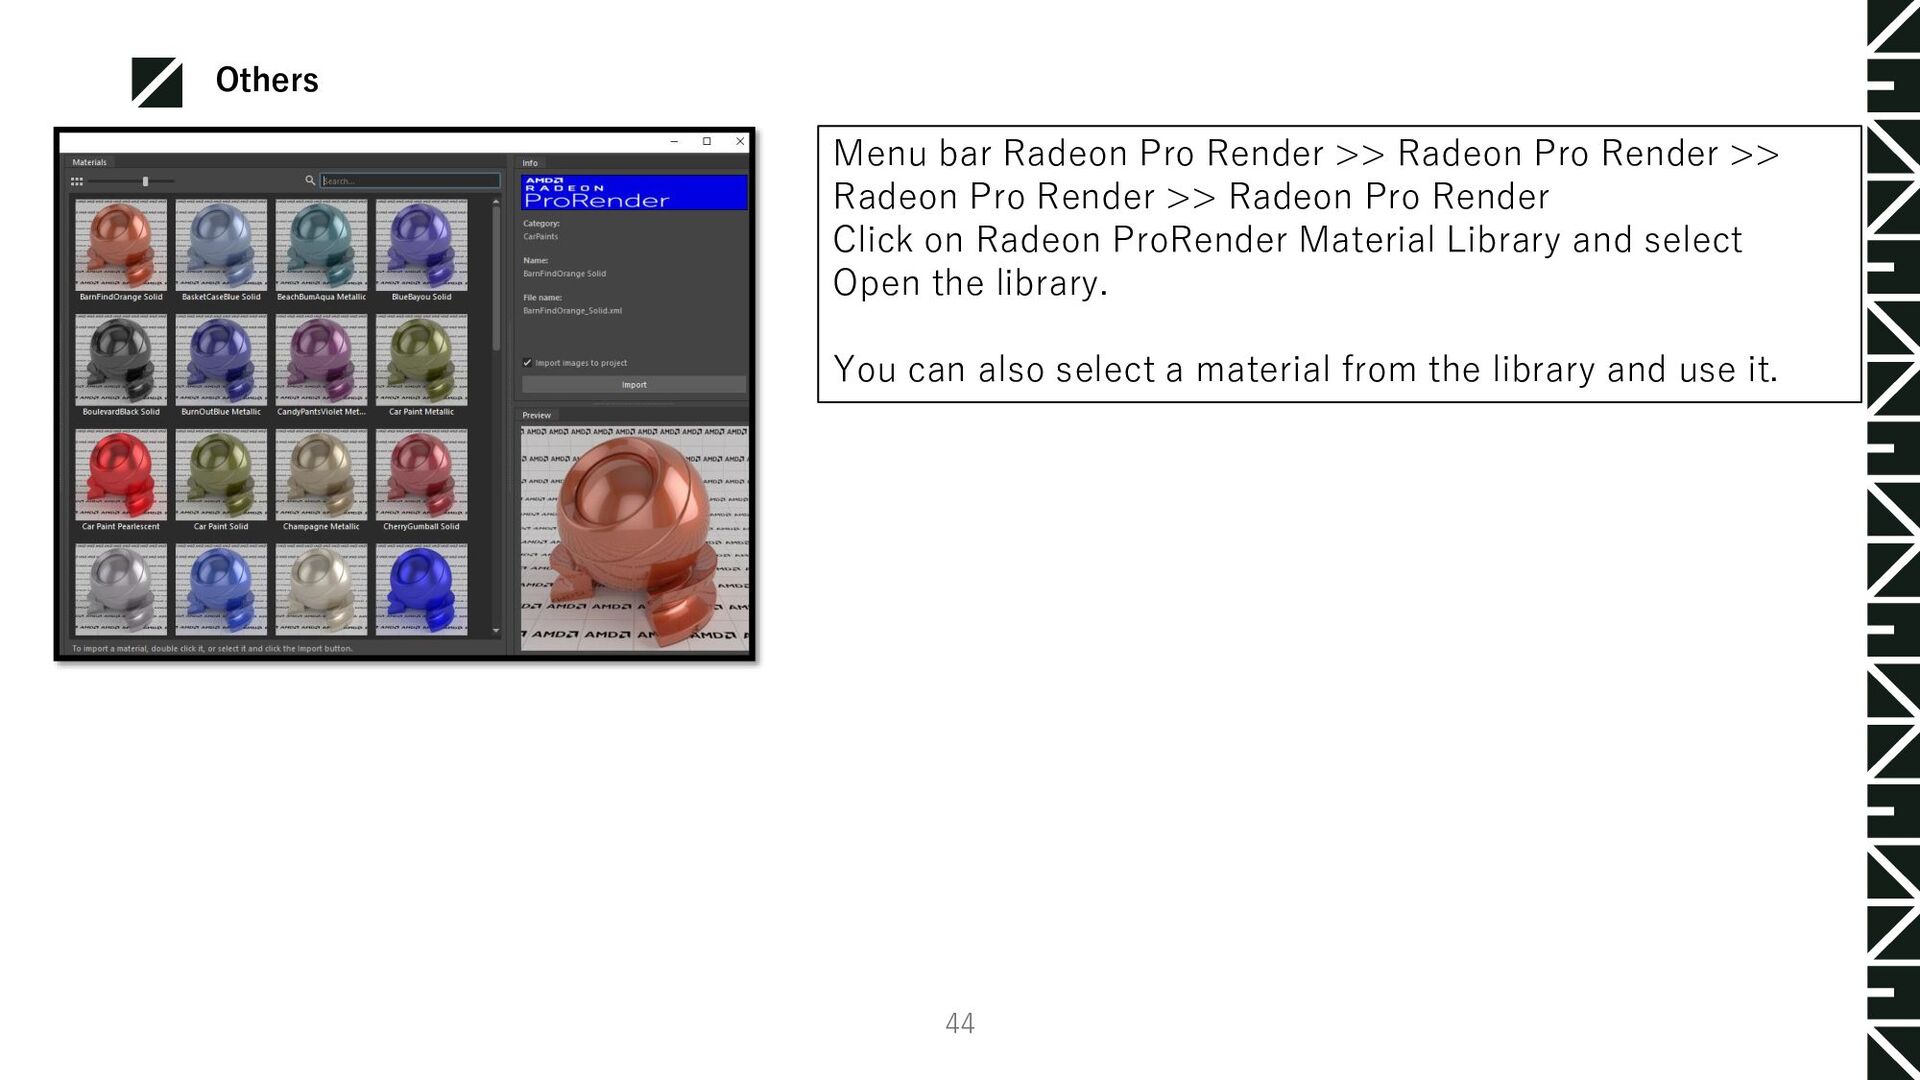
Radeon Pro Render >> Radeon Pro Render Click on Radeon ProRender Material Library and select Open the library. You can also select a material from the library and use it. Others 44
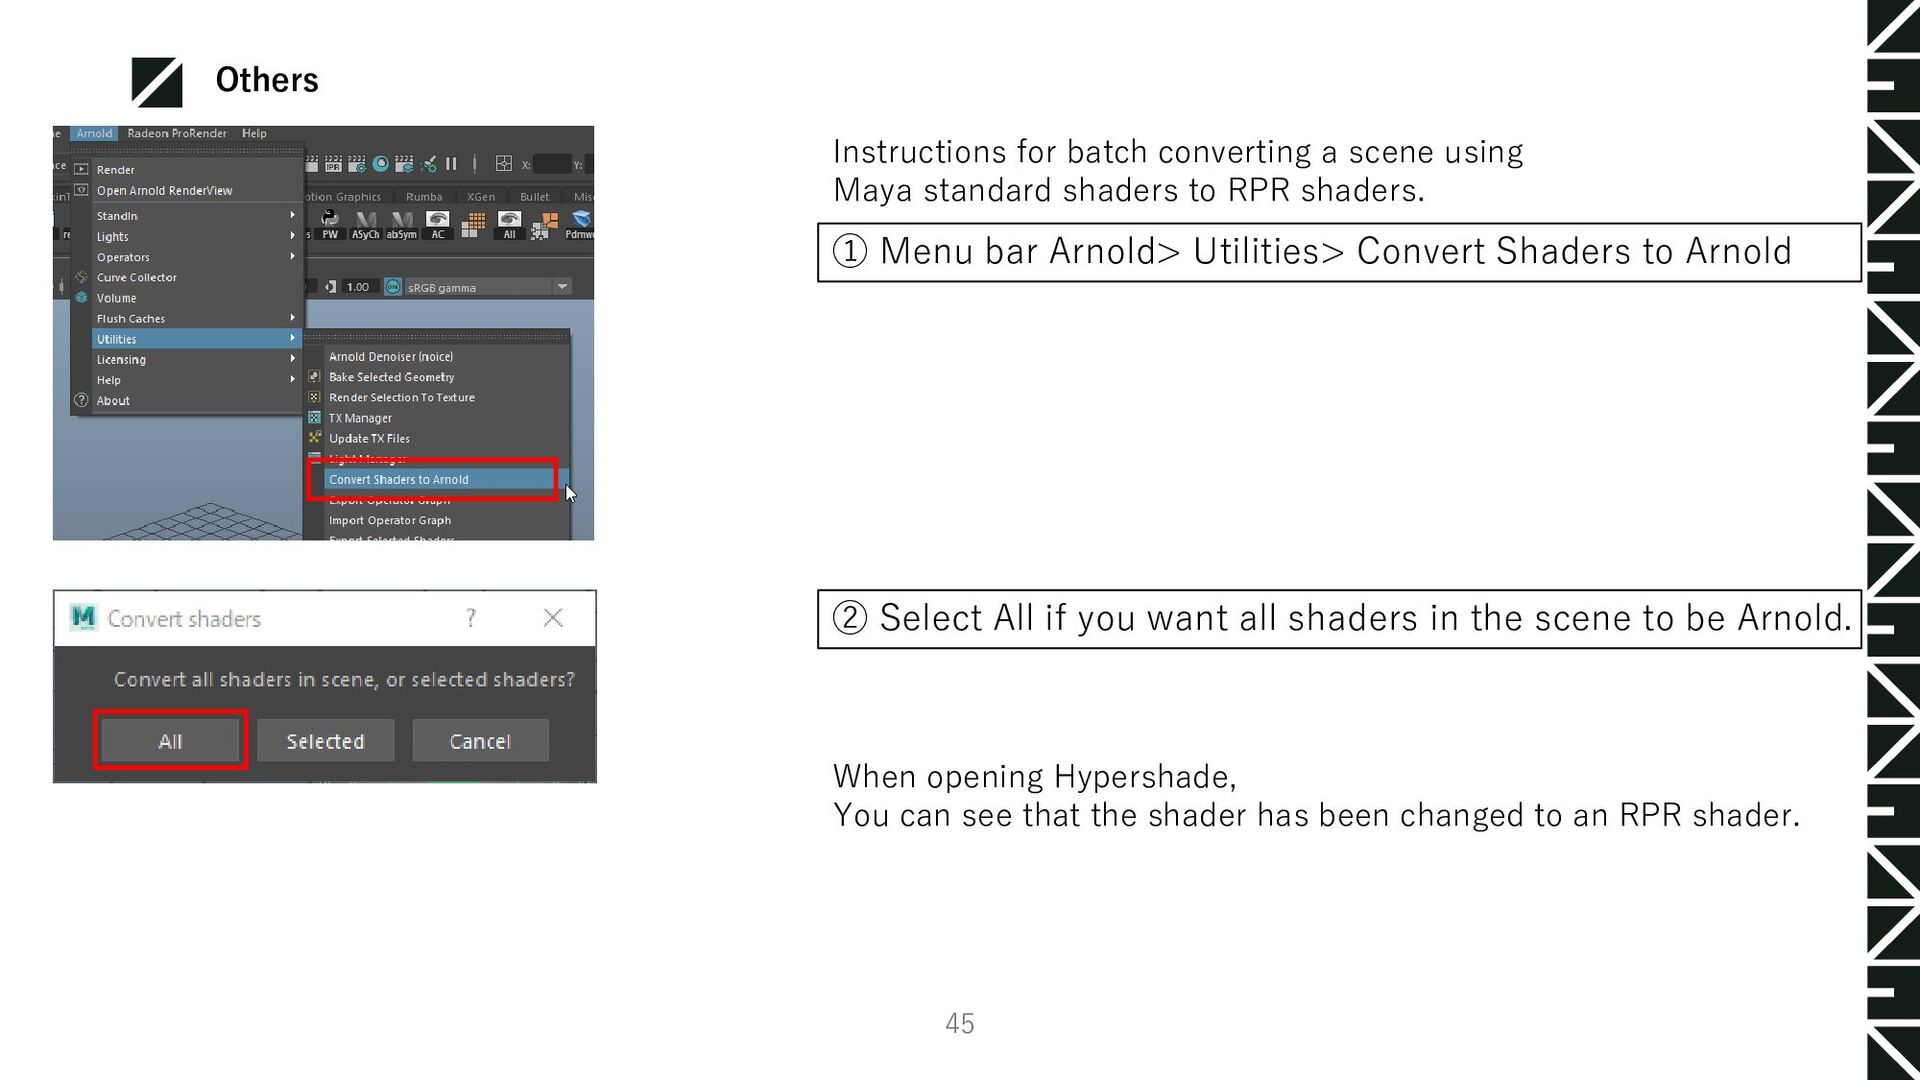
for batch converting a scene using Maya standard shaders to RPR shaders. ② Select All if you want all shaders in the scene to be Arnold. When opening Hypershade, You can see that the shader has been changed to an RPR shader. Others 45
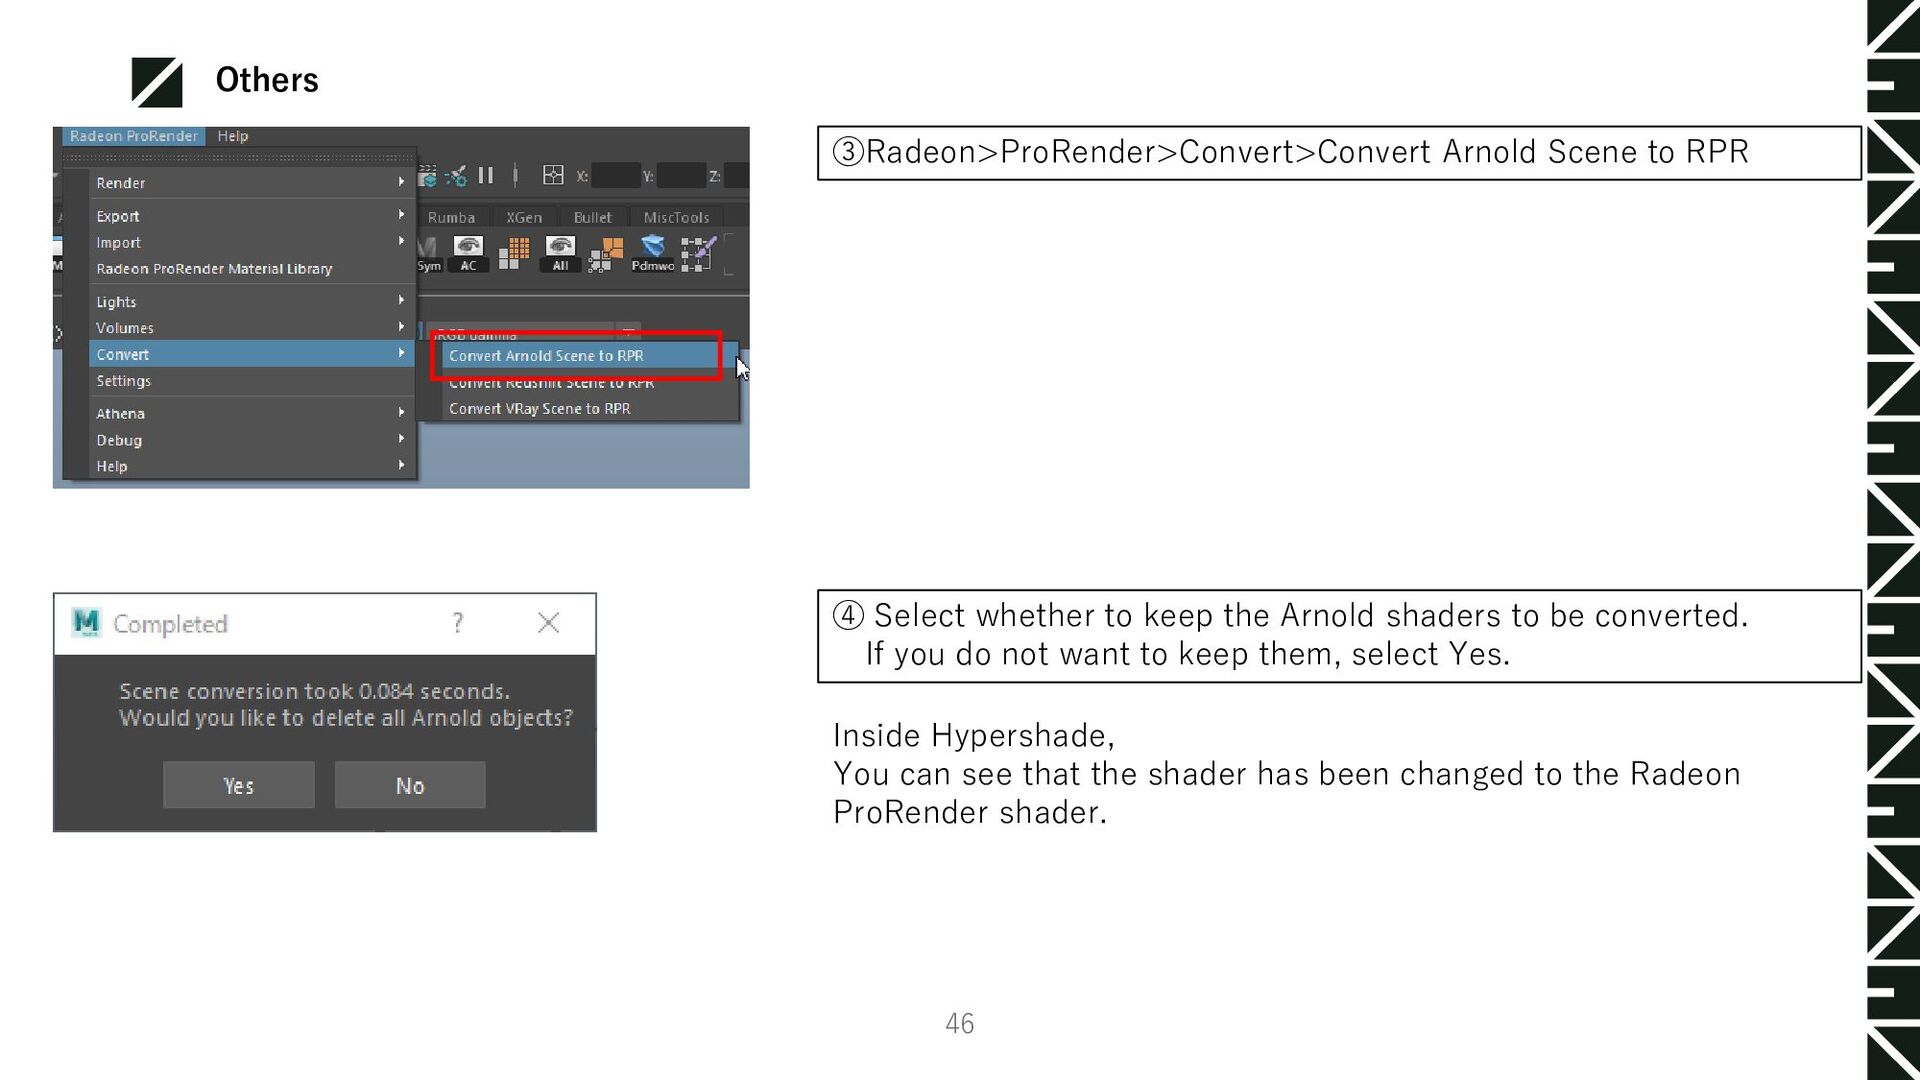
the Arnold shaders to be converted. If you do not want to keep them, select Yes. Inside Hypershade, You can see that the shader has been changed to the Radeon ProRender shader. Others 46