Upgrade to Pro — share decks privately, control downloads, hide ads and more …

お外でBlackhole

Avatar for Tenstorrent Japan Tenstorrent Japan
October 29, 2025
97

 お外でBlackhole

Tenstorrent TechTalk #4, LT2

Avatar for Tenstorrent Japan

Tenstorrent Japan

October 29, 2025
Tweet

Transcript

  1. お外で Blackhole Tenstorrent Teck Talk #4 - Lightning Talk 林

    哲矢 : LT なので自己紹介はスキップ ※ 注意事項: 本資料の内容は Tenstorrent 公式とは一切関係ありません  あくまでも個人の趣味情報としてご理解ください
  2. はじめに いつでもどこでも Blackhole をハッ クしたい! やっぱり手元で実物を触りたい 俺の Blackhole を持ち込んで見 せびらかしたい

    皆で Blackhole を持ち寄って 800Gbps で繋ぎ合いたい 4 人で 2D トーラス、8 人で 3D トーラスなんて痺れる (1) 頑張ればできるかも. TT is freedum! ※ 右の画像は Gemini Nano Banana で生成したものです (1)
  3. お買いもの 1. Thunderbolt 3 M.2 NVMe アダプタ: Wavlink Portable M.2

    NVMe SSD 2. M.2 NVMe PCIe 3.0 x4 アダプタ : ADT-Link R42UF 3. 1000W ATX 3.1 電源: Thermalright TR-TPFX-1000-W Aliexpress 7 月のセールで一式購入して 32,335 円 DIY で eGPU ボックスよりお安くできました 参考にしたサイト https://darekasan-net.hatenablog.com/entry/2024/09/04/152918
  4. いろいろ繋いでみた 結果 接続 メモリ 古い ThinkPad X1 Carbon ✗ TB3

    16GB 基板認識できず orz... BIOS に Abobe 4G Decoding が無いため 名刺サイズx86 Radxa X4 △ M.2 OCI link 8GB 惜しい! 小さなサンプルは動くが vLLM はメモリ不足で動かず tt-smi OK, run_op_on_device.py OK, vLLM NG 最近の ThinkPad P14s Gen5 ◯ TB3 64GB 動いた! TTSMI ┌────────────────────────────────────────────────────────────────────────────────────────────────────────────────────────────────────────┐ │ V e r s i o n   3 . 0 . 3 2                                                                   TT-SMI                                                 O c t   2 3   2 0 2 5   1 1 : 1 2 : 0 4   P M │ └────────────────────────────────────────────────────────────────────────────────────────────────────────────────────────────────────────┘ ┌─  H o s t   I n f o   ( C o n f i g   W a r n i n g ! )  ─ ─ ─ ─ ─ ─ ─ ─┐I n f o r m a t i o n   ( 1 ) T e l e m e t r y   ( 2 ) F W   V e r s i o n   ( 3 ) │ │╸━ ━ ━ ━ ━ ━ ━ ━ ━ ━ ━ ━ ━ ━ ━╺━━━━━━━━━━━━━━━━━━━━━━━━━━━━━━━━━━━━━━━━━━━━━━━━━━━━━━━━━━━━━━━━━━━━━━━━━━━━━━━━━ │*  O S               :  L i n u x   ( x 8 6 _ 6 4 ) │┌─  D e v i c e   I n f o r m a t i o n  ───────────────────────────────────────────────────────────────────────────┐ │*  D i s t r o       :  U b u n t u   2 4 . 0 4 . 3   L T S ││ │ │*  K e r n e l       :  6 . 1 4 . 0 - 3 3 - g e n e r i c ││ #       B u s   I D       B o a r d   T y p e   B o a r d   I D     C o o r d s D R A M   T r a i n e d D R A M   S p e e d L i n k   S p e e d   L i │ │*  H o s t n a m e   :  h a u y n i t e ││ │ │*  P y t h o n       :  3 . 1 2 . 3 ││ 0  0 0 0 0 : 0 3 : 0 0 . 0        p 1 0 0 a          4 3 2 3 1 9 1 1 0 5 c     N ∕ A             N ∕ A                 N ∕ A         G e n 3  ∕   G e n 5     x │ │*  M e m o r y       :  7 . 5 4   G B ││ │ │                      *   3 2 G B + ││ │ │*  D r i v e r       :  T T - K M D   2 . 4 . 1 ││ │ │ ││ │ └─ ─ ─ ─ ─ ─ ─ ─ ─ ─ ─ ─ ─ ─ ─  *   R e c o m m e n d e d   C o n f i g  ─┘│ │ │ │ │ │ │ ▉ │ │ │ └────────────────────────────────────────────────────────────────────────────────────────────────┘   q  Q u i t    h  H e l p    d  T o g g l e   d a r k   m o d e    c  T o g g l e   s i d e b a r    1  D e v i c e   i n f o   t a b    2  T e l e m e t r y   t a b    3  F i r m w a r e   t a b   ▏^ p  p a l e t t e ※2 ERROR 10-12 03:13:08 [engine.py:453] [enforce fail at alloc_cpu.cpp:117] err == 0. DefaultCPUAllocator: can't allocate memory: you tried to allocate 17179869184 bytes. Error code 12 (Cannot allocate memory) 2
  5. 動いた! ハード接続と BIOS 基板: 俺の Blackhole p100a PC: Thinkpad P14s

    Gen5 Intel Core Ultra 7 155H 64GB Ubuntu 24.04.3 bare metal installed BIOS: Thunderbolt 3 -> Security Level: No Security Security -> Virtualization -> VT-d Feature: Disable ※ 私の場合なぜか IOMMU(VT-d) 有効だと vLLM がエラー出て動きませんでした!? ※
  6. TT-SMI の表示 TTSMI ┌────────────────────────────────────────────────────────────────────────────────────────────────────────────────────────────────────────────────┐ │ V e r s i

    o n   3 . 0 . 3 2                                                                         TT-SMI                                                       O c t   2 0   2 0 2 5   1 2 : 2 4 : 3 7   A M │ └────────────────────────────────────────────────────────────────────────────────────────────────────────────────────────────────────────────────┘ ┌─  H o s t   I n f o   ( F u l l y   C o m p a t i b l e )  ─ ─ ─ ─ ─ ─ ─┐I n f o r m a t i o n   ( 1 ) T e l e m e t r y   ( 2 ) F W   V e r s i o n   ( 3 ) │ │╸━ ━ ━ ━ ━ ━ ━ ━ ━ ━ ━ ━ ━ ━ ━╺━━━━━━━━━━━━━━━━━━━━━━━━━━━━━━━━━━━━━━━━━━━━━━━━━━━━━━━━━━━━━━━━━━━━━━━━━━━━━━━━━━━━━━━━━ │*  O S               :  L i n u x   ( x 8 6 _ 6 4 ) │┌─  D e v i c e   I n f o r m a t i o n  ───────────────────────────────────────────────────────────────────────────────────┐ │*  D i s t r o       :  U b u n t u   2 4 . 0 4 . 3   L T S ││ │ │*  K e r n e l       :  6 . 1 4 . 0 - 3 3 - g e n e r i c ││ #       B u s   I D       B o a r d   T y p e   B o a r d   I D     C o o r d s D R A M   T r a i n e d D R A M   S p e e d L i n k   S p e e d   L i n k   W i d t h │ │*  H o s t n a m e   :  m i d n i g h t ││ │ │*  P y t h o n       :  3 . 1 2 . 3 ││ 0  0 0 0 0 : 5 2 : 0 0 . 0        p 1 0 0 a          4 3 2 3 1 9 1 1 0 5 c     N ∕ A             N ∕ A                 N ∕ A         G e n 3  ∕   G e n 5     x 4  ∕   x 1 6 │ │*  M e m o r y       :  6 2 . 3 0   G B ││ │ │*  D r i v e r       :  T T - K M D   2 . 4 . 1 ││ │ │ ││ │ └─ ─── ──── ─── ─── ─── ──── ─── ─── ──── ─── ─── ─┘│ │ │ │ │ │ │ │ │ │ │ ▏ │ │ │ └────────────────────────────────────────────────────────────────────────────────────────────────────────┘   q  Q u i t    h  H e l p    d  T o g g l e   d a r k   m o d e    c  T o g g l e   s i d e b a r    1  D e v i c e   i n f o   t a b    2  T e l e m e t r y   t a b    3  F i r m w a r e   t a b   ▏^ p  p a l e t t e tt-smi から SVG 保存するとこんな枠が付くけど Mac じゃないよ
  7. 動いた! TT-Inference-Server チュートリアルの Deploying LLMs に沿って vLLM がサクッと動きました (request-venv) hayate@midnight:~/git/tt-inference-server$

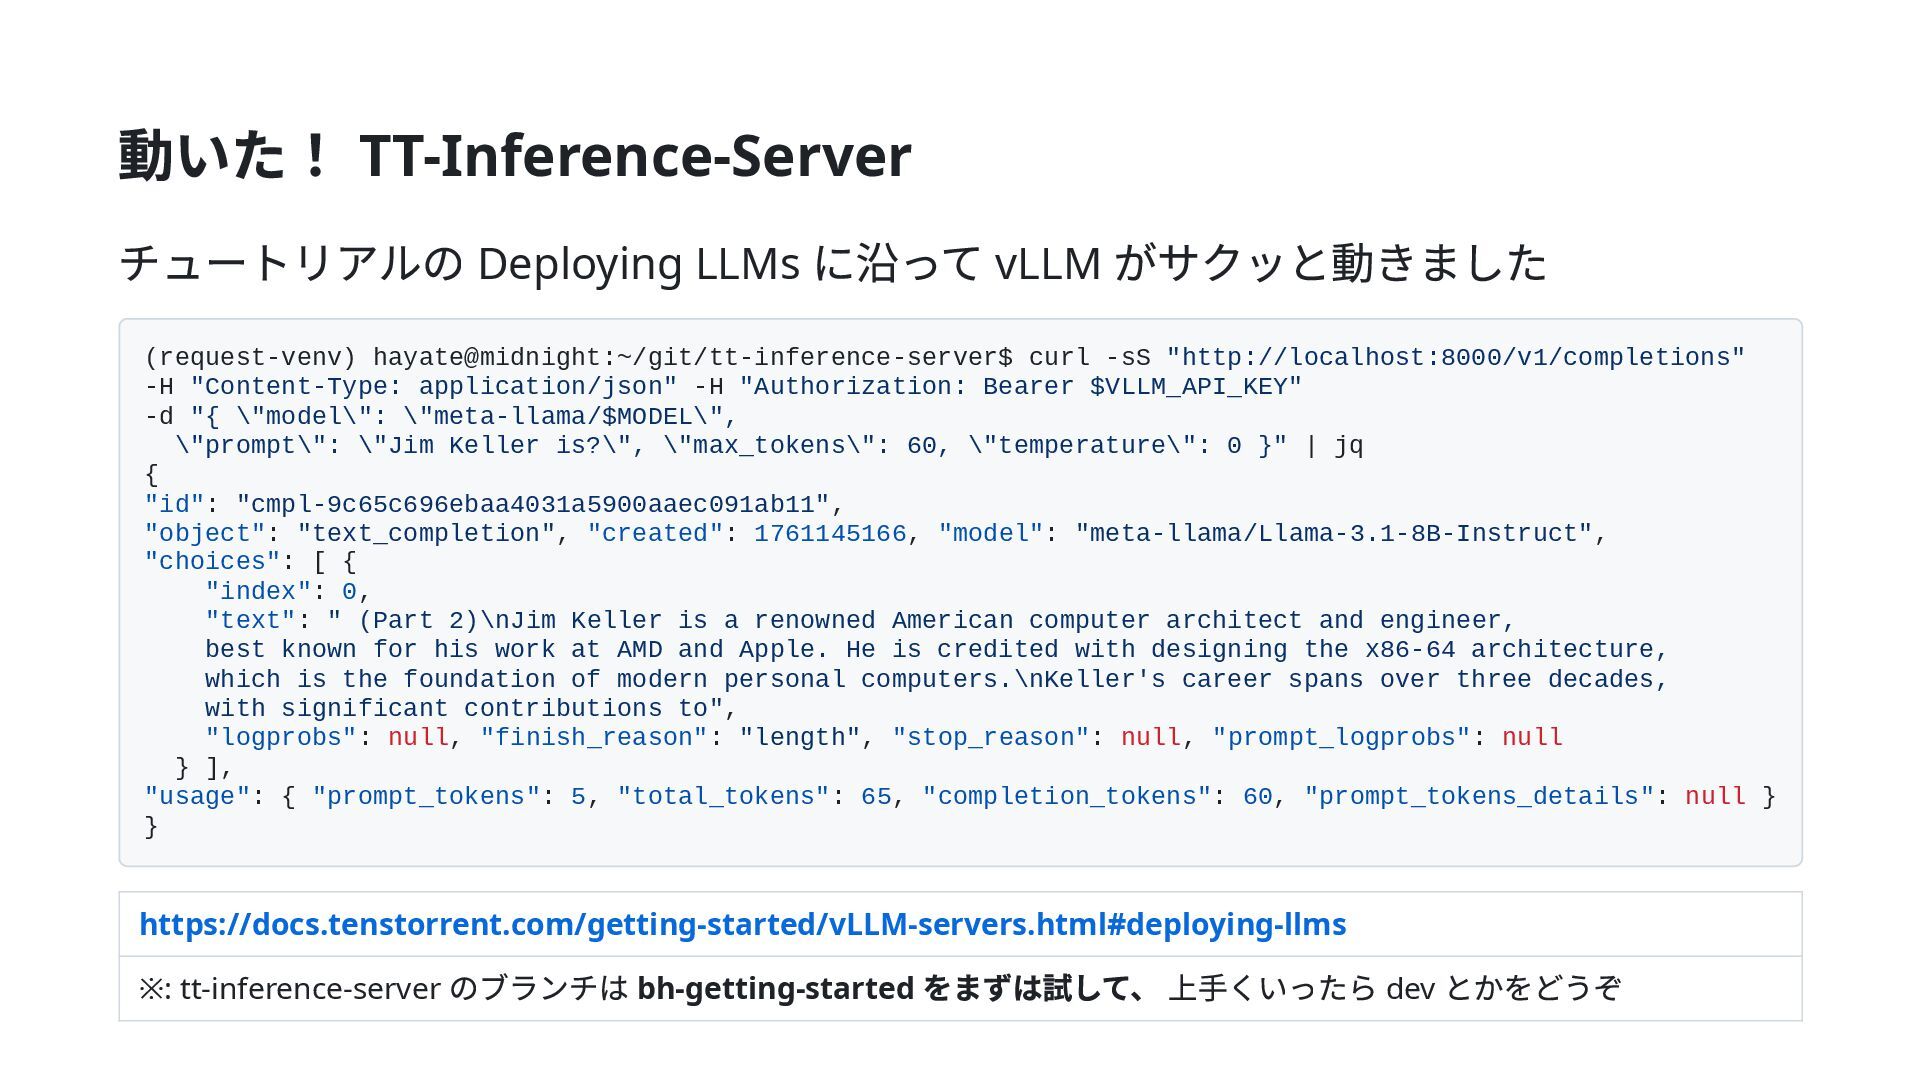
    curl -sS "http://localhost:8000/v1/completions" -H "Content-Type: application/json" -H "Authorization: Bearer $VLLM_API_KEY" -d "{ \"model\": \"meta-llama/$MODEL\", \"prompt\": \"Jim Keller is?\", \"max_tokens\": 60, \"temperature\": 0 }" | jq { "id": "cmpl-9c65c696ebaa4031a5900aaec091ab11", "object": "text_completion", "created": 1761145166, "model": "meta-llama/Llama-3.1-8B-Instruct", "choices": [ { "index": 0, "text": " (Part 2)\nJim Keller is a renowned American computer architect and engineer, best known for his work at AMD and Apple. He is credited with designing the x86-64 architecture, which is the foundation of modern personal computers.\nKeller's career spans over three decades, with significant contributions to", "logprobs": null, "finish_reason": "length", "stop_reason": null, "prompt_logprobs": null } ], "usage": { "prompt_tokens": 5, "total_tokens": 65, "completion_tokens": 60, "prompt_tokens_details": null } } https://docs.tenstorrent.com/getting-started/vLLM-servers.html#deploying-llms ※: tt-inference-server のブランチは bh-getting-started をまずは試して、 上手くいったら dev とかをどうぞ
  8. まとめ Thunderbolt アダプタ + p100a でポータブルな Blackhole 環境を構築できた いつでもどこでも、お外で Blackhole

    ハックが可能となった 今後の展望 Thunderbolt 接続による性能低下影響の調査 (8.0 Gb/s しか出てない?) Blackhole Peer to Peer 800Gbps 接続性能評価 そのためには、P150 が2 台以上必要、うん、欲しいなぁ (2) pci 0000:52:00.0: 8.000 Gb/s available PCIe bandwidth, limited by 2.5 GT/s PCIe x4 link at 0000:00:07.2 (capable of 504.112 Gb/s with 32.0 GT/s PCIe x16 link) 00:07.2 PCI bridge: Intel Corporation Meteor Lake-P Thunderbolt 4 PCI Express Root Port #2 (rev 02) (2)
  9. Tips. Linux デバイス認識と hugepage 1. udev 設定を追加して Thunderbolt デバイスを接続時に認識するようにする /etc/udev/rules.d/99-removable.rules

    ACTION=="add", SUBSYSTEM=="thunderbolt", ATTR{authorized}=="0", ATTR{authorized}="1" ※ 参考URL: https://wiki.archlinux.org/title/Thunderbolt 2. p100a を接続して lspci で確認 lspci -vv -d 1e52:* で確認する 52:00.0 Processing accelerators: Tenstorrent Inc Blackhole デバイスが表示されて且つ Region 0, 2, 4 の3つの Memory が割り当てられていること ※ 自分の環境では起動後に何回か認識しなおしていると Region 0 が割当失敗することありました 3. hugepage をセットしなおす ( プラグ&プレイ接続する場合は必須) lspci でデバイスが見えたら sudo /opt/tenstorrent/bin/hugepage-setup.sh を手動実行する Node 0 hugepages after: 4 と表示されればOK. cat /proc/meminfo でも情報見れる
  10. lspci と hugepage-setup.sh の出力 $ lspci -vv -d 1e52:* 52:00.0

    Processing accelerators: Tenstorrent Inc Blackhole Subsystem: Tenstorrent Inc Blackhole Control: I/O- Mem+ BusMaster+ SpecCycle- MemWINV- VGASnoop- ParErr- Stepping- SERR- FastB2B- DisINTx+ Status: Cap+ 66MHz- UDF- FastB2B- ParErr- DEVSEL=fast >TAbort- <TAbort- <MAbort- >SERR- <PERR- INTx- Latency: 0 Interrupt: pin A routed to IRQ 198 Region 0: Memory at 4800000000 (64-bit, prefetchable) [size=512M] Region 2: Memory at 4820000000 (64-bit, prefetchable) [size=1M] Region 4: Memory at 4000000000 (64-bit, prefetchable) [size=32G] Capabilities: <access denied> Kernel driver in use: tenstorrent Kernel modules: tenstorrent $ sudo /opt/tenstorrent/bin/hugepages-setup.sh Node 0 hugepages before: 0 Node 0 hugepages needed: 4 Node 0 hugepages after: 4 Completed hugepage setup