$30 off During Our Annual Pro Sale. View Details »

TT-NN 概要 ~内部実装の概説

Avatar for Tenstorrent Japan Tenstorrent Japan
December 18, 2025
18

TT-NN 概要 ~内部実装の概説

Tenstorrent Tech Talk #5, Session1

Avatar for Tenstorrent Japan

Tenstorrent Japan

December 18, 2025
Tweet

Transcript

  1. Tenstorrent TeckTalk #5 AI everywhere • May 2025 • Tenstorrent

    Japan KK TT-NN 概要~内部実装の概説 Sr. Staff Mgr, FAE 伊藤康宏 Dec 2025 Tenstorrent Japan KK
  2. Partners TT-Forge vLLM Python kernels TT-NN TT-Metalium TT-LLK (low-level-kernels) PyTorch

    models TT-Fabric (unified scale-up and scale-out) Manually optimized models TT-Train TT- Transformer LLM training LLM inference models LLM, t2s, s2t models Jax PyTorch TF ONNX Models AI Workloads Open Source Partners Tenstorrent Open Source Software 今日のTopic TT-NNの概要と, TT-metaliumとの繋ぎ部分
  3. 3 Compute RISC-V 2 RISC-V 3 RISC-V 4 RISC-V 5

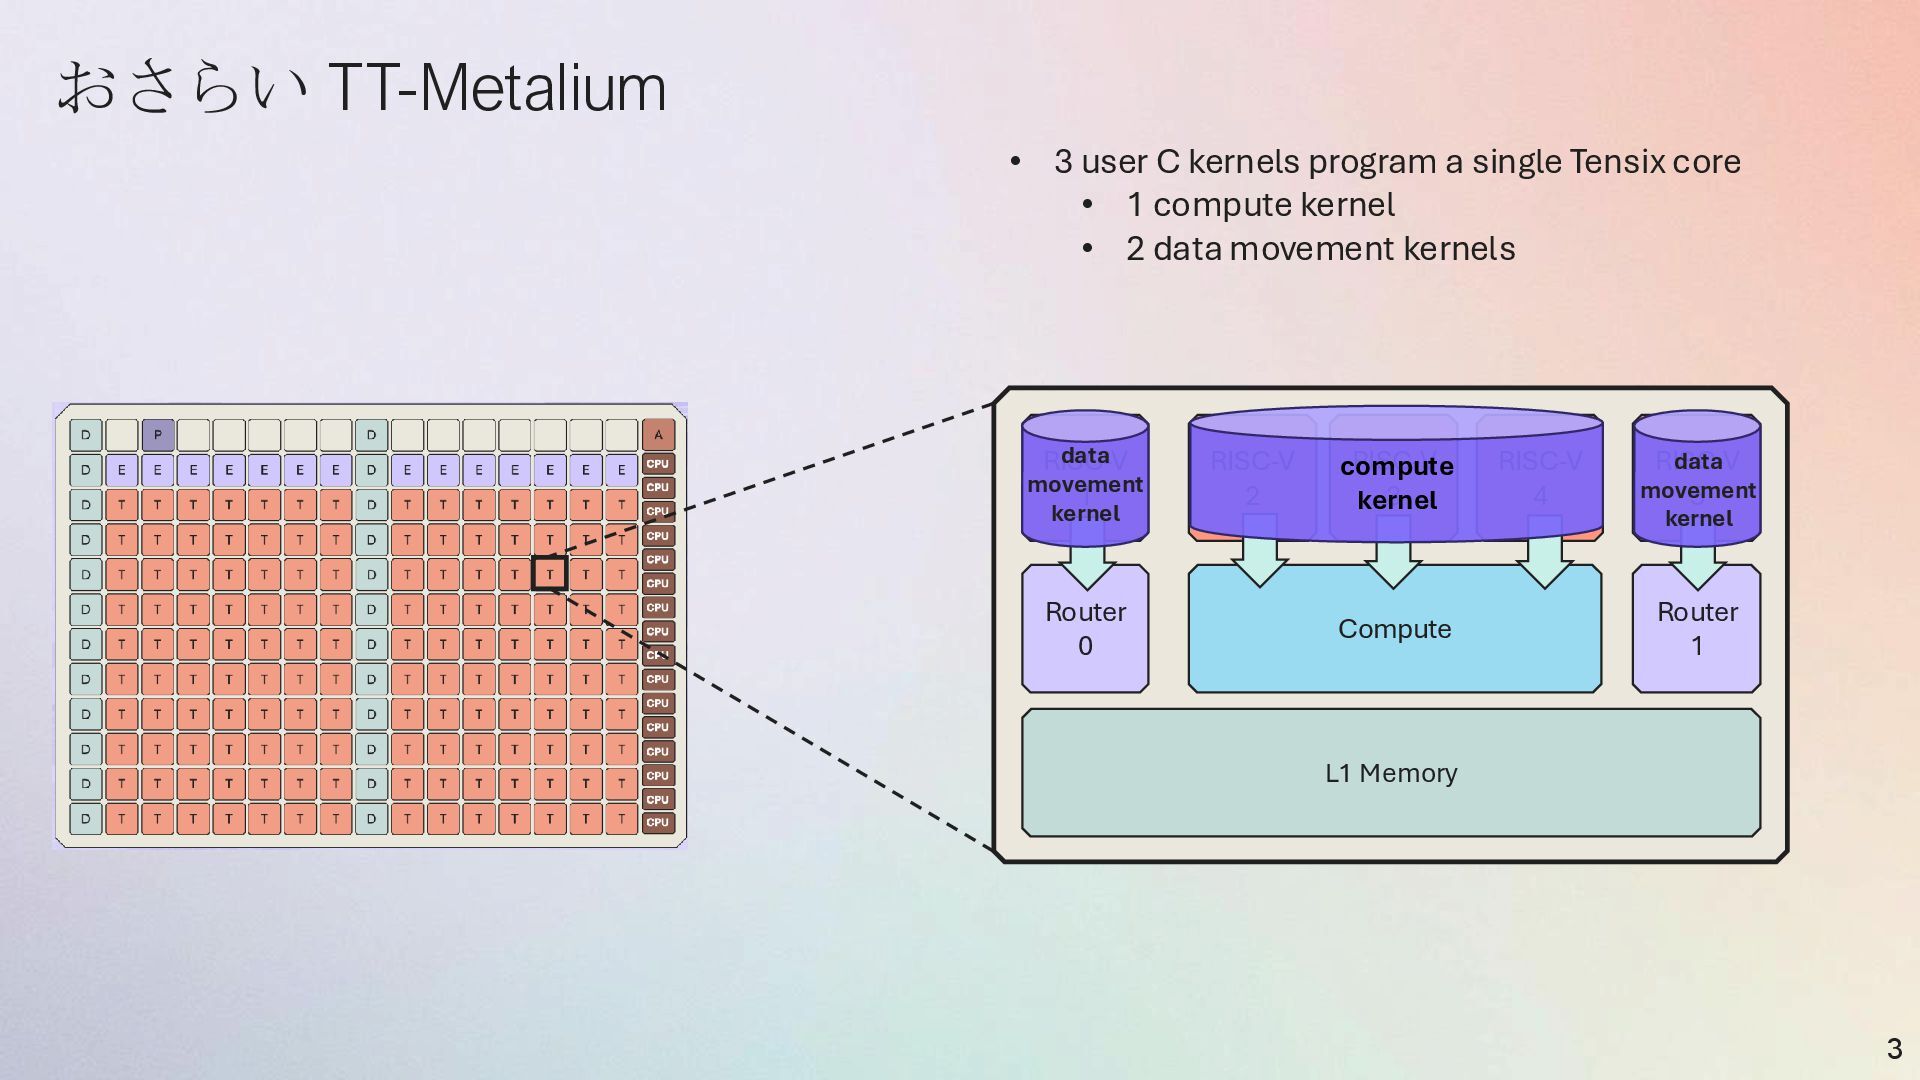
    RISC-V 1 Router 1 Router 0 L1 Memory • 3 user C kernels program a single Tensix core • 1 compute kernel • 2 data movement kernels data movement kernel data movement kernel compute kernel おさらい TT-Metalium
  4. Kernel Synchronization 4 Compute RISC-V 2 RISC-V 3 RISC-V 4

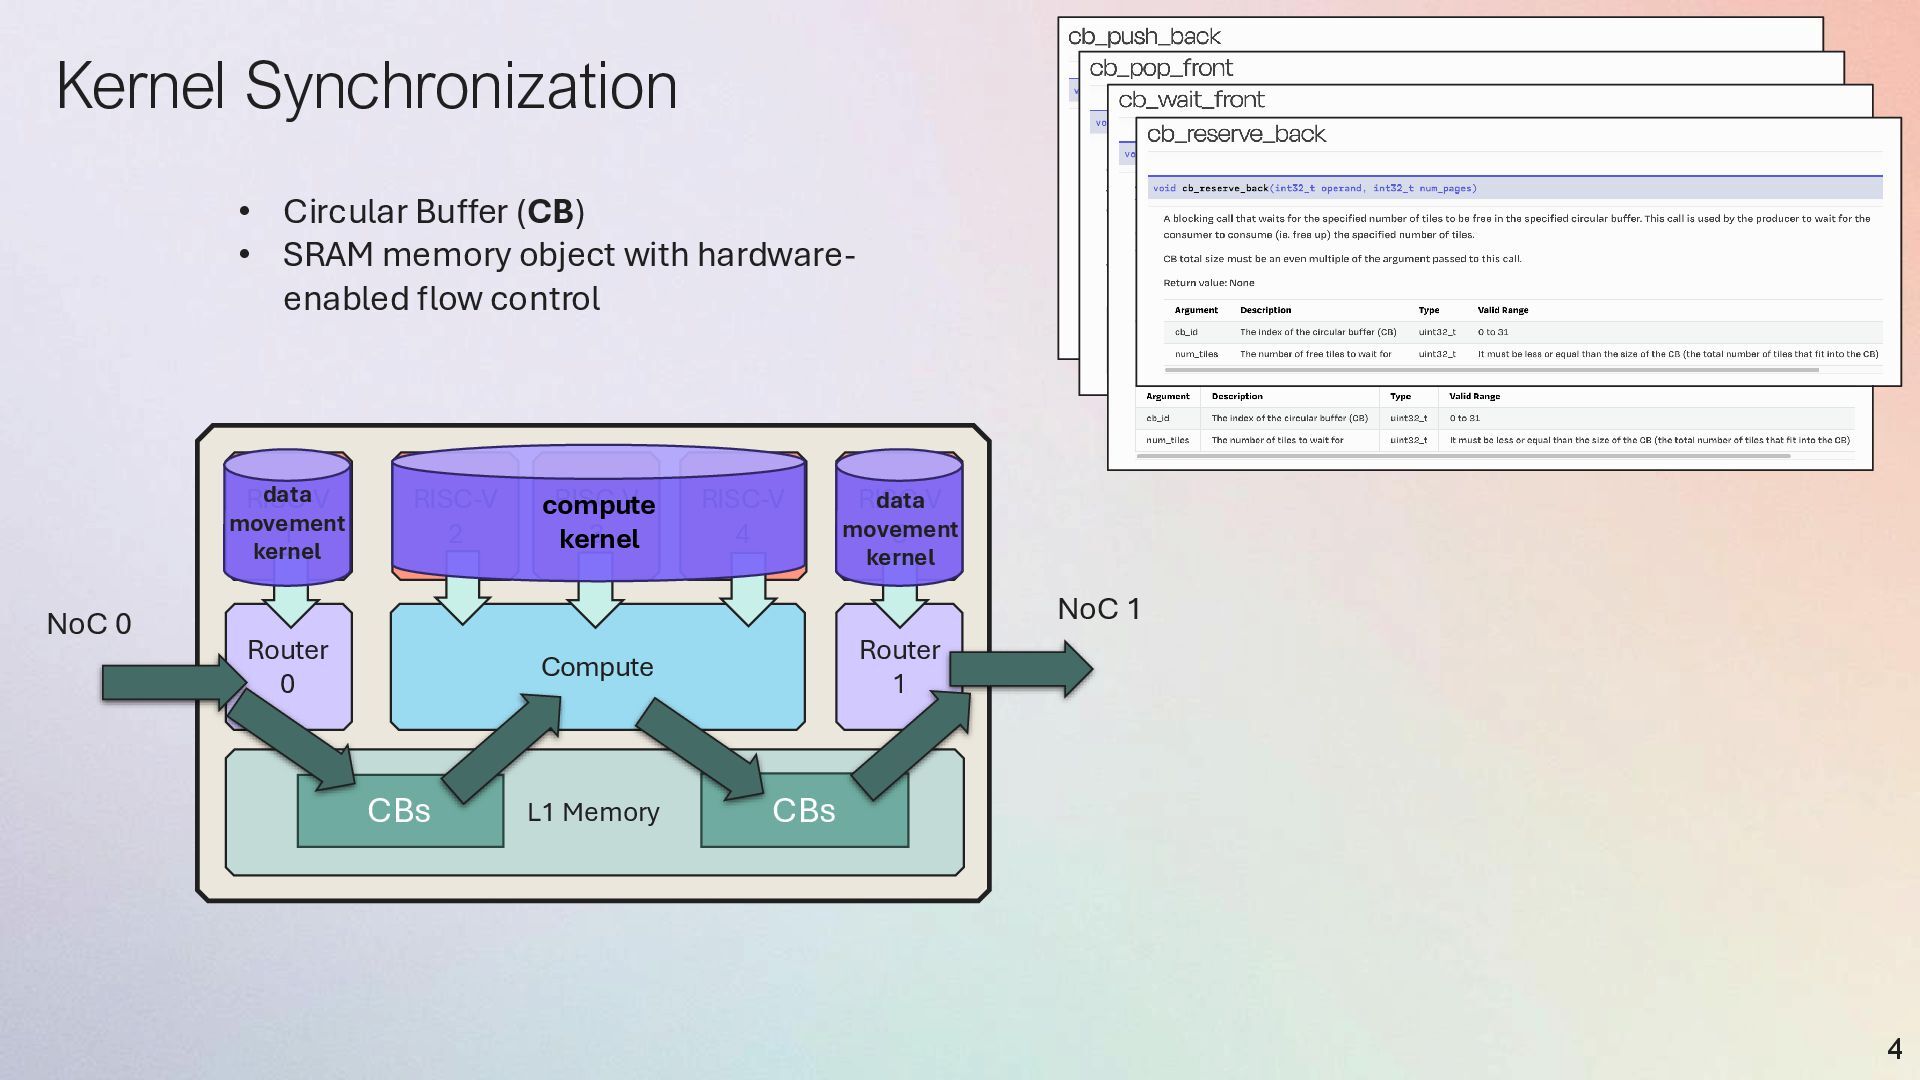
    RISC-V 5 RISC-V 1 Router 1 Router 0 L1 Memory CBs CBs NoC 0 NoC 1 data movement kernel data movement kernel compute kernel • Circular Buffer (CB) • SRAM memory object with hardware- enabled flow control
  5. TT-NN: next gen NN OP library built for AI accelerators

    • Pytorch • Doesn’t handle block-floats, tiles, layouts or sharding • Doesn’t natively handle multi-device • Custom libraries currently developed for multi-device • Doesn’t support performance OP configurations • Model developer can’t configure Ops for performance • Not really native multi-device • Additional layers on top 5 TT-NN • Native layouts and sharding • Native Distributed Shared Memory • SRAM and DRAM • Developer can configure OPs for performance • OPs are designed to be a great target for compilers compilers / MLIR • Native multi-device / multi-host
  6. TT-NN • PyTorch-likeな記述ができる. • PyTorchでやりづらいTT向け最適化が記載できる. • テンソルデータ配置指定(マルチチップ, マルチTensixコアの指定) , 集合通信

    • PyTorchにすごい依存している. 行列積の例 torch_input_tensor_a = torch.rand(4, 7, dtype=torch.float32) torch_input_tensor_b = torch.rand(7, 1, dtype=torch.float32) input_tensor_a = ttnn.from_torch(torch_input_tensor_a, dtype=ttnn.bfloat16, layout=ttnn.TILE_LAYOUT, device=device) input_tensor_b = ttnn.from_torch(torch_input_tensor_b, dtype=ttnn.bfloat16, layout=ttnn.TILE_LAYOUT, device=device) matmul_output_tensor = input_tensor_a @ input_tensor_b torch_matmul_output_tensor = ttnn.to_torch(matmul_output_tensor) 6 PyTorchから入力Tensorもらって 演算結果をPyTorchに返す
  7. 貴重な?ttnnだけ使った例 import ttnn device = ttnn.open_device(device_id=0) a = ttnn.full([5, 5,

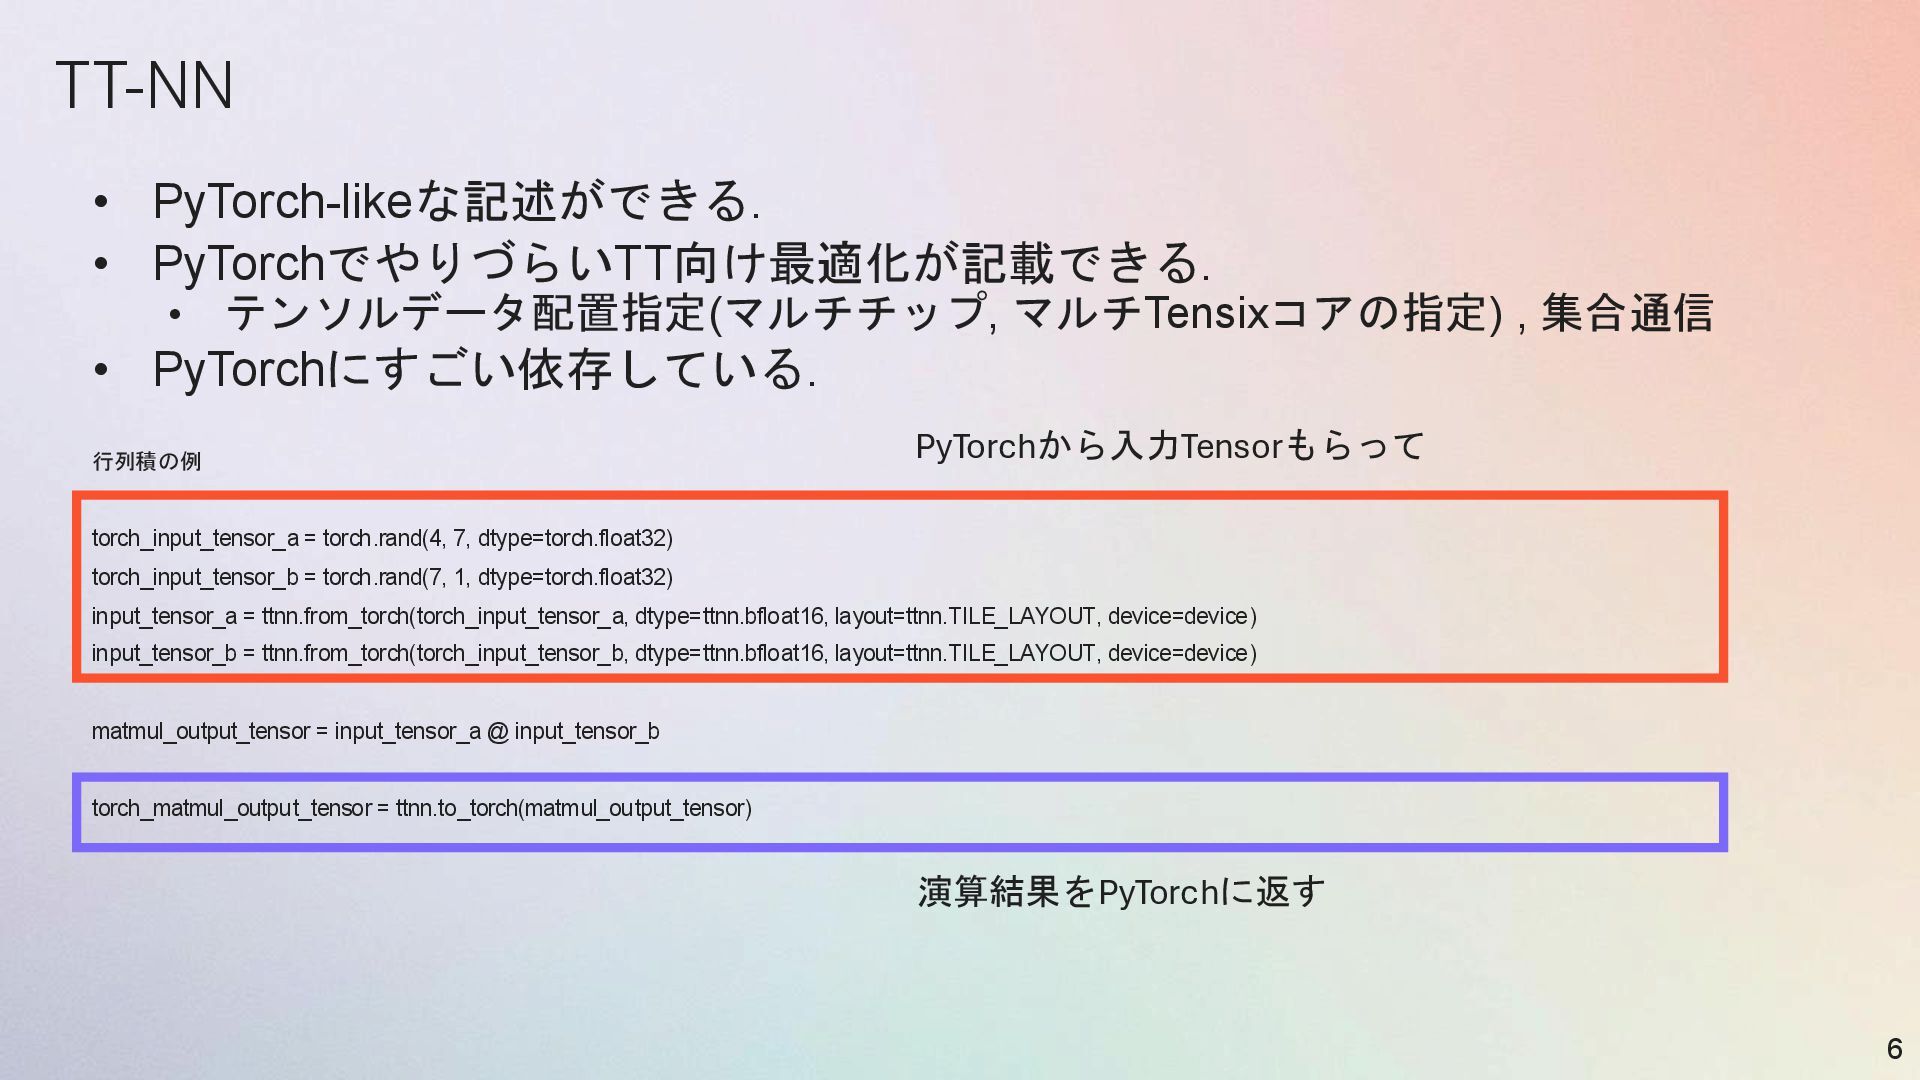
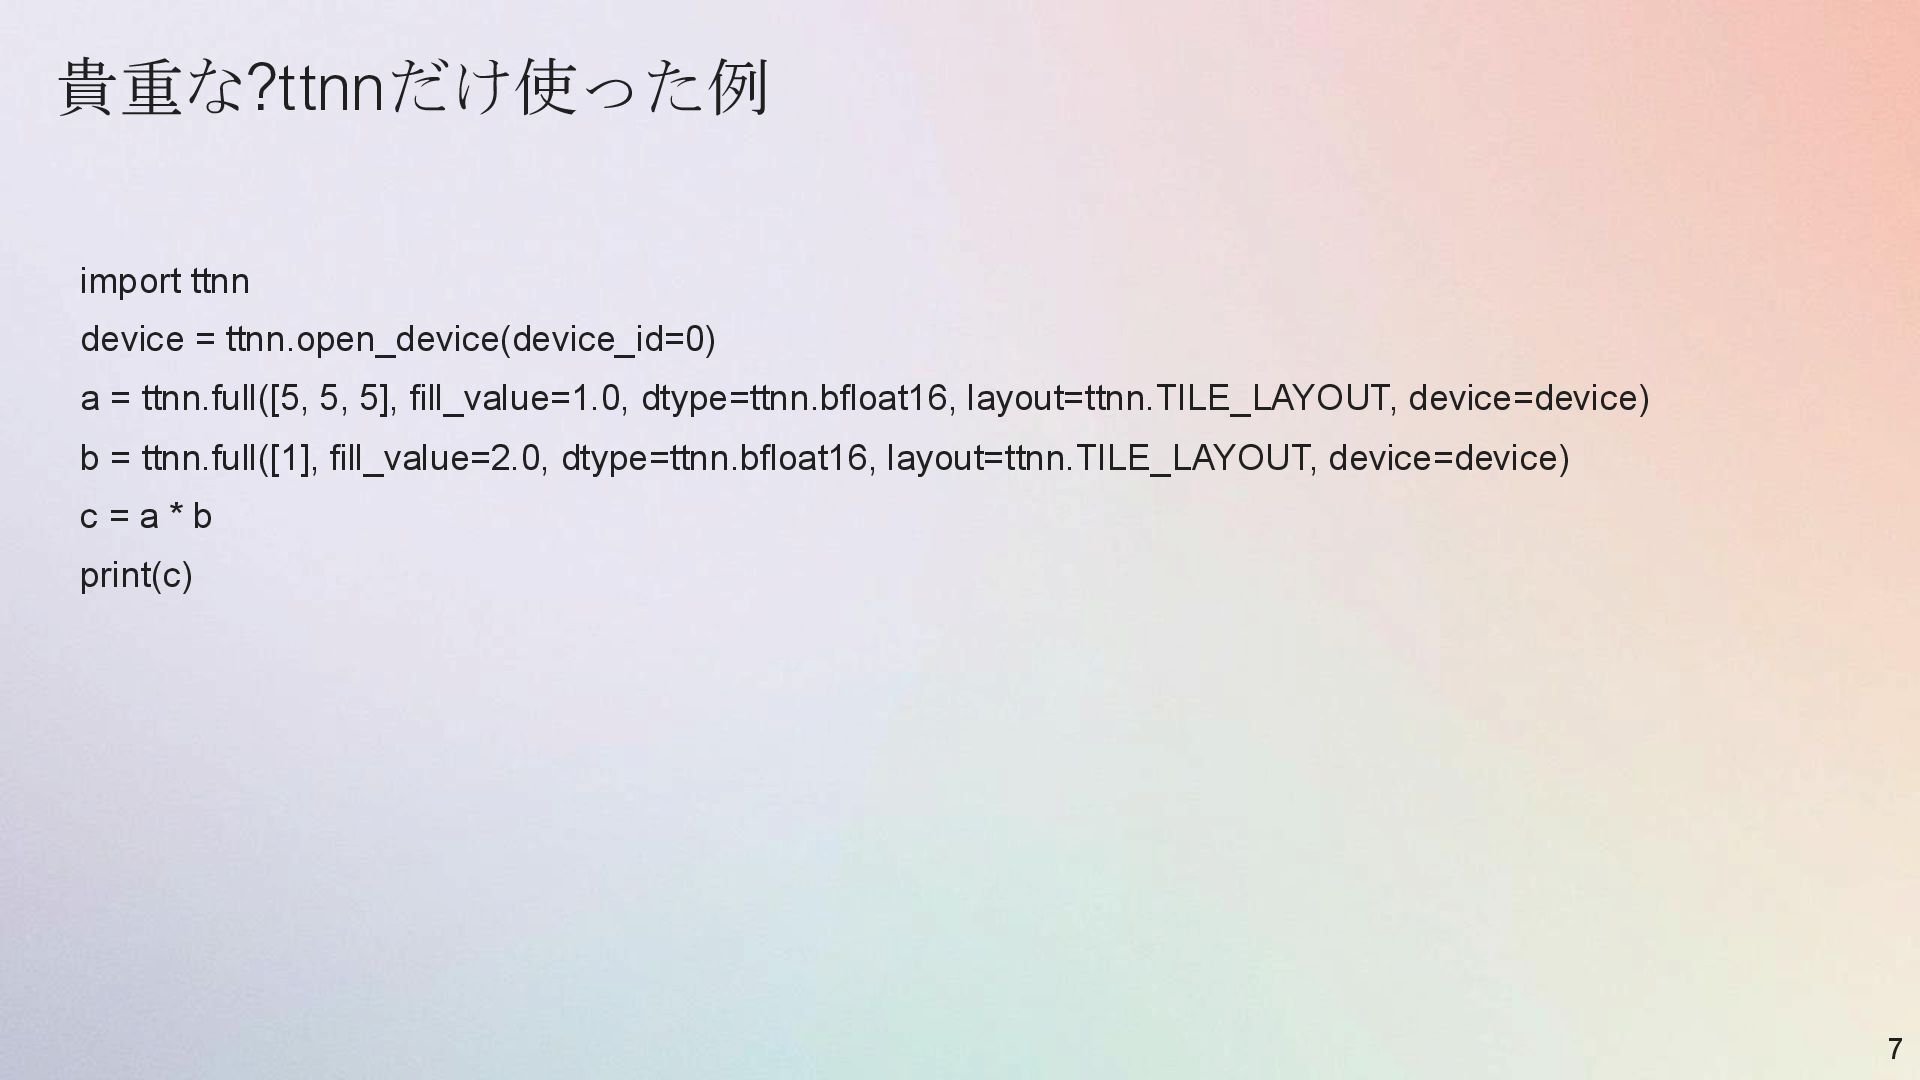
    5], fill_value=1.0, dtype=ttnn.bfloat16, layout=ttnn.TILE_LAYOUT, device=device) b = ttnn.full([1], fill_value=2.0, dtype=ttnn.bfloat16, layout=ttnn.TILE_LAYOUT, device=device) c = a * b print(c) 7
  8. TT-NN code example def bert_output( config, hidden_states, residual, *, parameters,

    ): output = hidden_states @ parameters.dense.weight output = output + parameters.dense.bias output = ttnn.layer_norm( output + residual, weight=parameters.LayerNorm.weight, bias=parameters.LayerNorm.bias, epsilon=config.layer_norm_eps, ) return output 8 計算をしているところは, かなり直感的でわかりやすい見た目をしている. TT-NN Pytorch class BertOutput(nn.Module): def __init__(self, config): super().__init__() self.dense = nn.Linear(config.intermediate_size, config.hidden_size) self.LayerNorm = nn.LayerNorm(config.hidden_size, eps=config.layer_norm_eps) def forward(self, hidden_states, input_tensor): hidden_states = self.dense(hidden_states) hidden_states = self.LayerNorm(hidden_states + input_tensor) return hidden_states
  9. Memory layout: • 重み, Activation等全てのTensorのレイアウト, メモリ上の位置とかも明示的に指 定すると性能が出る • TileはTensix Core,

    FPU(行列演算器)の演算単位と合致 9 通常の行Major配置 32x32タイルの単位で行Major配置 tt_tensor = ttnn.from_torch(torch_tensor,dtype=ttnn.bfloat16, layout=ttnn.TILE_LAYOUT)
  10. TILEの一個上のMemory rayout: Interleaved Tensors 10 Compute RISC-V 2 RISC-V 3

    RISC-V 4 RISC-V 5 RISC-V 1 Router 1 Router 0 L1 Memory Compute RISC-V 2 RISC-V 3 RISC-V 4 RISC-V 5 RISC-V 1 Router 1 Router 0 L1 Memory Compute RISC-V 2 RISC-V 3 RISC-V 4 RISC-V 5 RISC-V 1 Router 1 Router 0 L1 Memory Compute RISC-V 2 RISC-V 3 RISC-V 4 RISC-V 5 RISC-V 1 Router 1 Router 0 L1 Memory Compute RISC-V 2 RISC-V 3 RISC-V 4 RISC-V 5 RISC-V 1 Router 1 Router 0 L1 Memory Compute RISC-V 2 RISC-V 3 RISC-V 4 RISC-V 5 RISC-V 1 Router 1 Router 0 L1 Memory DRAM bank 0 DRAM bank 1 DRAM bank 2 0 1 2 0 1 2 8 x 8 tiles (256x256) 0 1 2 0 1 2 0 1 2 0 1 2 0 1 2 0 1 2 0 1 2 0 1 2 0 1 2 0 1 2 torch_tensor = torch.randn((256, 256), dtype=torch.bfloat16) tt_tensor = ttnn.from_torch( torch_tensor, dtype=ttnn.bfloat16, layout=ttnn.TILE_LAYOUT, device=device, memory_config=ttnn.DRAM_MEMORY_CONFIG) 複数Tileで構成される大きなTensorを縦/横方向で分割してDRAM/L1に配置 0 1 2 0 1 2 0 1 2 0 1 2 0 0 0 0 0 0 0 0 1 1 1 1 1 1 1 1
  11. TILEの一個上のMemory rayout: Sharding Tensor Compute RISC-V 2 RISC-V 3 RISC-V

    4 RISC-V 5 RISC-V 1 Router 1 Router 0 L1 Memory Compute RISC-V 2 RISC-V 3 RISC-V 4 RISC-V 5 RISC-V 1 Router 1 Router 0 L1 Memory DRAM bank 0 8 x 8 tiles (256x256) 0 (4x4tiles) shard_config = ttnn.create_sharded_memory_config( shape=[256, 256], core_grid=ttnn.CoreGrid(y=2, x=1), # Tensix Coreの2×1グリッド strategy=ttnn.ShardStrategy.HEIGHT) tt_tensor = ttnn.to_device( tensor, device, memory_config= strategy) 複数Tileで構成される大きなTensorを縦/横方向で分割してL1に配置 1 (4x4tiles) 0 (4x4tiles) 1 (4x4tiles)
  12. TILEの一個上のMemory rayout: Sharding Tensor Compute RISC-V 2 RISC-V 3 RISC-V

    4 RISC-V 5 RISC-V 1 Router 1 Router 0 L1 Memory Compute RISC-V 2 RISC-V 3 RISC-V 4 RISC-V 5 RISC-V 1 Router 1 Router 0 L1 Memory DRAM bank 0 8 x 8 tiles (256x256) 0 複数Tileで構成される大きなTensorを縦&横方向でBlock化してL1に配置 1 Compute RISC-V 2 RISC-V 3 RISC-V 4 RISC-V 5 RISC-V 1 Router 1 Router 0 L1 Memory Compute RISC-V 2 RISC-V 3 RISC-V 4 RISC-V 5 RISC-V 1 Router 1 Router 0 L1 Memory DRAM bank 1 2 3 0 (4x4tiles) 1 (4x4tiles) 2 (4x4tiles) 3 (4x4tiles) shard_config = ttnn.create_sharded_memory_config( shape=[256, 256], core_grid=ttnn.CoreGrid(y=2, x=2), # Tensix Coreの2×2グリッドを要求 strategy=ttnn.ShardStrategy.BLOCK, use_height_and_width_as_shard_shape=True ) tt_tensor = ttnn.to_device( tensor, device, memory_config=shard_config )
  13. Shardingされたmatmul 13 Tensorのレイアウトが違っても同じように扱える → DeviceのKernelに落ちる前にかなりの隠蔽が行われていそうな臭い # 入力Aをheight sharding A_sharded =

    ttnn.to_device( A,device, memory_config=ttnn.create_sharded_memory_config( shape=[M, K], core_grid=ttnn.CoreGrid(y=8, x=1), strategy=ttnn.ShardStrategy.HEIGHT ) ) # 入力Bをwidth sharding B_sharded = ttnn.to_device( B,device, memory_config=ttnn.create_sharded_memory_config( shape=[K, N], core_grid=ttnn.CoreGrid(y=1, x=8), strategy=ttnn.ShardStrategy.WIDTH ) ) # Matmul実行 C = ttnn.matmul(A_sharded, B_sharded)
  14. 実応用(Conv2d)でのSharding 14 input_tensor = torch.randn([32, 224, 224, 64]) # Height

    Sharding (画像を行方向で分割) input_sharded = ttnn.to_device( input_tensor, device, memory_config=ttnn.create_sharded_memory_config( shape=[32, 224, 224, 64], core_grid=ttnn.CoreGrid(y=8, x=8), strategy=ttnn.ShardStrategy.HEIGHT ) ) # Conv2D実行 output = ttnn.conv2d( input_sharded, weights, stride=(1, 1), padding=(1, 1), config=ttnn.Conv2dConfig( shard_layout=ttnn.TensorMemoryLayout.HEIGHT_SHARDED ) )
  15. 複数 chipのsharding • 4x2のチップのメッシュ結合にブロック化して載せる 15 from ttnn import ShardTensor2dMesh tensor

    = torch.randn([1, 1, 512, 512]) mesh_shape = ttnn.MeshShape(2, 4) tt_tensor = ttnn.from_torch(tensor, device=mesh_device, mesh_mapper=ShardTensor2dMesh( mesh_device, dims=(-2, -1) # 2次元で分割 ) ) Chip 0 Chip 4 Chip 1 Chip 5 Chip 2 Chip 6 Chip 3 Chip 7 各Shardのsizeは256*128
  16. Tensorを作る裏で集合演算 • 各DeviceのShardを集めてTensorを再構成したい時 • Weightを全チップで複製する 16 full_tensor = ttnn.all_gather( sharded_tensor,

    dim=-1, num_links=1, topology=ttnn.Topology.Ring ) tt_weights = ttnn.from_torch( weights, device=mesh_device, mesh_mapper=ReplicateTensorToMesh(mesh_device) ) ttnn.reduce_scatter, ttnn.all_reduceもある
  17. OPs Library: 18 Matrix Multiplication •ttnn.matmul - 行列乗算の基本操作 •ttnn.linear -

    全結合層の実装 Pointwise Unary(活性化関数など) •ttnn.relu, ttnn.relu6 - 最も一般的な活性化関数 •ttnn.gelu - Transformerで頻出 •ttnn.silu/swish - 現代のモデルで広く使用 •ttnn.softmax - 分類・attention層で必須 Pointwise Binary •ttnn.add, ttnn.subtract, ttnn.multiply - 基本的な算術演算 Normalization •ttnn.layer_norm - Transformerで必須 •ttnn.rms_norm - LLMで使用(LLaMAなど) •ttnn.batch_norm - CNNで使用 •ttnn.group_norm - Vision modelsで使用 Data Movement •ttnn.reshape, ttnn.permute - テンソル形状操作 •ttnn.concat - テンソル結合 •ttnn.slice - テンソル切り出し
  18. OPs Library: 19 Tenstorrentの特色が出ているops Transformer特化ops - ttnn.transformer.split_query_key_value_and_split_heads - QKV分割+multi-head分割を一度に実行 -

    ttnn.transformer.concatenate_heads - multi-headの結合 - ttnn.transformer.scaled_dot_product_attention - Attention全体を融合 - ttnn.transformer.scaled_dot_product_attention_decode - デコード時の最適化版 - ttnn.transformer.attention_softmax / attention_softmax_ - Attention向けsoftmax Fused Operations(融合演算) - ttnn.addmm - 行列乗算+加算を融合 - ttnn.unary_chain - 複数のunary演算を連鎖実行 - ttnn.bias_gelu_bw - bias加算とGELU backwardを融合 Convolution関連 - ttnn.conv2d - 2D畳み込み(専用Config classあり) - ttnn.prepare_conv_weights / prepare_conv_bias - 重みとバイアスの前処理 KV Cache操作 - ttnn.kv_cache.fill_cache_for_user_ - KVキャッシュの初期化 - ttnn.kv_cache.update_cache_for_token_ - トークン単位でのKVキャッシュ
  19. TT-NNの全体的な実行フロー 20 Python Layer ↓ (pybind11) C++ TT-NN Operations Layer

    ↓ (Operation Registration) Device Operation Layer ↓ (Program Factory) tt-metal Kernels Layer ↓ Hardware (Tensix Cores)
  20. Program Factory 21 利点 詳細 実行オーバーヘッドの削減 Tensor演算が同じ入力プロパティ(形状、設定など)で繰り返し実行される場合, 再コンパ イルの時間を完全に排除できる キャッシュされたプログラムがすぐに再利用されるため,

    推論のように同じ操作が連続して 行われるワークロードで, 大幅なレイテンシ削減とスループット向上を実現できる パフォーマンスの安定化 初回実行時のみプログラムのコンパイルが発生する 2回目以降はキャッシュからロードされるため, 実行時間が予測可能になる ハードウェア最適化 TT-Metalの低レベルのプログラム設定(コアの割り当て, データ転送戦略など)を管理する 主な機能: プログラムの生成とコンパイル: TT-NNの演算が呼び出される際, 入力テンソルの形状/データ型/メモリ設定, およびユーザーが指定したプ ログラム設定に基づいて, デバイスで実行するプログラムをコンパイルする. プログラムキャッシュの管理: 生成したプログラムを, その設定を一意に識別するキーとともにプログラムキャッシュに保存する
  21. 各opsの実装 • TT-NNのopに1~複数TT-Metaliumのdevice kernelが対応している. • Pythonの段階で計算本体が実装されるわけではない • 最適化オプション/Kernelの選択やweightの前処理が入る. • 具体的にConv2dを例に

    • Python I/F: ttnn/python/ttnn/operations/conv2d.py • Pybindやらcpp版ソース ttnn/cpp/ttnn/operations/conv/conv2d conv2d_pybind.cpp → python と c++で実装されたopsが繋がる conv2d.cpp → device/conv2d_device_operation.cpp → conv2d_op_sharded_program_factory.cpp → device kernelの登録(CreateKernel)が出てくる Reader, Writer, ComputeのKernel 22 Python Layer ↓ (pybind11) C++ TT-NN Operations Layer ↓ (Operation Registration) Device Operation Layer ↓ (Program Factory) tt-metal Kernels Layer ↓ Hardware (Tensix Cores)