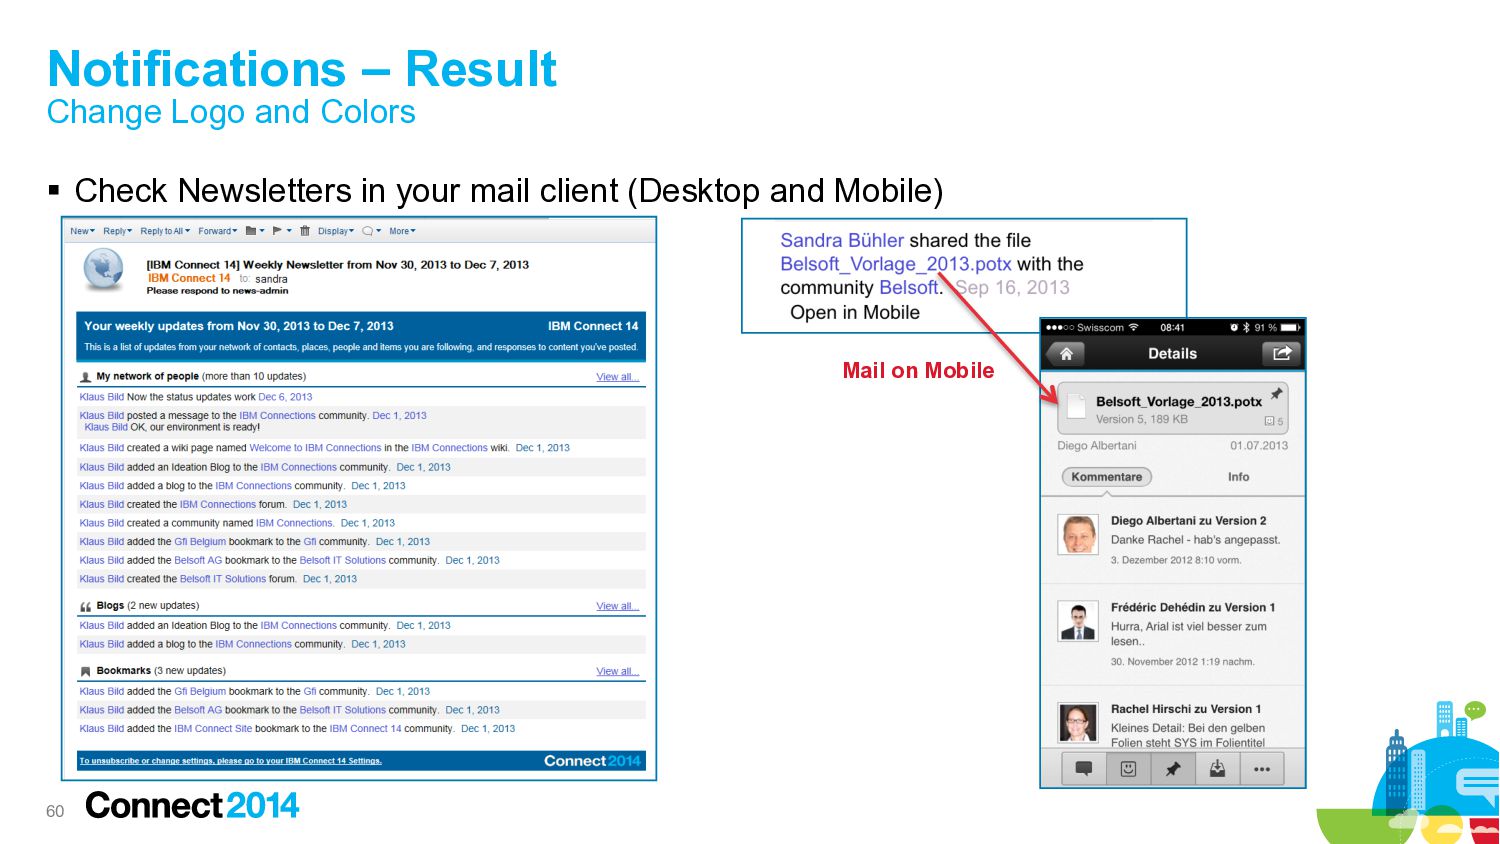
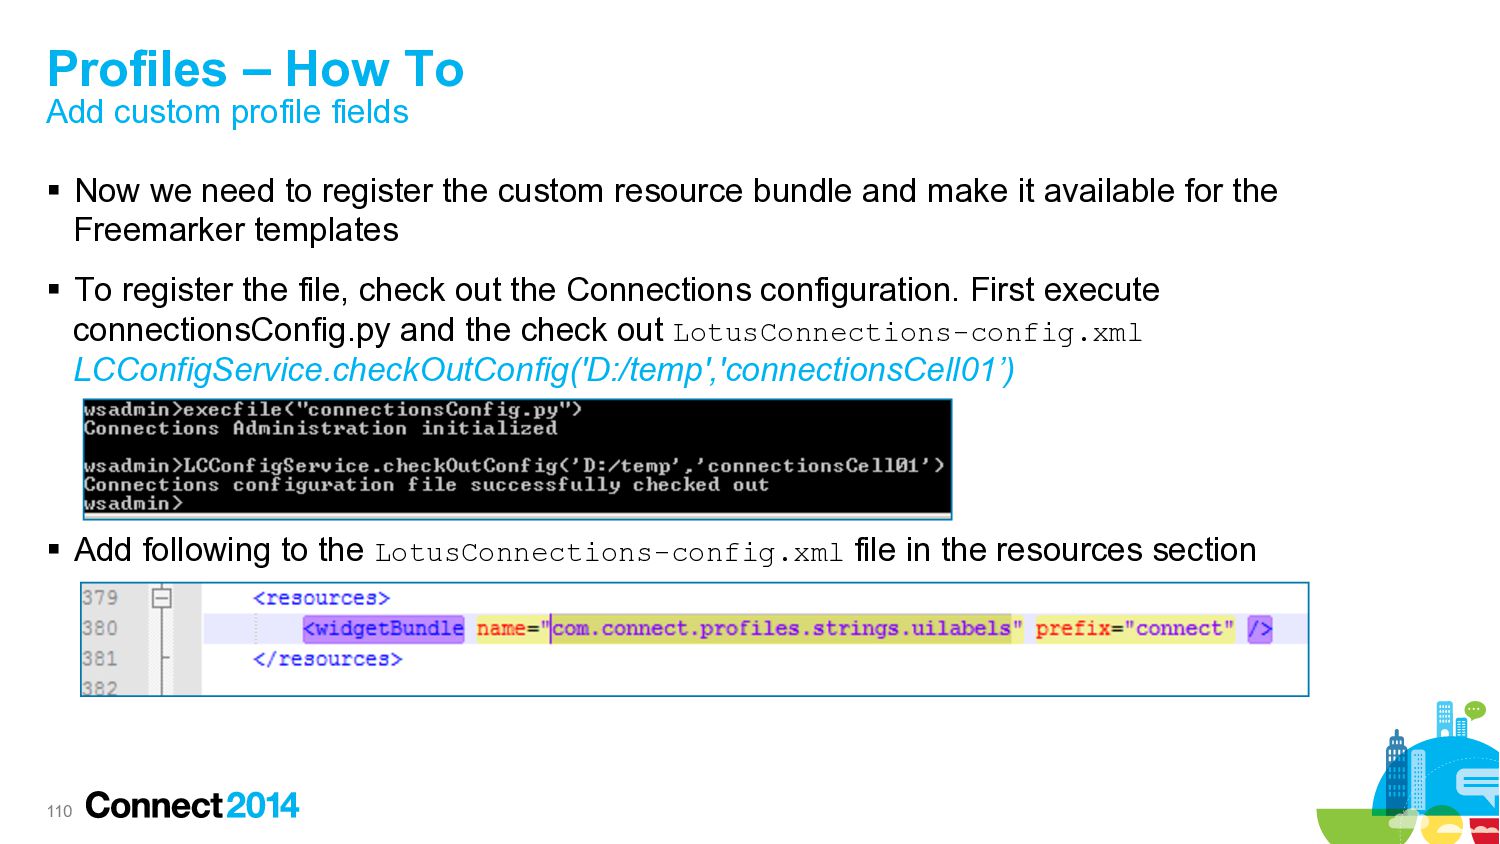
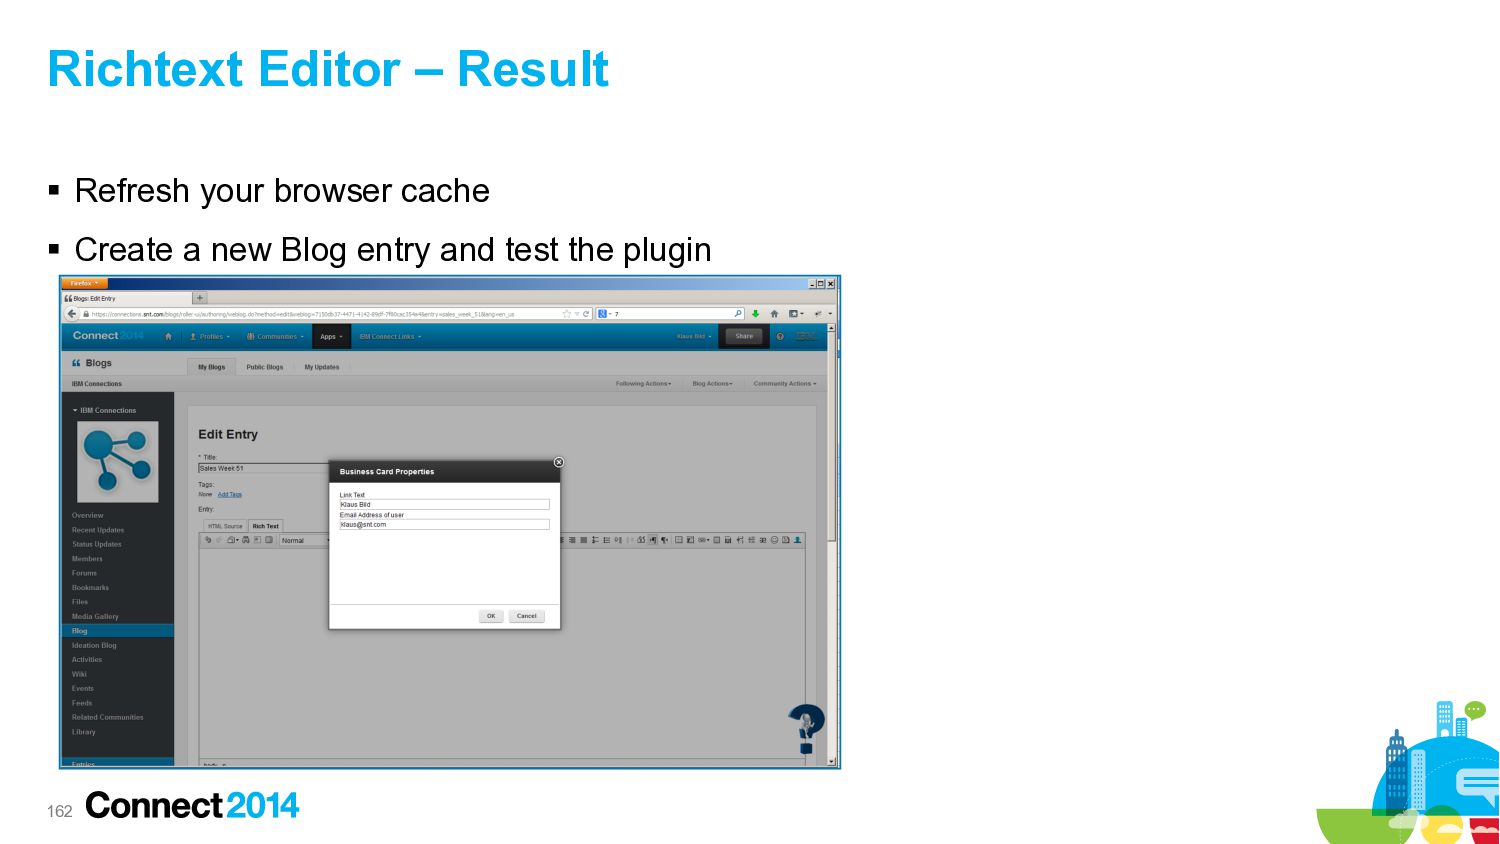
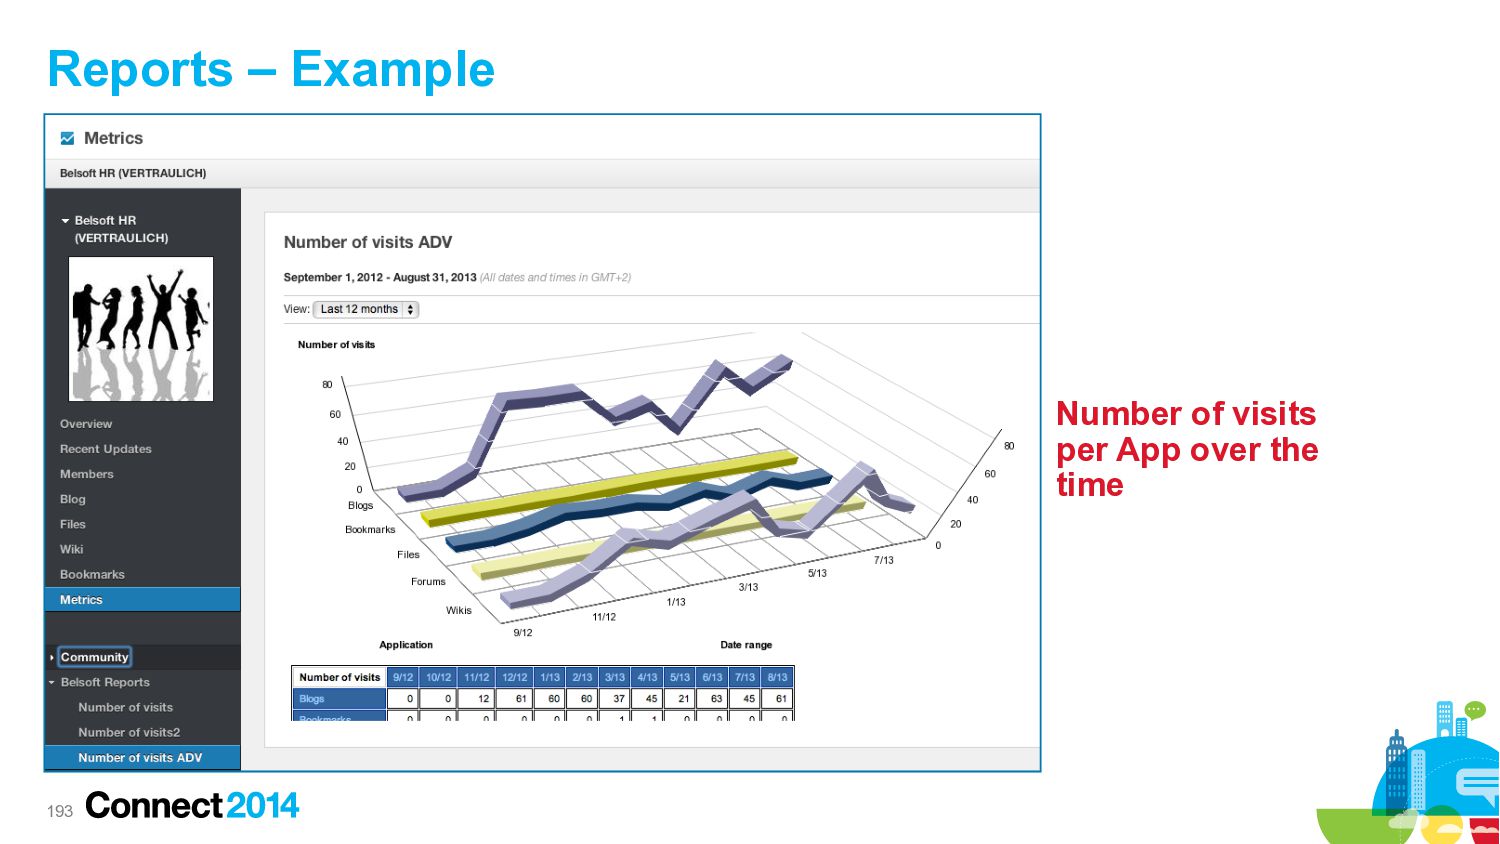
Upgrade to Pro — share decks privately, control downloads, hide ads and more …

Show301 make your ibm® connections deployment your own customize it!

Show301 make your ibm® connections deployment your own customize it!

Presented @IBM Connect 2014 with Klaus Bild

Wannes Rams

January 26, 2014
Tweet

More Decks by Wannes Rams

Other Decks in Technology

Transcript

  1. © 2014 IBM Corporation SHOW301: Make Your IBM® Connections Deployment

    Your Own: Customize It! Klaus Bild, Belsoft AG Wannes Rams, GFI
  2. This presentation mentions the following Copyrights and Trademarks §  IBM®

    Connections §  IBM Cognos® §  IBM® Lotus® Connections 3.0 §  IBM® Domino® §  IBM® Sametime® §  IBM® Tivoli® §  IBM® WebSphere® 2 §  Android™ §  BlackBerry® §  CKEditor™ §  Firefox® §  Google Maps™ §  Microsoft® Windows® §  Microsoft® Windows Server® 2008 R2 §  OASIS® §  LinkedIn® §  Twitter® §  Wordpress®
  3. Introduction Goal Show you live what can be customized and

    give you a starting point for your own customizations 6
  4. Agenda – First Part §  Introduction §  User Interface § 

    Login Page §  Notifications §  Getting Started Page §  Communities §  Wikis §  Profiles §  Richtext Editor 7
  5. Agenda – Second Part (if time will allow it) § 

    Media Gallery Object Types §  Mobile App §  Reports §  Desktop Plugin §  IBM Connections Content Manager 8
  6. Introduction Our environment §  Microsoft Windows Server 2008 R2 § 

    IBM Connections 4.5 CR3 (IBM Domino LDAP, single box installation) §  CONNECTIONS_CUSTOMIZATION_DEBUG enabled §  Next Generation Theme §  Profile templateReloading in profiles-config.xml set to 15 secs §  Login credentials stored in soap.client.properties -> Always disable debug & reloading settings in production! 10
  7. Introduction Remarks §  We use following abbreviations: – custom_dir: Customization directory,

    check the WebSphere variable CONNECTIONS_CUSTOMIZATION_PATH (here D:\IBM\Connections\data\shared\customization\ ) – provision_dir: Provision directory, check the WebSphere variable CONNECTIONS_PROVISION_PATH (here D:\IBM\Connections\data\shared\provision\) – profiles_dir: WebSphere profiles directory (here D:\IBM\WebSphere\AppServer\profiles) – htdocs: HTTP Server htdocs directory (here D:\IBM\HTTPServer\htdocs) 11
  8. User Interface – Introduction §  In this part we will:

    – Change logo and colors – Add a custom menu and permanent link 12
  9. 14 User Interface – How to Change Logo and Colors

    §  Open WAS Administrative Console and navigate to “Applications – WebSphere enterprise applications” §  Stop Common App
  10. 15 User Interface – How to Change Logo and Colors

    §  We are using the Next Generation Theme http://www-10.lotus.com/ldd/lcwiki.nsf/dx/Customizing_themes_for_IBM_Connections_4.5_CR1_ic451 §  NextGen Theme works different than the standard theme – We have to customize a source file (com.ibm.social.gen4.theme_4.0.0.cr3.jar) – This is more a hack than a proper documented way (but it is a supported way!) – Therefore you have to backup your changes before any fix/fixpack installation or upgrade (the changes may be overwritten) – Standard theme customization is easier, just create your own theme css file in custom_dir\themes\defaultTheme
  11. 16 User Interface – How to Change Logo and Colors

    §  Go to folder provision_dir\webresources\ §  Open com.ibm.social.gen4.theme_4.0.0.cr3.jar with a zip program
  12. 17 User Interface – How to Change Logo and Colors

    §  Extract all files to provision_dir\webresources\com.ibm.social.gen4.theme_4.0.0.cr3\
  13. 18 User Interface – How to Change Logo and Colors

    §  Delete the file com.ibm.social.gen4.theme_4.0.0.cr3.jar §  Rename the new folder to com.ibm.social.gen4.theme_4.0.0.cr3.jar REMARK: customizations can directly be tested, no repacking needed
  14. 19 User Interface – How to Change Logo and Colors

    §  Open the new folder com.ibm.social.gen4.theme_4.0.0.cr3.jar and navigate to resources\css\defaultTheme §  Open defaultTheme.css with a text editor
  15. 20 User Interface – How to Change Logo and Colors

    §  Search .lotusui30 div.lotusBanner .lotusRightCorner §  Replace the color gradient #3c404 - #151718 with #00b2ef - #00649d
  16. 21 User Interface – How to Change Logo and Colors

    §  Hide the IBM logo and add a new logo
  17. 22 User Interface – How to Change Logo and Colors

    §  Copy your referenced logo ibmconnect.png to the htdocs\images folder
  18. 23 User Interface – How to Change Logo and Colors

    §  Open WAS Administrative Console and navigate to „Applications – WebSphere enterprise applications“ §  Start the Common App
  19. 25 User Interface – How to Custom Menu and Permanent

    Link §  Copy the header.jsp file from profiles_dir\AppSrv01\installedApps\connectionsCell01\Homepage.ear \homepage.war\nav\templates to custom_dir\common\nav\templates
  20. 26 User Interface – How to Custom Menu and Permanent

    Link §  Open the copied header.jsp file with a text editor §  Change/Add some lines at the end of the file
 " Custom permanent link Reference to custom menu
  21. 27 User Interface – How to Custom Menu and Permanent

    Link §  Copy the referenced image question.png to the htdocs\images folder
  22. 28 User Interface – How to Custom Menu and Permanent

    Link §  Create a folder called menu and create the referenced jsp file ibmconnect14.jsp
  23. User Interface – Resources §  Customizing the user interface http://www-10.lotus.com/ldd/lcwiki.nsf/dx/Customizing_the_user_interface_ic45

    §  Customization of the Next Gen Theme http://kbild.ch/2013/07/customization-of-the-next-gen-theme-for-ibm-connections/ §  Customizing the navigation bar http://www-10.lotus.com/ldd/lcwiki.nsf/dx/Customizing_the_navigation_bar_ic45 31
  24. Login Page – Introduction 32 §  In this part we

    will: – Add a disclaimer to the login page
  25. Login Page – How to Alter the login.jsp §  We

    need to change login.jsp. To do that copy profiles_dir/AppSrv01/installedApps/connectionsCell01/Blogs.ear/blogs.war/nav/ templates/login.jsp to custom_dir\common\nav\templates §  Replace the following part 34
  26. Login Page – How to Alter the login.jsp §  With

    the following code to add the agreement text and agreement button 35
  27. Login Page – How to Alter the login.jsp §  Next

    thing is to change the loginbutton to make it disabled and assign an id for reference in our javascript. Change this code §  With this 36
  28. Login Page – How to Add Javascript §  Now we

    need to add a small piece of javascript to detect if the agreement was accepted to change the login button to enabled §  To do this add following javascript to the script section of the file 37
  29. Login Page – How to Add property file(s) §  Last

    step is to add the property files that contain the actual text. To do so add a new file to custom_dir\strings §  Name the file com.ibm.lconn.core.strings.templates.properties §  You can add files for other languages if you have a multi-language deployment 38
  30. 39 Login Page – How to §  Open WAS Administrative

    Console and navigate to „Applications – WebSphere enterprise applications“ §  Stop and Start the Common and Homepage App
  31. Login Page – Resources §  Customizing IBM Lotus Connections 3.0

    http://public.dhe.ibm.com/software/dw/lotus/LC30CustomizeFinal.pdf 41
  32. Notifications – Introduction 42 §  In this part we will:

    – Change default notifications texts – Change global sender for notifications – Change default notifications sending intervals – Change logo and colors
  33. 45 Notifications – How to Change Text §  Open following

    folder: profiles_dir\Dmgr01\config\cells\connectionsCell01\LotusConnections-config \notifications\ §  Here you can find the source files for all the different notifications
  34. 47 Notifications – How to Change Text §  Change the

    text IBM Connections to IBM Connect 14 §  Do the same for each language file which you want to use
  35. 48 Notifications – How to Change Text §  Go back

    to the notifications folder and now open the notification(_en).properties in \news\resources\nls\ §  Change every occurrence of IBM Connections to IBM Connect 14
  36. 49 Notifications – How to Change Logo and Colors § 

    Go back to the notifications folder and now open the style.ftl in \news\aggregated\ §  Change every occurrence of color #474747 to #025d9c
  37. 50 Notifications – How to Change Logo and Colors § 

    Change the referenced footer image from ibmLogoWhite23.png to ibmconnect.png
  38. 51 Notifications – How to Change Logo and Colors § 

    Go back to notification and copy ibmconnect.png to resources\images
  39. 52 Notifications – How to Change Logo and Colors § 

    Open WAS Administrative Console and navigate to „Applications – WebSphere enterprise applications“ §  Stop an Start the News App
  40. 53 Notifications – How to Change Default Notifications Settings § 

    Start the wsadmin client and execute connectionsConfig.py §  Check out the notification-config.xml LCConfigService.checkOutNotificationConfig('D:/temp','connectionsCell01’)
  41. 54 Notifications – How to Change Default Notifications Settings § 

    Open notification-config.xml in D:\temp §  Change properties for sender and mobile links
  42. 55 Notifications – How to Change Default Notifications Settings § 

    Change all defaultFollowFrequency="WEEKLY” to defaultFollowFrequency=”DAILY"
  43. 56 Notifications – How to Change Default Notifications Settings § 

    Close the file and check it in LCConfigService.checkInNotificationConfig() §  Execute newsAdmin.py
  44. 57 Notifications – How to Change Default Notifications Settings § 

    Run following command to refresh the default Email settings: NewsEmailDigestService.refreshDefaultEmailPrefsFromConfig()
  45. 58 Notifications – Result Change Default Notifications Settings §  Check

    the new settings in the browser by resetting to default notifications settings
  46. 59 Notifications – Result Change Logo and Colors §  You

    can trigger the email digests by accessing the following URL to verify your settings (admin will only receive digest) http://connections.snt.com/news/web/testEmailDigestSendMail.action?type=daily §  Or for all users http://connections.snt.com/news/web/testEmailDigestSendMail.action?type=daily&initNextTranche=true
  47. 60 Notifications – Result Change Logo and Colors §  Check

    Newsletters in your mail client (Desktop and Mobile) Mail on Mobile
  48. 61 Notifications – Resources §  Customizing notifications http://www-10.lotus.com/ldd/lcwiki.nsf/dx/Customizing_notifications_ic45 §  Including

    mobile links in notifications http://www-10.lotus.com/ldd/lcwiki.nsf/dx/Including_mobile_links_in_notifications_ic45 §  Setting the default frequency of email digests http://www-10.lotus.com/ldd/lcwiki.nsf/dx/Setting_the_default_frequency_of_email_digests_ic45 §  Verifying email digests http://www-10.lotus.com/ldd/lcwiki.nsf/dx/Verifying_email_digests_ic45
  49. Getting Started Page – Introduction 62 §  In this part

    we will: – Add a tab to the Getting Started Page
  50. 64 Getting Started Page – How to §  To add

    a tab to the getting started page we need to start the wsadmin client and execute homepageAdmin.py §  Check out the gettingstarted-config.xml HomepageCellConfig.checkOutGettingstartedConfig('D:/temp','connectionsCell01’)
  51. Getting Started Page – How to §  Add following to

    the gettingstarted-config.xml file §  All content must share the same host (http://connections.snt.com). Use your IBM http server to host the content 65
  52. Getting Started Page – How to §  To add the

    text for the tab, add a customization file to custom_dir\strings §  Name it com.ibm.lconn.homepage.resources.nls.jsp.jsp_resources.properties and add the title for the tab §  You can add files for other languages if you have a multi-language deployment 66
  53. 67 Getting Started Page – How to §  Close the

    file and check it in HomepageCellConfig.checkInGettingstartedConfig()
  54. 68 Getting Started Page – How to §  Execute connectionsConfig.py

    and run following commands to update your configuration/ version stamp LCConfigService.checkOutConfig('D:/temp','connectionsCell01’) LCConfigService.updateConfig(“versionStamp”,””) LCConfigService.checkInConfig()
  55. 69 Getting Started Page – How to §  Open WAS

    Administrative Console and navigate to „Applications – WebSphere enterprise applications“ §  Stop an Start the Homepage App
  56. Getting Started Page – Ressources §  Customizing the Getting Started

    view http://www-10.lotus.com/ldd/lcwiki.nsf/dx/Customizing_the_Getting_Started_view_ic45 71
  57. Communities – Introduction 72 §  In this part we will:

    – Create two additional Community themes – Add labels for this new themes – Add the themes – Create two simple Widgets – Add these Widgets to Communities
  58. 74 Communities – How to Theme §  Take defaultTheme.css as

    template and create a new theme css (nameTheme.css) in folder custom_dir\themes\nameTheme\ -> create folders belsoftTheme and gfiTheme and create files belsoftTheme.css and gfiTheme.css in this folders
  59. 75 Communities – How to Theme §  Take your customized

    NextGen defaultTheme.css as source for the new css files (provision_dir\webresources \com.ibm.social.gen4.theme_4.0.0.cr3.jar\resources\css\defaultTheme) §  change all relative paths to absolute ../../sprite/sprite16.png - > /com.ibm.social.gen4.theme/sprite/sprite16.png §  Customize the theme css files (Belsoft, Gfi) by changing the color gradients
  60. 76 Communities – How to Theme §  Pay special attention

    how to link your custom images and where you have to place them
  61. 77 Communities – How to Theme §  Start the wsadmin

    client and execute communitiesAdmin.py §  Check out the communities-config.xml CommunitiesConfigService.checkOutConfig('D:/temp','connectionsCell01’)
  62. 78 Communities – How to Theme §  Open communities-config.xml in

    D:\temp §  Add your new themes (the labels and thumbnails will be added in the next steps)
  63. 81 Communities – How to Theme §  Copy the theme

    thumbnail images to custom_dir\communities\images
  64. 82 Communities – How to Theme §  Open WAS Administrative

    Console and navigate to „Applications – WebSphere enterprise applications“ §  Stop and Start the Communities App
  65. 83 Communities – Result Theme §  Open a Community and

    change the theme to one of the new themes
  66. 85 Communities – How To Widgets §  We will add

    two very simple widgets to the Communities application. An iFrame widget showing clickable images that will guide you through the community and a widget that will show the displayname and email address of the logged on user. §  Add the widgets to your communities customization path custom_dir\communities
  67. 87 Communities – How To Widgets §  Now we add

    the widget to our Connections communities, start the wsadmin client and execute communitiesAdmin.py §  Check out the widgets-config.xml CommunitiesConfigService.checkOutWidgetsConfig('D:/temp','connectionsCell01')
  68. 88 Communities – How To Widgets §  Open widgets-config.xml in

    D:\temp §  Add your new widget definition §  Check in widgets-config.xml CommunitiesConfigService.checkInWidgetsConfig() This will define the widget to display in the middle column of the community
  69. 89 Communities – How to Theme §  Open WAS Administrative

    Console and navigate to „Applications – WebSphere enterprise applications“ §  Stop and Start the Communities App
  70. 90 Communities – Result Widgets §  Go to your Community

    and click “Community Actions – Customize” §  Select your widgets to add them
  71. 91 Communities – Resources §  Adding a custom theme to

    Communities http://www-10.lotus.com/ldd/lcwiki.nsf/dx/Adding_a_custom_theme_to_Communities_ic45 §  Branding Communities in IBM Connections (Jerald Mahurin) http://www.sociallycurious.com/2013/05/21/branding-communities-ibm-connections §  Enabling custom widgets for Communities http://www-10.lotus.com/ldd/lcwiki.nsf/dx/Enabling_custom_widgets_for_Communities_ic45
  72. Wikis – Introduction 92 §  In this part we will:

    – Change the default Welcome Page of Wikis
  73. 94 Wikis – How to Welcome Page §  Create a

    new Wiki and click edit §  Change the Welcome Page to your needs, we will use it as template for the customization §  Switch to the HTML Source view and copy the HTML code
  74. 95 Wikis – How to Welcome Page §  Paste the

    HTML code into a file and remove all “end of lines” (EOL)
  75. 96 Wikis – How to Welcome Page §  Create com.ibm.lconn.share.services.handlers.wiki.nls.WikiWelcomeMessages_en.properties

    in custom_dir\strings\ and add your title and HTML code (one line!) §  Create a property file for every language you want to support
  76. 97 Wikis – How to Welcome Page §  Open WAS

    Administrative Console and navigate to “Applications – WebSphere enterprise applications” §  Stop and Start the Wikis App
  77. 99 Wikis – Resources §  Customizing the Wikis welcome page

    http://www-10.lotus.com/ldd/lcwiki.nsf/dx/Customizing_the_Wikis_welcome_page_ic45
  78. Profiles - Agenda §  Add custom profile fields §  Synchronize

    custom fields using IBM TDI §  Add a profile widget §  Add profile types 100
  79. Profiles – Introduction Add custom profile fields 101 §  In

    this part we will: – Add custom profile fields – Create customized labels – Add custom macros for advanced layout – Edit the freemarker templates to display the custom fields
  80. Profiles – How To Add custom profile fields §  Start

    the wsadmin client and execute profilesAdmin.py §  Check out the profiles-config.xml ProfilesConfigService.checkOutConfig('D:/temp','connectionsCell01’) §  We need to declare the custom fields in the profiles-config.xml, open the file with a text editor 104
  81. Profiles – How To Add custom profile fields §  Add

    following attributes to the Profile Data Model 105
  82. Profiles – How To Add custom profile fields §  Now

    we need to associate the new fields with a profile type §  To do so, edit the profiles-types.xml and add the new fields to the default profile 106
  83. Profiles – How To Add custom profile fields §  Check

    in the profiles-config.xml ProfilesConfigService.checkInConfig() 107
  84. Profiles – How To Add custom profile fields §  We

    need to add custom strings for the interface labels §  To do so we will create a custom resource bundle com.connect.profiles.strings.uilabels.properties in custom_dir\strings §  Create translation files for all languages you want to support 108
  85. Profiles – How To Add custom profile fields §  Now

    we need to register the custom resource bundle and make it available for the Freemarker templates §  To register the file, check out the Connections configuration. First execute connectionsConfig.py and the check out LotusConnections-config.xml LCConfigService.checkOutConfig('D:/temp','connectionsCell01’) §  Add following to the LotusConnections-config.xml file in the resources section 110
  86. Profiles – How To Add custom profile fields §  Check

    in the configuration file LCConfigService.checkInConfig() §  Check out the profiles-config.xml again ProfilesConfigService.checkOutConfig('D:/temp','connectionsCell01’) 111
  87. Profiles – How To Add custom profile fields §  Edit

    the profiles-config.xml file and add a reference to the registered bundle 112
  88. Profiles – How To Add custom profile fields §  Next

    step is to add some custom macros for advanced controls. Instead of adding these to the commonUtil.ftl file that comes with Connections we will add these to a custom file to easy any upgrades and further customization §  Create a file customControls.ftl in profiles_dir\Dmgr01\config\cells\connectionsCell01\LotusConnections-config \profiles\templates §  This file will contain functions to render radio buttons, multiselect buttons and drop-down lists. We will show some parts of the file on the next slide. 113
  89. Profiles – How To Add custom profile fields §  To

    be able to alter your profile we first need to edit the profileEdit.ftl file in D:\temp §  We need to import the newly created custom controls §  Adjust the file to display the fields required and import the sections to change the visualization 115
  90. Profiles – How To Add custom profile fields §  We

    need to alter profileDetails.ftl in D:\temp to show the content in non-edit mode 118
  91. Profiles – How To Add custom profile fields §  Check

    in the profiles-config.xml again and synchronize all nodes (this will copy customControls.ftl to all nodes). REMARK: we already changed the template reloading to 15 seconds ProfilesConfigService.checkInConfig() synchAllNodes() 121
  92. Profiles – Introduction Synchronize custom fields using TDI §  In

    this part we will: – Synchronize a custom profile field with the LDAP server using TDI 122
  93. §  We will synchronize the twitter Id from LDAP to

    the Profiles database using TDI §  To do so, you need to add the following to your tdi-profiles-config.xml file in D:\IBM\TDI\V7.1\tdisol\TDI\conf\LotusConnections-config Profiles – How To Synchronize custom fields using TDI 123
  94. Profiles – How To Synchronize custom fields using TDI § 

    The data is stored in the “twitterid” field in LDAP §  Run your sync script 124
  95. 125 Profiles – How to §  Open WAS Administrative Console

    and navigate to “Applications – WebSphere enterprise applications” §  Stop and Start the Profiles App
  96. Profiles – Introduction Widget §  In this part we will

    add a custom google widget to profiles: – Create widget – Add widget 127
  97. 129 Profiles – How to Widget §  Create your widget

    called googleMap.xml in custom_dir\profiles
  98. 132 Profiles – How to Widget §  Now we add

    the widget to our Connections profiles, start the wsadmin client and execute profilesAdmin.py §  Check out the widgets-config.xml ProfilesConfigService.checkOutWidgetConfig('D:/temp','connectionsCell01')
  99. 134 Profiles – How to Widget §  Check in widgets-config.xml

    ProfilesConfigService.checkInWidgetConfig()
  100. 135 Profiles – How to Widget §  Open WAS Administrative

    Console and navigate to “Applications – WebSphere enterprise applications” §  Stop and Start the Profiles App
  101. Profiles – Introduction Add profile types §  In this part

    we will add a second profile type. This profile type will contain only a subset of the profile attributes that the default profile will have. We will also disable widgets based on the profile §  What are profile types – Definition of different types of users – Allows to change look and feel of the profiles application – Example: customer, employee, contractor §  Why use profile types – Show different data for different types of users – Block certain features – Block built in widgets – Block custom widgets – Limit information stream – Phase a rollout 137
  102. Profiles – How To Add profile types §  First thing

    we need to decide is what field in LDAP will define the profile type. In this example we will use an existing field that is not used for anything else §  Now we need to configure TDI to add the profile type to the Profiles database. Alter the map_dbrepos_from_source.properties file in your TDI Solution directory and map profileType to your field in LDAP 139
  103. Profiles – How To Add profile types §  Now run

    your TDI sync command §  This is what you will see in the Employee database 140
  104. Profiles – How To Add custom profile fields §  Start

    the wsadmin client and execute profilesAdmin.py §  Check out the profiles-config.xml ProfilesConfigService.checkOutConfig('D:/temp','connectionsCell01’) 141
  105. Profiles – How To Add profile types §  We need

    to define the profile types and the profile fields we want to show in the file profiles-types.xml 142
  106. §  We can now disable profile features or widgets based

    on the profile type. We will start with the profile features §  Open profiles-policy.xml and add the desired configuration Profiles – How To Add profile types 144
  107. Profiles – How To Add custom profile fields §  Check

    in the profiles configuration ProfilesConfigService.checkInConfig() 145
  108. 146 Profiles – How to Widget §  Open WAS Administrative

    Console and navigate to “Applications – WebSphere enterprise applications” §  Stop and Start the Profiles App
  109. §  Login with the external user Profiles – Result Add

    profile types 147 Tagging enabled when logged on as external user No Twitter Id
  110. Profiles – Result Logged in with internal user 148 Tagging

    disabled No invitation button Disabled
  111. Profiles – How To Add profile types §  We will

    now disable widgets based on the profile type §  Check out the widget configuration. §  Disable the widgets you don’t want to show in widgets-config.xml 149
  112. §  Check in the widget configuration again and restart the

    profiles application Profiles – How To Add profile types 150
  113. Profiles – Result Add profile types 151 Tags and sand

    gone Tabs gone All widgets gone except links
  114. 152 Profiles – Resources §  Adding custom widgets to Profiles

    http://www-10.lotus.com/ldd/lcwiki.nsf/dx/Adding_custom_widgets_to_Profiles_ic45 §  Customizing IBM Connections – Modifying the Report-To Chain iWidget to include profile data retrieved via Ajax (Hunter Medney) https://www.ibm.com/developerworks/community/blogs/hmedney/entry/ customizing_connections_modifying_the_report_to_chain_widget_using_profile_data §  Connections iWidget Development Guide http://www-10.lotus.com/ldd/lcwiki.nsf/dx/development-guide §  Easy as a pie – Creating Widgets for IBM Connections (Mikkel Heisterberg) http://www.slideshare.net/lekkim/bp207-easy-as-pie-creating-widgets-for-ibm-connections §  Customizing IBM Connections 4.0 Profiles http://www-10.lotus.com/ldd/lcwiki.nsf/dx/Customizing_IBM_Connections_4.0_Profiles
  115. 153 Profiles – Resources §  Customizing Profiles http://www-10.lotus.com/ldd/lcwiki.nsf/dx/Customizing_Profiles_ic45 §  Phasing

    an IBM Connections Rollout? Profile Types May Be the Answer https://www-304.ibm.com/connections/blogs/socialbusiness/entry/ phasing_an_ibm_connections_rollout_profile_types_may_be_the_answer4 §  Profile types and locking profile features http://www.slideshare.net/palmke/profile-types-and-locking-profile-features-15498931
  116. Richtext Editor – Introduction 154 §  In this part we

    will: – Create a new plugin – Add the plugin to the Richtext Editor
  117. 156 Richtext Editor – How to §  You have to

    know how to create CKEditor Plugins http://docs.cksource.com/CKEditor_3.x/Tutorials §  Create your Business Card plugin
  118. 157 Richtext Editor – How to §  Place your plugin

    in custom_dir\javascript\com\ibm\oneui\ckeditor\editor\plugins\
  119. 159 Richtext Editor – How to §  Copy ckeditor.js to

    custom_dir\javascript\lconn\blogs\ (or wikis)
  120. 161 Richtext Editor – How to §  Open WAS Administrative

    Console and navigate to “Applications – WebSphere enterprise applications” §  Stop and Start the Common App
  121. 162 Richtext Editor – Result §  Refresh your browser cache

    §  Create a new Blog entry and test the plugin
  122. 163 Richtext Editor – Resources §  CKEditor Tutorials http://docs.cksource.com/CKEditor_3.x/Tutorials § 

    Tutorial – Extending the IBM Connections Rich Text Editor (Rob Novak) http://ibmrockstar.com/2013/05/tutorial-extending-the-ibm-connections-rich-text-editor
  123. Media Gallery Object types – Introduction 166 §  In this

    part we will: – Add a custom object type for the media gallery – Add custom properties to the object type – Show how to enable and use the new object type
  124. §  Object types are defined in XML according to the

    Content Management Interoperability Services (CMIS) standard. §  Content Management Interoperability Services (CMIS) is an open standard that allows different content management systems to inter-operate §  CMIS provides a common data model covering typed files and folders with generic properties that can be set or read. There is a set of services for adding and retrieving documents ('objects') §  For this example we create a file connect_photo.xml in D:\temp Media Gallery Object types – How to Create your custom object type definition file 168
  125. … <cmis:propertyStringDefinition> <cmis:localName>location</cmis:localName> <cmis:localNamespace>location</cmis:localNamespace> <lcmis:displayNameKey>custom_location_title_key</lcmis:displayNameKey> <cmis:queryName>custom:location</cmis:queryName> <lcmis:descriptionKey>custom_location_summary_key</lcmis:descriptionKey> <cmis:propertyType>string</cmis:propertyType> <cmis:cardinality>single</cmis:cardinality> <cmis:updatability>readwrite</cmis:updatability>

    <cmis:inherited>false</cmis:inherited> <cmis:required>true</cmis:required> <cmis:queryable>true</cmis:queryable> <cmis:orderable>true</cmis:orderable> <cmis:openChoice>false</cmis:openChoice> <cmis:maxLength>64</cmis:maxLength> </cmis:propertyStringDefinition> 169 <cmis:propertyDateTimeDefinition> <cmis:localName>date</cmis:localName> <cmis:localNamespace>http://www.ibm.com/xmlns/prod/sn/cmis/logicaltypes</cmis:localNamespace> <lcmis:displayNameKey>photo1_date2_key</lcmis:displayNameKey> <cmis:queryName>custom:date1</cmis:queryName> <lcmis:descriptionKey>photo1_date2_summary_key</lcmis:descriptionKey> <cmis:propertyType>datetime</cmis:propertyType> <cmis:cardinality>single</cmis:cardinality> <cmis:updatability>readwrite</cmis:updatability> <cmis:inherited>false</cmis:inherited> <cmis:required>true</cmis:required> <cmis:queryable>true</cmis:queryable> <cmis:orderable>true</cmis:orderable> <cmis:openChoice>false</cmis:openChoice> </cmis:propertyDateTimeDefinition> Media Gallery Object types – How to Create your custom object type definition file
  126. Media Gallery Object types – How to Create your custom

    object type definition file <cmis:propertyStringDefinition> <cmis:localName>project</cmis:localName> <cmis:localNamespace>project</cmis:localNamespace> <lcmis:displayNameKey>custom_project_title_key</lcmis:displayNameKey> <cmis:queryName>custom:project</cmis:queryName> <lcmis:descriptionKey>custom_project_summary_key</lcmis:descriptionKey> <cmis:propertyType>string</cmis:propertyType> <cmis:cardinality>single</cmis:cardinality> <cmis:updatability>readwrite</cmis:updatability> <cmis:inherited>false</cmis:inherited> <cmis:required>true</cmis:required> <cmis:queryable>true</cmis:queryable> <cmis:orderable>true</cmis:orderable> <cmis:choice displayNameKey="IBM Connect"> <cmis:value>choice1Value</cmis:value> </cmis:choice> <cmis:choice displayNameKey="Gartner Symposium"> <cmis:value>choice2Value</cmis:value> </cmis:choice> <cmis:choice displayNameKey="Engage Benelux"> <cmis:value>choice3Value</cmis:value> </cmis:choice> <cmis:openChoice>false</cmis:openChoice> <cmis:maxLength>64</cmis:maxLength> </cmis:propertyStringDefinition> 170 <cmis:propertyBooleanDefinition> <cmis:localName>approved</cmis:localName> <cmis:localNamespace>approved</cmis:localNamespace> <lcmis:displayNameKey>custom_approved_title_key</lcmis:displayNameKey> <cmis:queryName>custom:approved</cmis:queryName> <lcmis:descriptionKey>custom_approved_summary_key</lcmis:descriptionKey> <cmis:propertyType>boolean</cmis:propertyType> <cmis:cardinality>single</cmis:cardinality> <cmis:updatability>readwrite</cmis:updatability> <cmis:inherited>false</cmis:inherited> <cmis:required>true</cmis:required> <cmis:queryable>true</cmis:queryable> <cmis:orderable>true</cmis:orderable> <cmis:openChoice>false</cmis:openChoice> </cmis:propertyBooleanDefinition> …
  127. Media Gallery Object types – How to Import the definition

    §  Start the wsadmin client and execute filesAdmin.py §  Import the CMIS file and check if the import was successfull FilesObjectTypeService.importType(“D:/temp/connect_photo.xml”) FilesObjectTypeService.browseTypes() 171
  128. §  Open profiles_dir\AppSrv01\installedApps\connectionsCell01\Files.ear \share.services.jar file with a zip program and

    navigate to com\ibm\lconn\files \strings. Copy the cmis.properties file to custom_dir\strings Media Gallery Object types – How to Add labels 172
  129. Media Gallery Object types – How to Add labels 173

    §  Rename the cmis.properties file to com.ibm.lconn.files.strings.cmis.properties
  130. Media Gallery Object types – How to Add labels § 

    Add new property labels as key-value pairs 174
  131. 175 Media Gallery Object types – How to §  Open

    WAS Administrative Console and navigate to “Applications – WebSphere enterprise applications” §  Stop and Start the Files App
  132. Media Gallery Object types – How to Use new object

    type in Community 176 §  Clear your browser cache and check the results §  Edit your Media Gallery §  Change the value for Photo to the newly created object type
  133. Media Gallery Object types – How to Import the definition

    §  Start the wsadmin client and execute communitiesAdmin.py §  Check out the Communities Widget configuration CommunitiesConfigService.checkOutWidgetsConfig('D:/temp','connectionsCell01’) 177
  134. Media Gallery Object types – How to Set definition as

    default for all 178 §  Open widgets-config.xml and change the mg_PhotoType value to the id of the new objecttype. You can find the id by using the FilesObjectTypeService.browseTypes() wsadmin command in the Files Configuration
  135. Media Gallery Object types – How to Set definition as

    default for all 179 §  Check the configuration back in §  Restart the Files application
  136. 180 Media Gallery Object Types – Resources §  Creating custom

    media gallery object types http://www-10.lotus.com/ldd/lcwiki.nsf/dx/Creating_custom_media_gallery_object_types_ic45 §  OASIS Content Management Interoperability Services (CMIS) https://www.oasis-open.org/committees/tc_home.php?wg_abbrev=cmis
  137. Mobile App – Introduction 181 §  In this part we

    will add following: – A link to the IBM Sametime App – A link to a Website
  138. §  Access Connect Online to complete your session surveys using

    any: – Web or mobile browser – Connect Online kiosk onsite 184
  139. Mobile App – How to Preparation §  You need the

    following images ready for every function (open Sametime, open link) – iOS Retina (48 x 48px) – iOS Standard (24 x 24px) – Low density for Android / BlackBerry (~24 x 24px) – Medium density for Android / BlackBerry (~32 x 32px) – High density for Android / BlackBerry (~48 x 48px) You can find examples for the images in profiles_dir\AppSrv01\installedApps\connectionsCell01\Mobile.ear \mobile.web.war\extensibilityIcons Use transparent png/gif’s for best results (selected/not selected) 185
  140. 187 Mobile App – How to §  Now we add

    the new Mobile functions, start the wsadmin client and execute mobileAdmin.py §  Check out the mobile-config.xml MobileConfigService.checkOutConfig('D:/temp','connectionsCell01')
  141. 188 Mobile App – How to §  Open mobile-config.xml and

    add following to the <Applications> sections
  142. 191 Mobile App – How to §  Open WAS Administrative

    Console and navigate to “Applications – WebSphere enterprise applications” §  Stop and Start the Mobile App
  143. 194 Reports – How to We will not cover this

    topic in this presentation because IBM Cognos is too heavy for our machines ;-) But steps would be: § Define the custom report & check dimensions/events – Pencil&Paper § Create Report with IBM Cognos Report Studio (We would recommend to use Firefox Version 3.5/3.6!) § Add Report to Global/Community Report list
  144. 195 Reports – Resources §  Community report customization for Connections

    4.0 Metrics http://www-10.lotus.com/ldd/lcwiki.nsf/dx/Community_report_customization_for_Connections_4.0_Metrics §  Create new Cognos metrics report http://www-10.lotus.com/ldd/lcwiki.nsf/dx/Connections_4.0_Metrics_customizationcol_create_new_Cognos_metrics_report §  Customizing reports based on the events captured in Metrics 4.0 http://www-10.lotus.com/ldd/lcwiki.nsf/dx/Customizing_reports_based_on_the_events_captured_in_Metrics4.0 §  Give your community owners the reports they really need – Step by step http://www.slideshare.net/kbild/give-your-community-owners-the-reports-they-really-need
  145. Desktop Plugin – Introduction 196 §  In this part we

    will: – Customize the look and feel of the Desktop Connector for IBM Connections
  146. Desktop Plugin – How to Preparation §  You need the

    following images ready – Desktop Image (256 x 256 .ico file) – SystemTray busy image (16x16 .ico file) – SystemTray idle image (16x16 .ico file) – SystemTray pending image (16x16 .ico file) – Context Menu image (13x13 .bmp file) – Office Send To image (32x32.bmp file) – Outlook Business card image (16x16.bmp file) 198
  147. Desktop Plugin – How to §  Edit the registry, to

    automate use group policies §  Make sure you take into account differences in registry keys for 32-bit and 64-bit Windows versions §  Change / Add following Registry Keys – HKEY_CLASSES_ROOT\CLSID\{21034BDC-B57E-400B-A5D5-2B1E98502805} •  (Default)=“Connect 2014” •  InfoTip=“Connect 2014” – HKEY_CLASSES_ROOT\CLSID\{21034BDC-B57E-400B- A5D5-2B1E98502805}\DefaultIcon •  (Default)=“c:\rebrand-256x256.ico” 199
  148. Desktop Plugin – How to – HKEY_LOCAL_MACHINE\SOFTWARE\Wow6432Node\IBM\Social Connectors \Branding •  Main

    Title=“Connect 2014” – HKEY_LOCAL_MACHINE\SOFTWARE\Wow6432Node\IBM\Social Connectors \Branding\Monitor •  SystemTray Busy Image=“c:\rebrand-16x16busy.ico” •  SystemTray PendingImage=“c:\rebrand-16x16pending.ico” •  SystemTray Idle Image=“c:\rebrand-16x16idle.ico” •  SystemTray Title=“Connect 2014” – HKEY_LOCAL_MACHINE\SOFTWARE\Wow6432Node\IBM\Social Connectors \Branding\Office •  Backstage SendTo Image=“c:\rebrand-32x32.bmp” •  BackStage SendTo Tiltle=“Connect 2014” •  RibbonTab Title=“Connect 2014” 200
  149. Desktop Plugin – How to – HKEY_LOCAL_MACHINE\SOFTWARE\Wow6432Node\IBM\Social Connectors \Branding\Outlook •  ContextMenu

    ContactCard Image=“c:\rebrand-16x16.bmp” •  Explorer RibbonTab Title=“Connect 2014” •  Inspector RibbonTab Title=“Connect 2014” •  Menu Title=“Connect 2014” •  Toolbar Title=“Connect 2014” •  ContextMenu ContactCard Title=“Connect 2014” – HKEY_LOCAL_MACHINE\SOFTWARE\Wow6432Node\IBM\Social Connectors \Branding\ShellExt •  ContextMenu Image=“c:\rebrand-13x13.bmp” •  ContextMenu Title=“Connect 2014” 201
  150. 202 Desktop Plugin – Resources §  Customizing the branding strings

    and images for the desktop plug-in http://www-10.lotus.com/ldd/lcwiki.nsf/dx/ Customizing_the_branding_strings_and_images_for_the_desktop_plugin_lv45
  151. Connections Content Manager – Introduction 203 §  In this part

    we will: – Create custom CCM property fields – Create a custom CCM document type – Add the new property fields to the document type – Change the default document type of a Community
  152. 205 Connections Content Manager – How to Document Types § 

    Open the Administration Console for Content Platform Engine (https://connections.snt.com/acce) and logon as CCM Admin §  Open the “ICObjectStore “
  153. 206 Connections Content Manager – How to Document Types § 

    First we create property fields which we will add to a document type later on §  Open “Data Design” and right click on “Property Templates” §  Choose “New Property Template” and call it Abstract, click “Next”
  154. 207 Connections Content Manager – How to Document Types § 

    Choose String as “Data Type”, click “Next”
  155. 208 Connections Content Manager – How to Document Types § 

    Leave default values in the next 2 screens and click “Finish” and “Close”
  156. 209 Connections Content Manager – How to Document Types § 

    Create a second new property template and call it Track and choose String as “Data Type” §  Click “Assign choice list” on the “Select Choice List or Marking Set” Screen and click on “New…”
  157. 210 Connections Content Manager – How to Document Types § 

    Use Track List as “Display Name” and click “Next”
  158. 211 Connections Content Manager – How to Document Types § 

    Use String as list data type and click “Next”
  159. 212 Connections Content Manager – How to Document Types § 

    Now we create the items, click on “New Items” and add Best Practices, Jump Starts and Show ‘n Tell as display names. Click “OK”
  160. 213 Connections Content Manager – How to Document Types § 

    Back on the “Add Choice List Items” screen click “Next”, after that click “Finish” and “Close”
  161. 214 Connections Content Manager – How to Document Types § 

    Back on the “New Property Template” screen click “Next” and click “Finish”, “Close”
  162. 215 Connections Content Manager – How to Document Types § 

    Now we create the new document type by opening “Classes” and right clicking on “Document” §  Choose “New Class” and call it IBM Connect session and click on “Next”
  163. 217 Connections Content Manager – How to Document Types § 

    Select the “Property Definitions” tab, click on “Add” and select the new properties “Abstract” and “Track” before clicking on “OK”
  164. 218 Connections Content Manager – How to Document Types § 

    Click “Save” and “Close” and “Log Out”
  165. 219 Connections Content Manager – How to Document Types § 

    Go back to one of your Connections Communities and edit the Community
  166. 220 Connections Content Manager – How to Document Types § 

    Click on the “Library” tab and change the “Default document type” to IBM Connect session
  167. 221 Connections Content Manager – How to Document Types § 

    Inside this community go to the Library App and add a file If you can’t see the document type properties restart the FNCS app
  168. 222 Connections Content Manager – Resources §  Creating and managing

    document types http://www-10.lotus.com/ldd/lcwiki.nsf/dx/Creating_and_managing_document_types_ic45 §  Create new document types in IBM Connections Content Manager (Roberto Boccadoro) http://www-10.lotus.com/ldd/lcwiki.nsf/dx/ Create_new_document_types_in_IBM_Connections_Content_Manager
  169. §  Access Connect Online to complete your session surveys using

    any: – Web or mobile browser – Connect Online kiosk onsite 224
  170. 225 Acknowledgements and Disclaimers © Copyright IBM Corporation 2014. All

    rights reserved. §  U.S. Government Users Restricted Rights - Use, duplication or disclosure restricted by GSA ADP Schedule Contract with IBM Corp. §  IBM, the IBM logo, ibm.com, IBM Connections, IBM Lotus Connections, IBM Sametime, IBM WebSphere, IBM Tivoli Directory Integrator, IBM Domino, IBM Cognos, IBM Cognos Report Studio are trademarks or registered trademarks of International Business Machines Corporation in the United States, other countries, or both. If these and other IBM trademarked terms are marked on their first occurrence in this information with a trademark symbol (® or ™), these symbols indicate U.S. registered or common law trademarks owned by IBM at the time this information was published. Such trademarks may also be registered or common law trademarks in other countries. A current list of IBM trademarks is available on the Web at “Copyright and trademark information” at www.ibm.com/legal/copytrade.shtml Other company, product, or service names may be trademarks or service marks of others. Twitter, Wordpress, LinkedIn, CKEditor, Firefox, Android, BlackBerry, Google Maps, Microsoft Windows, , Microsoft Windows Server 2008 R2, OASIS Availability. References in this presentation to IBM products, programs, or services do not imply that they will be available in all countries in which IBM operates. The workshops, sessions and materials have been prepared by IBM or the session speakers and reflect their own views. They are provided for informational purposes only, and are neither intended to, nor shall have the effect of being, legal or other guidance or advice to any participant. While efforts were made to verify the completeness and accuracy of the information contained in this presentation, it is provided AS-IS without warranty of any kind, express or implied. IBM shall not be responsible for any damages arising out of the use of, or otherwise related to, this presentation or any other materials. Nothing contained in this presentation is intended to, nor shall have the effect of, creating any warranties or representations from IBM or its suppliers or licensors, or altering the terms and conditions of the applicable license agreement governing the use of IBM software. All customer examples described are presented as illustrations of how those customers have used IBM products and the results they may have achieved. Actual environmental costs and performance characteristics may vary by customer. Nothing contained in these materials is intended to, nor shall have the effect of, stating or implying that any activities undertaken by you will result in any specific sales, revenue growth or other results.
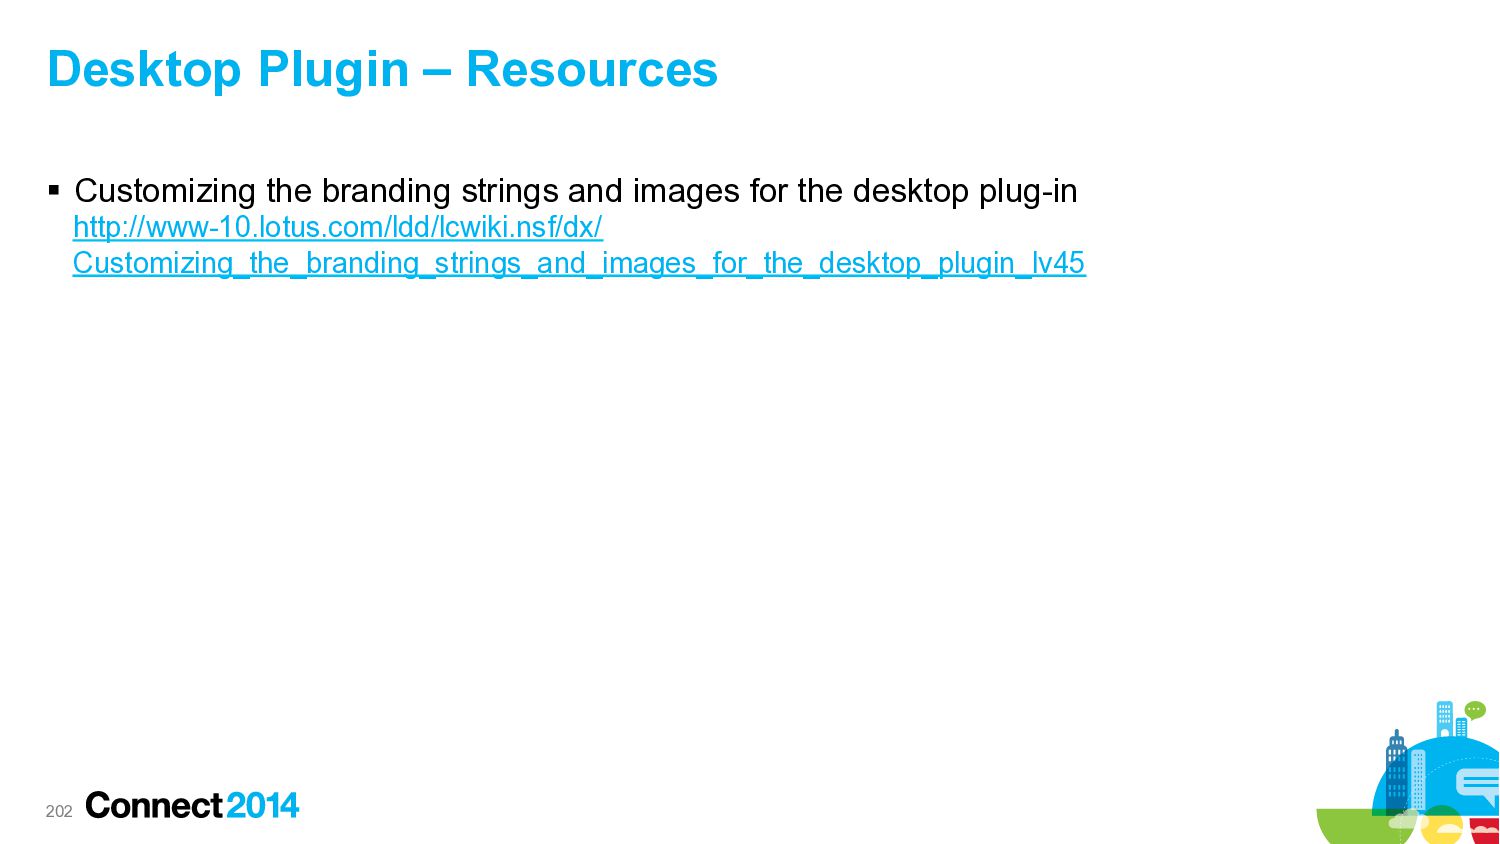