Some people use it as the V in MVC. Conceived at Facebook Heavily used on products made by Facebook and Instagram. Built to simplify the process of building complex UIs. Why React? React was built to solve one problem: building large applications with data that changes over time. All these companies use React! What Is React? (Model-View-Controller) I heard it was good
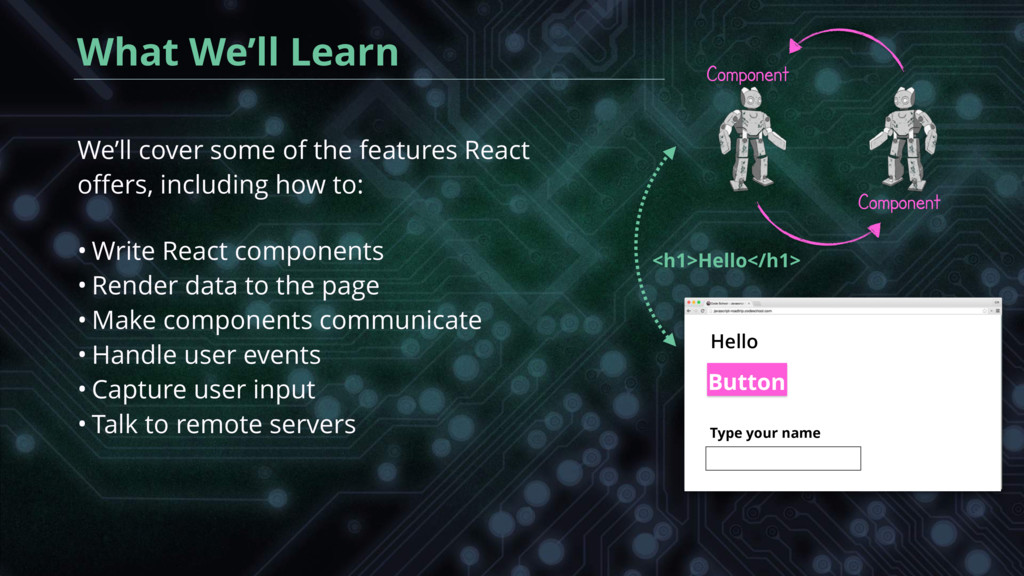
React offers, including how to: • Write React components • Render data to the page • Make components communicate • Handle user events • Capture user input • Talk to remote servers Button Type your name What We’ll Learn
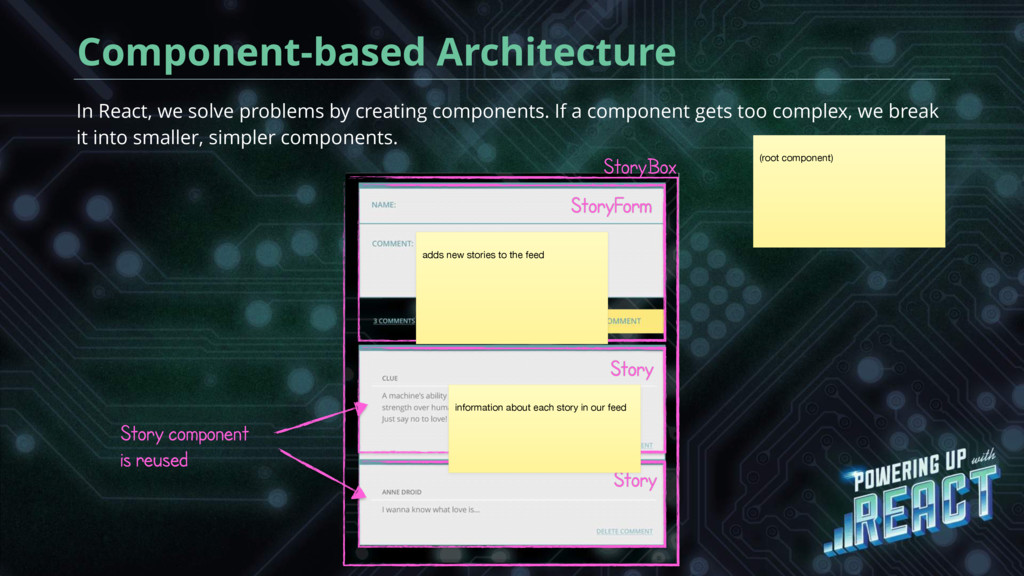
component gets too complex, we break it into smaller, simpler components. Component-based Architecture StoryBox StoryForm Story Story component is reused (root component) adds new stories to the feed information about each story in our feed Story
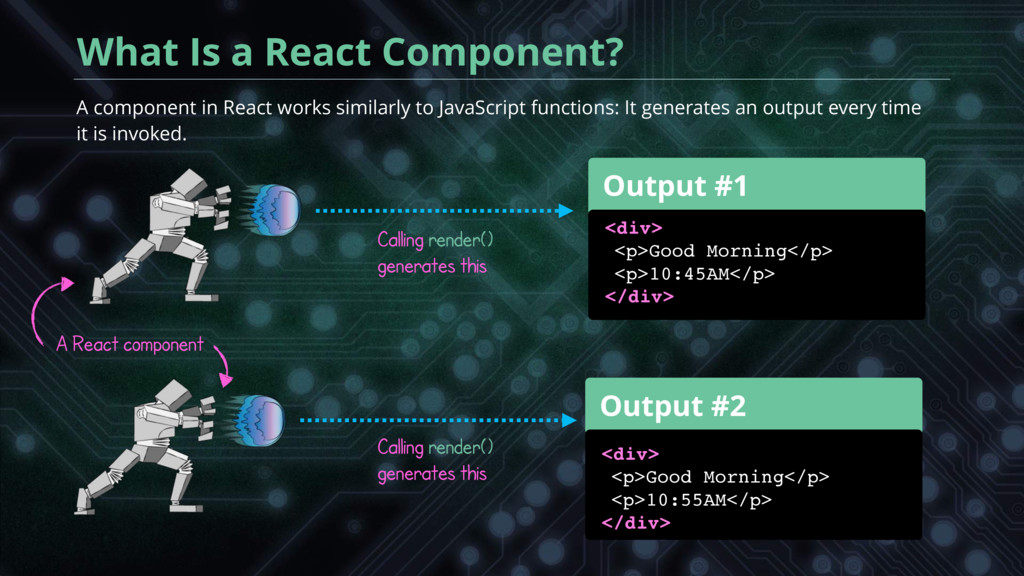
generates an output every time it is invoked. What Is a React Component? Calling render() generates this Output #2 Output #1 <div> <p>Good Morning</p> <p>10:45AM</p> </div> <div> <p>Good Morning</p> <p>10:55AM</p> </div> Calling render() generates this A React component
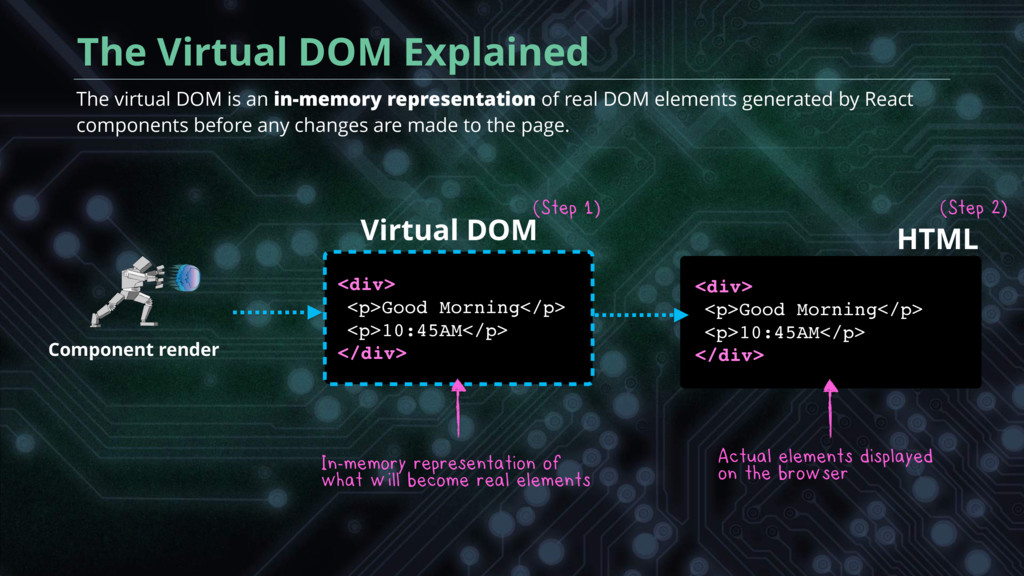
<p>Good Morning</p> <p>10:45AM</p> </div> Virtual DOM HTML Component render In-memory representation of what will become real elements The virtual DOM is an in-memory representation of real DOM elements generated by React components before any changes are made to the page. Actual elements displayed on the browser (Step 1) (Step 2)
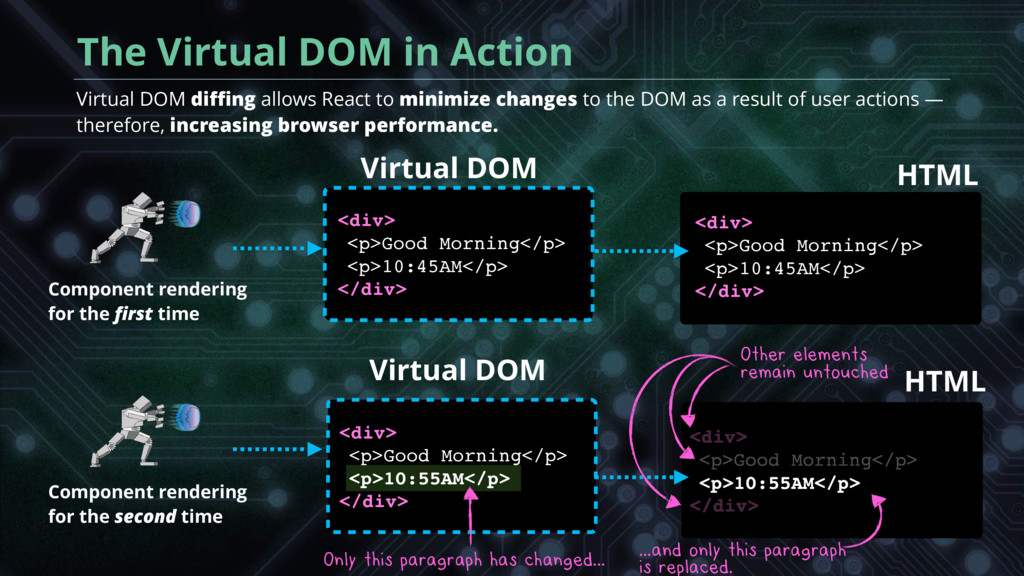
DOM as a result of user actions — therefore, increasing browser performance. The Virtual DOM in Action Only this paragraph has changed... ...and only this paragraph is replaced. Other elements remain untouched <div> <p>Good Morning</p> <p>10:45AM</p> </div> <div> <p>Good Morning</p> <p>10:45AM</p> </div> <div> <p>Good Morning</p> <p>10:55AM</p> </div> <div> <p>Good Morning</p> <p>10:55AM</p> </div> <p>10:55AM</p> Virtual DOM Virtual DOM HTML HTML Component rendering for the first time Component rendering for the second time
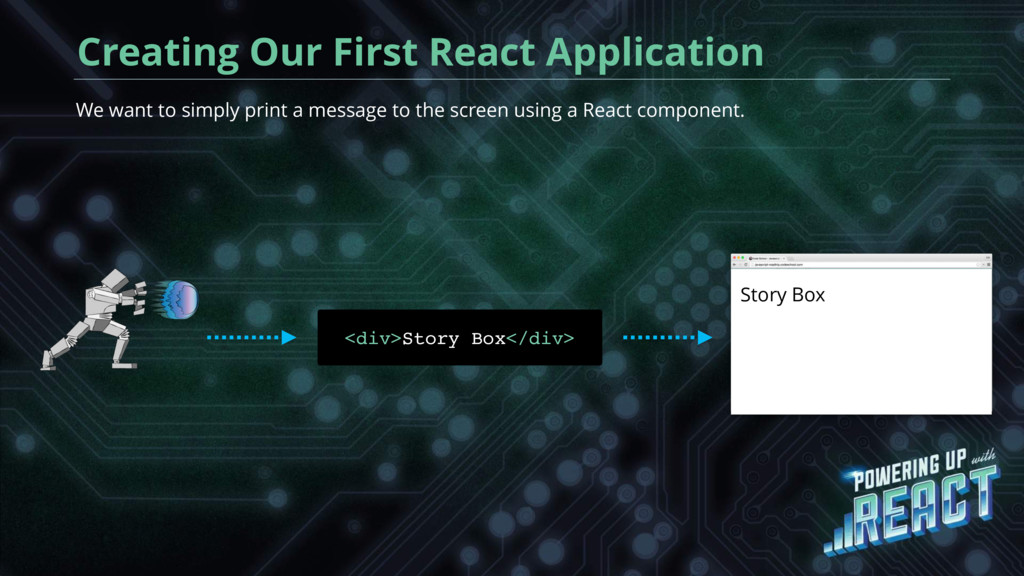
React.Component base class. Writing Our First React Component Component class inherits from a React base class. Every component needs a render() function. class StoryBox extends React.Component { render() { return( <div>Story Box</div> ); }. }/ No quotes needed — don't freak out. Now we need to tell our application where to put the result into our web page. components.js Components are written in upper camel case.
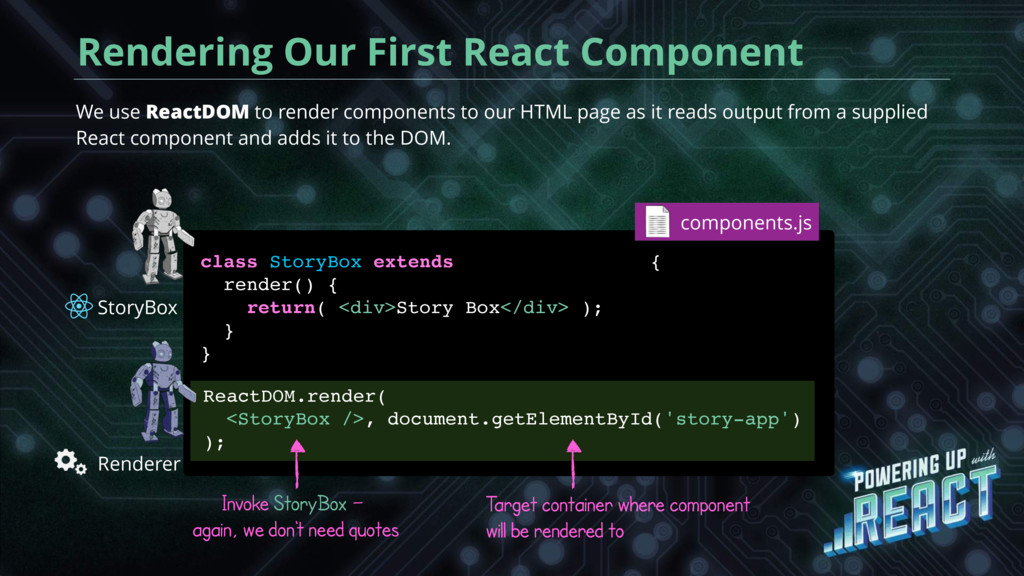
class StoryBox extends React.Component { render() { return( <div>Story Box</div> ); }. }/ Invoke StoryBox — again, we don't need quotes Target container where component will be rendered to We use ReactDOM to render components to our HTML page as it reads output from a supplied React component and adds it to the DOM. StoryBox Renderer components.js
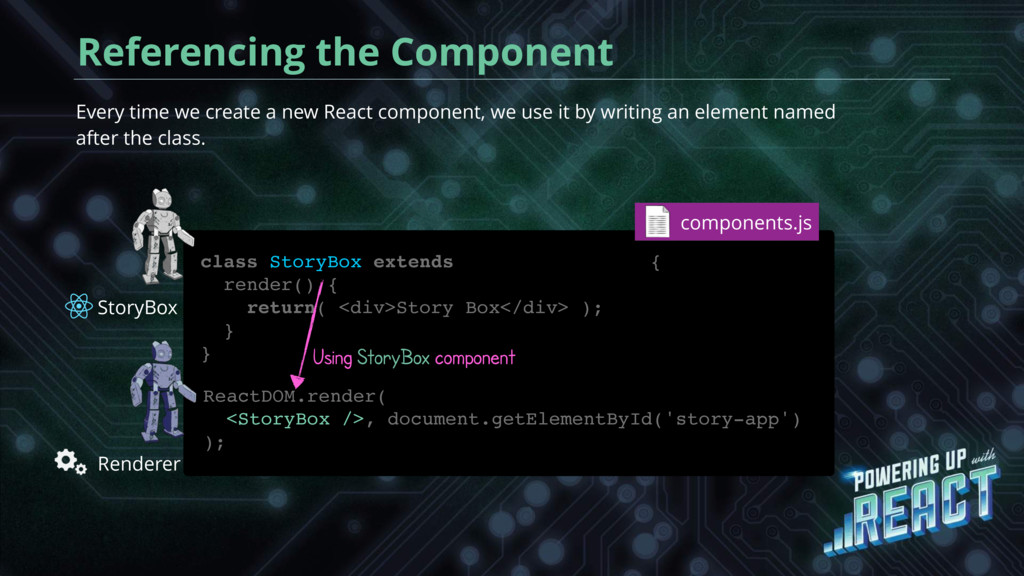
return( <div>Story Box</div> ); }. }/ Every time we create a new React component, we use it by writing an element named after the class. StoryBox Renderer Using StoryBox component components.js ReactDOM.render( <StoryBox />, document.getElementById('story-app') );
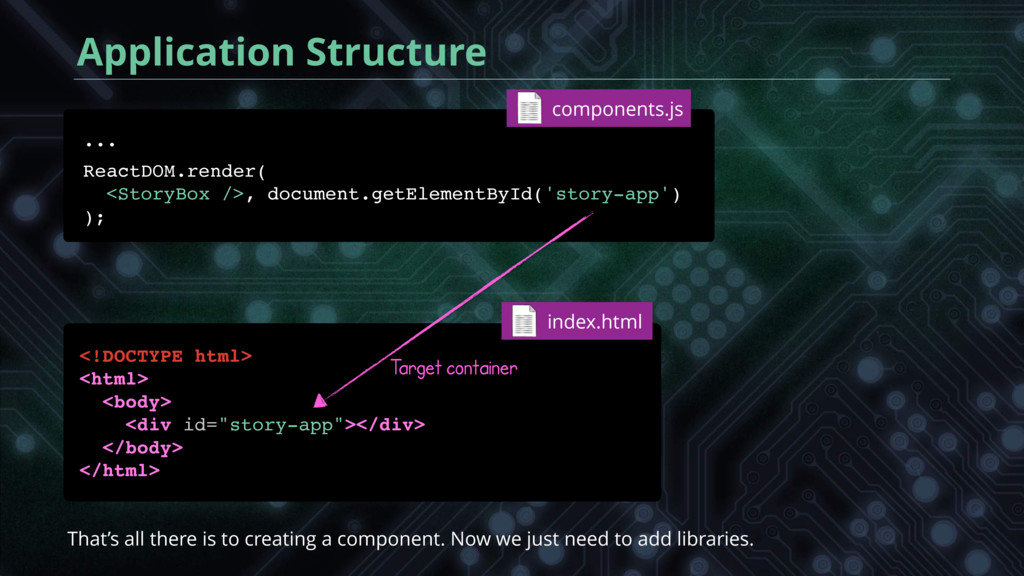
ReactDOM.render( <StoryBox />, document.getElementById('story-app') ); ... That’s all there is to creating a component. Now we just need to add libraries. components.js index.html </body> </html>
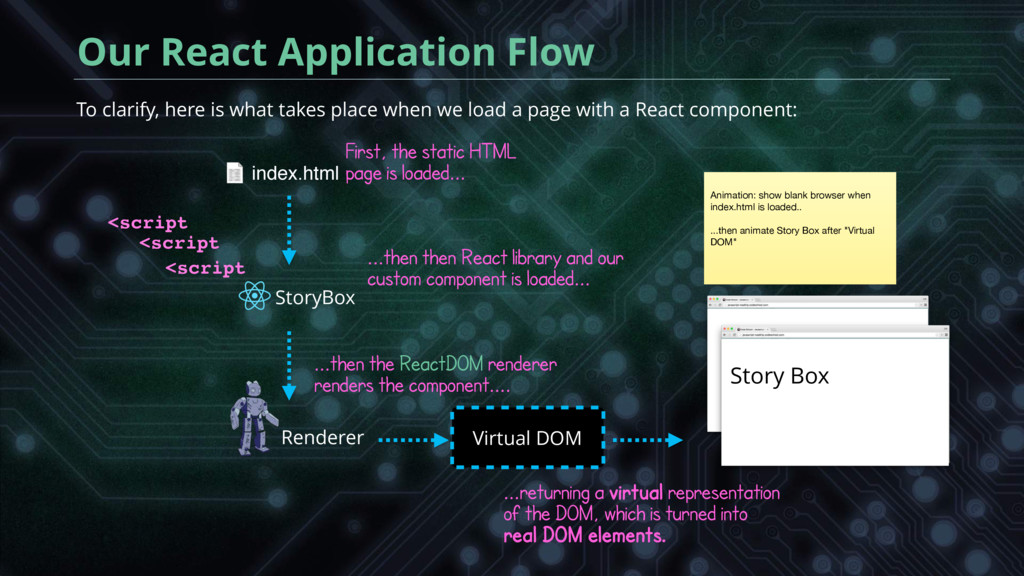
place when we load a page with a React component: StoryBox Renderer index.html Virtual DOM <script <script <script First, the static HTML page is loaded... ...then then React library and our custom component is loaded... ...then the ReactDOM renderer renders the component.... ...returning a virtual representation of the DOM, which is turned into real DOM elements. Story Box Animation: show blank browser when index.html is loaded.. ...then animate Story Box after "Virtual DOM"
problem: building large applications with data that changes over time. In React, we write apps in terms of components. We use JavaScript classes when declaring React components. Components must extend the React.Component class and must contain a render() method. We call the ReactDOM.render() function to render components to a web page.
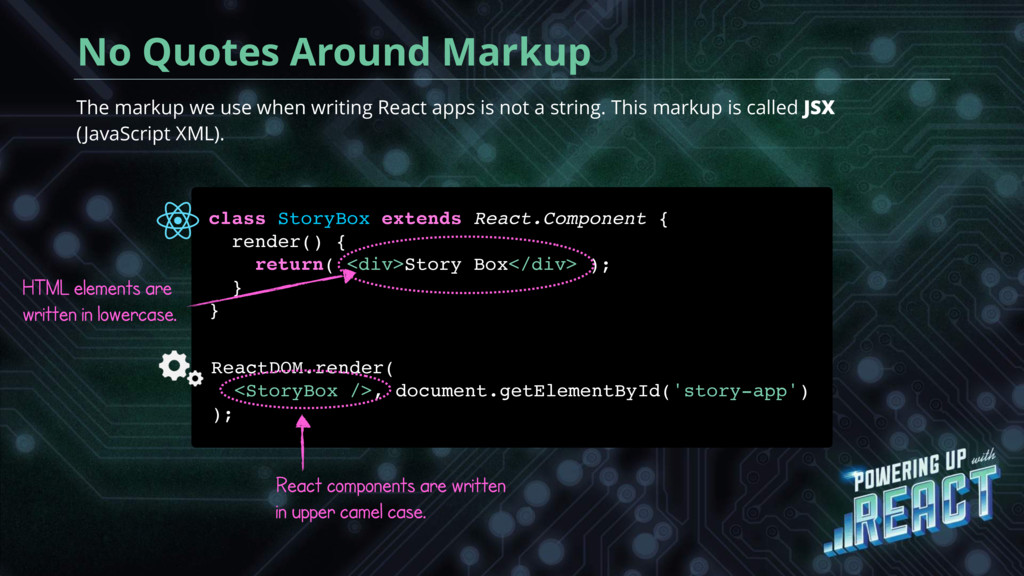
a string. This markup is called JSX (JavaScript XML). No Quotes Around Markup class StoryBox extends React.Component { render() { return( ReactDOM.render( <StoryBox />, document.getElementById('story-app') ); HTML elements are written in lowercase. React components are written in upper camel case. }? }? ); <div>Story Box</div>
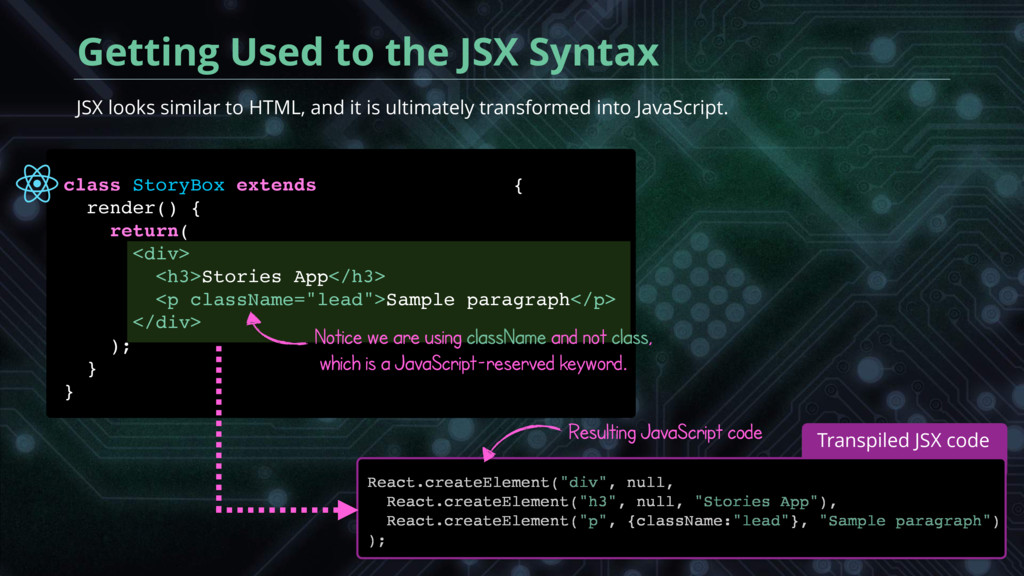
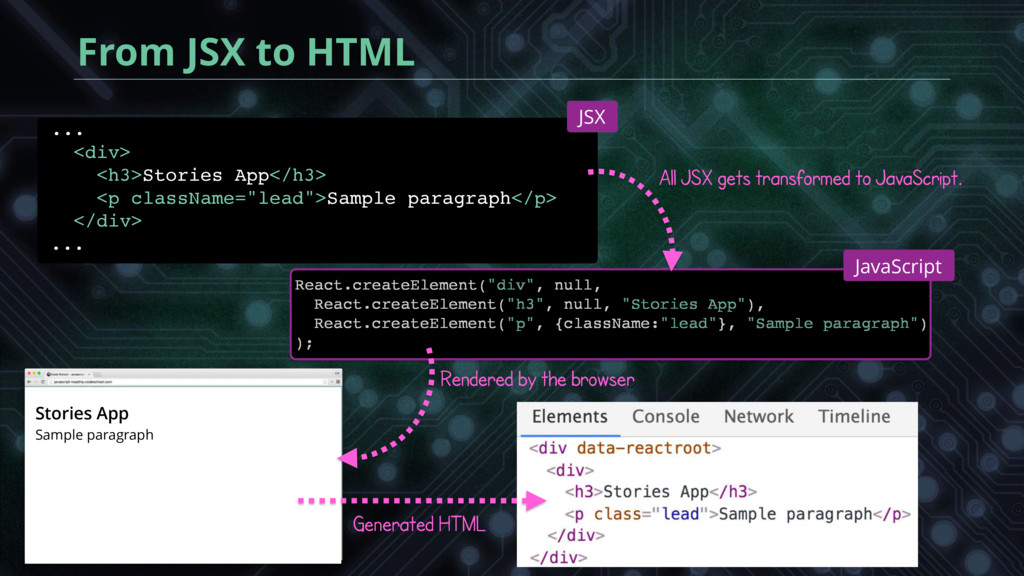
into JavaScript. Getting Used to the JSX Syntax React.createElement("div", null, React.createElement("h3", null, "Stories App"), React.createElement("p", {className:"lead"}, "Sample paragraph") ); Resulting JavaScript code Transpiled JSX code class StoryBox extends React.Component { render() { return( <div> <h3>Stories App</h3> <p className="lead">Sample paragraph</p> </div> }? }? Notice we are using className and not class, which is a JavaScript-reserved keyword. );
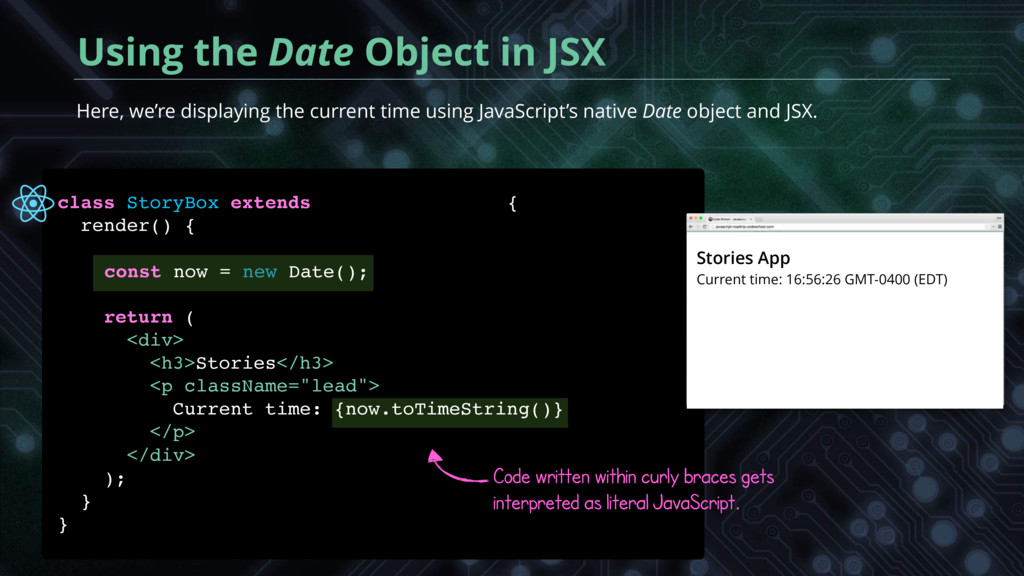
object and JSX. Using the Date Object in JSX class StoryBox extends React.Component { render() { Stories App Current time: 16:56:26 GMT-0400 (EDT) Code written within curly braces gets interpreted as literal JavaScript. const now = new Date(); {now.toTimeString()} </p> return ( <div> </div> ); }' }" <h3>Stories</h3> <p className="lead"> Current time:
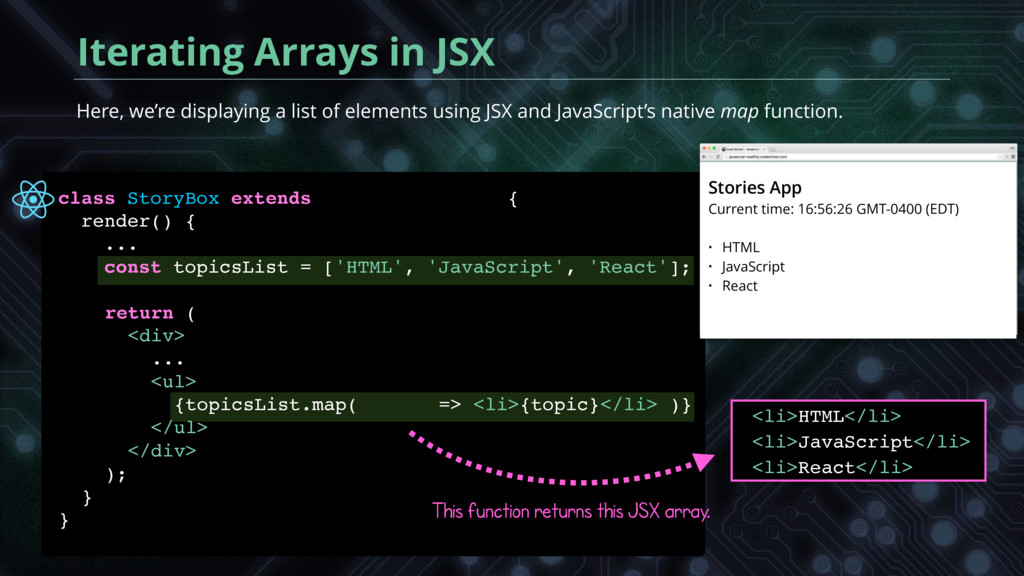
markup looks similar to HTML, but ultimately gets transpiled to JavaScript function calls, which React will know how to render to the page. Code written within curly braces is interpreted as literal JavaScript. It is a common pattern to map arrays to JSX elements.
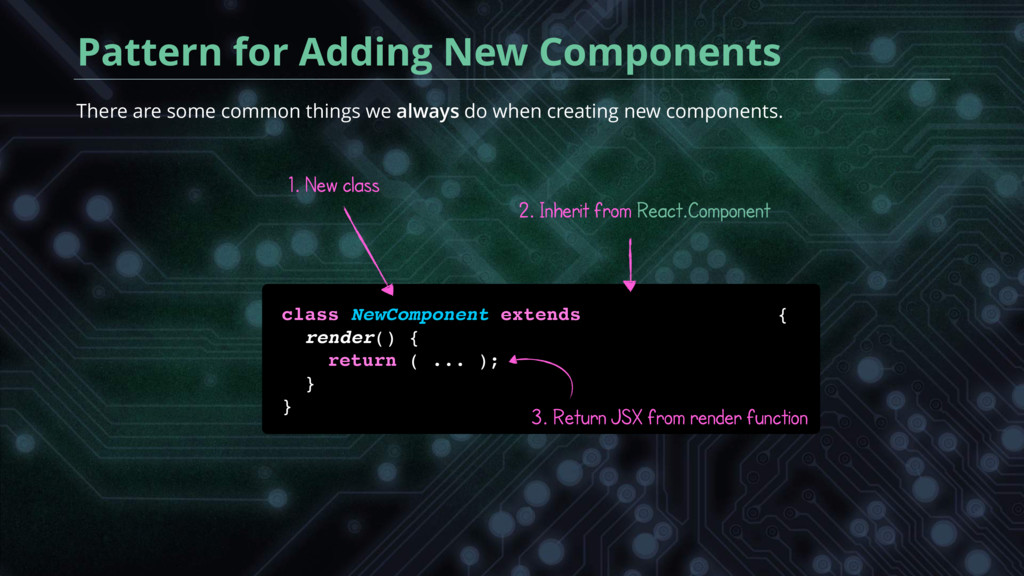
we always do when creating new components. class NewComponent extends React.Component { render() { return ( ... ); } } 1. New class 2. Inherit from React.Component 3. Return JSX from render function
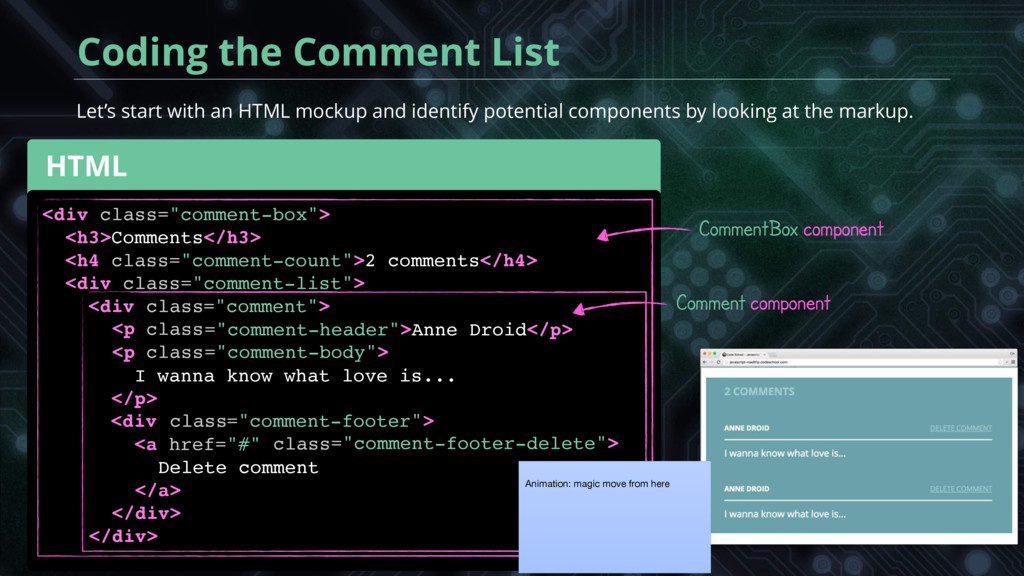
components by looking at the markup. Coding the Comment List <div class="comment-box"> <h3>Comments</h3> <h4 class="comment-count">2 comments</h4> <div class="comment-list"> CommentBox component Comment component <div Animation: magic move from here ="comment-footer-delete"> Delete comment </a> </div> </div> ="comment"> ="comment-header">Anne Droid</p> ="comment-body"> I wanna know what love is... </p> ="comment-footer"> class class class class class <a href="#" <p <p <div
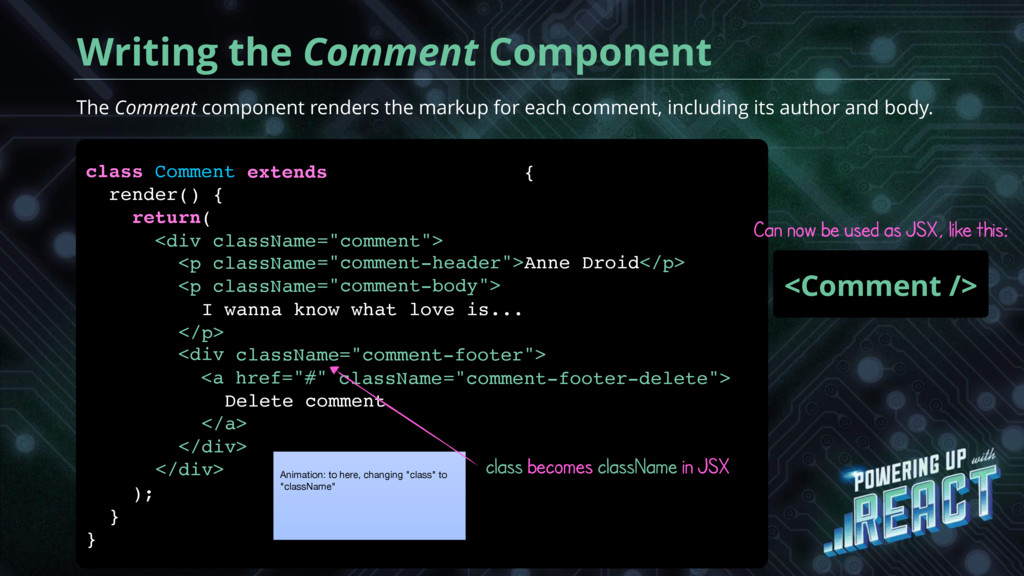
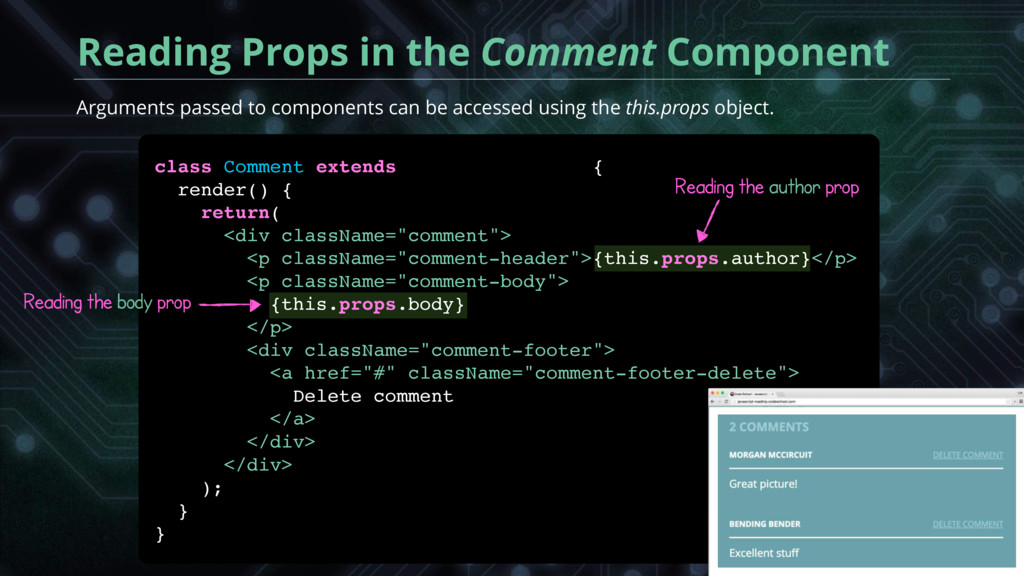
its author and body. Writing the Comment Component class Comment <Comment /> Can now be used as JSX, like this: class becomes className in JSX Animation: to here, changing "class" to "className" ); } } ="comment-footer-delete"> ="comment"> ="comment-header">Anne Droid</p> ="comment-body"> ="comment-footer"> className className className <p <p className <div className <a href="#" I wanna know what love is... </p> Delete comment </a> </div> </div> <div render() { return( extends React.Component {
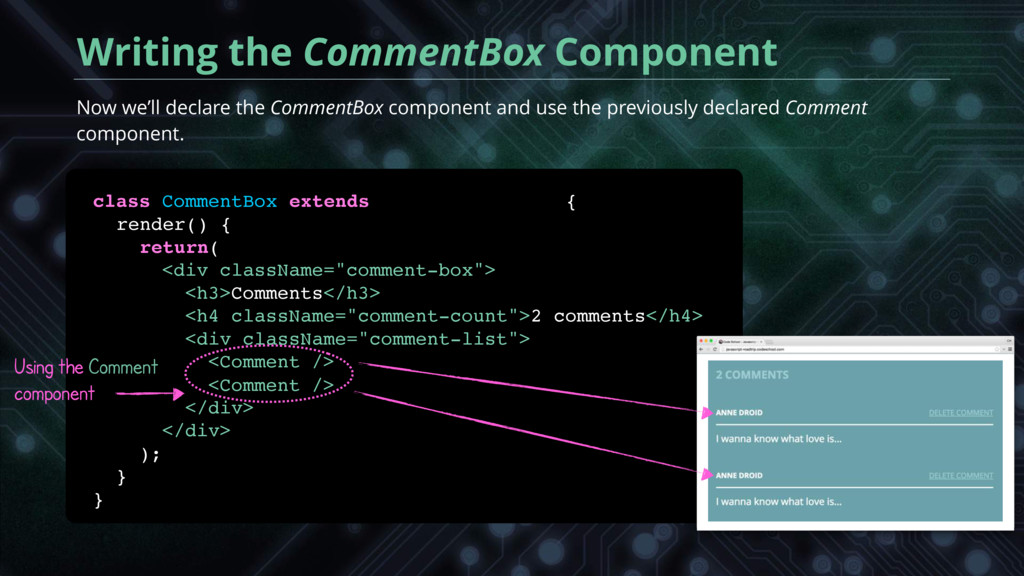
CommentBox Now we’ll declare the CommentBox component and use the previously declared Comment component. Writing the CommentBox Component Using the Comment component render() { return( extends React.Component { /> <Comment /> </div> </div> ); }/ }?
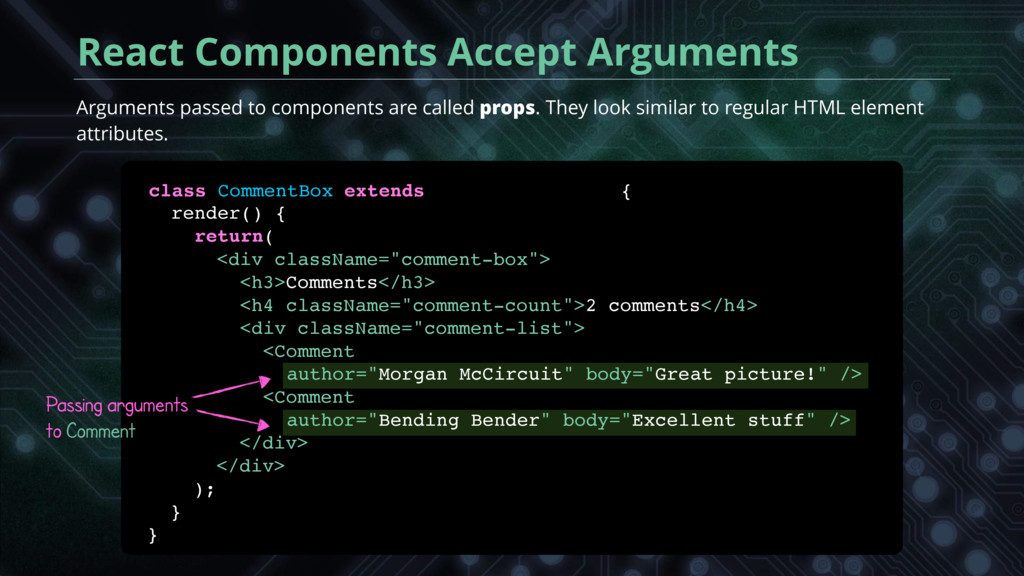
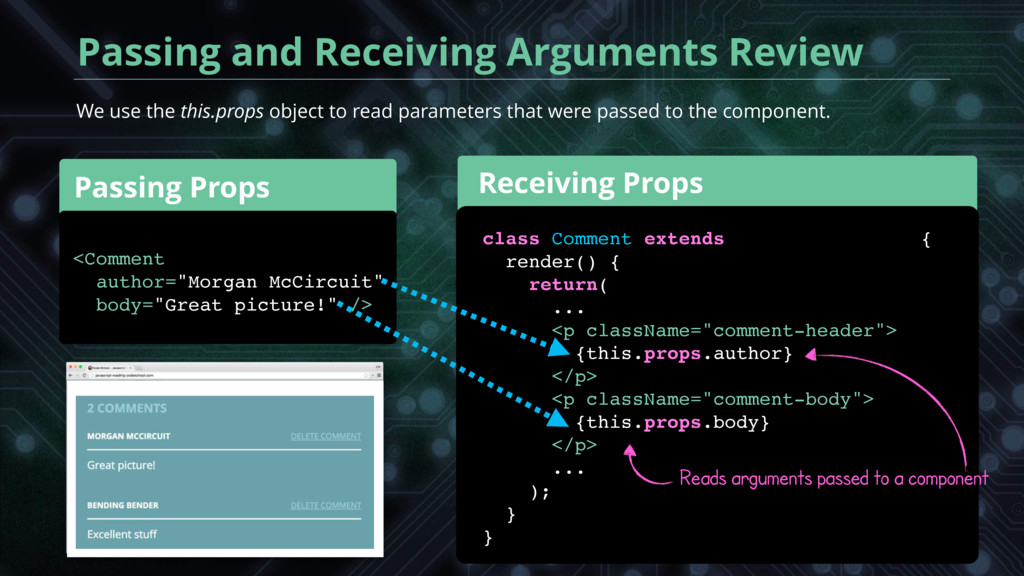
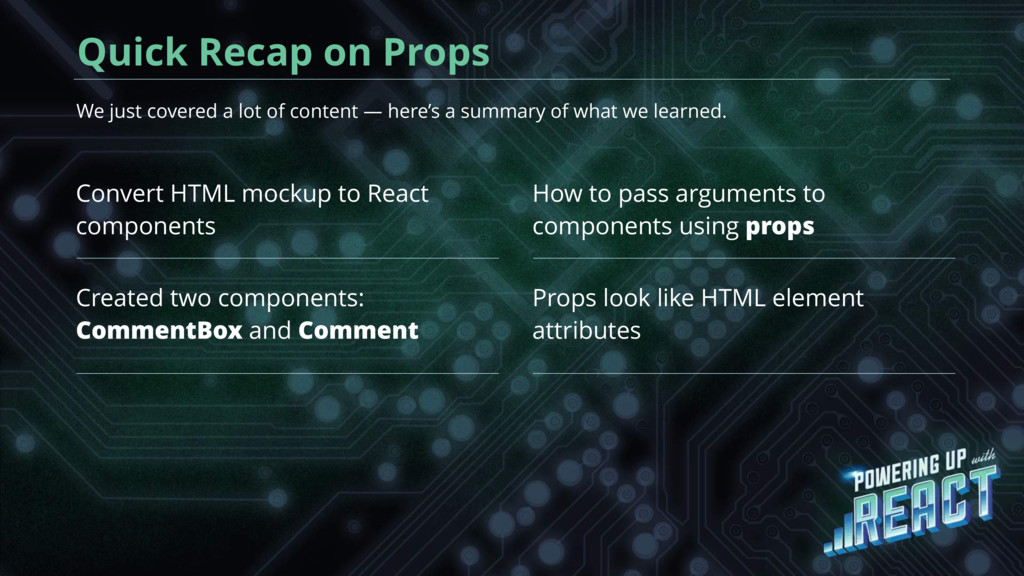
Created two components: CommentBox and Comment How to pass arguments to components using props Props look like HTML element attributes We just covered a lot of content — here’s a summary of what we learned.
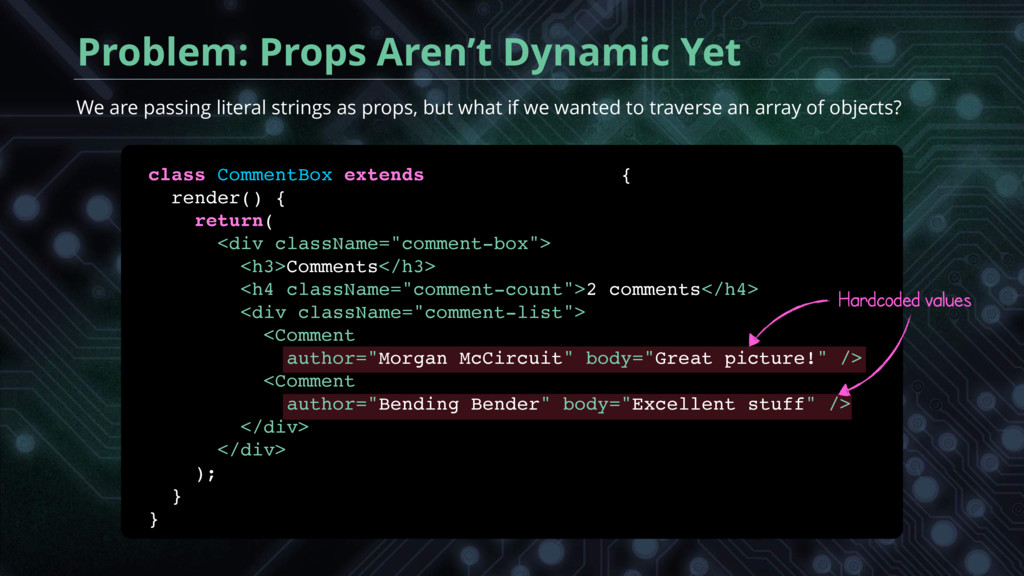
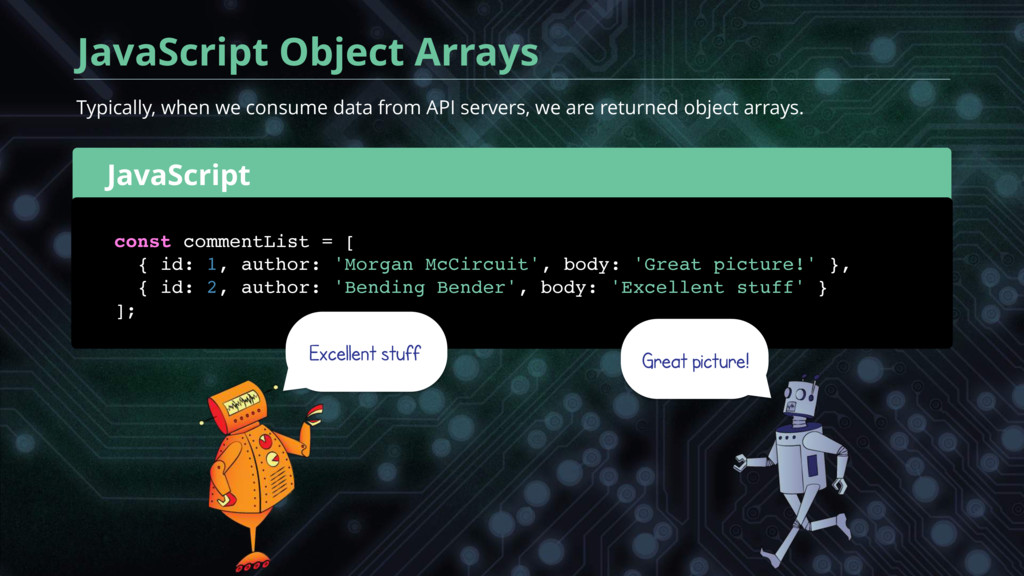
<h3>Comments</h3> <h4 className="comment-count">2 comments</h4> <div className="comment-list"> <Comment author="Morgan McCircuit" body="Great picture!" /> <Comment author="Bending Bender" body="Excellent stuff" /> </div> </div> ); } } We are passing literal strings as props, but what if we wanted to traverse an array of objects? Problem: Props Aren’t Dynamic Yet Hardcoded values
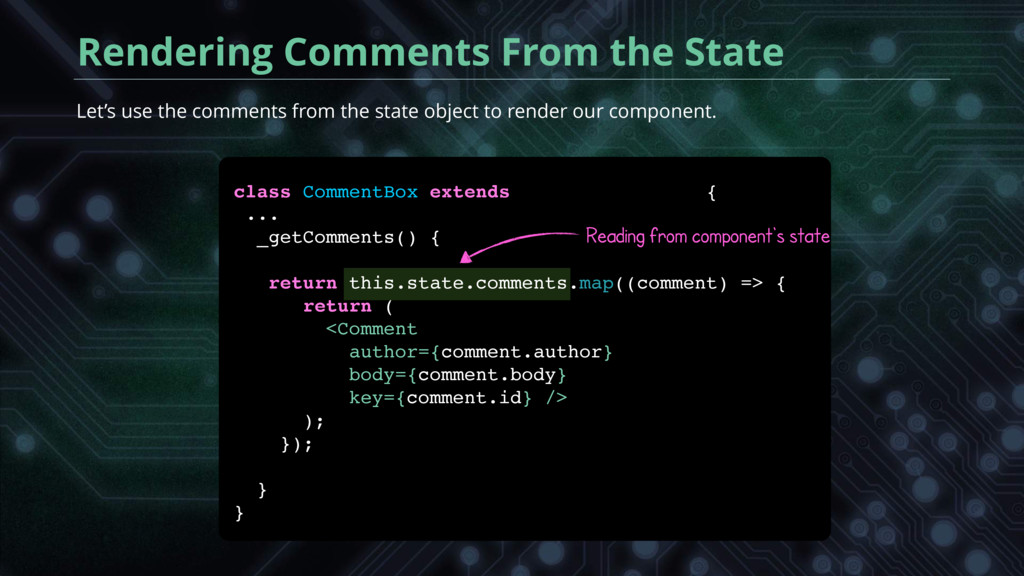
with Comment components. Mapping an Array to JSX class CommentBox extends React.Component { ... _getComments() { ...with a new component built for each element present in commentList. New method that will return array of JSX elements Underscore helps distinguish custom methods from React methods Returns an array... return commentList.map(( const commentList = [ { id: 1, author: 'Morgan McCircuit', body: 'Great picture!' }, { id: 2, author: 'Bending Bender', body: 'Excellent stuff' } ]; ); /> <Comment }. }); }- ) => { return (
to map takes an argument that represents each element from the calling object. Passing Dynamic Props ...which we can use to access properties and pass them as props. Each element from commentList is passed as argument... comment author={comment.author} body={comment.body} }); }- }. ); <Comment return ( ) => { return commentList.map(( const commentList = [ { id: 1, author: 'Morgan McCircuit', body: 'Great picture!' }, { id: 2, author: 'Bending Bender', body: 'Excellent stuff' } ]; />
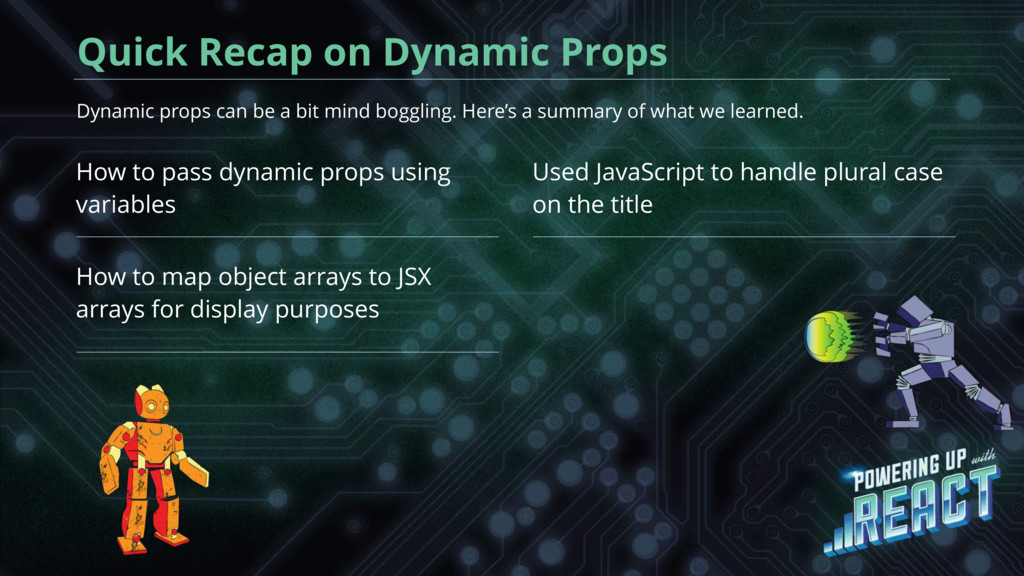
using variables How to map object arrays to JSX arrays for display purposes Used JavaScript to handle plural case on the title Dynamic props can be a bit mind boggling. Here’s a summary of what we learned.
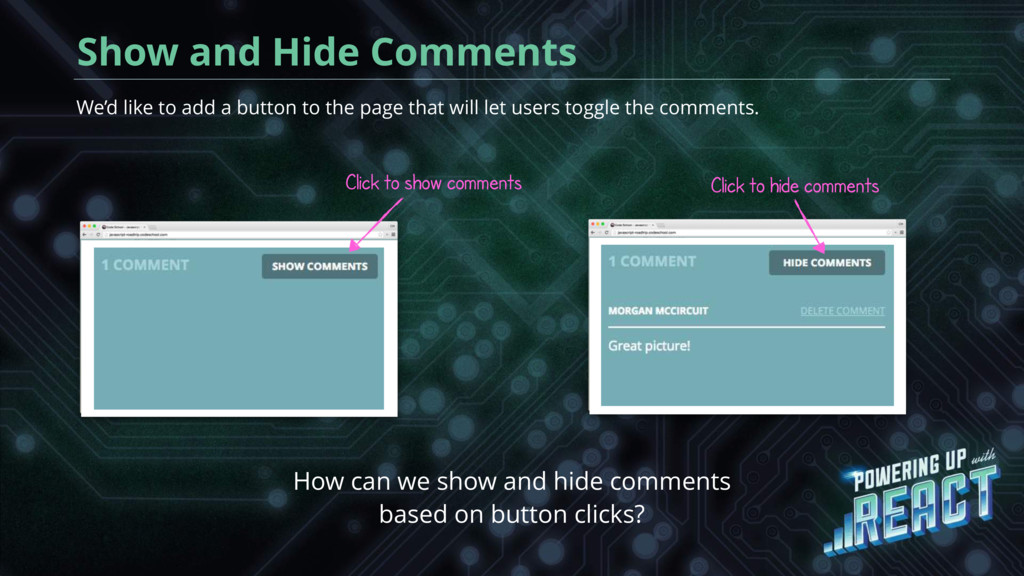
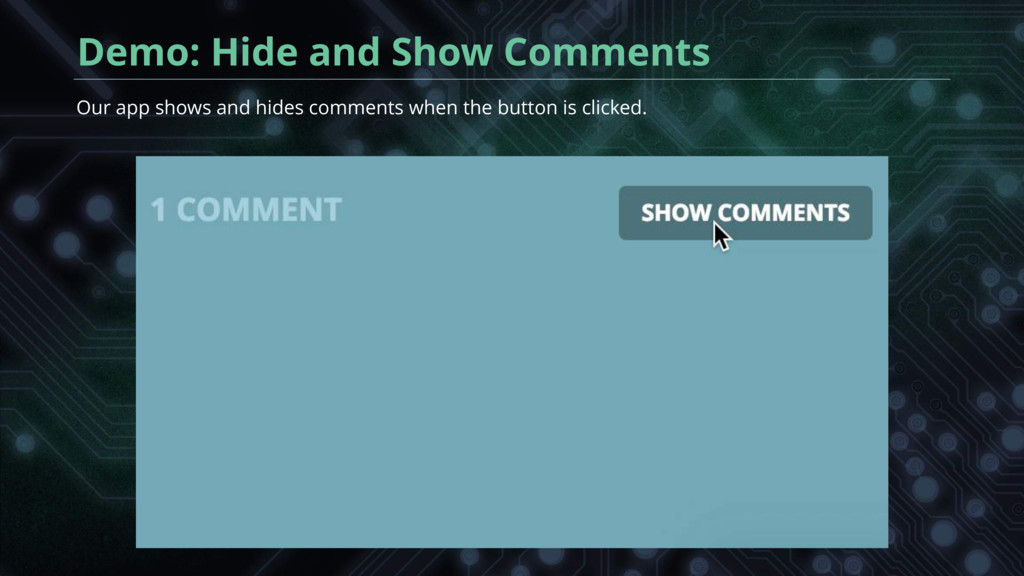
will let users toggle the comments. Show and Hide Comments Click to show comments Click to hide comments How can we show and hide comments based on button clicks?
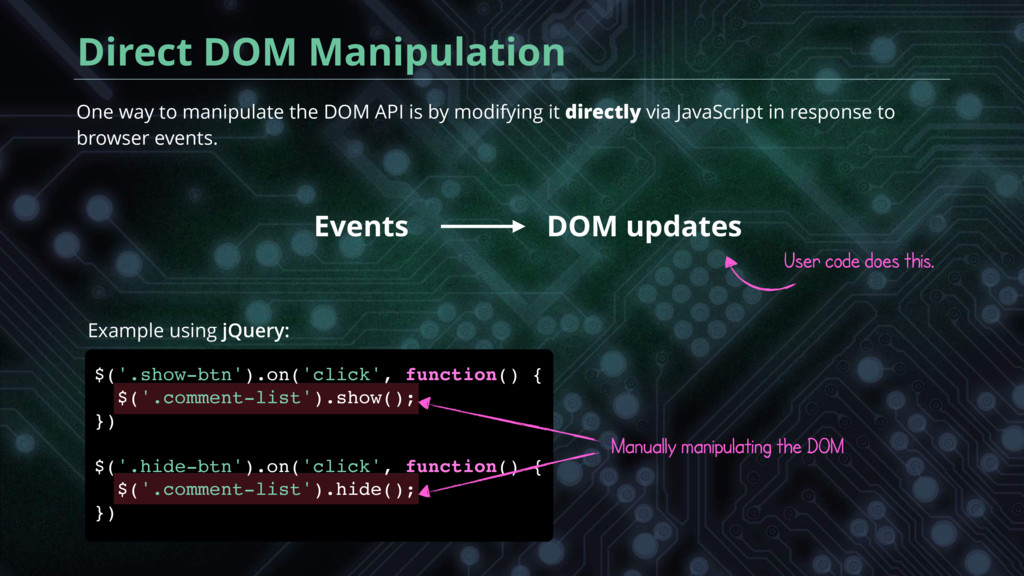
}) $('.hide-btn').on('click', function() { $('.comment-list').hide(); }) One way to manipulate the DOM API is by modifying it directly via JavaScript in response to browser events. Example using jQuery: Manually manipulating the DOM User code does this.
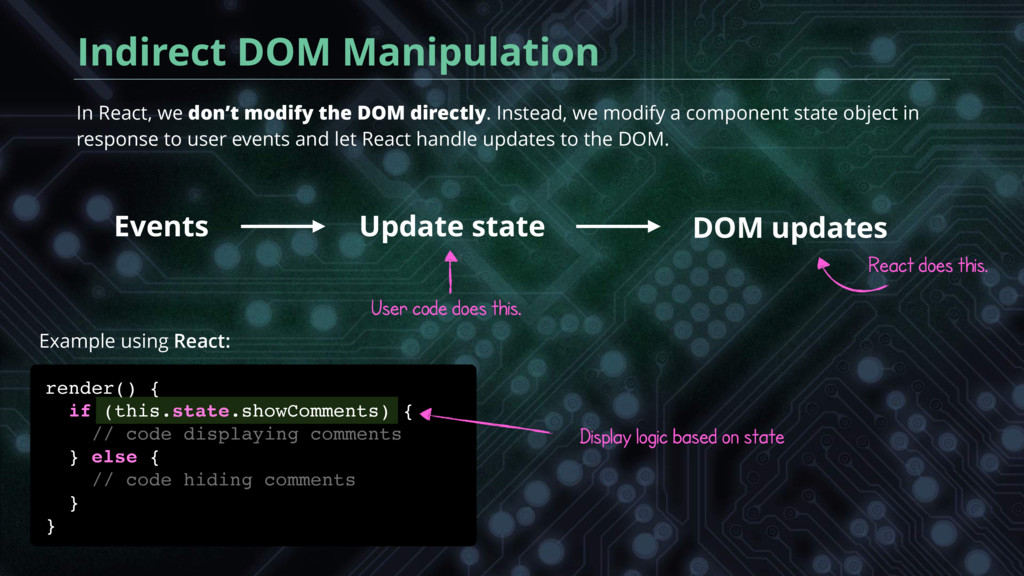
modify the DOM directly. Instead, we modify a component state object in response to user events and let React handle updates to the DOM. Update state User code does this. React does this. Example using React: Display logic based on state render() { if (this.state.showComments) { // code displaying comments } else { // code hiding comments } }
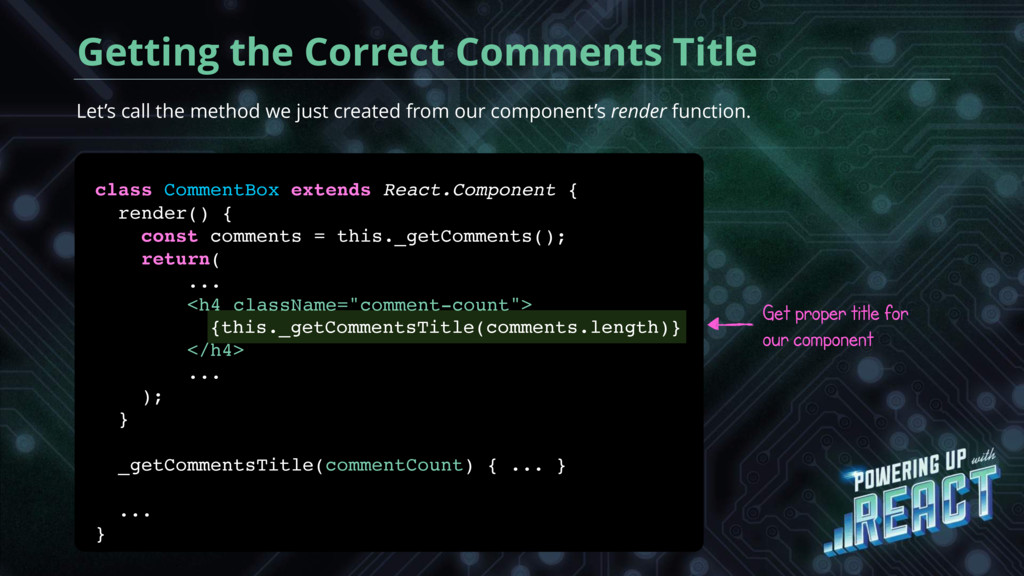
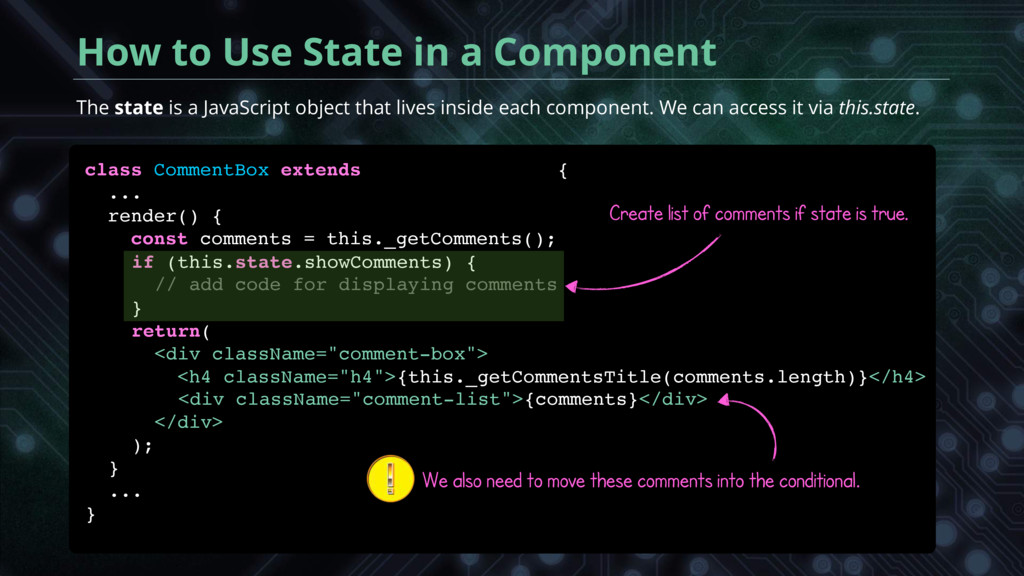
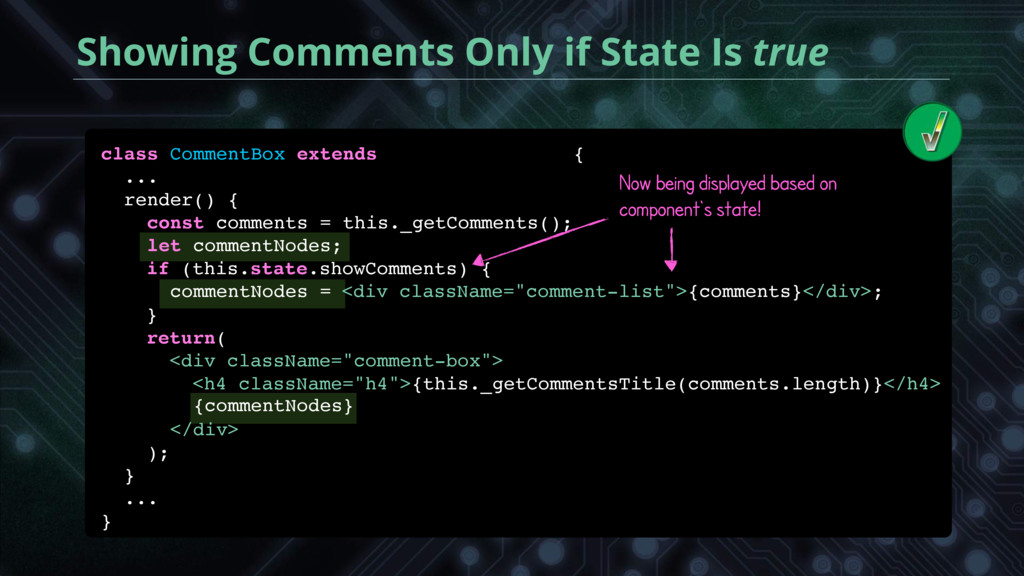
a JavaScript object that lives inside each component. We can access it via this.state. class CommentBox extends React.Component { ... render() { const comments = this._getComments(); Create list of comments if state is true. We also need to move these comments into the conditional. </div> ); }/ ... }. }. return( <div className="comment-box"> <h4 className="h4">{this._getCommentsTitle(comments.length)}</h4> // add code for displaying comments if (this.state.showComments) { <div className="comment-list">{comments}</div>
class constructor. Hiding Comments on the Initial State class CommentBox extends React.Component { constructor() { super(); this.state = { showComments: false }; } render() { ... } ... } super() must be called in our constructor . Initial state hides comments.
we call setState by passing it an object. How to Update a Component’s State this.state.showComments = true this.setState({showComments: true }) Calling setState will only update the properties passed as an argument, not replace the entire state object. Updates the showComments property and re-renders component Setting state this way won't work.
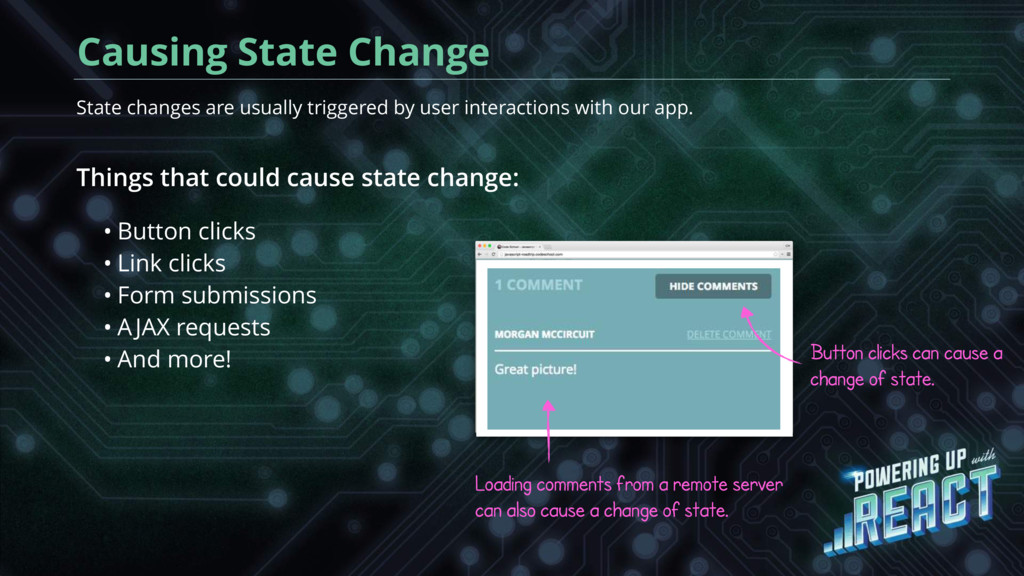
app. Causing State Change • Button clicks • Link clicks • Form submissions • AJAX requests • And more! Things that could cause state change: Button clicks can cause a change of state. Loading comments from a remote server can also cause a change of state.
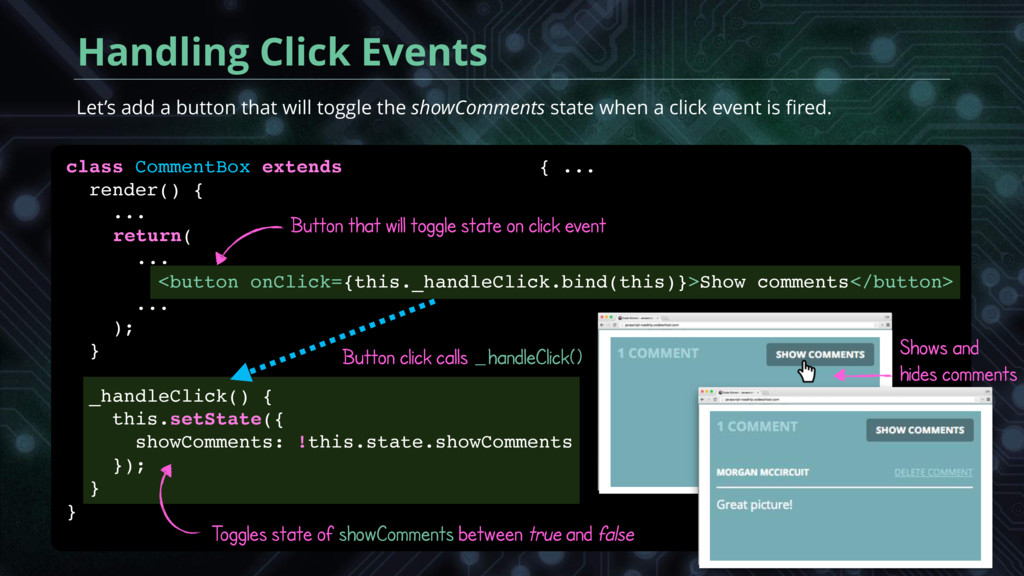
when a click event is fired. Handling Click Events class CommentBox extends React.Component { ... render() { ... Toggles state of showComments between true and false Button that will toggle state on click event Button click calls _handleClick() Shows and hides comments } _handleClick() { this.setState({ showComments: !this.state.showComments }); } ... ); } </button> Show comments <button onClick={this._handleClick.bind(this)}> return( ...
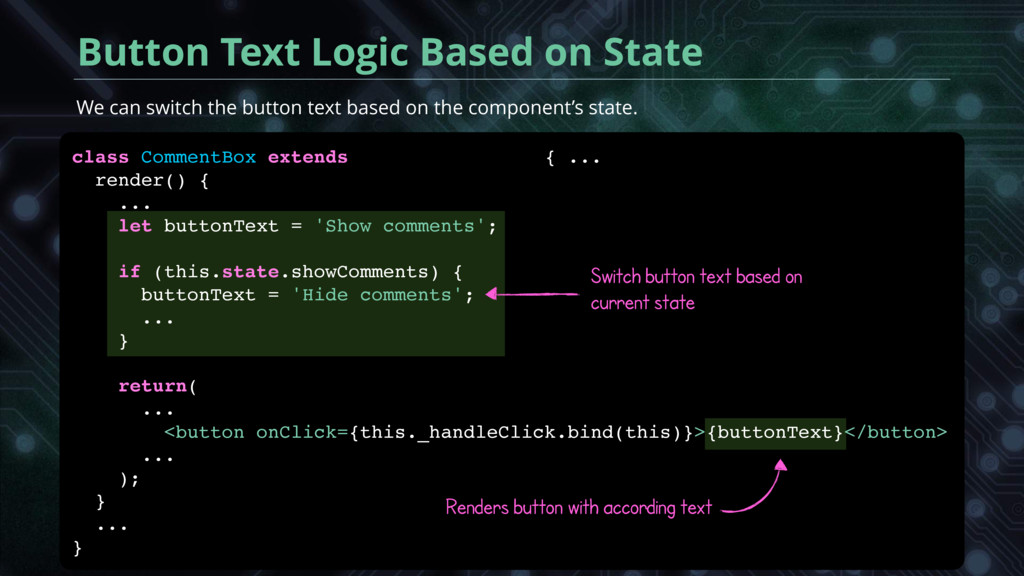
{ ... render() { ... Switch button text based on current state Renders button with according text We can switch the button text based on the component’s state. } ... ); } <button onClick={this._handleClick.bind(this)}> return( ... {buttonText}</button> let buttonText = 'Show comments'; if (this.state.showComments) { buttonText = 'Hide comments'; ... } ...
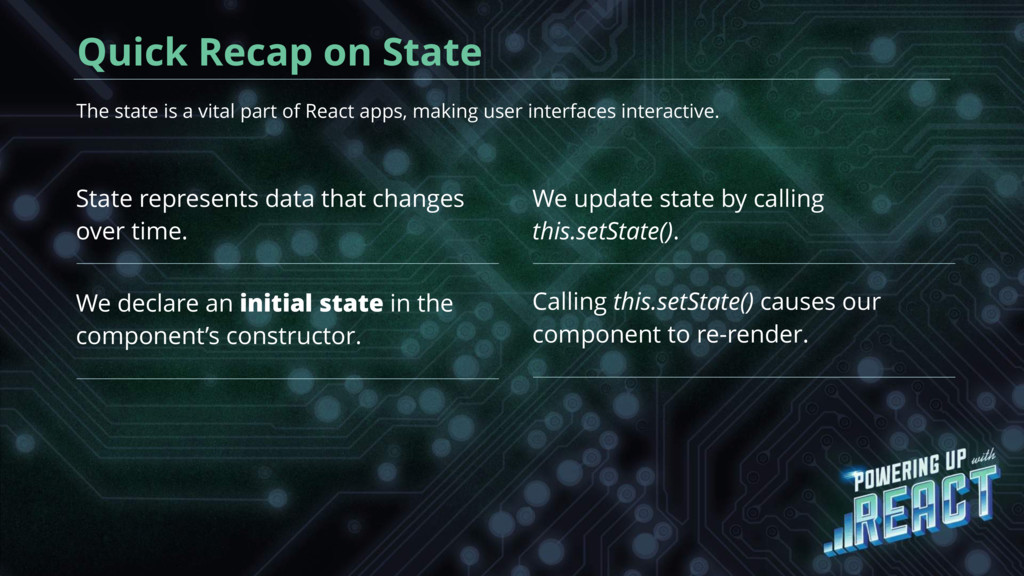
time. We declare an initial state in the component’s constructor. We update state by calling this.setState(). The state is a vital part of React apps, making user interfaces interactive. Calling this.setState() causes our component to re-render.
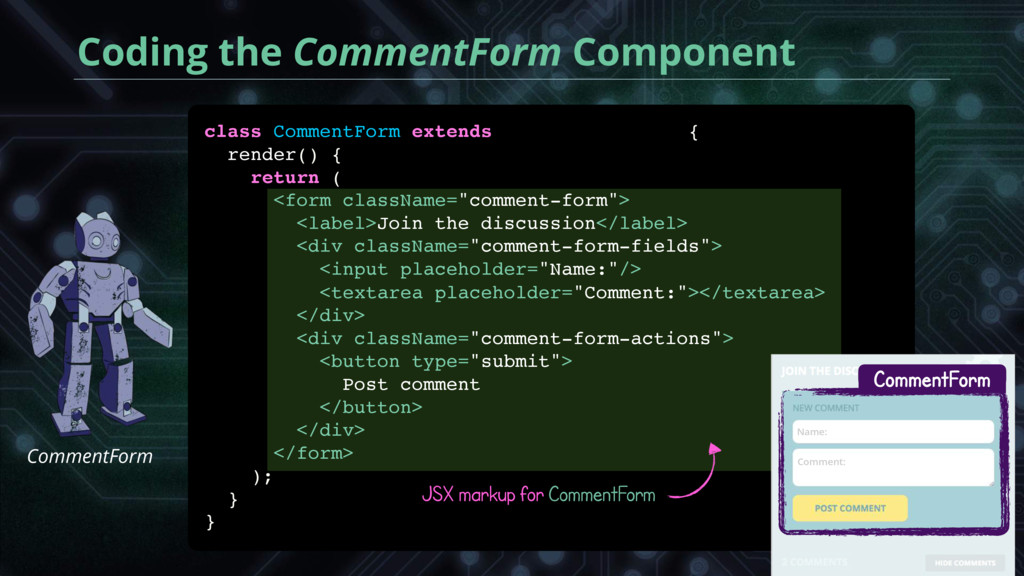
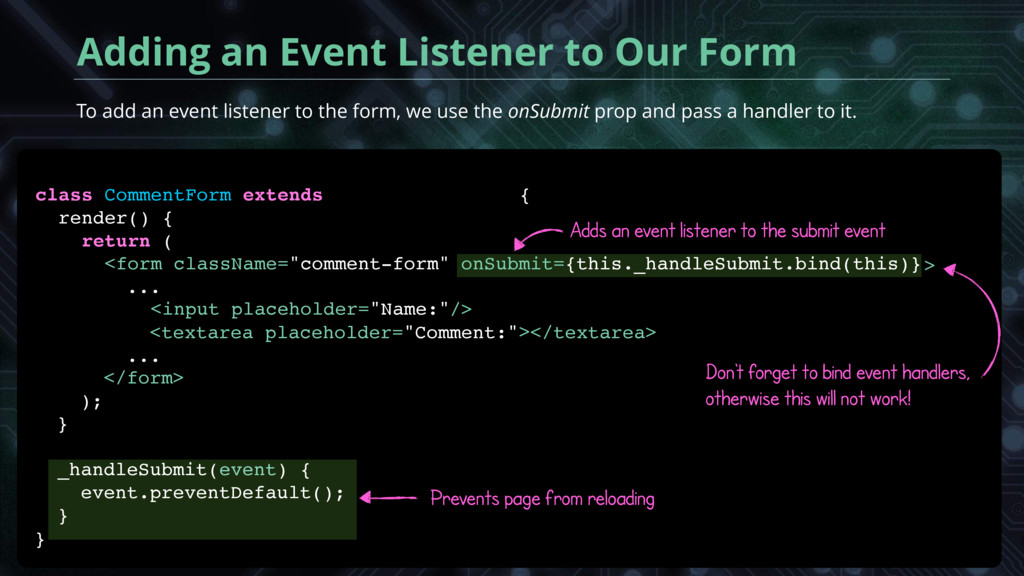
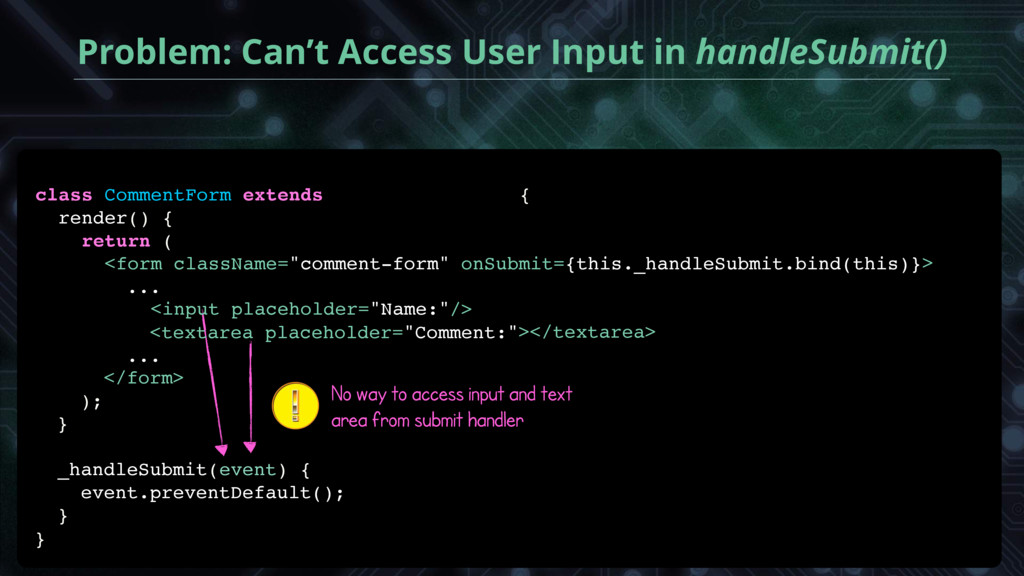
React.Component { render() { return ( <form className="comment-form" Adds an event listener to the submit event Don't forget to bind event handlers, otherwise this will not work! To add an event listener to the form, we use the onSubmit prop and pass a handler to it. Prevents page from reloading } _handleSubmit(event) { event.preventDefault(); } ); }. </form> ... <input placeholder="Name:" ... > onSubmit={this._handleSubmit.bind(this)} /> <textarea placeholder="Comment:" </textarea> >
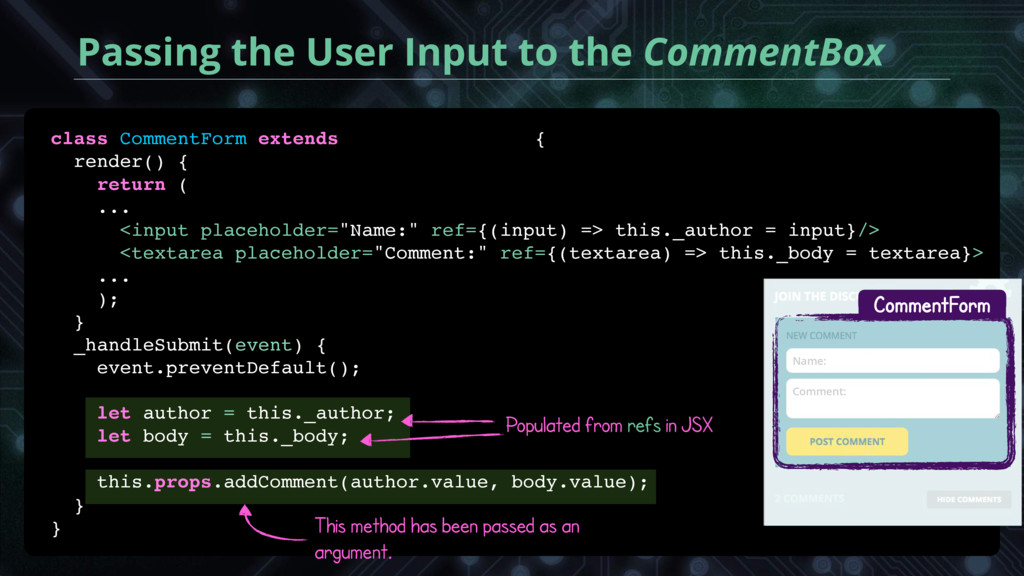
render() { return ( <form className="comment-form" We'll use these refs to access values from the input elements. We can use refs to assign form values to properties on the component object. } _handleSubmit(event) { event.preventDefault(); } ); }. </form> ... > </textarea> <textarea placeholder="Comment:" ref={(textarea) => this._body = textarea} ref={(input) => this._author = input} <input placeholder="Name:" /> ... > onSubmit={this._handleSubmit.bind(this)}
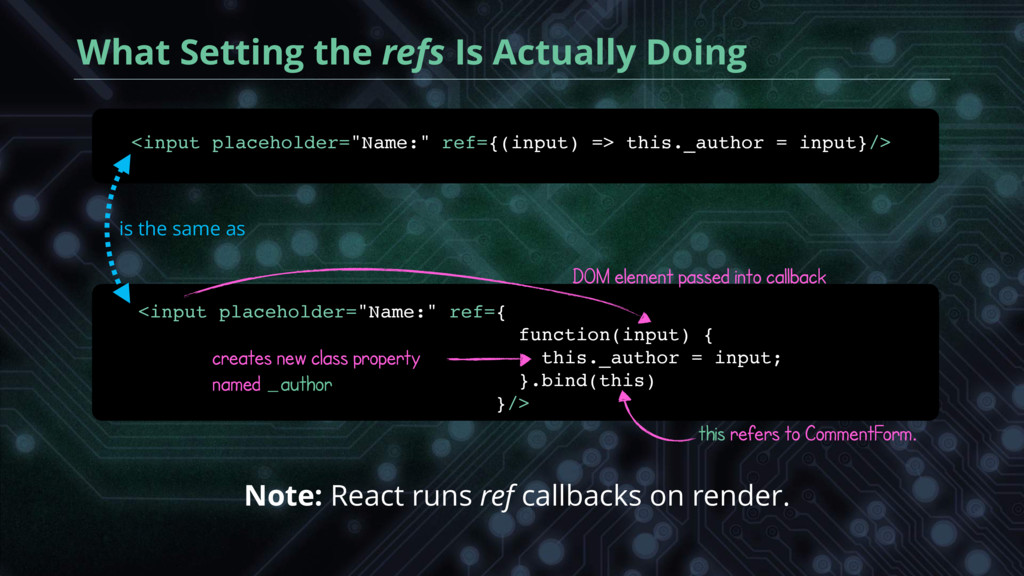
function(input) { this._author = input; }.bind(this) }/> this refers to CommentForm. creates new class property named _author DOM element passed into callback is the same as Note: React runs ref callbacks on render. ref={(input) => this._author = input} <input placeholder="Name:" />
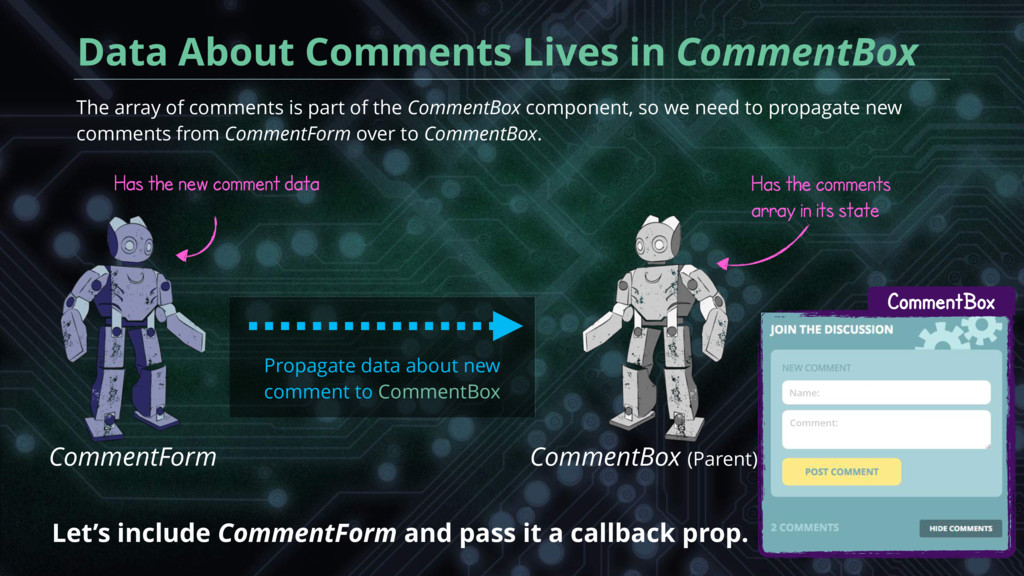
CommentBox component, so we need to propagate new comments from CommentForm over to CommentBox. Data About Comments Lives in CommentBox Let’s include CommentForm and pass it a callback prop. CommentBox CommentForm CommentBox (Parent) Has the comments array in its state Has the new comment data Propagate data about new comment to CommentBox
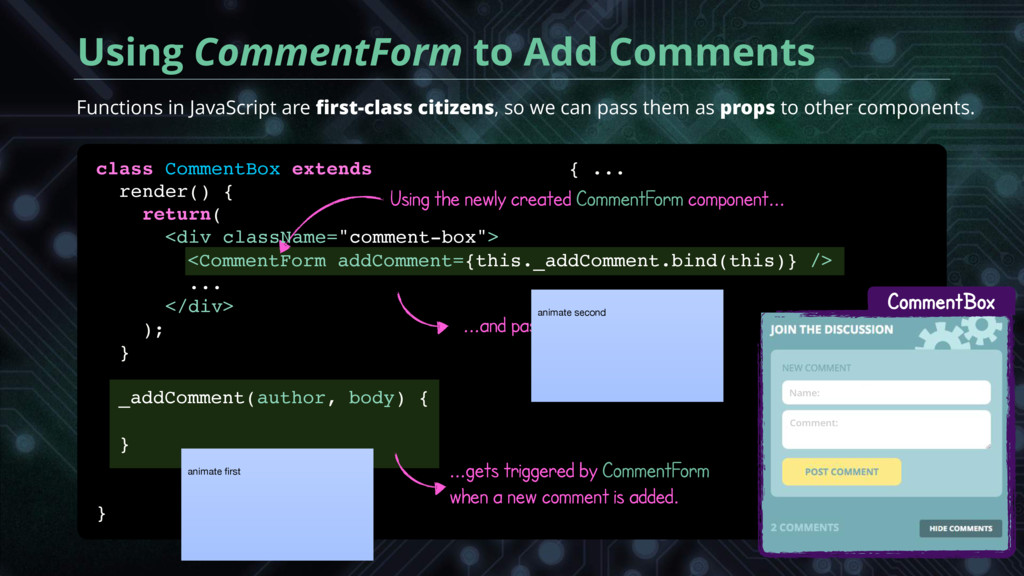
Add Comments Using the newly created CommentForm component... CommentBox ...and passing it a callback prop... ...gets triggered by CommentForm when a new comment is added. Functions in JavaScript are first-class citizens, so we can pass them as props to other components. animate second } } _addComment(author, body) { ... </div> ); }= <CommentForm addComment={this._addComment.bind(this)} /> animate first render() { return( <div className="comment-box"> ...
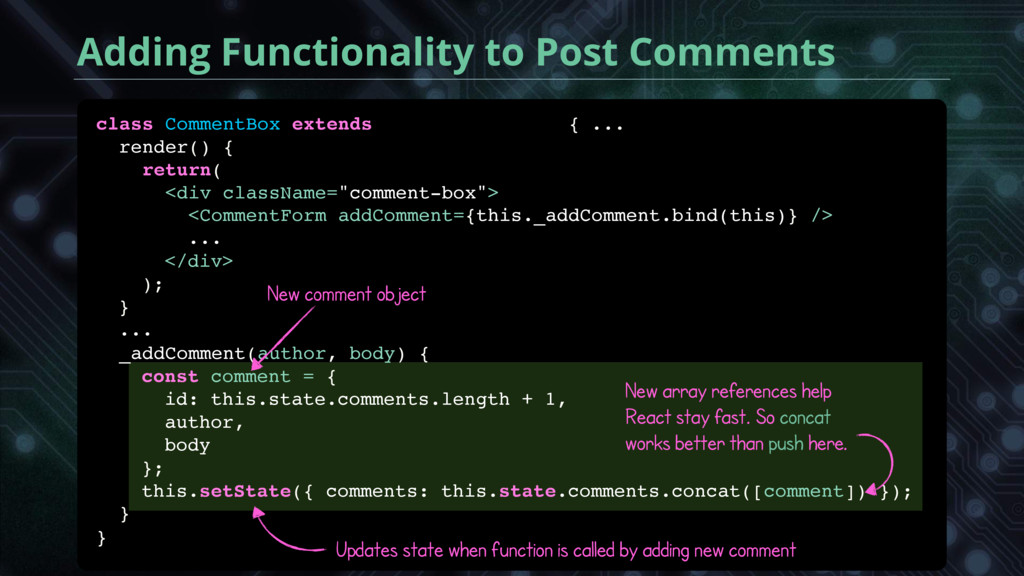
}; this.setState({ comments: this.state.comments.concat([comment]) }); Adding Functionality to Post Comments Updates state when function is called by adding new comment class CommentBox extends React.Component { New comment object New array references help React stay fast. So concat works better than push here. } } _addComment(author, body) { ... ... </div> ); }= <CommentForm addComment={this._addComment.bind(this)} /> render() { return( <div className="comment-box"> ...
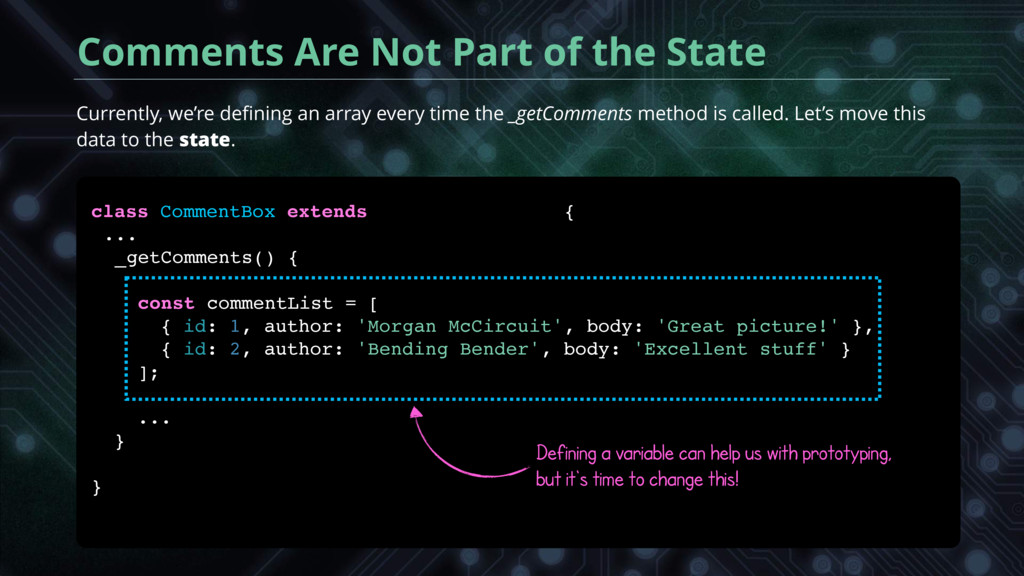
is called. Let’s move this data to the state. Comments Are Not Part of the State class CommentBox extends React.Component { Defining a variable can help us with prototyping, but it's time to change this! ]; ... } } { id: 1, author: 'Morgan McCircuit', body: 'Great picture!' }, { id: 2, author: 'Bending Bender', body: 'Excellent stuff' } ... _getComments() { const commentList = [
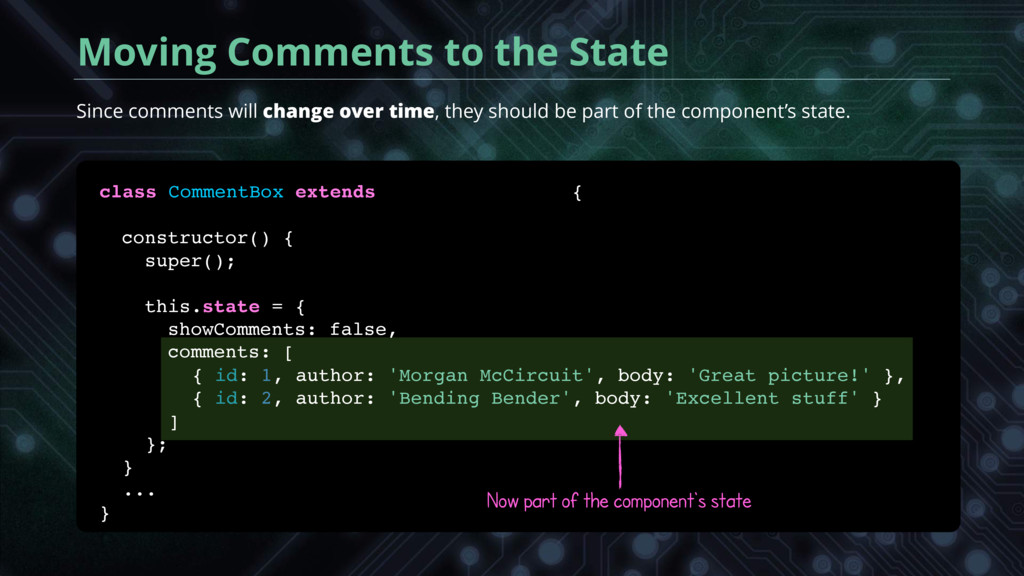
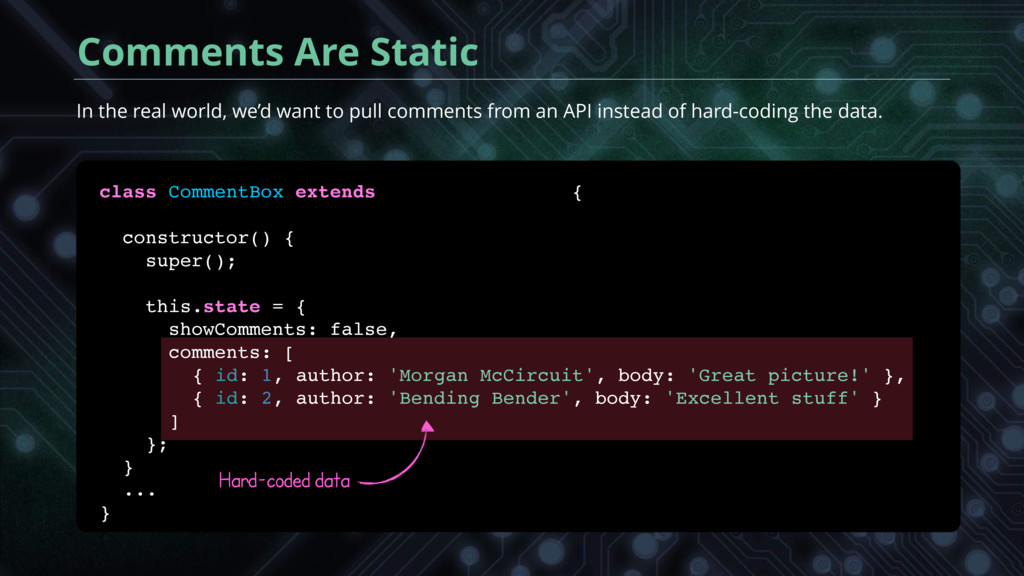
of the component’s state. Moving Comments to the State Now part of the component's state class CommentBox extends React.Component { { id: 1, author: 'Morgan McCircuit', body: 'Great picture!' }, { id: 2, author: 'Bending Bender', body: 'Excellent stuff' } ] }; } ... } comments: [ constructor() { super(); this.state = { showComments: false,
have consistent properties across different browsers, React wraps the browser’s native events into synthetic events, consolidating browser behaviors into one API. Synthetic events are my jam! eventSubmit theSubmitEvent submitEvent submitEvent onSubmit For the full list of browser events supported by React, visit http://go.codeschool.com/react-events Synthetic event Hypothetical different event handling with browsers
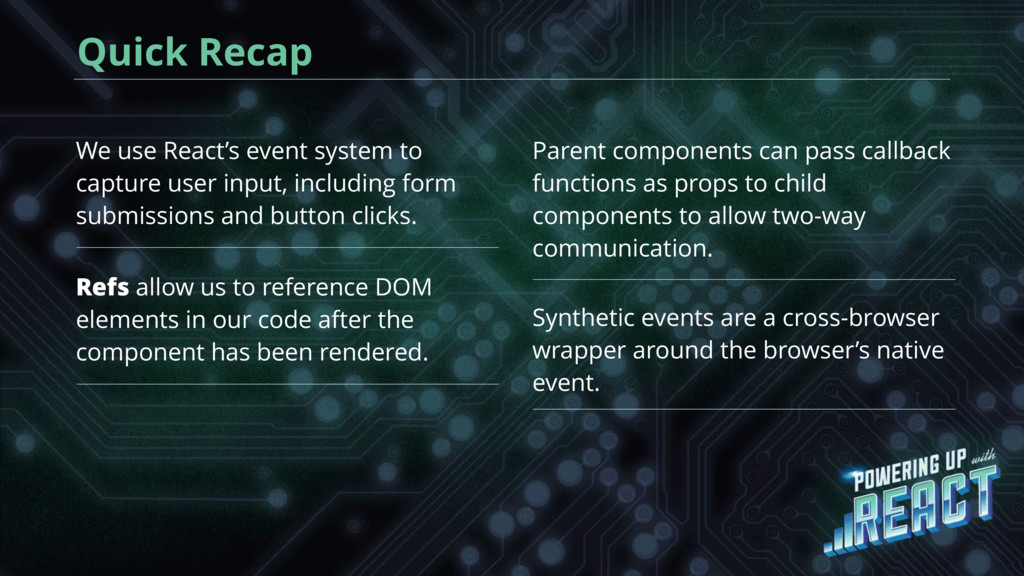
input, including form submissions and button clicks. Refs allow us to reference DOM elements in our code after the component has been rendered. Parent components can pass callback functions as props to child components to allow two-way communication. Synthetic events are a cross-browser wrapper around the browser’s native event.
array so we can later populate it with data from an API server. Loading Comments From a Remote Server class CommentBox extends React.Component { constructor() { super(); this.state = { showComments: false, comments: [ Initialized to an empty array }; }/ ... }- ]
help us make Ajax requests. We can download it from the jQuery website and include it in our HTML page. Adding jQuery as a Dependency jquery.js Download it from the jQuery website <!DOCTYPE html> <html> <body> <div id="story-app"></div> <script src="vendors/react.js"></script> <script src="vendors/react-dom.js"></script> <script src="vendors/jquery.js"></script> <script src="vendors/babel.js"></script> <script type="text/babel" src="components.js"></script> </body> </html> Brush up on your Ajax skills with our jQuery: The Return Flight course index.html
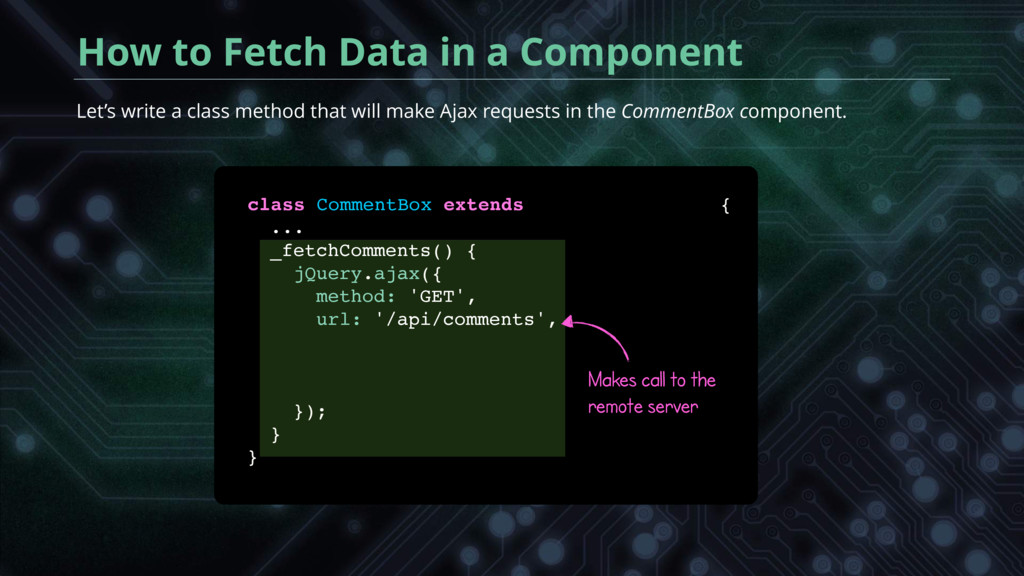
in the CommentBox component. How to Fetch Data in a Component class CommentBox extends React.Component { Makes call to the remote server }); } } _fetchComments() { jQuery.ajax({ method: 'GET', url: '/api/comments', ...
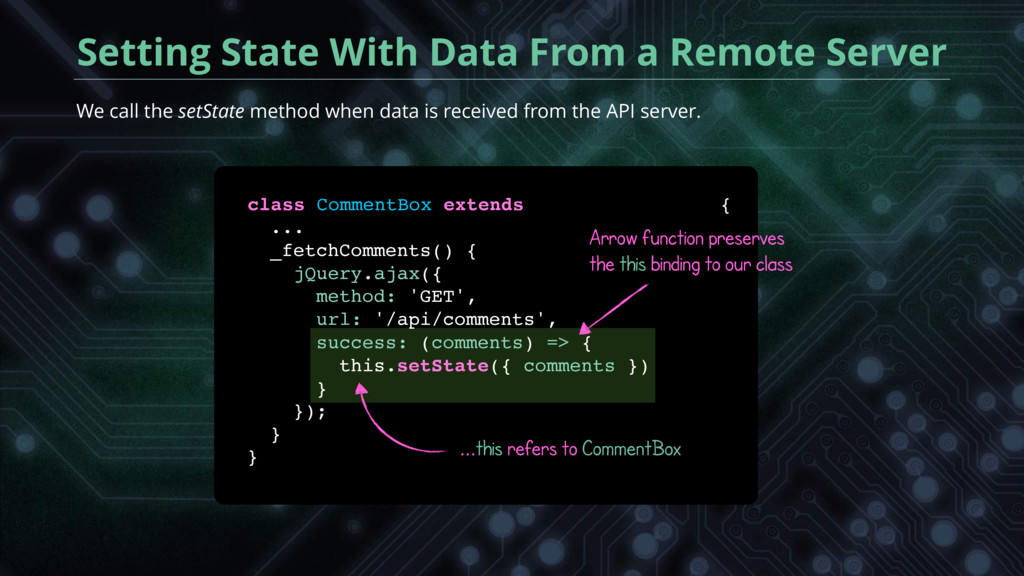
the API server. Setting State With Data From a Remote Server class CommentBox extends React.Component { Arrow function preserves the this binding to our class ...this refers to CommentBox }); } } success: (comments) => { this.setState({ comments }) } _fetchComments() { jQuery.ajax({ method: 'GET', url: '/api/comments', ...
calls render() That means we can't call _fetchComments() from render — we'll get an infinite loop! We need to call _fetchComments before render() is called. class CommentBox extends React.Component { render() { } _fetchComments() { ... } }
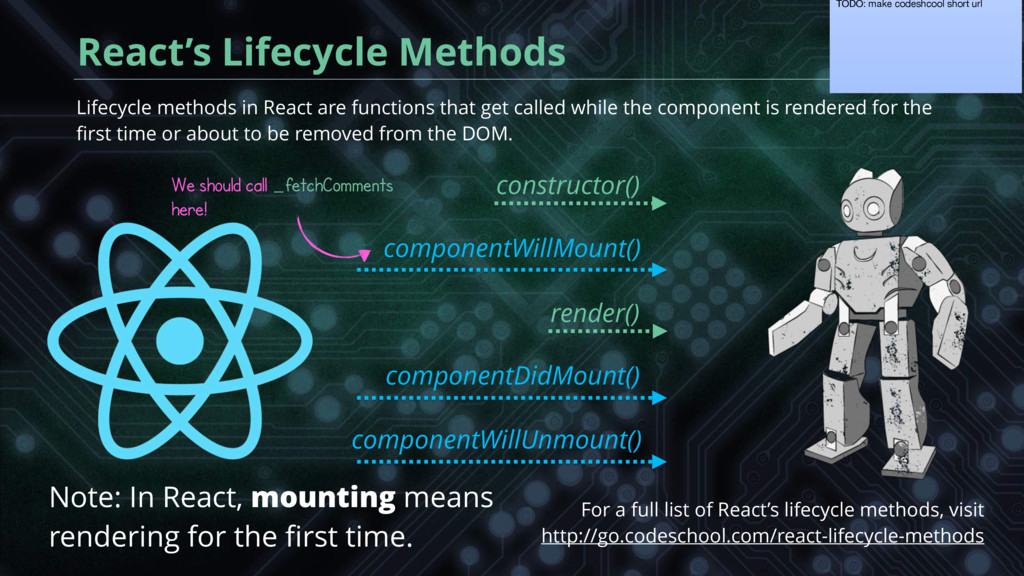
the component is rendered for the first time or about to be removed from the DOM. React’s Lifecycle Methods componentWillMount() componentDidMount() constructor() For a full list of React’s lifecycle methods, visit http://go.codeschool.com/react-lifecycle-methods TODO: make codeshcool short url render() We should call _fetchComments here! Note: In React, mounting means rendering for the first time. componentWillUnmount()
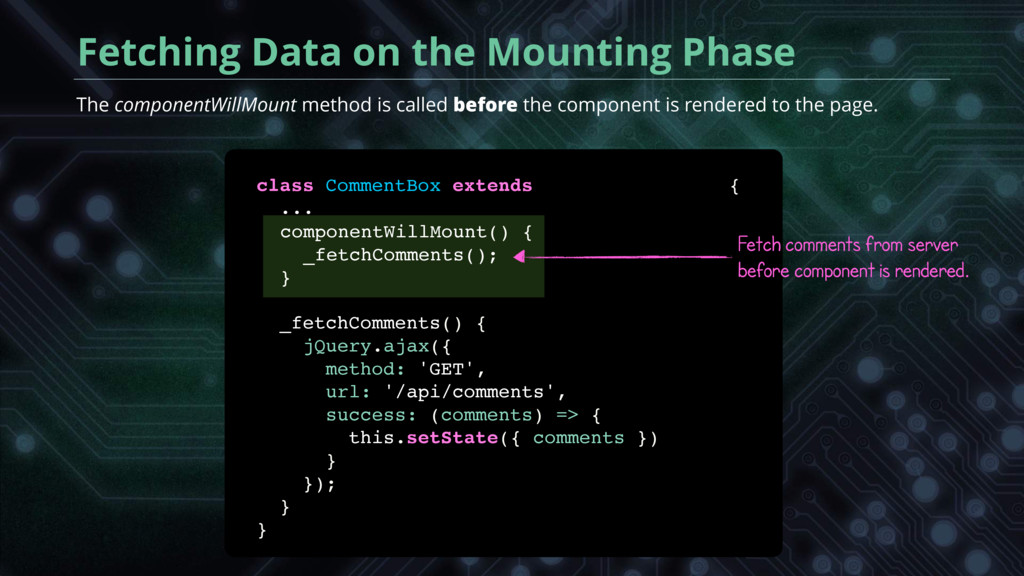
before component is rendered. The componentWillMount method is called before the component is rendered to the page. class CommentBox extends React.Component { ... _fetchComments() { jQuery.ajax({ method: 'GET', url: '/api/comments', success: (comments) => { this.setState({ comments }) } }); } } componentWillMount() { _fetchComments(); }
to the page. Polling Data on the Mounting Phase ... class CommentBox extends React.Component { ... } Polling the server every five seconds 5,000 milliseconds is equal to five seconds componentDidMount() { setInterval(() => this._fetchComments(), 5000); }
by only updating the DOM when changes are detected on the resulting markup. DOM change happens Note: render() is called after each Ajax response because setState is in the response function. New state value after initial Ajax request No new state value after second periodic Ajax request New state value after third periodic Ajax request No DOM change DOM change happens
CommentBox component to keep loading new comments every five seconds, even when they’re no longer being displayed. Memory Leaks on Page Change Page change Page change Still running from previous page Still running from previous two pages Our component grew because of this leak
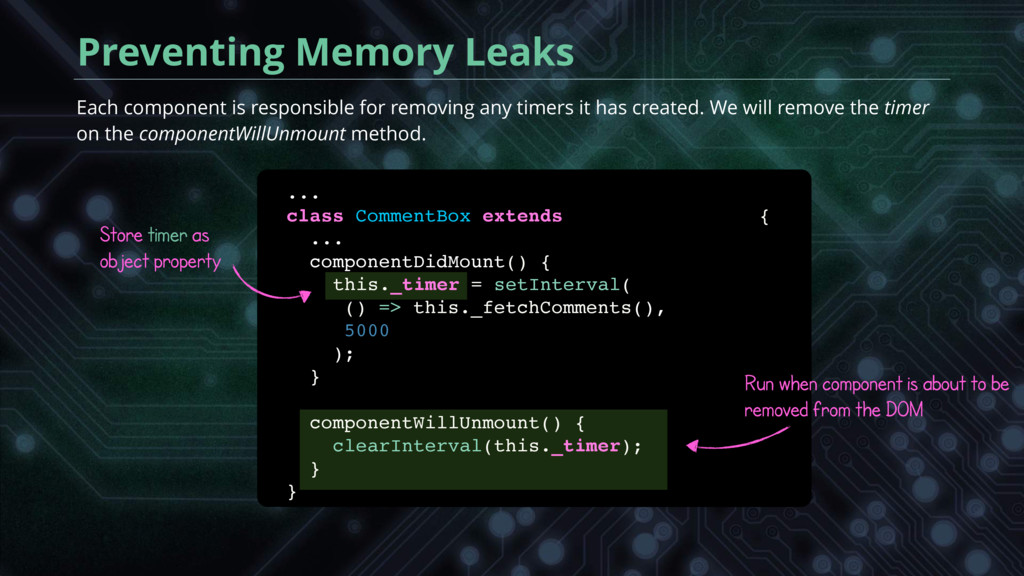
created. We will remove the timer on the componentWillUnmount method. Preventing Memory Leaks ... class CommentBox extends React.Component { ... componentDidMount() { = setInterval( () => this._fetchComments(), 5000 ); } } Run when component is about to be removed from the DOM Store timer as object property componentWillUnmount() { clearInterval(this._timer); } this._timer
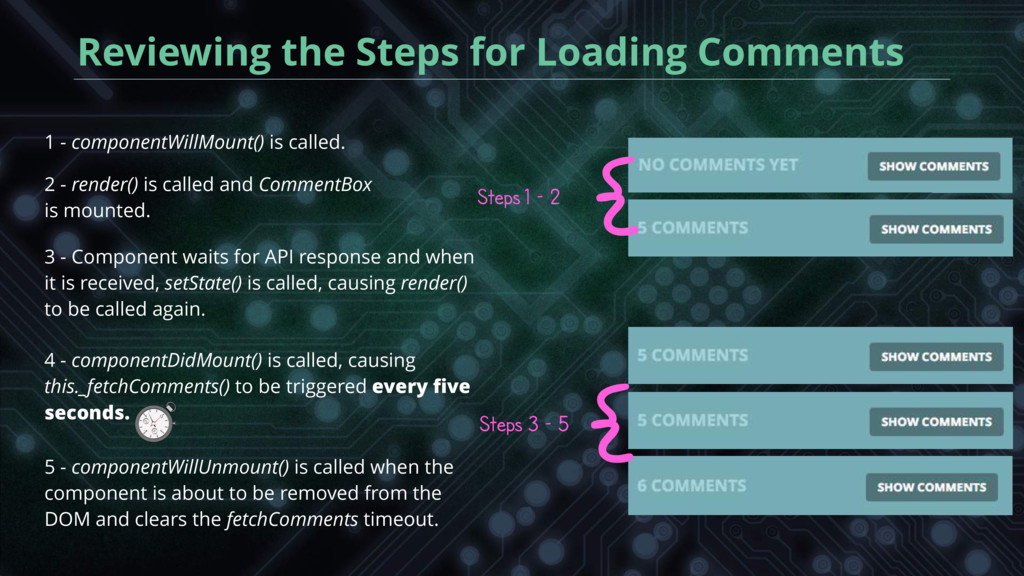
called and CommentBox is mounted. 1 - componentWillMount() is called. 3 - Component waits for API response and when it is received, setState() is called, causing render() to be called again. 4 - componentDidMount() is called, causing this._fetchComments() to be triggered every five seconds. 5 - componentWillUnmount() is called when the component is about to be removed from the DOM and clears the fetchComments timeout. Steps 1 – 2 { Steps 3 – 5 {
functions that get called during certain phases that components go through. componentWillMount() is called before the component is rendered. componentWillUnmount() is called immediately before the component is removed from the DOM. componentDidMount() is called after the component is rendered. More lifecycle methods at http://go.codeschool.com/react-lifecycle-methods
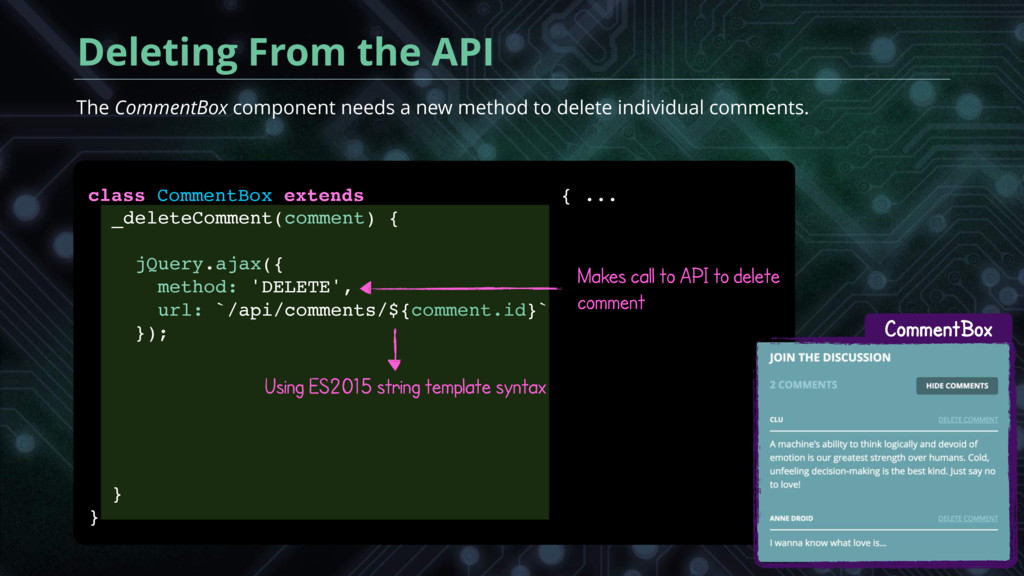
comments. Deleting From the API class CommentBox extends React.Component { Makes call to API to delete comment Using ES2015 string template syntax CommentBox } } _deleteComment(comment) { jQuery.ajax({ method: 'DELETE', }); url: `/api/comments/${comment.id}` ...
finished before updating the component’s state. We will give our user immediate visual feedback, which is known as an optimistic update. Updating the Comment List class CommentBox extends React.Component { Updates state with modified comments array removes comment from array use spread operator to clone existing array CommentBox } } const comments = [...this.state.comments]; const commentIndex = comments.indexOf(comment); comments.splice(commentIndex, 1); this.setState({ comments }); }); ... _deleteComment(comment) { jQuery.ajax({ method: 'DELETE', url: `/api/comments/${comment.id}`
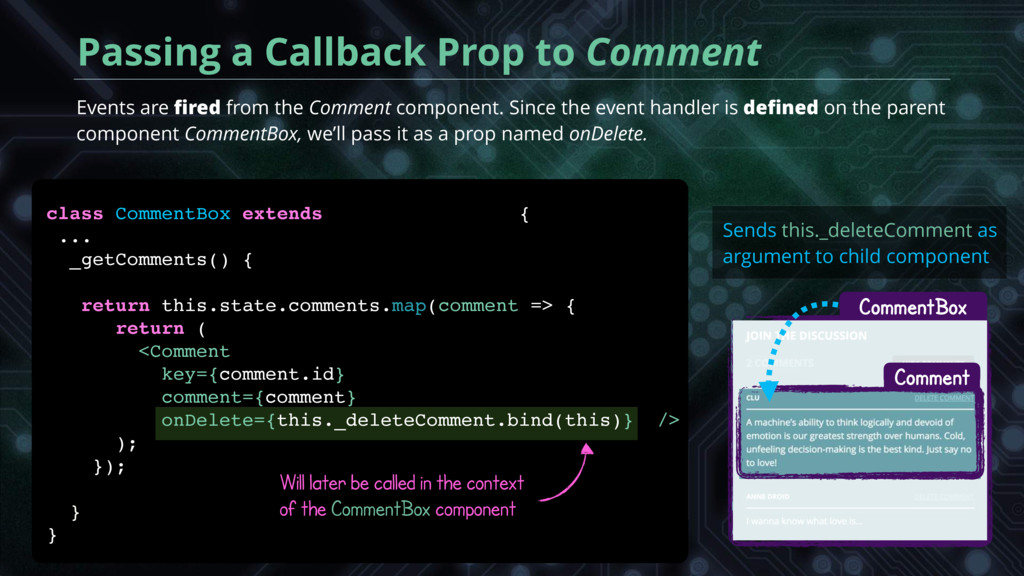
handler is defined on the parent component CommentBox, we’ll pass it as a prop named onDelete. Passing a Callback Prop to Comment CommentBox Comment class CommentBox extends React.Component { Will later be called in the context of the CommentBox component Sends this._deleteComment as argument to child component ... _getComments() { return this.state.comments.map(comment => { return ( <Comment key={comment.id} comment={comment} onDelete={this._deleteComment.bind(this)} /> ); }); } }
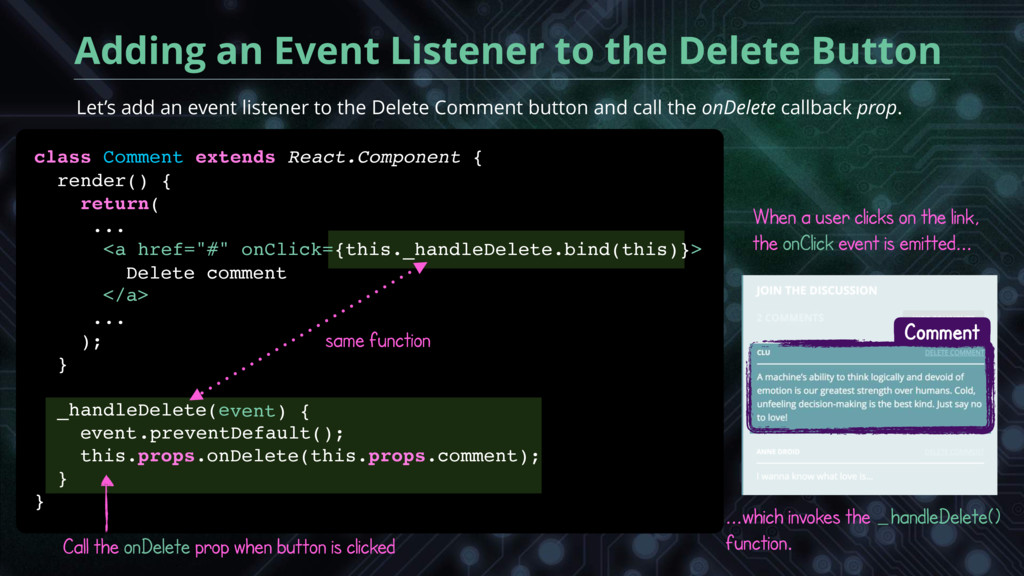
an event listener to the Delete Comment button and call the onDelete callback prop. Call the onDelete prop when button is clicked ...which invokes the _handleDelete() function. When a user clicks on the link, the onClick event is emitted... class Comment extends React.Component { same function Comment } } render() { return( ... <a href="#" onClick={this._handleDelete.bind(this)}> this.props.onDelete(this.props.comment); ... ); }. _handleDelete(e Delete comment </a> e ) { vent .preventDefault(); vent
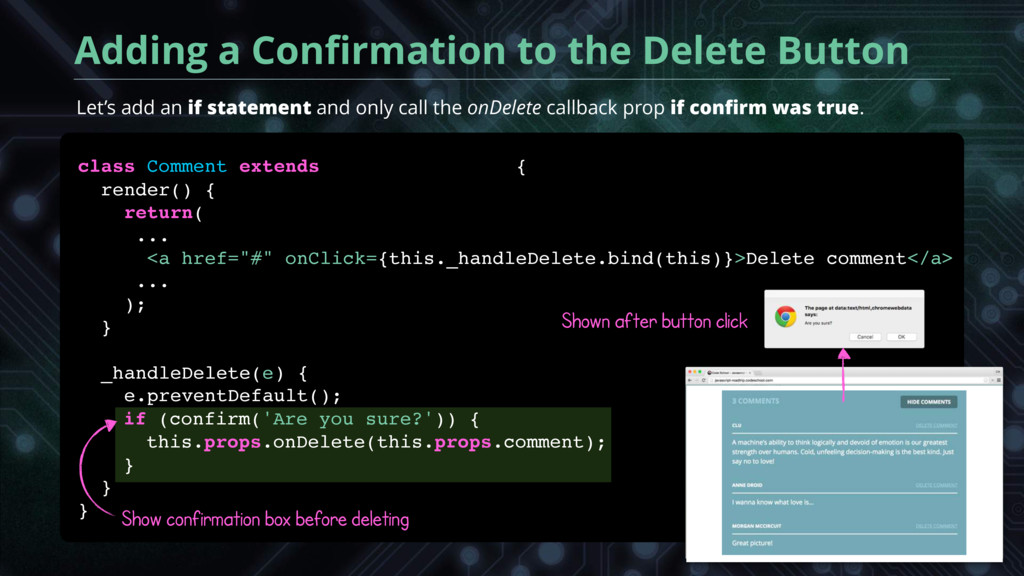
React.Component { Let’s add an if statement and only call the onDelete callback prop if confirm was true. Shown after button click Show confirmation box before deleting if (confirm('Are you sure?')) { this.props.onDelete(this.props.comment); } render() { return( ... <a href="#" onClick={this._handleDelete.bind(this)}> } } Delete comment</a> ... ); }. _handleDelete(e) { .preventDefault(); e
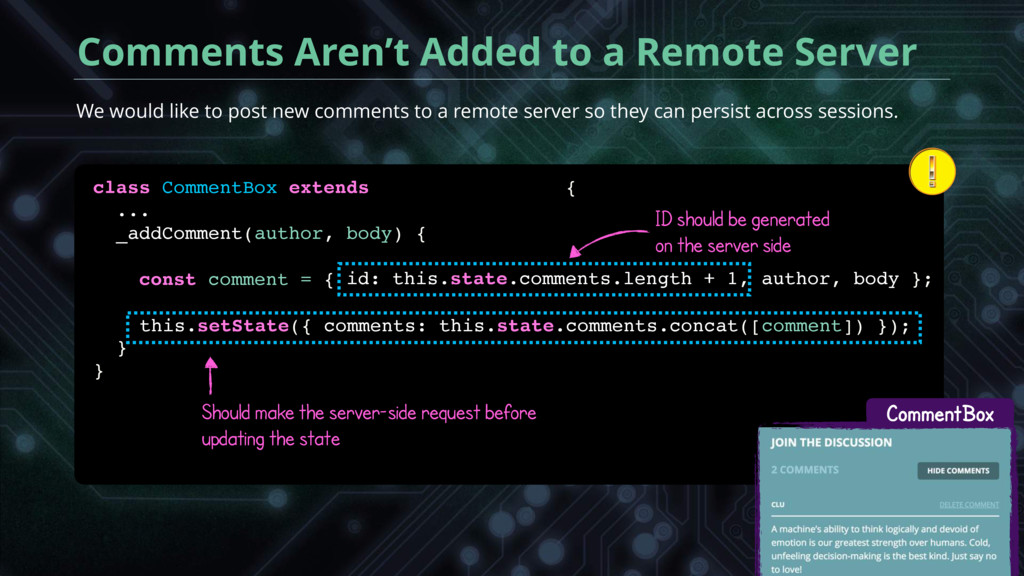
React.Component { ... _addComment(author, body) { const comment = { We would like to post new comments to a remote server so they can persist across sessions. ID should be generated on the server side Should make the server-side request before updating the state CommentBox } } this.setState({ comments: this.state.comments.concat([comment]) }); author, body }; id: this.state.comments.length + 1,
comment = { We learned how to add new comments using a form. Now let’s make sure the new comments are sent to a remote server so they can be persisted. Posting Comments to a Remote Server State is only updated when we get the new comment from the API request CommentBox } } jQuery.post('/api/comments', { comment }) .success(newComment => { this.setState({ comments: this.state.comments.concat([newComment]) }); }); author, body };
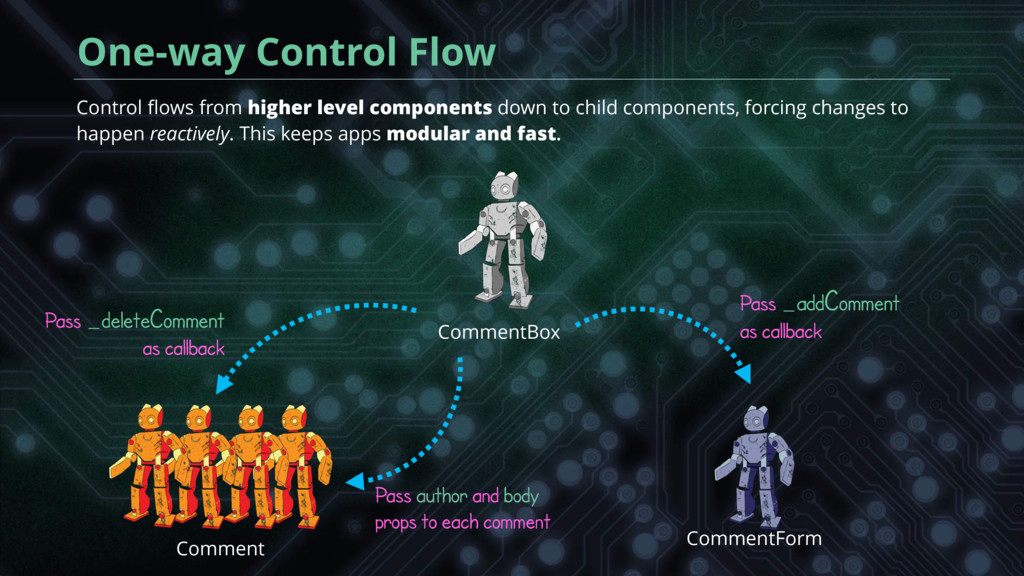
forcing changes to happen reactively. This keeps apps modular and fast. One-way Control Flow CommentBox CommentForm Comment Pass _deleteComment as callback Pass _addComment as callback Pass author and body props to each comment
things we learned in this section. Parent components can send data to child components using props. Child components can accept callback functions as props to communicate back with parent components.