Upgrade to Pro — share decks privately, control downloads, hide ads and more …

SVG for vector

anonymous
August 01, 2015

SVG for vector

SVG tutorial

anonymous

August 01, 2015
Tweet

More Decks by anonymous

Other Decks in Programming

Transcript

  1. You, Me & SVG! This course will answer these questions:

    • What are SVGs? • When you should use SVGs over raster images? • How do you build SVGs? • How do you use SVG elements together to build icons or other images? Prerequisites for this course include a working knowledge of HTML and CSS.
  2. All-New X59 Retina Screen How does the badge look on

    the X59 Retina screen? ICK, it’s blurry! 90,000px x 60,000px
  3. Scalable Vector Graphics FTW Raster images don’t work for every

    size screen. Future-proof your assets by using SVG! Our SVG will also work for any future size screens — even ones the size of Schmuffle Land itself! ? ? ? raster badge.jpg vector badge.svg
  4. Including SVG as <img> Source A common way to use

    SVGs is to treat them like any other file type and include them with an img tag. index.html <!DOCTYPE html> <html> <head>…</head> <body> <h1>My First SVG</h1> <img src='our_first.svg'> </body> </html> How do we actually create an SVG, though?
  5. Creating Our First SVG Element Let’s jump right into an

    SVG file and create our own. our_first.svg The first step is to use the SVG element. This looks similar to HTML tags because both HTML and SVG are types of XML. <svg </svg> >
  6. Setting the SVG’s Viewport Size We are going to set

    the window through which the SVG will be visible. This frame or canvas we draw our SVG on is called the viewport. our_first.svg Setting width and height of the viewport <svg w: 400px h:300px </svg> > height="300" width="400"
  7. We need to tell the browser that we are going

    to be using a different version of XML, with non- HTML tags, and what version of SVG we are going to use. Specifying SVG Namespace and Version our_first.svg These long scary lines just tell the browser: 
 Hey, we are about to use some SVG tags here, so get ready to draw! <svg </svg> > xmlns="http://www.w3.org/2000/svg" version="1.1" height="300" width="400"
  8. Loading Our SVG in the Browser Our canvas is now

    there, but we haven't drawn anything on it. If you inspect and use dev tools, you can see our invisible canvas.
  9. Ready to Start Building an Icon Now! Let’s build out

    the X59 icon in SVG elements for the Schmuffle folk. This is the simplified version of the X59 Retina screen! =
  10. Drawing Our First Rectangle The <rect> tag allows us to

    draw rectangles on our SVG canvas. our_first.svg <svg height="300" width="400" xmlns="http://www.w3.org/2000/svg" version="1.1"> <rect height="80" width="100"/> </svg>
  11. Adding a Second Rectangle We will create a second rect,

    but this one will have a white background. our_first.svg <svg height="300" width="400" xmlns="http://www.w3.org/2000/svg" version="1.1"> <rect height="80" width="100"/> <rect height="50" width="80" fill="white"/> Fill is used to give background color. How do we move this top white rect, though? </svg>
  12. Understanding Viewport Coordinate System Right now, our rectangles are being

    drawn at 0,0. They are anchored to their top left point. 0,300 0,0 X Y 400,300 400,0
  13. Moving the White Rectangle We need to specify a new

    anchor point for our white rectangle. 0,300 0,0 X Y 400,300 400,0 10,10 <rect height="50" width="80" fill="white" x="10" y="10"/>
  14. Creating One Last Rect to Finish the Icon We will

    create one more rectangle below the other two. This will be the base of the X59 screen icon. our_first.svg <svg xmlns="http://www.w3.org/2000/svg" version="1.1"> <rect height="80" width="100"/> <rect height="50" width="80" fill="white" x="10" y="10"/> <rect height="10" width="40" x="30" y="90"/> We did it! </svg> height="300" width="400"
  15. Adjusting Our Viewport We want our icon to be 100px

    by 100px. Let’s modify our viewport to this size! our_first.svg <svg xmlns="http://www.w3.org/2000/svg" version="1.1"> <rect height="80" width="100"/> <rect height="50" width="80" fill="white" x="10" y="10"/> <rect height="10" width="40" x="30" y="90"/> </svg> height="100" width="100"
  16. Section 1 – Circles by the Ton Level 2 Would

    You, Could You With a Badge?
  17. phone_icon.svg Drawing a New Icon Let’s create the icon for

    our Schmuffle screen! <rect/> … and creating a rectangle. index.html <!DOCTYPE html> <html> <head>...</head> <body> <h1>Schmuffle-Screen Icon</h1> <svg...> </svg> We will start by including the file… = </body> </html> <img src="phone_icon.svg"/>
  18. Adding a Rectangle Stroke We add a stroke color and

    we get a 1px outline. <rect /> stroke="#FF2626" fill="white" width="70" height="100" Schmuffle-Phone Icon
  19. Schmuffle-Phone Icon Creating a Thicker Outline We can create a

    thicker line with the stroke-width attribute. But why is the top and left side getting cut off? <rect /> stroke-width="10" stroke="#FF2626" fill="white" width="70" height="100"
  20. Investigating the Stroke Cut 0,0 Viewport Size 5px 5px Viewport

    The outline stroke is centered along the rectangle’s border. The 10px stroke Our icons default position starts in the top left corner 0,0. w: 80px h:110px Zoomed In
  21. Positioning the Rect We can move the rectangle origin using

    x and y. <rect height="100" width="70" fill="white" stroke="#FF2626" stroke-width="10" /> x="5" y="5" Schmuffle-Phone Icon
  22. Schmuffle-Phone Icon Drawing an SVG Circle First, we specify the

    center points cx, cy and specify a radius. <rect height="100" width="70" fill="white" stroke="#FF2626" stroke-width="10" x="5" y="5"/> <circle r 40,105 r="3" cy="105" cx="40" />
  23. Filling the Circle White Now we just need rounded corners

    on our rect! <circle r="3" cy="105" cx="40" /> fill="white" Schmuffle-Phone Icon
  24. Unlike a circle, which has the same radius for its

    x and y axes, ellipse has two different values for x and y axes. ry= 25 rx= 10 radius x! radius y! We specify both axes. 10 25 <ellipse /> But First, We Need to Know About Ellipses The center points and the fill are the same as the circle element. cx="50" cy="50" fill="blue" rx="10" ry="25"
  25. Rounding Rectangle Corners To round the corners, we use rx

    and ry, which set the radiuses on an invisible ellipse. rx: x-axis radius of the ellipse ry: y-axis radius of the ellipse 10 25 <rect height="100" width="70" fill="white" stroke="#FF2626" stroke-width="10" x="5" y="5" rx="10" ry="25"/>
  26. Drawing Our Icon’s Rounded Corners We want our rounded corners

    to be symmetrical, so we will use the same value for both rx and ry. If you only specify rx, the browser will assume the same value for ry! same as 5 5 <rect height="100" width="70" fill="white" stroke="#FF2626" stroke-width="10" x="5" y="5" <rect height="100" width="70" fill="white" stroke="#FF2626" stroke-width="10" x="5" y="5" rx="5"/> /> rx="5" ry="5" rx="5"
  27. So Far We Have Used the <img> Tag to Import

    SVG index.html <!DOCTYPE html> <html> <head>...</head> <body> <h1>Schmuffle-Screen Icon</h1> <img src="phone_icon.svg"/> </body> </html> phone_icon.svg <svg height="110" width="80" xmlns="http…" ...> <rect height="100" width="70" fill="white" stroke="#FF2626" stroke-width="10" x="5" y="5" rx="5"/> <circle cx="40" cy="105" r="3" fill="white"/> </svg> SVG in an img tag rotate scale animate (transition) on/off screen With the image tag, you are able to animate the SVG as a whole…
  28. What if we wanted to scale our phone icon’s button?

    Could we do this with CSS? Changing SVG’s Background? But what if we wanted to change the color of our SVG’s background? Nope! You cannot select inner elements of the SVG when you’re including it with an <img>… Again, nope. We would need to do this through CSS because the SVG tag has no “fill” attribute. SO HOW CAN WE DO THESE STYLING AND ANIMATING THINGS?! ? ? ? ? ? ? <svg height="110" width="80" xmlns="http…" ... > fill="color"
  29. <svg height="110" width="80" xmlns="http…" ...> <rect height="100" width="70" fill="white" stroke="#FF2626"

    stroke-width="10" x="5" y="5" rx="5"/> <circle cx="40" cy="105" r="3" fill="white"/> </svg> Another Way to Include Your SVG index.html <!DOCTYPE html> <html> <head>...</head> <body> <h1>Schmuffle-Phone Icon</h1> SVG INLINE There is another, more powerful way to include your SVG! Inline will allow us to control the individual parts of the SVG element. </body> </html>
  30. index.html SVG Inline HTML <!DOCTYPE html> <html> <head>...</head> <body> <h1>Schmuffle-Phone

    Icon</h1> Inline gives us access to the inner elements to iterate on the style or animate with CSS! <svg height="110" width="80" xmlns="http…" ...> <rect height="100" width="70" fill="white" stroke="#FF2626" stroke-width="10" x="5" y="5" rx="5"/> <circle cx="40" cy="105" r="3" fill="white"/> </svg> </body> </html> Because the svg is inline …
  31. SVG Inline With Animation style.css circle { animation: grow 2s

    infinite; transform-origin: center; } @keyframes grow { 0% {transform: scale(1);} 50% {transform: scale(0.5);} 100% {transform: scale(1);} } We have access to animate/style individual pieces of the SVG in our CSS! Schmuffle-Phone Icon
  32. Drawing a Fancy Schmancy Badge We’ll need to learn a

    few more shapes to build this SVG, like text, polygon, and line. line text polygon
  33. index.html Creating a New SVG Tag <!DOCTYPE html> <html> <head>

    </head> <body> </svg> <svg Let’s set the viewport size, version, and namespace attributes. version="1.1" xmlns="http://www.w3.org/2000/svg"> <meta charset="utf-8"> <title>SVG</title> </body> </html> height="268" width="268"
  34. index.html Starting Off With a Circle Our circle should have

    a 130 radius, 7px green border, no fill color, and be centered at 134x134. <!DOCTYPE html> <html> <head> </head> <body> </svg> </body> </html> <svg > Many of these styles can be separated into a stylesheet. <meta charset="utf-8"> <title>SVG</title> /> <svg ... <circle cy="134" cx="134" r="130" stroke="#008B6F" stroke-width="7" fill="none"
  35. index.html style.css Using a style.css File circle { <link rel="stylesheet"

    href="style.css"/> Anything that sets coordinates, though, must be inline! This cleans up our HTML and puts the styles where they belong. Notice a unit identifier (px) is required in the CSS file! <circle </svg> </body> </html> } fill: none; stroke: #008B6F; stroke-width: 7px; </head> <body> <!DOCTYPE html> <html> <head> <svg > ... ... /> cy="134" cx="134" r="130"
  36. index.html <!DOCTYPE html> <html> <head> Continuing to Build Our Badge

    <circle Next, draw the line! ... <link rel="stylesheet" href="style.css"/> </head> <body> <svg > ... </svg> </body> </html> /> cy="134" cx="134" r="130"
  37. index.html ... <line /> style.css Positioning the Line 47,198 0

    40 120 200 270 40 120 200 270 221,198 (x2, y2) Attributes x2,y2 tell the line where to end. (x1, y1) To draw a line you need to specify two x,y points. Attributes x1,y1 tell the line where to start. ... line { Next, draw the line! x1="47" y1="198" x2="221" y2="198" stroke: black; stroke-width: 5px; }
  38. SVG Text Element We have the line of the badge

    — now we need the text! line text What we have What we need polygon
  39. 134,142 (x, y) Using the SVG Text Element To get

    text to appear, we need to specify the anchor points and font size. style.css text { index.html The default anchor point is bottom left of the text box. ... } <text </text> SVG y="142" x="134" font-size: 60px; >
  40. style.css Changing the Default Text Anchor Now our text is

    centered. text { index.html ... } text-anchor: middle; <text </text> font-size: 60px; SVG y="142" x="134" >
  41. style.css Styling Our Text Setting stroke width and color Setting

    the color of the font text { index.html ... setting the font family } font-family : 'FilmotypeMajor'; stroke: #000; stroke-width: 3px; fill: #F6F7F3; text-anchor: middle; <text </text> font-size: 60px; SVG y="142" x="134" >
  42. index.html Understanding What Must Be Inline Must be inline —

    won’t work in CSS Any attribute to do with coordinates stays inline! <!DOCTYPE html> <html> <head> <meta charset="utf-8"> <title>SVG</title> <link rel="stylesheet" href="style.css"> </head> <body> <svg ...> <circle r="130" cx="134" cy="134"/> <line x1="47" y1="198" x2="221" y2="198"/> <text </text> </svg> </body> </html> SVG y="142" x="134" >
  43. Drawing One Last Shape line text All we need now

    is the triangle in the background! polygon
  44. Introducing the SVG Polygon Element The SVG <polygon> element is

    used to draw shapes with multiple (three or more) sides. 52,190 134,30 216,190 Polygon connects the x,y points to draw the shape and connects the last point to the first point. 0 40 120 200 270 40 120 200 270 x,y for each point! index.html <polygon points=" "/> 216,190 134,30 52,190
  45. index.html <polygon points=" "/> Styling Our Polygon Now inside the

    stylesheet, we can give the polygon a fill, stroke, and stroke width so it looks as the badge example does. blue/green fill ... polygon { } style.css black 2px stroke stroke-width: 2px; stroke: black; fill: #008B6F; 216,190 134,30 52,190
  46. index.html <!DOCTYPE html> <html> <head>...</head> <body> <svg ...> <circle r="130"

    cx="134" cy="134"/> <line x1="47" y1="198" x2="221" y2="198"/> </svg> </body> </html> Adding the Polygon to Our SVG What in Schmuffle Land is happening?! The triangle is plop right on top of our text. <polygon points=" "/> <text x="134" y="142">SVG</text> 216,190 134,30 52,190
  47. index.html <!DOCTYPE html> <html> <head>...</head> <body> <svg ...> <circle r="130"

    cx="134" cy="134"/> <line x1="47" y1="198" x2="221" y2="198"/> </svg> </body> </html> Fixing the Order For our badge, the polygon needs to go first in the markup so it is drawn first. HTML elements stack this way too! Order matters <polygon points=" "/> <text x="134" y="142">SVG</text> 216,190 134,30 52,190
  48. Where We Left Off index.html <!DOCTYPE html> <html> <head>...</head> <body>

    <svg ...> <circle r="130" cx="134" cy="134"/> <line x1="47" y1="198" x2="221" y2="198"/> <polygon points="52,190 134,30 216,190"/> <text x="134" y="142">SVG</text> </svg> </body> </html>
  49. Adding Some Detail to Our Badge Our badge is still

    looking a little plain. How could we add some detail (like below) to our badge?
  50. We would start off by drawing and positioning three of

    the triangles. Drawing the Triforce <polygon points=" " fill="#59BFC6" stroke-width="1px"/> <polygon points=" " fill="#59BFC6" stroke-width="1px"/> <polygon points=" " fill="#59BFC6" stroke-width="1px"/> 12,0 15,25 20,15 25,25 0,25 10,25 5,15 7,10 17,10
  51. index.html <!DOCTYPE html> <html> <head>...</head> <body> <svg xmlns="..." xmlns:svg="..."> <circle

    r="130" cx="134" cy="134"/> <line x1="47" y1="198" x2="221" y2="198"/> <polygon points="52,190 134,30 216,190"/> <text x="134" y="142">SVG</text> </svg> </body> </html> How are we going to get each triangle into the badge? But Our Triangles Are Not on the Badge ...? /> <polygon points="7,10 12,0 17,10" fill="#59BFC6" .../ /> <polygon points="0,25 5,15 10,25" fill="#59BFC6" ...' /> <polygon points="15,25 20,15 25,25" fill="#59BFC6" 45px 67px
  52. We could add to the x and y to fix

    the position. Moving Them Into the Badge But there is a better way! +45px +67px ... +45px +67px +45px +67px +45px +67px +45px +67px +45px +67px +45px +67px +45px +67px +45px +67px <polygon points="7,10 12,0 17,10" fill="#59BFC6" <polygon points="0,25 5,15 10,25" fill="#59BFC6" ...? /> .../ /> ...' /> <polygon points="15,25 20,15 25,25" fill="#59BFC6" 45px 67px
  53. By grouping these shapes together, we now have the option

    to transform. Group to the Rescue! This will enable us to move the group as a whole over and down 45,67 . <g> </g> <polygon points="7,10 12,0 17,10" fill="#59BFC6" <polygon points="0,25 5,15 10,25" fill="#59BFC6" <polygon points="15,25 20,15 25,25" fill="#59BFC6" .../ /> ...' /> ...? />
  54. <g The SVG transform attribute allows us to do multiple

    things, like translate, rotate, and scale. In order to move the group, we will need to use transform’s translate option. Translating (Moving) the Group Translate means “to move.” m ove y m ove x Translate takes two values that will move the x and y of the group by the values specified. transform="translate(45,67)"> </g> ...? .../ ...' /> <polygon points="7,10 12,0 17,10" fill="#59BFC6" /> <polygon points="0,25 5,15 10,25" fill="#59BFC6" /> <polygon points="15,25 20,15 25,25" fill="#59BFC6"
  55. When you group items, you effectively give them a new

    0,0 — the top left of the group! Group Items Have a New Origin! These numbers are now starting from the groups origin. <g transform="translate(45,67)" </g> > ...? /> <polygon points="7,10 12,0 17,10" fill="#59BFC6" .../ /> <polygon points="0,25 5,15 10,25" fill="#59BFC6" ...' /> <polygon points="15,25 20,15 25,25" fill="#59BFC6"
  56. fill="#59BFC6" fill="#59BFC6" <g <g The second group needs to be

    198 from the left edge of the viewport and 67 from the top. The Second Group transform="translate(45,67)" </g> transform= </g> ... ... /> fill="#59BFC6" ... /> /> > ...? /> <polygon points="7,10 12,0 17,10" fill="#59BFC6" .../ /> <polygon points="0,25 5,15 10,25" fill="#59BFC6" ...' /> <polygon points="15,25 20,15 25,25" fill="#59BFC6" <polygon points="7,10 12,0 17,10" <polygon points="0,25 5,15 10,25" <polygon points="15,25 20,15 25,25" "translate(198,67)">
  57. fill="#59BFC6" fill="#59BFC6" fill="#59BFC6" SVG coordinates take decimals! <g <g <g

    The last group needs to be 121.5 from the left edge of the viewport and 211 from the top. The Third Group transform="translate(45,67)" </g> transform= <polygon points="7,10 12,0 17,10" <polygon points="0,25 5,15 10,25" <polygon points="15,25 20,15 25,25" </g> ... ... ... /> /> /> transform= </g> ... ... ... /> /> /> ...? /> <polygon points="7,10 12,0 17,10" fill="#59BFC6" .../ /> <polygon points="0,25 5,15 10,25" fill="#59BFC6" ...' /> <polygon points="15,25 20,15 25,25" fill="#59BFC6" <polygon points="7,10 12,0 17,10" <polygon points="0,25 5,15 10,25" <polygon points="15,25 20,15 25,25" fill="#59BFC6" fill="#59BFC6" fill="#59BFC6" > > "translate(121.5,211)" "translate(198,67)">
  58. We will give each group a class and get rid

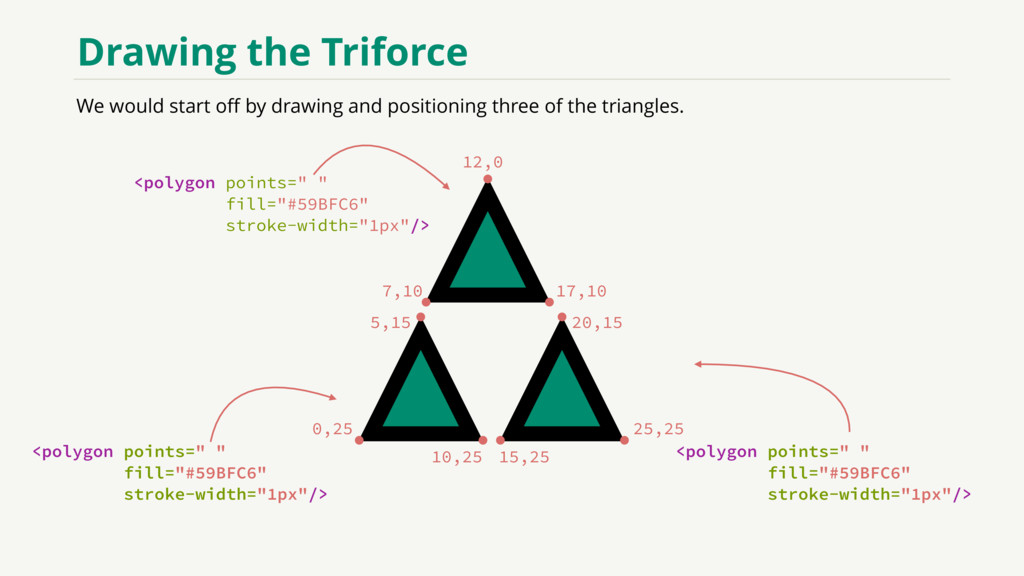
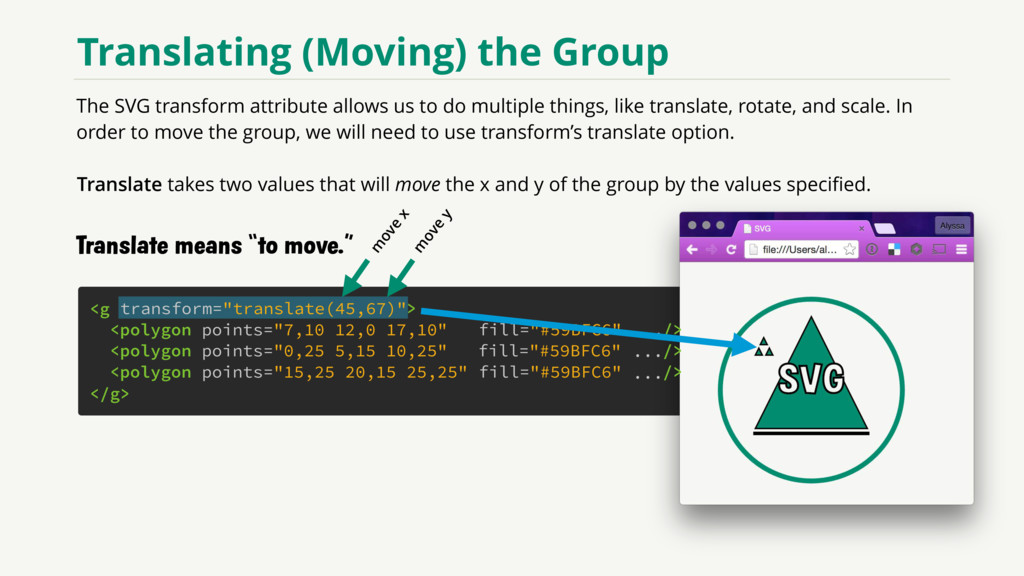
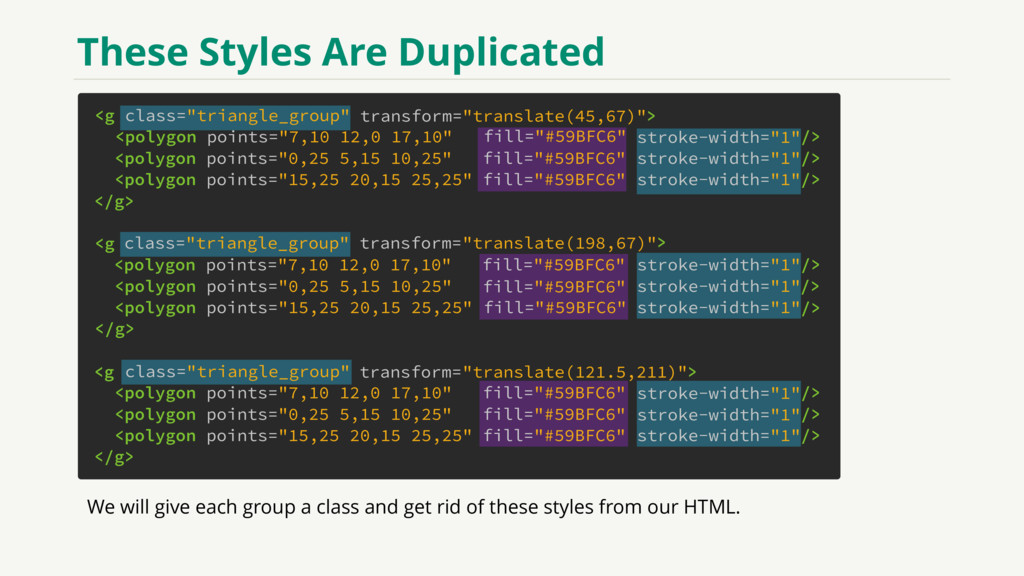
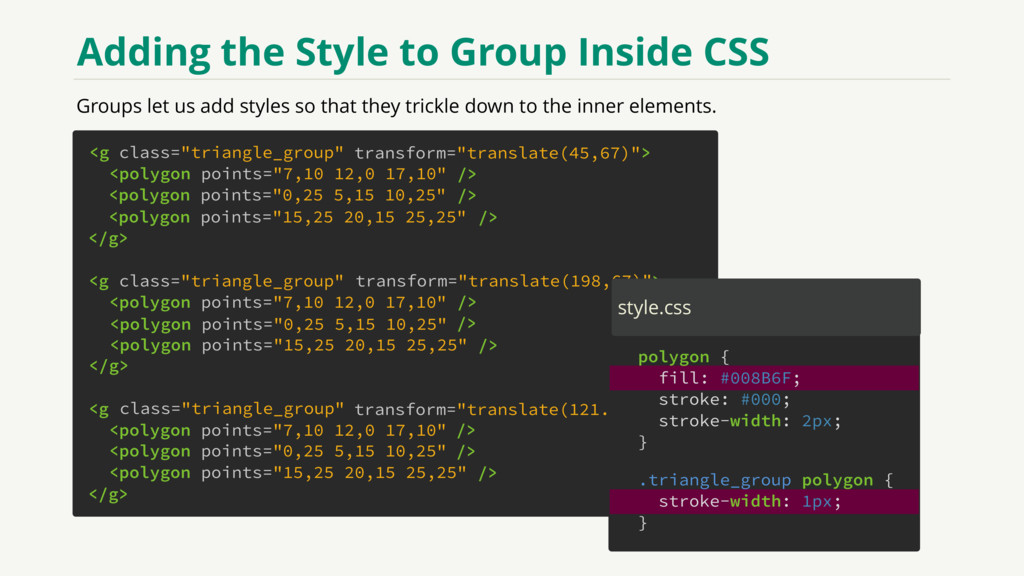
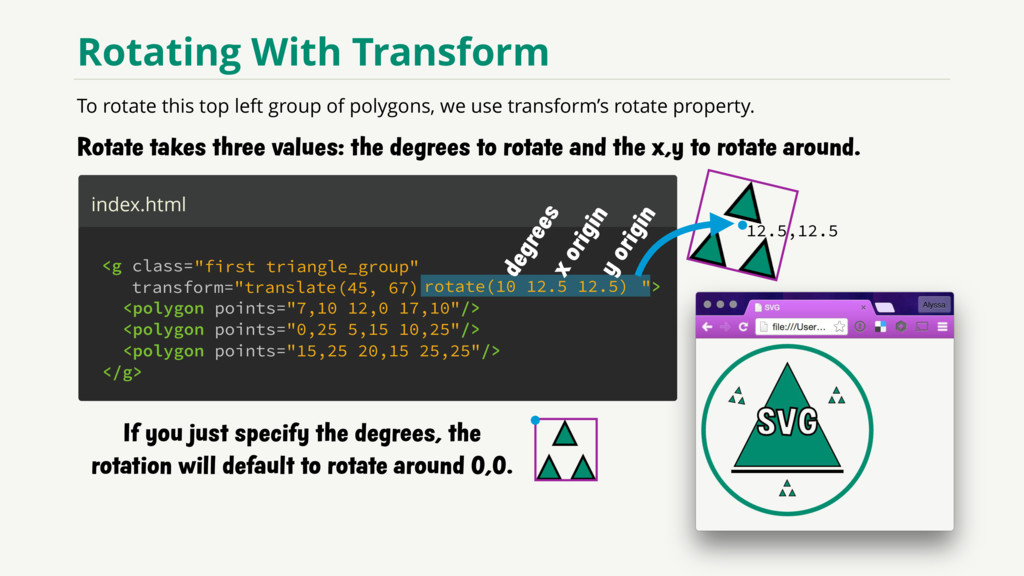
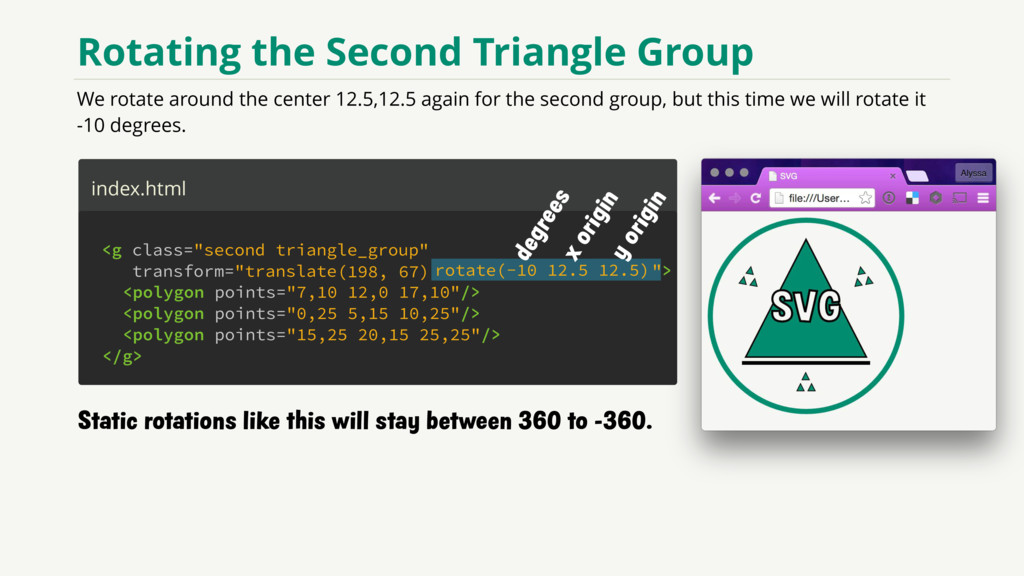
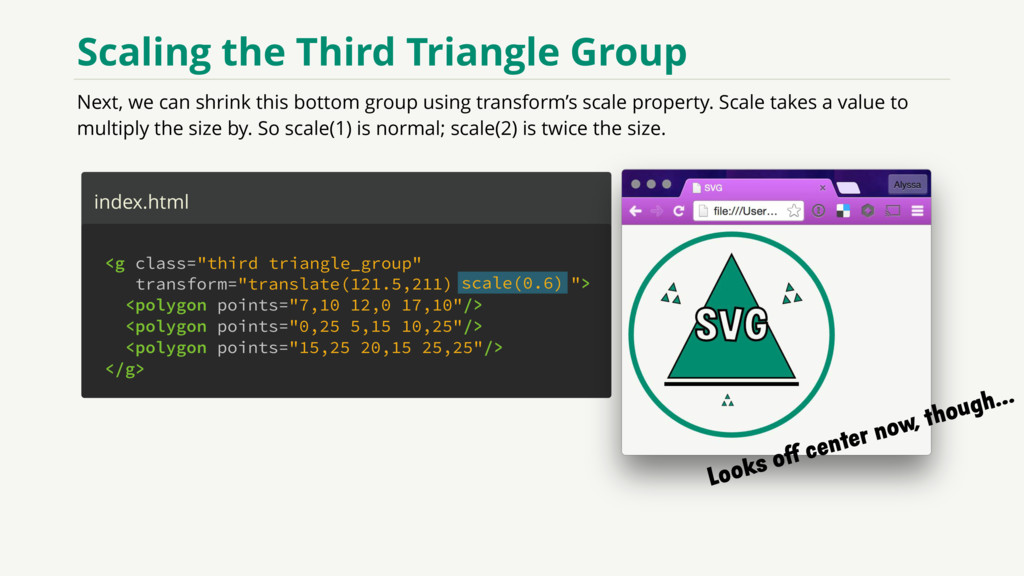
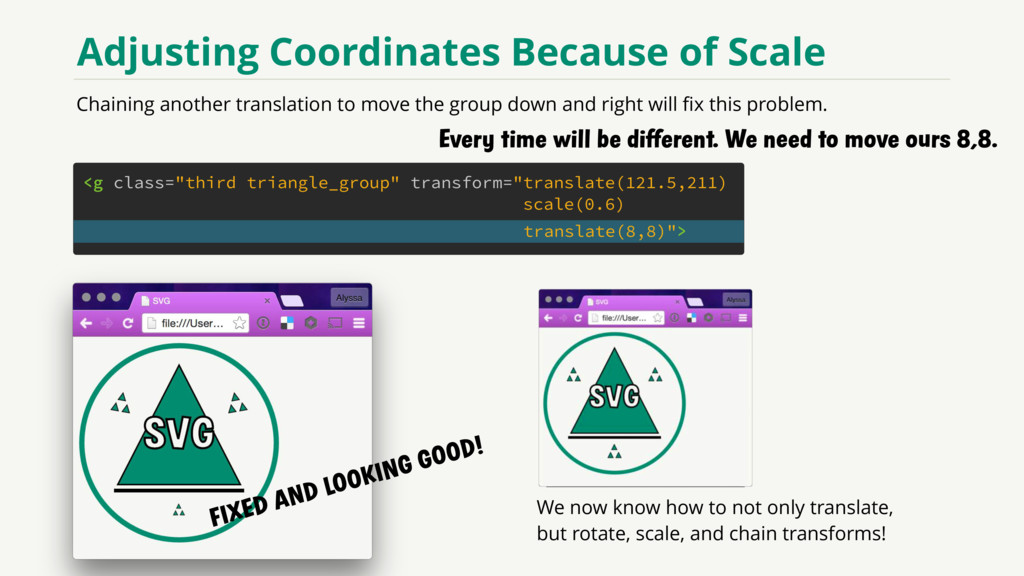
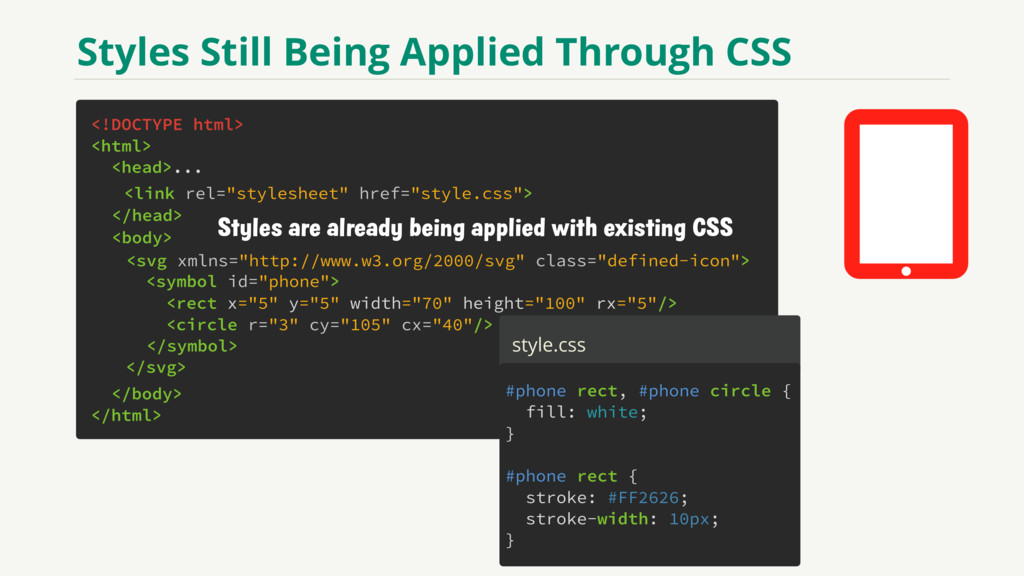
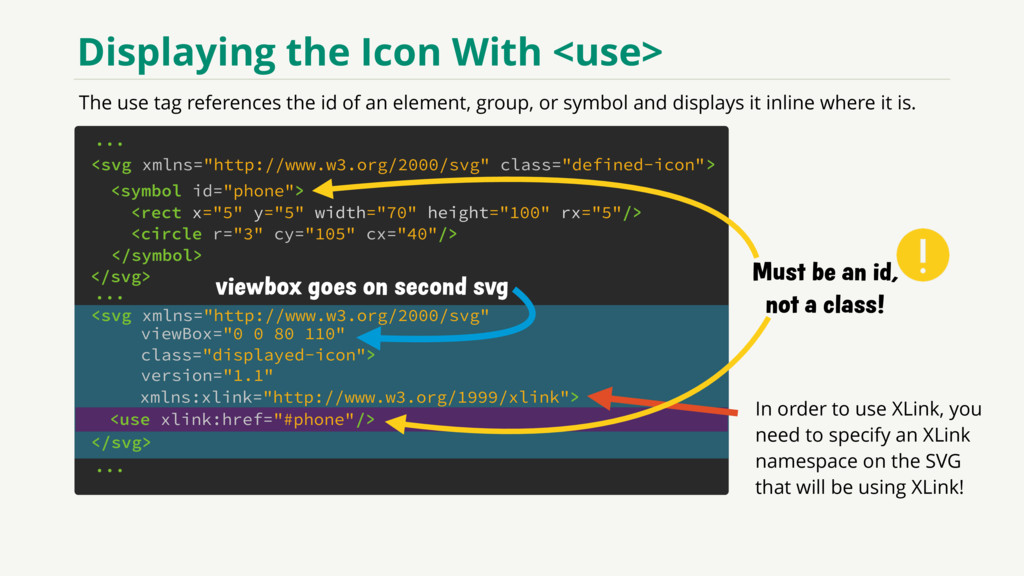
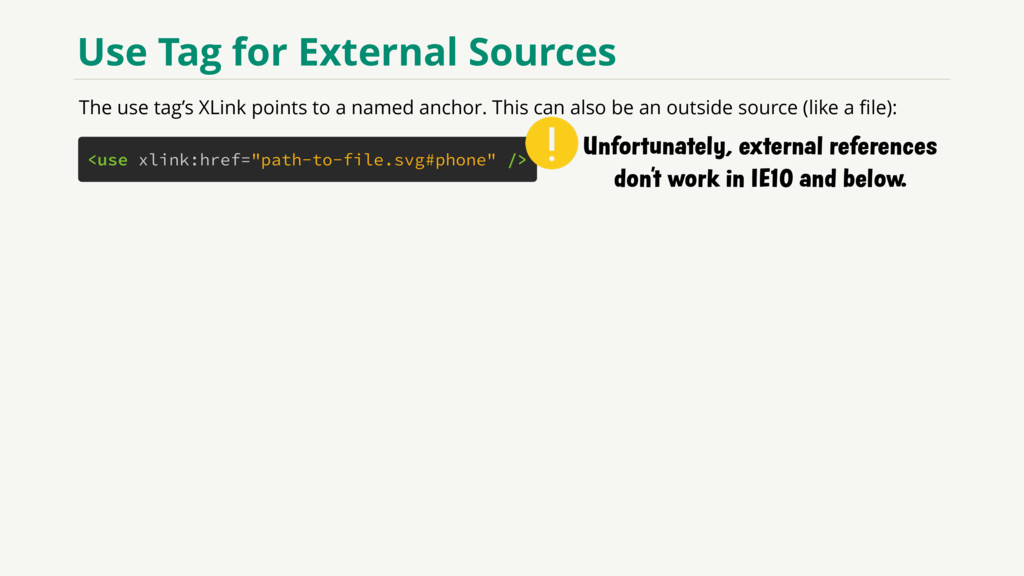
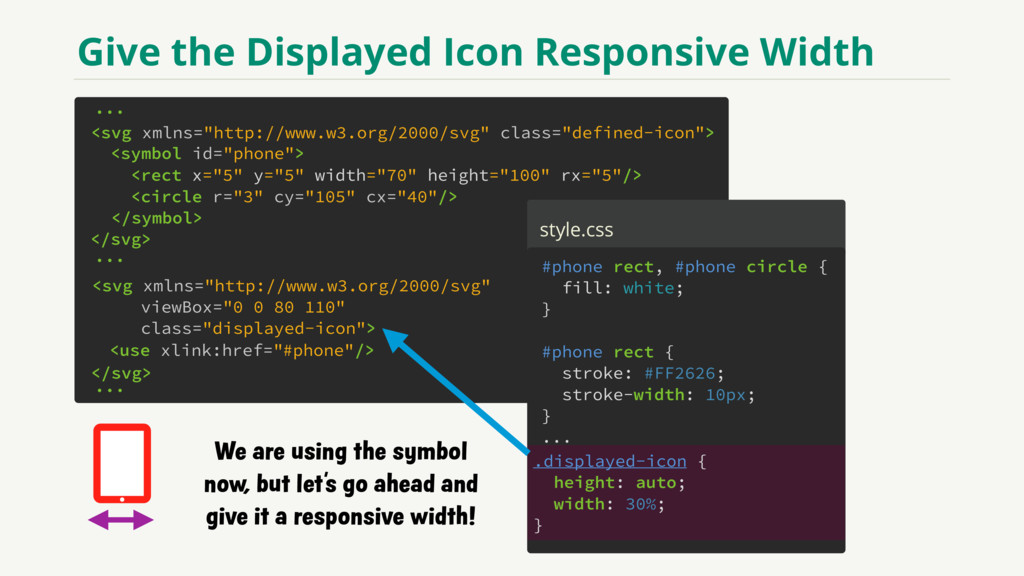
    of these styles from our HTML. These Styles Are Duplicated transform="translate(45,67)" </g> class="triangle_group" /> /> /> /> /> /> /> /> stroke-width="1" stroke-width="1" stroke-width="1" stroke-width="1" stroke-width="1" stroke-width="1" stroke-width="1" stroke-width="1" stroke-width="1" class="triangle_group" transform= transform= class="triangle_group" <polygon points="7,10 12,0 17,10" <polygon points="0,25 5,15 10,25" <polygon points="15,25 20,15 25,25" </g> <g <g <g <g /> <polygon points="7,10 12,0 17,10" fill="#59BFC6" <polygon points="0,25 5,15 10,25" fill="#59BFC6" <polygon points="15,25 20,15 25,25" fill="#59BFC6" <polygon points="7,10 12,0 17,10" fill="#59BFC6" <polygon points="0,25 5,15 10,25" fill="#59BFC6" <polygon points="15,25 20,15 25,25" fill="#59BFC6" fill="#59BFC6" fill="#59BFC6" fill="#59BFC6" > </g> "translate(121.5,211)" "translate(198,67)"> >
  59. Groups let us add styles so that they trickle down

    to the inner elements. Adding the Style to Group Inside CSS transform="translate(45,67)" class="triangle_group" <g > <polygon points="15,25 20,15 25,25" <polygon points="0,25 5,15 10,25" /> /> <polygon points="7,10 12,0 17,10" /> </g> /> /> /> class="triangle_group" transform= <polygon points="7,10 12,0 17,10" <polygon points="0,25 5,15 10,25" <polygon points="15,25 20,15 25,25" <g transform= </g> /> /> /> class="triangle_group" <polygon points="7,10 12,0 17,10" <polygon points="0,25 5,15 10,25" <polygon points="15,25 20,15 25,25" </g> <g "translate(121.5,211)" "translate(198,67)"> > style.css .triangle_group polygon { stroke-width: 1px; } polygon { fill: #008B6F; stroke: #000; stroke-width: 2px; }
  60. The Badge Is Looking Great! Groups allowed us to translate

    the entire group to its desired position. We also used groups to add semantic classes and moved our styles over to a stylesheet! transform="translate(45,67)" class="triangle_group" <g > ... </g> class="triangle_group" transform= <g </g> transform= class="triangle_group" </g> <g ... ... "translate(198,67)"> "translate(121.5,211)">
  61. index.html To rotate this top left group of polygons, we

    use transform’s rotate property. Rotating With Transform If you just specify the degrees, the rotation will default to rotate around 0,0. 12.5,12.5 Rotate takes three values: the degrees to rotate and the x,y to rotate around. degrees x origin y origin "> <g class= <polygon points="7,10 12,0 17,10"/> <polygon points="0,25 5,15 10,25"/> <polygon points="15,25 20,15 25,25"/> </g> rotate(10 12.5 12.5) (45, 67) "first triangle_group" transform="translate
  62. index.html We rotate around the center 12.5,12.5 again for the

    second group, but this time we will rotate it -10 degrees. Rotating the Second Triangle Group Static rotations like this will stay between 360 to -360. degrees x origin y origin "> <g class= <polygon points="7,10 12,0 17,10"/> <polygon points="0,25 5,15 10,25"/> <polygon points="15,25 20,15 25,25"/> </g> rotate(-10 12.5 12.5) (198, 67) "second triangle_group" transform="translate
  63. index.html Next, we can shrink this bottom group using transform’s

    scale property. Scale takes a value to multiply the size by. So scale(1) is normal; scale(2) is twice the size. Scaling the Third Triangle Group "> <g class= <polygon points="7,10 12,0 17,10"/> <polygon points="0,25 5,15 10,25"/> <polygon points="15,25 20,15 25,25"/> </g> Looks off center now, though… scale(0.6) transform="translate "third triangle_group" (121.5,211)
  64. Chaining another translation to move the group down and right

    will fix this problem. Adjusting Coordinates Because of Scale <g class="third triangle_group" transform="translate(121.5,211) scale(0.6) We now know how to not only translate, but rotate, scale, and chain transforms! FIXED AND LOOKING GOOD! Every time will be different. We need to move ours 8,8. translate(8,8)">
  65. Truly Scalable Graphics? We are looking good, but our SVG

    is still not very responsive based on the screen size. 268x268 100% ? ? ? Wouldn’t it be better if we could set our SVG’s width to a percentage of the screen width?!
  66. Viewport Is Our Base Coordinate System SVG height and width

    is called our viewport. index.html <!DOCTYPE html> <html> <head> <meta charset="utf-8"> <title>SVG</title> </head> <body> <svg height="268" width="268" </svg> </body> </html> <svg version="1.1" xmlns="http://www.w3.org/2000/svg"> (Base Coordinate System) 0 40 80 120 160 200 240 280 320 40 80 120 160 200 240 280 320 Viewport Coordinate System As we saw with groups, it is possible to have nested coordinate systems inside one SVG. ...
  67. Using a ViewBox 40 80 120 160 200 240 268

    40 80 120 160 200 240 268 0 Viewport Coordinate System 1. Copy our viewport values into a nested coordinate system called the viewBox. height: 268 width: 268
  68. Using a ViewBox 40 80 120 160 200 240 268

    40 80 120 160 200 240 268 0 Viewport Coordinate System 1. Copy our viewport values into a nested coordinate system called the viewBox. 0 40 80 120 160 200 240 268 40 80 120 160 200 240 268 ViewBox Coordinate System These two coordinate systems will lay right on top of each other. height: 268 width: 268 height: 268 width: 268
  69. Using Responsive Values auto 0 Viewport Coordinate System 1. Copy

    our viewport values into a nested coordinate system called the viewBox. ViewBox Coordinate System 0 40 80 120 160 200 240 268 40 80 120 160 200 240 268 2. Give our viewport responsive values for height and width. 50% height: auto width: 50% height: 268 width: 268
  70. index.html Moving Viewport Values to ViewBox <!DOCTYPE html> <html> <head>

    <meta charset="utf-8"> <title>SVG</title> </head> <body> height=" " width=" " </svg> </body> </html> <svg version="1.1" xmlns="http://www.w3.org/2000/svg"> viewBox=" "> 40 80 120 160 200 240 268 40 80 120 160 200 240 268 0 Viewport Coordinate System ... 268 268 0 ViewBox Coordinate System W H X,Y
  71. Moving Viewport Values to ViewBox 0 Viewport Coordinate System 40

    80 120 160 200 240 268 40 80 120 160 200 240 268 0 ViewBox Coordinate System W H X,Y index.html <!DOCTYPE html> <html> <head> <meta charset="utf-8"> <title>SVG</title> </head> <body> </svg> </body> </html> ... We will set the static size of our asset(268x268) on the viewBox. Width and Height version="1.1" xmlns="http://www.w3.org/2000/svg"> viewBox=" "> 268 268 <svg
  72. Same Origin for Both Coordinate Systems Viewport Coordinate System 40

    80 120 160 200 240 268 40 80 120 160 200 240 268 0 0 ViewBox Coordinate System W H X,Y index.html <!DOCTYPE html> <html> <head> <meta charset="utf-8"> <title>SVG</title> </head> <body> </svg> </body> </html> <svg ... ViewBox Origin X,Y Width & Height version="1.1" xmlns="http://www.w3.org/2000/svg"> viewBox=" "> 268 268 For this example, our coordinate systems will have the same origin: 0,0. 0 0
  73. style.css Now all we need to do is set our

    viewport height and width to responsive sizes. You need to do this in the CSS: Giving Viewport Responsive Values svg { height: auto; width: 50%; } index.html <!DOCTYPE html> <html> <head> <meta charset="utf-8"> <title>SVG</title> </head> <body> </svg> </body> </html> ... <svg version="1.1" xmlns="http://www.w3.org/2000/svg"> viewBox=" "> 268 268 0 0
  74. Exporting an SVG From a Drawing Tool Here’s a check

    we drew in Sketch. Let’s export it as an SVG!
  75. check.svg looks like this: Whether exporting from a program or

    found online somewhere, SVG assets can have some funky code… Looking at an Exported SVG check.svg <?xml version="1.0" encoding="UTF-8" standalone="no"?> <svg width="80px" height="80px" viewBox="0 0 80 80" version="1.1" xmlns="http://www.w3.org/2000/svg" xmlns:xlink="http://www.w3.org/1999/xlink" xmlns:sketch="http://www.bohemiancoding.com/sketch/ns"> <!-- Generator: Sketch 3.3.3 (12072) - http://www.bohemiancoding.com/sketch --> <title>check</title> <desc>Created with Sketch.</desc> <defs></defs> <g id="Page-1" stroke="none" stroke-width="1" fill="none" fill-rule="evenodd" sketch:type="MSPage"> Scary long path M40,0 C17.909,0 0,17.909 0,40 C0,62.091 17.909,80 40,80 C62.091,80 80,62.091 80,40 C80,17.909 62.091,0 40,0 L40,0 Z M34,56.657 L17.172,39.829 L22.828,34.171 L34,45.343 L55.172,24.171 L60.828,29.829 L34,56.657 L34,56.657 Z" id="check" fill="#000000" sketch:type="MSShapeGroup </g> </svg> "></path> <path d=" What is going on here?
  76. Paths are very powerful for creating complicated SVGs, but they’re

    better suited for creation by software. Understanding Paths ... Draws an object by following path instructions you send it We’ll show you the basics, but you typically wouldn’t write this by hand. <path d=" "></path>
  77. What would a triangle from our badge look like as

    a path? Comparing Path vs. Polygon <polygon points="7,10 12,0 17,10"/> start path close path draw line between points As a polygon: As a path: MLZ are all path commands that will draw straight lines. Just another way to draw a shape! M7,10 L7,10 L12,0 L17,10 Z <path d=" "></path>
  78. Cubic Bézier Path Cubic Bézier You can use `C` in

    your path to denote a cubic Bézier curve. Great article about paths: http://www.sitepoint.com/closer-look-svg-path-data/ 250,50 <path d=" "/> 250,-100 C0,150 x,y first point x,y second handle x,y second point x,y first handle 100,300 M100,300 C0,150 250,-100 250,50
  79. Playing Around With Cubic Bézier Play around with paths here:

    http://anthonydugois.com/svg-path-builder/
  80. Similarly, you can use `Q` to denote a quadratic Bézier

    curve. Quadratic Bézier Curve <path d="M100 200 Q200 0 300 200"/> Quadratic Bézier
  81. You can denote an elliptical arc curve with a leading

    `A`. This one has the most parameters: Elliptical Arc Curve Elliptical arc <path d="M350 300 A50 50 0 1 0 150 300 C150 400 350 300 350 400 A50 50 0 1 1 150 400"/>
  82. Paths can be styled or animated just like any other

    SVG element! Styling Paths stroke stroke-width stroke-linecap stroke-dasharray stroke-dashoffset These attributes exist to style the path: <path d="M7,10 L12,0 L17,10 L7,10 Z"></path> path { fill: #008B6F; stroke: #000; stroke-width: 2px; } <path d="M7,10 L12,0 L17,10 L7,10 Z" > </path> fill="#008B6F" stroke="black" stroke-width="1" You can also do these styles in CSS. The color of the stroke Thickness of the stroke Shape of lineCap (e.g., round) Length of dashes for the stroke Offset for when the stroke begins
  83. Icons Everywhere <h2>Schmuffle-Phone Specs</h2> <p>Easy to use yet capable of

    so much, Schmuffle OS was engineered to work hand in hand with the advanced technologies built into Schmuffle Phone.</p> ... <svg xmlns="http://www.w3.org/2000/svg"> <rect height="100" width="70" x="5" y="5" rx="5"/> <circle r="3" cy="105" cx="40"/> </svg> <svg xmlns="http://www.w3.org/2000/svg" class="defined-icon" <rect x="5" y="5" width="70" height="100" rx="5"/> <circle r="3" cy="105" cx="40"/> </svg> <!DOCTYPE html> <html> <head>...</head> </body> </html> …If you need to use an icon in multiple places on your page, the duplicate SVG can get a bit out of control! <body> >
  84. <!DOCTYPE html> <html> <head>... </body> </html> <svg xmlns="http://www.w3.org/2000/svg" class="defined-icon" <symbol

    id="phone"> <rect x="5" y="5" width="70" height="100" rx="5"/> <circle r="3" cy="105" cx="40"/> </symbol> </svg> </head> style.css The symbol element stores the SVG for later use. Symbol Is for Reusable Elements! .defined-icon { display: none; } Just define the icon — do not display it. Code to draw icon goes inside symbol <body> >
  85. <!DOCTYPE html> <html> <head>... </body> </html> <svg xmlns="http://www.w3.org/2000/svg" class="defined-icon" <symbol

    id="phone"> <rect x="5" y="5" width="70" height="100" rx="5"/> <circle r="3" cy="105" cx="40"/> </symbol> </svg> </head> <body> Styles Still Being Applied Through CSS style.css #phone rect, #phone circle { fill: white; } #phone rect { stroke: #FF2626; stroke-width: 10px; } <link rel="stylesheet" href="style.css"> Styles are already being applied with existing CSS >
  86. Displaying the Icon With <use> The use tag references the

    id of an element, group, or symbol and displays it inline where it is. <svg xmlns="http://www.w3.org/2000/svg" class="defined-icon" ... viewBox="0 0 80 110" class="displayed-icon"> viewbox goes on second svg <symbol id="phone"> <rect x="5" y="5" width="70" height="100" rx="5"/> <circle r="3" cy="105" cx="40"/> </symbol> </svg> ... ... <svg xmlns="http://www.w3.org/2000/svg" <use xlink:href=" </svg> > Must be an id, not a class! In order to use XLink, you need to specify an XLink namespace on the SVG that will be using XLink! xmlns:xlink="http://www.w3.org/1999/xlink"> version="1.1" /> #phone"
  87. Use Tag for External Sources <use xlink:href=" The use tag’s

    XLink points to a named anchor. This can also be an outside source (like a file): Unfortunately, external references don’t work in IE10 and below. /> #phone" path-to-file.svg
  88. Give the Displayed Icon Responsive Width <svg xmlns="http://www.w3.org/2000/svg" class="defined-icon"> <symbol

    id="phone"> <rect x="5" y="5" width="70" height="100" rx="5"/> <circle r="3" cy="105" cx="40"/> </symbol> </svg> ... ... ... We are using the symbol now, but let’s go ahead and give it a responsive width! style.css #phone rect, #phone circle { fill: white; } #phone rect { stroke: #FF2626; stroke-width: 10px; } ... .displayed-icon { height: auto; width: 30%; } <svg xmlns="http://www.w3.org/2000/svg" <use xlink:href=" </svg> viewBox="0 0 80 110" class="displayed-icon"> /> #phone"
  89. Two SVG elements that we can use here to make

    our SVG more meaningful and accessible: SVG Accessibility ... <svg xmlns="http://www.w3.org/2000/svg" xmlns:xlink="http://www.w3.org/1999/xlink" viewBox="0 0 80 110" class="displayed-icon"> <use xlink:href="#phone"/> </svg> Label for the asset A detailed description of what the asset looks like <title>Schmuffle Phone Icon</title> <desc> A phone with a large red border with rounded corners, a white screen, and a white round button centered below the screen. </desc>