Upgrade to Pro — share decks privately, control downloads, hide ads and more …

Basic Linux Commands For Forensics

Basic Linux Commands For Forensics

Basic Linux Commands presentation intended for use in forensics, presented in the Information Security Research Lab Seminar at EAFIT University.

Santiago Zubieta

April 24, 2015
Tweet

More Decks by Santiago Zubieta

Other Decks in Programming

Transcript

  1. mount Mount file systems Now, before file systems on devices

    can be used, first they must be mounted (though they can still be written to). Also, mounting some filesystems may require special drivers/modules, so you may want to check them, in this case using grep for finding the driver/module name. lsmod, shows status of modules loaded in Linux. dmesg, replays system startup message in case driver is not a module but its compiled directly into the kernel. ehci - enhanced host controller interface (applicable to USB 2.0)
  2. mount Mount file systems mount -t filesystem -o options device

    mountpoint mount -t vfat /dev/fd0 /mnt/floppy mount -t iso9660 /dev/cdrom /mnt/cdrom cd /mnt/floppy umount /mnt/floppy cd /mnt/cdrom umount /mnt/cdrom
  3. Thats it for ‘simple’ filesystems, such as floppy disks, cds.

    For hard drive disks, or USB storage, its a bit more complicated because of boot sectors, partitioning, and other stuff. Backing up an entire hard drive disk will result into a whole file without partition distinctions, whereas backing up individual partitions will allow to perform several forensics operations on them. For now lets ignore the mounting of hard drive disks. /dev/hda 1st Hard Disk (master, IDE-0) /dev/hda1 1st primary partition /dev/hda2 2nd primary partition ... /dev/hda5 1st logical drive /dev/hda6 2nd logical drive ... /dev/hdb 1st Hard Disk (slave, IDE-0) ... A single IDE interface can support two devices. Most motherboards come with dual IDE interfaces (primary and secondary) for up to four IDE devices. Because the controller is integrated with the drive, there is no overall controller to decide which device is currently communicating with the computer. This is not a problem as long as each device is on a separate interface, but adding support for a second drive on the same cable took some ingenuity. To allow for two drives on the same cable, IDE uses a special configuration called master and slave. This configuration allows one drive's controller to tell the other drive when it can transfer data to or from the computer. What happens is the slave drive makes a request to the master drive, which checks to see if it is currently communicating with the computer. Up to hda4, limit of x86 architecture http://computer.howstuffworks.com/ide4.htm
  4. Now that we have mounted a filesystem (or we are

    using the very filesystem from the computer we’re working in), we can perform several forensics operations on these with several programs. There are programs dedicated to this (some of which are propietary), but as beginners lets first focus on using the very tools Linux provides us, and then look unto some open source tools created for forensic purposes. dd Command used to copy from an input file or device to an output file or device. sfdisk Used to determine disk structure. /fdisk grep Search (multiple) files for instance of an expression or pattern. loop Allows you to associate regular files with device nodes. This will then allow you device to mount a bitstream image without having to rewrite the image to a disk md5sum/ Create and store an MD5 or SHA hash of a file or list of files (including devices) sha1sum for consistency validation purposes. file Reads a file’s header information in an attempt to ascertain its type, regardless of its name or extension. xxd Command line hexdump tool, for viewing a file in hex mode (or attempting to view in other bases). Linux commands Useful for forensics
  5. The dd utility copies the standard input to the standard

    output. Input data is read and written in 512-byte blocks. If input reads are short, input from multiple reads are aggregated to form the output block. When finished, dd displays the number of complete and partial input and output blocks and truncated input records to the standard error output. dd Convert and copy a file
  6. count=n Copy only n input blocks. skip=n Skip n blocks

    from the beginning of the input before copying. if=file Read input from file instead of the standard input. of=file Write output to file instead of the standard output. bs=n Set both input and output block size to n bytes, superseding the ibs and obs operands. obs=n Set the output block size to n bytes instead of the default 512. ibs=n Set the input block size to n bytes instead of the default 512. dd Convert and copy a file
  7. This is useful for several purposes. Since everything in Linux

    is a file, even the representations of external storage and hardware in the operating system, we can use dd to backup for example a connected storage, set parameters such as the block size, the number of blocks to skip, split in several files, etc. Conversely, we can have a backup split in several files, try to put it together, change the block size of the information, and generate a file to be mounted, most likely for forensic purposes. For splitting, we can determine the length ~ size n of the device, then determine the amount of files m we want to split it into, and then iteratively (with bash, or any scripting language) make copies such that i*n/m bytes are skipped at first, and then only n/m bytes are copied into an output file split_i.dd (we’ll use .dd to identify files created this way). dd Convert and copy a file $ dd if=/dev/fd0 of=image.dd bs=1024 Use this to create a backup image from a device (fd0 == floppy disk) $ dd if=image.dd of=/dev/fd0 bs=1024 Use this to restore an image to a device location (fd0 == floppy disk) Using dd on /dev/hda gets whole disk, /dev/hda1 gets 1st partition.
  8. BE WARNED, this copies the whole contents of a device,

    so it will result in a binary file sized the same as the ‘storage capability’ of the device. This can be troublesome for very large devices (with sizes of GBs or even TBs) but this is good for forensics because we can perform searches on unallocated ~ garbage space when looking for erased files. When a file is erased, its contents are not really gone, its just that the space that it occupied is now marked as writeable, but as long as no other file has written over this space, it is possible to retrieve what was erased. Really erasing every bit of information a file contained, can be something very lengthy. For security ~ confidentiality purposes, its recommended to not only erase files, but also run some program that will write 0s all over the empty space in the computer, but this can be troublesome, it can take even hours to perform. Some even claim that writing 0s is not enough, and that it may require several passes of different data scrambling and wiping algorithms. dd Convert and copy a file
  9. /dev/sd... SATA/SCSI USB controllers, main ‘disk’ here (because of VM?)

    /dev/sda Main ‘HDD’ /dev/sdc Connected USB X : Useful for dd, for having an estimate of where to start to copy whole partitions, and skip stuff such as fs tables and boot sectors, which can vary depending on device or filesystems used in the device.
  10. mount Mount file systems Another way to view the contents

    of an image without having to restore it to a disk located at /dev/... first is to mount it using the loop interface, which allows to mount from within an image instead of within a disk. Not all kernels support this by default. Using loopback device mount -t vfat -o ro,noexec,loop image.dd /mnt/mountpoint You need to create the folder for the mounting point, but after that and after mounting you can browse to the folder and find the contents of the image.dd file you just mounted.
  11. sha Create SHA hash(es) of file(s) find mountpoint -type f

    -print0 | xargs -0 sha1sum > ./shafiles.txt of files, not links or folders using character ‘0’ (not the number) as input separator receive multiple arguments and pass them separately to a program by default its a whitespace character but may be contained in input, so lets use the NULL terminator to denote the end of every ‘input’ find the sha1sum of every input. Run the find program to get names... at the given location using character ‘0’ (not the number) as input separator output file containing all the sha1sums sums filenames Since even drives are considered as files (or their backups), we can perform sha1sum of them to validate their state (no changes made, or information lost on transmission). We can store the sha1sums we expect some files/drives to have, and then validate them en masse routinely. LinuxLeo example
  12. This way we can routinely check the consistency and integrity

    of the files we transfer, receive from online sources, or that we want to assure no changes were made to them. If there’s a lot of files, we can use GREP to only match expressions that contain the FAILED string. sha1sum -c shafiles.txt lets change a file thats not supposed to be changed. sha Create SHA hash(es) of file(s)
  13. This is then a good entry point for the forensics

    of an attack, checking against the last working list of critical files, if changes were made to them, or if any of them is missing, otherwise it would be practically impossible for large filesystems (as in size and contents) to look manually for missing files, or what files were changed after an attack was carried out. This, however, can’t check for newly created files, it only verifies hash sums and returns whether its valid or not, or if the file is missing. For checking if a file was injected, do as follows: find the names of all files in the drive or critical area check the difference between old filelist and new filelist >: present in new file list, but not in old, so its a file that was just created. <: present in old file list, but not in new, so its a file that was just deleted. VERY IMPORTANT TO KEEP TRACK OF ALL YOUR CRITICAL FILES! sha Create SHA hash(es) of file(s)
  14. Beyond changes on file contents, files being injected or deleted,

    permissions/owners of files could also be changed, causing the access to functionality or content to unauthorized parties, this is why we want to also keep a registry of what kind of permissions some files have that we deem critical or need to secure from unauthorized access.
  15. grep g/re/p (globally search a regular expression and print) A

    regular expression to match emails. How does it work? grep options pattern/list file > ./hits.txt O u t p u t o f t h e LINES or starting bytes containing such patterns file to look for the pattern(s), omit if using xargs for querying a list of files -a process file as if it was text, even if its binary -b give byte offset of occurrence, useful for xxd or dd -i ignore upper/lower case -f match patterns from a list ~ given file. FF D8 FF D9 JPEG starting/ending bytes. We can look for such, then print all occurrences, and with the offset between closest pairs of these tell dd where to start cutting ~ carving until the location of the closing pair, this way potentially retrieving erased JPEGs (or any file where we know what the starting ~ ending headers are) LinuxLeo example
  16. xxd Binary file to dump -s starting offset Less is

    useful for anything that outputs huge amounts of text, because otherwise all the output will be printed into the screen, resulting in a loooooong text, instead, this displays only a bit of it in a ‘separate window’, and then allows moving across the output, and then allows to close the ‘window’. Opening man pages uses less. 75441 : line byte # offset (in base 10) 126b1 : line byte # offset (in base 16) (May not actually be the starting place of content, just the line where it occurs) If we are looking in a binary for particular ascii text, first scan with GREP reading as text to get location and then use XXD to check surrounding contents. If we are looking in a binary for particular hex text, first output the whole hex with XXD, and then use GREP to look for a particular hex occurrence. LinuxLeo example Make a hexdump or do the reverse
  17. xxd Output the whole HEX dump Pipe it to grep

    to look for a particular HEX string 52a0 : line byte # offset (in base 16) But its not actually where our desired HEX value happens, its just the line offset where it happens, so in that line lets see how much bytes further is the beginning of what we are looking for. Each symbol: 4 bits 0000, 0001... 1111 32 bits == 4 bytes Real starting location: 52a0 + 4 Each symbol: 4 bits 0000, 0001... 1111 48 bits == 6 bytes Real ending location: 6c70 + 6 Convert back and forth decimal and hex bases JPEG beginning JPEG ending https://en.wikipedia.org/wiki/Magic_number_%28programming%29 Make a hexdump or do the reverse
  18. Starting offset Ending offset count=n 27766 - 21156 Copy only

    n input blocks. skip=n 21156 Skip n blocks from the beginning of the input before copying. $ dd bs=1 skip=21156 count=6610 if=image_carve.raw of=image.jpg This was with only 1 opening tag and 1 ending tag. The idea is to find all opening and closing tags, then with Bash or some scripting language pair them by closeness, and then attempt to carve the data between the tags. Some false positives may arise, but it will retrieve image files from unallocated space as long as their data hasn’t been overwritten. This could be done with all other kind of files according to the respective delimiter tags their format uses. dd For carving files
  19. $ dd if=/dev/hda1 of=image.dd bs=1024 Use this to create a

    backup image from a device (hda1 == hard drive 1st partition) $ dd if=image.dd of=/dev/hda1 bs=1024 Use this to restore an image to a device location (hda1 == hard drive 1st partition) Using dd on /dev/hda gets whole disk, /dev/hda1 gets 1st partition. Partitions backed up this way can be mounted via the loop device. fdisk output: block address difference (7782399-1136)/2 = 3890631.5 3890632 kb Use this information to manually carve a partition, or... After checking it in fdisk, make a direct bitstream image of its file, not the whole drive. dd For carving partitions
  20. dd For loading and compressing from gz $ dd if=/dev/sdb1

    | gzip -c > usb.dd.gz No output file specified, so standard output. pipe SO to gzip doesn’t gzip input file, but it throws gzipped stuff to the standard output save gzipped output into a file. Compressing data outputted from dd on the fly. Also works backwards. dd works with standard input and standard output unless sources are specified, so using pipes lots of interesting actions could be performed, like compressing a partition while its being backed up, or loading into a device file a compressed file containing a partition. This can save a lot of time, if your standard approach is to first wait until a partition is decompressed and then waiting until its contents are loaded into a device file, or waiting until a partition has backed up and then compressing it.
  21. So far we’ve seen how to deal with file alteration,

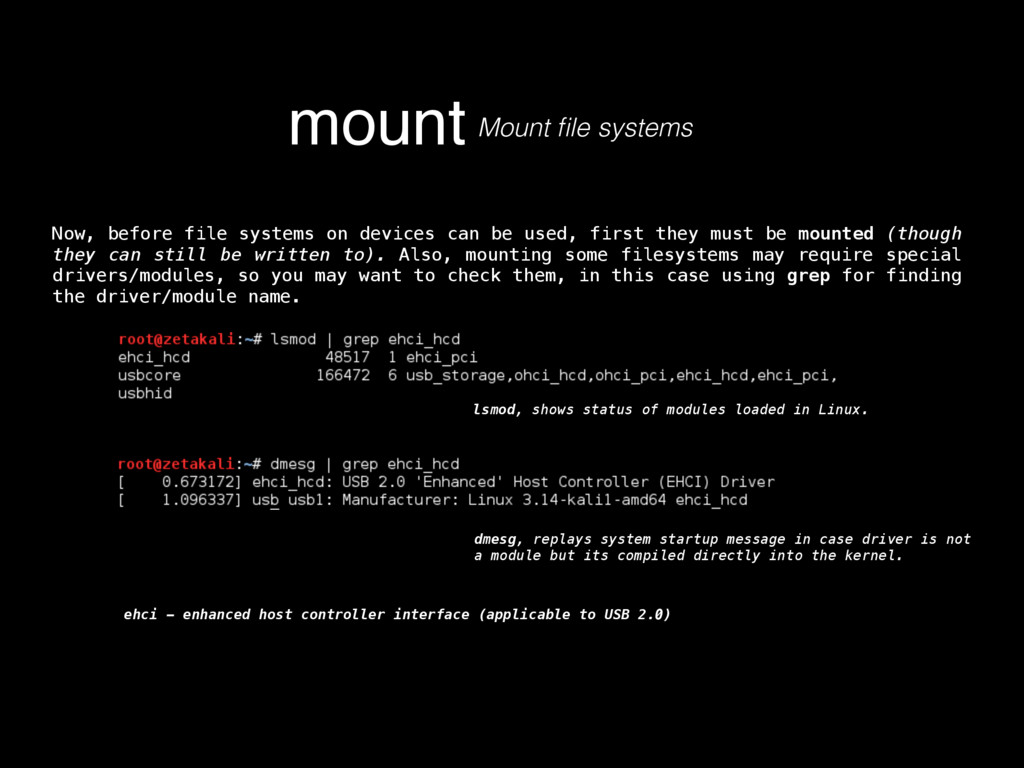
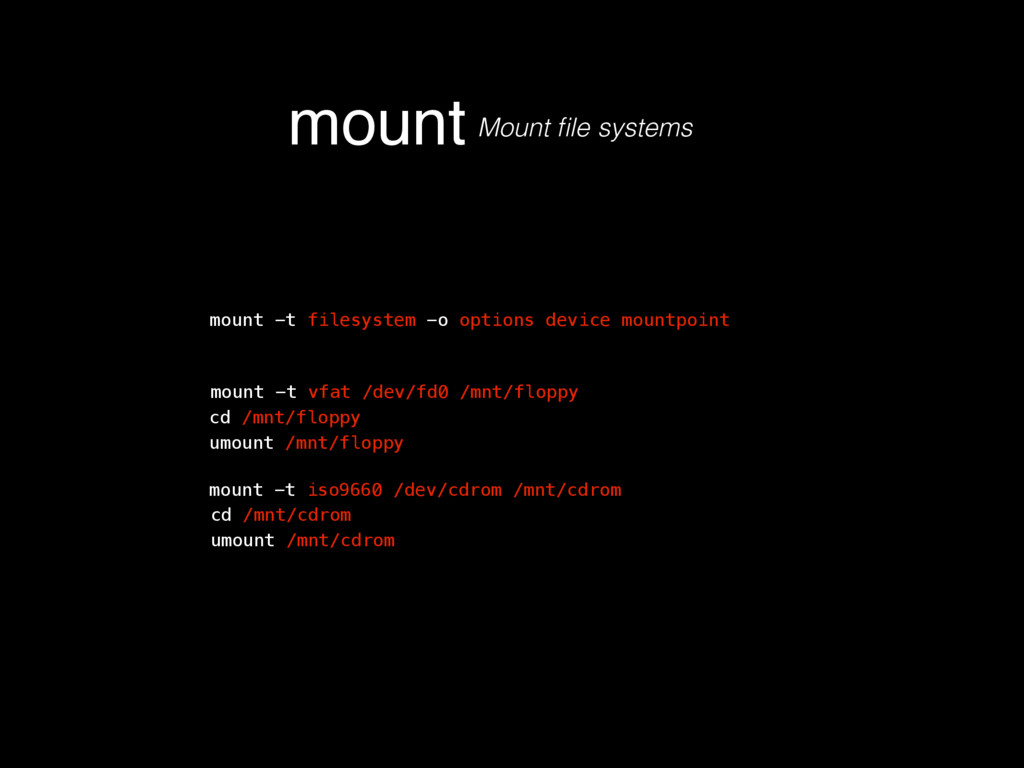
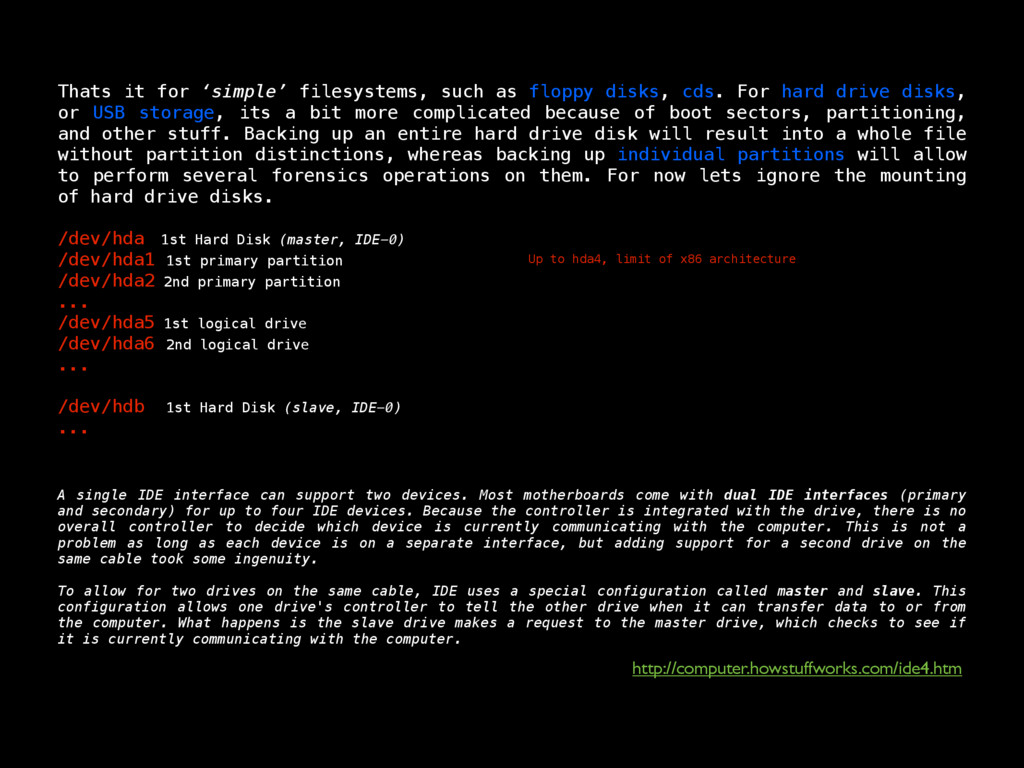
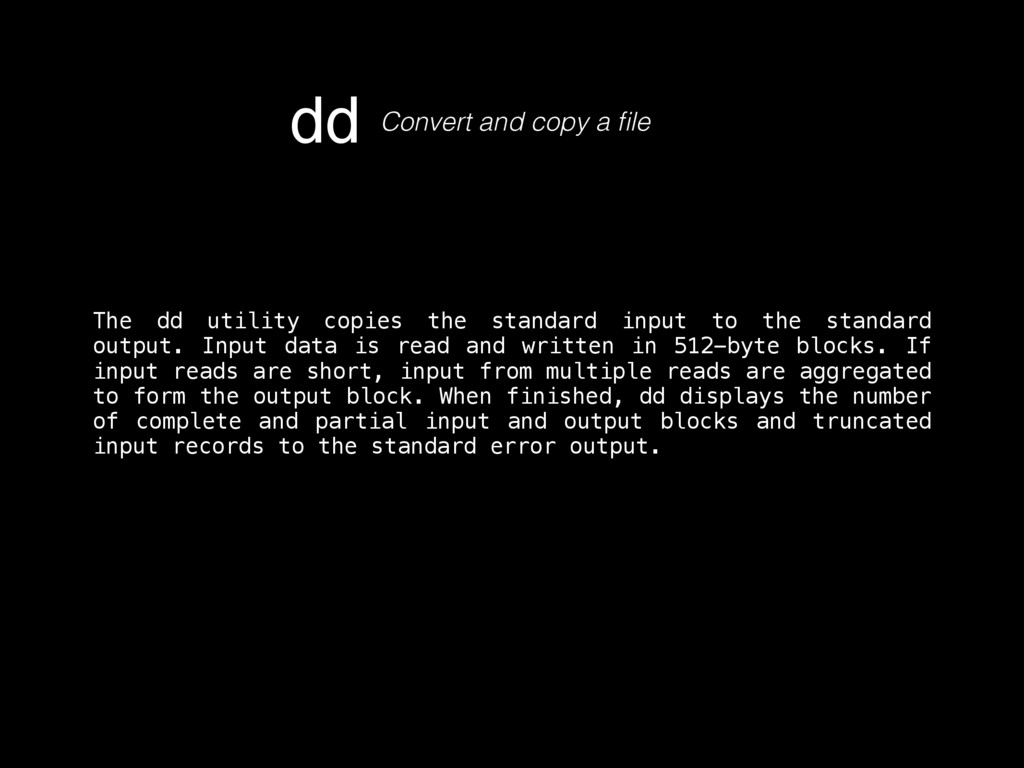
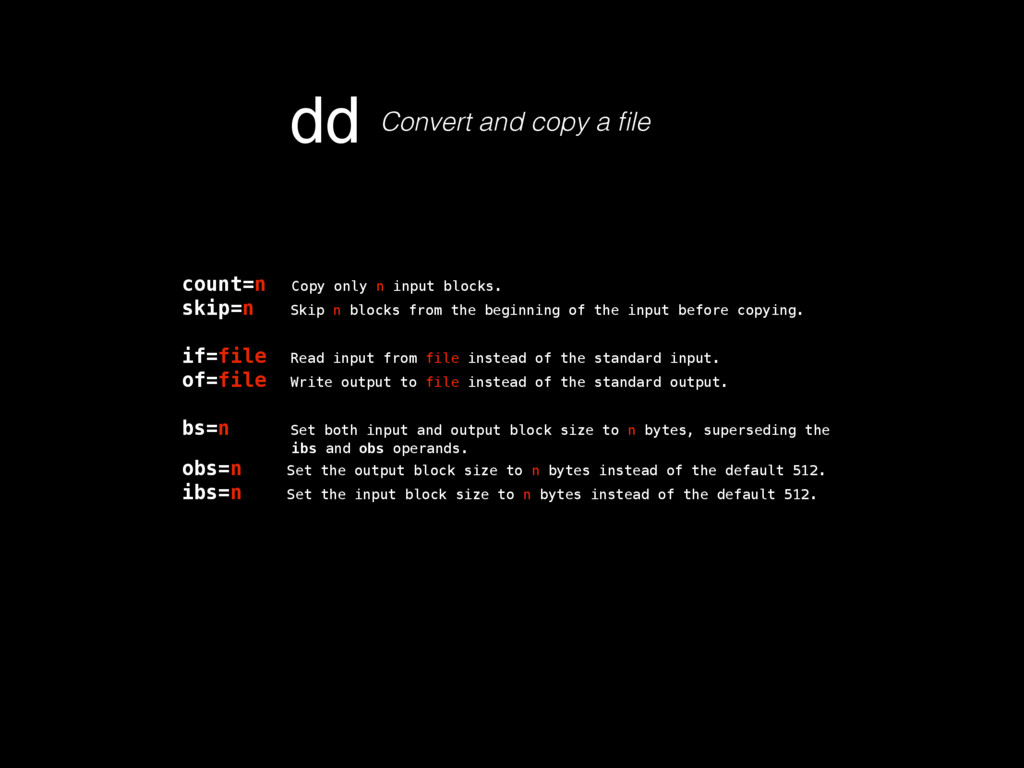
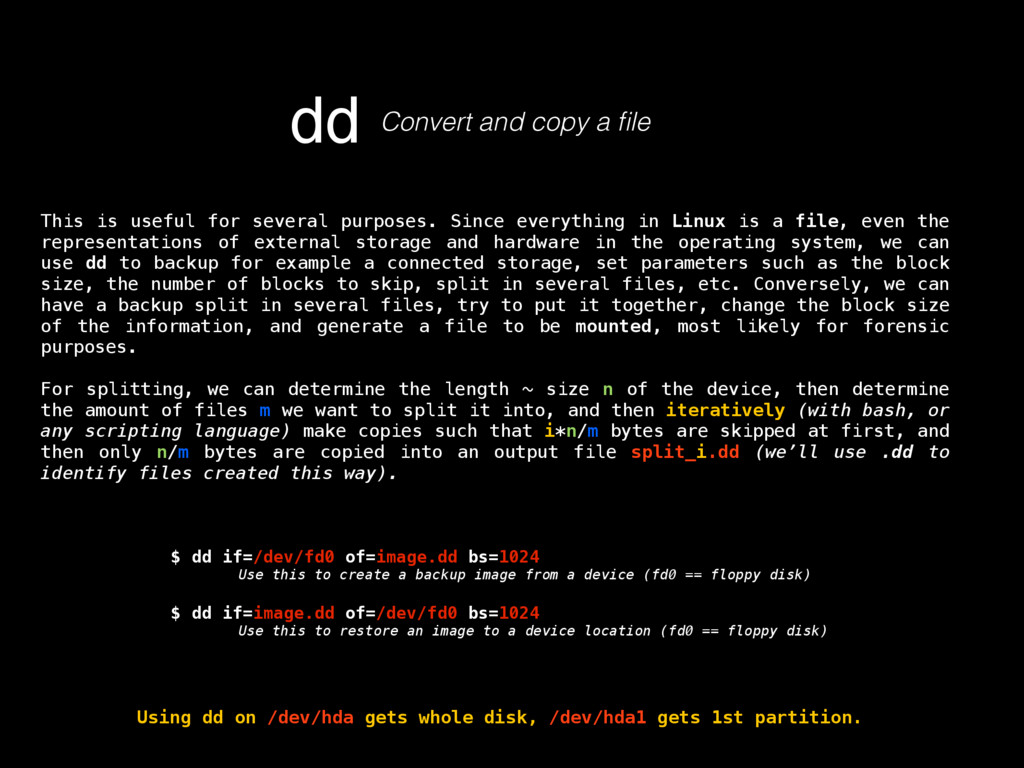
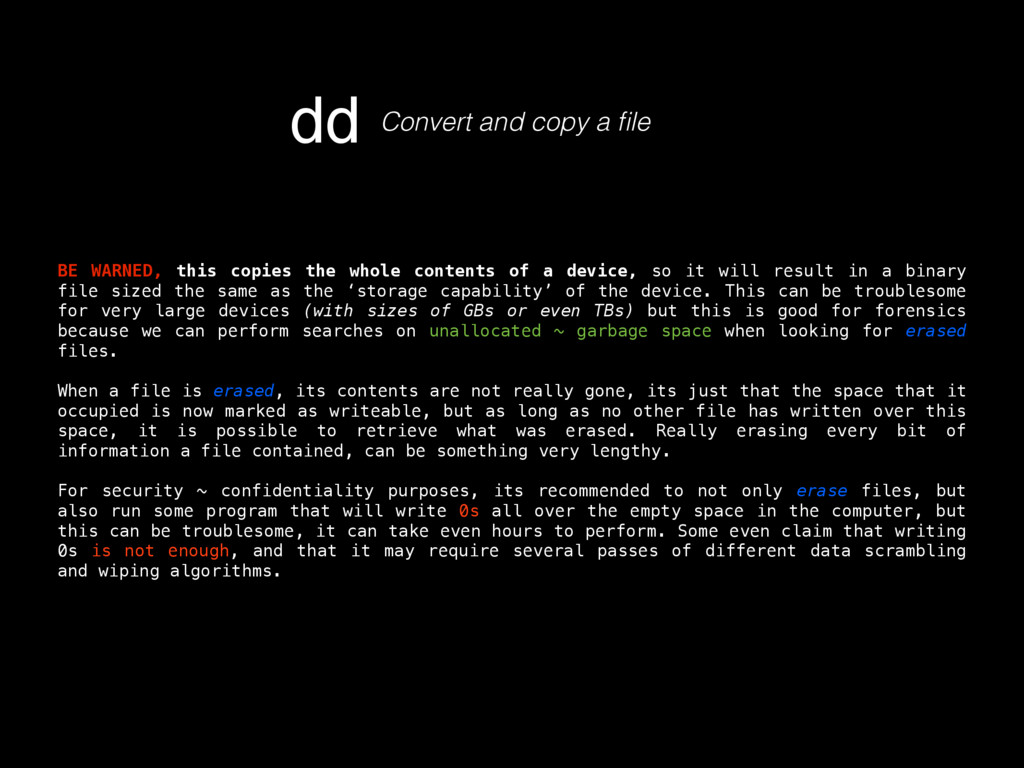
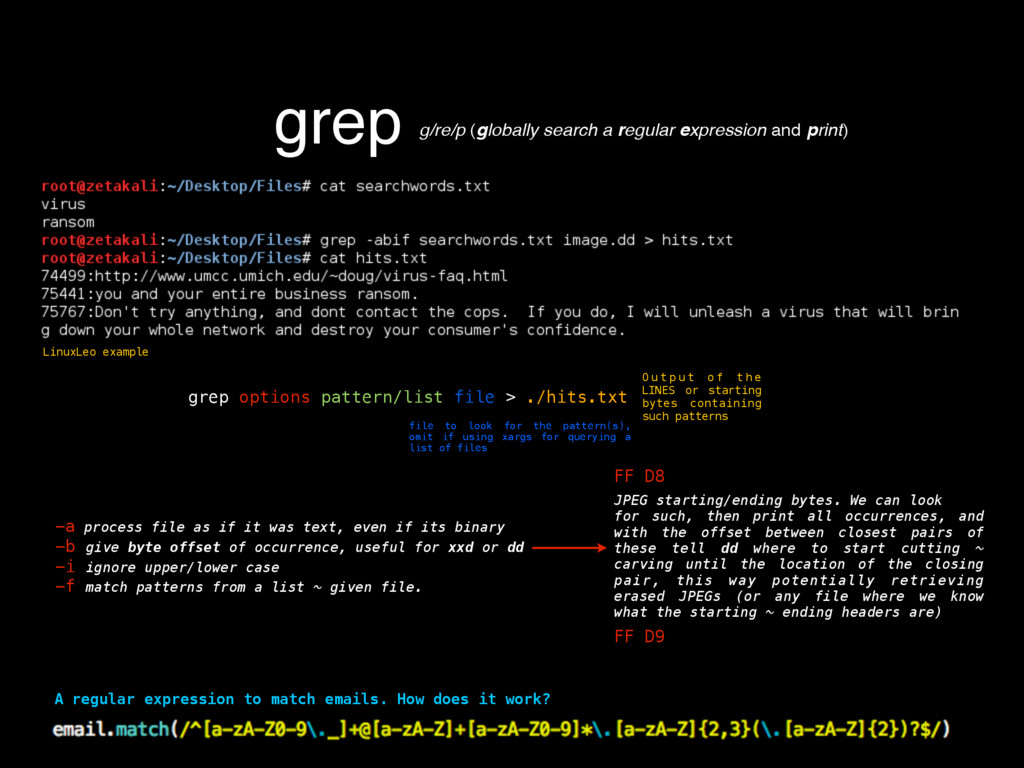
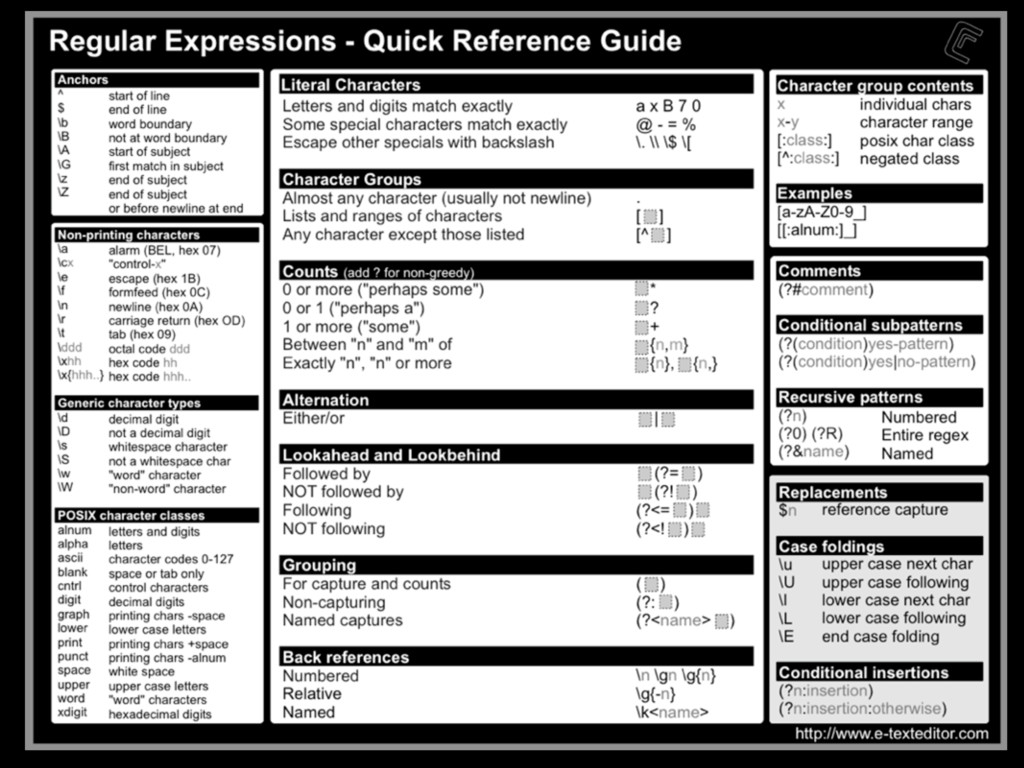
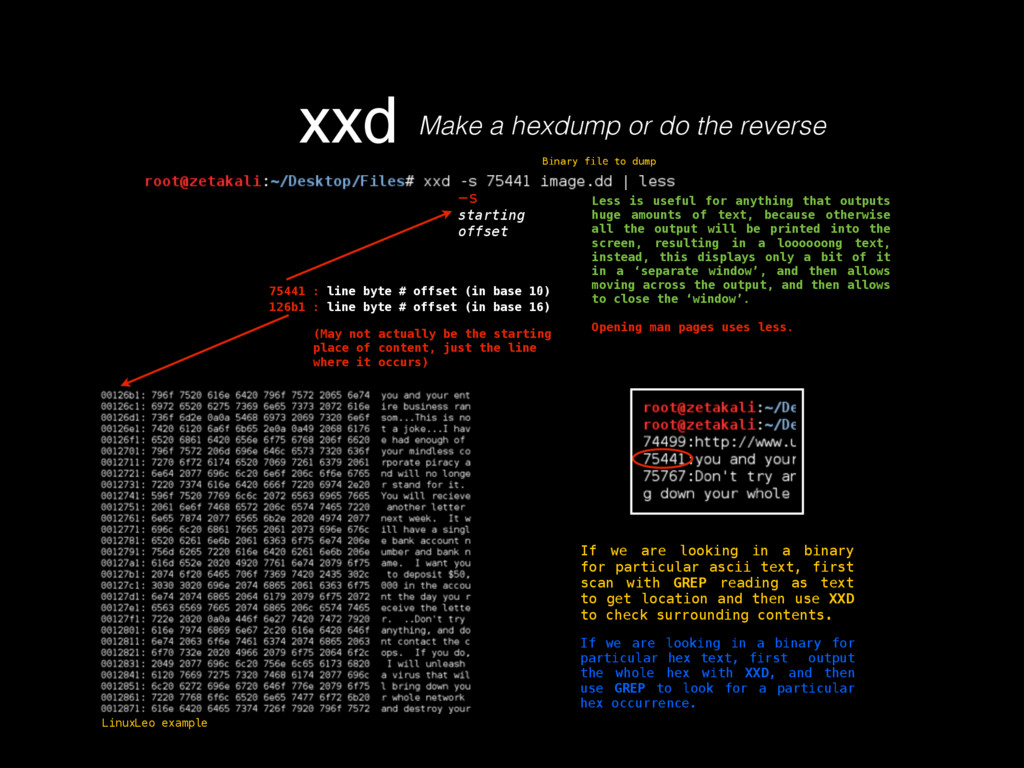
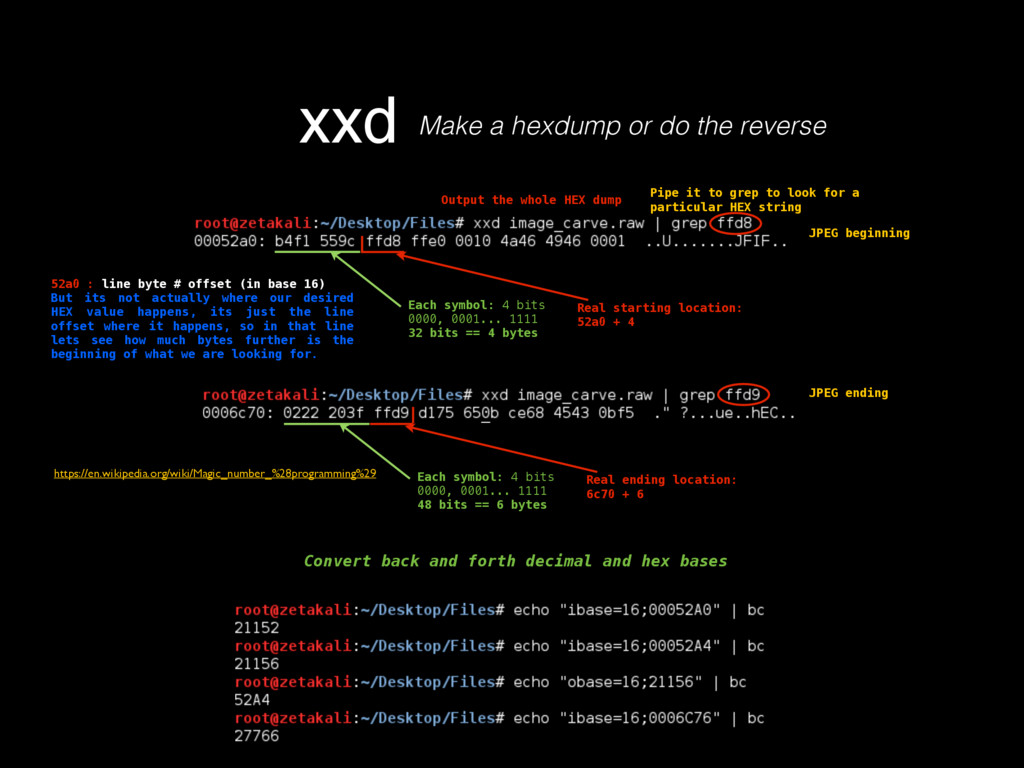
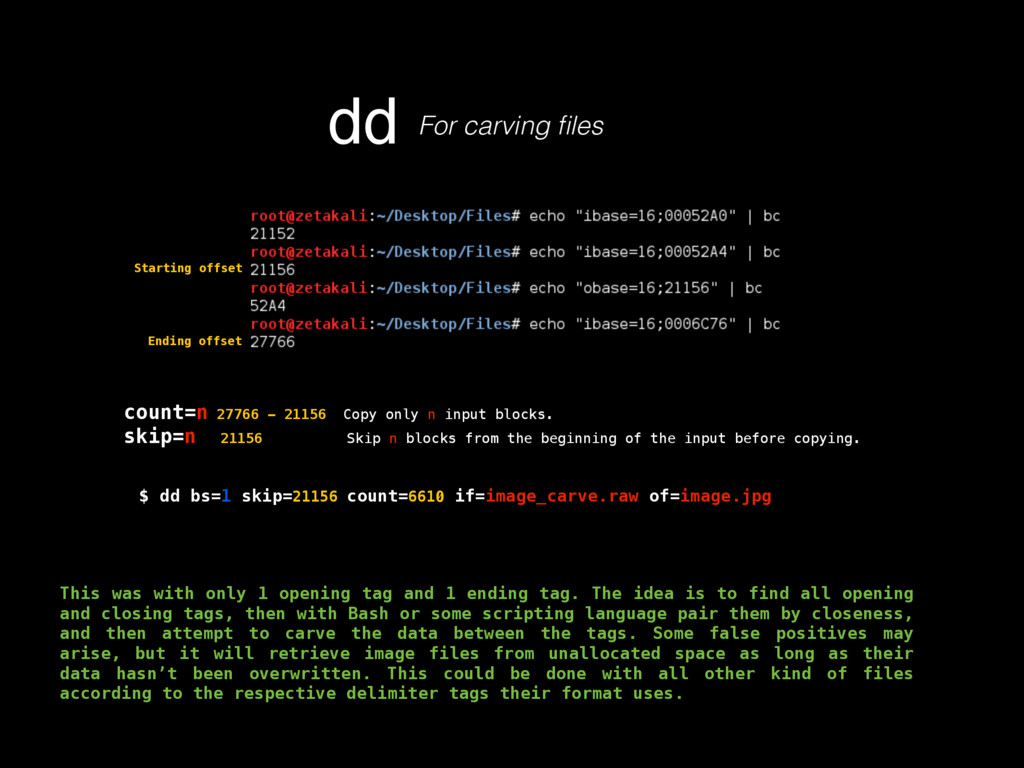
    as in its contents, deletion, injection, permission changes, how to carve a binary file (backed up storages) looking for files, or for content by using regular expressions, which mostly helps knowing what happened to our turf, but now there’s a very important question, where did that come from? If any system has a decent security, it keeps track of all sorts of activity in logs. Entering to a mail server, downloading files, POST/GET requests made to a HTTP server, filesystem browsing, attempts to open a password protected file or accessing unprivileged functionality, everything must be logged, since all that serves as valuable evidence for determining what in earth took place after some people realized something happened, or better, looking for suspicious behavior to determine that something big has not yet happened but nonetheless someone is trying to break through security to make it so. Because of all this activity logging, log files can be very HUGE, to the order of gigabytes of pure plain text just for requests of a moderately sized website. Thankfully, these are usually stored by months, and after a month has passed, the logs are compressed using tar, which for plaintexts can compress a lot, like 1.6GB into 200mb. These are good to store because one never knows how further into the past we’ll need to look into when searching for the origins of an attack or the start of some suspicious behavior. logsKinda the sysadmin best friend Manually scourging log files can be a very tasking, if not impossible labor, thats where some simple tools from Linux like GREP, AWK and UNIQ come really handy.
  22. logsKinda the sysadmin best friend 41.142.223.88 - - [30/Nov/2014:16:39:00 -0600]

    "GET /home/hola.php HTTP/1.1" 200 2089 "http://www.url.com/ home/" "Mozilla/5.0 (Windows NT 6.3) AppleWebKit/537.36 (KHTML, like Gecko) Chrome/38.0.2125.122 Safari/ 537.36" Origin IP Date Path Status Status: we can look for 403 error access for restricted things, or several 404 in case it may be a brute-force of possible paths. Path: we can look for accesses to paths that shouldn’t be visible to the public, or that shouldn’t accept certain kinds of requests. GET parameters are part of the URL, but sadly information from POST requests isn’t available. Date: we can look for accesses in unusual dates, particularly if we know the exact date of an attack, or search for dates that are too close (basically were part of very fast automated requests). Firewalls should handle such fast requests, but not some spaced a bit more but still requesting on exact spans of time. Origin IP: we can run a command that can count us the number of unique lines, or part of them, in this case, unique IP occurrences (and their repetition count) so we can see which IPs are accessing a server the most, and if the amount of accesses for a given period of time is too high to guarantee suspicions of being an automated attack. User Agent User Agent: each system has a determined user agent which identifies some characteristics of the used software and hardware. Up to a certain point, user agents may help profiling an accessor, and some automated tools have some user agents set, so even if these change IP origin (because many tend to change IPs quickly via proxys to avoid firewall detection), a same user agent accessing the same resource in a brief period of time a lot can raise suspicions of an automated attack.
  23. logsKinda the sysadmin best friend 41.142.223.88 - - [30/Nov/2014:16:39:00 -0600]

    "GET /home/hola.php HTTP/1.1" 200 2089 "http://www.url.com/ home/" "Mozilla/5.0 (Windows NT 6.3) AppleWebKit/537.36 (KHTML, like Gecko) Chrome/38.0.2125.122 Safari/ 537.36" Origin IP Date Path Status Status: we can look for 403 error access for restricted things, or several 404 in case it may be a brute-force of possible paths. Path: we can look for accesses to paths that shouldn’t be visible to the public, or that shouldn’t accept certain kinds of requests. GET parameters are part of the URL, but sadly information from POST requests isn’t available. Date: we can look for accesses in unusual dates, particularly if we know the exact date of an attack, or search for dates that are too close (basically were part of very fast automated requests). Firewalls should handle such fast requests, but not some spaced a bit more but still requesting on exact spans of time. Origin IP: we can run a command that can count us the number of unique lines, or part of them, in this case, unique IP occurrences (and their repetition count) so we can see which IPs are accessing a server the most, and if the amount of accesses for a given period of time is too high to guarantee suspicions of being an automated attack. User Agent User Agent: each system has a determined user agent which identifies some characteristics of the used software and hardware. Up to a certain point, user agents may help profiling an accessor, and some automated tools have some user agents set, so even if these change IP origin (because many tend to change IPs quickly via proxys to avoid firewall detection), a same user agent accessing the same resource in a brief period of time a lot can raise suspicions of an automated attack.
  24. awk Pattern-directed scanning and processing language $ cat logfile.txt |

    awk ‘{print $1” “$2}’ | less Print the first element, then a space “ “ then the second element filter dates, IPs, etc $ cat logfile.txt | awk ‘{print $1” “$2}’ | uniq -c uniq filters lines and gets unique occurrences, if given the original file, most likely it won’t find repeated lines, but if given the date-filtered file, then it will probably find lots of repeated lines, so it will print the unique occurrences, and with -c the amount of repetitions such occurrence has. Nov 13 and 23 seem to have multiple occurrences way beyond the monthly average, so lets query the original file for the complete lines containing one of those dates Suspicious Suspicious LinuxLeo example $ cat logfile.txt | grep ‘^Nov [13|23]’ Same as we have isolated a date, think of isolating an IP or a resource for counting access occurrences.
  25. awk Pattern-directed scanning and processing language $ cat logfile.txt |

    grep ‘identification string’ | awk ‘{print $1” “$2” “$NF}‘ | uniq -c Depending on log structure we can determine how to use AWK for extracting information from each line (lines == registries of access). If we want to access the last field, we can perform this: the file we want to inspect. first filtering, lets get only the lines that have a certain thing. Could be POST, GET, a resource, a date, or something else that identifies the kind of line we’re looking for. print the first, second and last field. We’ve found that first field is month, second is day, last is IP. NF == number of fields in each line. give only unique occurrences and their repetition count Turns from: Into: This IP is making lots of requests without identification string