Upgrade to Pro — share decks privately, control downloads, hide ads and more …

Machine Learning on Apple Watch

Machine Learning on Apple Watch

Presented at MADcon at the University of Texas on April 21st, 2018.

Sample code: https://github.com/cnstoll/Snowman

Conrad Stoll

April 21, 2018
Tweet

More Decks by Conrad Stoll

Other Decks in Technology

Transcript

  1. Agenda 4 Apple Watch History 4 Training a Model for

    CoreML 4 Building an Apple Watch Game with CoreML
  2. Public MNIST dataset for digits Lots of tutorials online Recently

    includes letters!!! Tutorials work for digits and letters!!!
  3. Training does not change no matter how many letters a

    user draws. Training is generic for all users.*
  4. Download a customized MLModel @interface MLModel (MLModelCompilation) + (nullable NSURL

    *)compileModelAtURL:(NSURL *)modelURL error:(NSError **)error; @end
  5. Model 1 num_samples = 10000 images = all_images[0:num_samples] labels =

    all_labels[0:num_samples] from sklearn import svm clf = svm.SVC() clf.fit(images,labels)
  6. Model 2 half_letters = [1,2,3,6,7,9,10,13,16,19,21,23,24] ind = [val in half_letters

    for val in labels] labels_2=labels[ind] images_2=images[ind][:] from sklearn import svm clf = svm.SVC() clf.fit(images_2,labels_2)
  7. Rule of thumb: If you can achieve ~80% accuracy with

    SVM, then the information you're trying to get at is in your data.
  8. Model 3 # Saved from previous step mat = pca.components_

    import numpy as np images_pca = np.matmul(images, mat.transpose()) from sklearn import svm clf = svm.SVC() clf.fit(images_pca,labels)
  9. Using PCA in watchOS import Accelerate // Input: 784 //

    Output: 25 func transform(from input: [NSNumber]) -> [NSNumber] { let image = input.map { $0.floatValue } // 784 let mat = pcaMatrix // Saved from Python var result = [Float](repeating: 0.0, count: 25) // 25 vDSP_mmul(image, 1, mat, 1, &result, 1, 1, 25, 784) return result.map { NSNumber(value: $0) } }
  10. Tutorials for Keras and Tensorflow 4 Simple Convolutional Neural Network

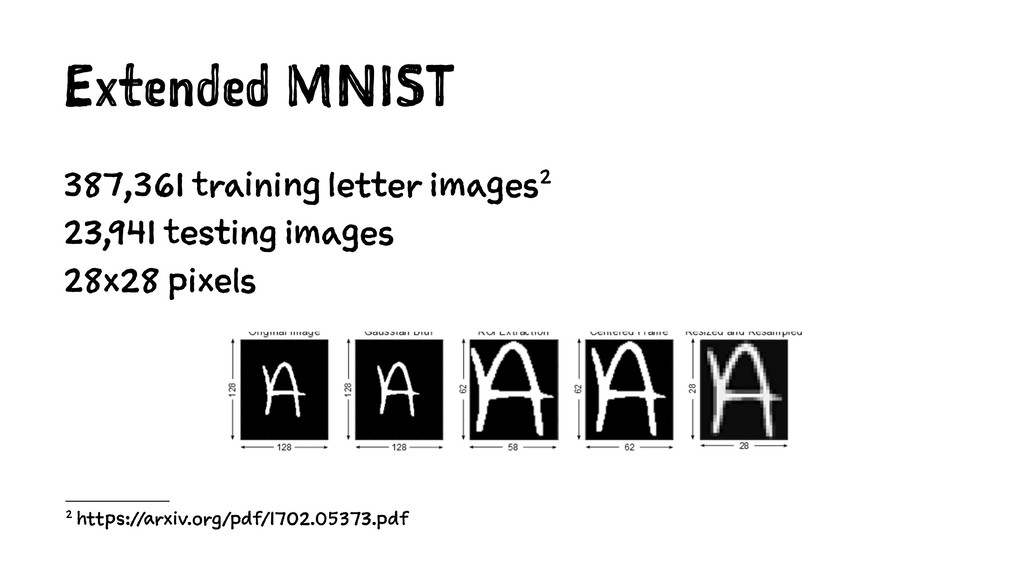
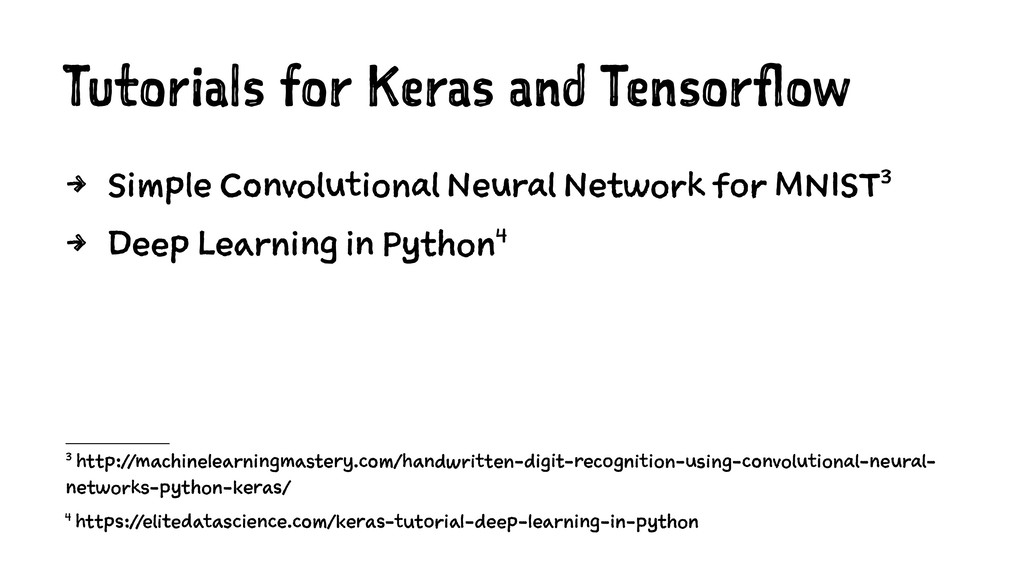
    for MNIST3 4 Deep Learning in Python4 4 https://elitedatascience.com/keras-tutorial-deep-learning-in-python 3 http://machinelearningmastery.com/handwritten-digit-recognition-using-convolutional-neural- networks-python-keras/
  11. Keras Model from keras.models import Sequential from keras.layers import Dense,

    Dropout, Activation, Flatten from keras.layers import Convolution2D, MaxPooling2D def baseline_model(): model = Sequential() model.add(Conv2D(30, (5, 5), padding='valid', input_shape=(28,28,1), activation='relu')) model.add(MaxPooling2D(pool_size=(2, 2))) model.add(Conv2D(15, (3, 3), activation='relu')) model.add(MaxPooling2D(pool_size=(2, 2))) model.add(Dropout(0.2)) model.add(Flatten()) model.add(Dense(128, activation='relu')) model.add(Dense(50, activation='relu')) model.add(Dense(num_classes, activation='softmax')) # softmax # Compile model model.compile(loss='categorical_crossentropy', optimizer='adam', metrics=['accuracy']) return model
  12. Model 4 # Build the model model = baseline_model() #

    Fit the model model.fit(X_train, y_train, validation_split=.1, epochs=10, batch_size=200, verbose=True)
  13. coremltools import coremltools coreml_model = coremltools.converters.keras.convert(model, input_names = ['imageAlpha'], output_names

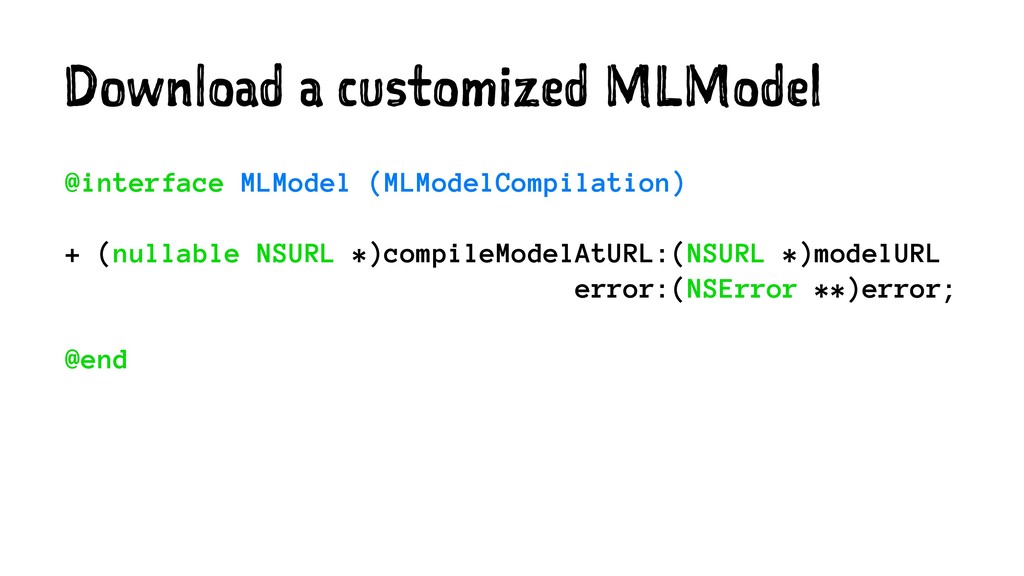
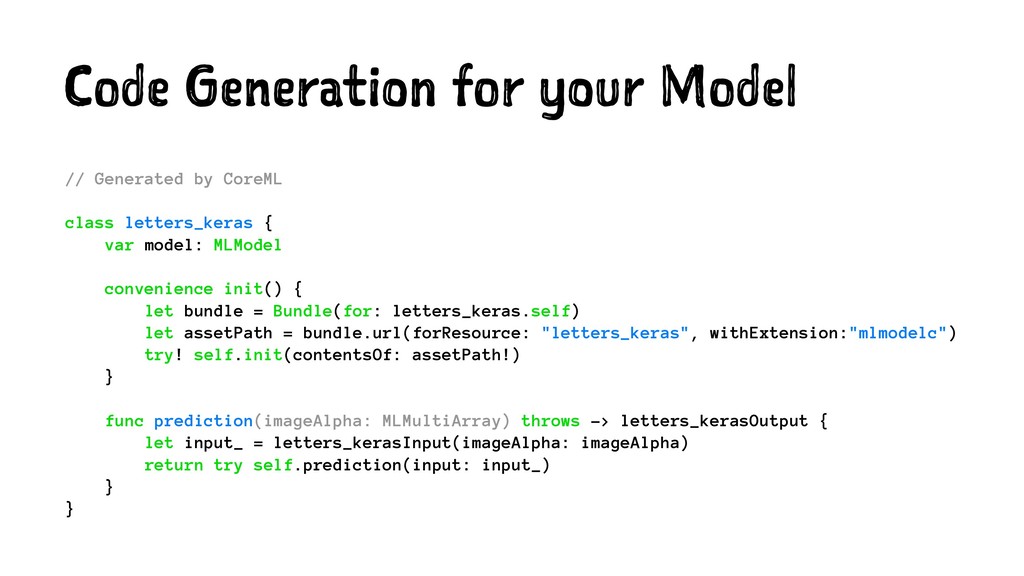
    = ['letterConfidence']) coreml_model.author = 'Kate Bonnen and Conrad Stoll' coreml_model.license = 'MIT' coreml_model.short_description = "Recognize the hand-drawn letter from an input image." coreml_model.input_description['imageAlpha'] = 'The input image alpha values, from top down, left to right.' coreml_model.output_description['letterConfidence'] = 'Confidence for each letter ranging from index 1 to 26. Ignore index 0.' coreml_model.save('letters_keras.mlmodel')
  14. Code Generation for your Model // Generated by CoreML class

    letters_keras { var model: MLModel convenience init() { let bundle = Bundle(for: letters_keras.self) let assetPath = bundle.url(forResource: "letters_keras", withExtension:"mlmodelc") try! self.init(contentsOf: assetPath!) } func prediction(imageAlpha: MLMultiArray) throws -> letters_kerasOutput { let input_ = letters_kerasInput(imageAlpha: imageAlpha) return try self.prediction(input: input_) } }
  15. Pan Gesture Captures Path @IBAction func didPan(sender : WKPanGestureRecognizer) {

    let location = sender.locationInObject() updateRecognitionLine(for: location, currentRecognizer: currentRecognizer) if sender.state == .ended { addSegmentAndWaitForConfirmation(with: currentRecognizer) } }
  16. Setting up a Path Shape Node let line = SKShapeNode()

    line.fillColor = SKColor.clear line.isAntialiased = false line.lineWidth = strokeWidth line.lineCap = .round line.strokeColor = UIColor.white lineNode = line let scene = SKScene(size: size) scene.addChild(line) scene.backgroundColor = UIColor.clear drawScene.presentScene(scene)
  17. Updating the Shape Node's Path func updateRecognitionLine(for location: CGPoint, currentRecognizer:

    Recognizer) { // Add the point to our path let path = currentRecognizer.addPoint(location) // Update the node's path lineNode?.path = path }
  18. Prediction Steps 4 Stroke Path to Image 4 Center and

    Crop Image 4 Get Pixel Alpha Values Between 0 and 1 4 Convert to Vector 4 Send to CoreML
  19. Stroke Path to Image UIGraphicsBeginImageContextWithOptions(CGSize(width: drawingWidth, height: drawingHeight), false, 0.0)

    let context = UIGraphicsGetCurrentContext()! context.setStrokeColor(UIColor.black.cgColor) path.lineJoinStyle = .round path.lineCapStyle = .round path.lineWidth = strokeWidth path.stroke(with: .normal, alpha: 1)
  20. Compute Center and Crop Image 4 Letter centered 4 2px

    padding on every side 4 Square aspect ratio 4 Must be 28x28 pixels
  21. Get Image Alpha Values extension UIImage { func getPixelAlphaValue(at point:

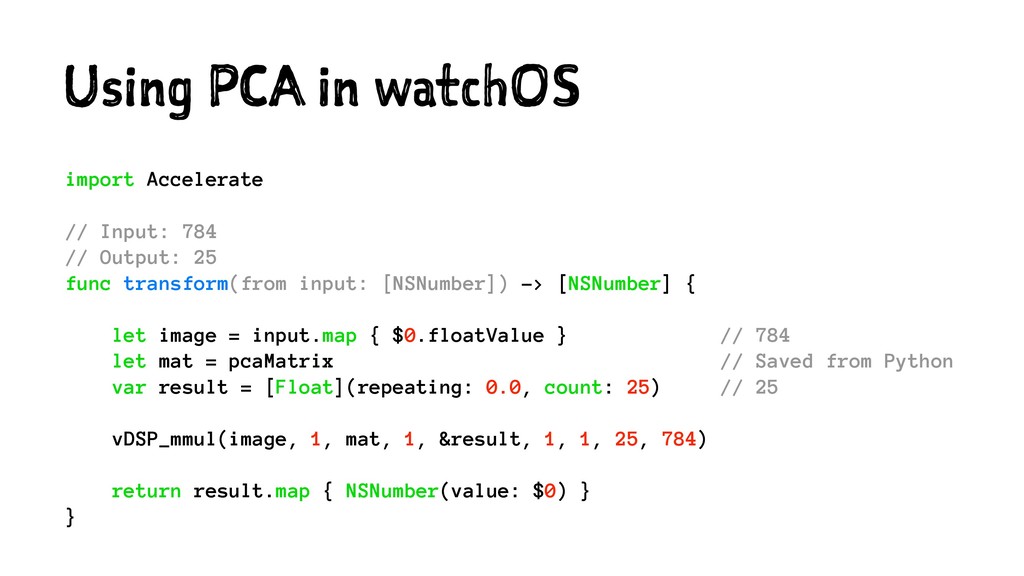
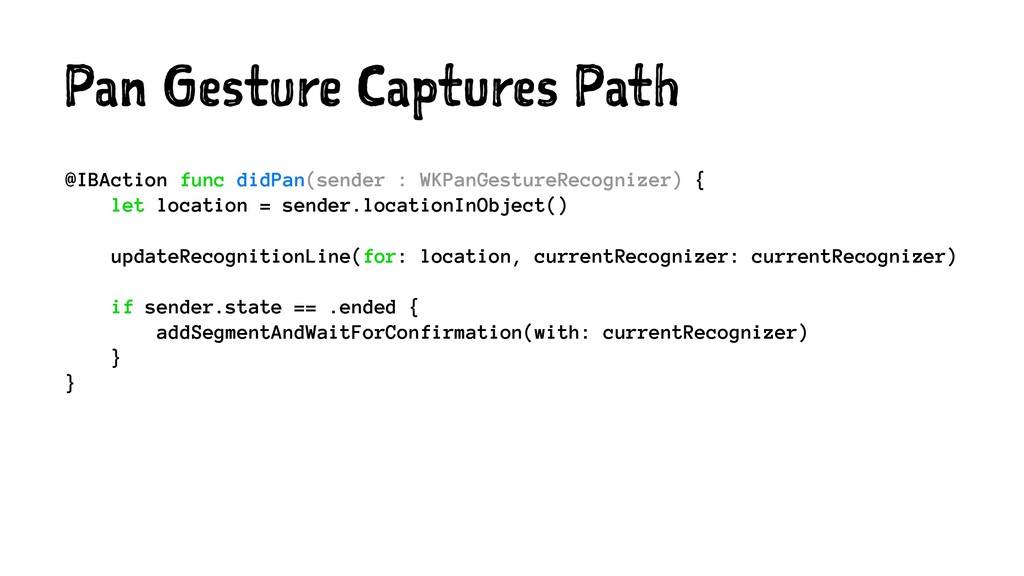
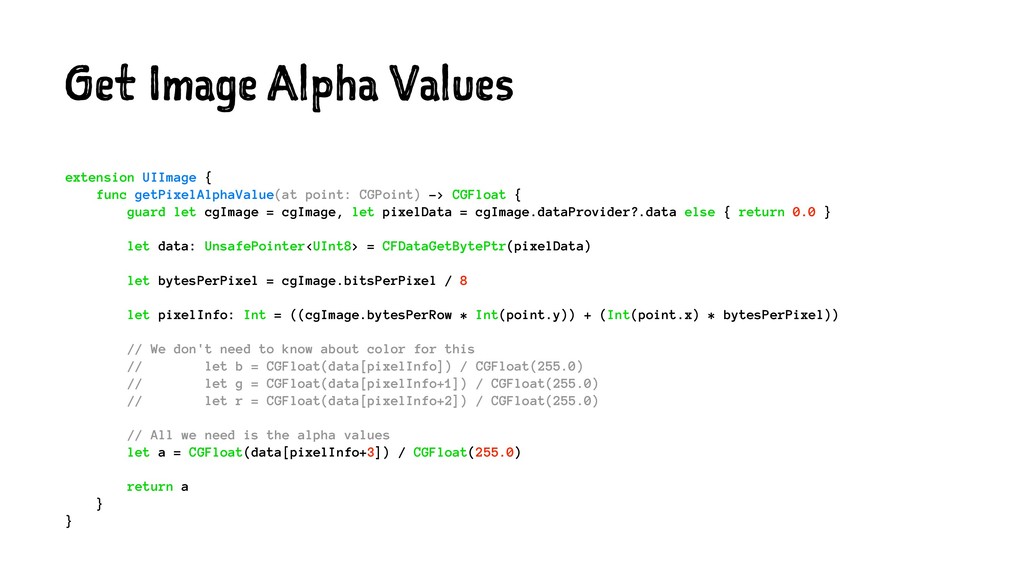
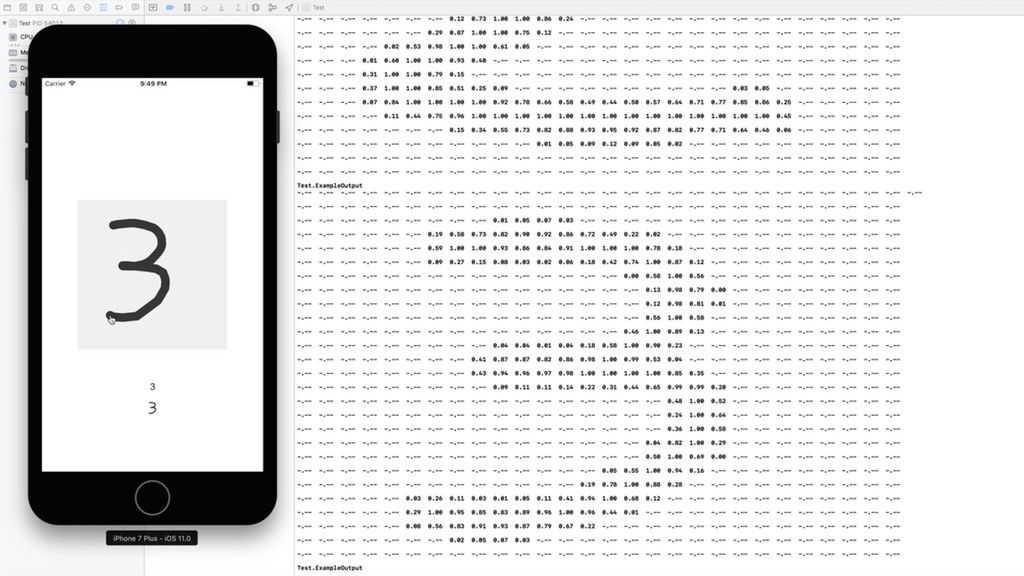
    CGPoint) -> CGFloat { guard let cgImage = cgImage, let pixelData = cgImage.dataProvider?.data else { return 0.0 } let data: UnsafePointer<UInt8> = CFDataGetBytePtr(pixelData) let bytesPerPixel = cgImage.bitsPerPixel / 8 let pixelInfo: Int = ((cgImage.bytesPerRow * Int(point.y)) + (Int(point.x) * bytesPerPixel)) // We don't need to know about color for this // let b = CGFloat(data[pixelInfo]) / CGFloat(255.0) // let g = CGFloat(data[pixelInfo+1]) / CGFloat(255.0) // let r = CGFloat(data[pixelInfo+2]) / CGFloat(255.0) // All we need is the alpha values let a = CGFloat(data[pixelInfo+3]) / CGFloat(255.0) return a } }
  22. Matching Training and Input Data Structure let a = CGFloat(data[pixelInfo+3])

    / CGFloat(255.0) a is between 0 and 1 not between 0 and 255
  23. Get Every Pixel's Alpha Value extension UIImage { func pixelAlpha()

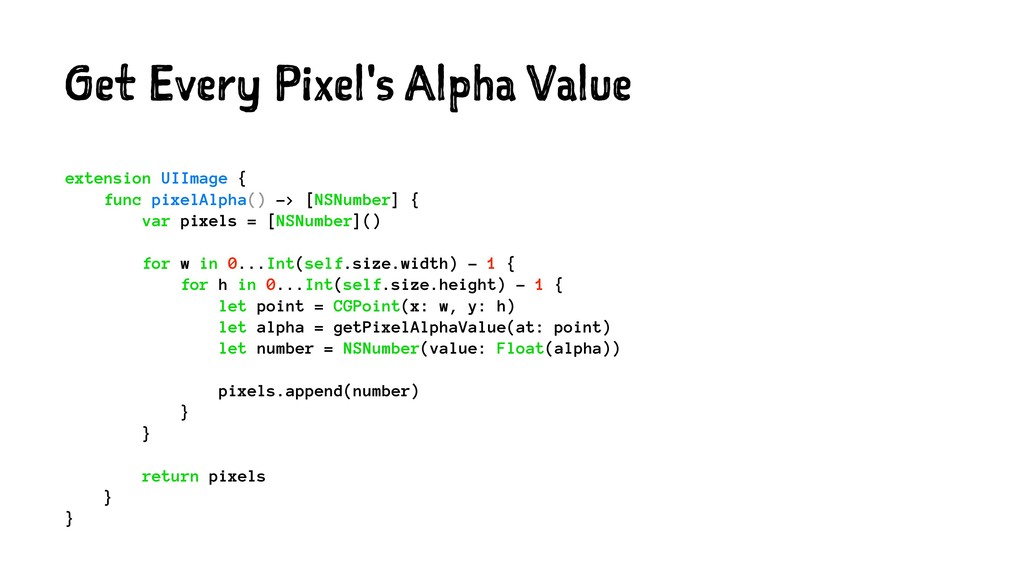
    -> [NSNumber] { var pixels = [NSNumber]() for w in 0...Int(self.size.width) - 1 { for h in 0...Int(self.size.height) - 1 { let point = CGPoint(x: w, y: h) let alpha = getPixelAlphaValue(at: point) let number = NSNumber(value: Float(alpha)) pixels.append(number) } } return pixels } }
  24. Convert to MLMultiArray import CoreML let alphaValues = drawing.generateImageVectorForAlphaChannel() let

    multiArray = try! MLMultiArray(shape: [1,28,28], dataType: MLMultiArrayDataType.double) for (index, number) in alphaValues.enumerated() { multiArray[index] = number }
  25. Make a Prediction with CoreML import CoreML let model =

    letters_keras() let prediction = try! model.prediction(imageAlpha: multiArray)