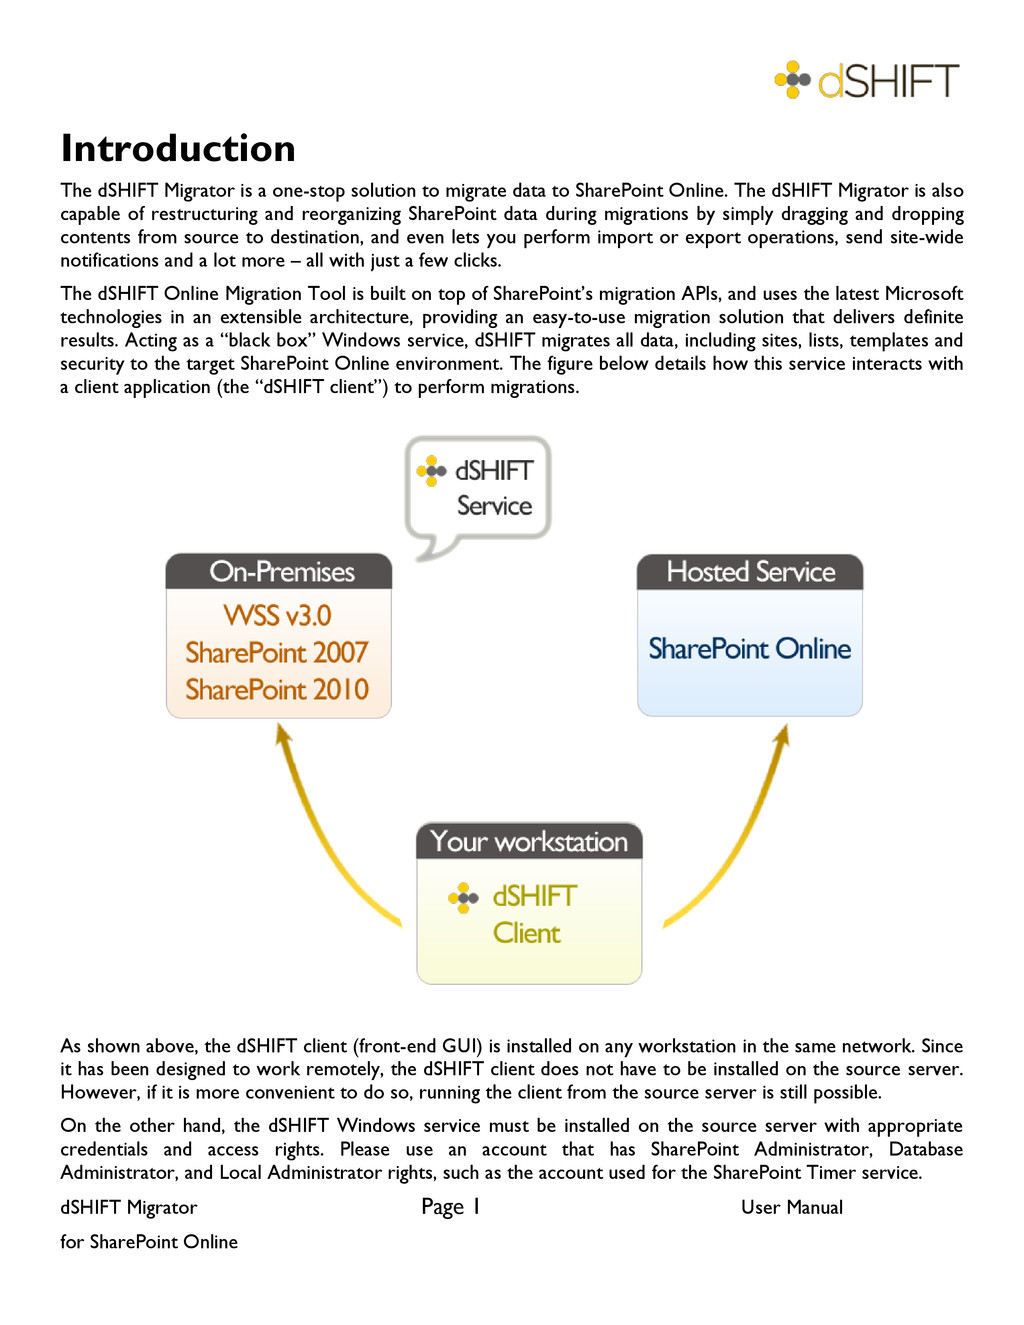
The dSHIFT Migrator is a one-stop solution to migrate data to SharePoint Online. The dSHIFT Migrator is also capable of restructuring and reorganizing SharePoint data during migrations by simply dragging and dropping contents from source to destination, and even lets you perform import or export operations, send site-wide notifications and a lot more – all with just a few clicks. The dSHIFT Online Migration Tool is built on top of SharePoint’s migration APIs, and uses the latest Microsoft technologies in an extensible architecture, providing an easy-to-use migration solution that delivers definite results. Acting as a “black box” Windows service, dSHIFT migrates all data, including sites, lists, templates and security to the target SharePoint Online environment. The figure below details how this service interacts with a client application (the “dSHIFT client”) to perform migrations. As shown above, the dSHIFT client (front-end GUI) is installed on any workstation in the same network. Since it has been designed to work remotely, the dSHIFT client does not have to be installed on the source server. However, if it is more convenient to do so, running the client from the source server is still possible. On the other hand, the dSHIFT Windows service must be installed on the source server with appropriate credentials and access rights. Please use an account that has SharePoint Administrator, Database Administrator, and Local Administrator rights, such as the account used for the SharePoint Timer service.
Migration Scenarios Windows SharePoint Services (WSS) v3.0 to SharePoint Online SharePoint 2007 to SharePoint Online SharePoint Foundation 2010 to SharePoint Online SharePoint Server 2010 to SharePoint Online SharePoint Online to SharePoint Online SharePoint Online to SharePoint 2010 Installation Steps 1. Installing the dSHIFT Client Before you begin installation of the dSHIFT Client, please ensure the following pre-requisites are in place: 1. An account with appropriate local administrator level access rights. 2. Dot Net Framework version 3.5 SP1 or higher installed. 3. The workstation on which dSHIFT Client is installed is on the same network. 4. Access to internet Once these pre-requisites are in place then download the installation package on the workstation where you wish to install the dSHIFT Client, unzip the package and run the “dSHIFT Setup” file to begin installation. The installation steps are as follows: 1. To advance through the installation wizard, click “Install”. Depending upon your system type i.e. 64-bit or 32-bit, the installer will download the relevant package and let you proceed with the installation. 1
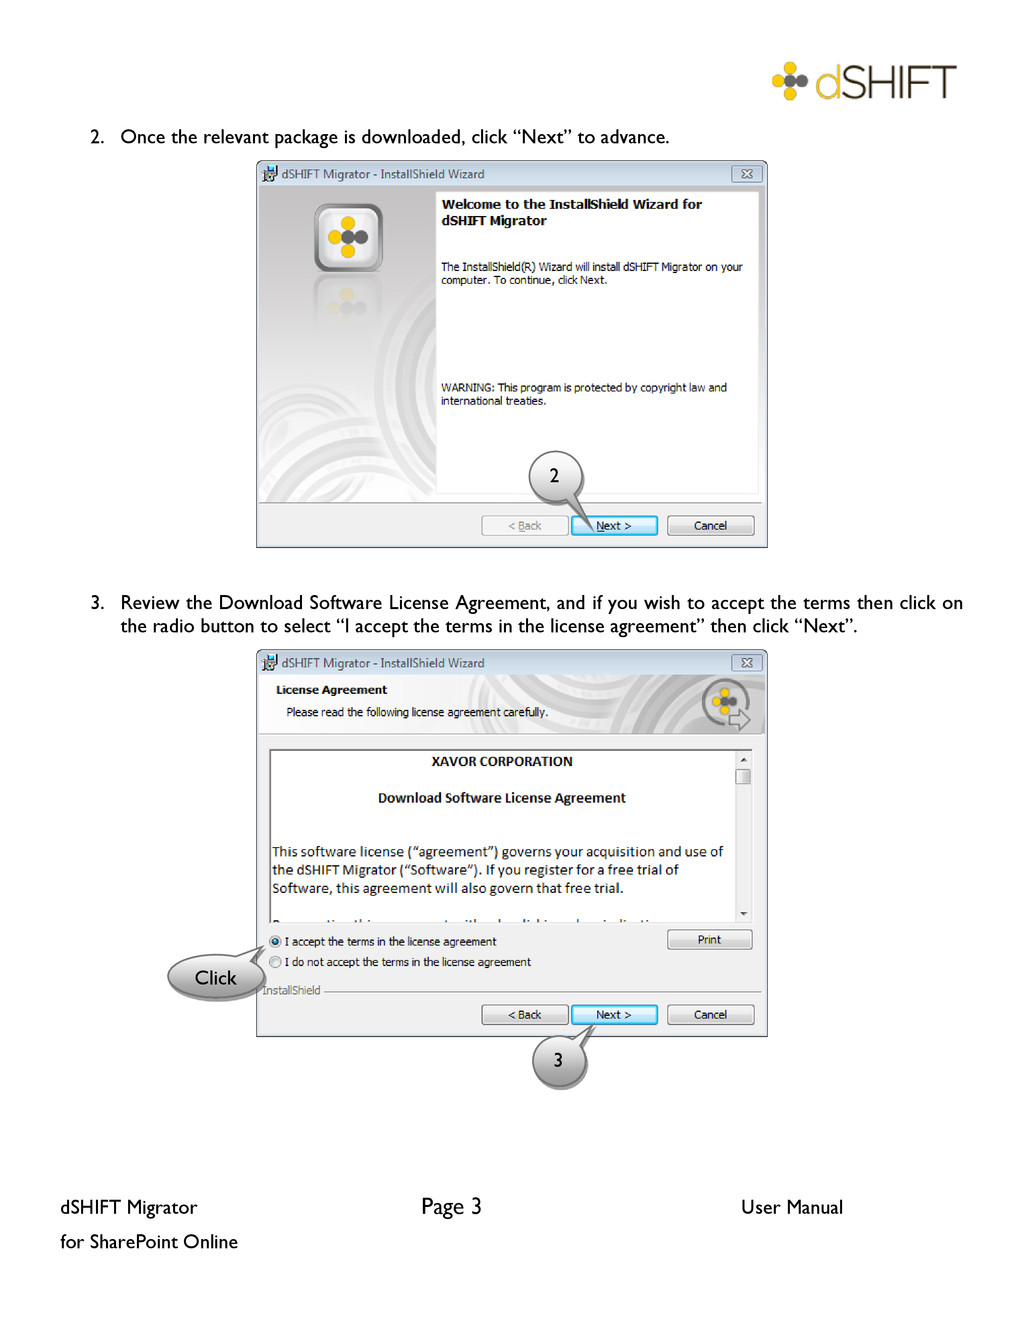
Once the relevant package is downloaded, click “Next” to advance. 3. Review the Download Software License Agreement, and if you wish to accept the terms then click on the radio button to select “I accept the terms in the license agreement” then click “Next”. Click 2 3
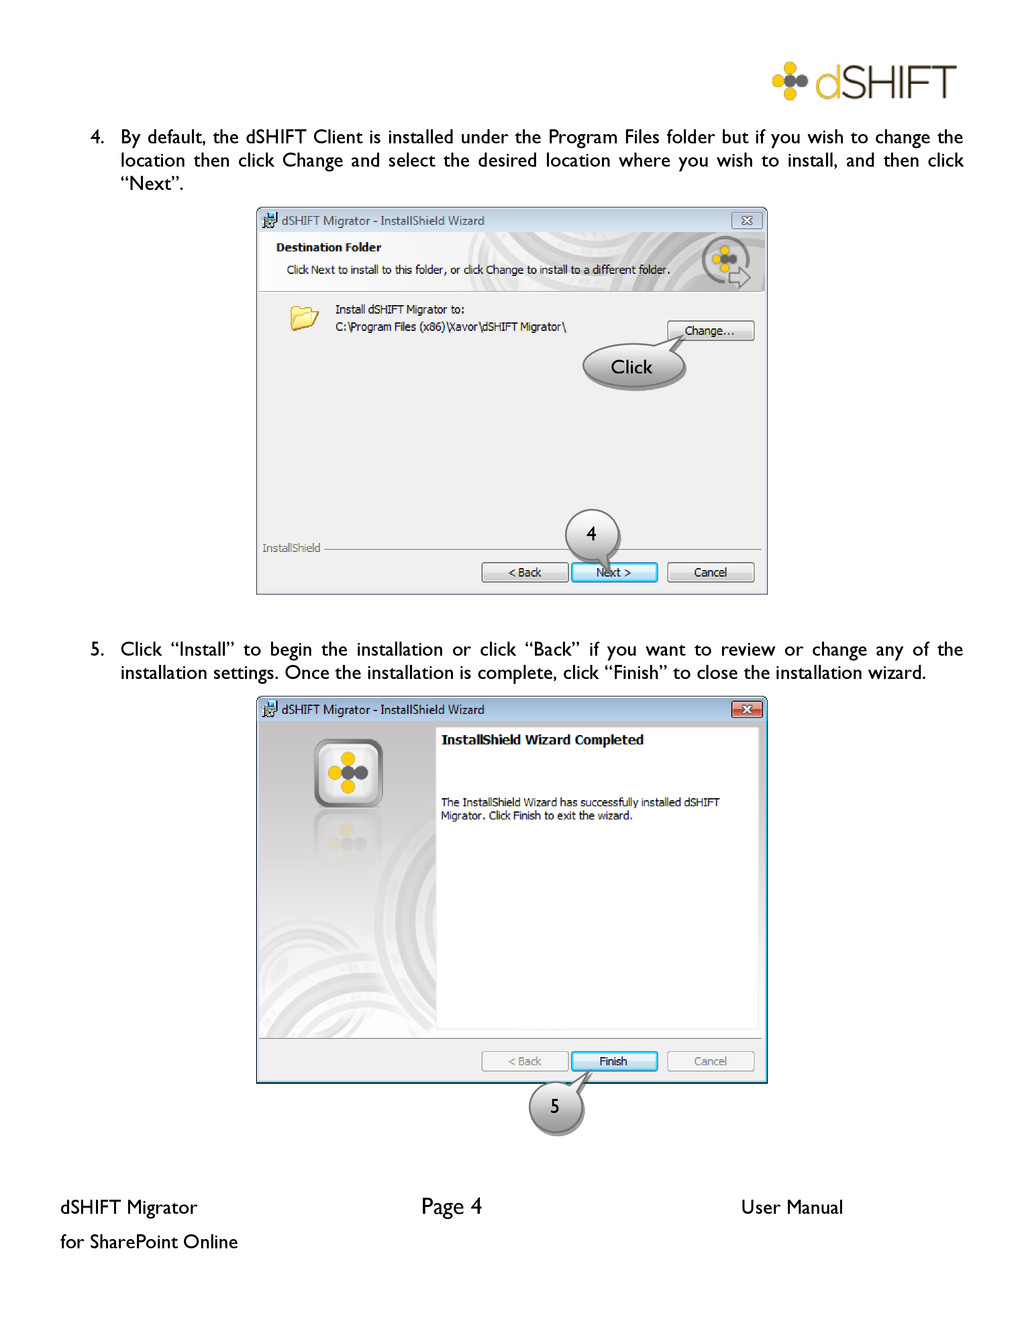
By default, the dSHIFT Client is installed under the Program Files folder but if you wish to change the location then click Change and select the desired location where you wish to install, and then click “Next”. 5. Click “Install” to begin the installation or click “Back” if you want to review or change any of the installation settings. Once the installation is complete, click “Finish” to close the installation wizard. 4 5 Click
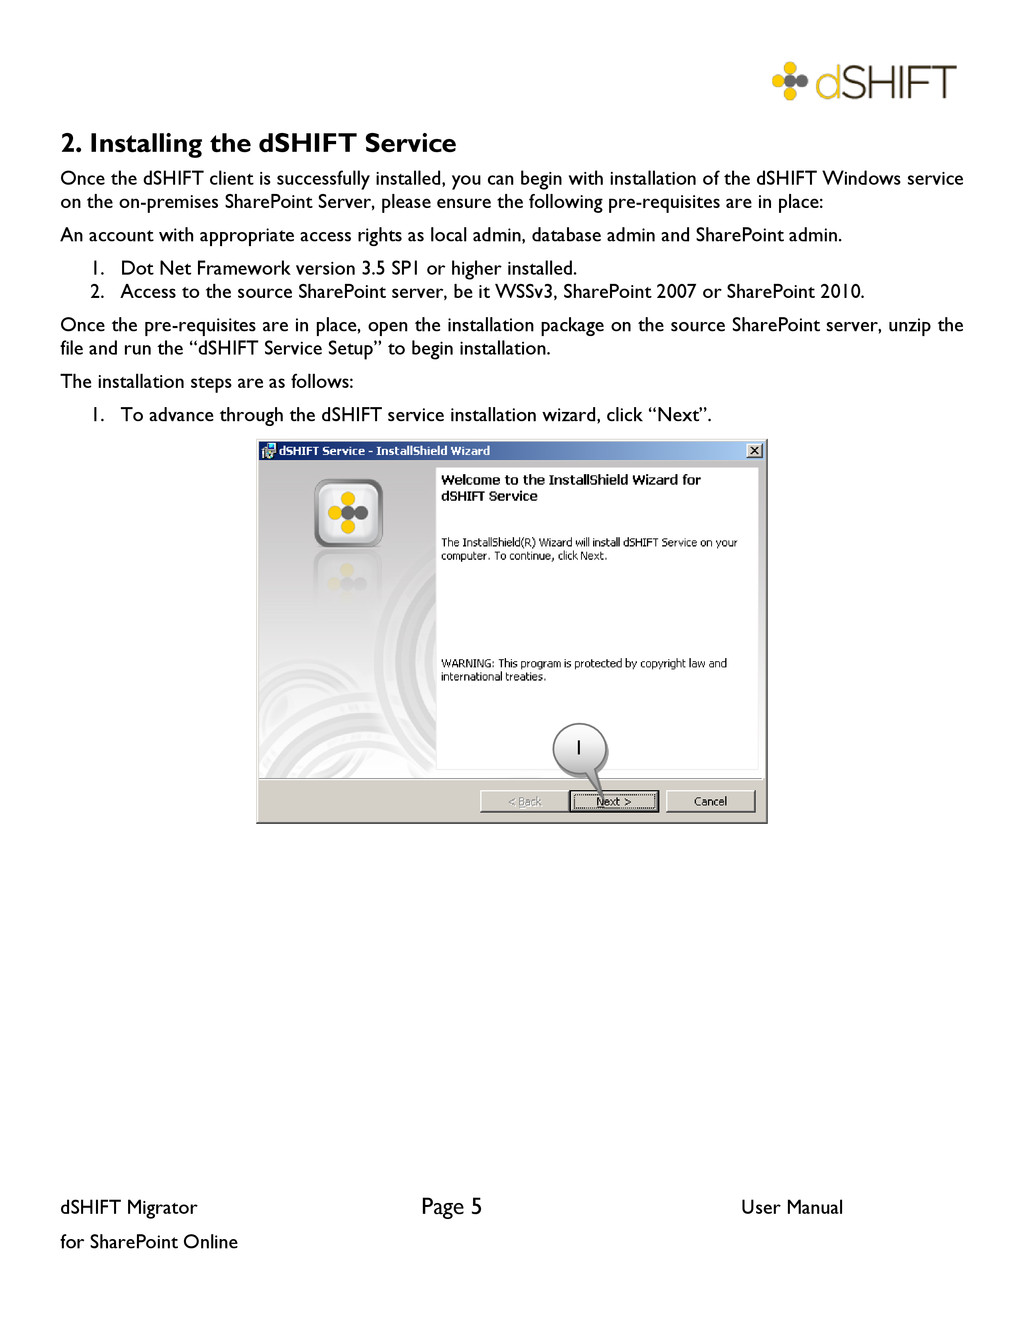
Installing the dSHIFT Service Once the dSHIFT client is successfully installed, you can begin with installation of the dSHIFT Windows service on the on-premises SharePoint Server, please ensure the following pre-requisites are in place: An account with appropriate access rights as local admin, database admin and SharePoint admin. 1. Dot Net Framework version 3.5 SP1 or higher installed. 2. Access to the source SharePoint server, be it WSSv3, SharePoint 2007 or SharePoint 2010. Once the pre-requisites are in place, open the installation package on the source SharePoint server, unzip the file and run the “dSHIFT Service Setup” to begin installation. The installation steps are as follows: 1. To advance through the dSHIFT service installation wizard, click “Next”. 1
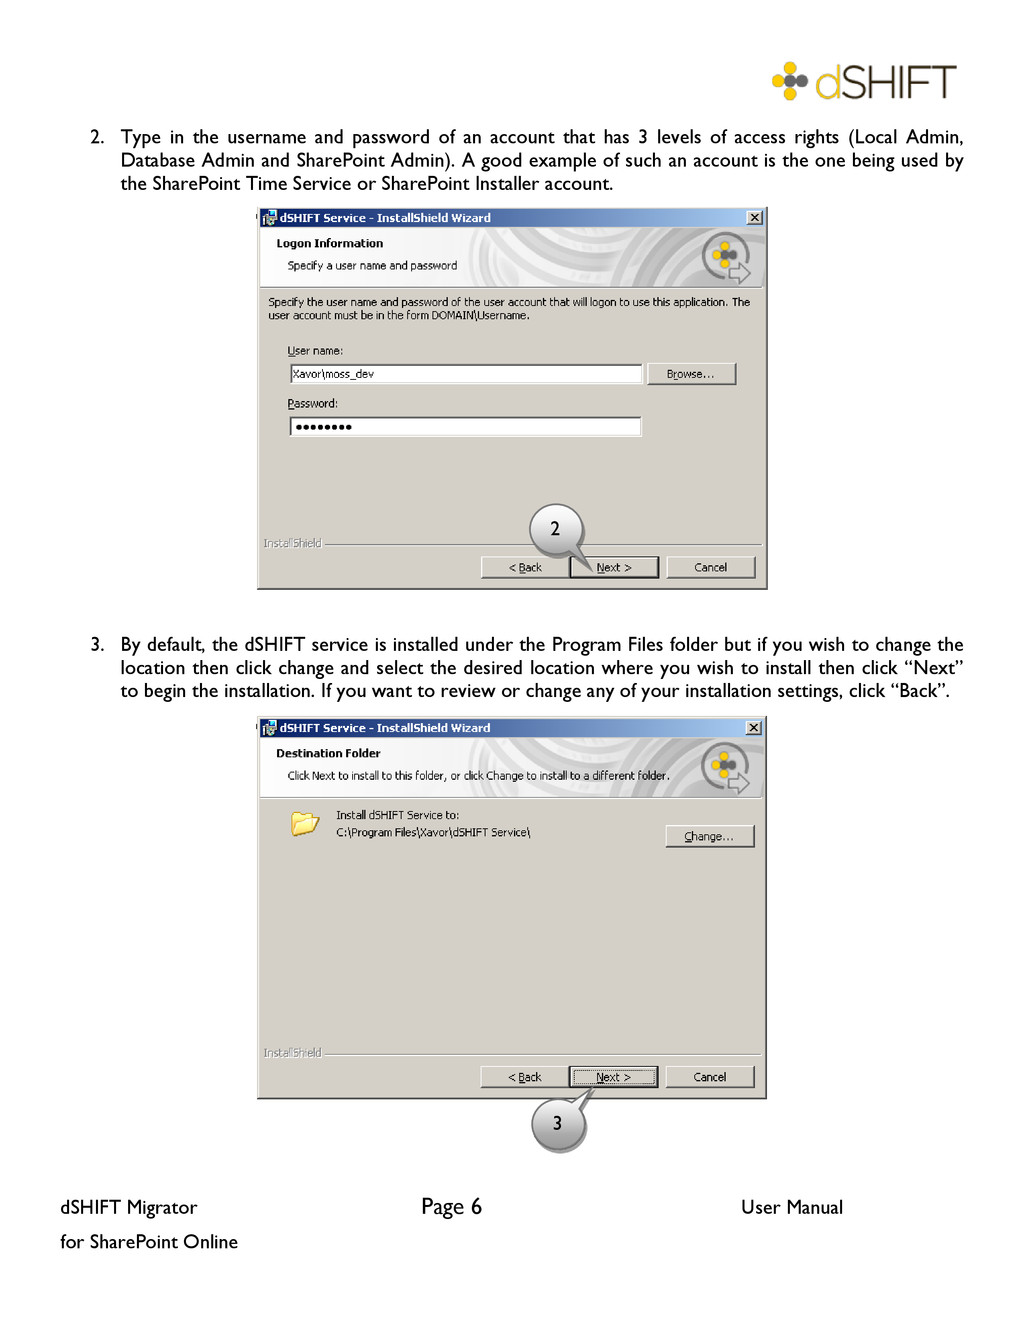
Type in the username and password of an account that has 3 levels of access rights (Local Admin, Database Admin and SharePoint Admin). A good example of such an account is the one being used by the SharePoint Time Service or SharePoint Installer account. 3. By default, the dSHIFT service is installed under the Program Files folder but if you wish to change the location then click change and select the desired location where you wish to install then click “Next” to begin the installation. If you want to review or change any of your installation settings, click “Back”. 2 3
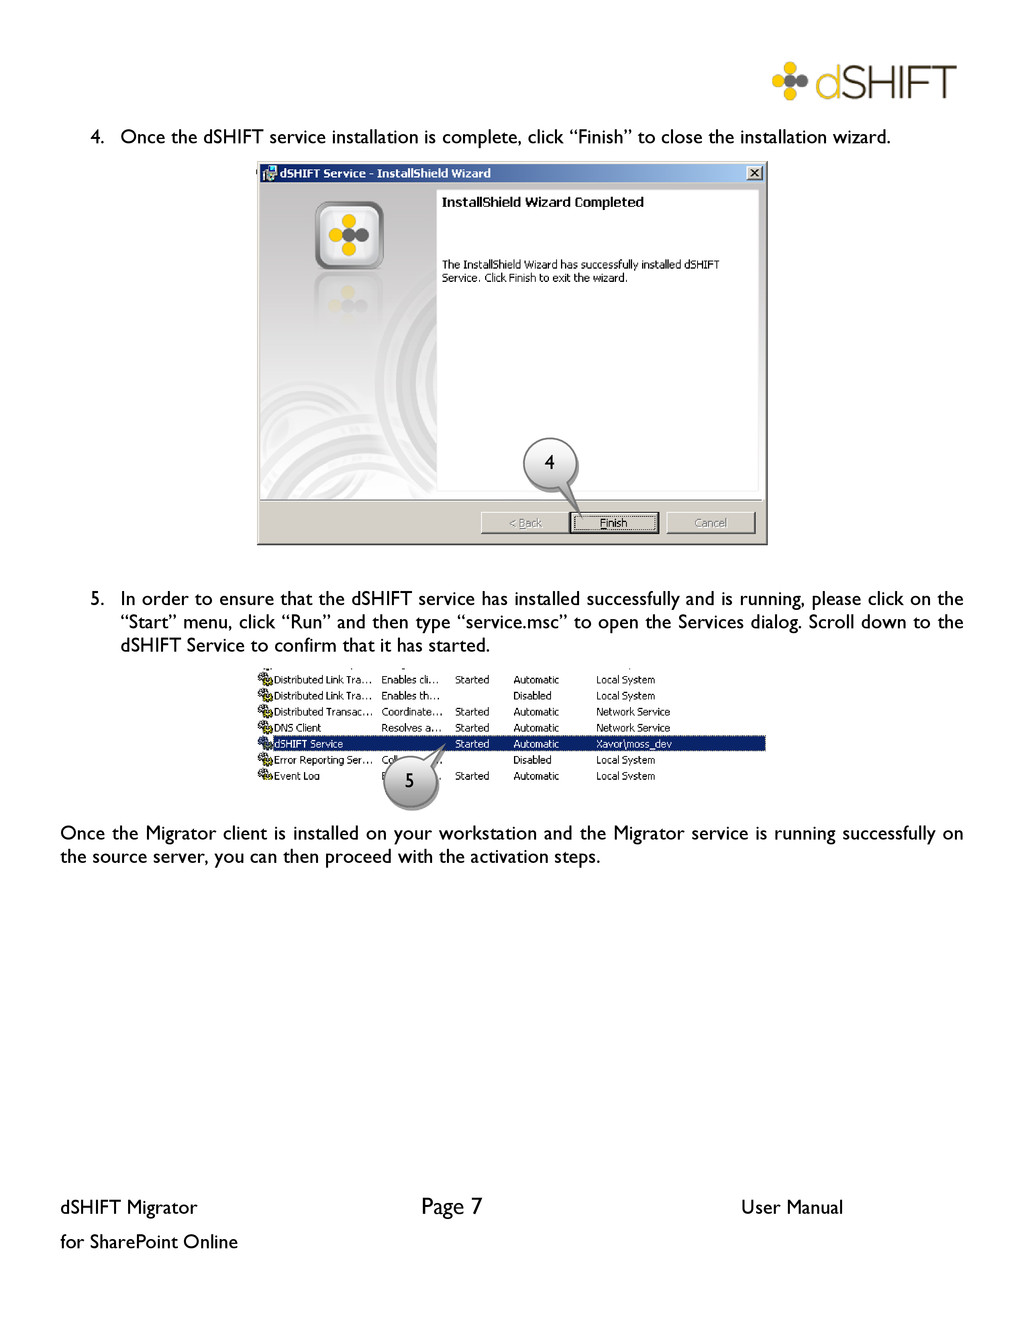
Once the dSHIFT service installation is complete, click “Finish” to close the installation wizard. 5. In order to ensure that the dSHIFT service has installed successfully and is running, please click on the “Start” menu, click “Run” and then type “service.msc” to open the Services dialog. Scroll down to the dSHIFT Service to confirm that it has started. Once the Migrator client is installed on your workstation and the Migrator service is running successfully on the source server, you can then proceed with the activation steps. 4 5
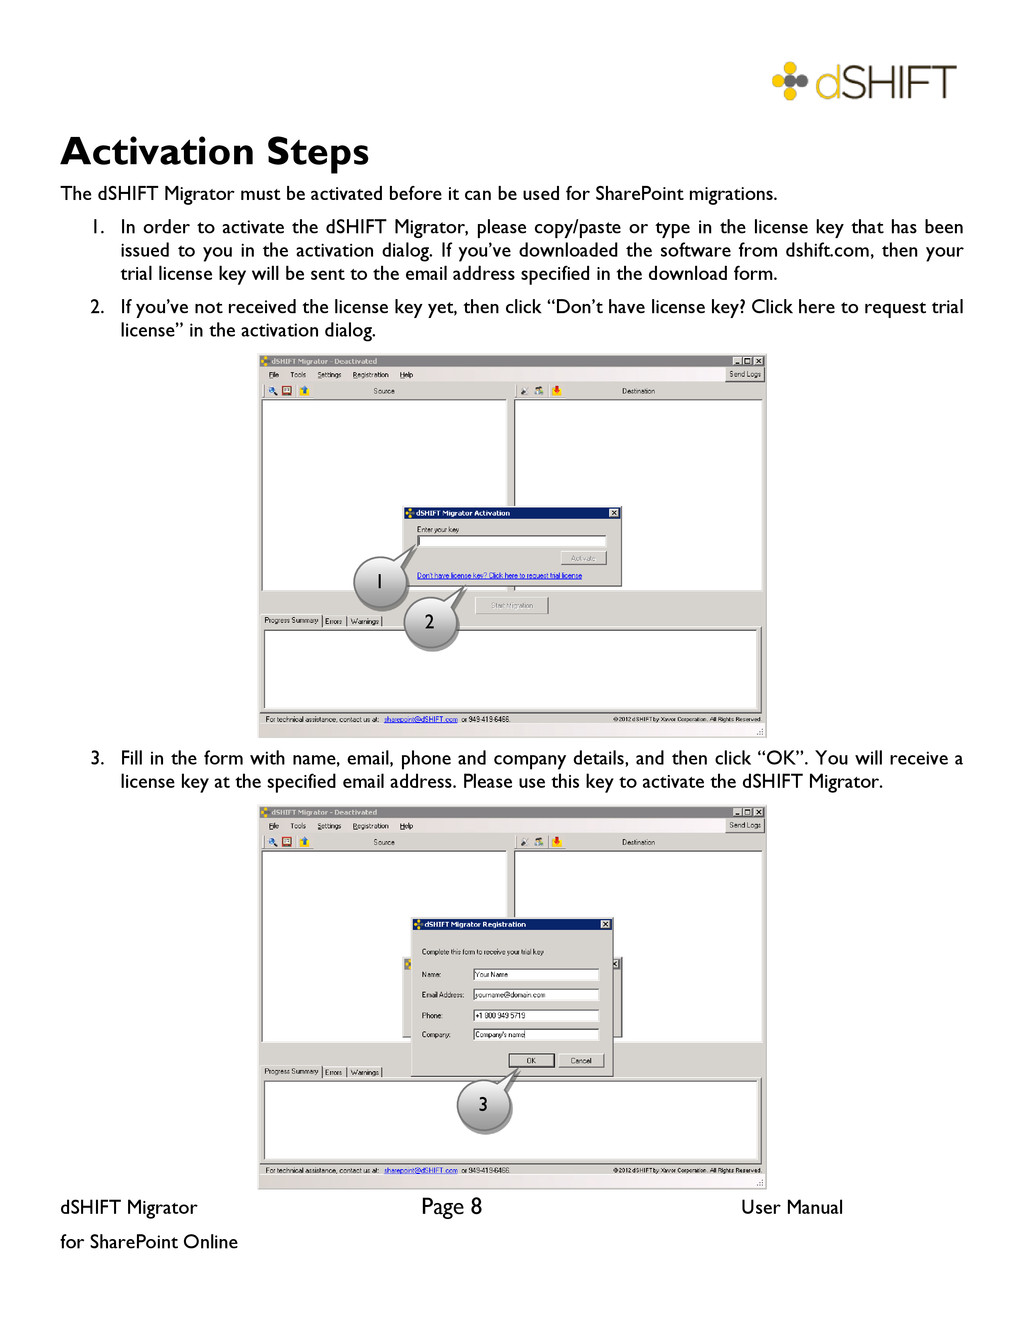
Steps The dSHIFT Migrator must be activated before it can be used for SharePoint migrations. 1. In order to activate the dSHIFT Migrator, please copy/paste or type in the license key that has been issued to you in the activation dialog. If you’ve downloaded the software from dshift.com, then your trial license key will be sent to the email address specified in the download form. 2. If you’ve not received the license key yet, then click “Don’t have license key? Click here to request trial license” in the activation dialog. 3. Fill in the form with name, email, phone and company details, and then click “OK”. You will receive a license key at the specified email address. Please use this key to activate the dSHIFT Migrator. 1 2 3
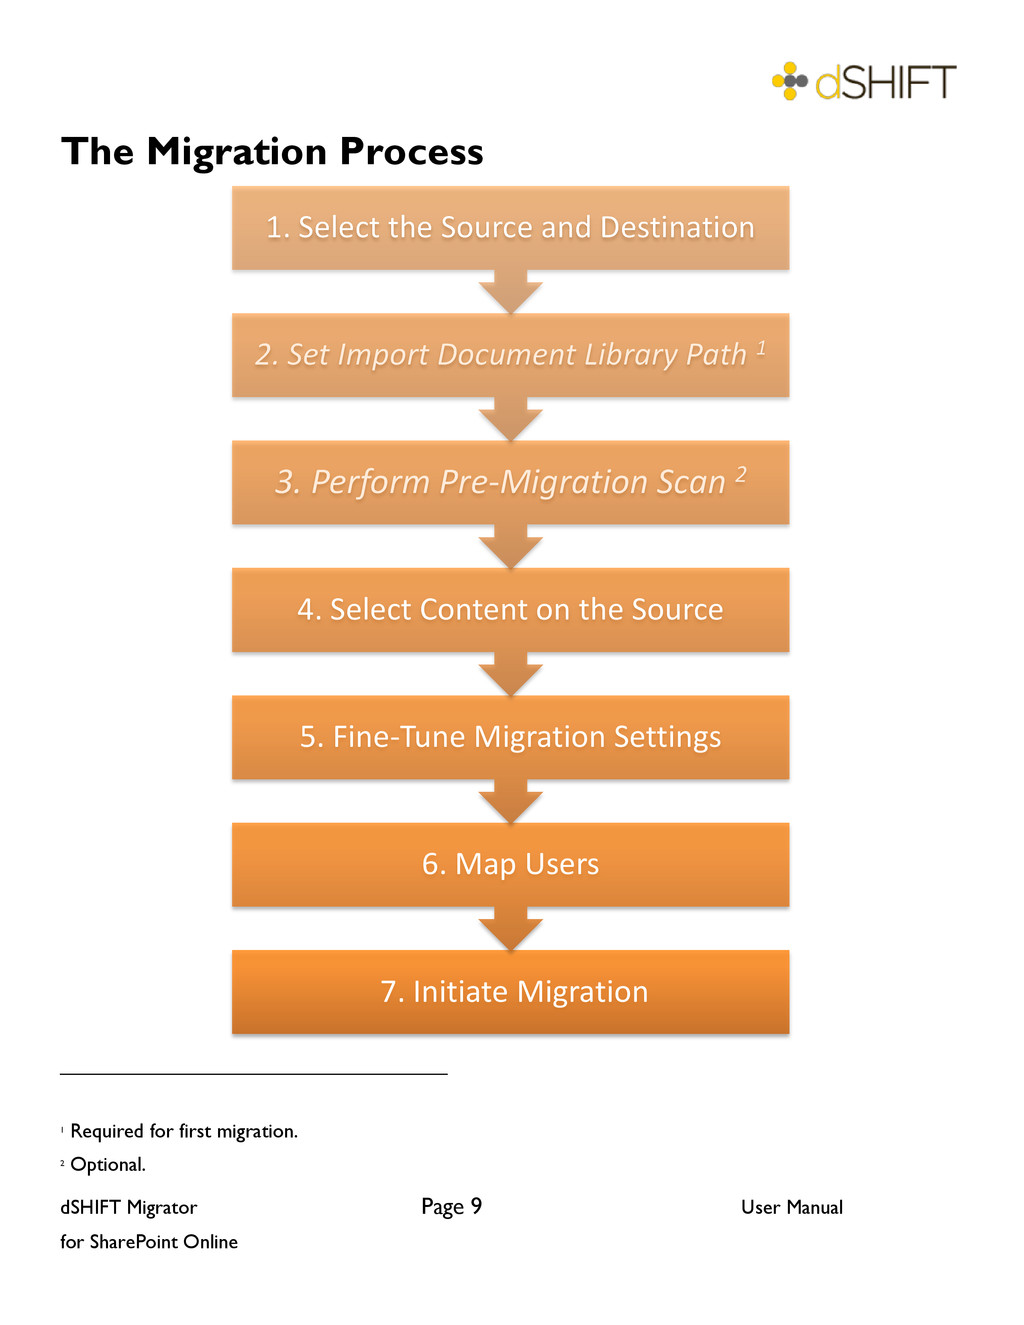
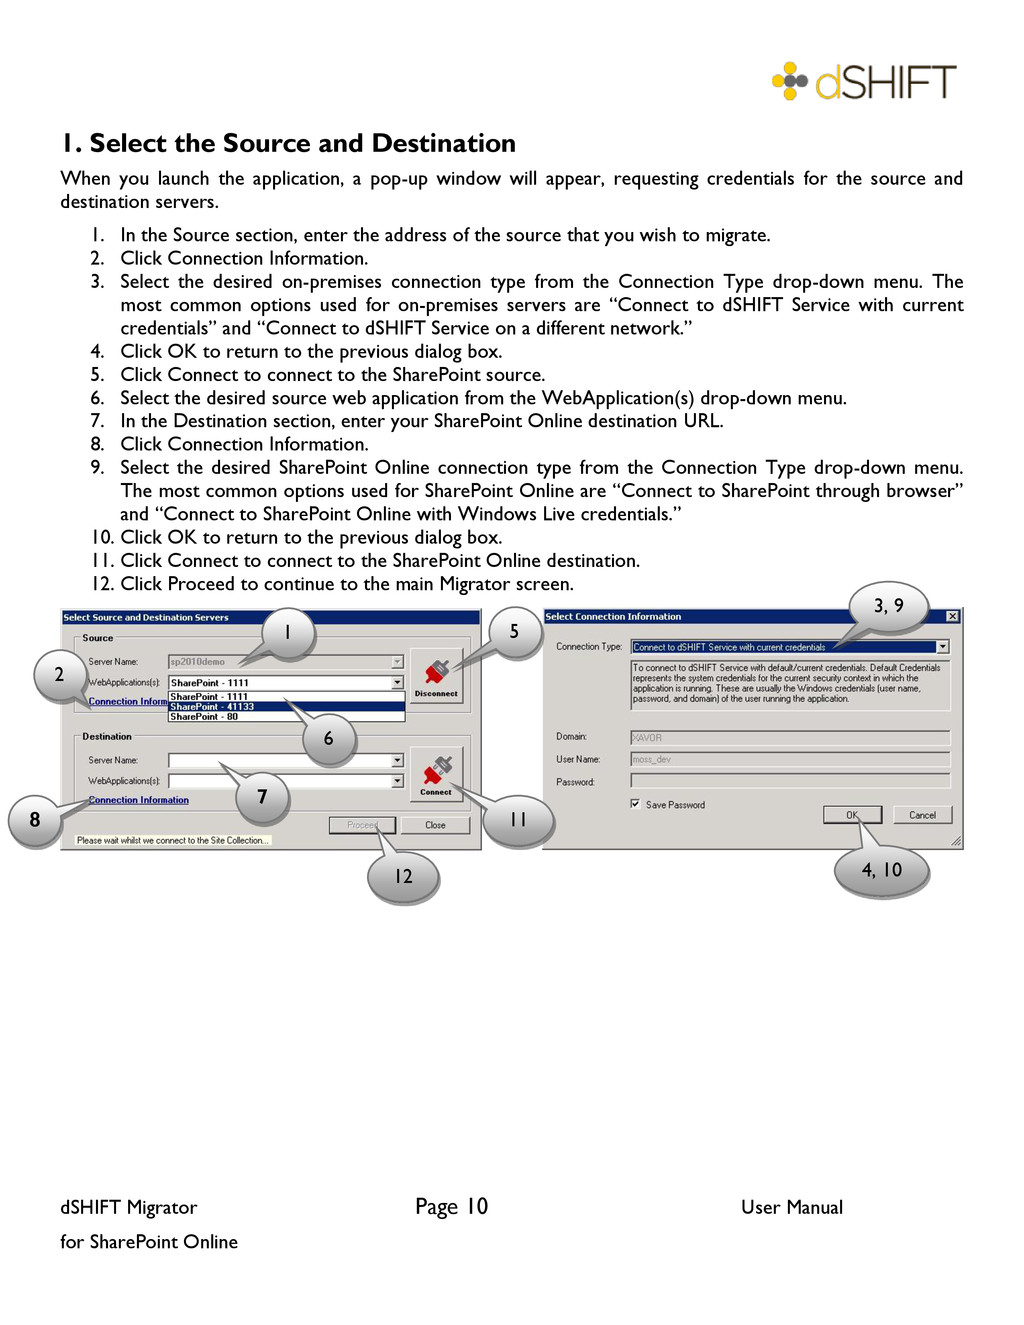
Select the Source and Destination When you launch the application, a pop-up window will appear, requesting credentials for the source and destination servers. 1. In the Source section, enter the address of the source that you wish to migrate. 2. Click Connection Information. 3. Select the desired on-premises connection type from the Connection Type drop-down menu. The most common options used for on-premises servers are “Connect to dSHIFT Service with current credentials” and “Connect to dSHIFT Service on a different network.” 4. Click OK to return to the previous dialog box. 5. Click Connect to connect to the SharePoint source. 6. Select the desired source web application from the WebApplication(s) drop-down menu. 7. In the Destination section, enter your SharePoint Online destination URL. 8. Click Connection Information. 9. Select the desired SharePoint Online connection type from the Connection Type drop-down menu. The most common options used for SharePoint Online are “Connect to SharePoint through browser” and “Connect to SharePoint Online with Windows Live credentials.” 10. Click OK to return to the previous dialog box. 11. Click Connect to connect to the SharePoint Online destination. 12. Click Proceed to continue to the main Migrator screen. 1 2 5 3, 9 6 8 a 4, 10 7 a 11 12
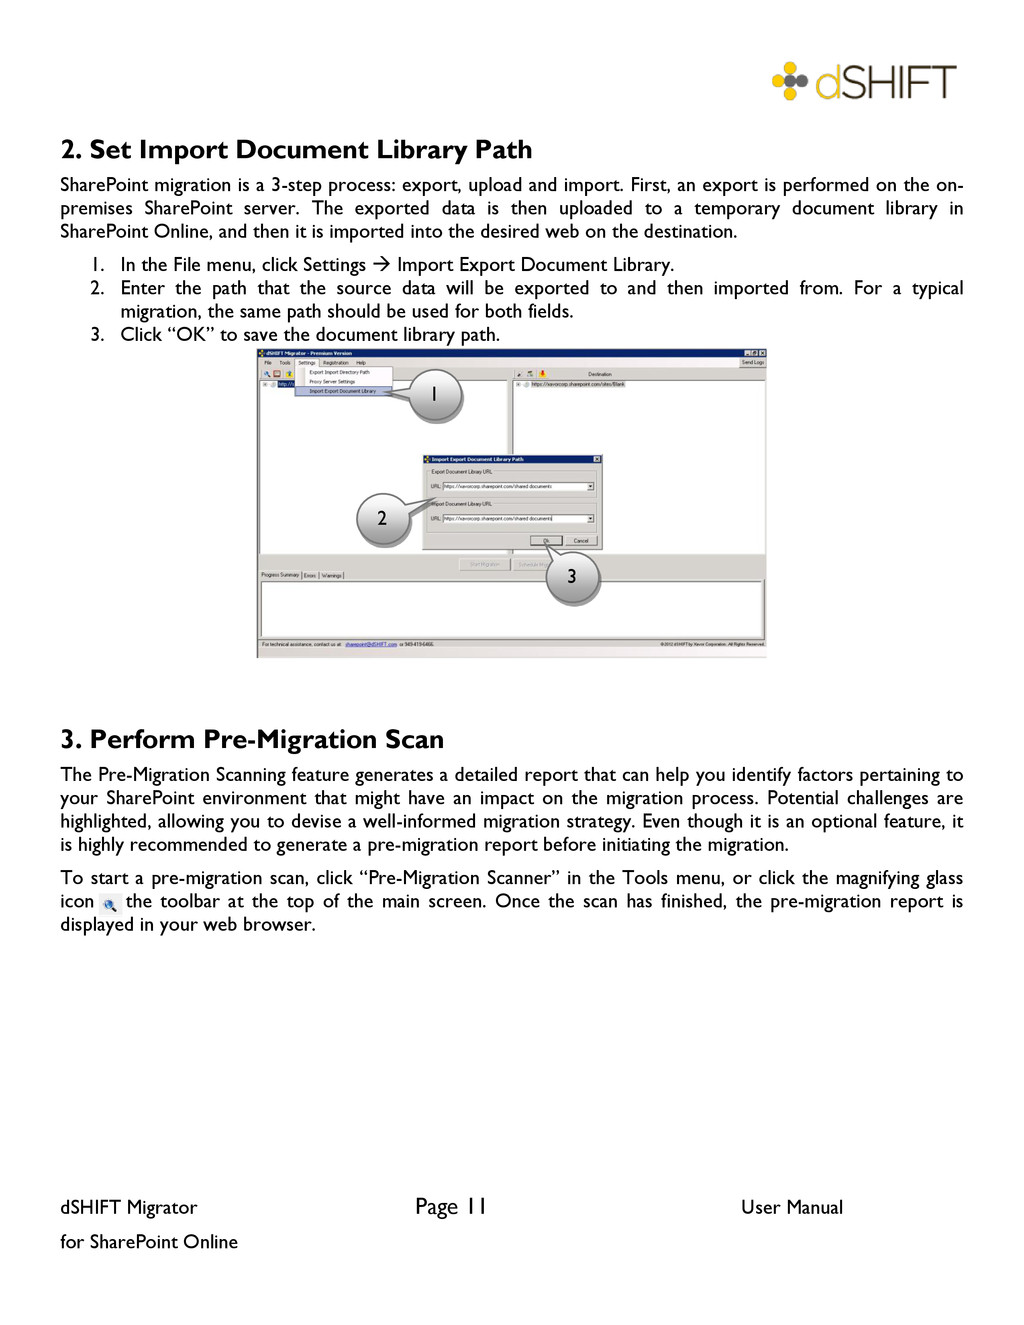
Set Import Document Library Path SharePoint migration is a 3-step process: export, upload and import. First, an export is performed on the on- premises SharePoint server. The exported data is then uploaded to a temporary document library in SharePoint Online, and then it is imported into the desired web on the destination. 1. In the File menu, click Settings Import Export Document Library. 2. Enter the path that the source data will be exported to and then imported from. For a typical migration, the same path should be used for both fields. 3. Click “OK” to save the document library path. 3. Perform Pre-Migration Scan The Pre-Migration Scanning feature generates a detailed report that can help you identify factors pertaining to your SharePoint environment that might have an impact on the migration process. Potential challenges are highlighted, allowing you to devise a well-informed migration strategy. Even though it is an optional feature, it is highly recommended to generate a pre-migration report before initiating the migration. To start a pre-migration scan, click “Pre-Migration Scanner” in the Tools menu, or click the magnifying glass icon in the toolbar at the top of the main screen. Once the scan has finished, the pre-migration report is displayed in your web browser. 1 2 3
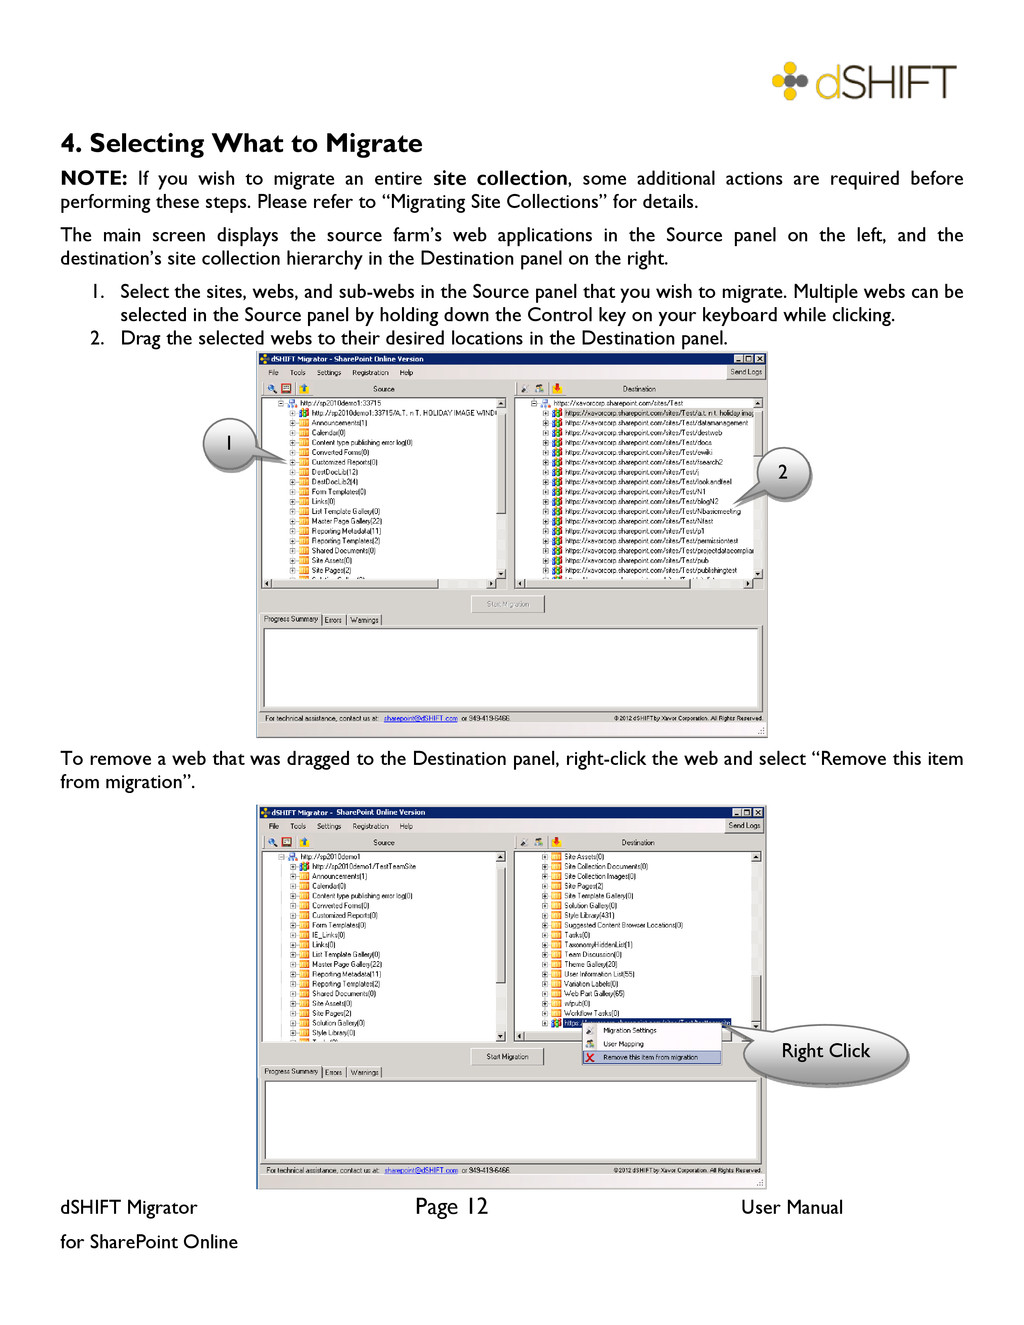
Selecting What to Migrate NOTE: If you wish to migrate an entire site collection, some additional actions are required before performing these steps. Please refer to “Migrating Site Collections” for details. The main screen displays the source farm’s web applications in the Source panel on the left, and the destination’s site collection hierarchy in the Destination panel on the right. 1. Select the sites, webs, and sub-webs in the Source panel that you wish to migrate. Multiple webs can be selected in the Source panel by holding down the Control key on your keyboard while clicking. 2. Drag the selected webs to their desired locations in the Destination panel. To remove a web that was dragged to the Destination panel, right-click the web and select “Remove this item from migration”. 1 2 Right Click
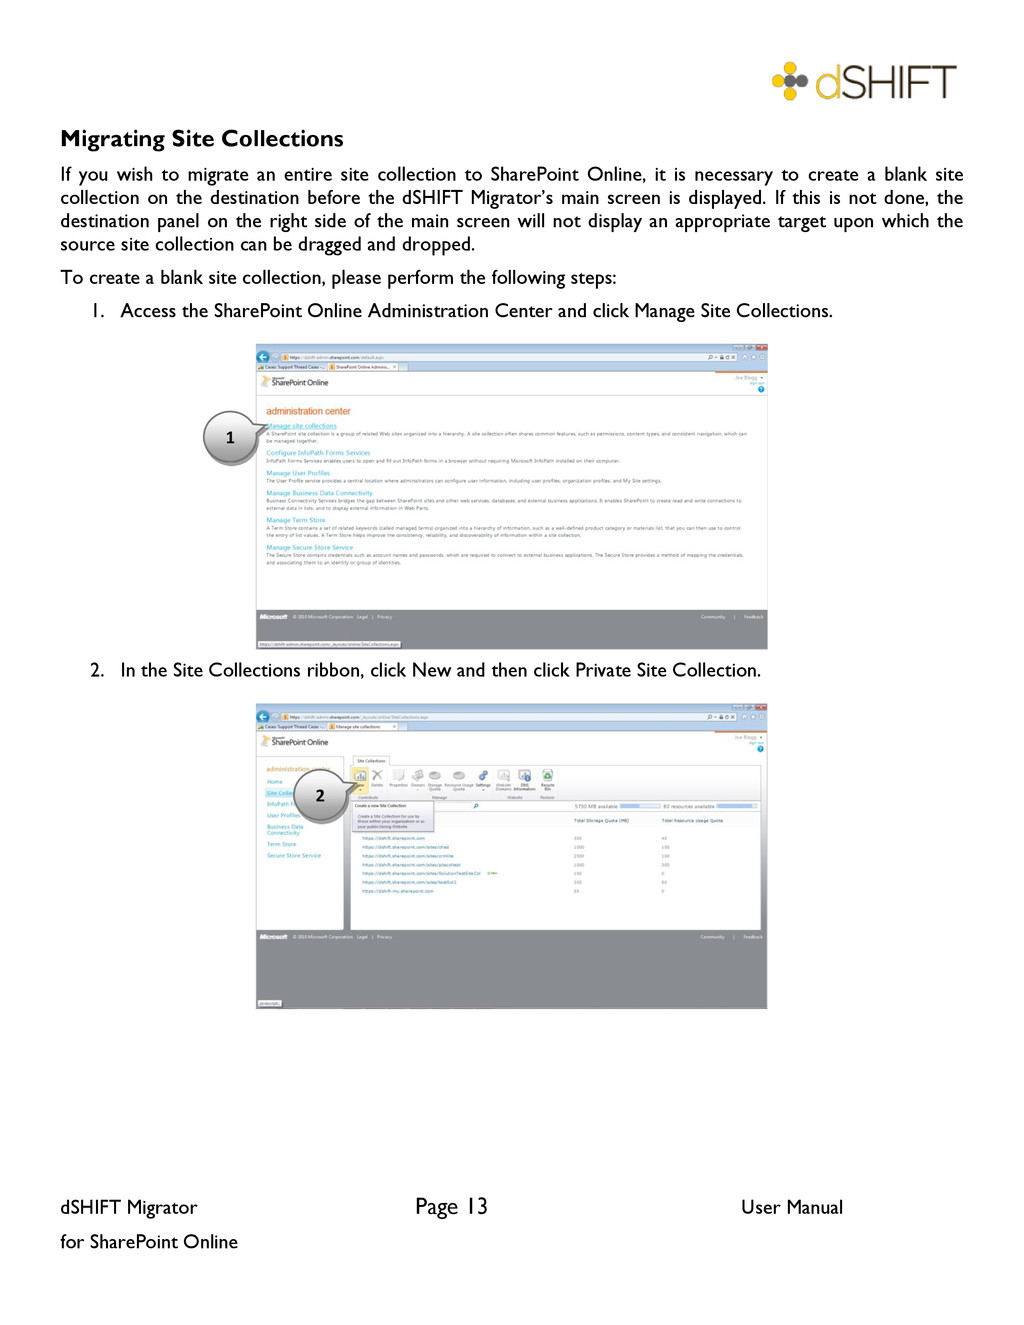
Site Collections If you wish to migrate an entire site collection to SharePoint Online, it is necessary to create a blank site collection on the destination before the dSHIFT Migrator’s main screen is displayed. If this is not done, the destination panel on the right side of the main screen will not display an appropriate target upon which the source site collection can be dragged and dropped. To create a blank site collection, please perform the following steps: 1. Access the SharePoint Online Administration Center and click Manage Site Collections. 2. In the Site Collections ribbon, click New and then click Private Site Collection. 1 2
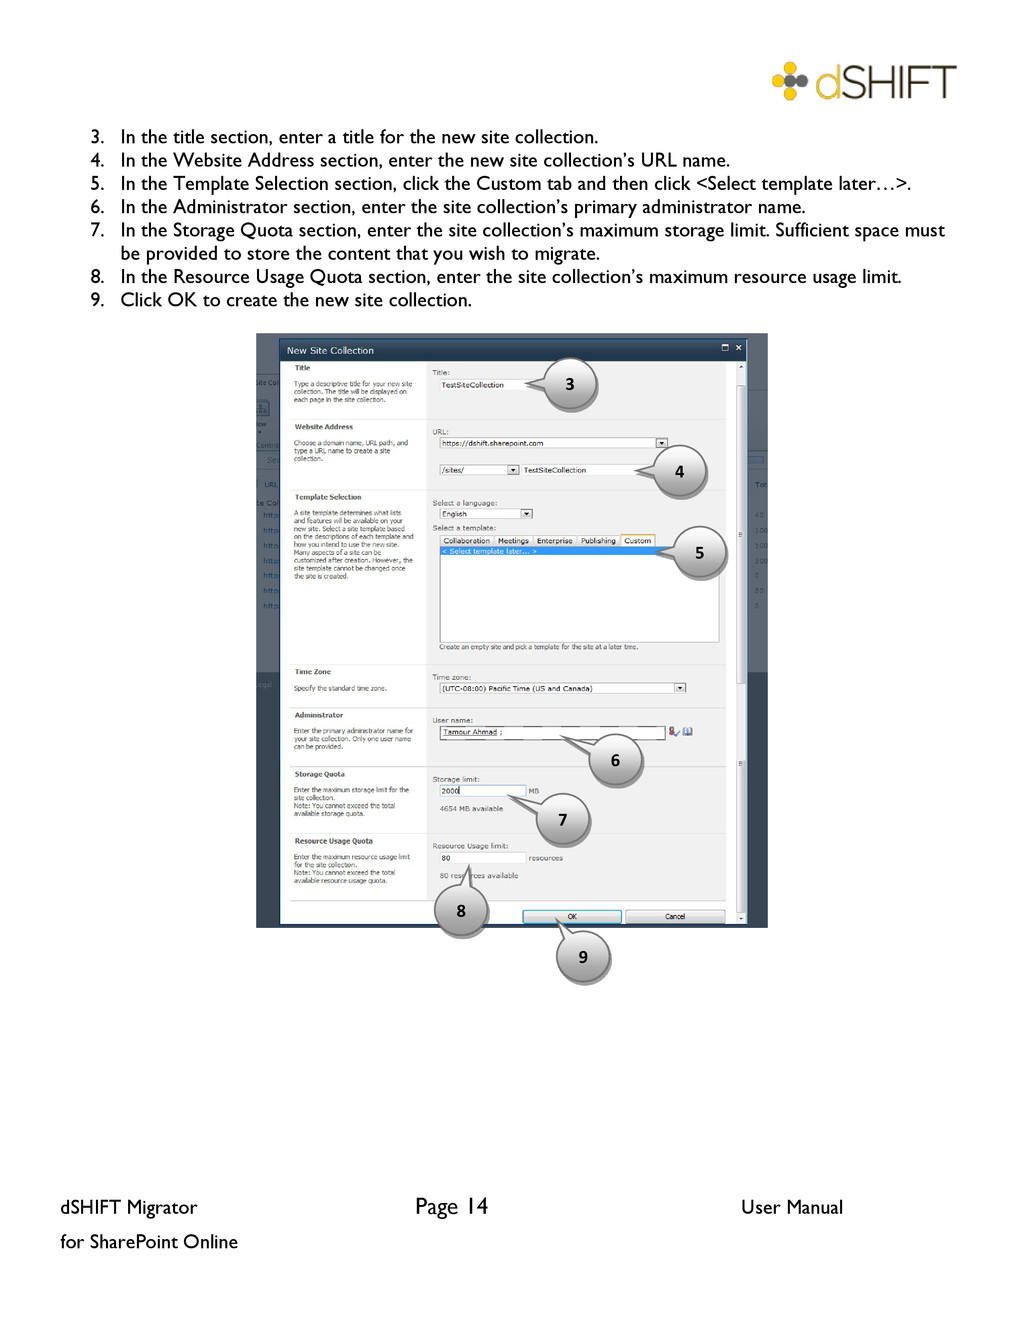
In the title section, enter a title for the new site collection. 4. In the Website Address section, enter the new site collection’s URL name. 5. In the Template Selection section, click the Custom tab and then click <Select template later…>. 6. In the Administrator section, enter the site collection’s primary administrator name. 7. In the Storage Quota section, enter the site collection’s maximum storage limit. Sufficient space must be provided to store the content that you wish to migrate. 8. In the Resource Usage Quota section, enter the site collection’s maximum resource usage limit. 9. Click OK to create the new site collection. 3 4 5 6 7 8 9
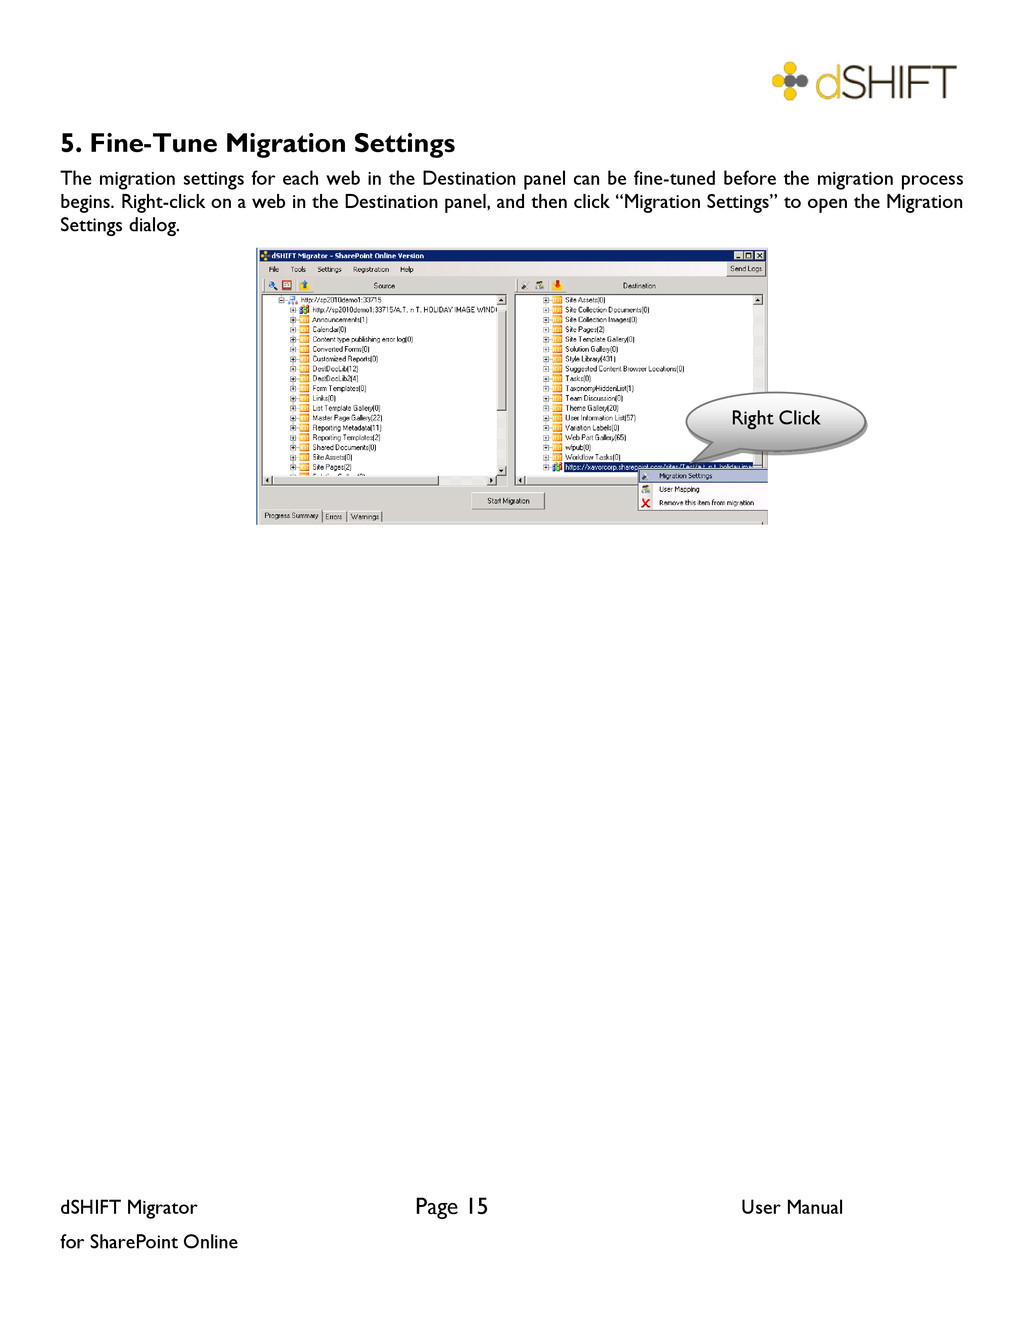
Fine-Tune Migration Settings The migration settings for each web in the Destination panel can be fine-tuned before the migration process begins. Right-click on a web in the Destination panel, and then click “Migration Settings” to open the Migration Settings dialog. Right Click
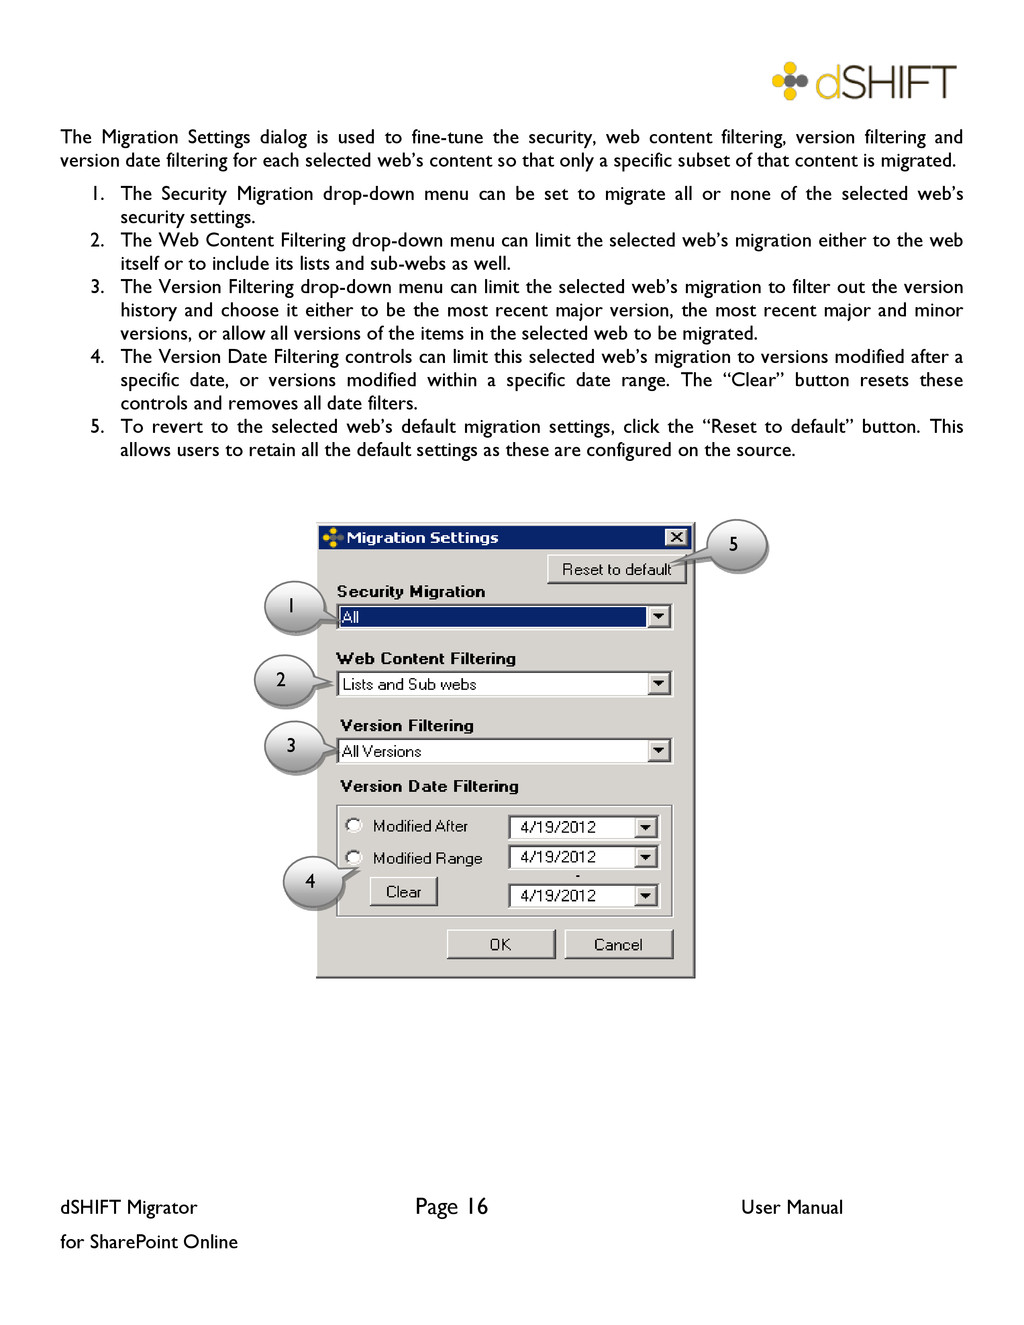
Migration Settings dialog is used to fine-tune the security, web content filtering, version filtering and version date filtering for each selected web’s content so that only a specific subset of that content is migrated. 1. The Security Migration drop-down menu can be set to migrate all or none of the selected web’s security settings. 2. The Web Content Filtering drop-down menu can limit the selected web’s migration either to the web itself or to include its lists and sub-webs as well. 3. The Version Filtering drop-down menu can limit the selected web’s migration to filter out the version history and choose it either to be the most recent major version, the most recent major and minor versions, or allow all versions of the items in the selected web to be migrated. 4. The Version Date Filtering controls can limit this selected web’s migration to versions modified after a specific date, or versions modified within a specific date range. The “Clear” button resets these controls and removes all date filters. 5. To revert to the selected web’s default migration settings, click the “Reset to default” button. This allows users to retain all the default settings as these are configured on the source. 1 2 4 3 5
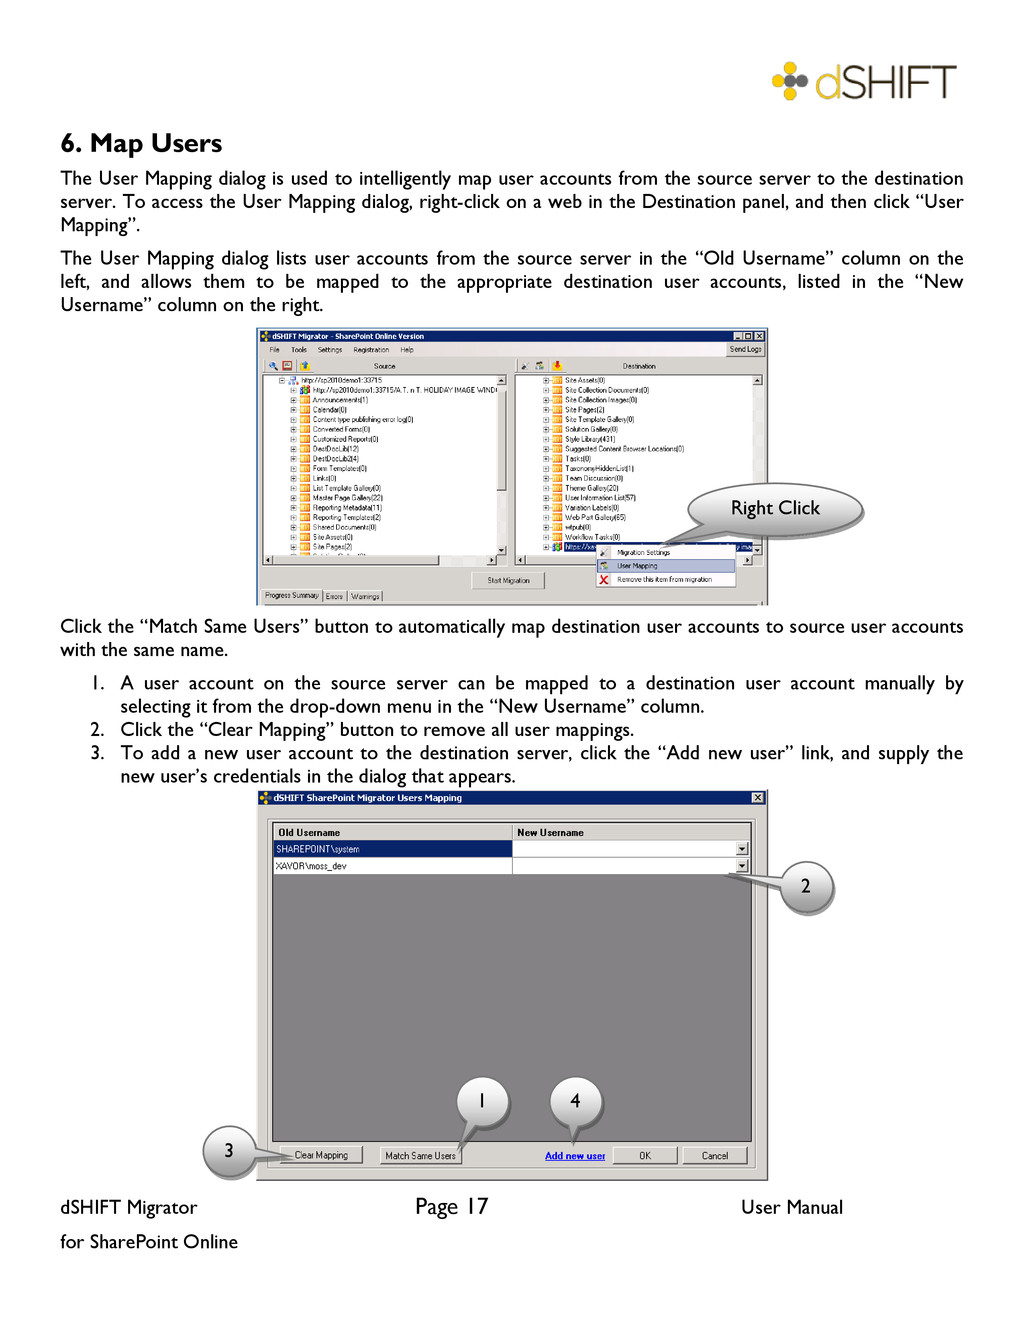
Map Users The User Mapping dialog is used to intelligently map user accounts from the source server to the destination server. To access the User Mapping dialog, right-click on a web in the Destination panel, and then click “User Mapping”. The User Mapping dialog lists user accounts from the source server in the “Old Username” column on the left, and allows them to be mapped to the appropriate destination user accounts, listed in the “New Username” column on the right. Click the “Match Same Users” button to automatically map destination user accounts to source user accounts with the same name. 1. A user account on the source server can be mapped to a destination user account manually by selecting it from the drop-down menu in the “New Username” column. 2. Click the “Clear Mapping” button to remove all user mappings. 3. To add a new user account to the destination server, click the “Add new user” link, and supply the new user’s credentials in the dialog that appears. Right Click 2 1 3 4
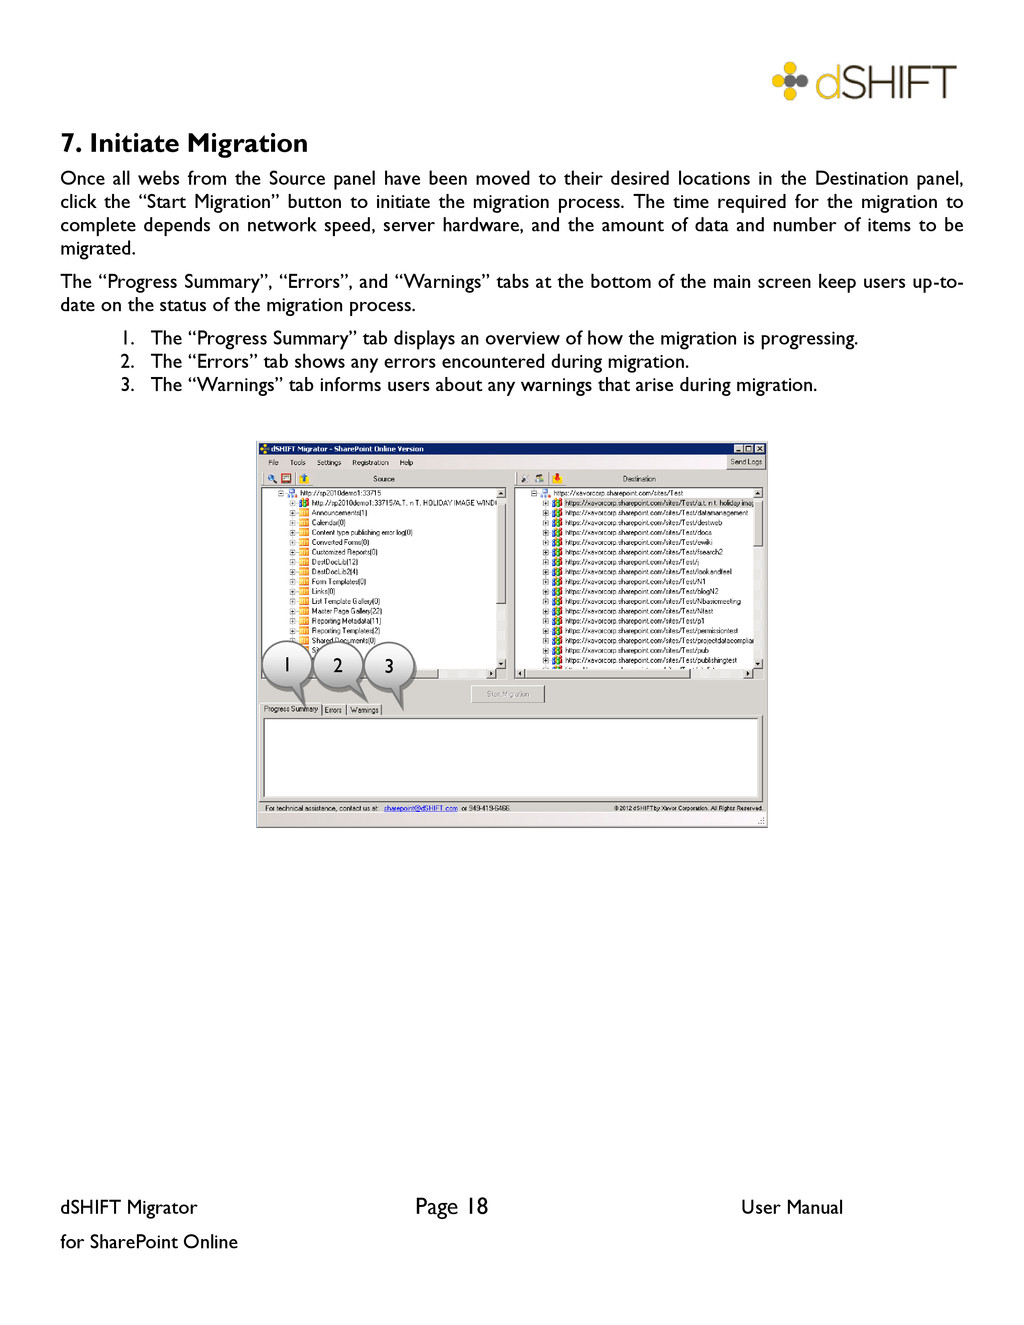
Initiate Migration Once all webs from the Source panel have been moved to their desired locations in the Destination panel, click the “Start Migration” button to initiate the migration process. The time required for the migration to complete depends on network speed, server hardware, and the amount of data and number of items to be migrated. The “Progress Summary”, “Errors”, and “Warnings” tabs at the bottom of the main screen keep users up-to- date on the status of the migration process. 1. The “Progress Summary” tab displays an overview of how the migration is progressing. 2. The “Errors” tab shows any errors encountered during migration. 3. The “Warnings” tab informs users about any warnings that arise during migration. 1 2 3
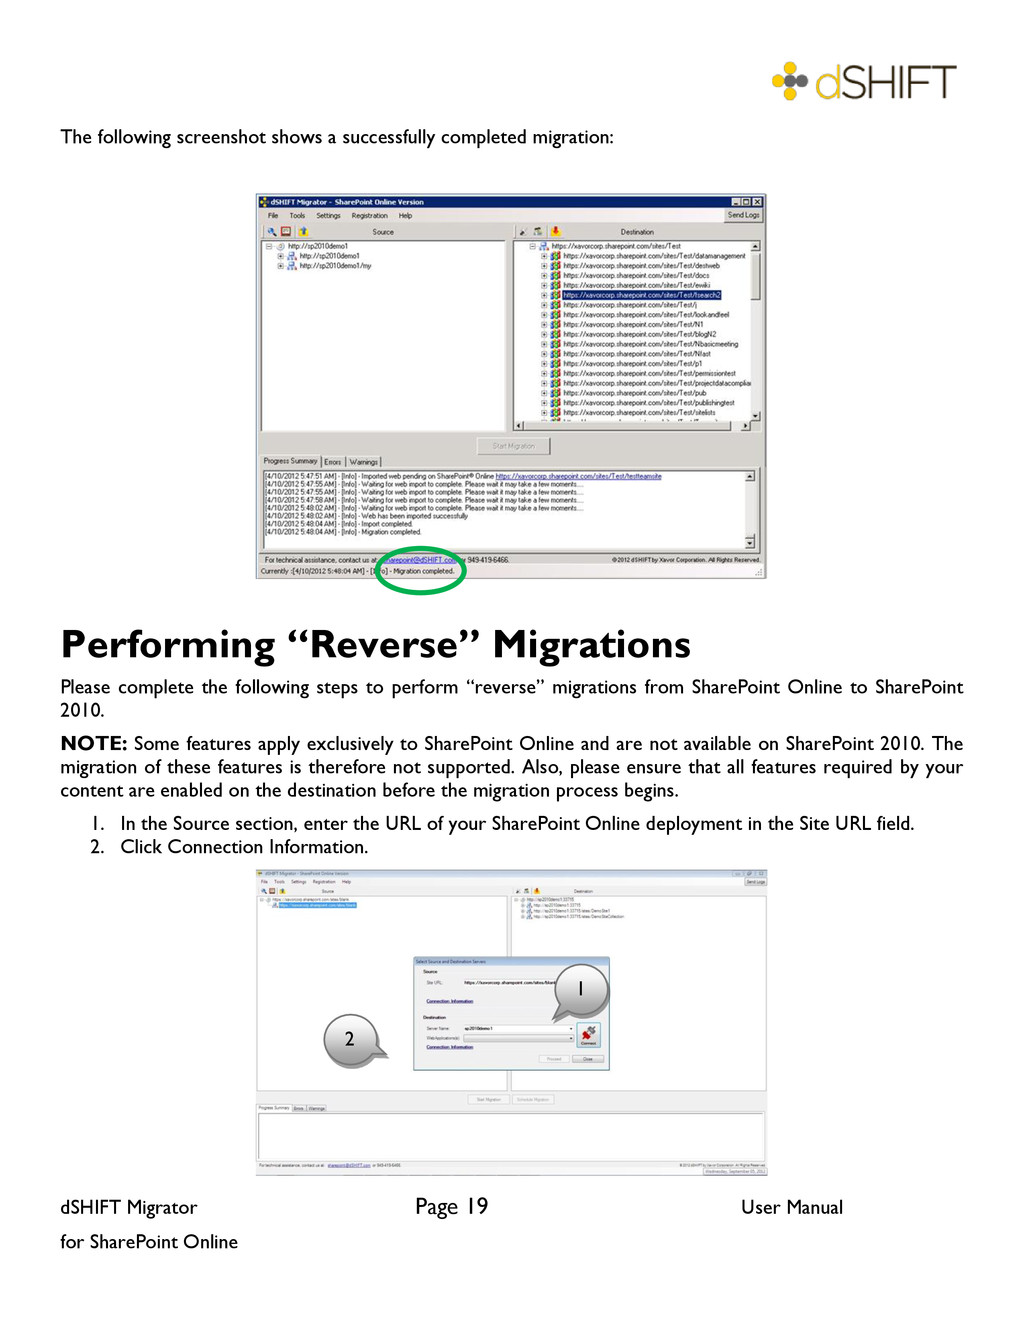
following screenshot shows a successfully completed migration: Performing “Reverse” Migrations Please complete the following steps to perform “reverse” migrations from SharePoint Online to SharePoint 2010. NOTE: Some features apply exclusively to SharePoint Online and are not available on SharePoint 2010. The migration of these features is therefore not supported. Also, please ensure that all features required by your content are enabled on the destination before the migration process begins. 1. In the Source section, enter the URL of your SharePoint Online deployment in the Site URL field. 2. Click Connection Information. 1 2
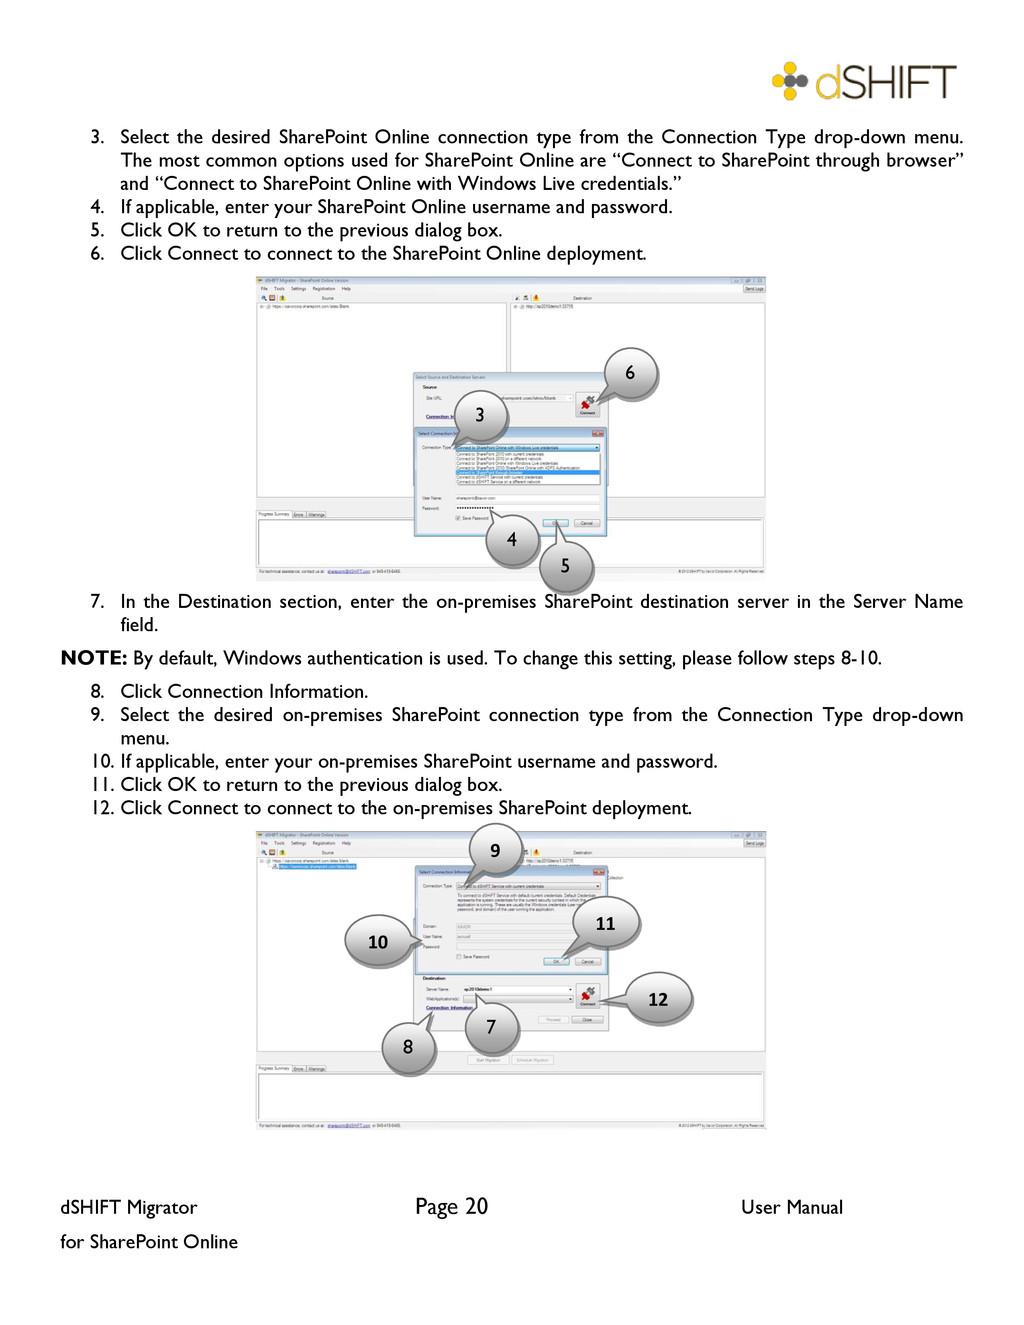
Select the desired SharePoint Online connection type from the Connection Type drop-down menu. The most common options used for SharePoint Online are “Connect to SharePoint through browser” and “Connect to SharePoint Online with Windows Live credentials.” 4. If applicable, enter your SharePoint Online username and password. 5. Click OK to return to the previous dialog box. 6. Click Connect to connect to the SharePoint Online deployment. 7. In the Destination section, enter the on-premises SharePoint destination server in the Server Name field. NOTE: By default, Windows authentication is used. To change this setting, please follow steps 8-10. 8. Click Connection Information. 9. Select the desired on-premises SharePoint connection type from the Connection Type drop-down menu. 10. If applicable, enter your on-premises SharePoint username and password. 11. Click OK to return to the previous dialog box. 12. Click Connect to connect to the on-premises SharePoint deployment. 3 4 5 7 6 8 9 If 10 If 11 If 12 If
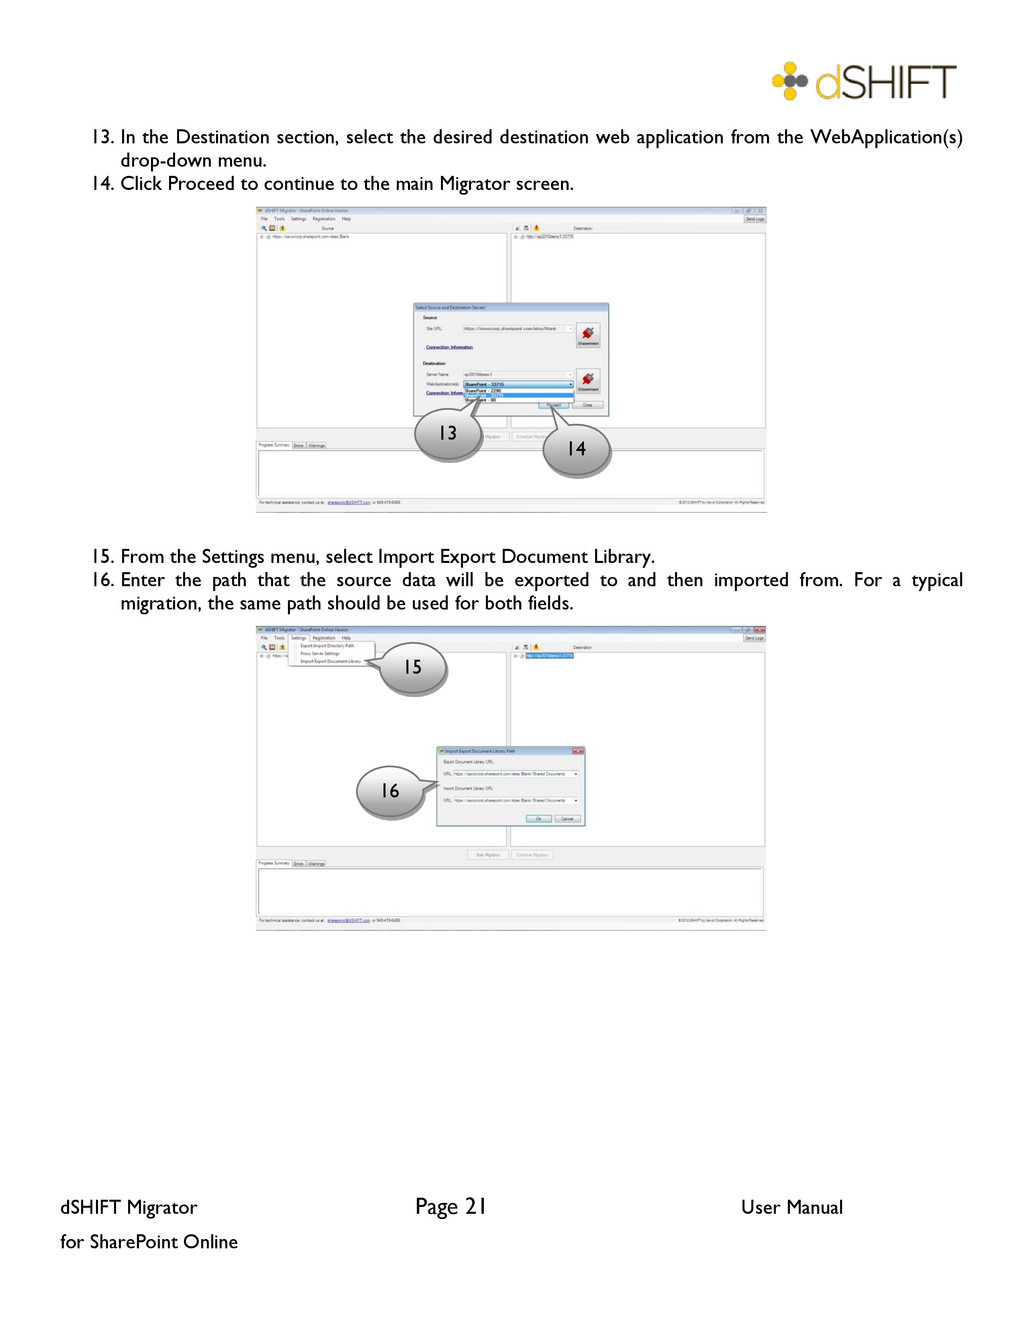
In the Destination section, select the desired destination web application from the WebApplication(s) drop-down menu. 14. Click Proceed to continue to the main Migrator screen. 15. From the Settings menu, select Import Export Document Library. 16. Enter the path that the source data will be exported to and then imported from. For a typical migration, the same path should be used for both fields. 13 14 15 16
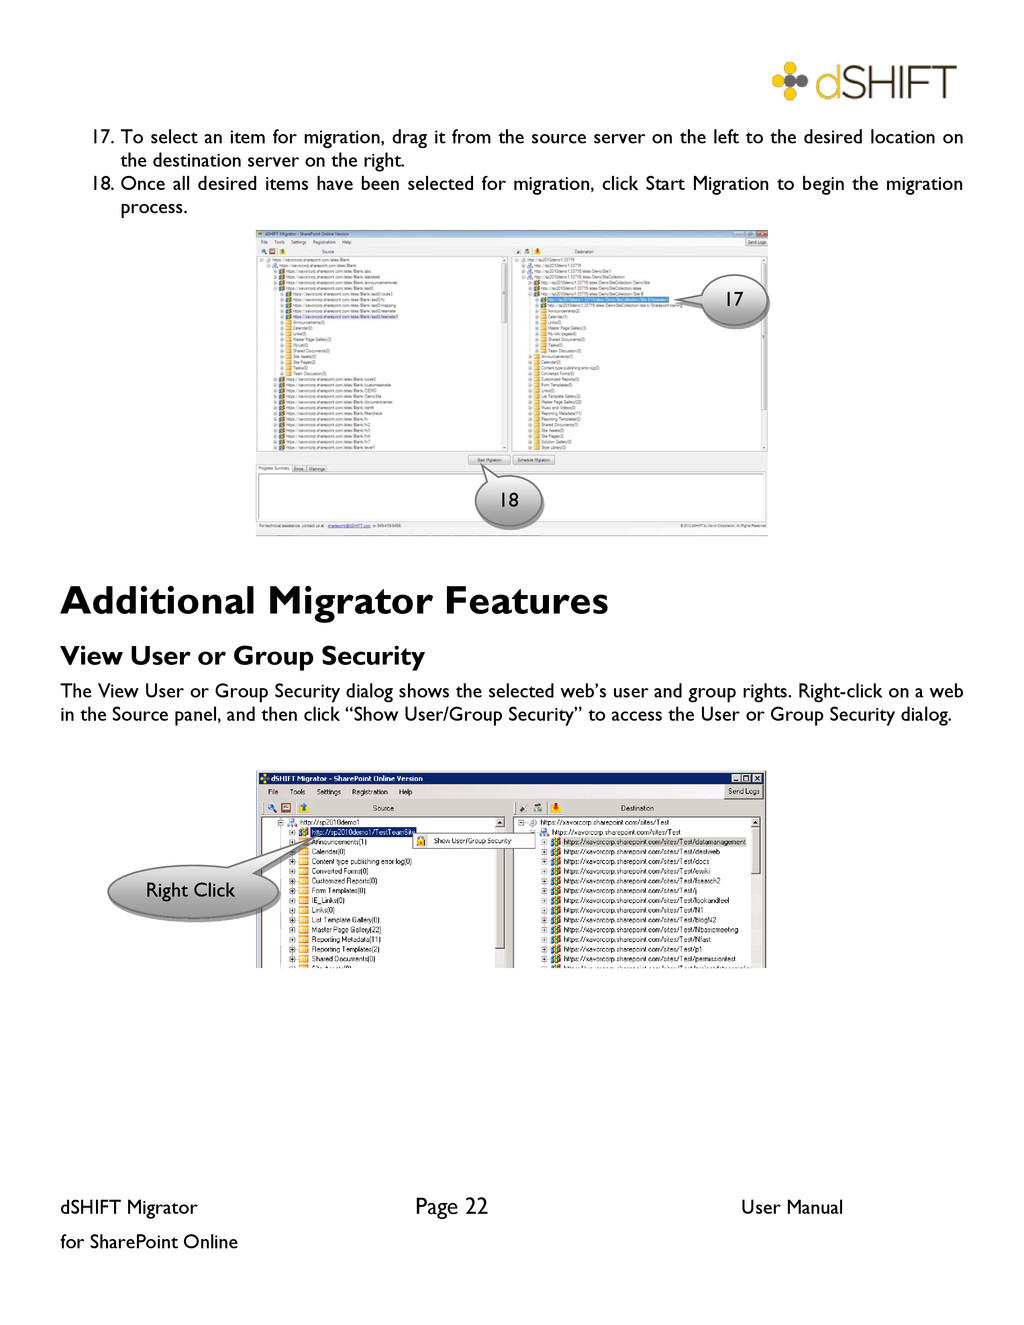
To select an item for migration, drag it from the source server on the left to the desired location on the destination server on the right. 18. Once all desired items have been selected for migration, click Start Migration to begin the migration process. Additional Migrator Features View User or Group Security The View User or Group Security dialog shows the selected web’s user and group rights. Right-click on a web in the Source panel, and then click “Show User/Group Security” to access the User or Group Security dialog. Right Click 17 18
User or Group Security dialog is a quick search feature to find a specific user or group’s permissions for the selected web within the dSHIFT Migrator. 1. Select whether to search for a user or group. 2. Enter the domain on which the user or group exists. 3. Enter the user or group name to search for. 4. Click “Check” to fetch the user or group’s permissions. 5. The panel at the bottom of the dialog displays the specified user or group’s permissions, and whether these permissions are inherited from the web’s parent. Manage Server Notifications The Manage Server Notifications dialog is used to post notifications on the source server’s site collections. It also allows changes to site collections to be disabled so content is not updated during migrations. Click “Manage Server Notifications” in the Tools menu or click the Notifications icon in the toolbar at the top of the main screen to access this dialog. The Manage Server Notifications dialog displays the URLs for each site collection, and allows an HTML notification banner to be displayed at the top of each SharePoint site. 1. To prevent a site collection from being modified, check its Read-Only box. 2. To edit a site collection’s notification banner, click its pencil icon in the Notification HTML column. 3. To apply the notification banner to a site collection, check its Apply box. 2 3 1 4 5
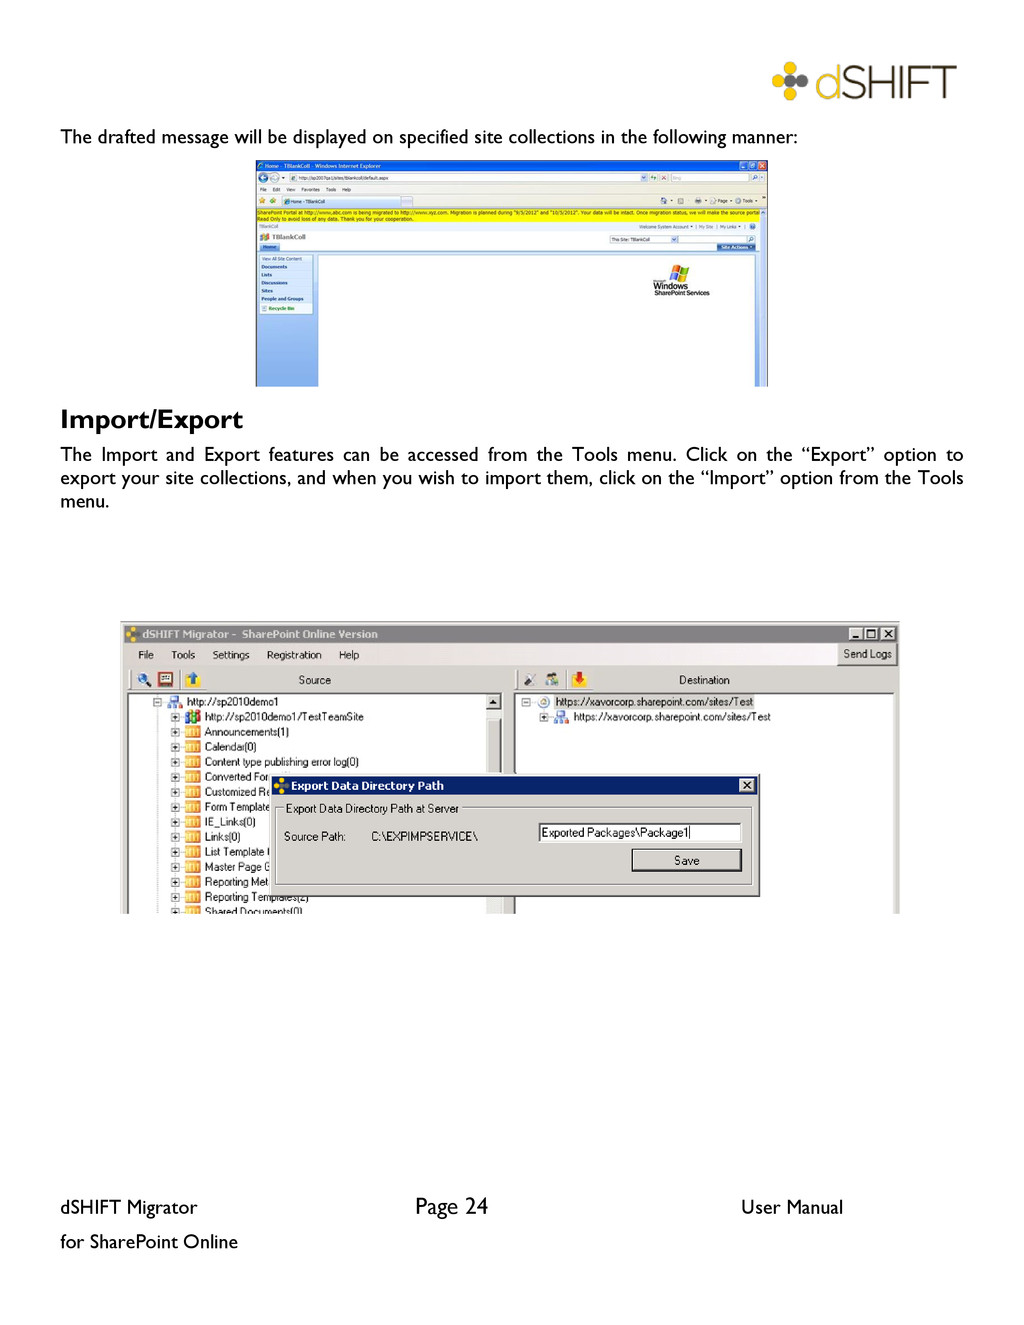
drafted message will be displayed on specified site collections in the following manner: Import/Export The Import and Export features can be accessed from the Tools menu. Click on the “Export” option to export your site collections, and when you wish to import them, click on the “Import” option from the Tools menu.