Upgrade to Pro — share decks privately, control downloads, hide ads and more …

5 Basic Survivual Skills Echo-Sigma Emergency P...

5 Basic Survivual Skills Echo-Sigma Emergency Preparedness information and everyday Survival hacks.

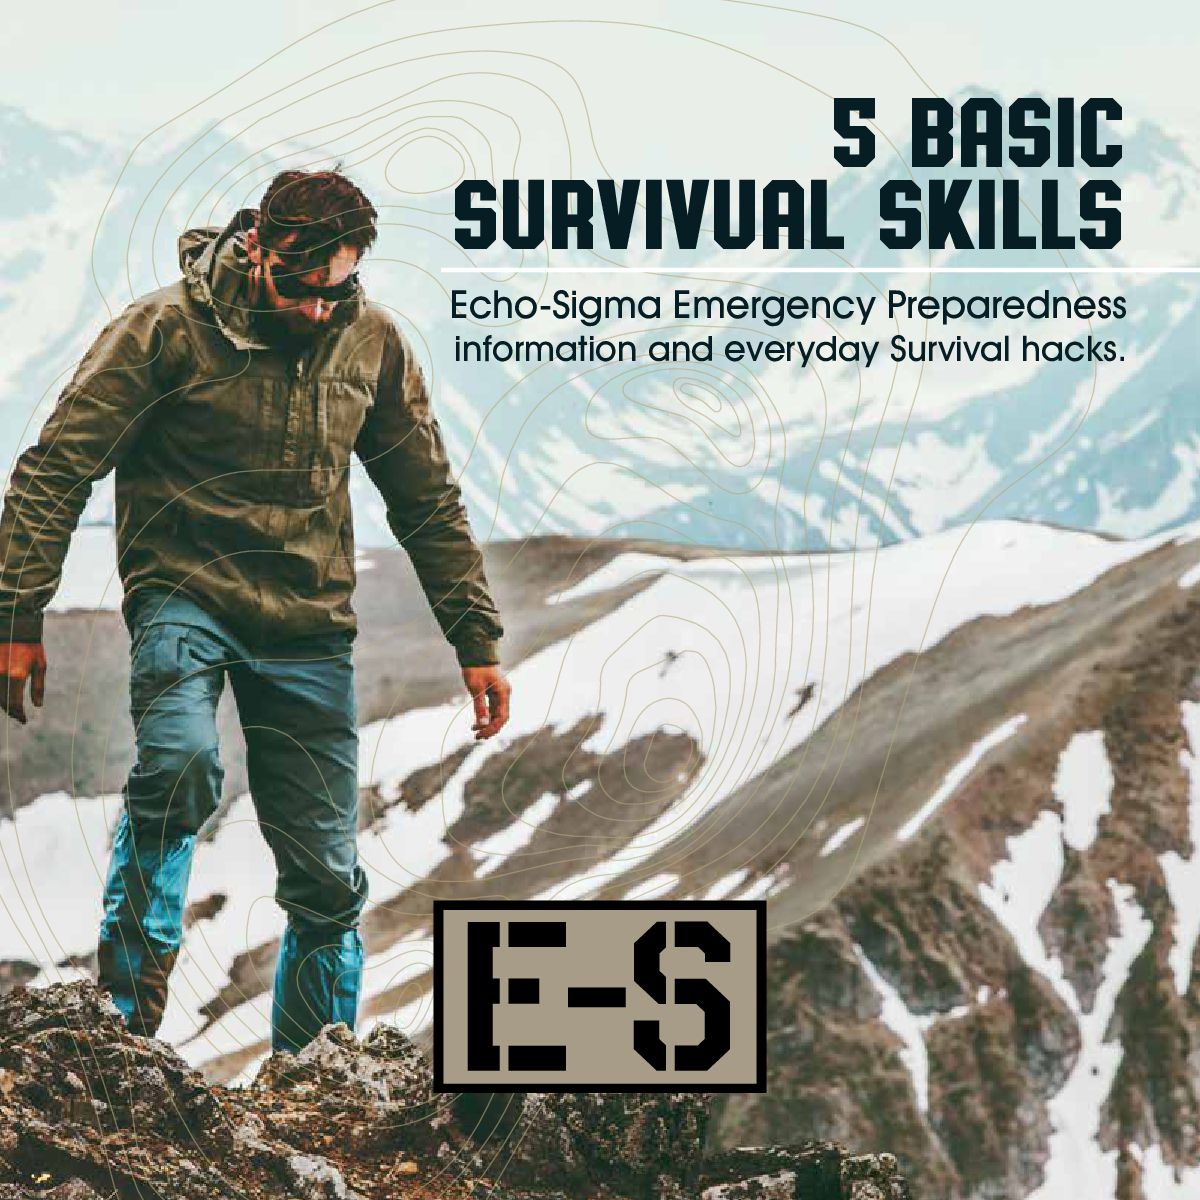
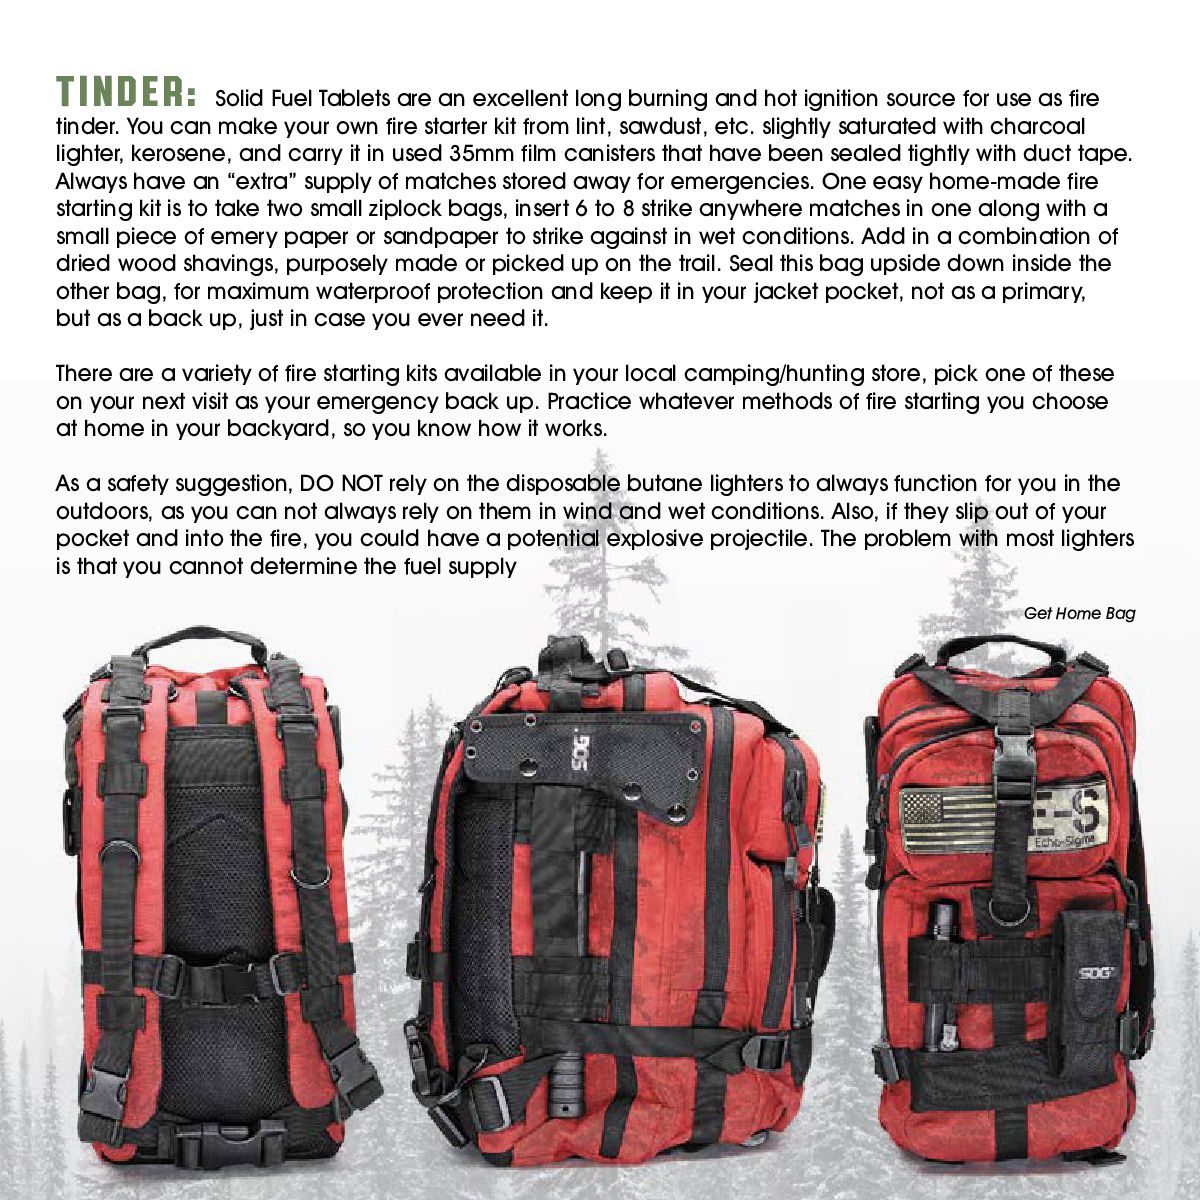
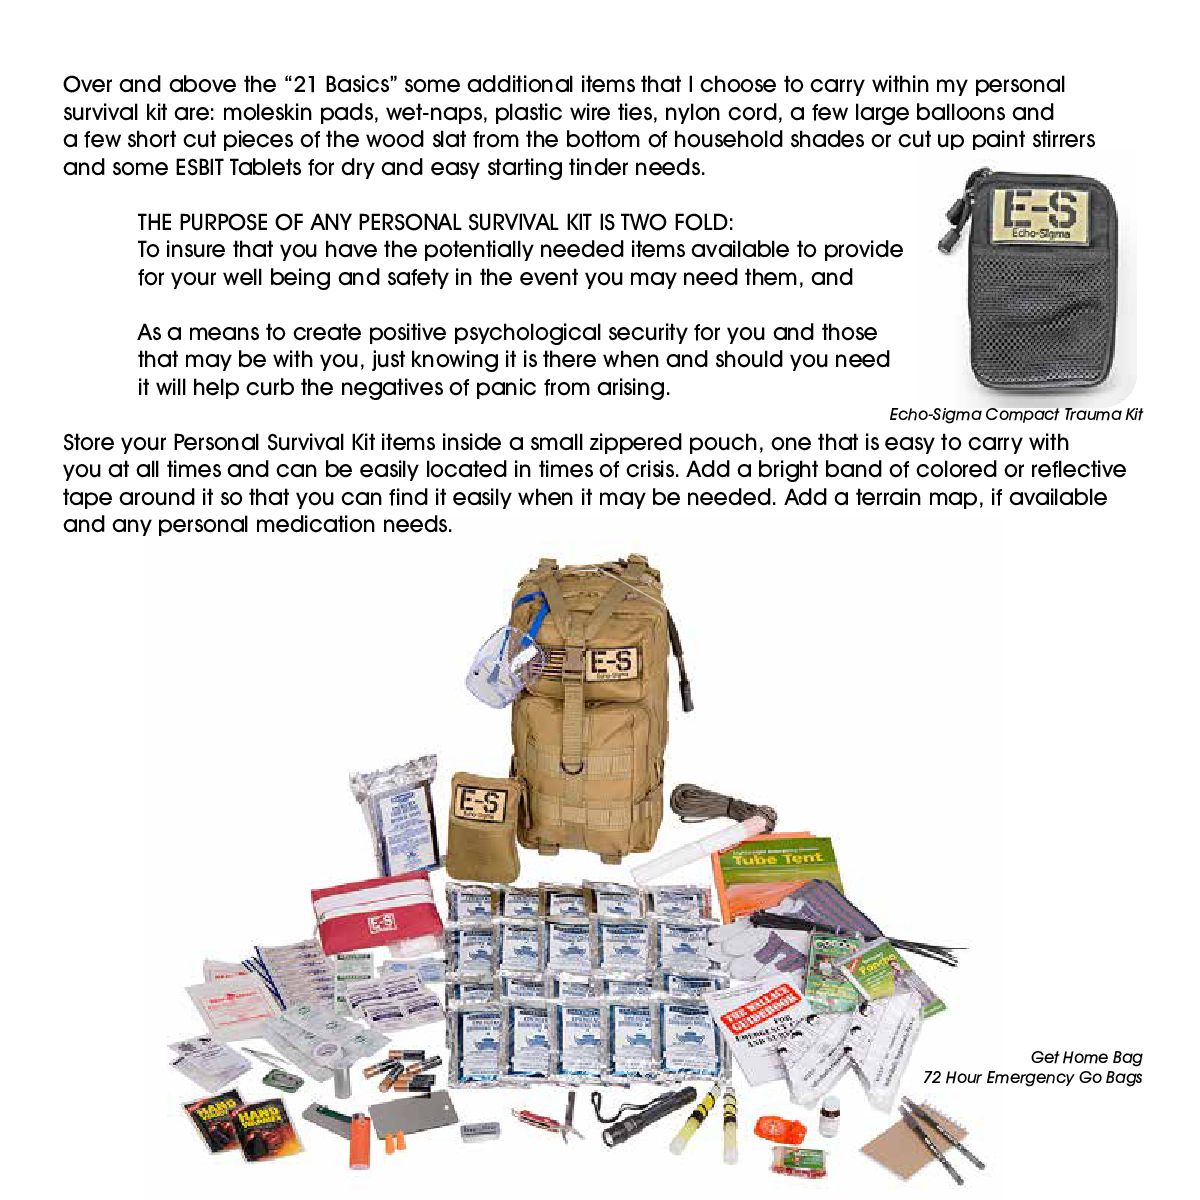
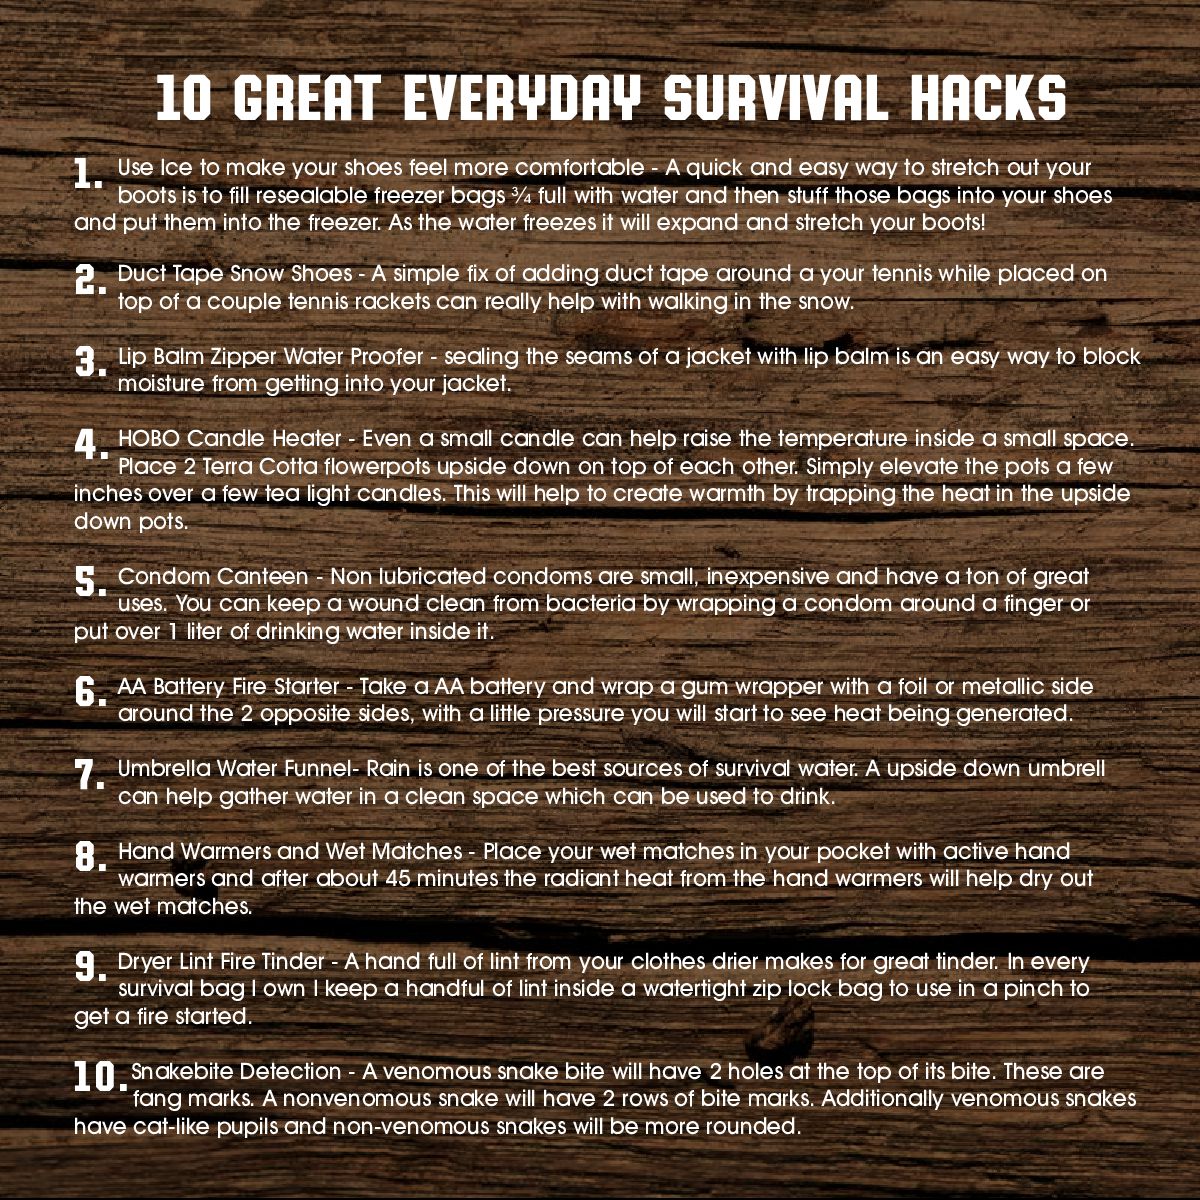
Echo-Sigma Emergency Preparedness is your go-to resource for comprehensive survival information and essential gear. Whether you’re preparing for a disaster or just want to be ready for everyday challenges, their expert advice and high-quality products will keep you safe.

Explore Everyday Survival Hacks to make life easier, from improvising tools to staying calm in a crisis. Stay prepared, stay safe, with Echo-Sigma!

Echo-Sigma

August 23, 2024
Tweet

Other Decks in Business

Transcript

  1. Echo-Sigma SURVIVAL BASICS 101 “Your Mind is Your Greatest Survival

    Tool” When you are involved in any outdoor situation that separates you from where you want to be, no matter how slight, or when you realize you are lost, separated from your party or disoriented in the woods, panic is the first reaction we all encounter and must defeat before it brings on more harm. How you handle the effects of the situation brought on by panic can determine your rate of success or failure in any outdoors-emergency situation. To emphasize the effect that panic can have on an individual, let me use the principle of the “RULES OF 3”. Experience has shown that: • You can only expect to survive in a panic induced emergency situation for only about “3 seconds”, • You can only expect to survive without oxygen or from severe bleeding for up to “3 minutes”, • You can only expect to survive exposure to excesses of heat or frigid cold for up to “3 hours” and, • You can only expect to survive without any major intake of food and water for up to “3 days”. Panic, as you can see is your major enemy. Panic is the one thing you must overcome, at once, because panic “will” cause you great harm. To help you deal with the onset of panic lets look at a simple method of handling an emergency situation. Remember the acronym S.T.O.P .. Bug Out Bag Complete Emergency Kit
  2. S.T.O.P. SIT: When you realize that you are lost or

    disoriented. Take the time to sit down and collect your thoughts. You are not lost, you are right where youare, your camp, vehicle and everyone else is just not where you thought they were. THINK: What do I have at my disposal? Take an inventory of physical supplies and mental that will help me cope with this situation. Take an inventory of your survival kit items and how you will use them, if needed. Take an inventory of your skills within your mind,remember what you always thought you would do if you got lost or stranded. Most of all you must maintain a positive mental attitude; you will survive. OBSERVE: Look around, is there shelter, water, high ground, and an open area so the searchers can see you. It will be easier for those searching to find you if you can stay in one selected location that will allow you to build a fire, provide shelter, set out signals and be in an area that can be seen at a distance or from aircraft. PLAN: Now create your plan of action. Be positive and take care of yourself.If it is late in the day, build a fire for heat and signaling, find or make a shelter against the weather, and most of all remain positive, you do have the ability to survive. You have conquered the major danger of not allowing panic to cast your fate; you can now conquer anything else that confronts you. As human beings we all have deep within us the necessary skills to survive when lost or stranded. What dampens these skills is the onset of panic. If you can keep yourself from allowing panic to rule, YOU WILL SURVIVE.
  3. “Nature is indifferent to the survival of the human species,

    including Americans.” -Adlai E. Stevenson- To keep yourself alive in the wilderness, you have to give some in-depth thought to the possibility of it happening to you before the situation comes up and smacks you right in the face. Survival is 80 percent attitude, 10 percent skill and 10 percent equipment... more importantly having the knowledge to use that equipment. Survival is also a very personal thing. You are like no one else in the world and your developed attitude and your acquired skills are what you need to depend on to survive. Survival may be seasonal, and it is definitely geographical, so equip yourself for the five points of necessities no matter who you are, where you go or at what time of year you venture into the great outdoors. The basic survival abilities you need to maSter are how to create Fire, how to build a Shelter, how to Signal, how to ration, find and maintain a supply of Food and Water and a basic knowledge of First-Aid. Let’s call them The Basic Big Five.
  4. The 5 Basic Survival Skills for every outdoors person to

    know and practice. There are 5 Basic Outdoor Survival Skills that everyone who ventures into the Outdoors should fully understand. This is a just brief outline; it is not a full explanation of all the requirements and items required in each category. “The” most important element for survival is between your ears it is your brain. DO NOT PANIC, stay calm, use your wits and take time before venturing into unknown areas to practice the 5 Basics, you may have to rely on them. FIRE can purify water, cook food, signal rescuers, provide warmth, light and comfort, help keep predators at a distance, and can be a most welcome friend and companion. Each and every per- son who ventures into the Outdoors should have a minimum of two ways to start a fire with them, one on their person at all times and the other with their gear. A few small fires provide more heat than one large fire. Collect firewood you think you will need for the night and then collect the same amount again, experience shows you will need it. Conserve fuel by making a “star fire” where the ends of large logs meet in the fire only, push inward as more fuel is needed. Make a reflector from your SPACE BLANKET on the back wall of a shelter to reflect heat of your survival fire to your back; sit between fire and back shelter wall. SHELTER is the means by which you protect your body from excess exposure from the sun, cold, wind, rain or snow. Anything that takes away or adds to your overall body temperature can be your enemy. Clothing is the first line of shelter protection, have the right clothes for the right environment. Always have a hat. Try and keep the layer closest to your body dry. Layers of clothing trap air and are warmer than one thick garment. Do not expend energy making a shelter if nature provides one. Build a lean-to shelter in case you cannot find your campsite. You can always improve on it later if needed. Use a SPACE BLANKET to prevent dampness, to insulate your shelter or to wrap yourself up in a sitting or in a squat position to concentrate your body core heat. SIGNALING is having available the means and ability to alert any and all potential rescuers that you are in need of HELP . Fire, flashing light, bright color markers, flags, mirrors, whistles all will help you be found. Three fires in a triangular form are a recognized distress signal. Carefully bank your signal fires to prevent igniting surrounding area. Use regular signal mirrors only when you can see a plane, or people in the distance. Make smoky fire with organic material over the fire during the day to attract attention. Lay out ground to air signal in open field; make a large S.O.S. from rocks, logs or colored clothing, whatever will be seen against the background. Most search and rescue parties use aircraft as a primary method of sighting.
  5. FOOD/WATER are vital to your survival. Ration your sweat not

    your water intake. Try to drink only in the cool of the evening. You can live up to three days without water. DO NOT eat plants you do not know. Never drink urine or seawater. Always assume that you will need extra food and water when you plan your trip. Pack energy bars and candy in your pockets, just in case. Boil stream or river water 10 minutes plus one minute for every 1000 feet above sea level. You can strain cloudy water through your handkerchief to remove large suspended particles. Try to drink only in the cool of the evening. Never wait until you are without water to collect it. Have some poly zip bags to collect and store water. Never eat any wild berries that you are not sure of what they are. You can catch rainwa- ter in your SPACE® BLANKET by laying it out in a shallow trench. FIRST AID is not just basic medical needs; it is the “attitude” that you employ in the way you act towards surviving. DO NOT PANIC, remain calm and do what you have to do to take care of YOU. STOP is an acronym for Sit, Think, Observe, and Plan. It is the most intelligent thing you can do when you realize you are lost or stranded. Another important element is to keep your brain functioning in a rational manner; this is the key to basic first aid for survival. Analyze your needs before every trip; create a medical checklist and carry a small personal survival kit with you at all times. Most outdoor medical situations require only dressing for small cuts, bruises and your own personal medication needs, make sure you know what you have with you and know how to use it. Prevent hypothermia by insulating yourself with a SPACE® BLANKET or layering clothing. Do not over pack, pack what you know you will need and what you will carry with you at all times. Con- centrate on being found; pack a picture of your family in with your gear to remind you of the reasons to remain calm and to survive. Get Home Bag: SOG Special Edition Emergency Kit Echo-Sigma Compact First Aid Kit
  6. “Careful with fire” is good advice we know. “Careful with

    words” is ten times doubly so. - William Carleton -
  7. CAMP FIRE TIPS • Whenever you build any fire, for

    warmth, overnight, or for cooking, get all the materials together in their proper place, before you strike your match. Matches are one of your most valuable physi- cal assets in the outdoors. Haste and poor preparation defeat the purpose of being able to quickly and efficiently start a fire. There is the old outdoor adage of only one-match for one- fire, if you practice, prepare and predetermine your actions you can accomplish this task, even in severe weather conditions. • For a midday cooking fire, pick a sheltered location, away from overhanging branches and on solid ground, and make a very small fire. For evening cooking and for an overnight fire, plan for a larger one or several small fires around you, this will help provide for greater warmth. Three (3) fires in a triangular arrangement is a recognized air to ground signal of distress. • For overnight fires, pick your sleeping location first and build your fire in relation to it for max- imum warmth. Do not set your sleeping bag too close to the fire, and make sure your fire pit it is a safe distance from overhanging trees, etc.. Do not use wet or damp rocks, they can heat up and explode. • Start any fire with the utmost of patience. Plan it carefully and one match will do. Get as much out of the wind as you can before striking your match, shield your fire area with your body or make a windshield with your jacket or other gear before lighting your match. Though one match-one fire is for the professionals, make sure before you leave home that you have plenty of matches stored in a weatherproof container. In times of need, what works in good times always fail in bad times, so BE PREPARED! • Lay a foundation of fine tinder, such as shavings from dried twigs, a bird’s nest, or whittle with your knife from a dried branch. Use pre-prepared tinder you have made from dryer lint or wood shavings from home. Whatever you have or decide to use get a good supply of dried tinder into your fire area before your strike that first match. • Crisscross above the fine tinder bed you have made a few larger dry twigs about the size of a pencil to begin. Have increasingly larger wood at hand. A good method is to lay your tinder beside a short length of stick 3 to six inches in diameter, lean the twigs over the tinder and against the large stick. Now when the tinder catches, the twigs go in a moment, add larger ones and a good blaze is there.
  8. • Always light your fire with the breeze at your

    back, and on the side nearest you to provide addition- al ease and shelter. Always light your fire from below the tinder, not on top. Never start your fire under overhanging limbs of trees, or where the smoke will blow into your shelter. Take the time to plan, and your fire will ignite quickly and burn safely. COOKING FIRES: Look for flat dry rocks to surround the fire, so you have contain- ment and a place for your utensils. A small pit built with rocks laid out in a “V” or a “U” with the open end toward the breeze will allow draft in that open end to help keep the fire going. If winds are strong, reverse the open end of your pit. Again, the most important consideration is to start with a small fire and progressively add larger material. Do not panic, take your time and concentrate and you can build the fire that you want. WET CONDITIONS: In rain or snow, fire making becomes more important, and also more difficult. Here is where having ESBIT® Solid Fuel Tablets will be a great help for your tinder base. One method is to make a tripod of sticks over your chosen fire area and drape your jacket over the tripod to shelter the firebase. Carefully light your tinder, add some twigs, and remove your jacket. If the ground is exceedingly wet lay a base of large logs and sticks and start your fire on top of them. TYPES OF WOOD: When and where possible use old dried wood from conifers (evergreens) for starting fires. Dry cones are great too for starting a fire. You may not have the time or the energy to go around and select wood, so burn what you can, get warm and safe and then look for more wood. Just remember that pine, cedar, spruce will start a fire quickly but burn swiftly. Woods such as oak, ash and maple will burn longer but are more difficult to ignite. Aspen, birch and poplar are quite common and they make good fires as they burn hot but fairly fast. You don’t want wet or new wood; look around for downed trees or limbs. Whatever supply of wood you intend to have at hand to burn, gather at least 3 times more than you think you will need, experience shows that you will use it. Wood burns faster than you think.
  9. TINDER: Solid Fuel Tablets are an excellent long burning and

    hot ignition source for use as fire tinder. You can make your own fire starter kit from lint, sawdust, etc. slightly saturated with charcoal lighter, kerosene, and carry it in used 35mm film canisters that have been sealed tightly with duct tape. Always have an “extra” supply of matches stored away for emergencies. One easy home-made fire starting kit is to take two small ziplock bags, insert 6 to 8 strike anywhere matches in one along with a small piece of emery paper or sandpaper to strike against in wet conditions. Add in a combination of dried wood shavings, purposely made or picked up on the trail. Seal this bag upside down inside the other bag, for maximum waterproof protection and keep it in your jacket pocket, not as a primary, but as a back up, just in case you ever need it. There are a variety of fire starting kits available in your local camping/hunting store, pick one of these on your next visit as your emergency back up. Practice whatever methods of fire starting you choose at home in your backyard, so you know how it works. As a safety suggestion, DO NOT rely on the disposable butane lighters to always function for you in the outdoors, as you can not always rely on them in wind and wet conditions. Also, if they slip out of your pocket and into the fire, you could have a potential explosive projectile. The problem with most lighters is that you cannot determine the fuel supply Get Home Bag
  10. Fire Starting Tips Easy Fire Starting Tinder One of the

    critical elements for starting a fire in the wilderness is to get good dry tinder to ignite easily, so you can build your fire on this initial ignition point. Most people rely on available pine needles, bird’s nest, dry grass, etc. as their primary source of tinder. Sometimes these critical elements are not readily available, or in a crisis situation you don’t have time to look for them. Here is one you may not have thought of, DRYER LINT. Do you know how much accumulates in the dryer catch screen, believe me its readily available, plentiful and the cost is nothing. Considering that most of your clothes are made of poly- ester or cotton blends, this off flow of lint particles is a good fire ignition source. You can get a large supply into a very small flat polyethylene bag. If you add a few strike-anywhere matches you have a ready-made tinder and fire starting kit. This is lightweight and easy to carry with you at all times. You can increase the volatility of the lint by packing a 35mm film canister tightly, then carefully saturating it with some white gas or kerosene. Close the container securely, wipe off all spillage and then tightly seal the canister around the cap with duct tape. Be very careful when you use this method of fire starting in the field, stay back from the source, as it will flash up very quickly. Easy way to Waterproof Wooden Matches The common perception for waterproofing stick matches is to dip your “strike anywhere” match heads into wax as a preventative to water penetration. Though this method works, it is very difficult to do successfully. First of all not many of us want to melt down a candle or a bar of wax for coating a few matches, secondly there is the chance that the wax may become too hot in its liquid stage and ignite the match. In times of crisis it may also be extremely difficult to successfully scrape away the wax in order to ignite the match. An easier and more practical way to waterproof your “stick matches” is with an application of a heavy coating of clear nail polish over the match head and down the wood stick. Don’t forget to coat the bottom of the matchstick. Think of it as the same method in which you would waterproof your deck. Clear nail polish will seal the match head and coat the wood to prevent penetration of any moisture. Clear nail polish applies easily and dries quickly. After allowing time to dry the coated matches can be securely stowed with your survival gear.
  11. Easy way to light your campfire Remember those birthday candles

    someone once put on your cake that you can’t blow out… they mysteriously keep re-lighting making your feel a little silly trying to continually blow them out. These “trick candles” make great additions to your outdoor fire starting kit. Use your match to ignite one of these, keep it somewhat sheltered in the cup of your hand and use it to ignite your tinder. It is a lot easier to position than a match or a lighter. Liberally wet your fingertips to extinguish the candle and keep it for another use. Find these in your local grocery store. They are small, lightweight and extremely useful in wet or windy weather. The Basic Rules For PERSONAL Outdoor Survival 1. Always leave a detailed itinerary of where you are going and when you plan to return with someone you trust. If you change your sched- ule for any reason, please be sure that tell someone of that change. 2. Never go into a wilderness area by yourself. Unavoidable accidents can and do happen. 3. Make sure that you take with you and wear the proper clothing. Remember the weather can and will most likely change. 4. If you do get lost or stranded. Stay in one location. Rescuers will find you if you have followed rule No. 1. 5. Learn how to use a compass or a GPS, take a map of the area and orient yourself to the area before you trek off into any wilderness. 6. Always carry a personal survival kit with you at all times in the outdoors. A survival kit in the hands of someone who does not know ahead of time what is in it, or if it is not with you on your person, or how to use the contents when and where needed can do more harm than good. So take the preparation time at home to make and pack your own personal kit. Also invest the time beforehand to understand the life saving use of every item in your personal survival kit.
  12. 7. The greatest and most important of all survival tools

    is what lays between your ears… your brain. If you should become lost, stranded or separated from others… The most important element towards surviving is to insure you DO NOT PANIC… you will survive. 8. Proper Planning and Preparation Prevents Potential Problems. “The more we exploit nature, the more our options are reduced, until we have only one: to fight for survival.” - Morris K. Udall -
  13. 12” x 24” sheets of Aluminum foil Fold for cooking,

    fire reflector from wind or use to signal Heavy plastic Trash bag Use for water, food storage, keeping things dry SPACE ® Brand Emergency Blankets or EMERGENCY Bag Shelter, signaling, personal protection from elements and a means to provide warmth A high shrill whistle 3 short blasts is a recognized distress signal A Compass or GPS with extra batteries Navigation needs Waterproof wooden matches and tinder (Having more is better – try adding a few small birthday candles to your fire kit, the kind you can’t blow out) Provides ability for fire starting, if you can start a fire you know will be OK. (Stops panic) Emergency Ration bars Sustenance—high calorie providing good energy Bright colored Bandanna or large piece of blaze orange colored cloth Filtering dirty water, signaling, head band, sling, wash cloth, etc. Chemical light sticks (8 – 12 hour type) Provides light, signaling and for your personal well being Multiple function knife-multi-tool For your general tool needs Water purification tablets Insures you have potable water Small Fishing kit Line, hooks, lures, snares, repairs Signal mirror Visual signaling High quality Flashlight You need a good flashlight that will NOT fail you Hard candy or a high energy bar Survival food, peace of mind Heavy Duty Paracord, thread/needle Shelters, snares, repairs, shoe laces Insect repellent and lip balm Personal comfort/protection SMALL First Aid Kit: Bandages, antiseptic, pills, etc. Suited to the terrain you are in and your personal needs. Don’t pack for surgery; pack what you know you may need. Pocket Hand Warmers Ideal for staving off hypothermia Survival Notes-make your own notes or use purchased laminated cards Reminder guide (puts your mind at ease) of what to do and what not to do A picture of your loved ones For the will to survive (One of the most important things you can carry) HERE IS A GREAT SUGGESTED PERSONAL SURVIVAL KIT This is only a suggested outline of the basics for a personal outdoor survival kit; it is by no means all encompassing. Always customize your kit to meet your specific needs for the area you are traversing. The Echo-Sigma Get Home Bag can save you over 40 hours of time building your own kit.
  14. Over and above the “21 Basics” some additional items that

    I choose to carry within my personal survival kit are: moleskin pads, wet-naps, plastic wire ties, nylon cord, a few large balloons and a few short cut pieces of the wood slat from the bottom of household shades or cut up paint stirrers and some ESBIT Tablets for dry and easy starting tinder needs. THE PURPOSE OF ANY PERSONAL SURVIVAL KIT IS TWO FOLD: To insure that you have the potentially needed items available to provide for your well being and safety in the event you may need them, and As a means to create positive psychological security for you and those that may be with you, just knowing it is there when and should you need it will help curb the negatives of panic from arising. Store your Personal Survival Kit items inside a small zippered pouch, one that is easy to carry with you at all times and can be easily located in times of crisis. Add a bright band of colored or reflective tape around it so that you can find it easily when it may be needed. Add a terrain map, if available and any personal medication needs. Echo-Sigma Compact Trauma Kit Get Home Bag 72 Hour Emergency Go Bags
  15. Cold Weather Survival One of the most difficult survival situations

    is a cold weather scenario. Every time you venture into the cold, you are pitting yourself against the elements. With a little knowledge of the environment, proper plans, and appropriate equipment, you can overcome the elements of cold. Winter weather is highly variable. Prepare yourself to adapt to blizzard conditions even during sunny and clear weather. • Cold is a far greater threat to survival than it appears. It decreases your ability to think and weakens your will to do anything except to get warm. • Cold is an insidious enemy; as it numbs the mind and body, it subdues the will to survive. Cold makes it very easy to forget your ultimate goal--to survive. • You can classify about 50 percent of the northern hemisphere’s total landmass as a cold region due to the influence and extent of air temperatures. • Ocean currents affect cold weather and cause large areas normally included in the temperate zone to fall within the cold regions during winter periods. • Elevation also has a great marked effect on defining cold regions. Within the cold weather regions, you may face two types of cold weather environments--wet or dry. “In the depths of winter I finally learned there was in me an invincible summer.” Albert Camus-
  16. WET COLD Weather Survival Wet cold weather conditions exist when

    the average temperature in a 24-hour period averages at or near 20 to 30° F. Characteristics of this condition are freezing during the colder night hours and thawing during the day. Even though the temperatures are warmer during this condition, the terrain is usually very sloppy due to slush and mud. You must concentrate on protecting yourself from the wet ground and from freezing rain or wet snow. Dry Cold Weather Environments Dry cold weather conditions exist when the average temperature in a 24-hour period remains below 20°F. Even though the temperatures in this condition are much lower than normal, you do not have to contend with the freezing and thawing. In these conditions, you need more layers of inner clothing to protect you from temperatures as low as -30 degrees F. More extremely hazardous conditions exist when high wind and these low temperatures combine. It is more difficult for you to satisfy your basic water, food, and shelter needs in a cold environment than in a warm environment. Even if you have the basic requirements, you must also have adequate protective clothing and a further dedicated will to survive. The will to survive is as important as the basic needs. There have been incidents when trained and wellequipped individuals have not sur- vived cold weather situations because they lacked the will to live. Conversely, these will has sustained individuals less well trained and equipped. You must not only have enough clothing to protect you from the cold, you must also know how to maximize the warmth you get from it. For example, always keep your head covered. You can lose 40 to 45 percent of body heat from an unprotected head and even more from the unprotected neck, wrist, and ankles. These areas of the body are good radiators of heat and have very little insulating fat. The brain is very susceptible to cold and can stand the least amount of cooling. Because there is much blood circulation in the head, most of which is on the surface, you can lose heat quickly if you do not cover your head. There are four basic principles to follow to keep warm. An easy way to remember these basic princi- ples is to use the word COLD: C - Keep clothing CLEAN O - Avoid OVER HEATING L - Wear clothes LOOSE and in LAYERS. D - Keep clothing DRY.
  17. • Keep clothing clean. This principle is always important for

    sanitation and comfort. In winter, it is also important from the standpoint of warmth. Clothes matted with dirt and grease loses much of their insulation value. Heat can escape more easily from the body through the clothing’s crushed or filled up air pockets. • Avoid overheating. When you get too hot, you sweat and your clothing absorbs the moisture. This affects your warmth in two ways: dampness decreases the insulation quality of clothing, and as sweat evaporates, your body cools. Adjust your clothing so that you do not sweat. Do this by partially open- ing your parka or jacket, by removing an inner layer of clothing, by removing heavy outer mittens, or by throwing back your parka hood or changing to lighter headgear. The head and hands act as efficient heat dissipaters when overheated. • Wear your clothing loose and in layers. Wearing tight clothing and footgear restricts blood circula- tion and invites cold injury. It also decreases the volume of air trapped between the layers, reducing its insulating value. Several layers of lightweight clothing are better than one equally thick layer of clothing, because the layers have dead-air space between them. The deadair space provides extra insulation. Also, layers of clothing allow you to take off or add clothing layers to prevent excessive sweating or to increase warmth. • Keep clothing dry. In cold temperatures, your inner layers of clothing can become wet from sweat and your outer layer, if not water repellent; can become wet from snow and frost melted by body heat. Wear water repellent outer clothing, if available. It will shed most of the water collected from melting snow and frost. • Before entering a heated shelter, brush off the snow and frost. Despite the precautions you take, there will be times when you cannot keep from getting wet. At such times, drying your clothing may become a major problem. If you are walking out, hang your damp mittens and socks on your back- pack to dry. Even in freezing temperatures, the wind and sun will dry your clothing. • You can also place damp socks or mittens, unfolded, near your body so that your body heat can dry them. In a campsite, hang damp clothing inside the shelter near the top, using drying lines or improvised racks. You may even be able to dry each item by holding it before an open fire. Dry leather items slowly. If no other means are available for drying your boots, put them between your sleeping bag shell and liner. Your body heat will help to dry the leather.
  18. 10 Great Everyday Survival Hacks 1. Use Ice to make

    your shoes feel more comfortable - A quick and easy way to stretch out your boots is to fill resealable freezer bags ¾ full with water and then stuff those bags into your shoes and put them into the freezer. As the water freezes it will expand and stretch your boots! 2. Duct Tape Snow Shoes - A simple fix of adding duct tape around a your tennis while placed on top of a couple tennis rackets can really help with walking in the snow. 3. Lip Balm Zipper Water Proofer - sealing the seams of a jacket with lip balm is an easy way to block moisture from getting into your jacket. 4. HOBO Candle Heater - Even a small candle can help raise the temperature inside a small space. Place 2 Terra Cotta flowerpots upside down on top of each other. Simply elevate the pots a few inches over a few tea light candles. This will help to create warmth by trapping the heat in the upside down pots. 5. Condom Canteen - Non lubricated condoms are small, inexpensive and have a ton of great uses. You can keep a wound clean from bacteria by wrapping a condom around a finger or put over 1 liter of drinking water inside it. 6. AA Battery Fire Starter - Take a AA battery and wrap a gum wrapper with a foil or metallic side around the 2 opposite sides, with a little pressure you will start to see heat being generated. 7. Umbrella Water Funnel- Rain is one of the best sources of survival water. A upside down umbrell can help gather water in a clean space which can be used to drink. 8. Hand Warmers and Wet Matches - Place your wet matches in your pocket with active hand warmers and after about 45 minutes the radiant heat from the hand warmers will help dry out the wet matches. 9. Dryer Lint Fire Tinder - A hand full of lint from your clothes drier makes for great tinder. In every survival bag I own I keep a handful of lint inside a watertight zip lock bag to use in a pinch to get a fire started. 10.Snakebite Detection - A venomous snake bite will have 2 holes at the top of its bite. These are fang marks. A nonvenomous snake will have 2 rows of bite marks. Additionally venomous snakes have cat-like pupils and non-venomous snakes will be more rounded.
  19. • 1 Three Day Pass Backpack • 1 Hydration System

    (2.5 Liter) • 1 Suisse Sport Zero Degree Mummy Sleeping Bag • 1 Echo-Sigma Provision Pack (3-10 days) • 3 Complete Full Size A-Pack MRE meals • 9 Food Ration Bars • 5 Liters of, 5 Year Storage Pure Drinking Water • Paper Napkins • 1 Echo-Sigma Compact Survival Kit • 1 Compass • 1 Emergency Whistle • 1 Emergency Blanket by Coghlan’s • 1 BIC Brand Butane Disposable Lighter • 1 Magnesium Fire Starter with Flint Striker • 40 Waterproof Matches by Coghlan’s • 1 Tinder Kit by Coghlan’s ,vith Flint Striker • 50 Inches of Duct Tape • 1 Bottle of Water Purification Tablets by Coghlan’s • 2 Chemical Light Sticks by Coghlan’s • 2 BIC Brand Ball Point Pens • 1 Pad of Paper • 1 Set of Earplugs • 1 Echo-Sigma 68 Piece Compact First Aid Kit • 1 SOG S44 Power Pliers Multi-Tool • 1 Fenix LD2 2 Flashlight (190 Lumen) • 1 Emergency Multiband Weather Radio by Eton • 50 Feet of Military Grade 550 Paracord • 10 Extra Large Zip Ties • 1 Camp Trowel • 1 Coghbm’s Emergency Tube Tent • 1 Emergency Poncho • 1 Plexiglass Mirror for signaling help • 1 Thermal Sleeping Bag Cocoon by Survival Industries • 6 Premium AA Alkaline Batteries (guaranteed fresh for 10 years) • 1 Pair Leather Work Gloves • 2 N95 Rated-Respirator Masks • 1 Set of protective goggles • 2 Hand Warmers by Coghlan’s Ultimate Trauma kit Whether you’re in the field or at the range, some- times fate strikes at the worst time. Having the right tools to be able to stabilize a traumatic hemor- rhagic injury can mean the difference between life or death. Being Echo-Sigma, we had to take it one step fur- ther. Given the potential scarcity of medical help during a wide spread emergency event, we’ve also included a Suture Kit from Adventure Medical that allows you to patch yourself up assuming you have the know-how. Alternately, if you’re looking for a great all-in-one kit for your outdoor adven- tures you can swap out the Suture Kit for one of our great Echo-Sigma Compact First Aid Kits. The choice is yours! Please note, some items in the Echo-Sigma Trauma Kit are designed for use by trained personnel only. Please seek proper training before utilizing the contents of this kit! BUG-OUT BAG The Echo-Sigma Emergency Bug-Out Bag is a full size disaster prepared- ness kit that is designed to be kept in the home or office in case of an emergency. The unique vertical storage configuration with custom draw string dust cover enables you to easily store your bag in any unobtrusive location you wish while maintaining access to 95% of the kit’s contents at a moment’s notice. The Bug-Out Bag is designed to provide provisions, tools, communications and first-aid to help you get through any emer- gency situation that should arise. All items included in the bag are pre-configured and ready to use right out of the box. • 1 Condor Outdoor MA41 Rip-Away EMT Pouch • 1 C.A.T. Combat Tourniquet • 1 Celox RAPID Hemostatic Gauze • 1 Adventure Medical Suture/Syringe Kit • 1 Pair of Gloves, Nitrile, Hand Wipe • 1 Angiocatheter, 18G X 1 1/4” • 1 Needle, Disposable, Sterile, 18G X 1 1/2” • 1 Needle, Disposable, Sterile 21G X 1 1/2” • 1 Needle, Disposable, Sterile, 25G X 5/8” • 1 Suture, Nylon, 5-0 • 1 Syringe, 1 cc with Needle • 1 Syringe, Luer Lok, 3ml • 3 After Cuts & Scrapes Anethestic/Antiseptic Wipe • 4 Alcohol Swabs • 1 N.A.R. Emergency Trauma Dressing 6” • 2 N.A.R. Compressed Gauze • 1 Pair Trauma Shears • 2 Rolls Adhesive Dressing Tape • 2 Pair N.A.R. Black Talon Nitrile Gloves
  20. • lHCB Pack • 1 Modular MOLLE Compatible Utility Pouch

    • 1 Echo-Sigma Micro Provision Pack • 6 Food Ration Bars • 1 Liter of 5 Year Storage Pure Drinking Water • All weather storage • 1 Echo-Sigma Compact Survival Kit • 1 Compass • 1 Emergency Whistle • 1 Emergency Blanket by Coghlan’s • 1 BIC Brand Butane Disposable Lighter • 1 Magnesium Fire Starter, with Flint Striker • 40 Waterproof Matches by Coghlan’s • 1 Tinder Kit by Coghlan’s with Flint Striker • 50 Inches of Duct Tape • 1 Bottle of Water Purification Tablets by Coghlan’s • 2 Chemical Light Sticks by Coghlan’s • 2 BIC Brand Ball Point Pens • 1 Pad of Paper • 1 Set of Earplugs • 1 Echo-Sigma 68 Piece Compact First Aid Kit • 1 Emergency Poncho • 1 Pair Work Gloves • 2 N95 Rated Respirator Masks • 1 Set of Protective Goggles • 2 Hand Warmers by Coghlan’s Get-home bag The Echo-Sigma Get-Home-Bag is a midsized disaster preparedness kit that is perfectly suited to keep on hand in your office, dorm room or the trunk of your car. The Get-Home Bag is designed to provide provisions and tools appropriate to help you get home (or other suitable shelter) should an emergency emerge while you are going about everyday life. All items included in this bag are pre-configured and ready to use right out of the box. RUNNER BAG The Echo-Sigma Runner is a compact disaster pre- paredness kit that is designed for individuals who either want to stay super mobile or add emergency kit features to their existing compliment of gear. The entire pack is MOLLE compatible for attachment to an existing pack OR you can use the included back- pack straps for use as a stand-alone backpack. • 1 Compact Assault Pack • 1 Hydration System (2.5 Liter) • 1 Echo-Sigma 1-3 Day Provision Pack • 6 Food Ration Bars • 2.5 Liters of 5 Year Storage Drinking Water • Paper Napkins • All weather storage • 1 Echo-Sigma Compact Survival Kit • 1 Compass • 1 Emergency Whistle • 1 Emergency Blanket by Coghlan’s • 1 BIC Brand Butane Disposable Lighter • 1 Magnesium Fire Starter with Flint Striker • 40 Waterproof Matches by Coghlan‘s • 1 Tinder Kit by Coghlan’s with Flint Striker • 50 Inches of Duct Tape • 1 Bottle of Water Purification Tablets by Coghlan’s • 2 Chemical Light Sticks by Coghlan’s • 2 BIC Brand Ball Point Pens • 1 Pad of Paper • 1 Set of Earplugs • 1 Echo-Sigma 68 Piece Compact First Aid Kit • 1 Gerber “Dime” Multi-Tool • 1 Fenix E21 Flashlight (17.0 Lumen) • 1 Coghlan’s Emergency Tube Tent • 1 Emergency Poncho • 1 Plexiglass Mirror for signaling help • 1 Thermal Sleeping Bag Cocoon by Survival Industries • 6 Premium AA Alkaline Batteries (guaranteed fresh for 10 years) • 50 Feet of Military Grade 550 Paracord • 10 Extra Large Zip Ties • 1 Pair Work Gloves • 2 N95 Rated Respirator Masks • 1 Set of Protective Goggles