Upgrade to Pro — share decks privately, control downloads, hide ads and more …

React Native: Building to Scale

Lawren
April 27, 2018

React Native: Building to Scale

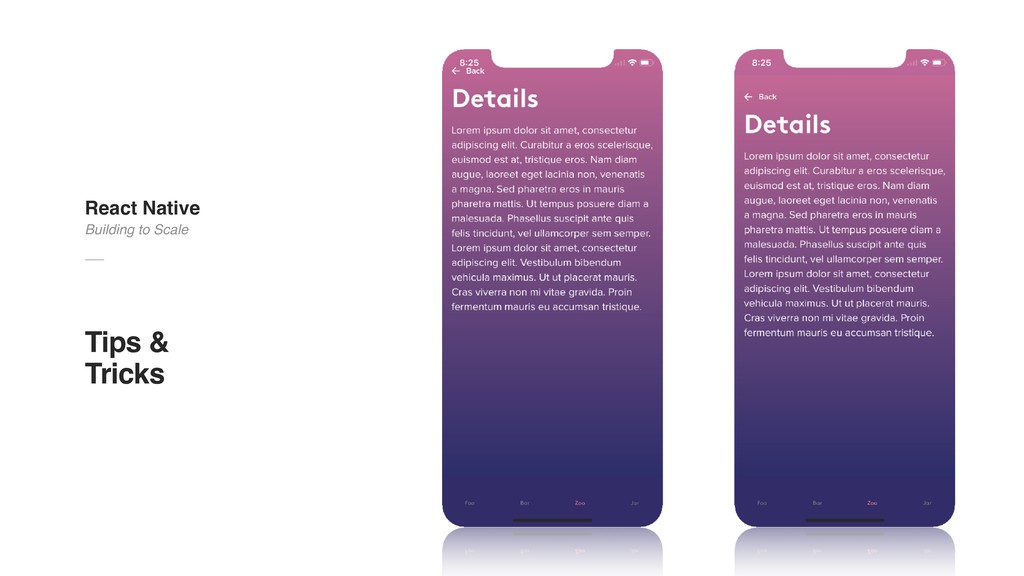
We’ve all heard of React Native and how great it is for building powerful, native applications. But how is it really? Spoiler Alert: It’s awesome. As with all libraries and frameworks, it doesn’t come without its own nuances and caveats, however.

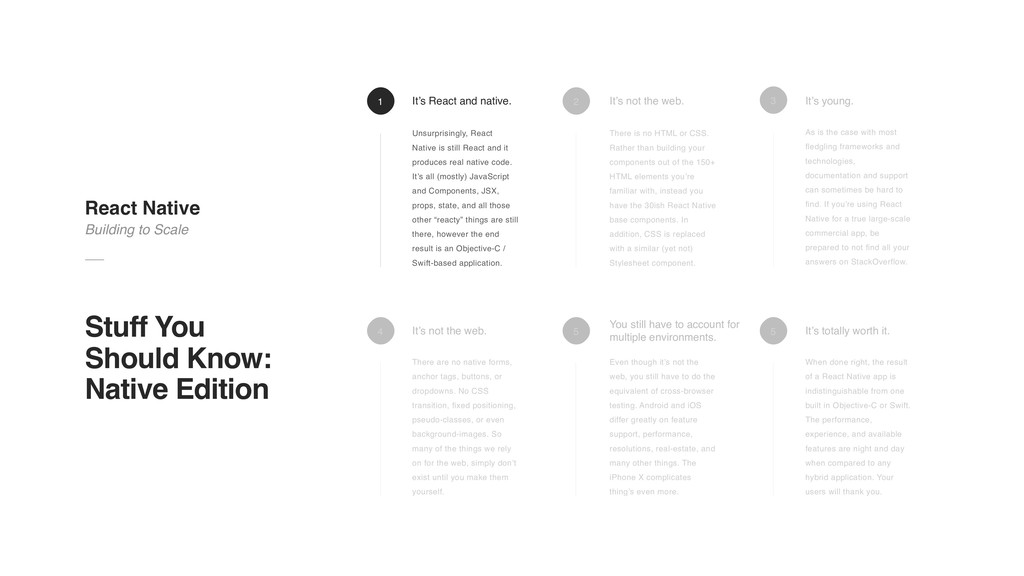
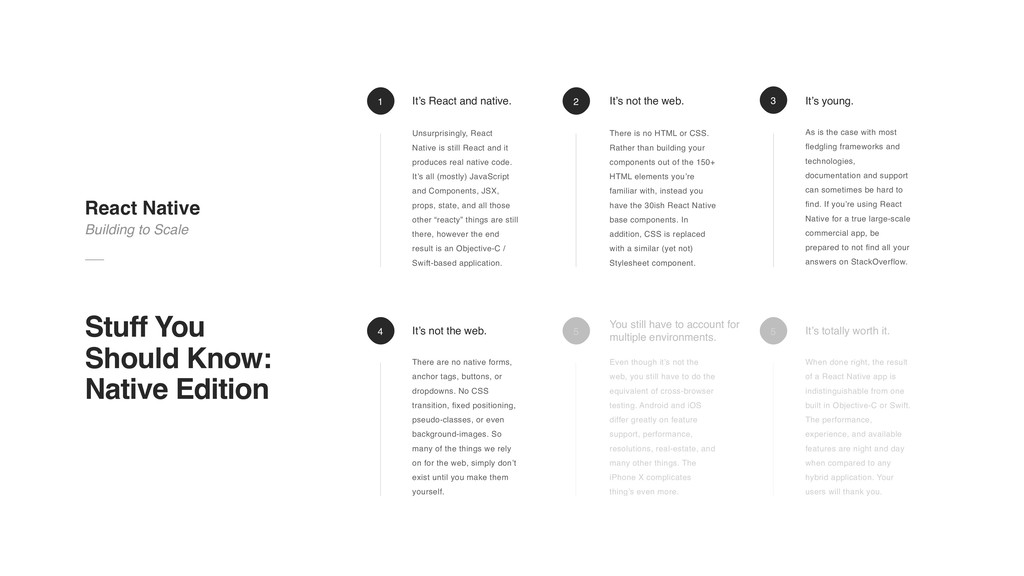
In this conversation, we’re going to go a bit beyond the “Getting Started” section you can find so easily on the official documentation. Instead, we’ll cover what some of those nuances are and what it’s actually like to build a large-scale native application in React Native and some of the lessons learned along the way (another spoiler: there’s a lot).

What we'll cover:
- Things you should know before diving in
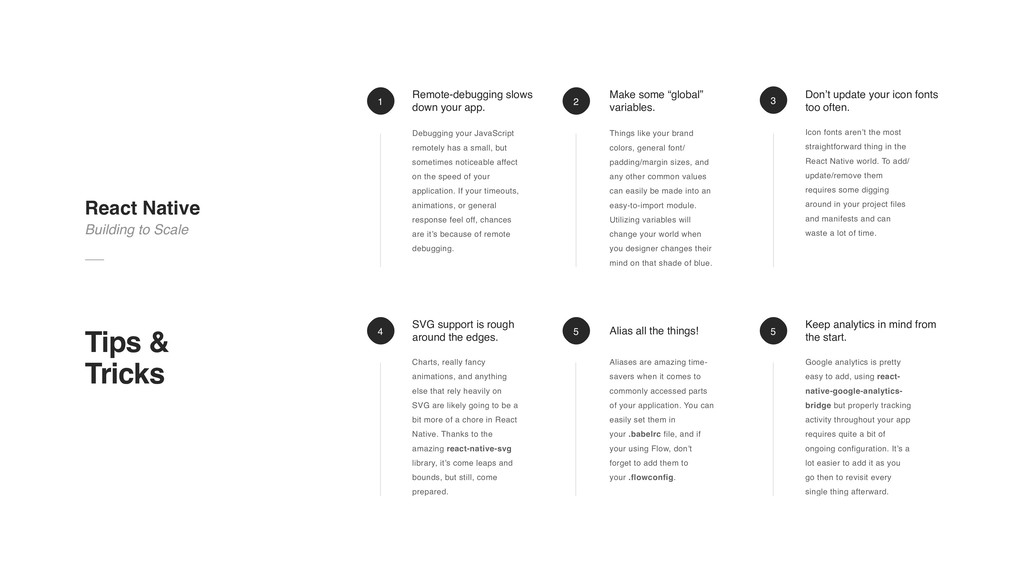
- Tips for building a scalable React Native project
- Things that aren’t in the official documentation (but should be)
- Routing
- Polishing your application with Animations & Transitions

Lawren

April 27, 2018
Tweet

More Decks by Lawren

Other Decks in Programming

Transcript

  1. With features like hot-reloading, react devtools, and being able to

    remote-debug your code in real-time with chrome devtools, it’ll make you feel right at home. Especially if you’re used to the web. It makes for an amazing developer experience. You can bypass the App Store approval process. Because JavaScript is at the heart of everything, you can enable your app to pull live updates from your server without having to actually release a build through the App Store. You can share code across iOS and Android. The majority, if not all of your code can be shared across iOS and Android. Gone are the days of having a dedicated team for each platform and with React Native you can iterate much, much faster. React Native Building to Scale Why React Native?
  2. React Native Building to Scale Stuff You Should Know: Native

    Edition As is the case with most fledgling frameworks and technologies, documentation and support can sometimes be hard to find. If you’re using React Native for a true large-scale commercial app, be prepared to not find all your answers on StackOverflow. 3 When done right, the result of a React Native app is indistinguishable from one built in Objective-C or Swift. The performance, experience, and available features are night and day when compared to any hybrid application. Your users will thank you. 5 It’s young. It’s totally worth it. Even though it’s not the web, you still have to do the equivalent of cross-browser testing. Android and iOS differ greatly on feature support, performance, resolutions, real-estate, and many other things. The iPhone X complicates thing’s even more. 5 There is no HTML or CSS. Rather than building your components out of the 150+ HTML elements you’re familiar with, instead you have the 30ish React Native base components. In addition, CSS is replaced with a similar (yet not) Stylesheet component. 2 It’s not the web. You still have to account for multiple environments. There are no native forms, anchor tags, buttons, or dropdowns. No CSS transition, fixed positioning, pseudo-classes, or even background-images. So many of the things we rely on for the web, simply don’t exist until you make them yourself. 4 Unsurprisingly, React Native is still React and it produces real native code. It’s all (mostly) JavaScript and Components, JSX, props, state, and all those other “reacty” things are still there, however the end result is an Objective-C / Swift-based application. 1 It’s React and native. It’s not the web.
  3. React Native Building to Scale Stuff You Should Know: Native

    Edition As is the case with most fledgling frameworks and technologies, documentation and support can sometimes be hard to find. If you’re using React Native for a true large-scale commercial app, be prepared to not find all your answers on StackOverflow. 3 When done right, the result of a React Native app is indistinguishable from one built in Objective-C or Swift. The performance, experience, and available features are night and day when compared to any hybrid application. Your users will thank you. 5 It’s young. It’s totally worth it. Even though it’s not the web, you still have to do the equivalent of cross-browser testing. Android and iOS differ greatly on feature support, performance, resolutions, real-estate, and many other things. The iPhone X complicates thing’s even more. 5 There is no HTML or CSS. Rather than building your components out of the 150+ HTML elements you’re familiar with, instead you have the 30ish React Native base components. In addition, CSS is replaced with a similar (yet not) Stylesheet component. 2 It’s not the web. You still have to account for multiple environments. There are no native forms, anchor tags, buttons, or dropdowns. No CSS transition, fixed positioning, pseudo-classes, or even background-images. So many of the things we rely on for the web, simply don’t exist until you make them yourself. 4 Unsurprisingly, React Native is still React and it produces real native code. It’s all (mostly) JavaScript and Components, JSX, props, state, and all those other “reacty” things are still there, however the end result is an Objective-C / Swift-based application. 1 It’s React and native. It’s not the web.
  4. React Native Building to Scale Stuff You Should Know: Native

    Edition As is the case with most fledgling frameworks and technologies, documentation and support can sometimes be hard to find. If you’re using React Native for a true large-scale commercial app, be prepared to not find all your answers on StackOverflow. 3 When done right, the result of a React Native app is indistinguishable from one built in Objective-C or Swift. The performance, experience, and available features are night and day when compared to any hybrid application. Your users will thank you. 5 It’s young. It’s totally worth it. Even though it’s not the web, you still have to do the equivalent of cross-browser testing. Android and iOS differ greatly on feature support, performance, resolutions, real-estate, and many other things. The iPhone X complicates thing’s even more. 5 There is no HTML or CSS. Rather than building your components out of the 150+ HTML elements you’re familiar with, instead you have the 30ish React Native base components. In addition, CSS is replaced with a similar (yet not) Stylesheet component. 2 It’s not the web. You still have to account for multiple environments. There are no native forms, anchor tags, buttons, or dropdowns. No CSS transition, fixed positioning, pseudo-classes, or even background-images. So many of the things we rely on for the web, simply don’t exist until you make them yourself. 4 Unsurprisingly, React Native is still React and it produces real native code. It’s all (mostly) JavaScript and Components, JSX, props, state, and all those other “reacty” things are still there, however the end result is an Objective-C / Swift-based application. 1 It’s React and native. It’s not the web.
  5. React Native Building to Scale Stuff You Should Know: Native

    Edition As is the case with most fledgling frameworks and technologies, documentation and support can sometimes be hard to find. If you’re using React Native for a true large-scale commercial app, be prepared to not find all your answers on StackOverflow. 3 When done right, the result of a React Native app is indistinguishable from one built in Objective-C or Swift. The performance, experience, and available features are night and day when compared to any hybrid application. Your users will thank you. 5 It’s young. It’s totally worth it. Even though it’s not the web, you still have to do the equivalent of cross-browser testing. Android and iOS differ greatly on feature support, performance, resolutions, real-estate, and many other things. The iPhone X complicates thing’s even more. 5 There is no HTML or CSS. Rather than building your components out of the 150+ HTML elements you’re familiar with, instead you have the 30ish React Native base components. In addition, CSS is replaced with a similar (yet not) Stylesheet component. 2 It’s not the web. You still have to account for multiple environments. There are no native forms, anchor tags, buttons, or dropdowns. No CSS transition, fixed positioning, pseudo-classes, or even background-images. So many of the things we rely on for the web, simply don’t exist until you make them yourself. 4 Unsurprisingly, React Native is still React and it produces real native code. It’s all (mostly) JavaScript and Components, JSX, props, state, and all those other “reacty” things are still there, however the end result is an Objective-C / Swift-based application. 1 It’s React and native. It’s not the web.
  6. React Native Building to Scale Stuff You Should Know: Native

    Edition As is the case with most fledgling frameworks and technologies, documentation and support can sometimes be hard to find. If you’re using React Native for a true large-scale commercial app, be prepared to not find all your answers on StackOverflow. 3 When done right, the result of a React Native app is indistinguishable from one built in Objective-C or Swift. The performance, experience, and available features are night and day when compared to any hybrid application. Your users will thank you. 5 It’s young. It’s totally worth it. Even though it’s not the web, you still have to do the equivalent of cross-browser testing. Android and iOS differ greatly on feature support, performance, resolutions, real-estate, and many other things. The iPhone X complicates thing’s even more. 5 There is no HTML or CSS. Rather than building your components out of the 150+ HTML elements you’re familiar with, instead you have the 30ish React Native base components. In addition, CSS is replaced with a similar (yet not) Stylesheet component. 2 It’s not the web. You still have to account for multiple environments. There are no native forms, anchor tags, buttons, or dropdowns. No CSS transition, fixed positioning, pseudo-classes, or even background-images. So many of the things we rely on for the web, simply don’t exist until you make them yourself. 4 Unsurprisingly, React Native is still React and it produces real native code. It’s all (mostly) JavaScript and Components, JSX, props, state, and all those other “reacty” things are still there, however the end result is an Objective-C / Swift-based application. 1 It’s React and native. It’s not the web.
  7. React Native Building to Scale Stuff You Should Know: Native

    Edition As is the case with most fledgling frameworks and technologies, documentation and support can sometimes be hard to find. If you’re using React Native for a true large-scale commercial app, be prepared to not find all your answers on StackOverflow. 3 When done right, the result of a React Native app is indistinguishable from one built in Objective-C or Swift. The performance, experience, and available features are night and day when compared to any hybrid application. Your users will thank you. 5 It’s young. It’s totally worth it. Even though it’s not the web, you still have to do the equivalent of cross-browser testing. Android and iOS differ greatly on feature support, performance, resolutions, real-estate, and many other things. The iPhone X complicates thing’s even more. 5 There is no HTML or CSS. Rather than building your components out of the 150+ HTML elements you’re familiar with, instead you have the 30ish React Native base components. In addition, CSS is replaced with a similar (yet not) Stylesheet component. 2 It’s not the web. You still have to account for multiple environments. There are no native forms, anchor tags, buttons, or dropdowns. No CSS transition, fixed positioning, pseudo-classes, or even background-images. So many of the things we rely on for the web, simply don’t exist until you make them yourself. 4 Unsurprisingly, React Native is still React and it produces real native code. It’s all (mostly) JavaScript and Components, JSX, props, state, and all those other “reacty” things are still there, however the end result is an Objective-C / Swift-based application. 1 It’s React and native. It’s not the web.
  8. The majority of new features begin by copying an existing

    feature and tweaking it fit your new mold. The more consistent your document structure and writing style, the less you’ll have to write. Consistency is king. More is less. Comment. Unit-test. Add type-checking. Use long variable names. All these things add to your up-front investment, but will save you tons of time and many headaches down the road. Keep it simple. Your big public-facing app is not the place to test that new thing you learned, or show off to your co-workers. Thing of programmer UX and generally speaking, stick to the basics. React Native Building to Scale Tips & Tricks
  9. Your application structure is arguably one of the most important

    parts to ensuring the scaleability of your application, however everyone approaches this differently and there is no one, true answer. That being said, it’s generally a good idea to structure your application from the perspective of someone completely new the project. For us, that meant that things that are accessed universally throughout our application (components, services, fonts, icons, etc) lived closer to the root of the project, and things that were less general lived in more nested locations. The idea is that the code structure mimics the application flow. We took this a step further and decided to nest variations of components (for example a checkbox) inside their more generic counterparts (an input in this case). Additionally, you can re- export our “child-component” in the parent- components index file for easy importing elsewhere. RETHINK YOUR APPLICATION STRUCTURE. React Native Building to Scale Tips & Tricks app/ |- assets |- components |- Input |- components |- Checkbox index.js styles.js types.js |- config |- navigators |- scenes |- services index.js
  10. React Native Building to Scale Tips & Tricks /** re-export

    any child components */ export { default as LinkButton } from './components/LinkButton'; export { default as URLButton } from './components/URLButton'; /** import all our dependencies */ import … class Button extends React.Component<Props> { … export default Button; import Button, { LinkButton } from 'Components/Button';
  11. When it comes to React Native, iOS and Android often

    behave very differently. Generally speaking, Android tends to have the most “gotchas” and caveats during development, but the good news is that if it works on Android, it will typically work on iOS, with the exception of platform specific components or features. Creating and testing a feature only on iOS to later find out that it behaves and/or looks completely different on Android can be quite frustrating, so save yourself some headaches and start with Android. You will likely find some small differences when you load it up on iPhone for the first time, but the cleaning effort is often much, much less. ANDROID FIRST. React Native Building to Scale Tips & Tricks
  12. Phone and tablets have quite the range of resolutions, screen

    sizes, ratios, and native UI elements. This is further complicated when certain flagships make big changes to their UI, like the iPhone X. SafeAreaView is a React Native component that accounts for many of these variants and nuances and ensures that your content is only rendered within “safe” bounds. It will ensure that your view isn’t getting rendered behind toolbars, status bars, or other native UI elements. USE SAFEAREAVIEW. React Native Building to Scale Tips & Tricks <SafeAreaView style={{ flex: 1 }}> <View style={{ flex: 1 }}> <Text>Hello World!</Text> </View> </SafeAreaView>
  13. Like any large application, a big React Native project can

    be a beast to handle. This can be increasingly unwieldy if you have a lot a separate functionality between iOS and Android. From the start of your project, don’t shy away from a large file count and long names. Don’t try to pack too much into any one individual file or component or scene. Keep things broken up and do whatever it takes to keep them isolated and simple. Don’t get too caught up in “best practices” that dictate organization or style. These things are best left to the individuals maintaining the project. For example, we opted to treat all of our components as class-based stateful components, regardless of if they actually have state or not. This allows us to be consistent across all of our components and avoids a lot of tedious restructuring if we ever end up adding state to a component that didn’t have it before. PUT MAINTAINABILITY FIRST. React Native Building to Scale Tips & Tricks
  14. Icon fonts aren’t the most straightforward thing in the React

    Native world. To add/ update/remove them requires some digging around in your project files and manifests and can waste a lot of time. 3 Google analytics is pretty easy to add, using react- native-google-analytics- bridge but properly tracking activity throughout your app requires quite a bit of ongoing configuration. It’s a lot easier to add it as you go then to revisit every single thing afterward. 5 Don’t update your icon fonts too often. Keep analytics in mind from the start. Aliases are amazing time- savers when it comes to commonly accessed parts of your application. You can easily set them in your .babelrc file, and if your using Flow, don’t forget to add them to your .flowconfig. 5 Things like your brand colors, general font/ padding/margin sizes, and any other common values can easily be made into an easy-to-import module. Utilizing variables will change your world when you designer changes their mind on that shade of blue. 2 Make some “global” variables. Alias all the things! Charts, really fancy animations, and anything else that rely heavily on SVG are likely going to be a bit more of a chore in React Native. Thanks to the amazing react-native-svg library, it’s come leaps and bounds, but still, come prepared. 4 Debugging your JavaScript remotely has a small, but sometimes noticeable affect on the speed of your application. If your timeouts, animations, or general response feel off, chances are it’s because of remote debugging. 1 Remote-debugging slows down your app. SVG support is rough around the edges. React Native Building to Scale Tips & Tricks
  15. A Navigator is simply a React component that allows you

    to define your application structure and render common, configurable elements such as headers and tab bars. A navigator usually takes a route configuration object and an options object to help you configure the appearance and behavior of your navigator. The navigator is also what typically handles your navigation history along with the gestures and animations you would expect when navigating. Out of the box, React Navigation comes with a handful of useful navigator functions to help you easily create a Navigator and define the flow of your application. These then get included in your application exactly like you would any other React component. NAVIGATORS React Native Building to Scale React Navigation /** import dependencies */ import { SwitchNavigator } from "react-navigation"; import EnterEmail from "Scenes/EnterEmail"; import EmailSent from "Scenes/EmailSent"; /** our navigator settings and export */ const Navigator = SwitchNavigator({ EnterEmail: { screen: EnterEmail, }, EmailSent: { screen: EmailSent, }, }, { initialRouteName: 'EnterEmail', backBehavior: 'initialRoute', }); export default Navigator;
  16. A Navigation service can be wildly useful if you find

    yourself struggling to keep track of multiple navigators or wanting to navigate to a parent- route. One is highly recommended for a large- scale application. In this basic example, we’ve created a simple service that allows us to easily render our routes (helpful for easily distinguishing Navigators from other components), and store refs to rendered routes for easy use from anywhere in application. Furthermore, this enables us to add an option to our LinkButton component so it can conveniently navigate to a route outside of it’s current context. NAVIGATION SERVICE React Native Building to Scale React Navigation const Navigation = { /** register the navigator to our navigators object */ navigators: { Root, Unauthenticated, Authenticated, }, refs: {}, /** render a registered navigator and create a ref for global use */ render: function(name) { const Navigator = this.navigators[name]; return <Navigator ref={ref => this.refs[name] = ref } />; }, /** return the ref of a registered navigator */ get: function(name) { return this.refs[name]; }, /** navigate to a given route within a specific navigator */ navigate: function(navigator, routeName, params) { this.get(navigator).dispatch( NavigationActions.navigate({ type: 'Navigation/NAVIGATE', routeName, params, }), ); }, };
  17. React Native Building to Scale React Navigation import Navigation from

    "Services/Navigation"; class Unauthenticated extends React.Component<{}> { render() { return ( <KeyboardAvoidingView> <ScrollView> {Navigation.render('Unauthenticated')} </ScrollView> </KeyboardAvoidingView> ); } } import Navigation from 'Services/Navigation'; class LinkButton extends React.Component<Props> { handlePress = () => { LinearAnimation(); Keyboard.dismiss(); setTimeout(() => { /** if a navigator was passed, use that instead */ if (this.props.navigator) { Navigation.navigate(this.props.navigator, this.props.to); } else this.props.navigation.navigate(this.props.to); }, 150) }; render() { return ( <TouchableOpacity onPress={this.handlePress}> … </TouchableOpacity> ); } } export default withNavigation(LinkButton); <LinkButton to="WhatsNew" navigator="Root" text="What's New?" />
  18. React Native has an Animation API that can be extremely

    useful, however it tends to be overused and can hurt application performance and create unnecessary overhead for the developer(s). Instead, try the LayoutAnimation API. LayoutAnimation is typically called immediately prior to a state change or in your render method, and automagically animates view changes whenever the layout is updated (on state changes for example). This includes both style changes and content changes. Not only is it generally more performant than the Animation API, but LayoutAnimation is also easier to implement and can be used to create transitions between scenes that are otherwise very, very difficult to implement. LAYOUTANIMATION React Native Building to Scale Animations
  19. React Native Building to Scale Animations LayoutAnimation.configureNext(LayoutAnimation.Presets.spring); LayoutAnimation.configureNext({ duration: 200,

    create: { type: LayoutAnimation.Types.linear, property: LayoutAnimation.Properties.opacity, }, update: { type: LayoutAnimation.Types.easeInEaseOut, }, });
  20. React Native Building to Scale Animations export const LinearAnimation =

    () => { return LayoutAnimation.configureNext({ duration: 200, create: { type: LayoutAnimation.Types.linear, property: LayoutAnimation.Properties.opacity, }, update: { type: LayoutAnimation.Types.easeInEaseOut, }, }); }; import … import { LinearAnimation } from 'Components/LayoutAnimators'; class RegisterEmail extends React.Component<Props, State> { state = { activeIndex: 0, }; handleChange = (activeIndex) => { LinearAnimation(); this.setState({ activeIndex }); }; handleSubmit = (values) => { … }; render() { return ( <Form onSubmit={this.handleSubmit}> ... </Form> ); } } export default RegisterEmail;
  21. React Native Building to Scale Animations import { UIManager }

    from ‘react-native'; UIManager.setLayoutAnimationEnabledExperimental && UIManager.setLayoutAnimationEnabledExperimental(true); There is one small caveat to LayoutAnimation. It does not support Android out of the box. To enable LayoutAnimation for Android devices, make sure you add the following line to your application’s index file (or any global javascript file). Supporting Android
  22. Additional Reading React Native’s LayoutAnimation is Awesome by Justin Poliachik

    React Native Animations Revisited by Michał Chudziak React Navigation - Getting Started How to Better Organize Your React Applications by Alexis Mangin So You Want To Dynamically Update Your React Native App by Clay Allsopp