Upgrade to Pro — share decks privately, control downloads, hide ads and more …

Lessons Learned With Dockerfiles and Docker Builds

Lessons Learned With Dockerfiles and Docker Builds

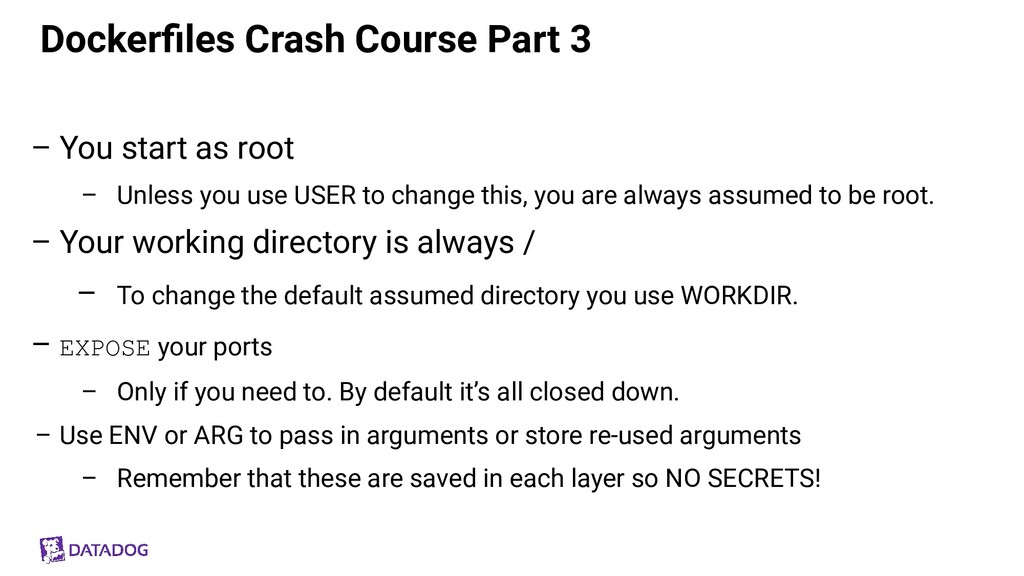
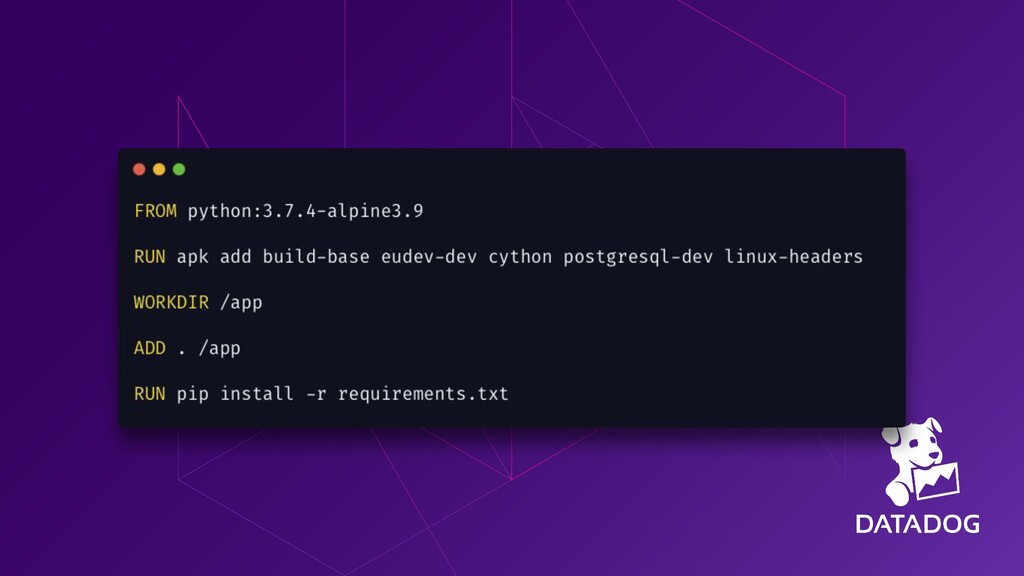
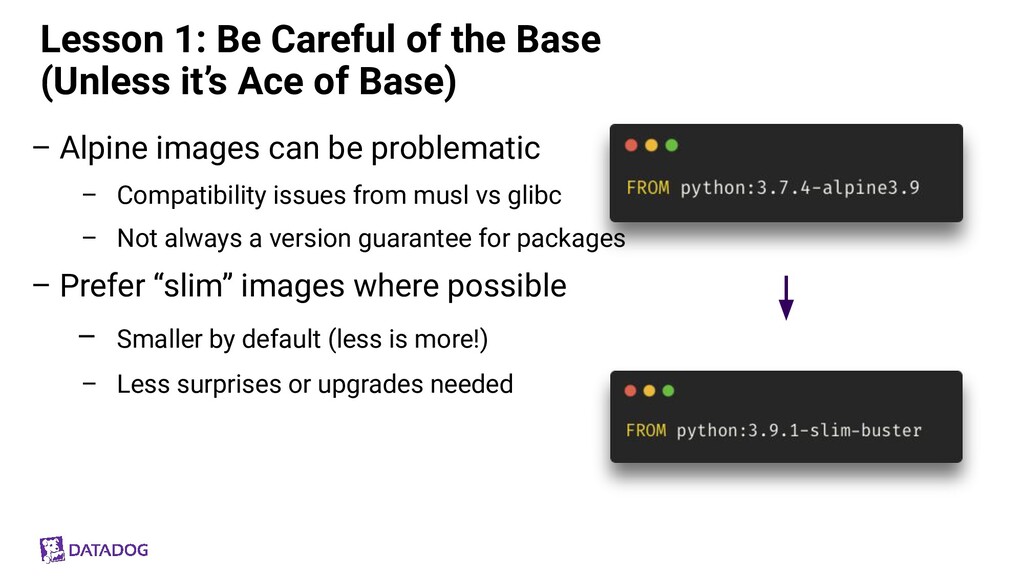
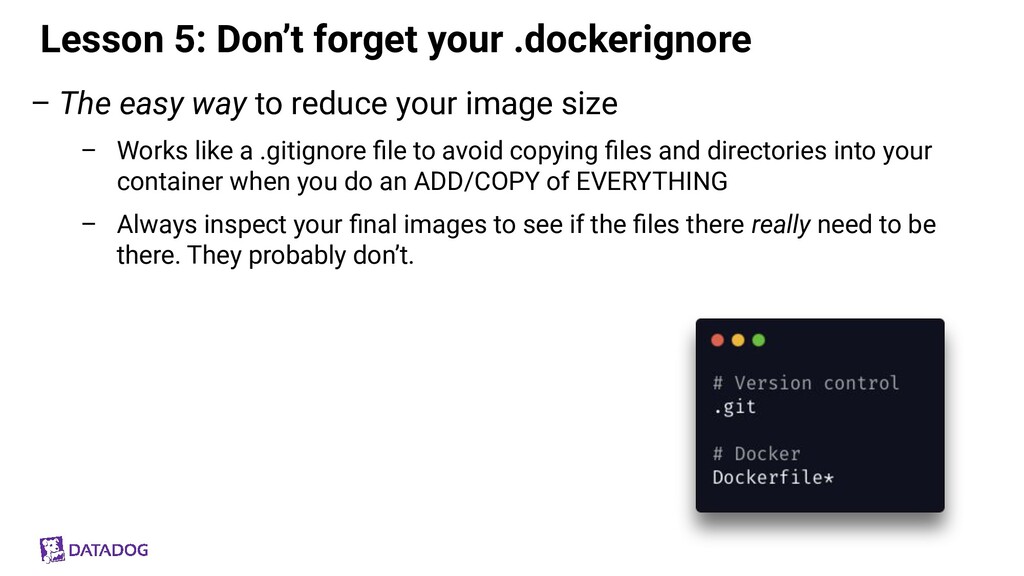
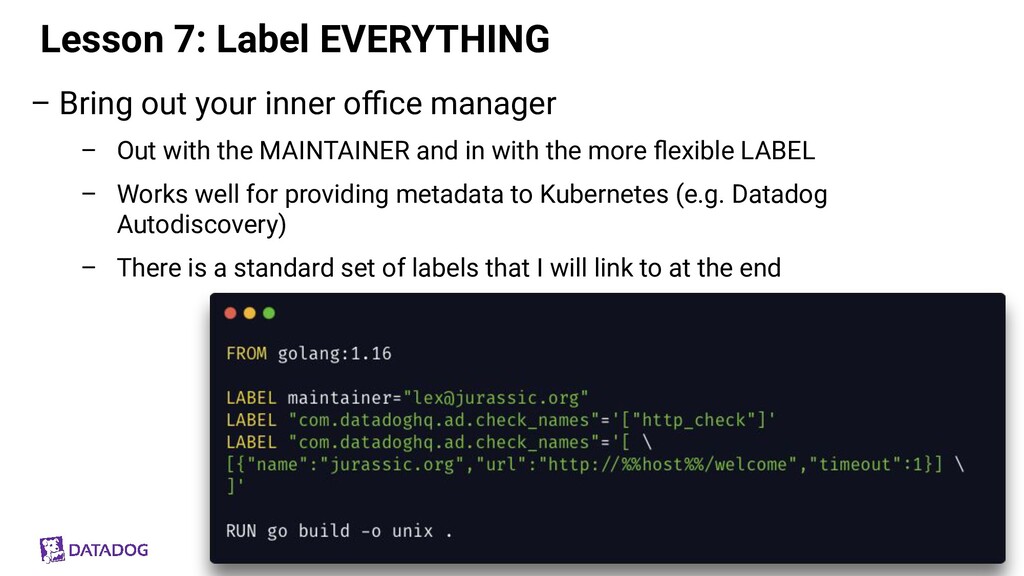
Dockerfiles and Docker builds can be pretty straightforward until you realize you are constantly rebuilding and creating very large containers as a result. Learning the tricks to optimizing your Dockerfiles and Docker builds pay dividends in productivity. In this session, we will review the basics of a Dockerfile so we are all on the same page. Then, we will do a few variations of that Dockerfile to highlight some strengths and weaknesses of each variation so you can make better decisions about improving your build process. You’ll also learn about new innovations in the Docker build chain space that you might have not heard, which could drastically change how you think about Docker builds.

Aaron Kalin

May 27, 2021
Tweet

More Decks by Aaron Kalin

Other Decks in Programming

Transcript

  1. Hi! I’m Aaron – Tech Evangelist with Datadog – Software

    developer and Sysadmin for over 20 years – Active maintainer on Ecommerce Workshop – Social media: @martinisoft
  2. Overview – What is a Dockerfile anyway? – 7 Lessons

    Learned via Dockerfiles – Going further with Buildkit and buildx – Takeaways and Resources
  3. Dockerfiles Crash Course Part 1 – It’s a lot like

    a Makefile – Each instruction (FROM, RUN, COPY, ENTRYPOINT) all creates a layer – The beginning of a Dockerfile is always FROM – Usually an operating system image
  4. Dockerfiles Crash Course Part 2 – Each layer generates a

    cache – If the layer instruction doesn’t change the cache won’t invalidate (Usually) – Each command is generally straightforward – The simplest container can just be a FROM, but you probably want an ENTRYPOINT and CMD
  5. Dockerfiles Crash Course Part 3 – You start as root

    – Unless you use USER to change this, you are always assumed to be root. – Your working directory is always / – To change the default assumed directory you use WORKDIR. – EXPOSE your ports – Only if you need to. By default it’s all closed down. – Use ENV or ARG to pass in arguments or store re-used arguments – Remember that these are saved in each layer so NO SECRETS!
  6. Lesson 1: Be Careful of the Base (Unless it’s Ace

    of Base) – Alpine images can be problematic – Compatibility issues from musl vs glibc – Not always a version guarantee for packages – Prefer “slim” images where possible – Smaller by default (less is more!) – Less surprises or upgrades needed
  7. Lesson 2: Chain your RUN commands – Layer efficiency for

    the win – Remember each command creates a layer – Setup dependency packages as early as possible – Sort your dependency package names
  8. Lesson 3: Cleanup is good – Again, Layer efficiency –

    Can drastically reduce resulting image size – Any cleanup from that layer MUST BE DONE IN THAT LAYER
  9. Lesson 4: Run your app package installs separately – Remember

    the layer cache – When a layer cache is rebuilt, all following (below) layers have to be rebuilt – Your app packages don’t change too often, but your source code does – Bring in your app code after this step if it’s not a compiled language
  10. Lesson 5: Don’t forget your .dockerignore – The easy way

    to reduce your image size – Works like a .gitignore file to avoid copying files and directories into your container when you do an ADD/COPY of EVERYTHING – Always inspect your final images to see if the files there really need to be there. They probably don’t.
  11. Lesson 6: Use multi-stage builds – Your new superpower with

    Docker – Technically you are doing multi-stage builds already if you aren’t building from scratch – Organize your multi-stage builds to put low activity parts earlier – Better control of dependency changes – Adds complexity since you now have multiple build targets
  12. Lesson 7: Label EVERYTHING – Bring out your inner office

    manager – Out with the MAINTAINER and in with the more flexible LABEL – Works well for providing metadata to Kubernetes (e.g. Datadog Autodiscovery) – There is a standard set of labels that I will link to at the end
  13. Buildkit is AWESOME – Buildkit was first introduced to docker

    in 18.09 – Still kept behind a feature flag 😢 (Slowly merging into build) – Enable it via DOCKER_BUILDKIT=1 environment variable per command – Or add { “features”: { “buildkit”: true } } to your docker config and restart – Once enabled, check out the docker buildx command
  14. But why? – Lots of major changes – You can

    pass secrets to a container at build time that won’t stay with the container – You can also send SSH agent keys (private repo clone in the container) – Concurrent builds thanks to a new intermediary format – Distributed builds via a registry build cache* – OpenTracing of builds (Trace layer build performance with Datadog?) – Multi-arch builds (AMD64 and ARM64? Sure!) – Even more… I can’t list it all!
  15. Don’t forget... – Pay attention to the base – Less

    is more with commands (compact them) – Invest in multi-stage builds – Clean up after packages and use .dockerignore – Label ALL THE THINGS! – Try out Buildkit via buildx
  16. Resources – Docker Docs: Search for “Buildkit” – Ecommerce workshop

    project https://github.com/DataDog/ecommerce-workshop – OpenContainers Annotations (Label ALL THE THINGS) https://github.com/opencontainers/image-spec/blob/master/an notations.md – Dive (for exploring the filesystem in each layer of a container) https://github.com/wagoodman/dive