version of Google’s massively popular MV* framework for building complex applications in the browser (and beyond). One framework for mobile and desktop
concrete or conceptual platform where common code with generic functionality can be selectively specialized or overridden by developers or users. Frameworks take the form of libraries, where a well-defined application program interface (API) is reusable anywhere within the software under development.” Wikipedia
productive. It is a skeleton, a complete set of tools that was built with the purpose of allowing you to focus on one or more specific tasks. You take that skeleton and build your application on top of it.” Andrei Cristof, Software developer
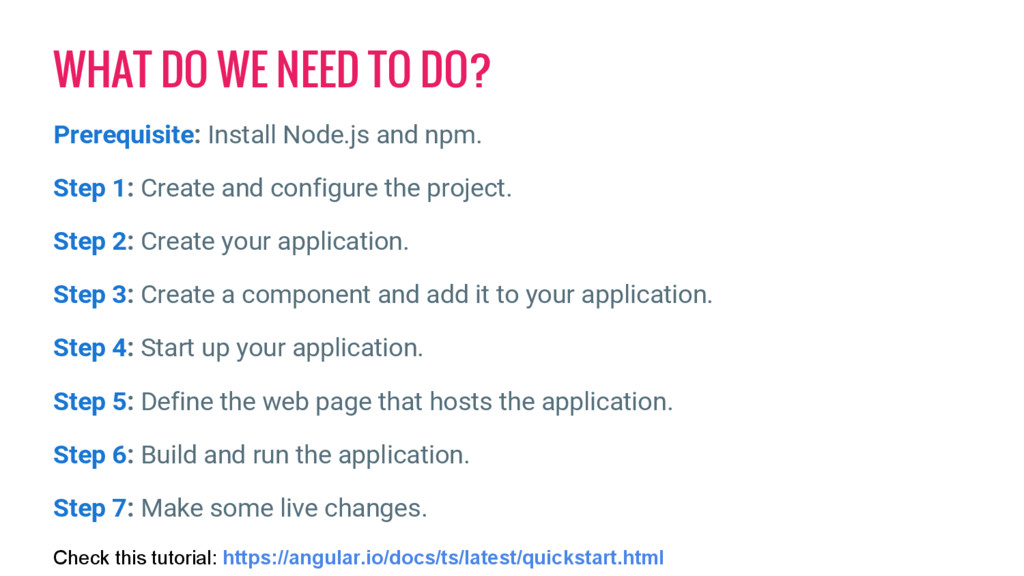
npm. Step 1: Create and configure the project. Step 2: Create your application. Step 3: Create a component and add it to your application. Step 4: Start up your application. Step 5: Define the web page that hosts the application. Step 6: Build and run the application. Step 7: Make some live changes. Check this tutorial: https://angular.io/docs/ts/latest/quickstart.html
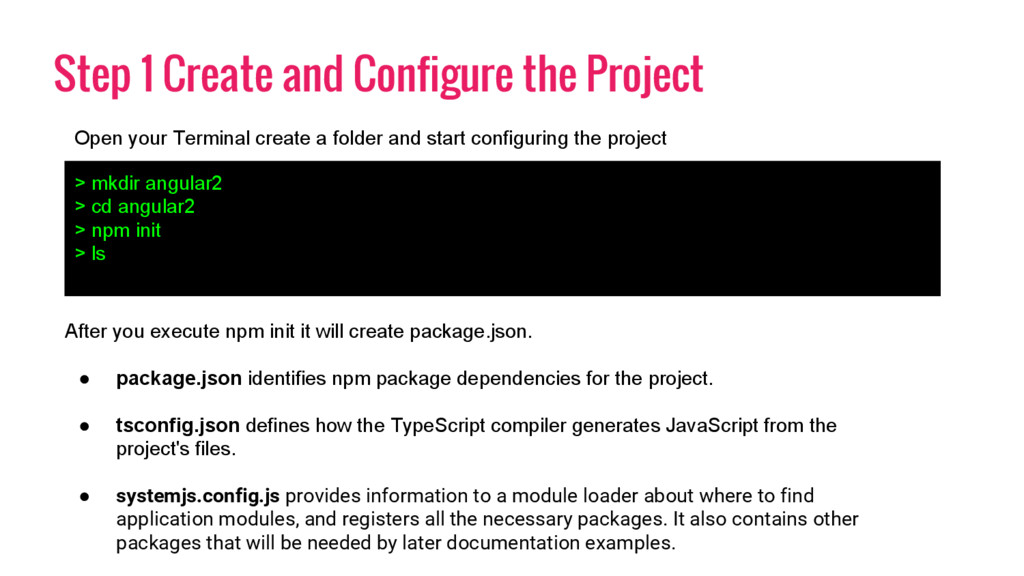
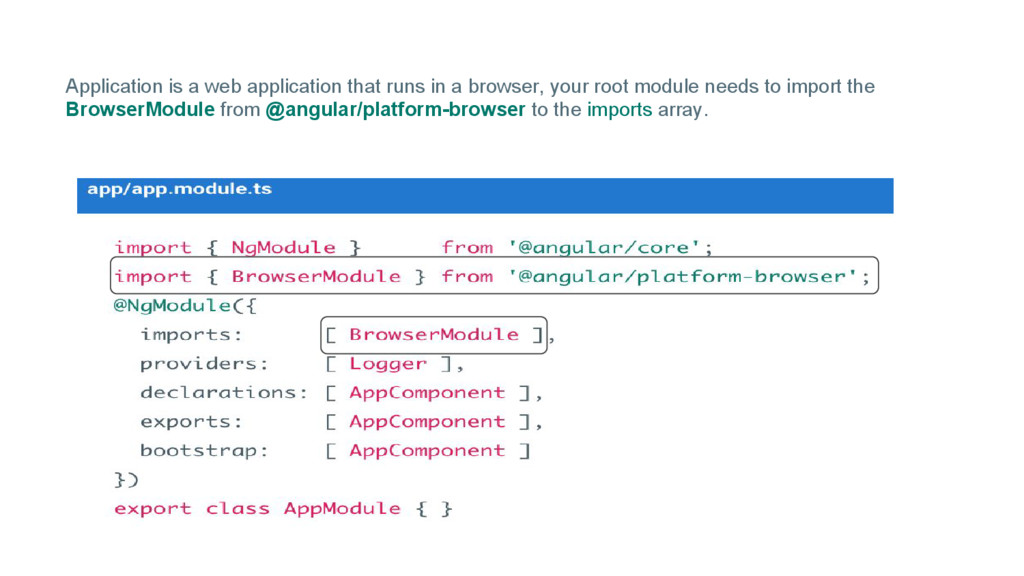
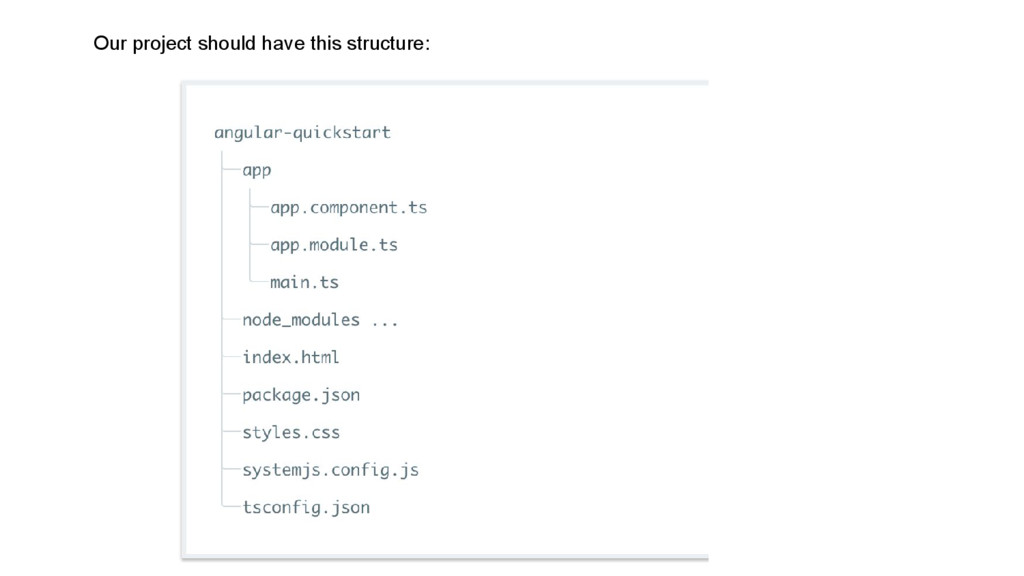
create a folder and start configuring the project > mkdir angular2 > cd angular2 > npm init > ls After you execute npm init it will create package.json. • package.json identifies npm package dependencies for the project. • tsconfig.json defines how the TypeScript compiler generates JavaScript from the project's files. • systemjs.config.js provides information to a module loader about where to find application modules, and registers all the necessary packages. It also contains other packages that will be needed by later documentation examples.
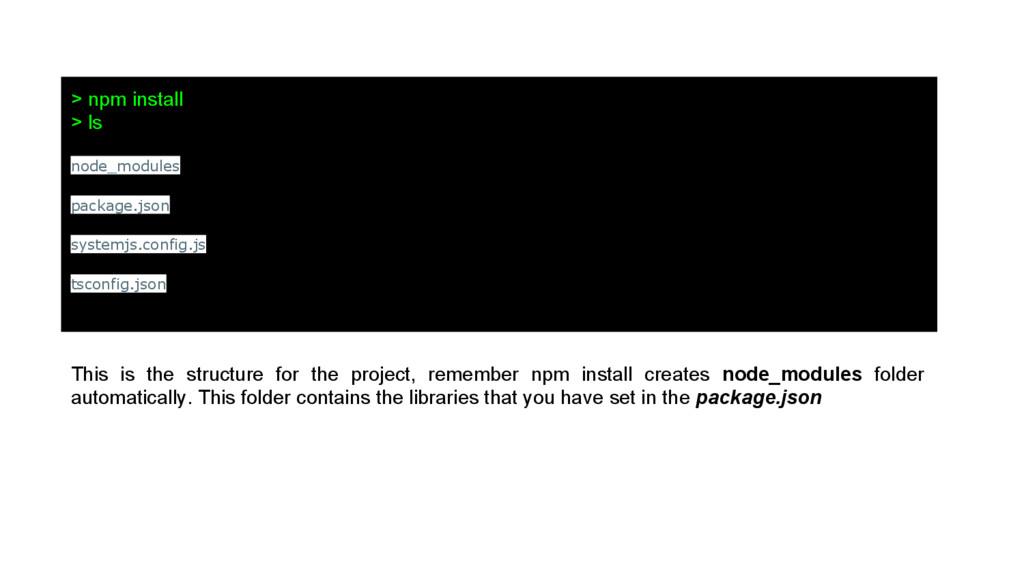
is the structure for the project, remember npm install creates node_modules folder automatically. This folder contains the libraries that you have set in the package.json
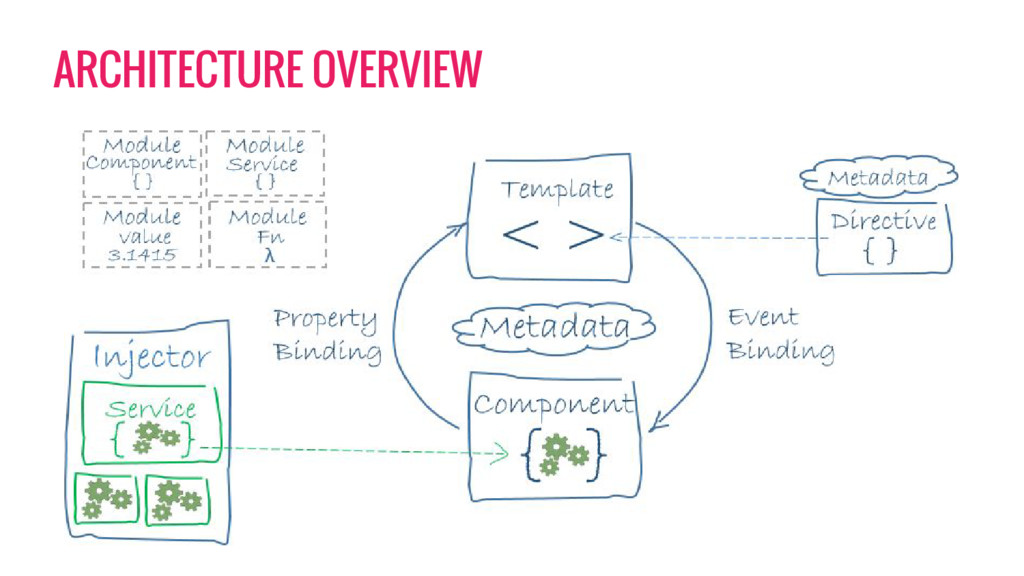
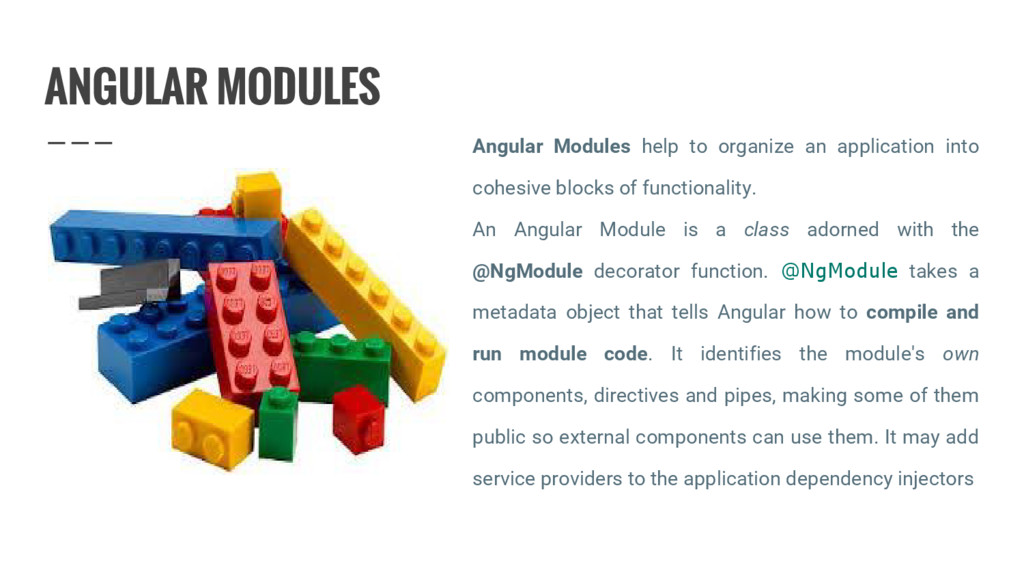
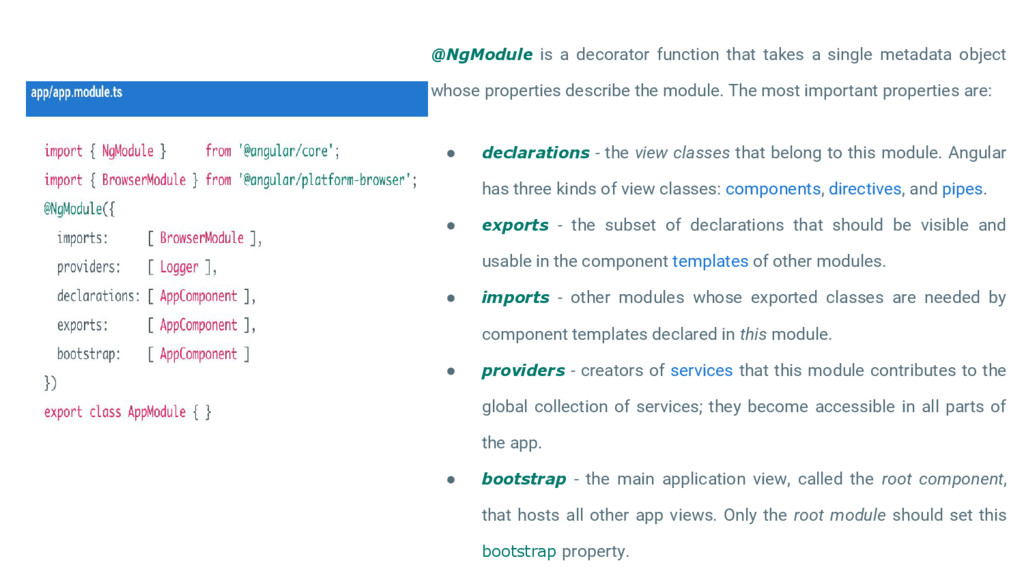
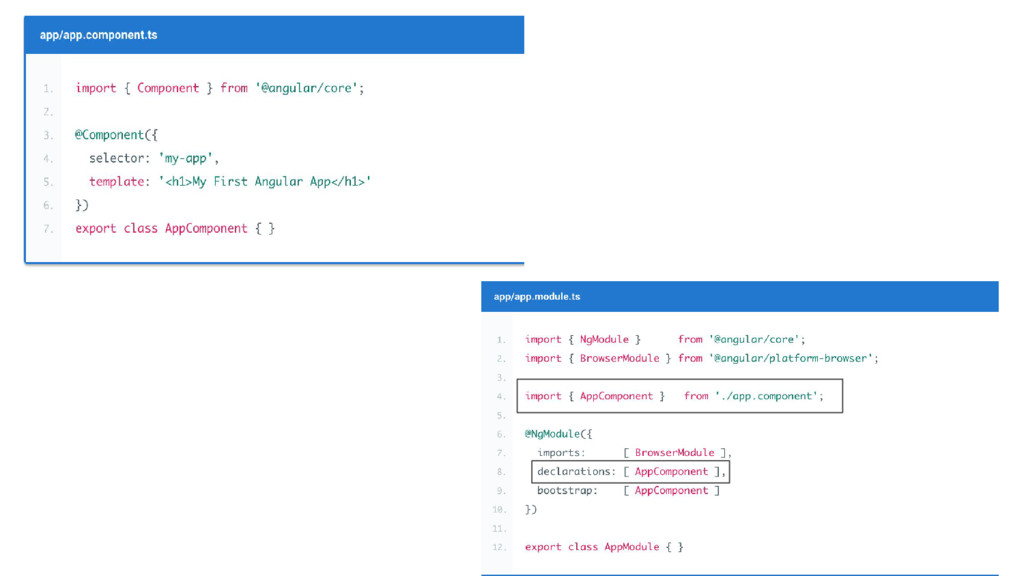
cohesive blocks of functionality. An Angular Module is a class adorned with the @NgModule decorator function. @NgModule takes a metadata object that tells Angular how to compile and run module code. It identifies the module's own components, directives and pipes, making some of them public so external components can use them. It may add service providers to the application dependency injectors
object whose properties describe the module. The most important properties are: • declarations - the view classes that belong to this module. Angular has three kinds of view classes: components, directives, and pipes. • exports - the subset of declarations that should be visible and usable in the component templates of other modules. • imports - other modules whose exported classes are needed by component templates declared in this module. • providers - creators of services that this module contributes to the global collection of services; they become accessible in all parts of the app. • bootstrap - the main application view, called the root component, that hosts all other app views. Only the root module should set this bootstrap property.
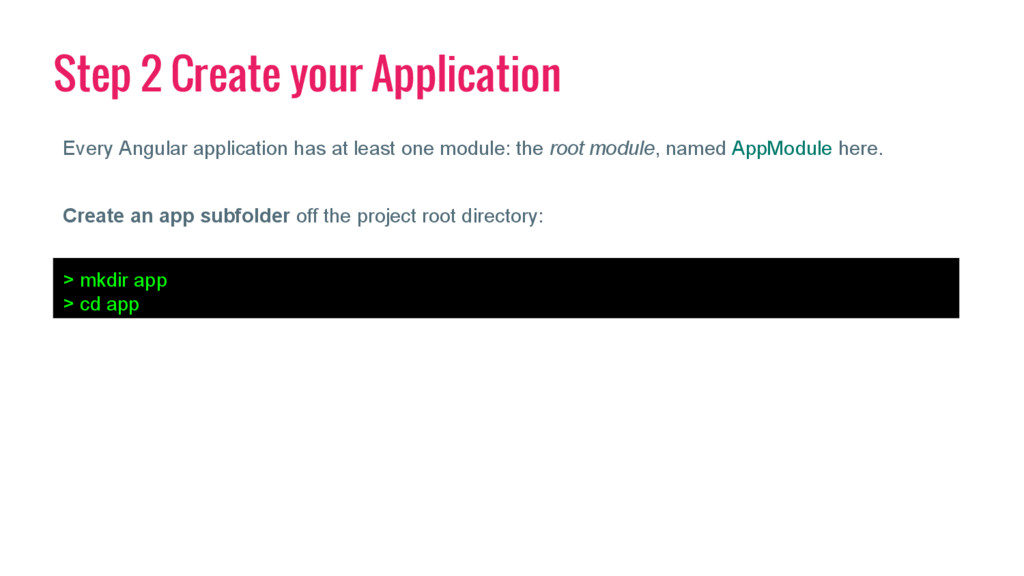
application Every Angular application has at least one component: the root component, named AppComponent here. Components are the basic building blocks of Angular applications. A component controls a portion of the screen—a view—through its associated template.
an Angular component and provide additional metadata that determines how the component should be processed, instantiated and used at runtime. A component must belong to an NgModule in order for it to be usable by another component or application. To specify that a component is a member of an NgModule, you should list it in the declarations field of that NgModule.
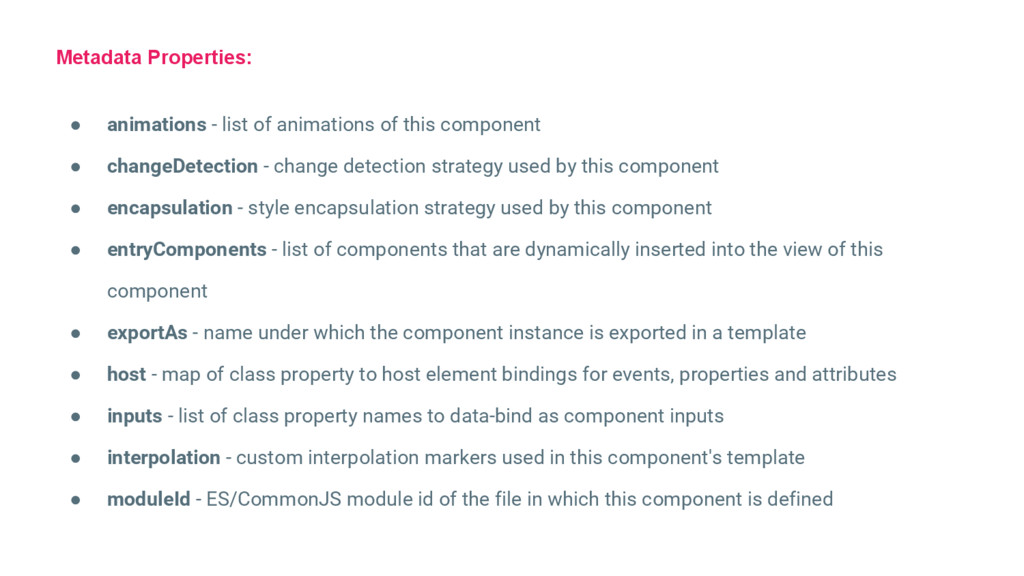
component • changeDetection - change detection strategy used by this component • encapsulation - style encapsulation strategy used by this component • entryComponents - list of components that are dynamically inserted into the view of this component • exportAs - name under which the component instance is exported in a template • host - map of class property to host element bindings for events, properties and attributes • inputs - list of class property names to data-bind as component inputs • interpolation - custom interpolation markers used in this component's template • moduleId - ES/CommonJS module id of the file in which this component is defined
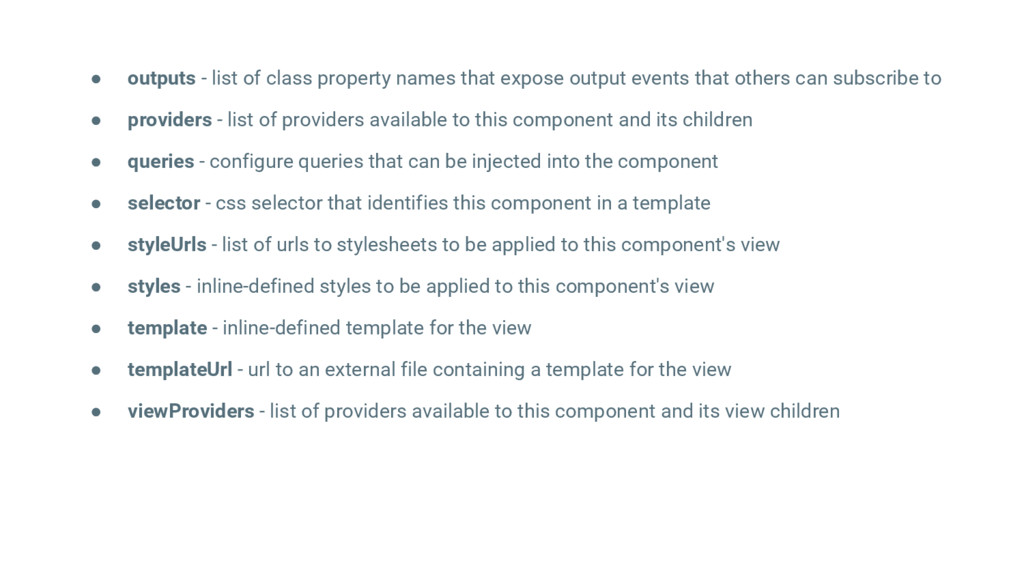
output events that others can subscribe to • providers - list of providers available to this component and its children • queries - configure queries that can be injected into the component • selector - css selector that identifies this component in a template • styleUrls - list of urls to stylesheets to be applied to this component's view • styles - inline-defined styles to be applied to this component's view • template - inline-defined template for the view • templateUrl - url to an external file containing a template for the view • viewProviders - list of providers available to this component and its view children
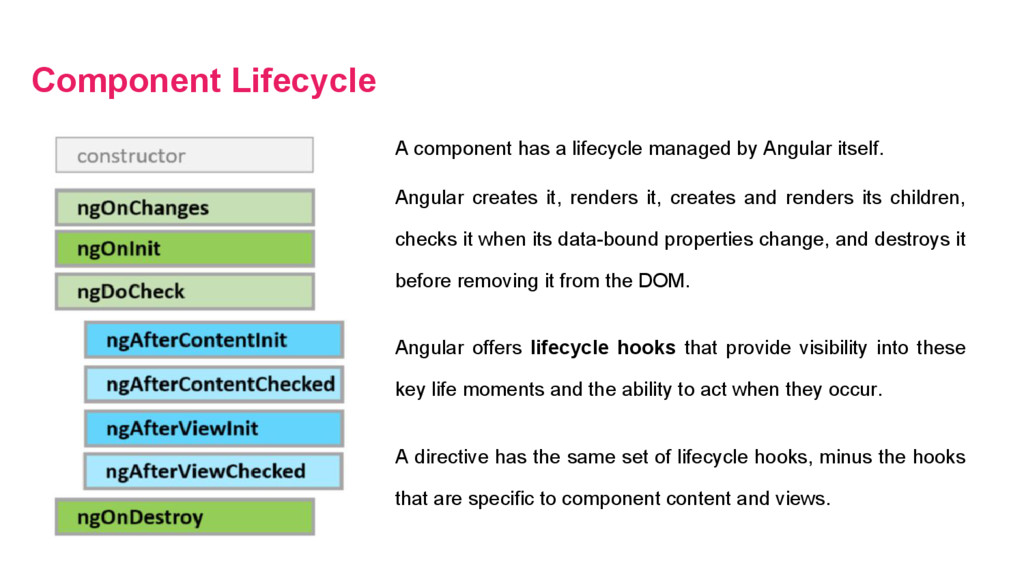
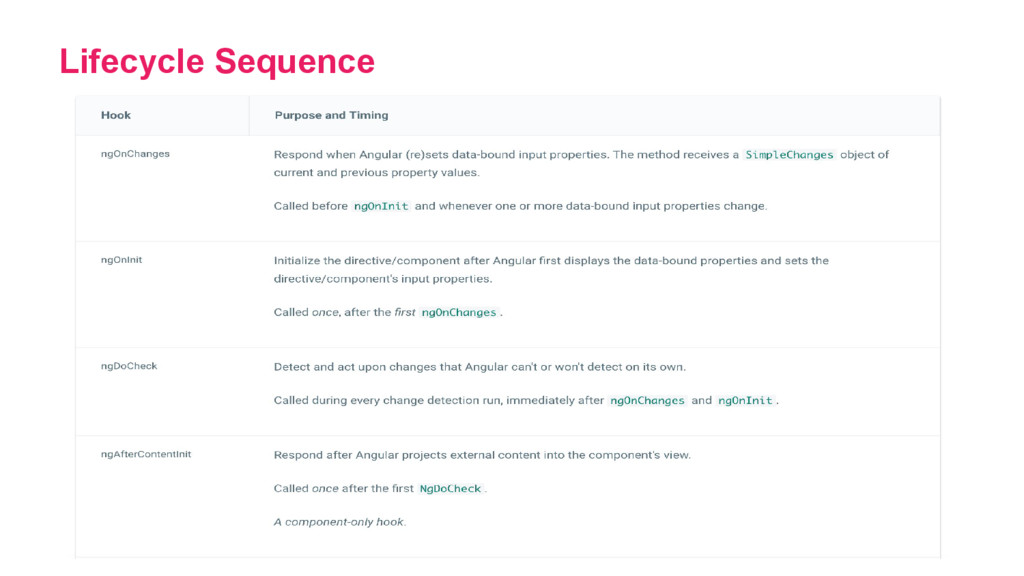
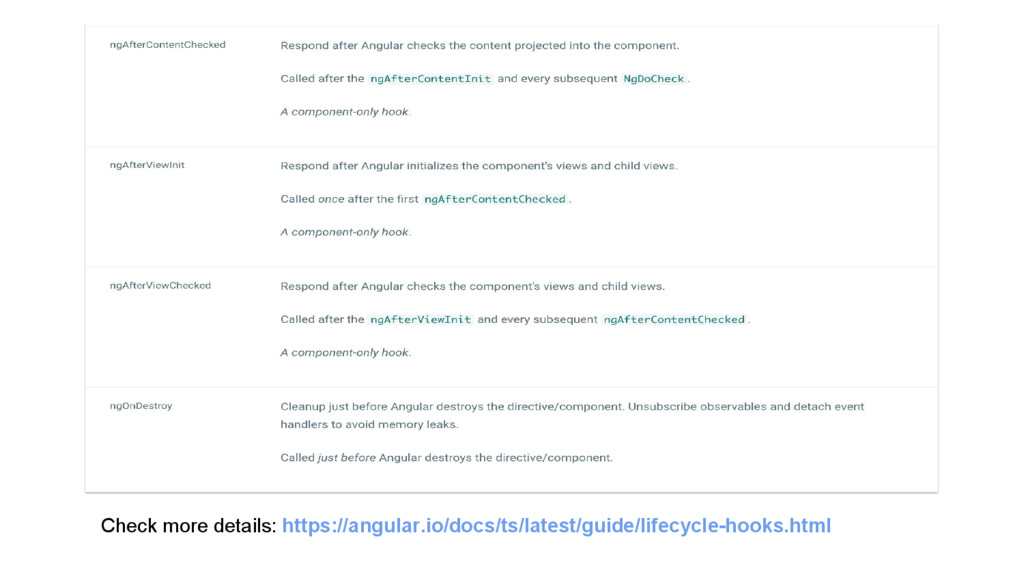
itself. Angular creates it, renders it, creates and renders its children, checks it when its data-bound properties change, and destroys it before removing it from the DOM. Angular offers lifecycle hooks that provide visibility into these key life moments and the ability to act when they occur. A directive has the same set of lifecycle hooks, minus the hooks that are specific to component content and views.
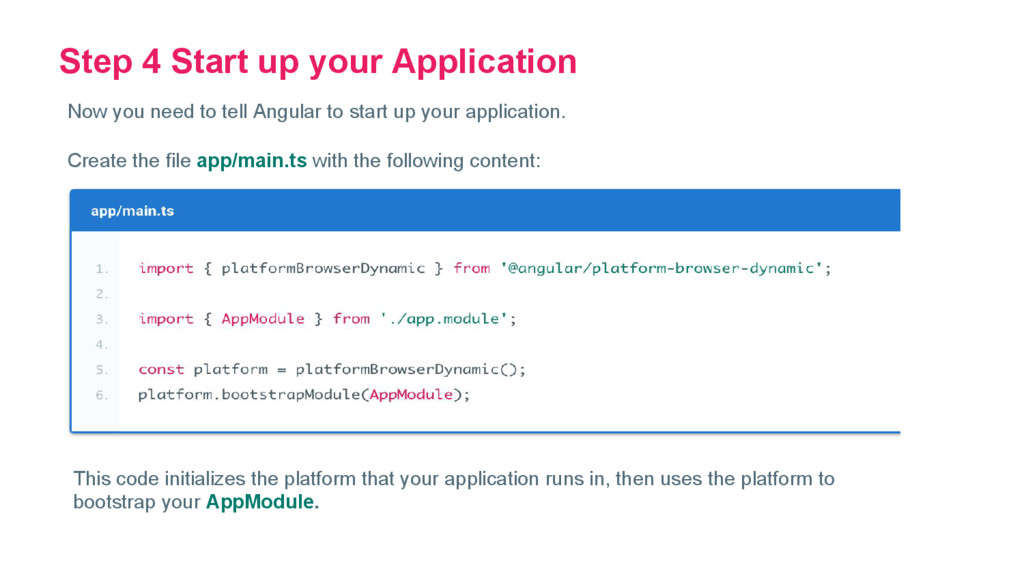
tell Angular to start up your application. Create the file app/main.ts with the following content: This code initializes the platform that your application runs in, then uses the platform to bootstrap your AppModule.
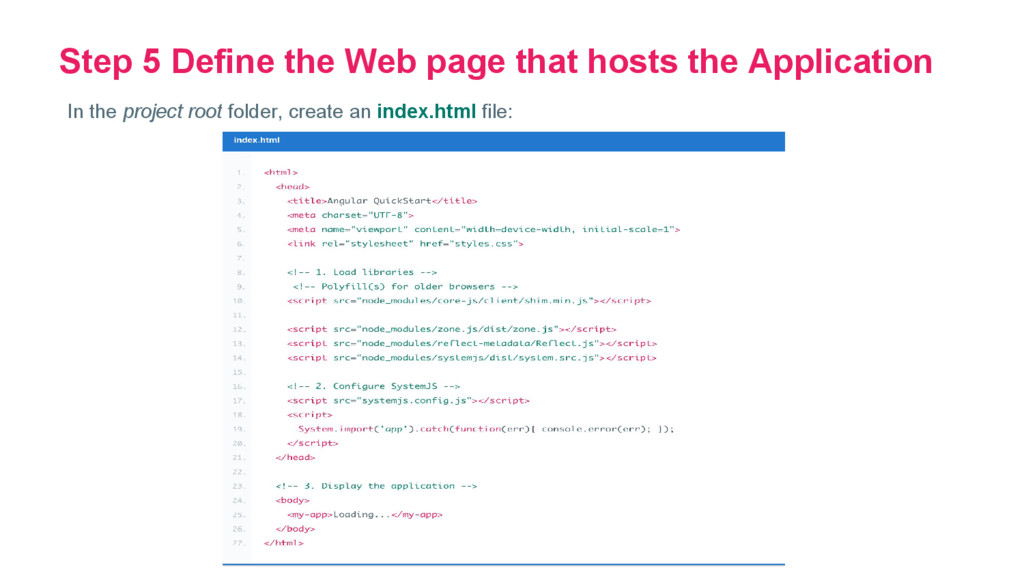
for older browsers, the zone.js and reflect-metadata libraries needed by Angular, and the SystemJS library for module loading. • Configuration file for SystemJS, and a script where you import and run the app module which refers to the main file that you just wrote. • The <my-app> tag in the <body> which is where your app lives!
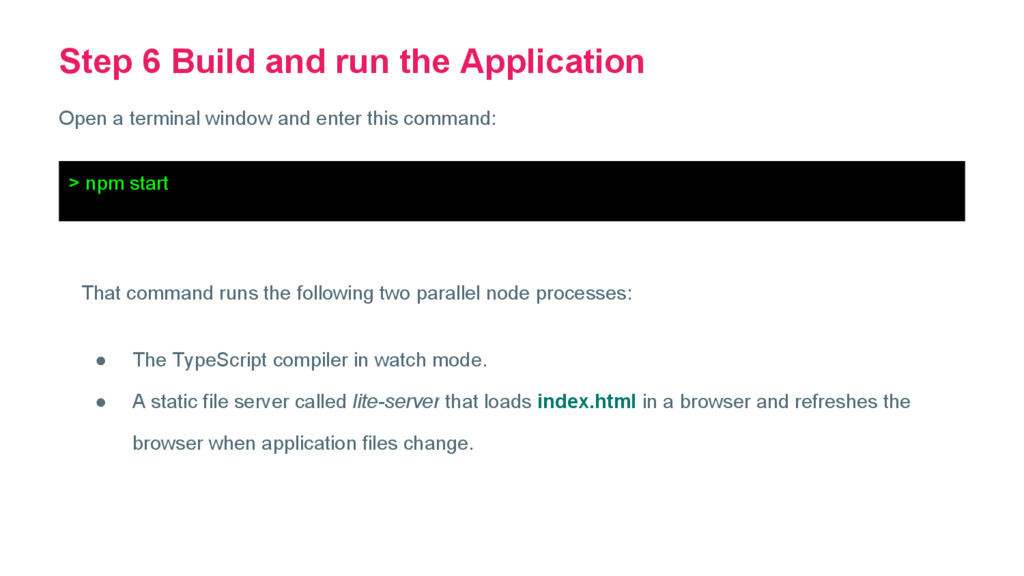
window and enter this command: > npm start That command runs the following two parallel node processes: • The TypeScript compiler in watch mode. • A static file server called lite-server that loads index.html in a browser and refreshes the browser when application files change.
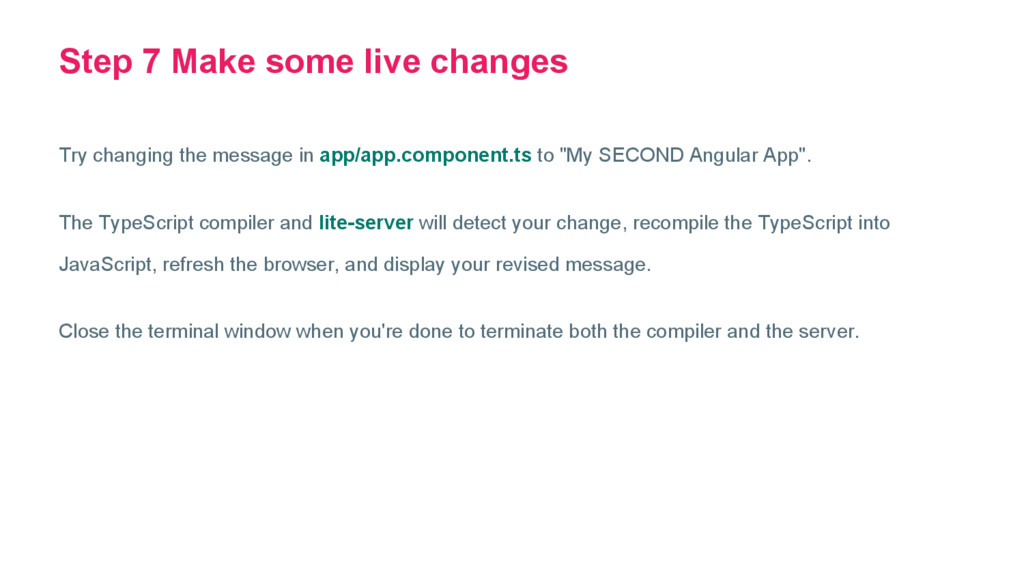
in app/app.component.ts to "My SECOND Angular App". The TypeScript compiler and lite-server will detect your change, recompile the TypeScript into JavaScript, refresh the browser, and display your revised message. Close the terminal window when you're done to terminate both the compiler and the server.