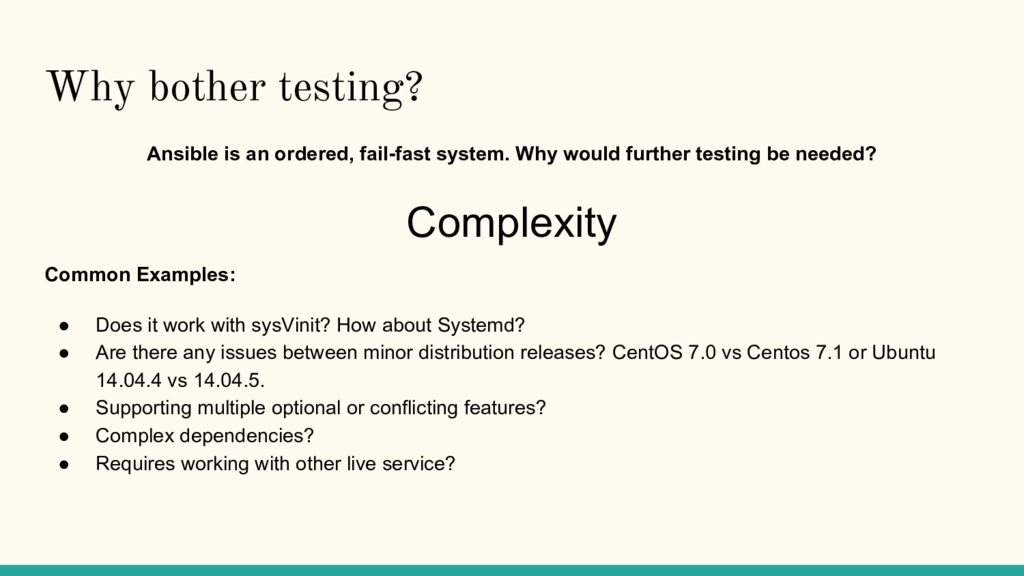
would further testing be needed? Common Examples: • Does it work with sysVinit? How about Systemd? • Are there any issues between minor distribution releases? CentOS 7.0 vs Centos 7.1 or Ubuntu 14.04.4 vs 14.04.5. • Supporting multiple optional or conflicting features? • Complex dependencies? • Requires working with other live service? Complexity
◦ Performs Code Analysis without executing any code itself. ◦ Examples: ▪ Ansible Syntax check (ansible-playbook --syntaxcheck). ▪ Ansible-lint - Performs checks on playbooks for practices and behavior that could be improved. • Unit Test ◦ Smallest possible ‘unit’ of code is tested in isolation. ◦ Within Ansible, this would be classified as a task requisite or assertion. A service ‘should’ be started. A file ‘should’ contain this string. When it is not encountered, fail the task. ◦ Example: ▪ Ansible Check Mode (ansible-playbook --check).
◦ Builds upon unit-tests and tests them as a group or module. Within Ansible, this would be a role. ◦ Verifies all units executed and produced the desired outcome. ◦ Usually tested with a functional version of external dependencies. • Acceptance Testing ◦ Similar to Integration testing, Acceptance testing builds upon Integration testing. The intent is to test end-to-end, say an entire playbook of multiple roles. ◦ If at all possible, simulate end-user usage of the deployed system.
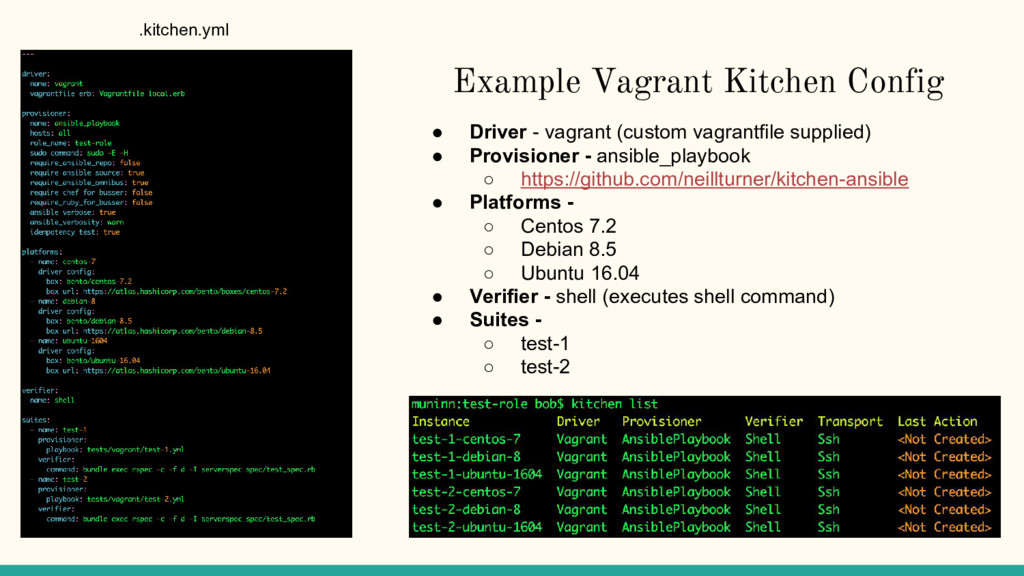
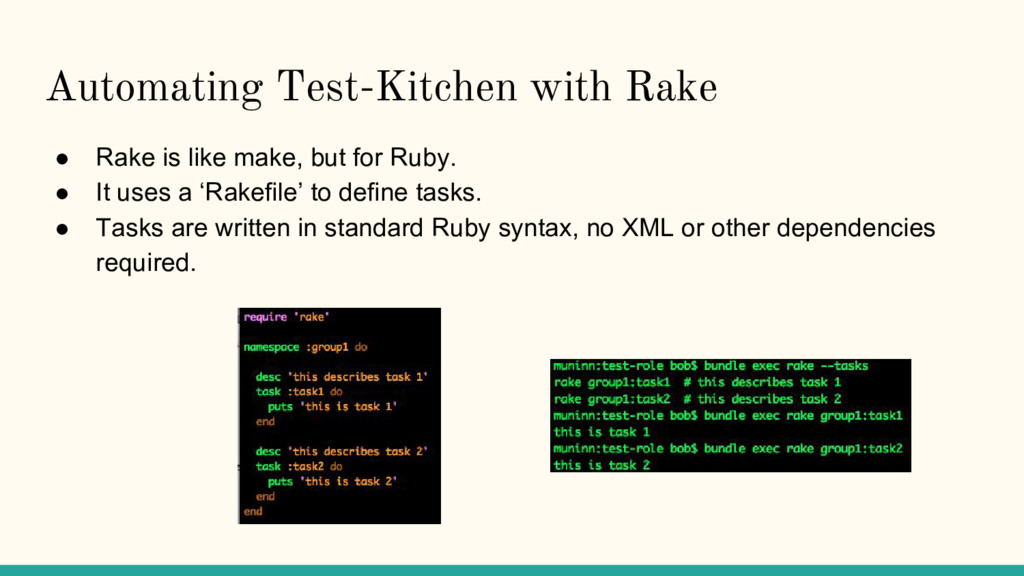
2012. 1.0 released in 2013, and is still actively being maintained and developed. • Extremely simple workflow based of a yaml DSL. • Large plugin ecosystem supporting roughly 50 drivers and over 20 different testing frameworks. • Easy to integrate with a variety of CI systems using native Ruby tools. • FAST FAST FAST!
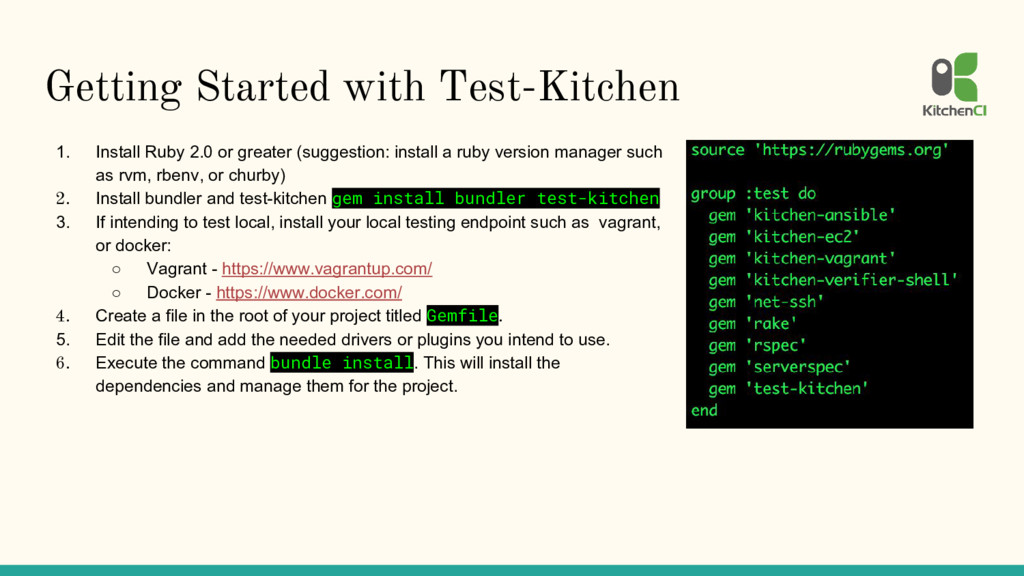
(suggestion: install a ruby version manager such as rvm, rbenv, or churby) 2. Install bundler and test-kitchen gem install bundler test-kitchen 3. If intending to test local, install your local testing endpoint such as vagrant, or docker: ◦ Vagrant - https://www.vagrantup.com/ ◦ Docker - https://www.docker.com/ 4. Create a file in the root of your project titled Gemfile. 5. Edit the file and add the needed drivers or plugins you intend to use. 6. Execute the command bundle install. This will install the dependencies and manage them for the project.
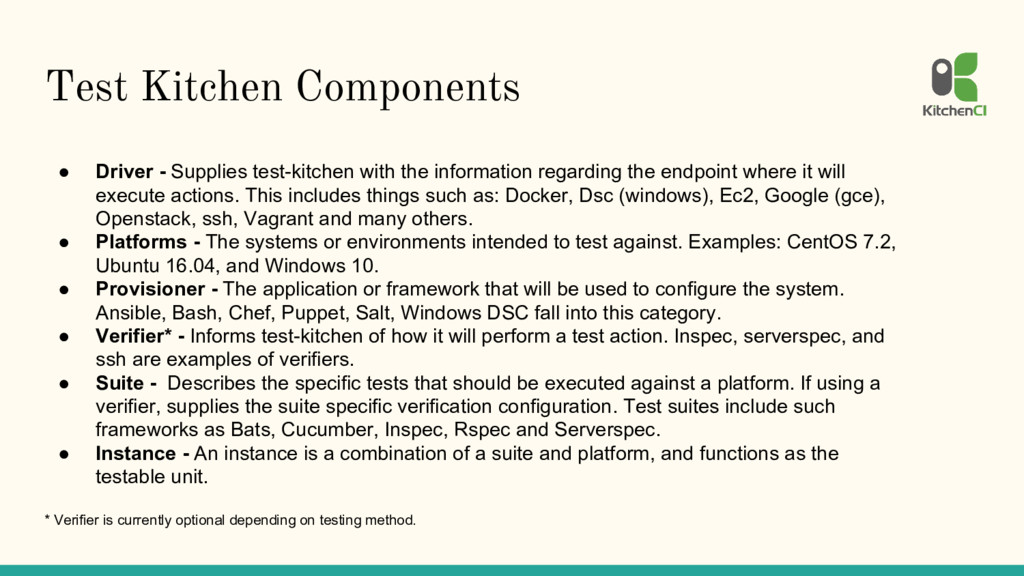
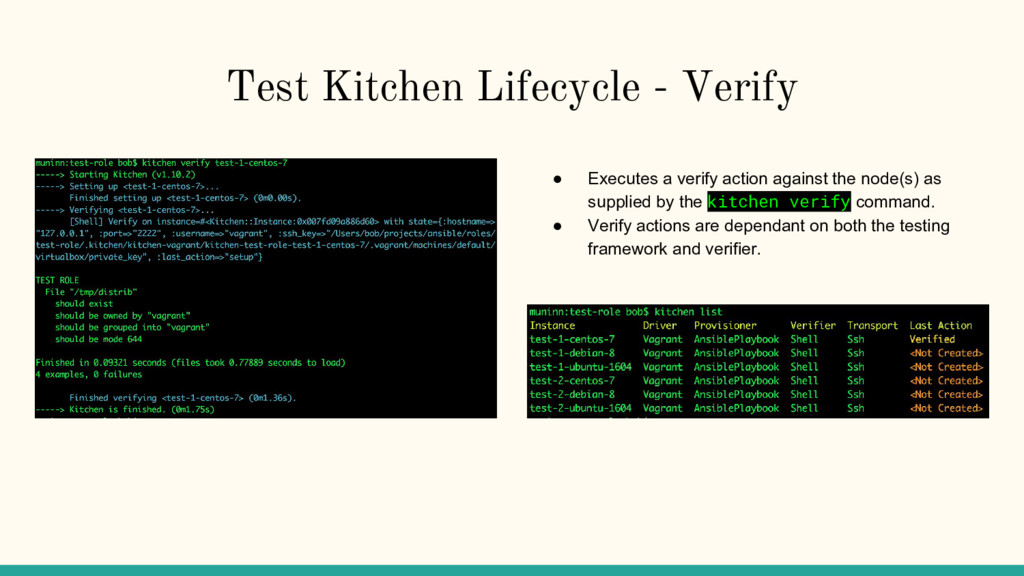
information regarding the endpoint where it will execute actions. This includes things such as: Docker, Dsc (windows), Ec2, Google (gce), Openstack, ssh, Vagrant and many others. • Platforms - The systems or environments intended to test against. Examples: CentOS 7.2, Ubuntu 16.04, and Windows 10. • Provisioner - The application or framework that will be used to configure the system. Ansible, Bash, Chef, Puppet, Salt, Windows DSC fall into this category. • Verifier* - Informs test-kitchen of how it will perform a test action. Inspec, serverspec, and ssh are examples of verifiers. • Suite - Describes the specific tests that should be executed against a platform. If using a verifier, supplies the suite specific verification configuration. Test suites include such frameworks as Bats, Cucumber, Inspec, Rspec and Serverspec. • Instance - An instance is a combination of a suite and platform, and functions as the testable unit. * Verifier is currently optional depending on testing method.
the node(s) as supplied by the kitchen converge command. • The converge process happens in 3 stages. ◦ Provisioning dependencies are installed (install ansible) ◦ Local files (ansible role) are copied to the node ◦ Execute an action as supplied by the test-kitchen config. For Ansible, this would be executing the supplied playbook.
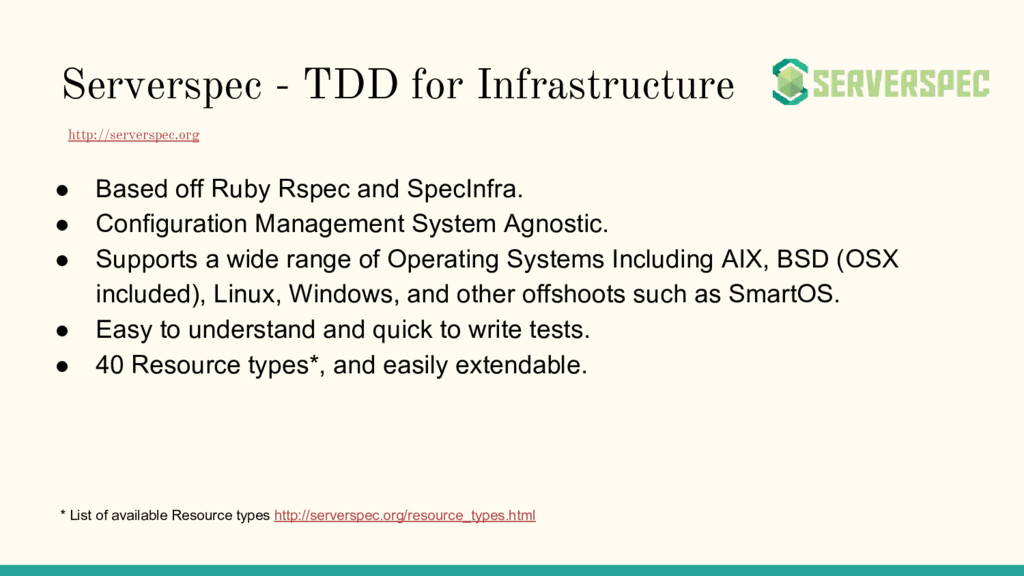
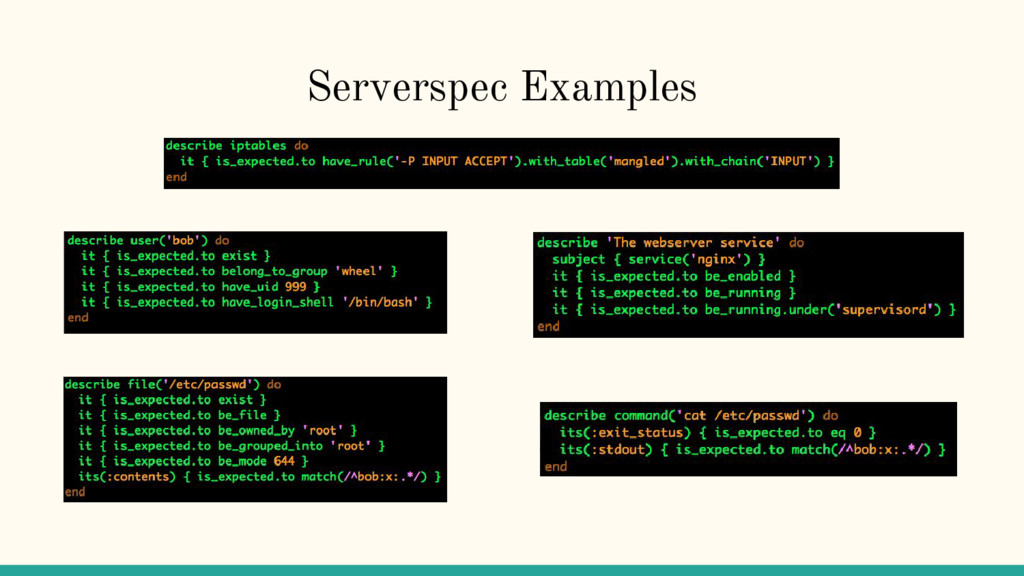
and SpecInfra. • Configuration Management System Agnostic. • Supports a wide range of Operating Systems Including AIX, BSD (OSX included), Linux, Windows, and other offshoots such as SmartOS. • Easy to understand and quick to write tests. • 40 Resource types*, and easily extendable. * List of available Resource types http://serverspec.org/resource_types.html http://serverspec.org
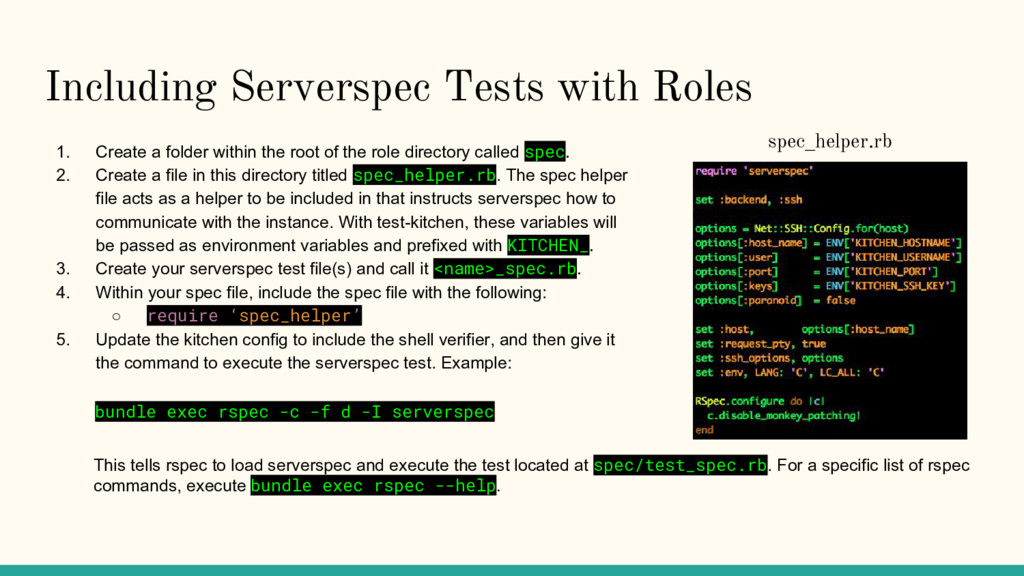
the root of the role directory called spec. 2. Create a file in this directory titled spec_helper.rb. The spec helper file acts as a helper to be included in that instructs serverspec how to communicate with the instance. With test-kitchen, these variables will be passed as environment variables and prefixed with KITCHEN_. 3. Create your serverspec test file(s) and call it <name>_spec.rb. 4. Within your spec file, include the spec file with the following: ◦ require ‘spec_helper’ 5. Update the kitchen config to include the shell verifier, and then give it the command to execute the serverspec test. Example: spec_helper.rb bundle exec rspec -c -f d -I serverspec This tells rspec to load serverspec and execute the test located at spec/test_spec.rb. For a specific list of rspec commands, execute bundle exec rspec --help.
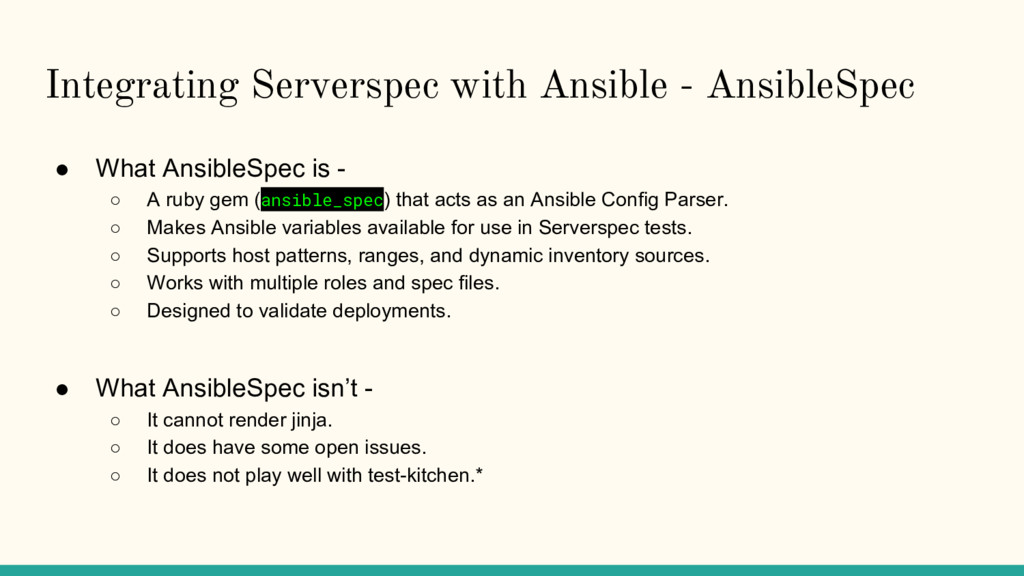
- ◦ A ruby gem (ansible_spec) that acts as an Ansible Config Parser. ◦ Makes Ansible variables available for use in Serverspec tests. ◦ Supports host patterns, ranges, and dynamic inventory sources. ◦ Works with multiple roles and spec files. ◦ Designed to validate deployments. • What AnsibleSpec isn’t - ◦ It cannot render jinja. ◦ It does have some open issues. ◦ It does not play well with test-kitchen.*
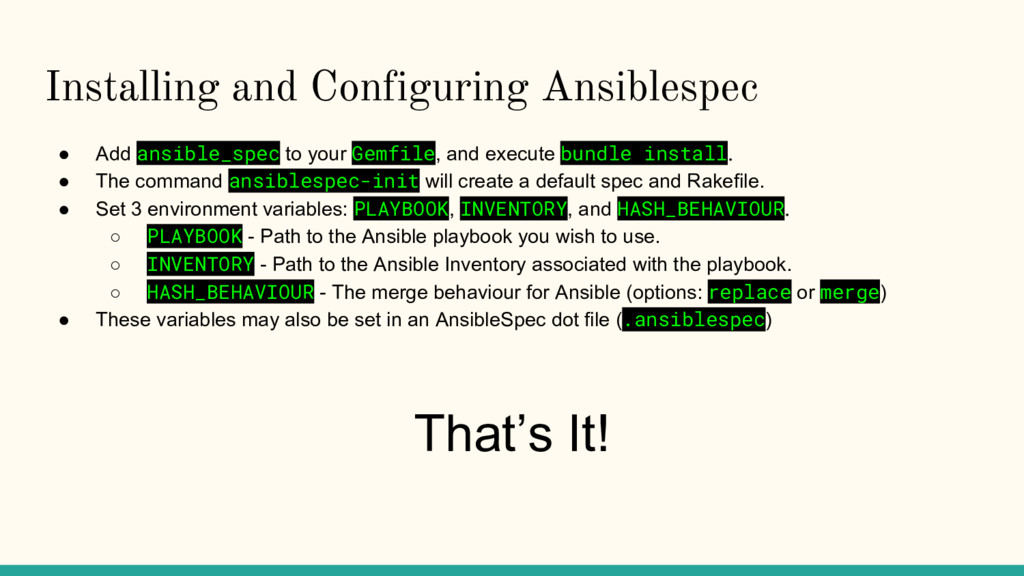
and execute bundle install. • The command ansiblespec-init will create a default spec and Rakefile. • Set 3 environment variables: PLAYBOOK, INVENTORY, and HASH_BEHAVIOUR. ◦ PLAYBOOK - Path to the Ansible playbook you wish to use. ◦ INVENTORY - Path to the Ansible Inventory associated with the playbook. ◦ HASH_BEHAVIOUR - The merge behaviour for Ansible (options: replace or merge) • These variables may also be set in an AnsibleSpec dot file (.ansiblespec) That’s It!
loaded and logger defined. • The tasks are defined and instances filtered by suite name. • For each instance, the test-kitchen action test will be called. The rake task can then be called and that specific test suite will be executed on all defined platforms.
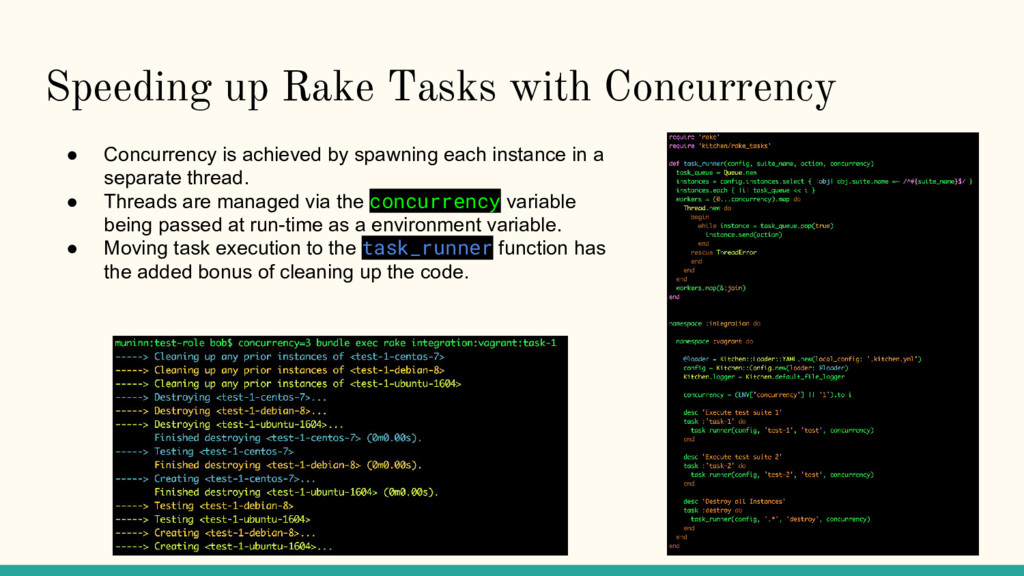
by spawning each instance in a separate thread. • Threads are managed via the concurrency variable being passed at run-time as a environment variable. • Moving task execution to the task_runner function has the added bonus of cleaning up the code.
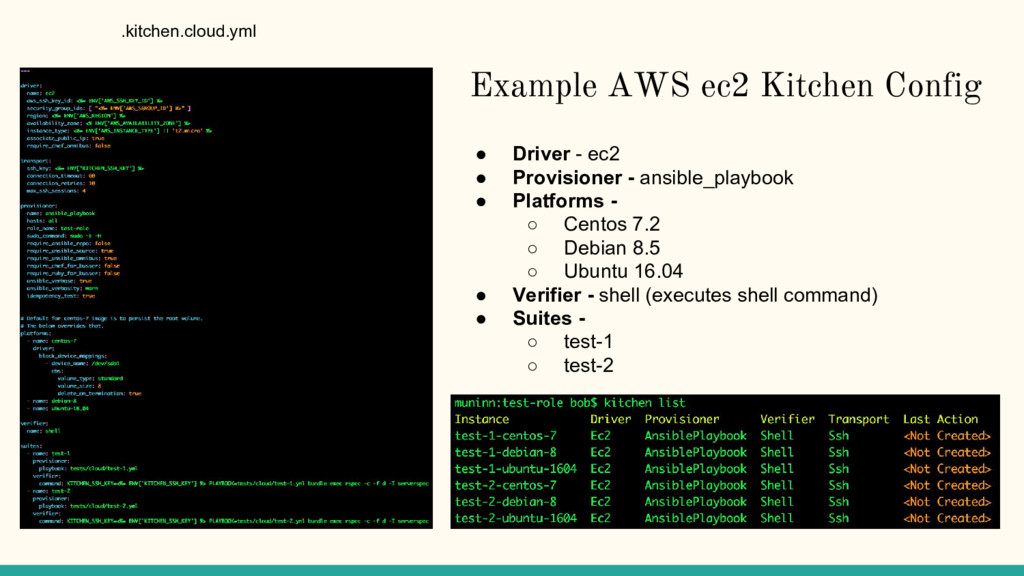
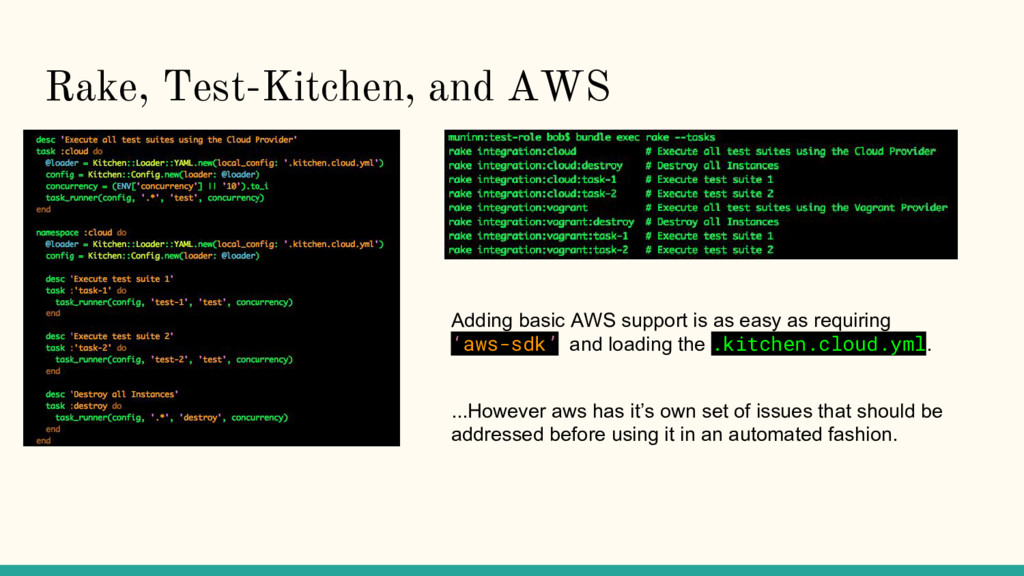
easy as requiring ‘aws-sdk’ and loading the .kitchen.cloud.yml. ...However aws has it’s own set of issues that should be addressed before using it in an automated fashion.
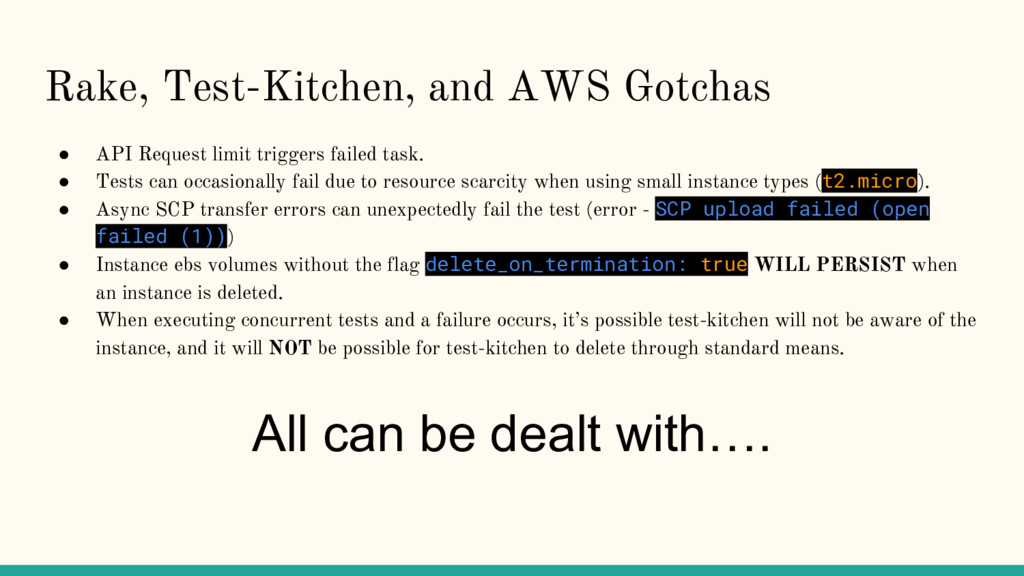
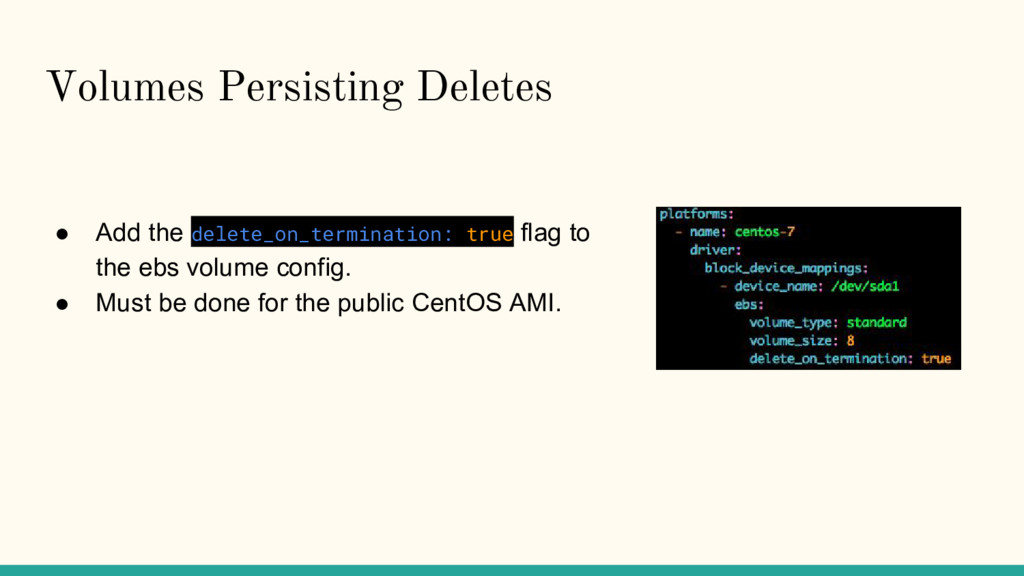
failed task. • Tests can occasionally fail due to resource scarcity when using small instance types (t2.micro). • Async SCP transfer errors can unexpectedly fail the test (error - SCP upload failed (open failed (1))) • Instance ebs volumes without the flag delete_on_termination: true WILL PERSIST when an instance is deleted. • When executing concurrent tests and a failure occurs, it’s possible test-kitchen will not be aware of the instance, and it will NOT be possible for test-kitchen to delete through standard means. All can be dealt with….
Error. • Decrease concurrency count (suggested value: 8) • Open PR to wrap commands in a retryable block: ◦ https://github.com/test-kitchen/kitchen-ec2/pull/305
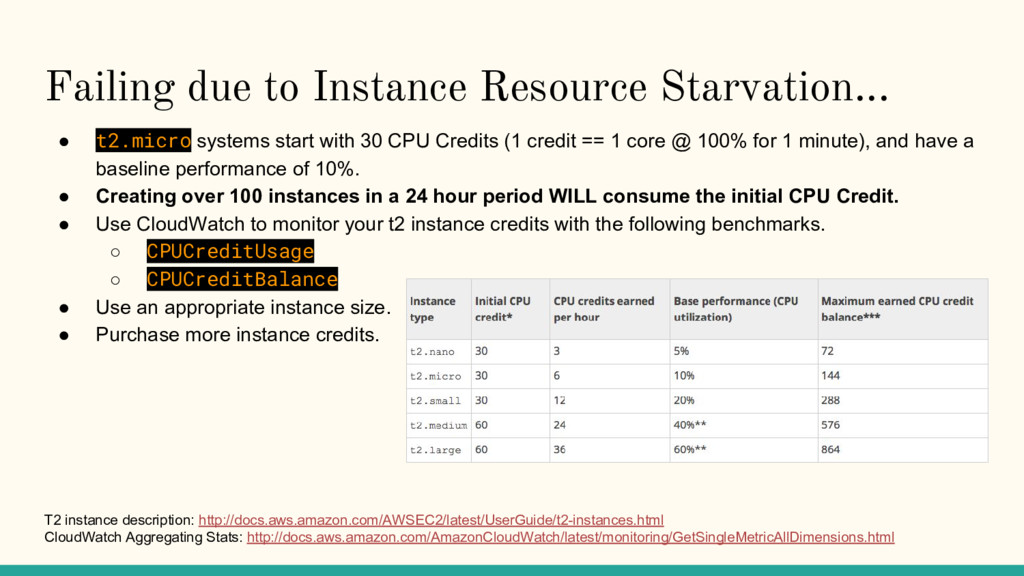
with 30 CPU Credits (1 credit == 1 core @ 100% for 1 minute), and have a baseline performance of 10%. • Creating over 100 instances in a 24 hour period WILL consume the initial CPU Credit. • Use CloudWatch to monitor your t2 instance credits with the following benchmarks. ◦ CPUCreditUsage ◦ CPUCreditBalance • Use an appropriate instance size. • Purchase more instance credits. T2 instance description: http://docs.aws.amazon.com/AWSEC2/latest/UserGuide/t2-instances.html CloudWatch Aggregating Stats: http://docs.aws.amazon.com/AmazonCloudWatch/latest/monitoring/GetSingleMetricAllDimensions.html
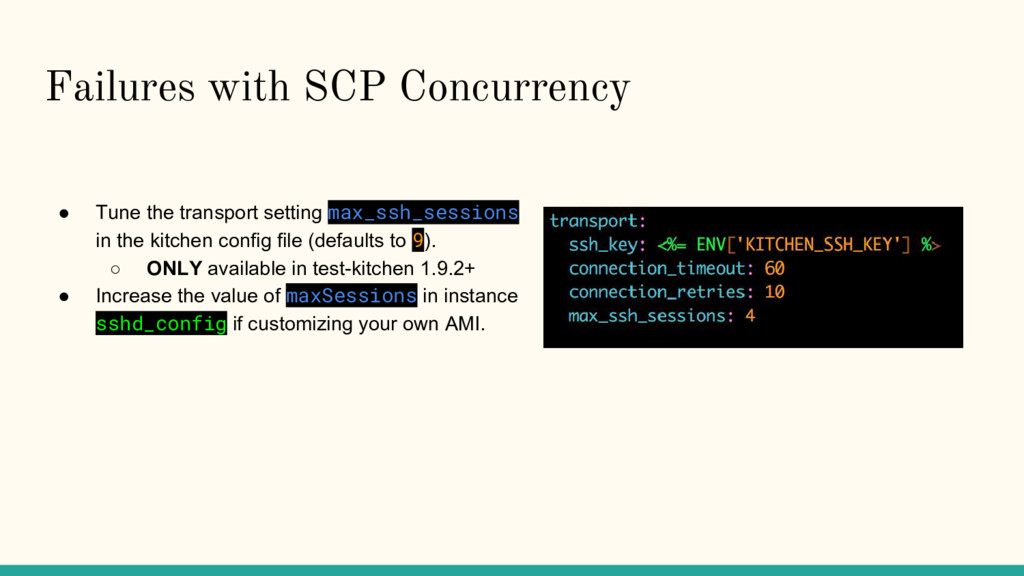
in the kitchen config file (defaults to 9). ◦ ONLY available in test-kitchen 1.9.2+ • Increase the value of maxSessions in instance sshd_config if customizing your own AMI.
for any in the security group that are in a running or pending state. 2. Generate a list of volumes attached to those instances. 3. Sends signal to instance to terminate. 4. Poll until all instances are destroyed. 5. Iterate through volumes gathered earlier and send signal to destroy. 6. Poll until all volumes are destroyed.
and all integrate differently. TravisCI, Jenkins, CircleCI, Drone.io, Concourse etc. • Common components among all of them for working with test-kitchen: ◦ Set environment variables - AWS variables ◦ Execute command - Rake Command ◦ Signal Success/Fail - End Result
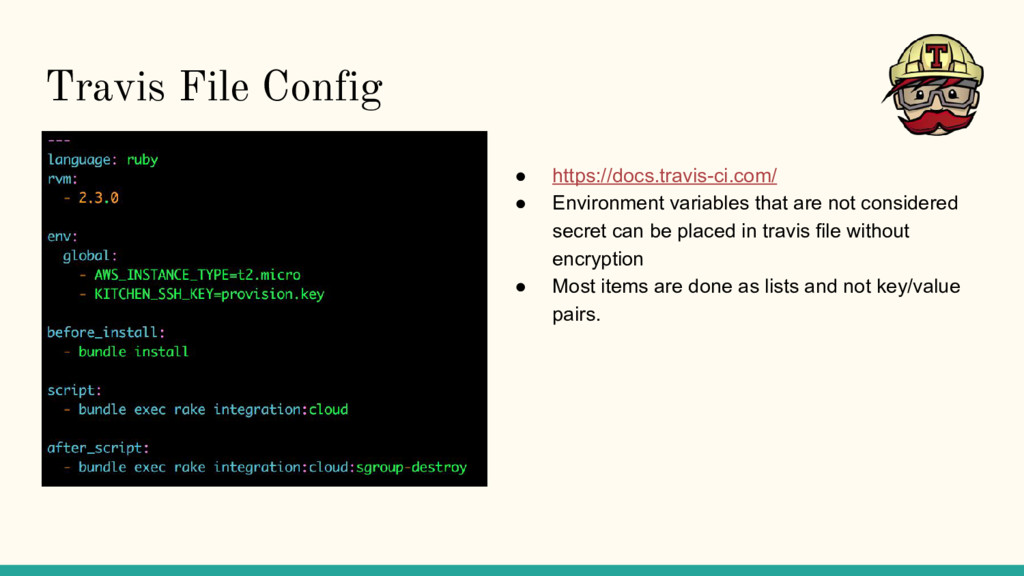
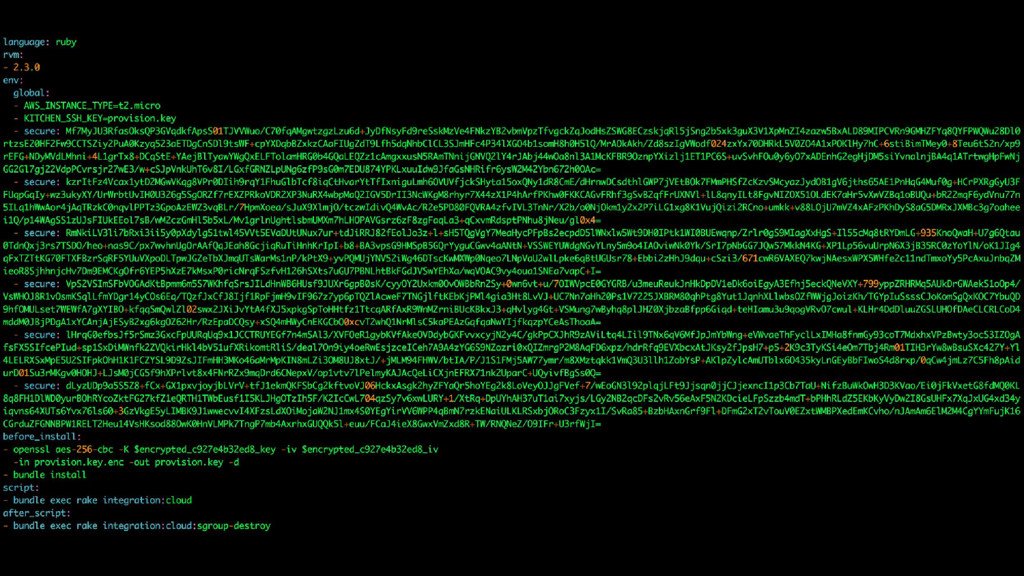
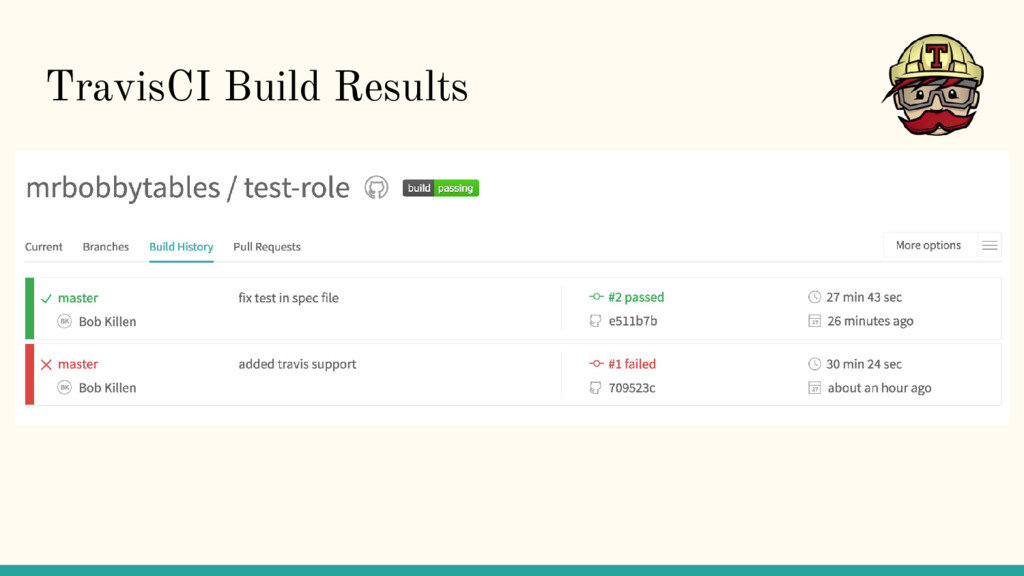
Repos. • Ansible Galaxy’s default. • Incredibly easy to use. • Tests branches and Pull Requests. • Execution controlled via .travis.yml file located at root of git repo. • Caveats: ◦ No advanced reporting. Either pass/fail by Exit Code. ◦ Builds running more than 50 minutes will be killed. ◦ Log limit size of 4MB, if log is going to be larger a wrapper script (example: https://gist.github.com/roidrage/5238585) is required. https://travis-ci.org/
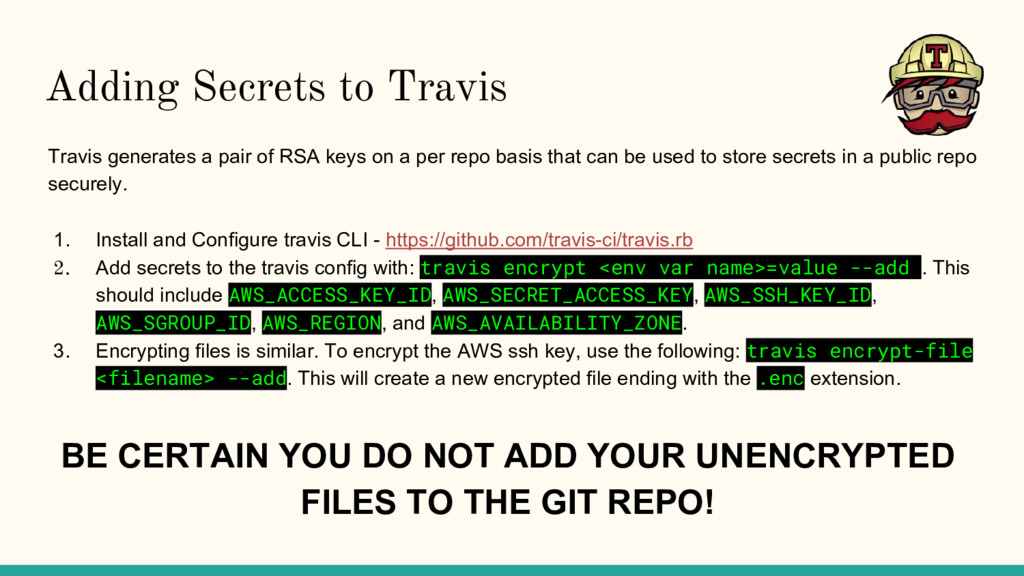
- https://github.com/travis-ci/travis.rb 2. Add secrets to the travis config with: travis encrypt <env var name>=value --add . This should include AWS_ACCESS_KEY_ID, AWS_SECRET_ACCESS_KEY, AWS_SSH_KEY_ID, AWS_SGROUP_ID, AWS_REGION, and AWS_AVAILABILITY_ZONE. 3. Encrypting files is similar. To encrypt the AWS ssh key, use the following: travis encrypt-file <filename> --add. This will create a new encrypted file ending with the .enc extension. Travis generates a pair of RSA keys on a per repo basis that can be used to store secrets in a public repo securely. BE CERTAIN YOU DO NOT ADD YOUR UNENCRYPTED FILES TO THE GIT REPO!