Upgrade to Pro — share decks privately, control downloads, hide ads and more …

Raspberry Pi 寵物小車

Raspberry Pi 寵物小車

Raspberry Pi Follower Car 適用於 Pi 4。更新的投影片請參考 ==> http://bit.ly/2ragI76

更新的範例程式(在Pi做)
$ cd ~
$ wget http://bit.ly/37qN6TN -O pi-follower-car.tar.gz
$ tar zxvf pi-follower-car.tar.gz

台灣樹莓派

September 10, 2016
Tweet

More Decks by 台灣樹莓派

Other Decks in Technology

Transcript

  1. 姓名標示 — 非商業性 — 相同方式分享 CC (Creative Commons) 姓名標示 —

    你必須給予 適當表彰、提供指向本授權 條款的連結,以及 指出(本作品的原始版本)是否已 被變更。你可以任何合理方式為前述表彰,但不得以 任何方式暗示授權人為你或你的使用方式背書。 非商業性 — 你不得將本素材進行商業目的之使 用。 相同方式分享 — 若你重混、轉換本素材,或依本 素材建立新素材,你必須依本素材的授權條款來 散布你的貢獻物。
  2. 6 • 馬達與小車介紹 • GPIO 介紹 • 馬達控制 • 小車組裝與控制

    • Raspberry Pi Camera 介紹 • 基礎 Camera 使用 • 數位影像處理與 OpenCV 今日主題
  3. 15 • 硬體 : Raspberry Pi 3 • 作業系統 :

    2016-05-29-raspbian-jessie.img • 為了可以使用 USB 轉 TTL 傳輸線 • 修改 /boot/config.txt, 來停用 SoC 的藍牙功能 – dtoverlay=pi3-disable-bt 今日環境 https://www.raspberrypi.com.tw/10842/raspberry-pi-3-uart-overlay-workaround/
  4. 17 環境設定: Serial + WiFi 1. 樹莓派 Serial 連線 2.

    樹莓派 WiFi 連線 用 Serial 來設定 WiFi 3. 筆電、手機、樹莓派 在同一個 LAN
  5. 18 • 以 USB 轉 TTL 傳輸線和 Pi 相連 •

    接線方式 • 黑色 / 白色 / 綠色照圖接 • 紅色不接 Serial 連線方式
  6. 放大圖 黑色線接 6 號 白色線接 8 號 綠色線接 10 號

    http://www.raspberrypi-spy.co.uk/2014/07/raspberry-pi-b-gpio-header-details-and-pinout/
  7. • 下載 putty, http://goo.gl/zdD9G9 • 執行 putty • 1. 選擇

    Session • 2. 選擇 Serial • 3. Serial line 填 COM9 • 4. Speed 填入 115200 • 5. Open ! • 沒畫面 , 先按 ENTER • 再不行 , 重插拔電源 Serial Port in Windows - 2
  8. 22 • $ ls /dev/ttyUSB* • 開啟 putty • 選擇

    Session • 在 Serial line 填入 /dev/ttyUSB0 ( 本例為 ttyUSB0) • Speed 填入 115200 • Open ! • 無法連線時 , 使用 sudo 執行 putty Serial Port in Linux
  9. 23 • 安裝驅動程式 , http://goo.gl/htlt3F • 重開機生效 • $ ls

    /dev/cu* • 如果有 /dev/cu.usbserial • $ screen /dev/cu.usbserial 115200 • 如果沒畫面 , 重新插拔電源 (PL2303 不要拔 ) Serial Port in Mac
  10. 24 • 預設帳號 / 密碼: pi / raspberry • 如果沒有畫面

    , 先按 Enter, 再不行 , 重新插拔電源 • 如果出現亂碼 , 確定 baud rate 為 115200 連線成功
  11. 25 • 登入畫面 • pi 是登入的使用者 • @ 表示”在” •

    raspberrypi 是主機名稱 • ~ 表示在家目錄 (home directory) • $ 表示該使用者所使用的 shell( 一種文字工具介面 ) 符號說明
  12. 26 使用: nano <NAME_OF_FILE> 離開: Ctrl + x > 令存新檔:

    y > 不存離開: n > 離開: Ctrl + c nano 編輯器使用
  13. 29 • Serial 以實體線路相連 , 純文字 , 是獨占式的連線 • SSH

    是 TCP/IP 通訊協定 , 透過 Ethernet 或 WiFi 連線 Serial 連線和 SSH 連線有什麼不同?
  14. • $ sudo apt-get update • $ sudo apt-get install

    -y python-opencv • $ sudo apt-get install -y python-dev • $ sudo apt-get install -y python-pip • $ sudo pip install readchar • $ sudo pip install bottle 安裝今日所需軟體
  15. 32 • General Purpose Input Output • GPIO 是一種可用軟體控制的數位訊號 什麼是

    GPIO ? http://www.tek.com/datasheet/tps2000b-series-digital-storage-oscilloscopes-datasheet
  16. 35 • C • C + wiringPi • C# •

    Ruby • Perl • Python • Scratch • Java Pi4J Library • Shell script 如何控制 Raspberry Pi 的 GPIO ?
  17. 46 • 載入模組 (Import module) • 選擇編號系統 (Define pin numbering)

    • 定義腳位 (Setup up a channel) • 讀取輸入 / 寫入輸出 (Input/Output) • 清理 (Cleanup) Python Code 基本流程 http://code.google.com/p/raspberry-gpio-python/wiki/BasicUsage
  18. 47 #!/usr/bin/python • • import RPi.GPIO as GPIO # 載入模組

    • import time • • GPIO.setmode(GPIO.BOARD) # 選擇系統 ( 以實體腳位系 統為例 ) • GPIO.setup(12, GPIO.OUT) # 定義腳位 • • print("LED is on") • GPIO.output(12, GPIO.HIGH) # 設定腳位狀態 • time.sleep(3) • • GPIO.cleanup() # 清理 一分鐘學會用 Python 控制 GPIO
  19. 48 • Wiki • http://sourceforge.net/p/raspberry-gpio-python/wiki/Home/ • 用 Raspberry Pi 學

    GPIO - 自己做遊戲機 • http://www.slideshare.net/raspberrypi-tw/gpio-gameconsolestarterkit 更多 RPi.GPIO 的使用方法
  20. 50 • cd < 目錄 > # 跳到 < 目錄

    > • cd .. # 回上一層 • cd ~ # 回 < 家目錄 > • pwd # 查看目前工作目錄 • ls # 列出檔案與目錄 • sudo reboot # 重開機 你必須知道的 Linux 指令
  21. 51 $ cd ~ $ https://github.com/raspberrypi-tw/pi-follower-car $ cd pi-follower-car $

    cd 01-gpio $ cd 01_1-led_on $ sudo python led_on.py 讀寫 GPIO 會存取 /dev/mem, 需 root 權限 (2015-09-24 以後的 image 可以用一般使用者身份執行 ) 執行方式
  22. 54 GPIO.setmode(GPIO.BOARD) • LED_PIN = 12 • GPIO.setup(LED_PIN, GPIO.OUT) •

    • while True: • print("LED is on") • GPIO.output(LED_PIN, GPIO.HIGH) • time.sleep(1) • print("LED is off") • GPIO.output(LED_PIN, GPIO.LOW) • time.sleep(1) • • GPIO.cleanup() 永不停止的 while 迴圈 - 按 Ctrl+c 跳出迴圈
  23. 56 RuntimeWarning: This channel is already in use, continuing anyway.

    Use GPIO.setwarnings(False) to disable warnings.
  24. 58 try: • while True: • print("LED is on") •

    GPIO.output(LED_PIN, GPIO.HIGH) • time.sleep(1) • print("LED is off") • GPIO.output(LED_PIN, GPIO.LOW) • time.sleep(1) • except KeyboardInterrupt: • print "Exception: KeyboardInterrupt" • finally: • GPIO.cleanup() 接住例外
  25. 62 • 數位:亮和不亮 • 類比:亮 , 有點亮 , 有點不亮 ...,

    不亮 • 可是 GPIO 腳位輸出都是固定值 , 怎麼辦? 從 LED 的角度來看
  26. 63 • 旋轉式 , 滑動式 • 線性關係 (B 型 ),

    對數關係 (A 型 ) • 常見規格: 0 -10k Ohm( 線性 ) 可變電阻 Potentiometer(VR) https://en.wikipedia.org/wiki/Potentiometer 接高電位 接低電位 滑動接點 ( 可變輸出 )
  27. 66 • 是將類比信號轉為脈波的一種技術 • 改變工作比 (duty cycle) = 改變電壓 •

    Duty cycle = pulse width x100 / period ( 單位 :%) 脈寬調變 (Pulse-Width Modulation) http://www.protostack.com/blog/2011/06/atmega168a-pulse-width-modulation-pwm/
  28. 68 • To create a PWM instance: • p =

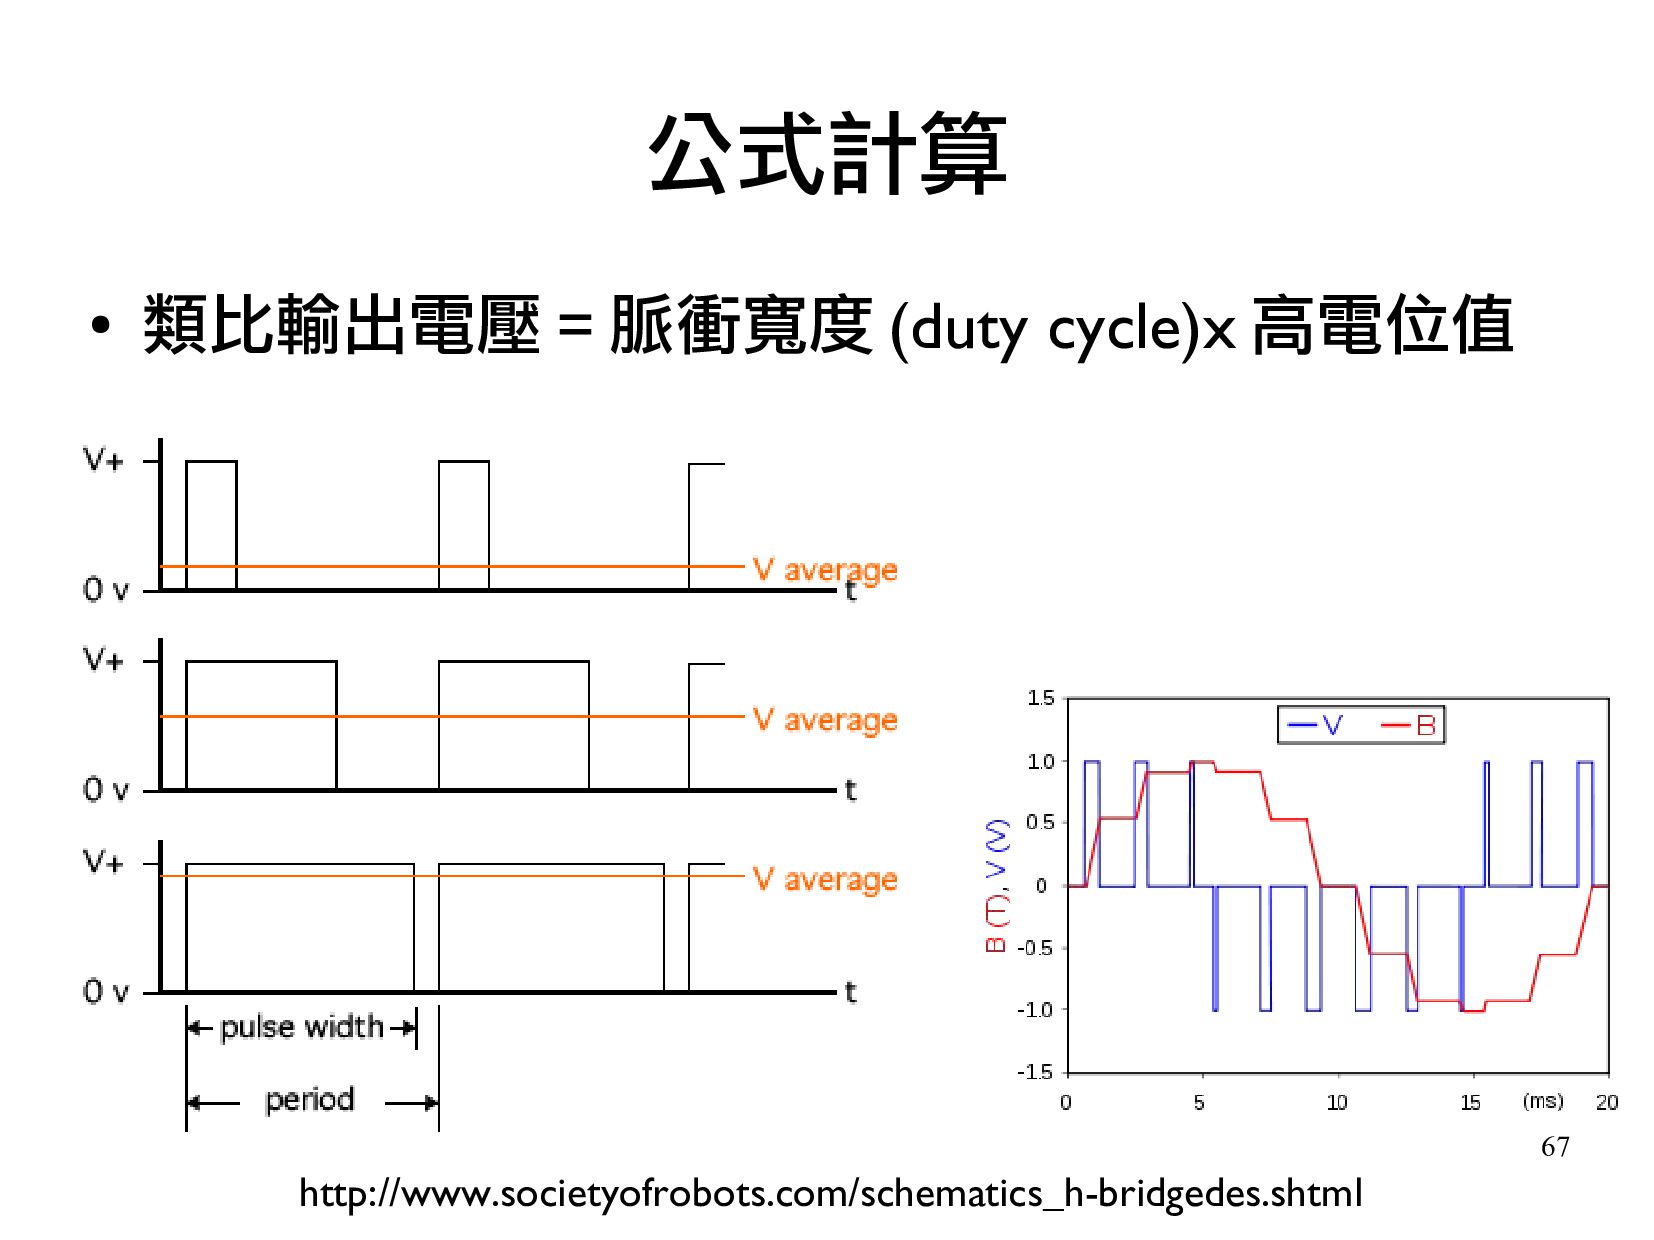
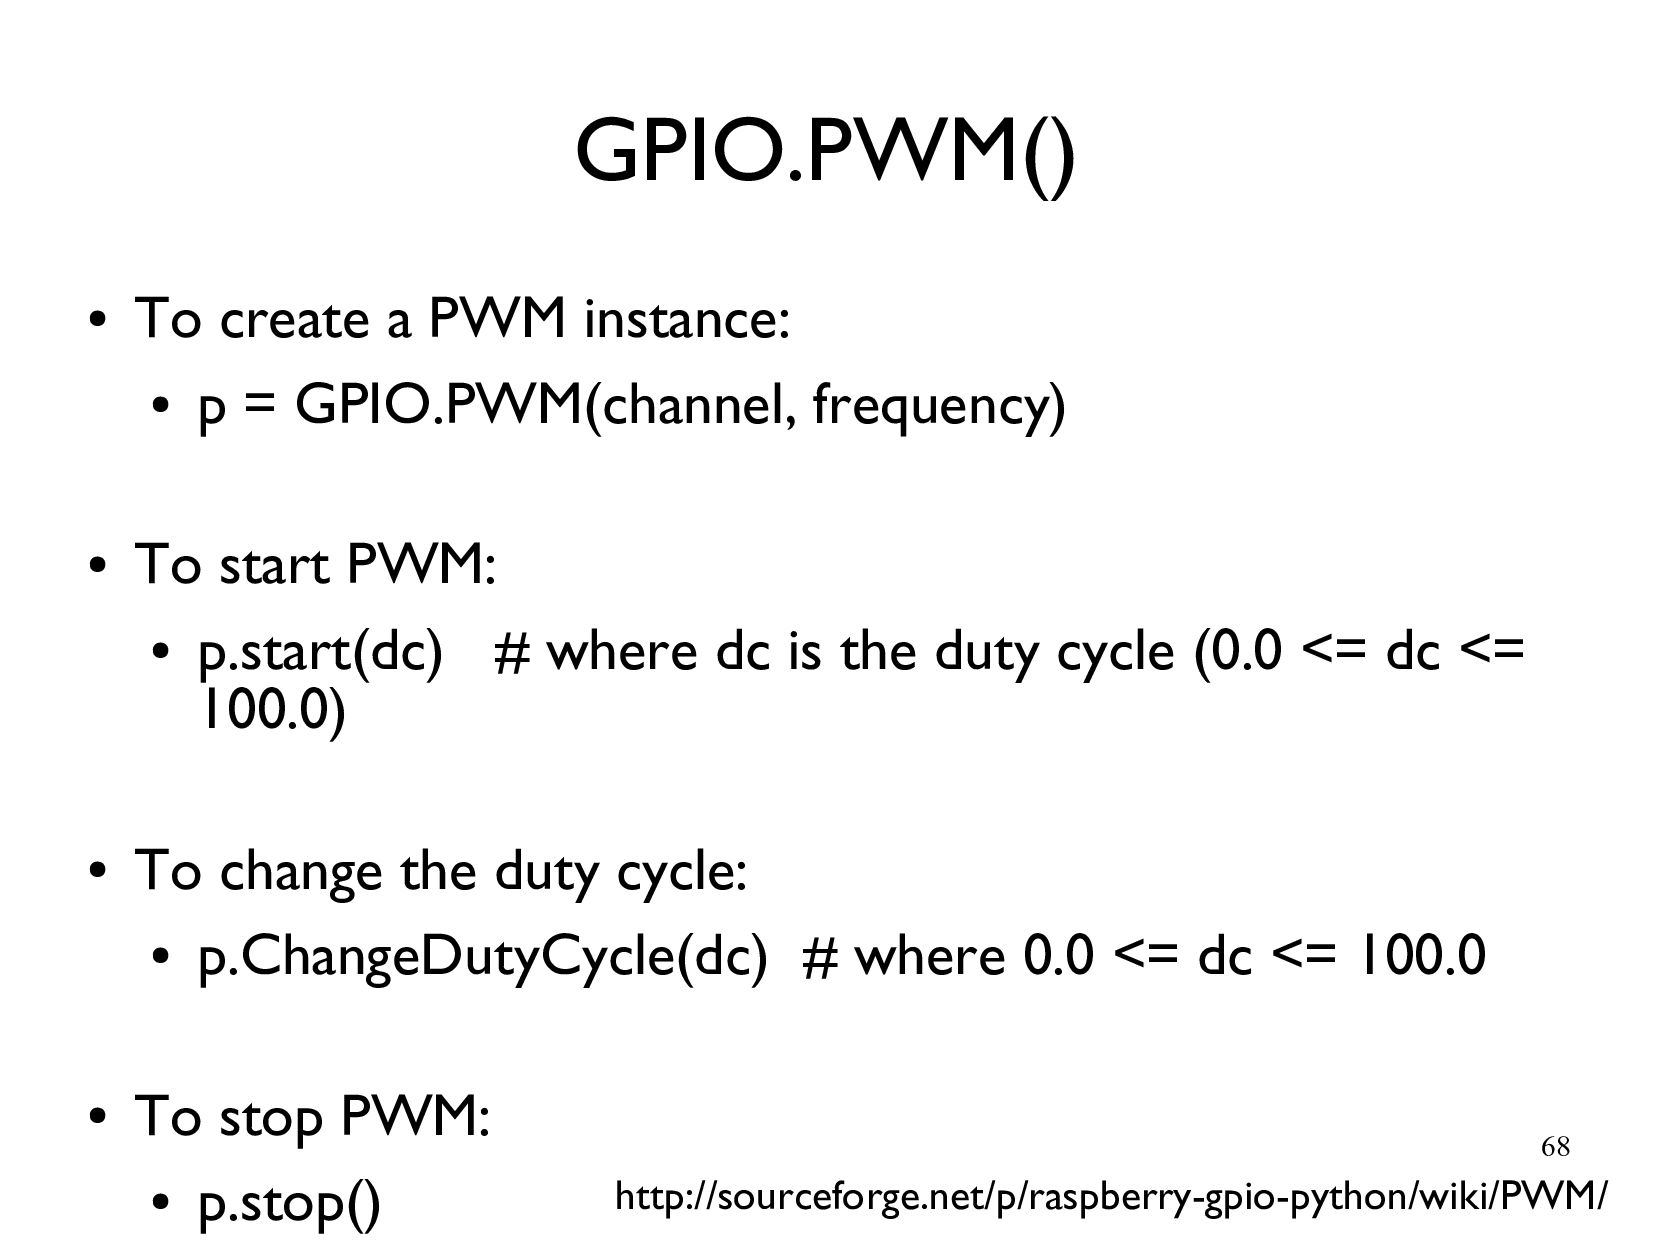
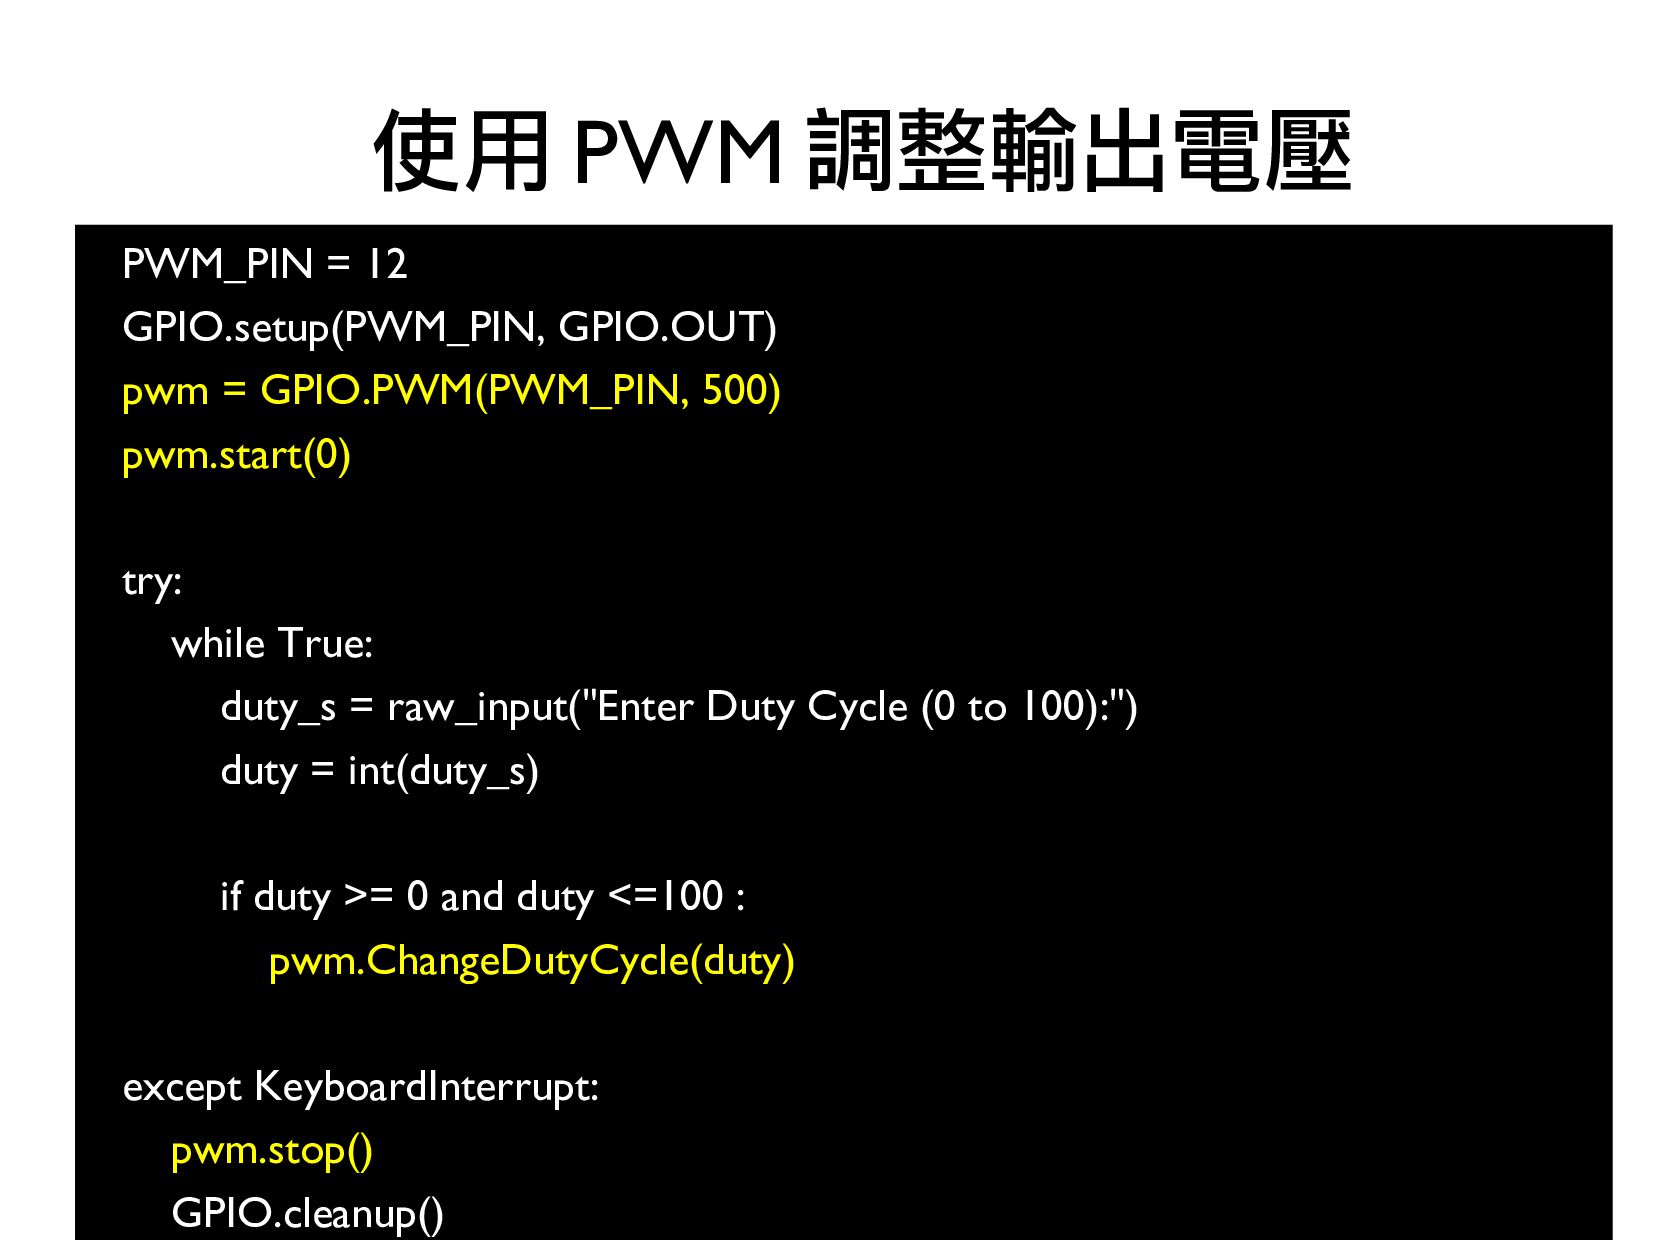
    GPIO.PWM(channel, frequency) • To start PWM: • p.start(dc) # where dc is the duty cycle (0.0 <= dc <= 100.0) • To change the duty cycle: • p.ChangeDutyCycle(dc) # where 0.0 <= dc <= 100.0 • To stop PWM: • p.stop() GPIO.PWM() http://sourceforge.net/p/raspberry-gpio-python/wiki/PWM/
  29. 70 PWM_PIN = 12 • GPIO.setup(PWM_PIN, GPIO.OUT) pwm = GPIO.PWM(PWM_PIN,

    500) • pwm.start(0) • • try: • while True: • duty_s = raw_input("Enter Brightness (0 to 100):") • duty = int(duty_s) • • if duty >= 0 and duty <=100 : • pwm.ChangeDutyCycle(duty) • • except KeyboardInterrupt: • pwm.stop() • GPIO.cleanup() 互動式的調光
  30. 73 • 直流馬達 (DC motors) • 伺服馬達 (Servo motors) •

    步進馬達 (Stepper motors) 馬達種類 https://learn.adafruit.com/adafruit-motor-selection-guide
  31. 76 • 速度和負重的需求 ( 負載 ) • 轉速 • 扭力

    ( 轉矩 ) • 電源和控制器的配置 • 工作電壓 • 消耗電流 • 堵轉電流 FA-130RA 直流馬達規格 工作電壓 空載 堵轉 負載
  32. 79 GPIO.setmode(GPIO.BOARD) GPIO.setup(MOTOR_PIN, GPIO.OUT) try: while True: print("Motor start ...")

    GPIO.output(MOTOR_PIN, GPIO.HIGH) time.sleep(2) print("Motor stop !!!") GPIO.output(MOTOR_PIN, GPIO.LOW) time.sleep(2) finally: GPIO.cleanup() • 轉 - 停 - 轉 - 停 -
  33. 82 • 電源和控制器的配置 • 工作電壓 • 消耗電流 • 堵轉電流 •

    Raspberry Pi GPIO 的電流輸出為 2 mA 到 16 mA 重新檢視直流馬達規格 工作電壓 空載 堵轉 負載
  34. 84 水管閥門功能 https://learn.adafruit.com/adafruit-motor-selection-guide http://commons.wikimedia.org/wiki/File:Transistor_animation.gif E( 射極 ) 射出電流 C( 集極

    ) 收集電流 B( 基極 ) 控制閥門 微小電流就可控制 允許大電流通過 推動大型負載 腳位意義 ( 依功能分 ) 實際運作情形
  35. 86 GPIO.setmode(GPIO.BOARD) GPIO.setup(MOTOR_PIN, GPIO.OUT) try: while True: print("Motor start ...")

    GPIO.output(MOTOR_PIN, GPIO.HIGH) time.sleep(2) print("Motor stop !!!") GPIO.output(MOTOR_PIN, GPIO.LOW) time.sleep(2) finally: GPIO.cleanup() • 控制的是電晶體
  36. 88 • C 極外部電源提供馬達轉動 • B 極發送控制訊號讓電晶體導通 • 一個電晶體電路可控制馬達轉動 回顧剛剛的電路圖

    https://learn.adafruit.com/adafruit-motor-selection-guide http://www.robotoid.com/my-first-robot/rbb-bot-phase2-part1.html E( 射極 ) 射出電流 C( 集極 ) 收集電流 B( 基極 ) 控制閥門
  37. 90 如何用程式控制? https://learn.adafruit.com/adafruit-motor-selection-guide 連接 作用 Q1 和 Q4 順時鐘轉動 Q3

    和 Q2 逆時鐘轉動 Q1 和 Q3 煞車 無 慣性自由轉動 Q1 和 Q2 短路 ! Q3 和 Q4 短路 ! http://www.robotoid.com/my-first-robot/rbb-bot-phase2-part1.html
  38. 91 如何用程式控制? https://learn.adafruit.com/adafruit-motor-selection-guide 連接 作用 Q1 和 Q4 順時鐘轉動 Q3

    和 Q2 逆時鐘轉動 Q1 和 Q3 煞車 無 慣性自由轉動 Q1 和 Q2 短路 ! Q3 和 Q4 短路 ! http://www.robotoid.com/my-first-robot/rbb-bot-phase2-part1.html 可是 ... 1. 不小心給錯電就會把電晶體燒掉 2. 一個馬達要搭配四個電晶體電路 3. 我想要一次控制兩個馬達的轉動
  39. 92 • 馬達驅動晶片 : L298N • 雙 H 橋式直流 (

    步進 ) 馬達驅動 • 最大馬達驅動電壓 : DC 50V • 降壓晶片 : 78M05 • 將外部輸入電源降壓為 DC 5V 給電路板 • 外部輸入電源電壓限制範圍 : DC 7V - DC 35V L298N 馬達控制板 https://learn.adafruit.com/adafruit-motor-selection-guide
  40. 93 OUT1 OUT2 OUT3 OUT4 ENA: OUT1, OUT2 生效 IN1

    IN2 IN3 IN4 馬達控制接腳: IN1-2 : OUT1-2 IN3-4 : OUT3-4 ENB: OUT3, OUT4 生效 輸出電源 ( 正極 ) 電源 ( 負極 ) 輸入電源 ( 正極 )
  41. 94 單輪電路圖 (L298N 要和 Pi 共接地 ) L298N RPi IN1(Green)

    Pin16(GPIO4) IN2(Yellow) Pin18(GPIO5) 馬達 A L298N Motor OUT1(Yellow) 馬達 A(Yellow) OUT2(Green) 馬達 A(Green)
  42. 95 Motor_R1_Pin = 16 • Motor_R2_Pin = 18 GPIO.setmode(GPIO.BOARD) GPIO.setup(Motor_R1_Pin,

    GPIO.OUT) GPIO.setup(Motor_R2_Pin, GPIO.OUT) try: GPIO.output(Motor_R1_Pin, True) # clockwise time.sleep(3) GPIO.output(Motor_R1_Pin, False) • time.sleep(1) # protect motor GPIO.output(Motor_R2_Pin, True) # counterclockwise time.sleep(3) GPIO.output(Motor_R2_Pin, False) finally: GPIO.cleanup() 控制單輪正反轉
  43. 98 • 改變電壓的方式 • 增加 ( 減少 ) 電池 •

    增加負載 ( 利用可變電阻 ) • 脈寬調變 (PWM) 技術 直流馬達轉速由輸入電壓決定
  44. 99 一樣的線路圖 L298N RPi IN1(Green) Pin16(GPIO4) IN2(Yellow) Pin18(GPIO5) 馬達 A

    L298N Motor OUT1(Yellow) 馬達 A(Yellow) OUT2(Green) 馬達 A(Green)
  45. 100 PWM_PIN = 12 • GPIO.setup(PWM_PIN, GPIO.OUT) pwm = GPIO.PWM(PWM_PIN,

    500) • pwm.start(0) • • try: • while True: • duty_s = raw_input("Enter Duty Cycle (0 to 100):") • duty = int(duty_s) • • if duty >= 0 and duty <=100 : • pwm.ChangeDutyCycle(duty) • • except KeyboardInterrupt: • pwm.stop() • GPIO.cleanup() 使用 PWM 調整輸出電壓
  46. 103 • 車體 ( 機構 ) • 馬達 / 車輪

    ( 動力 ) • 控制板 / 微處理器 ( 邏輯 ) • 無線網路 / 紅外線 / 藍牙 ( 傳輸控制 ) 遙控車的組成
  47. 119 和 L298N 相接 共接地 L298N RPi IN1(Brown) Pin16 IN2(RED)

    Pin18 IN3(Orange) Pin11 IN4(Yellow) Pin13
  48. 122 • 向前走 ( 雙輪逆時鐘旋轉 ) • 向後走 ( 雙輪順時鐘旋轉

    ) • 向右轉 ( 左輪逆時鐘轉 , 右輪靜止 ) • 向左轉 ( 右輪逆時鐘轉 , 左輪靜止 ) 車子如何移動? 前 左
  49. 123 雙輪電路圖 L298N RPi IN1(Green) Pin16(GPIO4) IN2(Yellow) Pin18(GPIO5) IN3(Purple) Pin11(GPIO0)

    IN4(Orange) Pin13(GPIO1) 馬達 A 馬達 B L298N Motor OUT1(Yellow) 馬達 A(Yellow) OUT2(Green) 馬達 A(Green) OUT3(Purple) 馬達 B(Green) OUT4(Orange) 馬達 B(Yellow)
  50. 124 • def stop(): # stop all wheels def forward():

    GPIO.output(16, True) GPIO.output(18, False) GPIO.output(11, True) GPIO.output(13, False) time.sleep(1) stop() try: while True: • ch = readchar.readkey() • • if ch == 'w': • forward() 控制小車移動
  51. 從手機相機模組講起 http://www.phonearena.com/news/13MP-camera-tipped-for-Samsung-Galaxy-S-IV_id35168 1. Lens( 透鏡 ) 2. VCM( 音圈馬達 )

    3. IR-Cut( 紅外光濾片 ) 4. Sensor( 感光元件 ) 5. PCB( 印刷電路板 ) 6. ISP( 影像訊號處理器 )
  52. • Sensor: OmniVision OV5647 Color CMOS QSXGA (5MP) • 靜態拍照最高解析度:

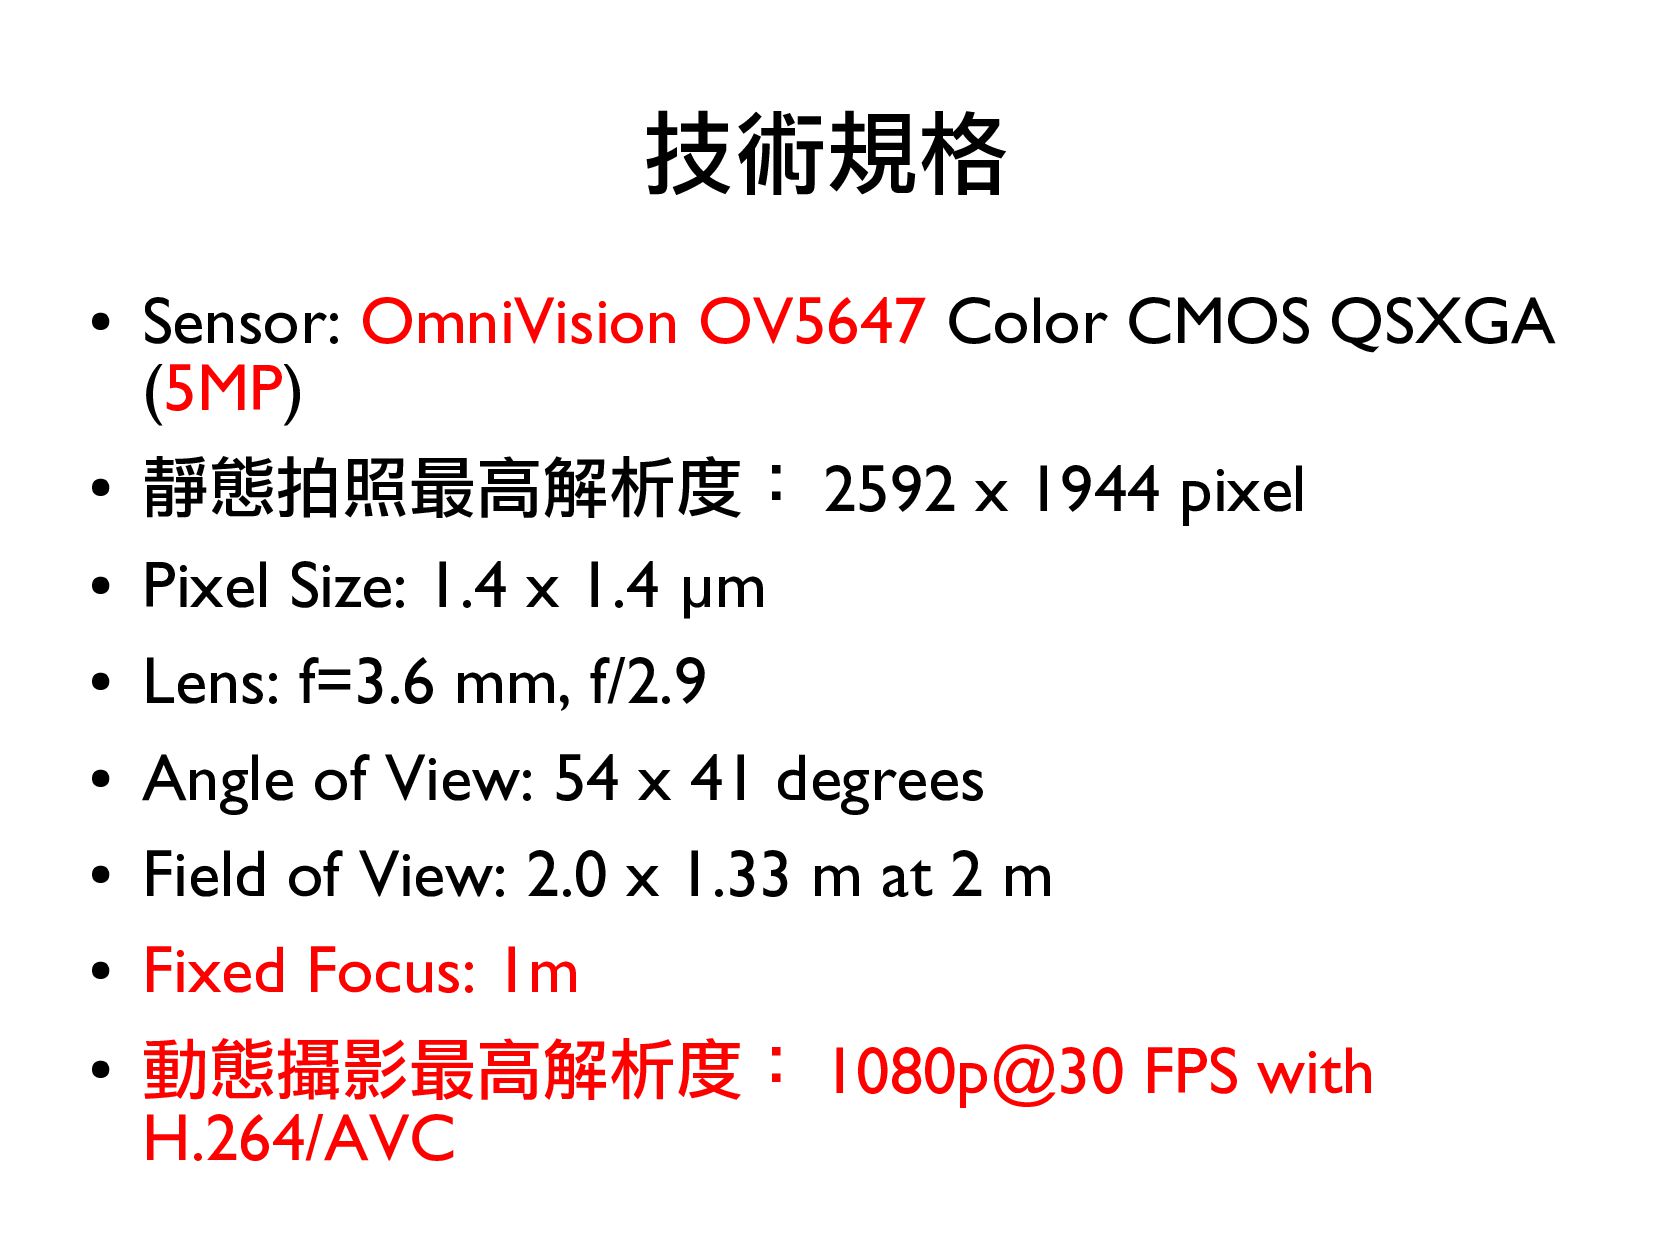
    2592 x 1944 pixel • Pixel Size: 1.4 x 1.4 µm • Lens: f=3.6 mm, f/2.9 • Angle of View: 54 x 41 degrees • Field of View: 2.0 x 1.33 m at 2 m • Fixed Focus: 1m • 動態攝影最高解析度: 1080p@30 FPS with H.264/AVC 技術規格
  53. • No IR = No 'IR cut filter' installed •

    因此 CMOS 可吸收到不可見光 (Infrared) • No IR 相機 ≠ 夜視相機 • 除非有額外的紅外線發光源 No IR Camera (v1) 黑色 PCB 板
  54. • 只預覽 2 秒 (-t), 不存檔 • $ raspistill -t

    2000 • 5 秒後拍照 ( 預設 ), 檔案 test.jpg(-o) • $ raspistill -o test.jpg • 3 秒後拍照 , 並編碼成 png 格式 (-e), 長 640x 寬 480 • $ raspistill -t 3000 -o test.png -e png -w 640 -h 480 RaspiStill https://www.raspberrypi.org/documentation/usage/camera/raspicam/raspistill.md
  55. 145 • 是一種圖形應用標準 • Client/Server 架構 • X Client :

    應用程式 • X Server : 管理硬體輸入 / 輸出 • 可透過網路傳輸 • TCP/IP 或是 Unix Domain Socket • X11 是通訊協定名稱 X Window System http://keyj.emphy.de/files/linuxgraphics_en.pdf
  56. 146 • Windows( 使用 Xming + putty) • Xming 安裝

    (http://sourceforge.net/projects/xming/)+ 下一步到底 • putty > SSH > X11 > Enable X11 forwarding • Linux/Mac : ssh -X [email protected] X11 Forwarding using SSH
  57. • 看照片 • $ gpicview image.jpg • 如果不行 , 先確認

    1. 是不是使用 SSH 連線? 不能使用 COM 連線 ! 2. SSH 是以 X11 Forwarding 方式連線嗎? 3. 如果是 Windows, 上面的 Xming 有跑起來嗎? X11 Forwarding 連線成功後
  58. • 在 Mac 上 • 第一步:編輯 /etc/sshd_config 修改這行 # X11Forwarding

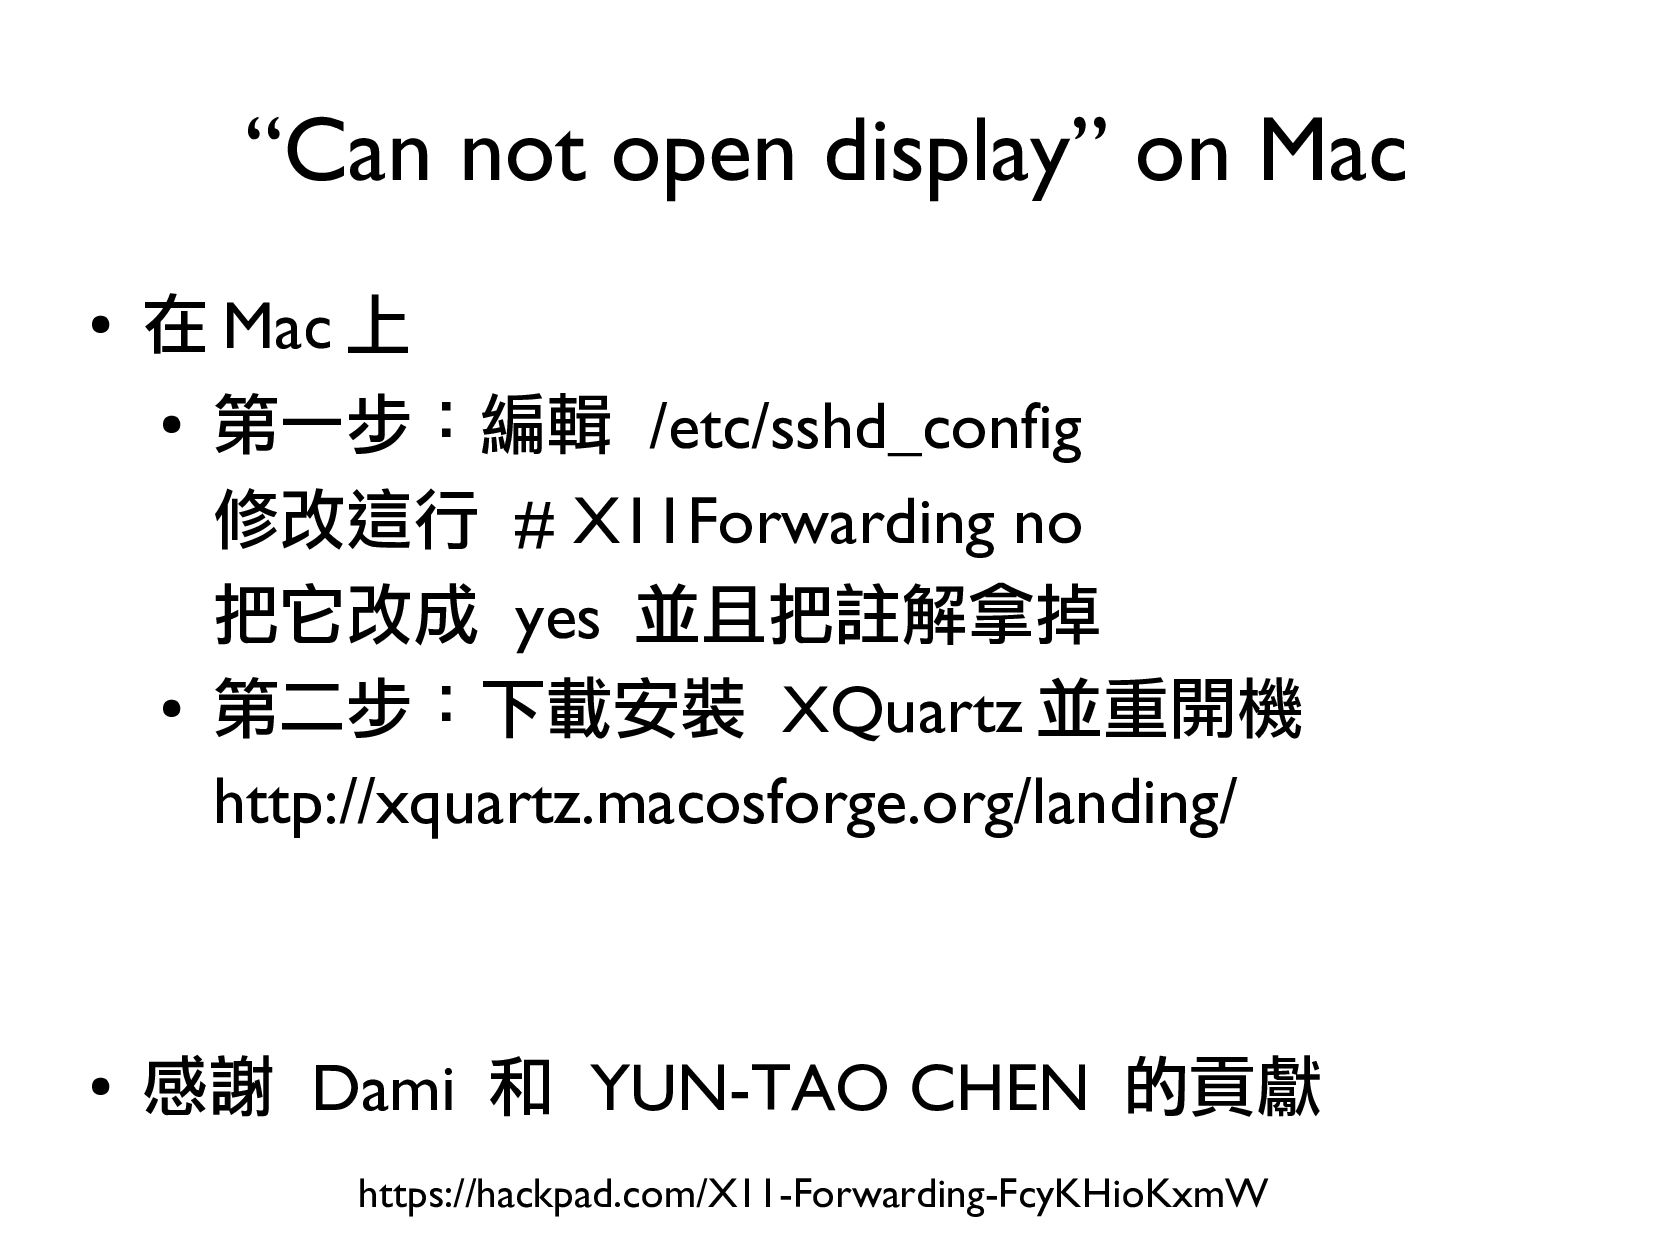
    no 把它改成 yes 並且把註解拿掉 • 第二步:下載安裝 XQuartz 並重開機 http://xquartz.macosforge.org/landing/ • 感謝 Dami 和 YUN-TAO CHEN 的貢獻 “Can not open display” on Mac https://hackpad.com/X11-Forwarding-FcyKHioKxmW
  59. 150 • 使用 scp • 一個實做 SCP(Secure Copy Protocol) 的應用程式

    • 透過 SSH(Secure Shell) 傳輸資料 • Windows 請安裝 WinSCP • http://winscp.net/eng/download.php • 從 Pi 複製檔案到 PC 上 • scp [email protected]:/home/pi/file.txt . • scp file.txt [email protected]:/home/pi 如何讓 Pi 和 PC 互傳檔案? http://winscp.net/
  60. • 跨平台的計算機函式庫 , 主要由 C/C++ 撰寫 OpenCV - Open Source

    Computer Vision Library http://www.embedded-vision.com/technology/computer-vision-algorithms
  61. import cv2 • import sys • imagePath = sys.argv[1] image

    = cv2.imread(imagePath) • • cv2.imshow("preview", image) cv2.waitKey(0) cv2.destroyAllWindows() • 載入圖檔並顯示
  62. • 預定義好的 Userspace API • Video and radio streaming devices

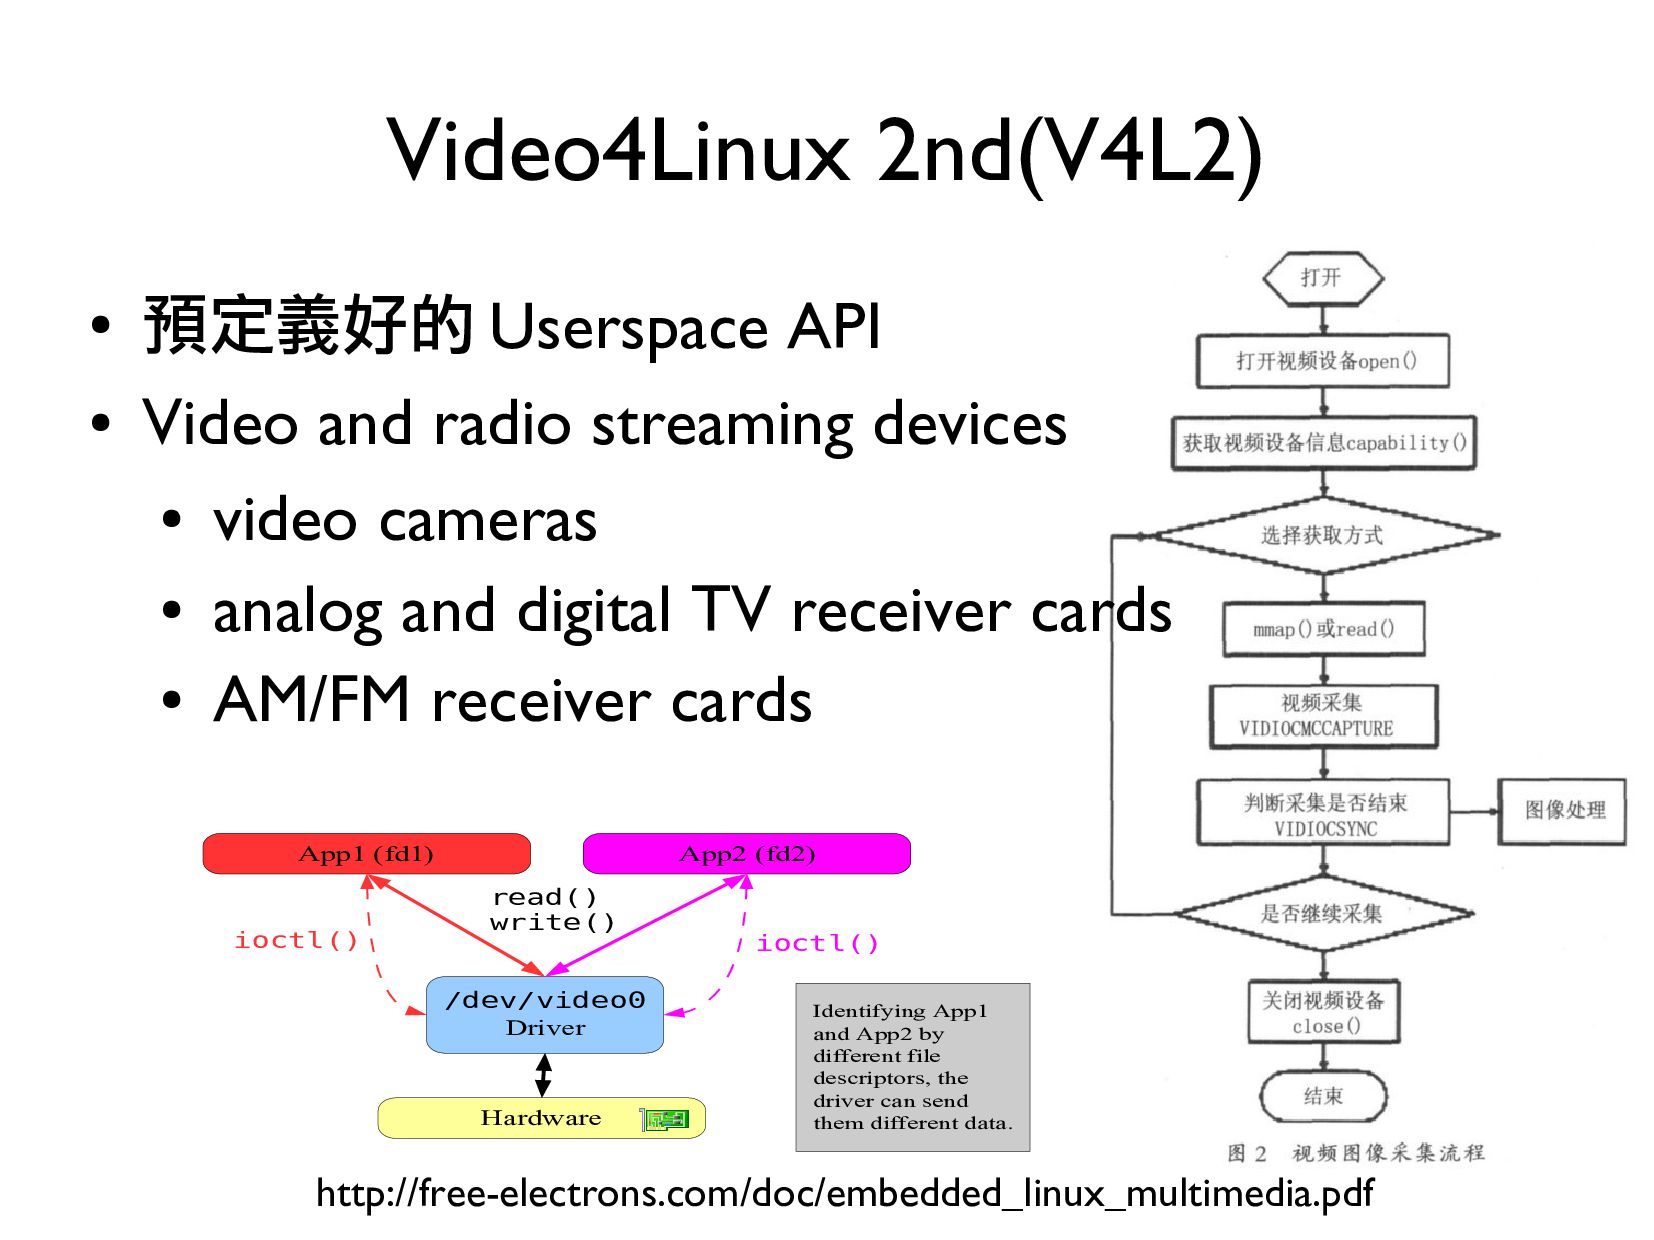
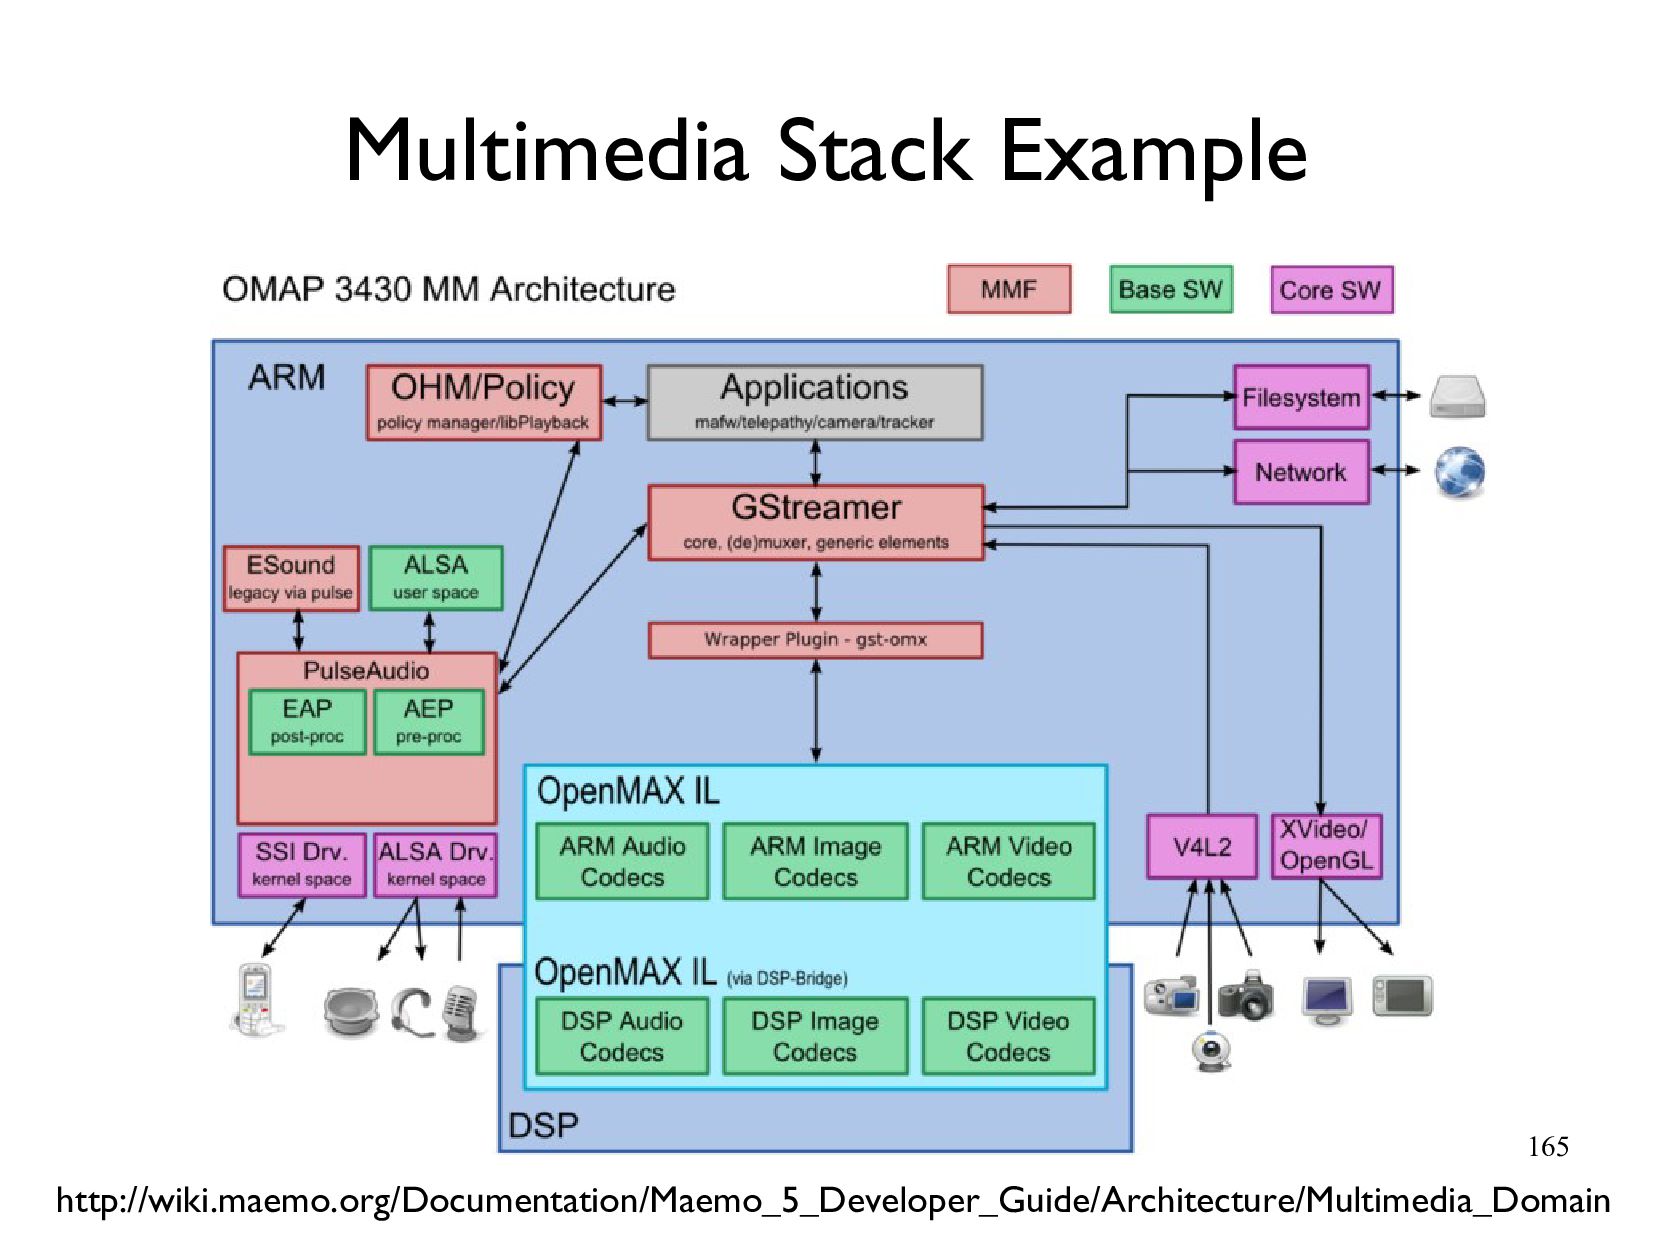
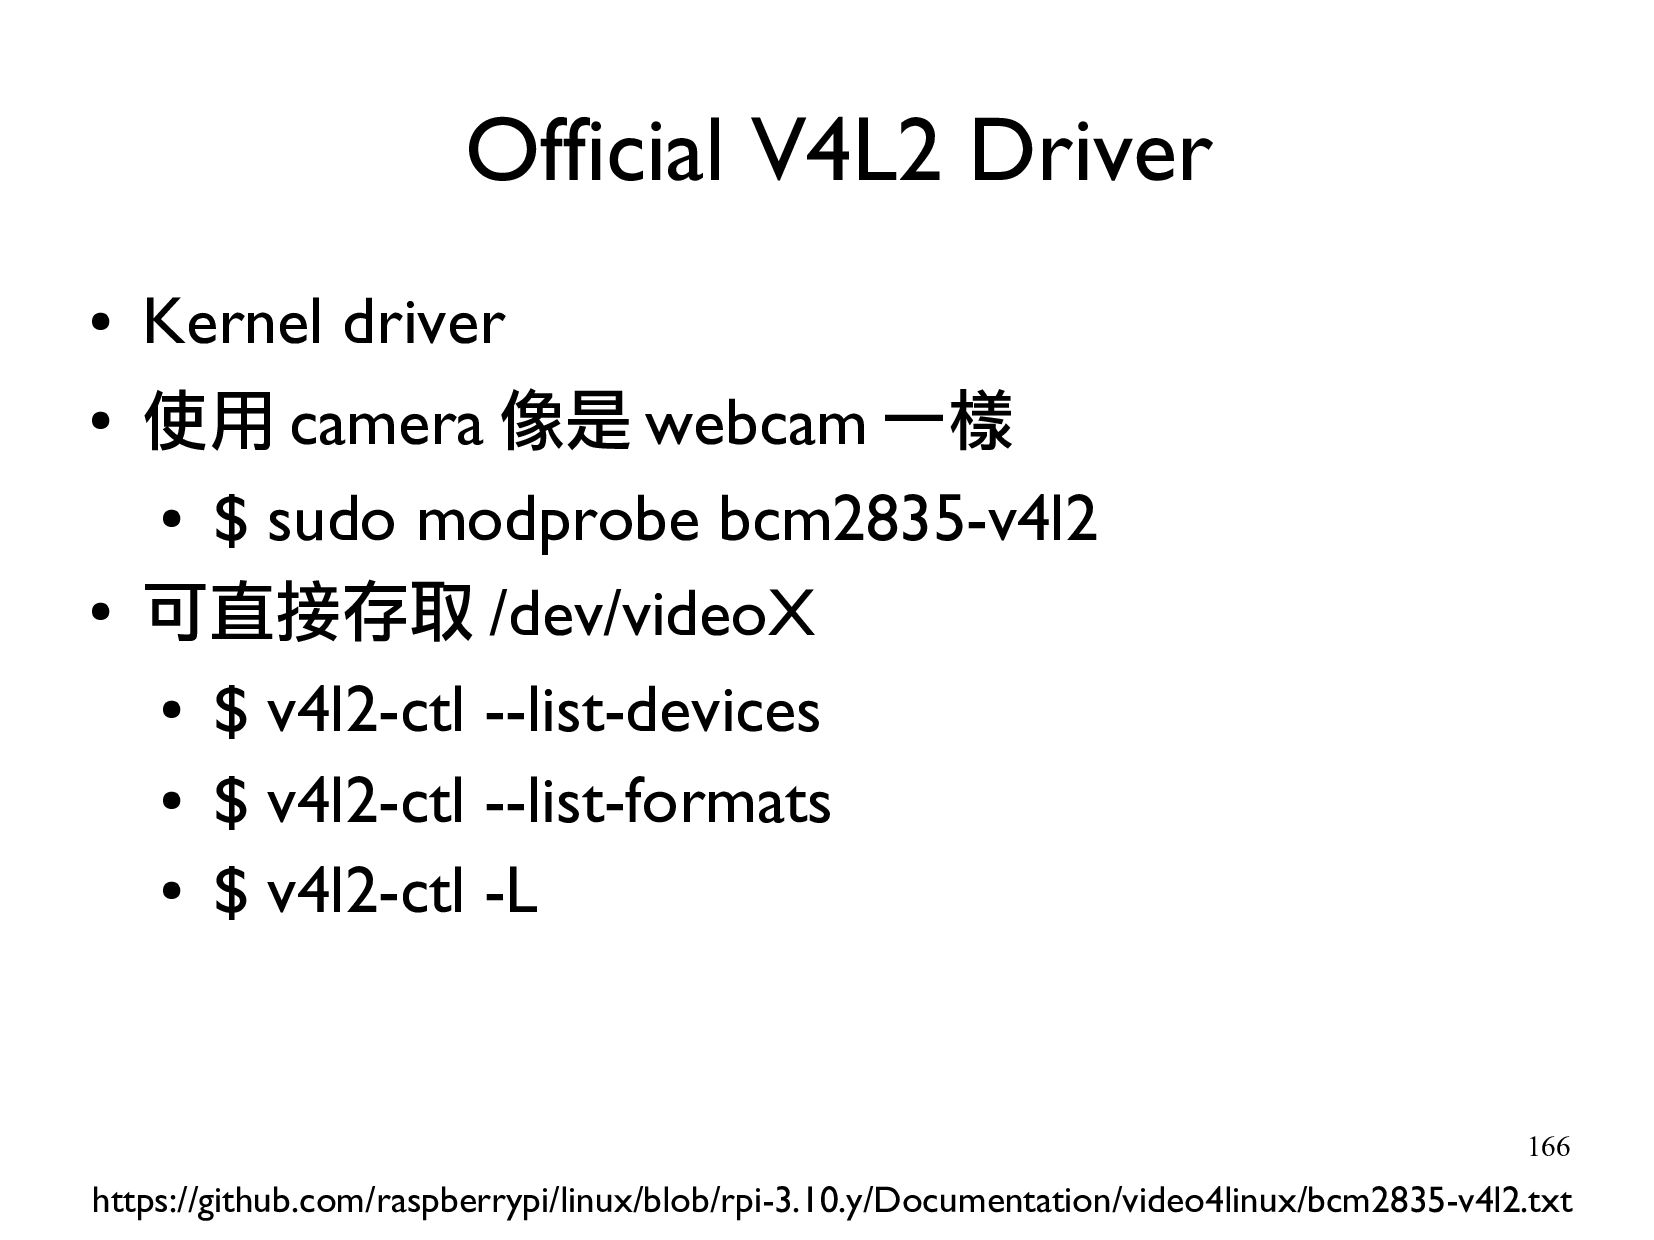
    • video cameras • analog and digital TV receiver cards • AM/FM receiver cards Video4Linux 2nd(V4L2) http://free-electrons.com/doc/embedded_linux_multimedia.pdf /dev/video0 Driver Hardware App1 (fd1) App2 (fd2) ioctl() ioctl() read() write() Identifying App1 and App2 by different file descriptors, the driver can send them different data.
  63. 164 • 開放多媒體加速層 (Open Media Acceleration) • 由 Khronos Group

    提出的標準 • 統一的介面,加速大量多媒體資料的處理 OpenMAX https://www.khronos.org/openmax/
  64. 166 • Kernel driver • 使用 camera 像是 webcam 一樣

    • $ sudo modprobe bcm2835-v4l2 • 可直接存取 /dev/videoX • $ v4l2-ctl --list-devices • $ v4l2-ctl --list-formats • $ v4l2-ctl -L ×Official V4L2 Driver https://github.com/raspberrypi/linux/blob/rpi-3.10.y/Documentation/video4linux/bcm2835-v4l2.txt
  65. import cv2 cap = cv2.VideoCapture(0) cap.set(cv2.cv.CV_CAP_PROP_FRAME_WIDTH, 320) cap.set(cv2.cv.CV_CAP_PROP_FRAME_HEIGHT, 240) while

    True: ret, frame = cap.read() cv2.imshow(“preview”, frame) if cv2.waitKey(1) & 0xFF == ord(“q”): break cap.release() cv2.destroyAllWindows() 讀取 Camera 並顯示
  66. • R( 紅 ), G( 綠 ), B( 藍 )

    • 光的三原色 • 疊加型混色的色彩模型 • 常用在電腦上表現色彩 • 8-bit: (255, 0, 0), #FF0000 RGB - R(Red), G(Green), B(Blue) https://en.wikipedia.org/wiki/RGB_color_model
  67. • C( 青 ), M( 紫 ), Y( 黃 ),

    K( 黑 ) • 彩色墨水三原色 • 削減型混色的色彩模型 • 常用在印表機 / 影印機表現色彩 • 黑色 , R=G=B=1 CMY(K) - C(Cyan), M(Magenta), Y(Yellow), K(Black) https://en.wikipedia.org/wiki/CMYK_color_model
  68. • H( 彩度 , 0-179), S( 飽和度 , 0-255), V(

    明度 , 0- 255) • 符合人對顏色的感知 • 常用在數位影像處理 HSV - H(Hue), S(Saturation), V(Value) https://en.wikipedia.org/wiki/HSL_and_HSV
  69. • 以 RGB 為中心 • RGB to CMY 色彩空間的轉換 •

    CMY to RGB http://isis-data.science.uva.nl/koelma/horus/dox/horus2.0/refcpp/html/HxColConvert_8h.html
  70. • cv2.cvtColor(img, flag) • 灰階 , flag = cv2.COLOR_BGR2GRAY •

    HSV, flag = cv2.COLOR_BGR2HSV 色彩空間的轉換 http://docs.opencv.org/3.0-beta/modules/imgproc/doc/miscellaneous_transformations.html
  71. • cv2.threshold(img, thresh, maxval, type) • 轉成黑白 • cv2.threshold(image, 127,

    255, cv2.THRESH_BINARY) 二值化 - 將影像以強度 (threshold) 區分 http://docs.opencv.org/3.0-beta/modules/imgproc/doc/miscellaneous_transformations.html
  72. • cv2.inRange(img, lowerval, upperval) • 只取出紫色部份 • lower = np.array(

    [141, 0, 0] ) • upper = np.array( [164, 145, 197] ) 另一種二值化 - 在 HSV 空間裡 , 根據區間 (lower/upper) 分割
  73. image = cv2.imread("lena512rgb.png") • gray = cv2.cvtColor(image, cv2.COLOR_BGR2GRAY) • •

    (_, binary) = cv2.threshold(gray, 127, 255, cv2.THRESH_BINARY) hsv = cv2.cvtColor(image, cv2.COLOR_BGR2HSV) • • lower = np.array( [141, 0, 0] ) • upper = np.array( [164, 145, 197] ) • mask = cv2.inRange(hsv, lower, upper) • • bitwise = cv2.bitwise_and(image, image, mask=mask) 色彩空間轉換與二值化處理
  74. • 輪廓就是一堆連續的點 , 可以將兩個不同顏色或 是不同密度的點分離 • 是物體辨識或是形狀分析應用的前處理 • 使用二值化 (

    黑白 ) 的圖形可更精準的找出輪廓 輪廓 (Contours) http://urbanhonking.com/ideasfordozens/2013/07/10/announcing-opencv-for-processing/
  75. • cv2.findContours(image, mode, method) • mode( 輪廓取得模式 ) • method(

    輪廓儲存法 ) 尋找輪廓 (findContours) http://docs.opencv.org/3.0-beta/doc/py_tutorials/py_imgproc/py_contours/py_contours_hierarchy/py_contours_hierarchy.html
  76. • mode( 輪廓取得模式 ) • CV_RETR_EXTERNAL: 只取最外層的輪廓 • CV_RETR_LIST: 取得所有輪廓,不建立階層

    (hierarchy) • CV_RETR_CCOMP: 取得所有輪廓,但只儲存成兩層的 階層 • CV_RETR_TREE: 取得所有輪廓,以全階層的方式儲存 • method( 輪廓儲存法 ) • CV_CHAIN_APPROX_NONE: 儲存所有輪廓點 • CV_CHAIN_APPROX_SIMPLE: 只留下頭尾點或對角頂 點 參數說明 http://monkeycoding.com/?p=615 http://docs.opencv.org/3.0-beta/doc/py_tutorials/py_imgproc/py_contours/py_contours_hierarchy/py_contours_hierarchy.html
  77. • cv2.drawContours(image, contours, contourIdx, color) • contourIdx = -1 表示畫出所有輪廓點

    畫輪廓 (drawContours) http://docs.opencv.org/3.0-beta/modules/imgproc/doc/drawing_functions.html
  78. image = cv2.imread("lena512rgb.png") • • gray = cv2.cvtColor(image, cv2.COLOR_BGR2GRAY) •

    (_, binary) = cv2.threshold(gray, 127, 255, cv2.THRESH_BINARY) • • (contours, _) = cv2.findContours(binary, cv2.RETR_TREE, cv2.CHAIN_APPROX_SIMPLE) • cv2.drawContours(image, contours, -1, (0,255,0), 3) • cv2.imshow("Contours", image) • 找出輪廓並且全部畫出
  79. 193 DEMO draw_contour.py $ cd .. $ cd 04_2-contours $

    python draw_contour.py ../lena512rgb.png
  80. • 空間矩 (spatial moments) • 中心矩 (central moments) • 正規中心矩

    (central normalized moments) 常見矩 http://docs.opencv.org/3.1.0/d8/d23/classcv_1_1Moments.html
  81. image = cv2.imread("rectangle1rgb.png") • • gray = cv2.cvtColor(image, cv2.COLOR_BGR2GRAY) •

    (_, binary) = cv2.threshold(gray, 127, 255, cv2.THRESH_BINARY) • (contours, _) = cv2.findContours(binary, cv2.RETR_TREE, cv2.CHAIN_APPROX_SIMPLE) • • cnt = contours[0] • M = cv2.moments(cnt) • • ((x, y), radius) = cv2.minEnclosingCircle(cnt) • M = cv2.moments(cnt) • center = (int(M["m10"] / M["m00"]), int(M["m01"] / M["m00"])) • cv2.circle(image, (int(x), int(y)), int(radius), (0, 255, 255), 2) • cv2.circle(image, center, 5, (0, 0, 255), -1) 找中心點與外框
  82. • cv2.erode(src, kernel[, iterations]) • iterations – number of times

    dilation is applied. 侵蝕 (Erode) http://docs.opencv.org/2.4/modules/imgproc/doc/filtering.html 黑白 iteration=1 iteration=2
  83. • cv2.dilate(src, kerne[, iterations]) • iterations – number of times

    dilation is applied. 膨脹 (Dilate) http://docs.opencv.org/2.4/modules/imgproc/doc/filtering.html 黑白 iteration=1 iteration=2
  84. image = cv2.imread("lena512rgb.png") • gray = cv2.cvtColor(image, cv2.COLOR_BGR2GRAY) • (_,

    binary) = cv2.threshold(gray, 127, 255, cv2.THRESH_BINARY) • • erode = cv2.erode(binary, None, iterations=2) • cv2.imshow("erode", erode) • • #dilate = cv2.dilate(binary, None, iterations=2) • #cv2.imshow("dilate", dilate) • 侵蝕效果
  85. 204 DEMO erode_dilate.py $ python erode_dilate.py ../lena512rgb.png $ cd ..

    $ cd 04_3-image_processing $ python erode_dilate.py ../lena512rgb.png
  86. image = cv2.imread("lena512rgb.png") • gray = cv2.cvtColor(image, cv2.COLOR_BGR2GRAY) • (_,

    binary) = cv2.threshold(gray, 127, 255, cv2.THRESH_BINARY) • • #erode = cv2.erode(binary, None, iterations=2) • #cv2.imshow("erode", erode) • • dilate = cv2.dilate(binary, None, iterations=2) • cv2.imshow("dilate", dilate) • 膨脹效果 ( 將註解換掉 )
  87. • 目的是為了去除雜訊 , 但對比度可能下降 • 線性濾波 • 平均平滑 (blur) •

    高斯平滑 (GaussianBlur) • 非線性濾波 • 中值濾波 (medianBlur) • 雙邊濾波 (bilateralFilter) 影像平滑
  88. image = cv2.imread(“lena512rgb.png”) • cv2.imshow("Normal", image) • • blur =

    cv2.GaussianBlur(image, (9,9), 0) • cv2.imshow("GaussianBlur", blur) • • • 高斯平滑效果
  89. • 定義要追蹤的顏色 ( 例如綠色 ) • 將影像轉到 HSV 空間後二值化 •

    綠色參考數值 – Color_Lower = (36, 130,46) – Color_Upper = (113, 255, 255) • 找出該顏色的輪廓 • 找出質心與半徑 • 畫出質心與半徑 追蹤流程
  90. • 找出顏色質心 , 定義規則 ( 超過中心線 10 就動作 ) if

    radius < 90: motor.forward() elif radius > 100: motor.backward() if center[0] > width/2 + 10: motor.turnRight() elif center[0] < width/2 - 10: motor.turnLeft() 根據移動規則控制小車移動
  91. • 是否要做高斯模糊化? frame = cv2.GaussianBlur(frame, (11, 11), 0) • 是否要作侵蝕?

    mask = cv2.erode(mask, None, iterations=2) • 是否要作膨脹? • mask = cv2.dilate(mask, None, iterations=2) • 修改找輪廓的參數是否會更快? • (contours, _) = cv2.findContours(mask, cv2.RETR_EXTERNAL, cv2.CHAIN_APPROX_SIMPLE) 優化
  92. • 關掉顯示視窗 # cv2.imshow("Frame", frame) • 使用 PWM 控制轉速 pwm_r1

    = GPIO.PWM(Motor_R1_Pin, 500) • pwm_r2 = GPIO.PWM(Motor_R2_Pin, 500) • pwm_l1 = GPIO.PWM(Motor_L1_Pin, 500) • pwm_l2 = GPIO.PWM(Motor_L2_Pin, 500) 優化
  93. • 一個軟體 • 回應從 80/8080 port 進來的 HTTP 要求 •

    可透過 CGI 或 module 方式擴充 • 如 Apache, Nginx, Boa 網頁伺服器 (Web Server) http://www.resultantsys.com/index.php/general/what-is-a-web-application-server/