Upgrade to Pro
— share decks privately, control downloads, hide ads and more …
Speaker Deck
Features
Speaker Deck
PRO
Sign in
Sign up for free
Search
Search
Chatbot Development - EC Bot Practice
Search
Ryan Chung
August 26, 2018
Technology
590
1
Share
Embed
Copy iframe code
Copy JS code
Copy link
Start on current slide
Chatbot Development - EC Bot Practice
#SheMeansBusiness
Ryan Chung
August 26, 2018
More Decks by Ryan Chung
See All by Ryan Chung
MovieBot Development
ryan403
0
330
Design Voice-First Games for Alexa
ryan403
0
89
AI Teaching Talk
ryan403
0
150
Cognitive Service
ryan403
0
120
jQuery & API Practices
ryan403
0
160
CSS Practices
ryan403
1
180
JavaScript Practices
ryan403
0
110
Web Programming - Lesson 6
ryan403
1
670
Web Programming - Lesson 7
ryan403
1
660
Other Decks in Technology
See All in Technology
攻撃者がいなくてもAIエージェントはインシデントを起こす
nomizone
0
210
Oracle Base Database Service 技術詳細
oracle4engineer
PRO
15
110k
CSに"SLO"は要らない、経営層に"99.9%"は伝わらない - SREを全社に"翻訳"する3原則
cscengineer
PRO
1
4.3k
AIと共生する開発者プラットフォーム:バクラクのモノレポ×マイクロサービス基盤
sakajunquality
2
3.2k
完全自律ロボットを作りたくて、先に開発を自律させた話(ROS Japan UG #63 LT)
rryz09
0
440
アカウントが増えてからでは遅い? ~ マルチアカウント統制の勘所 ~
kenichinakamura
0
220
「最後に責任を取るのはチーム」— 人間のPRレビューを最小化してアップデートしたメンタルモデル
jnishime_dresscode
0
130
SRE本の知られざる名シーン / The Hidden Gems of Google SRE Book
nari_ex
1
330
デジタル・デザイン構想 by Sayaka Ishizuka
y150saya
0
200
事業価値を⽣み出すSREへ SREが担うべき意思決定の5層
kenta_hi
2
3.2k
スタートアップにおけるアジャイルの実践について #shibuyagile
murabayashi
3
2.2k
Terraform共通モジュールをチーム横断で“変えられる”運用へ ― リリースと適用の分離
kekke_n
1
2.5k
Featured
See All Featured
The Curious Case for Waylosing
cassininazir
1
430
Building Applications with DynamoDB
mza
96
7.1k
Crafting Experiences
bethany
1
210
The Straight Up "How To Draw Better" Workshop
denniskardys
239
140k
sira's awesome portfolio website redesign presentation
elsirapls
0
300
Digital Ethics as a Driver of Design Innovation
axbom
PRO
1
340
[Rails World 2023 - Day 1 Closing Keynote] - The Magic of Rails
eileencodes
38
2.9k
For a Future-Friendly Web
brad_frost
183
10k
Bioeconomy Workshop: Dr. Julius Ecuru, Opportunities for a Bioeconomy in West Africa
akademiya2063
PRO
1
170
Design of three-dimensional binary manipulators for pick-and-place task avoiding obstacles (IECON2024)
konakalab
0
490
Money Talks: Using Revenue to Get Sh*t Done
nikkihalliwell
0
290
Max Prin - Stacking Signals: How International SEO Comes Together (And Falls Apart)
techseoconnect
PRO
0
200
Transcript
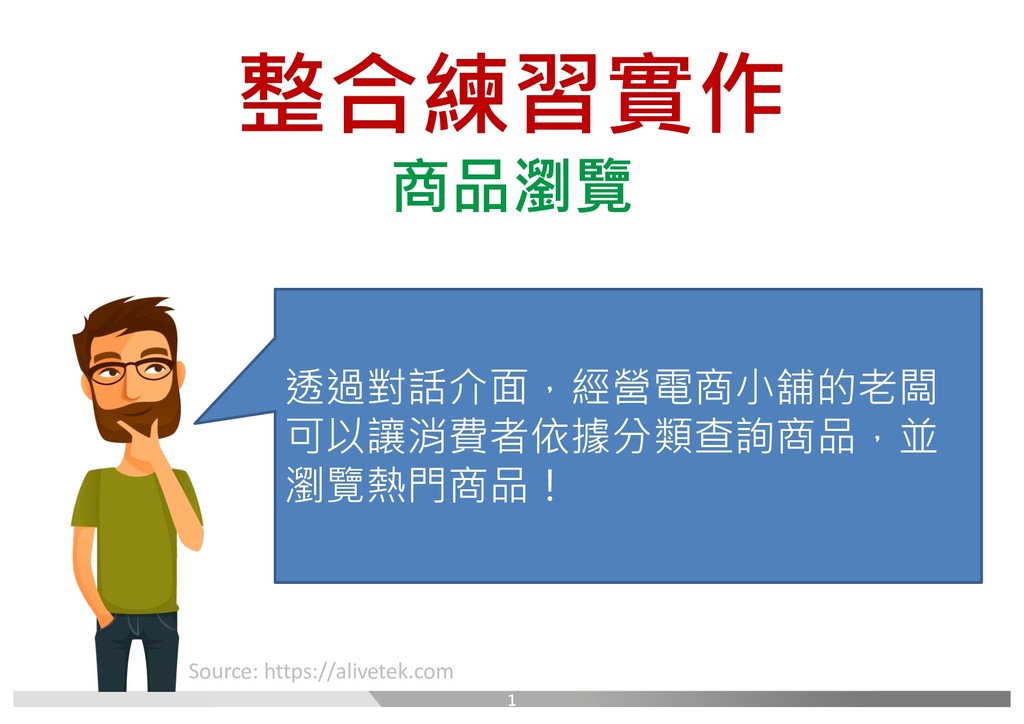
整合練習實作 商品瀏覽 Source: https://alivetek.com 透過對話介面,經營電商小舖的老闆 可以讓消費者依據分類查詢商品,並 瀏覽熱門商品! 1
課前可準備事項 • 申請Google帳號(有Gmail亦可) • 申請Heroku帳號 https://signup.heroku.com/login • 安裝Heroku CLI指令列工具 –
Windows 64-bit • https://cli-assets.heroku.com/heroku-x64.exe – Mac • https://cli-assets.heroku.com/heroku.pkg 2
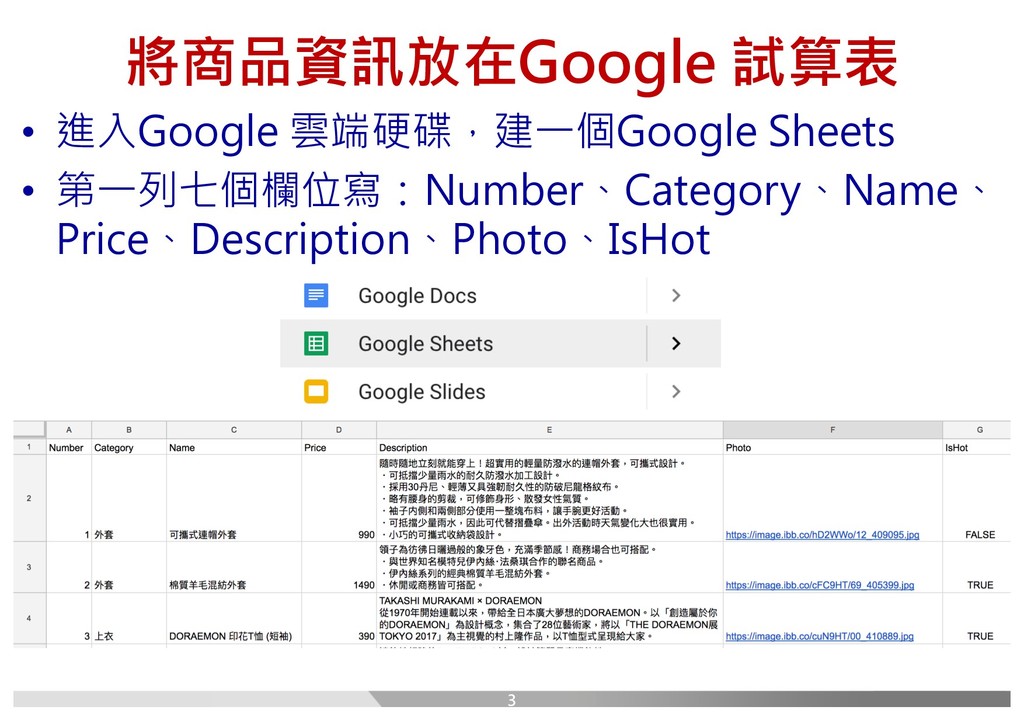
將商品資訊放在Google 試算表 • 進入Google 雲端硬碟,建一個Google Sheets • 第一列七個欄位寫:Number、Category、Name、 Price、Description、Photo、IsHot 3
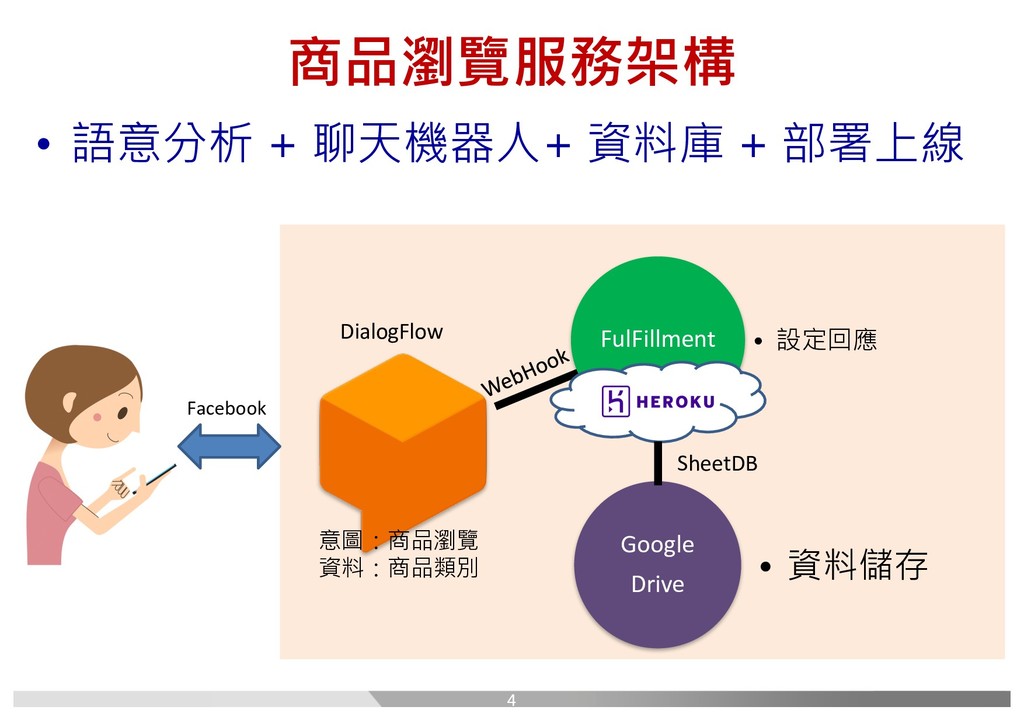
商品瀏覽服務架構 • 語意分析 + 聊天機器人+ 資料庫 + 部署上線 FulFillment •
設定回應 Google Drive • 資料儲存 DialogFlow 意圖:商品瀏覽 資料:商品類別 SheetDB Facebook 4
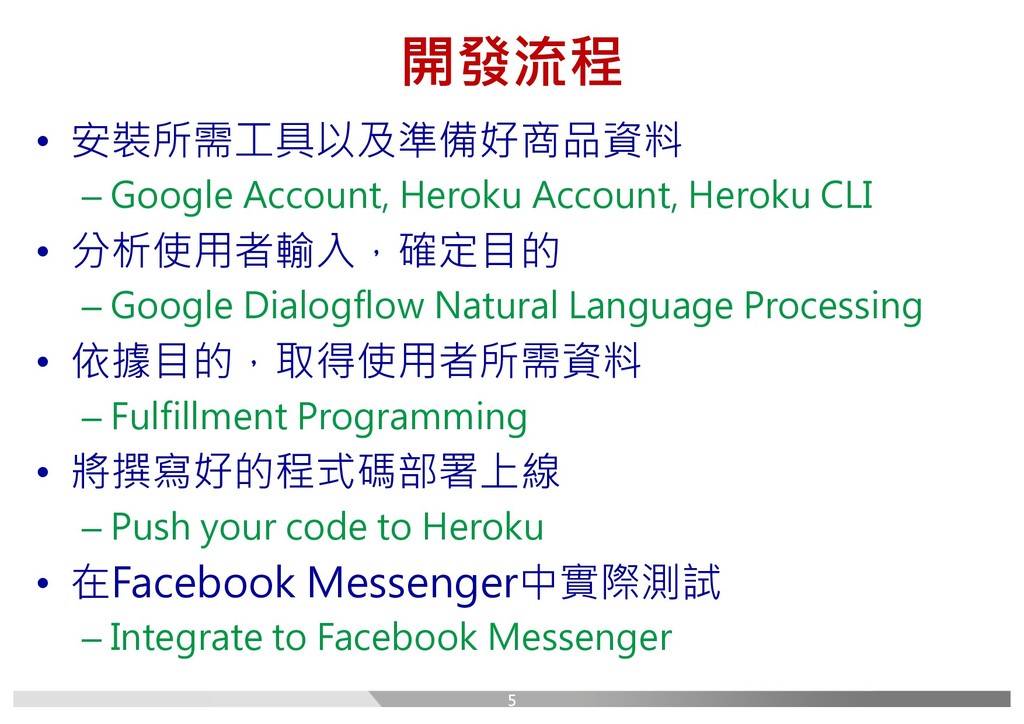
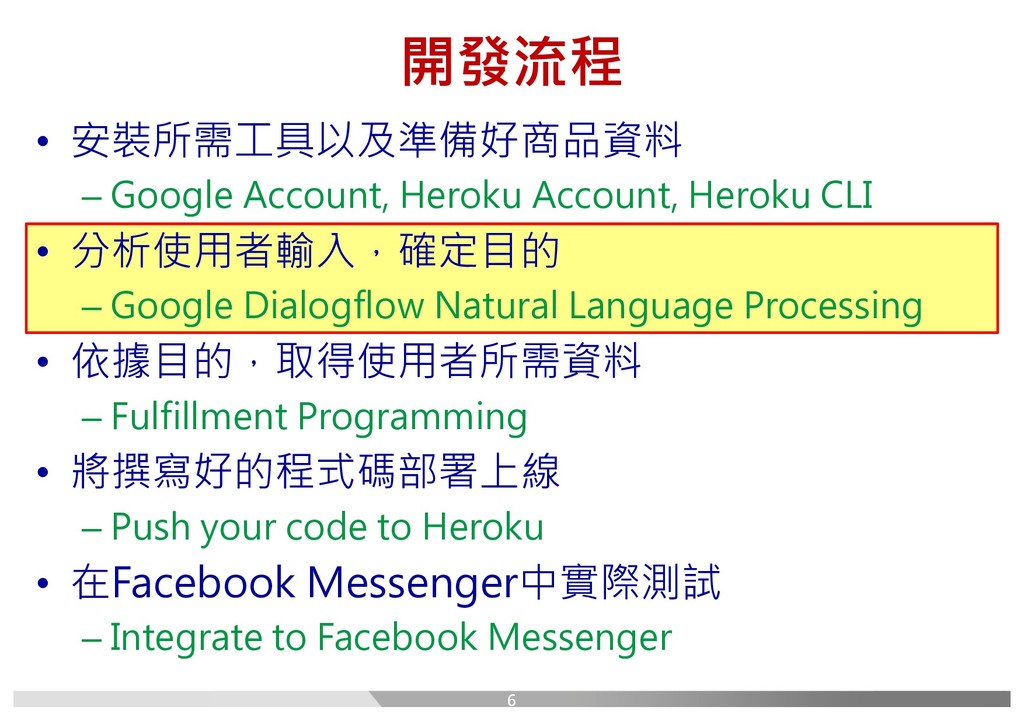
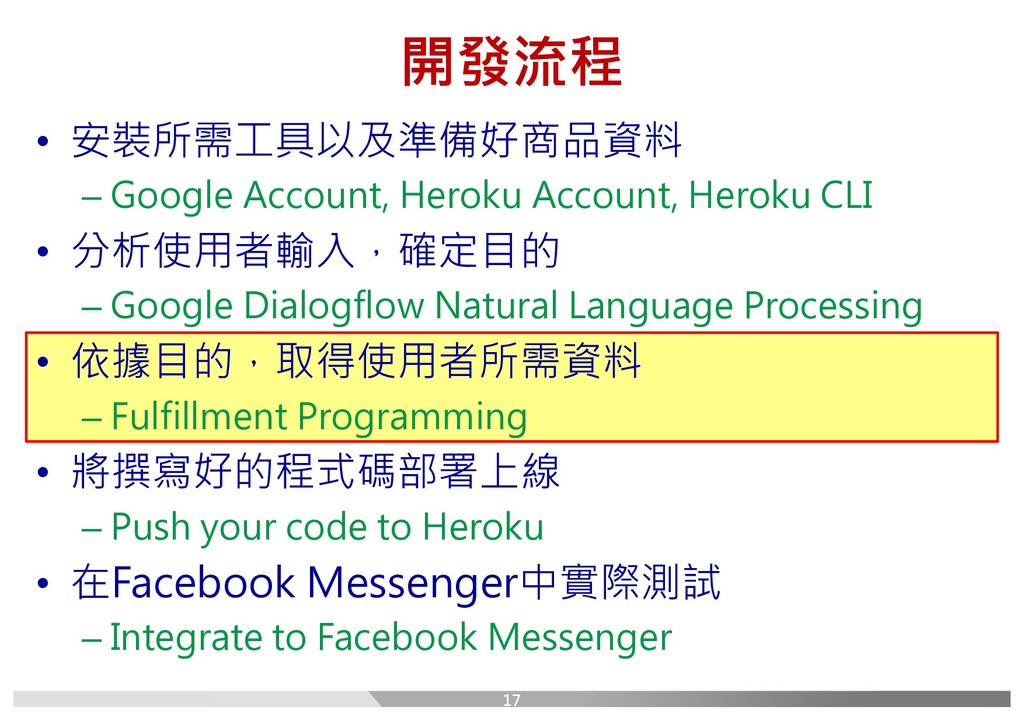
開發流程 • 安裝所需工具以及準備好商品資料 – Google Account, Heroku Account, Heroku CLI
• 分析使用者輸入,確定目的 – Google Dialogflow Natural Language Processing • 依據目的,取得使用者所需資料 – Fulfillment Programming • 將撰寫好的程式碼部署上線 – Push your code to Heroku • 在Facebook Messenger中實際測試 – Integrate to Facebook Messenger 5
開發流程 • 安裝所需工具以及準備好商品資料 – Google Account, Heroku Account, Heroku CLI
• 分析使用者輸入,確定目的 – Google Dialogflow Natural Language Processing • 依據目的,取得使用者所需資料 – Fulfillment Programming • 將撰寫好的程式碼部署上線 – Push your code to Heroku • 在Facebook Messenger中實際測試 – Integrate to Facebook Messenger 6
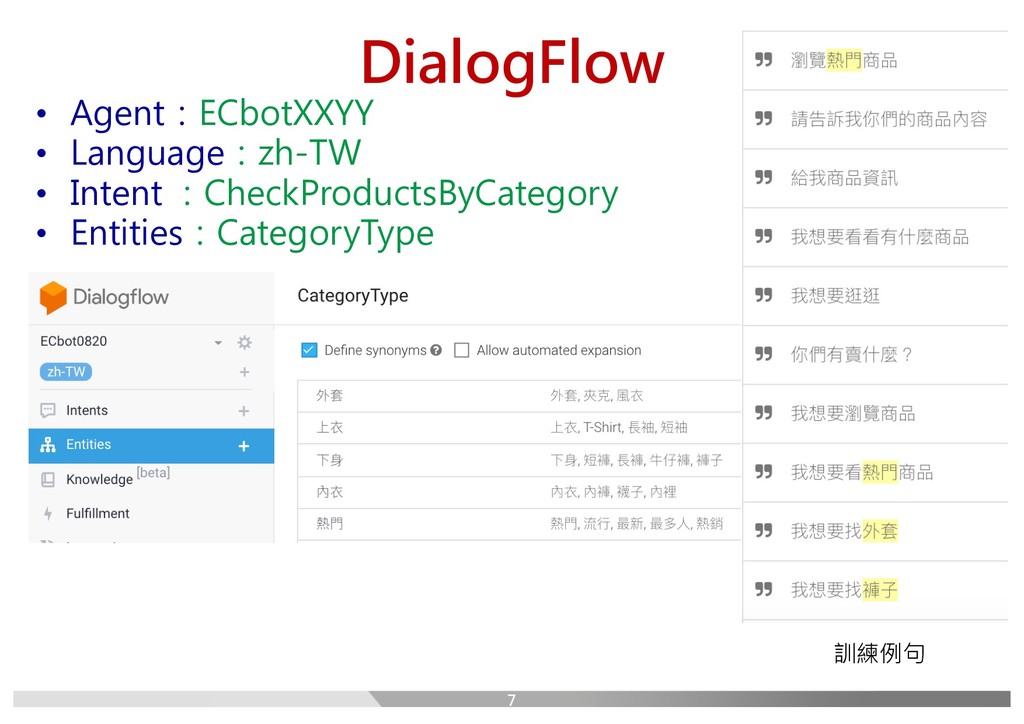
DialogFlow • Agent:ECbotXXYY • Language:zh-TW • Intent :CheckProductsByCategory • Entities:CategoryType
訓練例句 7
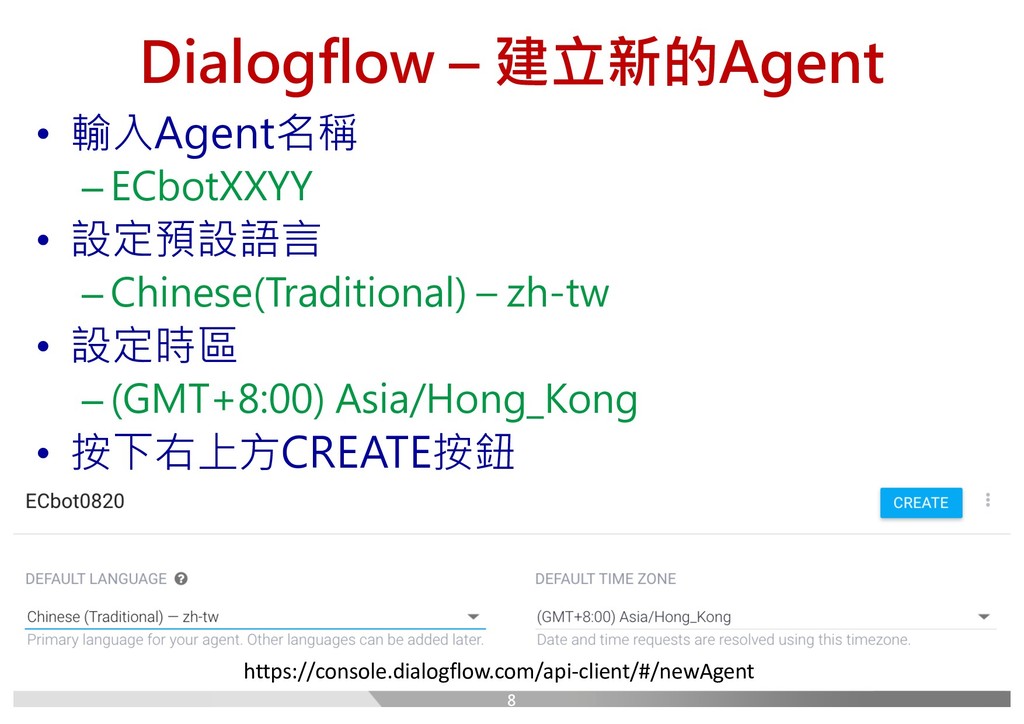
Dialogflow – 建立新的Agent • 輸入Agent名稱 – ECbotXXYY • 設定預設語言 –
Chinese(Traditional) – zh-tw • 設定時區 – (GMT+8:00) Asia/Hong_Kong • 按下右上方CREATE按鈕 8 https://console.dialogflow.com/api-client/#/newAgent
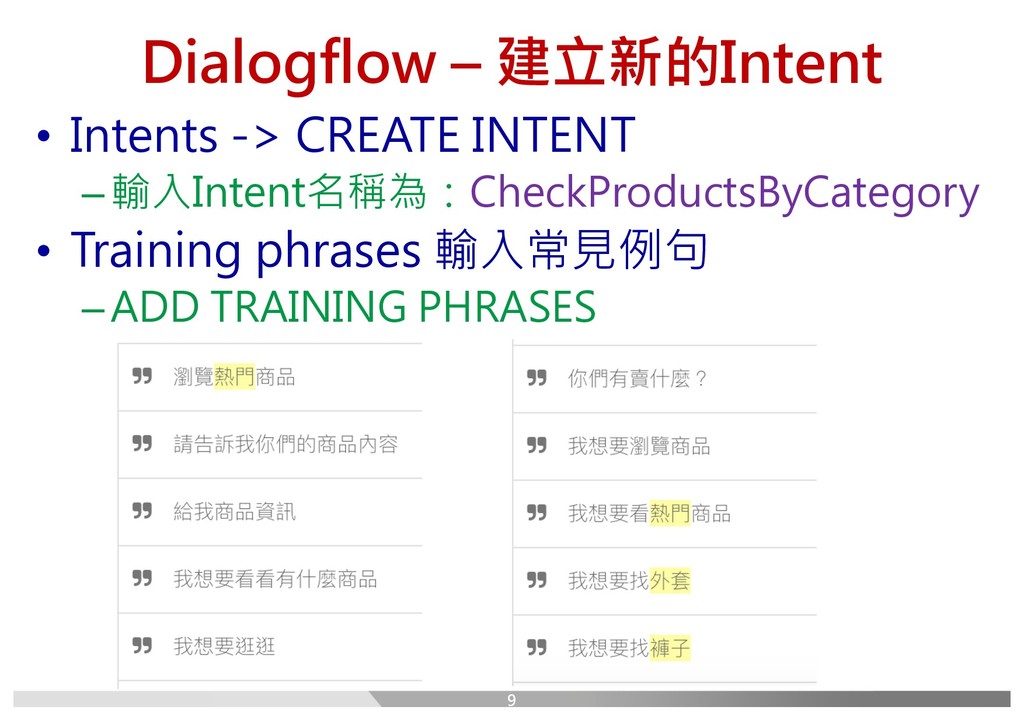
Dialogflow – 建立新的Intent • Intents -> CREATE INTENT –輸入Intent名稱為:CheckProductsByCategory •
Training phrases 輸入常見例句 –ADD TRAINING PHRASES 9
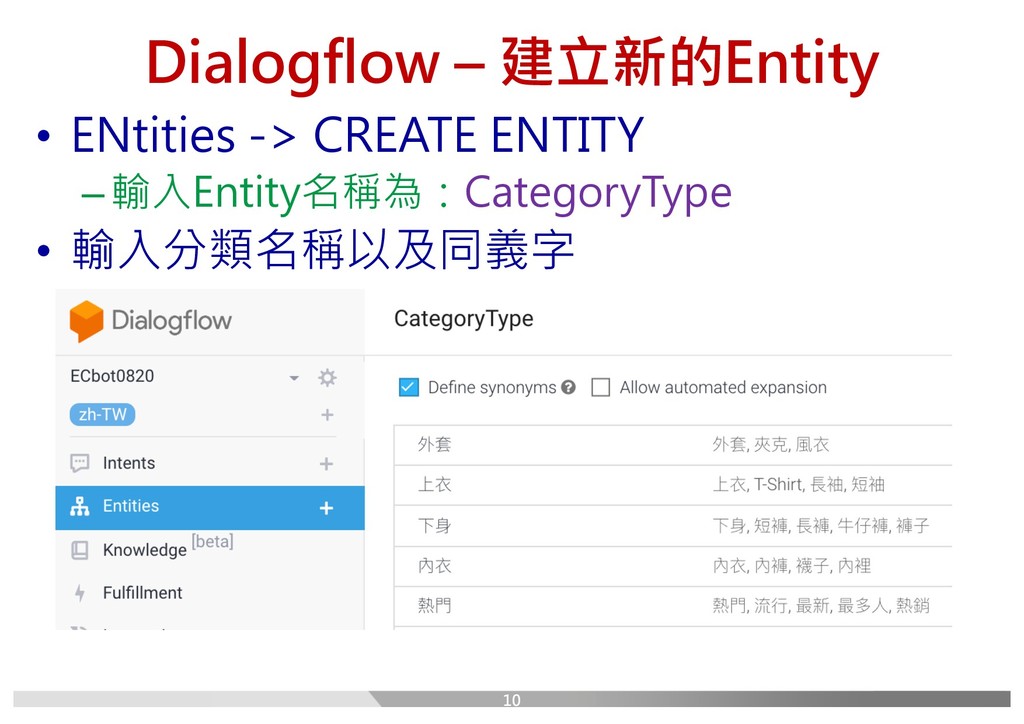
Dialogflow – 建立新的Entity • ENtities -> CREATE ENTITY –輸入Entity名稱為:CategoryType •
輸入分類名稱以及同義字 10
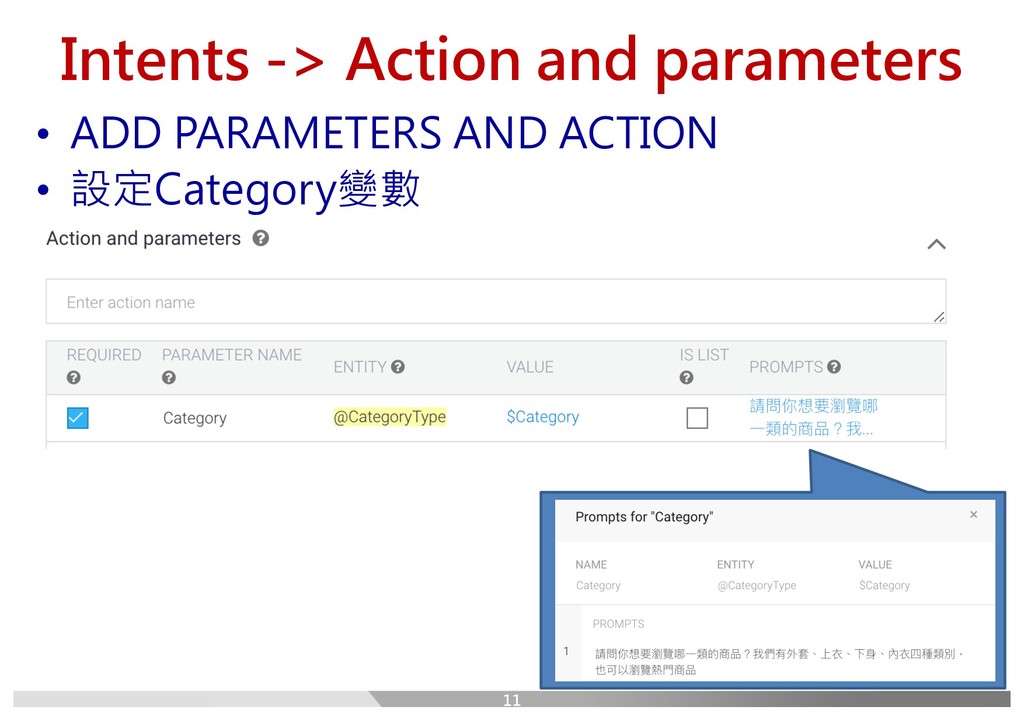
Intents -> Action and parameters • ADD PARAMETERS AND ACTION
• 設定Category變數 11
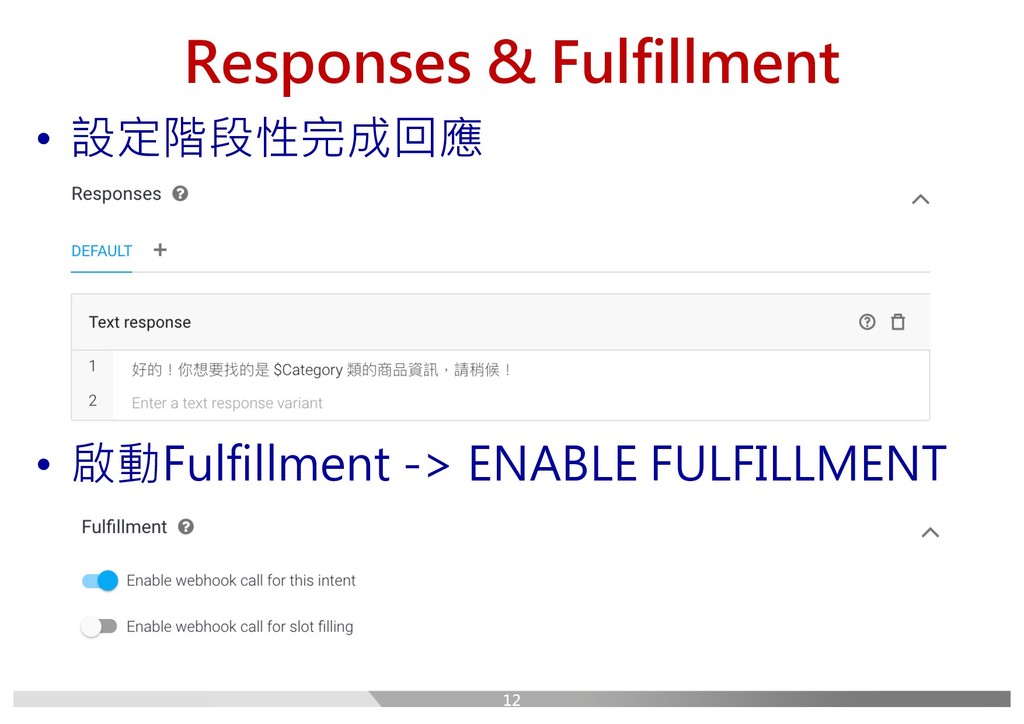
Responses & Fulfillment • 設定階段性完成回應 • 啟動Fulfillment -> ENABLE FULFILLMENT
12
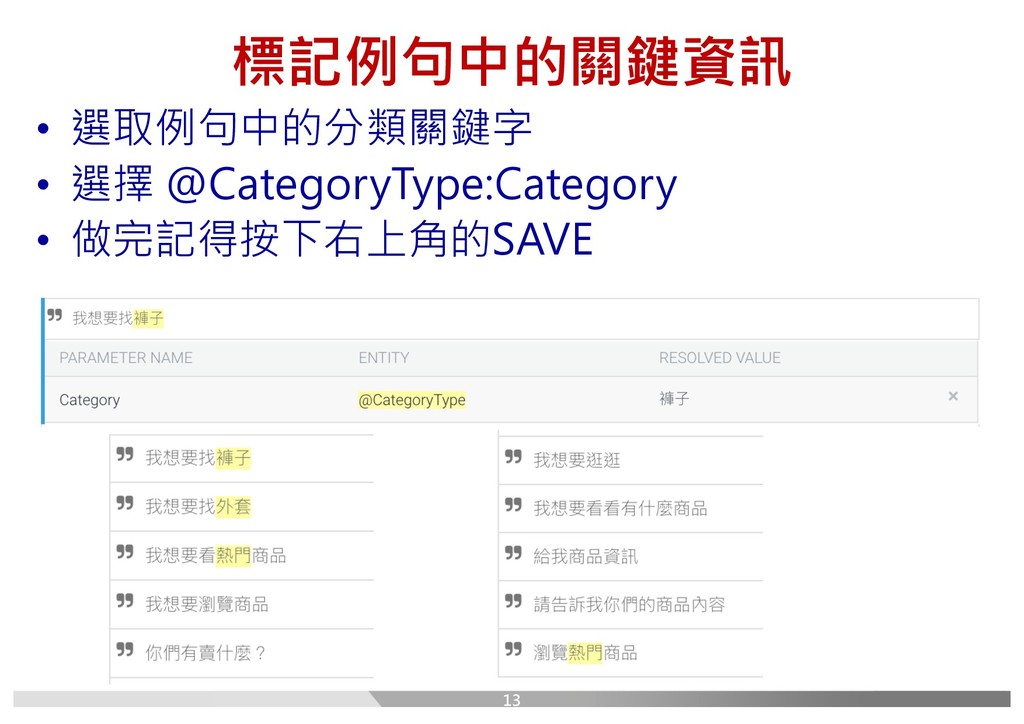
標記例句中的關鍵資訊 • 選取例句中的分類關鍵字 • 選擇 @CategoryType:Category • 做完記得按下右上角的SAVE 13
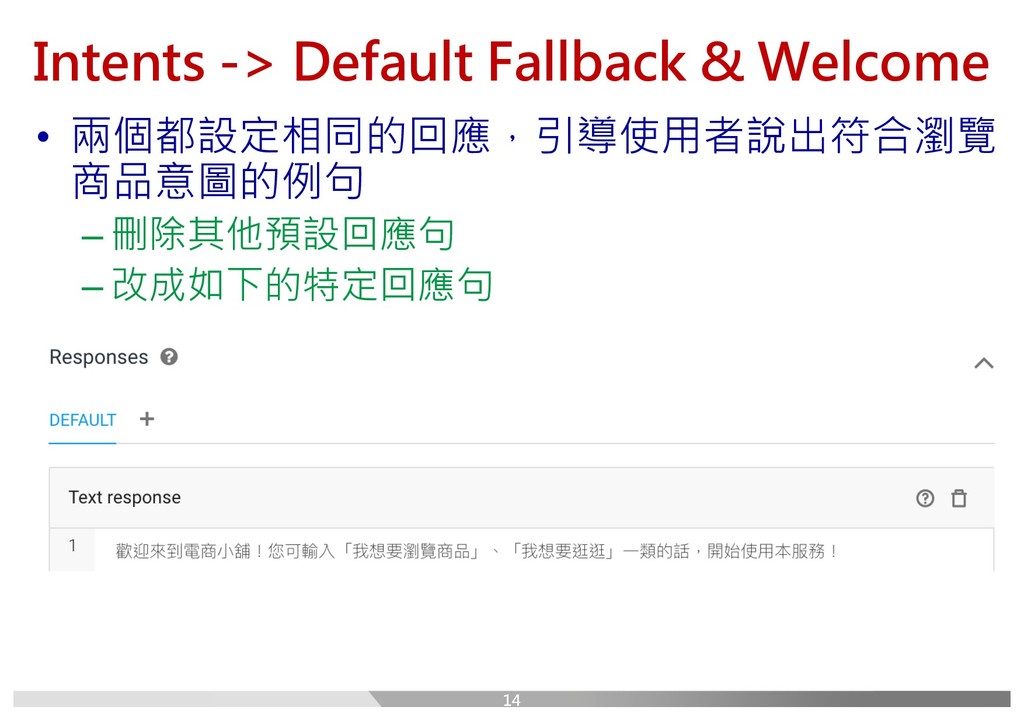
Intents -> Default Fallback & Welcome • 兩個都設定相同的回應,引導使用者說出符合瀏覽 商品意圖的例句 –
刪除其他預設回應句 – 改成如下的特定回應句 14
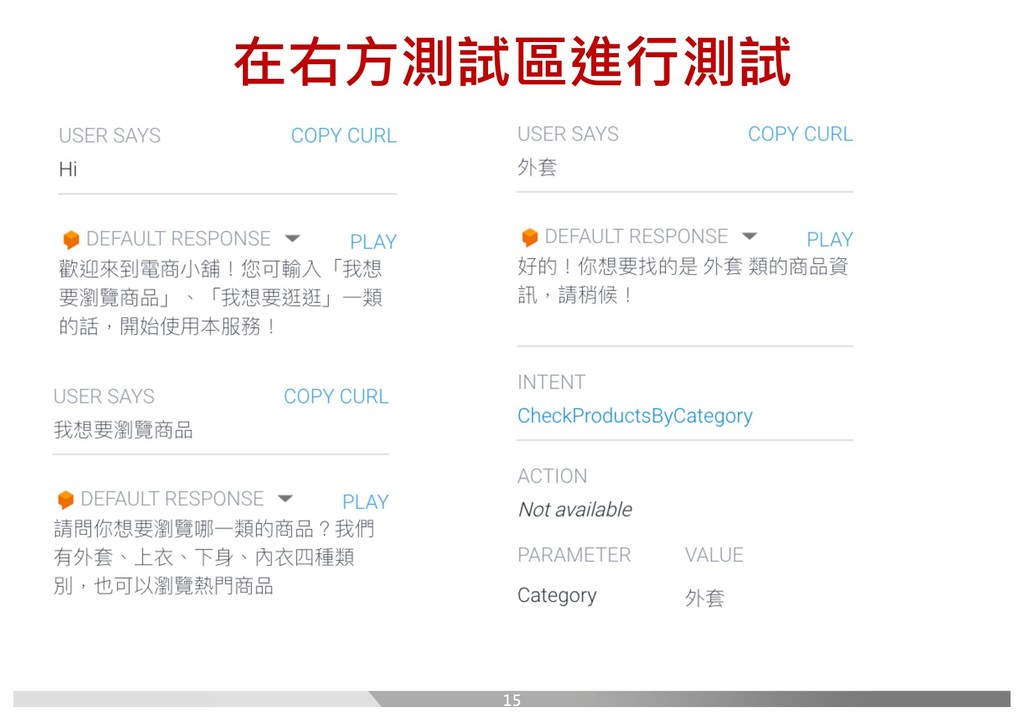
在右方測試區進行測試 15
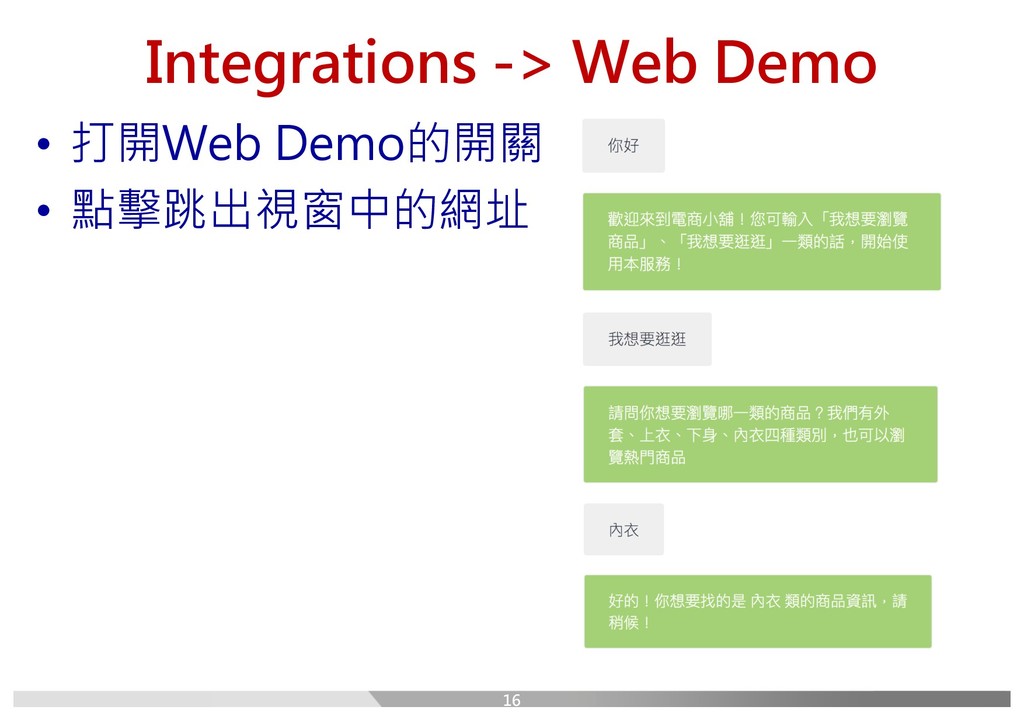
Integrations -> Web Demo • 打開Web Demo的開關 • 點擊跳出視窗中的網址 16
開發流程 • 安裝所需工具以及準備好商品資料 – Google Account, Heroku Account, Heroku CLI
• 分析使用者輸入,確定目的 – Google Dialogflow Natural Language Processing • 依據目的,取得使用者所需資料 – Fulfillment Programming • 將撰寫好的程式碼部署上線 – Push your code to Heroku • 在Facebook Messenger中實際測試 – Integrate to Facebook Messenger 17
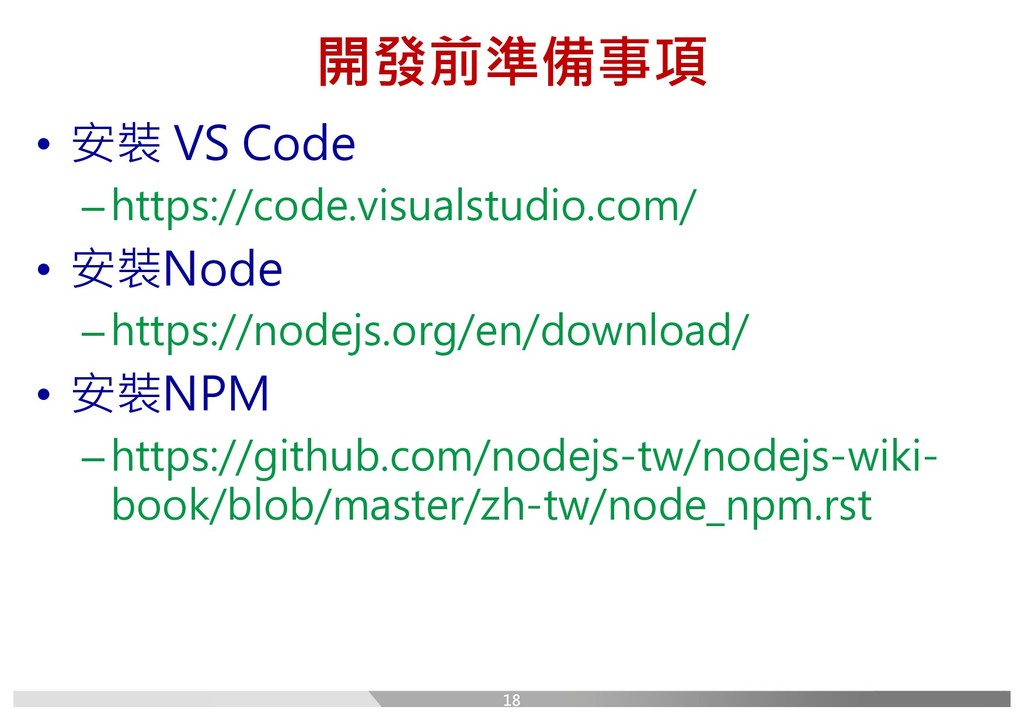
開發前準備事項 • 安裝 VS Code –https://code.visualstudio.com/ • 安裝Node –https://nodejs.org/en/download/ •
安裝NPM –https://github.com/nodejs-tw/nodejs-wiki- book/blob/master/zh-tw/node_npm.rst 18
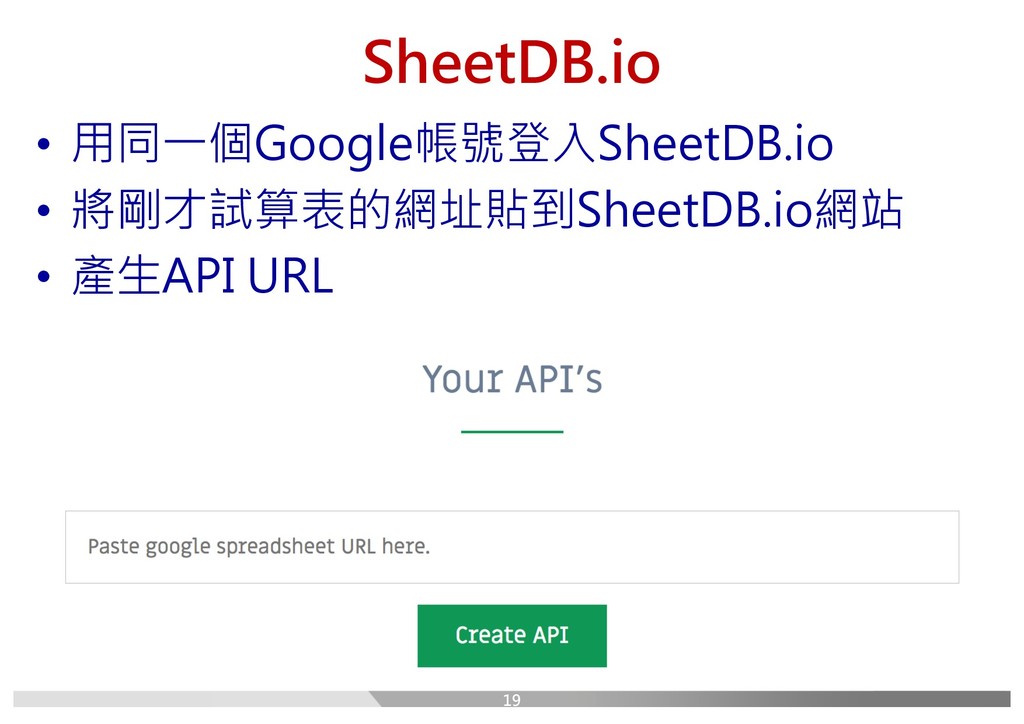
SheetDB.io • 用同一個Google帳號登入SheetDB.io • 將剛才試算表的網址貼到SheetDB.io網站 • 產生API URL 19
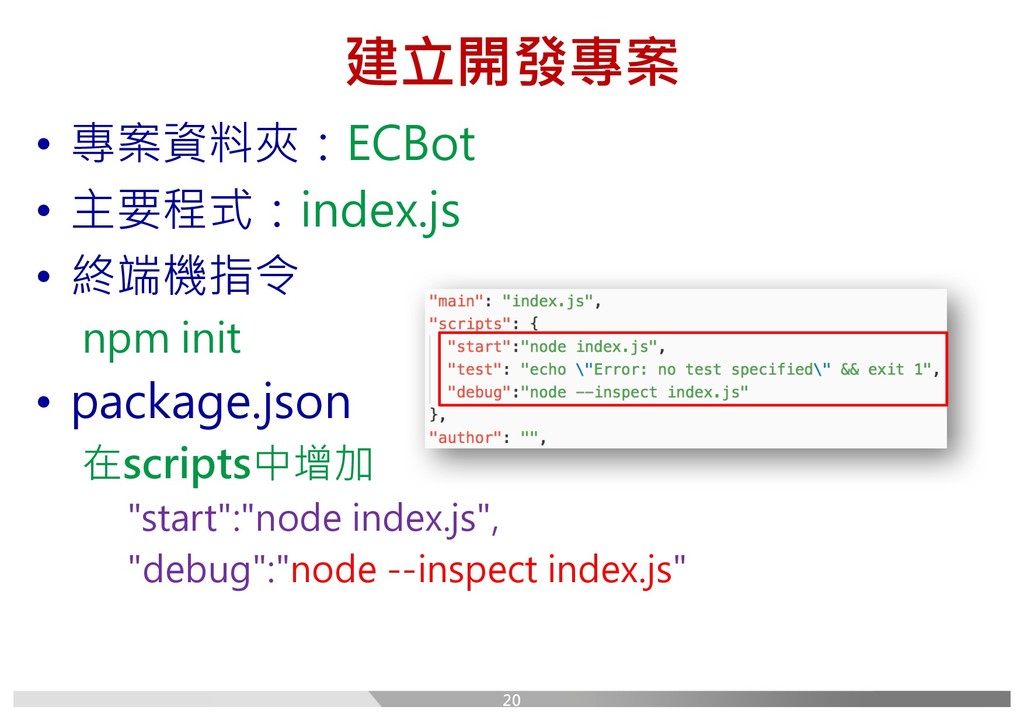
建立開發專案 • 專案資料夾:ECBot • 主要程式:index.js • 終端機指令 npm init •
package.json 在scripts中增加 "start":"node index.js", "debug":"node --inspect index.js" 20
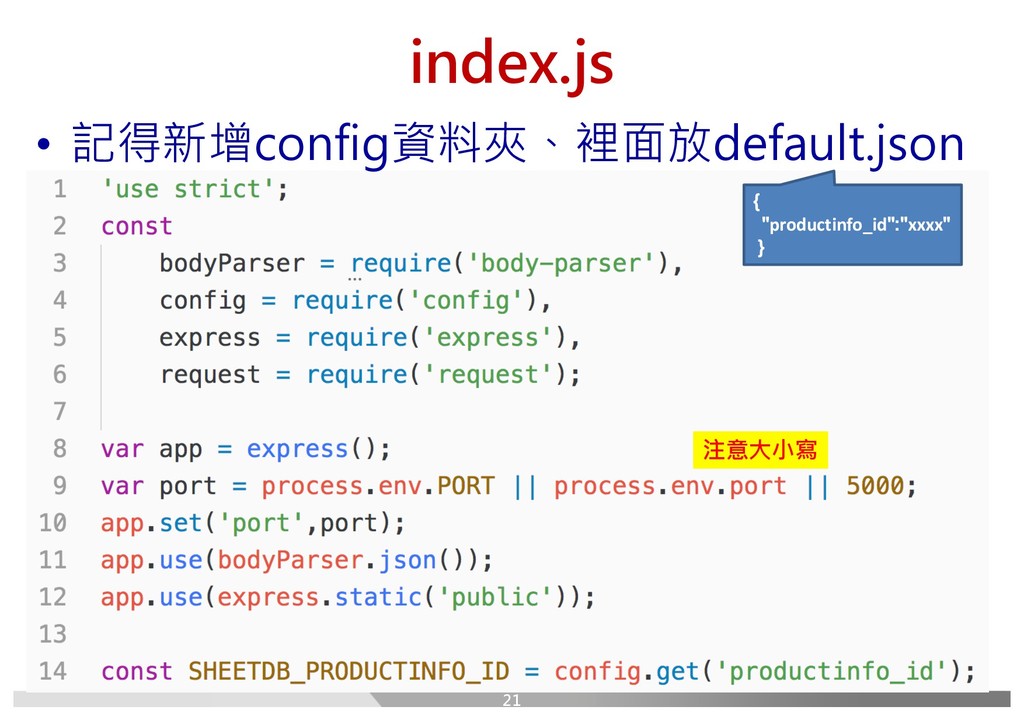
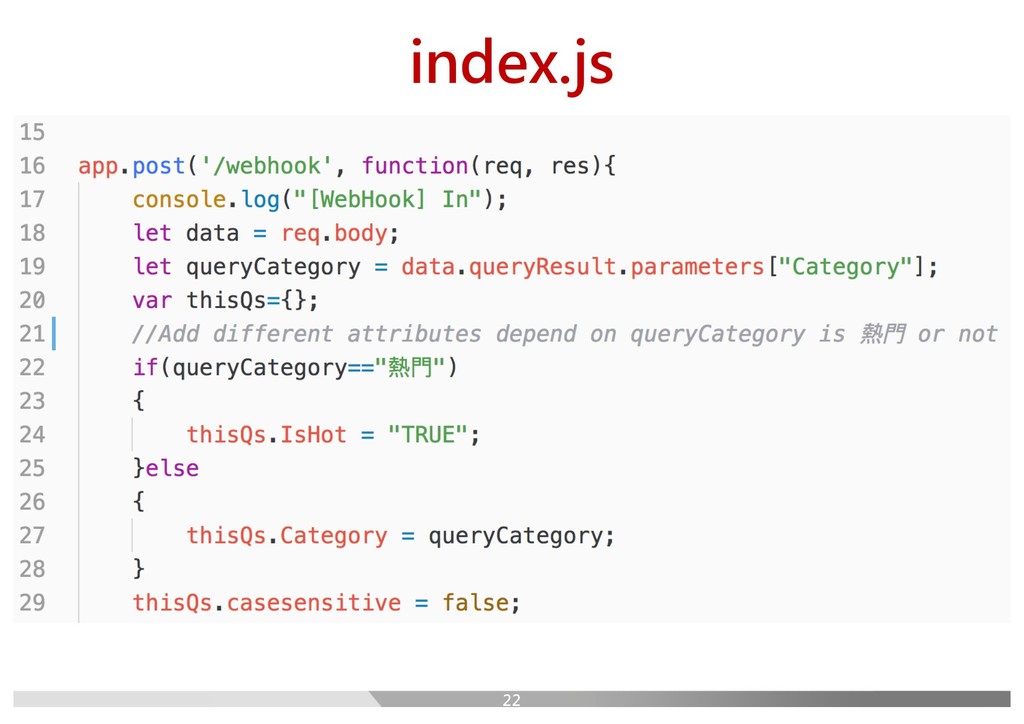
index.js • 記得新增config資料夾、裡面放default.json { "productinfo_id":"xxxx" } 注意大小寫 21
index.js 22
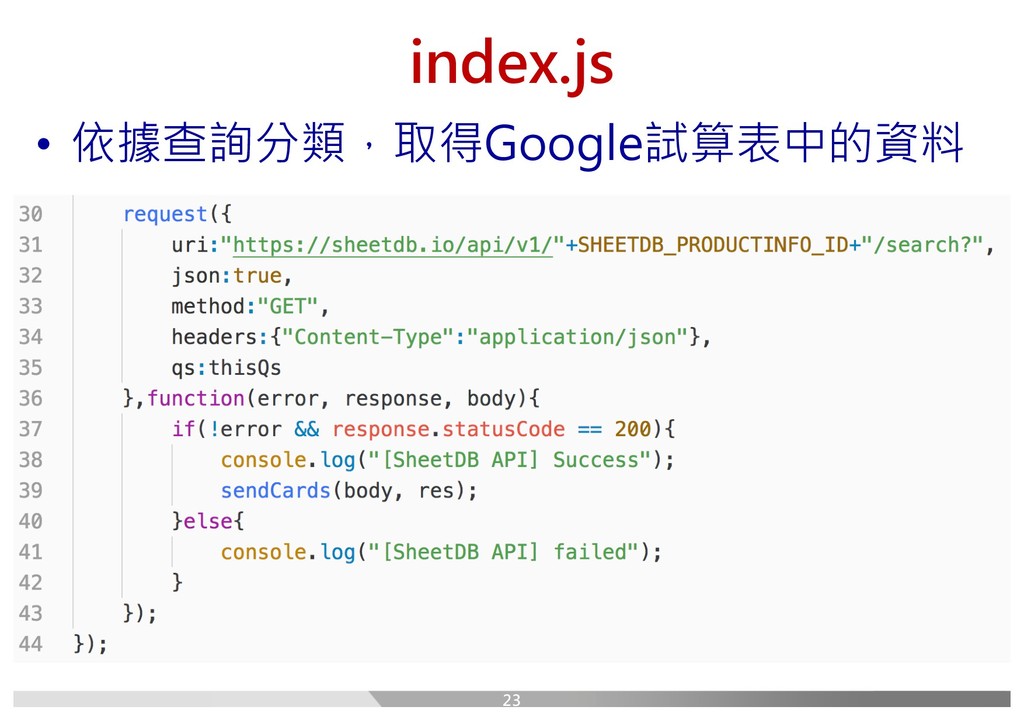
index.js • 依據查詢分類,取得Google試算表中的資料 23
index.js • 設定確認連結的訊息 24
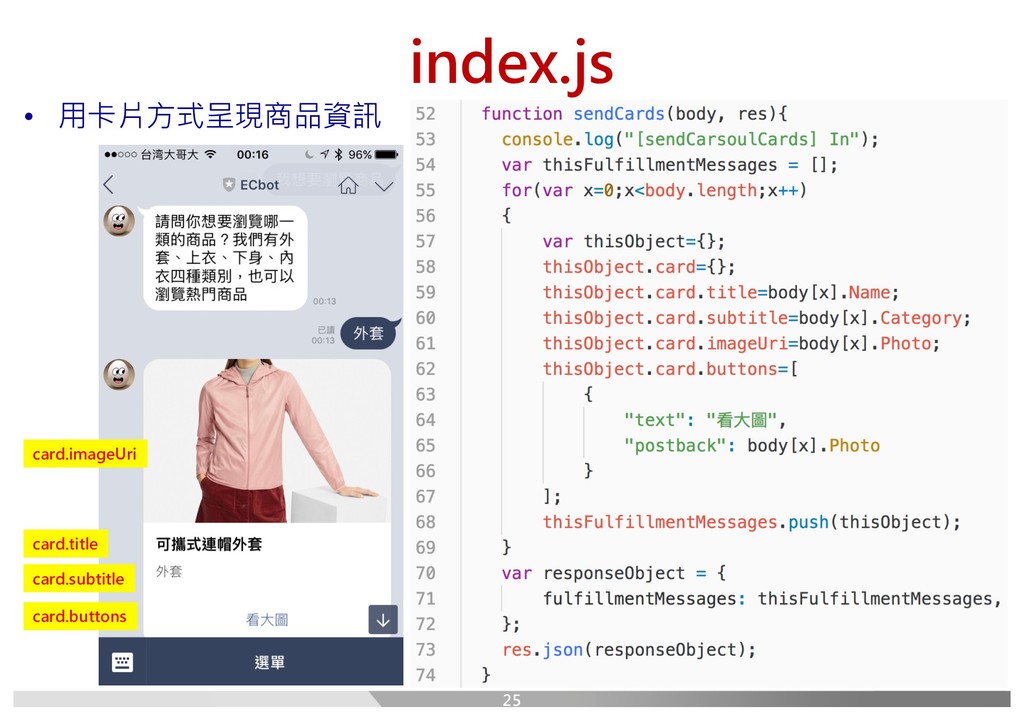
index.js • 用卡片方式呈現商品資訊 card.title card.subtitle card.imageUri card.buttons 25
套件安裝 • 終端機: npm-install-all index.js (如果沒有npm-install-all的話請先照下面步驟安裝) npm install npm-install-all -g
• 增加 .gitignore 檔案 –裡面寫:node_modules/ 26
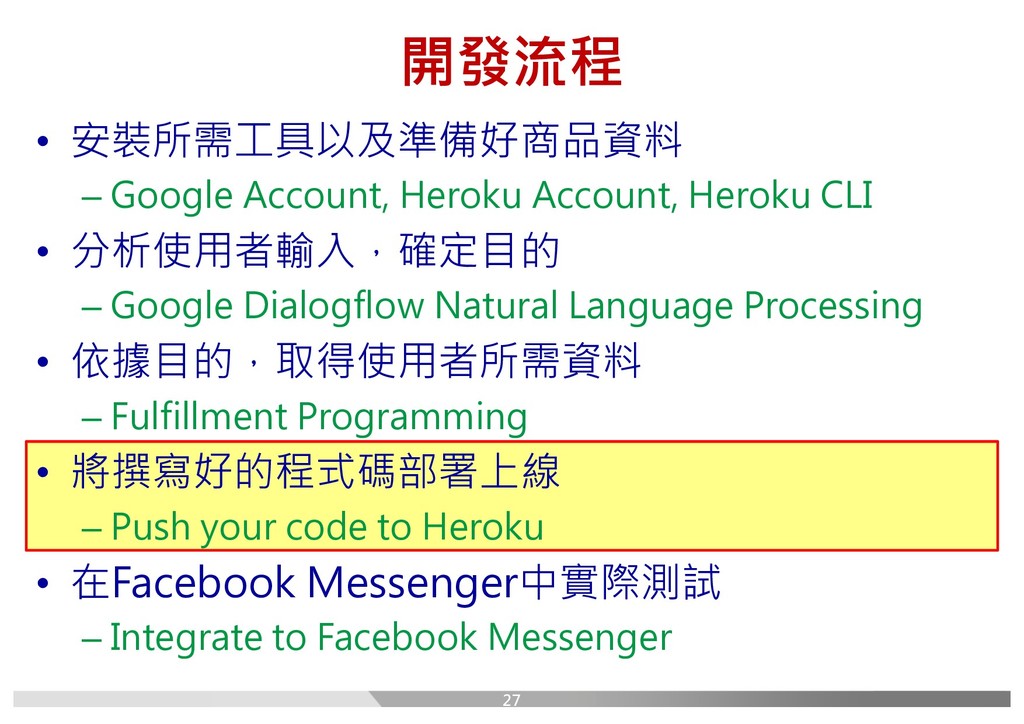
開發流程 • 安裝所需工具以及準備好商品資料 – Google Account, Heroku Account, Heroku CLI
• 分析使用者輸入,確定目的 – Google Dialogflow Natural Language Processing • 依據目的,取得使用者所需資料 – Fulfillment Programming • 將撰寫好的程式碼部署上線 – Push your code to Heroku • 在Facebook Messenger中實際測試 – Integrate to Facebook Messenger 27
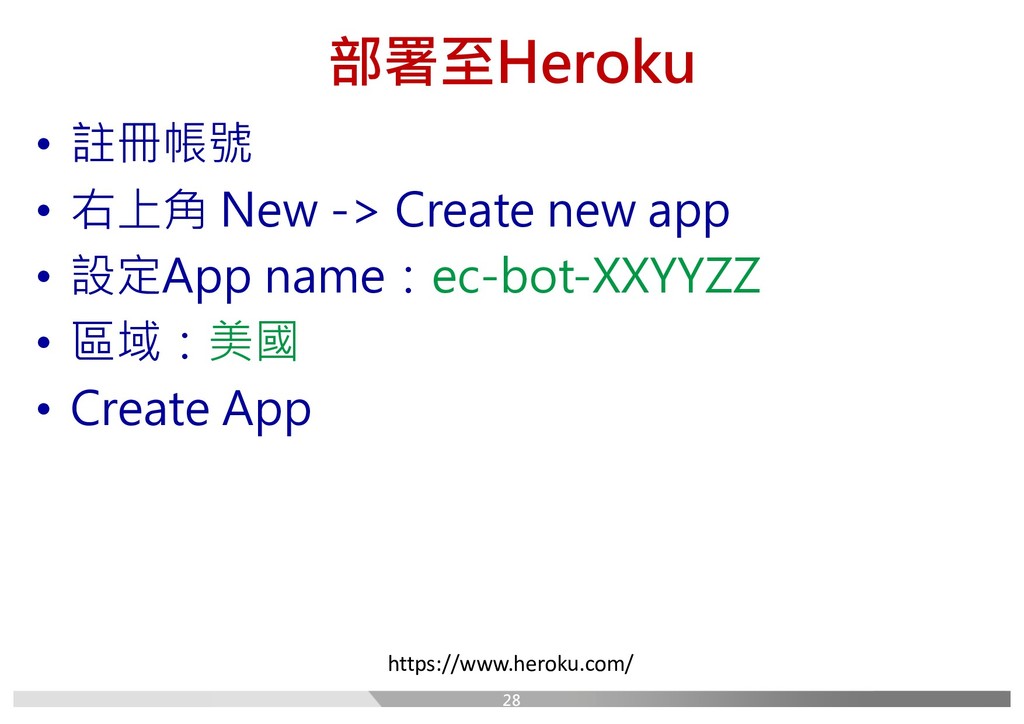
部署至Heroku • 註冊帳號 • 右上角 New -> Create new app
• 設定App name:ec-bot-XXYYZZ • 區域:美國 • Create App https://www.heroku.com/ 28
Deploy using Heroku Git • 使用Heroku Git (Use Heroku CLI)
• 下載與安裝 Heroku CLI • 終端機 heroku login cd my-project-dic git init heroku git:remote –a YourProjectNameHere https://devcenter.heroku.com/articles/heroku-command-line 是你在Heroku中的專案名稱哦! 通常長得像 ec-bot-xxyyzz 29
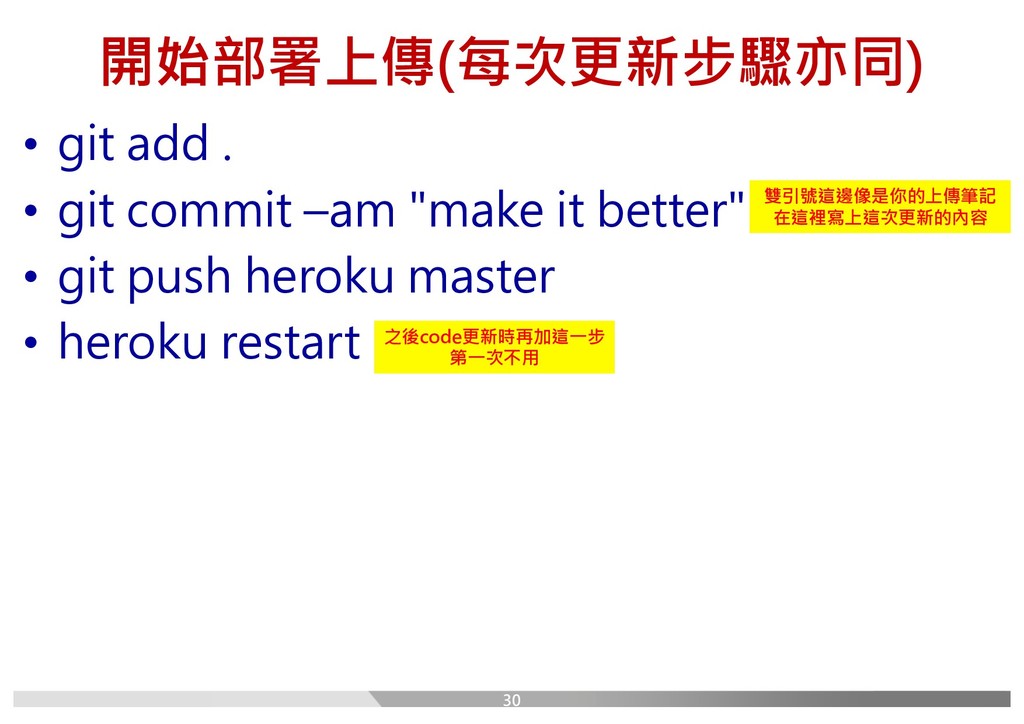
開始部署上傳(每次更新步驟亦同) • git add . • git commit –am "make
it better" • git push heroku master • heroku restart 雙引號這邊像是你的上傳筆記 在這裡寫上這次更新的內容 之後code更新時再加這一步 第一次不用 30
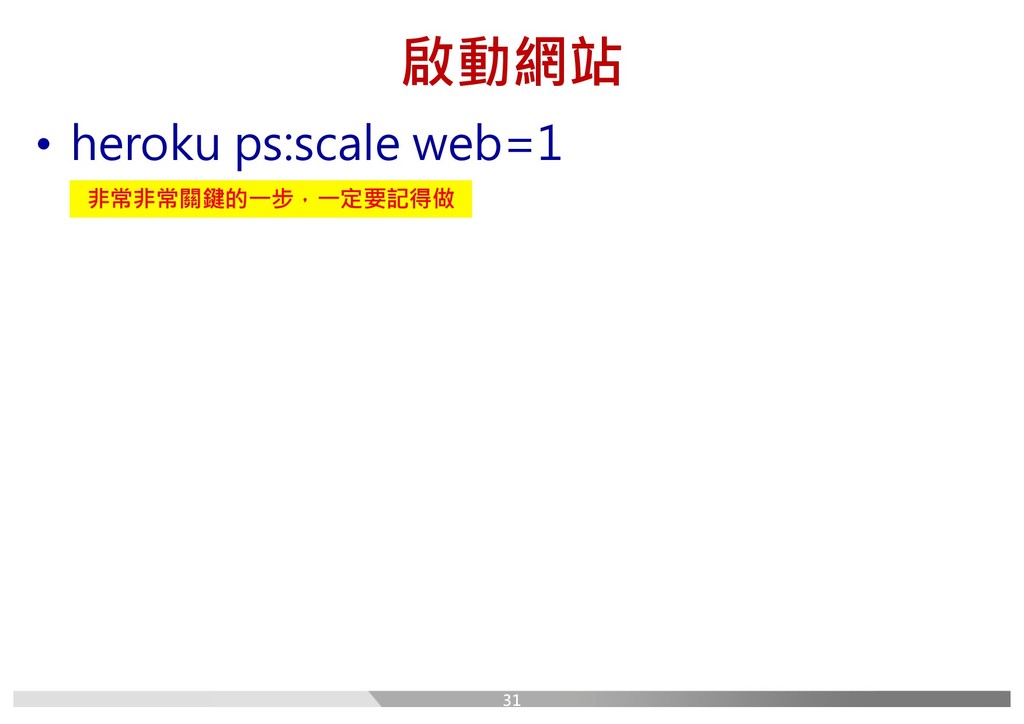
啟動網站 • heroku ps:scale web=1 非常非常關鍵的一步,一定要記得做 31
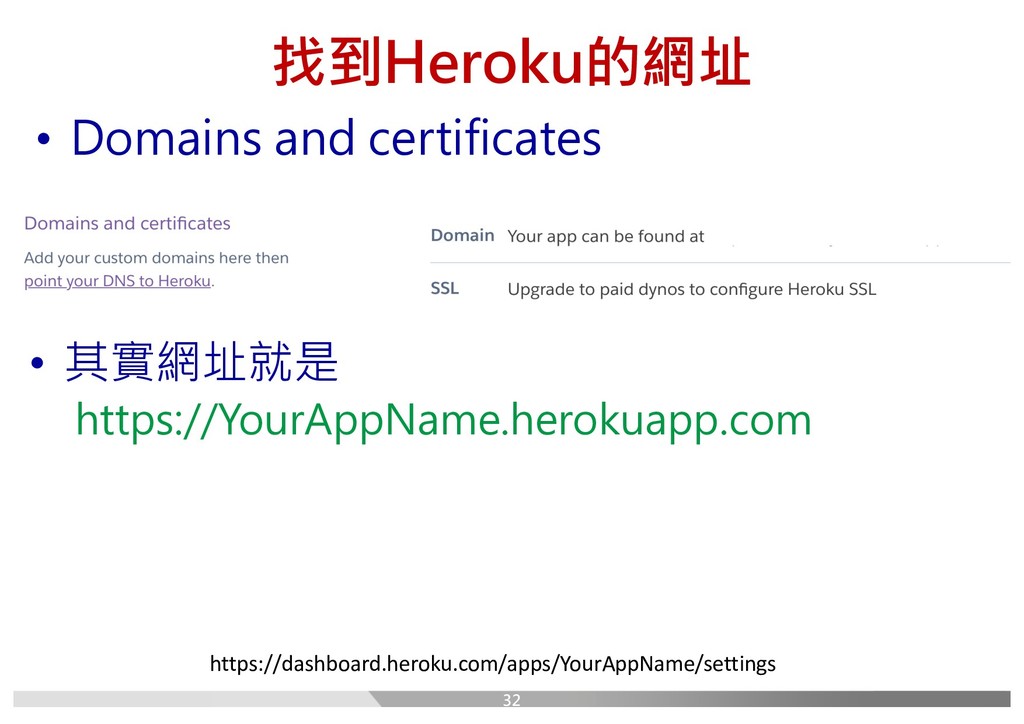
找到Heroku的網址 • Domains and certificates https://dashboard.heroku.com/apps/YourAppName/settings • 其實網址就是 https://YourAppName.herokuapp.com 32
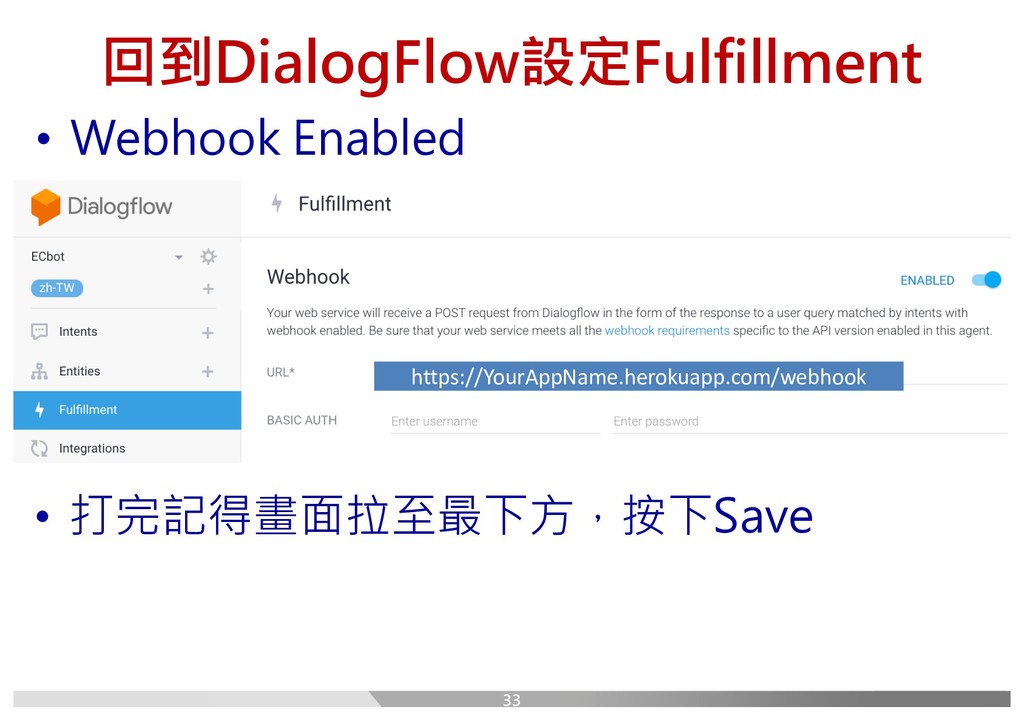
回到DialogFlow設定Fulfillment • Webhook Enabled https://YourAppName.herokuapp.com/webhook • 打完記得畫面拉至最下方,按下Save 33
開發流程 • 安裝所需工具以及準備好商品資料 – Google Account, Heroku Account, Heroku CLI
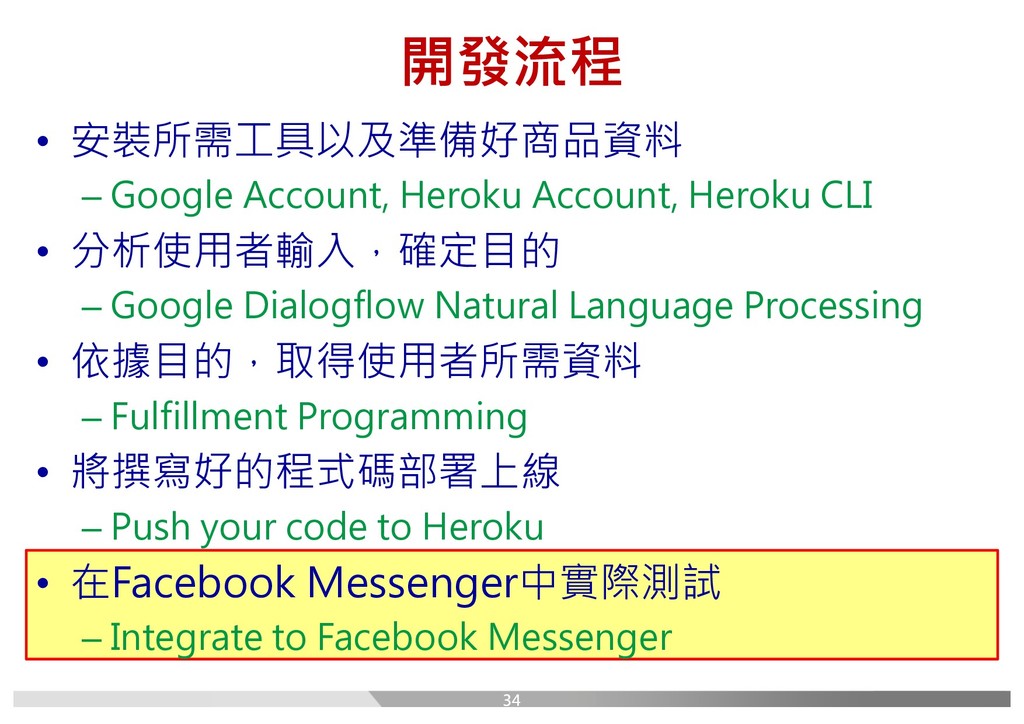
• 分析使用者輸入,確定目的 – Google Dialogflow Natural Language Processing • 依據目的,取得使用者所需資料 – Fulfillment Programming • 將撰寫好的程式碼部署上線 – Push your code to Heroku • 在Facebook Messenger中實際測試 – Integrate to Facebook Messenger 34
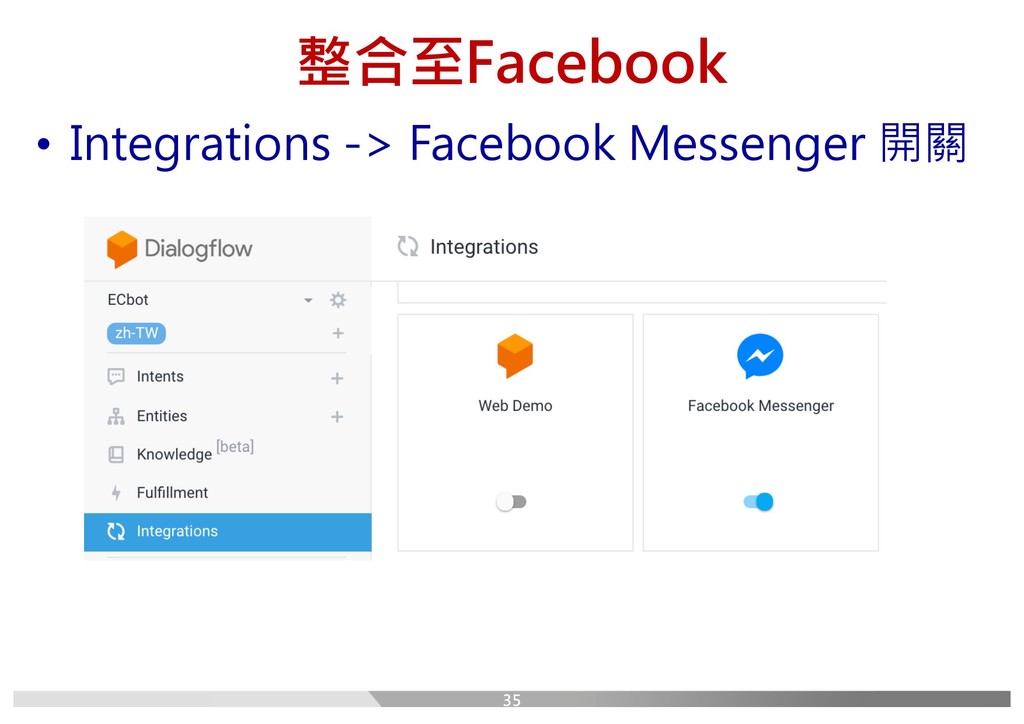
整合至Facebook • Integrations -> Facebook Messenger 開關 35
整合至Facebook 36
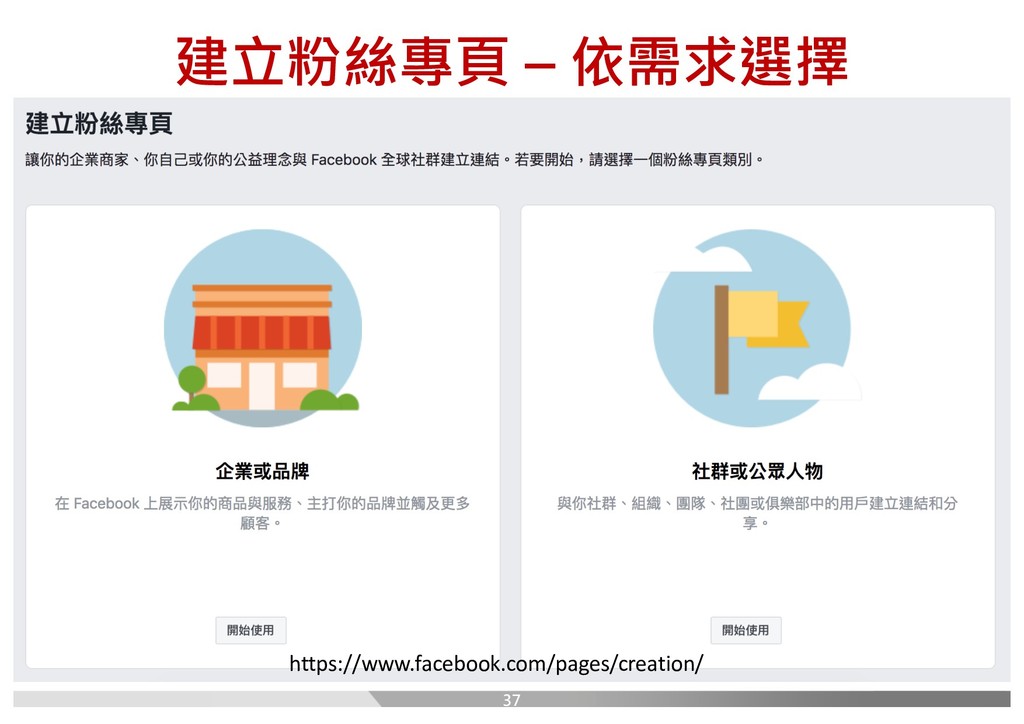
建立粉絲專頁 – 依需求選擇 https://www.facebook.com/pages/creation/ 37
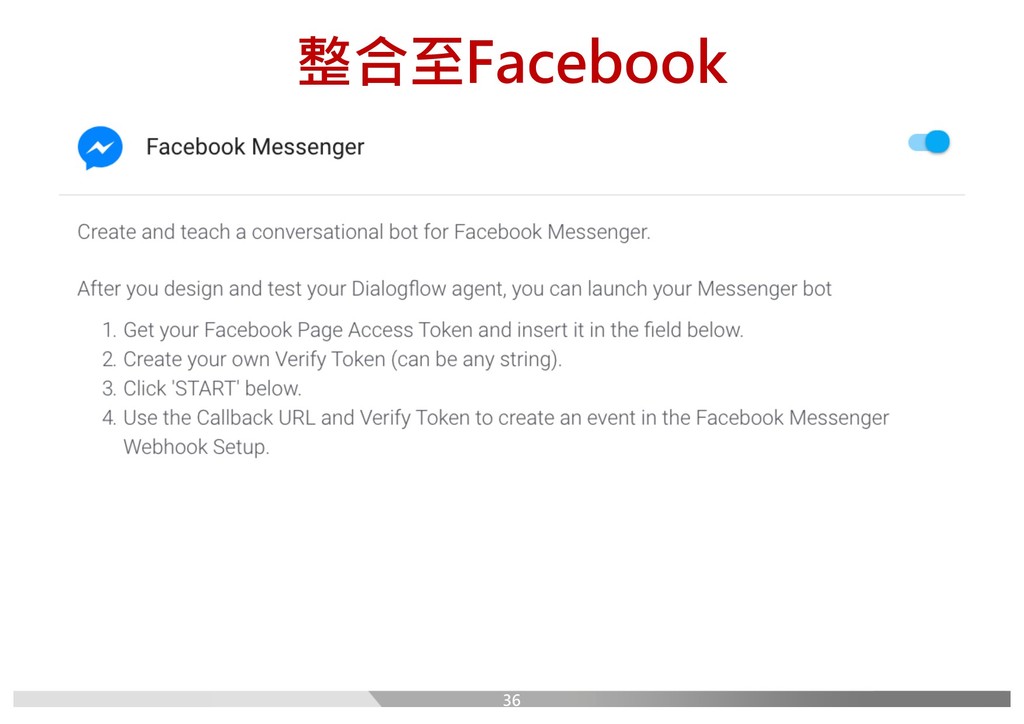
建立應用程式 • 取完名字後,設定Messenger • 選擇粉絲專頁產生存取權杖 • 貼回DialogFlow • 設定Verify Token:任意字串均可
• 複製Callback URL,回到FB應用程式 • 設定Webhooks回呼網址、驗證權杖(Verify Token) • 勾選messages, messagin_postbacks • 設定應用程式訂閱對應的粉絲專頁 https://developers.facebook.com/ 38
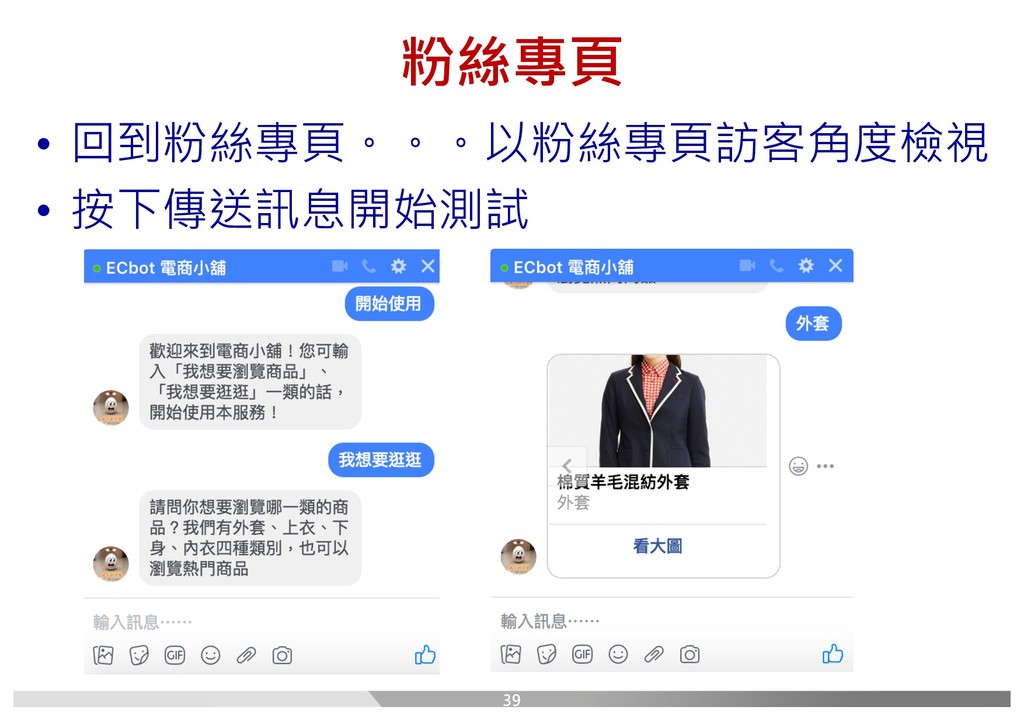
粉絲專頁 • 回到粉絲專頁。。。以粉絲專頁訪客角度檢視 • 按下傳送訊息開始測試 39
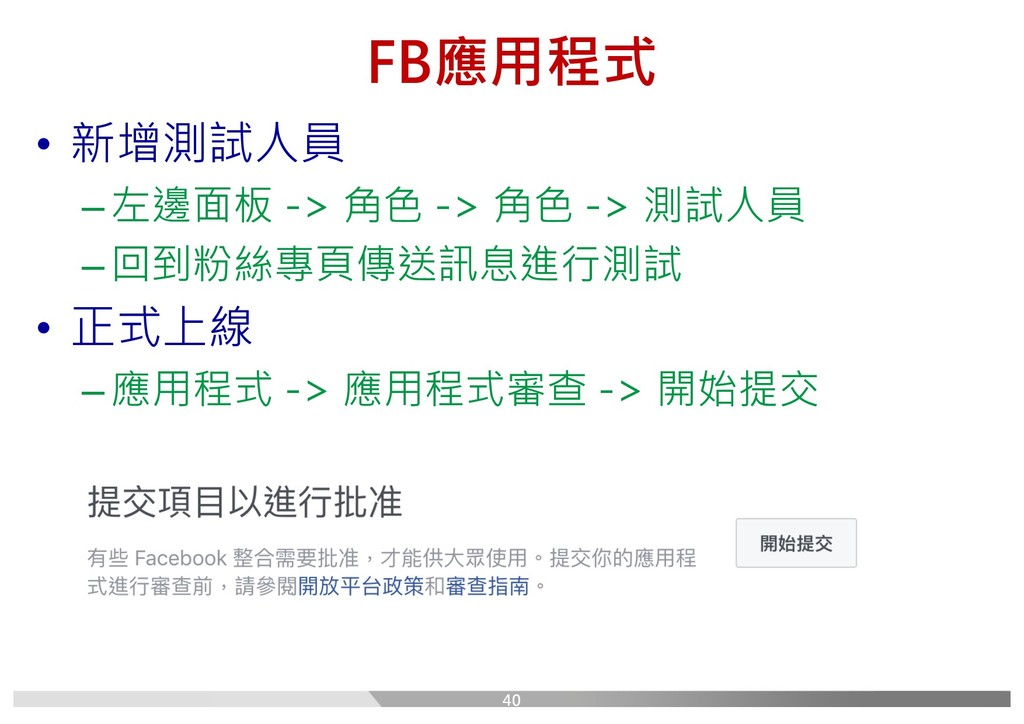
FB應用程式 • 新增測試人員 –左邊面板 -> 角色 -> 角色 -> 測試人員
–回到粉絲專頁傳送訊息進行測試 • 正式上線 –應用程式 -> 應用程式審查 -> 開始提交 40